Step 1. How to Configure Database & Back-end on Your Server?
- First of all find the eCart - Multivendors folder from the PHP code folder from the downloaded package and upload to your server.
- Create a new database from cPanel
- Create new user for the database & give all the privileges to the user
- Import the database file 'eCart - Multivendors - blank.sql' to your PHPMYADMIN and follow steps shown here.
- Open File Manager or FTP or File Explorer
- Go To
'includes/'directory and Open'crud.php'file in PHP Code - set 'DOMAIN_URL' to your admin panel URL like this >>
'https://myapppanel.com/' or 'https://myapppanel.com/admin/' or 'https://admin.myapppanel.com/' on line number - 8
define('DOMAIN_URL','https://myapppanel.com/');
Note : Especially don't forget to add ' forward slash ' at the end of the domain URL like this - Set database credentials with your credentials on line number - 17,18,19,20
private $db_host = "localhost"; // Change as required
private $db_user = "mydb_user"; // Change as required
private $db_pass = "mydb_user_password"; // Change as required
private $db_name = "myquizpanel_db"; // Change as required
'/'
Thats it! Now you are ready to run your eCart Multivendor Panel : https://myapppanel.com/
How install the eCart Multivendor backend code on your server by using installation wizard?
- First of all find the eCart Multivendor folder from the PHP code folder from the downloaded package and upload the code to your server on your desired domain or subdomain. Like for example, You have https://ecartmultivendor.com domain with you
- Create a new database from cPanel
- After that you can visit
https://ecartmultivendor.com/install - Database Hostname : Enter the hostname.
- Database Username : Enter the username that have access to the database.
- Database Password : Enter the password.
- Database Name : Enter the name of database.
- Admin Username : Enter the username (The username will be used further for user authentication)
- Admin Password : Enter the password(The password will be used further for user authentication)
- Admin Email : Enter the email(The email will be used further for user authentication)
- App Url : Enter the your app / domain url. Make sure you enter the complete URL with the correct protocol say http:// or https://
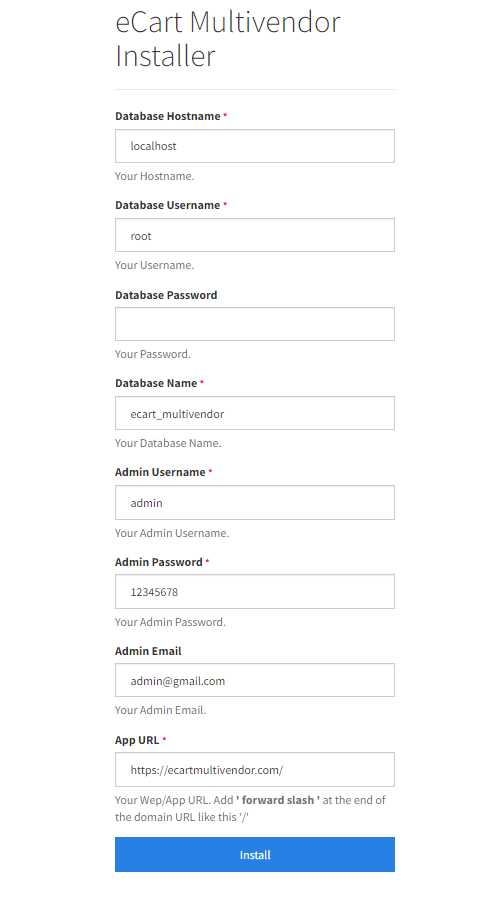
Sample image
Now click Install. Thats it! Now you are ready to run your eCart Multivendor Panel : https://ecartmultivendor.com/
Step 2:Dealing with the database
- Go to phpmyadmin : Open url:http://localhost/phpmyadmin for localhost or yourserver.com/phpmyadmin for live server in the browser.
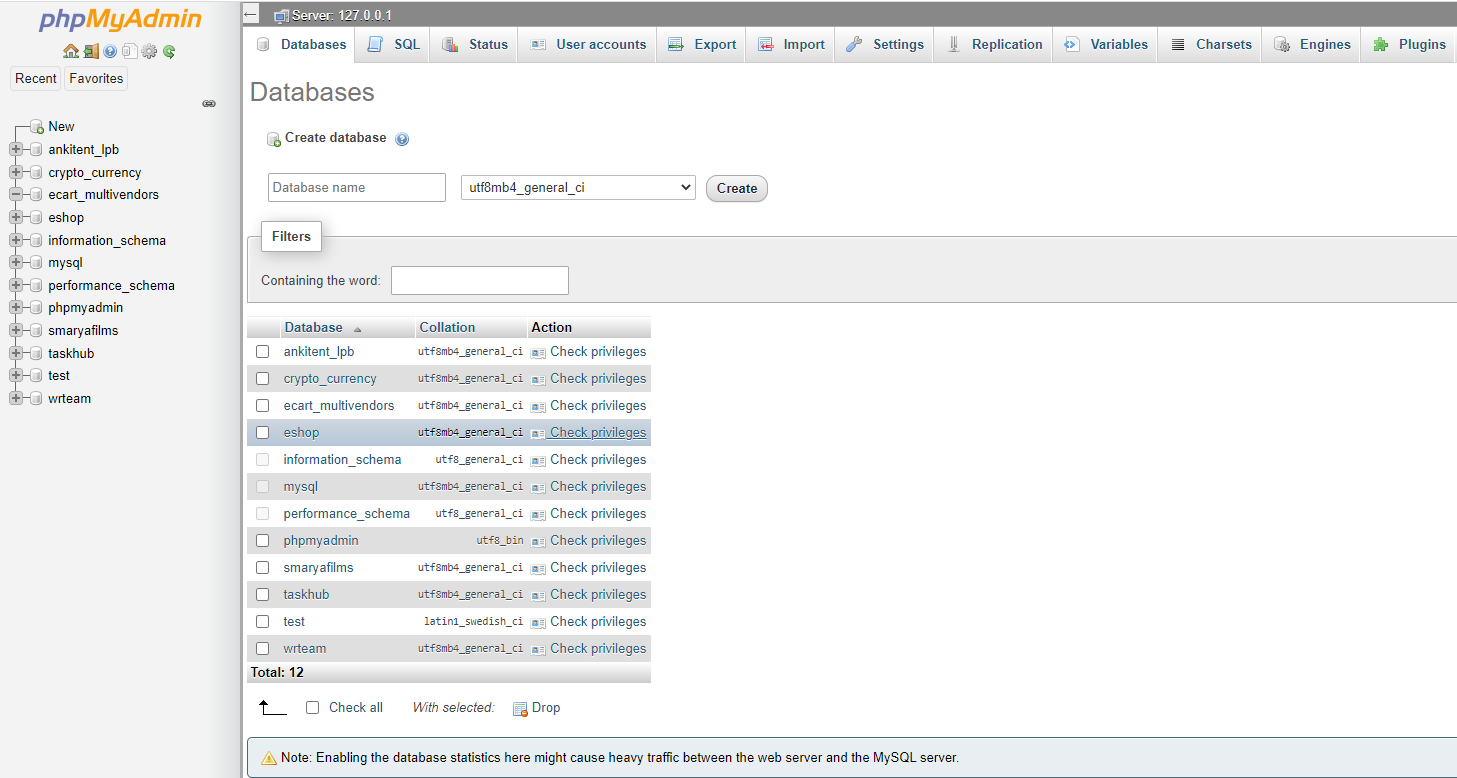
Sample image
- Now, Create database by clicking in the New tab
Step 3:Performing Operations with the database
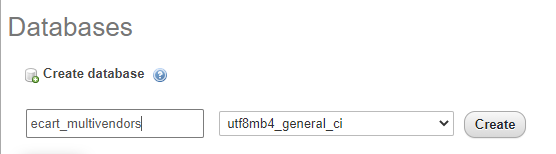
Sample image
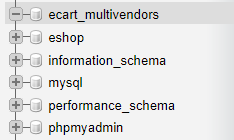
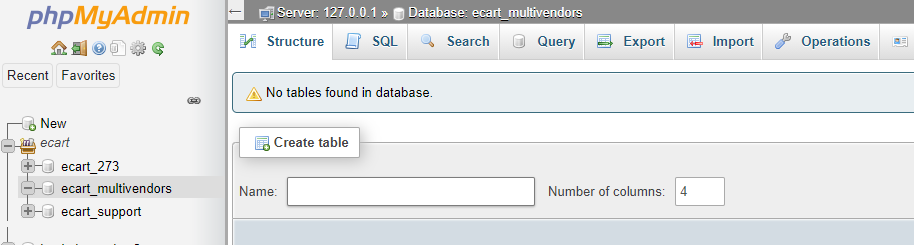
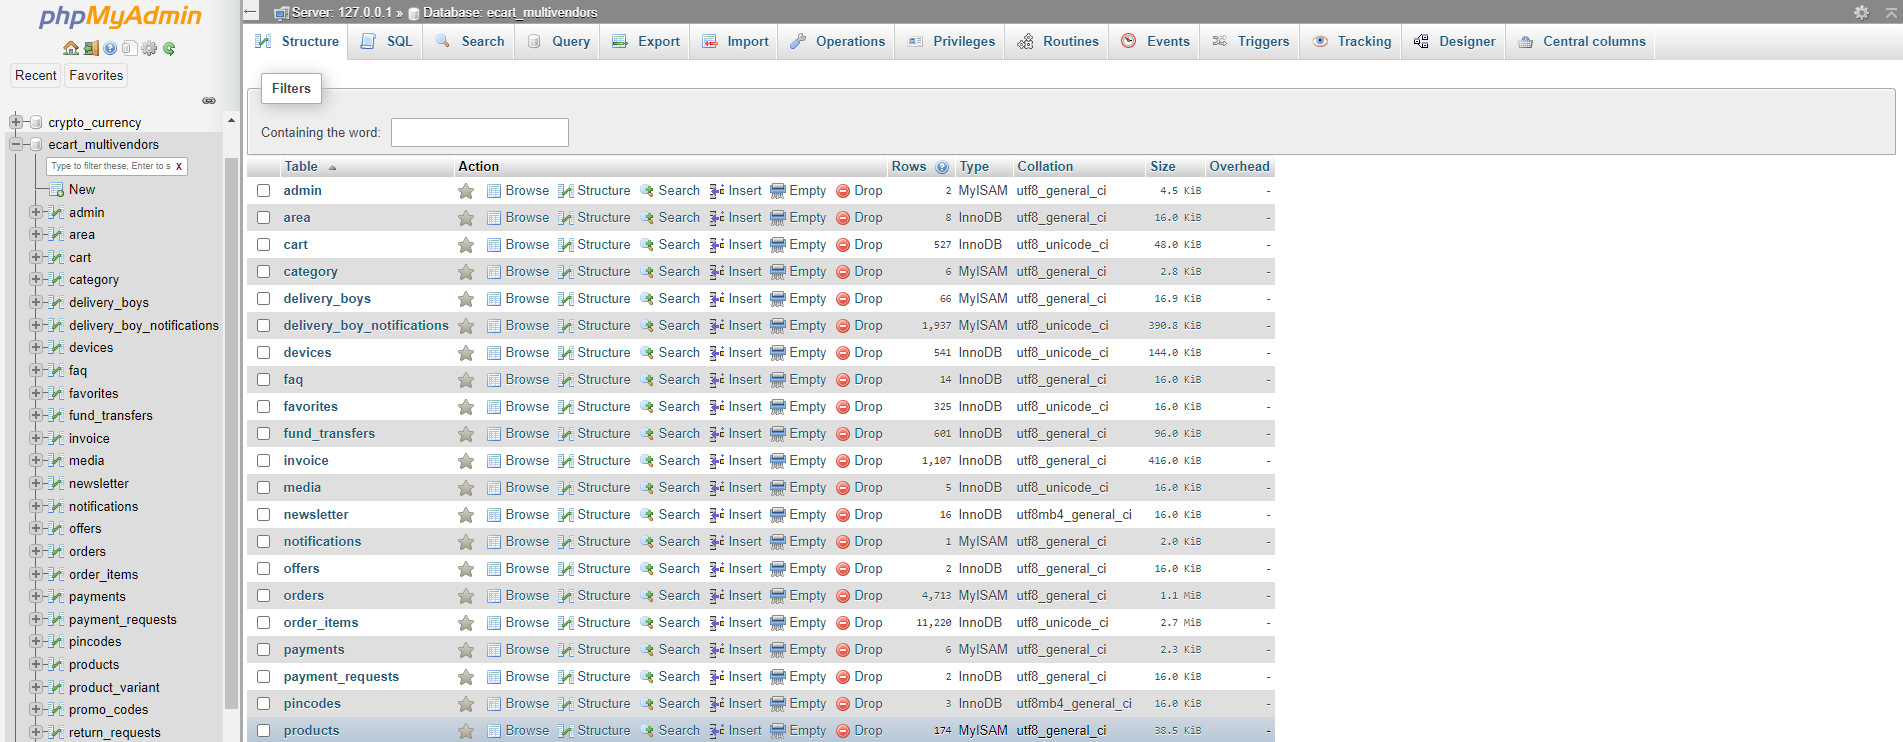
- Well,Database(ecart_multivendors) was created and also listed in the Name field
Sample image
- Select The Database(ecart_multivendors)
Sample image
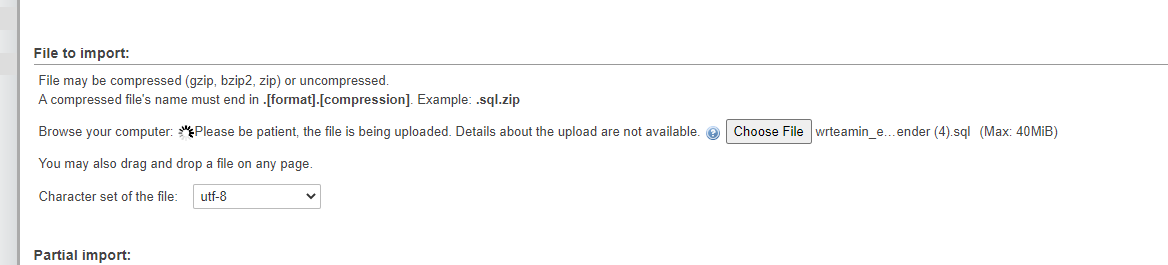
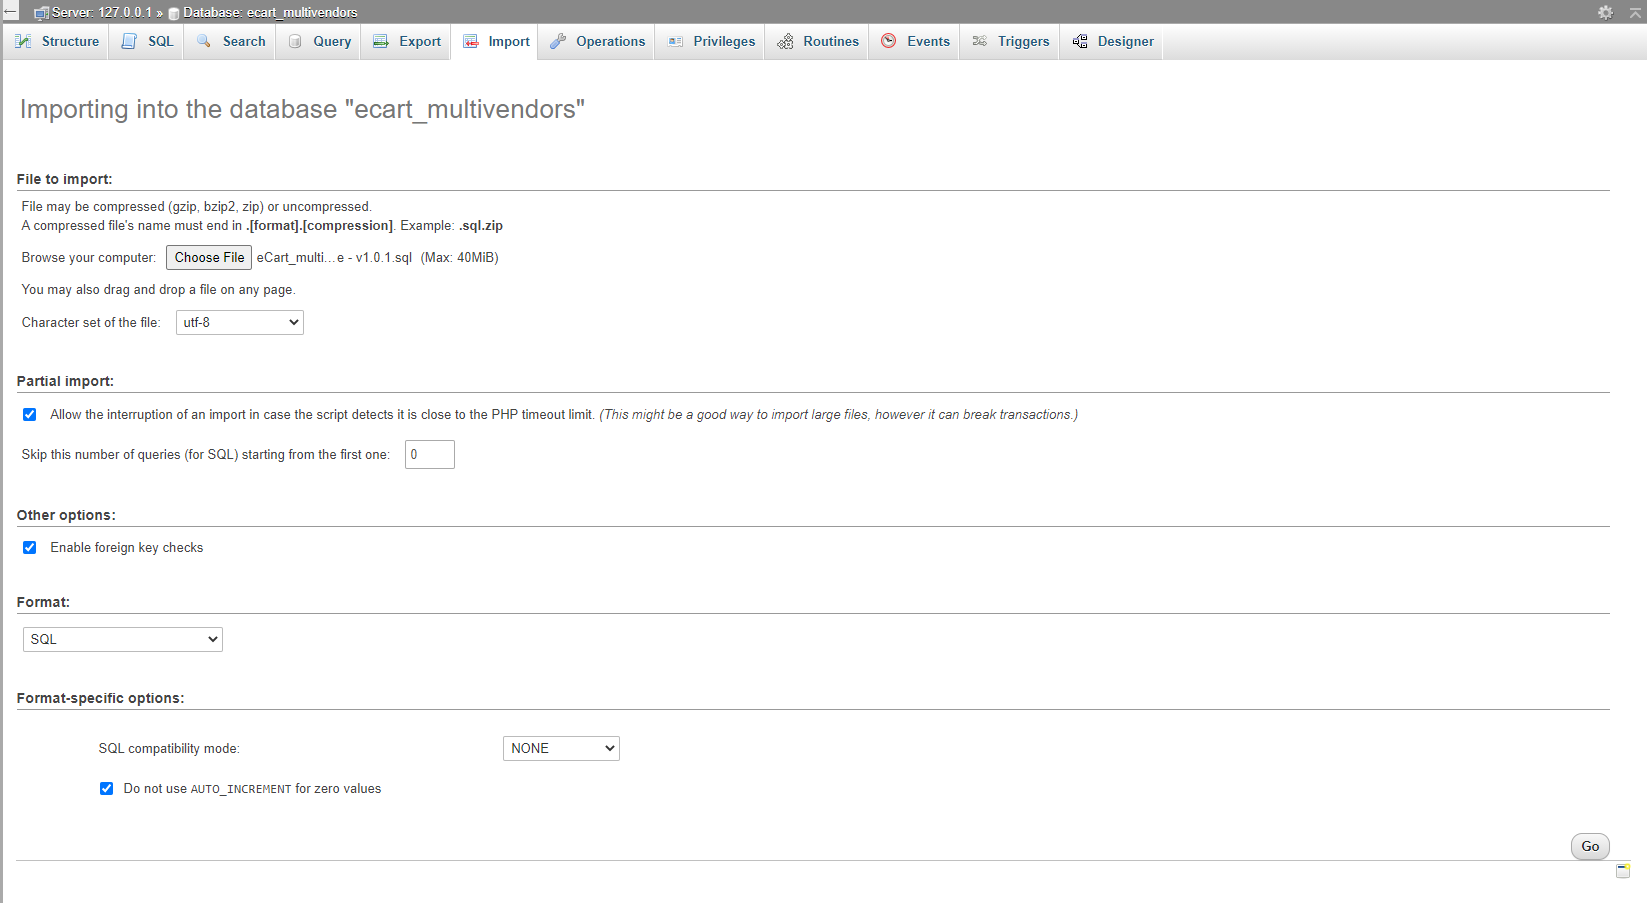
- Click on Choose File to import the database file which will be provided by us
Sample image
- The file is selected
Sample image
Sample image
Set your jwt secret key for extra layer of security.
- JWT secret key is just like password & You can create your own.It should be same in eCart app, delivery boy app,as well as php side
- Goto includes/crud.php file.
- You can see jwt_secret_key as per image below.
- Replace 'replace_with_your_strong_jwt_secret_key' with your values.That's all

Sample image
Set your package name for app and product sharing feature.
- Goto .htaccess in root directory (if .htaccess file is not visible find and turn on show hidden files in your cPanel).
- You can see your.package.name as per image below replace it with your package name that's all.

Sample image
Privacy policy page for play store.
- www.your.admin.panel.link/play-store-privacy-policy.php
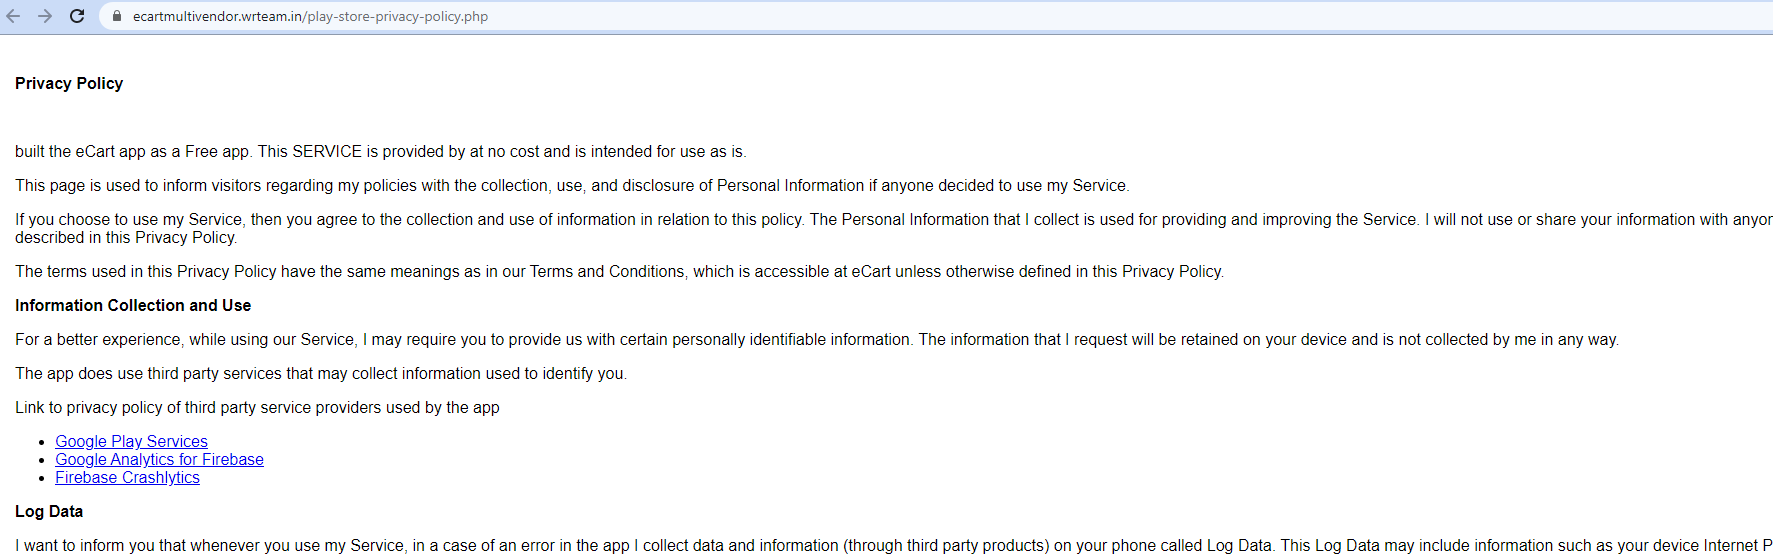
Sample image
Auto Update
How to auto update your admin panel to latest version?
And in includes/crud.php file check for this line >> define('ALLOW_MODIFICATION', 1); << if you don't find it add it under DOMAIN_URL
- Find update from vX.X to vX.X.X.zip file from downloded PHP source code.
- Visit
https://myapppanel.com/update.php - Upload update.zip file.
- Click on the Upload Button.
- That's all. You have successfully updated your system from older version to newer one.
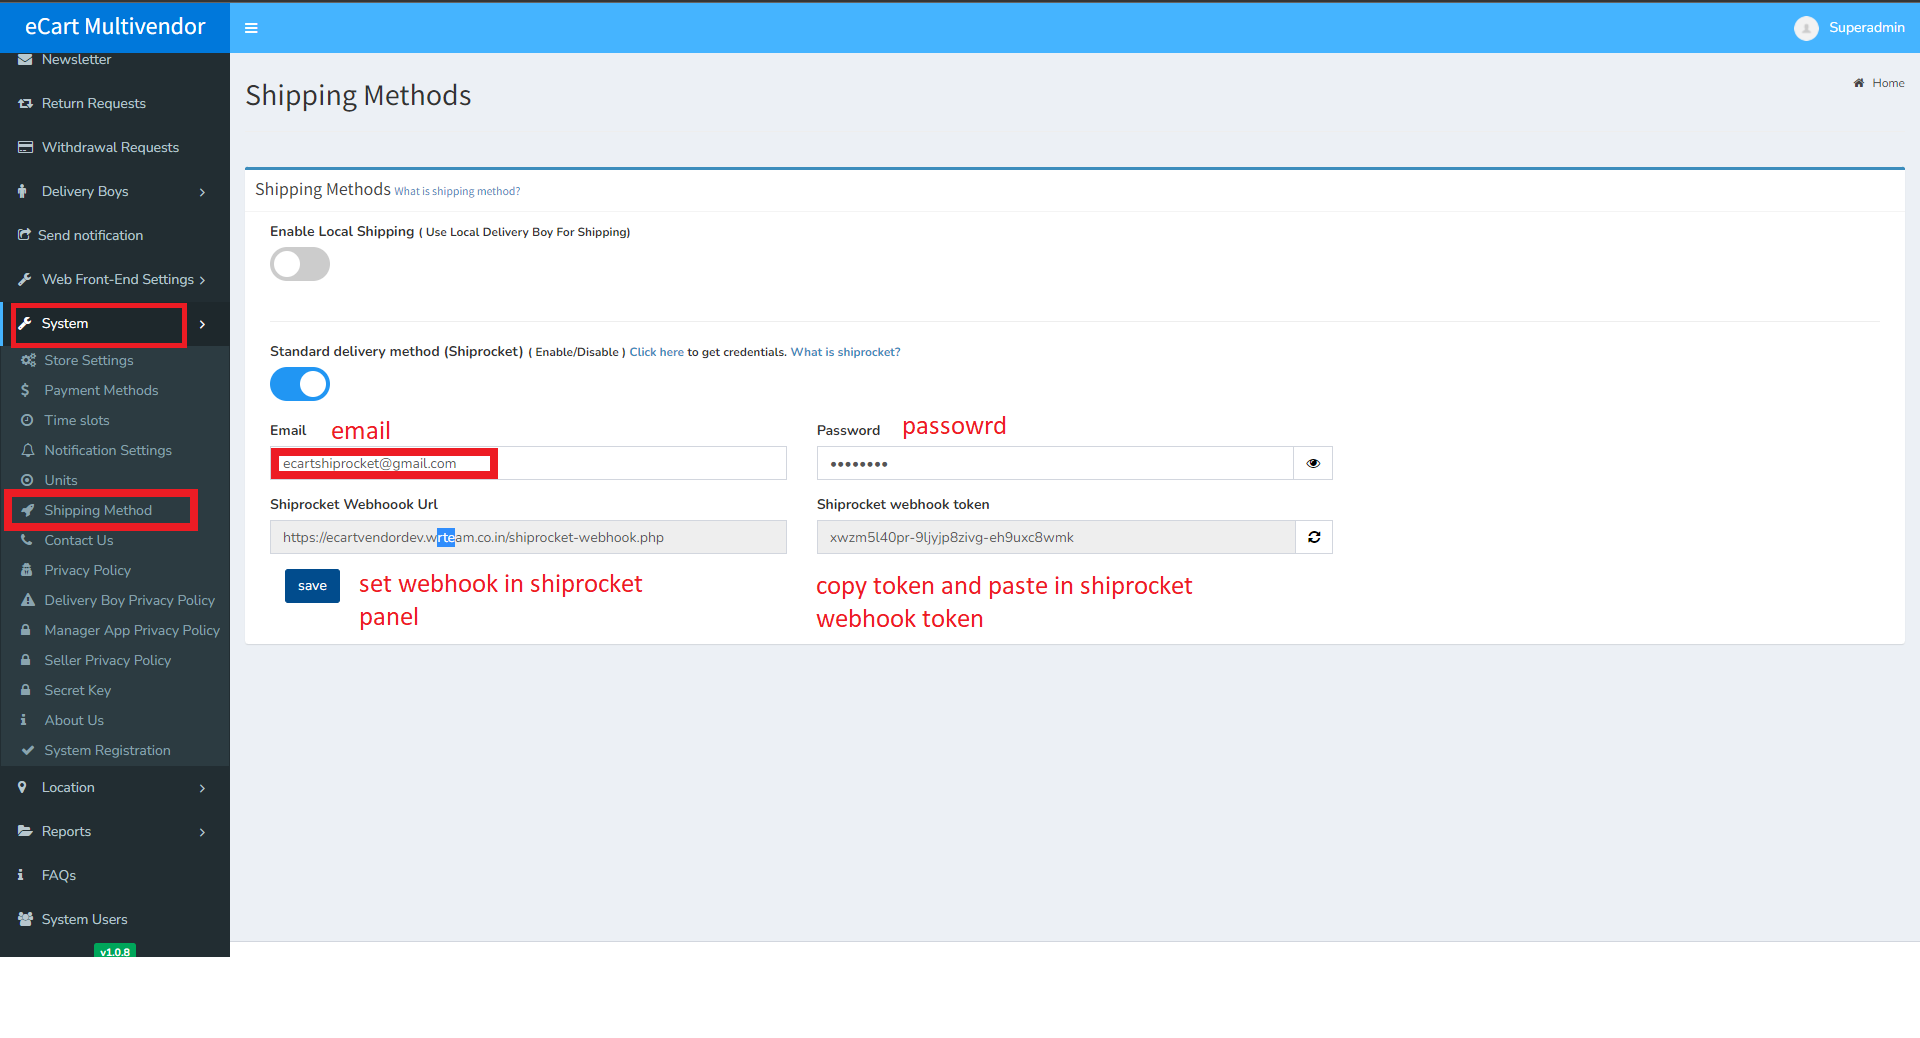
Shipping Methods
In Shipping you can select shippings method for delivered orders to customers.currently 2 shipping methods available. you can use one shipping mathod at a time
How to change shipping Methods:
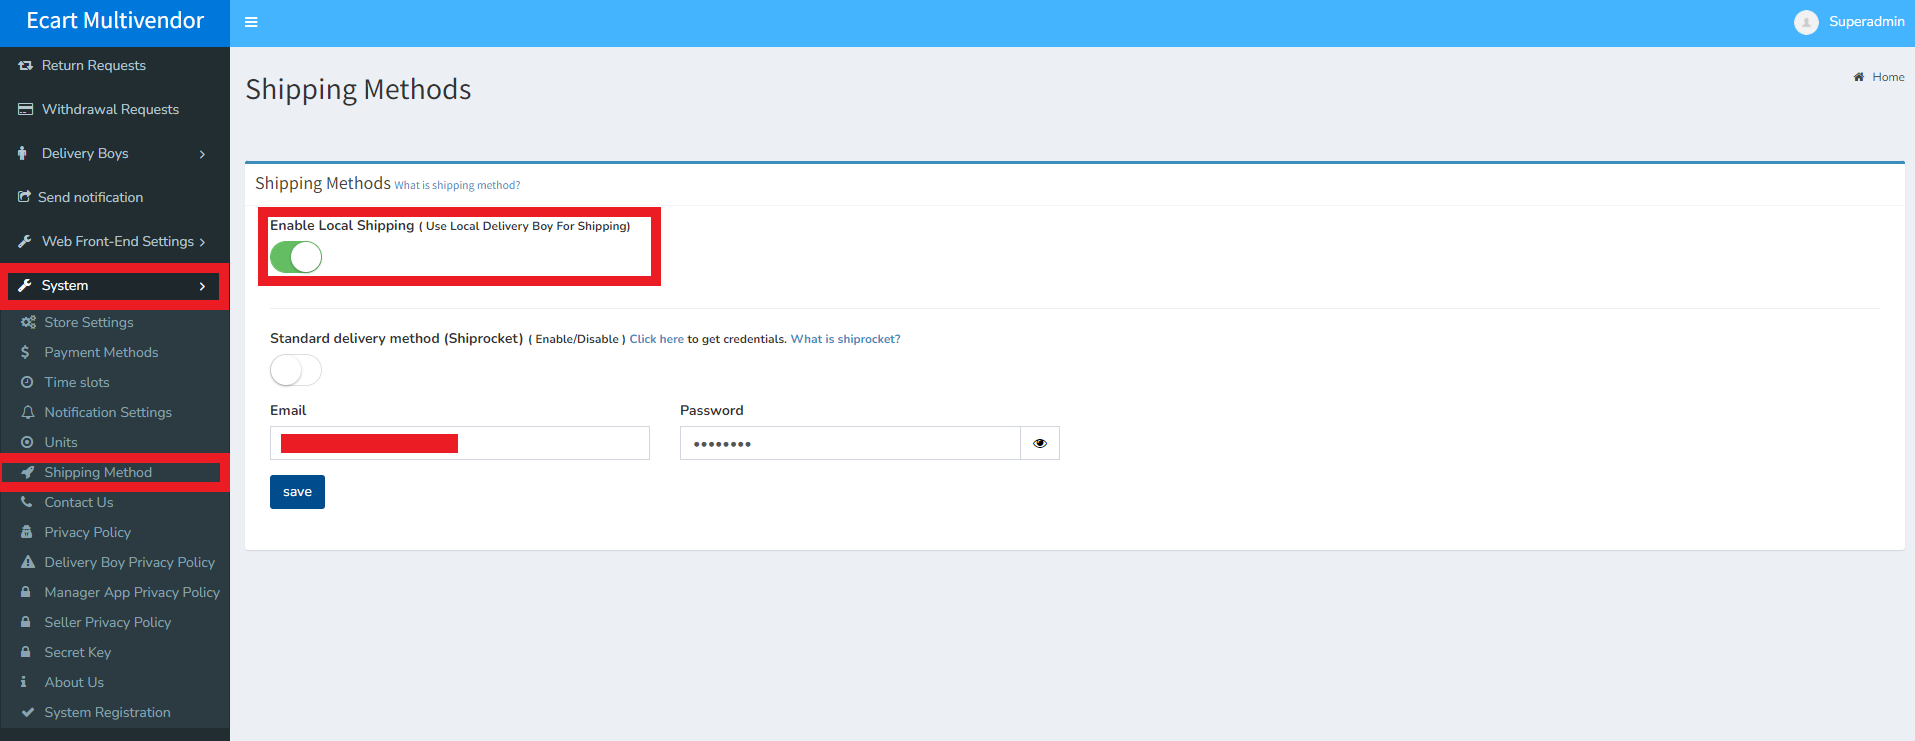
Local Shipping Method
In this you can use delivery boy for deliver orders to customersNote:In your system by default local shipping is enabled you can see on above image
Standard Shipping
in standard you can use other currier services like shiprocket for deliver orders to customers.Type
Shiprocket
Shiprocket, a product of Delhi based BigFoot Retail solution, is India's first automated shipping software that aims reduce ecommerce shipping to its bare bones. ... You can print bulk shipping labels and ship your products to in and around the world using a single platform.Account
First Create account on shiprockdet Click here
Recharge Wallet
after successfully login you have to recharge you shiprocket wallet withou wallet balance you can use their services
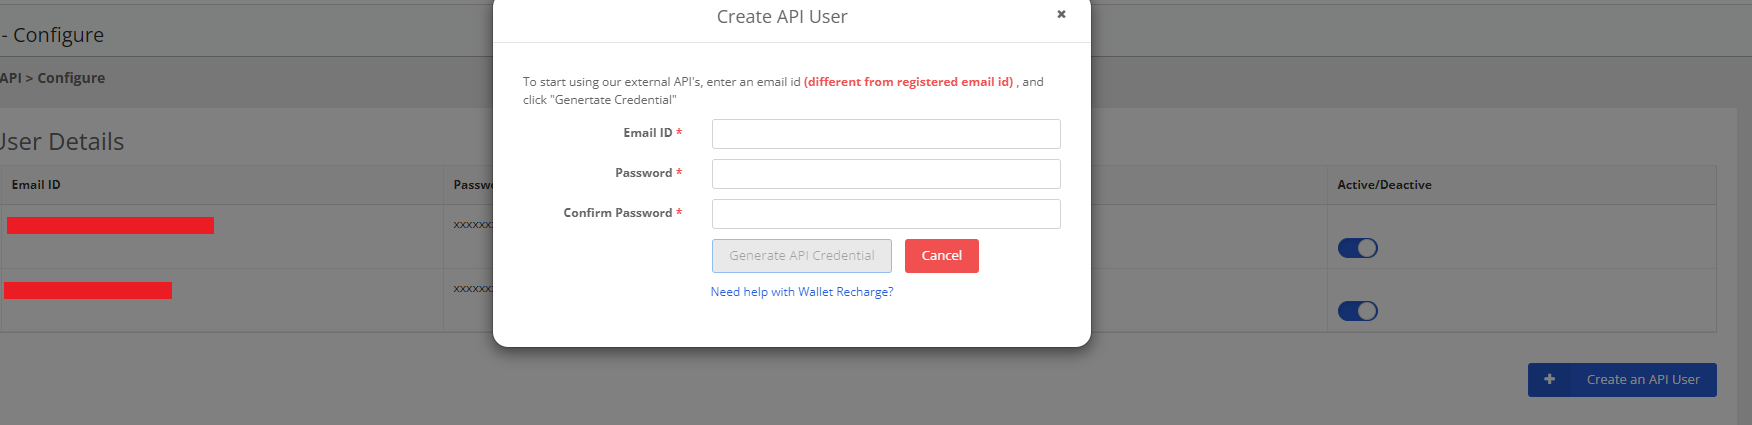
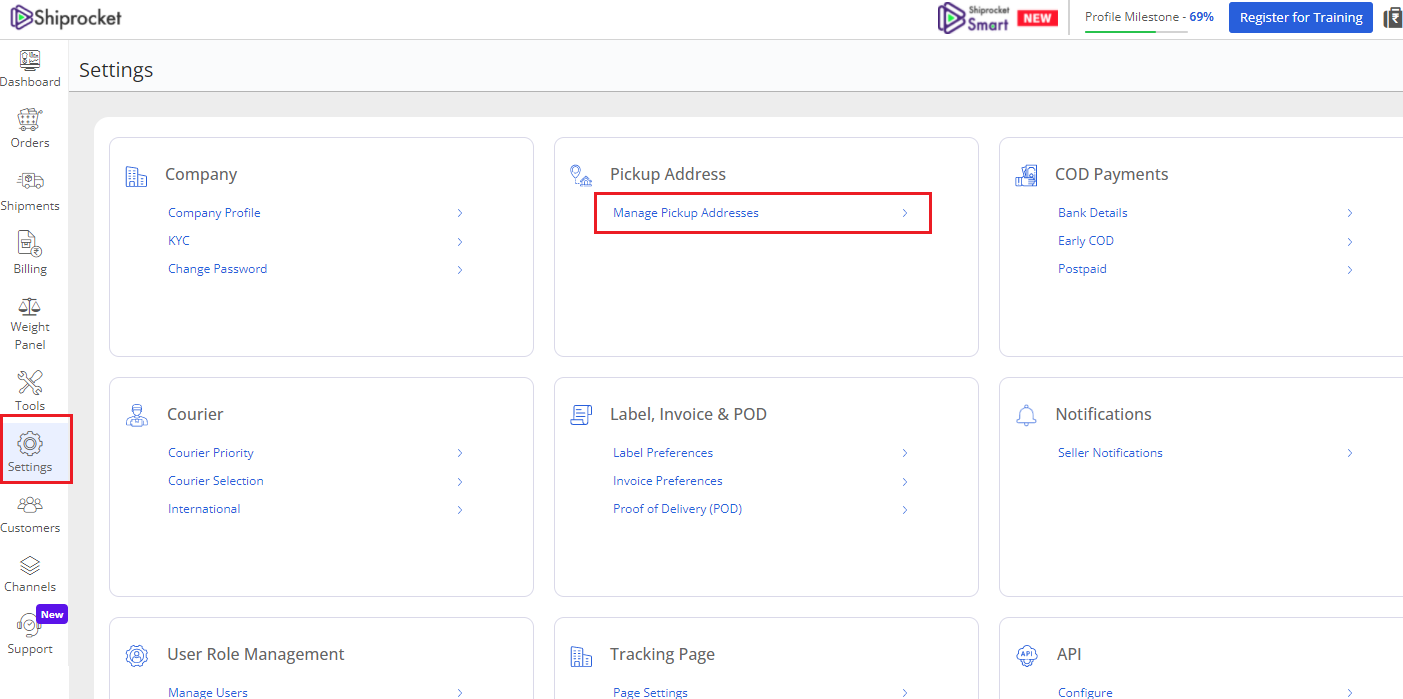
API Config
So now use shiprocket for first go to api Config from here also you can go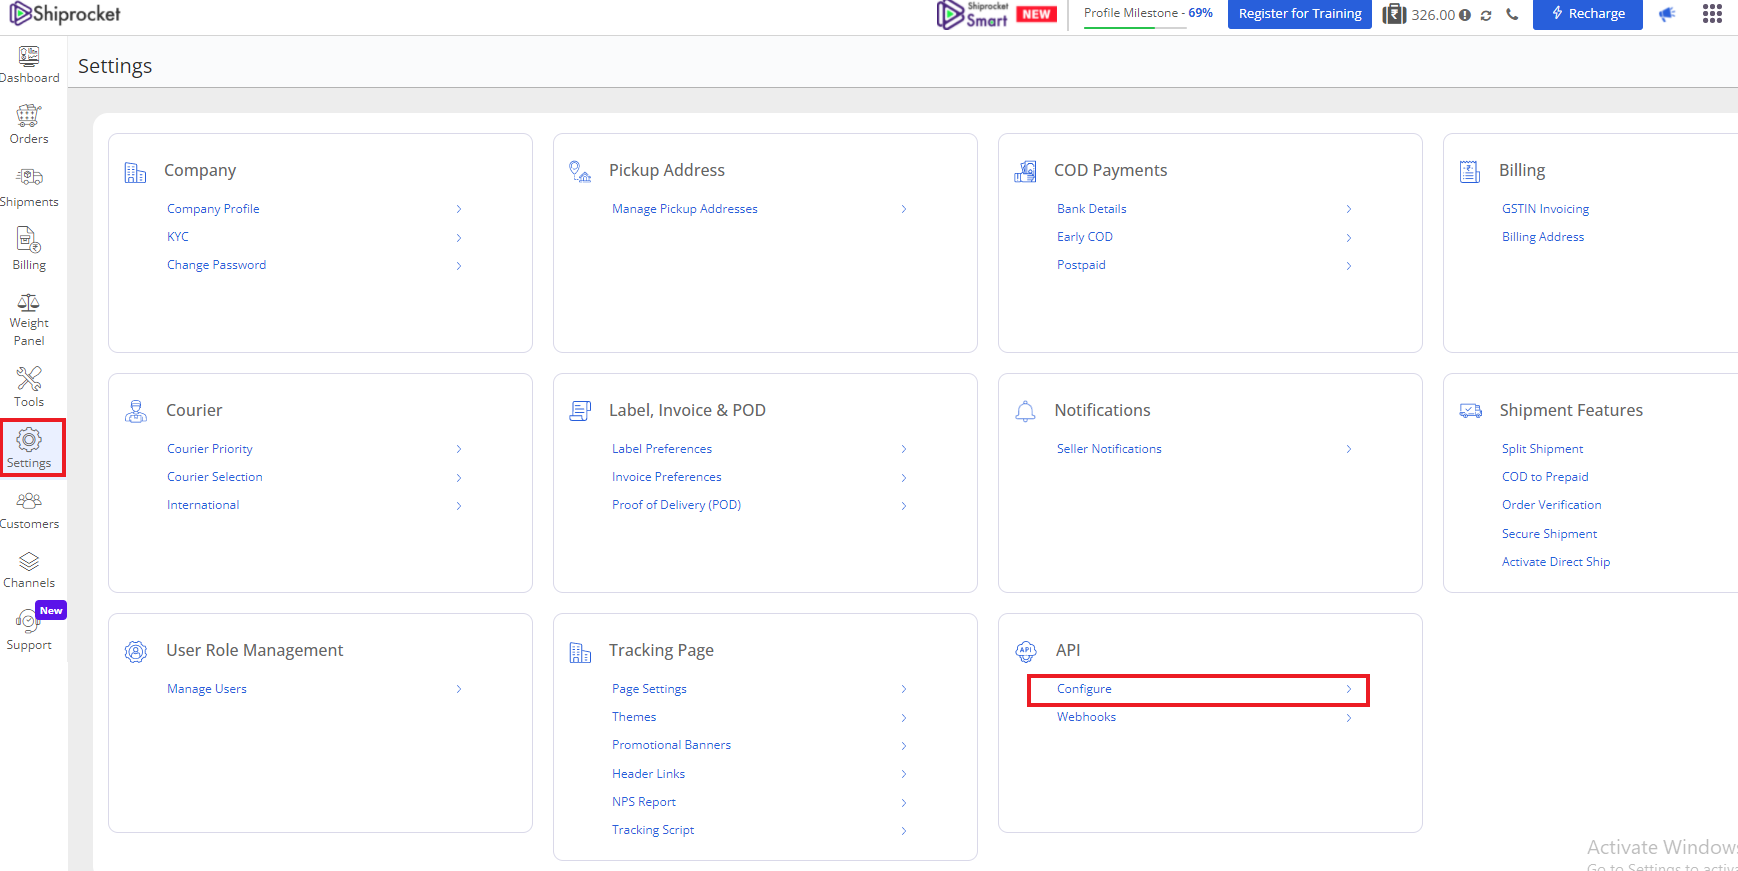
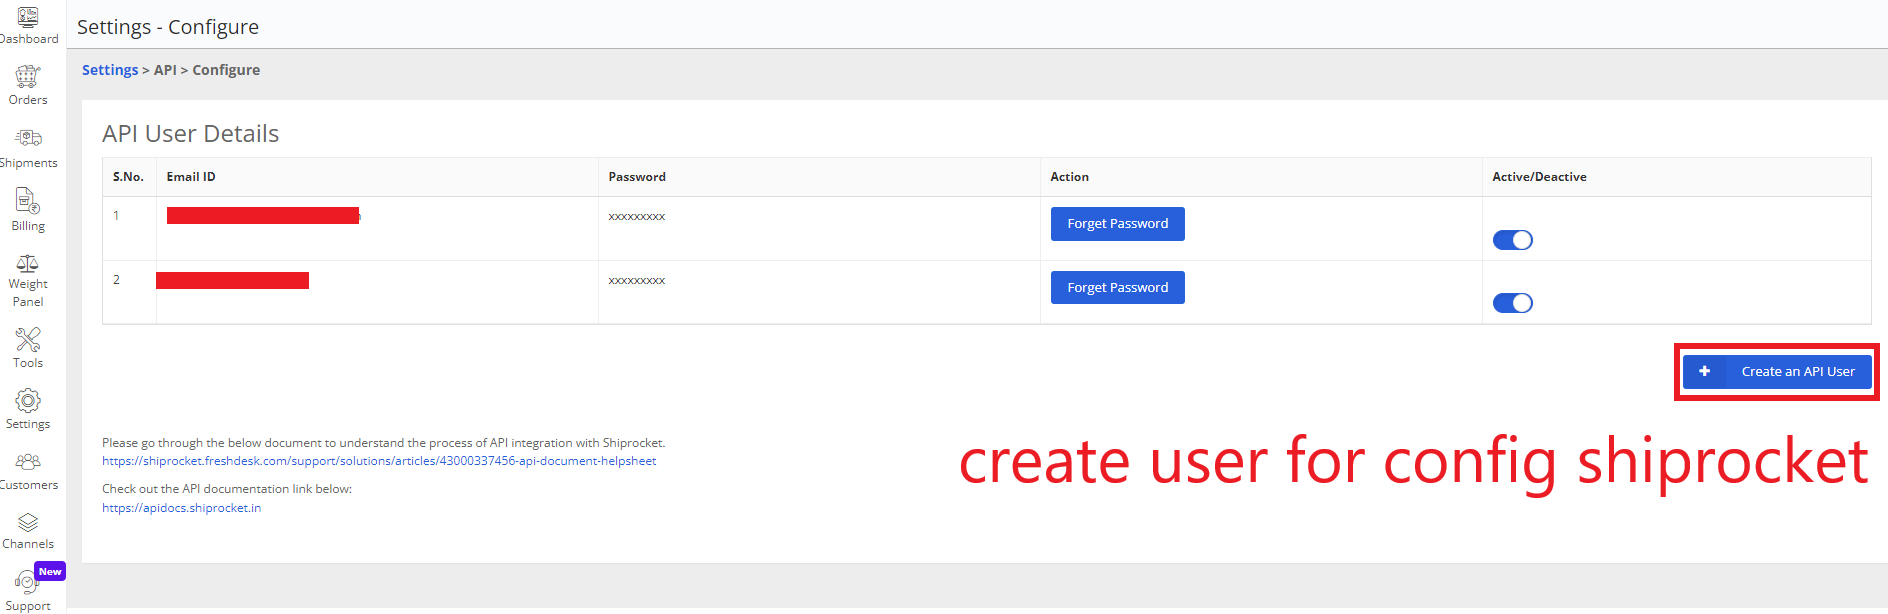
here you have to create user for use shiprockdet in your system:
After create user you have to add use credentials in you admin panel here
How will work?
Now learn how will shiprocket in you system:Add pickup location
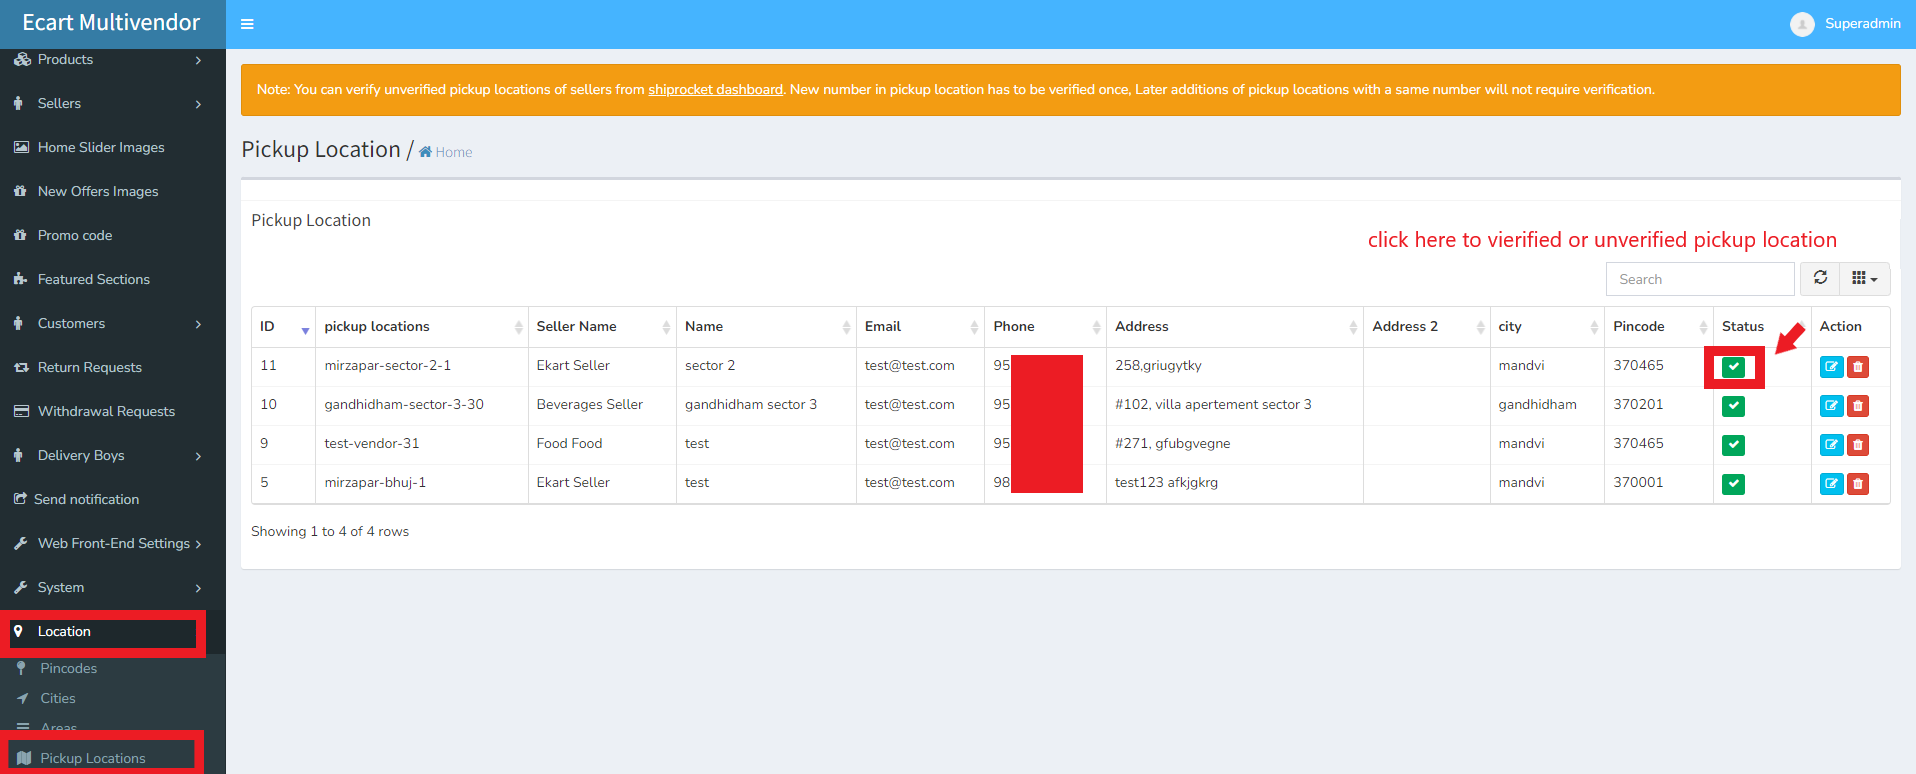
shiprocket use pickup location for pickup orders from owner:in your system only seller can add pickup location, here seller can add pickup location.
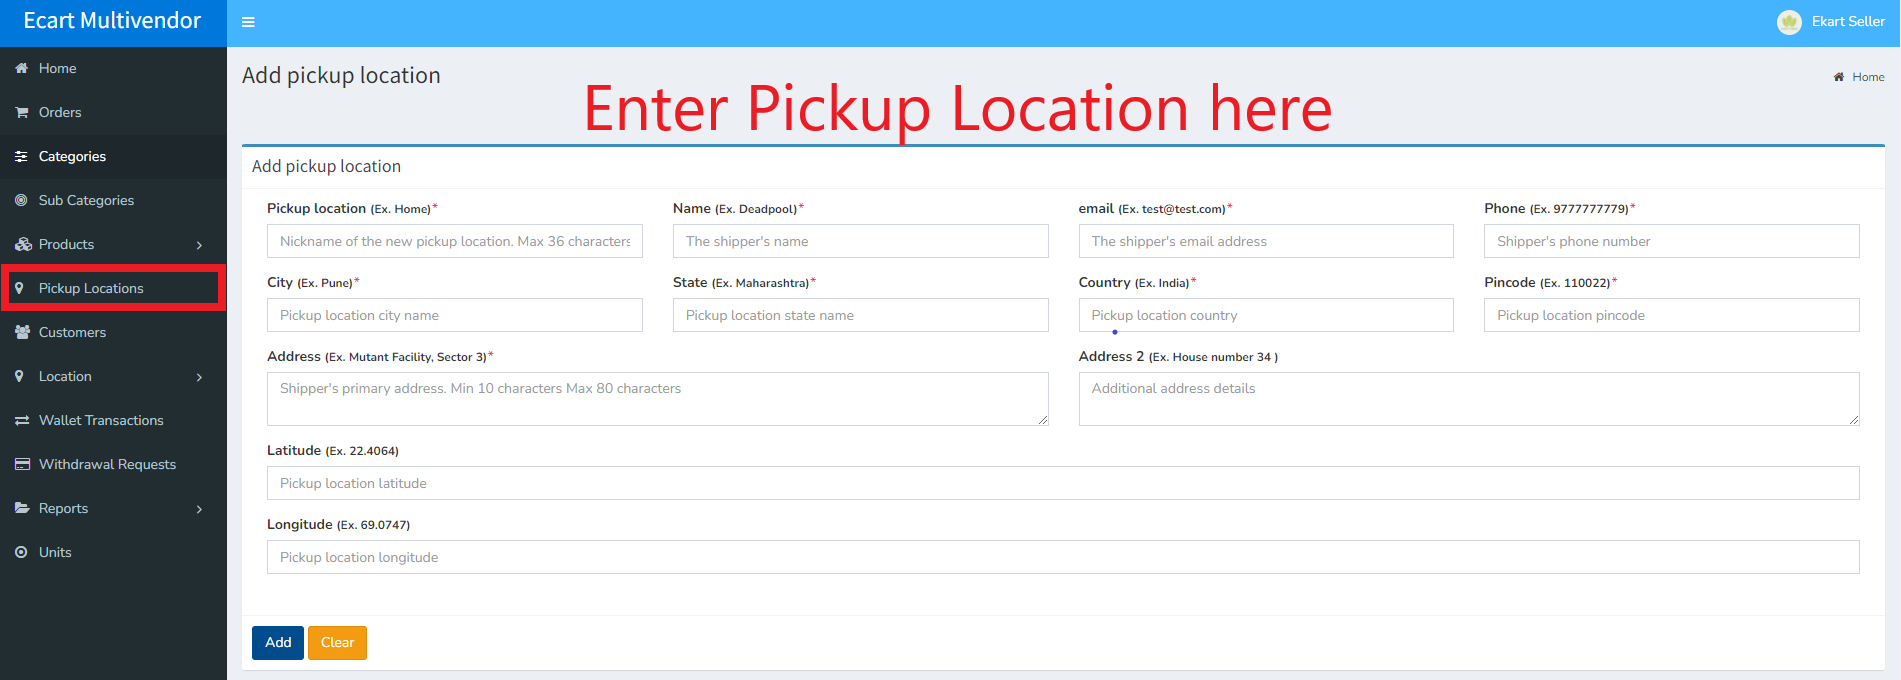
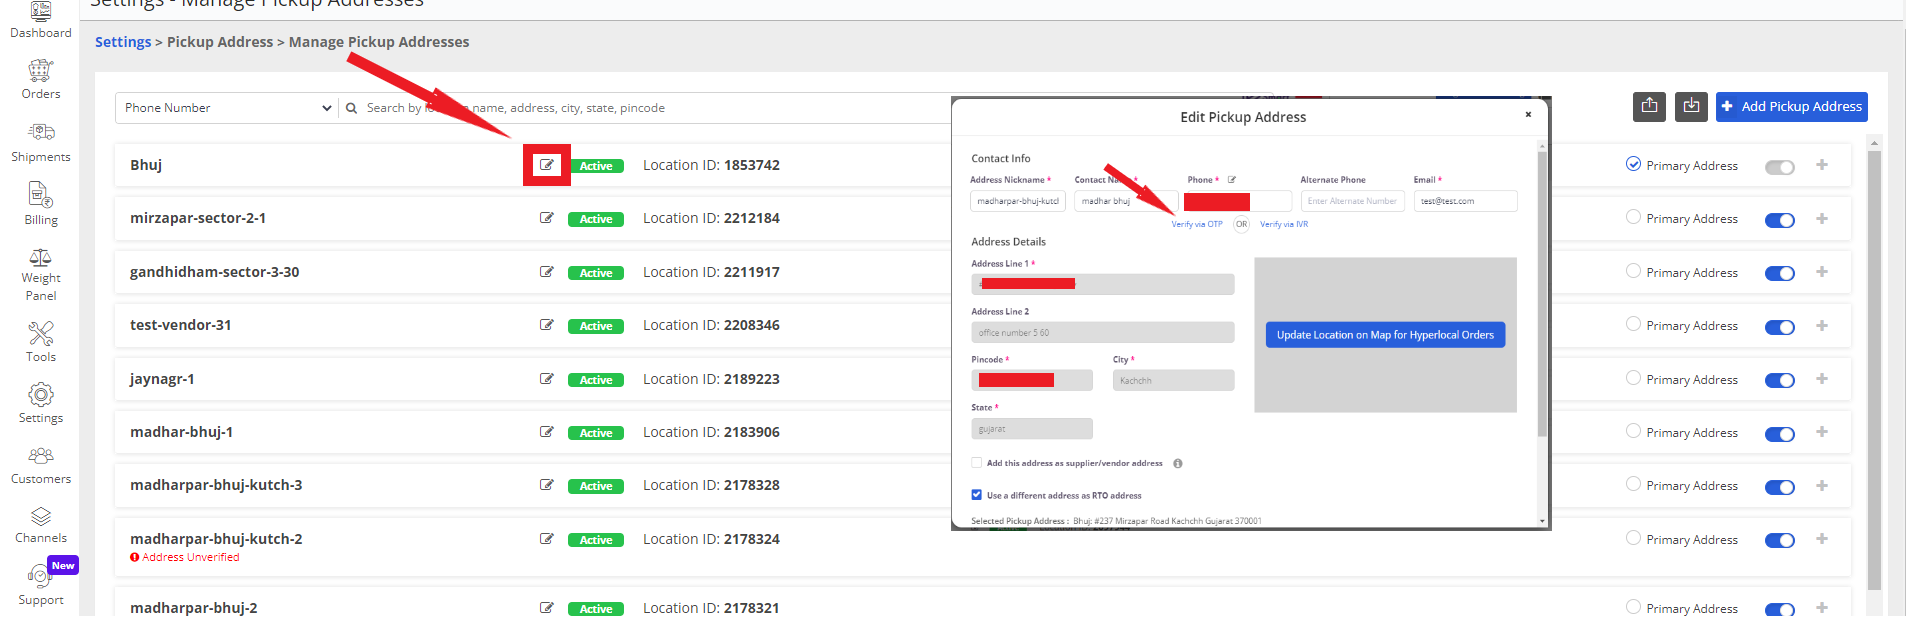
after adding pickup location admin have to verifed pickup location from panel and also from shiprocket panel
verify pickup location from admin panel
verify pickup location from shiprocket :
here you can edit or verify pickup location
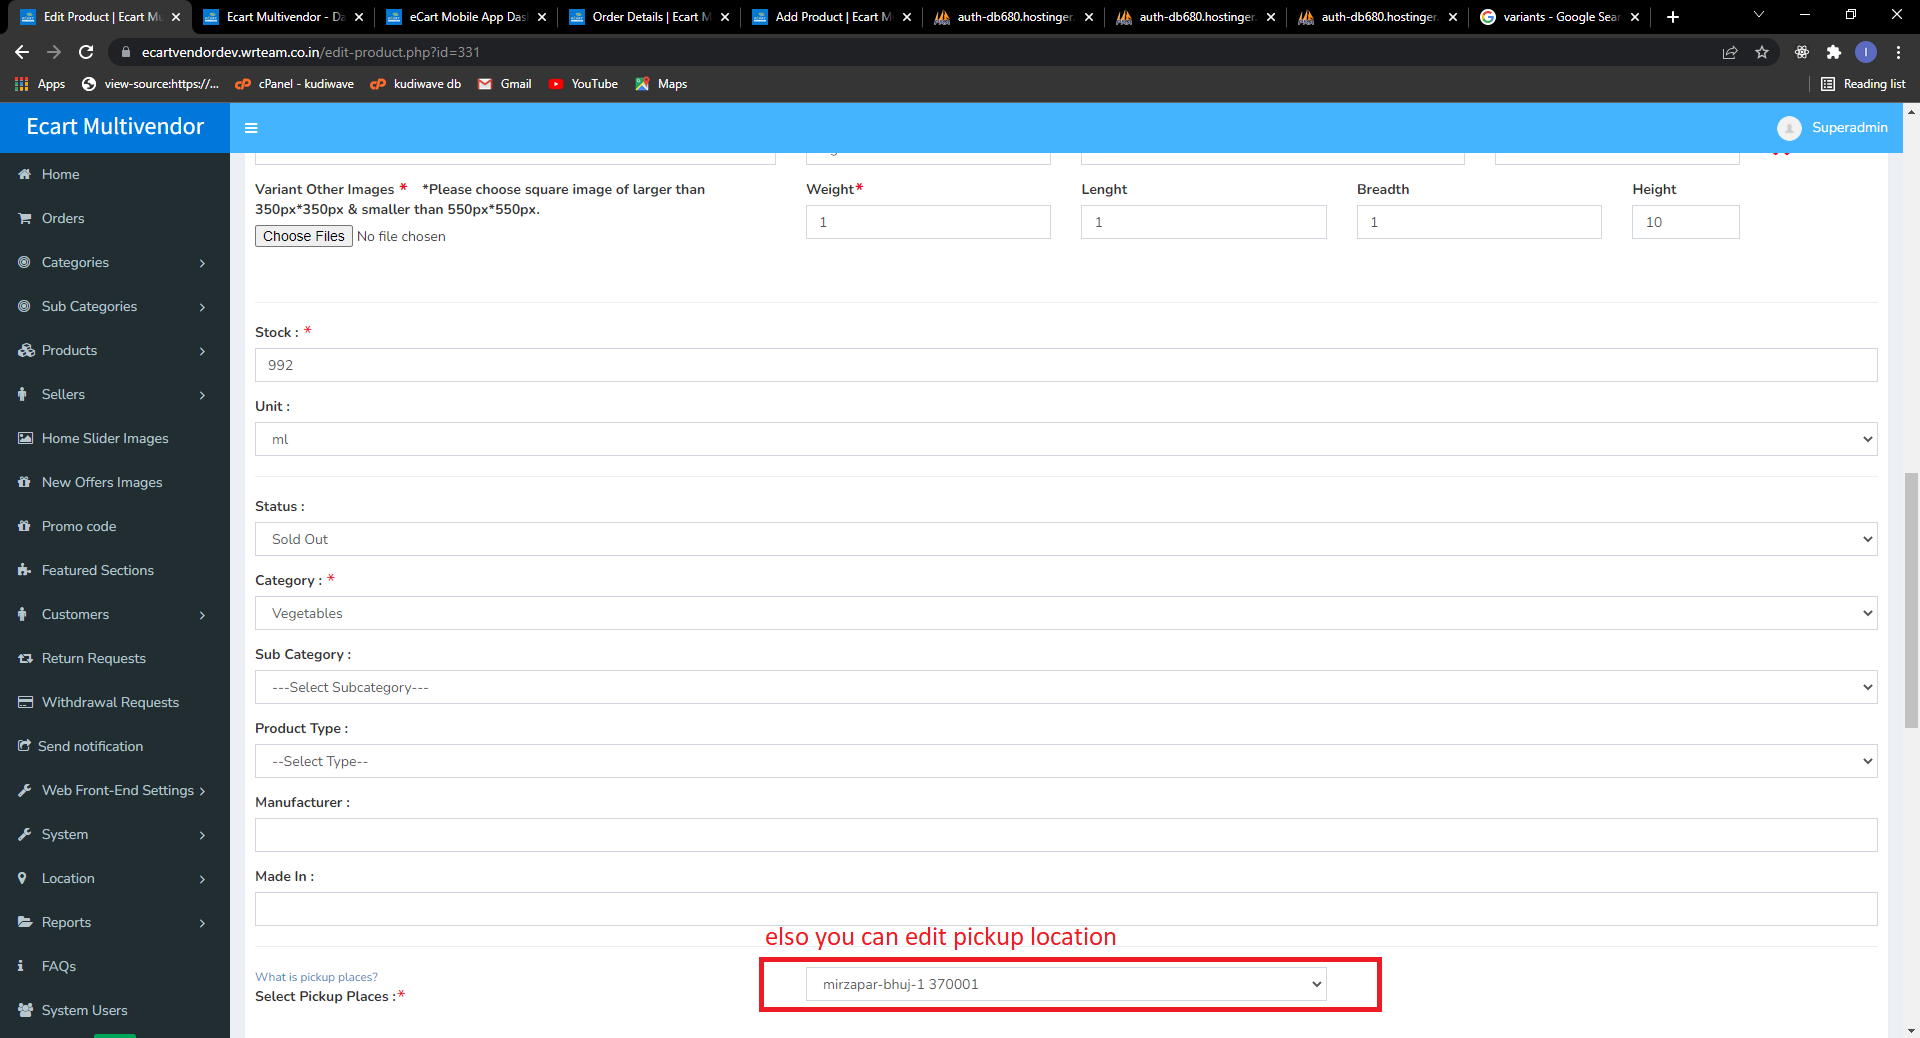
Add product or Edit product
after successfully verify pickup location you can add product like this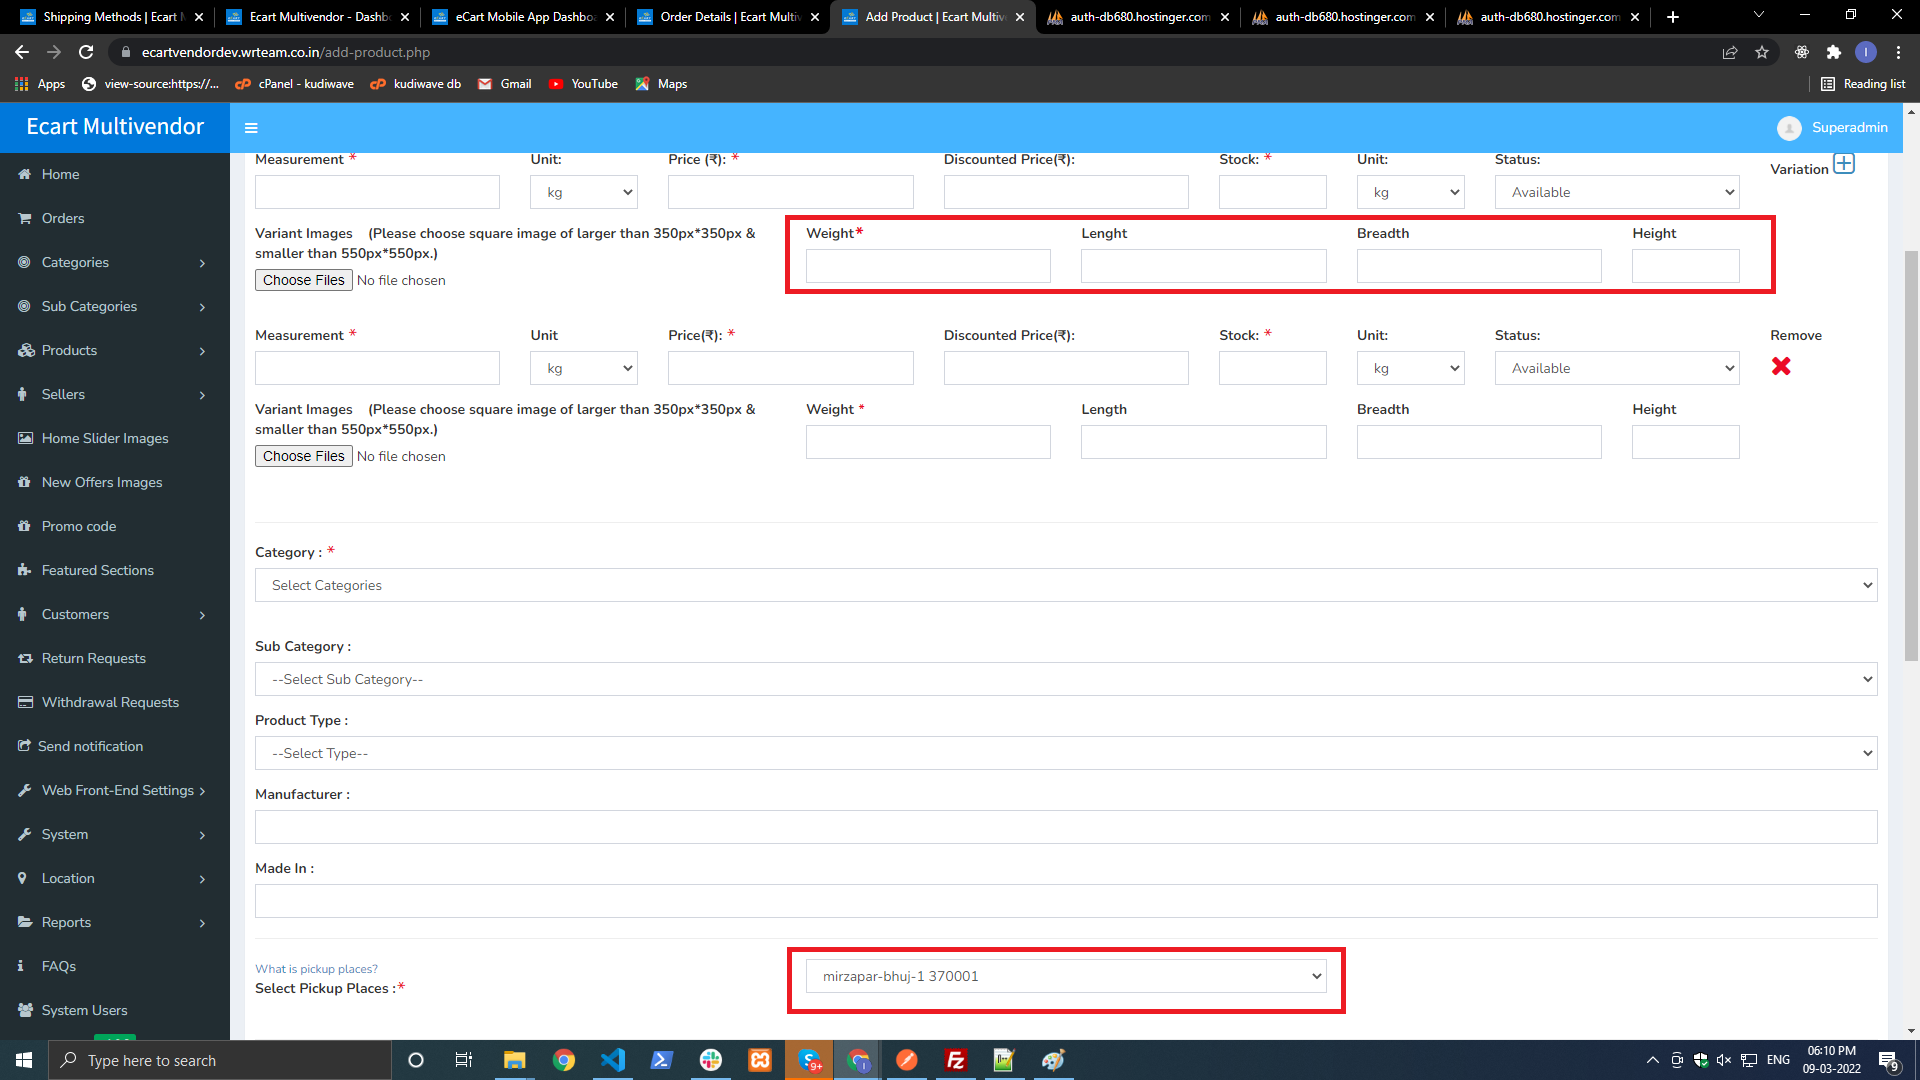
also you can edit product like This
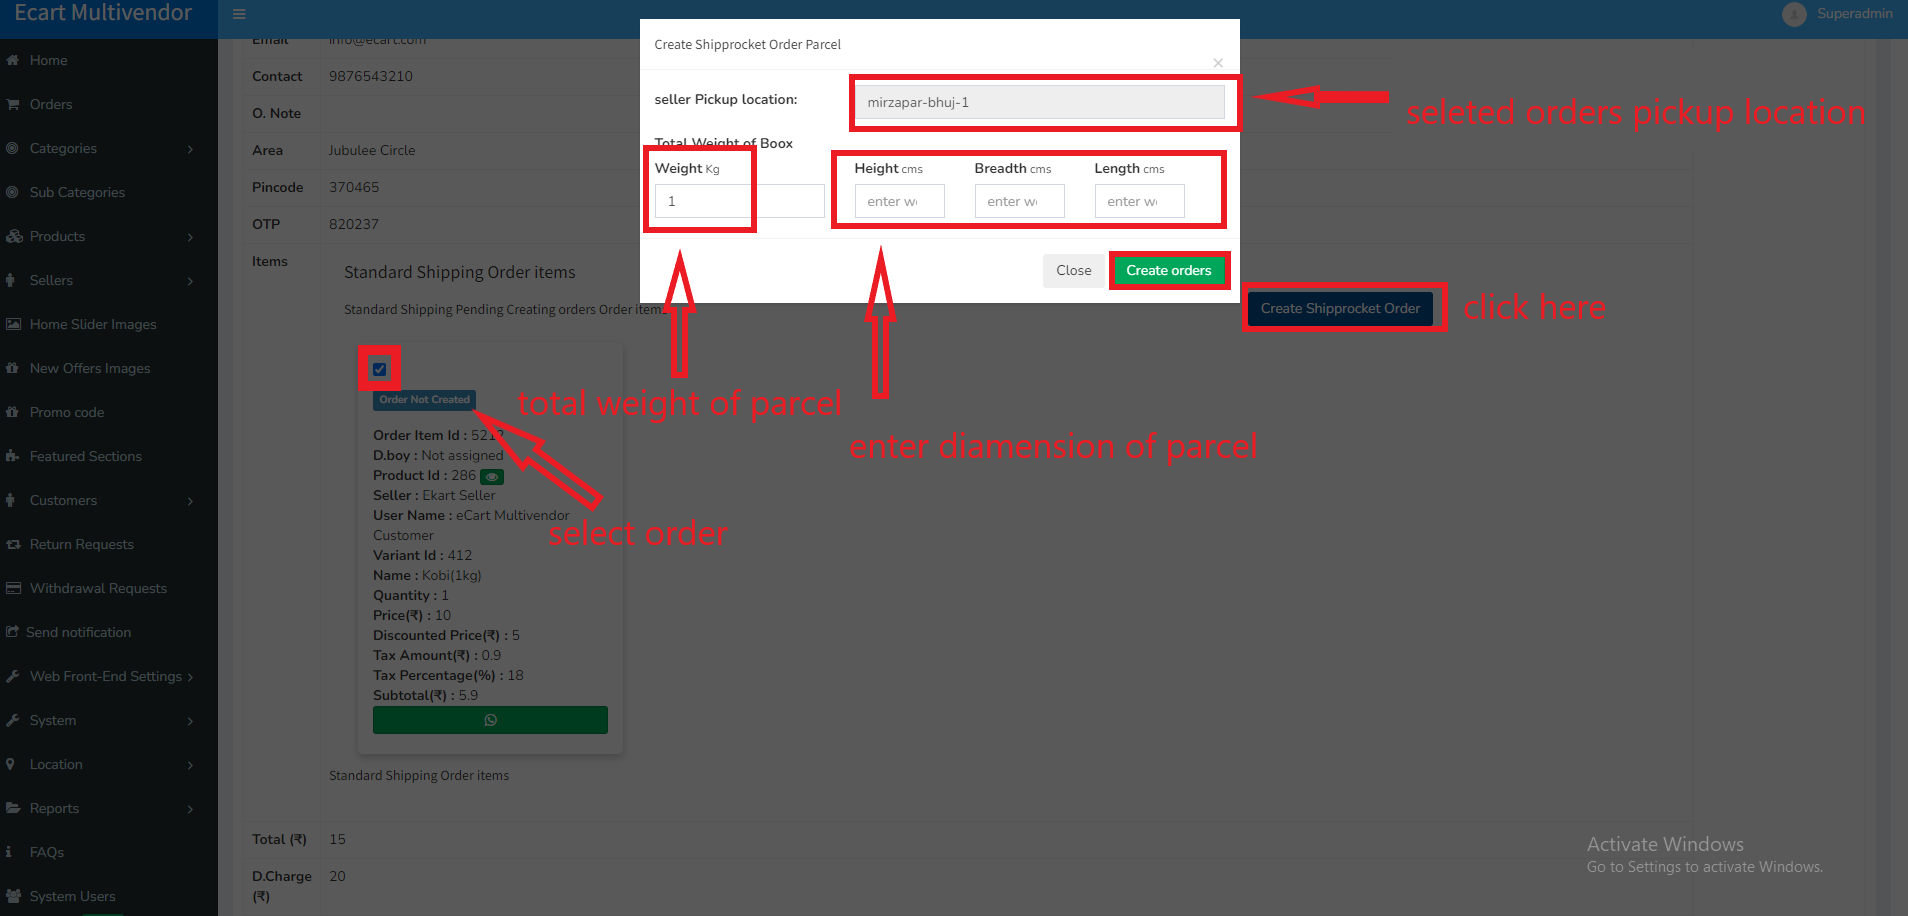
Creat shiprocket
after getting orders and want deliver order using shiprocket you have to create shiprockt orderGo to edit order in you panel there you can select orders items which you add on one parcel after this click on create shiprocket order button then add diamensions of parcel here and then click on create oder.
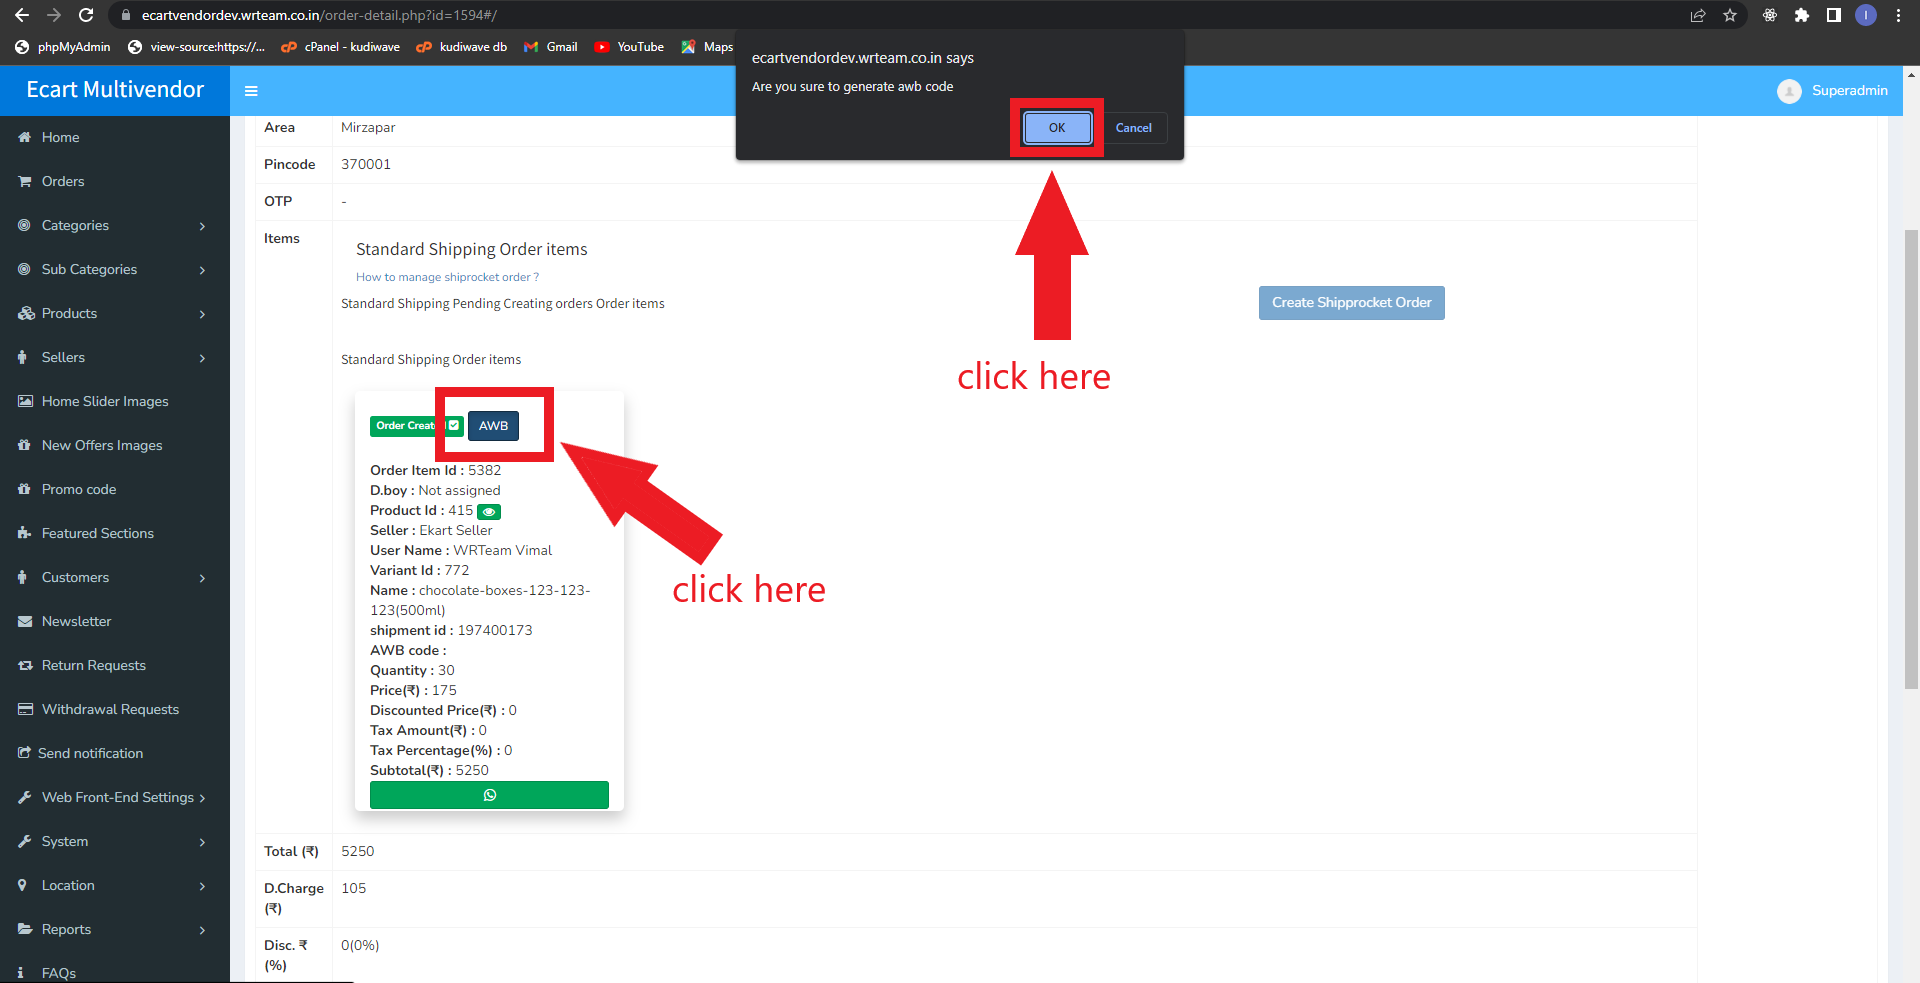
Generate AWB
After creating order you have to generate AWB(its unique number generated by shiprocket help to find your order quicky) for your orderafter creating order you can see there button name with awb click on it .
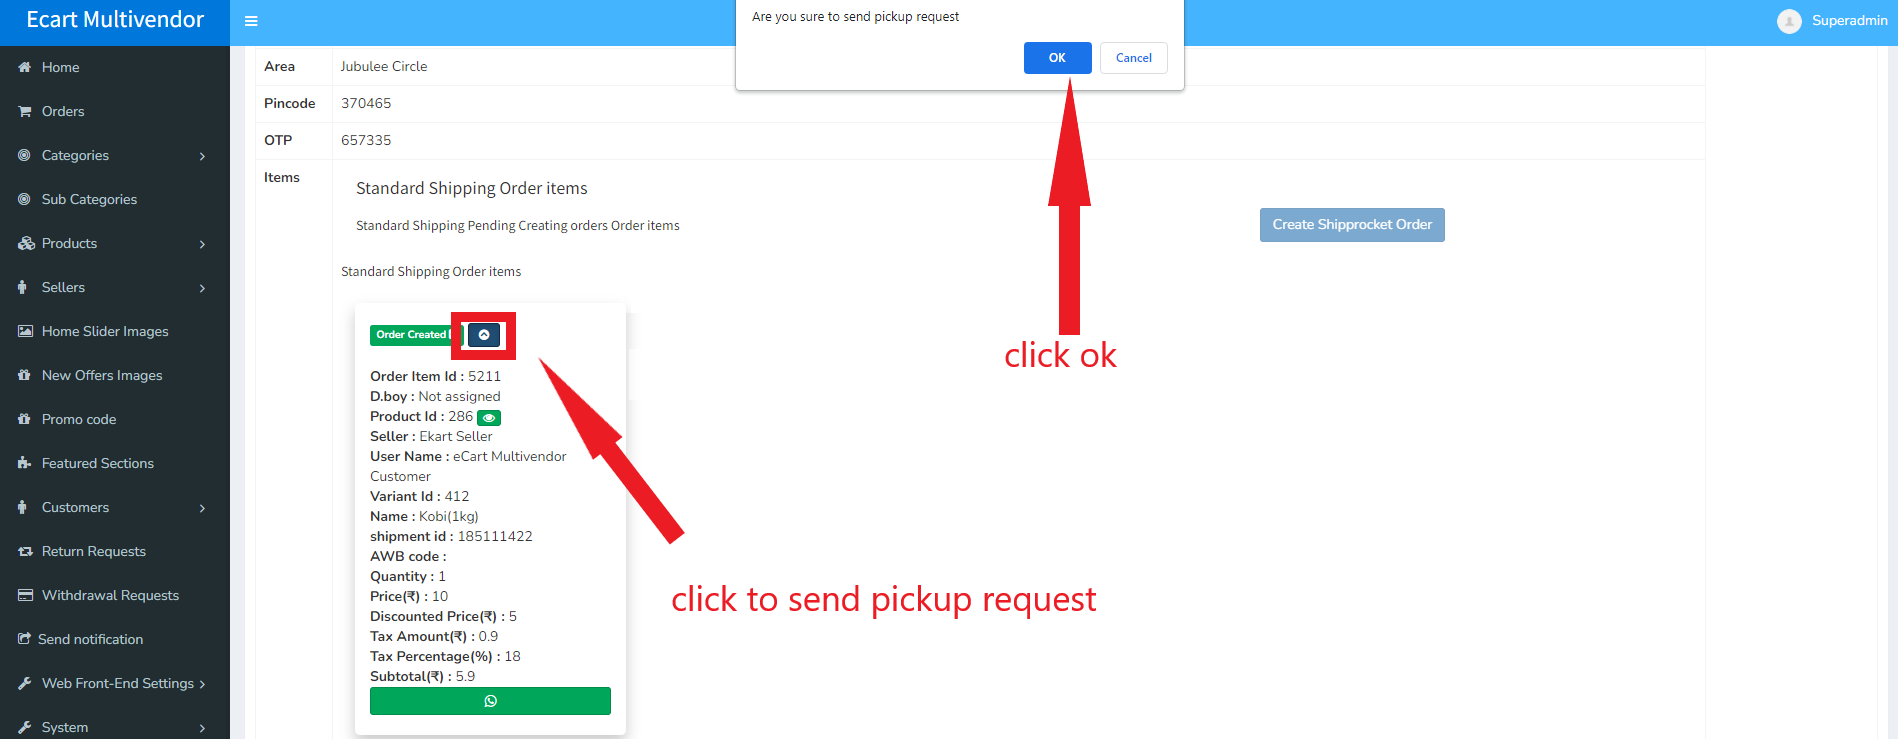
Send pickup request
after creating order you have to send pickup request to so currier company will pickup order from you and deliver to customers.so you can send pickup request like this ;
Track order
after sending pickup request you can track your order like this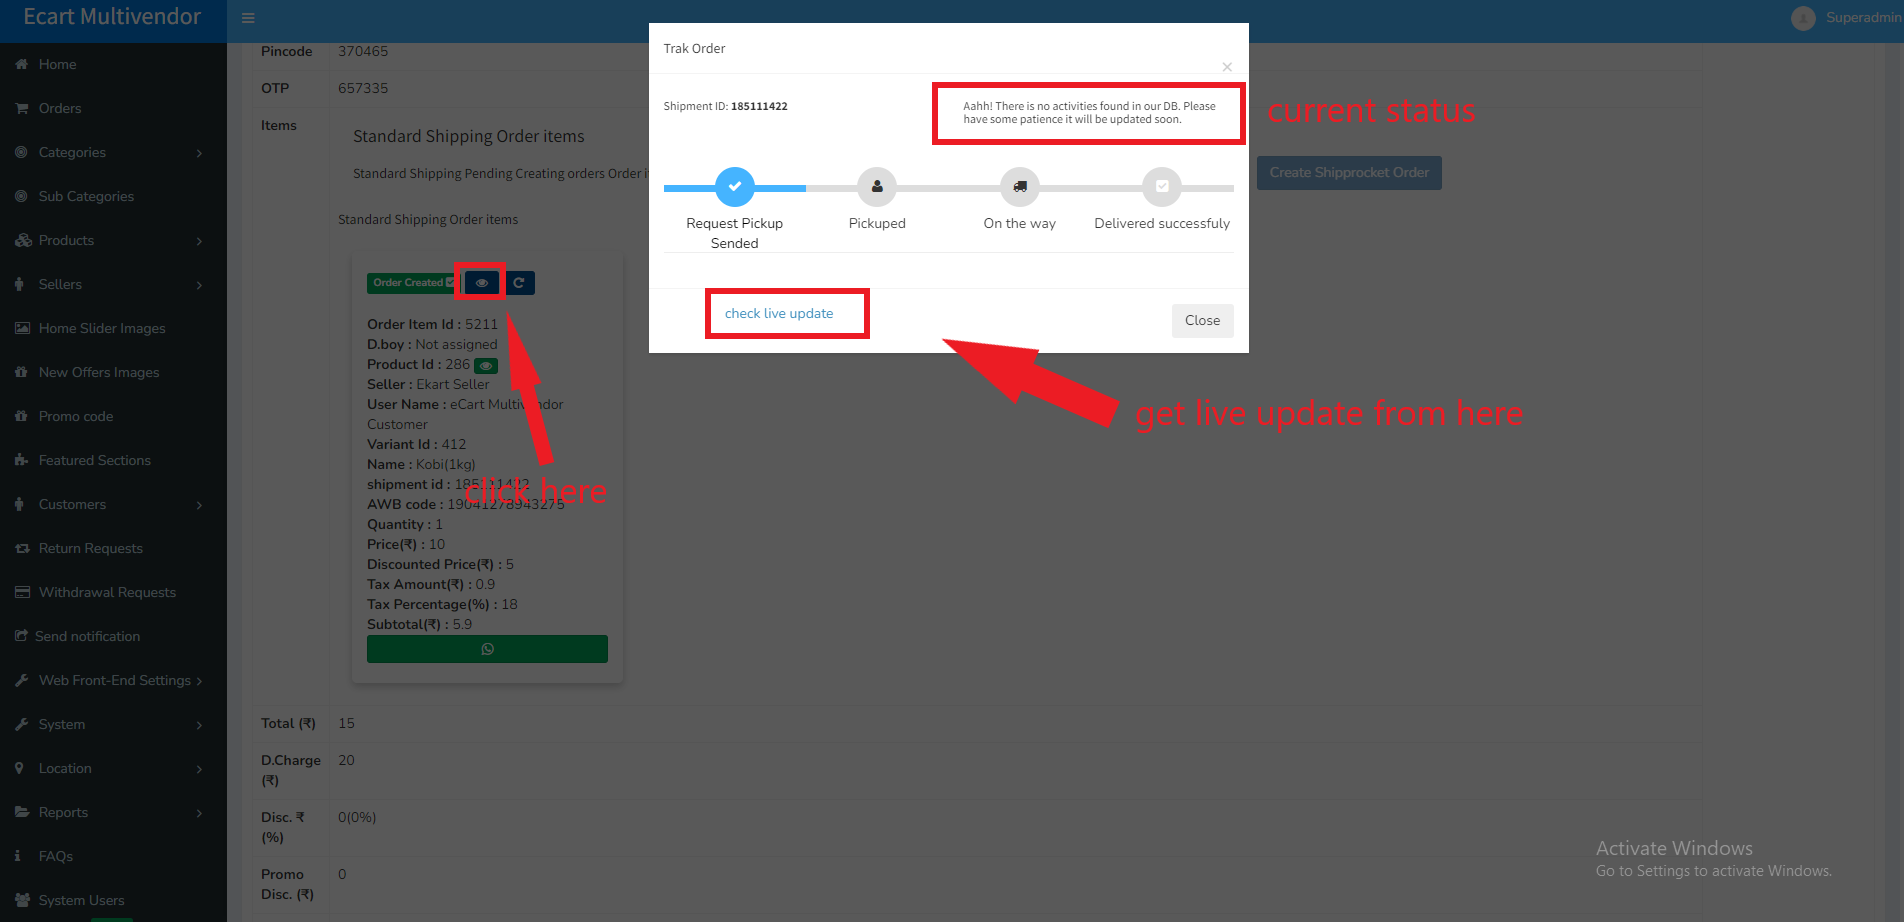
Cancel Order
With some reason if you have to cancel order you can cancel your order like this: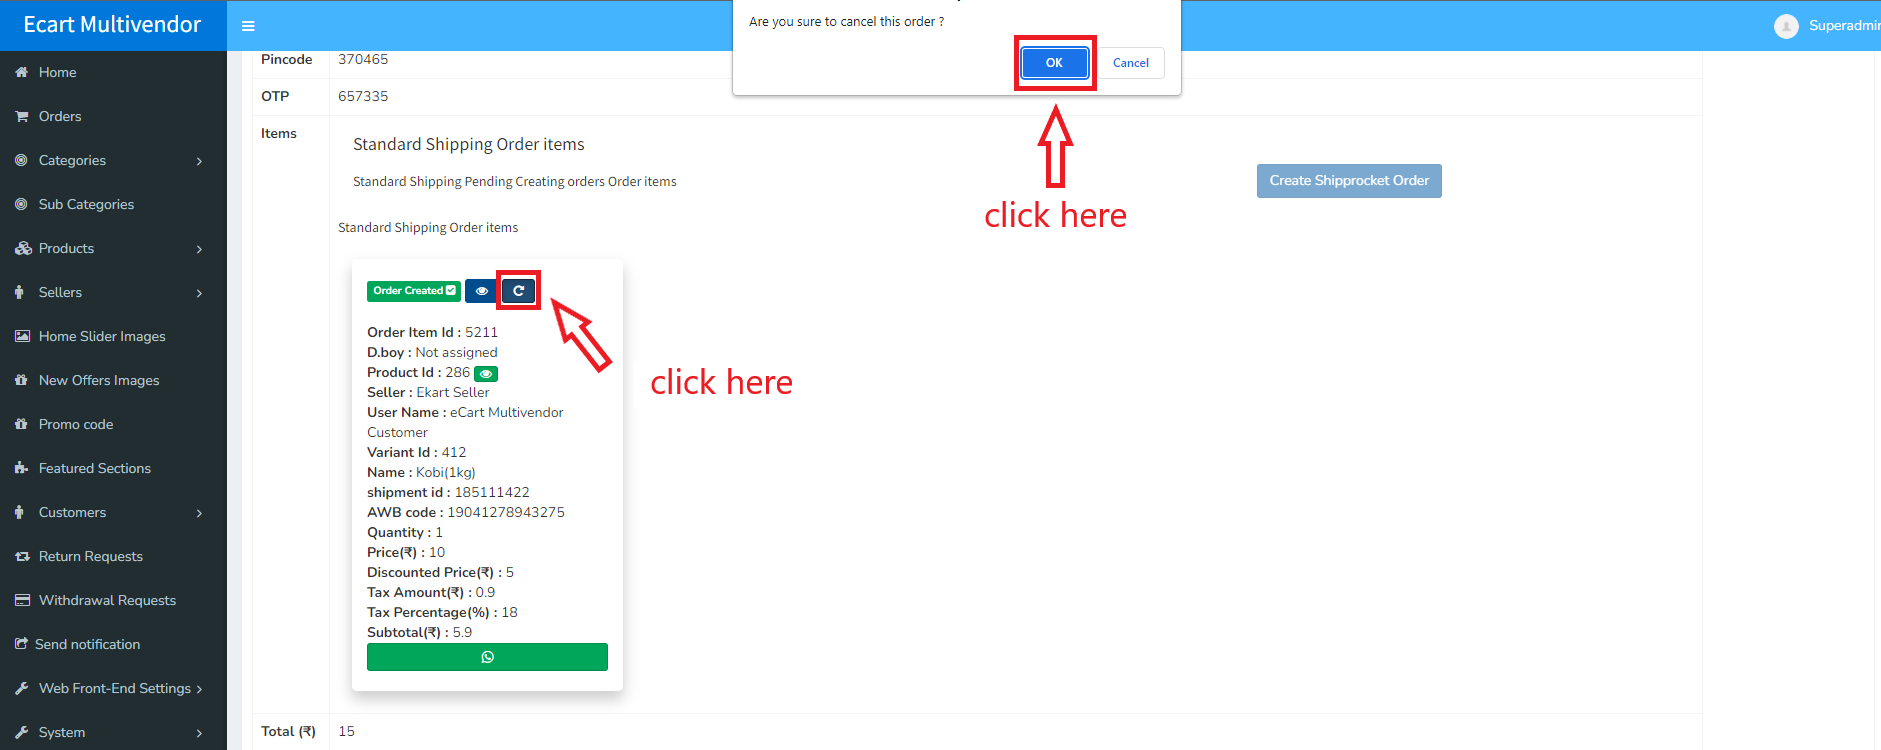
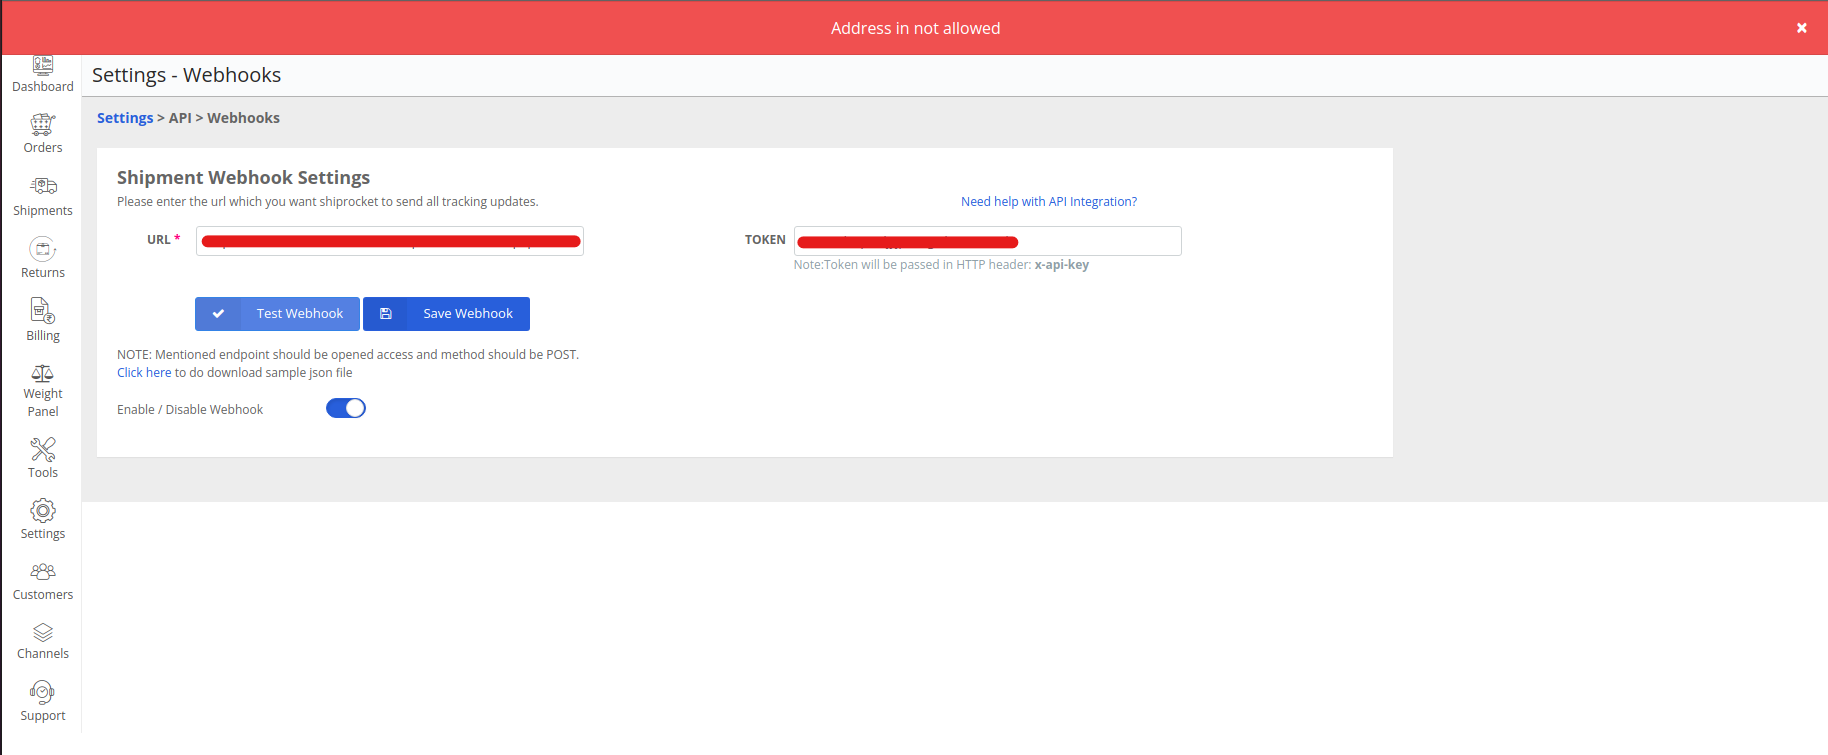
Address is not allowed error occurred
Rename Shiprocket webhook URL like this:Existing URL : https://eCart_multi_vendor/webhook.php
Rename URL : https://eCart_multi_vendor/new_webhook.php
Support
If you are facing any technical issues or challanges while using our system. You can contact us on skype.We are available for technical support from 9.00AM to 6.00PM Indian Standard Time Monday to Friday.
Drop a Message on Skype
Website Overview
Sample image
The Above web page contains tabs on the left panel like Home,Orders,Sellers,Categories,Subcategories,Product,Customers,Send notifications,Transaction,System,Location,Reports,Web Pages and FAQs to manage the whole website
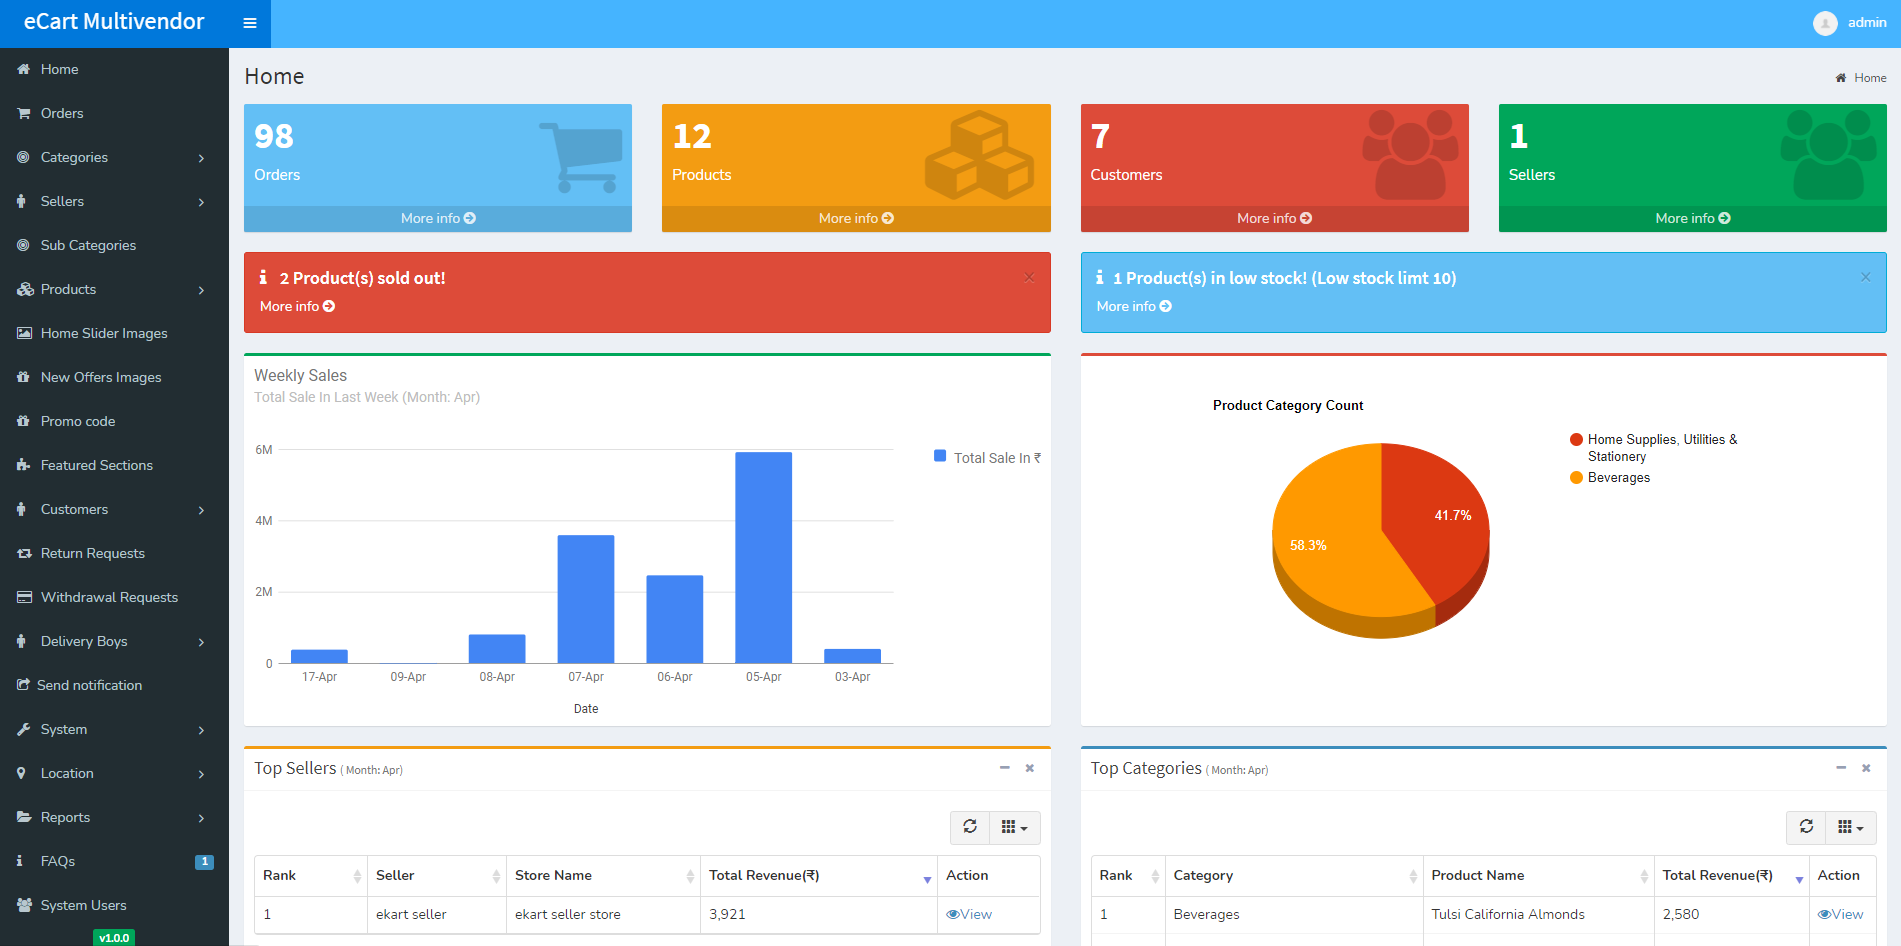
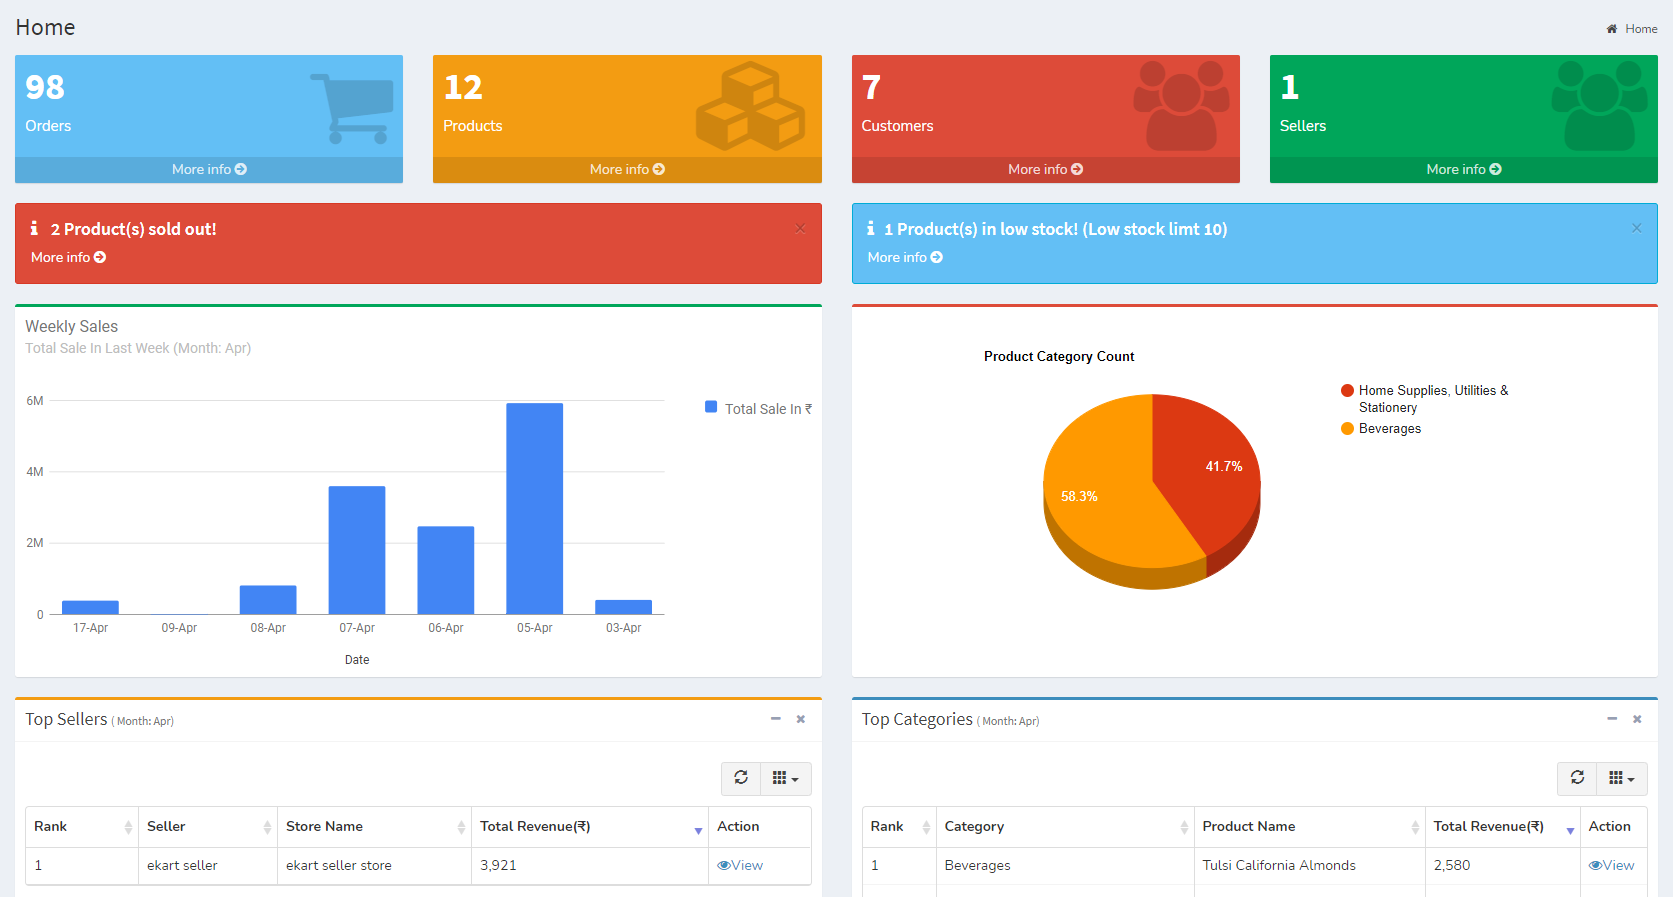
Home
Sample image
It Mainly contains 4 Items
- Orders:To view Orders Information
- Product:To view Product Information
- Registered Customers:To view Registered Customers Information
- Sellers:To view Sellers Information
Two charts
- Weekly sale:To summarize sale in last 7 days
- Category Wise Product:To summarize category wise product count
And two anylysis
- Top Sellers:To display the best Sellers from the last mouth to the present
- Top Categories:To display the best Categories from the last mouth to the present
Order Panel
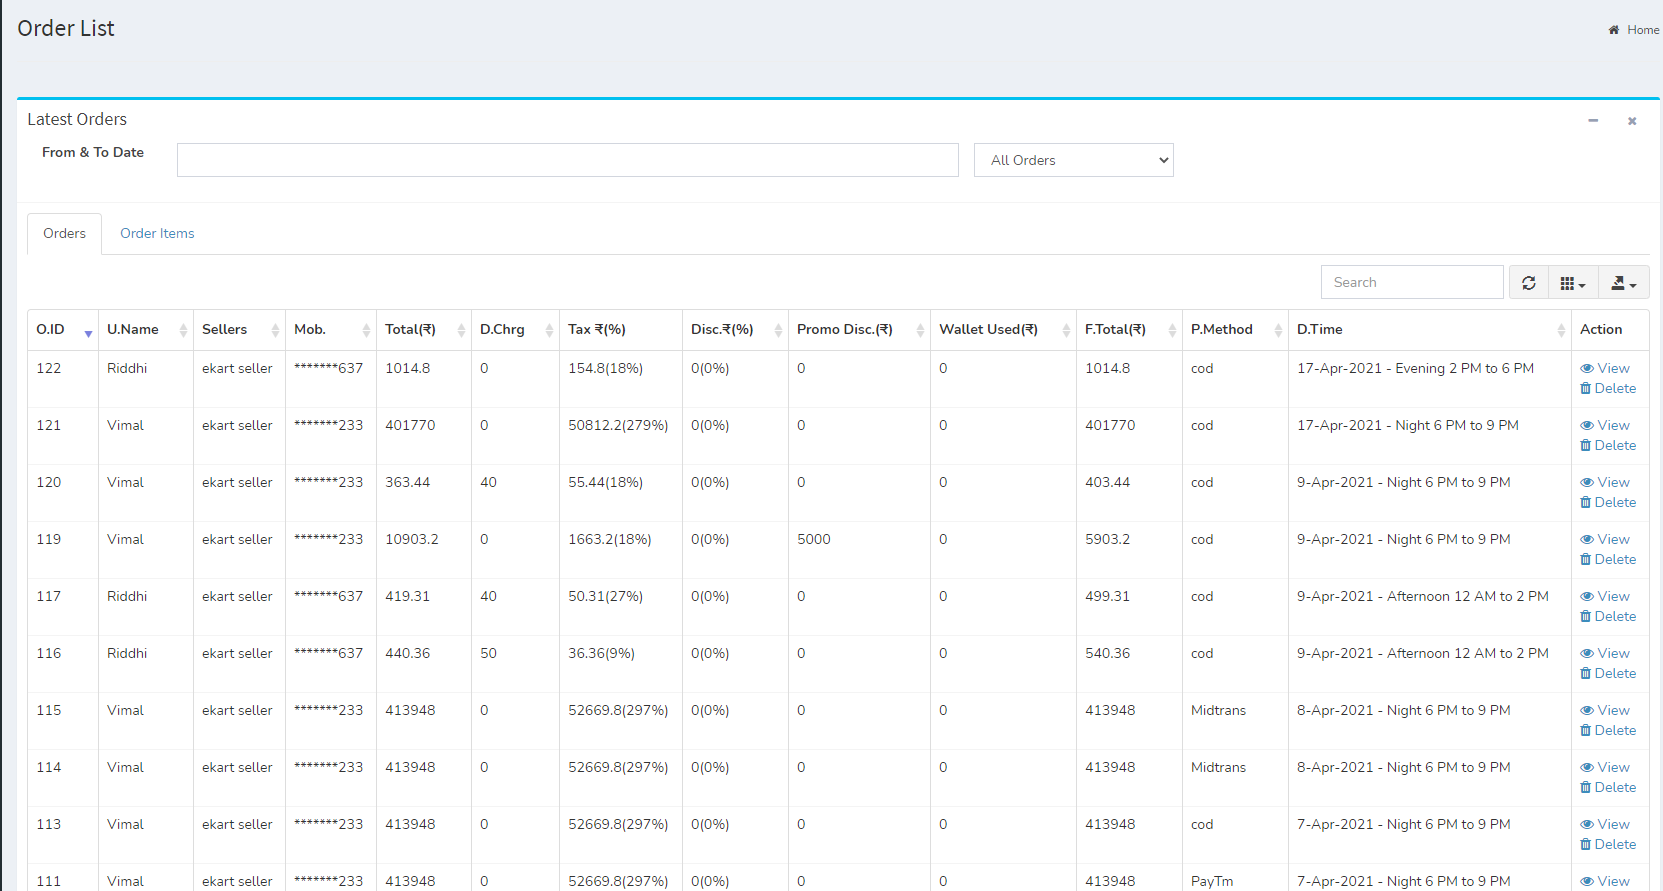
Here all the information related to order is displaying
Actions- View Order
-
 To View the Order details
- Delete Order
-
 To delete the Order
Categories
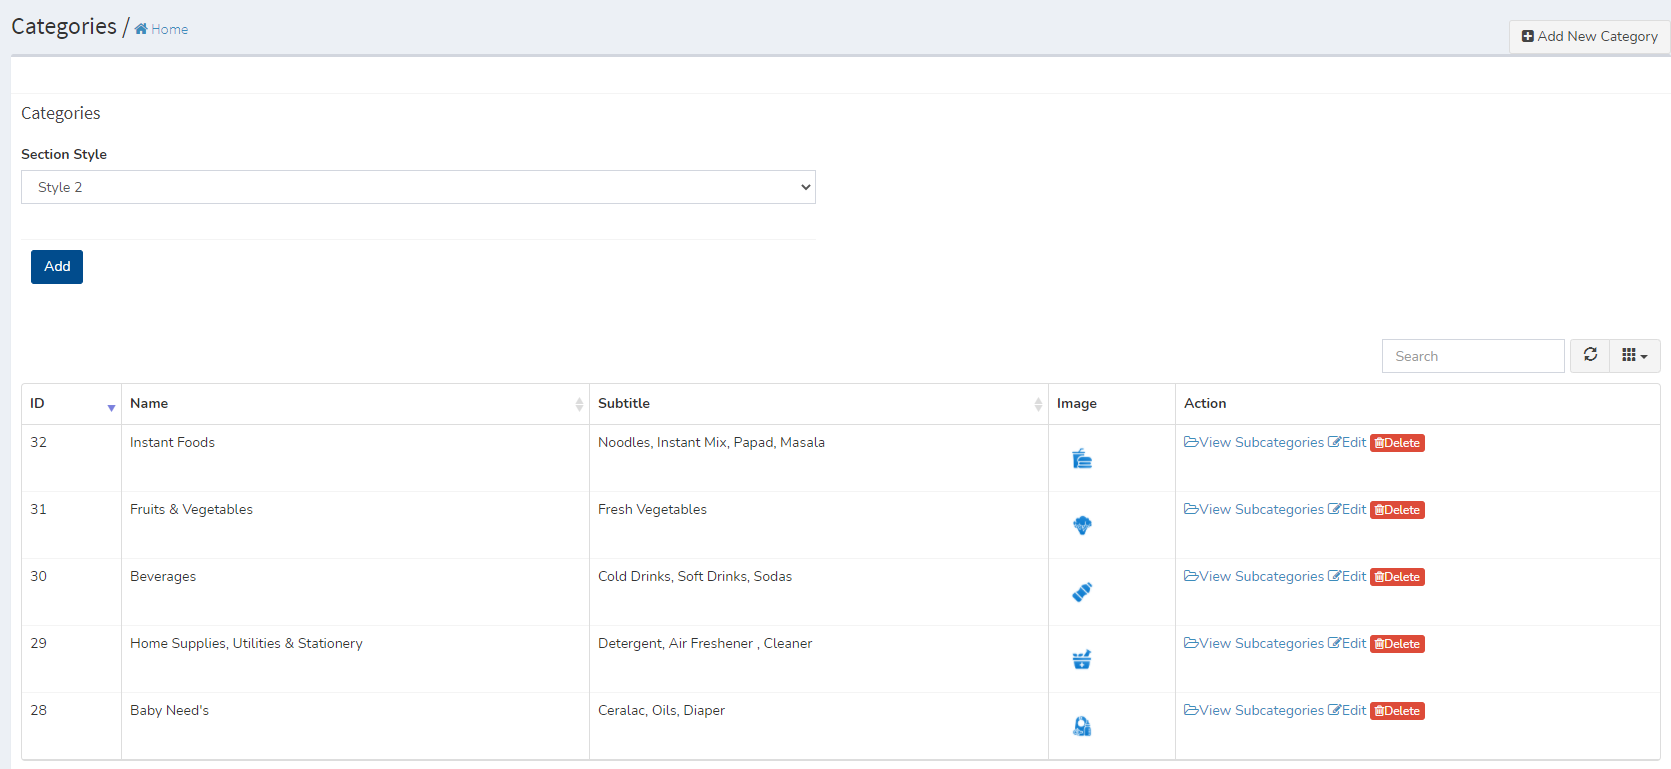
Here all the information related to Product Categories is display
Actions- Search Product Category details
-
 To search the Product Name or Any other Detail
- Refresh Product list
-
 To Refresh Product List
- Filters
-
 Used to filter the Product Category details according to the criteria
- View Subcategories
-
 Used to view the subcategories of category
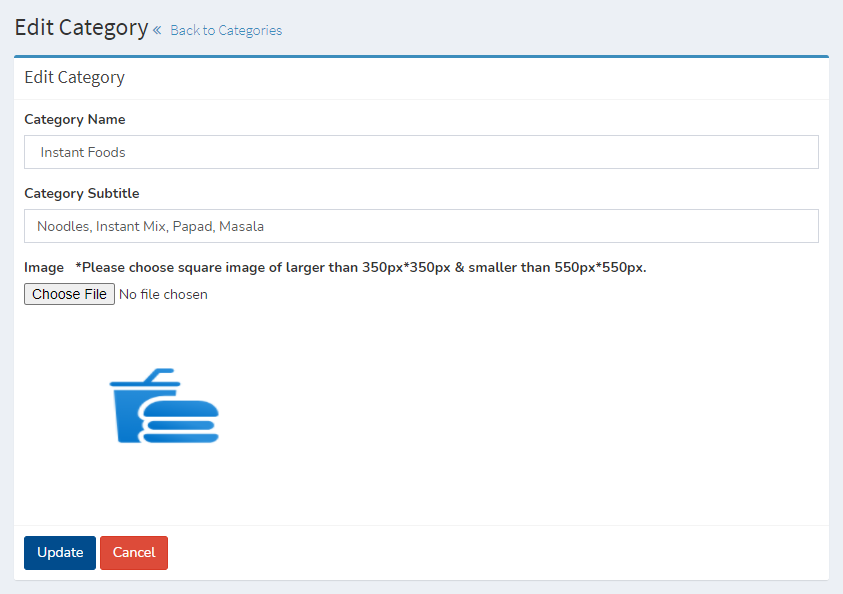
- Edit Category
-
 Used to Edit the Product Category details
- Delete Category
-
 Used to Delete the Product Category details
We Can add New categories and delete categories by following Steps :
Step 1:Adding New Category in the Category List
Click on Add New Category Tab Present On The Right Side

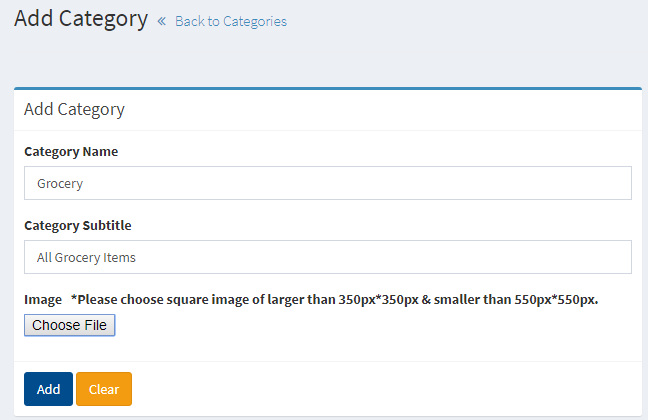
- In Category Name field Enter the Name of the Category.
- In Category Subtitle field Enter the Subtitles of the Category.
- At Last Choose The Image For The Category.
- Click Add to add the Category
The Grocery Category Added Successfully
Step 2:Delete Category from the List
For Deleting category we need to use as explained above under Actions category.
Sub categories
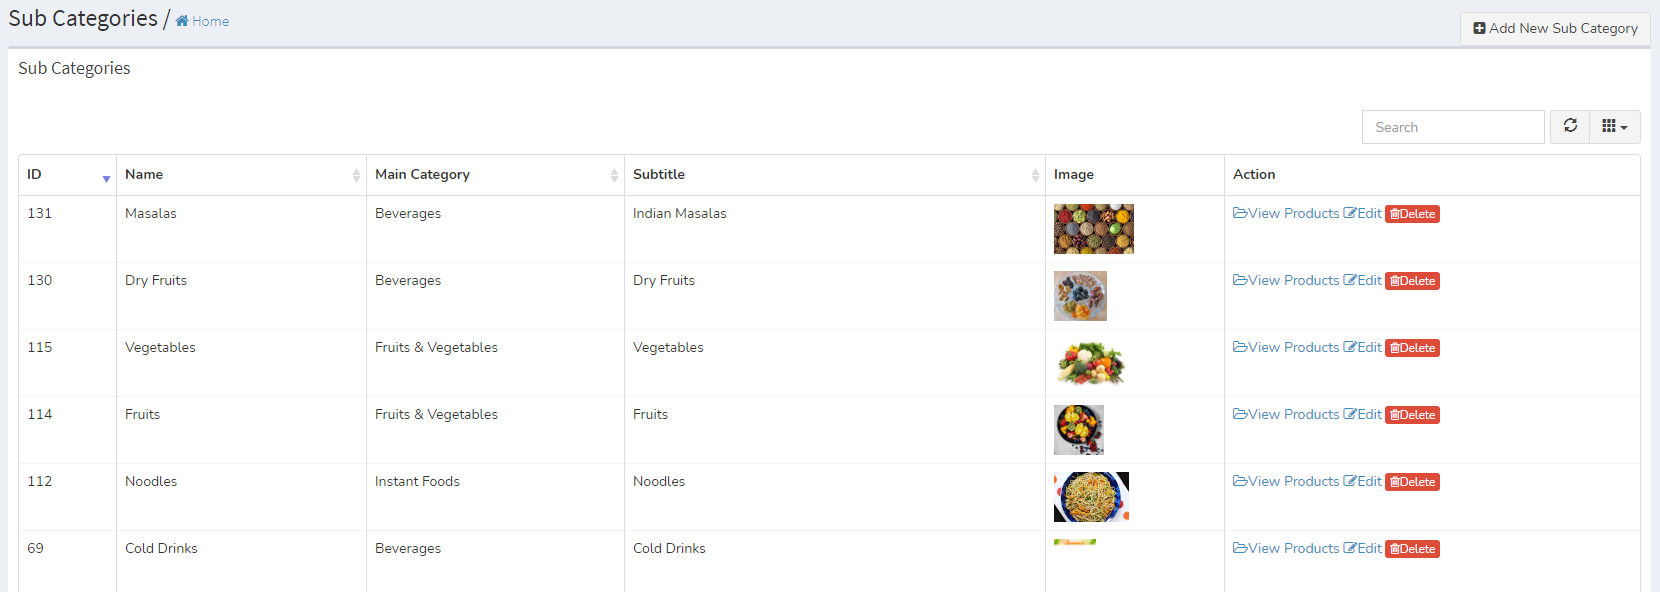
Here all the information related to Subcategories is display
Actions- Search Subcategory details
-
To search the Subcategory Name or Any other Detail
- Refresh Product list
-
To Refresh Subcategory List
- Filters
-
Used to filter the Subcategory details according to the criteria
- View Products
-
 Used to view the products of subcategory
- Edit subcategory
-
Used to Edit the Subcategory details
- Delete subcategory
-
Used to Delete the subcategory details
We Can add New subcategory and delete subcategory by following Steps :
Step 1:Adding New subcategory in the subcategory List
Click on Add New Subcategory Tab Present On The Right Side

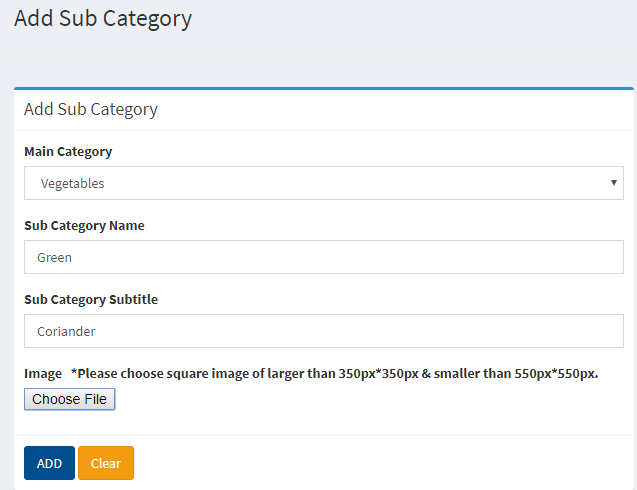
- In Main Category field select category.
- In Sub category name enter name of subcategory.
- In subcategory Subtitle field Enter the Subtitles of the subategory.
- At Last Choose The Image For The subcategory.
- Click Add to Add the Subcategory or clear to clear the form.
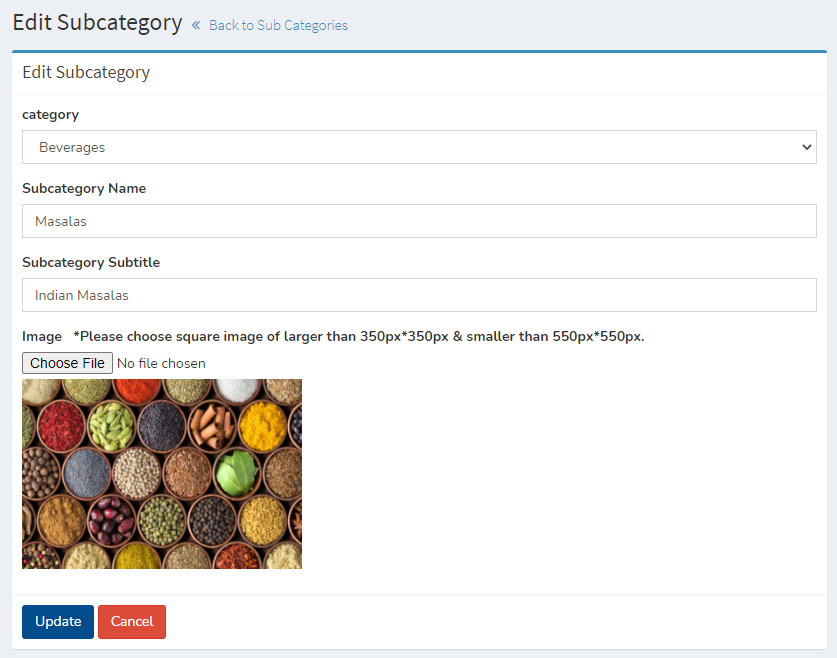
The Green subcategory Added Successfully
Step 2:Delete subcategory from the List
For Deleting subcategory we need to use as explained above under Actions category.
Sellers
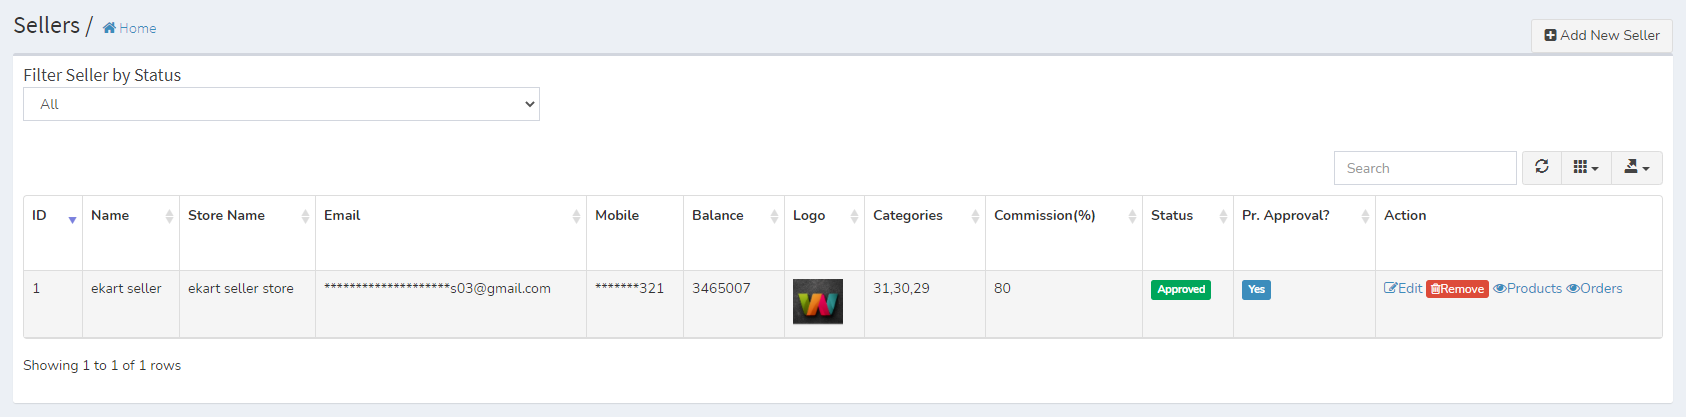
Here all the information related to Subcategories is display
Actions- Search Subcategory details
-
To search the Subcategory Name or Any other Detail
- Refresh Product list
-
To Refresh Subcategory List
- Filters
-
Used to filter the Seller details according to the criteria
- View Seller Products
-
 Used to view the products of seller
- View Seller Orders
-
 Used to view the orders of seller
- Edit seller
-
Used to Edit the Seller details
- Remove Seller Temporary
-
 Used to remove seller Temporary
- Delete Seller Permanently
-
 Used to delete seller permanently
We Can add New Seller and delete Seller by following Steps :
Step 1:Adding New Seller in the seller List
Click on Add New Seller Tab Present On The Right Side

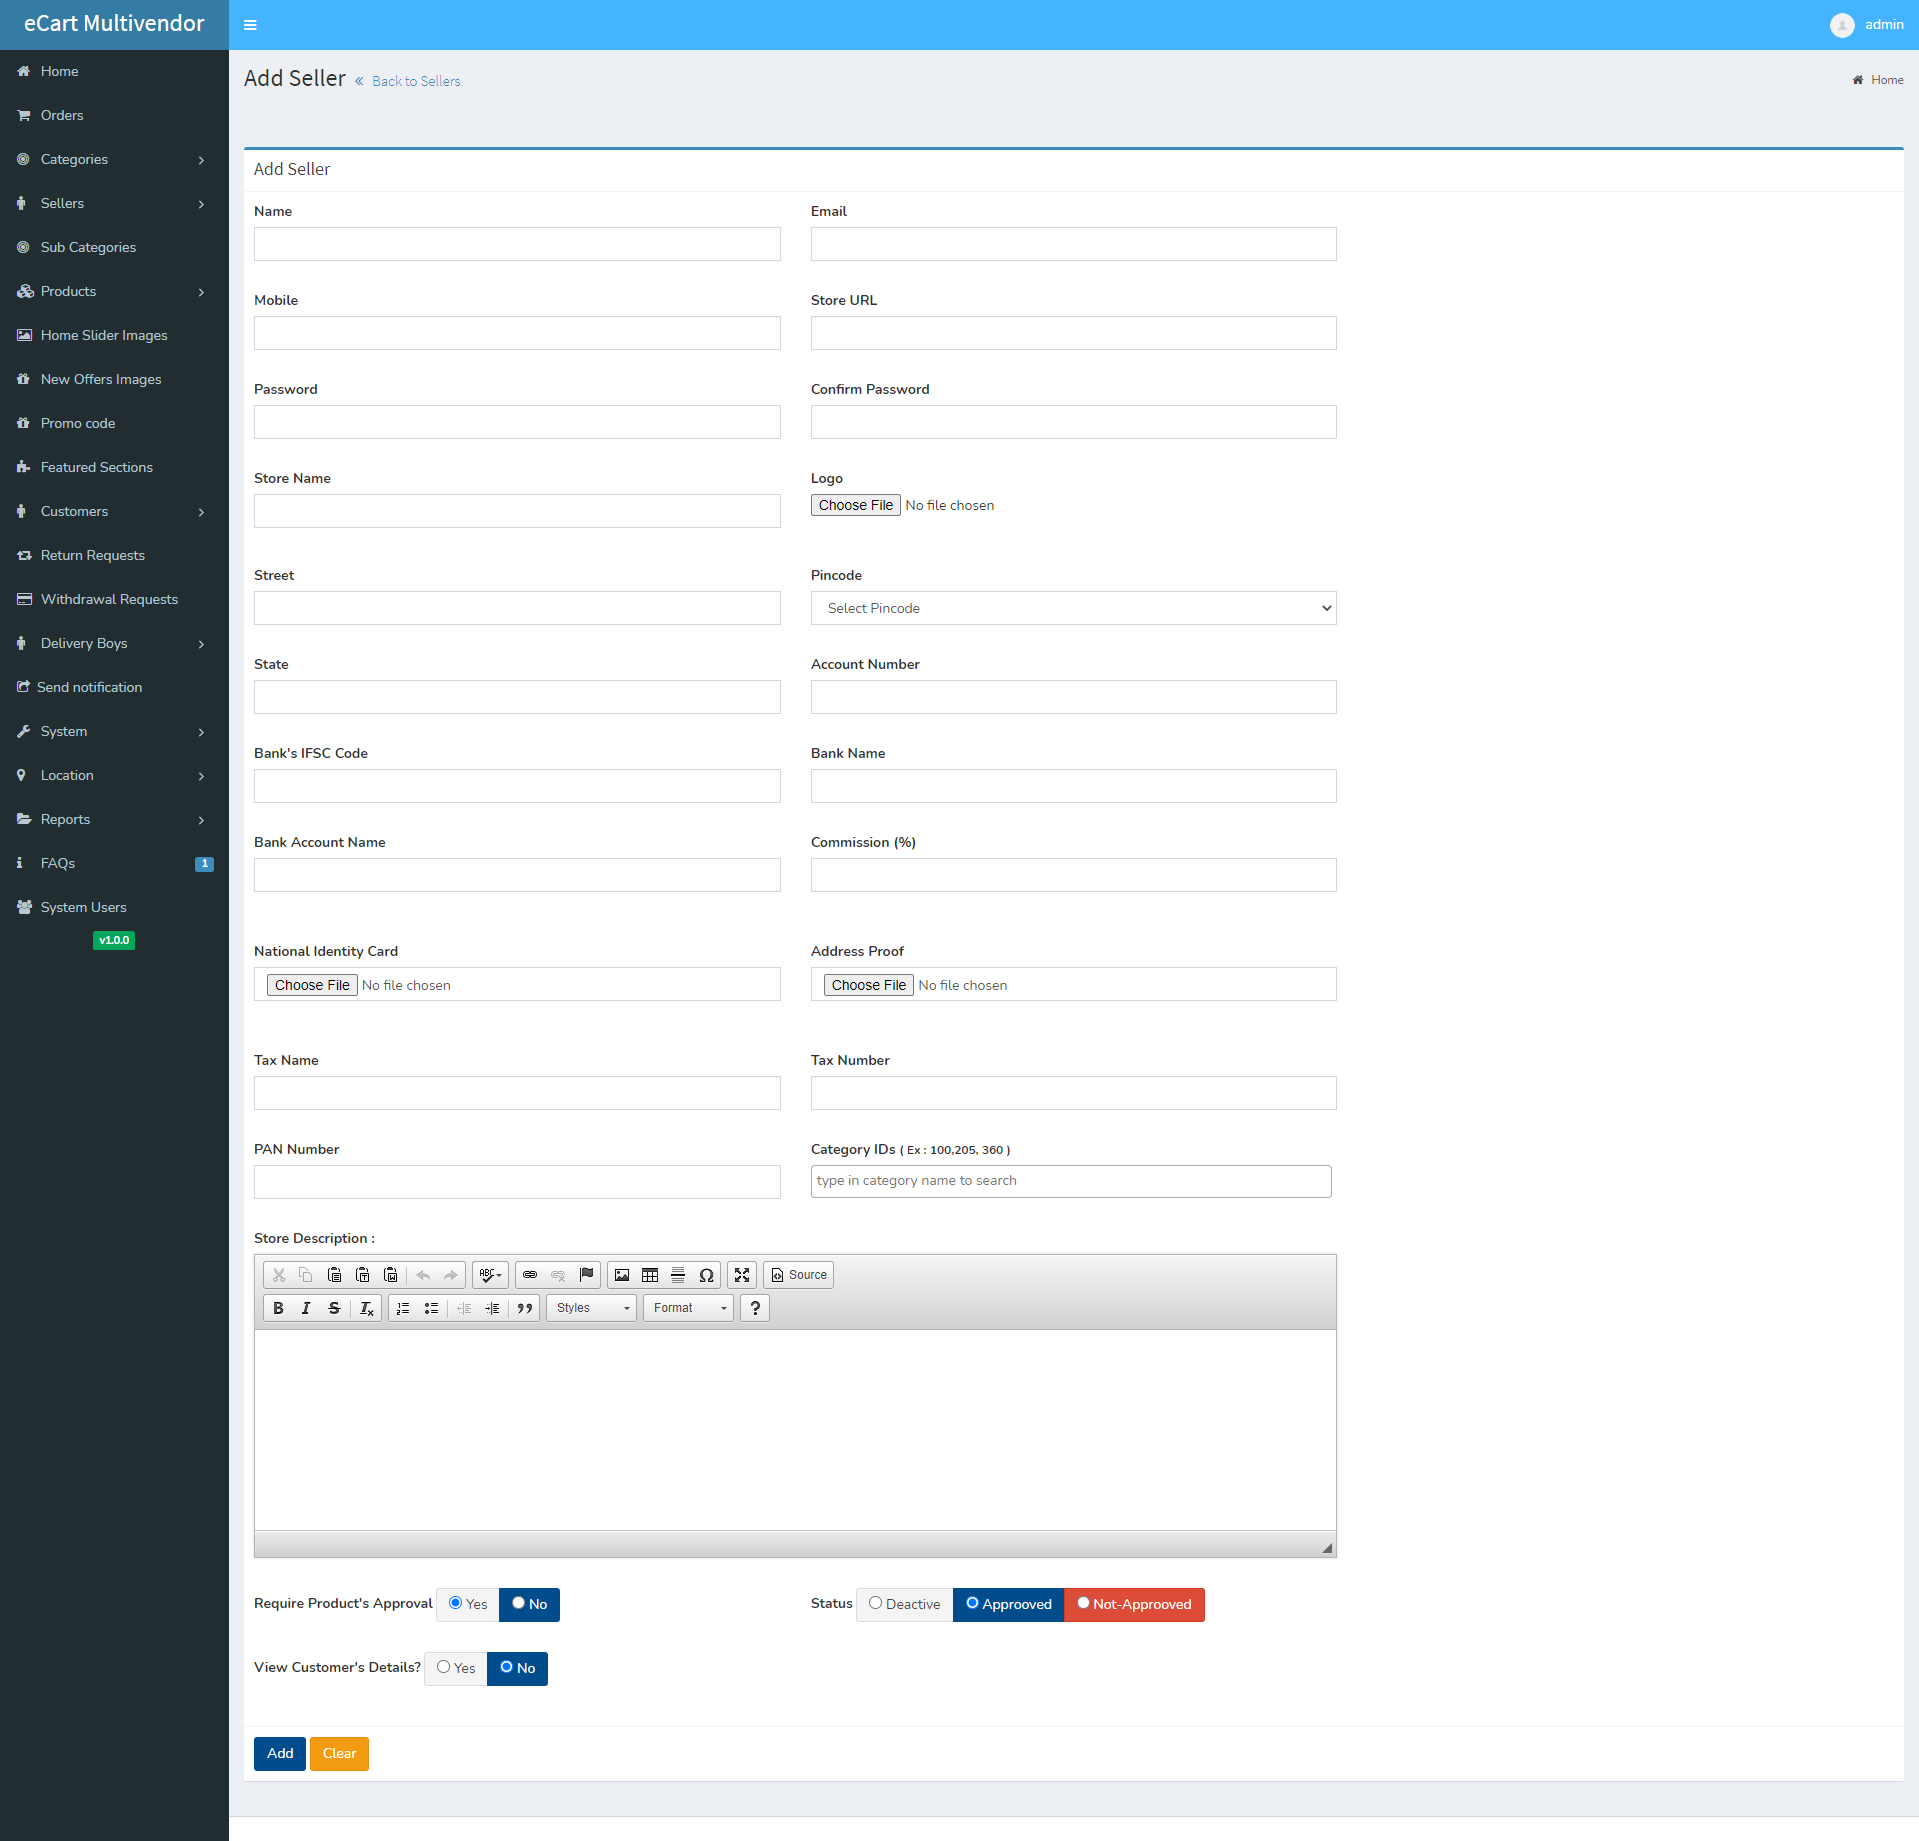
- Fill all the informations of seller as you see in above image.

- Here you will see three fields.
- Require Product's Approval - Here you can give permission for direct publish of that seller's products.
- View Customer's Details? - Here you can give permission for customer details will show to seller or not
- Status - Here you can change the status of seller.
- Click Add to Add the Seller or Clear to clear the form.
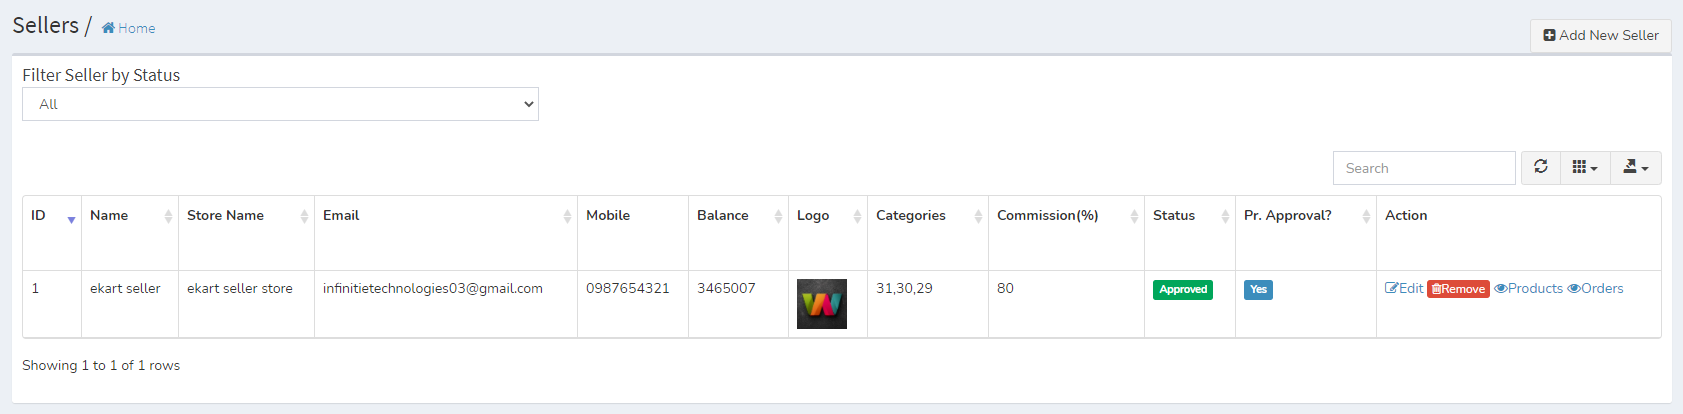
The "ekart seller store" Added Successfully
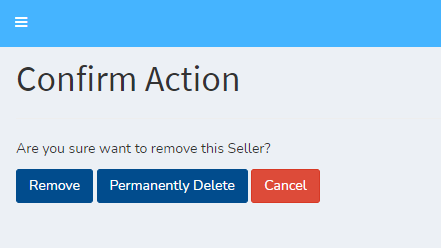
Step 2:Delete Seller OR Remove Seller from the List
For Remove Seller, we need to use Remove Button.
For Delete Seller, we need to use Permanently Delete Button as explained above under Actions category.
Product Panel
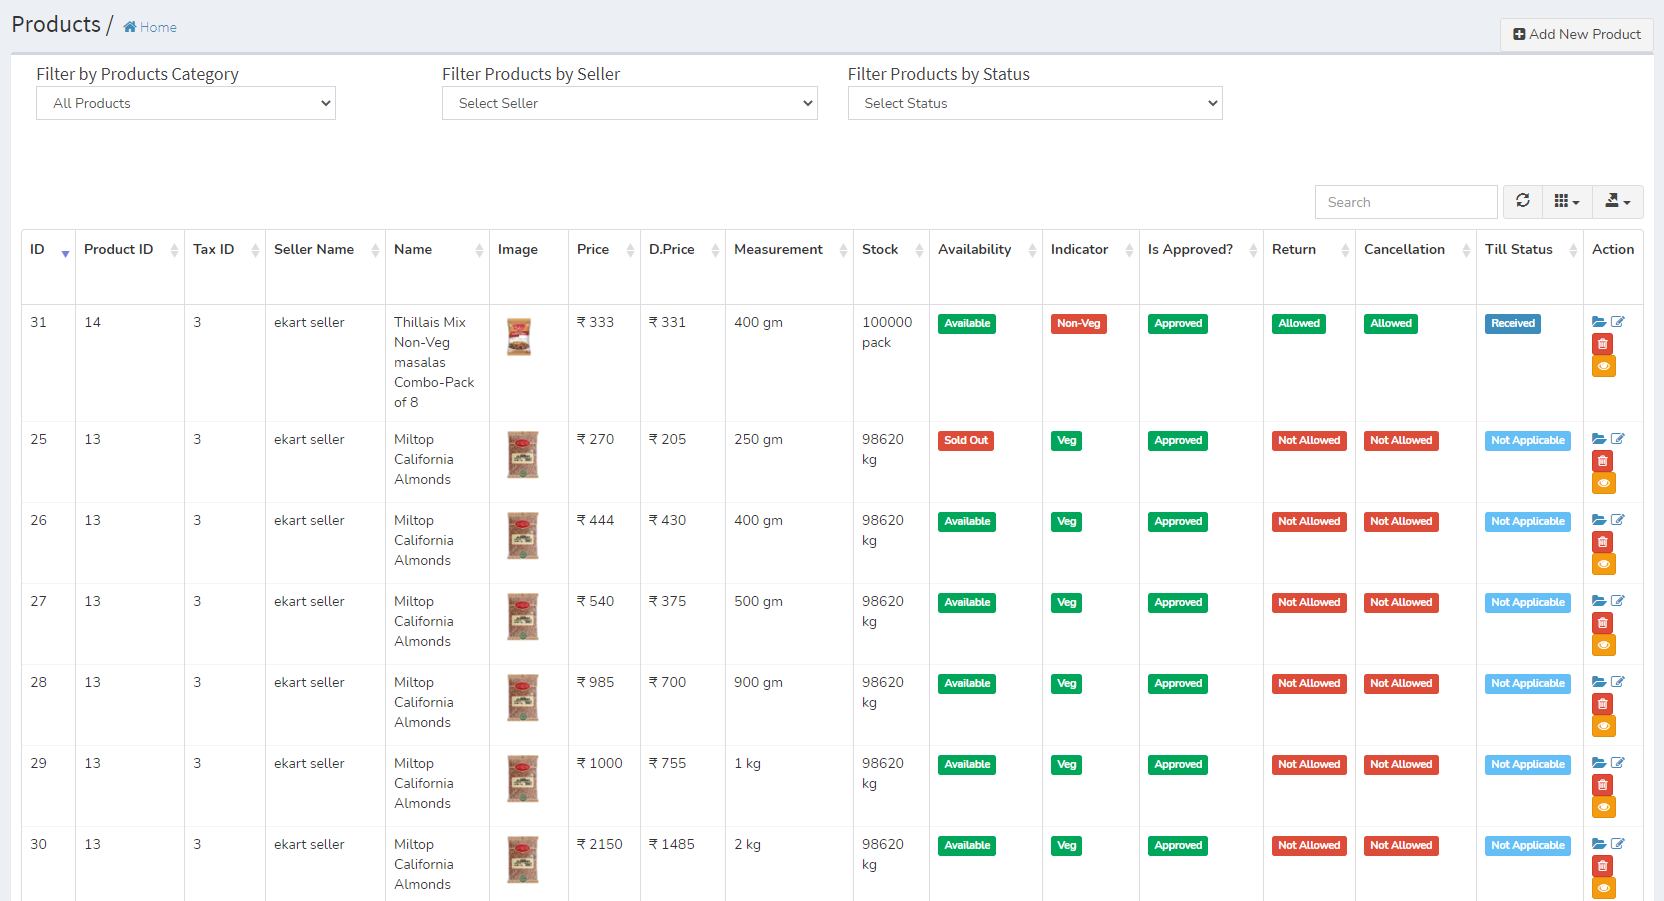
Here all the information related to product is display
Actions- View Product
-
 To View the Product details
- Edit Product
-
To Edit the Product Details
- Delete Product
-
To Delete the Product
- Activate/Deactivate Product
-
 To Activate/Deactivate the Product by clicking on eye icon
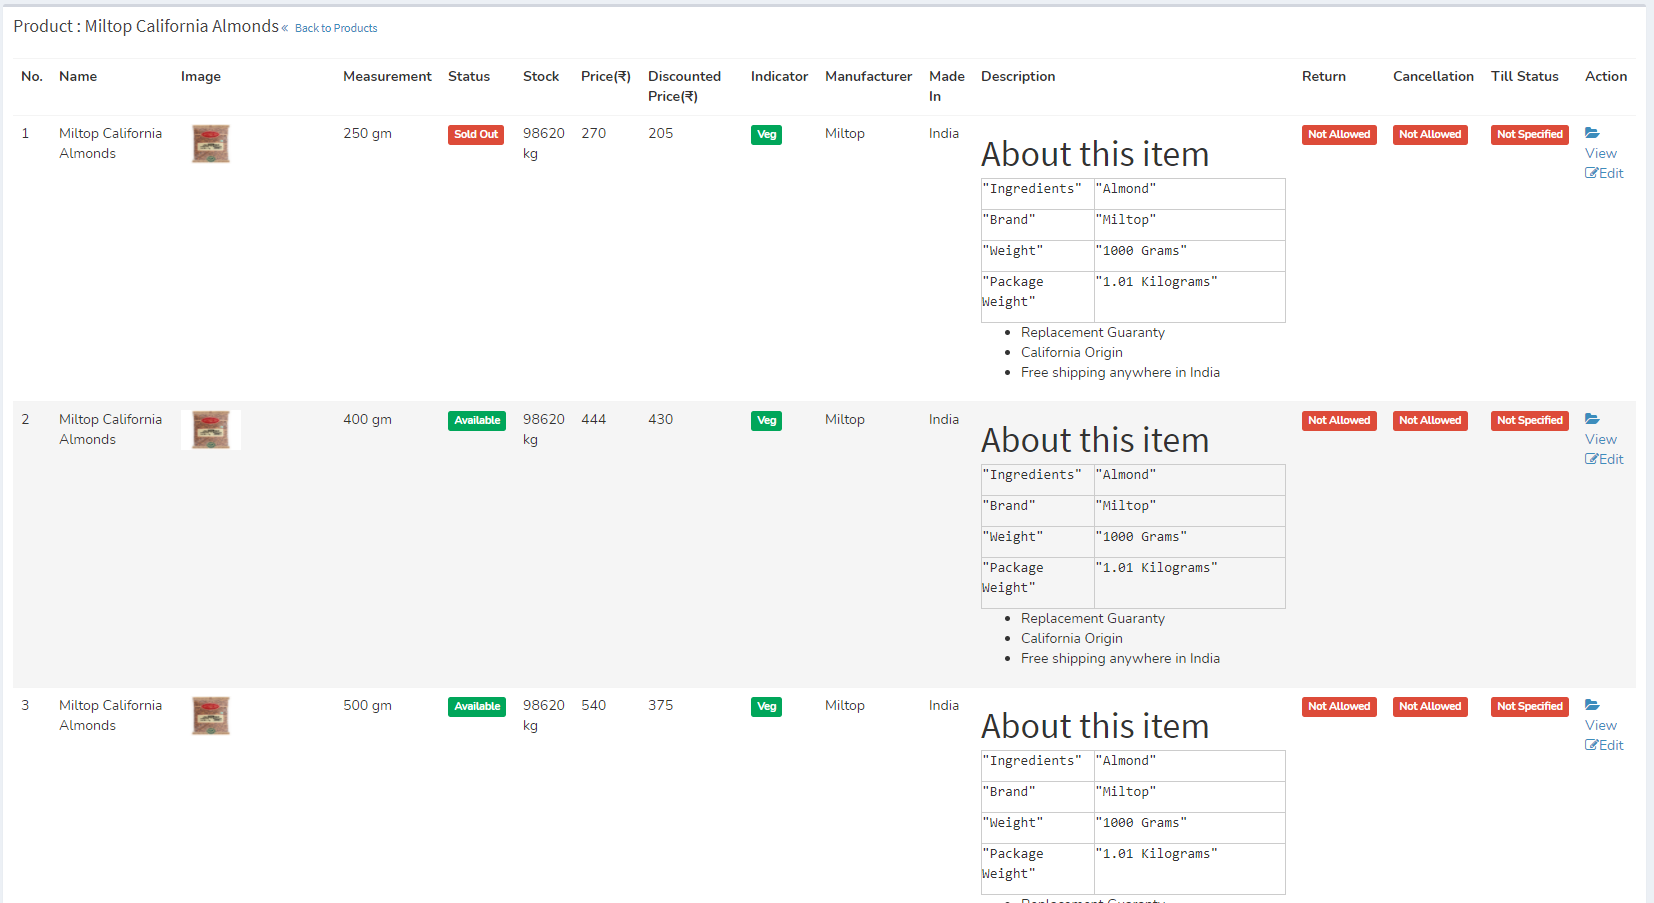
By clicking all available variants of product will be displayed like below.
We Can add New product by following Steps :
Step 1:Adding New Product in the Product List
Click on Add New Product Tab Present On The Right Side

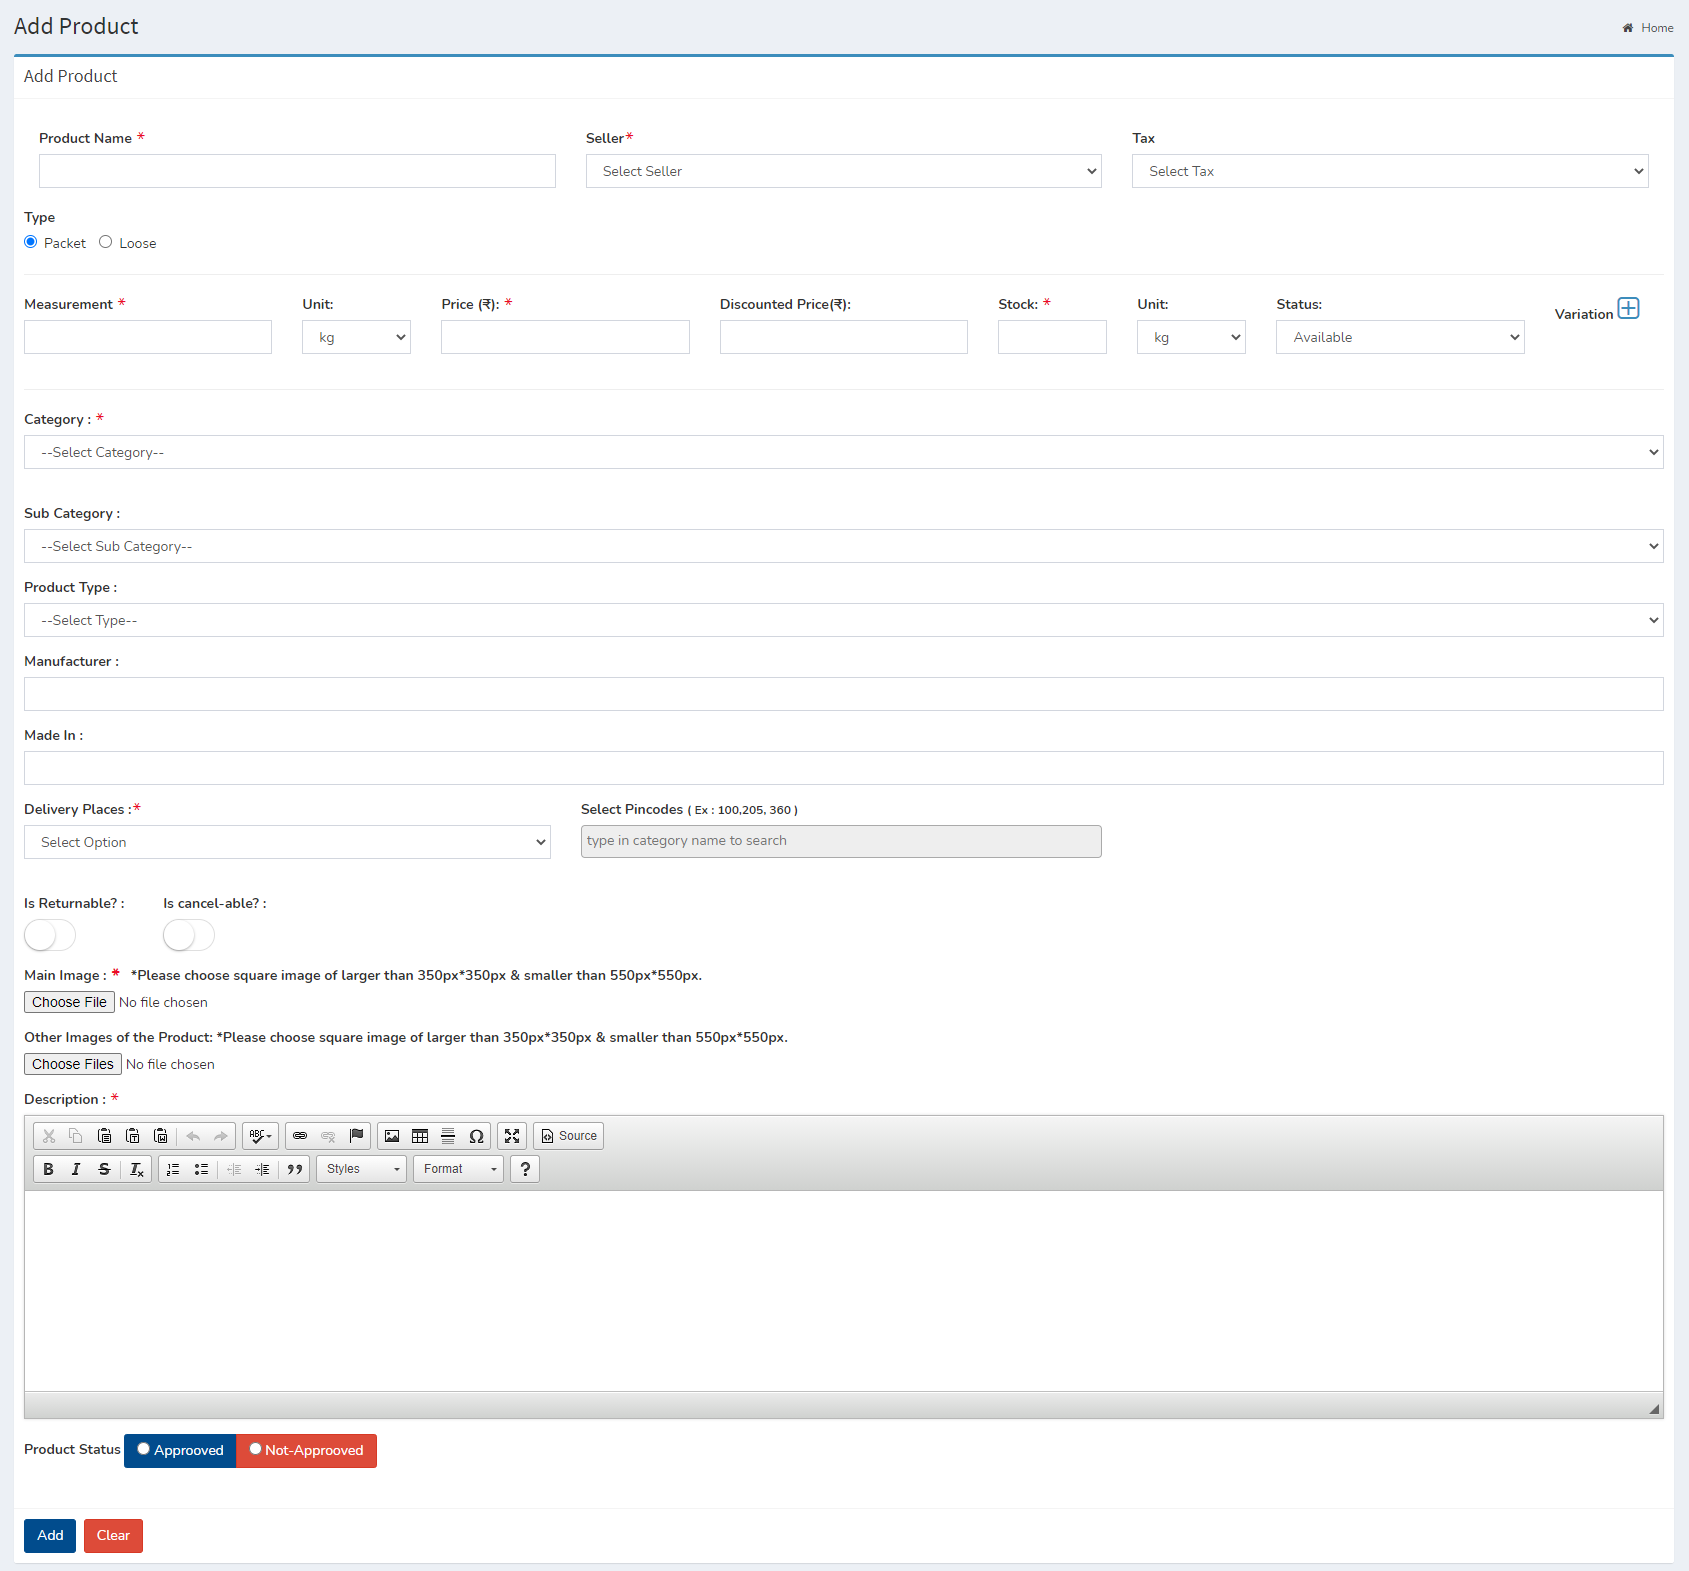
- In Product Name field Enter the Name of the Product.
- Choose product type loose or packet.
- Add Variations of product.
- Select status available or sold out.
- Select category of product.
- Select subcategory of product.
- Select Delivery Places type for pincodes and select pincodes according to that type. For example you want to select included pincodes in which your Specific product can deliverable.
- Choose main image and other images for product.
- Add description about product.
- Click add to add product or clear to clear the form.
The Thillais Mix Non-Veg masalas Product Added Successfully
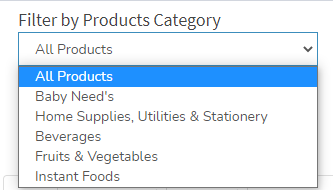
Select category to filter products by category.
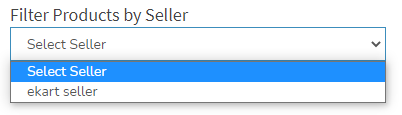
Select Seller to filter products by seller.
Select Product Status to filter products by it's status.

Home Slider
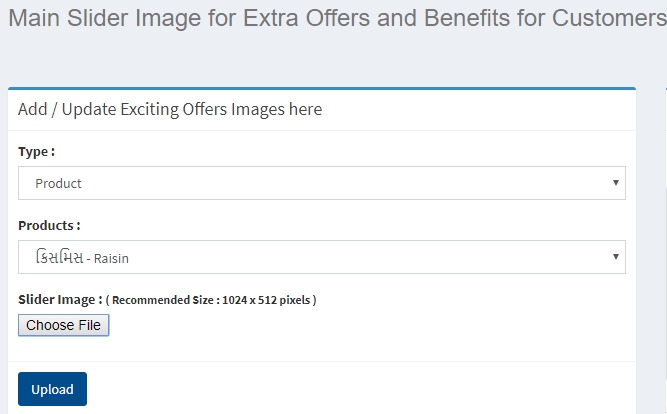
- Select type from dropdown either category or product.
- Select particular product or category from another dropdown.
- Choose file to be display as a slider on home page.
-
Click on
 to add slider image.
The slider image Added Successfully
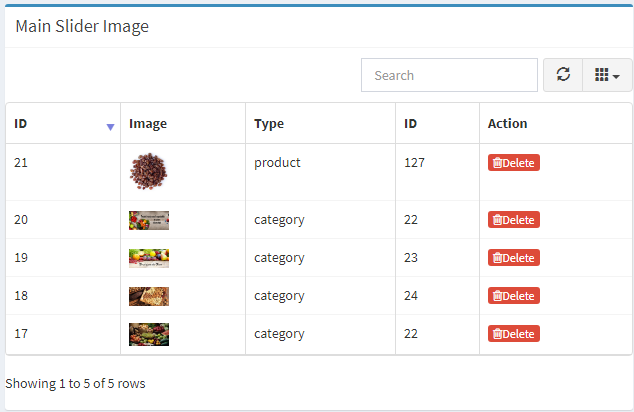
- Search slider image details
-
To search the slider related Detail
- Refresh slider list
-
To Refresh slider List
- Filters
-
Used to filter the slider details according to the criteria
- Delete slider
-
Used to Delete the slider image.
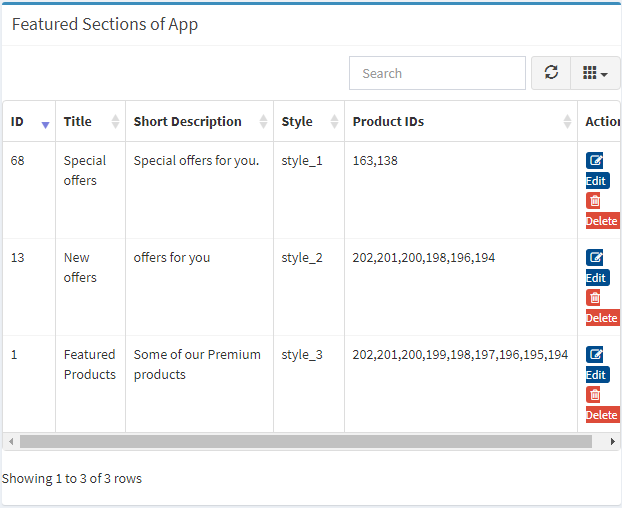
Featured Section
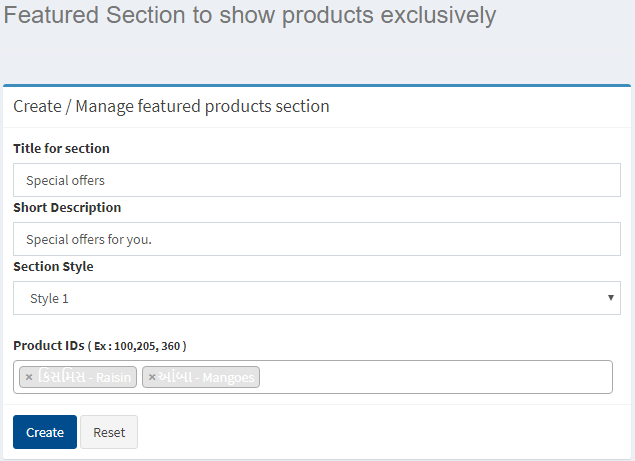
- Enter appropriate title.
- Enter short description.
- Select style.
- Choose one or more products.
-
Click on
 to create featured section or
  to reset form.
The section created Successfully
- Search section details
-
To search the section related Detail
- Refresh section list
-
To Refresh section List
- Filters
-
Used to filter the section details according to the criteria
- Delete section
-
Used to Delete the section.
Customer Panel
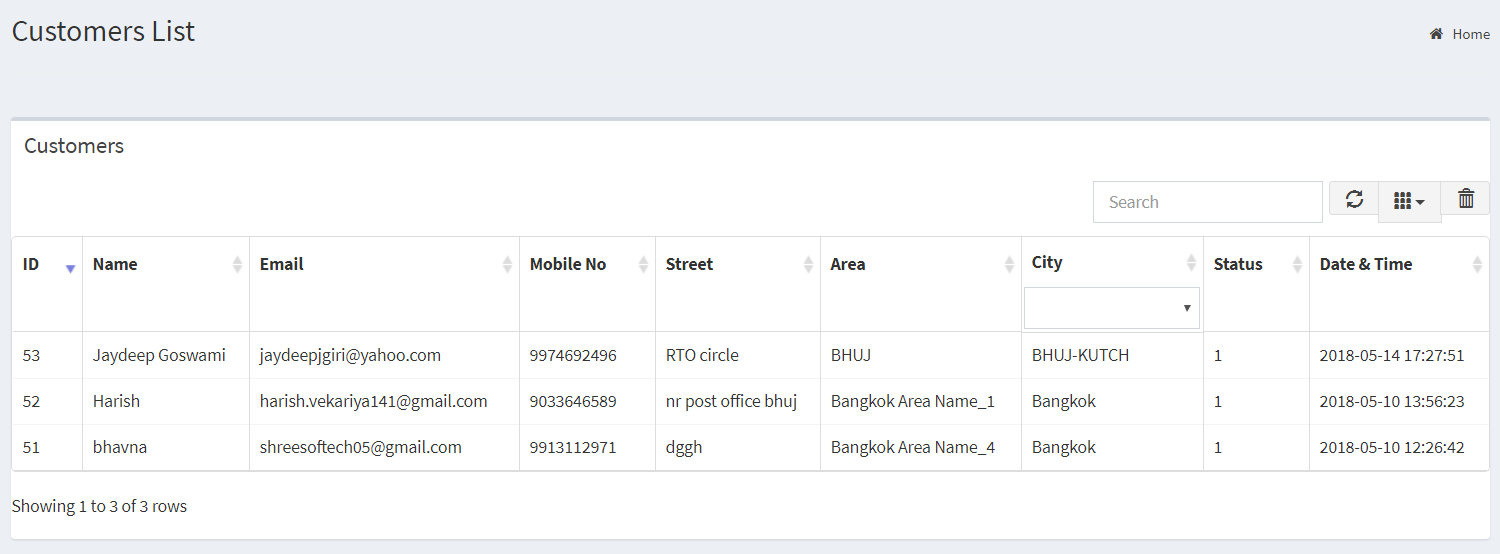
Here all the information related to Customer is display
Actions- Search Customer
-
To search the Customer Name or Any other Detail
- Refresh Customer list
-
To Refresh Customer List
- Filters
-
Used to filter the Customer details according to the criteria
Send Notification
We can Send Notification to the User By following Steps
Step 1: Fill the Fields as follows
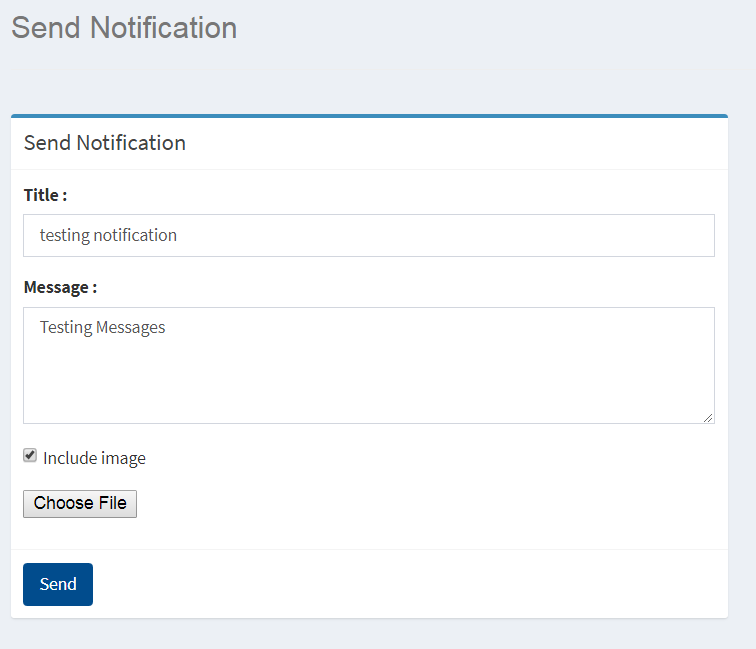
Sample Image
Step 2: Choose the Image to be displayed in the notification bar
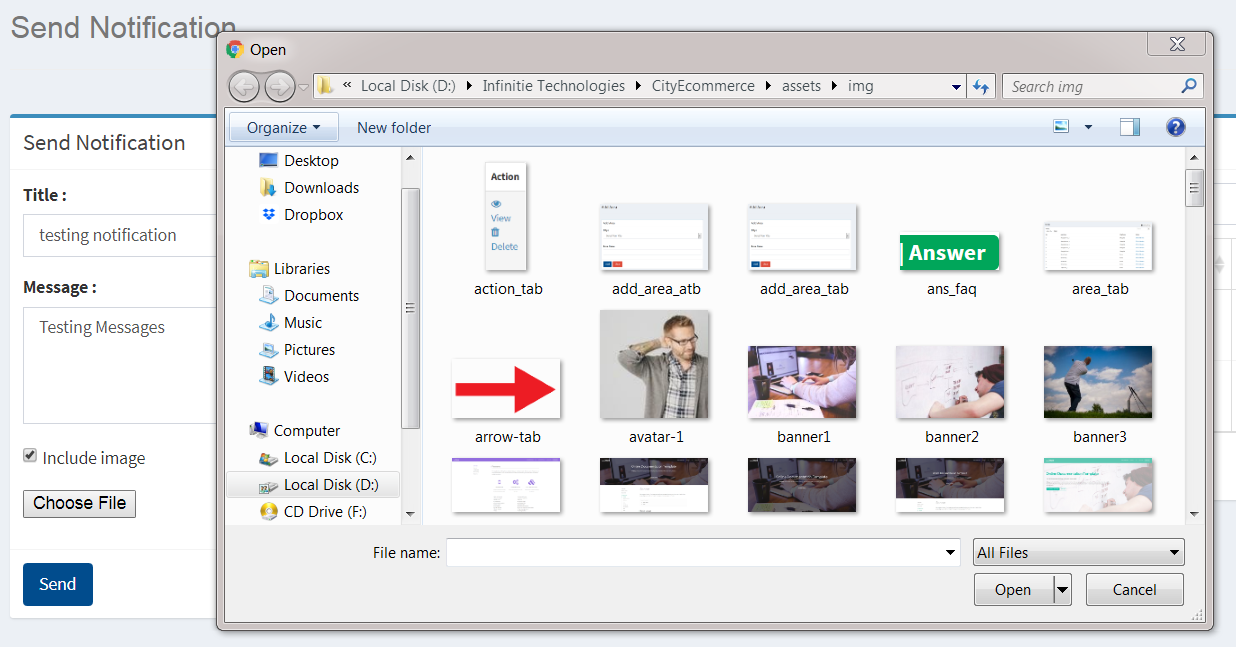
Sample Image
Step 3: Click on Send to
Transaction
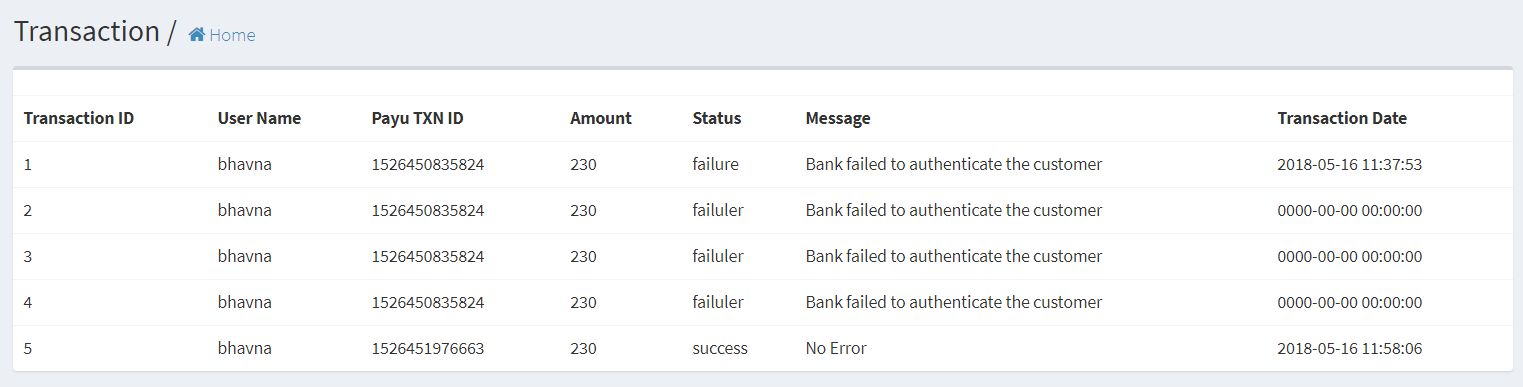
All Transaction's list
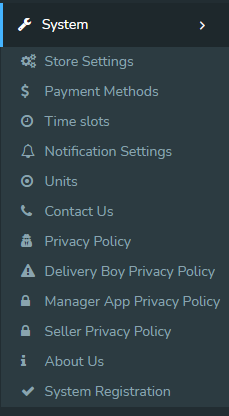
System
Store Settings
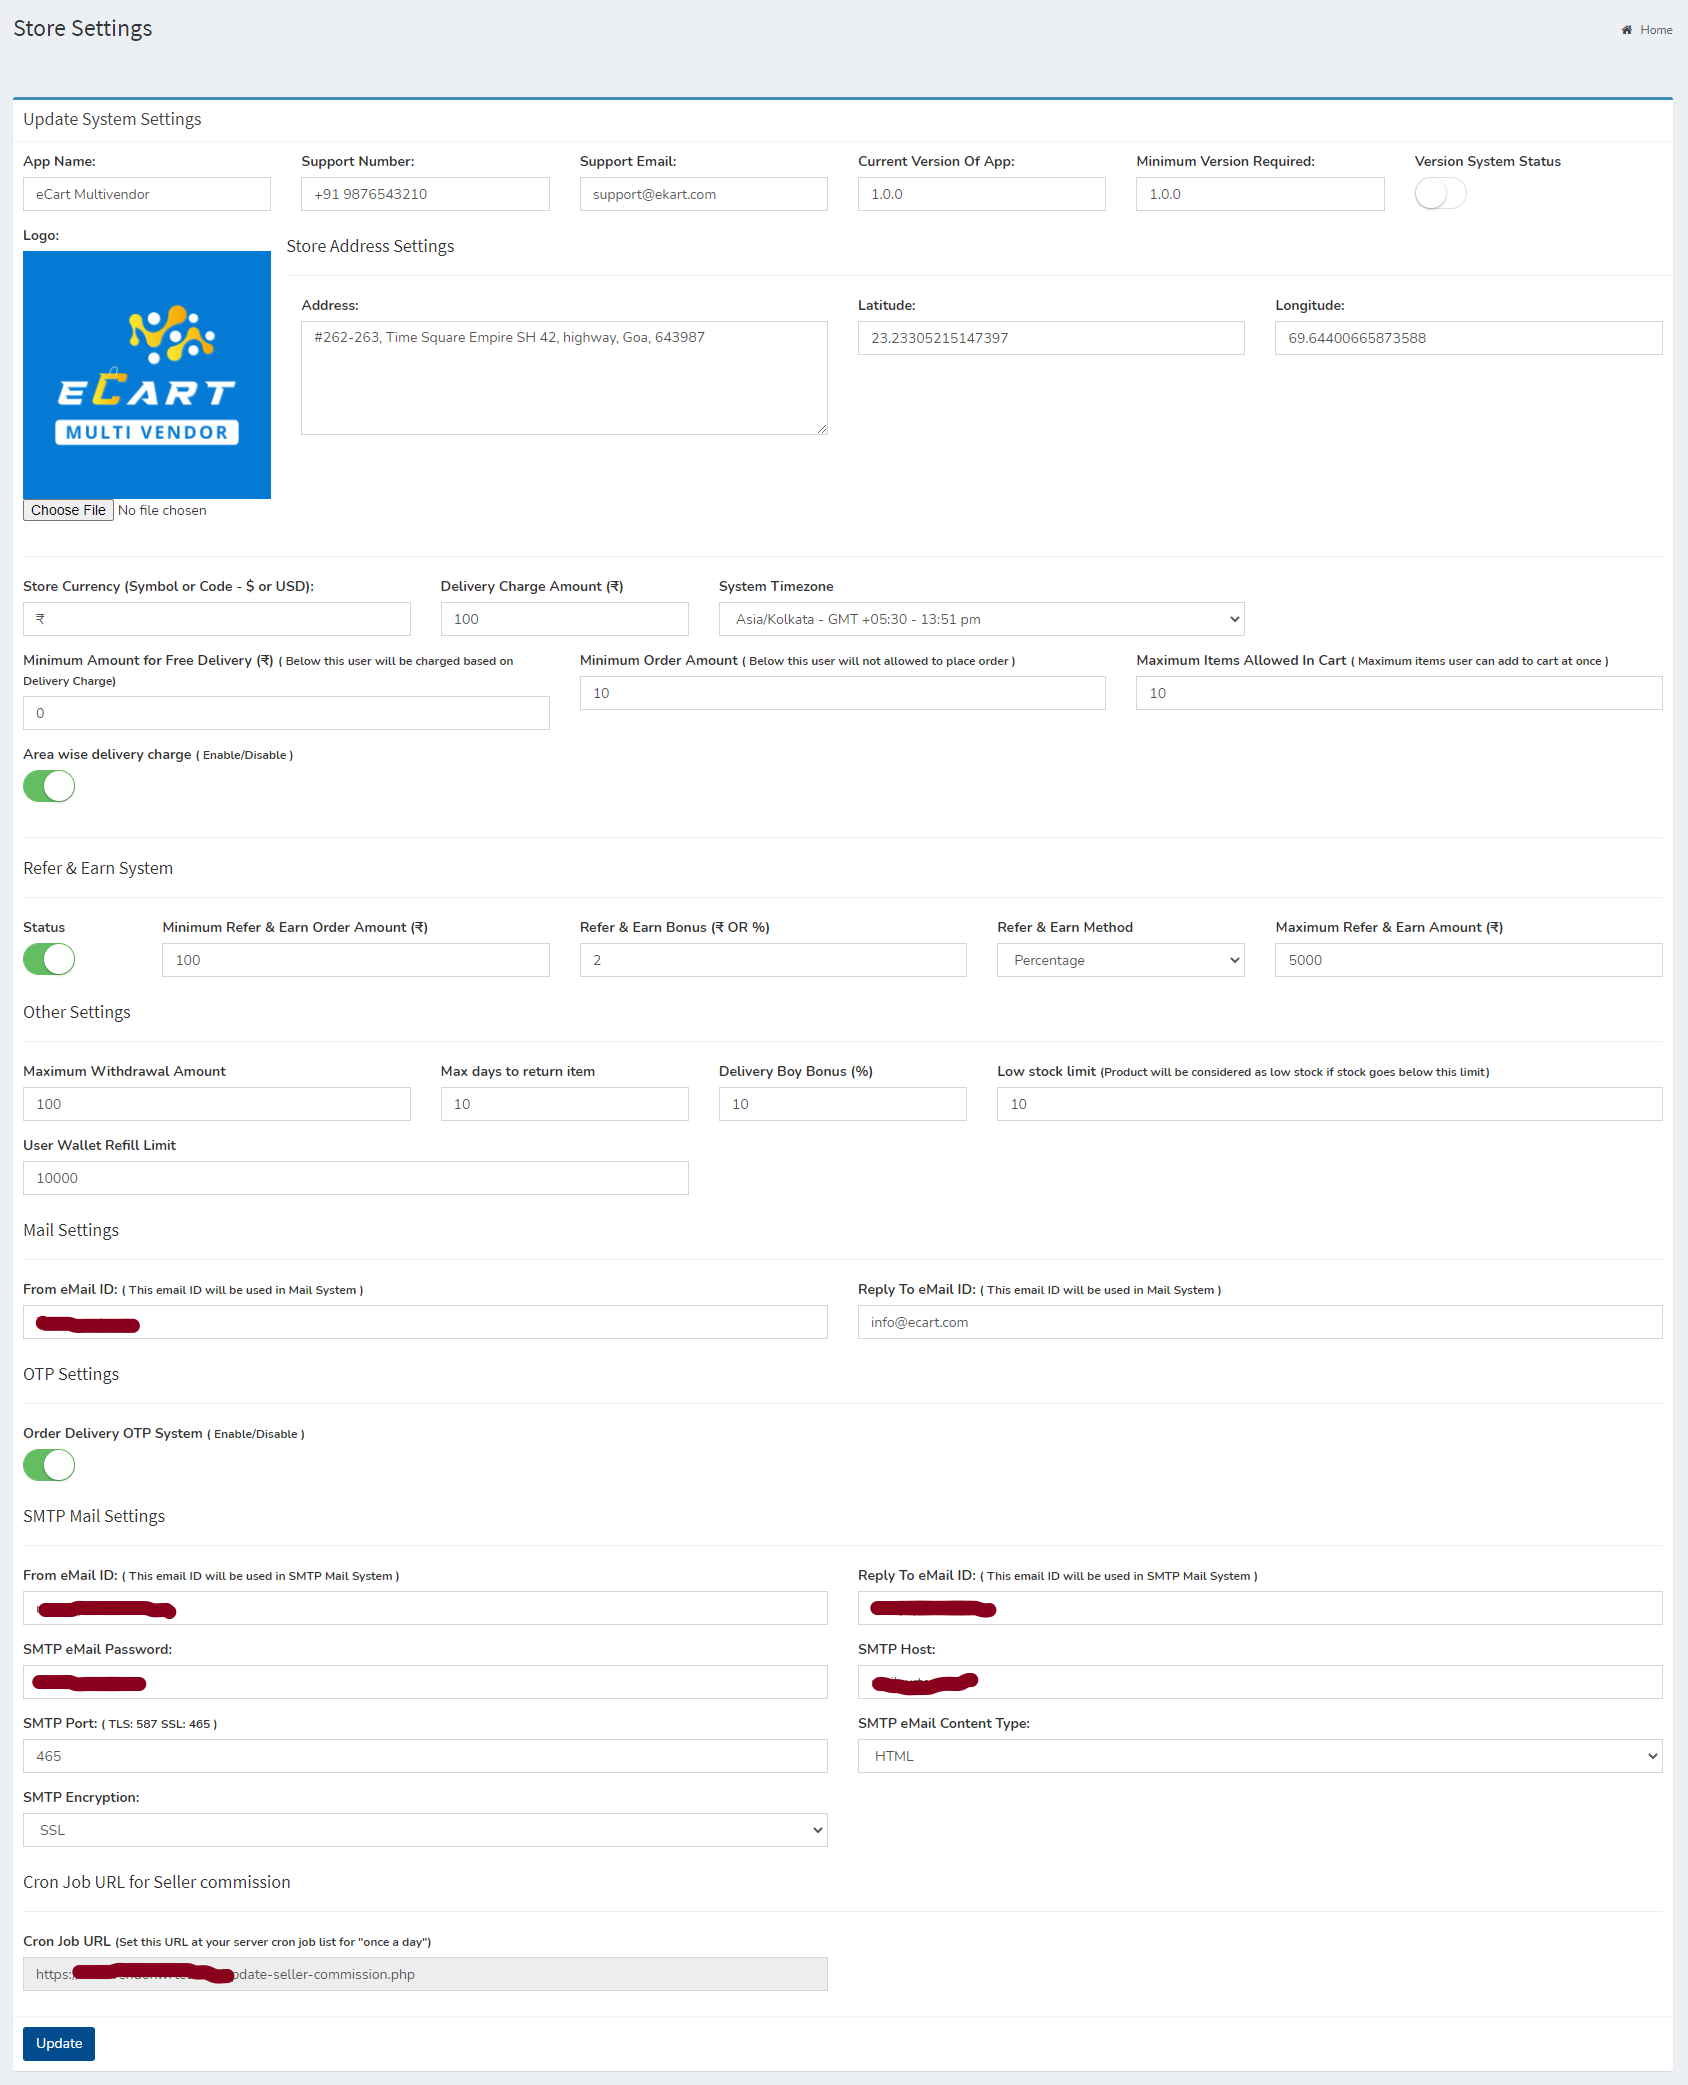
- From Here The System's Settings can be Updated as per requirements
- Fields:
- App Name : From Here we can update the App name
- Logo : From Here we can update the App Logo
- Store Currency : From Here we can update the Store Currency
- Tax : From Here we can update the Tax
- Delivery Charge Amount : From Here we can update the Delivery Charge Amount
- Minimum Amount For free Delivery : From Here we can update the Minimum Amount For free Delivery
- Store Address Settings : From Here we can update Store Address
- Area wise delivery charge : From Here we can enable or disable the Area wise delivery charge
- Refer & Earn System : From Here we can set the details for Refer & Earn System
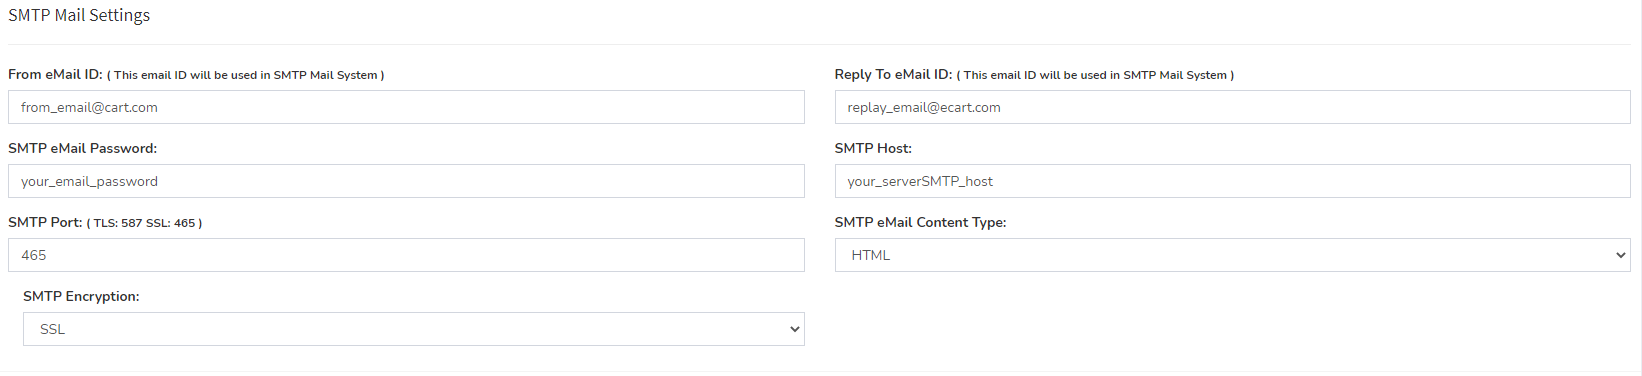
- From eMail ID :
 All Emails in the system will be sent from this email id
 - Reply To eMail ID :
 Customer who receives the email will be able to reply on this email id
 - SMTP Mail Settings : We have two email setting following is SMTP email settings
- Cron Jobs Setting
- To give the commission to seller we have to set cron job and here is the information to the cron job on your server. So cron job will automatic run and seller get the commission after expiring the return policy of that product.
- Cron job is set from your server panel
- Common Settings : From Here you have to set "Once per day"
- Command : From Here you have to set your path(server path) for file https://your_panel.com/update-seller-commission.php
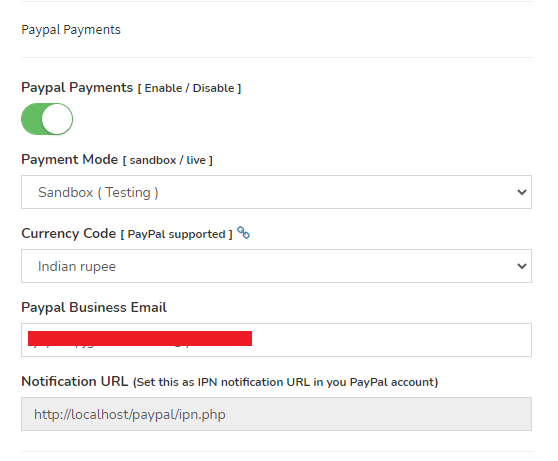
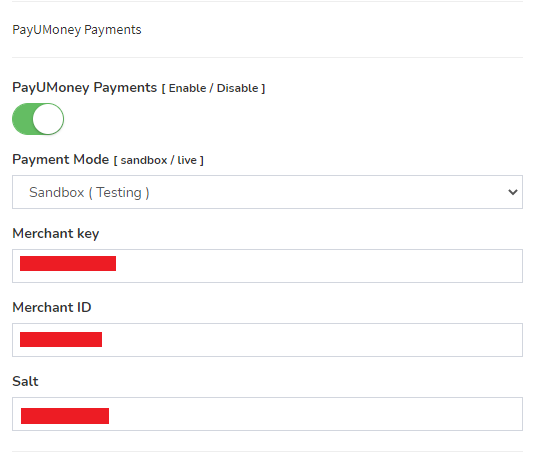
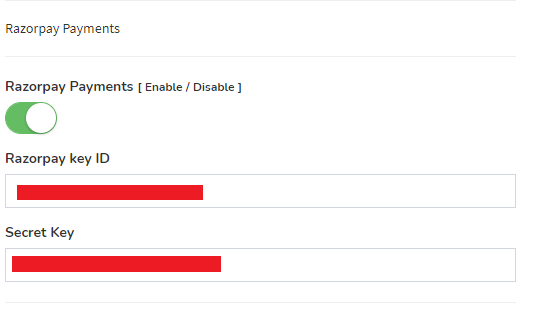
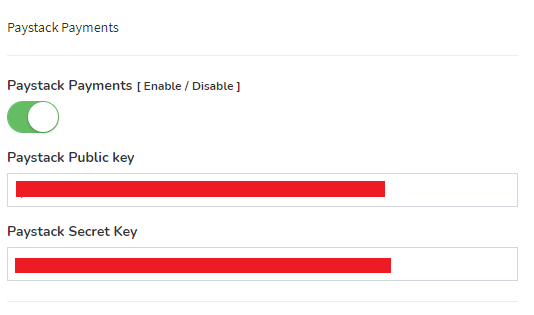
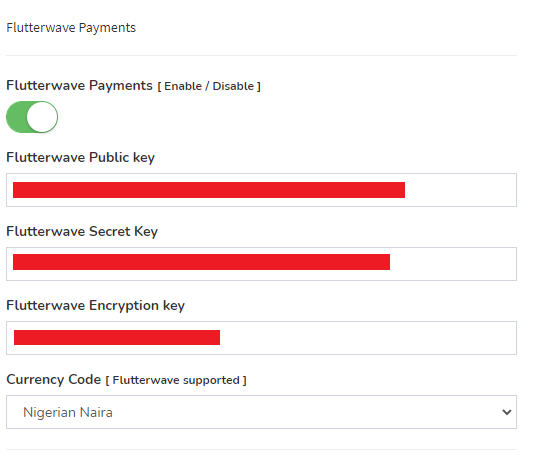
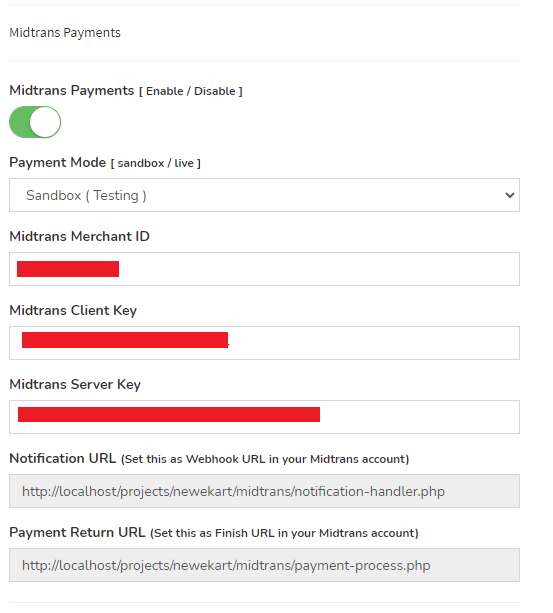
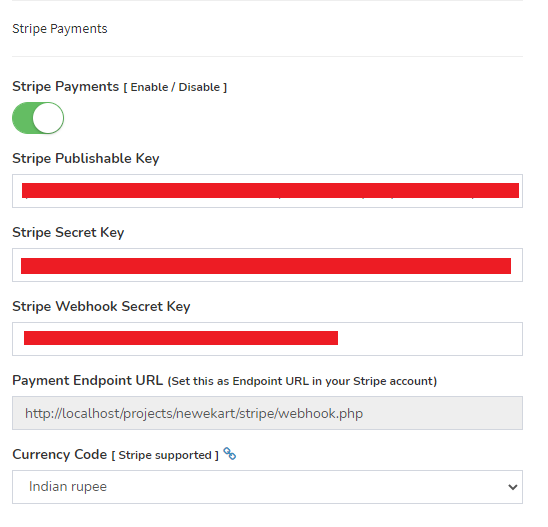
Payment Methods
- From Here, The Payment Settings can be Updated.
- Types of Payment Methods:
- Cash On Delivery(COD)
- Paypal
- PayUMoney
- Razorpay
- Paystack
- Flutterwave
- Midtrans
- Stripe
Notification Settings
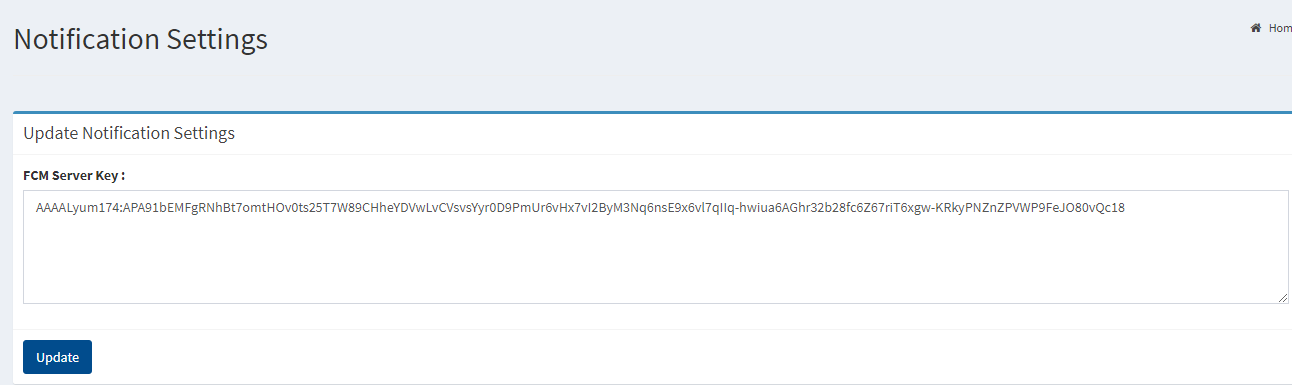
- From Here The Notification Settings can be Updated as per requirements
- FCM Server Key : From Here we can update the FCM Server Key
- Click
 Button To Update Current FCM Server Key.
Contact Us
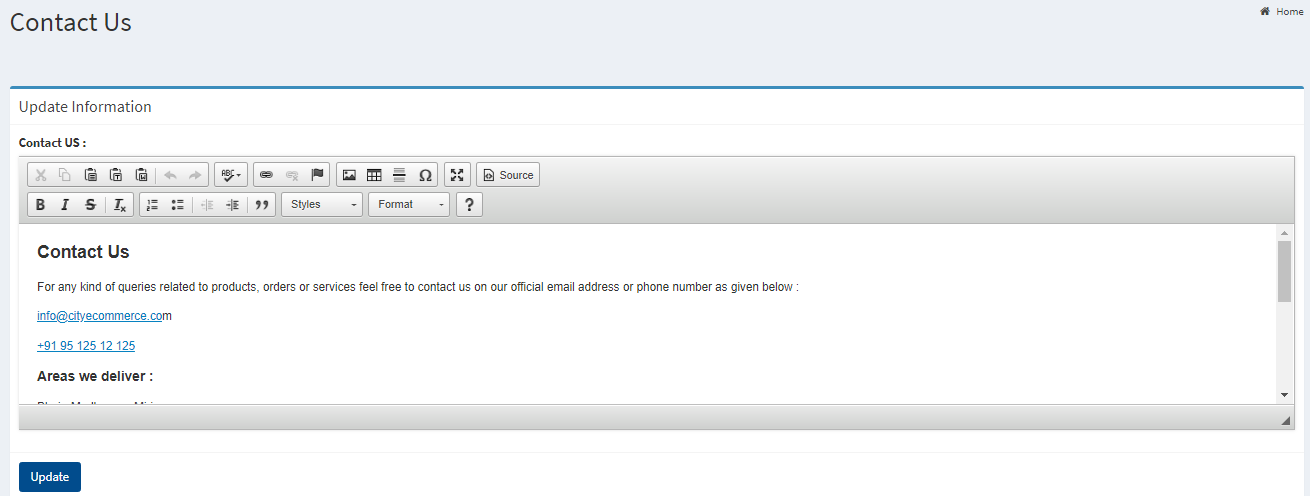
- From here the contact us information can be updated as per requirements
- Click button to update contact us information.
Privacy Policy
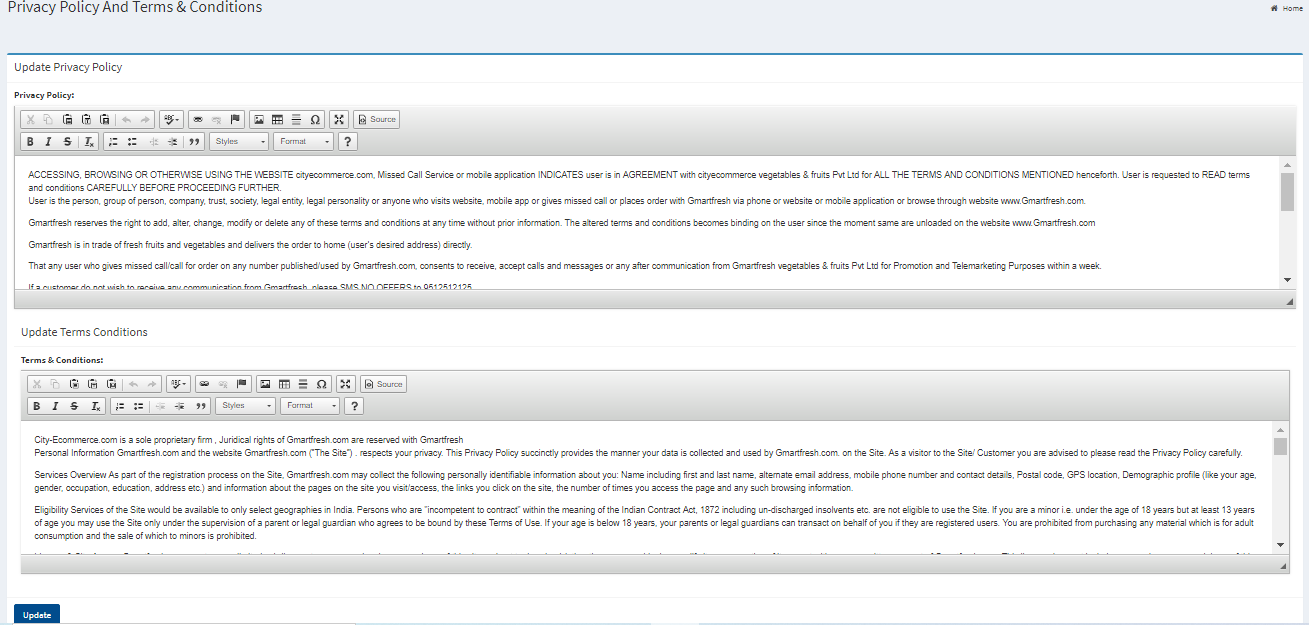
- From here the privacy policy and terms and conditions can be updated as per requirements
- Click button to update information.
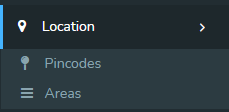
Location
- Pincodes
- Areas
Sample Image
Pincodes
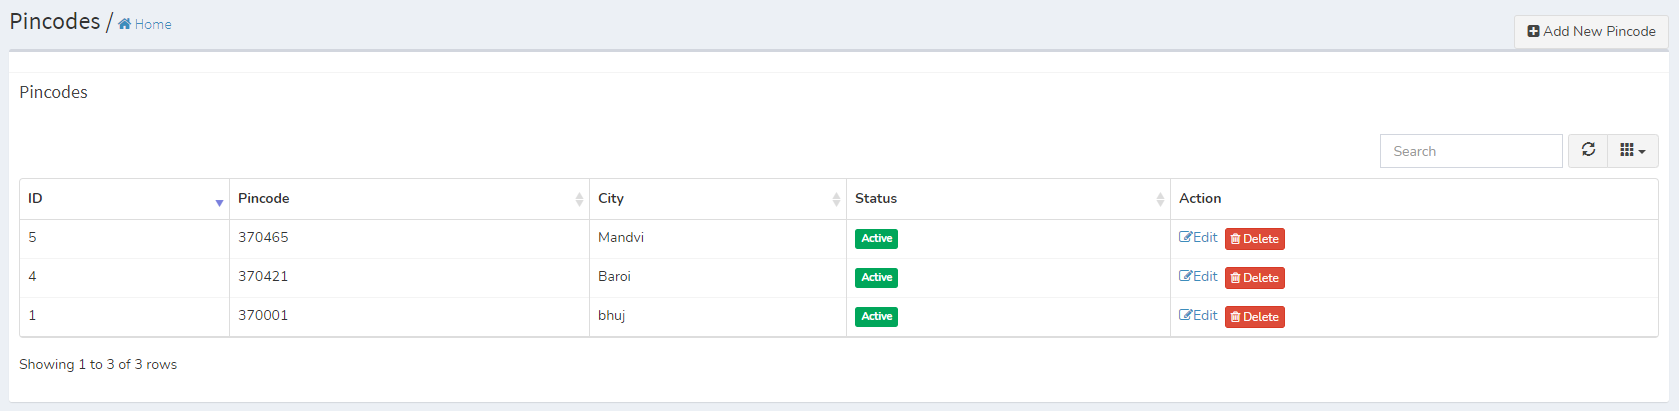
Sample Image
Actions:
-
Used to Edit the Pincode details
-
Used to Delete the Specific Pincode
-
Used to search the Specific Pincode
Adding New Pincodes in the Pincode List
Click on Add New Pincode Tab Present On The Right Side

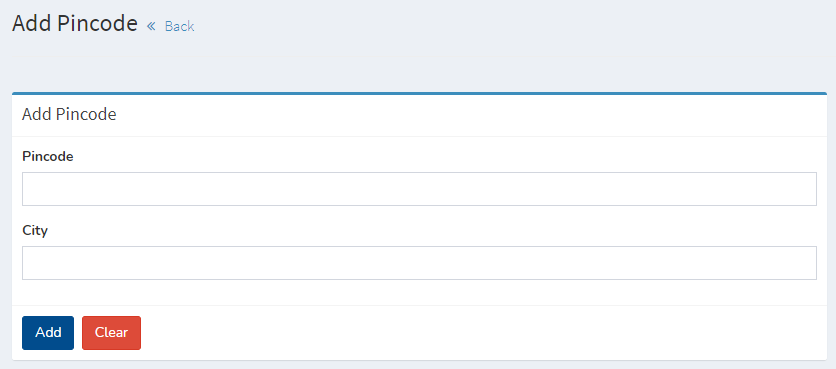
- In Pincode field Enter the Pincode of the City.
- In City field Enter the city name of the pincode you have entered above.
- Click Add button to Add the Pincode
Area
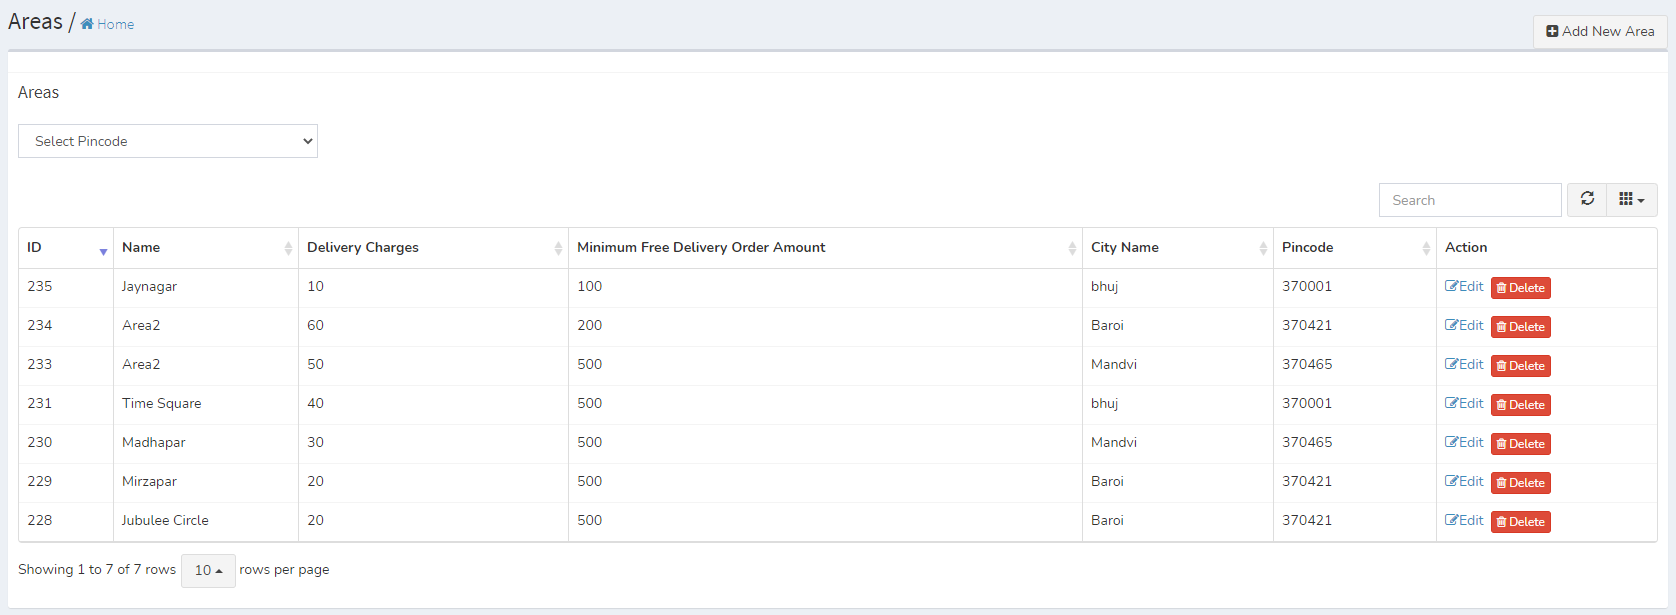
Sample Image
Actions:
-
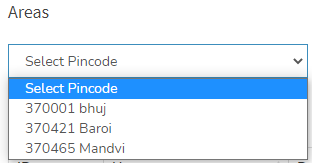 This feature is used to search areas according to Pincode
-
Used to Edit the Area details
-
Used to Delete the Specific Area
Adding New Area in the List
Click on Add New Area Tab Present On The Right Side

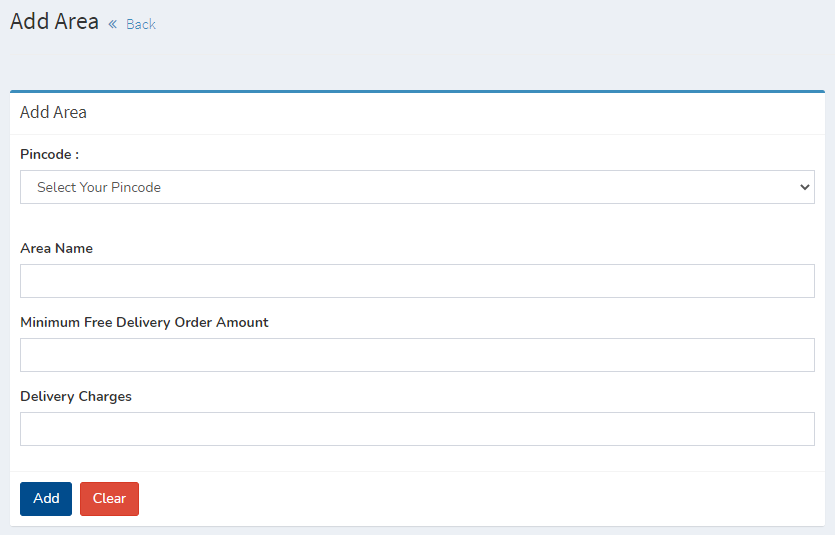
- In Pincode field select the pincode of the Area.
- In Area Name Field Enter the Area Name .
- In Minimum Free Delivery Order Amount field Enter the minimum amount for free delivery order.
- In Delivery Charges field Enter the amount for delivery charge for order.
- Click Update to Add
Report
- Product Sales Report
- Sales Report
Sample Image
Product Sales Report
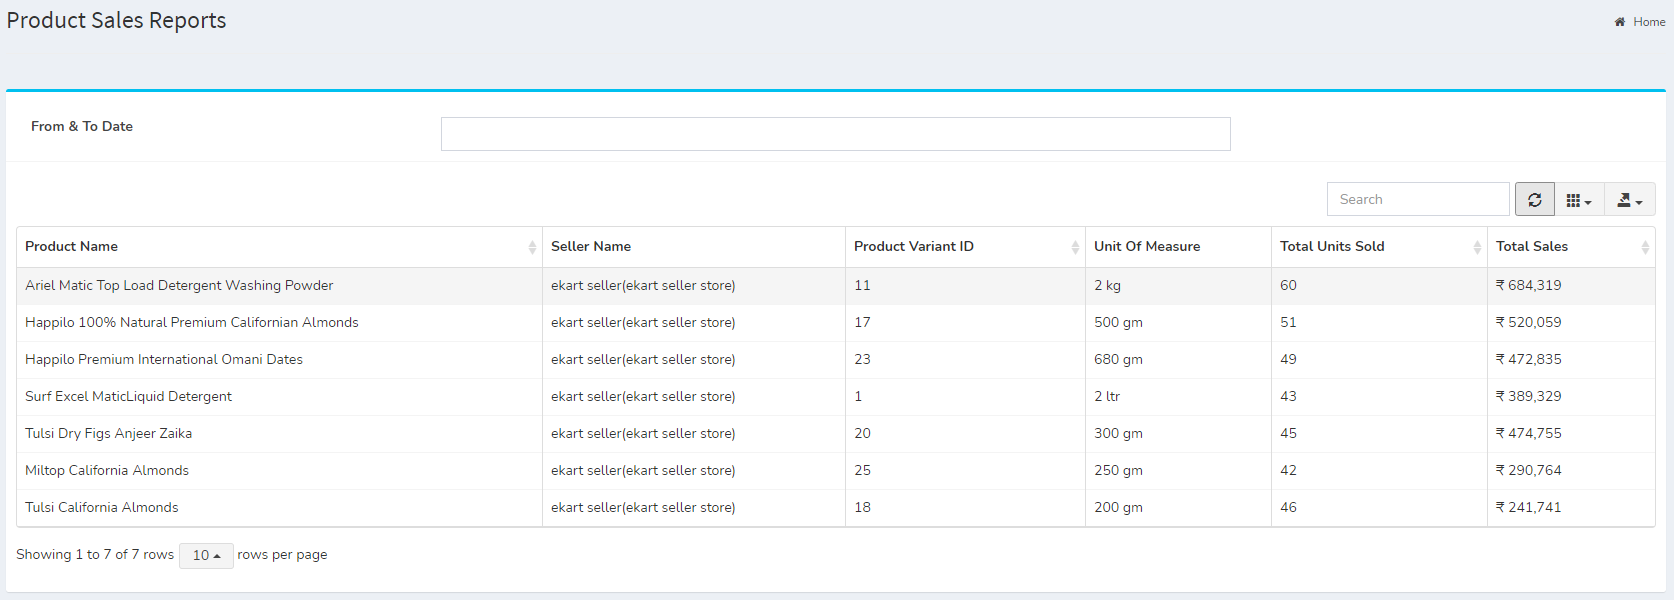
Sample Image
Actions:
-
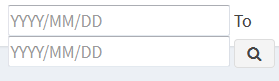 This feature is used to search Product Sales report data between dates specified by the user
-
This feature is used to search Product Sales Report data
Sales Report
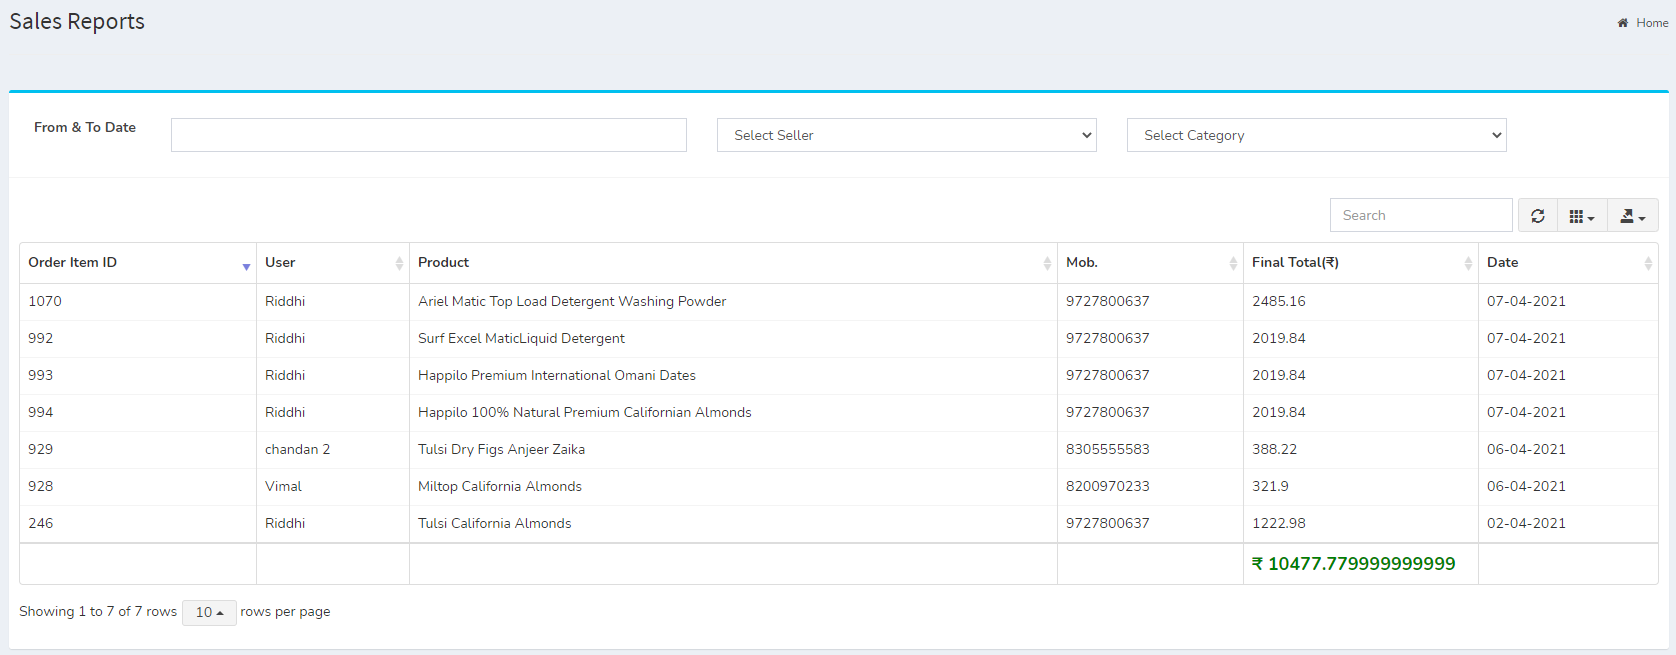
Sample Image
Actions:
-
This feature is used to search Sales report data between dates specified by the user
-
This feature is used to search Sales data between dates specified by the user
-
This feature is used to search invoice data between dates specified by the user
-
This feature is used to search Invoice report data
New Offers For Customers
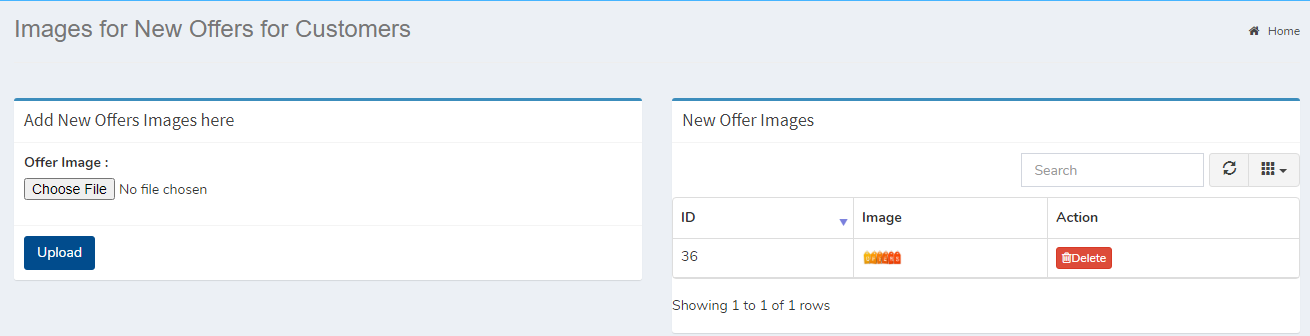
Sample Image
To add and delete new offers for the customer as per requirement. customers can see that offers in app
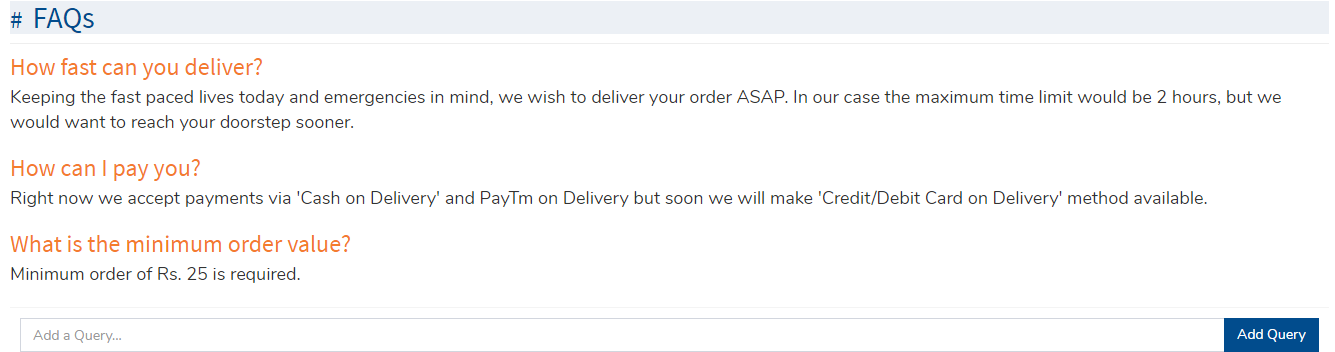
FAQ
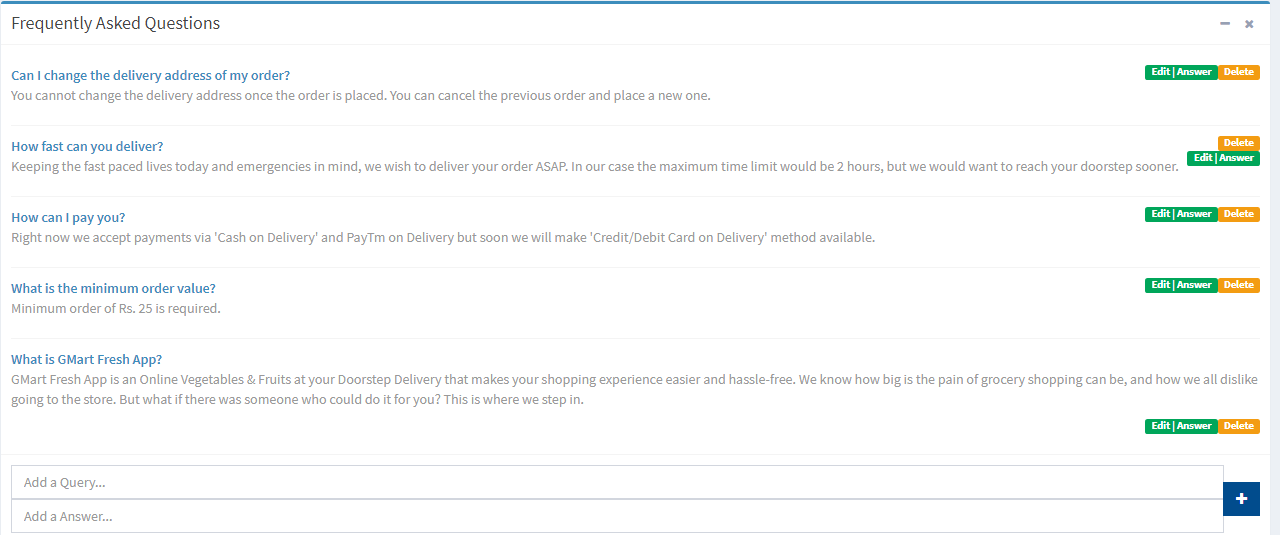
Sample Image
In this Panel all The Questions are display Which are asked by the users
Actions:
-
Edit
 Used to Edit the Answers
-
Answer
 Used to Answer the Specified Questions
-
Delete
 Used to delete the Questions
To add new faq enter question and it's answer in form and hit  button as below.

Sample Image
Manage customer wallet
From here system admin can credit or debit particular user's wallet.
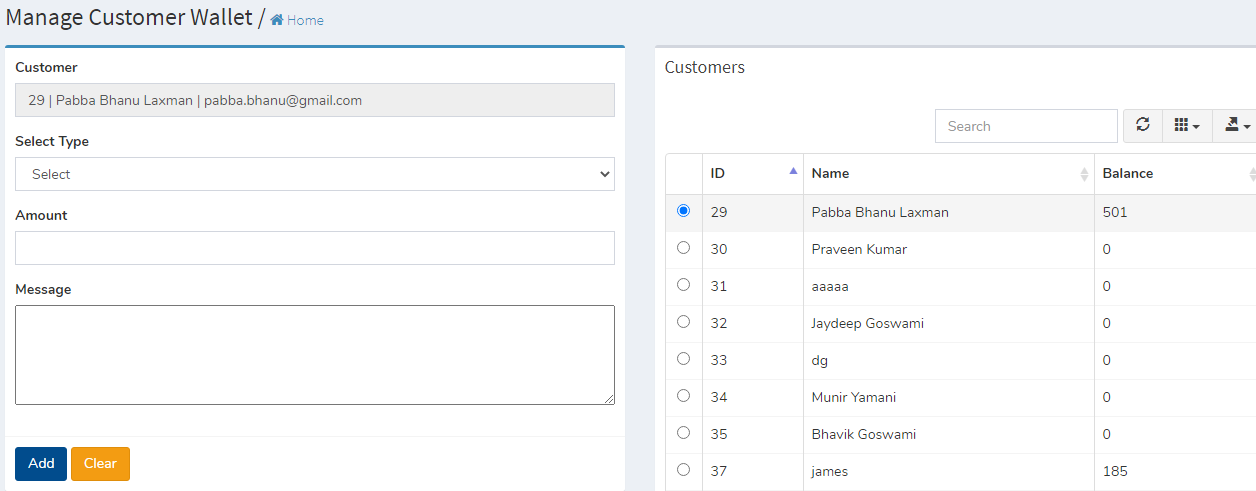
Sample Image
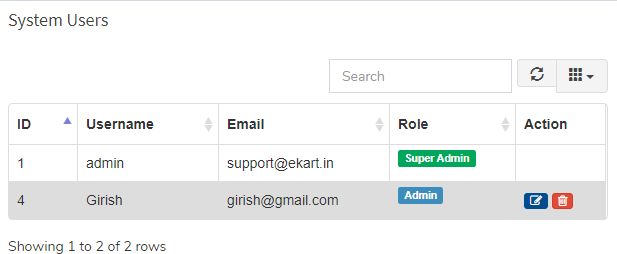
System Users
- Super Admin : Can create and update new system users. super admin have no any restrictions
- Admin : Can create and update system users.
- Editor : Does't have permission to create or update system users.
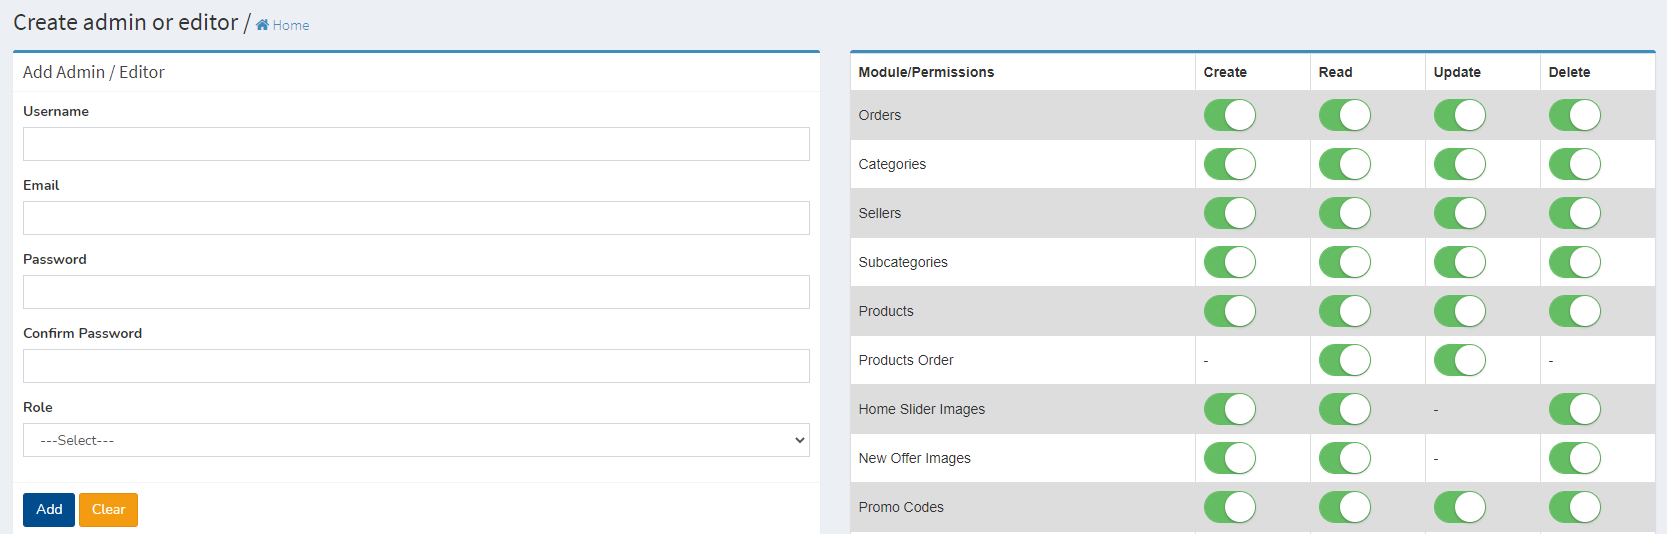
Sample Image
Sample Image
Web Page
Faq
Sample Image
This allows user to add question from app.