Introduction
We appreciate your code purchase, and it brings us immense joy to provide you with exceptional service. Thank you sincerely for selecting WRTeam. Should you encounter any challenges with the code or documentation, feel free to reach out to our Support Team through this link. 😊Prerequisites
Before you begin, ensure you have the following versions installed:
- Flutter: Version 3.29.2
- Dart: Version 3.7.2
- Java: OpenJdk Version 17
- Android Studio: Android Studio Koala
1. Setup Flutter
Download the Flutter 3.29.2 version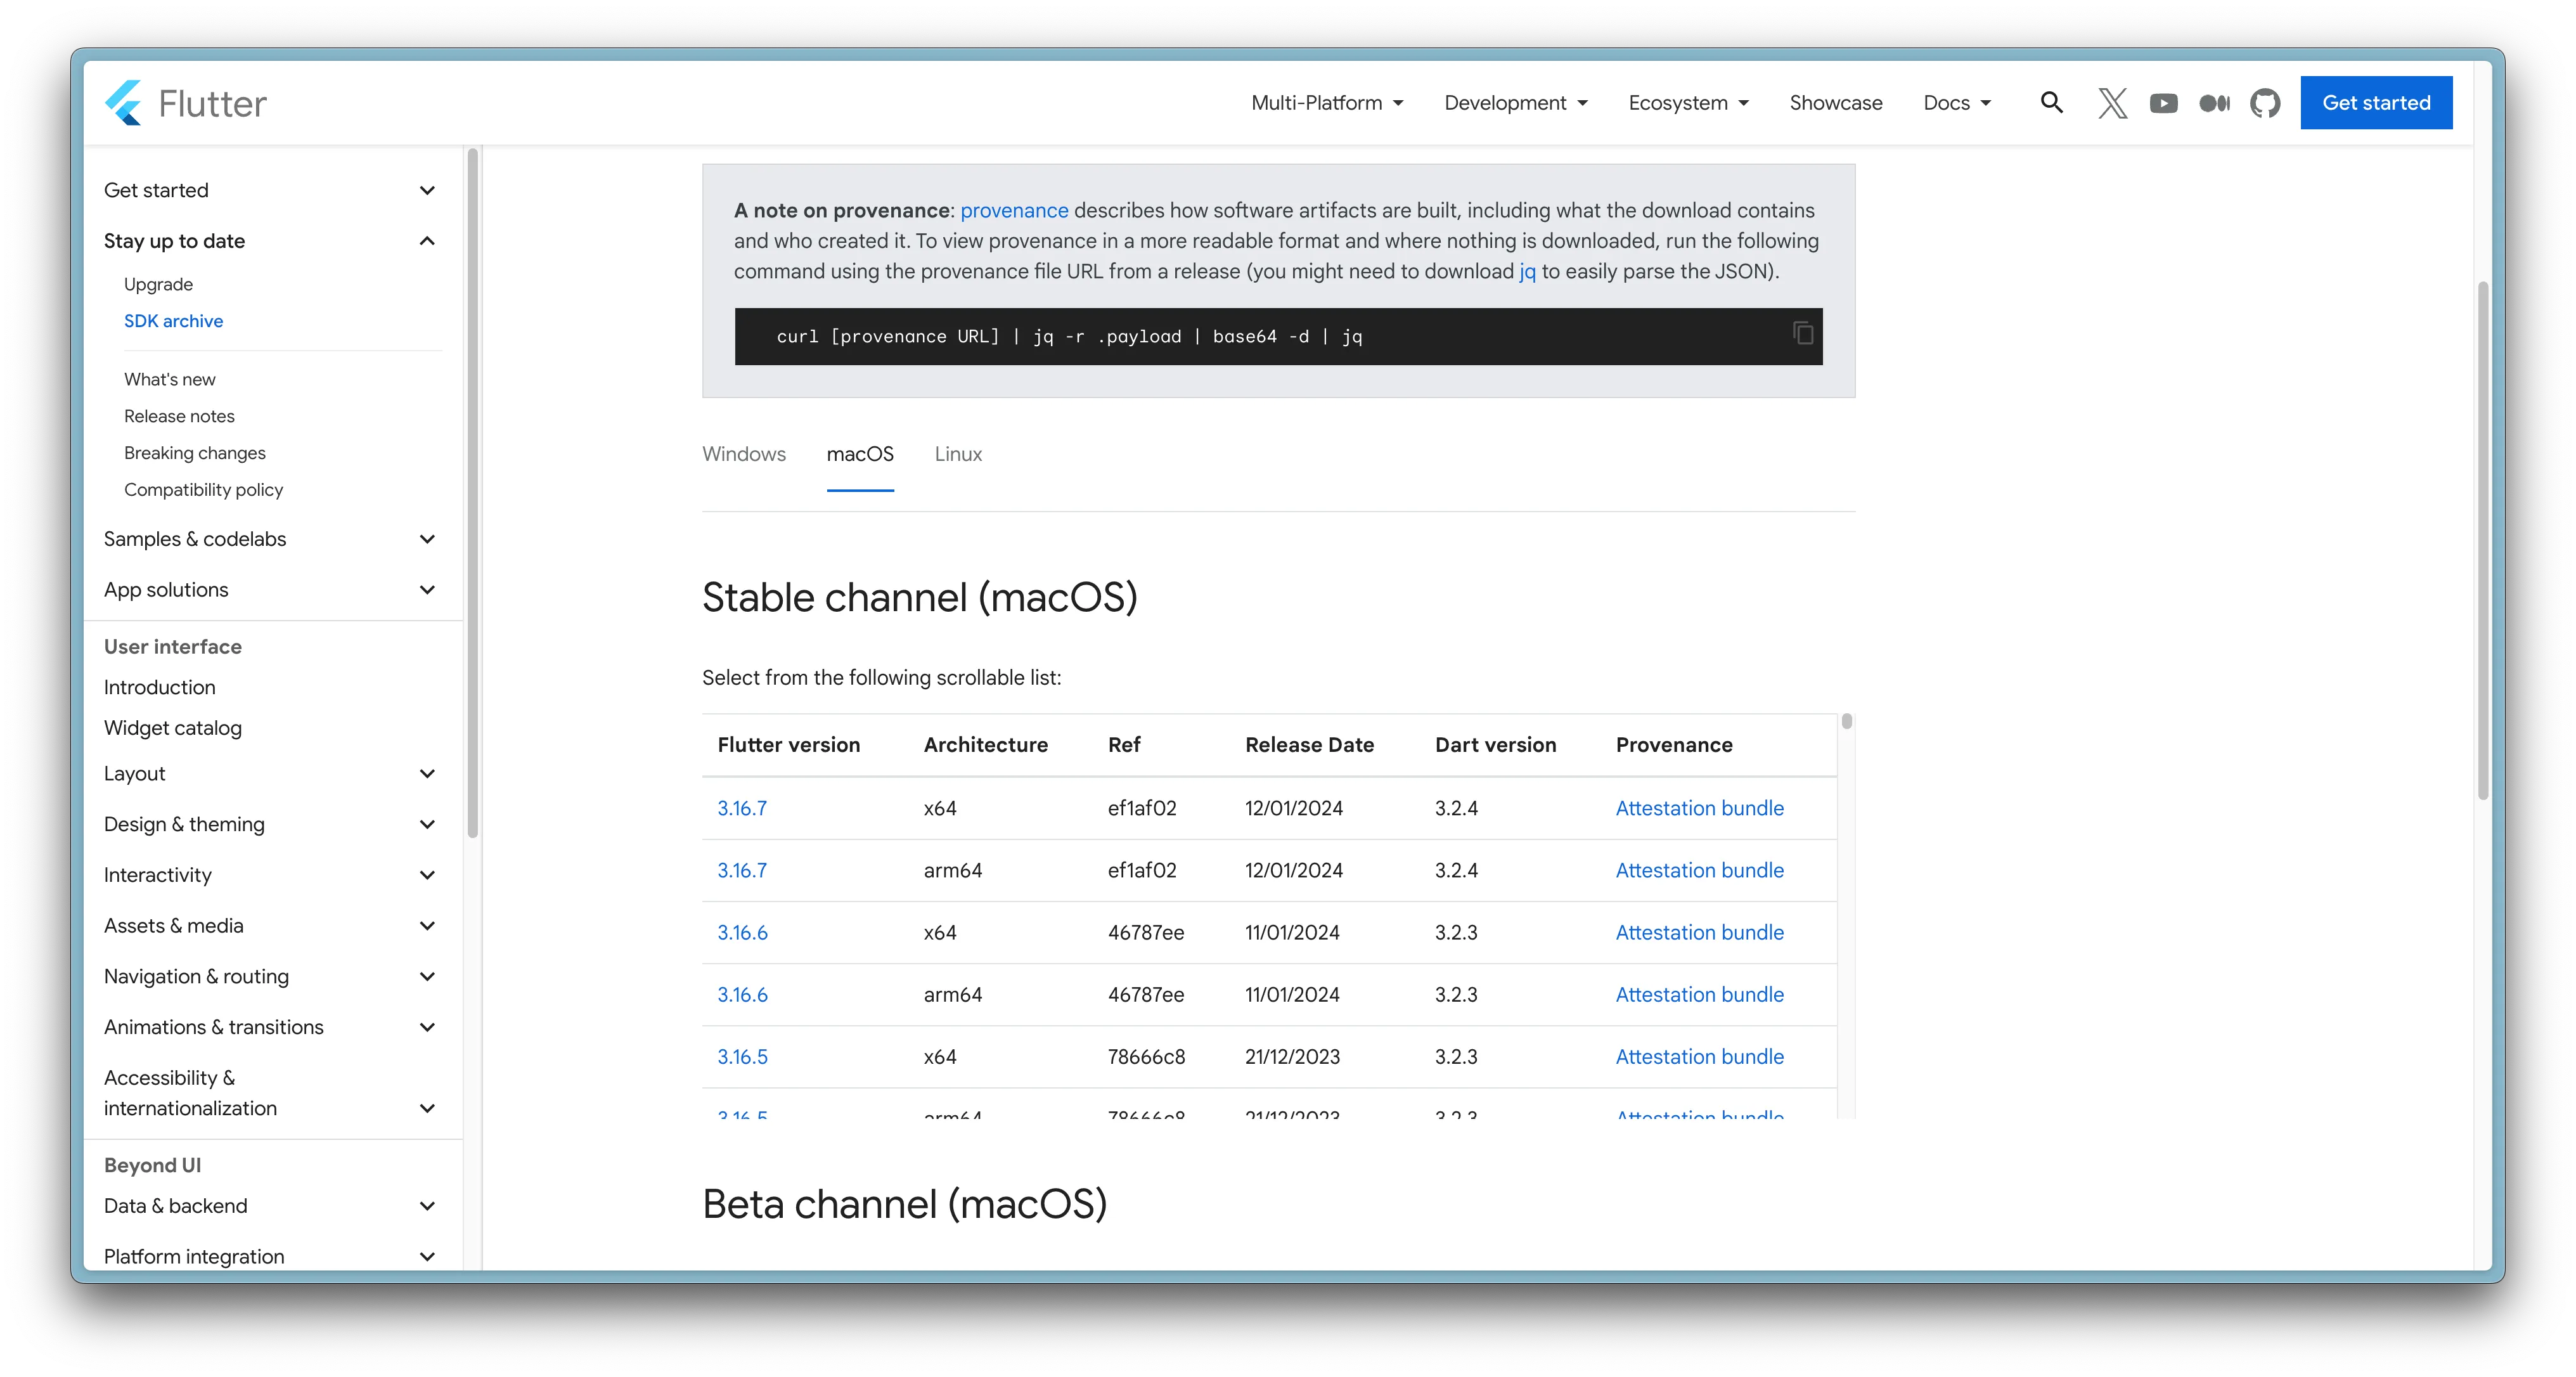
-
Unzip the file and place the Flutter folder in your preferred installation
destination for the Flutter SDK (e.g.,
C:\flutter). Avoid installing Flutter in locations such asC:\Program Files.` -
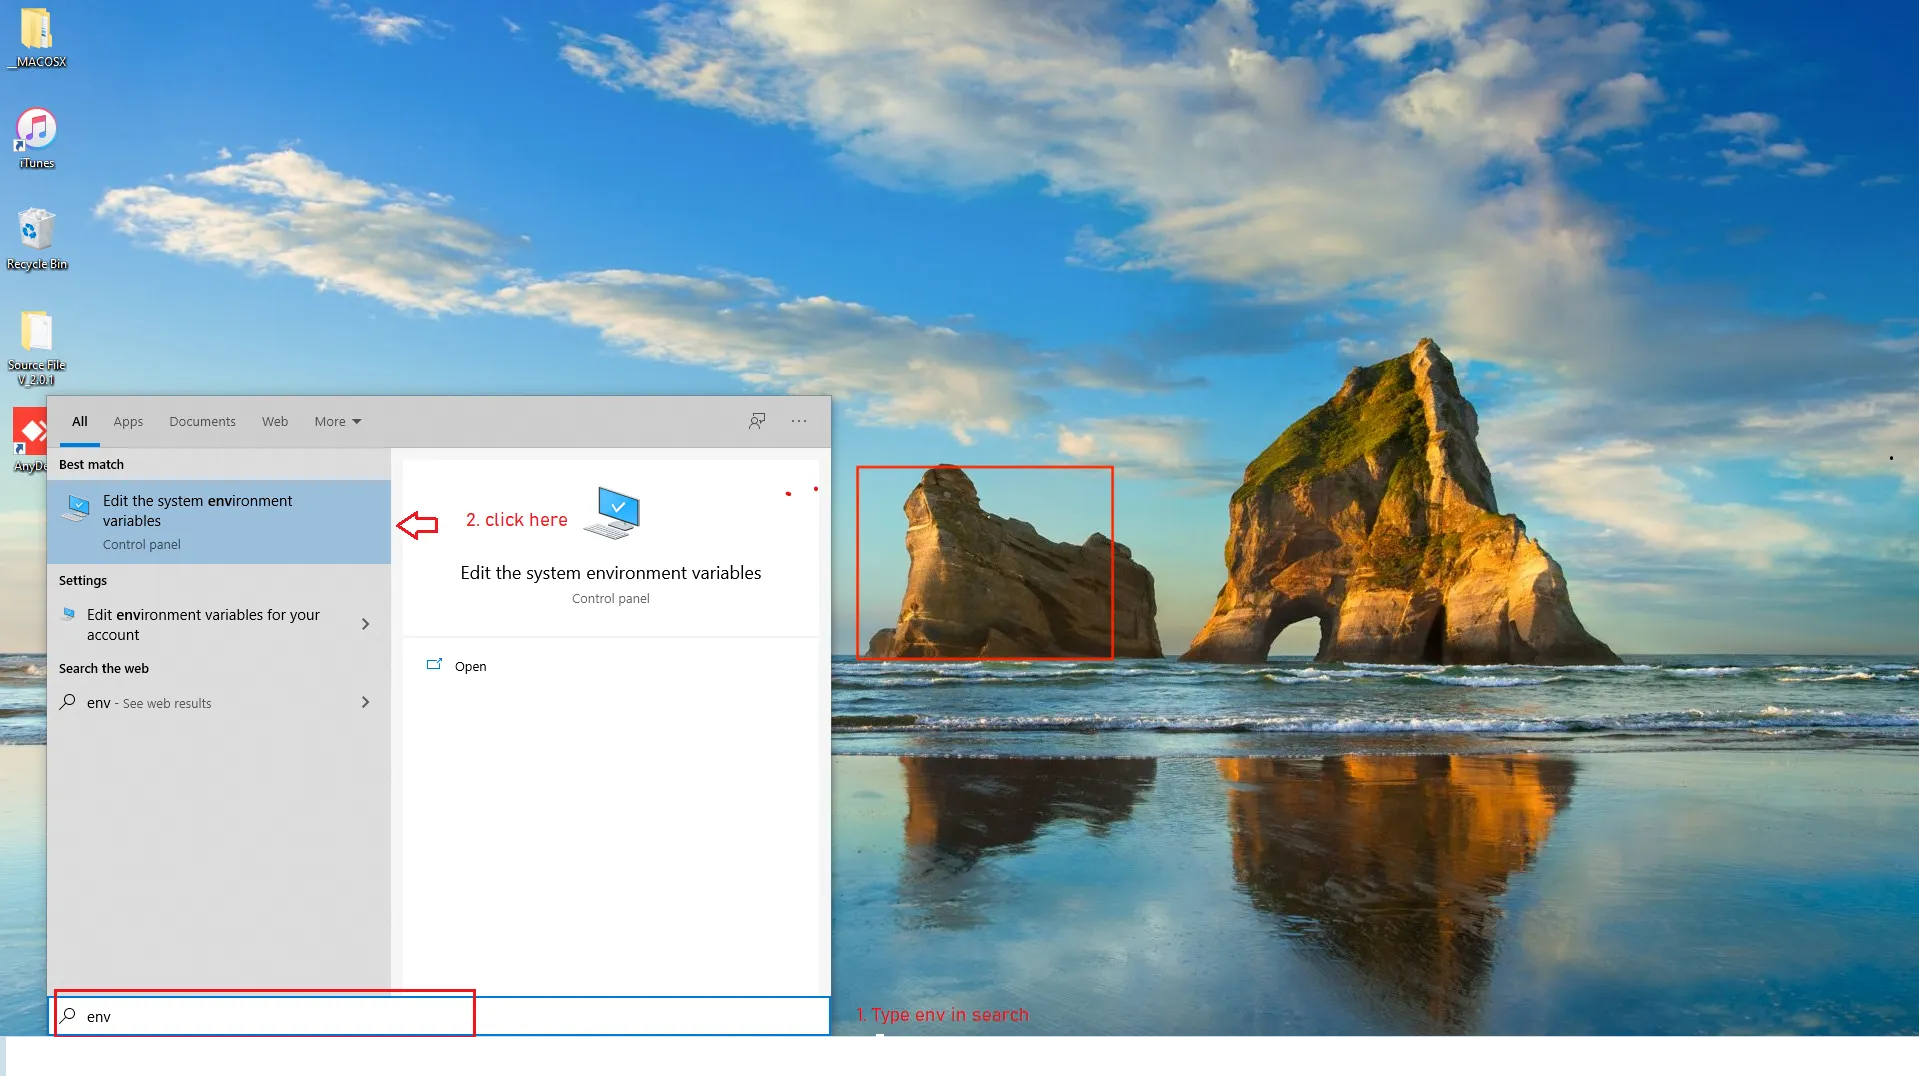
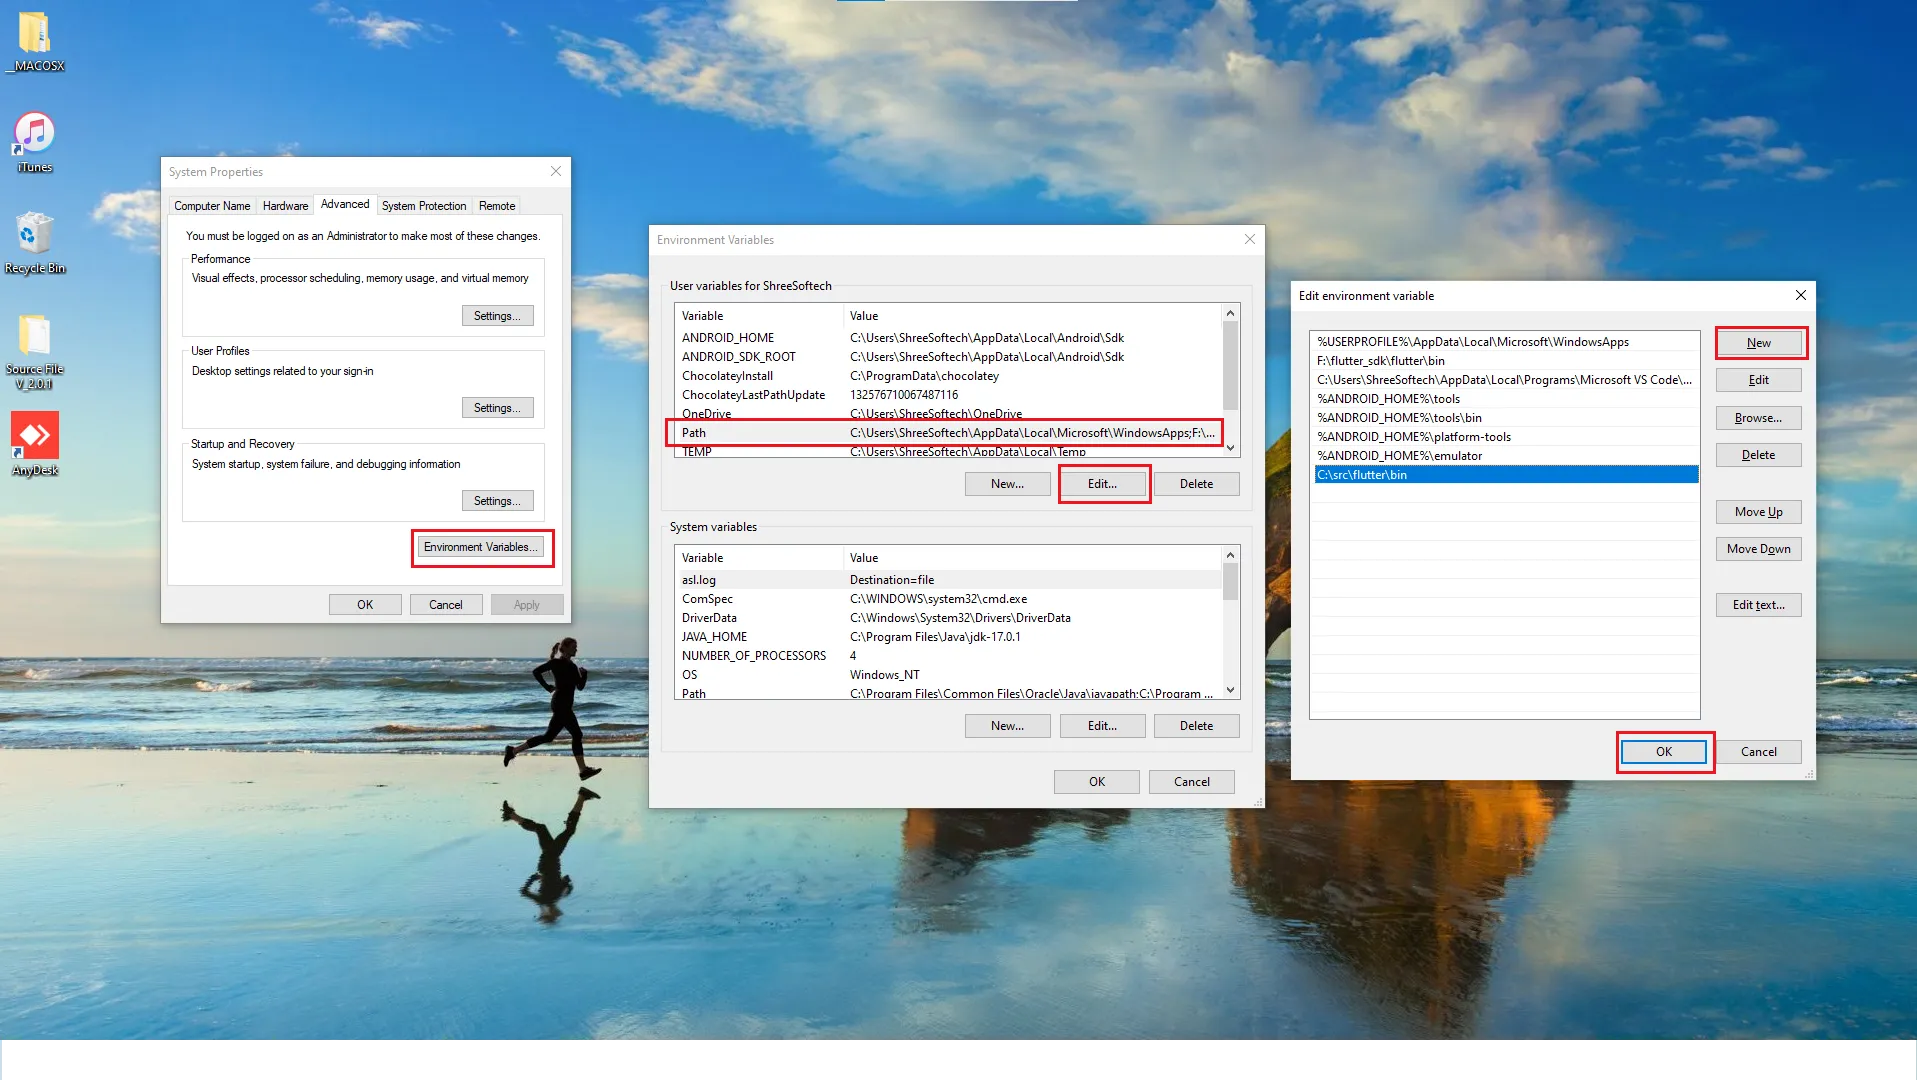
Let's add Flutter to the environment path. Search 'environment' in the Start bar and
select Edit the system environment variables.
-
Within the User variables section of the Path environment variable, proceed by
selecting the "Edit" option. A new dialog box will appear; within this dialog,
select "New" and then proceed to paste the path to your Flutter installation,
specifically the \bin directory. Click OK on all the dialogs to close them.
-
Now to check if everything is installed correctly.
Open the Command Prompt, and runflutter doctor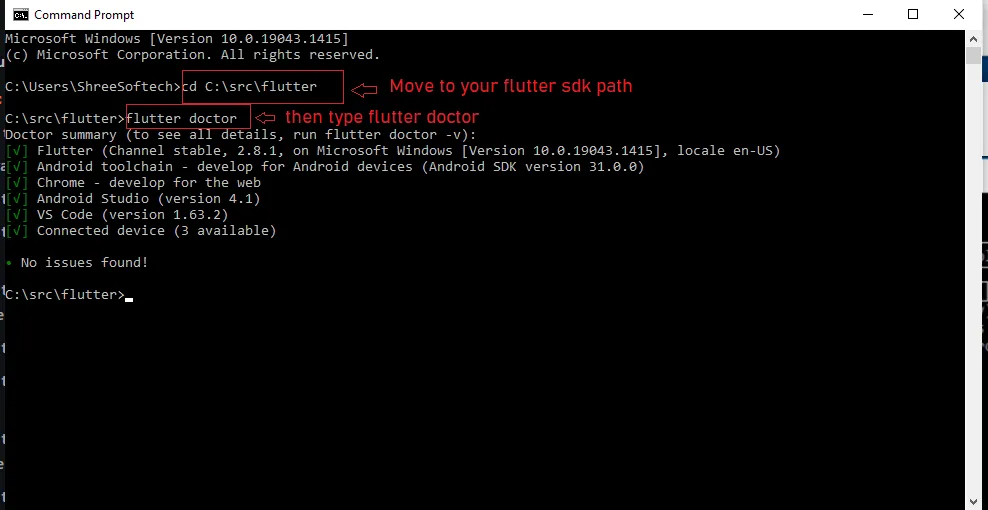
Explore the official Flutter website at
https://docs.flutter.dev/get-started/install
for a complete installation guide.
Prefer video tutorials? Check out the playlist:
2. Setup Android Studio
-
After downloading the package from Codecanyon, extract the main zip file. Inside that, you'll find another zip file named
PrimeWeb_Flutter_Appwhich contains changelogs and other documentation. -
Inside this folder, locate file named
PrimeWeb_2.0.2. Extract this file to get the actual Flutter project. -
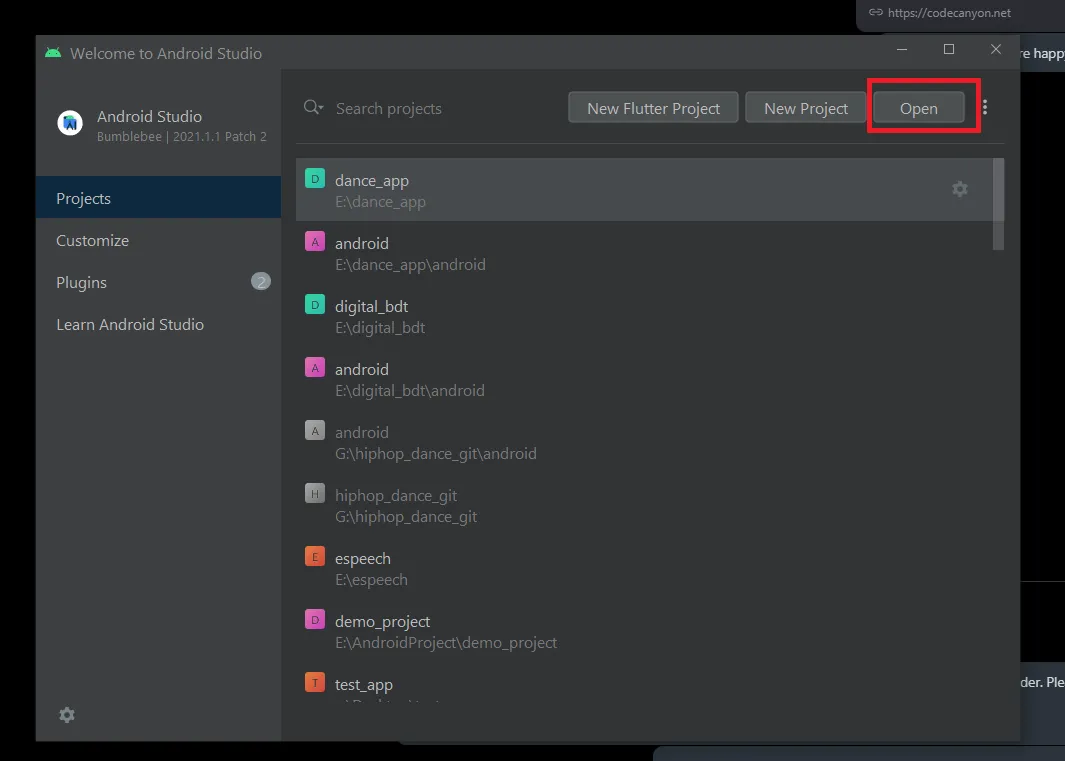
Launch Android Studio and navigate to the 'Open' option. From there, select the
PrimeWeb_2.0.2folder that you just extracted in previous step.
-
Now if you are first time creating/opening flutter project inside Android Studio
then you will need to Install the flutter plugin, add flutter and dart sdk path.
-
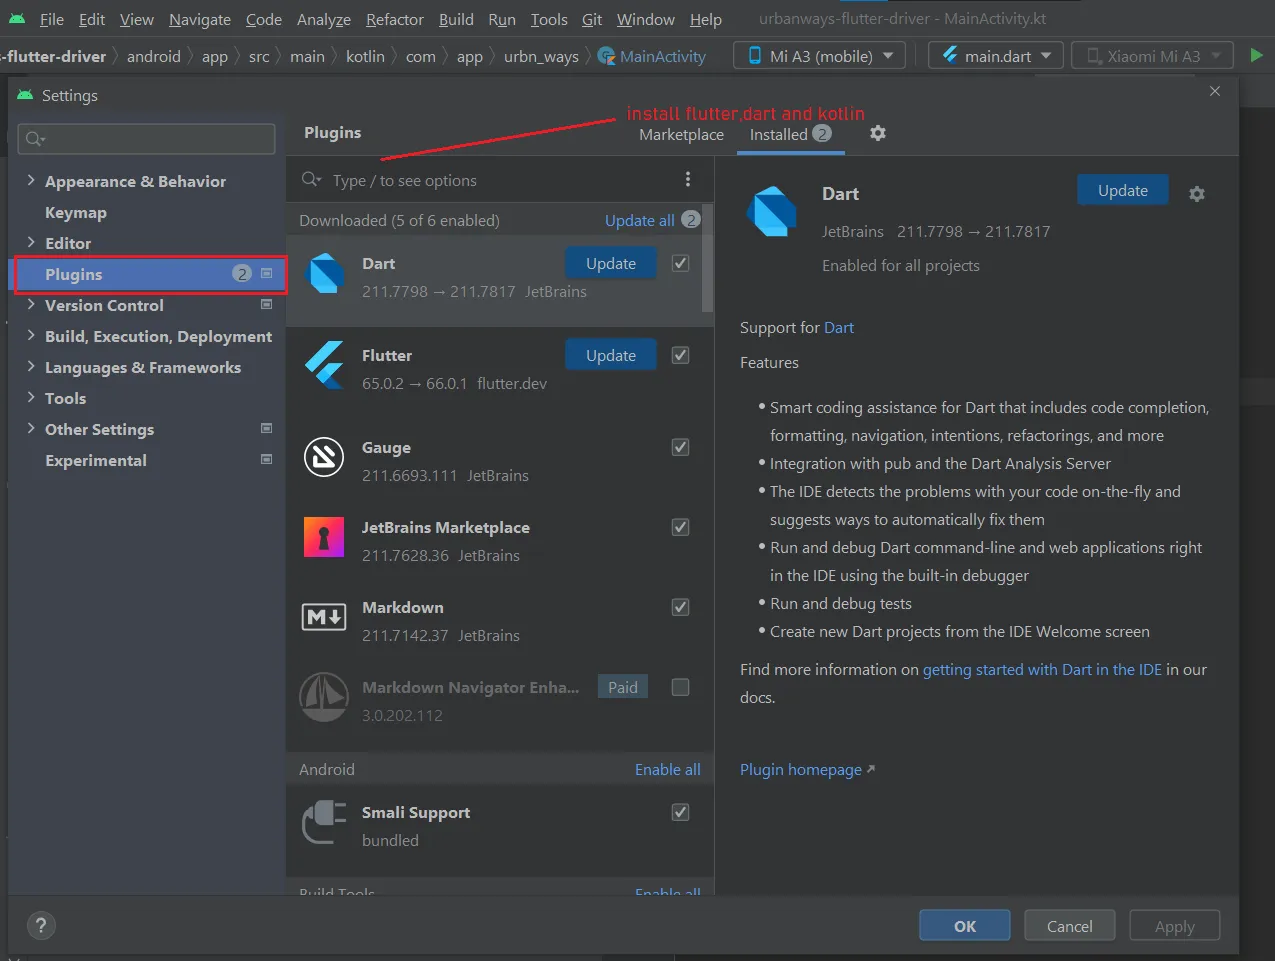
Open File->Settings, then go to Plugins
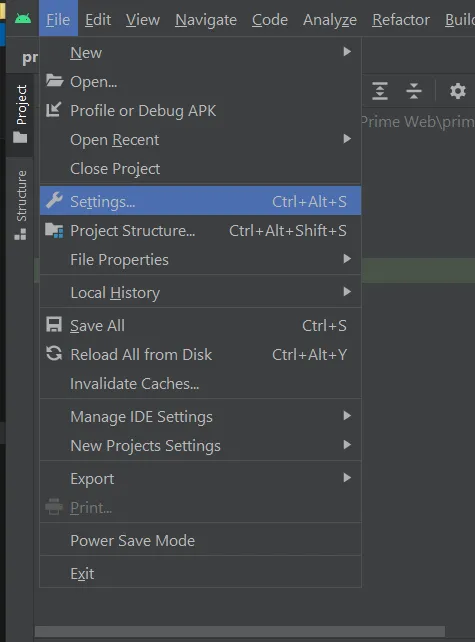
-
And Install flutter, dart, and kotlin plugins
-
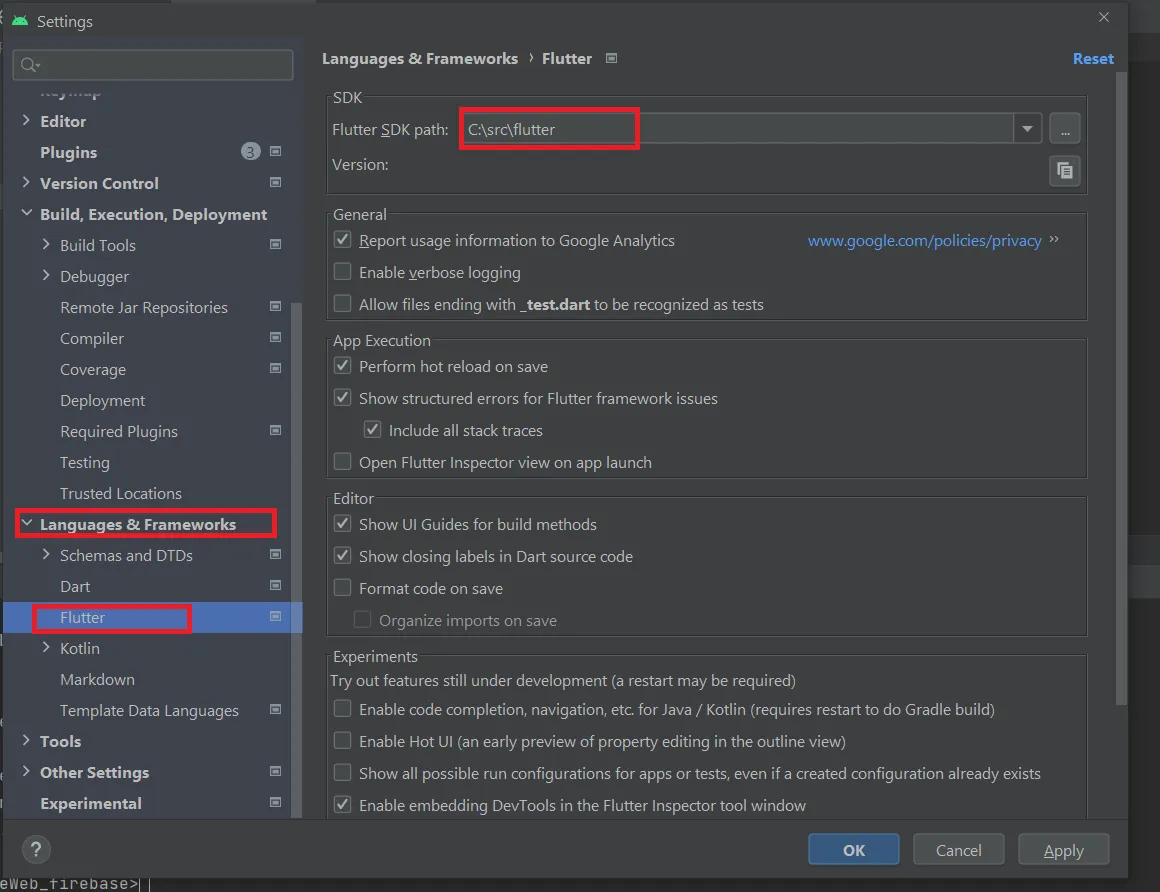
From left pane, open 'Language and Frameworks' and click on 'flutter', then
on right panel set path of flutter.
-
Now dart sdk should automatically be selected, if not select flutter path
and add
\bin\cache\dart-sdkas shown in image.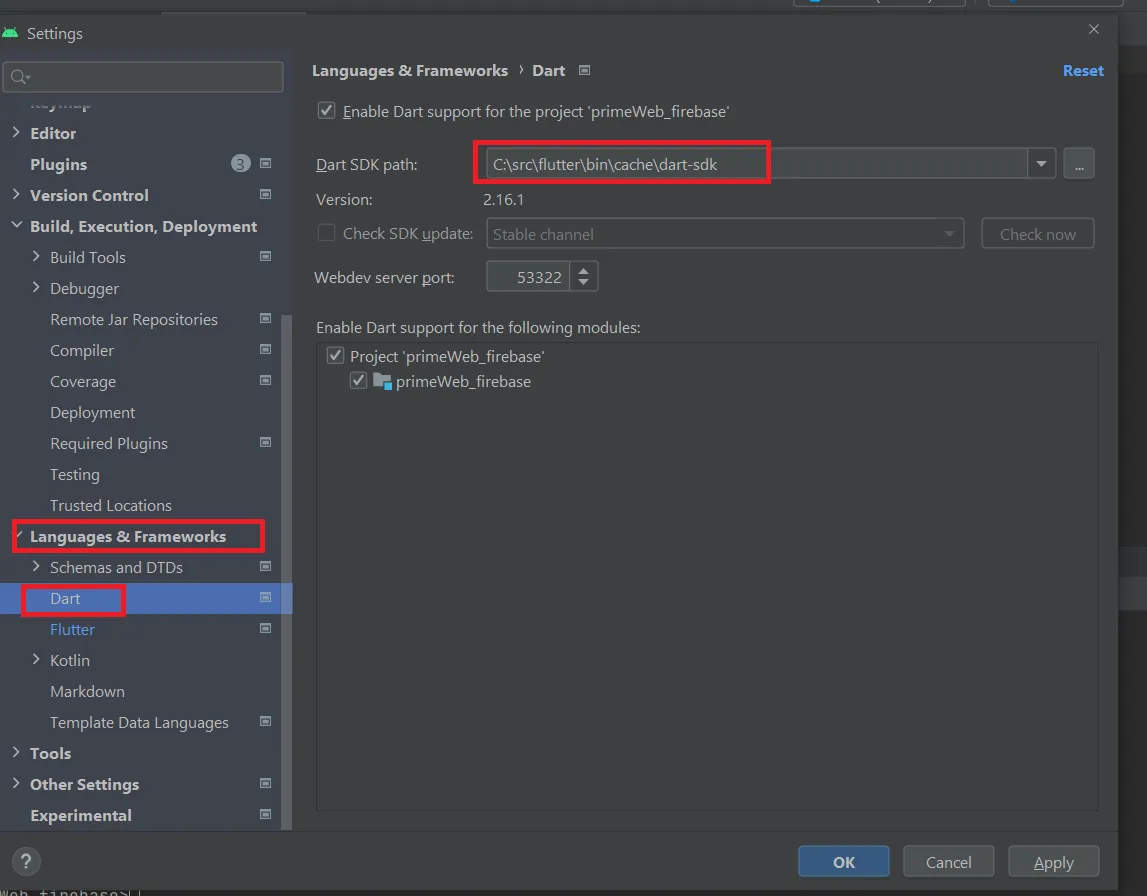
-
Open File->Settings, then go to Plugins
-
Navigate to the SDK Manager located in the upper right corner. Subsequently, access
the Android SDK section, unmark the 'Hide Obsolete Packages' option, and select
'Android SDK Command Line Tool Latest.' Proceed by applying the changes and clicking
'OK.'
This action will initiate the download of the most recent version
3. Change package name
-
If you are using Android Studio, press
Ctrl + Shift + Rand if you are using VS Code, pressCtrl + Shift + Fto replace the old package name with the new one throughout the entire codebase.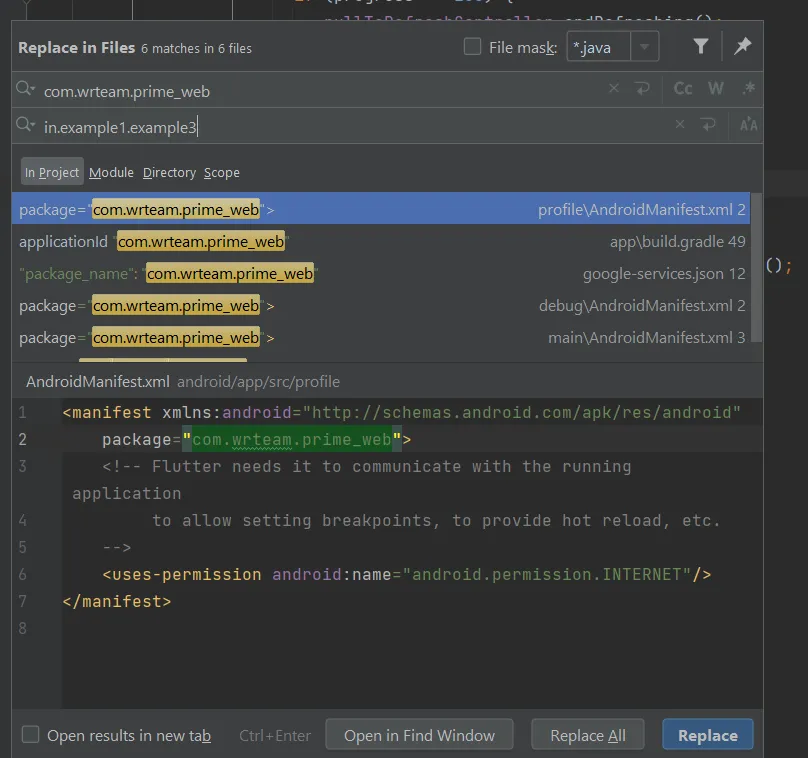
-
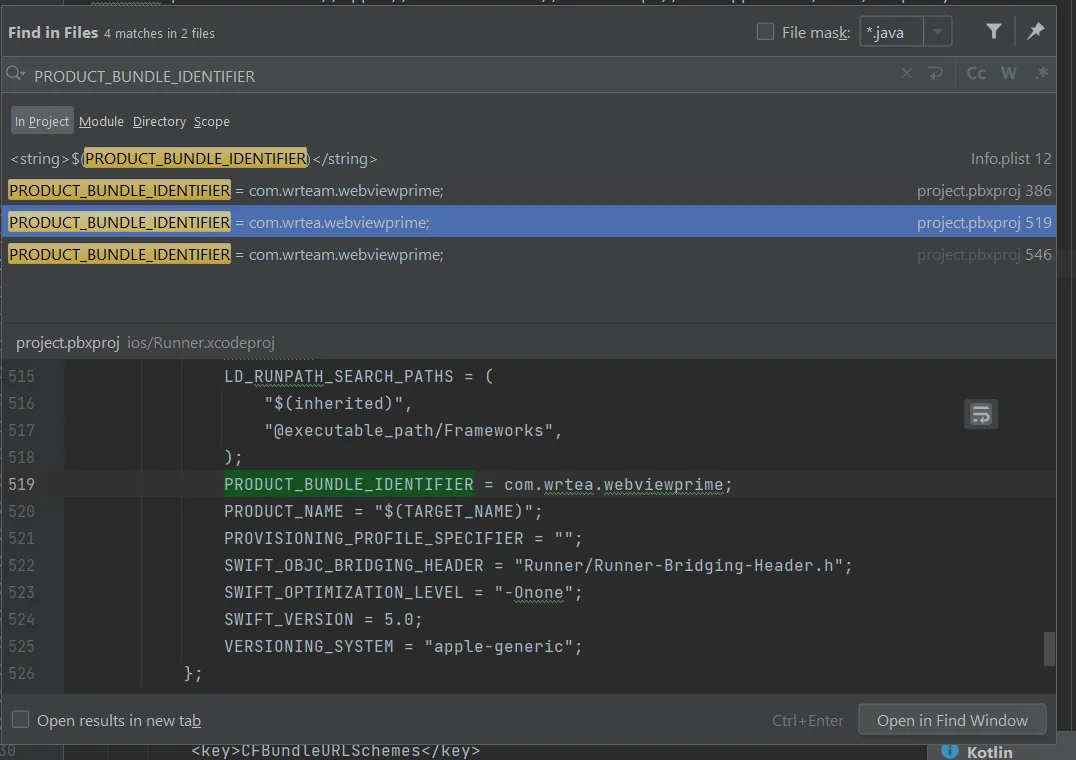
For iOS, navigate to ios > Runner > info.plist. Locate the key CFBundleIdentifier,
which derives its value from the 'PRODUCT_BUNDLE_IDENTIFIER' variable. Press
Ctrl+Shift+F and search for 'PRODUCT_BUNDLE_IDENTIFIER,' then update its value at
every instance. For instance, in this project, the iOS package name is
'com.wrteam.webviewprime,' so replace it with your designated package name.
-
When You are changing package name the you also need change name of folders according to your package name in
(android\app\src\main\kotlin)location in project. For Example if Package name is"com.wrteam.webviewprime"Then inside kotlin folder folder stucture are(com\wrteam\webviewprime)now this folder structure will change as per your package name if your package name is"wrteam.primeweb.webviewprime"then new folder structure is wrteam\primeweb\webviewprime. for change name of this folders just open your project folder navigate inside the kotlin folder just rename the folders according to your package name . Note : (Sometime you got issue dou to this reason.)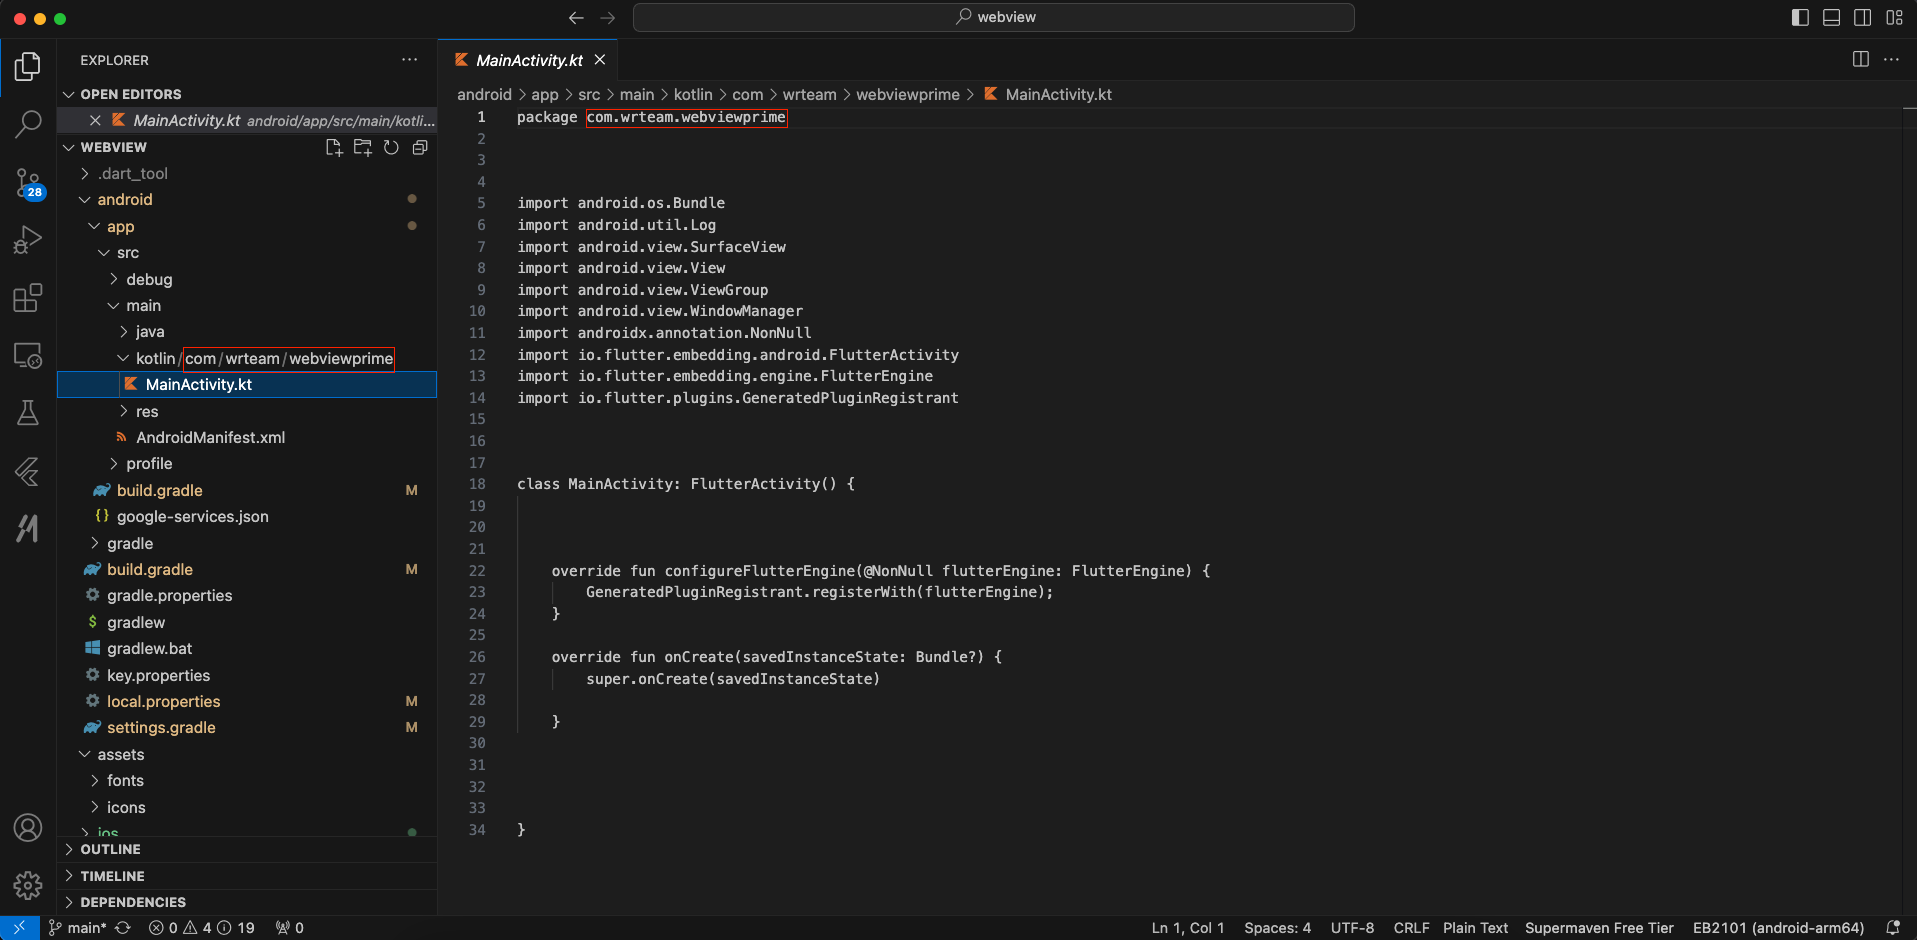
-
Some Doubt regarding package name change
1. what if my package name is like this
com.primeweb.webviewprime.view,so how can i make folder structure ?
Ans. => in this situation you have to add one folder according to your package name , now you have 4 folder insode the kotlin folder like this\com\primeweb\webviewprime\view\
4. Run Flutter Project
-
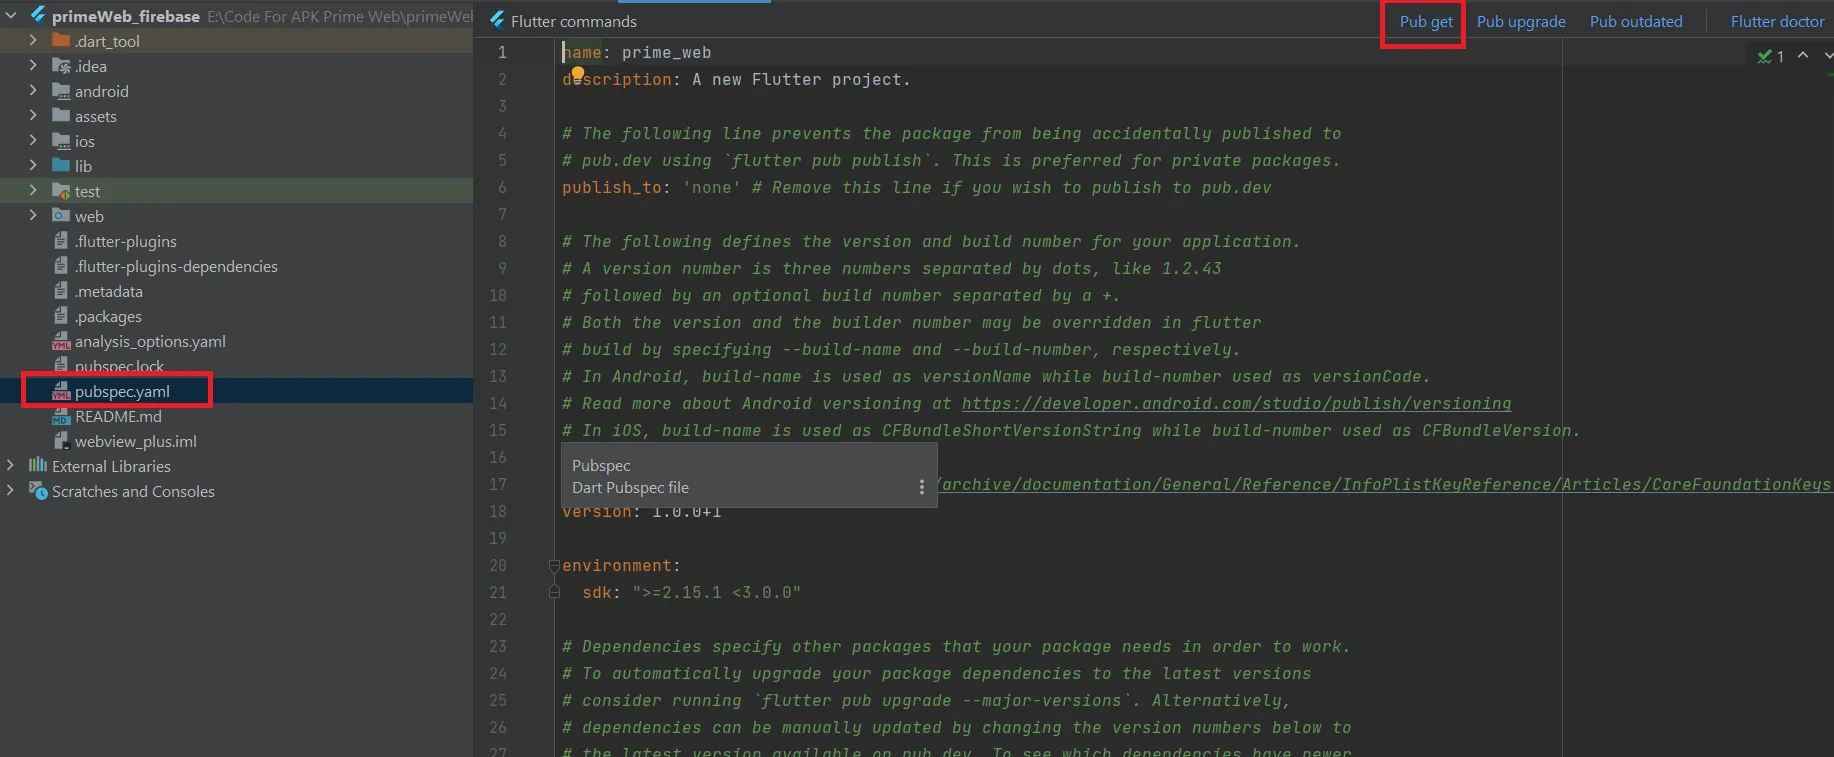
For first-time users, enable Dart support for the project. Afterward, navigate to
the pubspec.yaml file and retrieve the packages by clicking on "Pub Get" located at
the top right corner, as illustrated in the image.
-
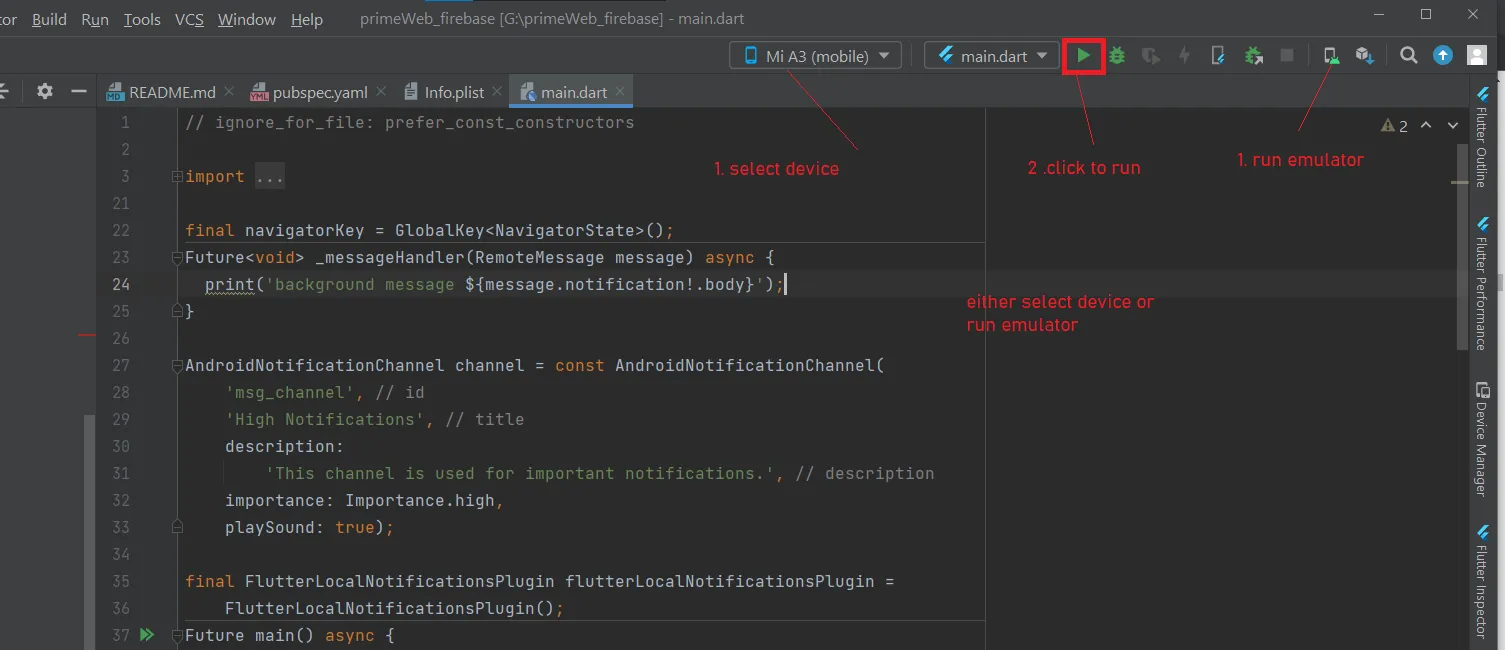
After enabling Dart support and fetching packages, select a device or run an
emulator. Click the 'Play' icon in the upper-right corner to launch the app. For
physical devices, enable 'Developer Options' and 'USB Debugging' on your phone.
-
To run the iOS app, follow these steps in the terminal:
- Navigate to your project directory.
- Run the following commands:
flutter cleanflutter pub getcd iospod install
- Once pods are installed successfully, return to Android Studio and run 'flutter run'.
- If you encounter errors during pod install, delete the .symlinks folder, Pods folder, and Podfile.lock file from the ios folder. Then repeat the above steps.
1) If you have executed the 'prime_web_firebase' app, ensure to set up Firebase and configure the 'google-services.json' file before running the app. Refer to the steps outlined in the section How to integrate Firebase.
How to change application name
In Android Studio, press CTRL+SHIFT+R to open the replace dialog. Search for `Prime Web` and update the app name in three files.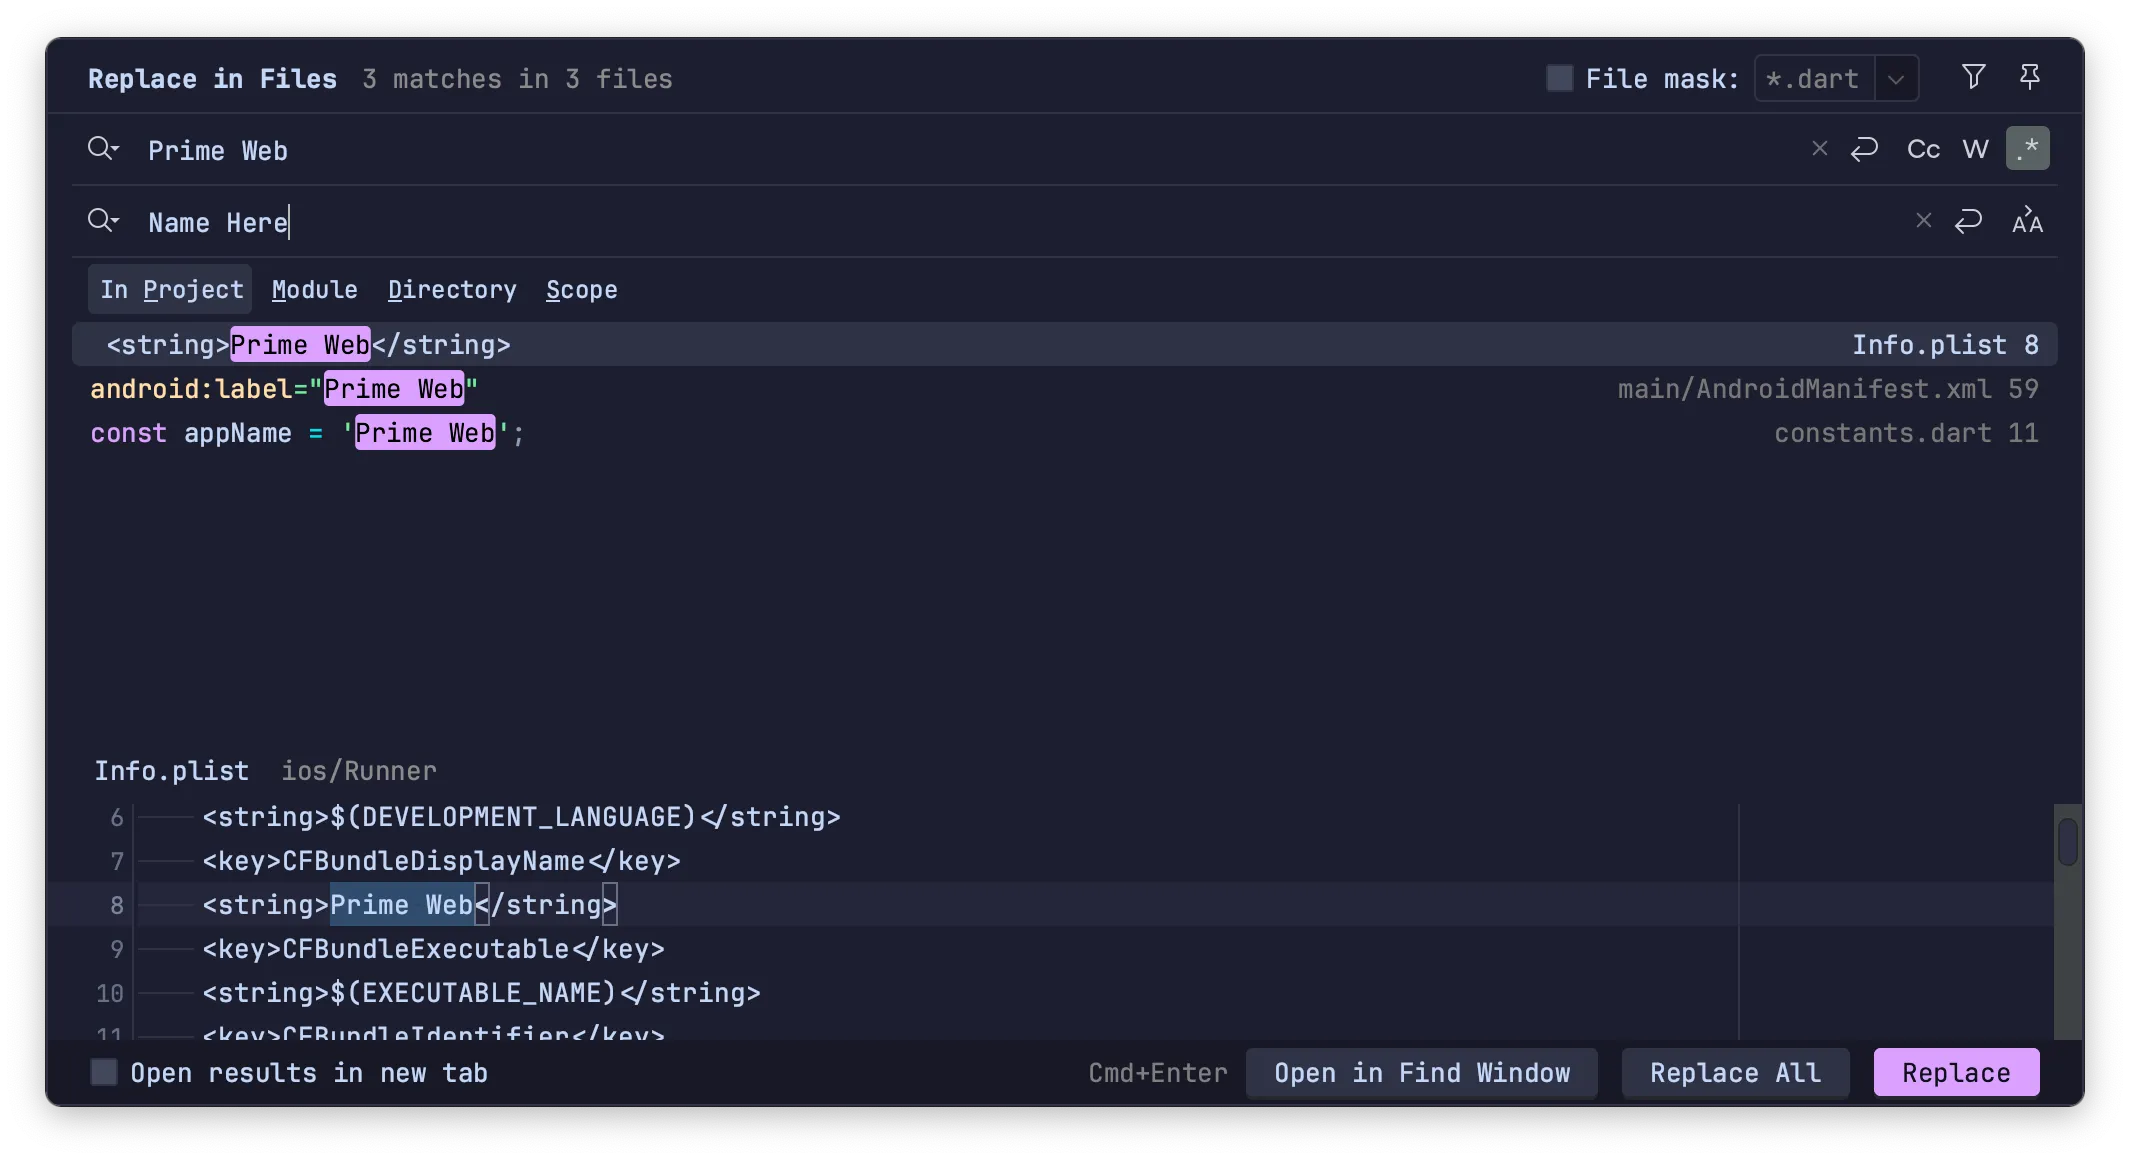
How to change application version
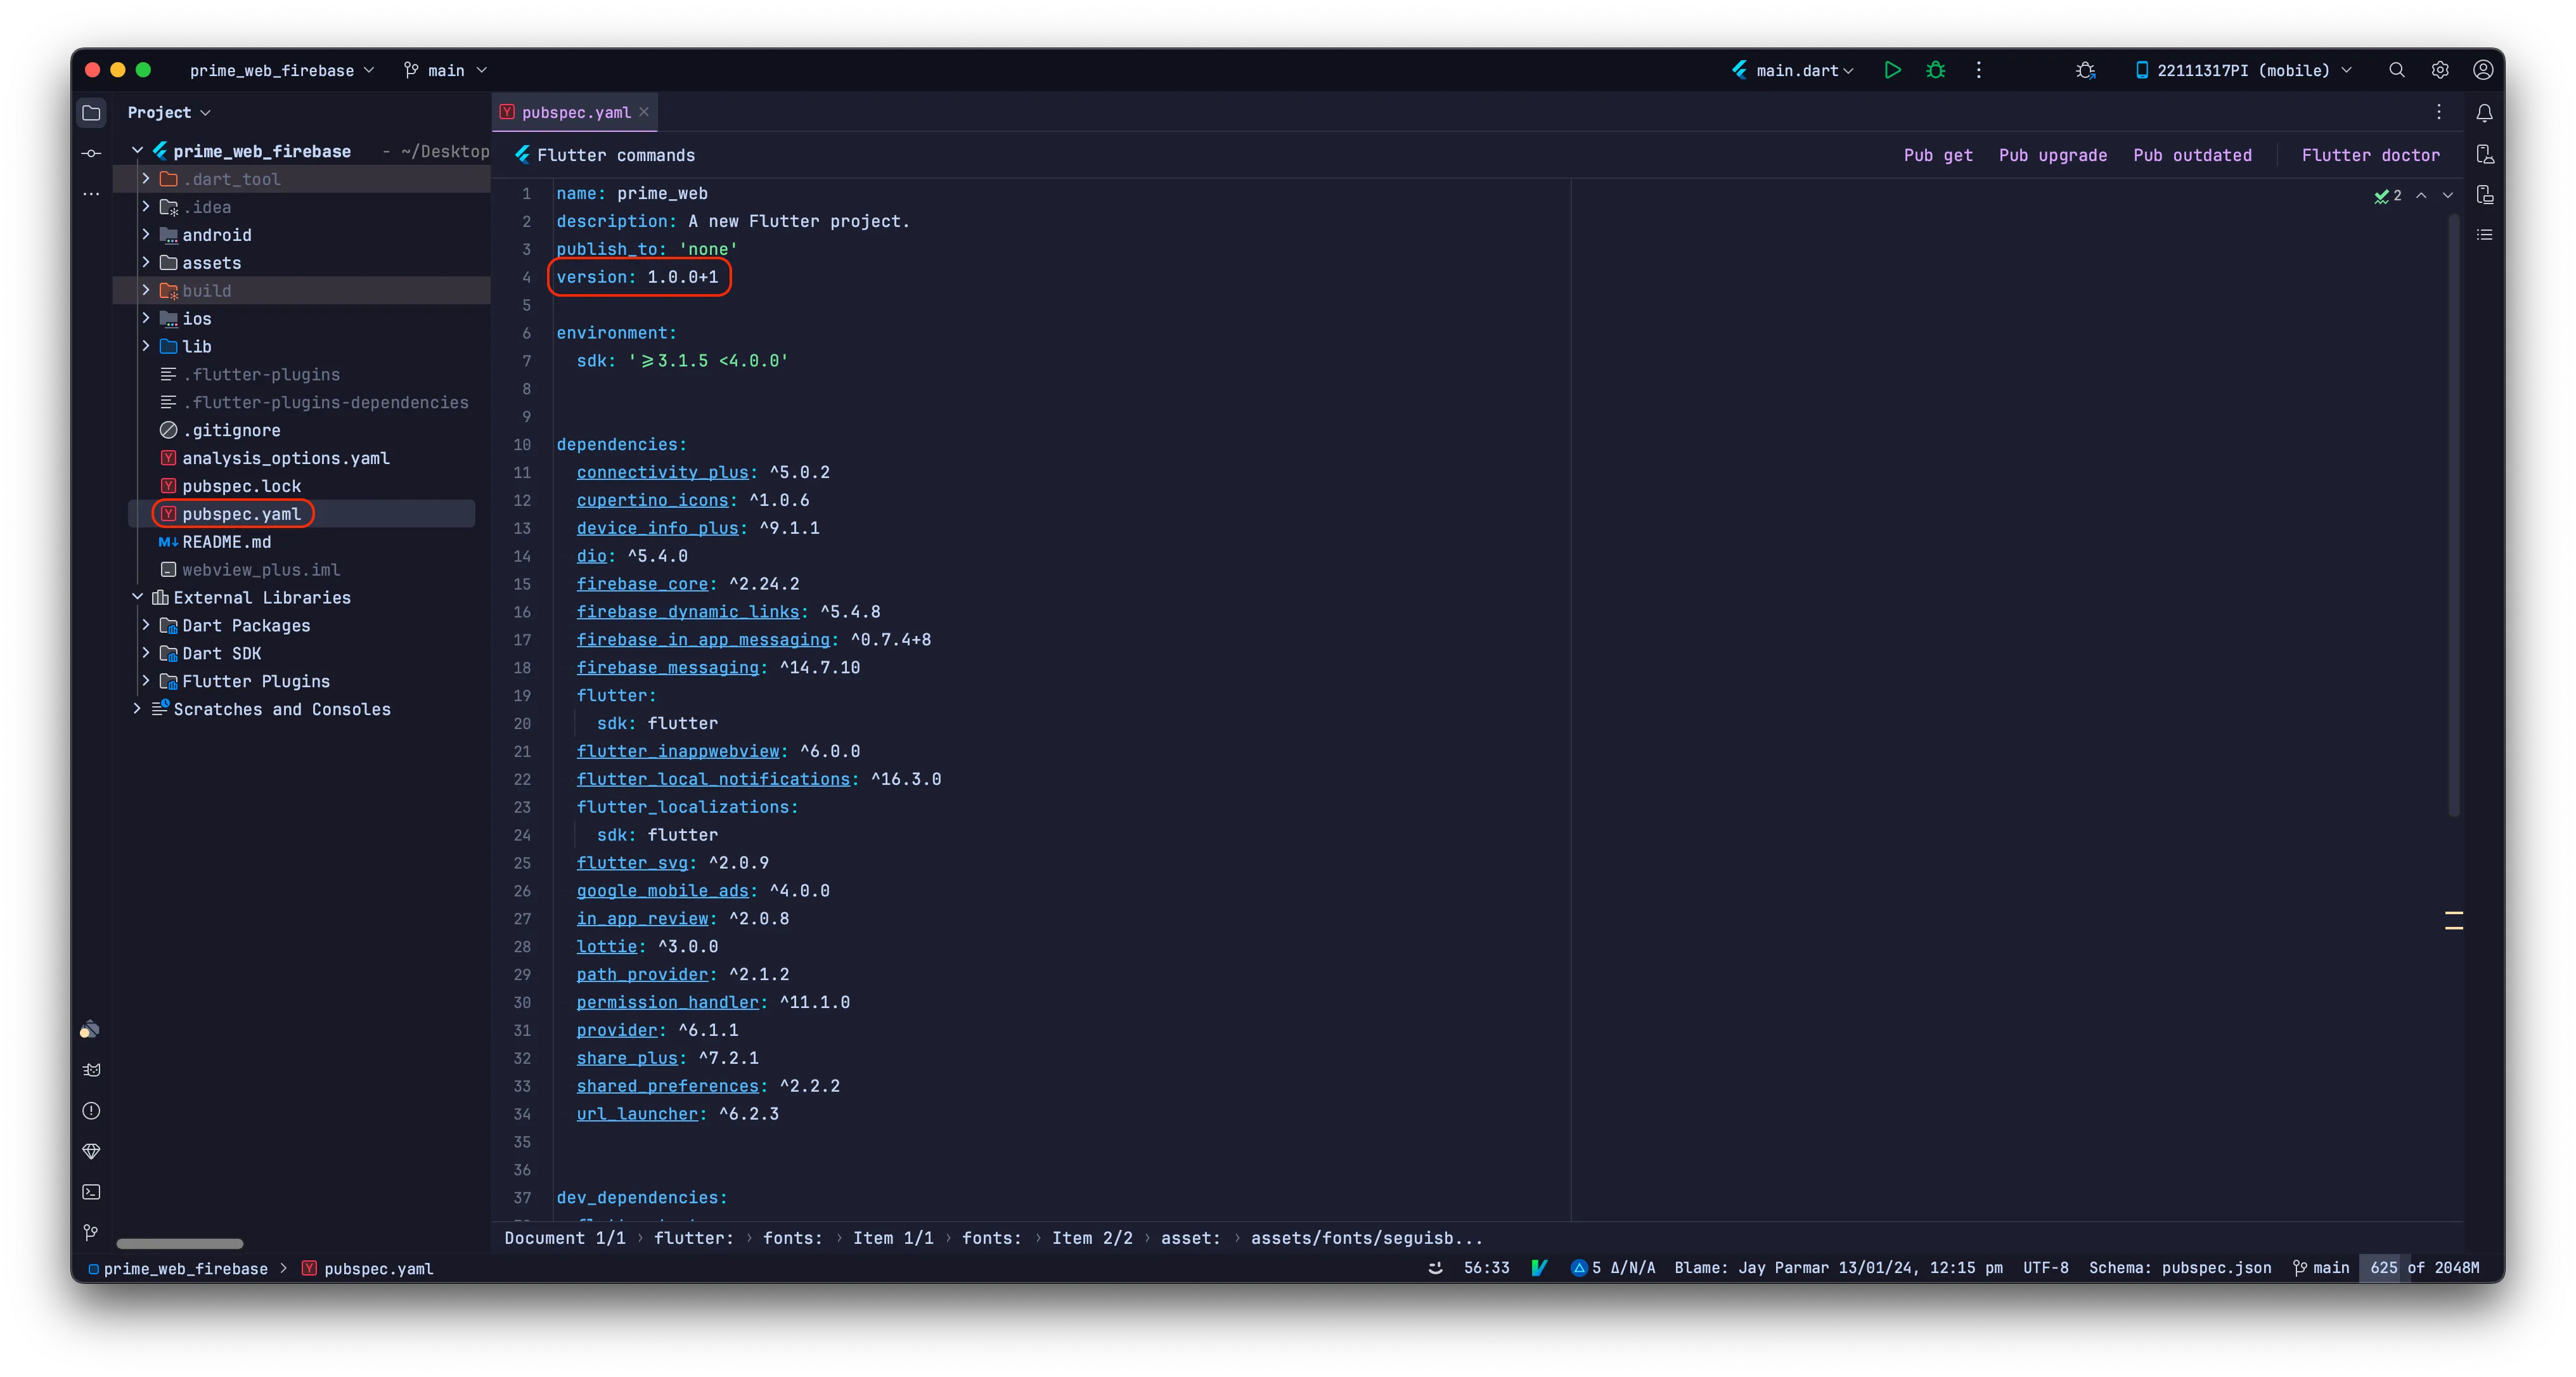
Navigate to the pubspec.yaml file and modify the 'version' field. For instance, if the previous version is 1.0.0+1, update it to 1.0.1+2.IMPORTANT: Ensure to execute 'flutter pub get' and 'flutter run' after making this adjustment.
How to change application logo
How to Change server url
Go to lib > utils > constants.dart. here you have to change your API server url.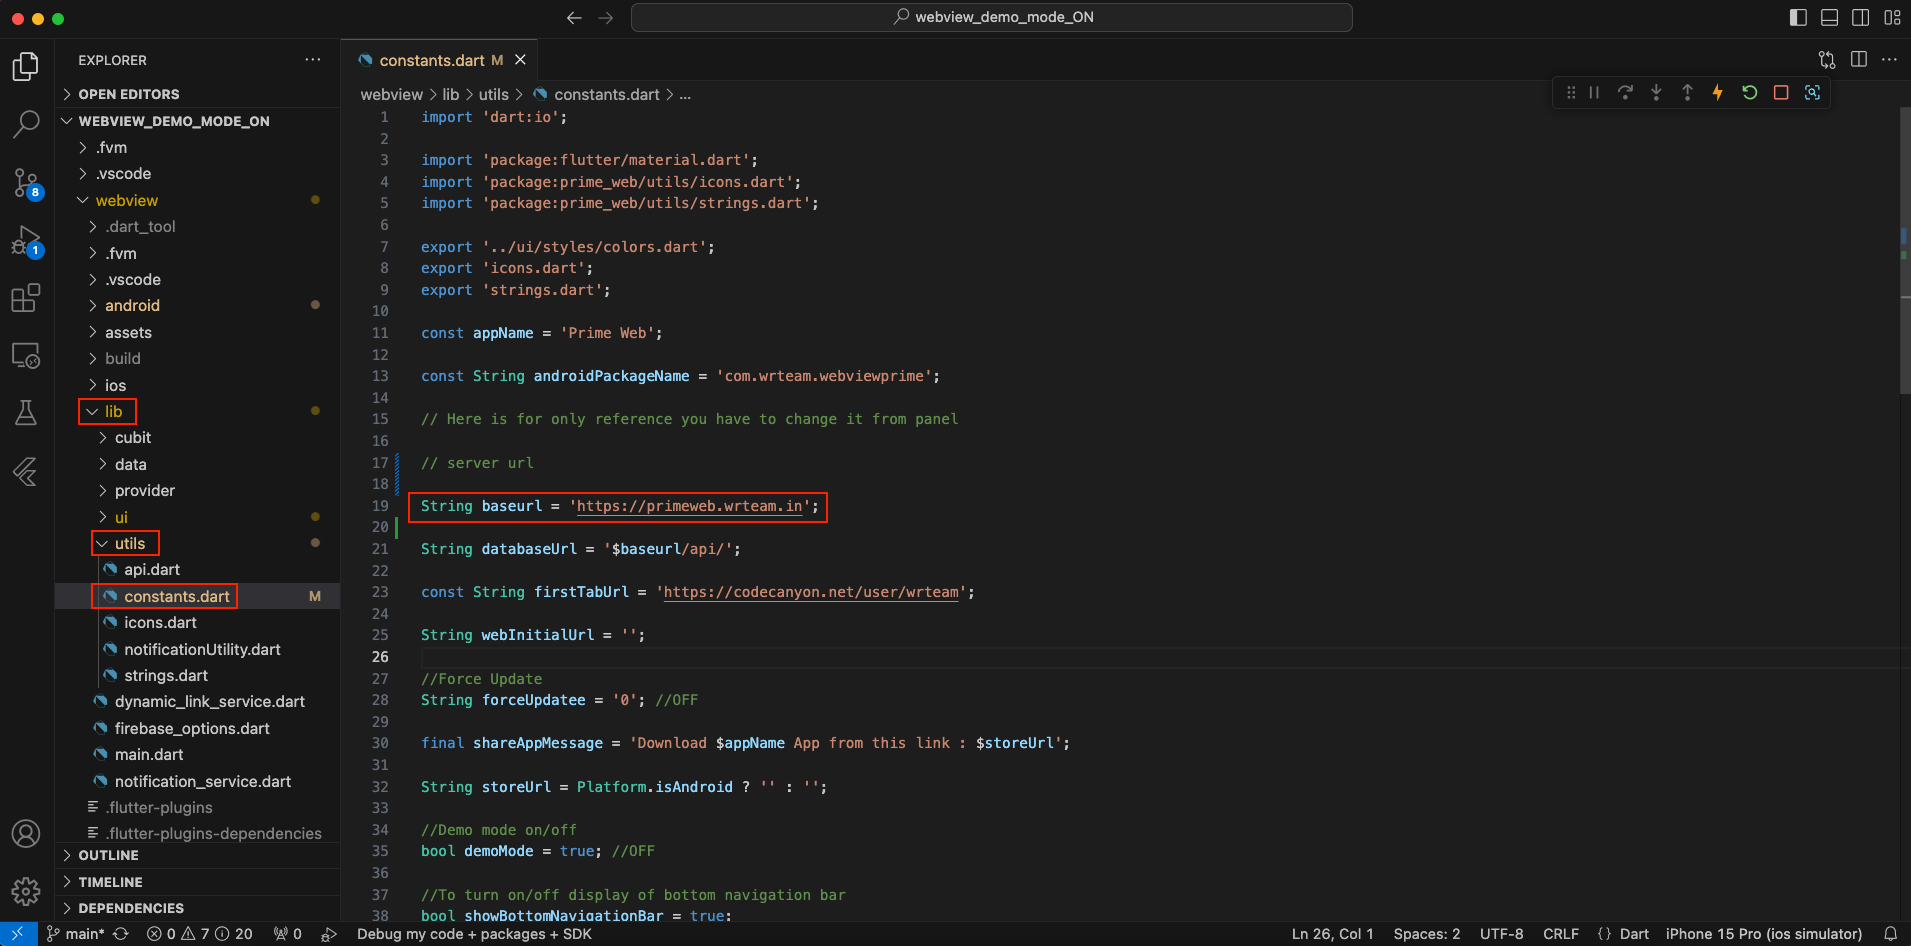
How to set Dual Website URL
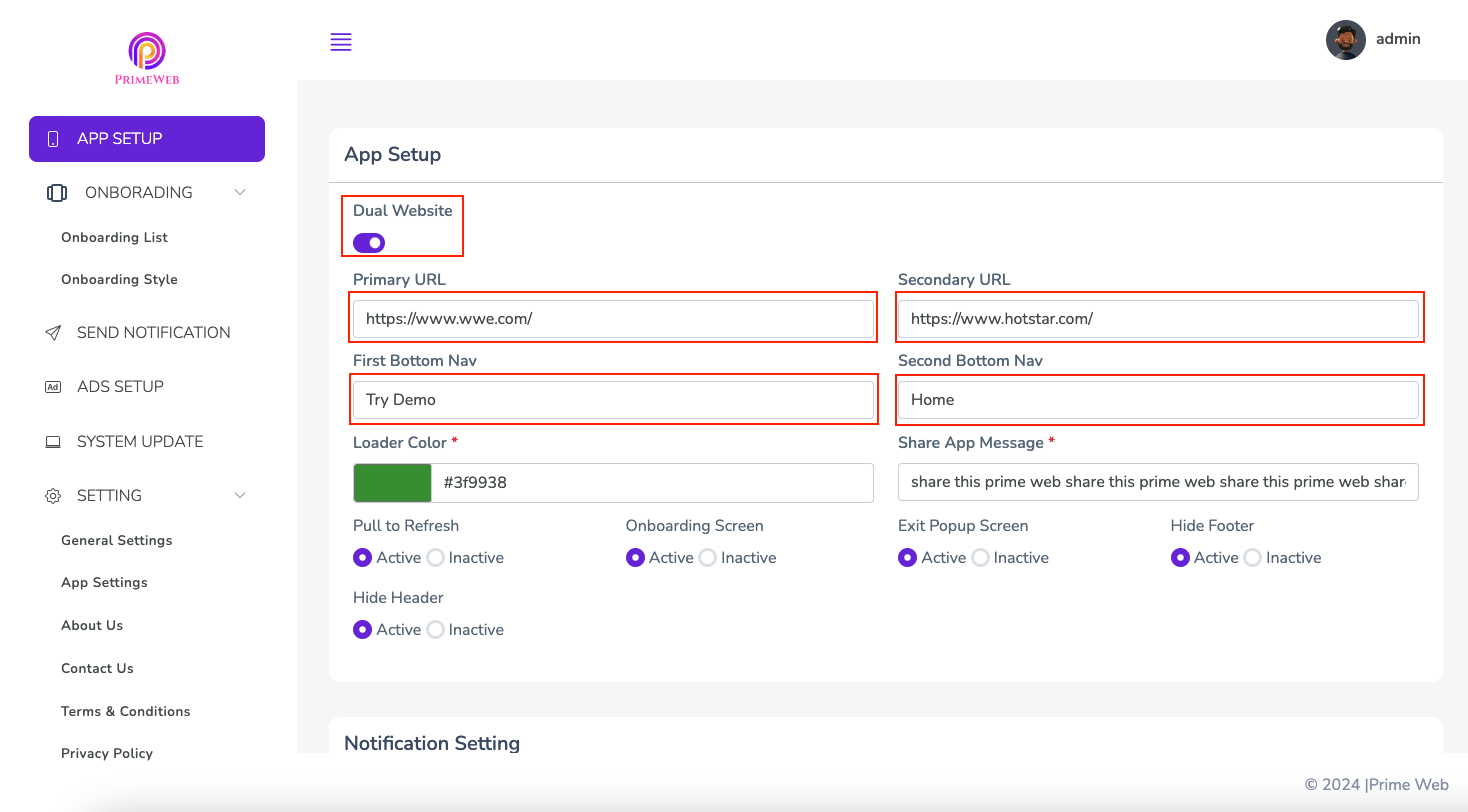
Turn on theDual Websitebutton to enable the dual website feature. This will
display four
text fields:
1. The first is for the Primary URL to set the primary website URL.
2. The second is for the Secondary URL to set the secondary website URL.
3. The third option is to set the title of the first icon in the Bottom Navigation as described below.
4. The fourth option is to set the title of the second icon in the Bottom Navigation as described below.
Note: If the Dual Website button is turned off, the bottom navigation bar will not be shown. Instead, a floating action button will be displayed, and the URL specified in the Website URL field in the admin panel will be shown on the home page.
How to set your website URL
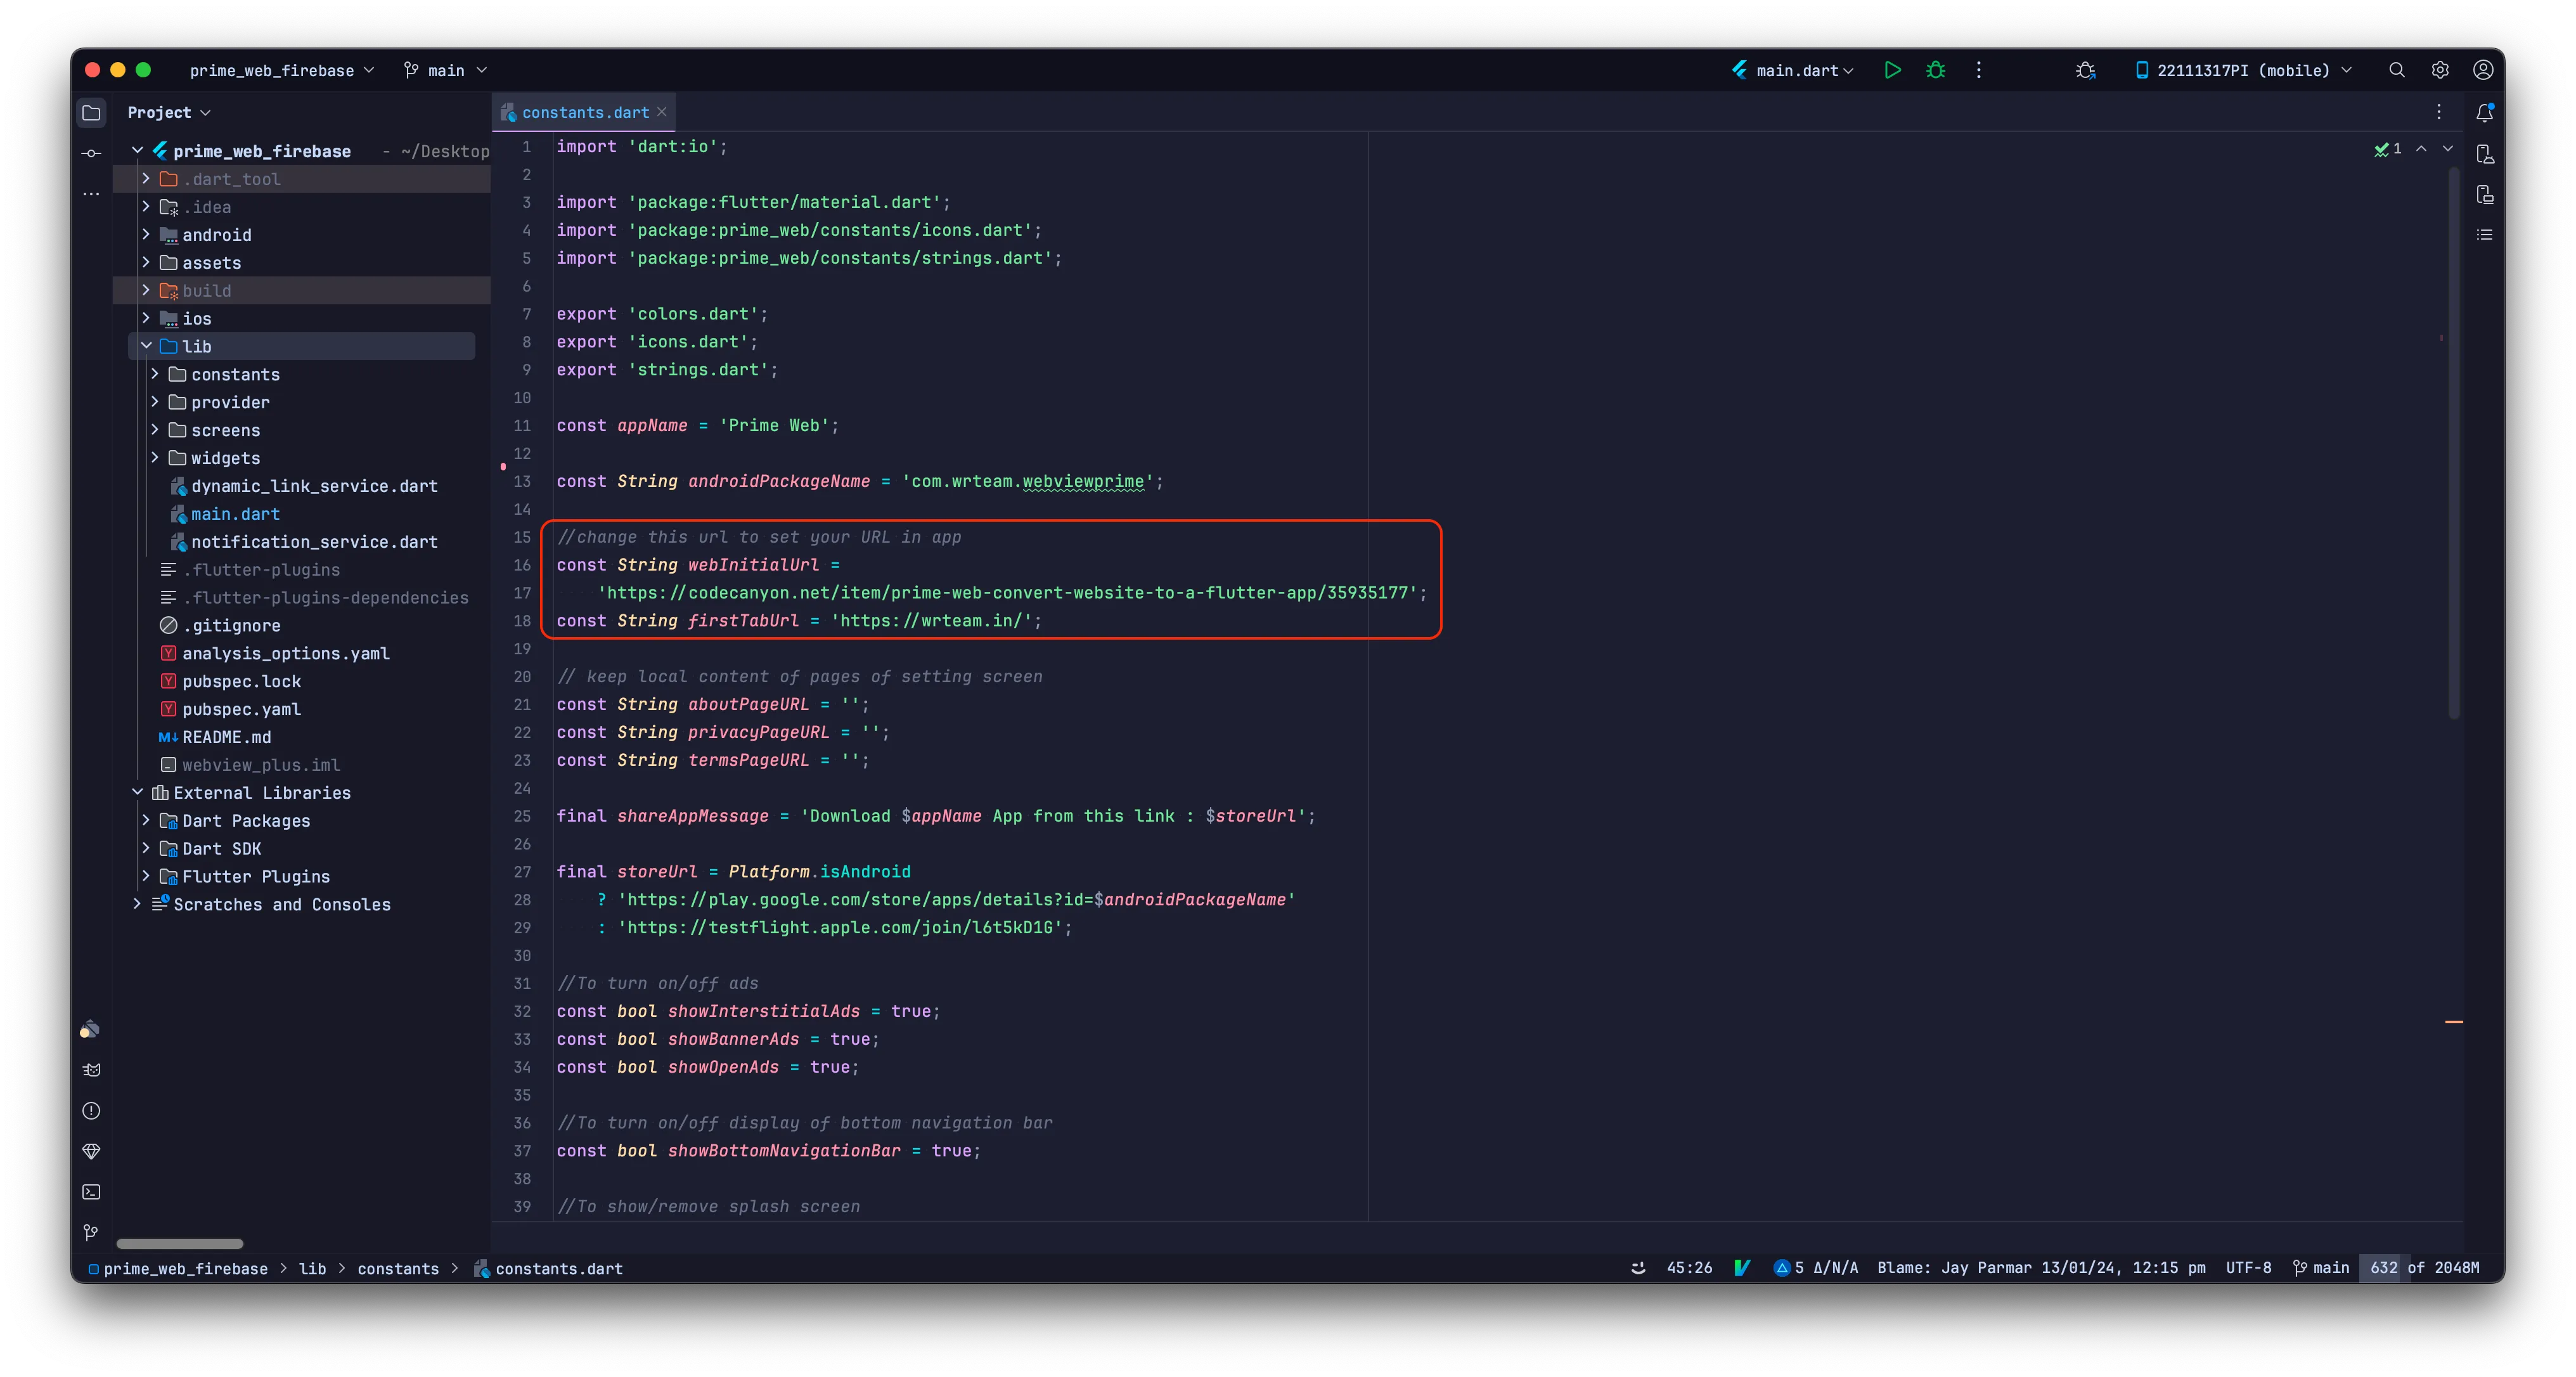
To configure the URL for your website (displayed on the home page), paste your URL into
the
"Website URL" Make sure to use the proper URL format, starting with either
'http://' or
'https://'.
Note: This URL will only be displayed on the app's home screen when the Dual Website button is turned off.
How to change Loader Color
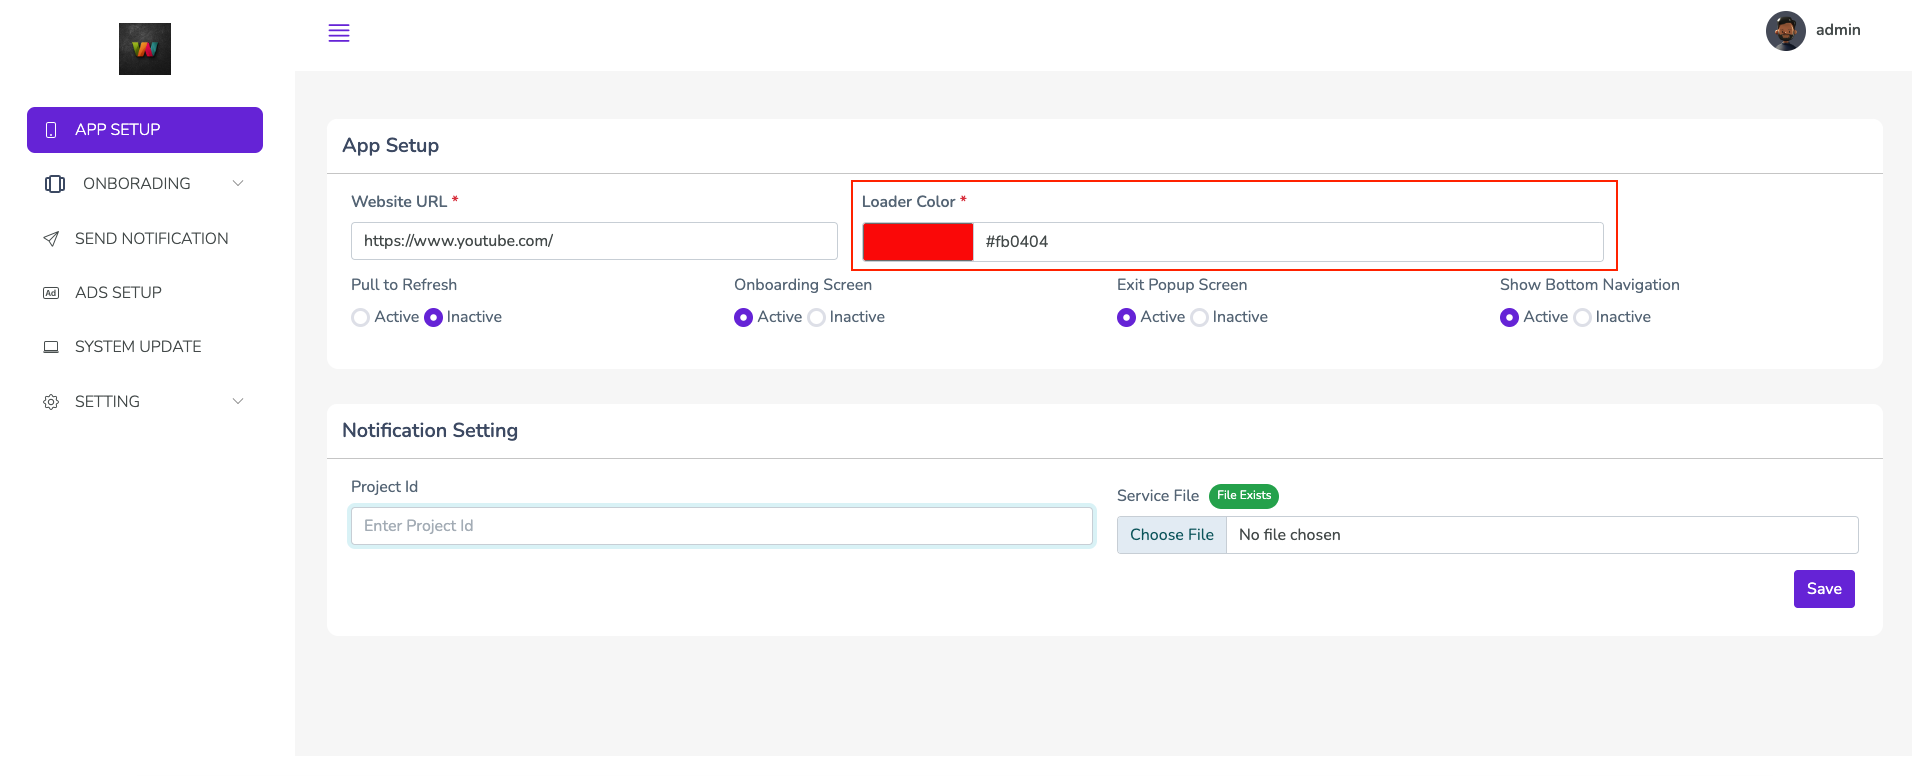
You can select the color in the"Loader Color" option under App Setup.
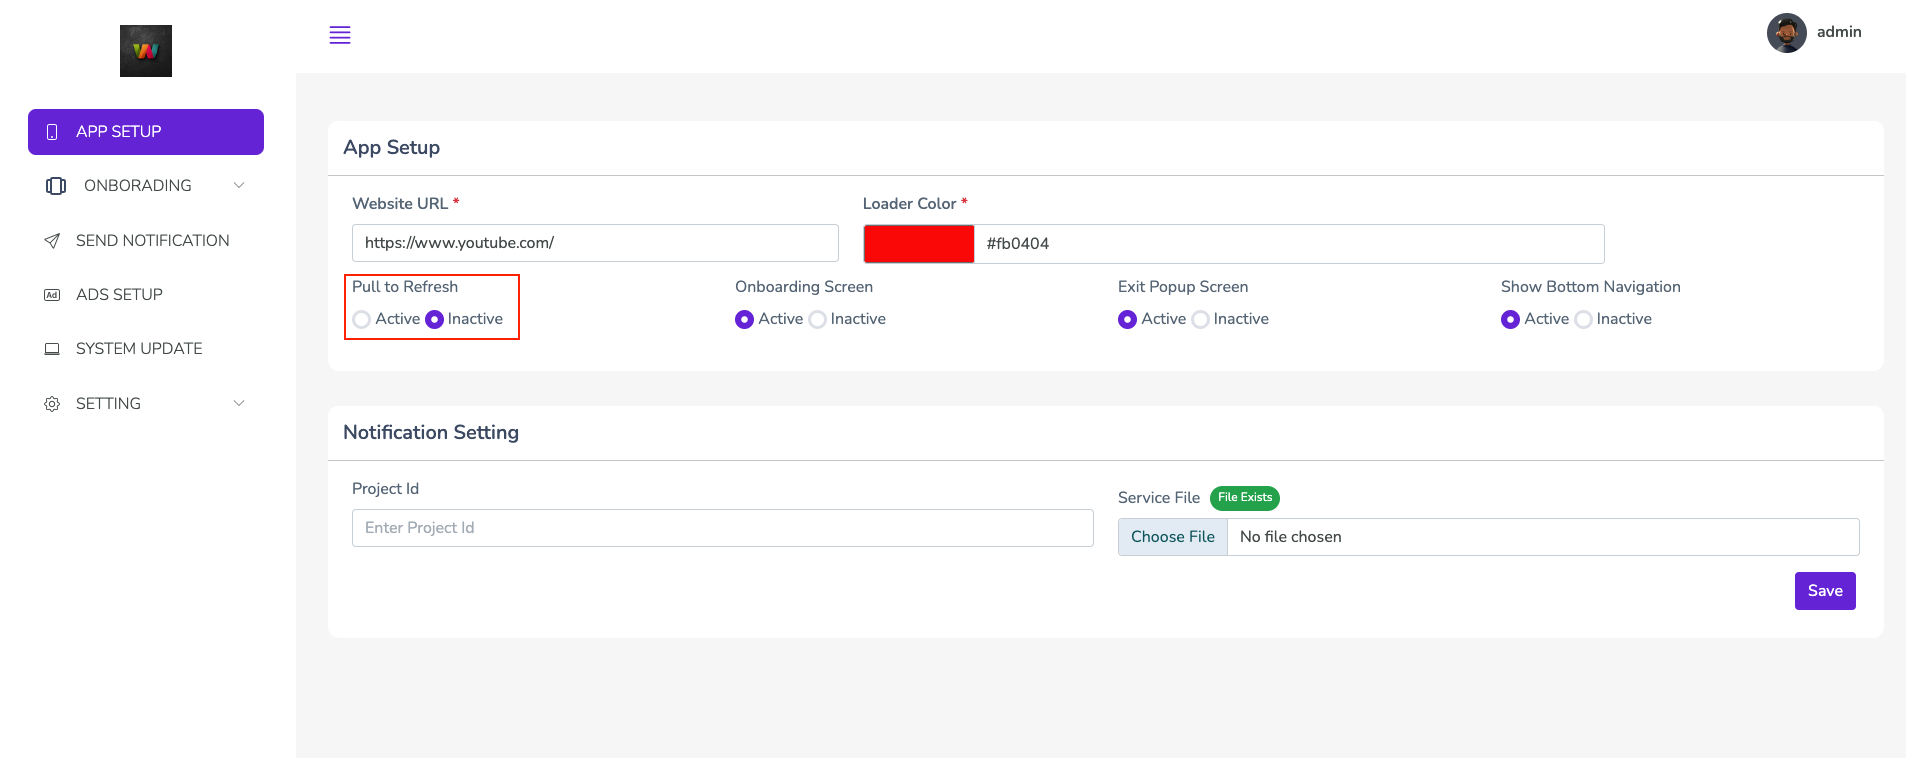
How to Turn on/off Pull to Refresh
If you want to enable Pull to Refresh, set the Pull to Refresh option to"Active" If you want to disable Pull to Refresh, set the option to
"Inactive"
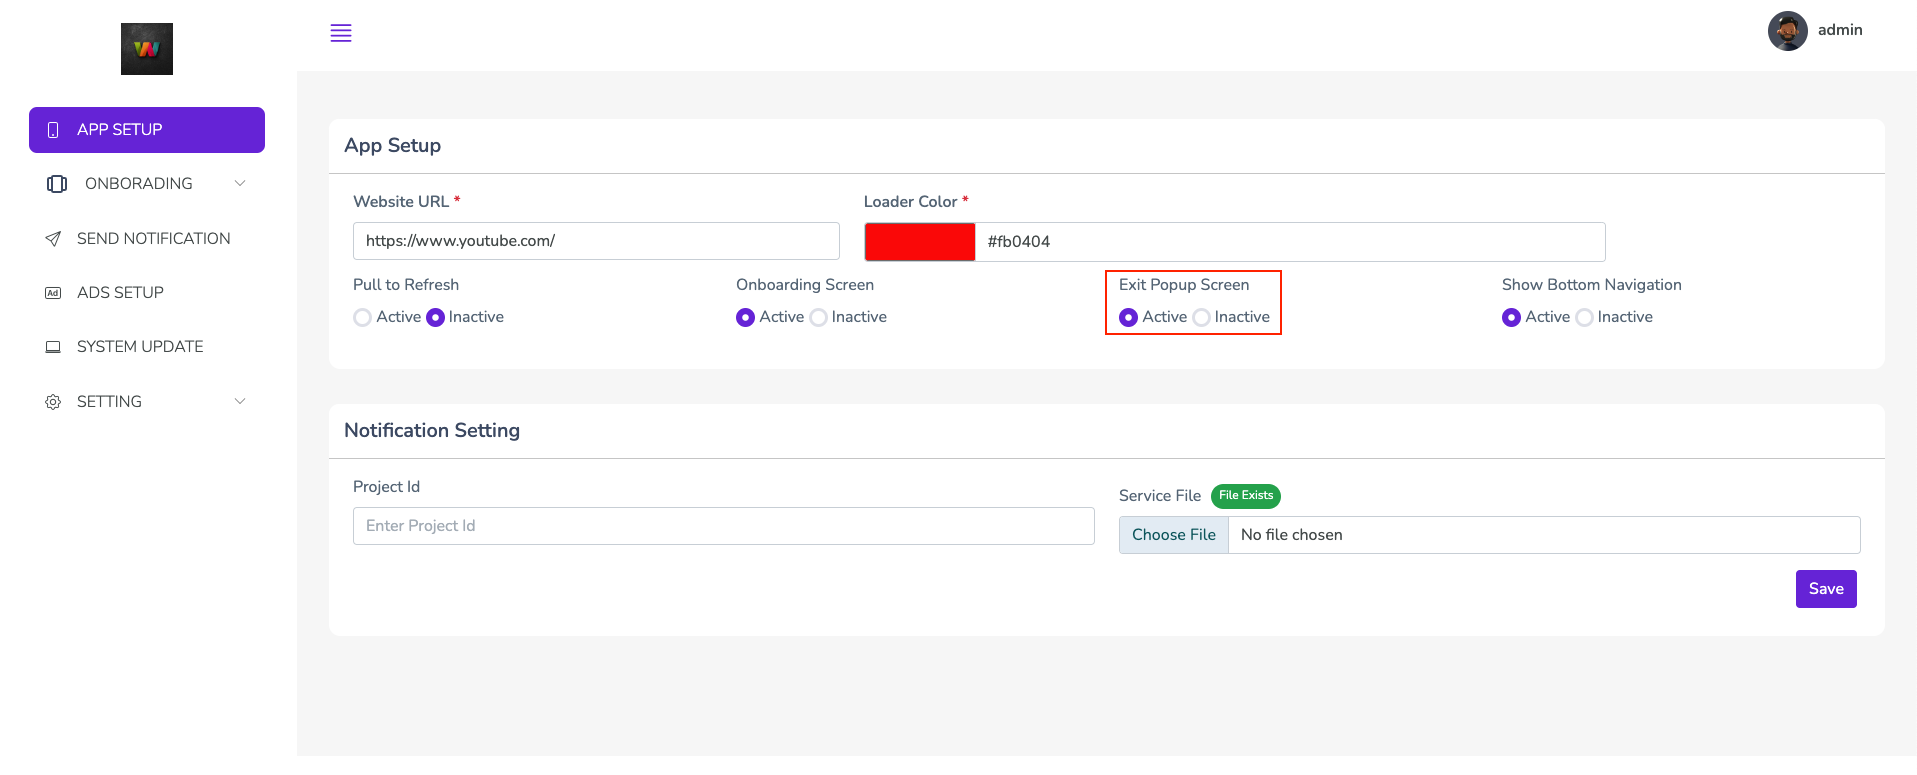
How to Turn on/off Exit Popup Screen
If you want to enable Exit Popup Screen, set the Exit Popup Screen option to"Active" If you want to disable Exit Popup Screen, set the option to
"Inactive"
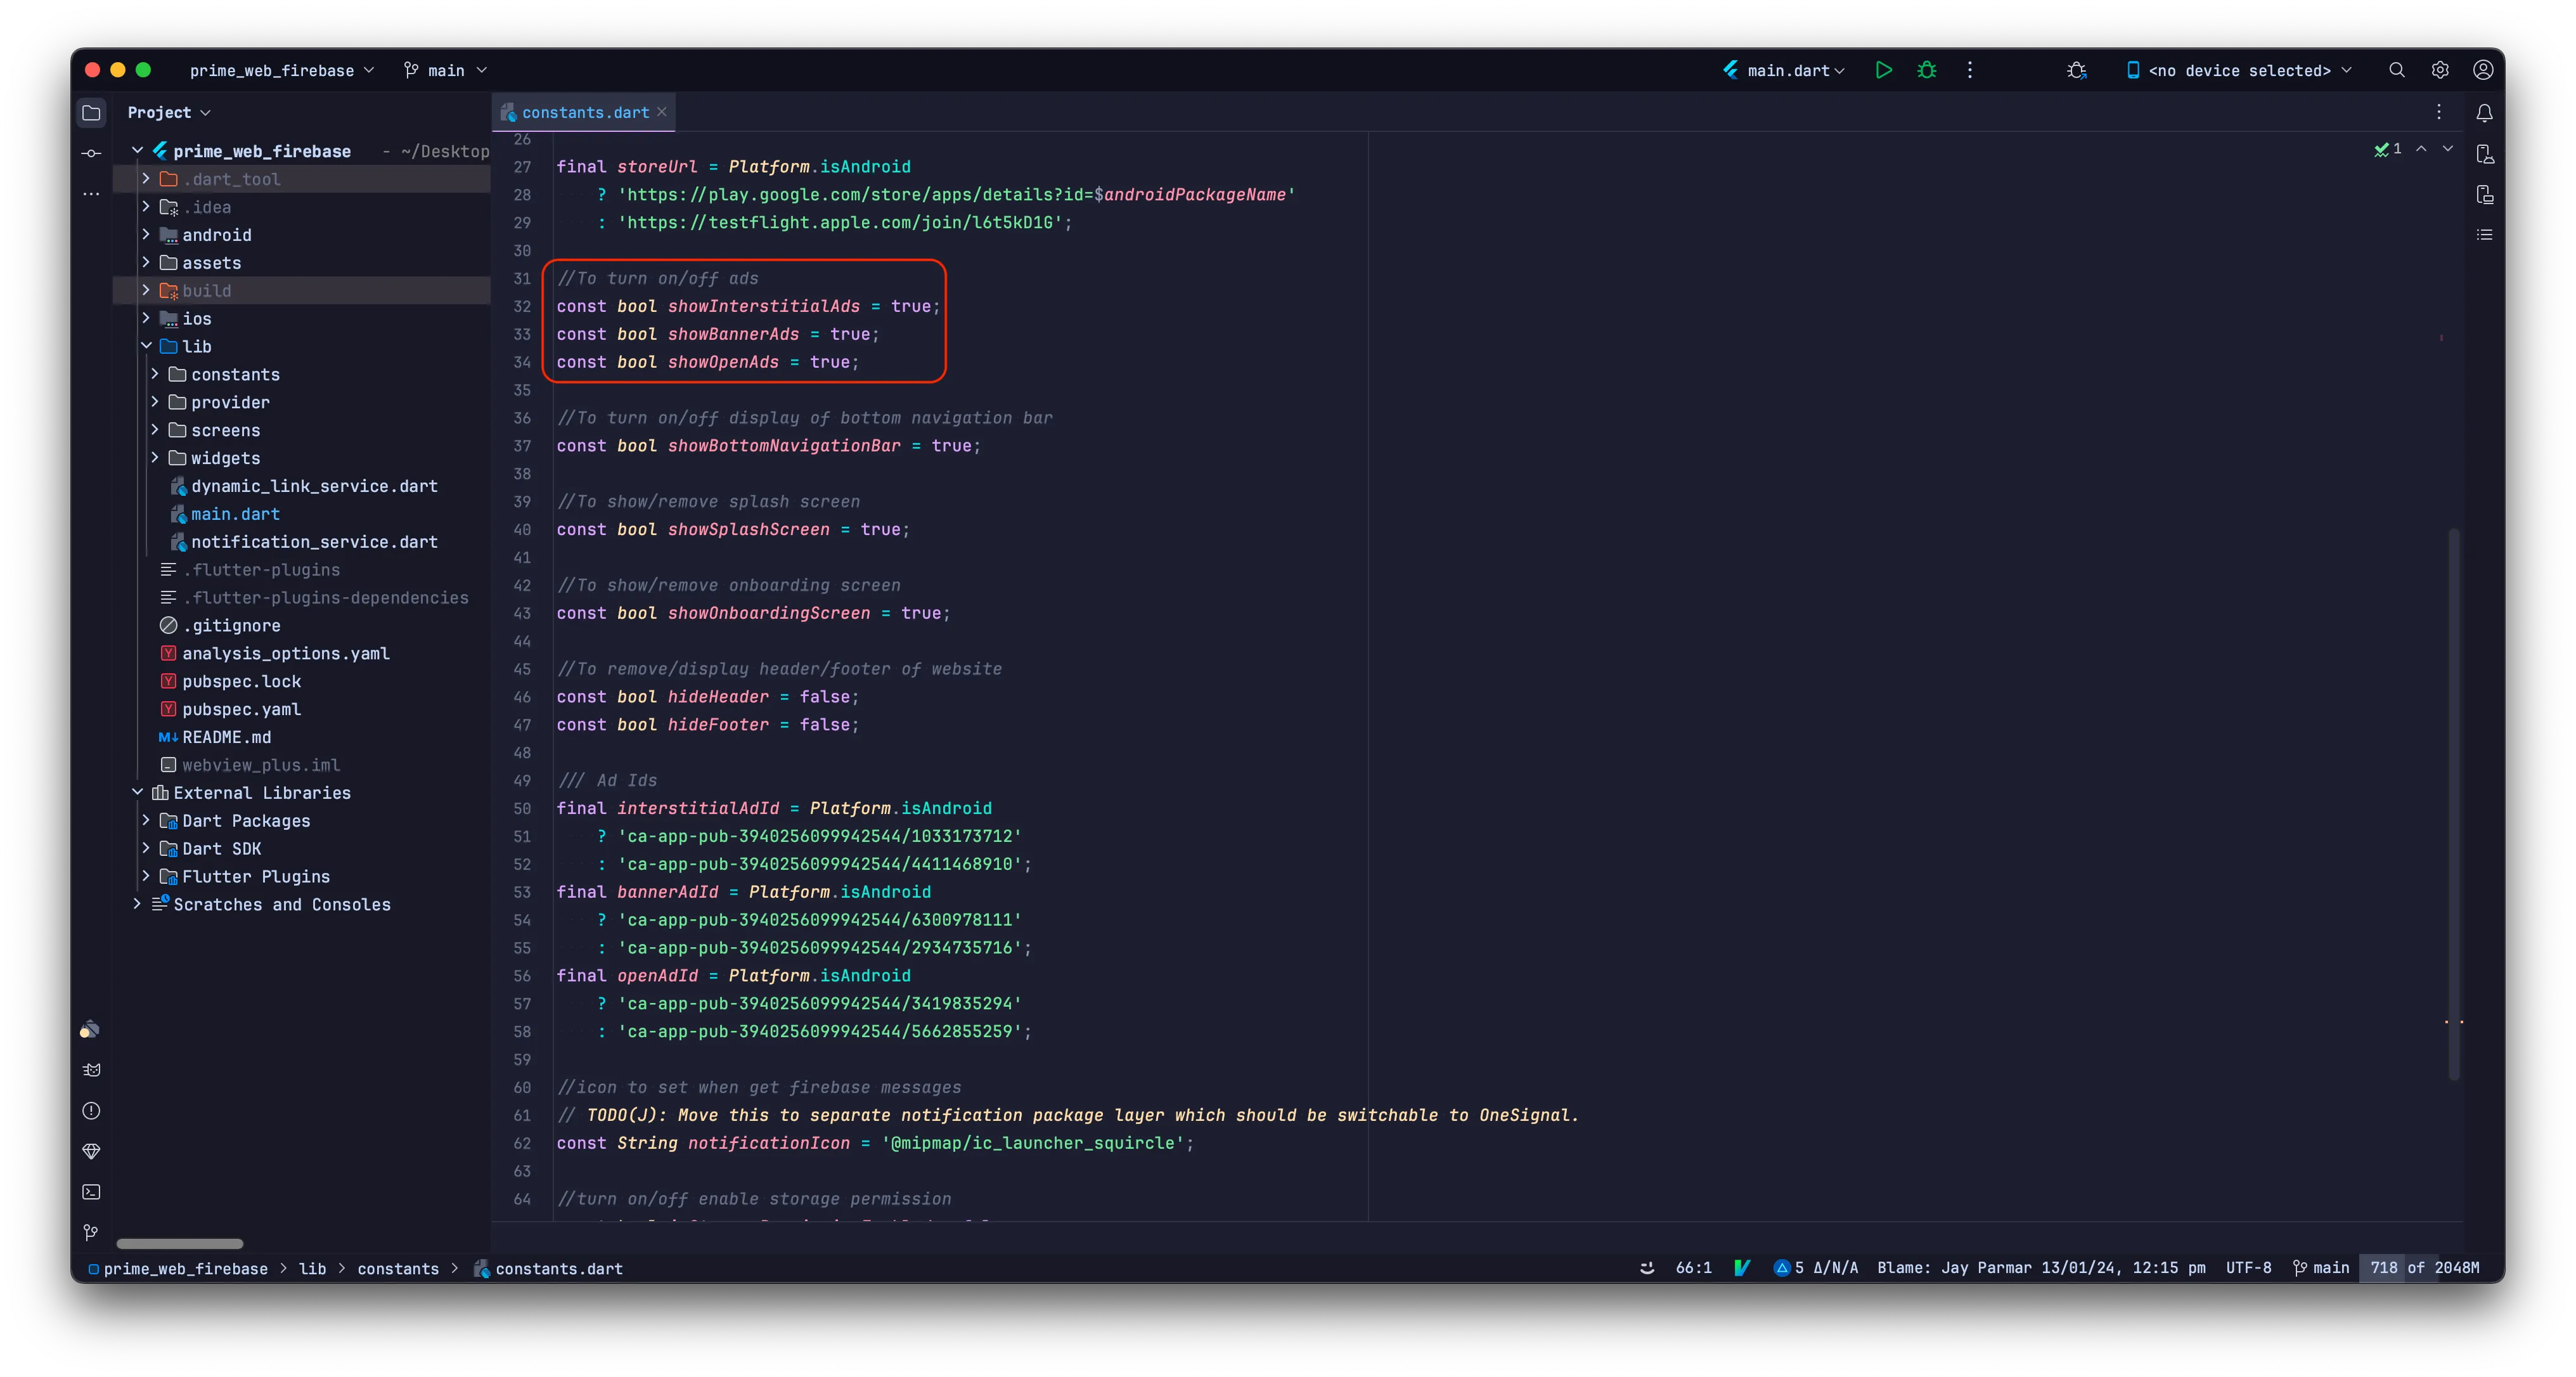
How to Turn on/off Ads
To enable the display of ads, set the Admob App Ad Status, Banner Ad Status, and Interstitial Ad Status options to"Active" If you prefer not to display ads,
set these
three options to "Inactive"
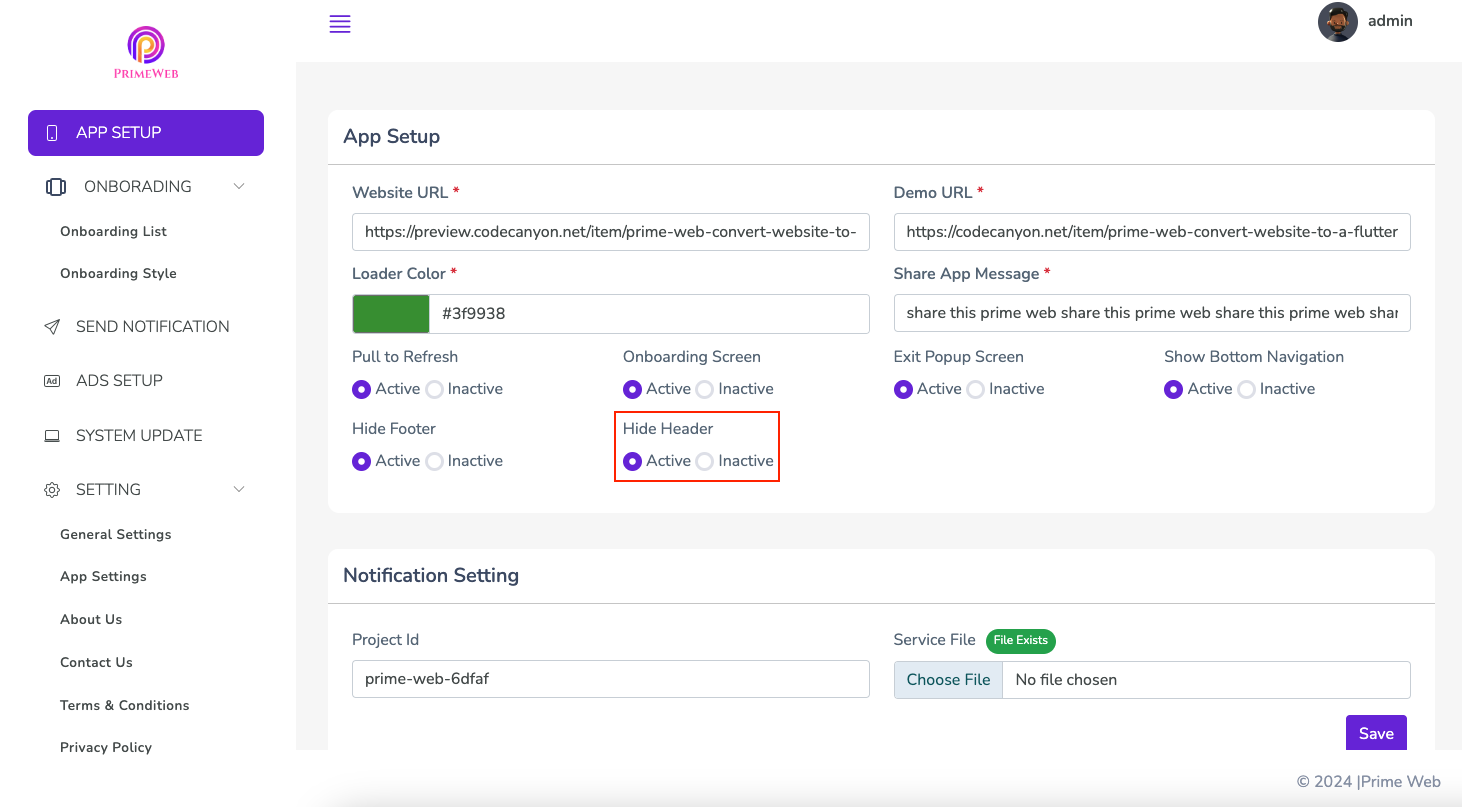
How to Hide Header
To hide the header, set the "Hide Header" option to"Active"
How to Add/Remove Tabs in Bottom Navigation Bar:
To Add a New Tab:
- Add Lottie icons with light and dark brightness to the
assets/iconsfolder.
Inlib/constants/icons.dart, use them as shown in the image.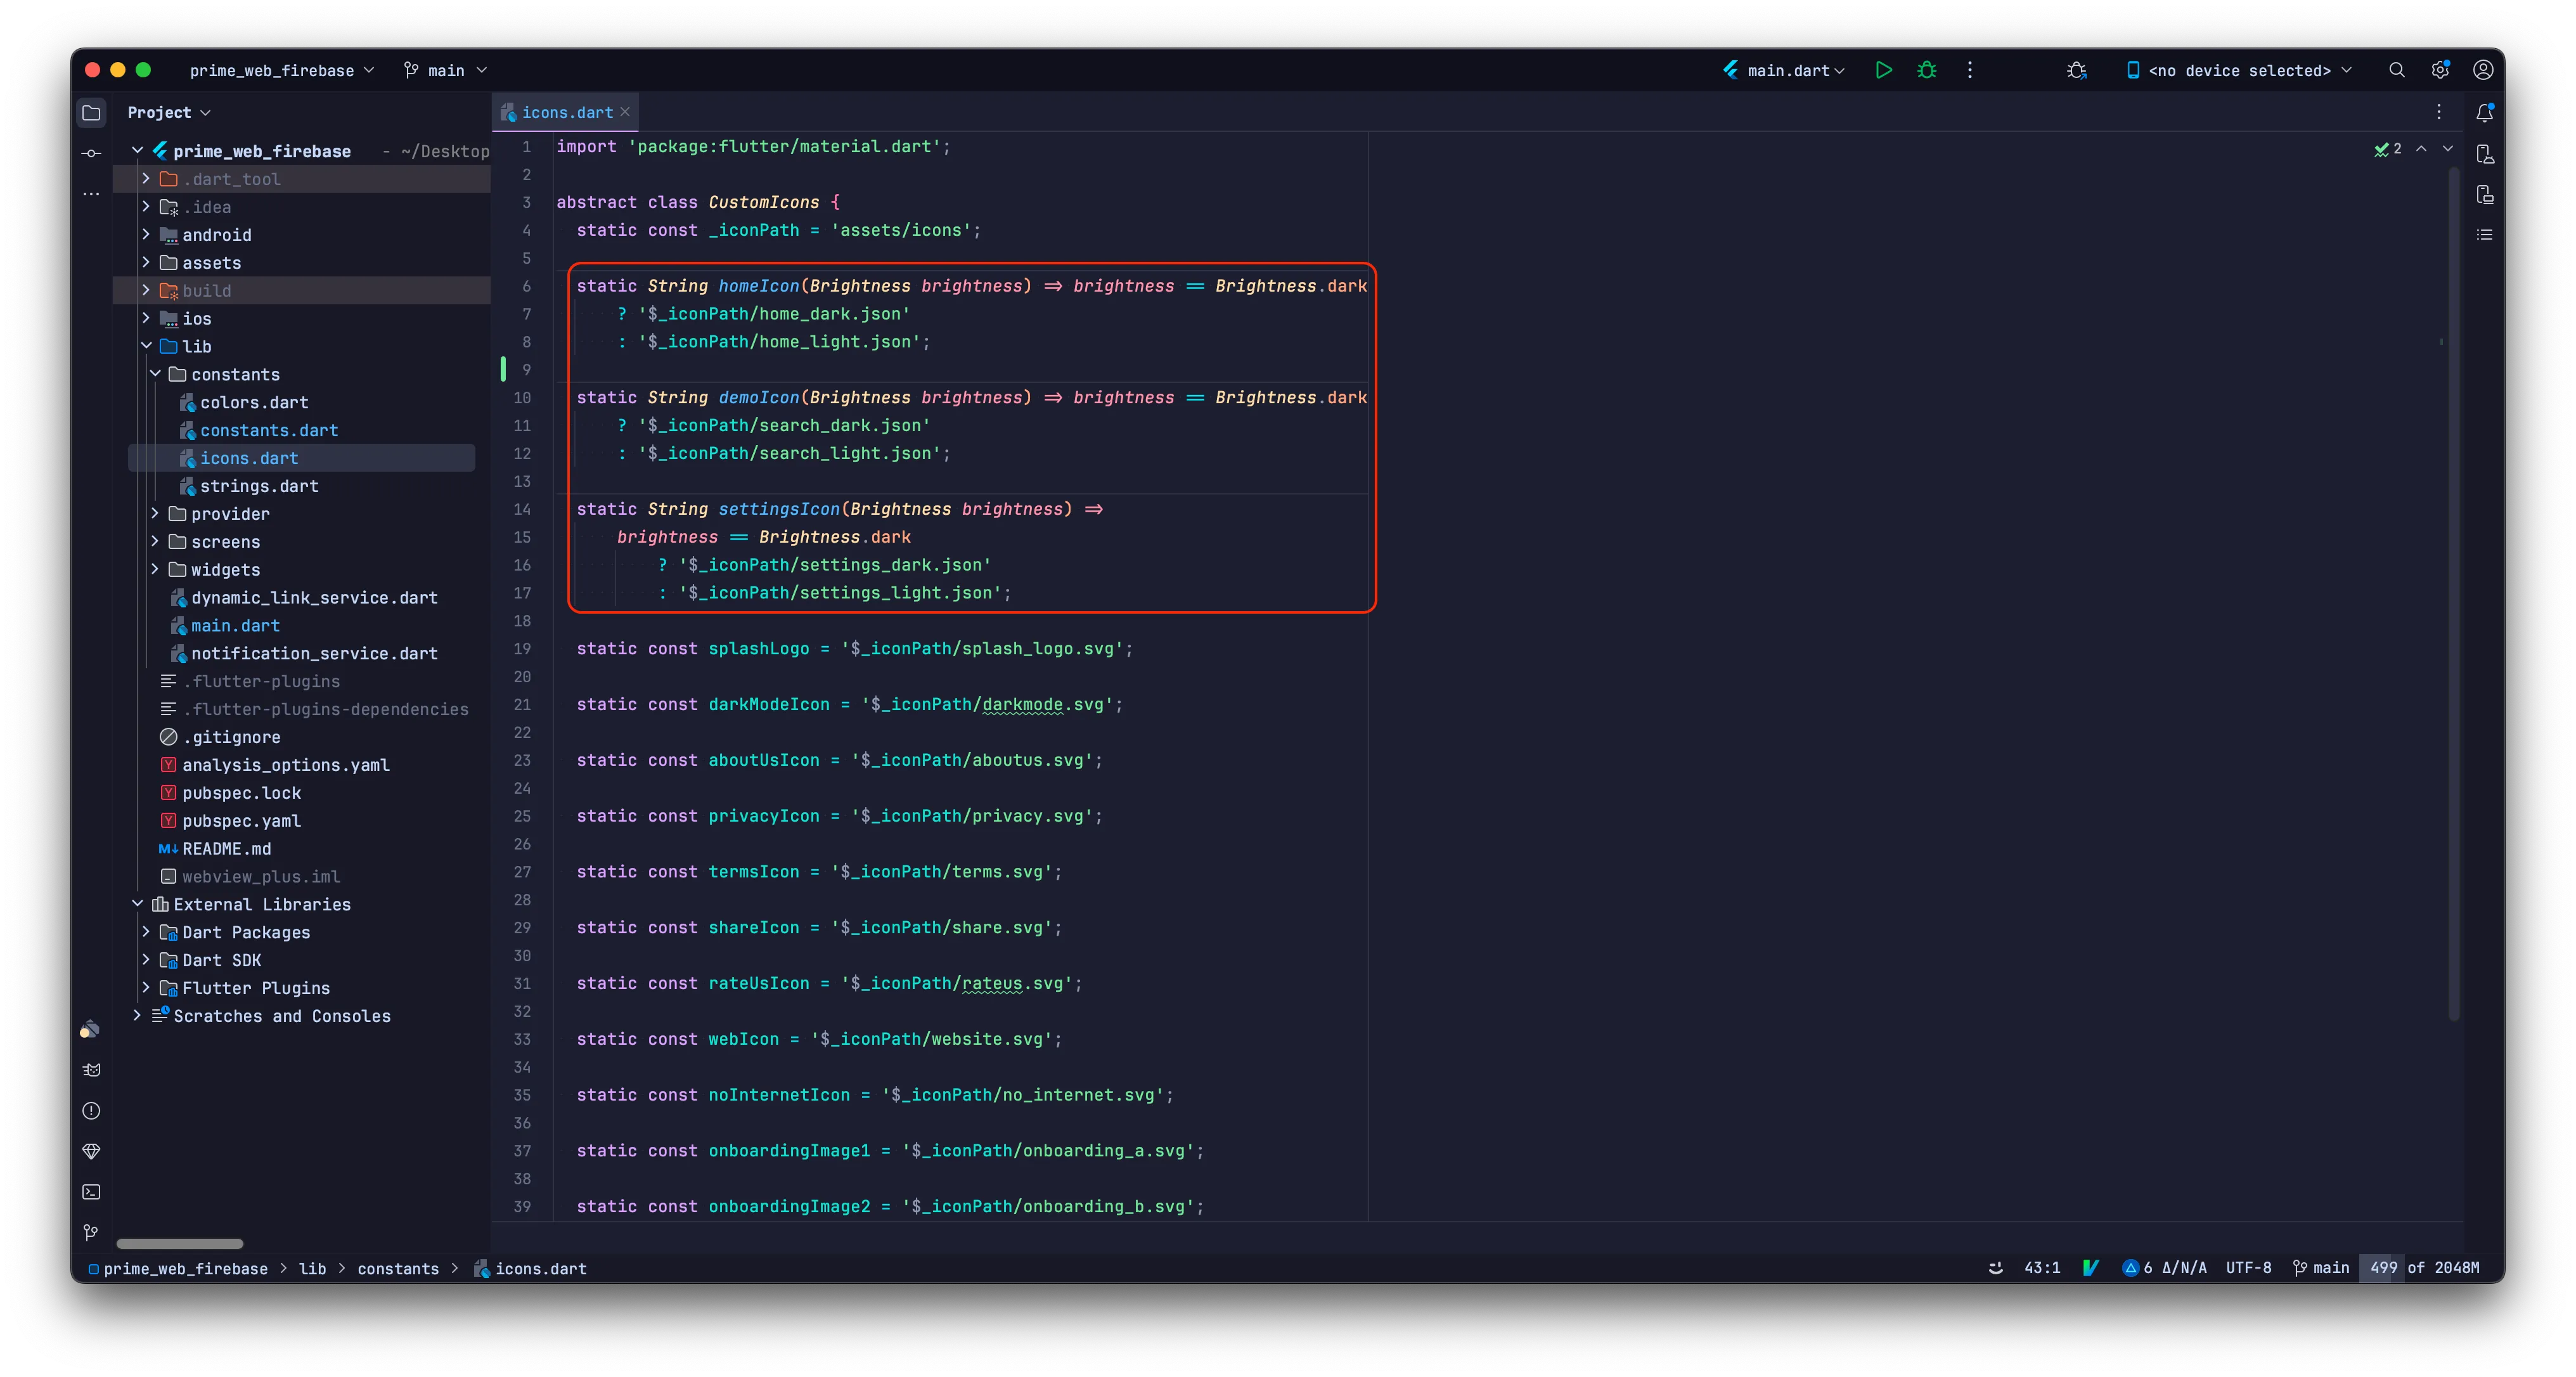
- Add the corresponding variable in the icons.dart file. Modify the navigationTabs
list in the Constants file to add or remove tabs. You can use the following code as
a template:
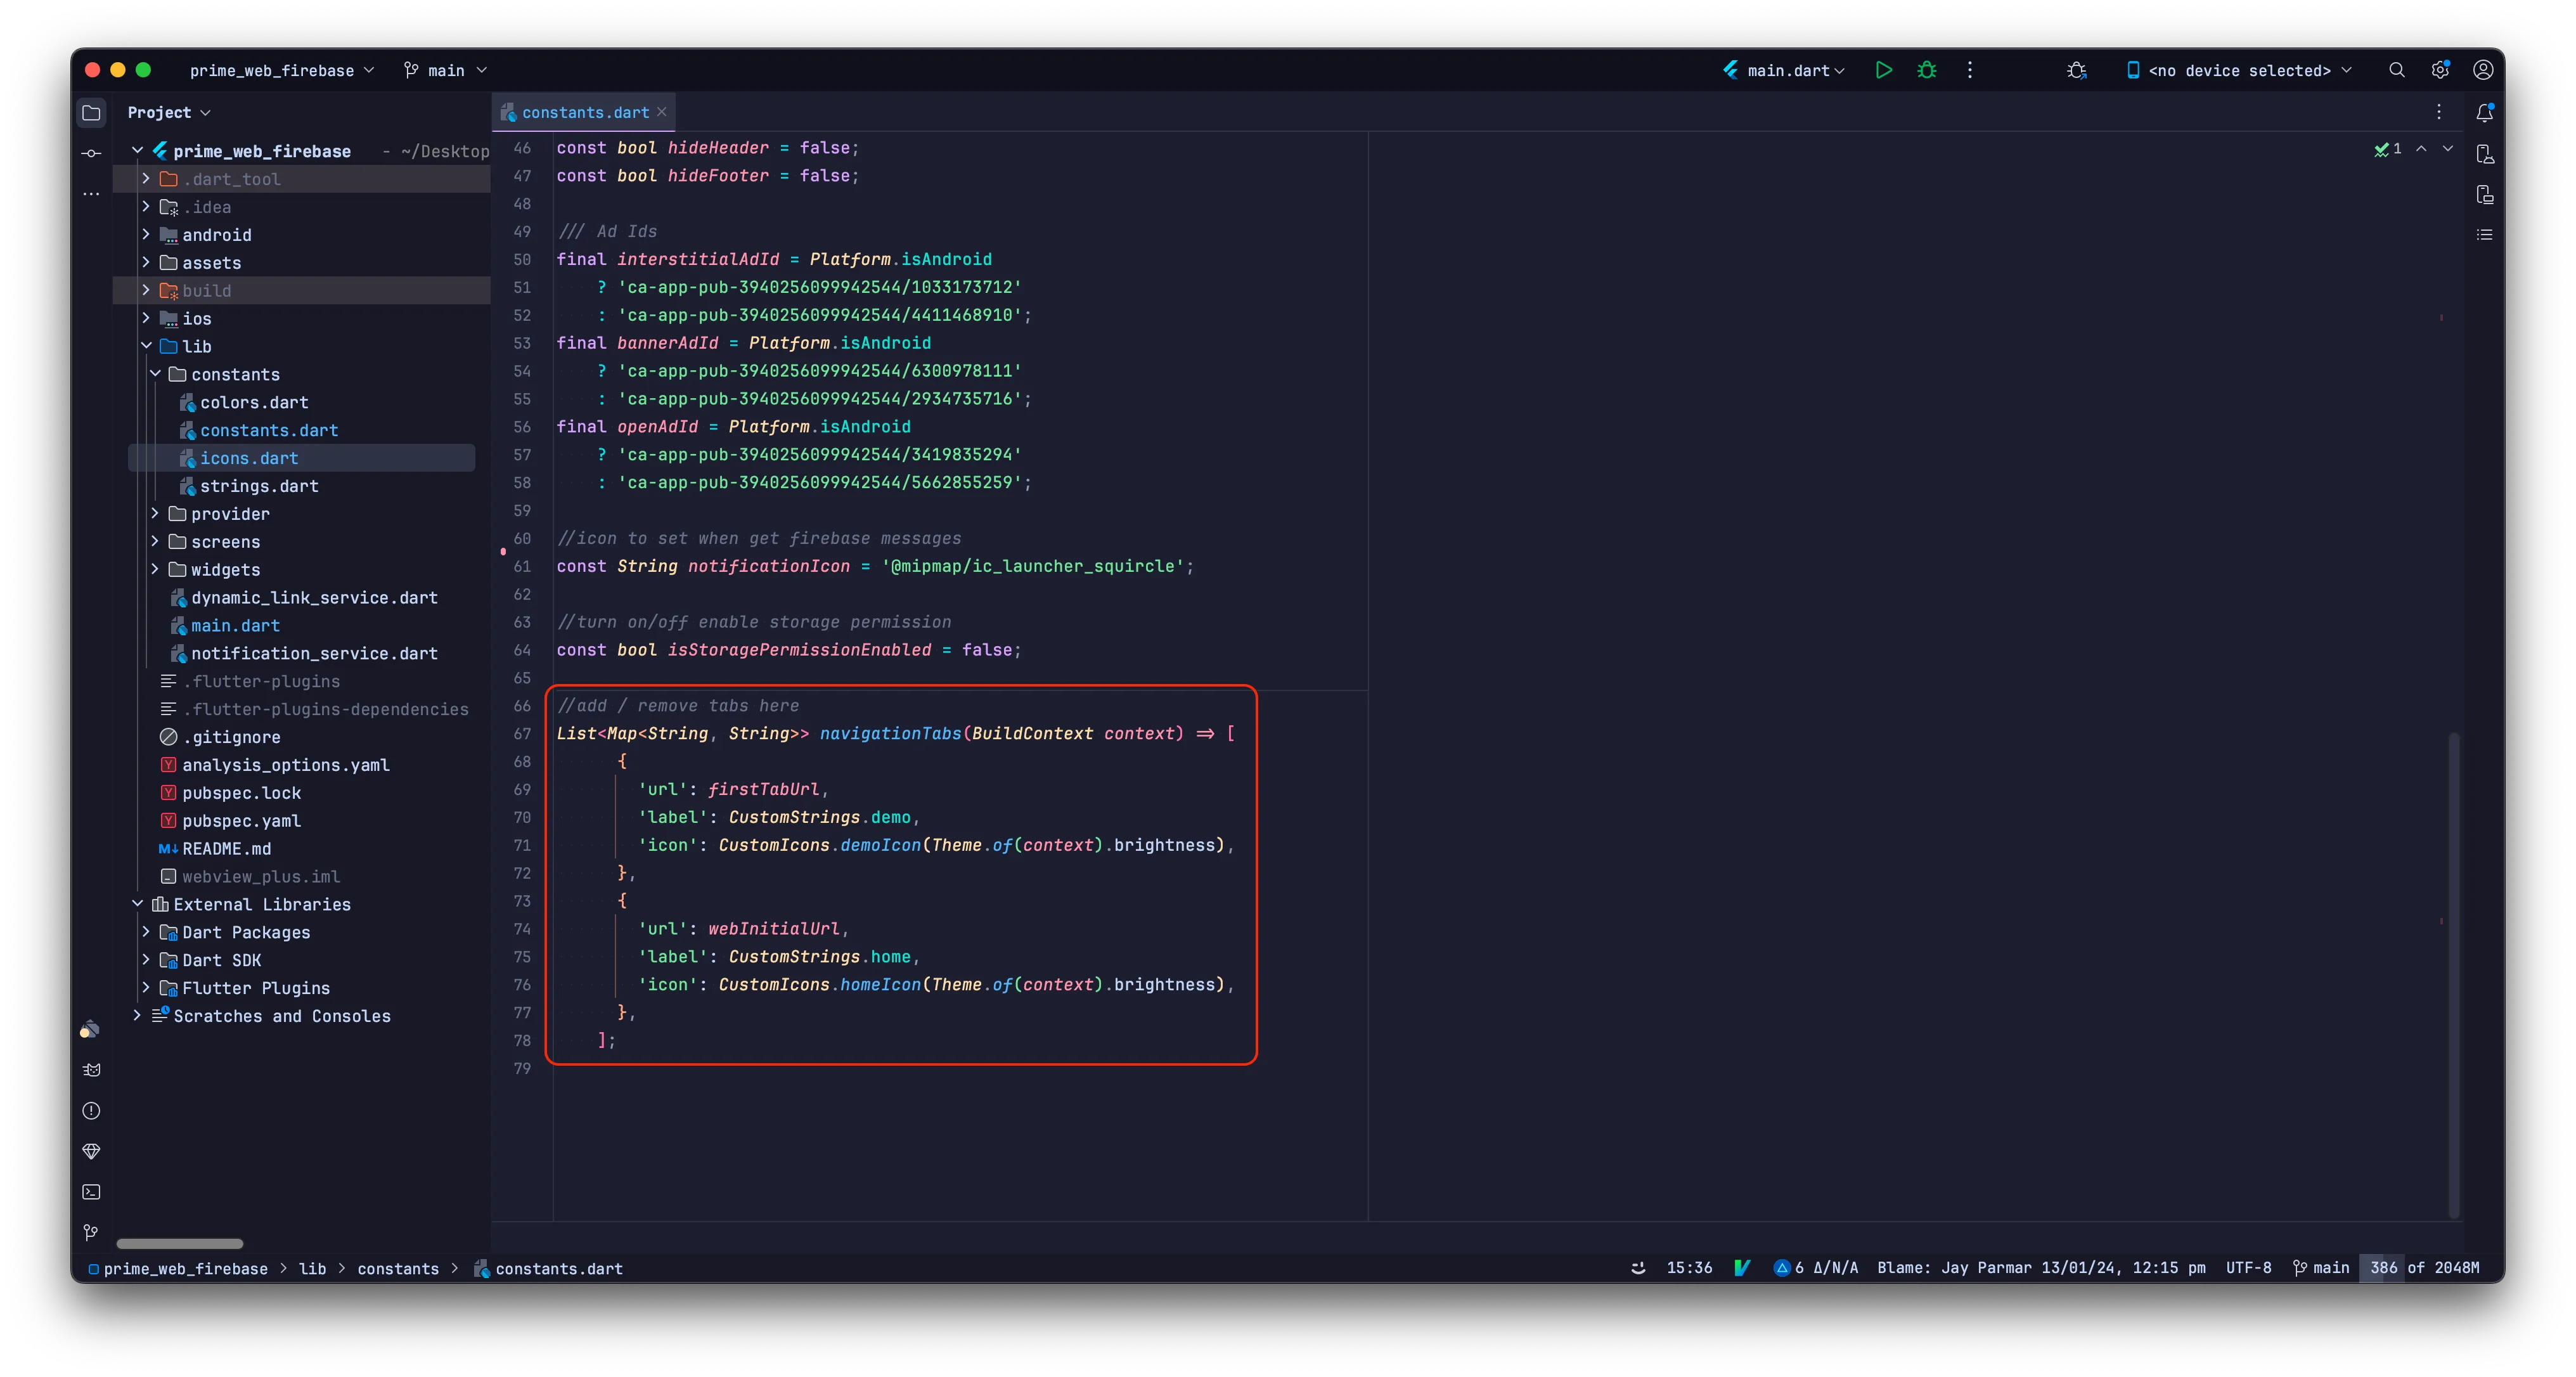
        {
            'url': '',
            'label': '',
            'icon': ''
        },
Note: The Settings tab will be added in the code, and you can't modify it from this list.
How to Show/Hide Onboarding Screen:
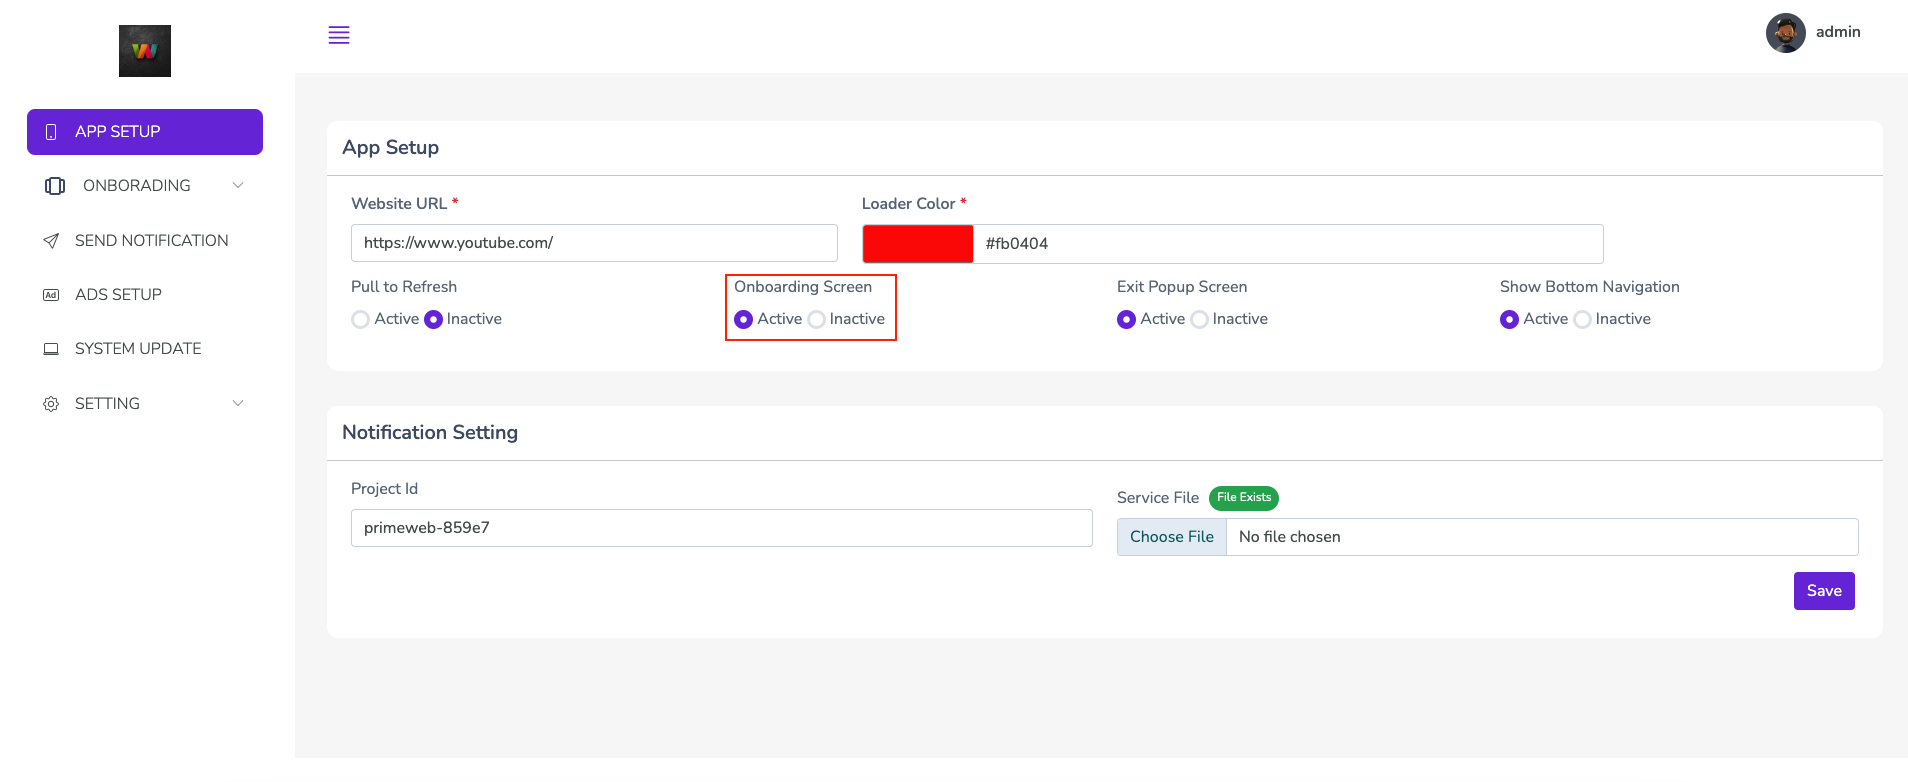
If you want to display the Onboarding Screen when the user opens the app for the first
time, set the Onboarding Screen option to "Active" If you do not want to
display the Onboarding Screen, set the option to "Inactive"
How to Change Splash Logo and Color:
To Change Splash Logo:
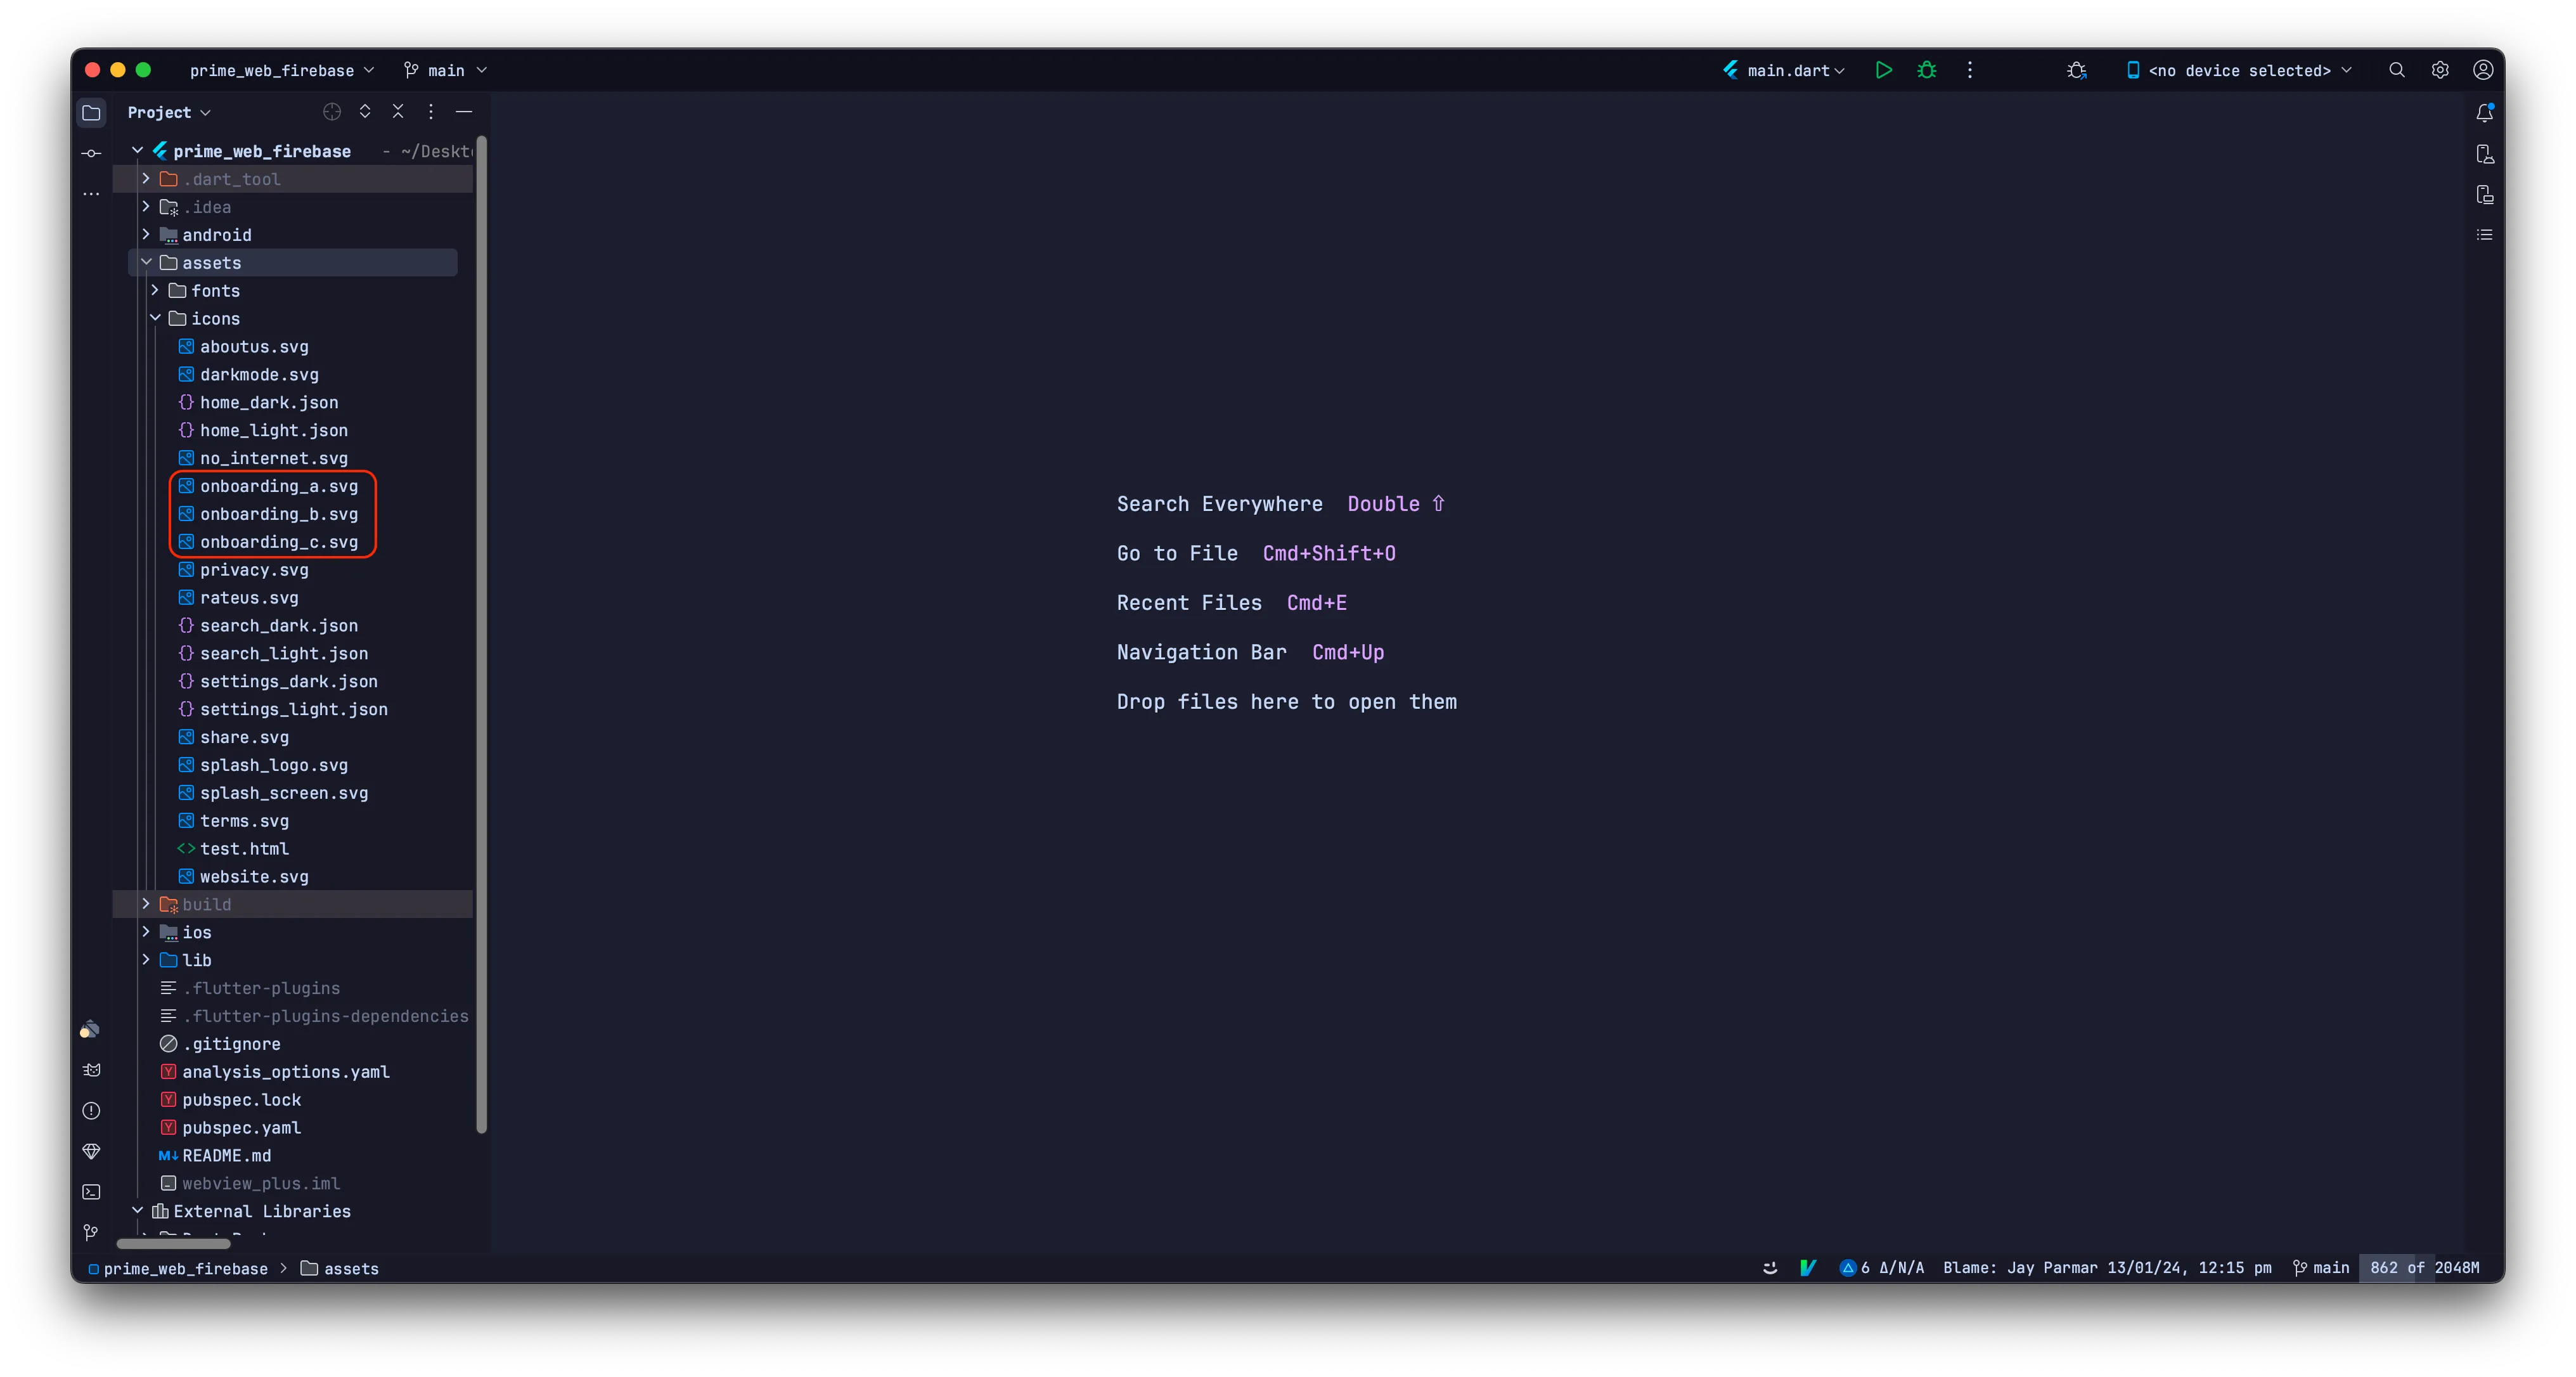
- Create a logo in 'svg' format.
- Replace 'splash_logo.svg' in the 'icons' folder with your new SVG logo.
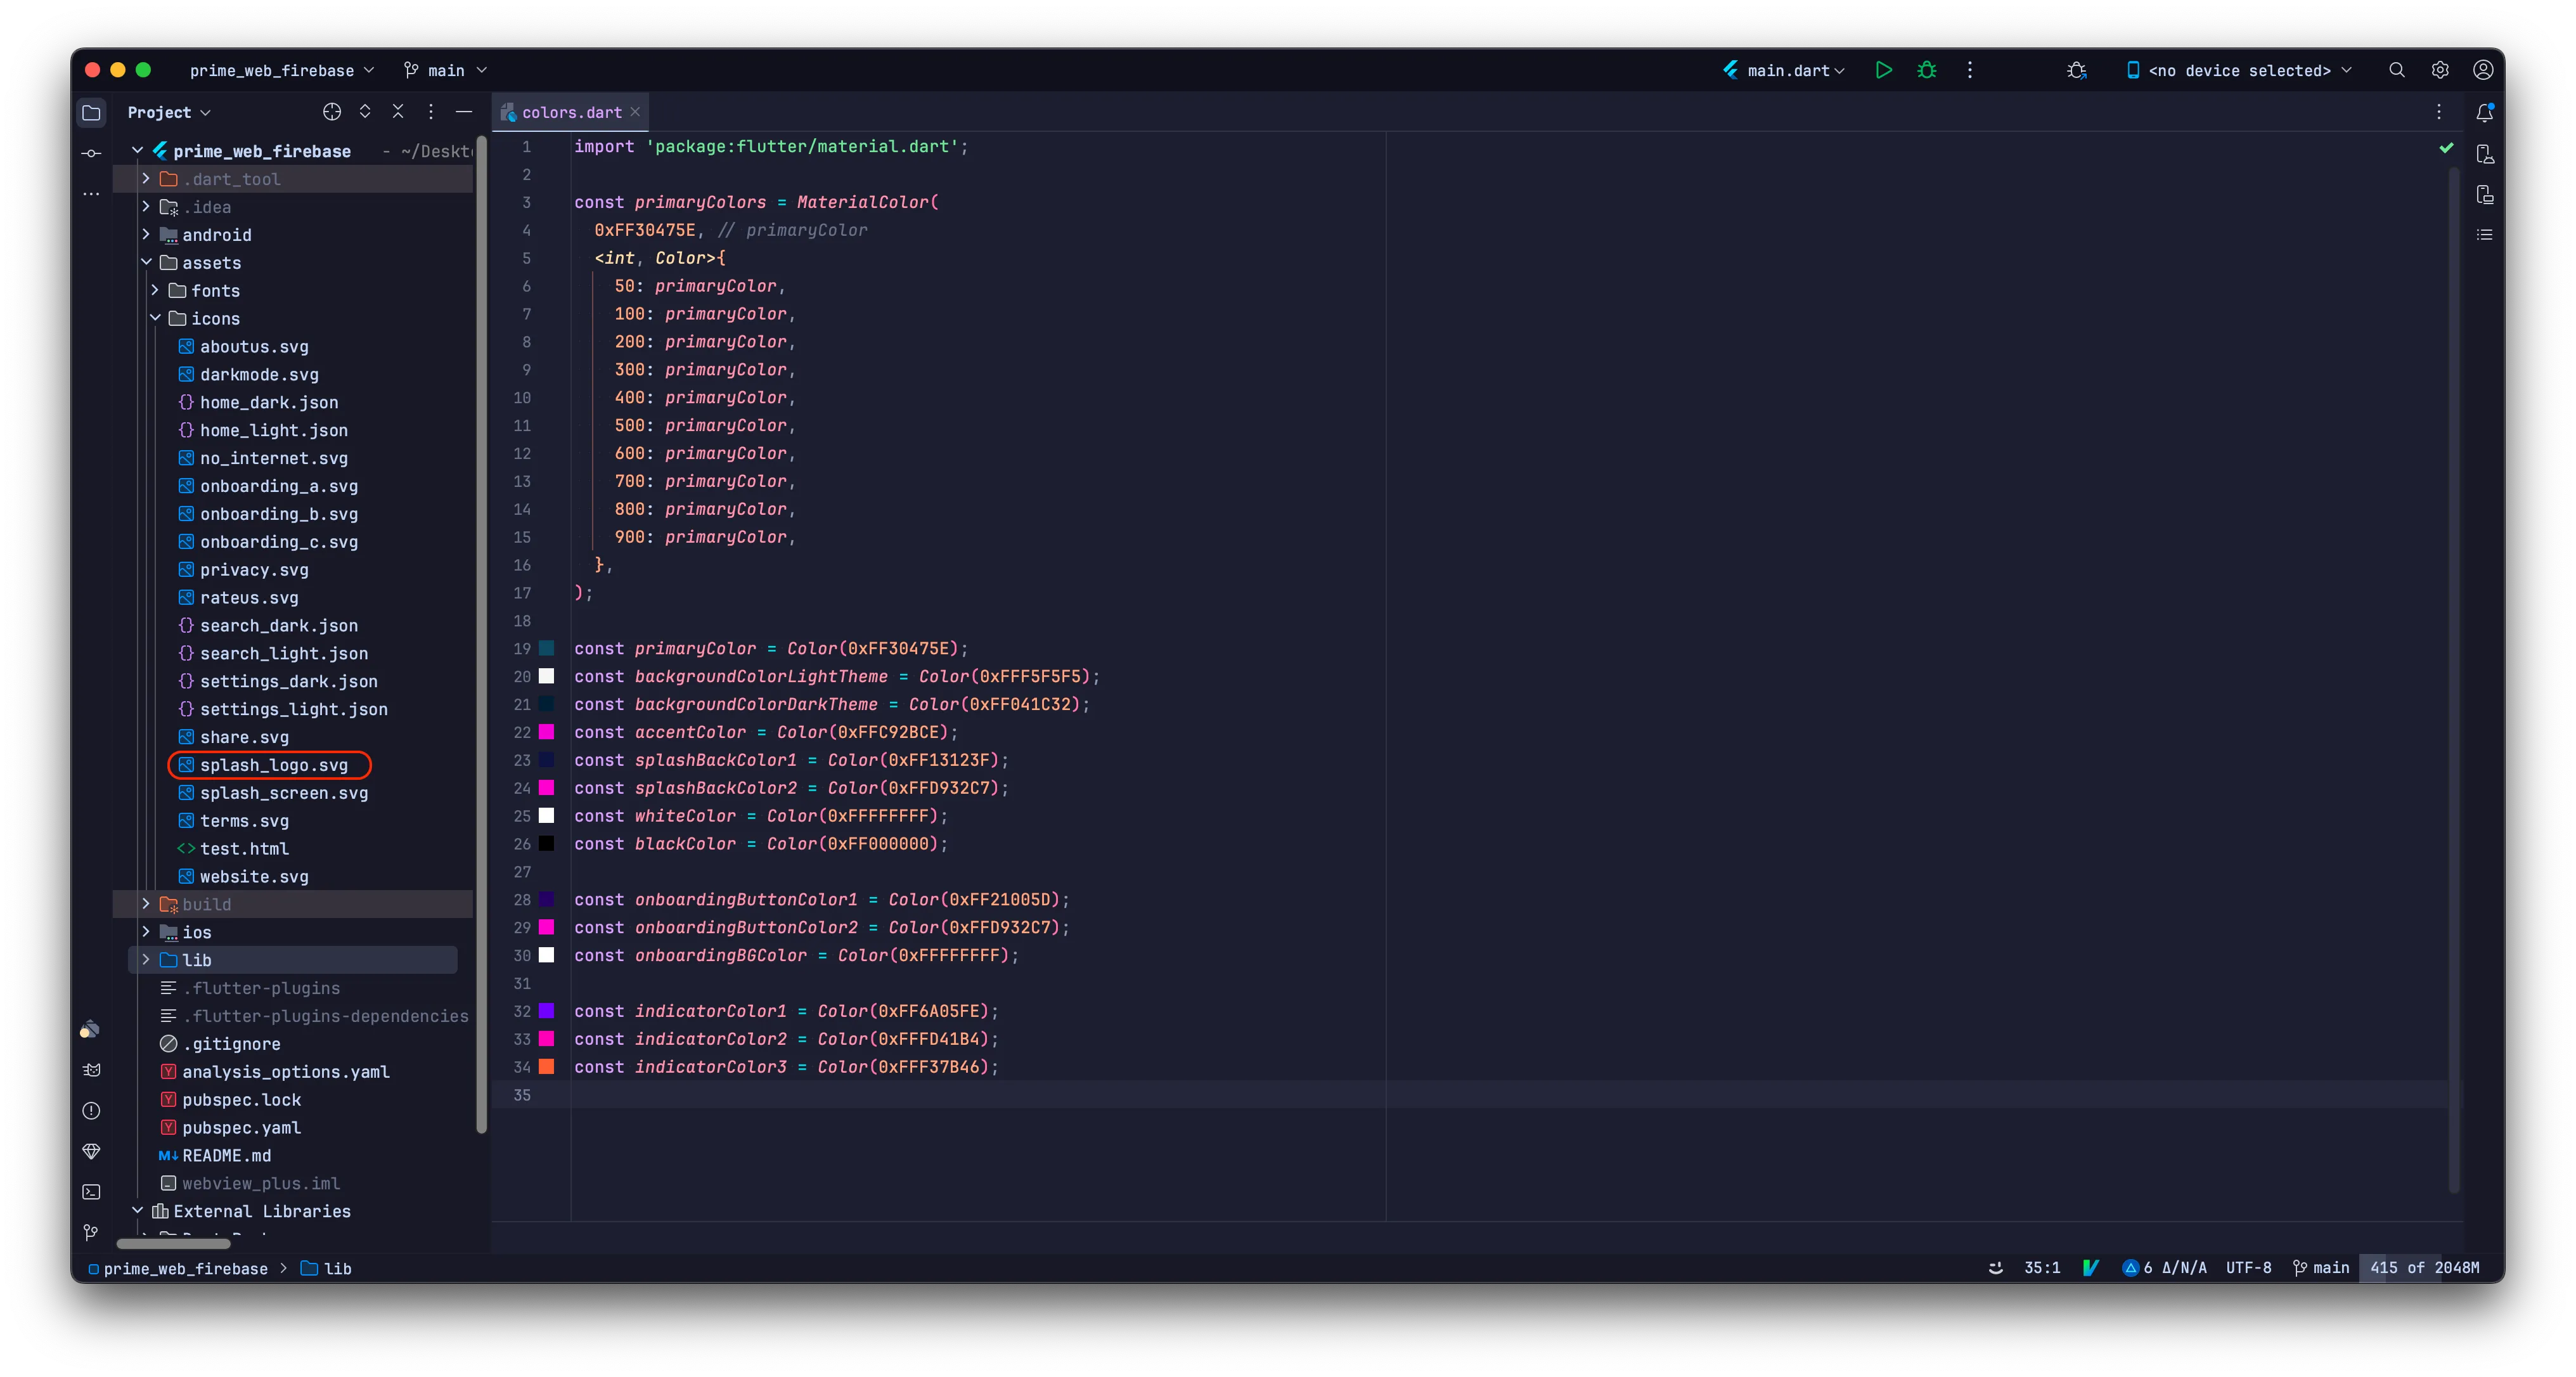
To Change Splash Background Gradient Colors:
Change the value of the variable as shown below:
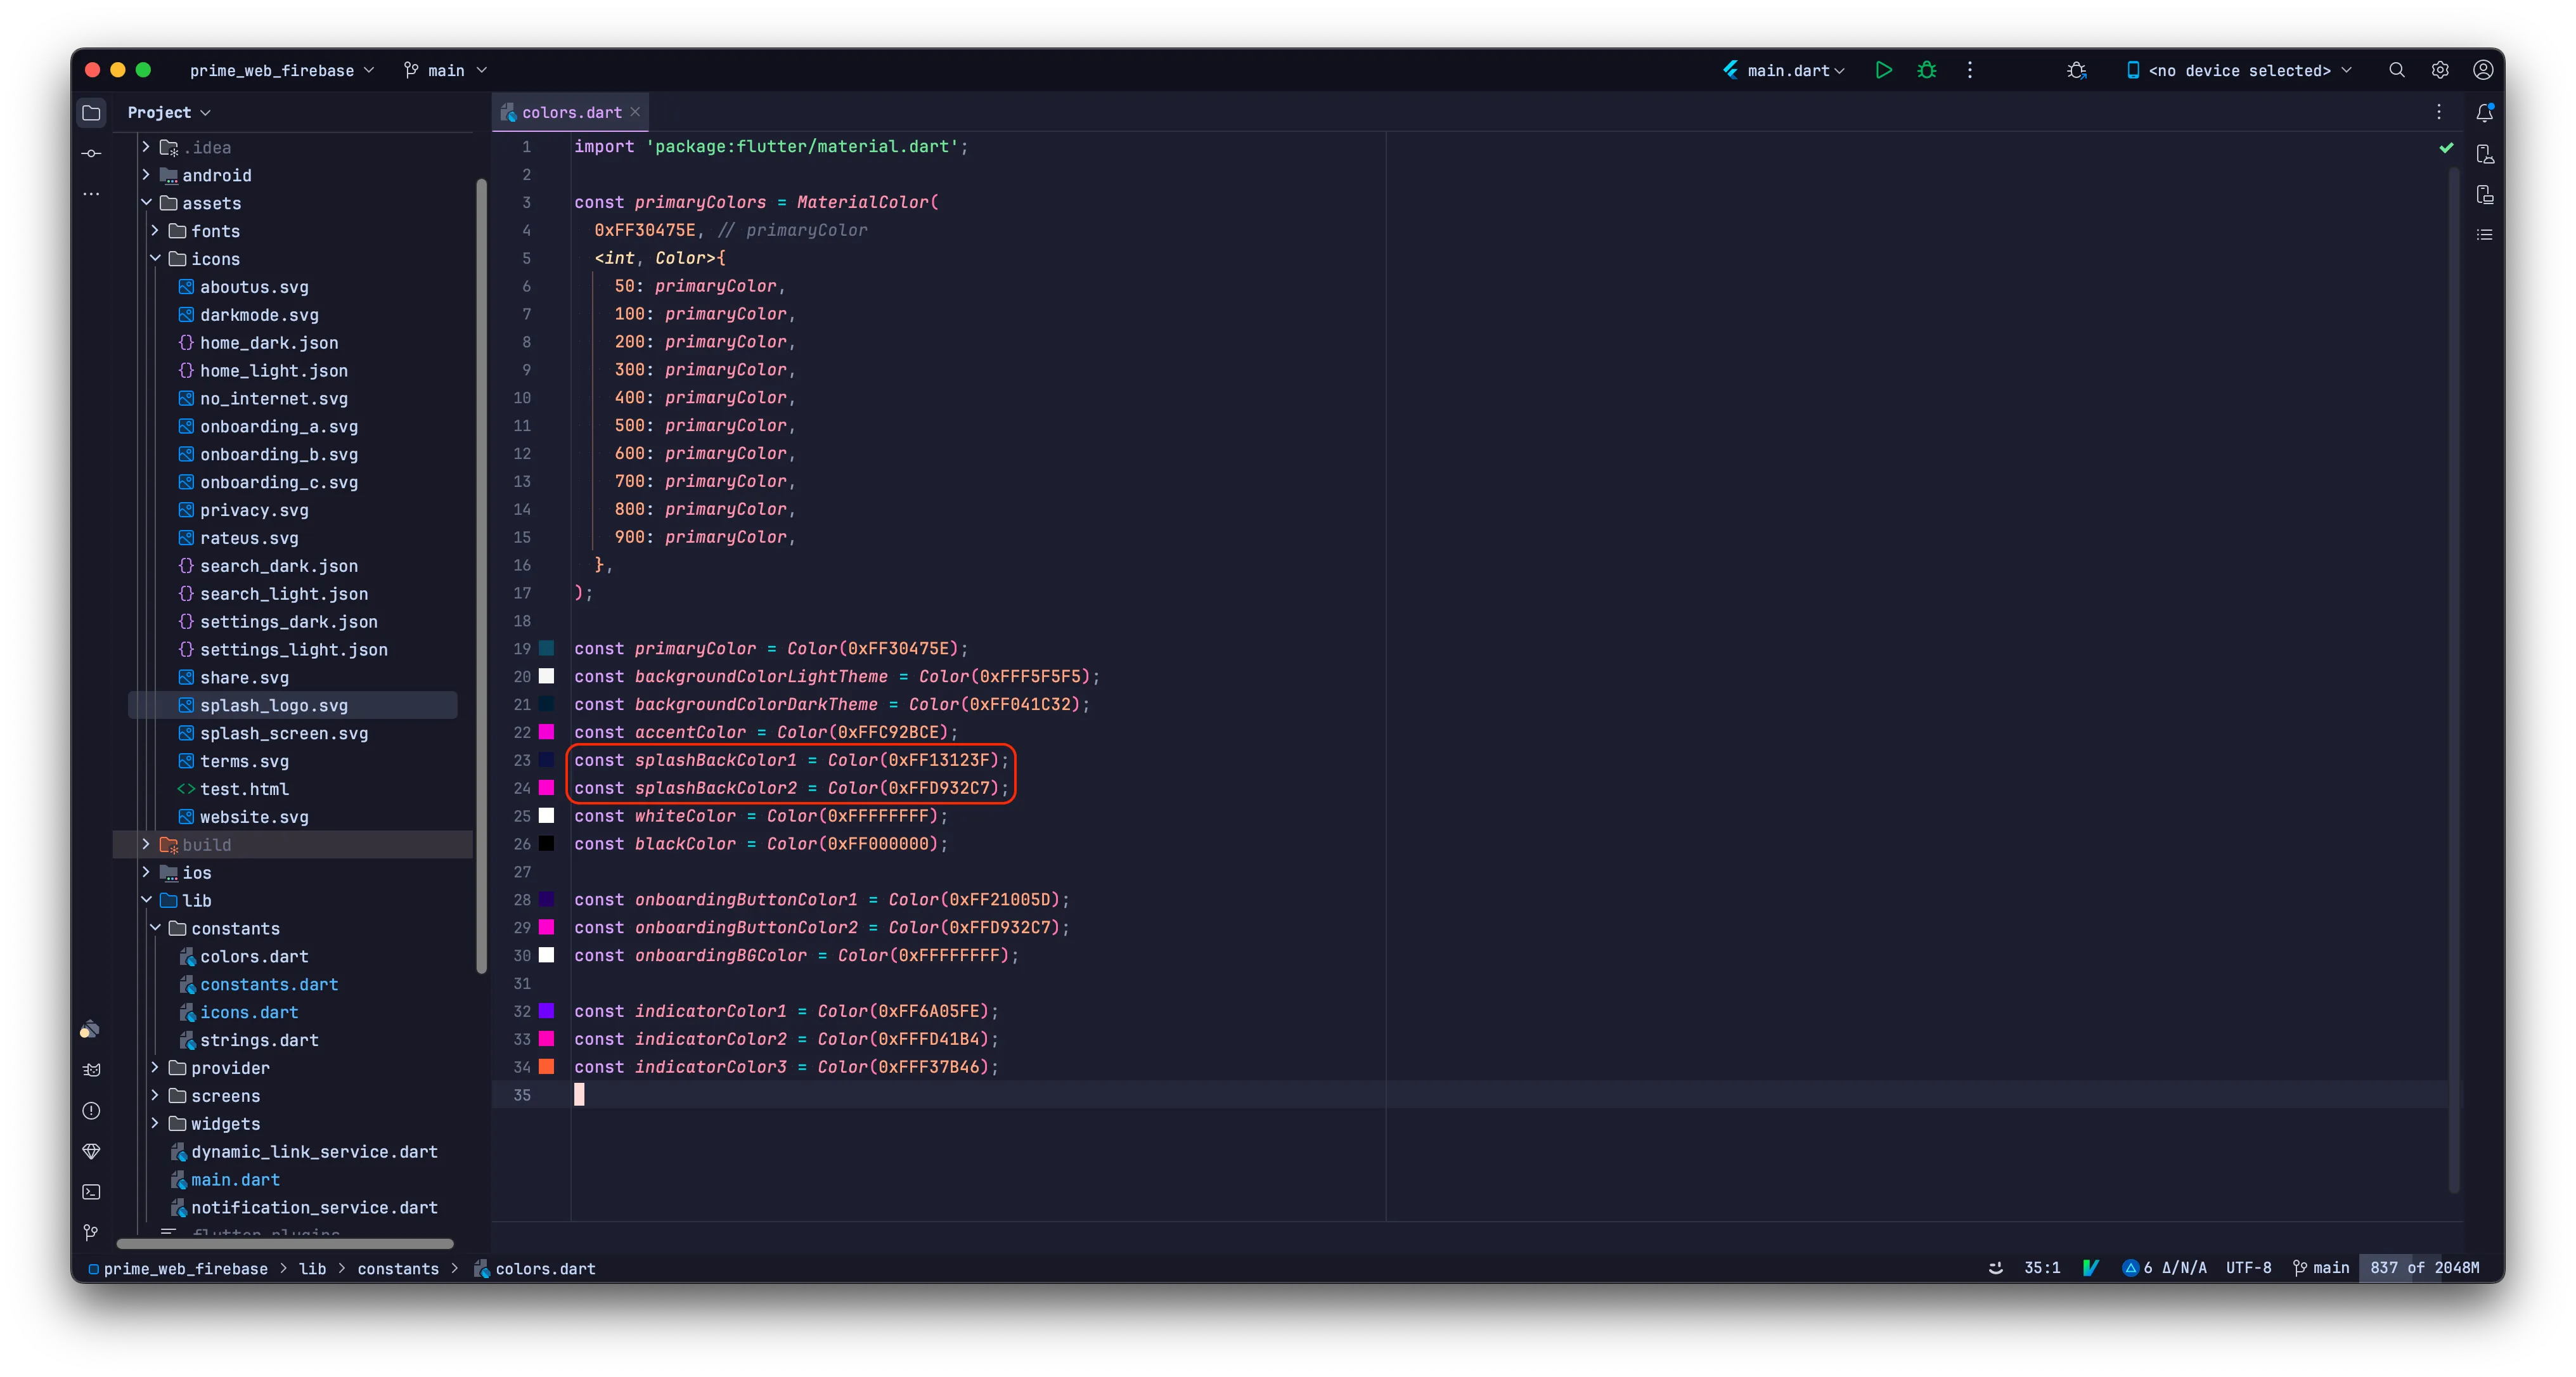
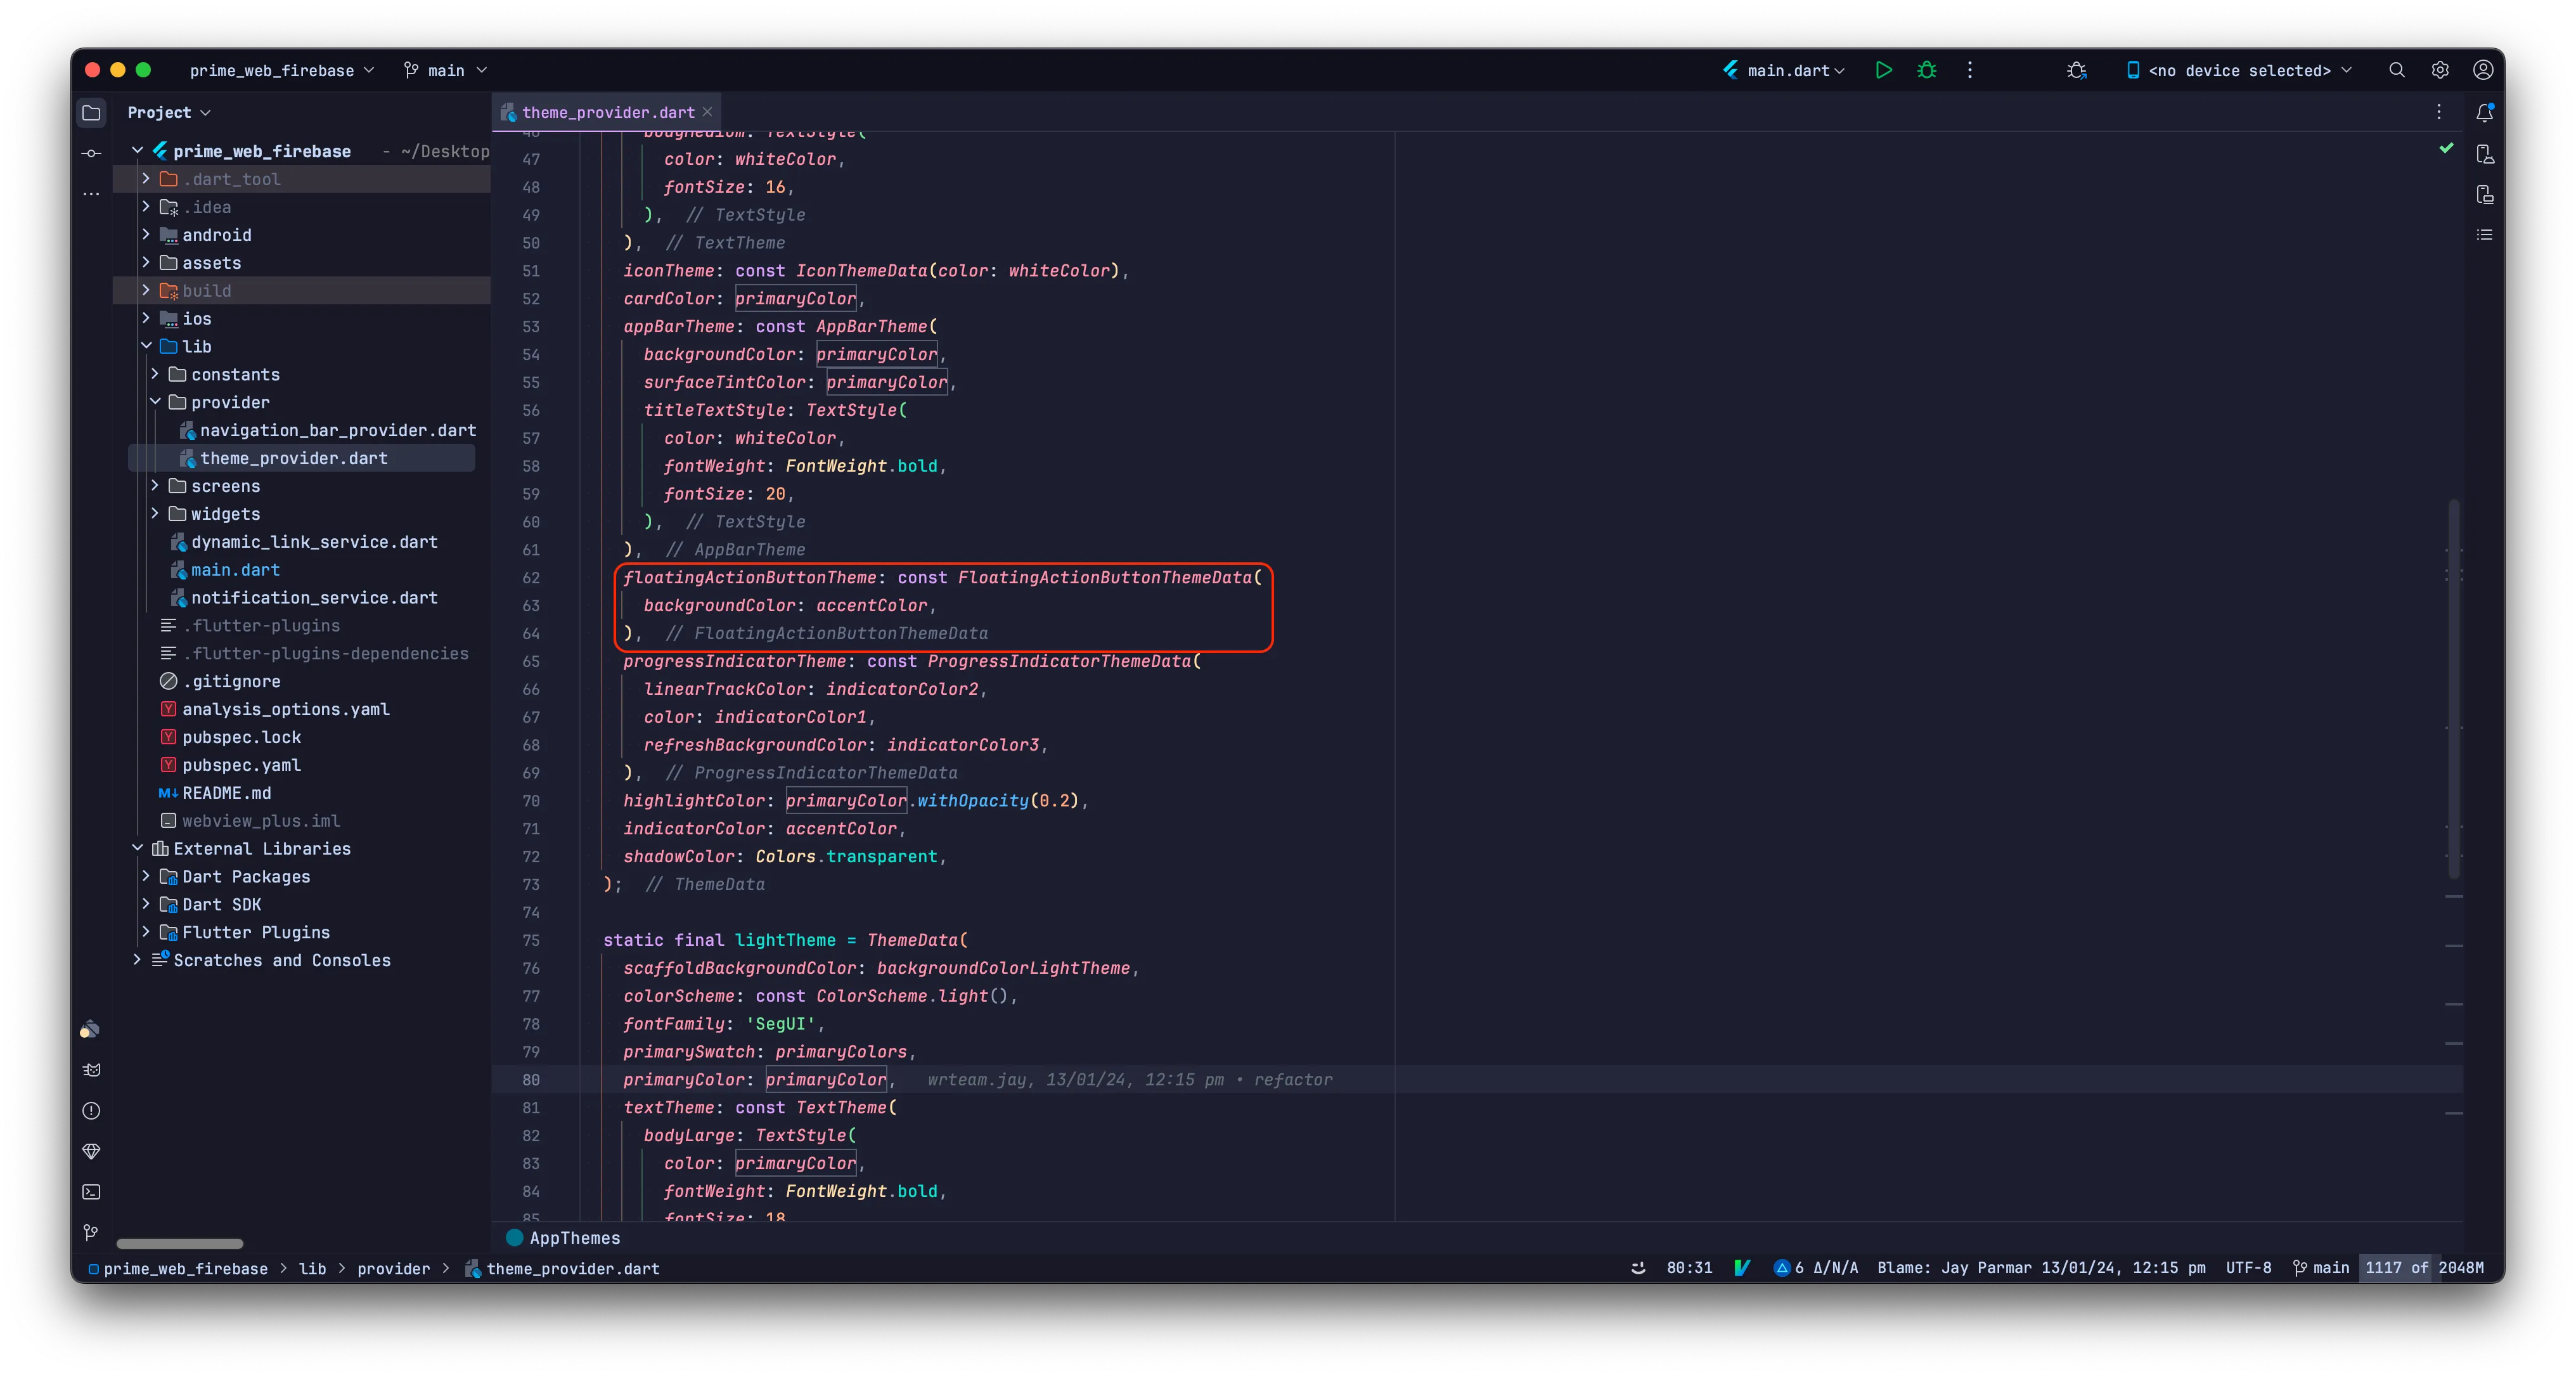
How to Change Floating Action Button Color:
Open lib->provider->theme_provider.dart file and change the value of
'backgroundColor' in floatingActionButtonTheme (both in light
and dark themes if required).
How to Add Onboarding Screen Elements:
Click the "Add Onboarding" button to add Onboarding Screen elements.
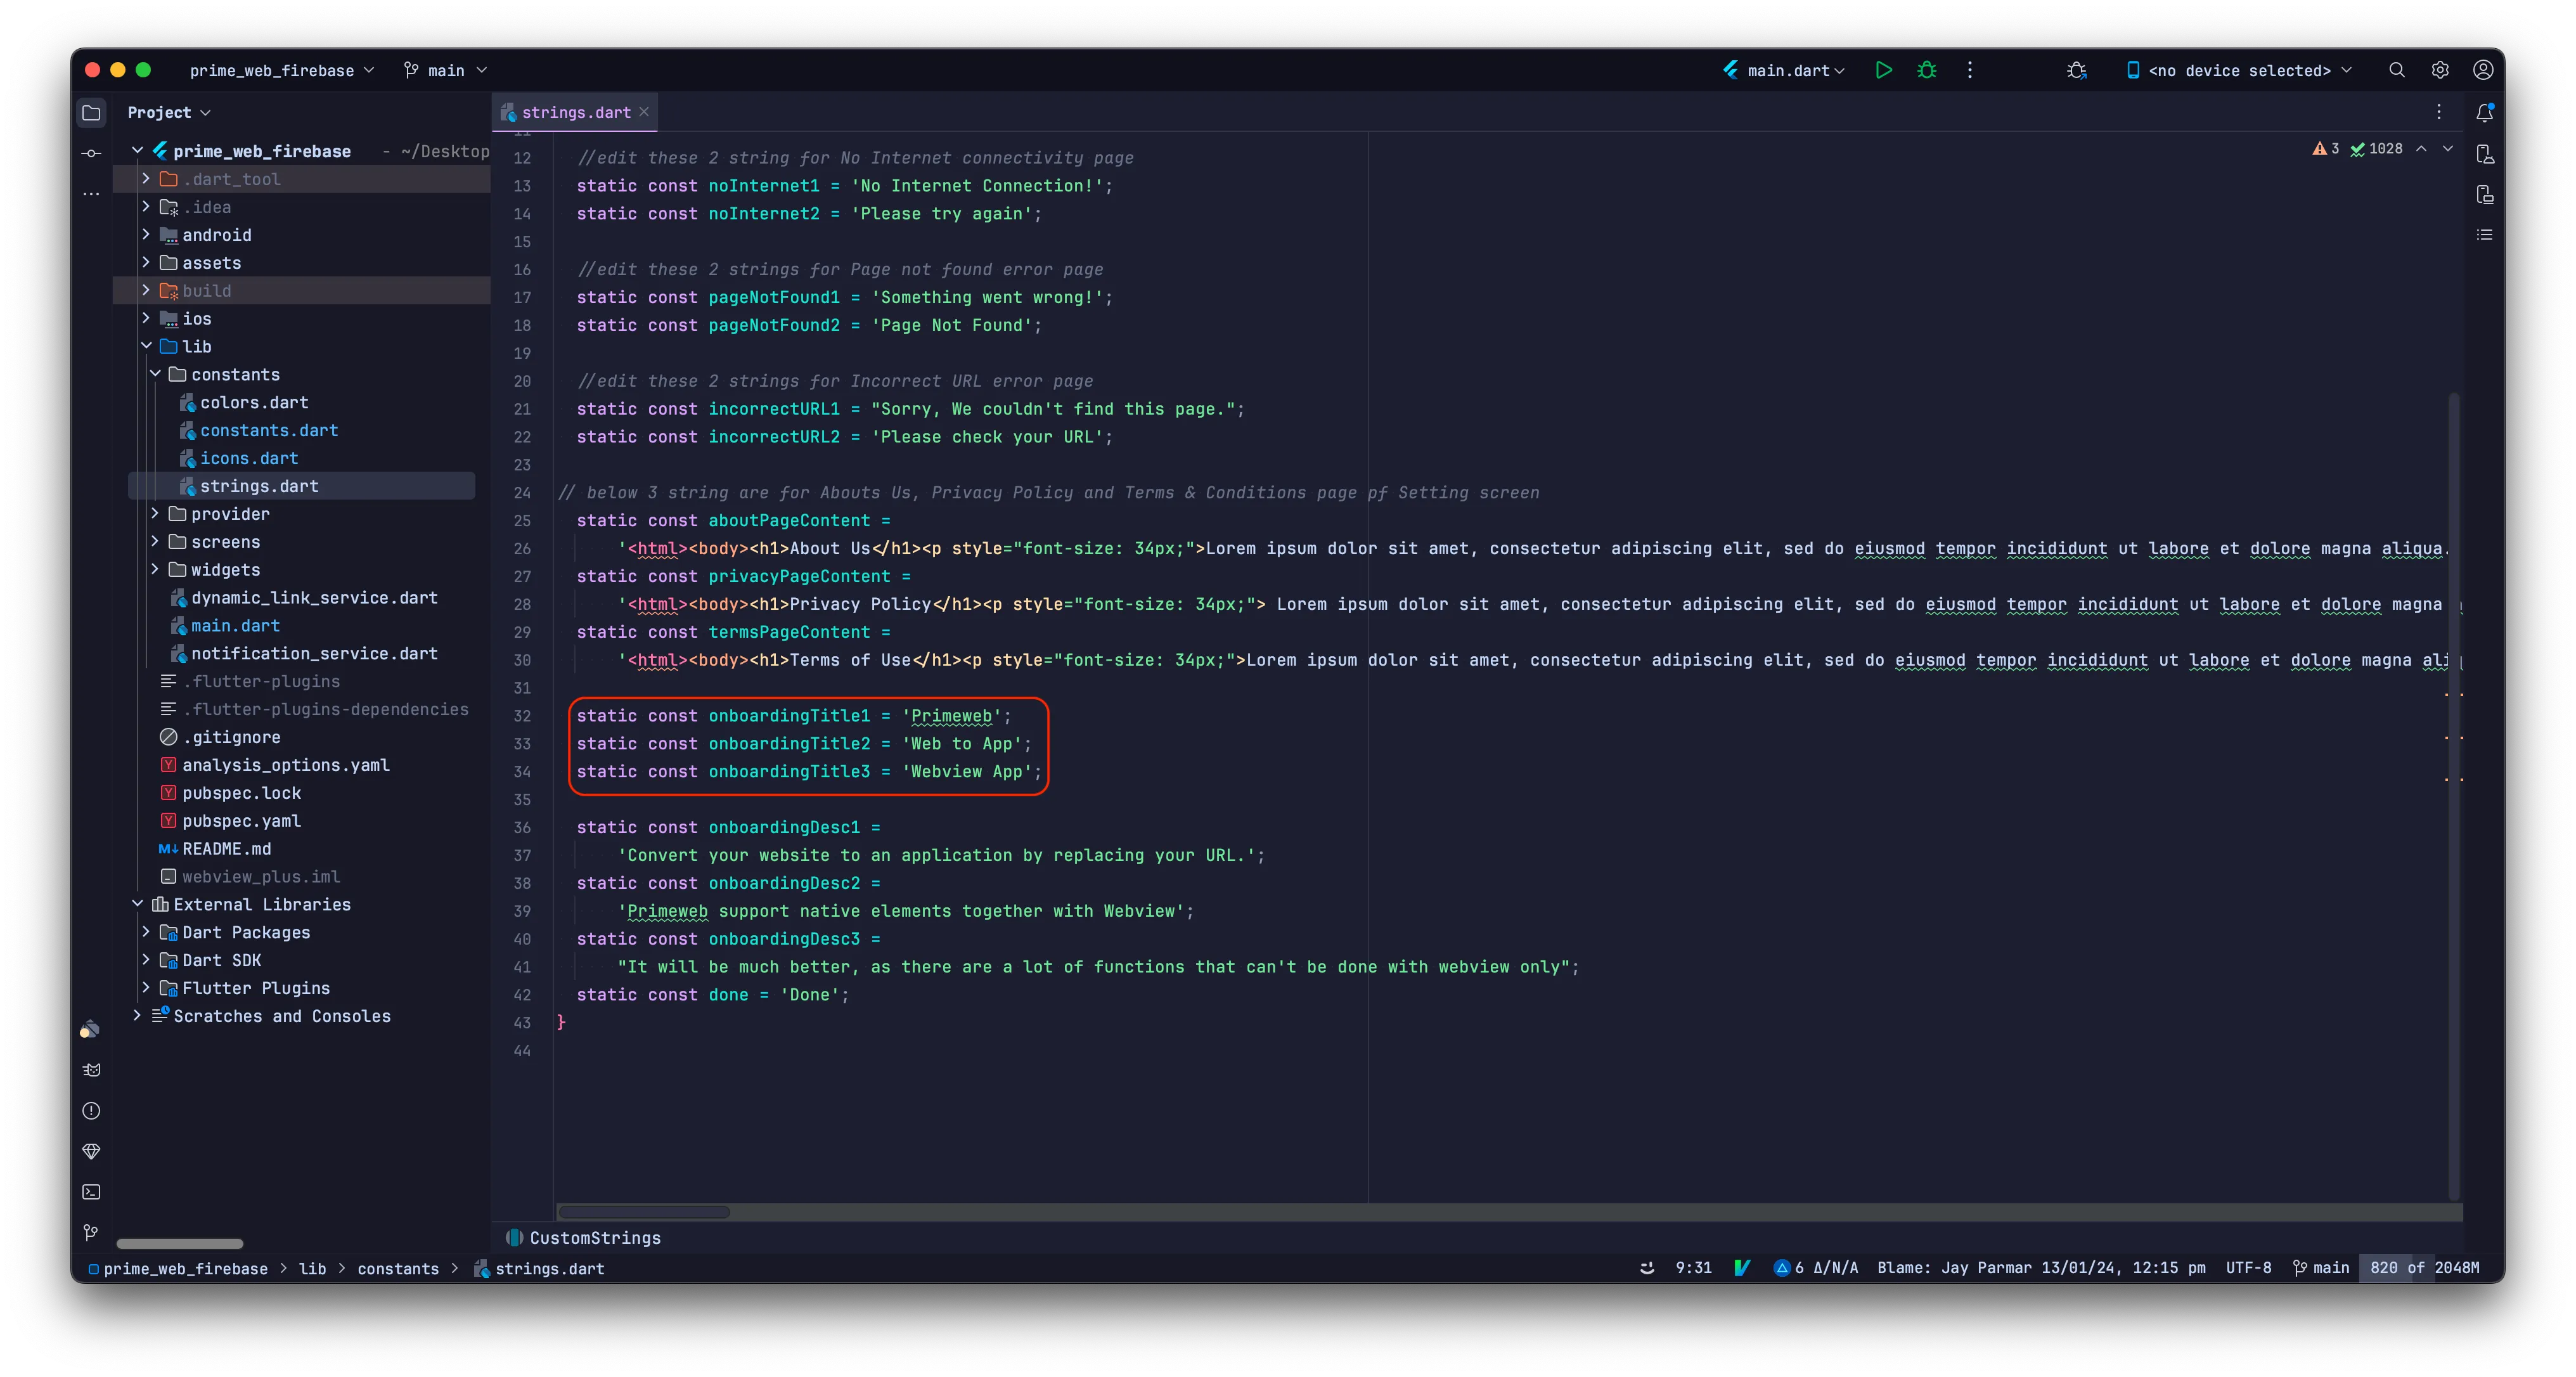
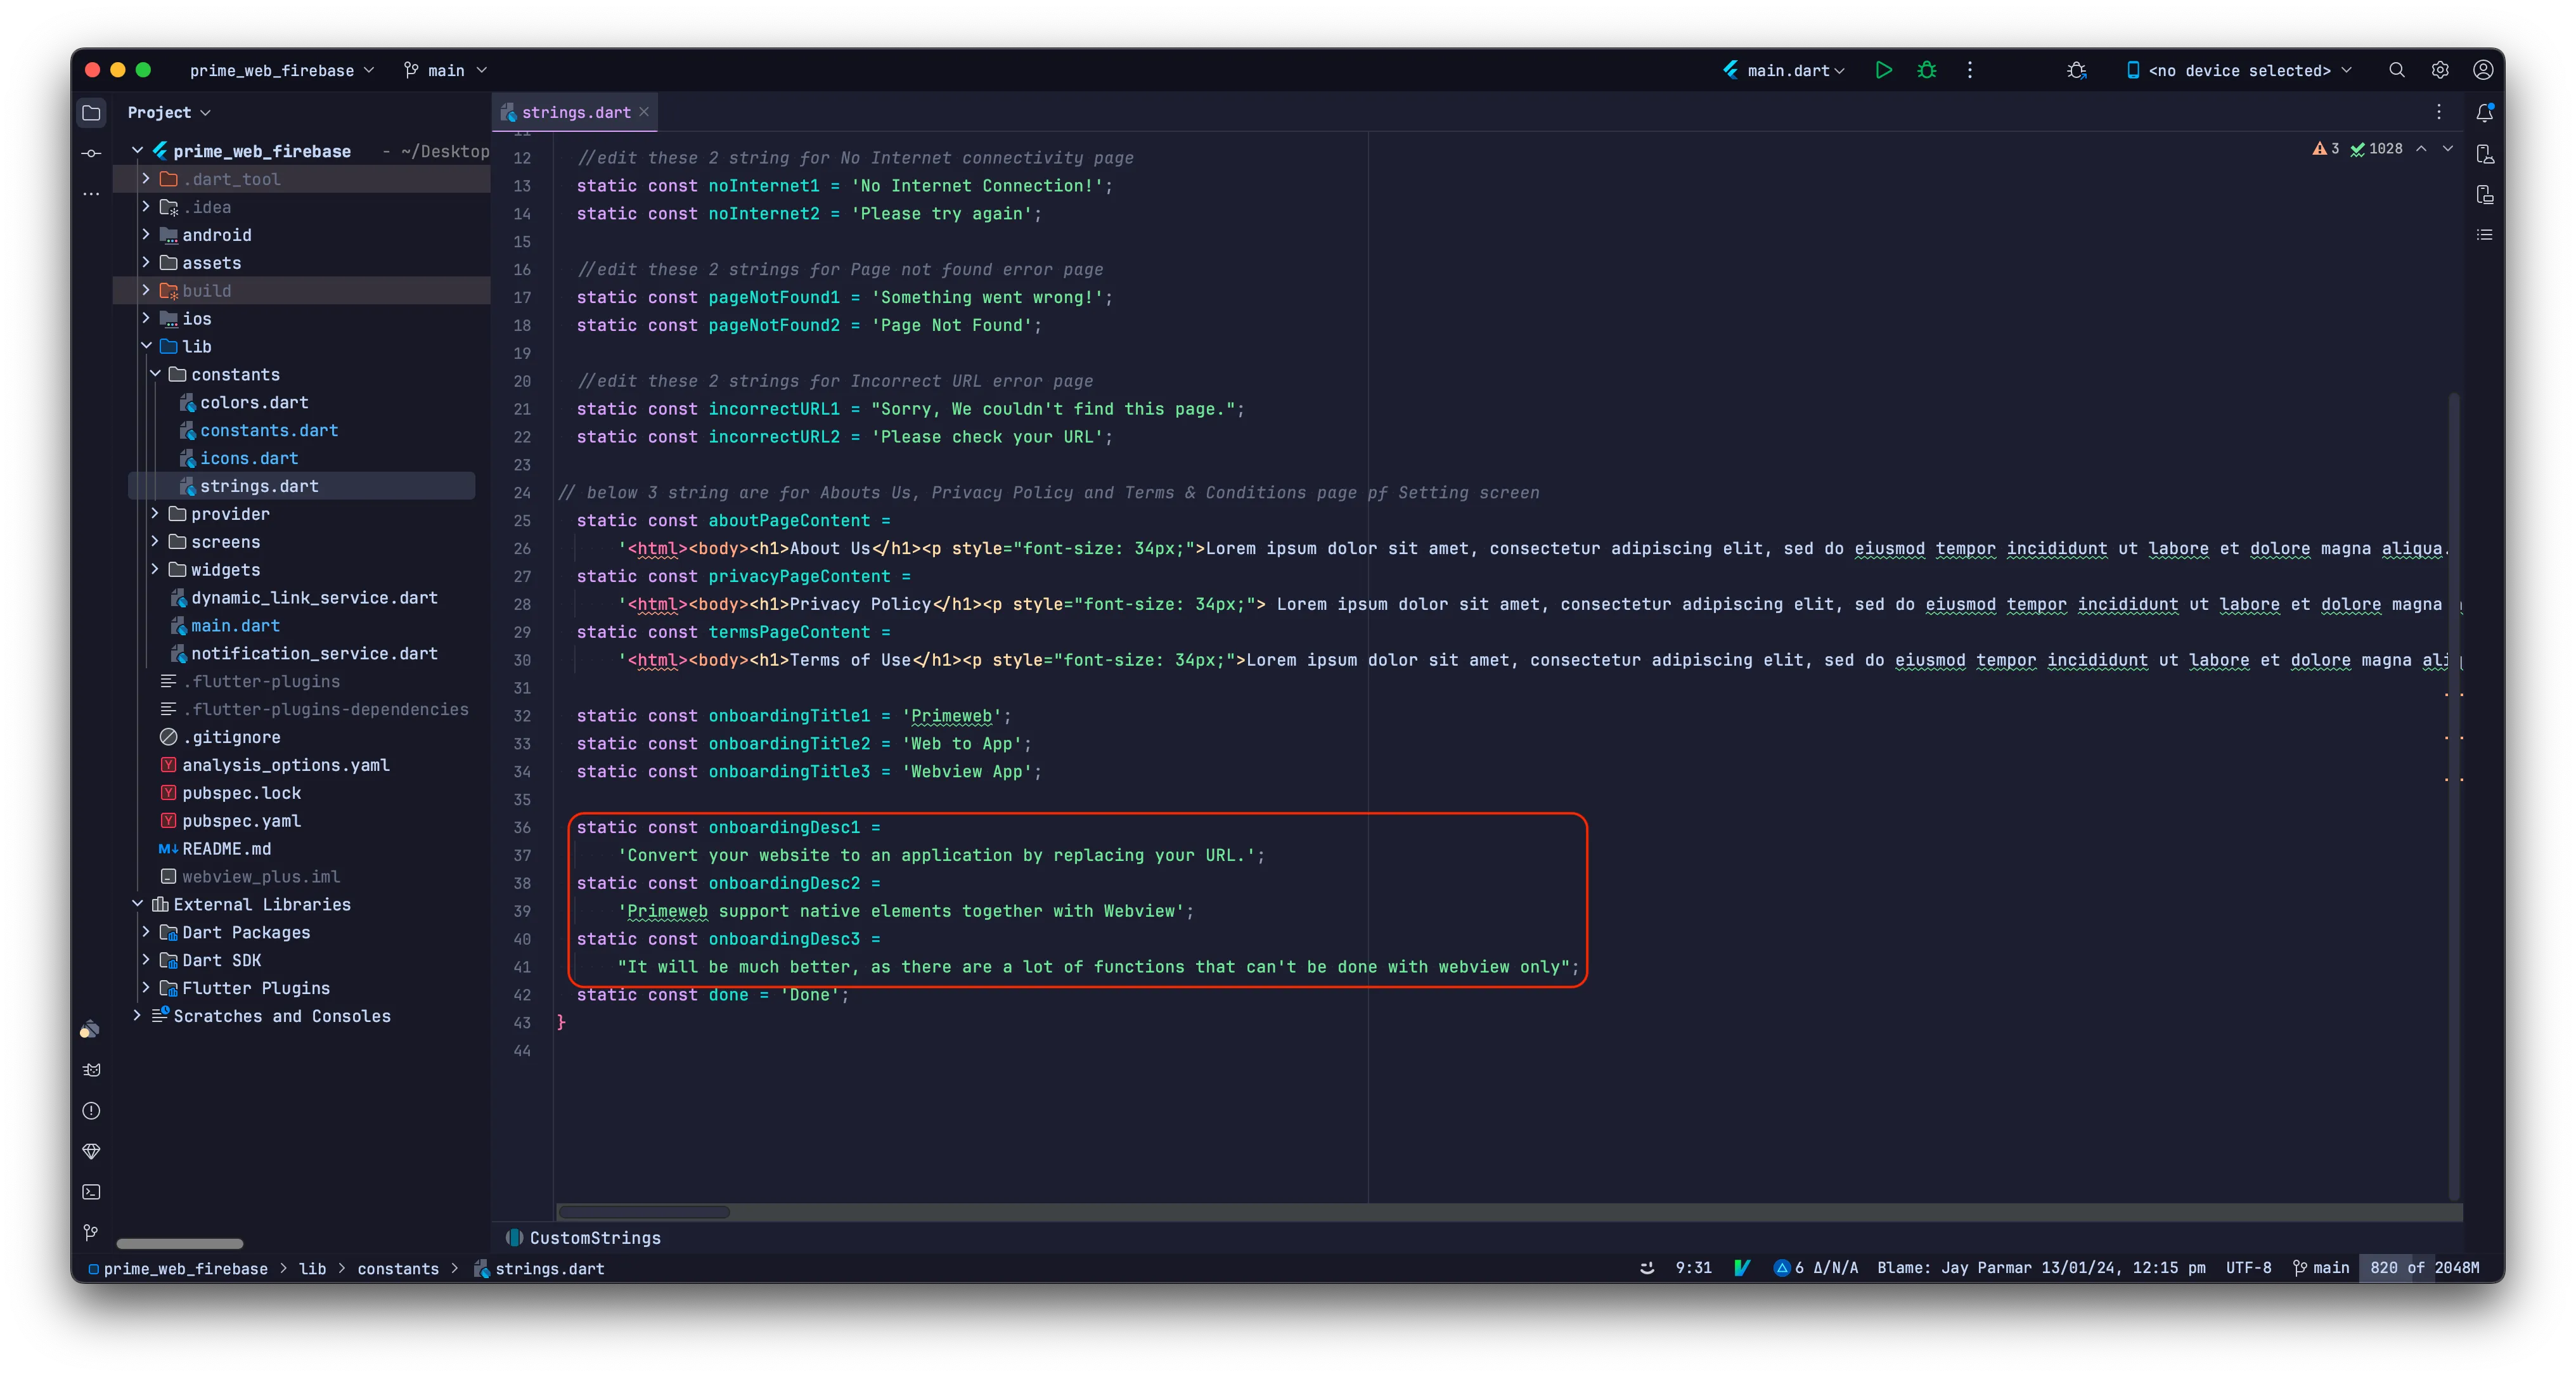
To Add Onboarding Screen Titles:
To Add Onboarding Screen Descriptions:
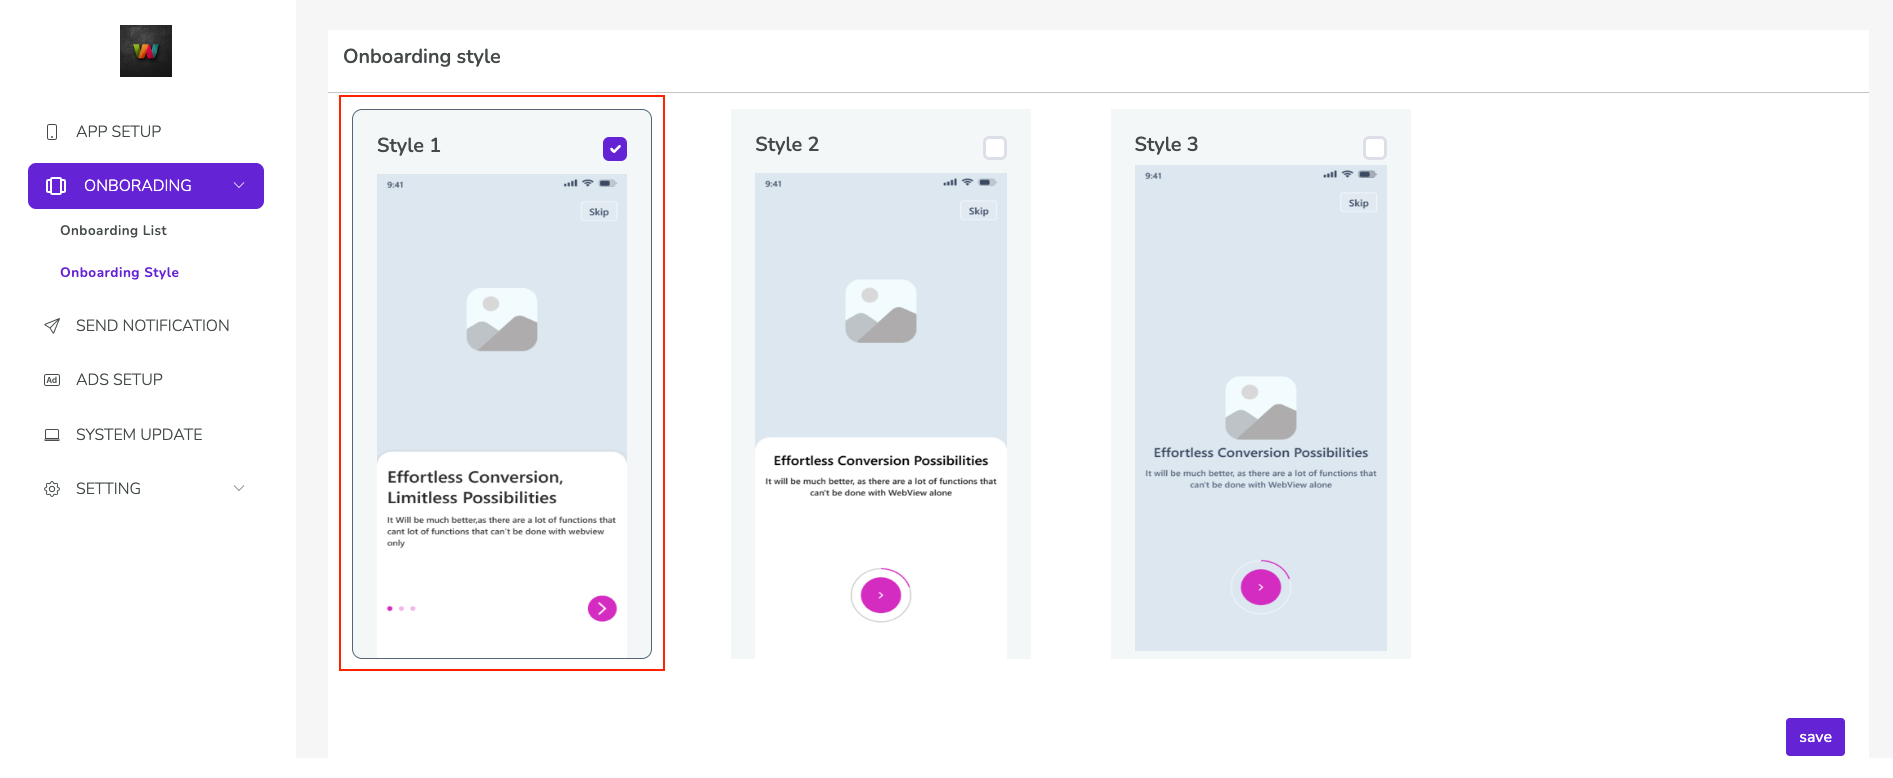
How to Change Onboarding Screen Style
In the Onboarding section, under the Onboarding Style option, you can select the style you prefer.
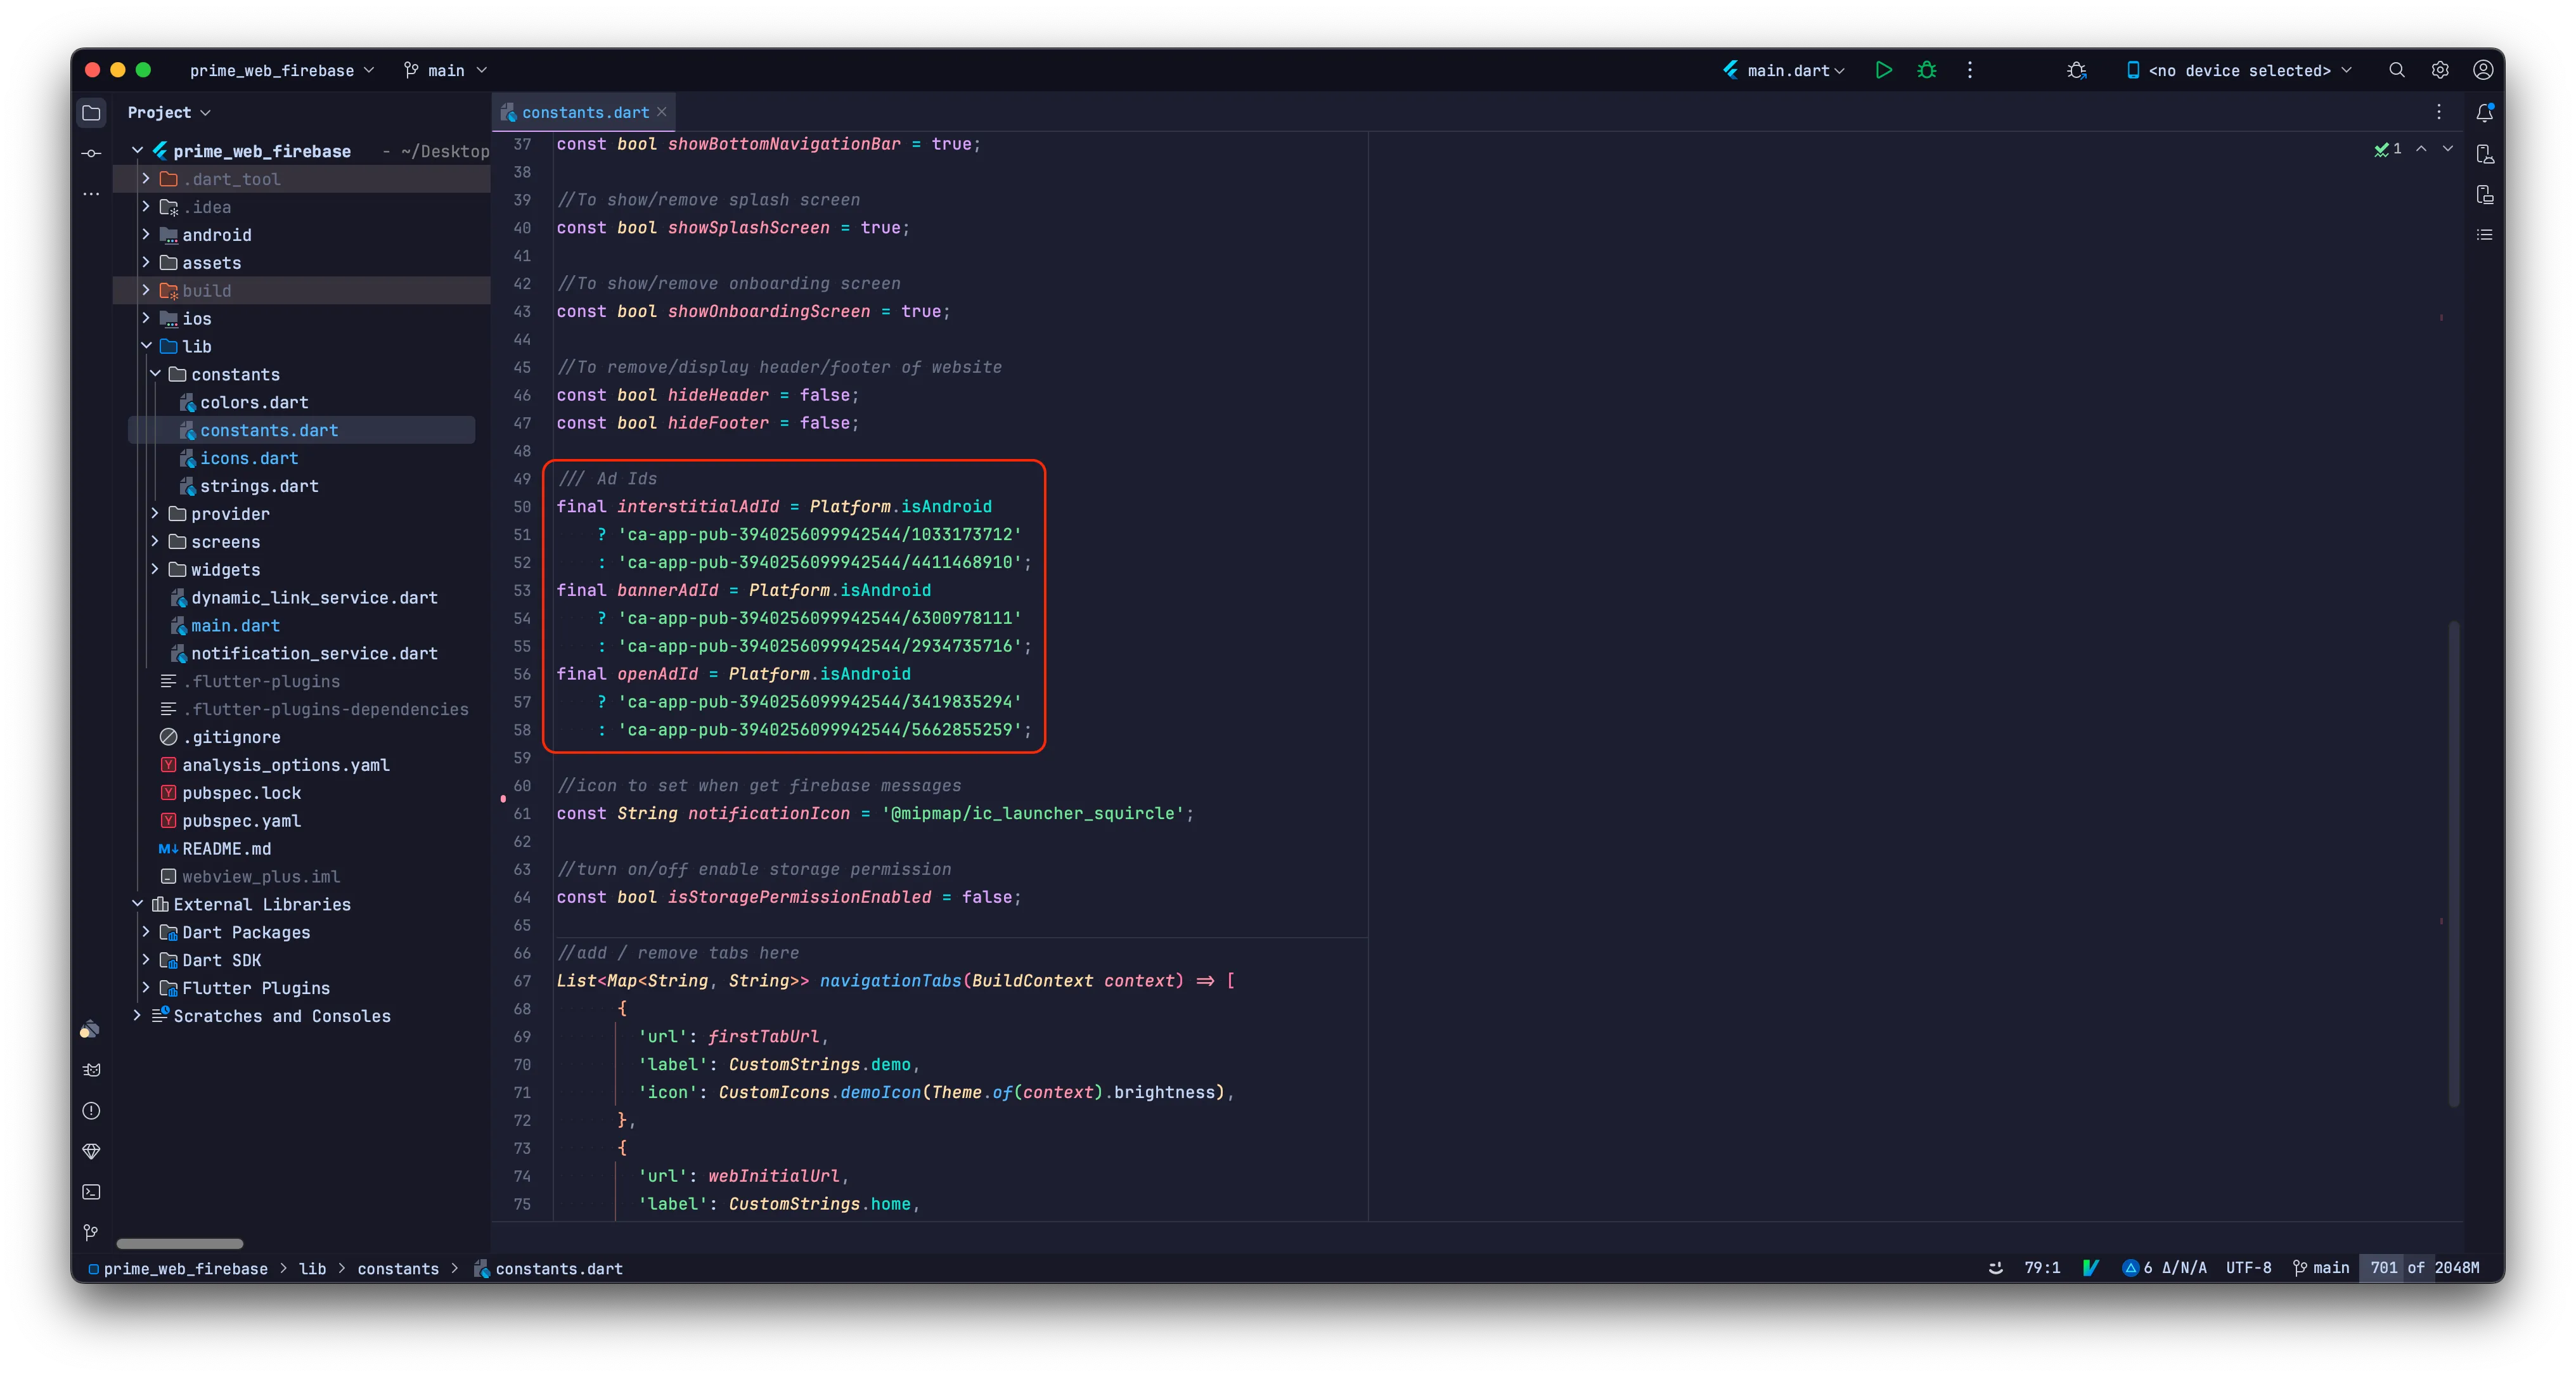
How to Change Ad IDs:
In the Ads Setup option, enter the iOS and Android Ad IDs in the text fields.
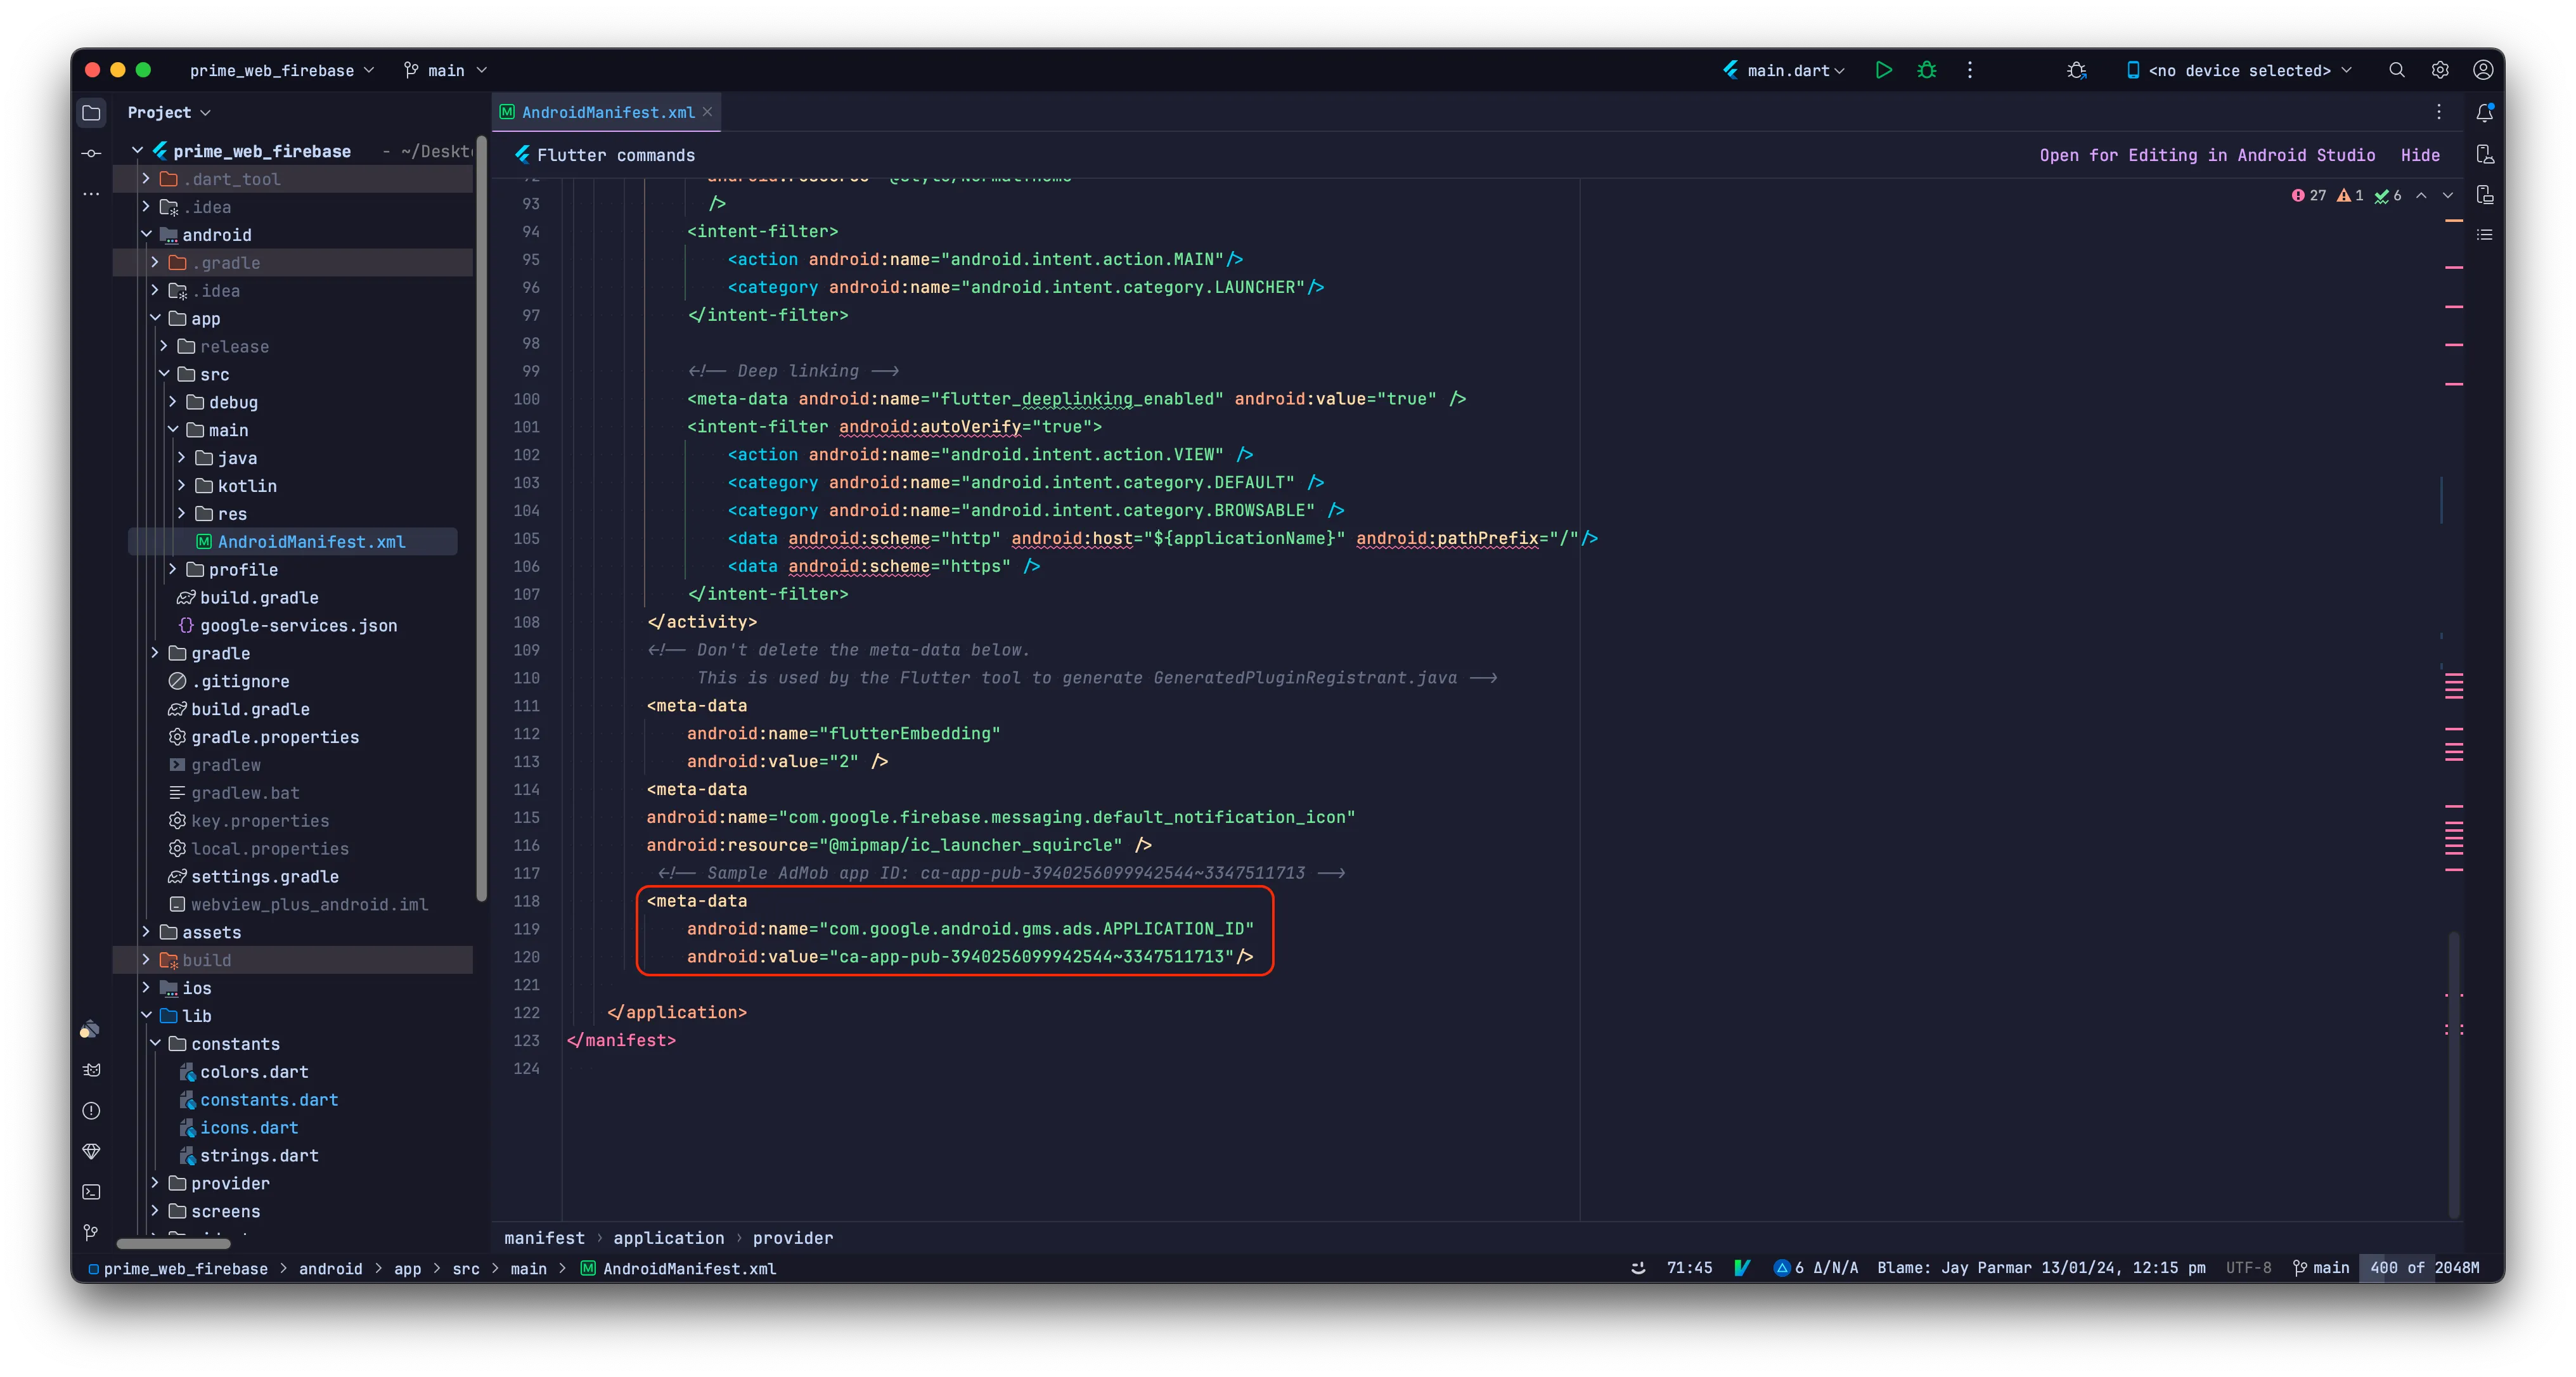
For Android:
Go to android/app/src/main/AndroidManifest.xml and update the ad account ID
as shown below:
For iOS:
Go to ios/Runner/Info.plist and update the ad account ID as shown below:
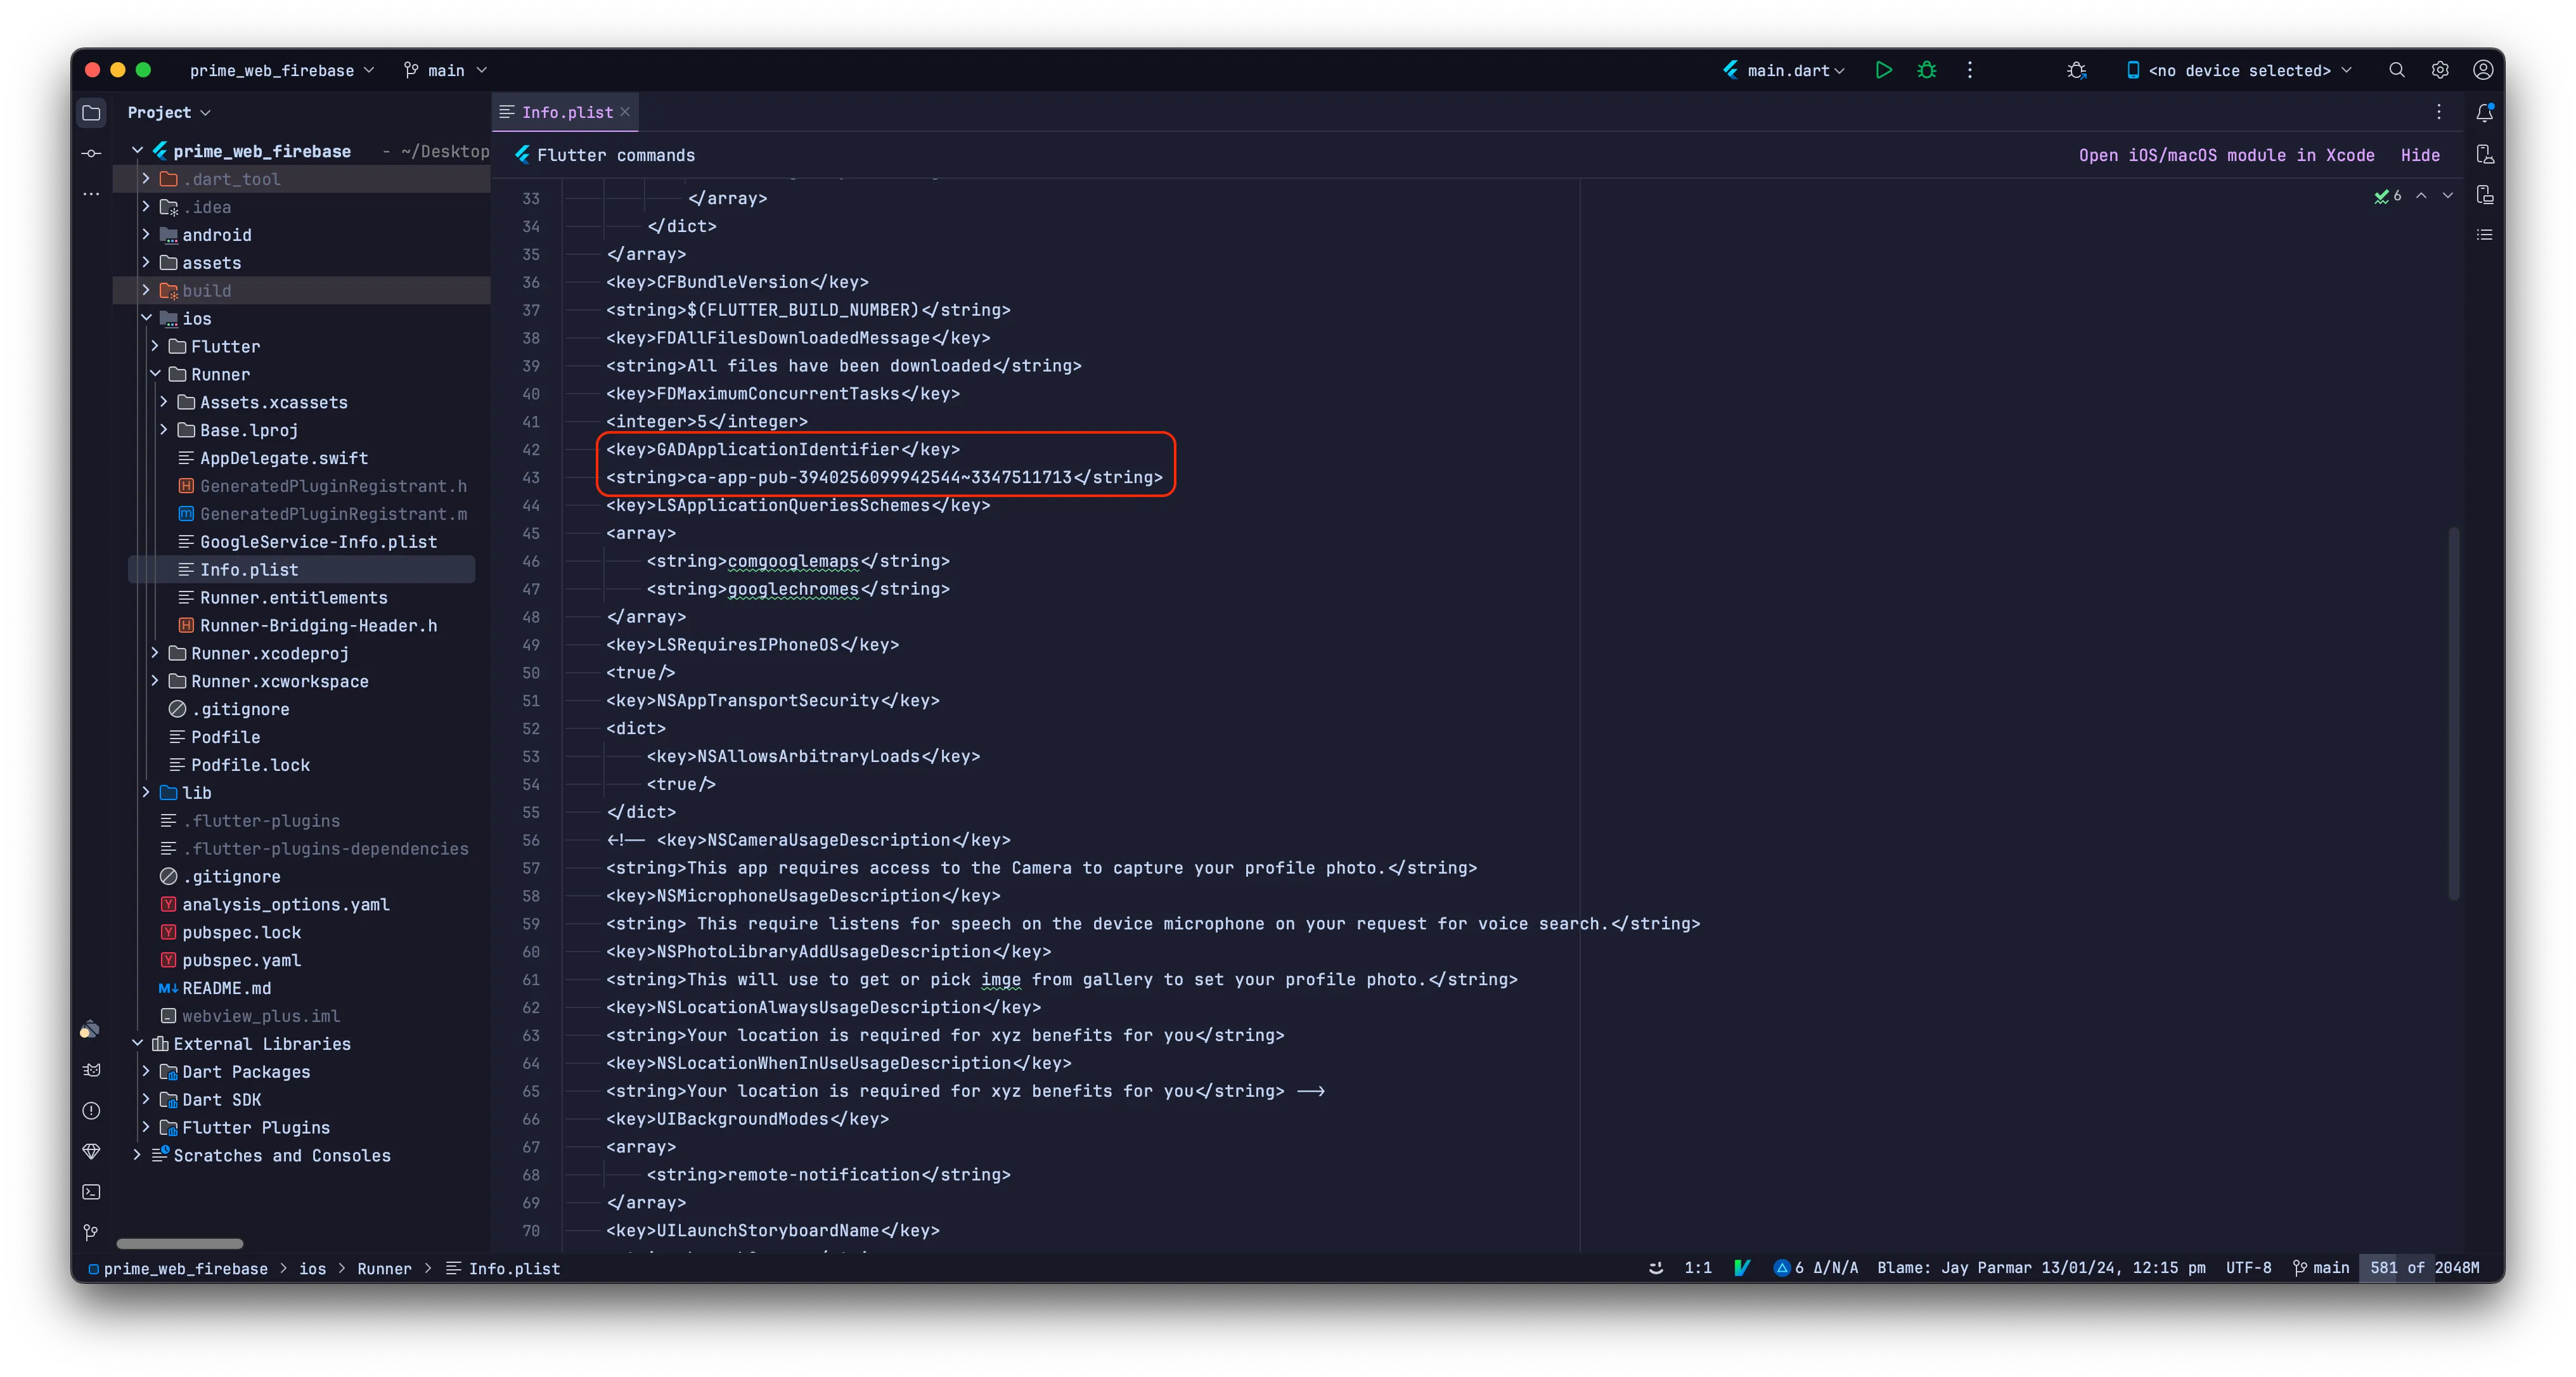
For more info, click here.
How to Change Application Colors:
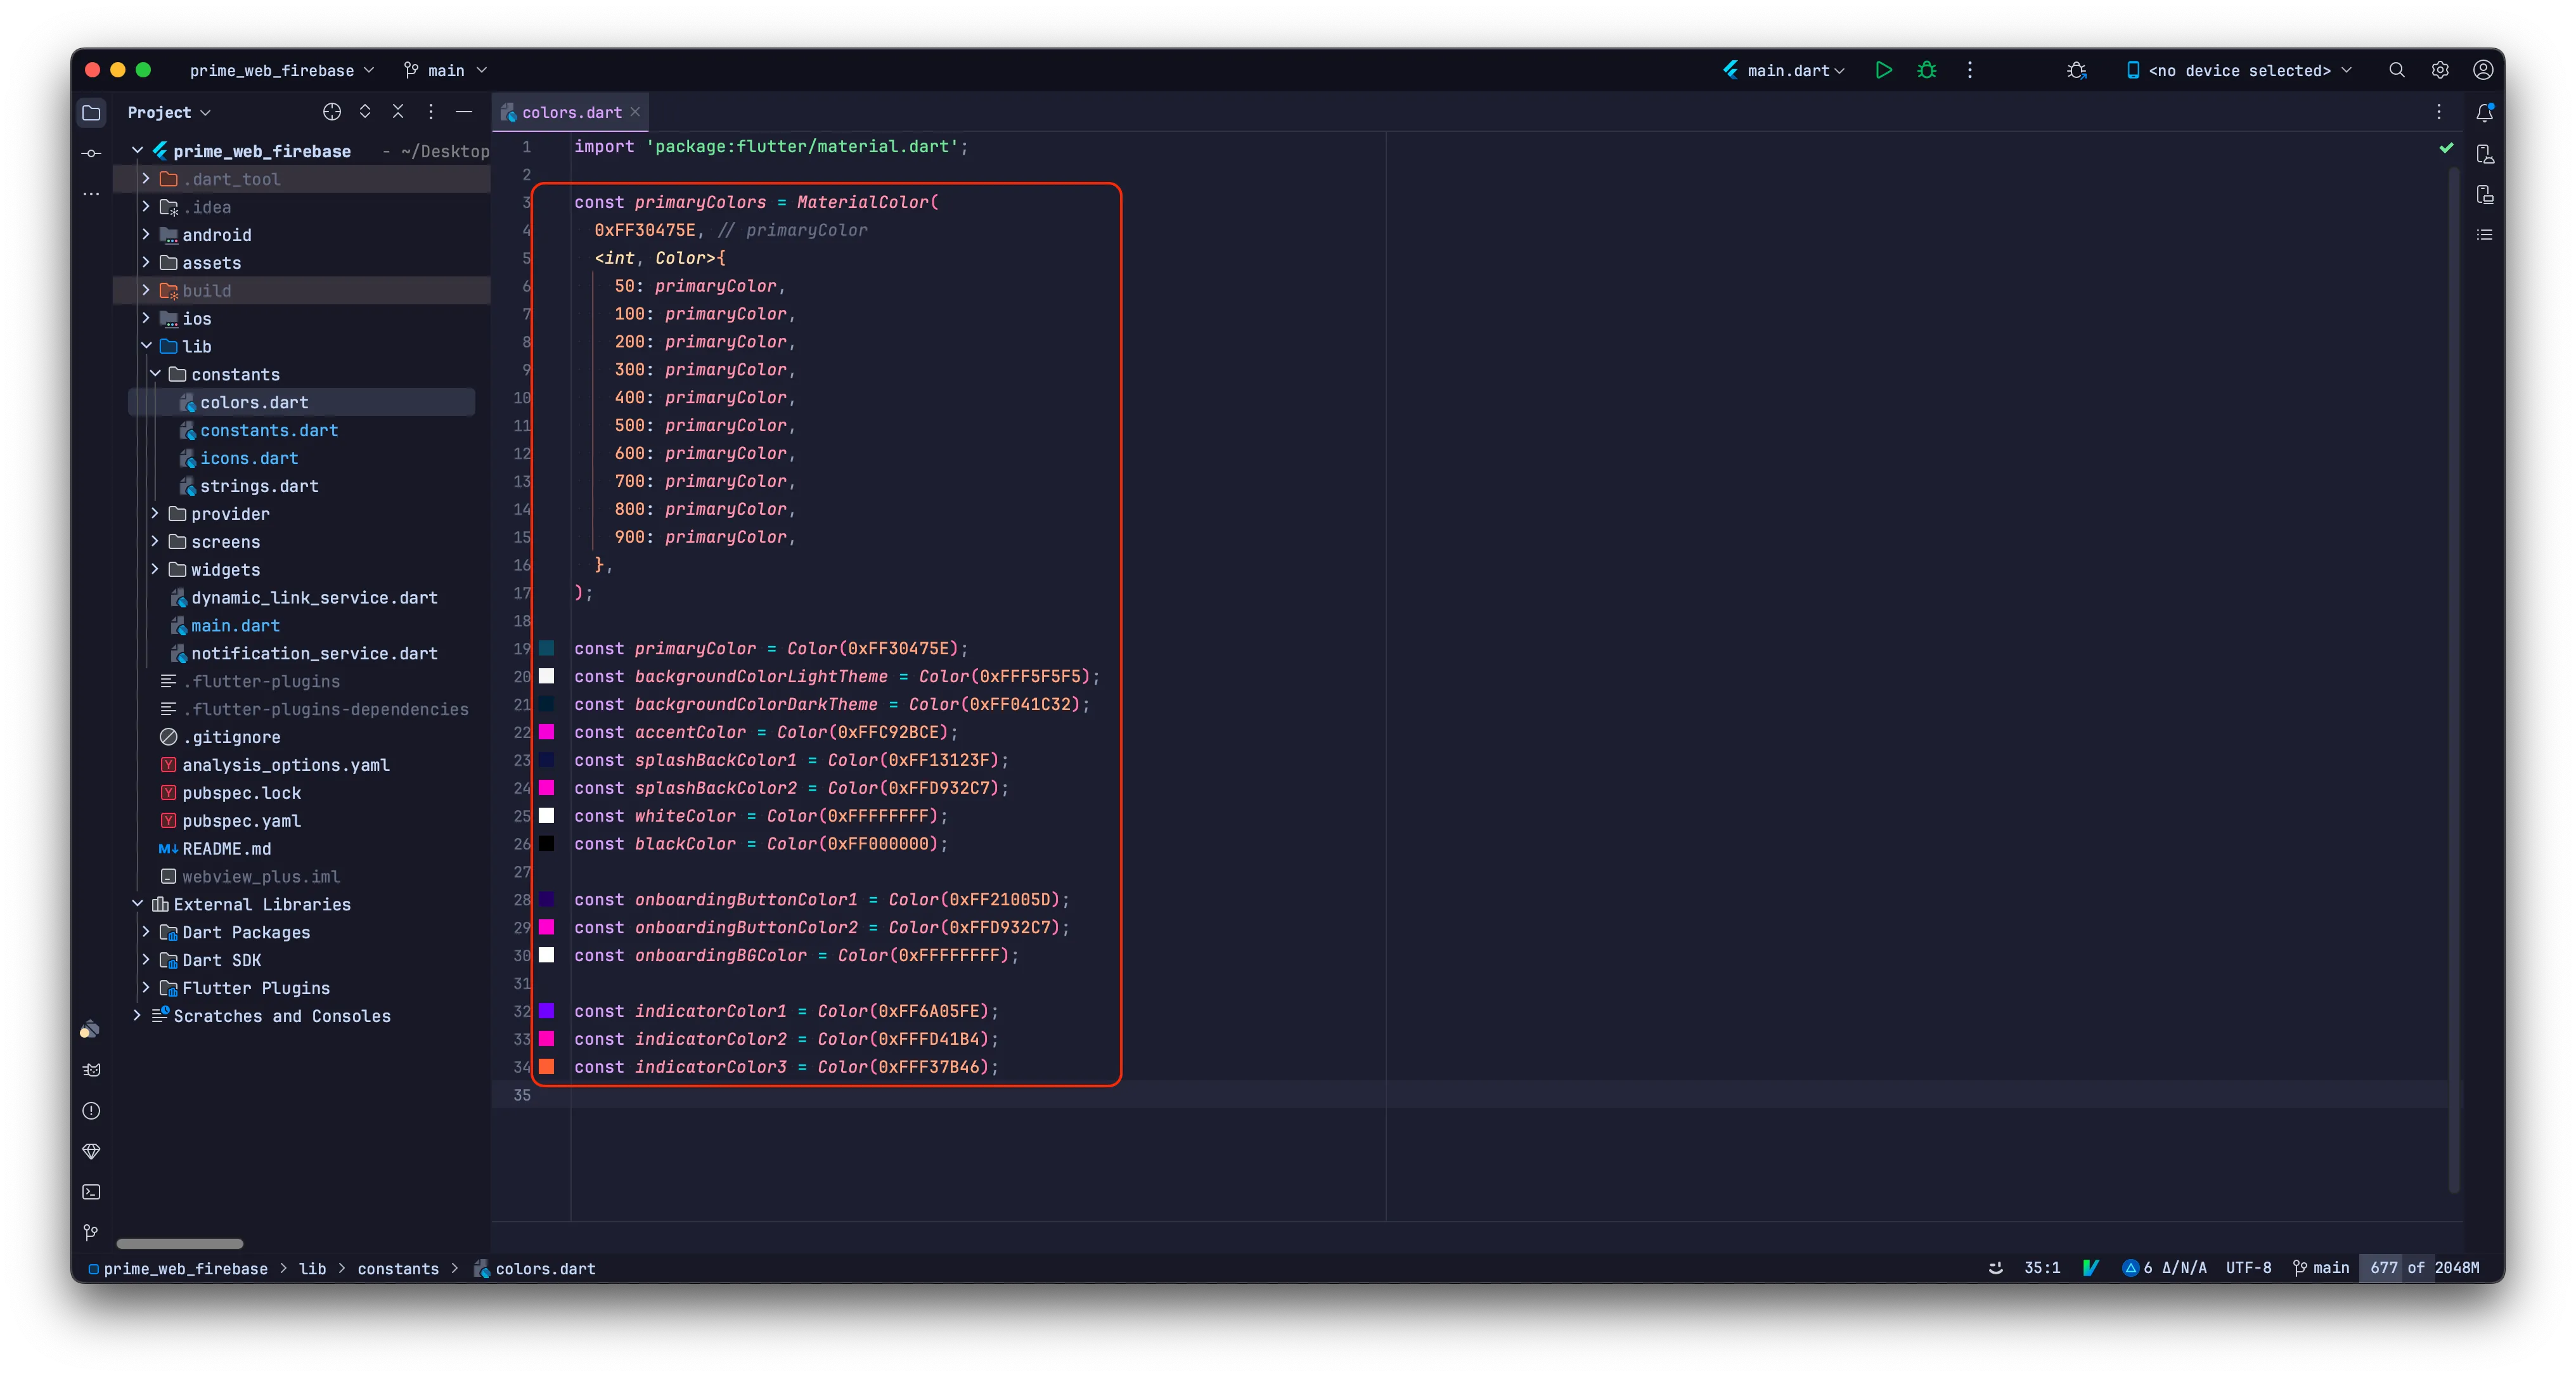
To Add Your Colors:
Add your colors in lib->constants->colors.dart and do not change the
color variable names.
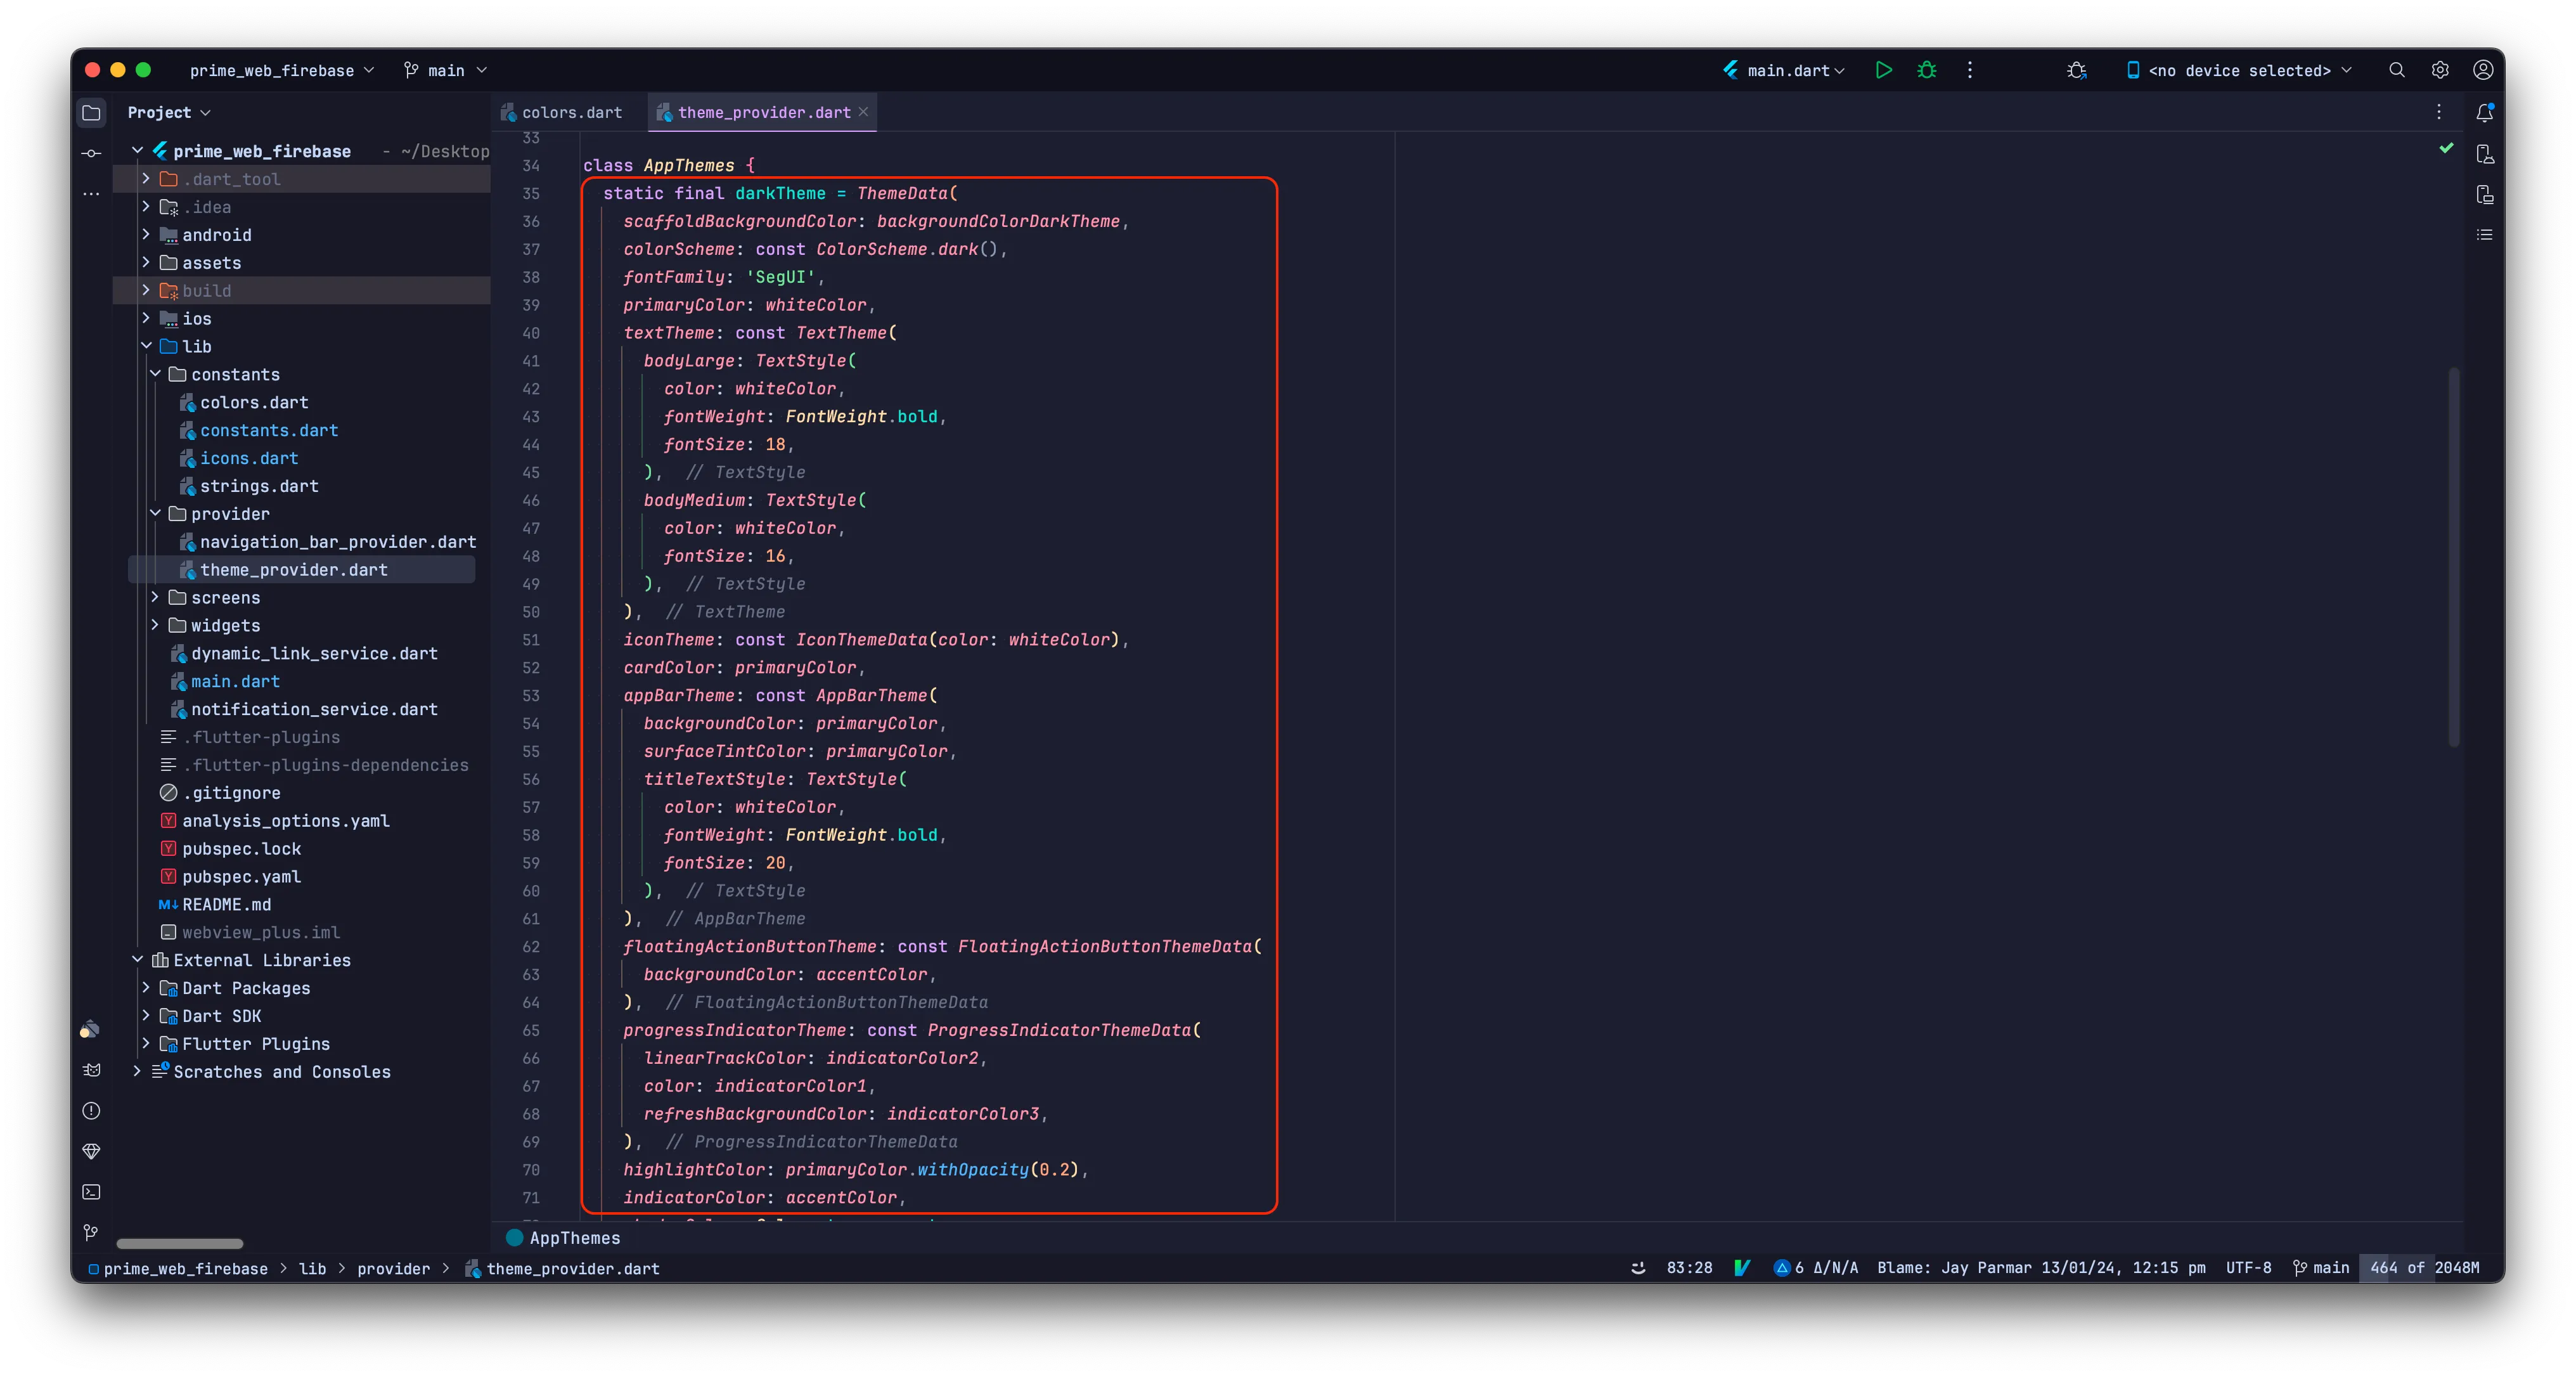
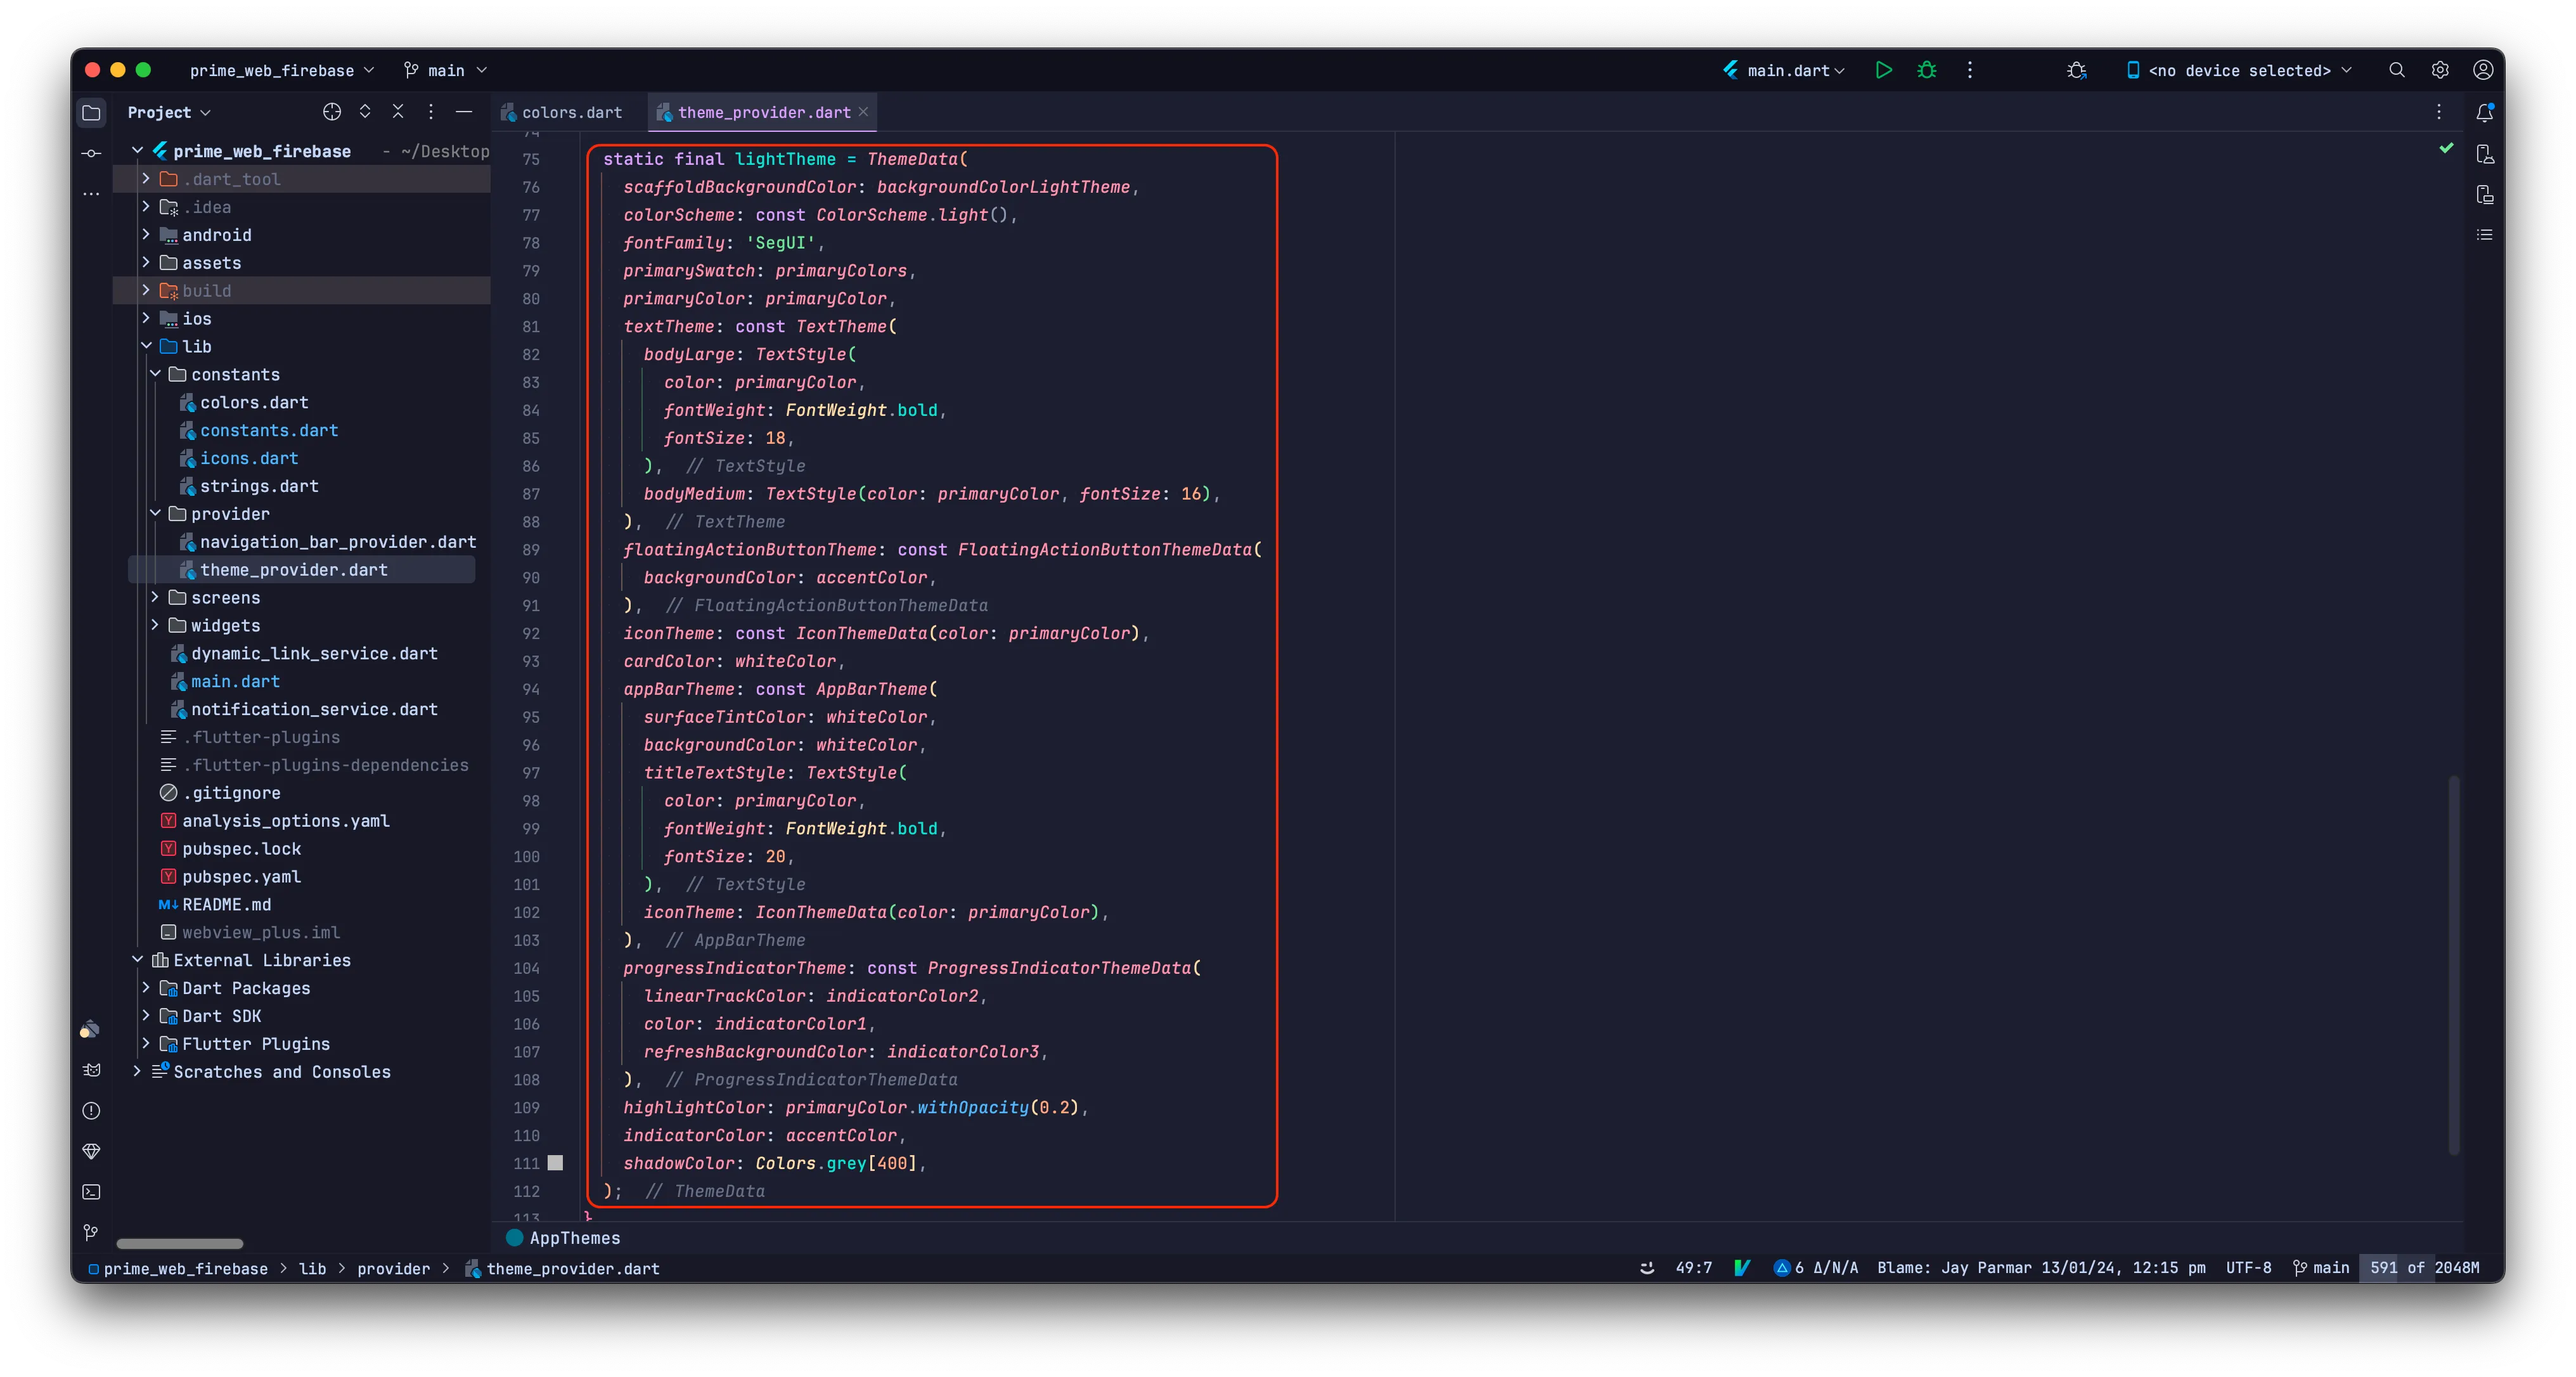
To Change Colors Usage for Dark and Light Themes:
Change colors usage for dark and light themes in
lib->provider->theme_provider.dart.
How to Change Application Font:
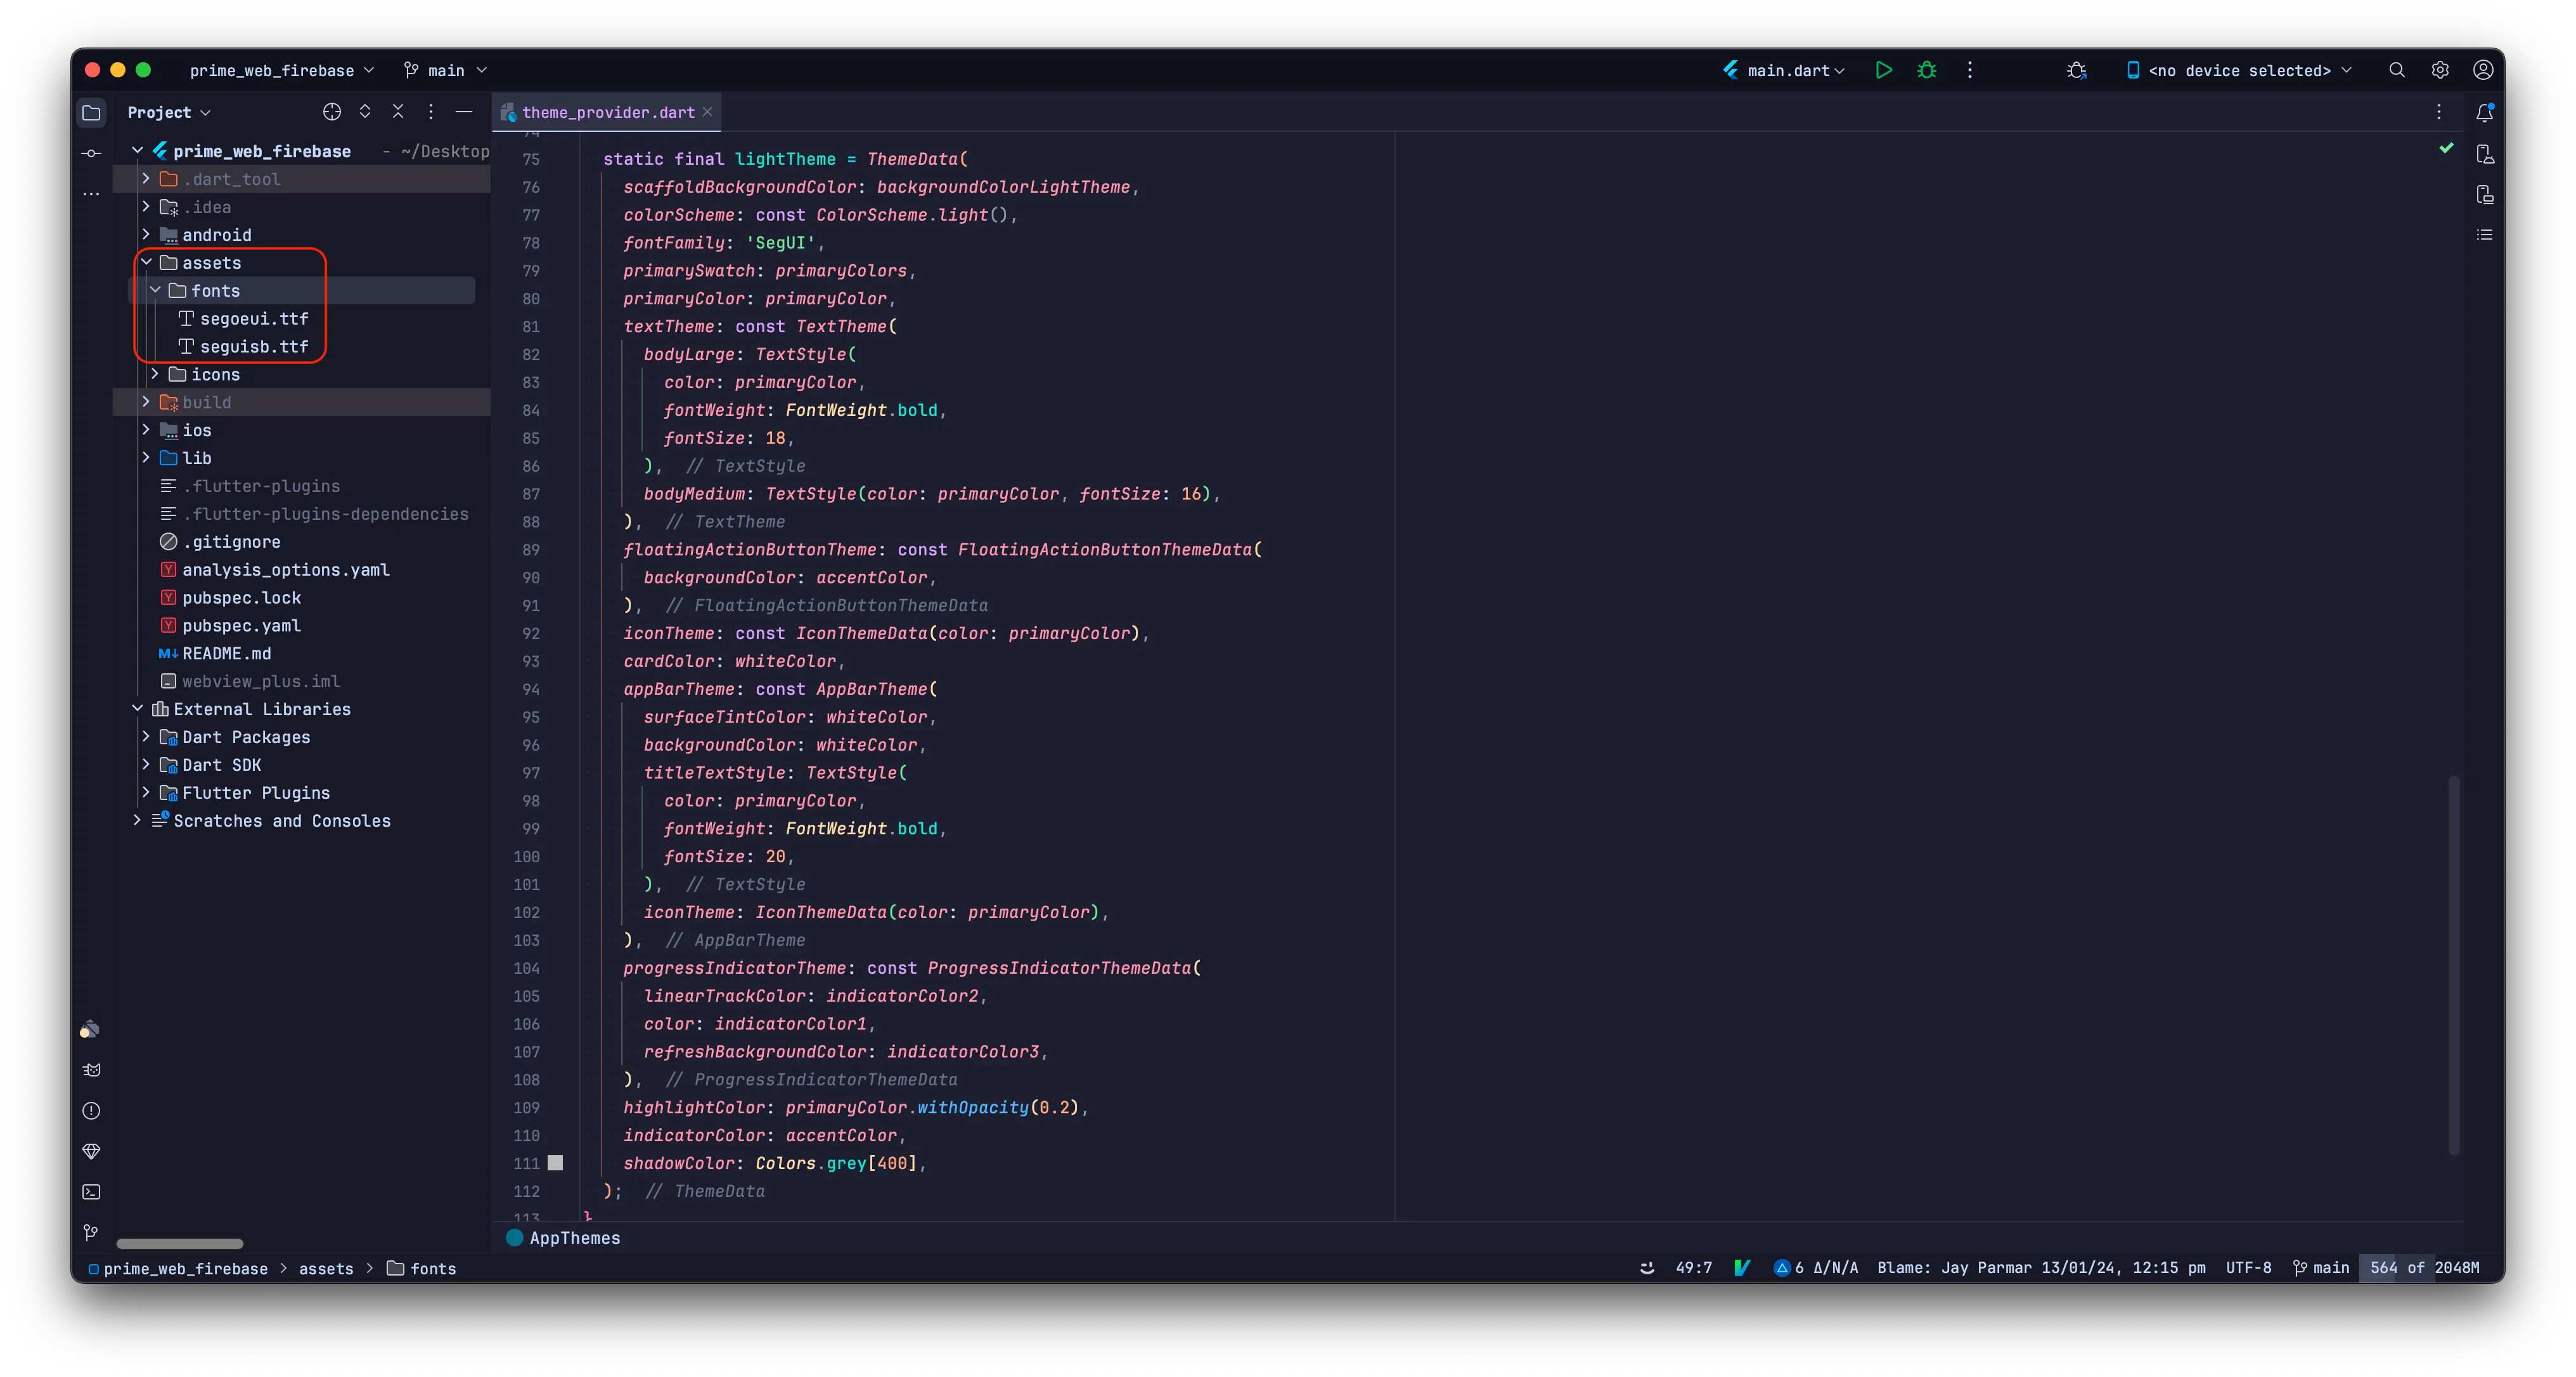
1. Add Your Font in assets/fonts:
Go to assets/fonts and add your font as shown in the image.
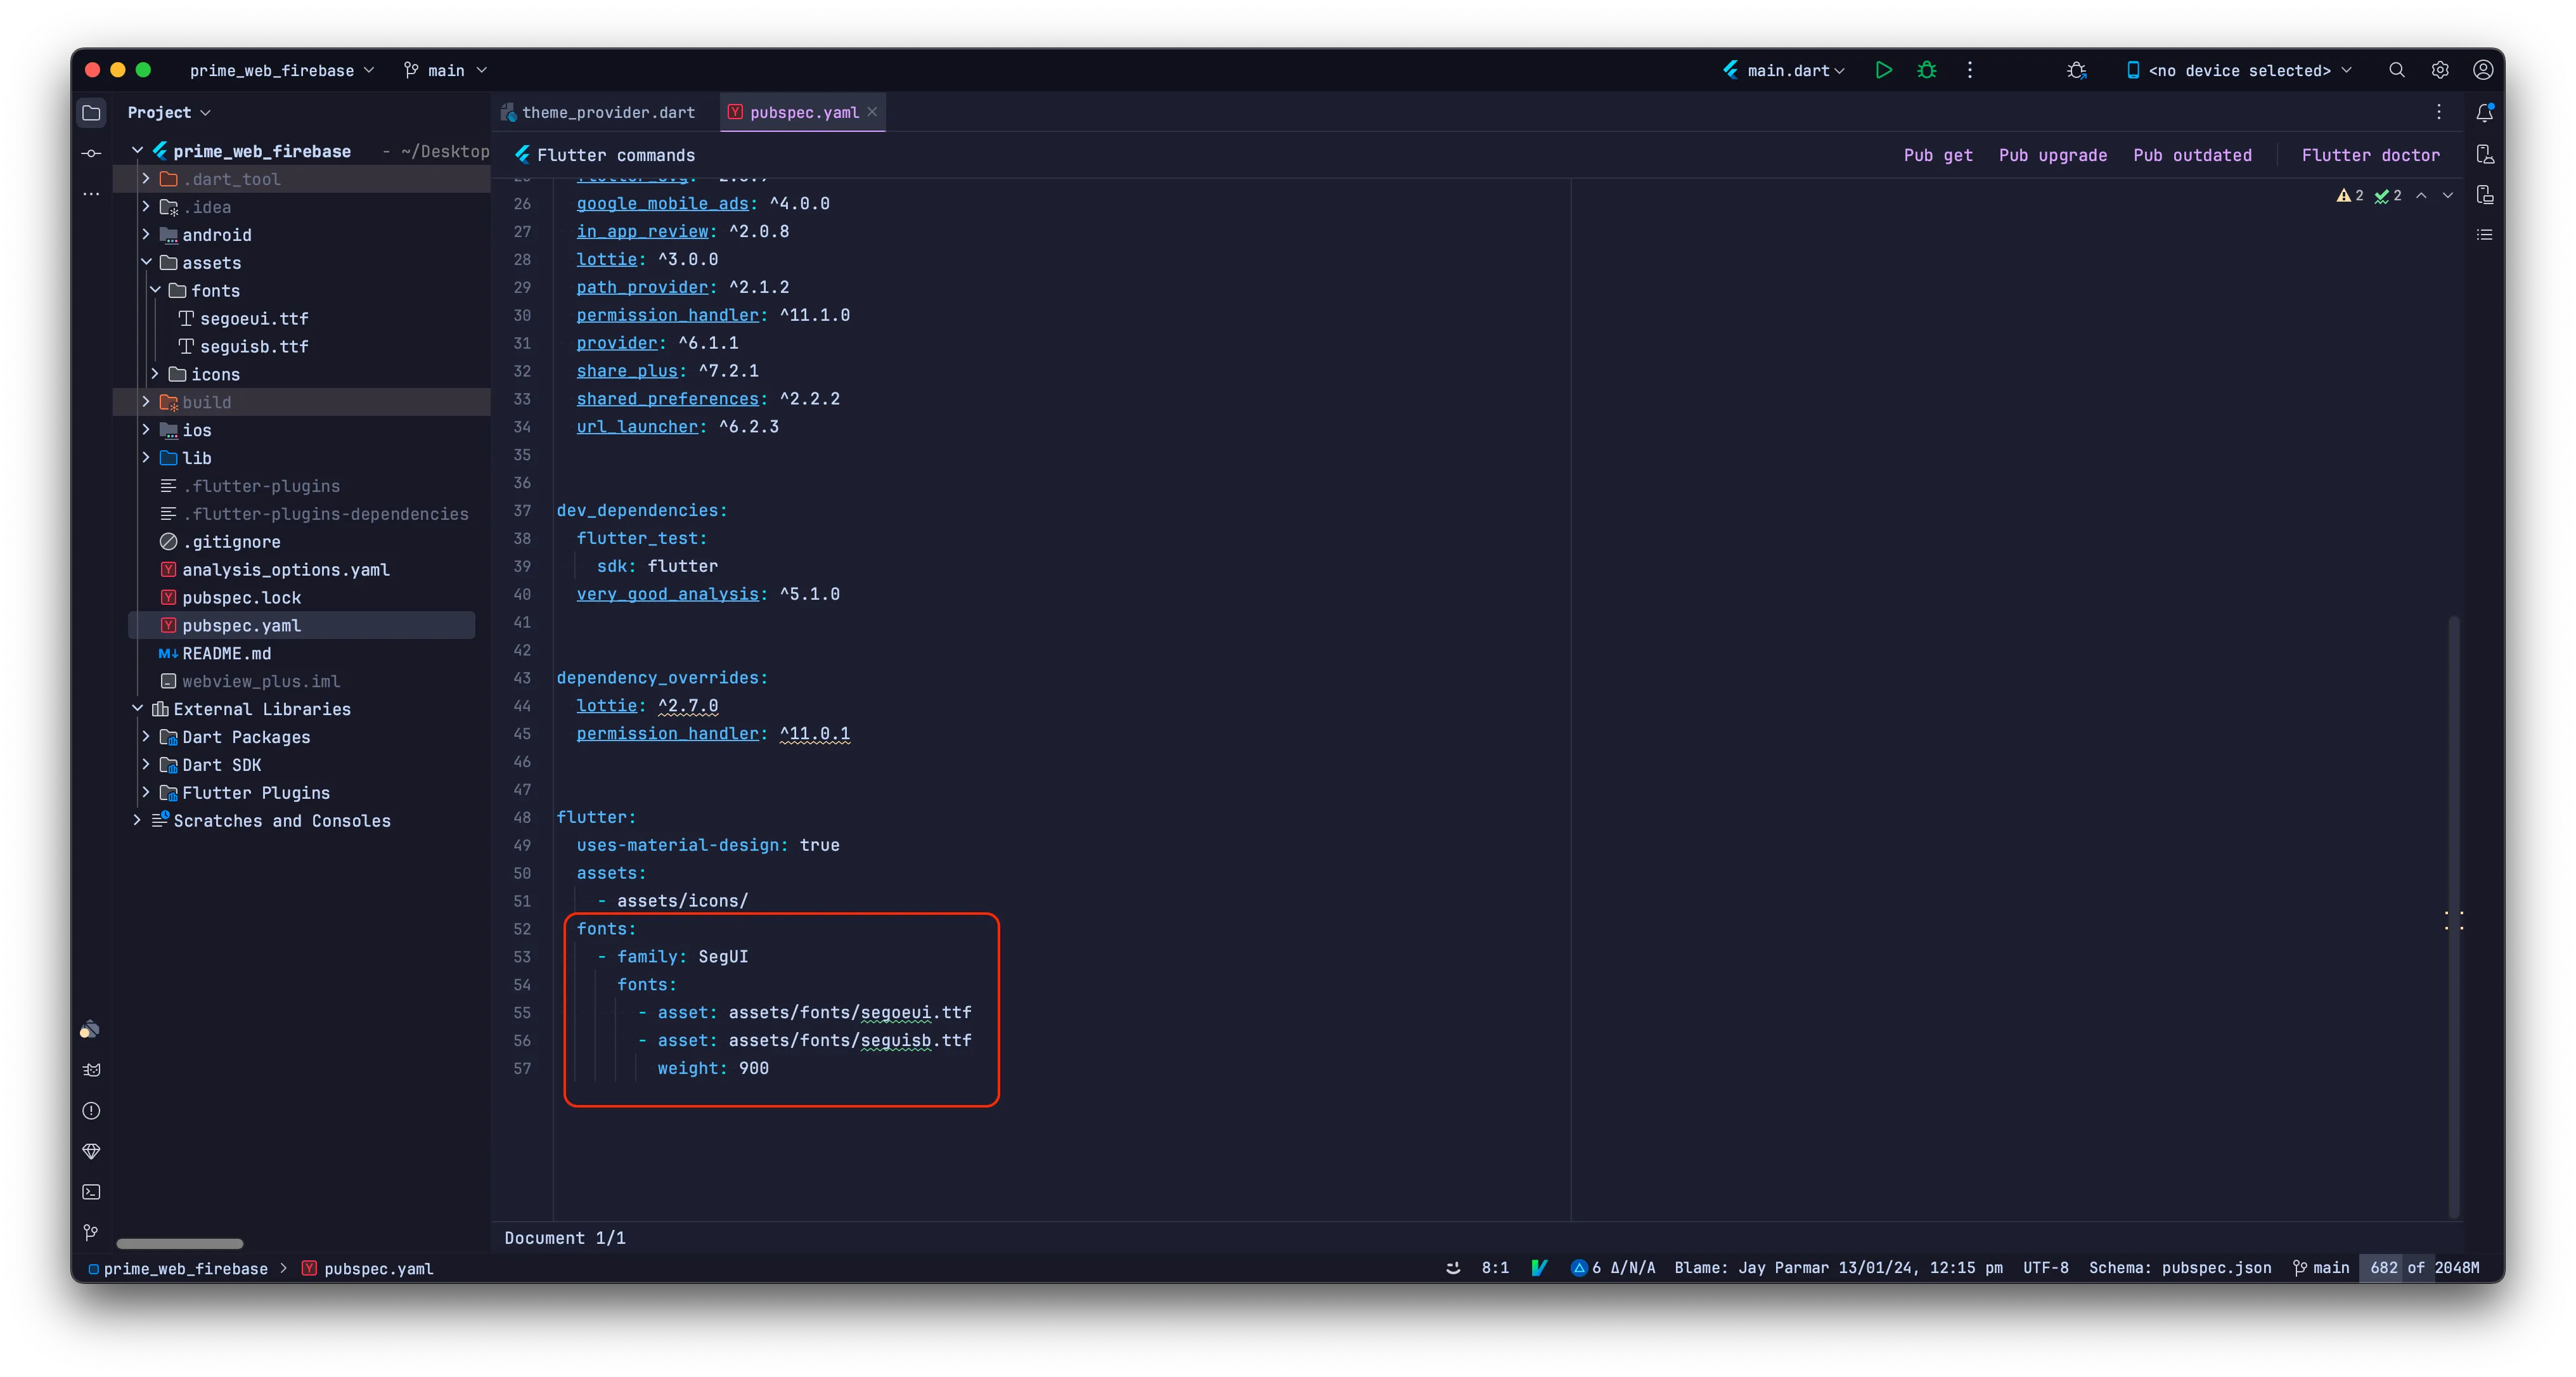
2. Add Font Details in pubspec.yaml:
Open pubspec.yaml file and add your font details as shown below:
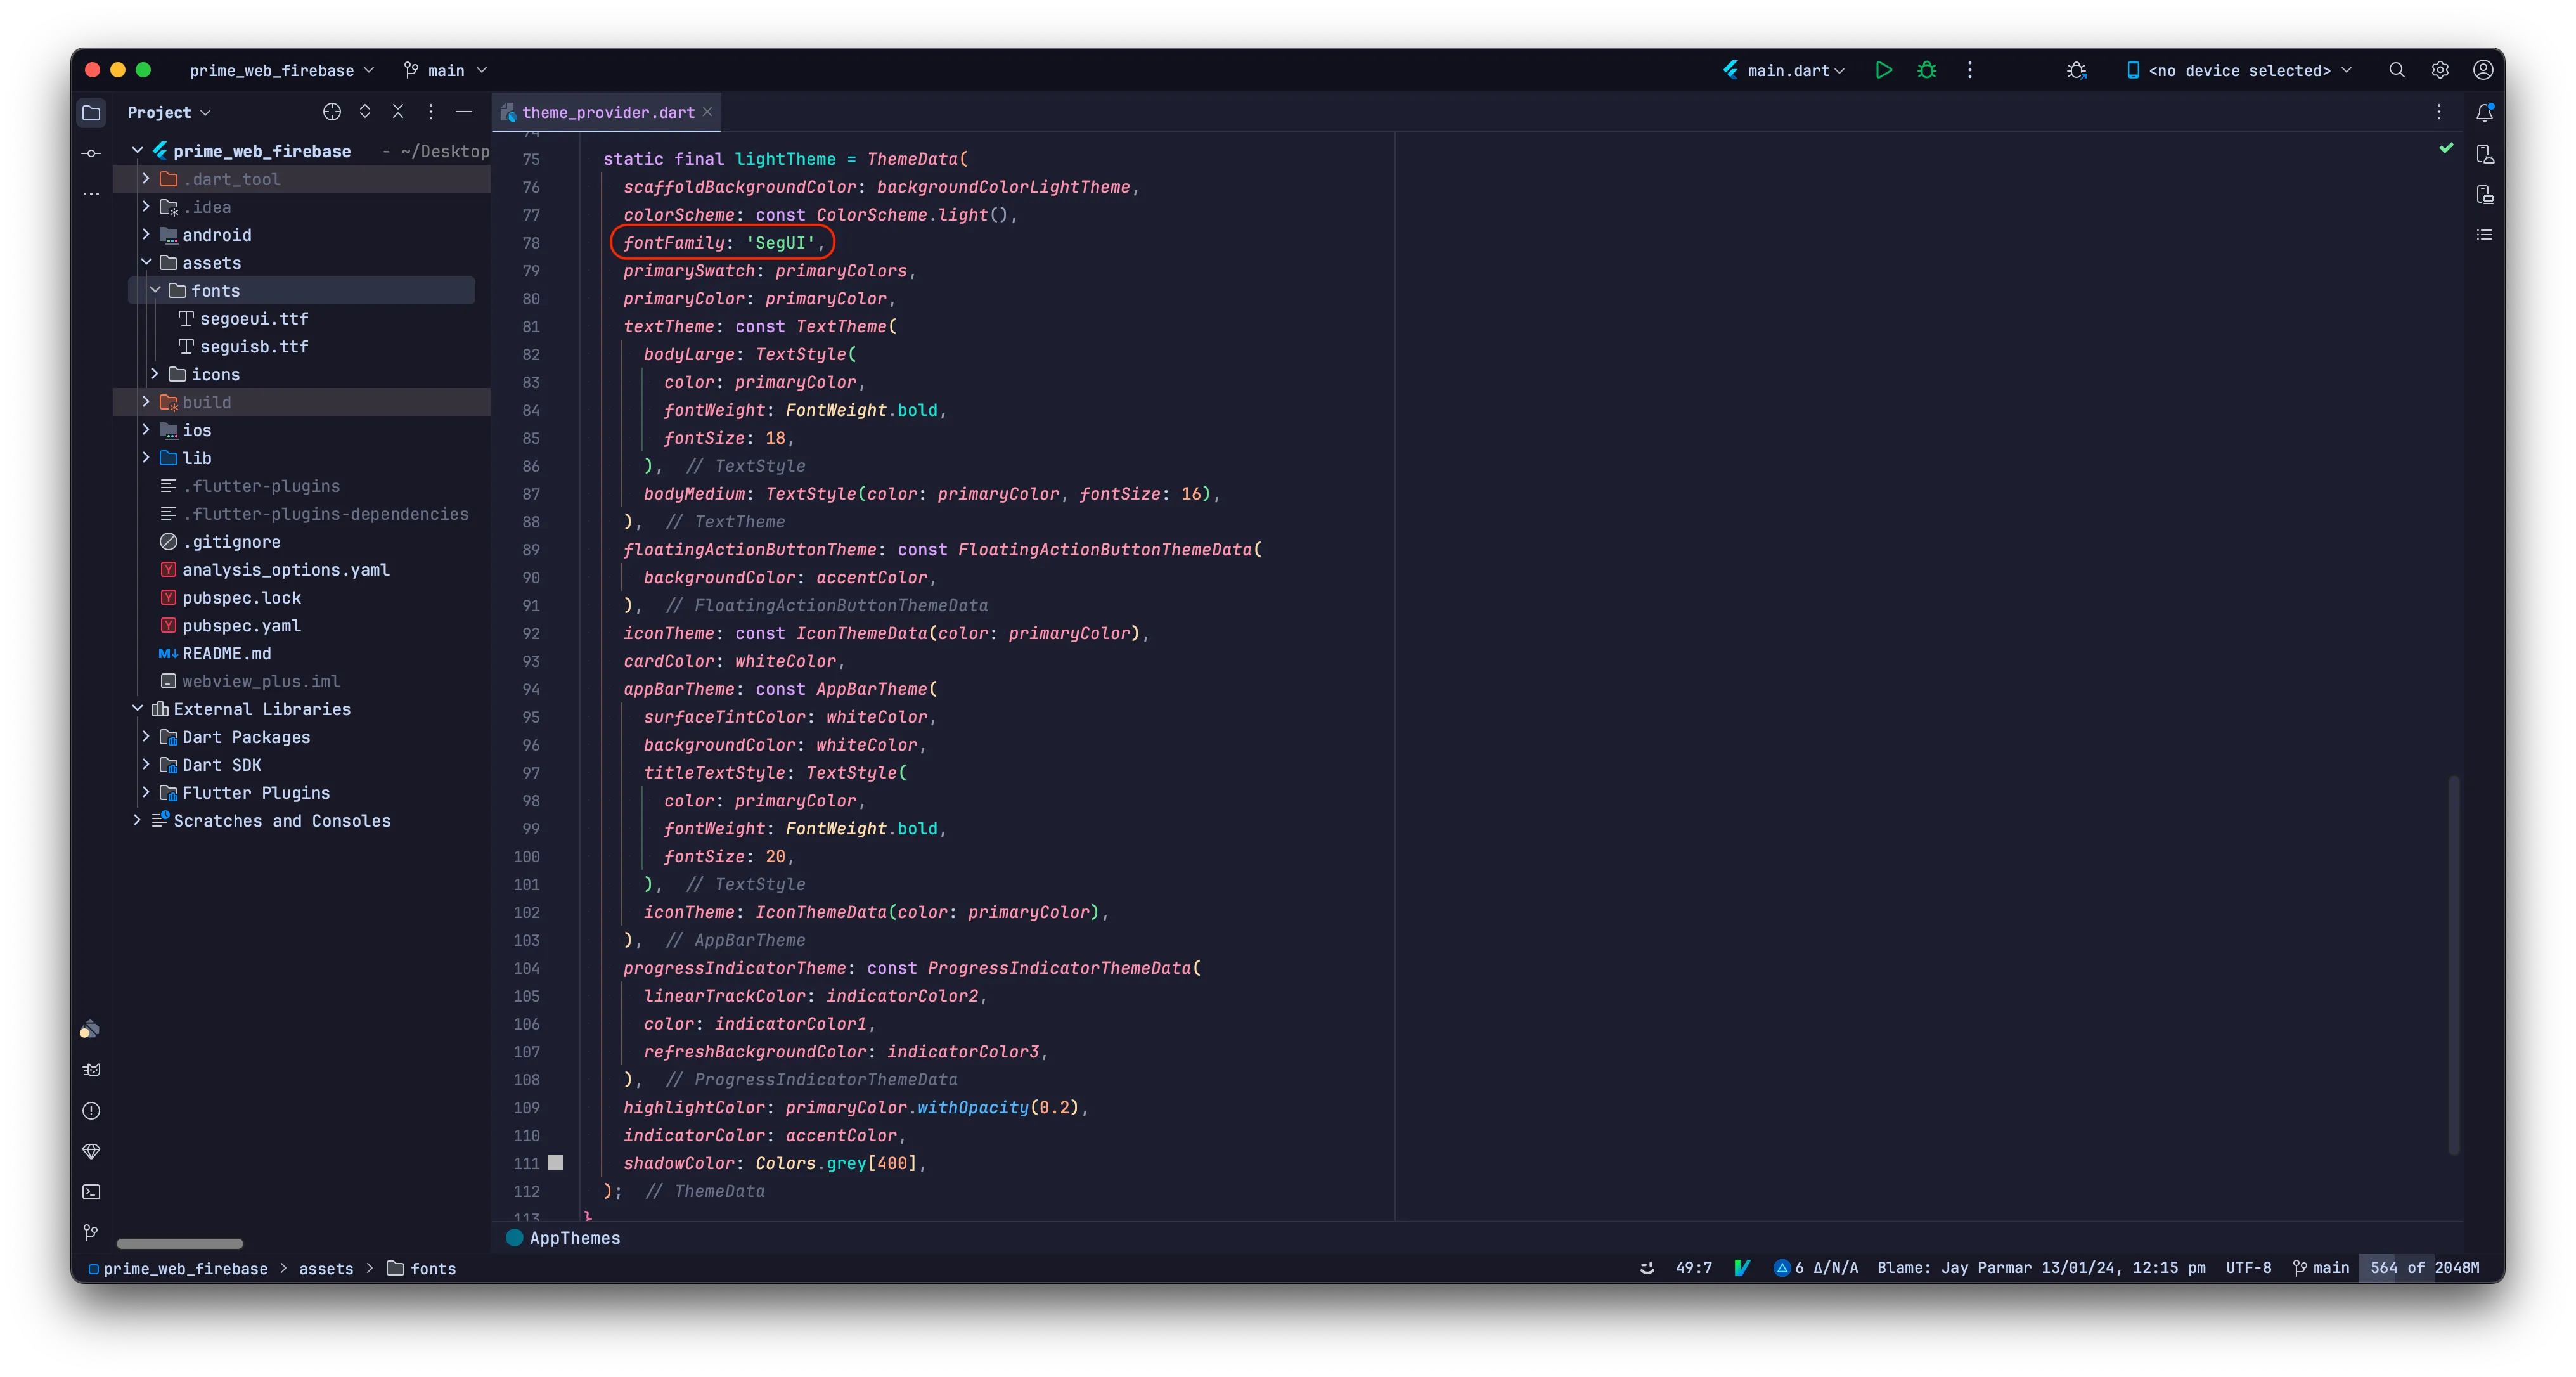
3. Then Change Font Family Name in theme_provider.dart:
As per shown in the image, change the fontFamily name in
theme_provider.dart file:
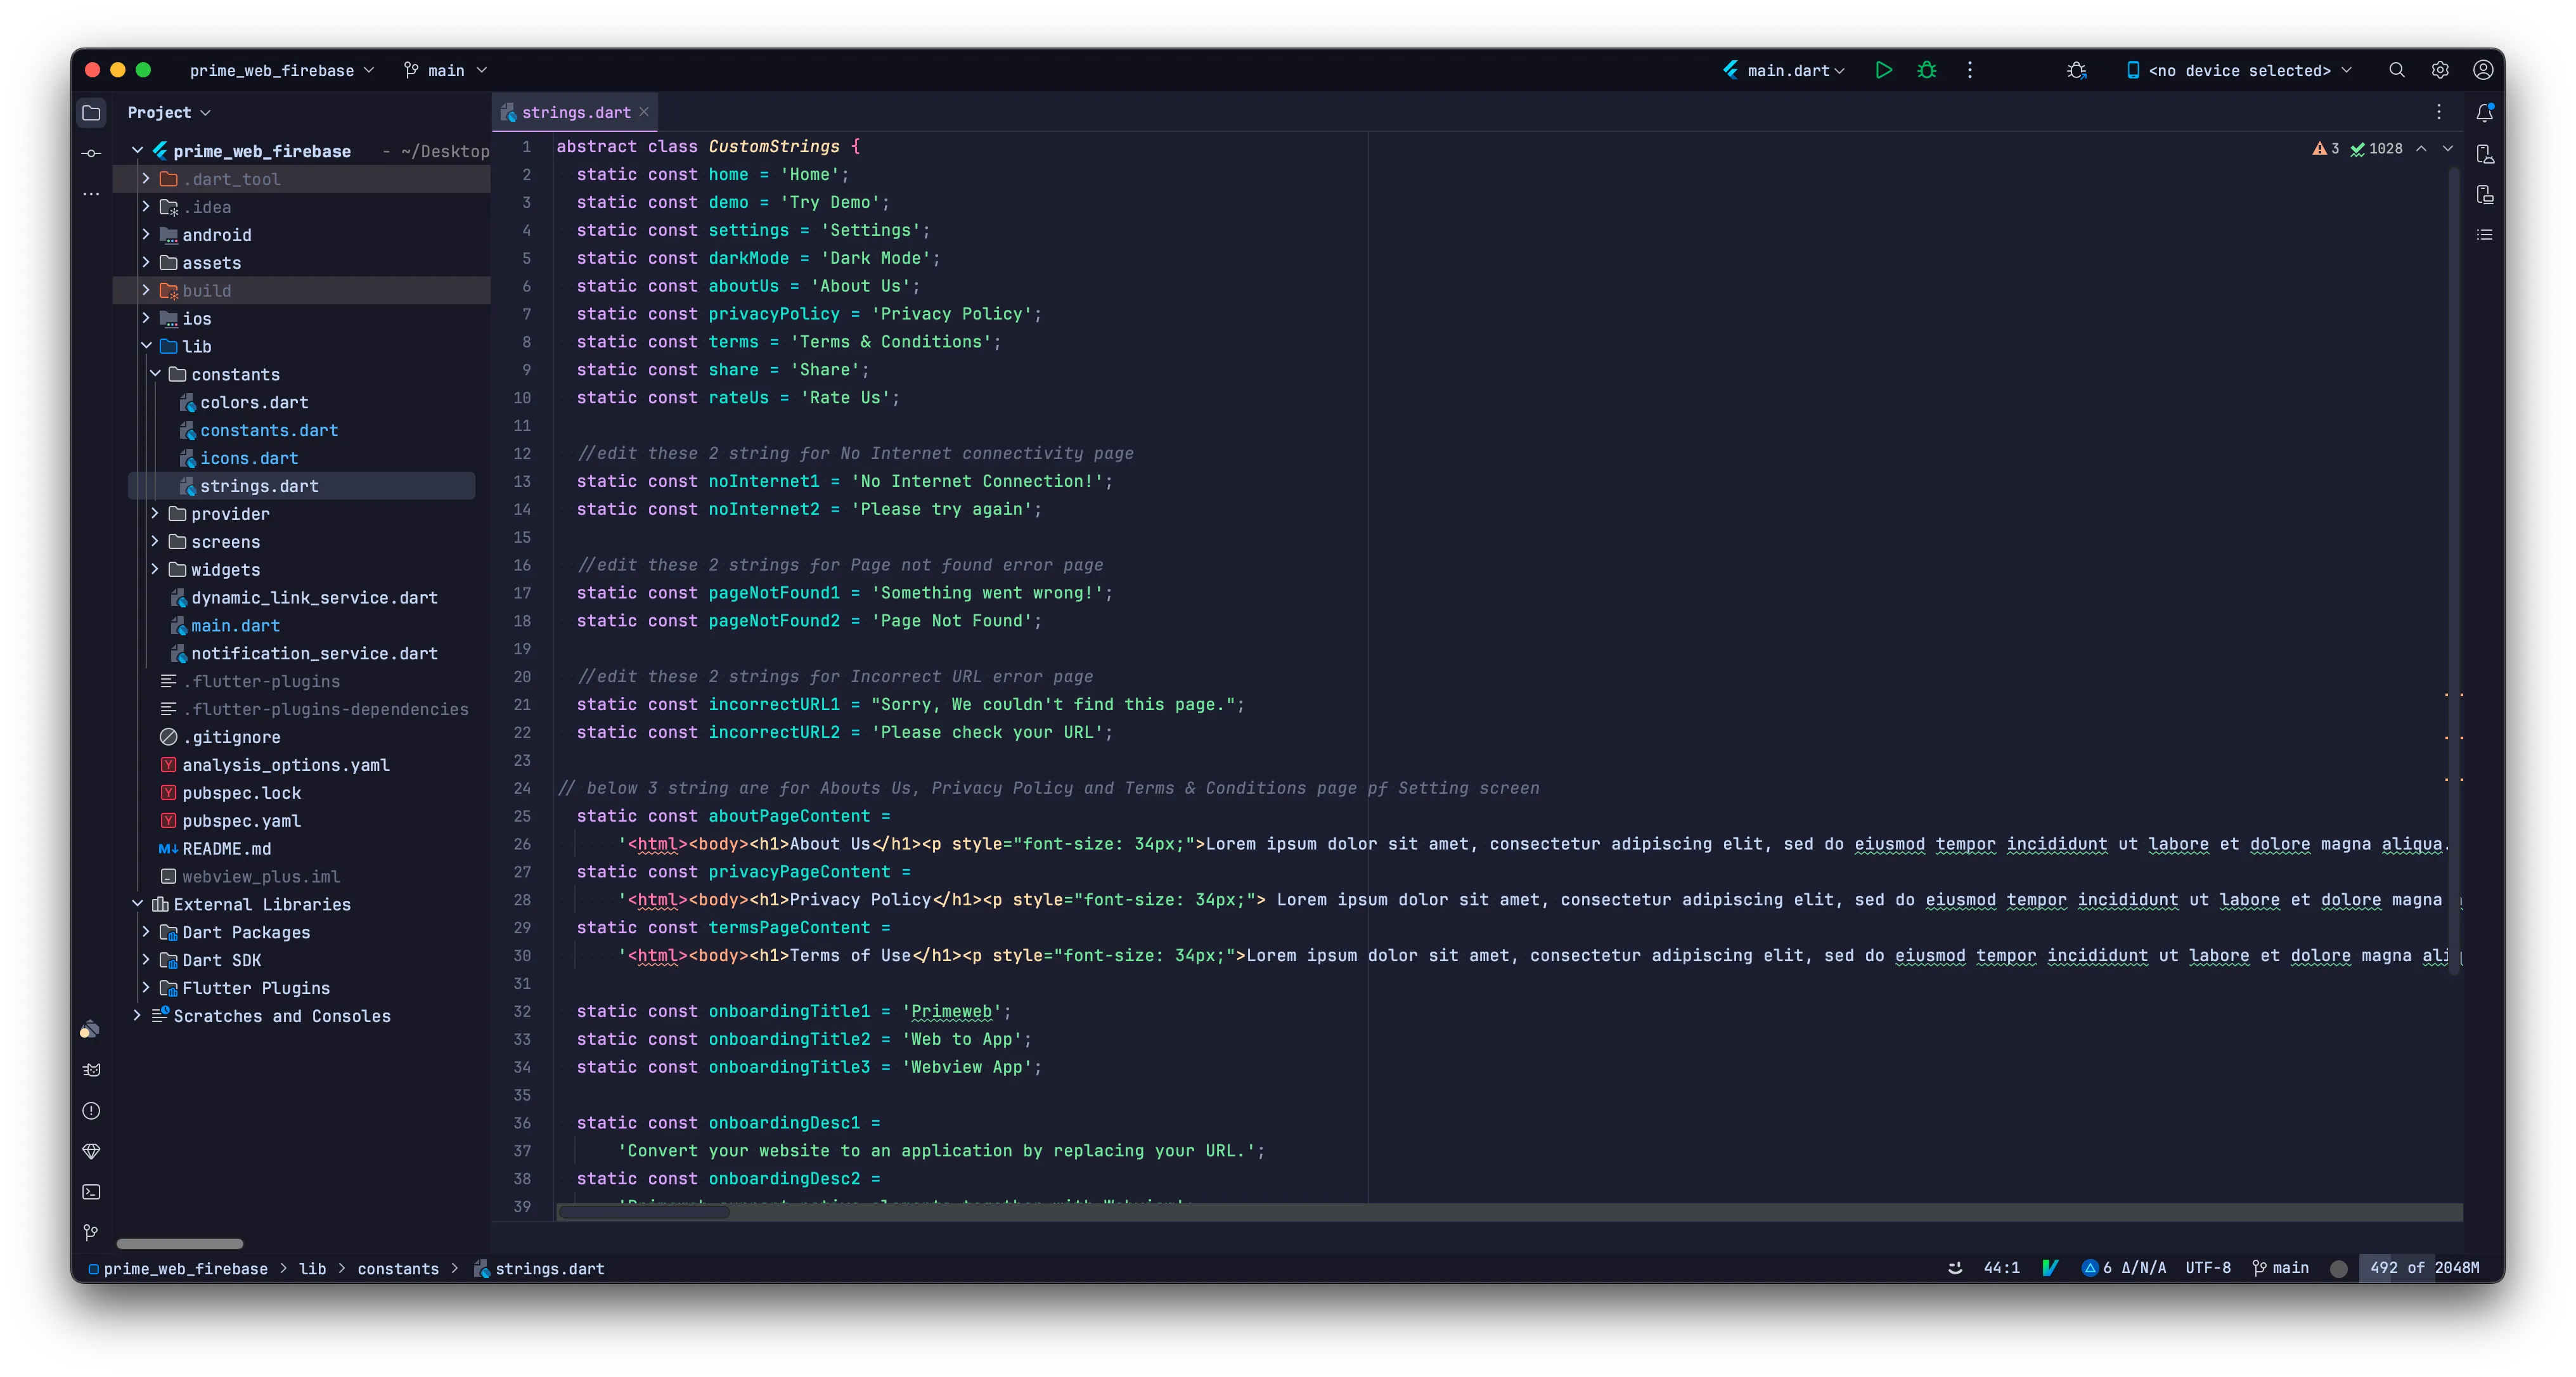
How to Change Application String Constants:
Go to lib->constants->strings.dart as shown in the image and change
the values of the variables you want to change according to your app:
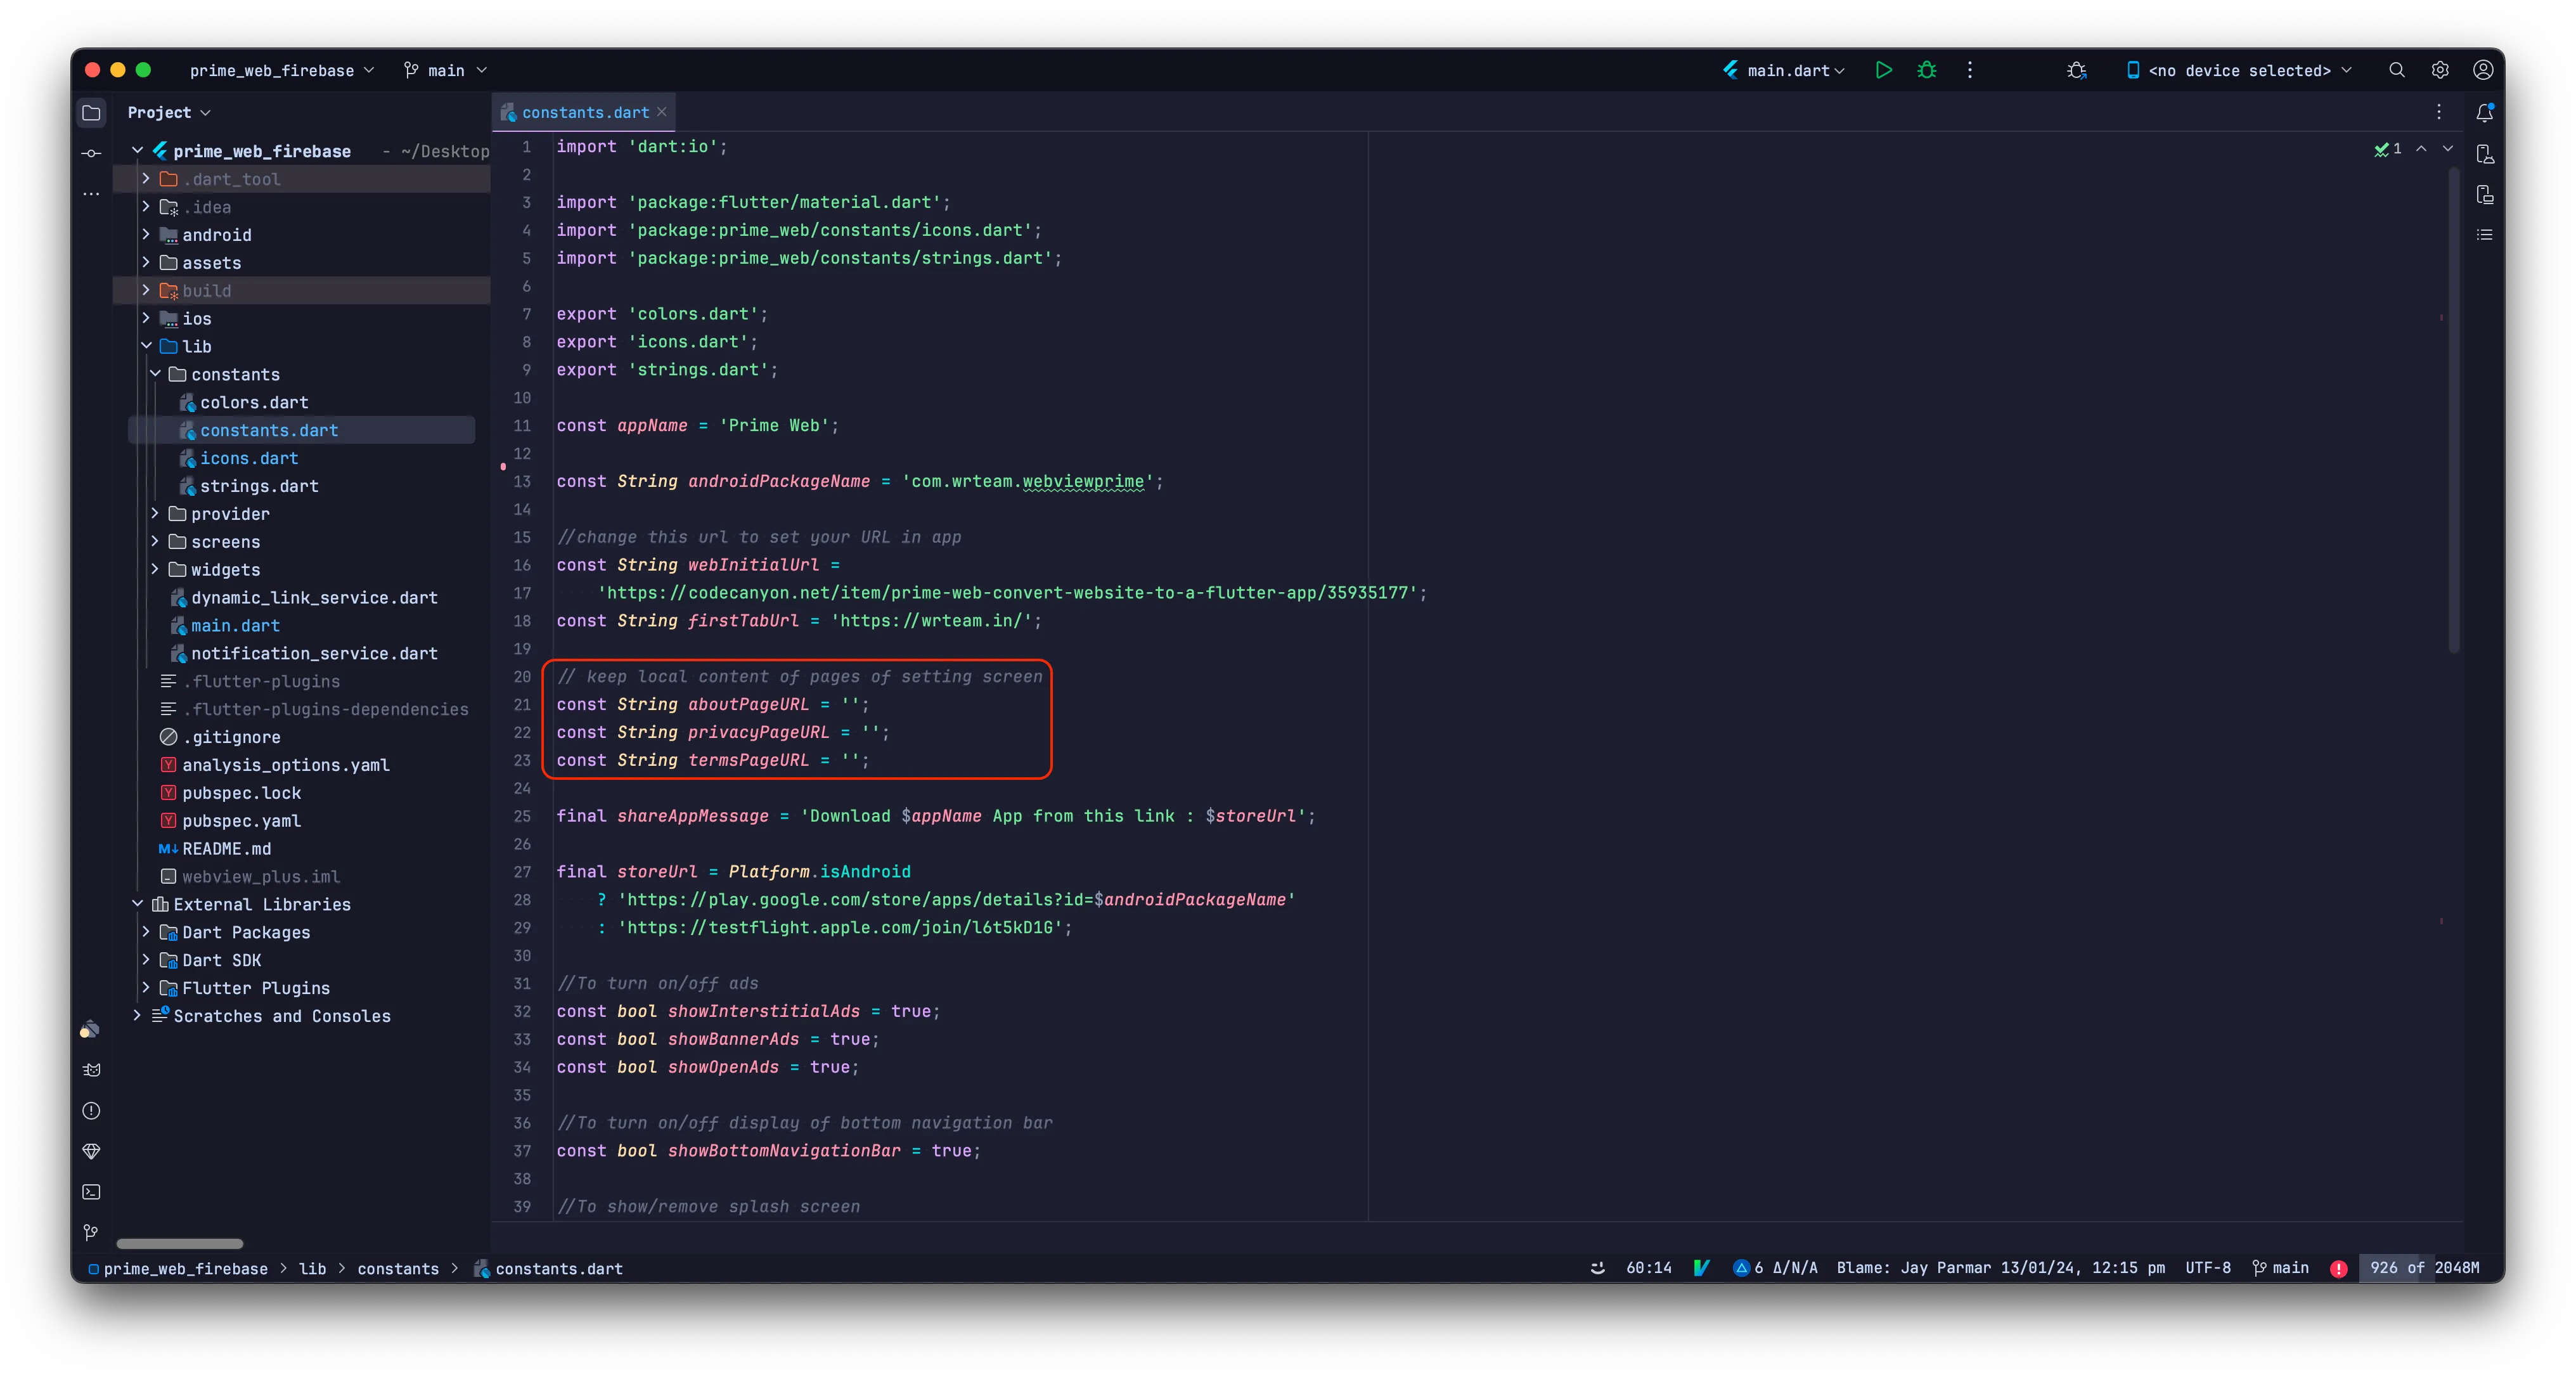
How to Change About Us, Contact Us, Privacy Policy, and Terms & Conditions Pages:
In the Settings option, you can edit the About Us, Contact Us, Privacy Policy, and Terms & Conditions pages.
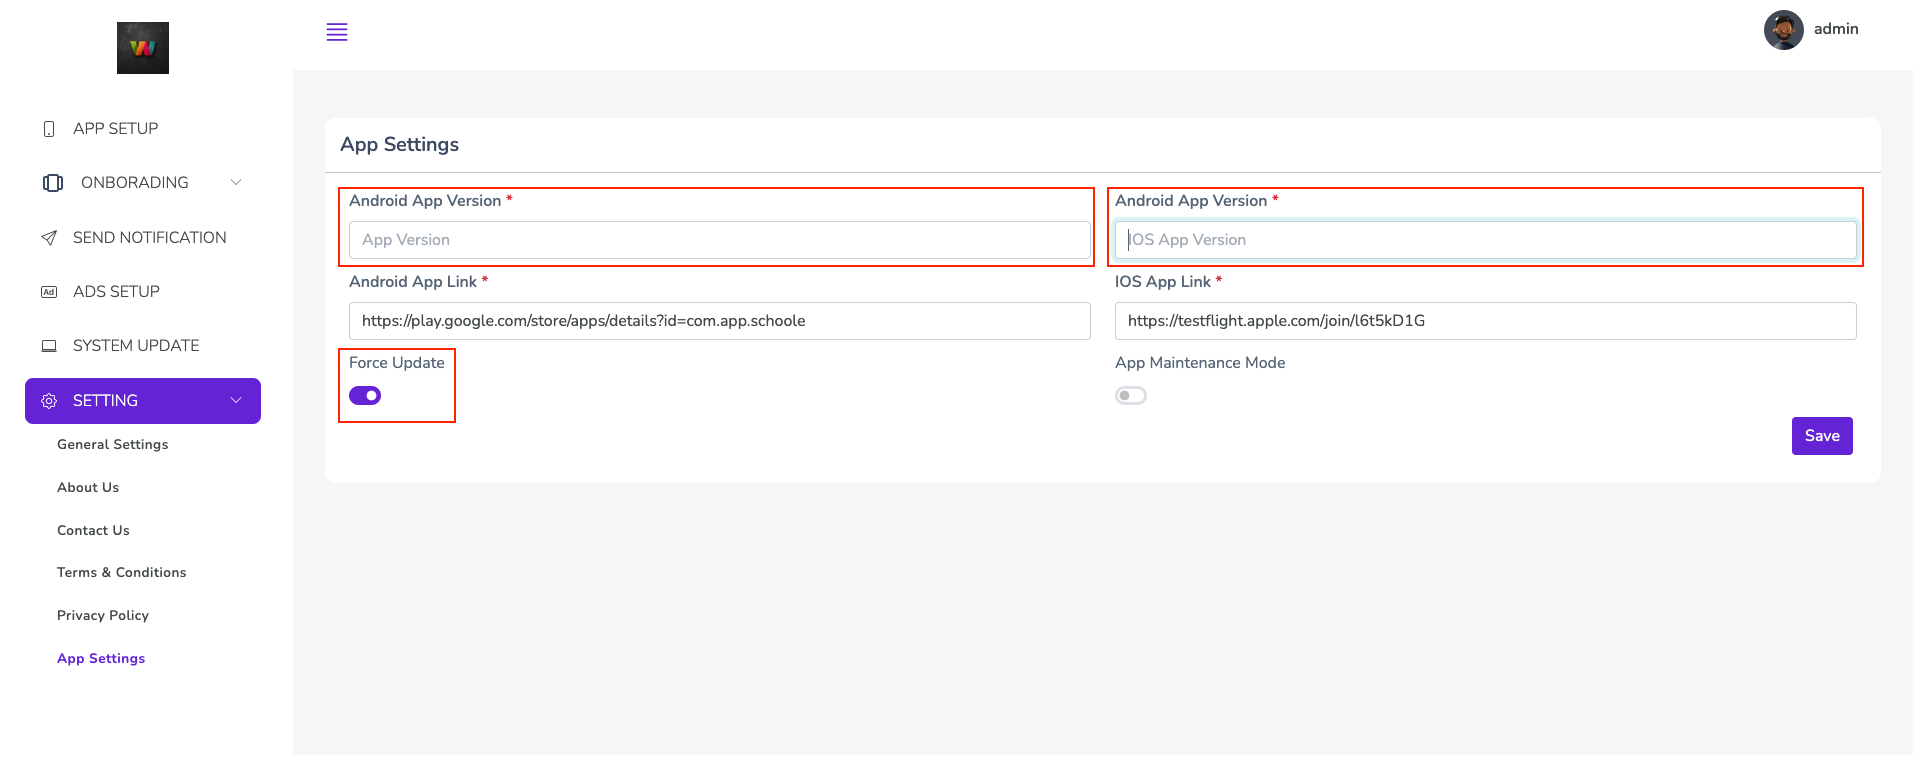
How to Turn On/Off Force Update
In the Settings under the App Settings option, use the Force Update button to enable or disable forced updates.
For example, if your current Android and iOS versions are 1.0.1+1 and you update to version 1.0.1+2, enter the latest version in the Android App Version and iOS App Version fields. Then, enable the Force Update button to ensure this functionality works properly.
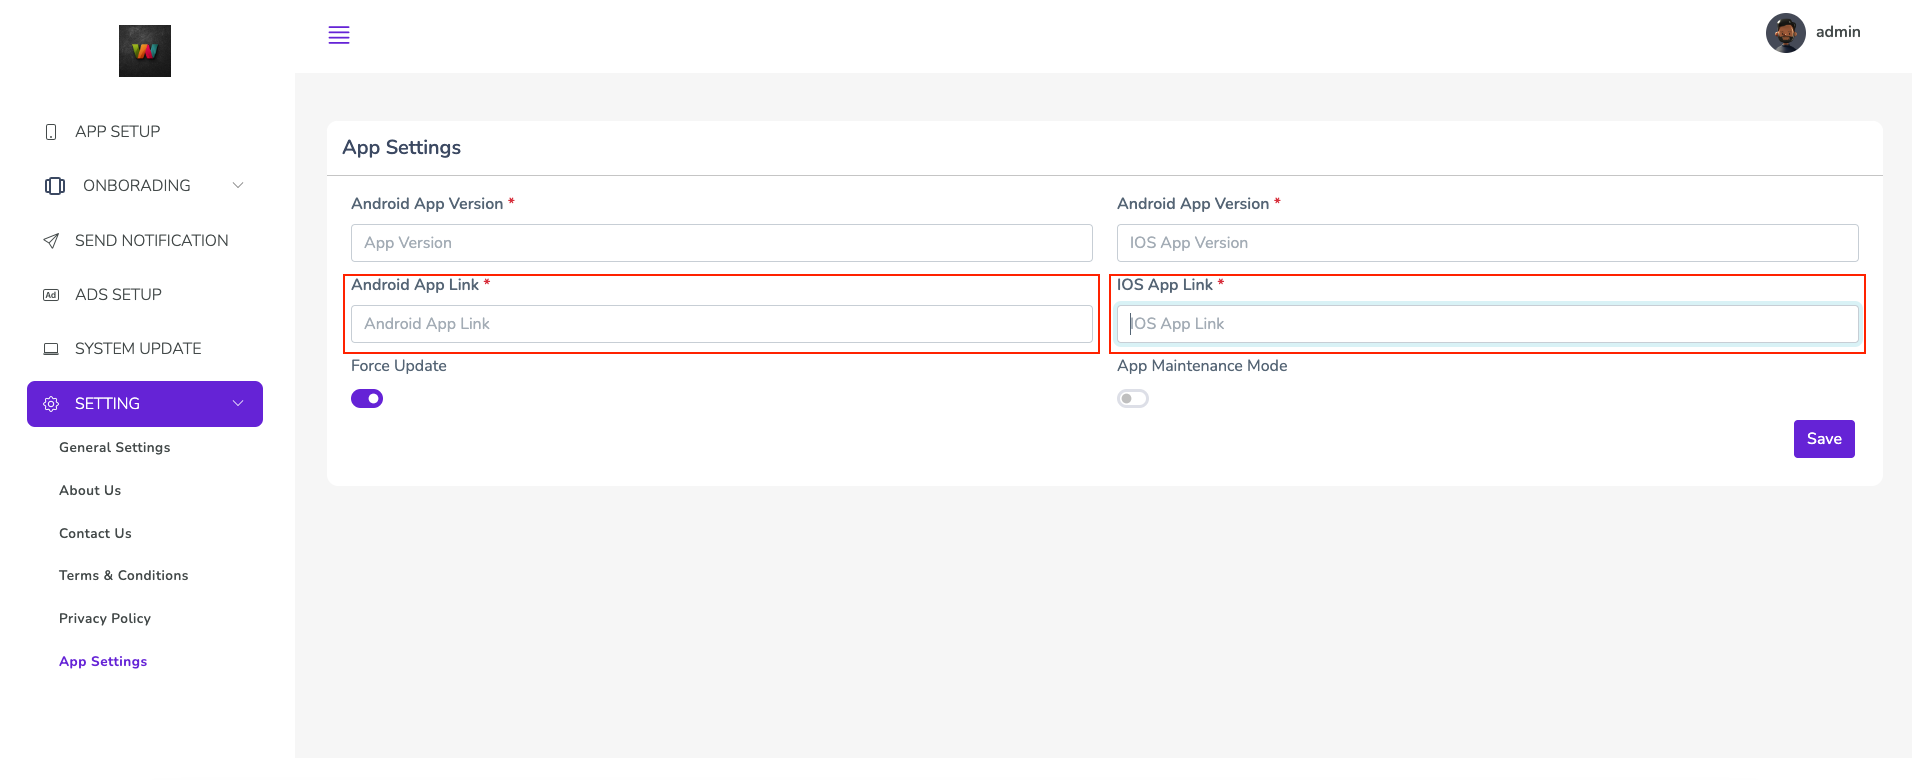
How to Add Android/IOS App Link
In the Settings under the App Settings option, use the Android App Link field to add the Android app link, and use the iOS App Link field to add the iOS app link.
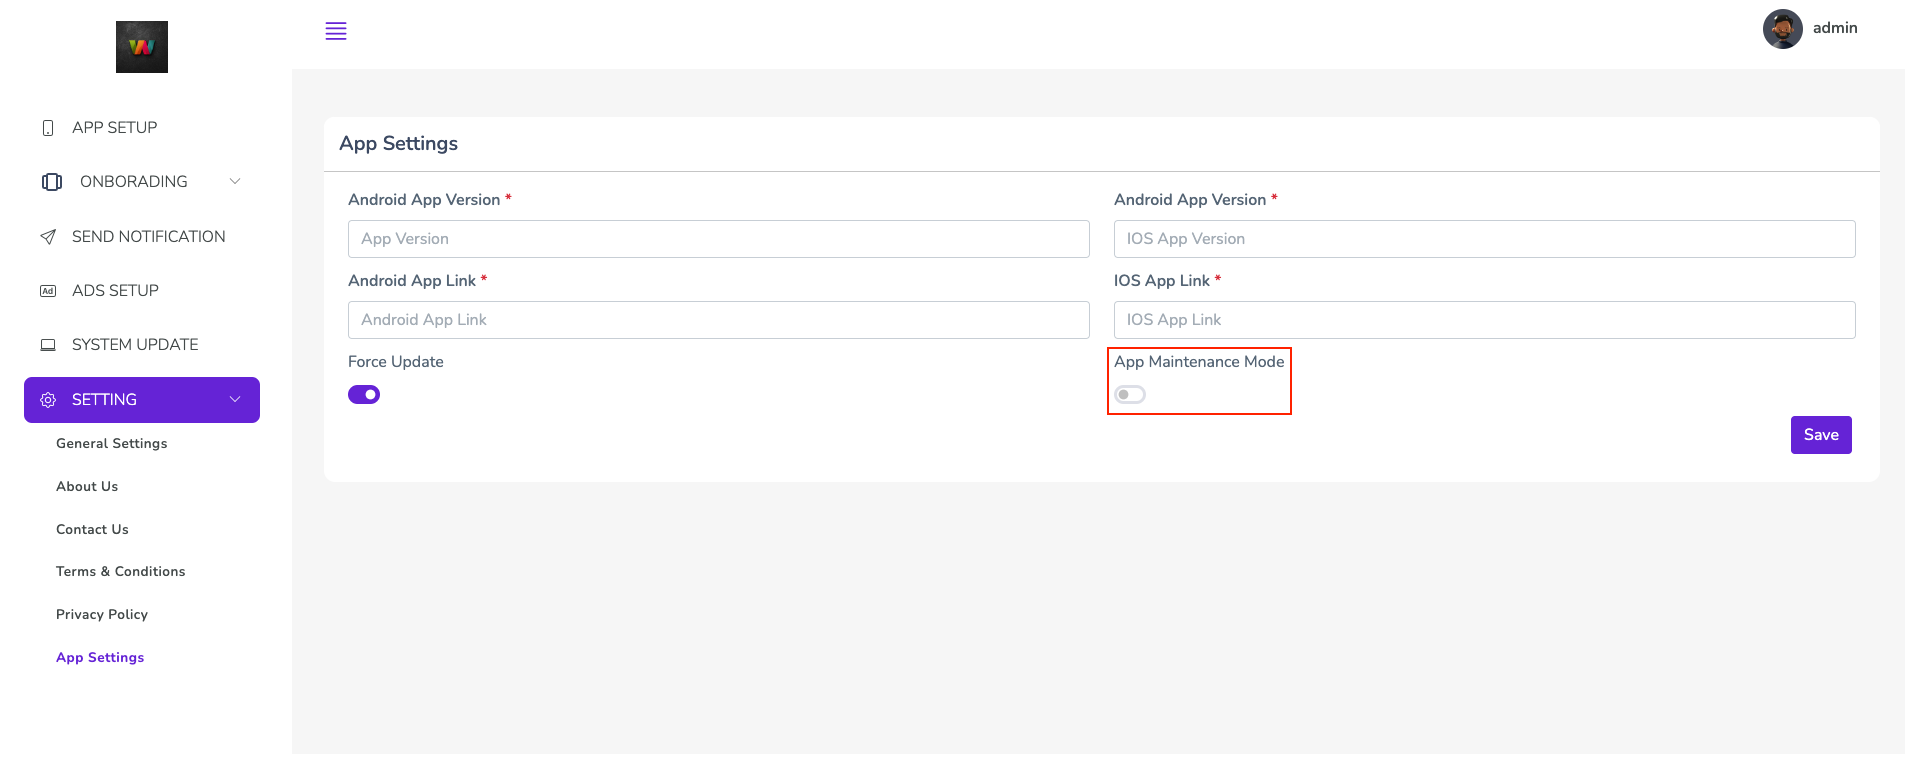
How to Turn On/Off App Maintenance Mode
In the Settings under the App Settings option, use the App Maintenance Mode button to enable or disable Maintenance Mode.
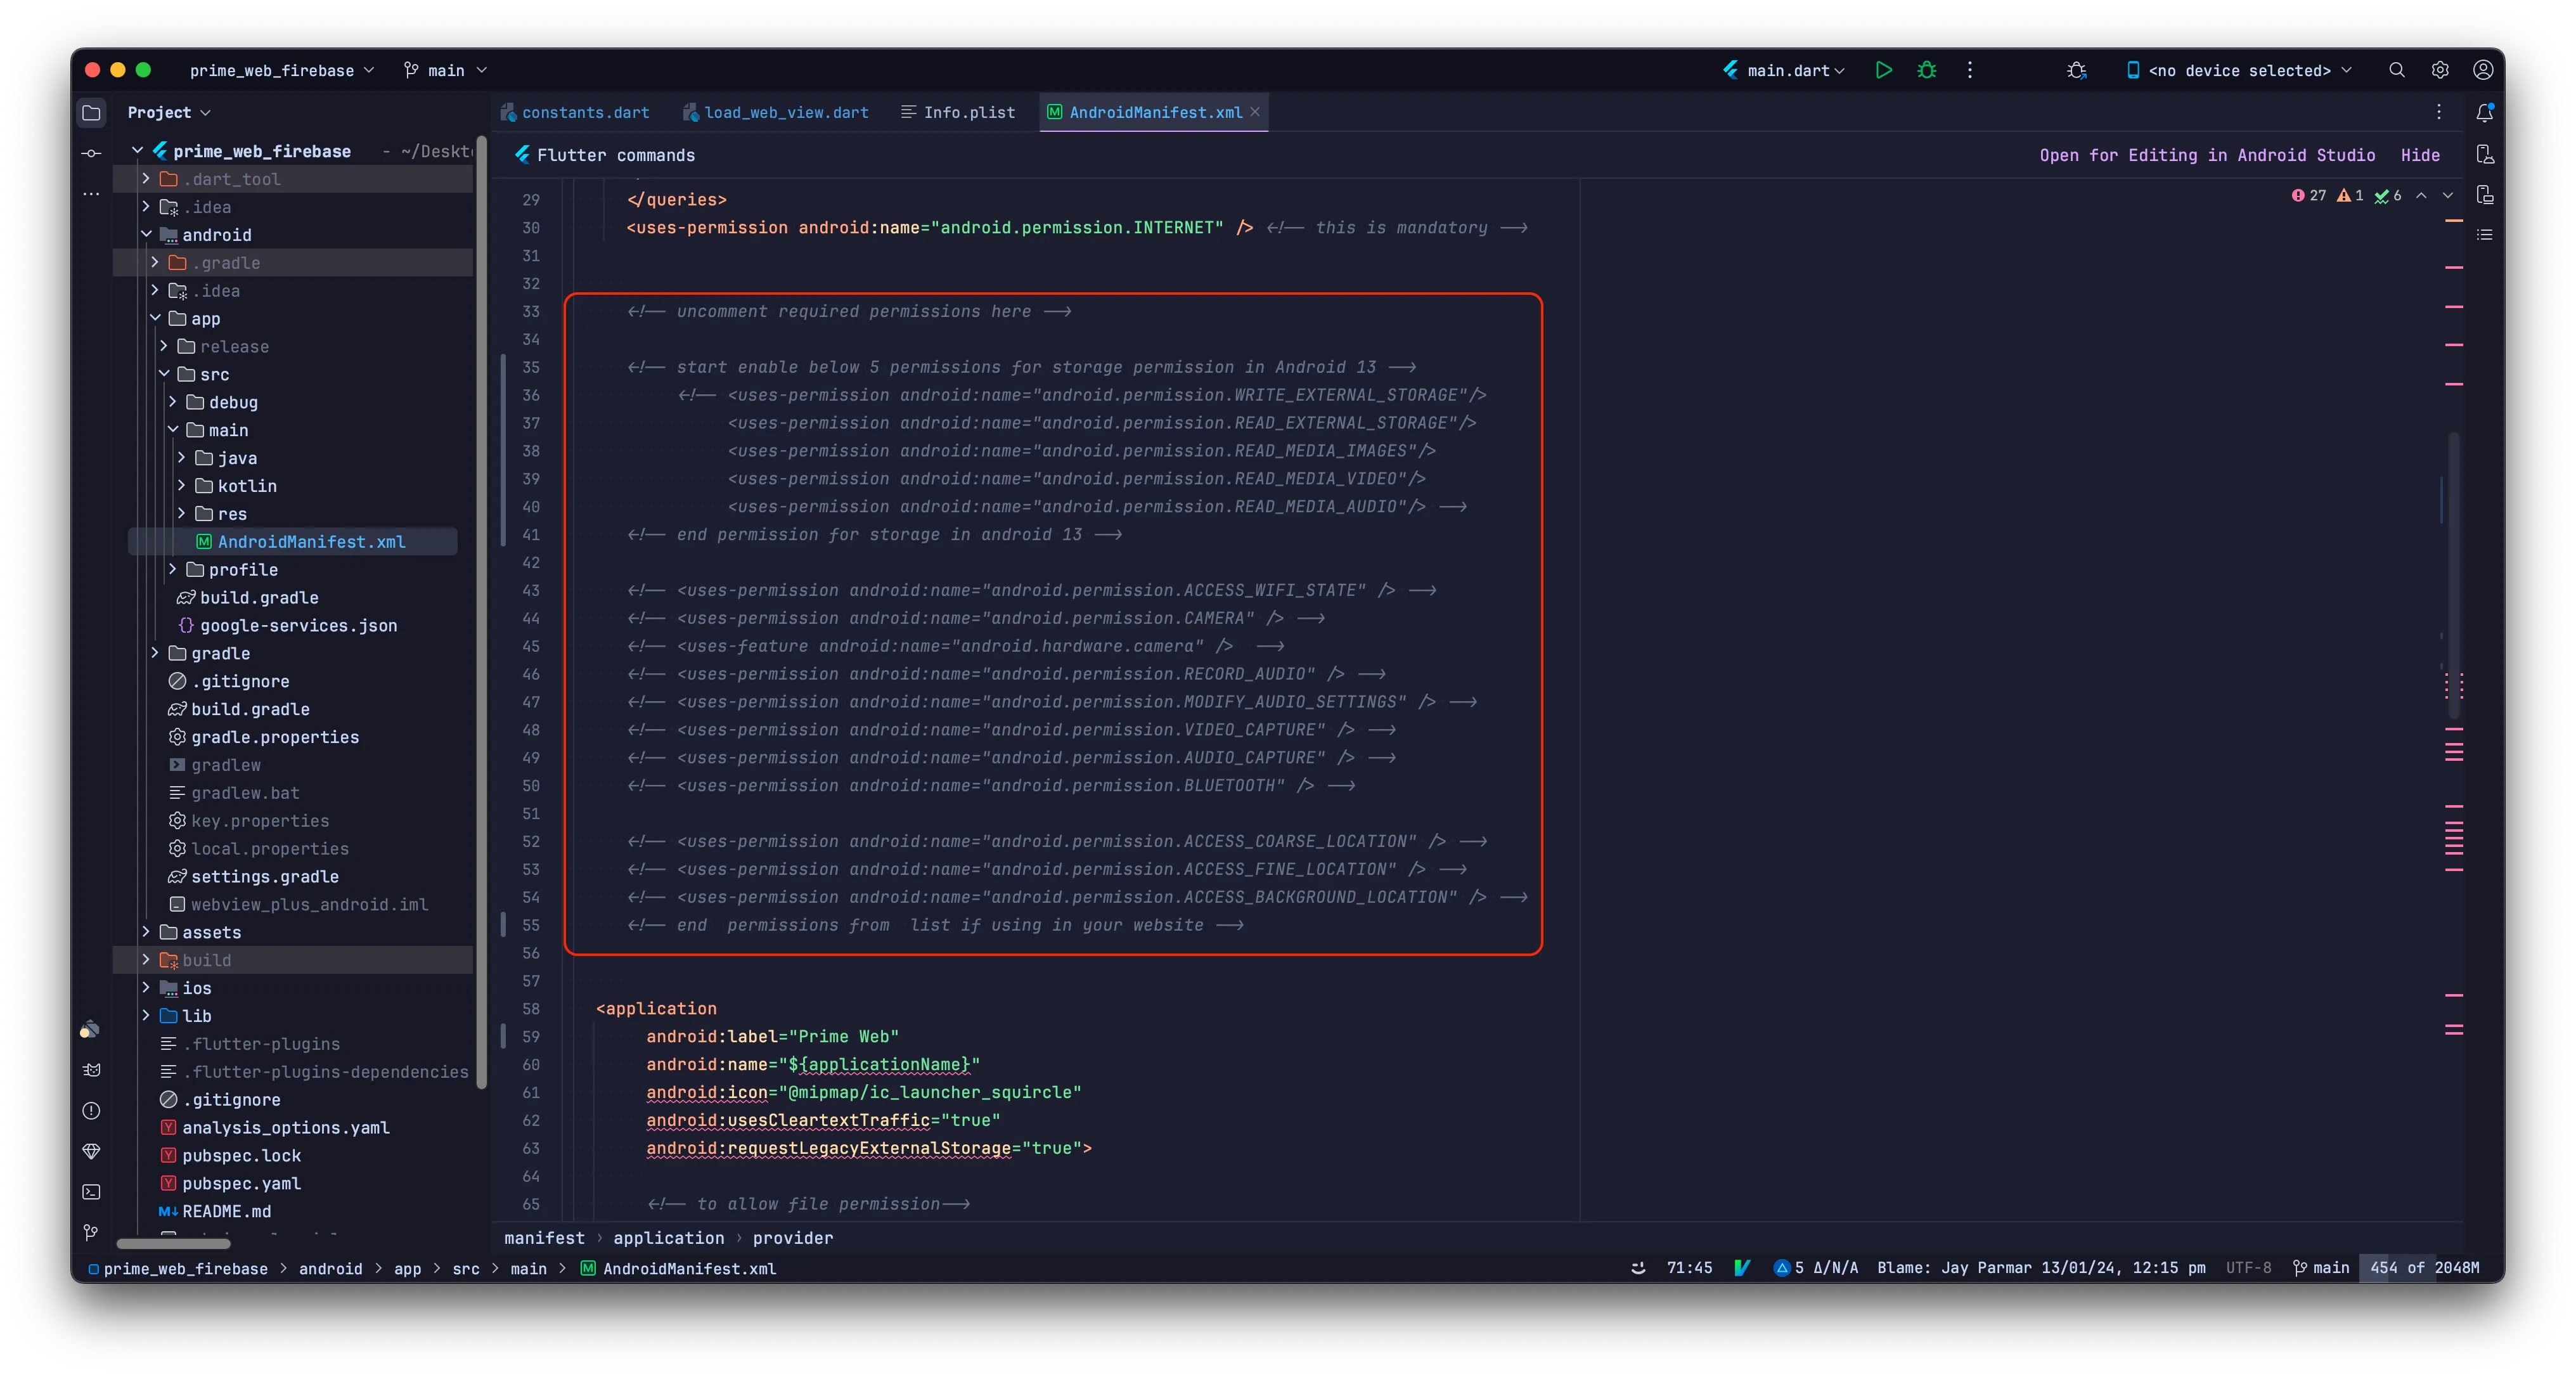
How to Add Necessary Permissions:
Android - List of Permissions
Note: Uncomment any of the following permissions from the AndroidManifest file to use them:
- For storage access:
- For camera access:
- For Audio device access:
- For capture video access:
- Location-related permissions:
<uses-permission android:name="android.permission.WRITE_EXTERNAL_STORAGE"/>
<uses-permission android:name="android.permission.CAMERA" /><uses-feature android:name="android.hardware.camera" />
<uses-permission android:name="android.permission.RECORD_AUDIO" /><uses-permission android:name="android.permission.MODIFY_AUDIO_SETTINGS" />
<uses-permission android:name="android.permission.VIDEO_CAPTURE" /><uses-permission android:name="android.permission.AUDIO_CAPTURE" />
<uses-permission android:name="android.permission.ACCESS_COARSE_LOCATION" />
Include the below permission only if your app benefits from precise location
access.
<uses-permission android:name="android.permission.ACCESS_FINE_LOCATION" />
Required only when requesting background location access on Android 10 (API level 29)
and higher.
<uses-permission android:name="android.permission.ACCESS_BACKGROUND_LOCATION" />
IOS - List of Permissions
Note: Uncomment any of the following permissions from the Info.plist file to use them:
- For gallery access:
- For camera access:
- For microphone access:
- Location-related permissions:
<key>NSPhotoLibraryAddUsageDescription</key><string>This will be used to get or pick an image from the gallery to set your profile photo.</string>
<key>NSCameraUsageDescription</key><string>This app requires access to the Camera to capture your profile photo.</string>
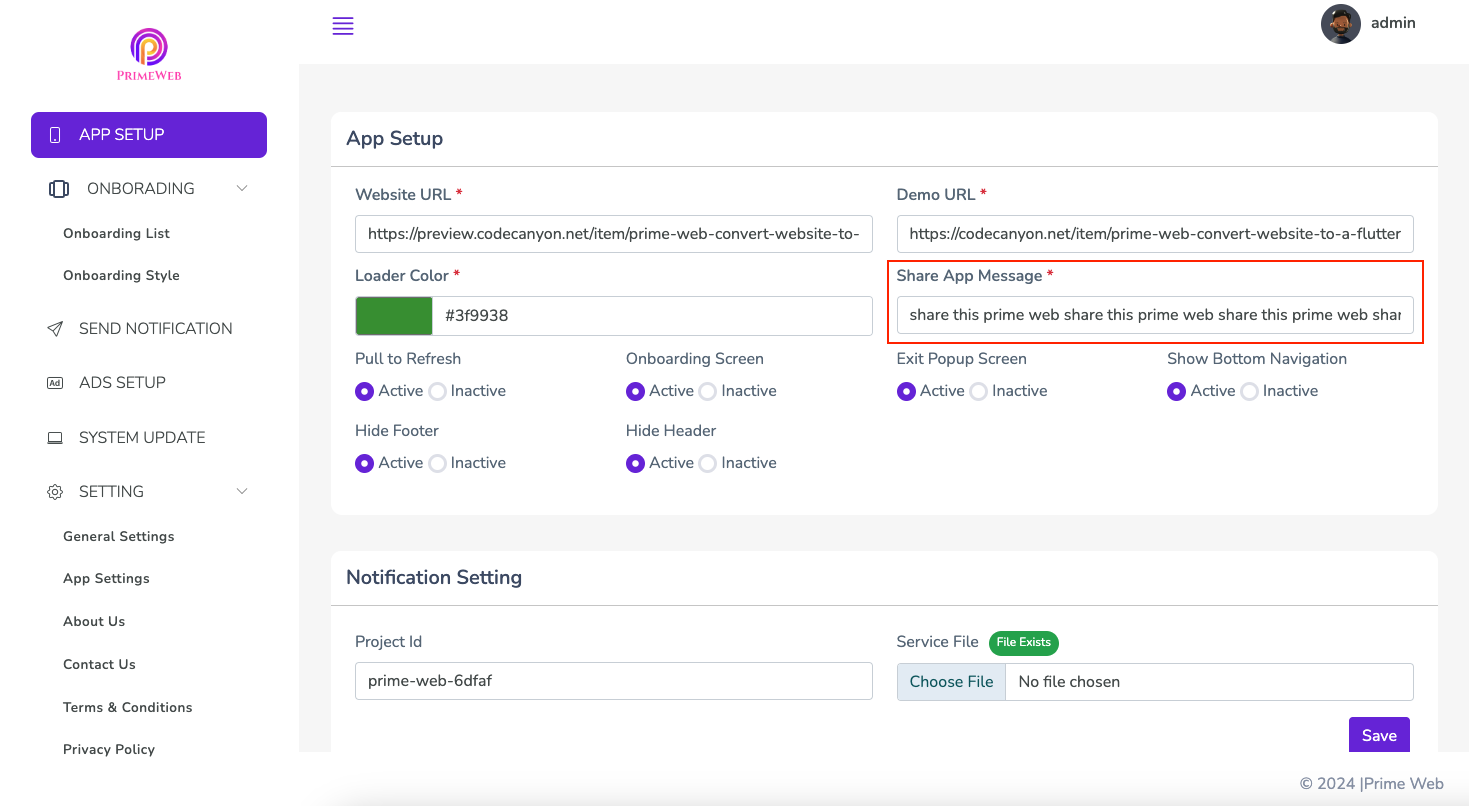
<key>NSMicrophoneUsageDescription</key><string>This requires listening for speech on the device microphone on your request for voice search.</string>
<key>NSLocationAlwaysUsageDescription</key><string>Your location is required for XYZ benefits for you.</string>
<key>NSLocationWhenInUseUsageDescription</key><string>Your location is required for XYZ benefits for you.</string>
Open ios/Runner/Info.plist file. Uncomment the required permissions as shown in
the figure below.
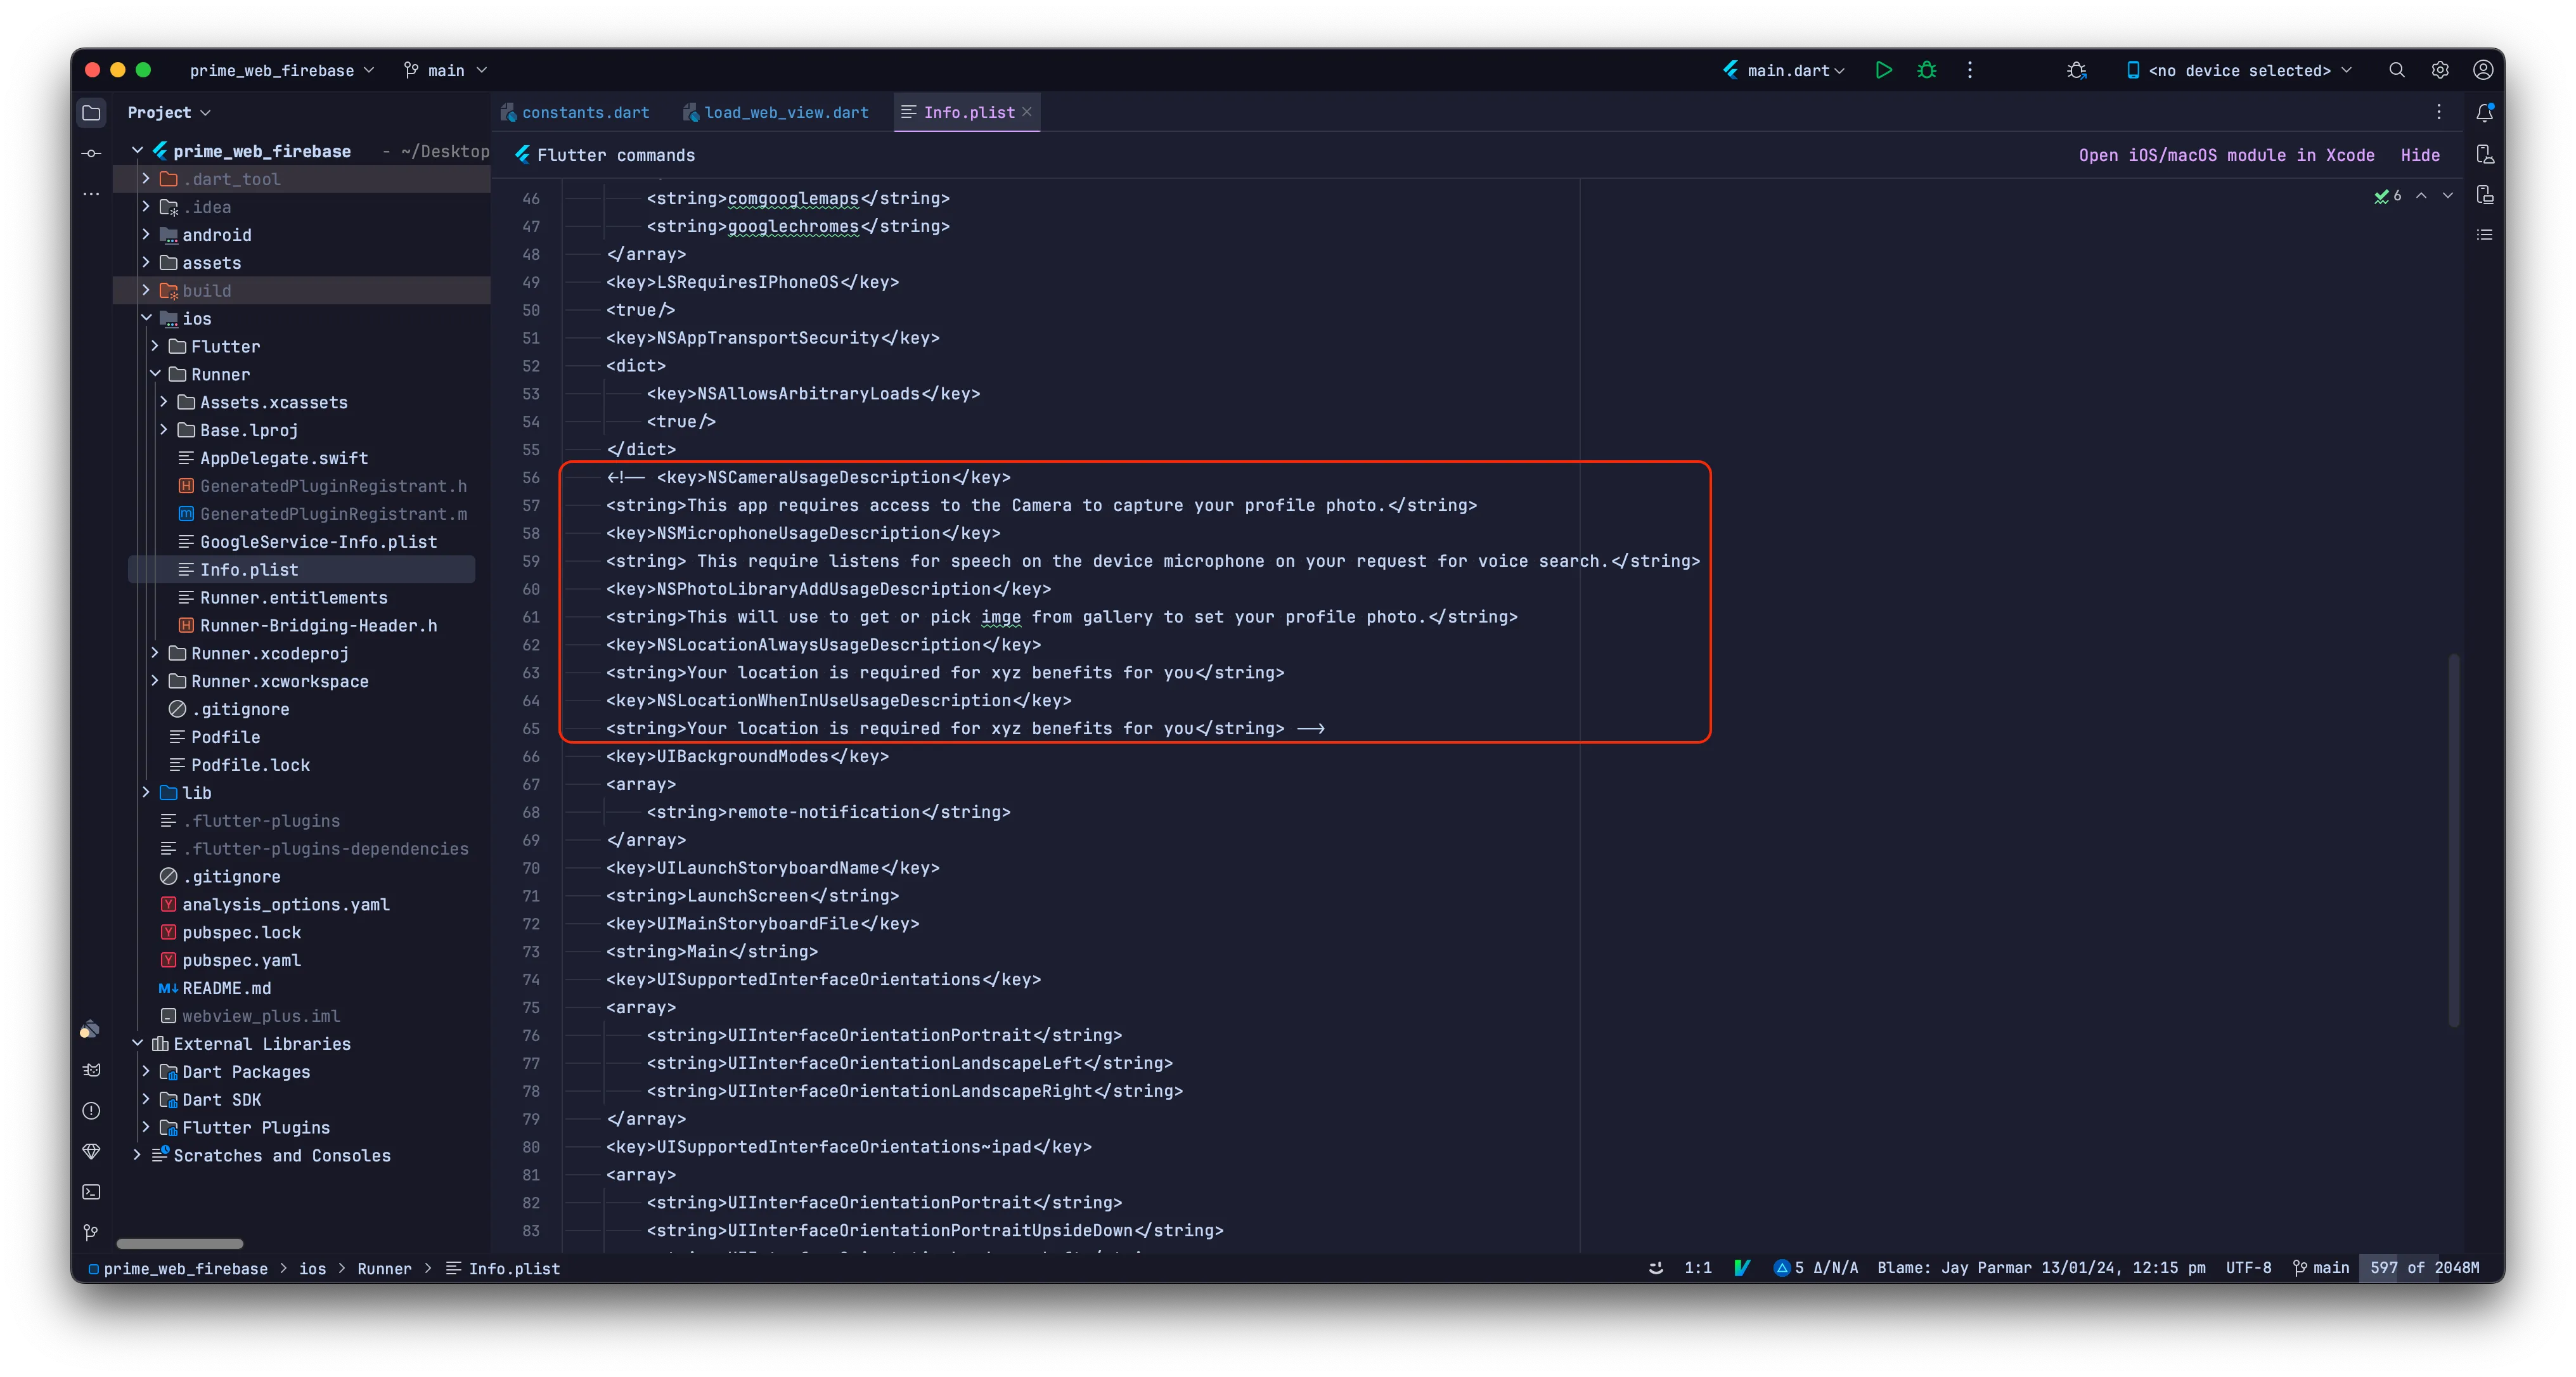
IMPORTANT: Change the reason for using particular permission in the Info.plist accordingly.
How to Solve Common Errors:
-
If you encounter the following error while generating a release APK, please lower the Gradle version in two files:

-
Open
android->build.gradlefile and change Gradle to 4.1.0 as shown below:
classpath 'com.android.tools.build:gradle:4.1.0' -
Open
android->gradle->wrapper->gradle-wrapper.propertiesand change Gradle to 6.7 as shown below:
distributionUrl=https\://services.gradle.org/distributions/gradle-6.7-all.zip
Now build it again and then generate the release app.
-
Open
Create Necessary Accounts
How to Set Up AdMob in App:
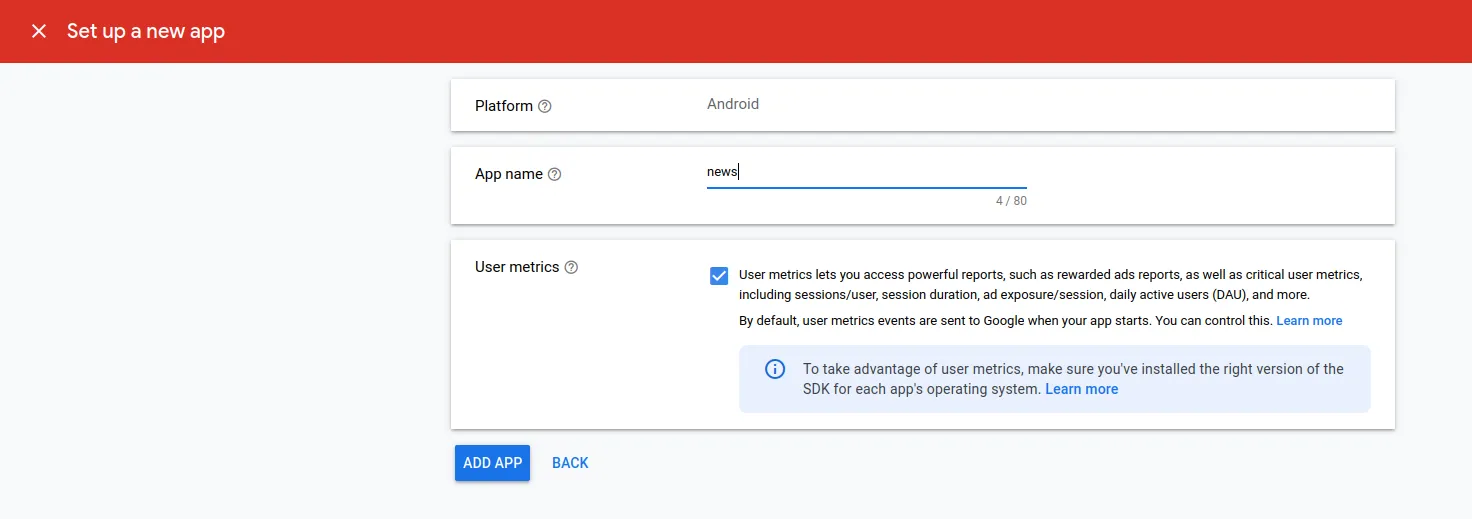
For Android:
- Log in to your AdMob account on the AdMob website.
- Navigate to the "Apps" section or a similar menu in the AdMob console.
- Look for an option to "Add Android App" or a similar function.
- Provide the necessary information about your Android app, such as the app name.
- Enabling user metrics is not necessary to complete this codelab. However, it is recommended as it allows you to understand user behavior in more detail.
- Click on the "ADD APP" button.
- Follow any additional steps or prompts to complete the app addition process.
Note: The exact steps may vary slightly based on updates or changes to the AdMob interface. If you encounter any difficulties, check the official AdMob documentation or contact AdMob support for assistance.

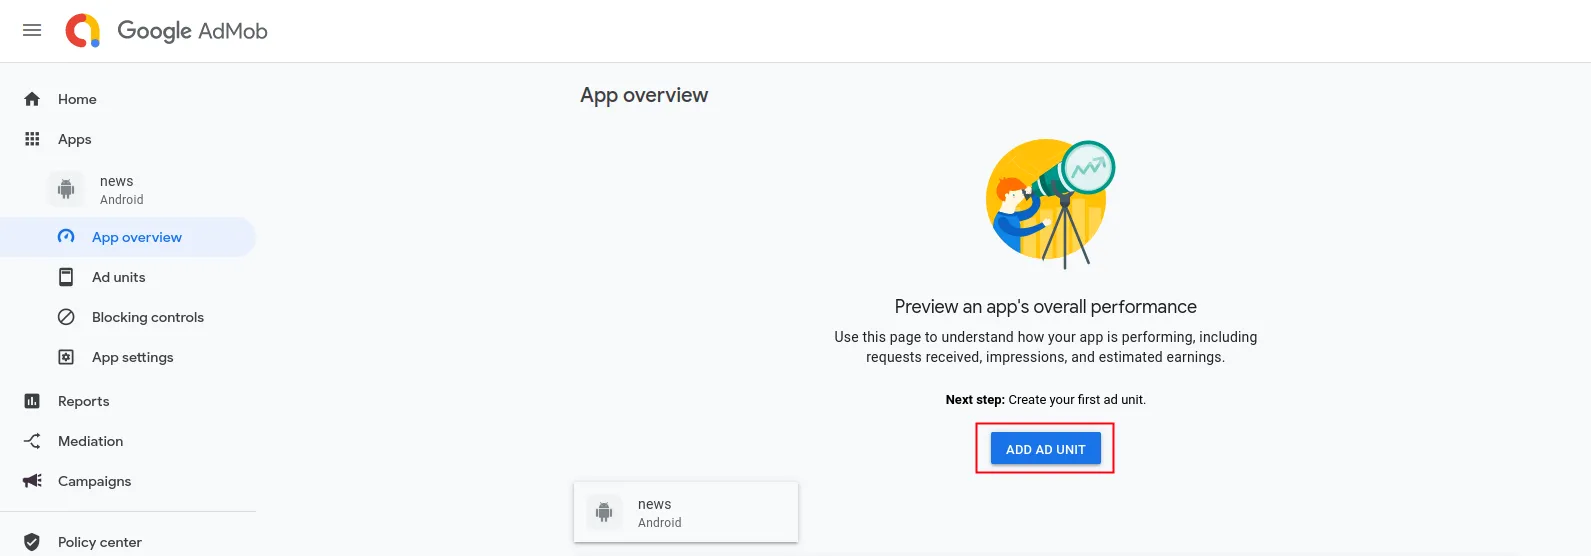
Create Ad Units:
- Select "Banner" ad unit, enter the banner unit ad name, then click on "Create Ad Unit" button.
- Follow the same procedure to create "Interstitial" and "Open" ads.

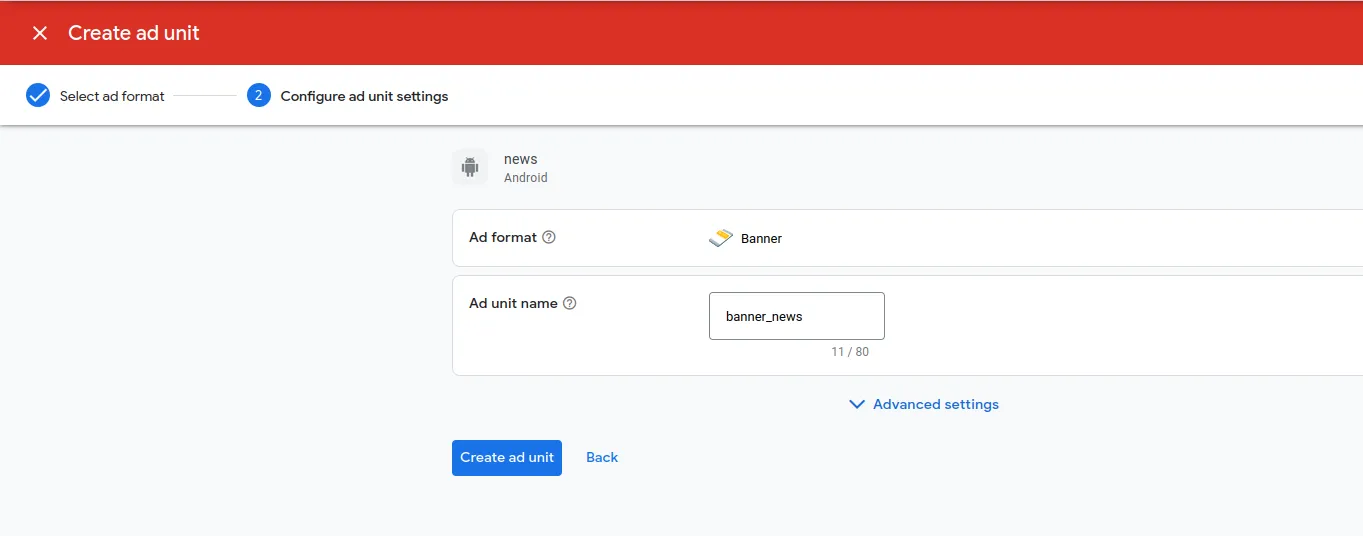
For IOS, Follow the same steps as android to create unit ads.
How to Integrate Firebase:
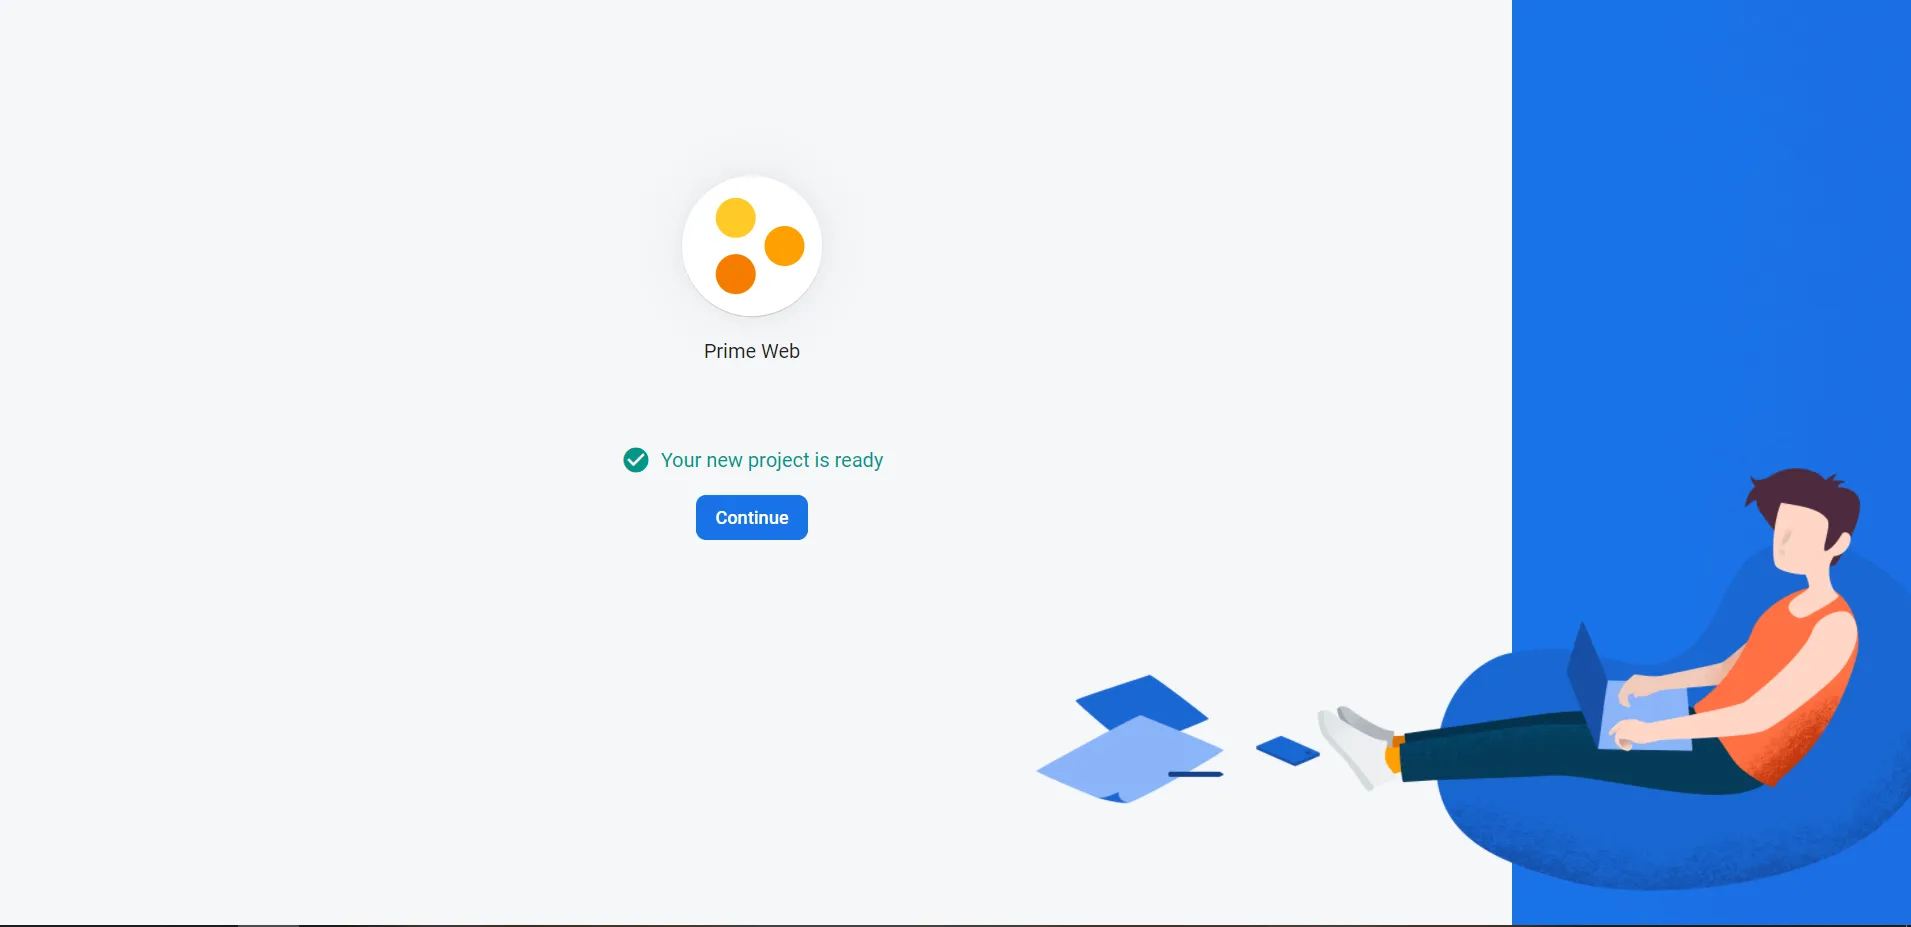
Create Firebase Project:
- Visit the Firebase Console and log in to your account.
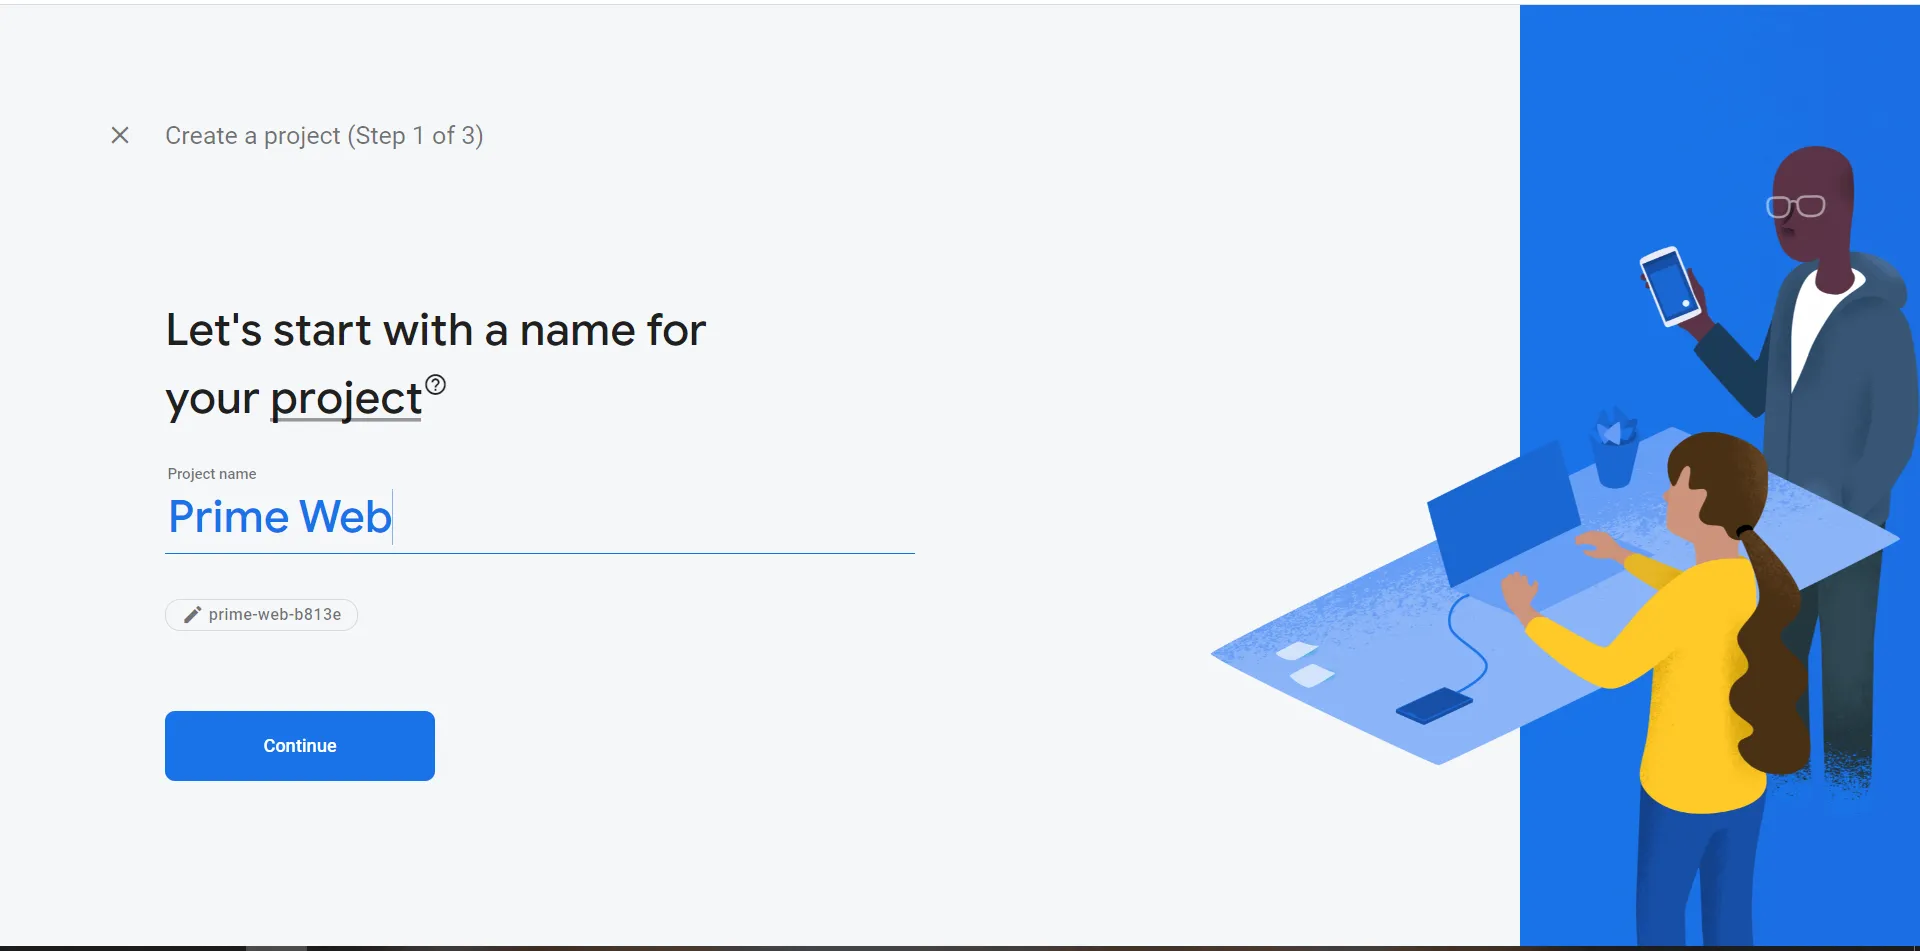
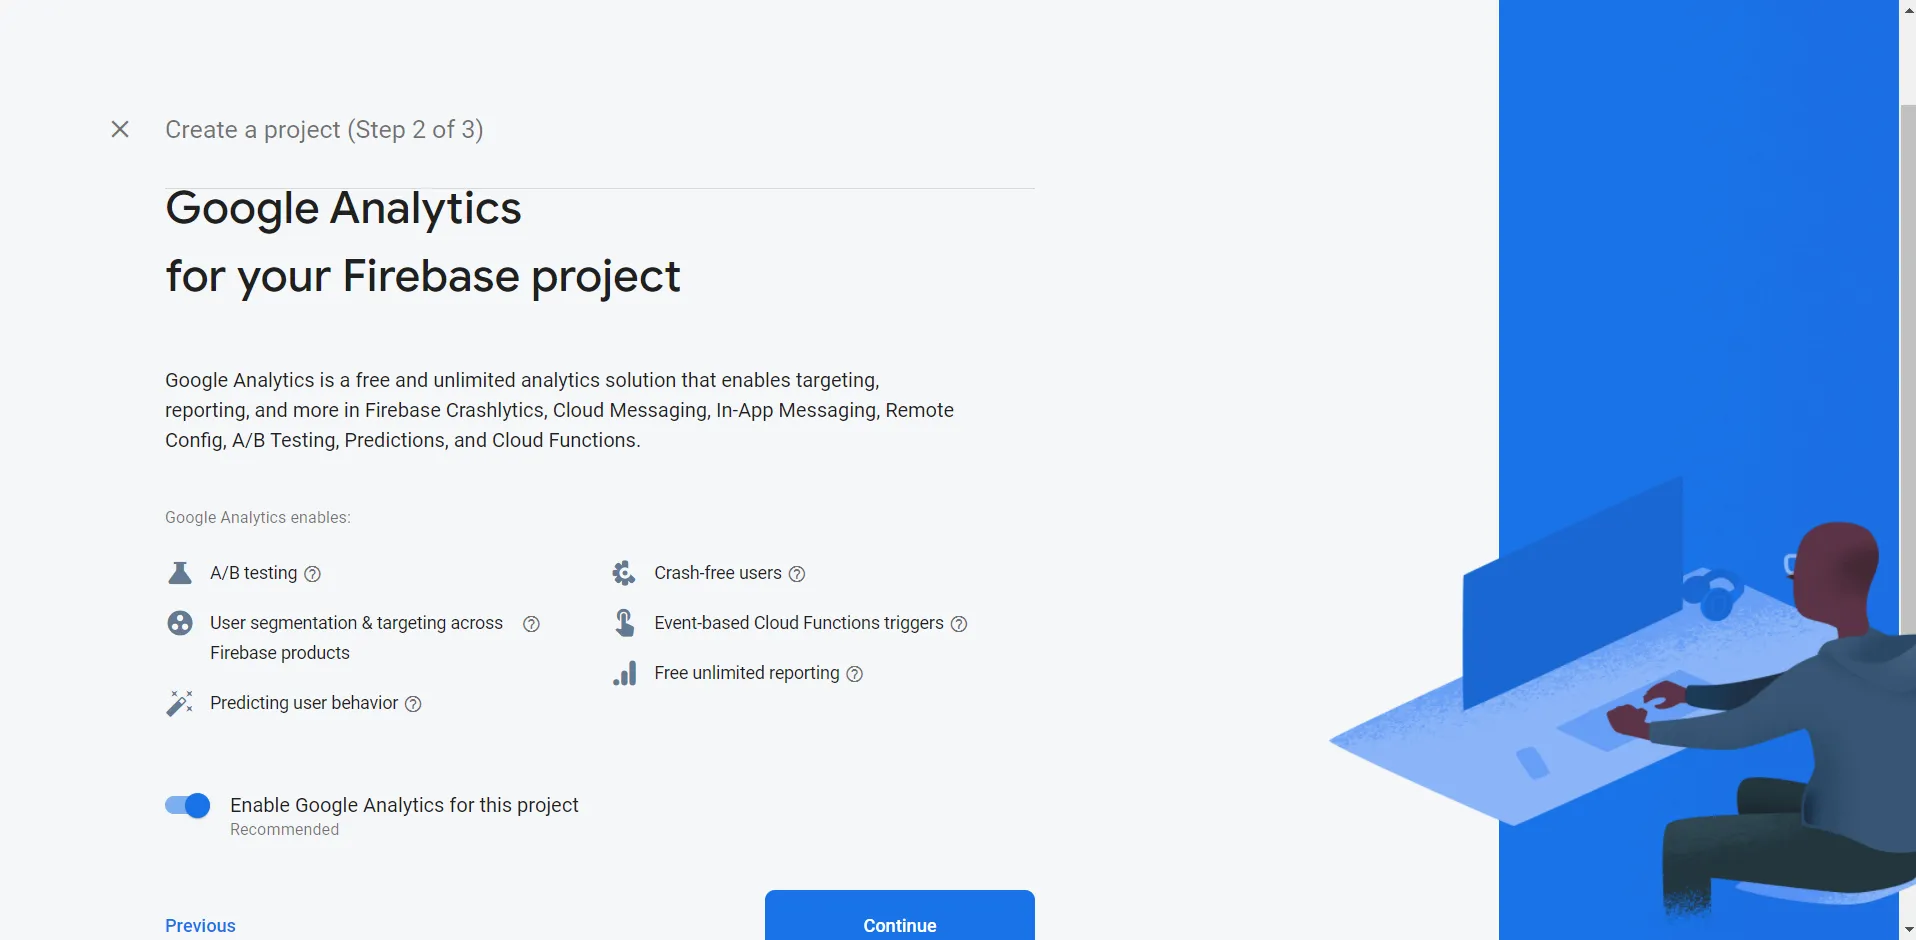
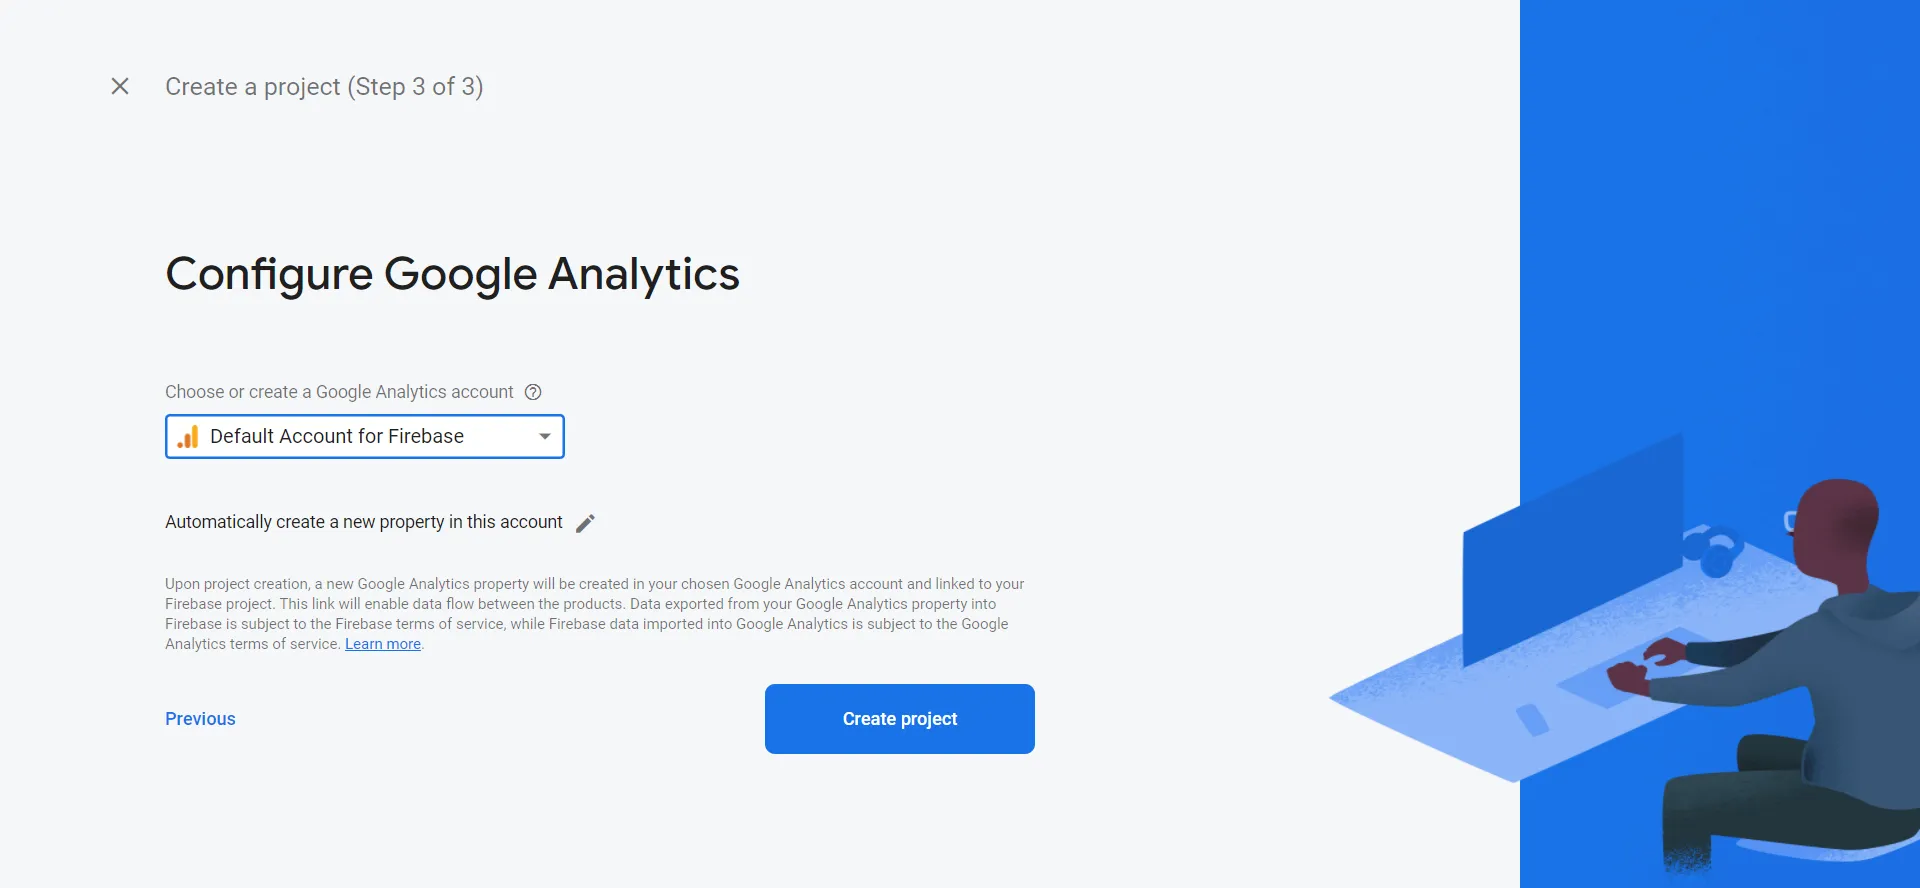
- Create a new Firebase project by clicking on the "Add Project" button.
- Follow the steps as shown in the images below:
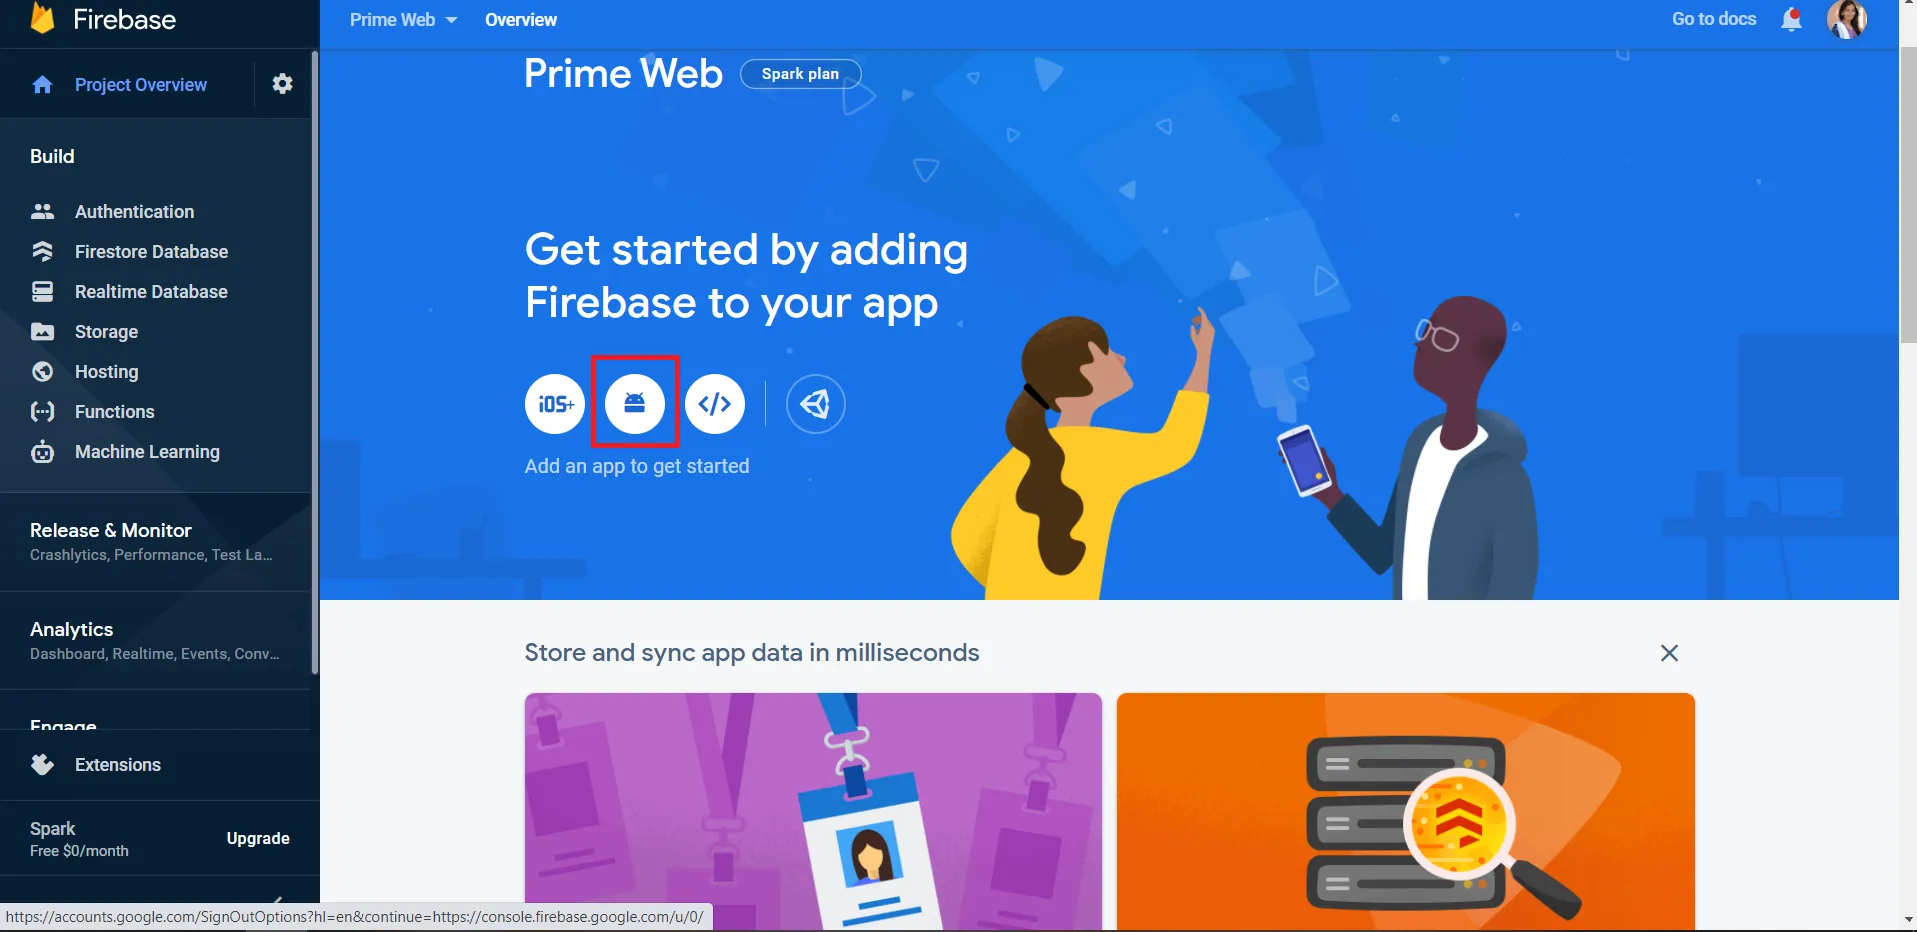
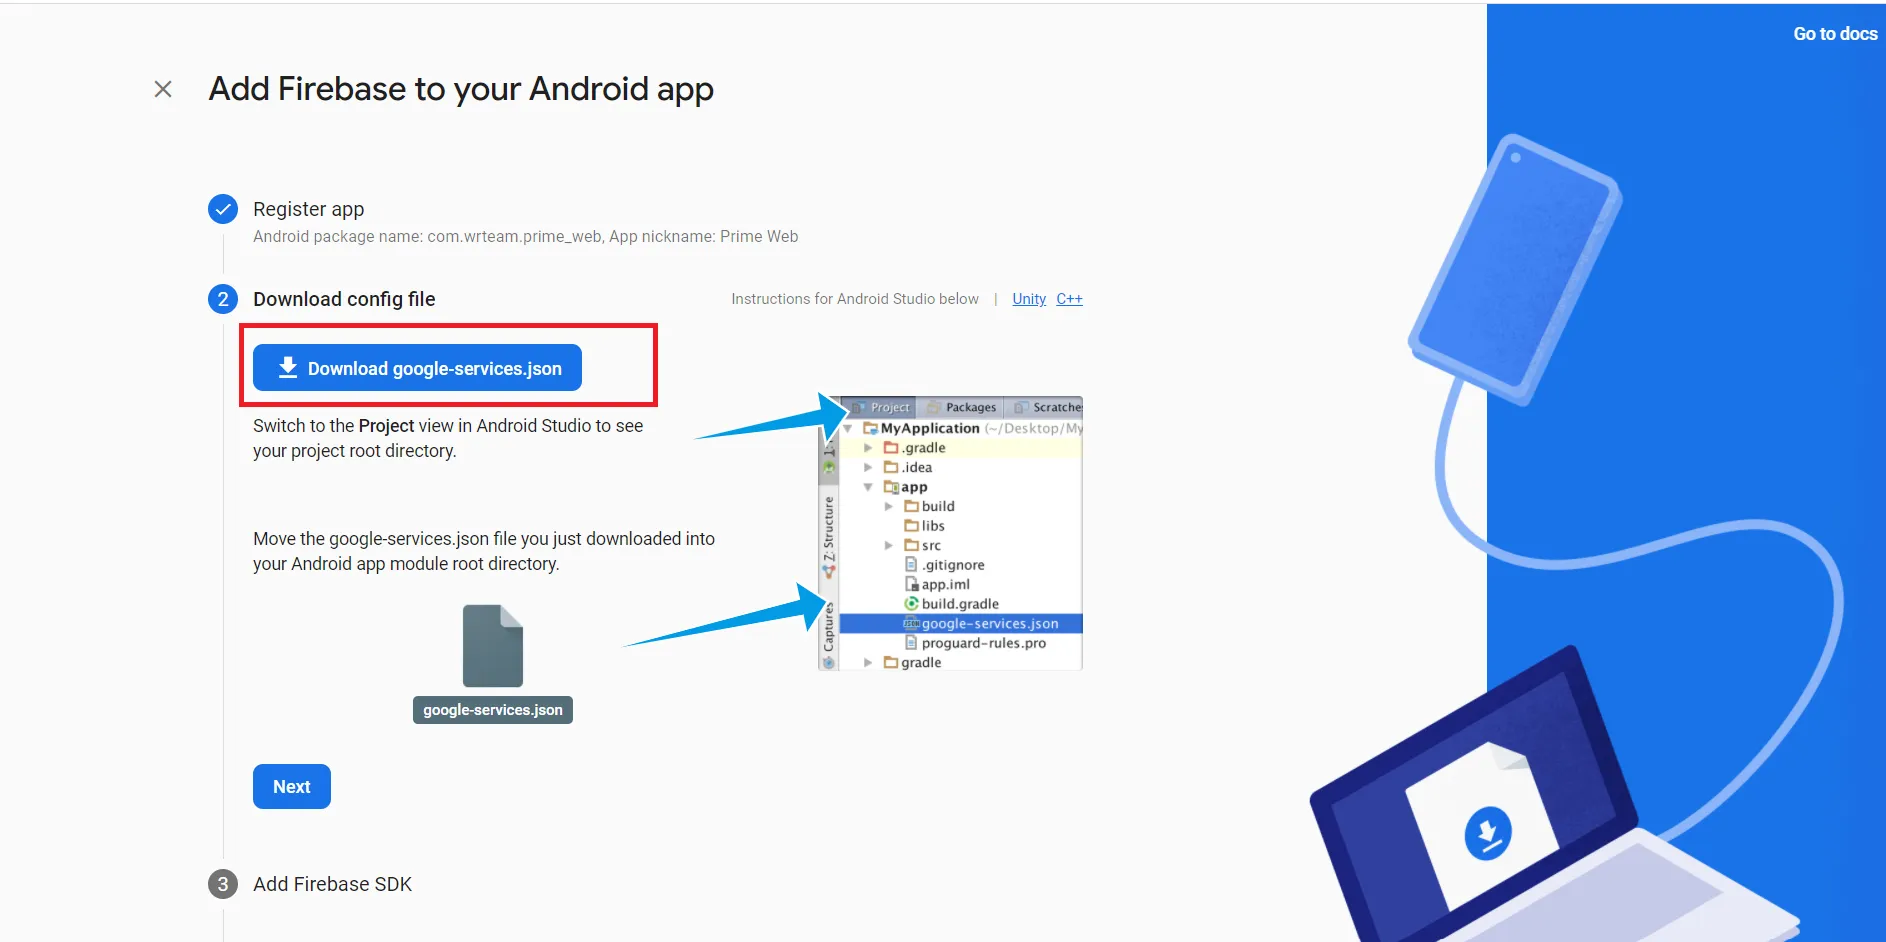
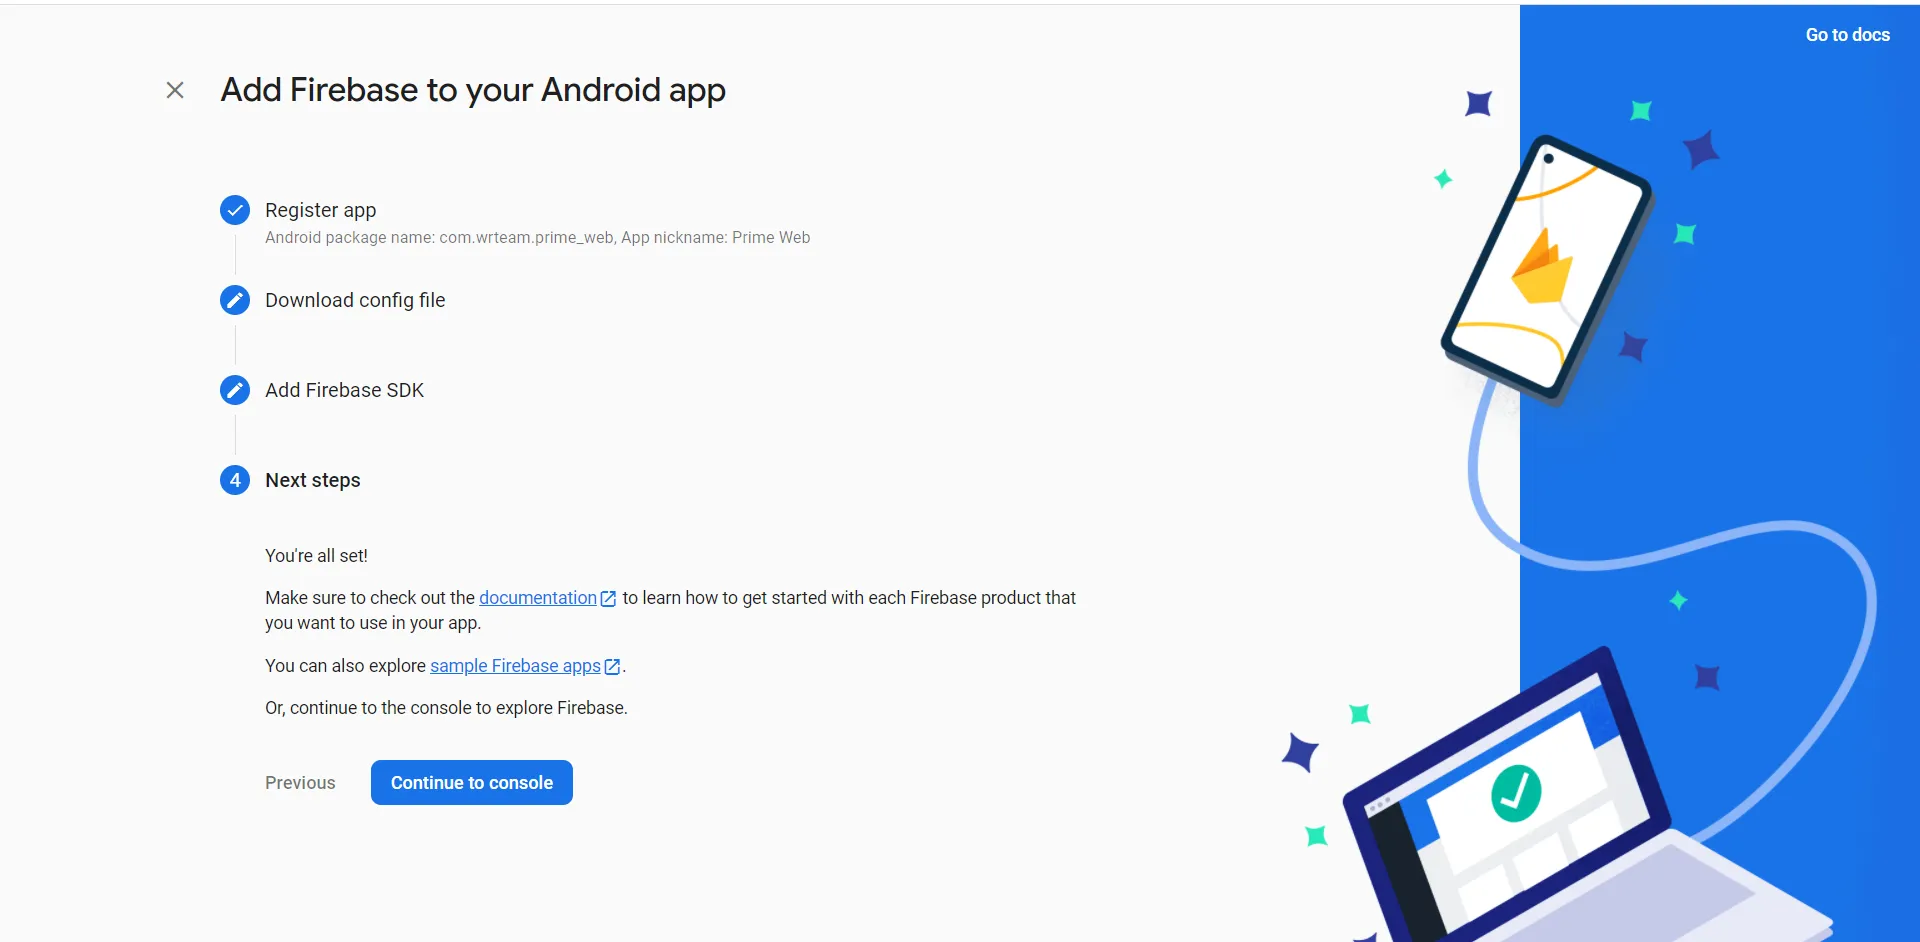
To Connect your Android app with Firebase:
- Add an android app in firebase
- Follow the steps mentioned in the firebase.
- And add google-services.json file in project.
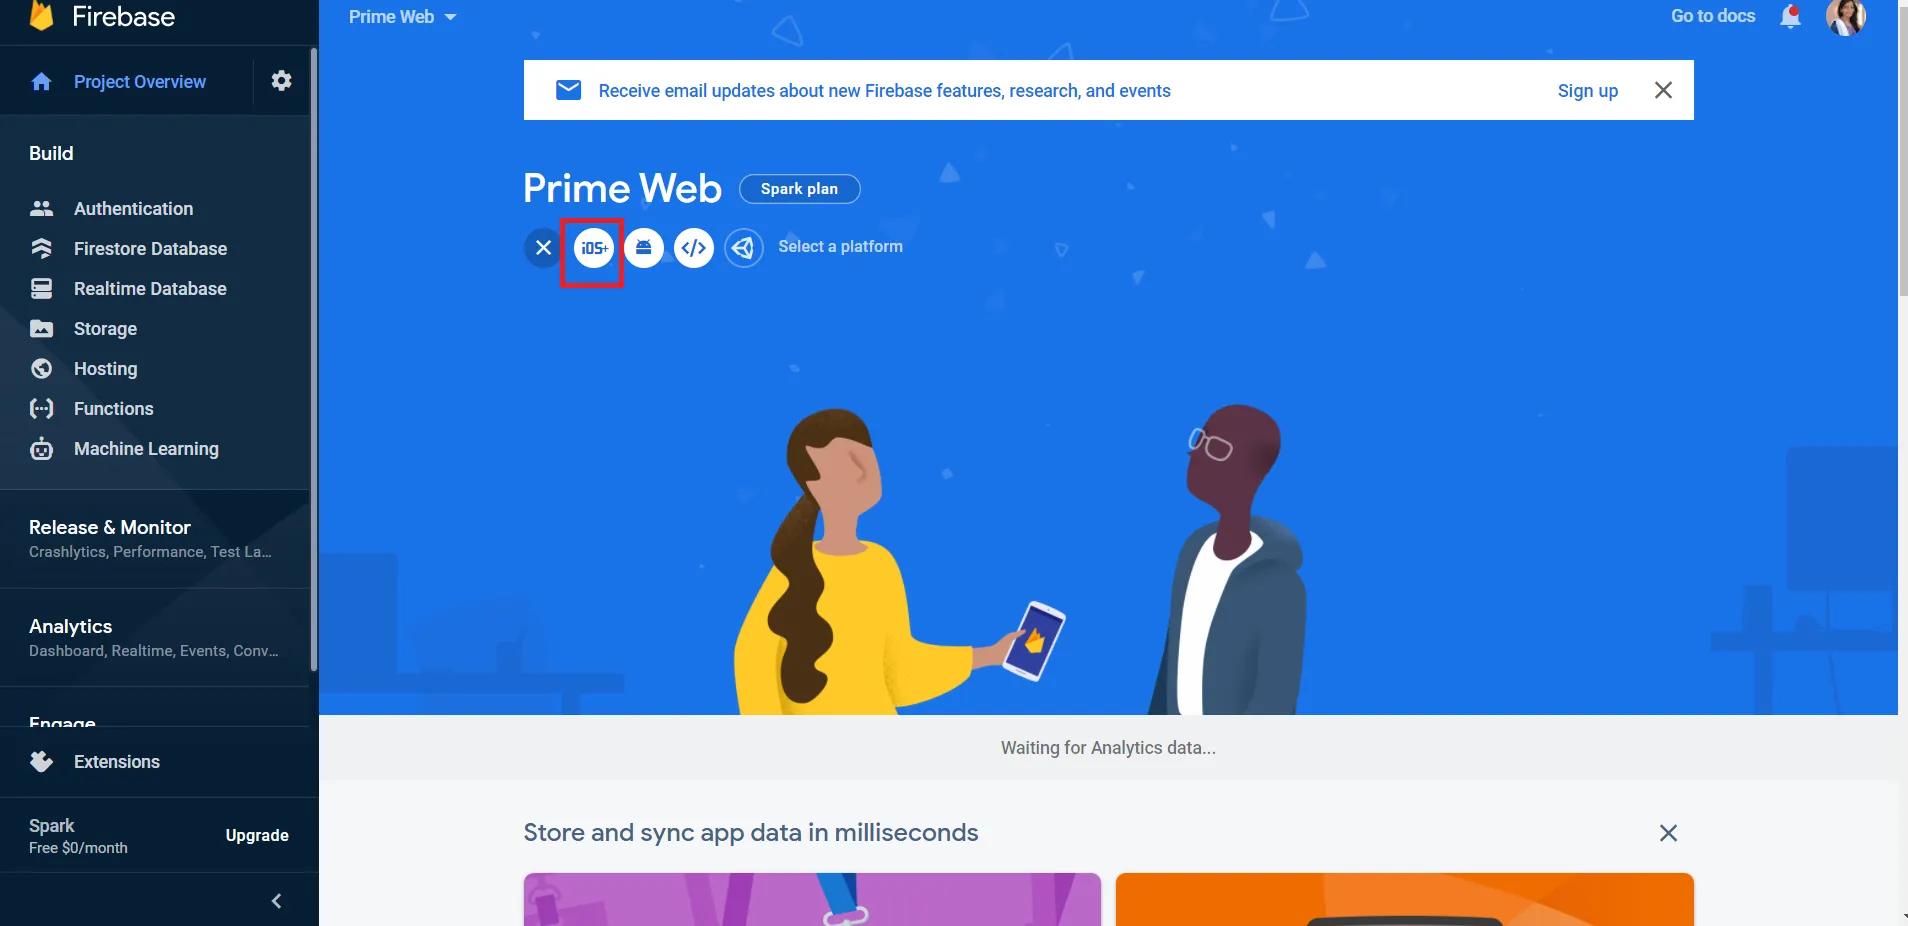
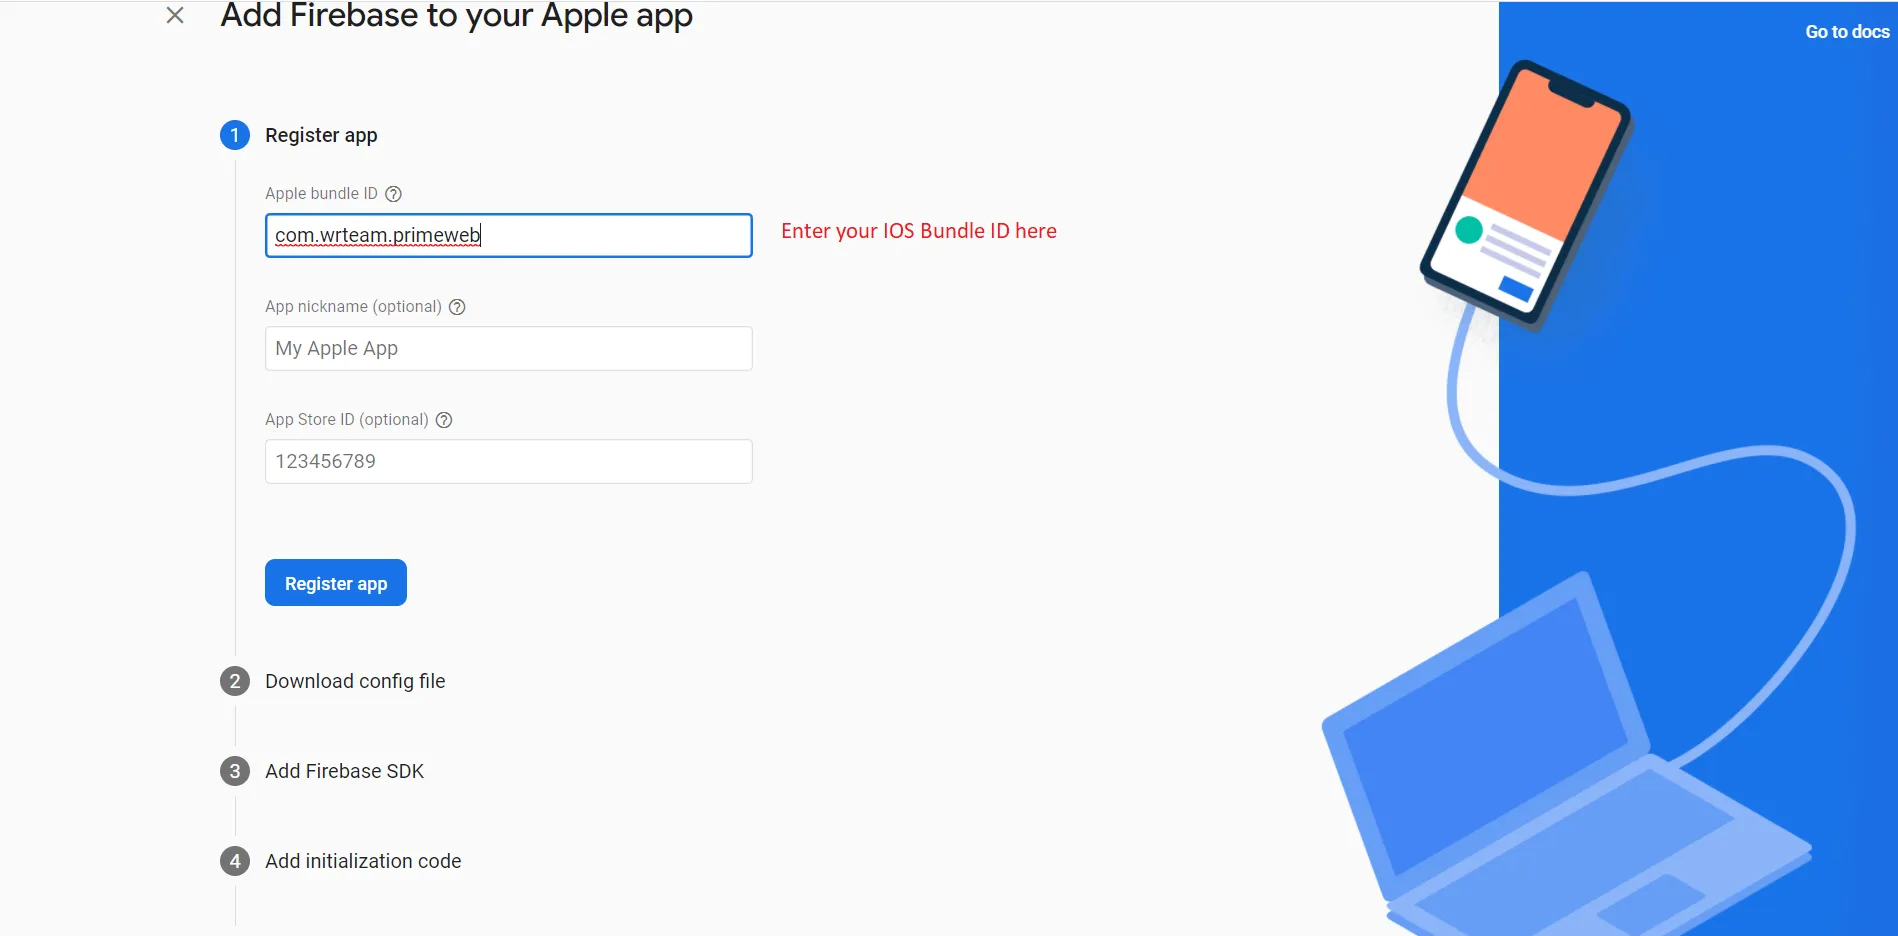
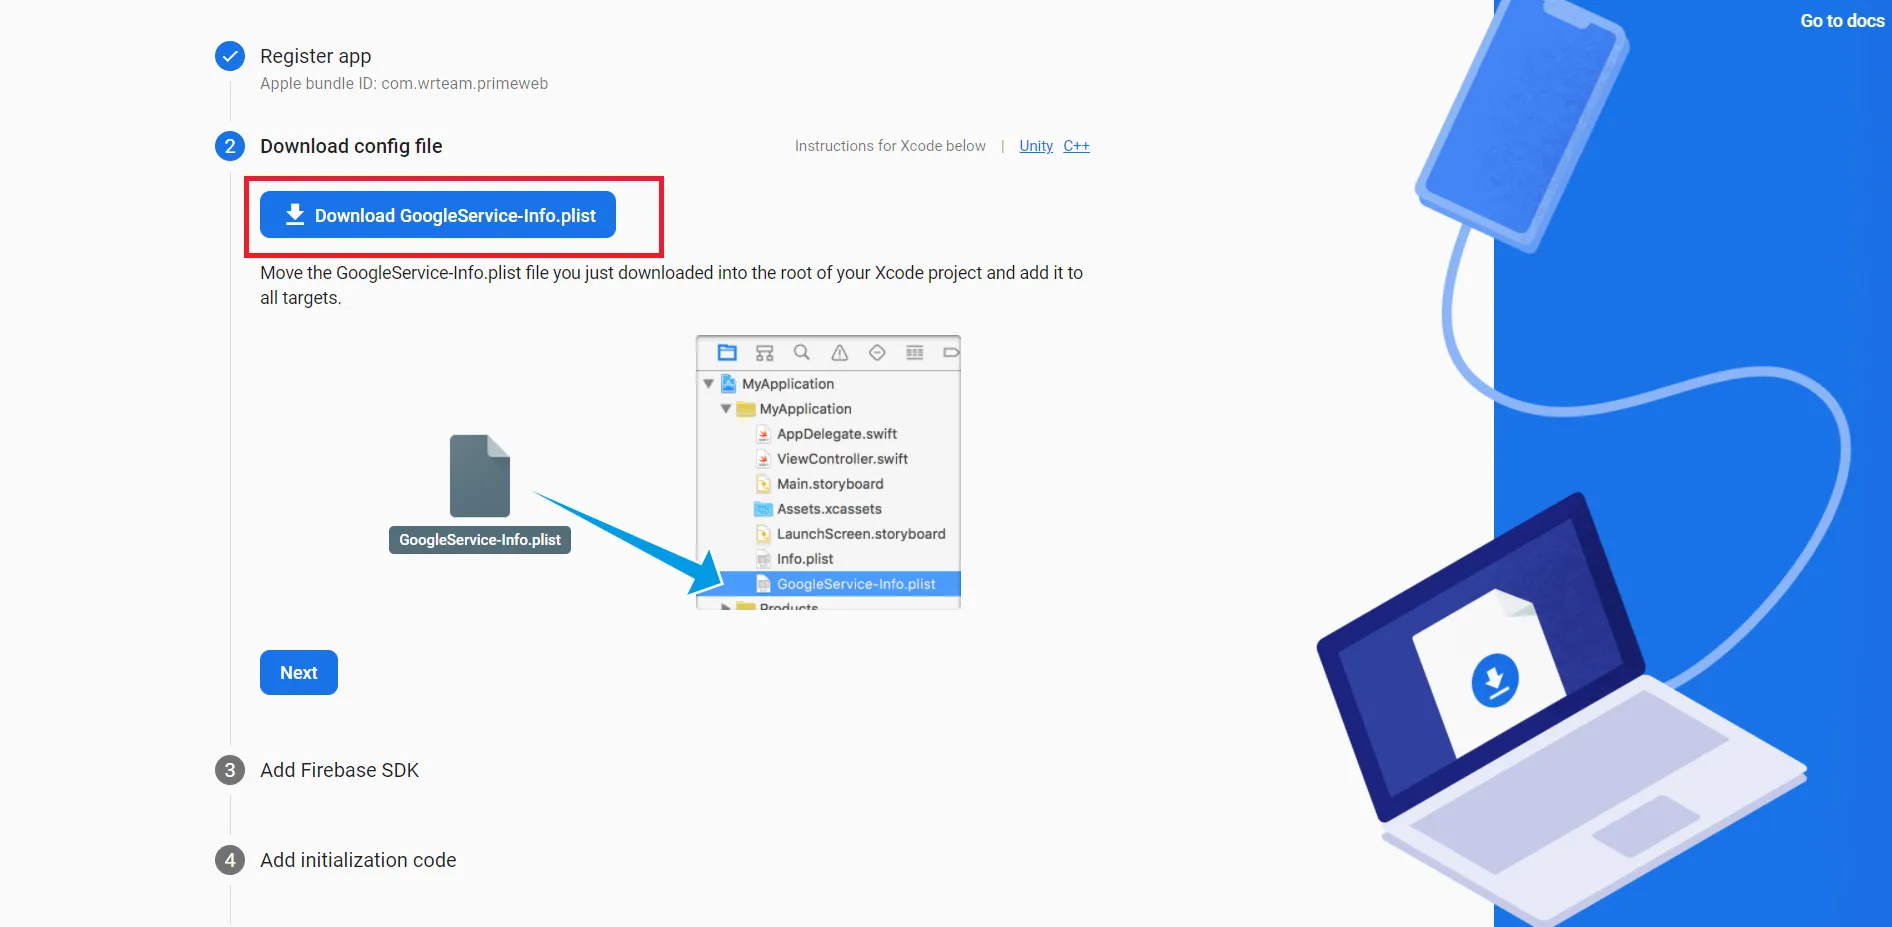
To Connect your IOS app with Firebase:
- Add an IOS app in firebase
- Follow the steps mentioned in the firebase.
- And add GoogleServices-Info.plist file in project.
To Enable Notifications in IOS:
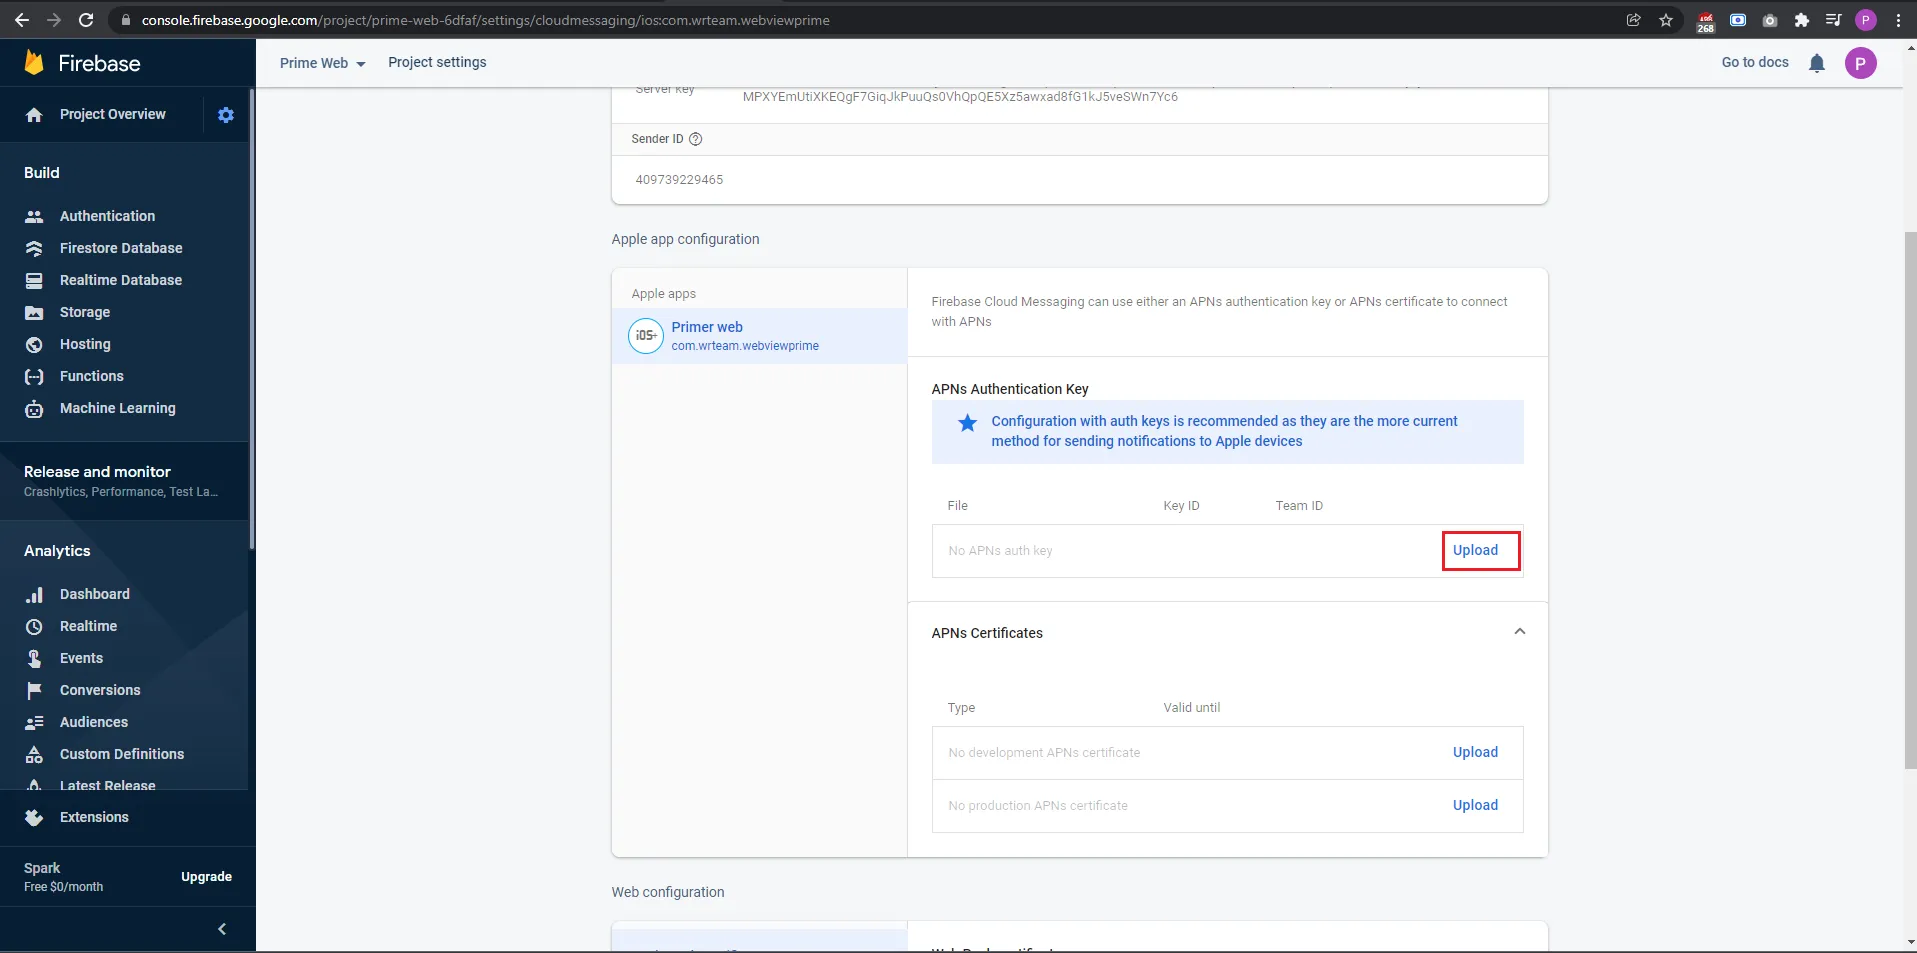
- Go to your Firebase Console.
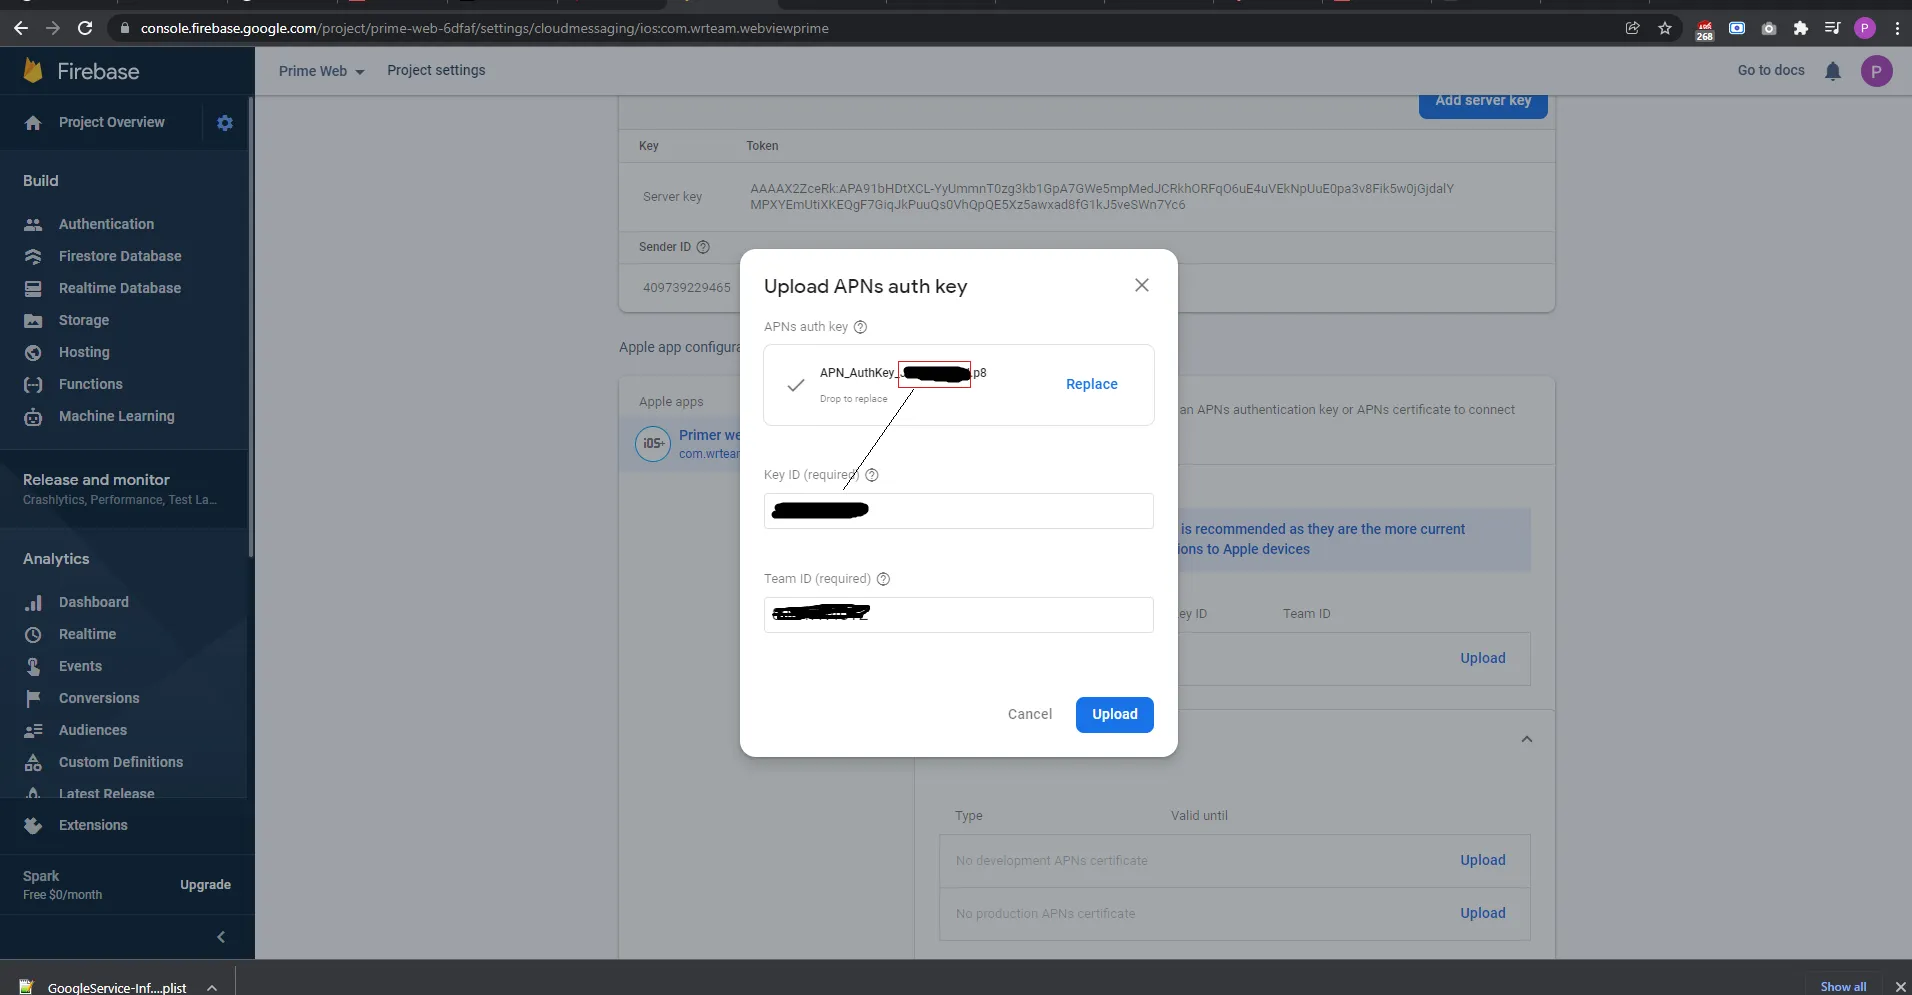
- Navigate to "Project Settings" -> "Cloud Messaging" -> "Apple app configuration."
- Upload your p8 Certificate here. (Follow this guide to generate p8 certificate)
- Paste the Key ID and Team ID:
- The Key ID is the string behind AuthKey in the file name of your p8 certificate.
- For the Team ID, you can find it on your Apple developer account membership page.
Generate Release APKs
Create and Add Key Store File for Android
-
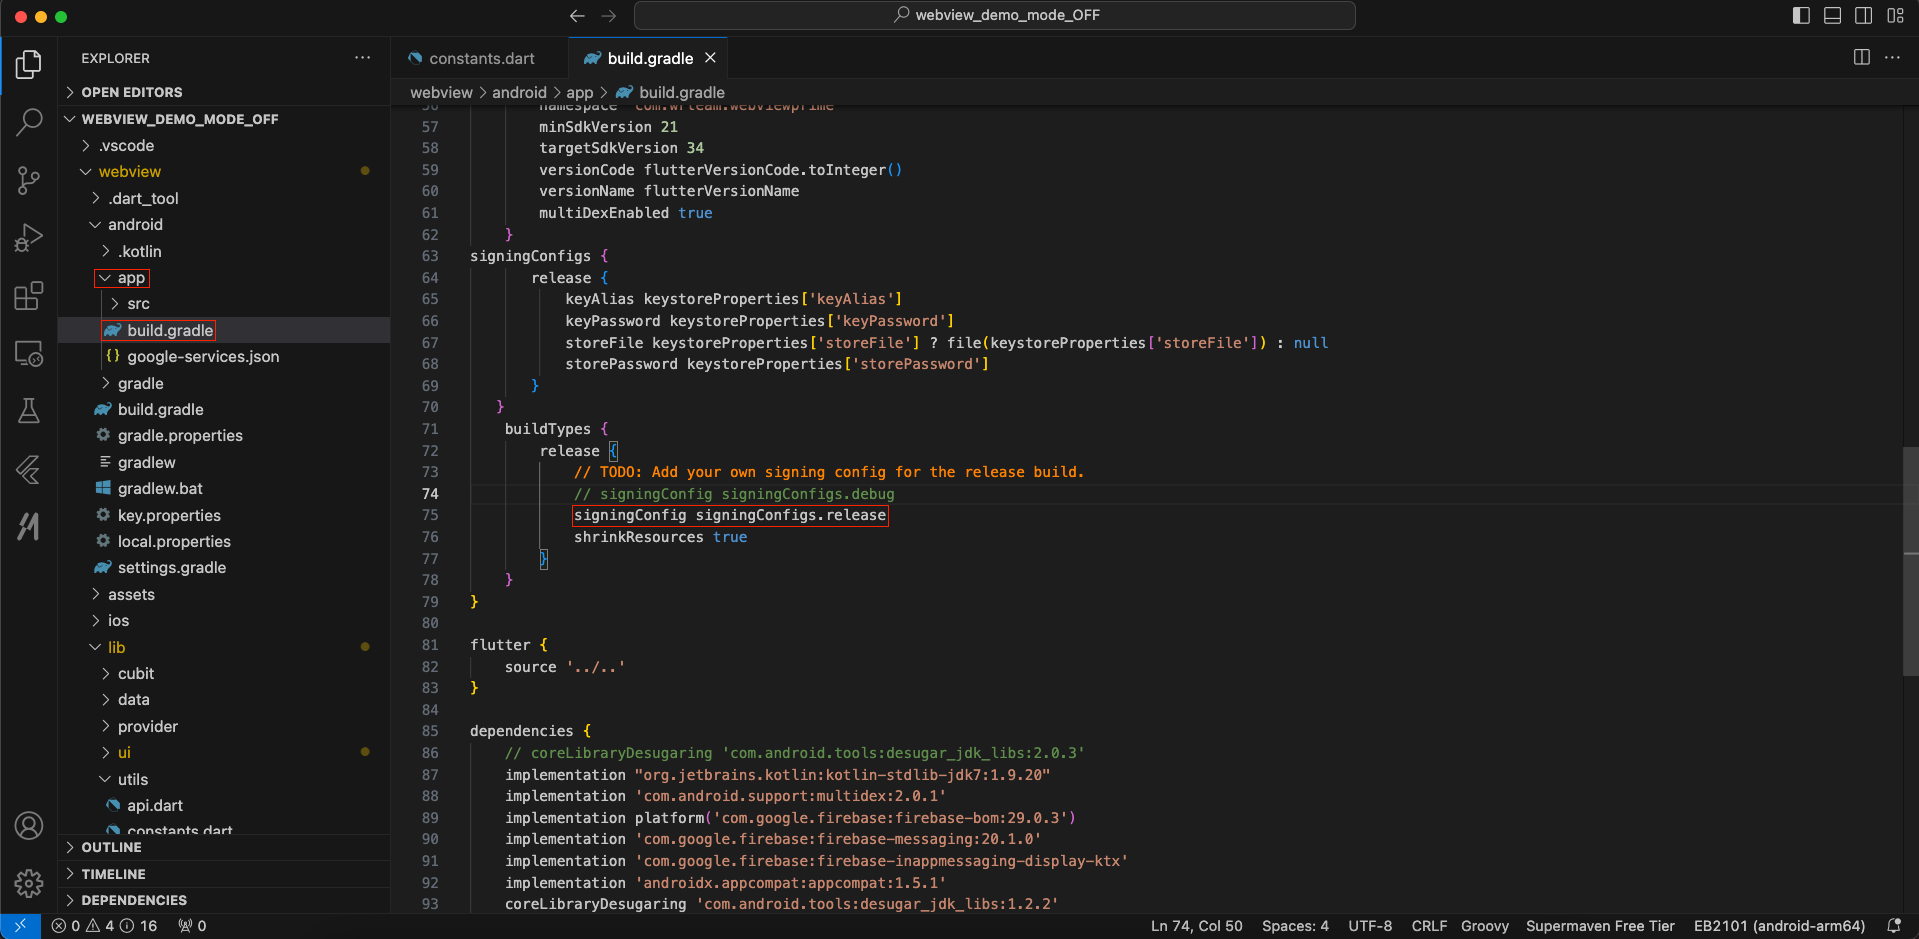
First, verify whether the release is already specified in the build.gradle file. If it is not, set the release.
-
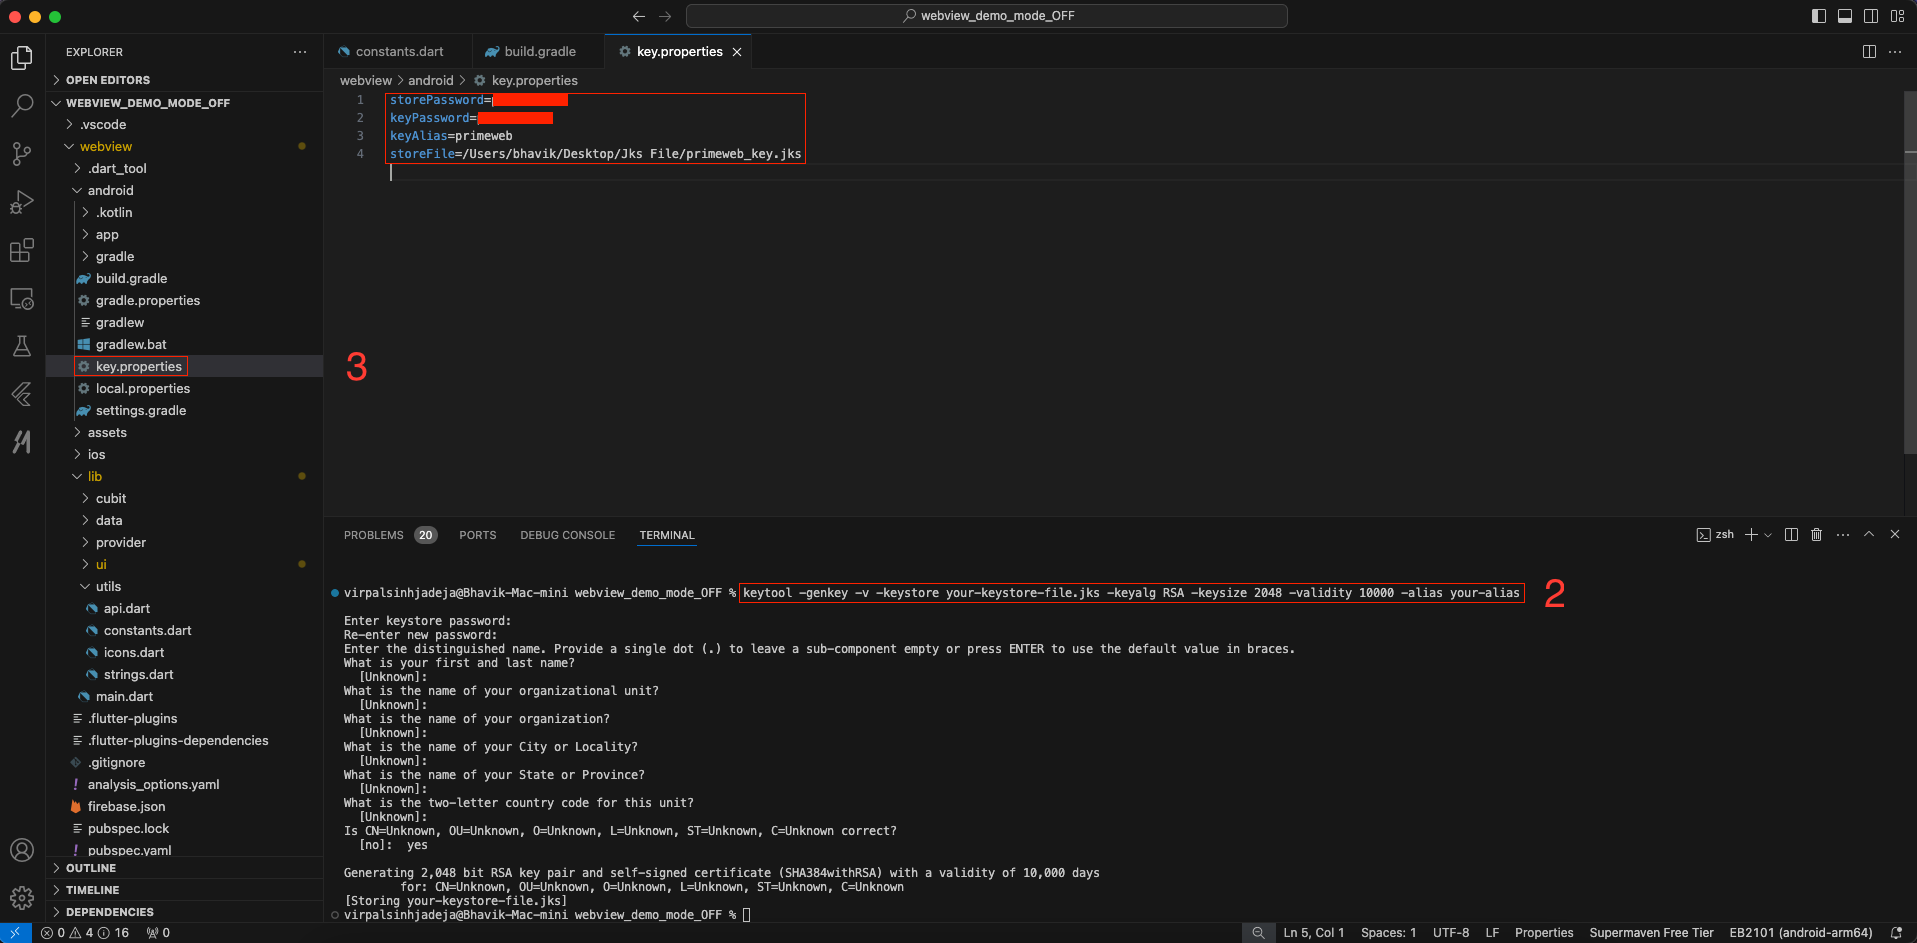
To generate a keystore file, run the following command:
keytool -genkey -v -keystore your-keystore-file.jks -keyalg RSA -keysize 2048 -validity 10000 -alias your-alias
You can replace "your-keystore-file.jks" with your preferred filename, but ensure you keep the ".jks" extension. Similarly, you can change "your-alias" as needed, but make sure to remember it. During this process, you will be prompted to set a password; please note that the password characters won't be visible on the screen.
Additional information may be requested, but you can simply press Enter to skip those as they are optional fields.
-
Create a file named "key.properties" in your project's
"android" folder and add the following details, which correspond to
the information you used in the previous step:
                                        storePassword=[your-password-from-previous-step]

                                        keyPassword=[your-password-from-previous-step]

                                        keyAlias=[your-alias-from-previous-step]

                                        storeFile=[your-keystore-file-location]
Replace the placeholders ("[]" brackets) with the actual details you used. Once these two steps are completed, you can generate either an APK file using the following command:
flutter build apk
Or an app bundle file for the Play Store upload with:
flutter build appbundle
Follow these links for more information on generateing the release version:
- To generate release android app-bundle and publish to playstore follow https://flutter.dev/docs/deployment/android
Steps to Publish iOS App to App Store
To publish your iOS app on the App Store, follow these steps:
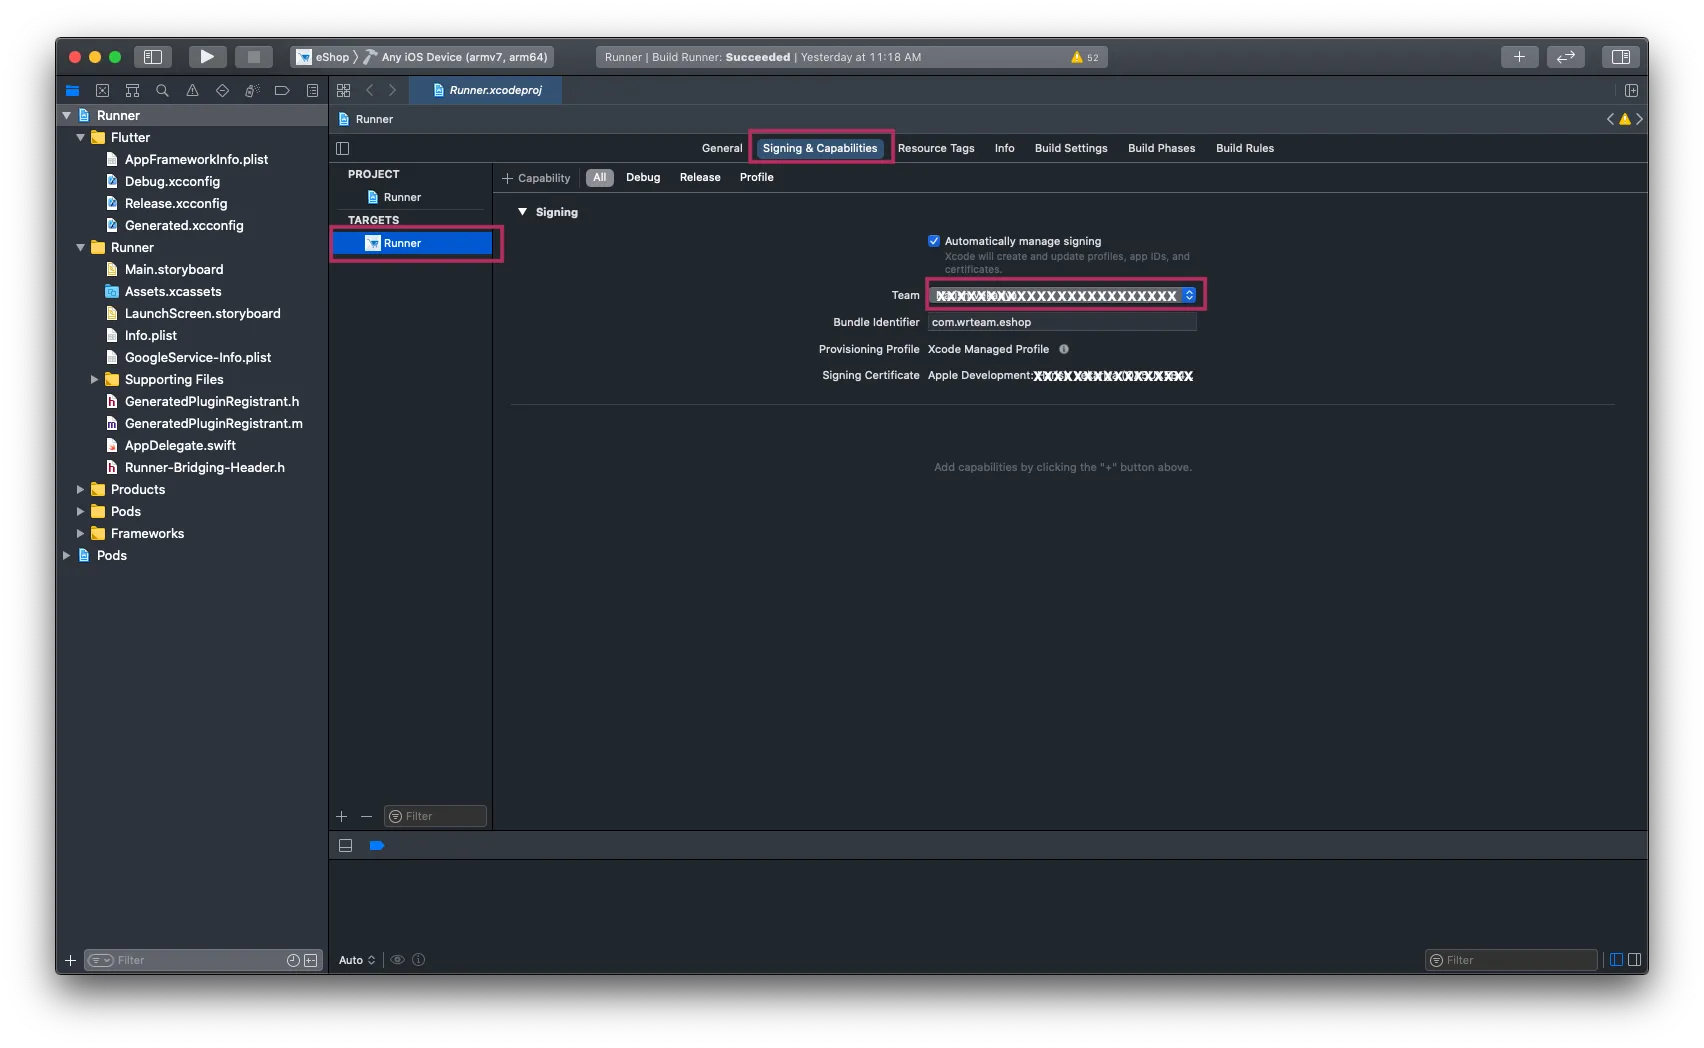
- Open the Runner.xcworkspace file in Xcode.
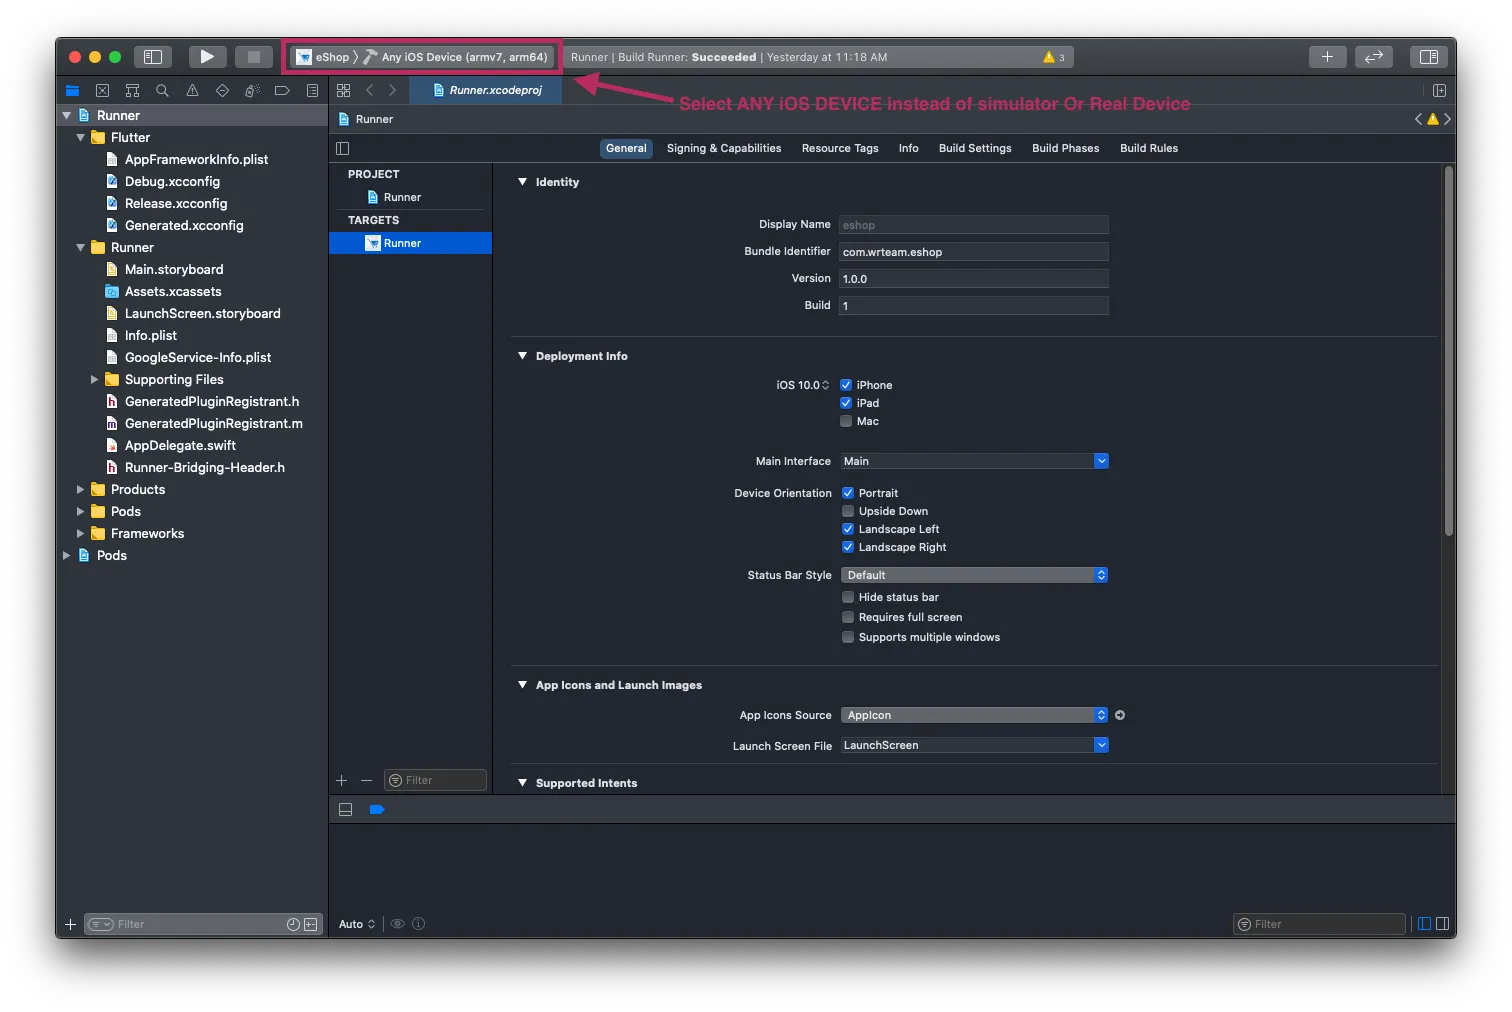
- Add your Team (Apple Developer ID) inside the Runner as shown in image.
- Select any iOS device (armv7, arm64).
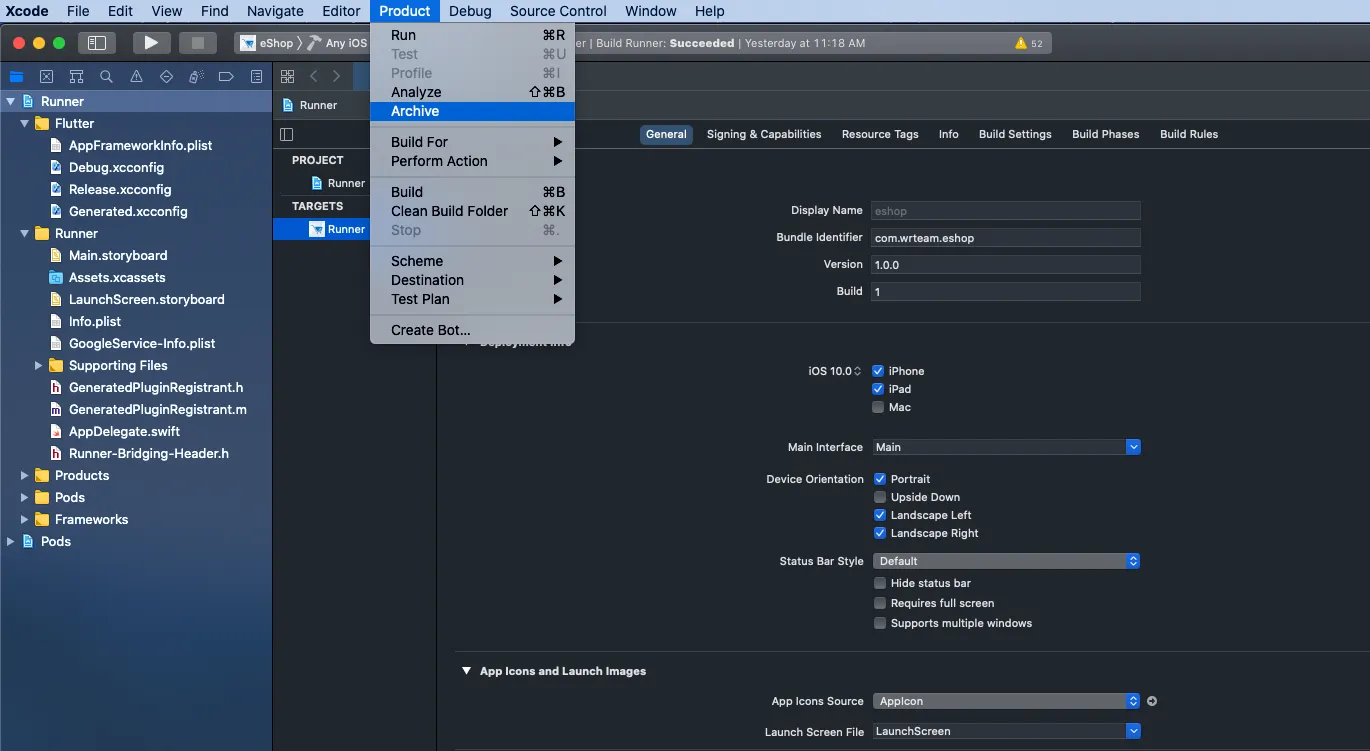
- Choose "Archive" from the Product menu in Xcode.
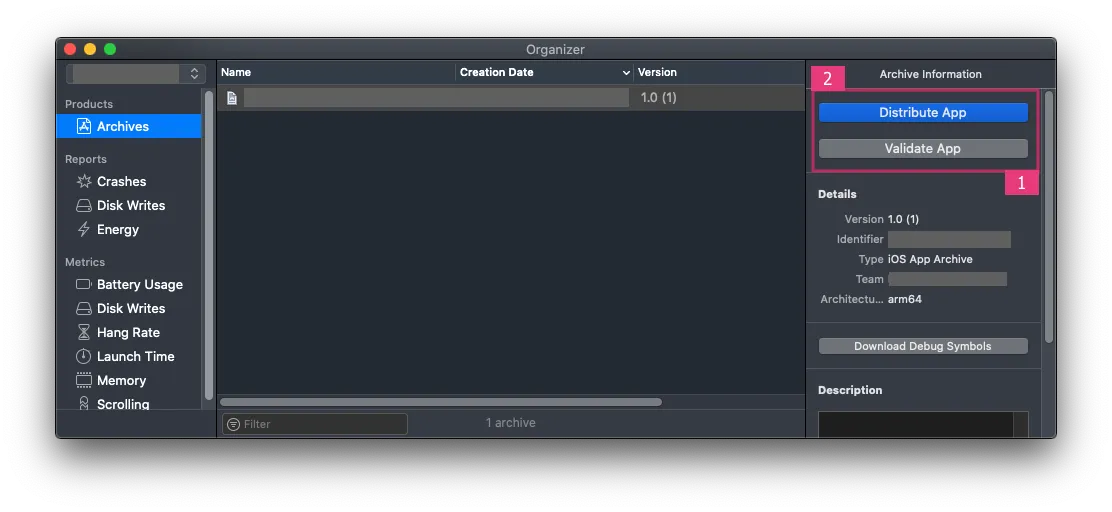
- Once the build/archive is generated, a popup window will appear. Validate the app first, and after successful validation, you can distribute the app to the App Store.
After a successful submission, the build file will be reflected in your Apple Developer Account with the same Bundle ID. For detailed assistance, click here.
Support
It is our pleasure to provide dedicated service and support. Please reach out to our support team.
Head of Customer Support: Ishit Tanna [MS Teams]
To assist our customers, we maintain constant communication. If you require any help regarding our product, our support is available from Monday to Friday, 9:00 am to 6:00 pm IST (GMT +5.30) – We are a Team located in India – Asia.
Typically, we respond to all customer questions and queries within 24 hours via comments, support forums, or emails.
Your Feedback
Dear valued customer,
Thank you for choosing our product. We take pleasure in providing you with top-notch
service. Your honest feedback is invaluable in helping us enhance and strengthen our
product. Please take a moment to share your thoughts by clicking here
to Rate Us.
Thank you very much.
Contact Us
WRTeam comprises a creative and dedicated group of developers with expertise in Apps Development and Web Application Development. We specialize in delivering high-quality solutions to customers worldwide. Connect with us today to explore how we can assist you or to discuss potential freelance opportunities.
Visit Our Website: https://wrteam.in
Email Us: info@wrteam.in
Thank you very much.
