
eShop - Flutter Multi Vendor eCommerce Full App
Author: WRTeam
Contact: CodeCanyon Profile
Thank you for purchasing the code. If you have any questions that are beyond the scope of this help file, please feel free to message me via my user page contact form here. Thanks so much!
Required Softwares
- Android Studio Koala | 2024.1.1
- Flutter 3.32.1
- Java Version 19.0.2
How to Setup Java jdk on windows
- If your System already have Java jdk installed then you
can skip this step.
- Download Java jdk by clicking below link.
(JAVA jdk) - Download Java JDK for your version 32 bit or JDK download 64 bit.
- Please prefer video tutorials, we recommend this playlist for set environment variable for java in Windows 10 - https://www.youtube.com/watch?v=zzfHPGyjoWw
- Please prefer video tutorials, we recommend this playlist for set environment variable for java in Windows 11 - https://www.youtube.com/watch?v=zAyIqbBAUxQ
How to Setup Flutter
- Visit flutter official website : https://docs.flutter.dev/get-started/install for full install guide.
- If you prefer video tutorials, we recommend this playlist for the full installation process https://www.youtube.com/playlist?list=PLSzsOkUDsvdtl3Pw48-R8lcK2oYkk40cm
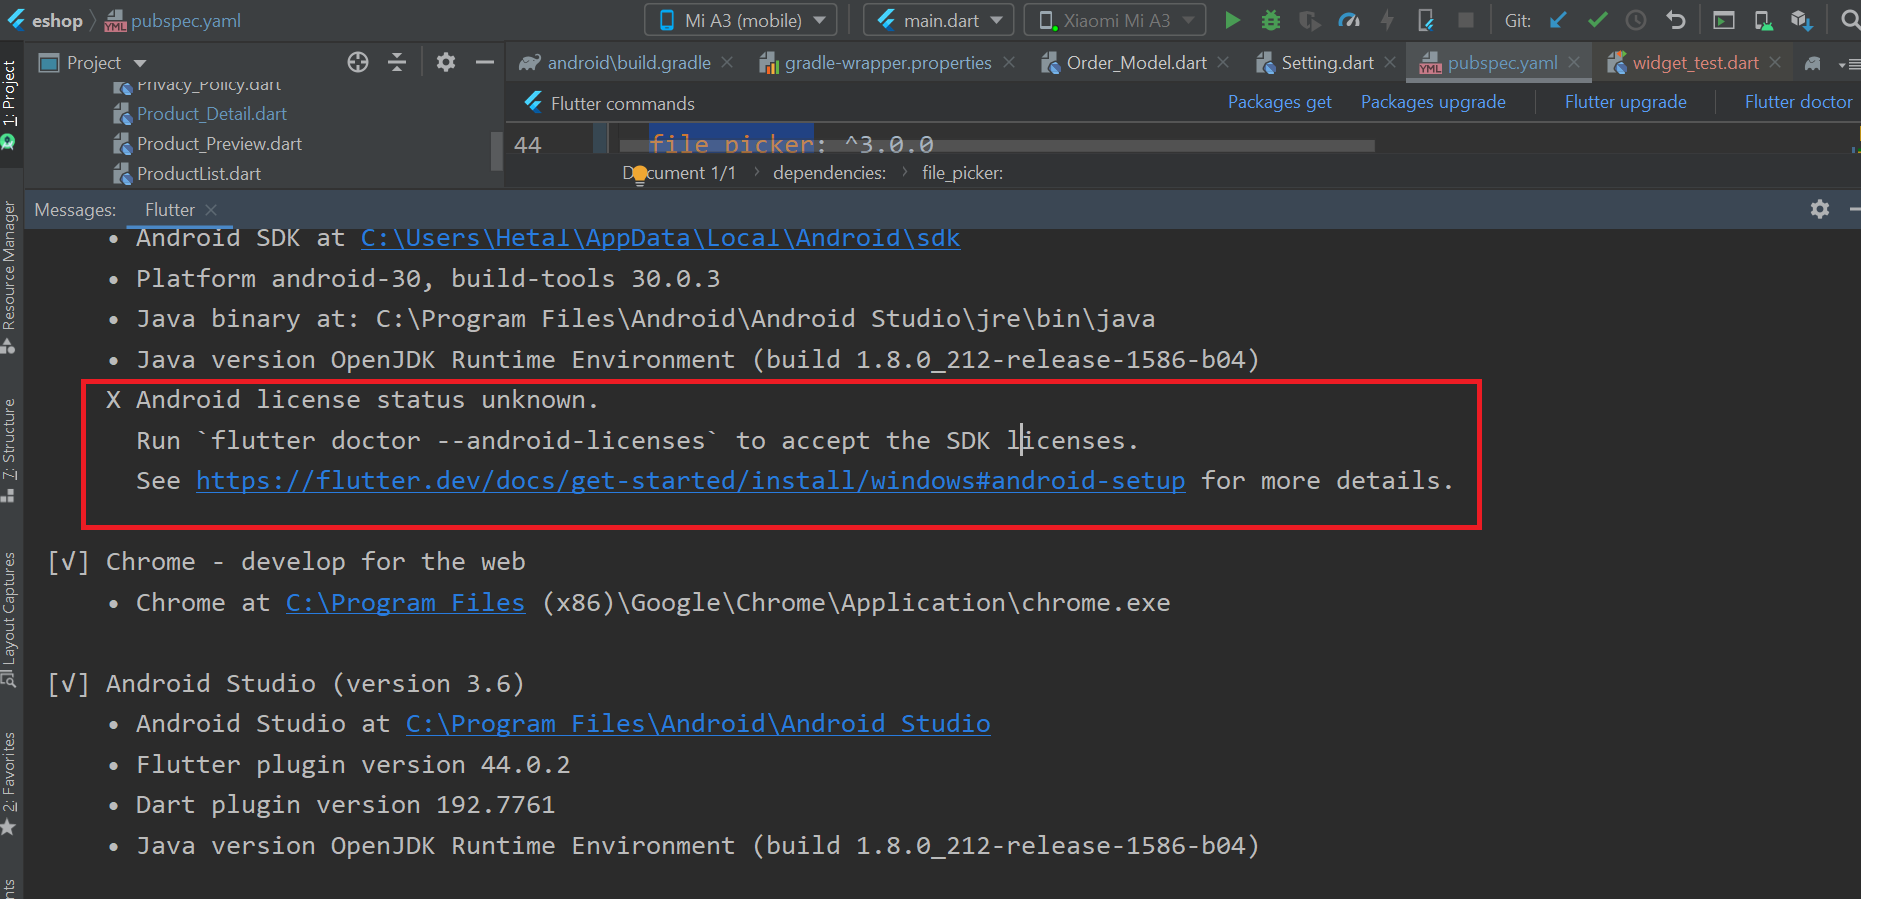
Flutter Doctor Output Error
- If you have run flutter doctor. and in flutter doctor if you see below error like licence status unknown.
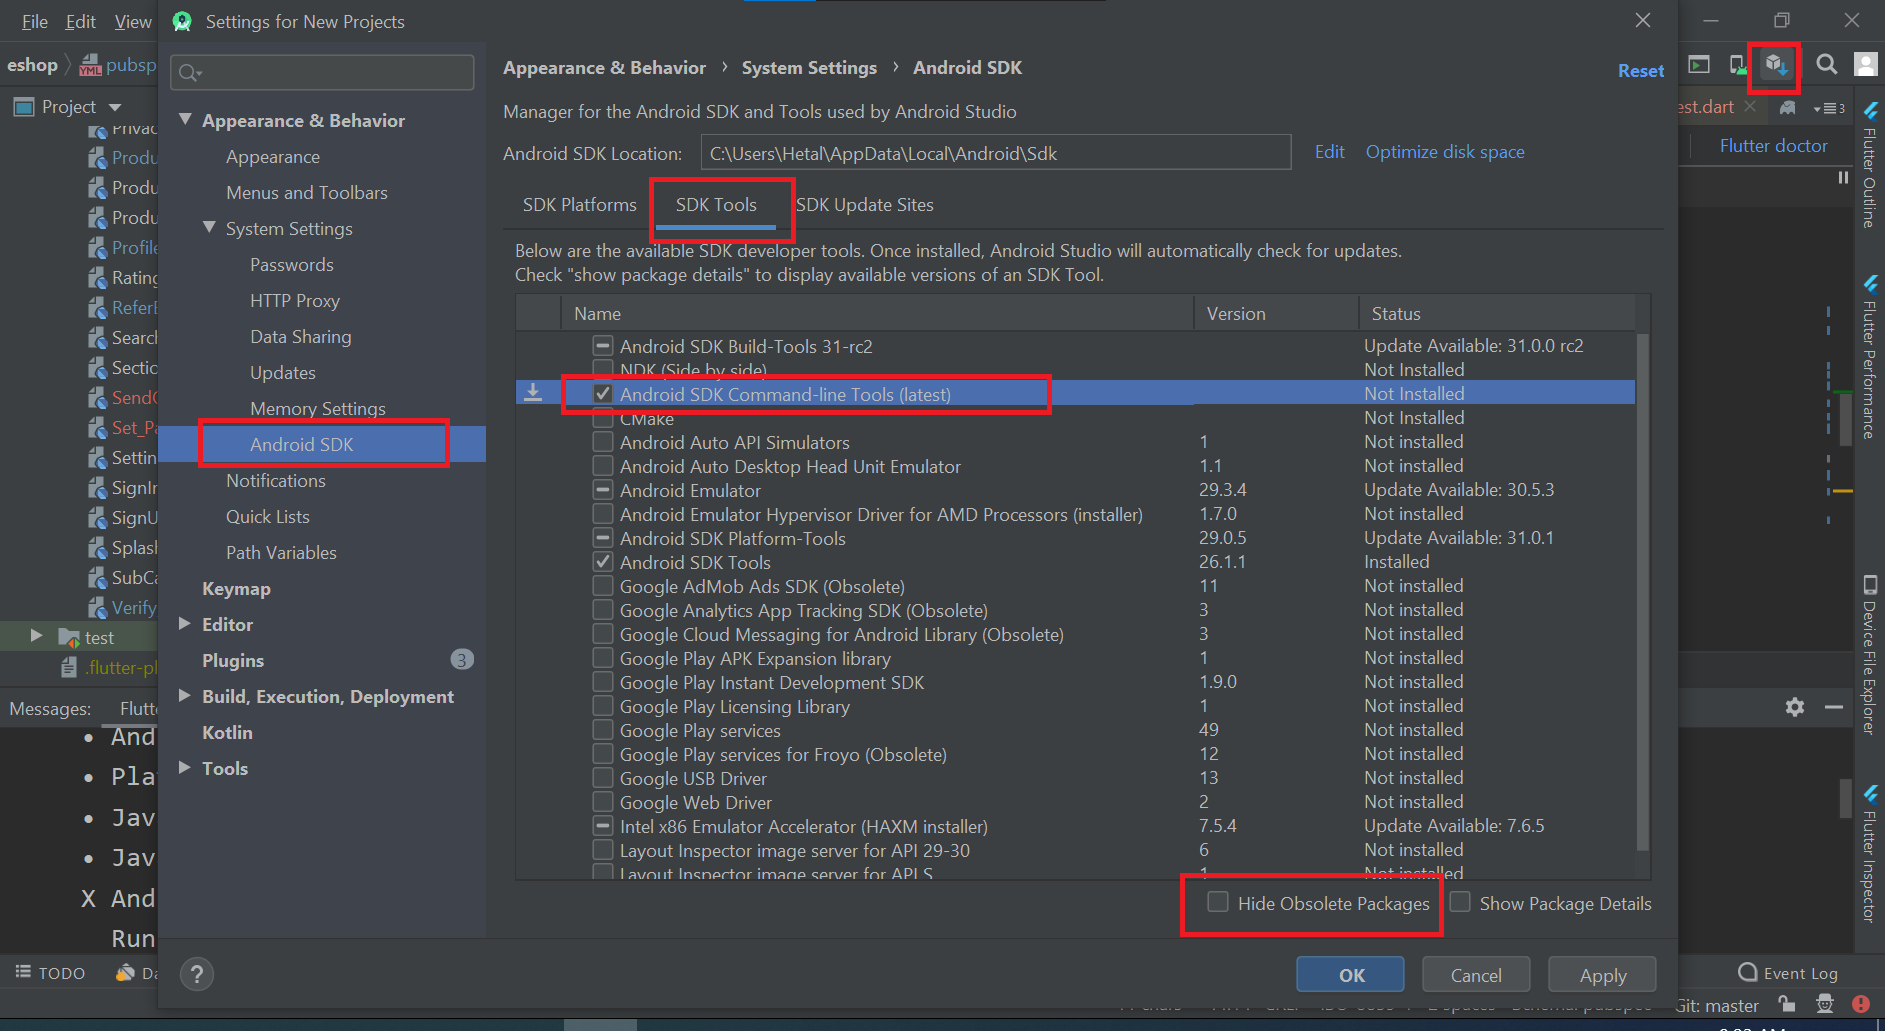
- then go to sdk manager from upar right corner then go to android sdk inside that sdk tools and then uncheck hide obsolute package then check android sdk command line tool latest then apply and then ok. it will download latest version as shown in below fig.
- now run flutter doctor again your error will be removed
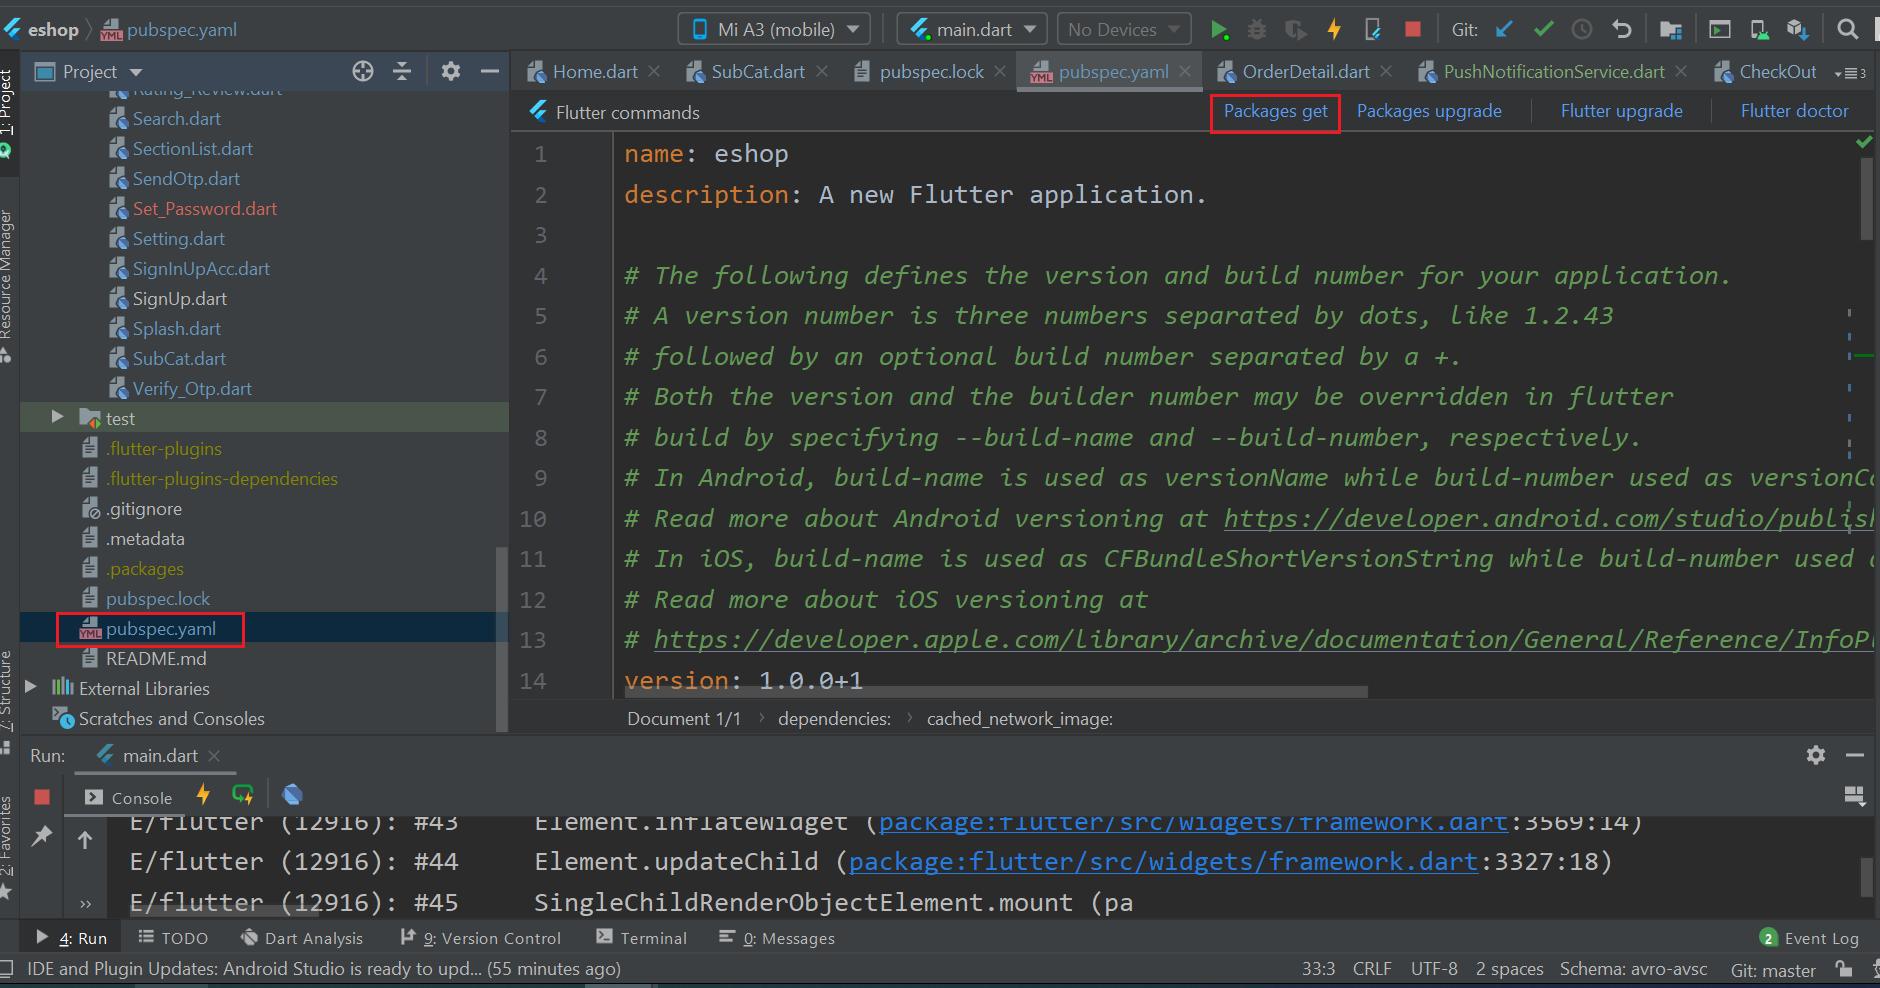
How to first run project
- Go to file > open > then choose your downloaded project location then your project will open.and if you see upar right part 'enable dart support' then click that and go to pubspec.yaml file and in uper right part click pub get or package get and then press run button.
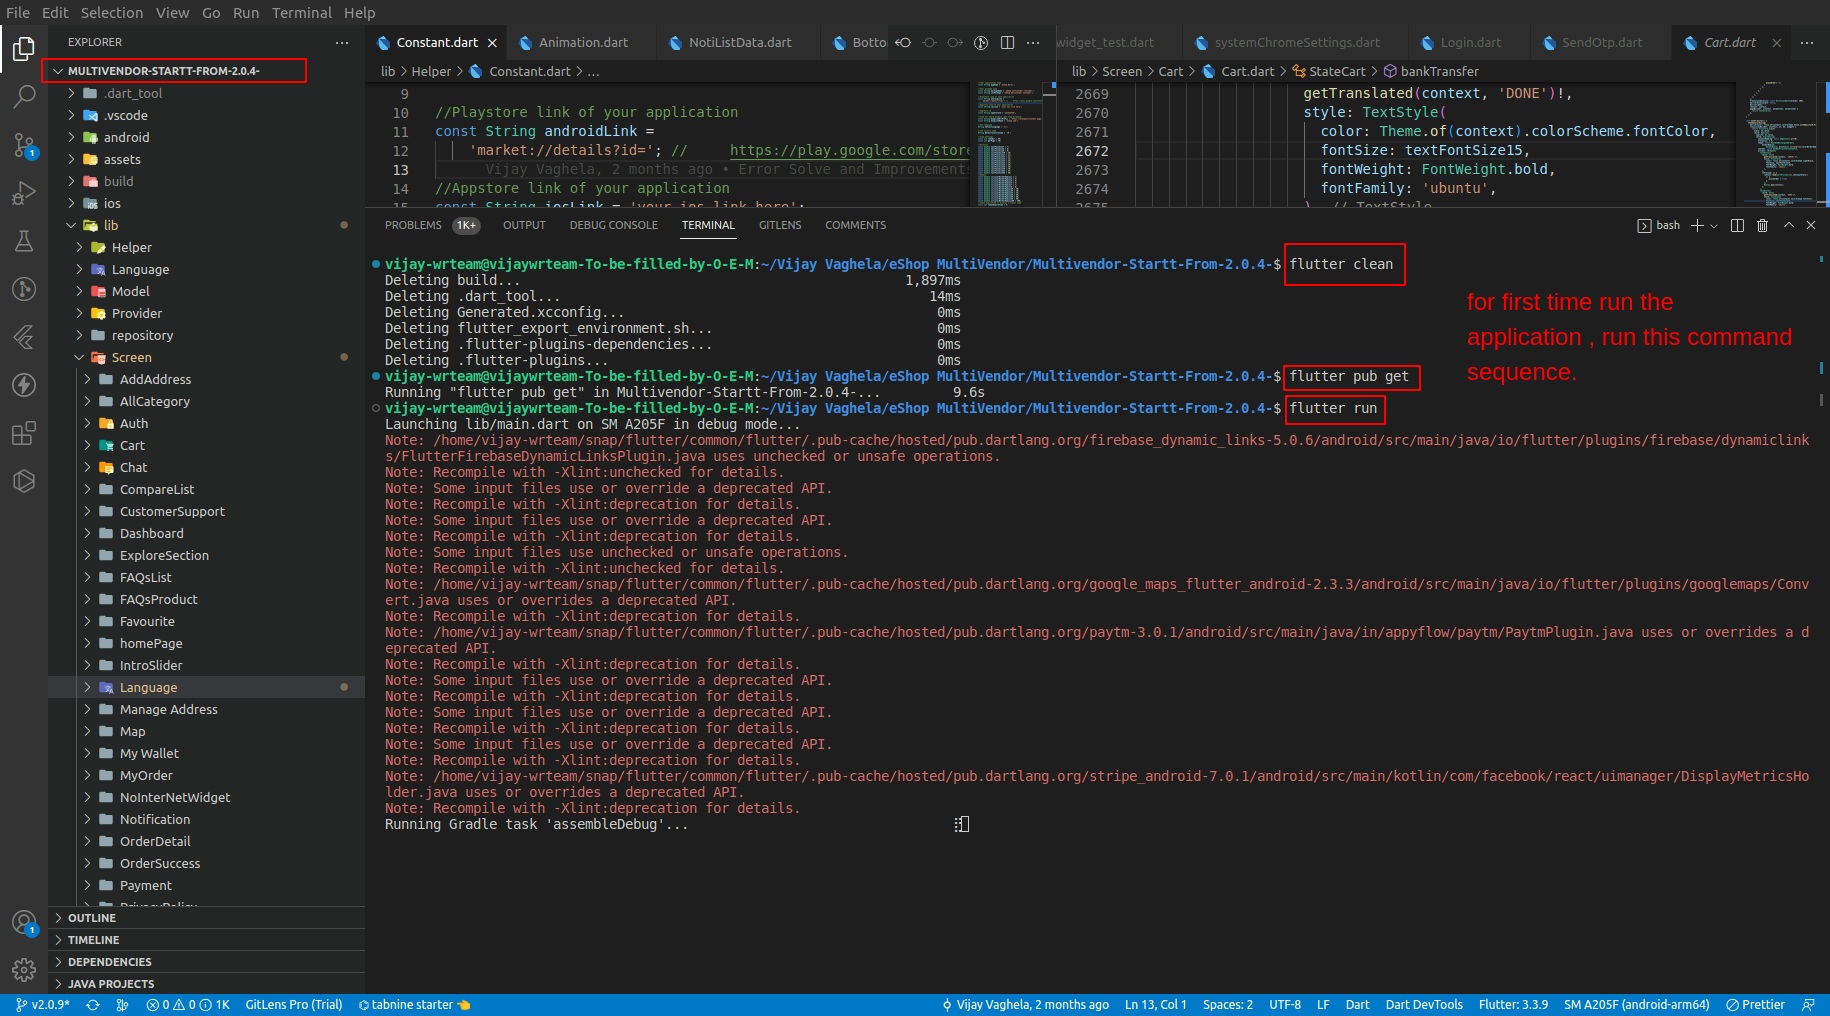
- also you can open your IDE terminal then execute command
1. flutter clean
2. flutter pub get
3. flutter run
- If your are getting error then you can perform below hack
- if in your system firewall is on, then you can temporary disable firewall and then try to run project
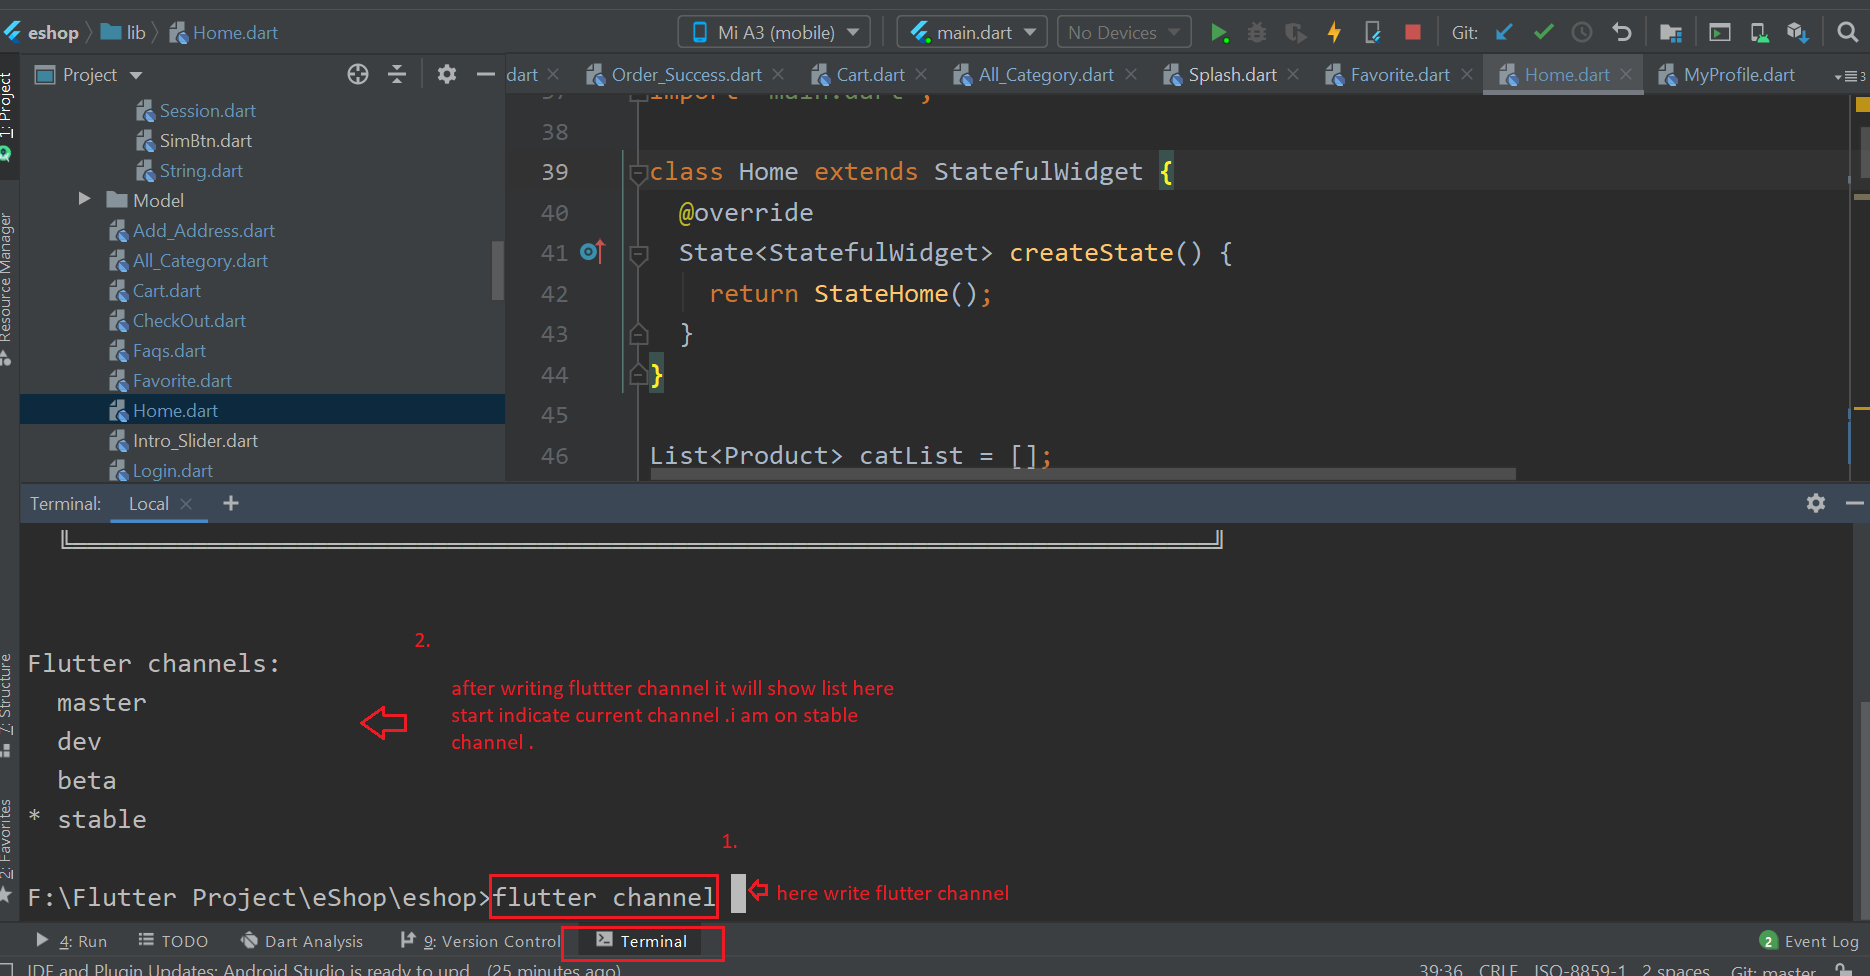
- if your flutter channel is not stable then you need to change it to stable. you can check your flutter channel by terminal.
- go to android studio in bottom line click on terminal, in terminal write flutter channel.as shown below.
- if your are not in stable then write flutter channel stable
- go to Tools > Flutter > Flutter Clean.
- go to file > invalidate cache/ restart
How to change AppName
(Check Video)
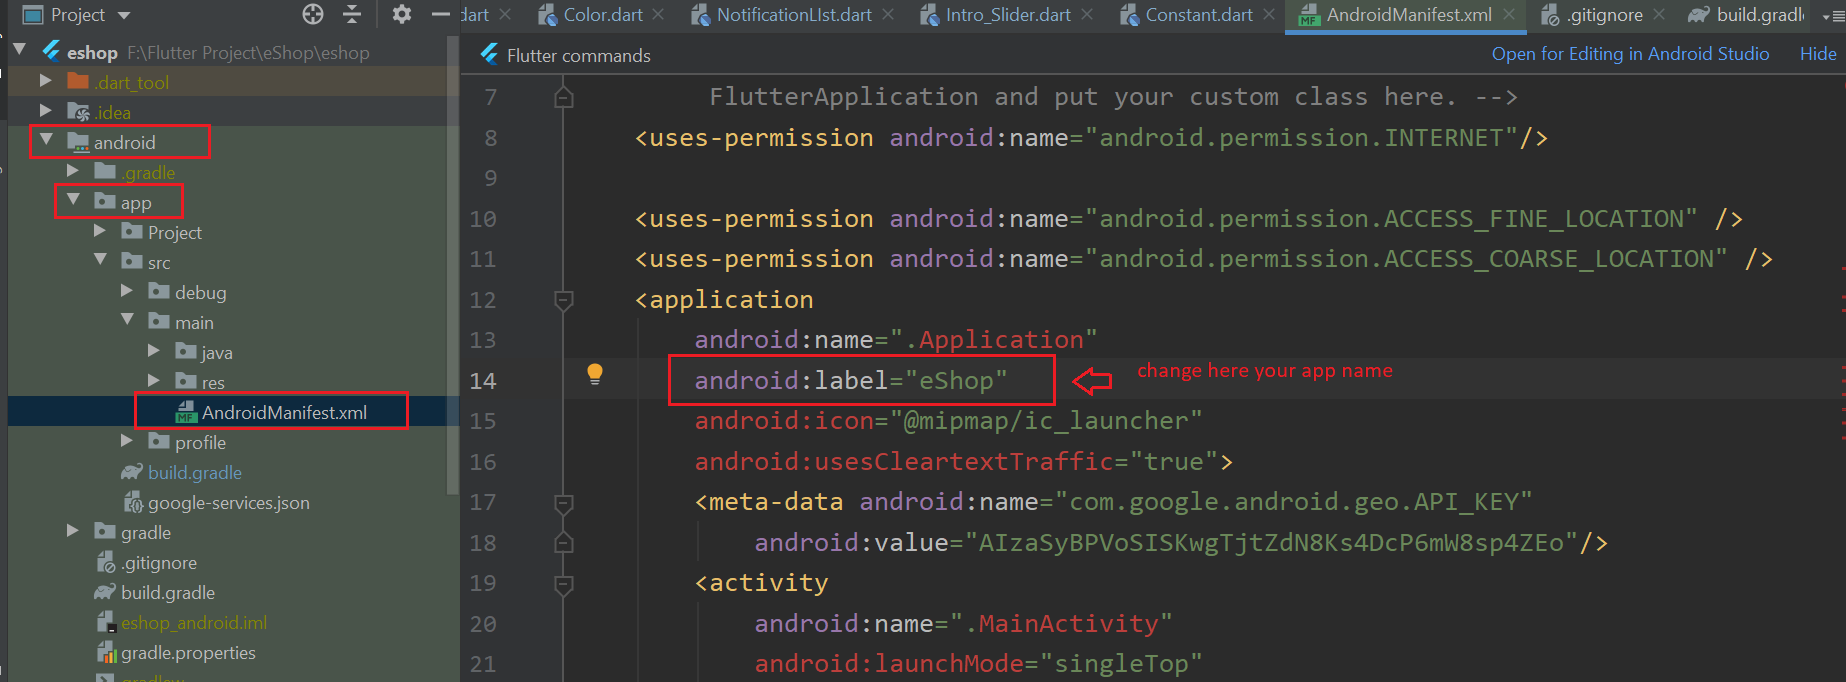
- For Android, to change label that is shown below android app icon, open android > app > src > main > open mainfest.xml and inside that label change that string as shown in below fig.
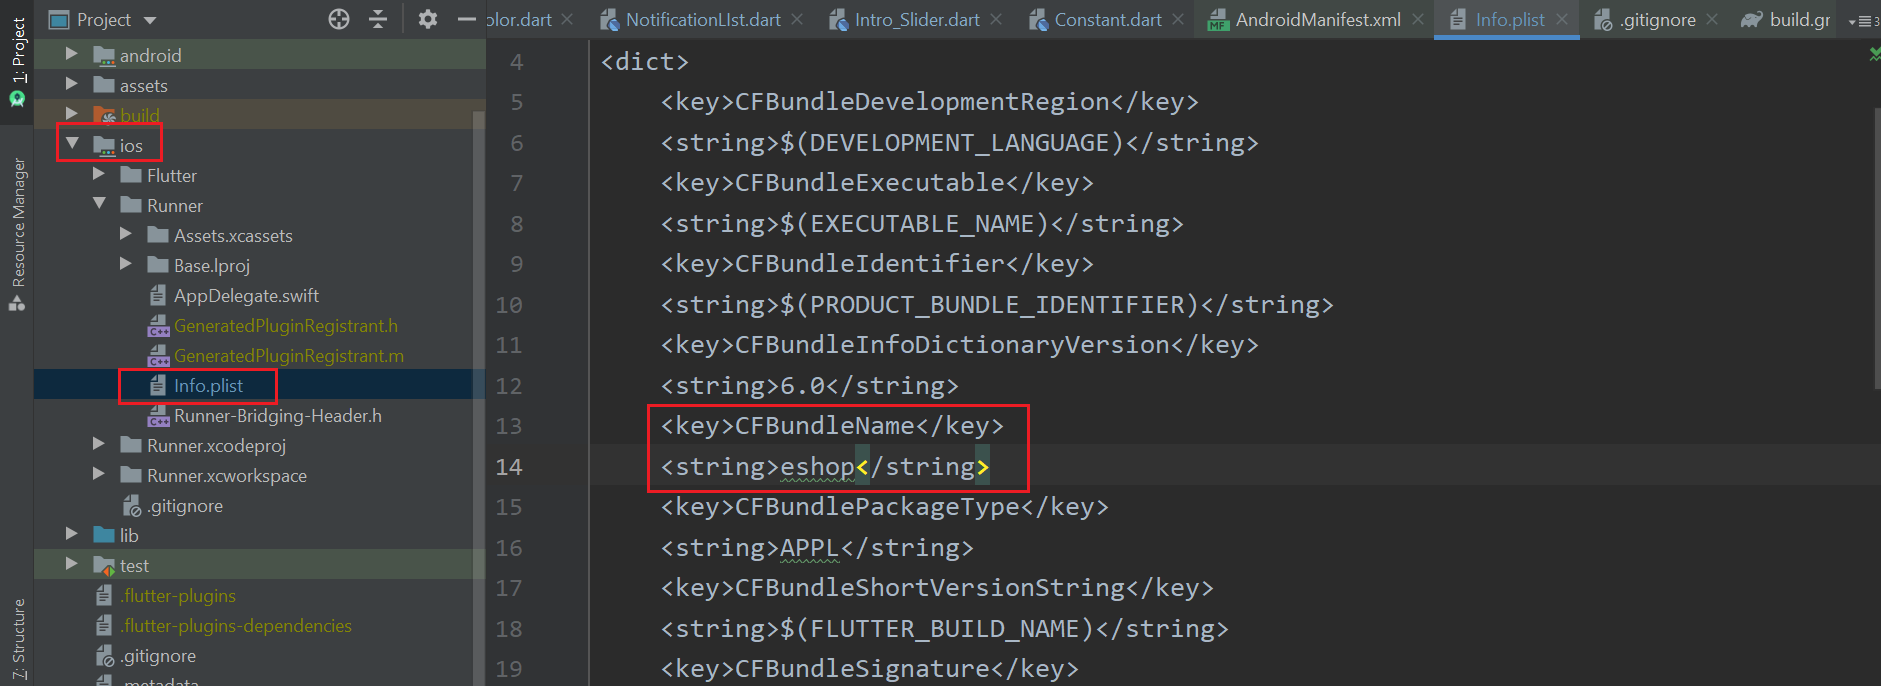
- For iOS, to change label that is shown below ios app icon, open
ios > Runner >
Info.plist inside that
CFBundleName change that string as shown in below fig.
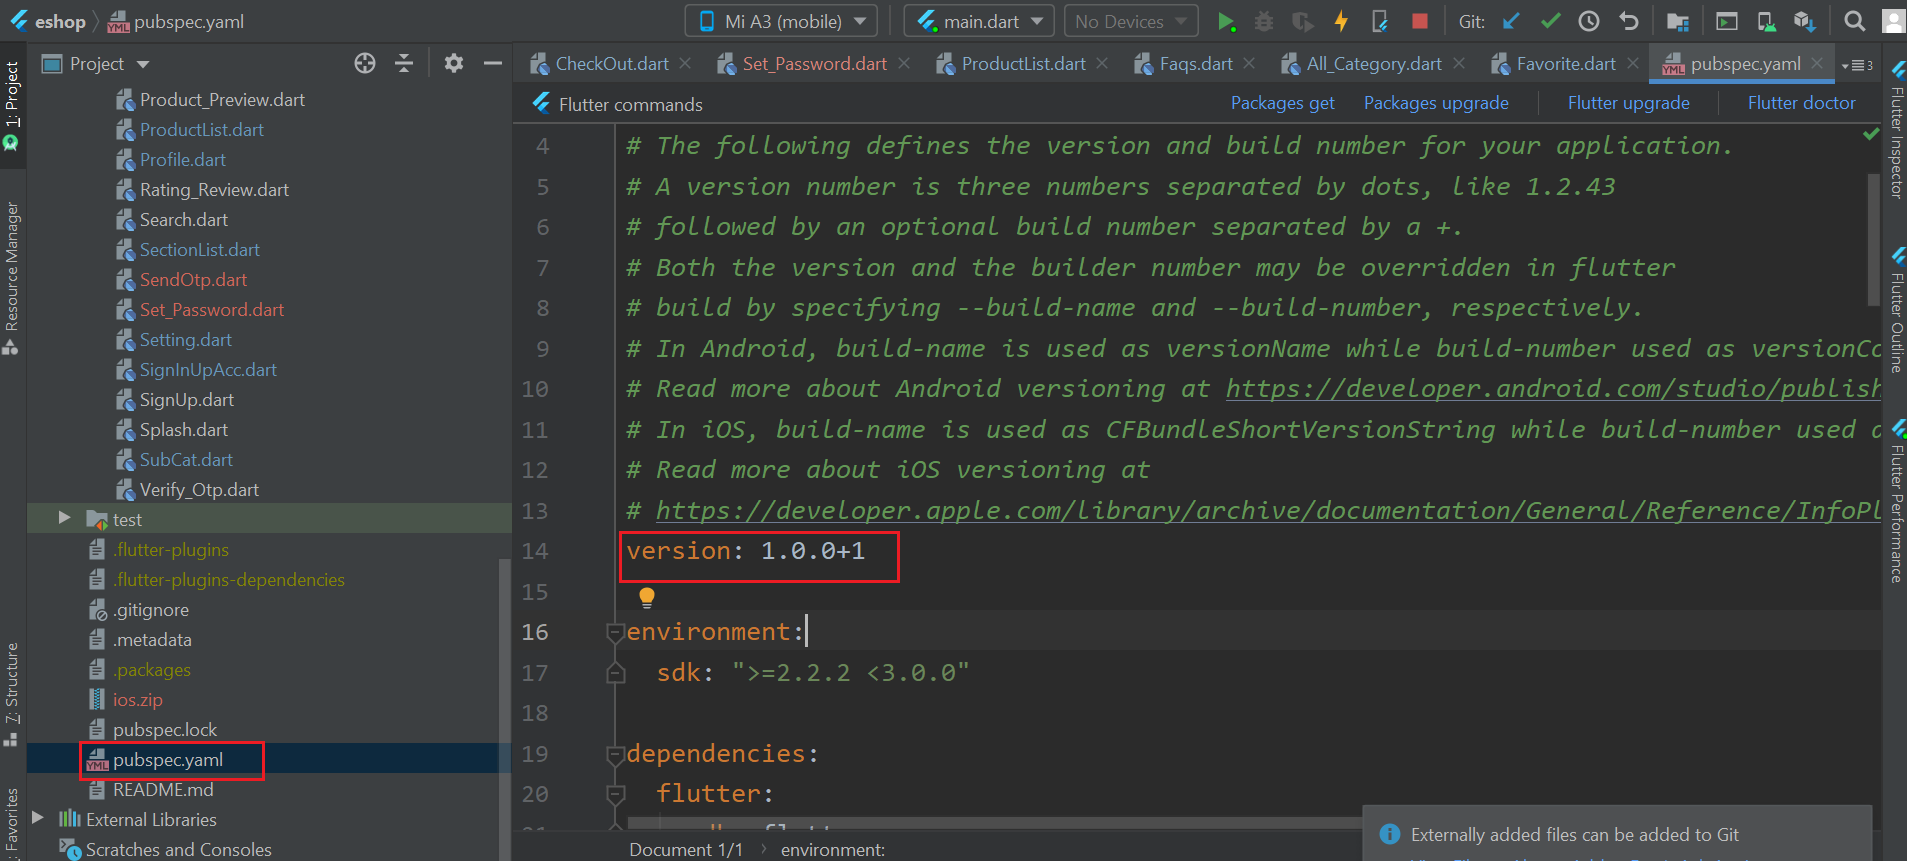
How to change App Version
(Check Video)
- go to pubspec.yaml
- EX.Update version:A.B.C+X in pubspec.yaml.
- For Android: A.B.C represents the versionName such as 1.0.0. X (the number after the +) represents the versionCode such as 1, 2, 3, etc.
- Do not forget to execute flutter packages get, flutter build or flutter run after this step
- For iOS
- A.B.C represents the CFBundleShortVersionString such as 1.0.0. X (the number after the +) represents the CFBundleVersion such as 1, 2, 3, etc.
- Do not forget to execute flutter packages get, flutter build or flutter run after this step
How to Change app logo
(Check Video)
- For Android, open android > app > src > main > res > mipmap add here your logo according to device screen size
- For iOS, open ios > Runner > Assets.xcassets > AppIcon.appiconset here you need to put your logo according to diffrent size.
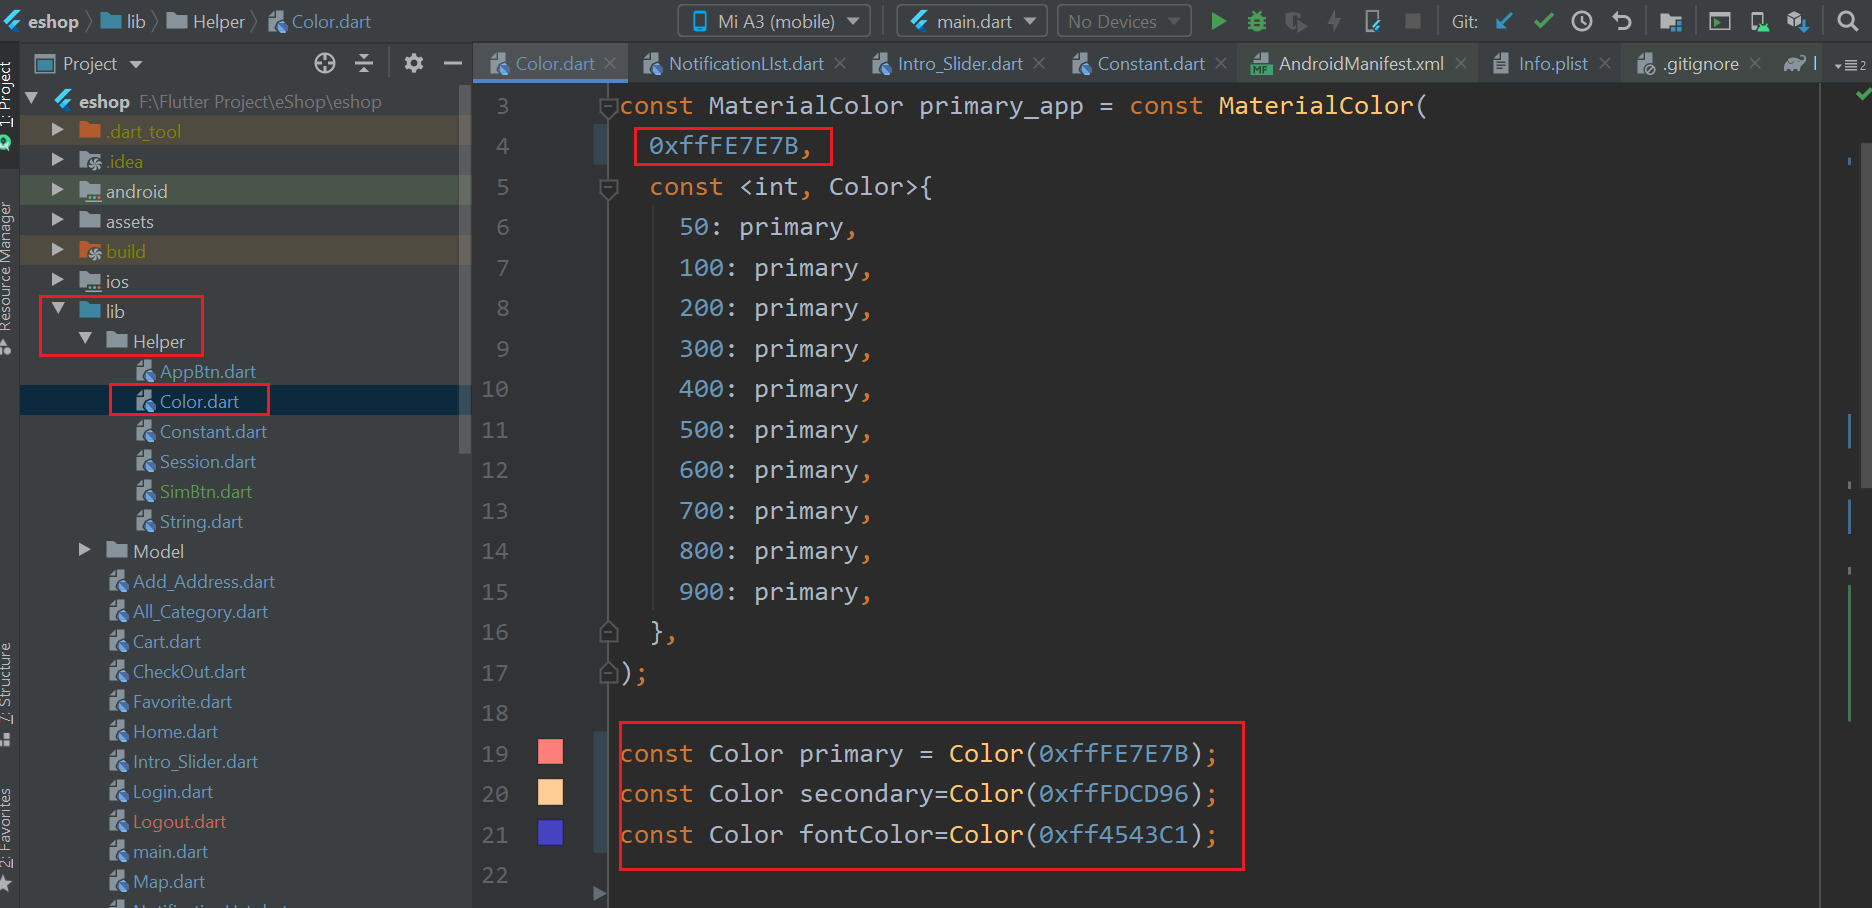
How to Change app color
(Check Video)
- To change app color, your need to add your color code in lib > helper> color.dart
- In flutter color code start from 0xff so your have to add your color hex after this 4 digit.your can change primary,second,fontcolor as shown in below image.
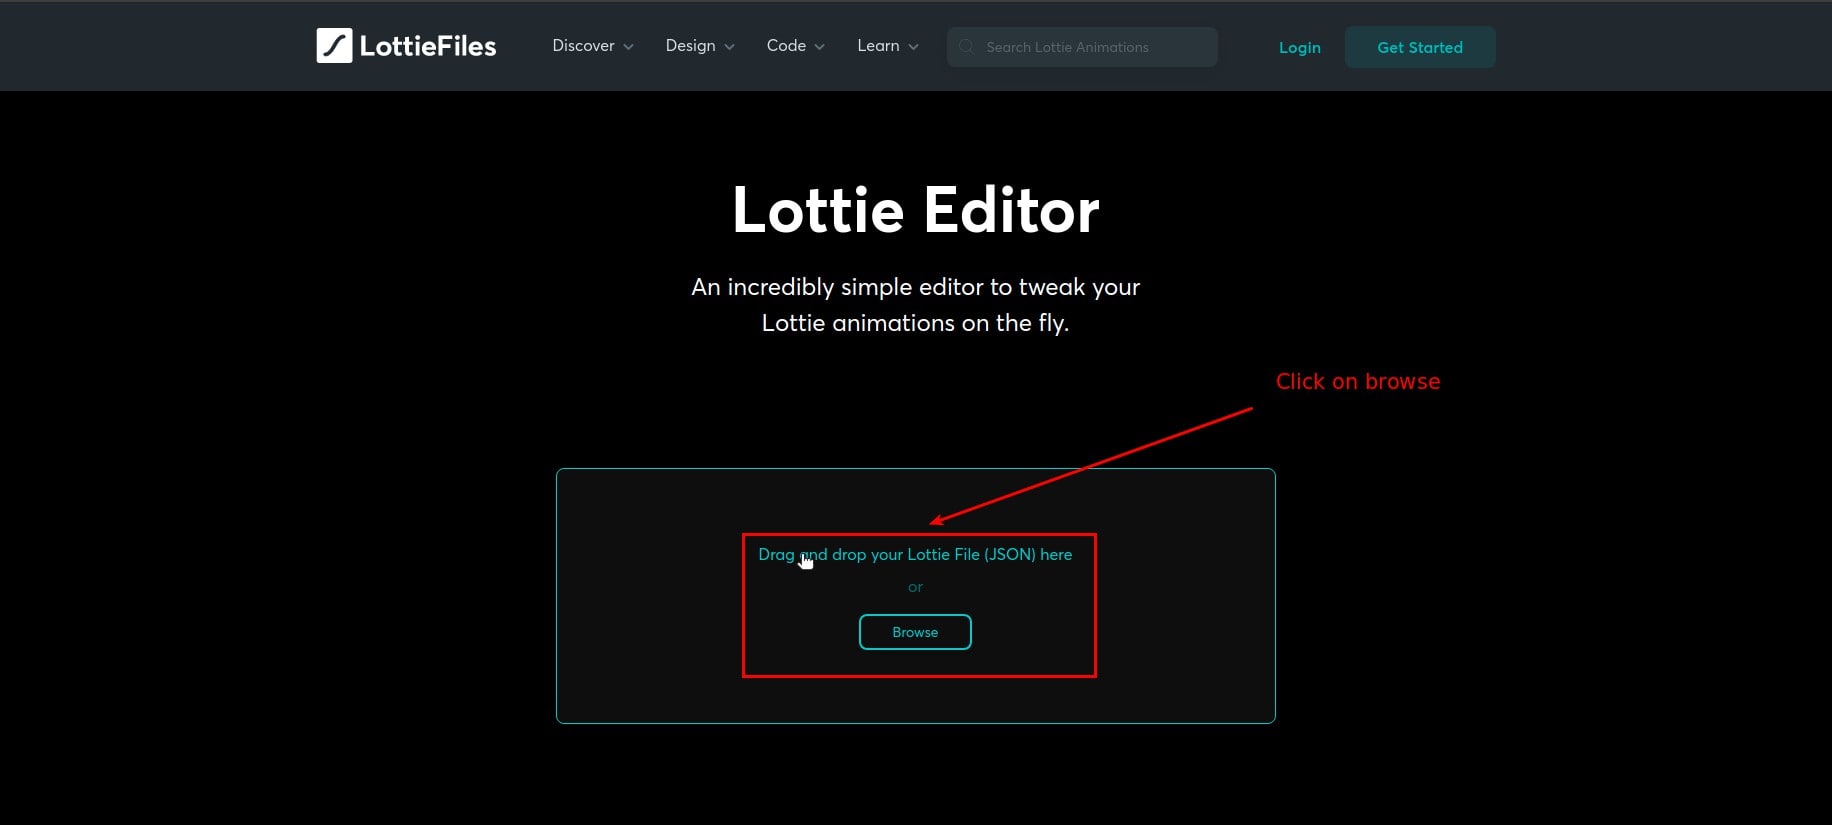
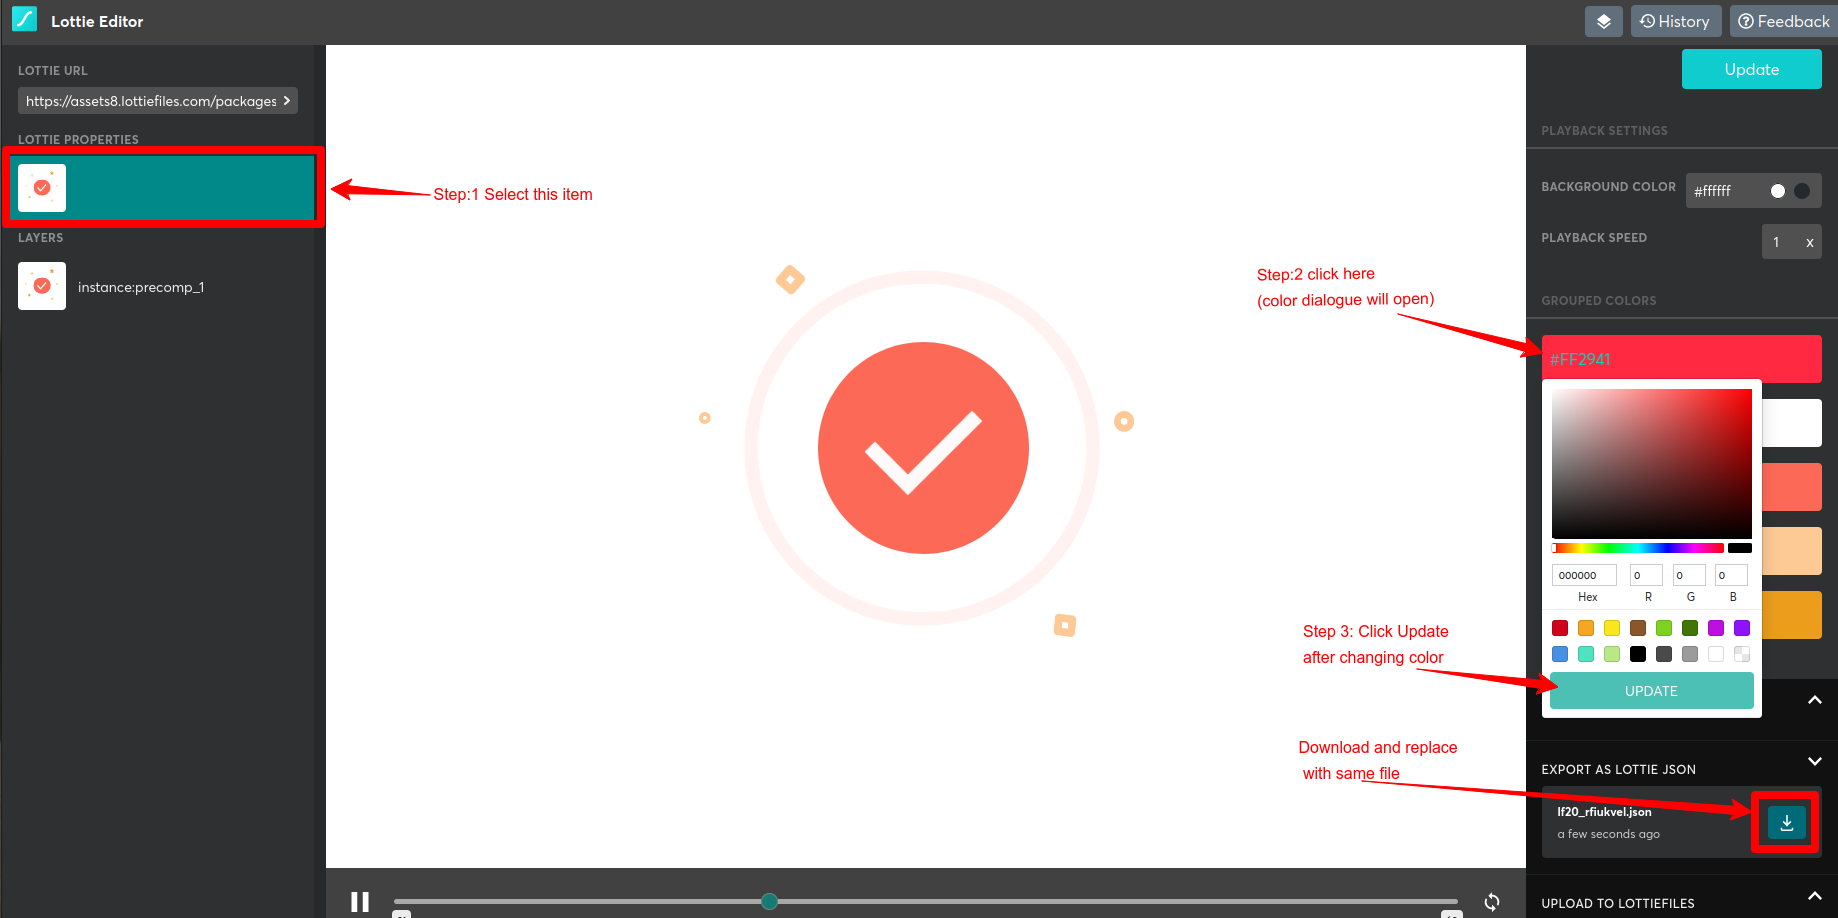
How to Change Animation color
Note : We are only responsible for exist animation, If you can change whole animation we can not help for it. we can only help if any issue occures by changing color of animation.
- Open Browser and Goto website https://lottiefiles.com and login or create account and login.
- Goto https://lottiefiles.com/editor
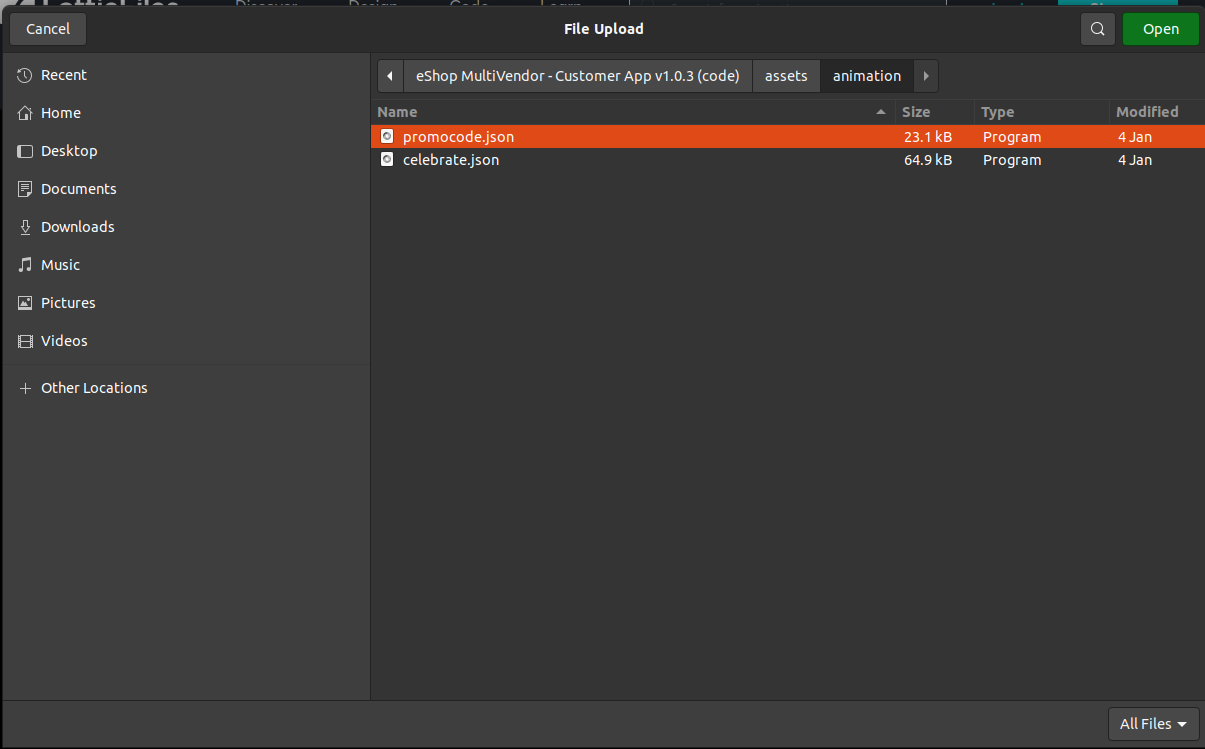
- Select assets/animation/promocode.json file and open
- Follow below image
- Do the same with celebrate.json
How to change Animation
Note : We are only responsible for exist animation, If you change whole animation we can not help for it.
- Open Browser and Goto website https://lottiefiles.com and login or create account and login.
- Search animation only in lottiefiles modify acording your requirement and download that json file rename that file as per exist file in assest/animation folder.
- You can do the same with all exist animation files in the assets/animation folder.
- Note : You need to set file name same as per exist files in android code, if file name will be changes even caps and small also then it will not works and it will throws error and that will be not part of support you need to handle it from your side.
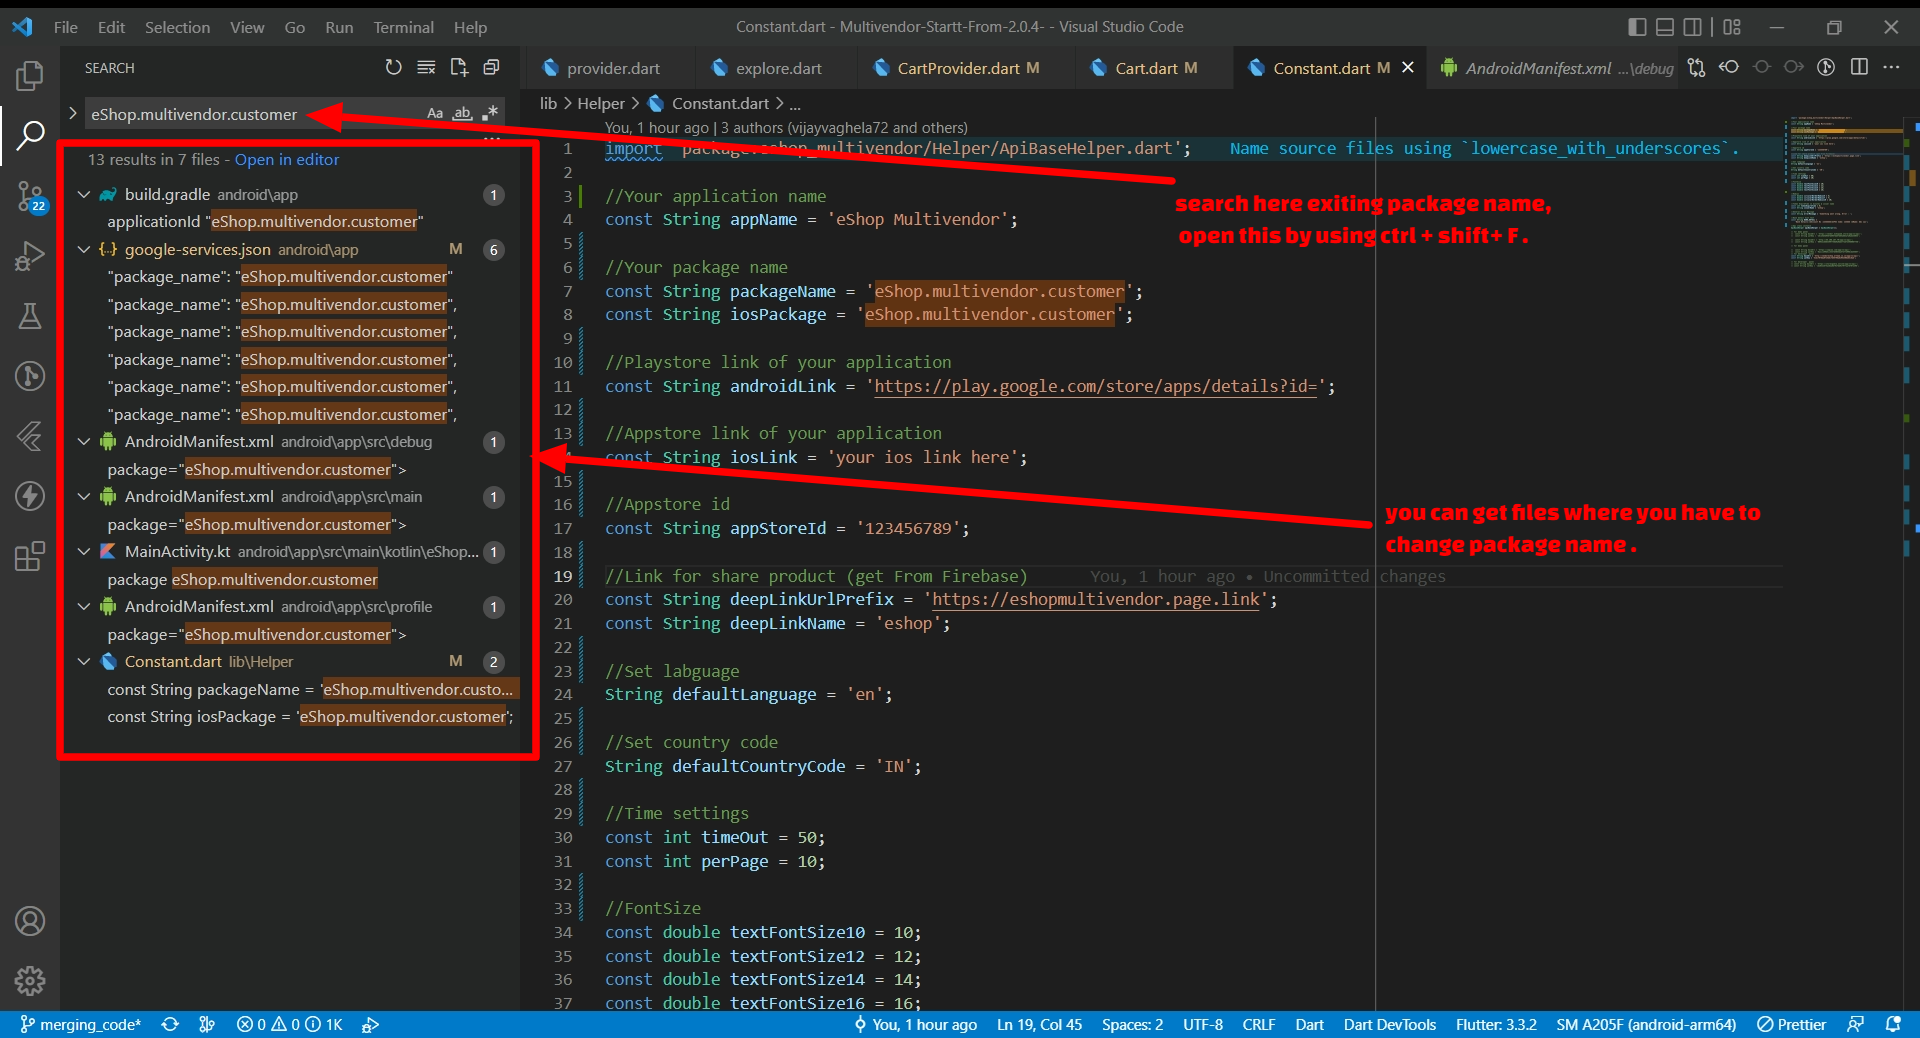
How to change package name
(Check Video)
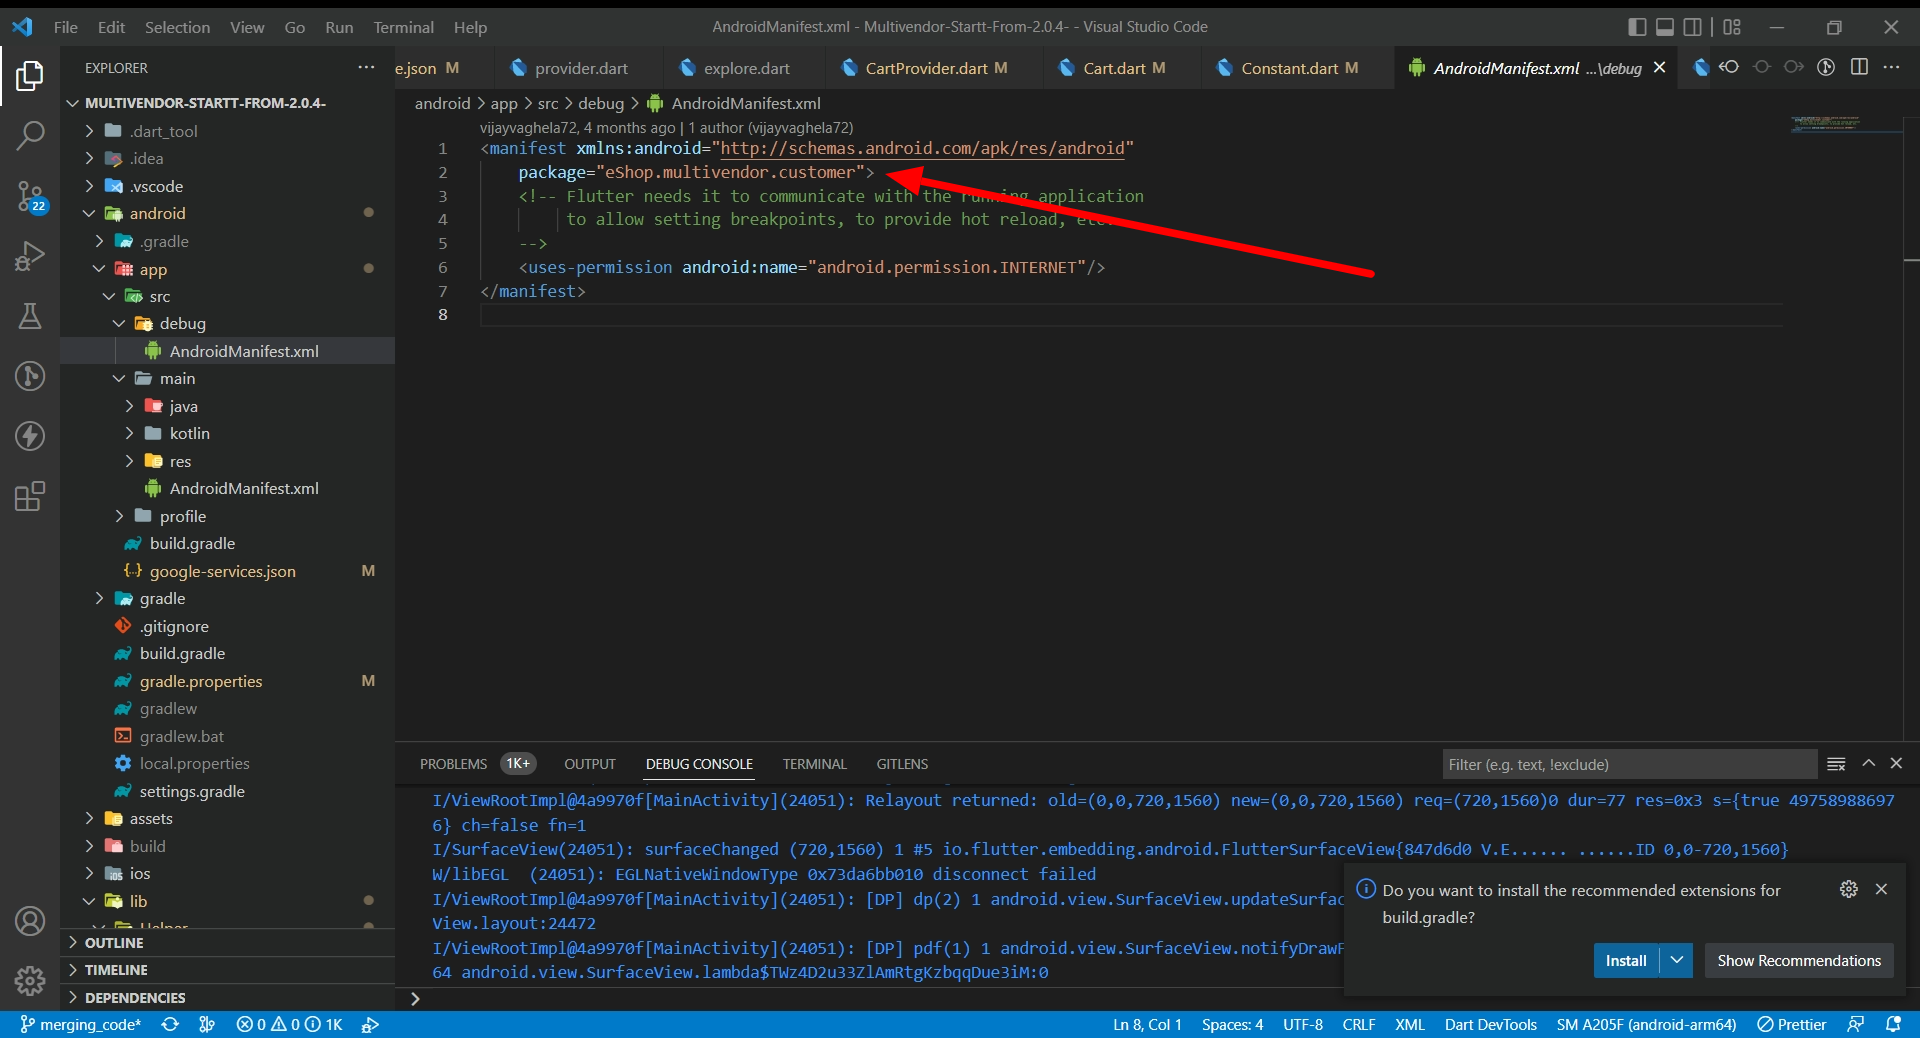
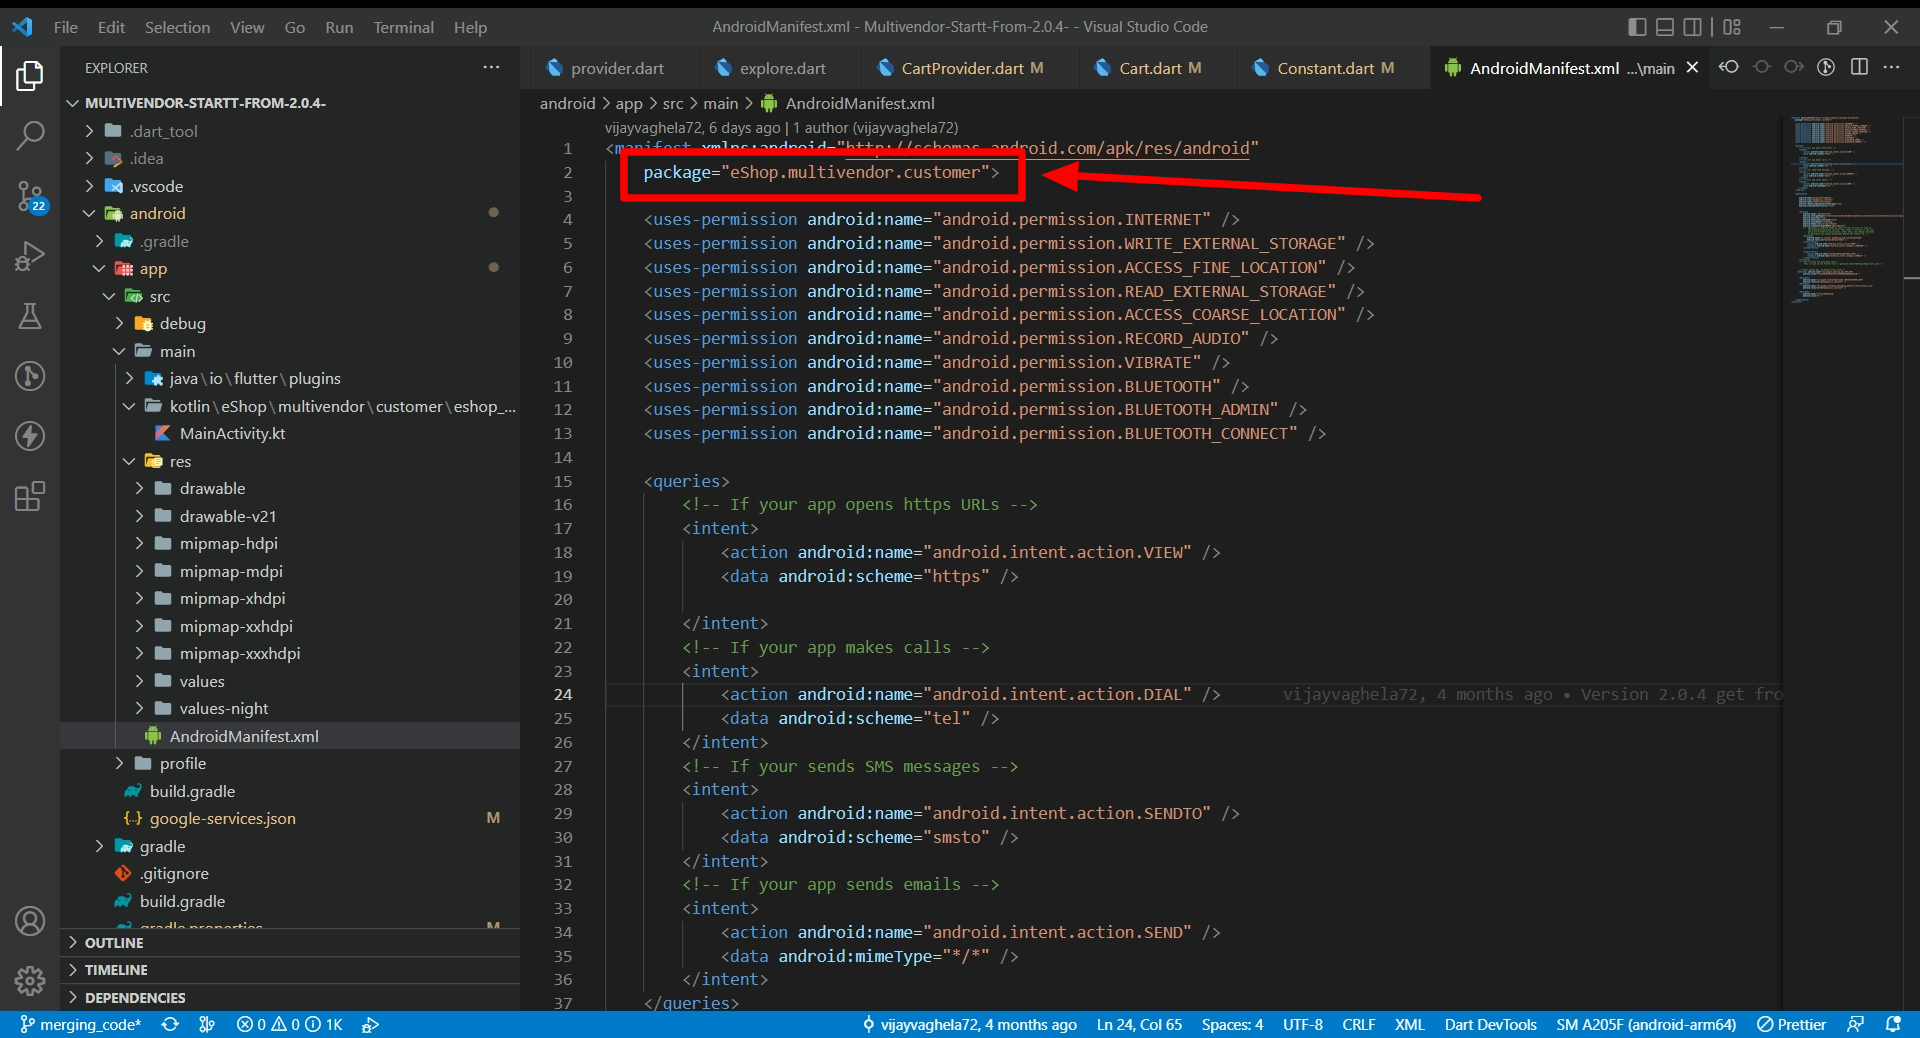
- Press ctrl + shift + F and enter existing package name and change all result which show in search, else you have change it manually buy replace package name in below files.
- android\app\src\debug\AndroidManifest.xml
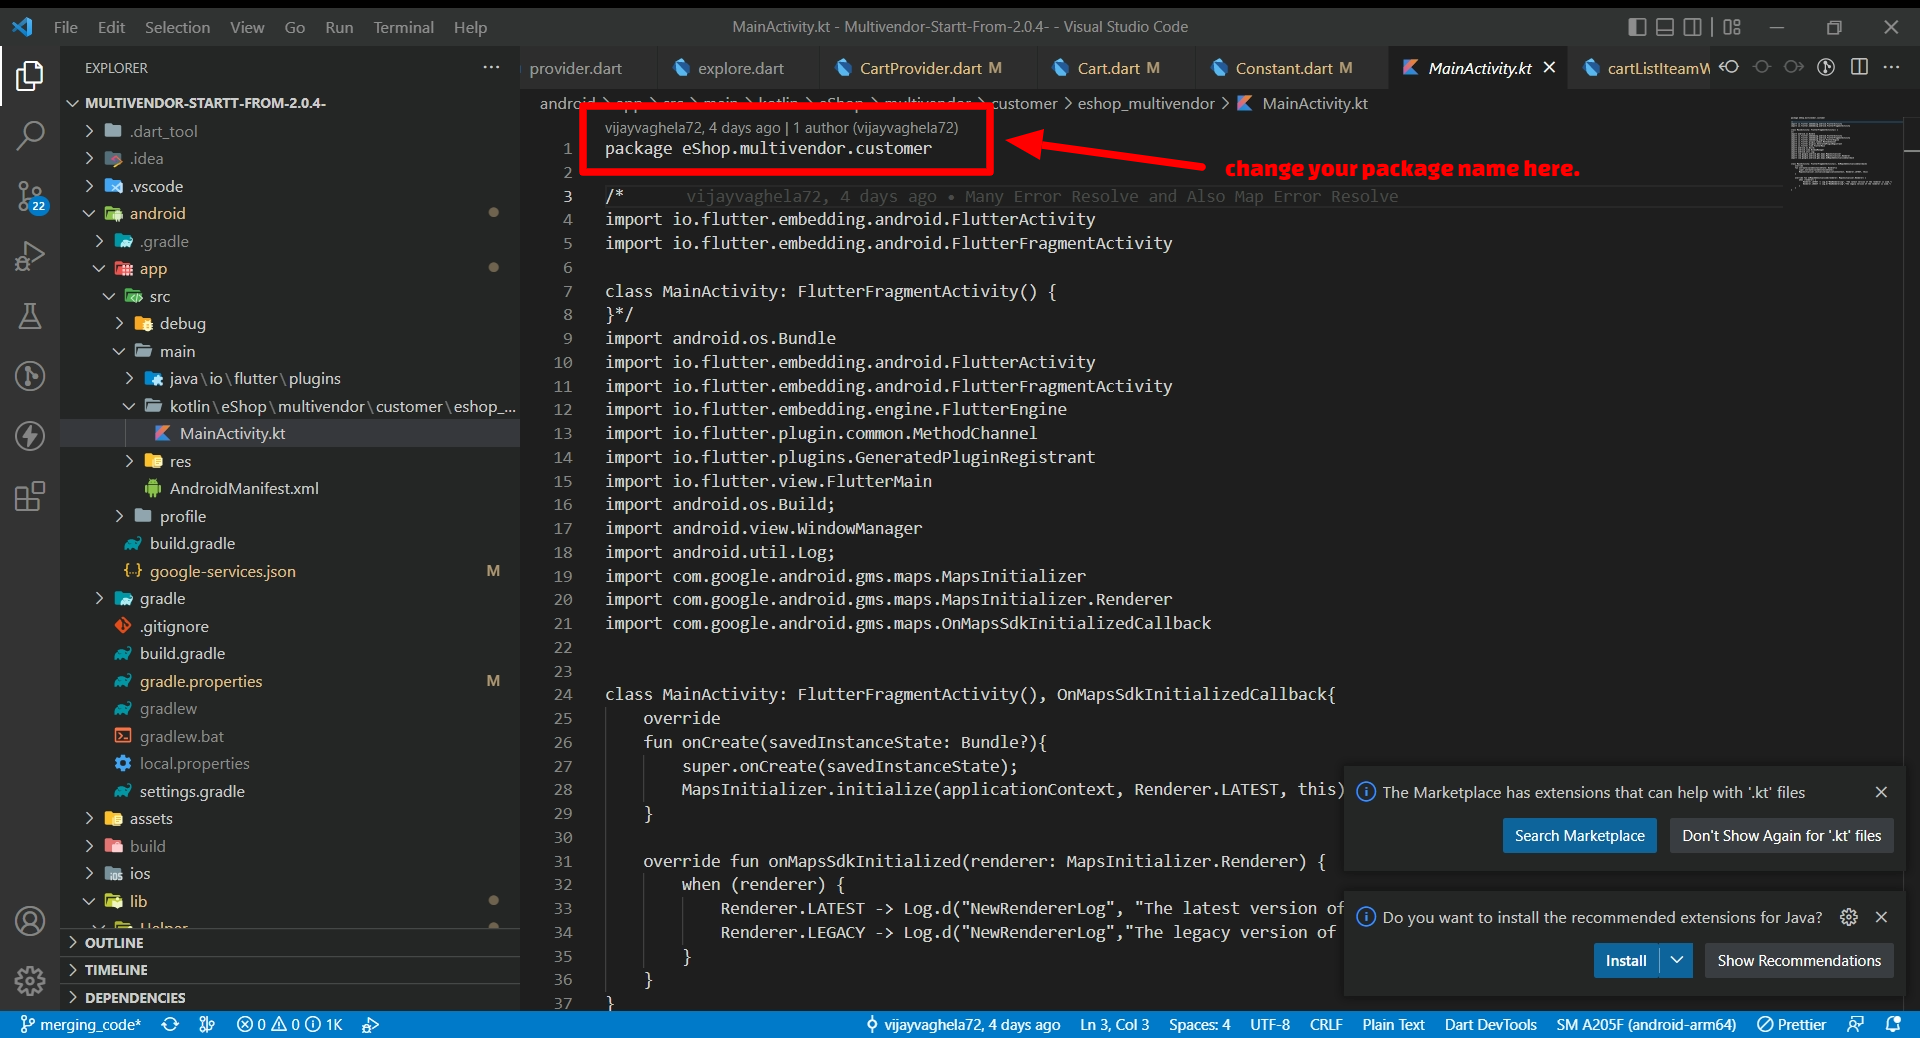
- android\app\src\main\kotlin\eShop\multivendor\customer\eshop_multivendor\MainActivity.kt
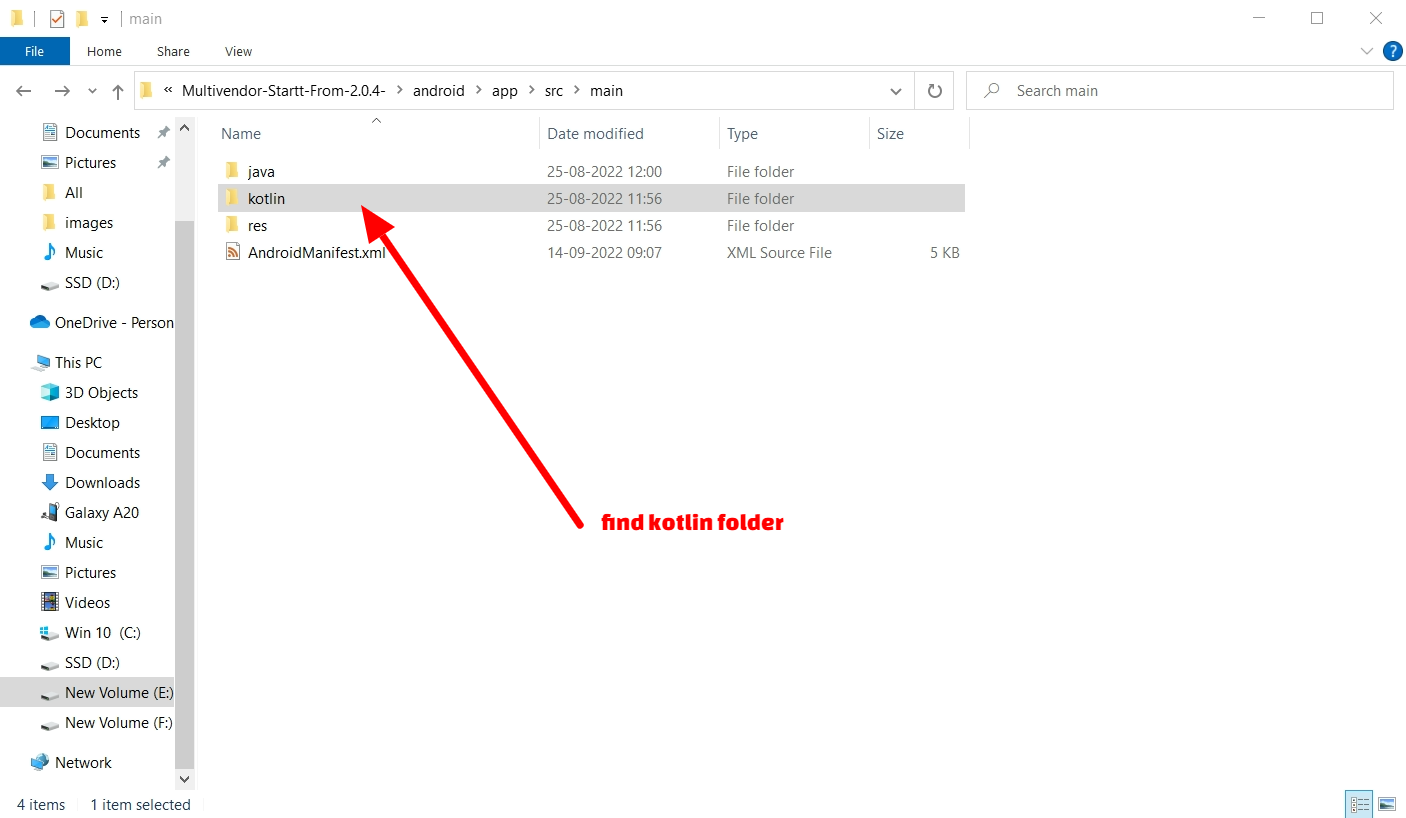
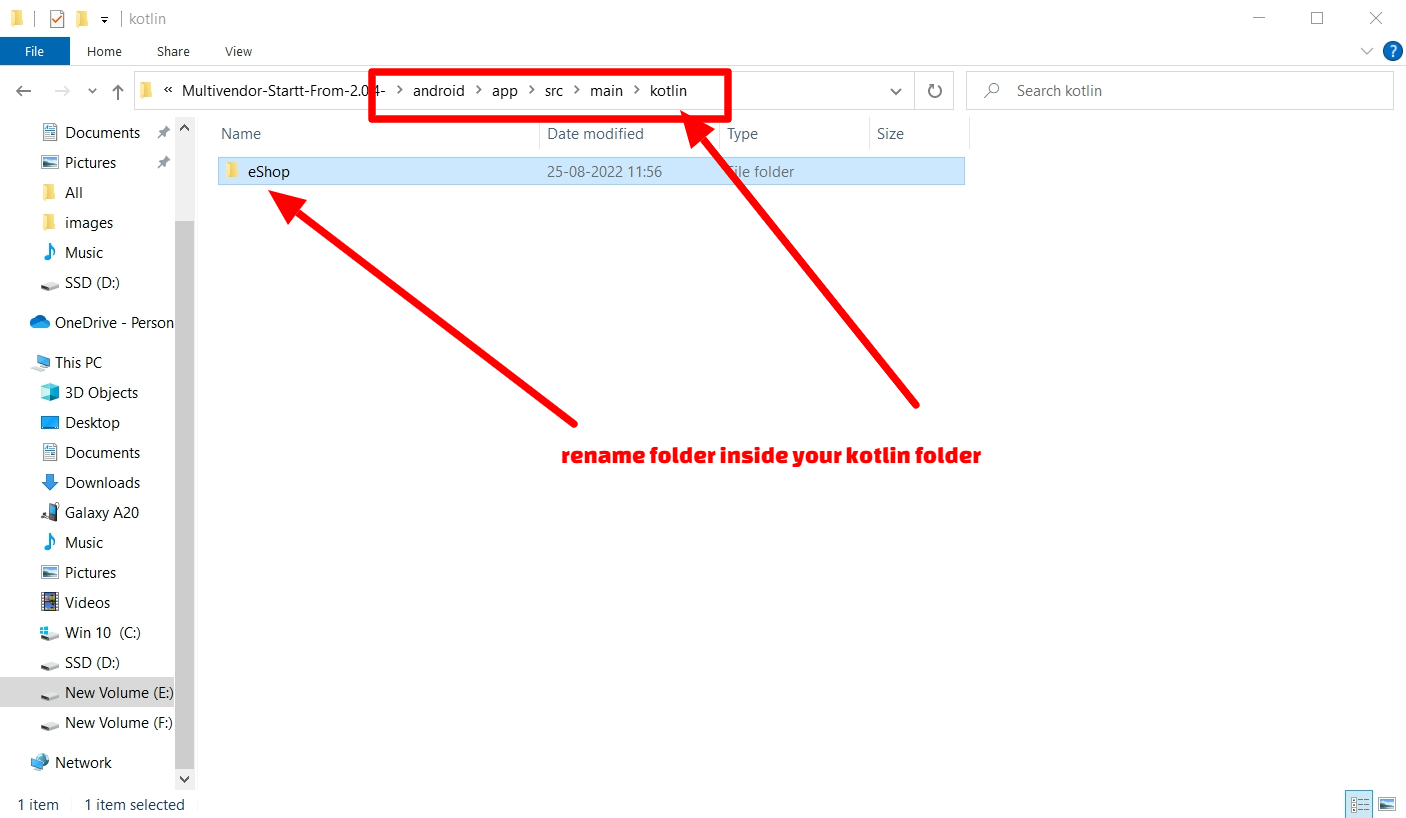
- When You are changing package name the you also need change name of folders according to your package name in (android\app\src\main\kotlin\) location in project. For Example if PAckage name is "eShop.multivendor.customer" Then inside kotlin folder folder stucture are eshop\multivendor\customer. now this folder structure will change as per your package name if your package name is "wrteam.eShop.customer" then new folder structure is wrteam\eShop\customer. for change name of this folders just open your project folder navigate inside the kotlin folder just rename the folders according to your package name . Note : (Sometime you got issue dou to this reason.)
- Some Doubt regarding package name change
1. what if my package name is like this eShop.wrteam.multivendor.customer, so how can i make folder structure ?
Ans. => in this situation you have to add one folder according to your package name , now you have 4 folder insode the kotline folder like this \eShop\wrteam\multivendor\customer\ - android\app\src\main\AndroidManifest.xml
- android\app\src\profile\AndroidManifest.xml
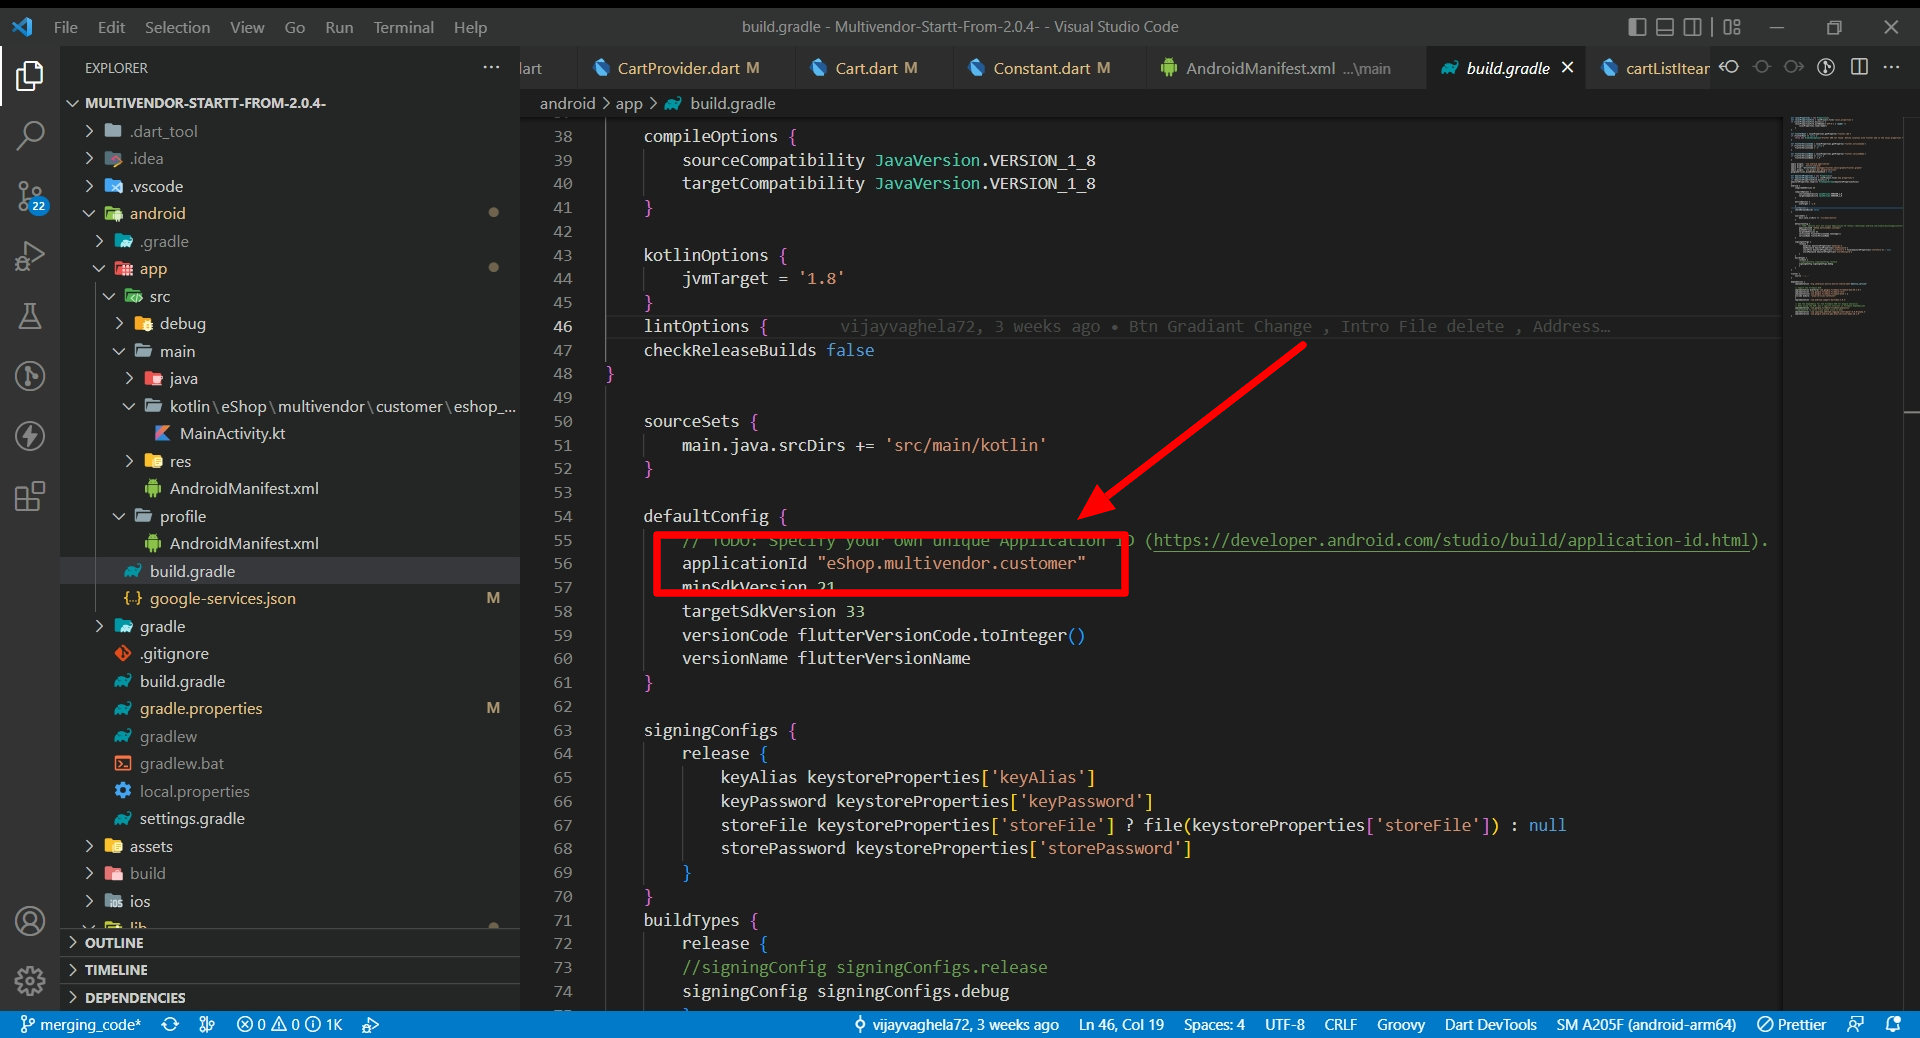
- android\app\build.gradle
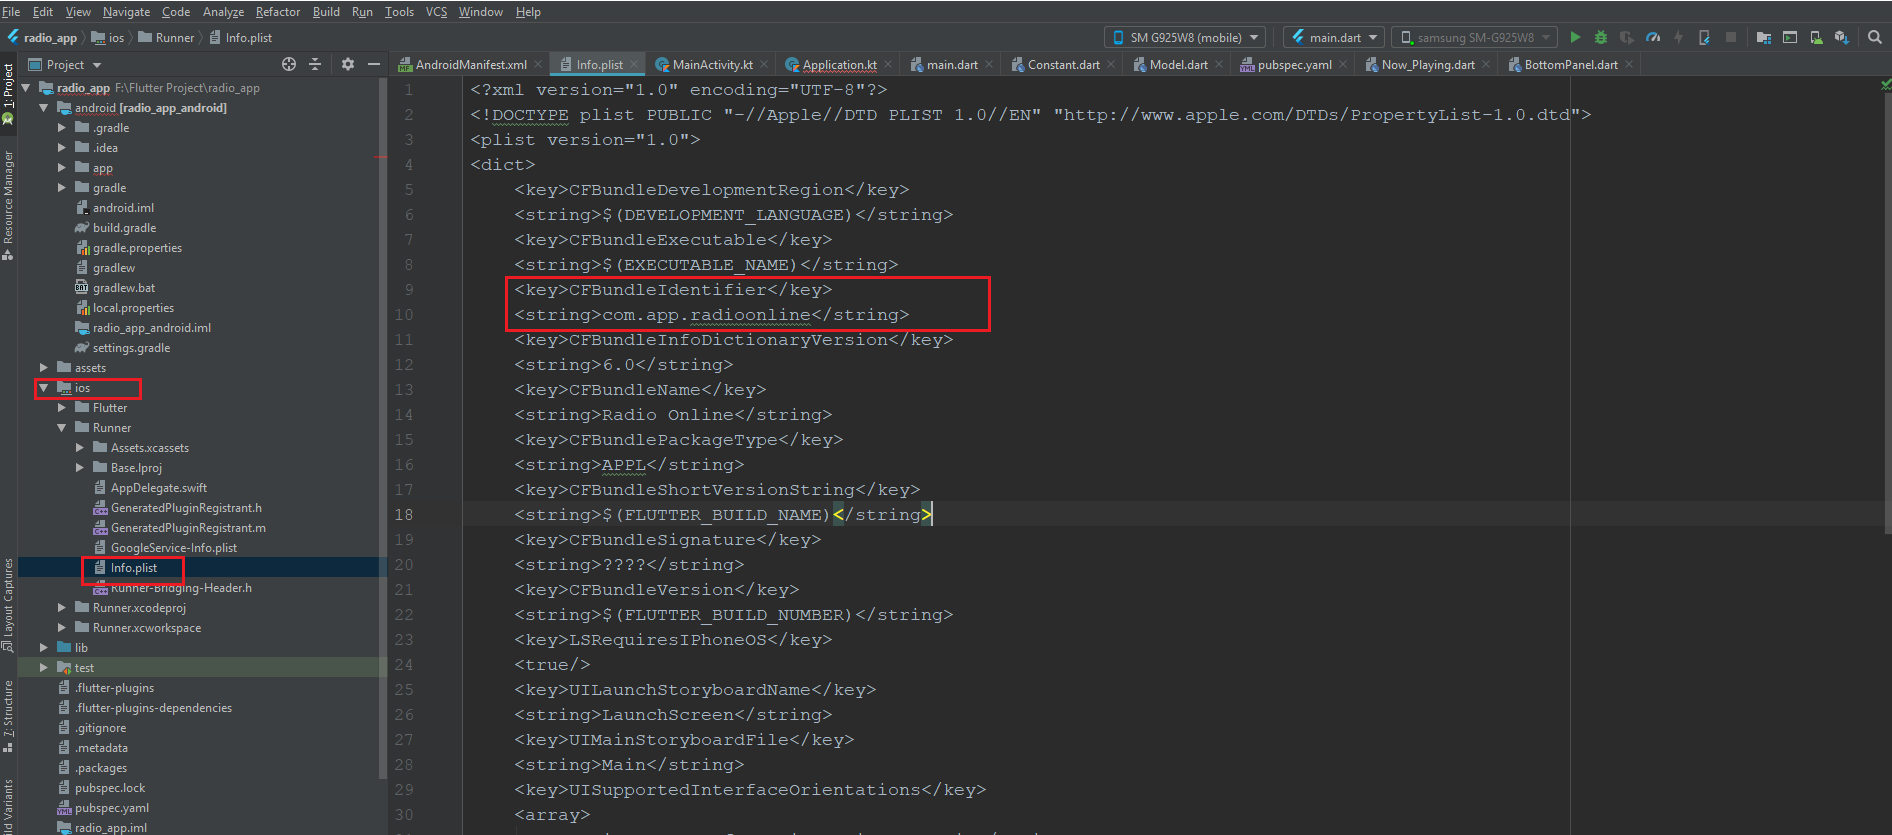
- For ios open ios > Runner > info.plist > there is the key CFBundleIdentifier change the string value for that as shown in below
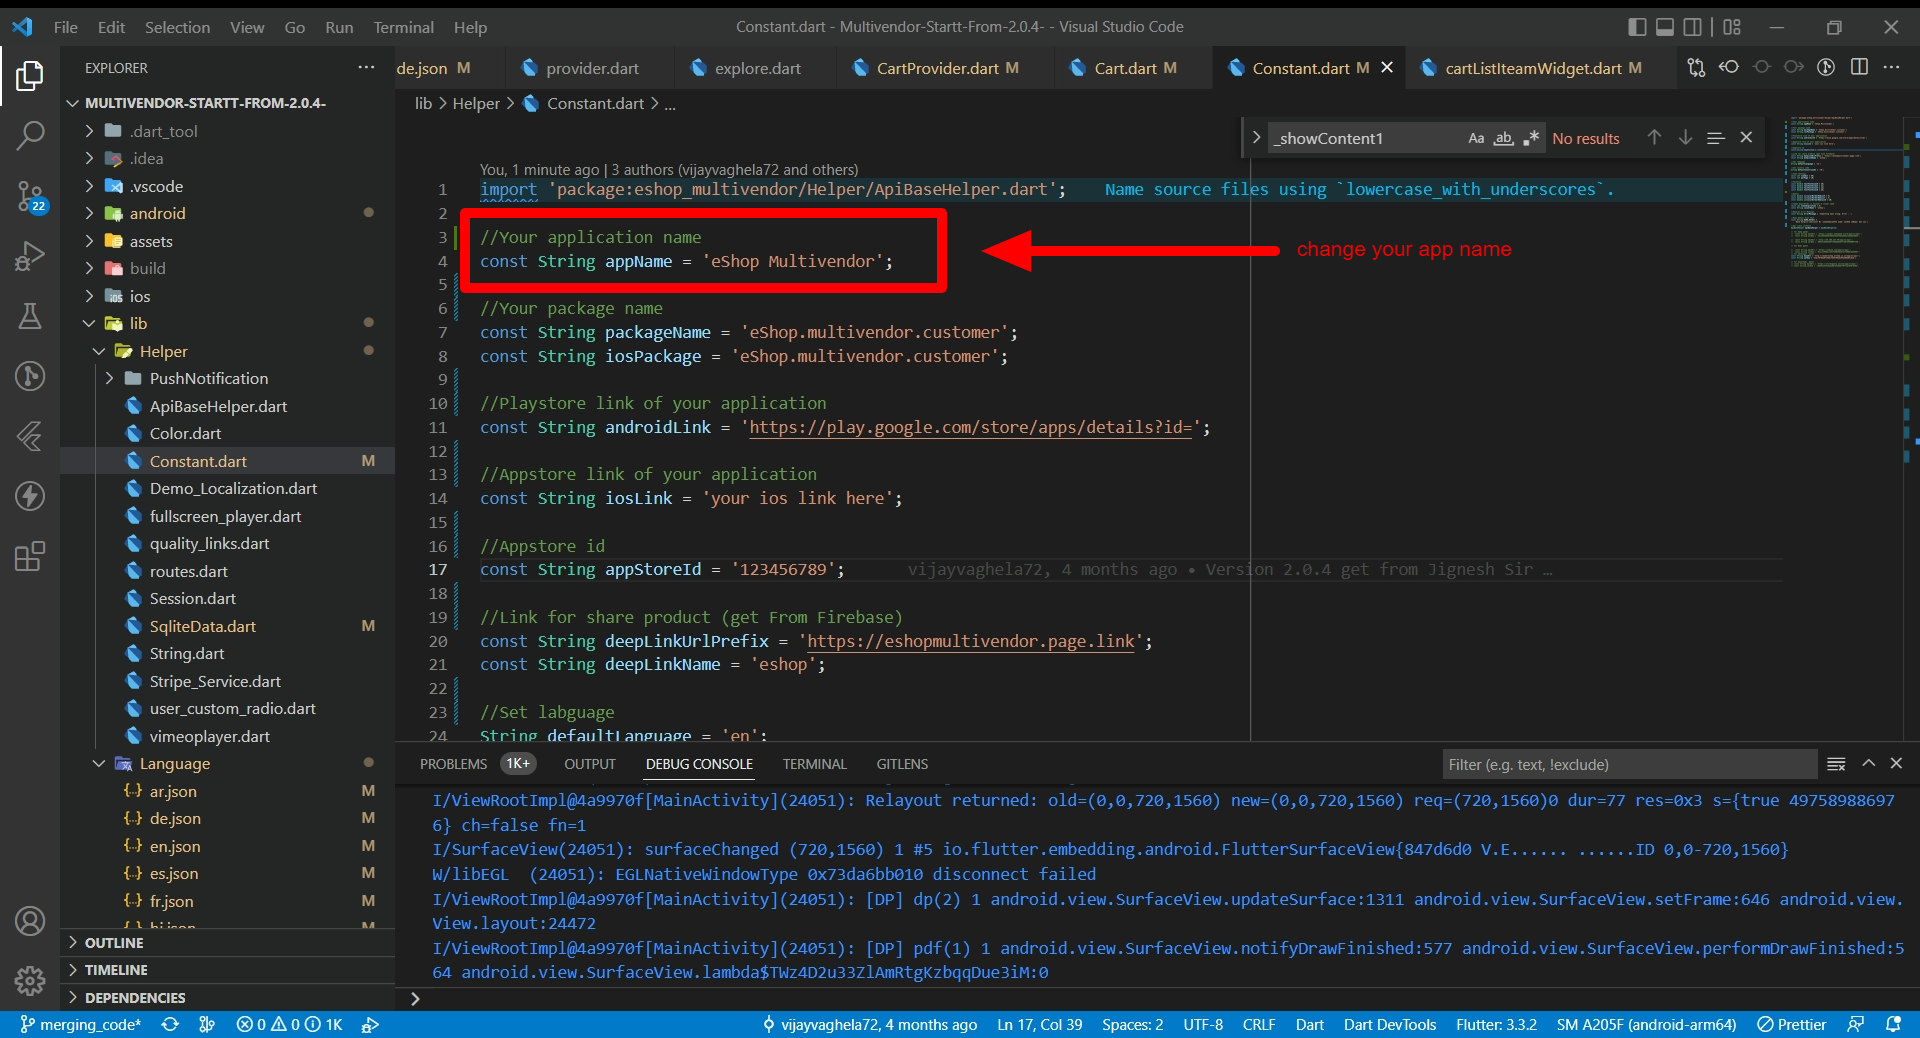
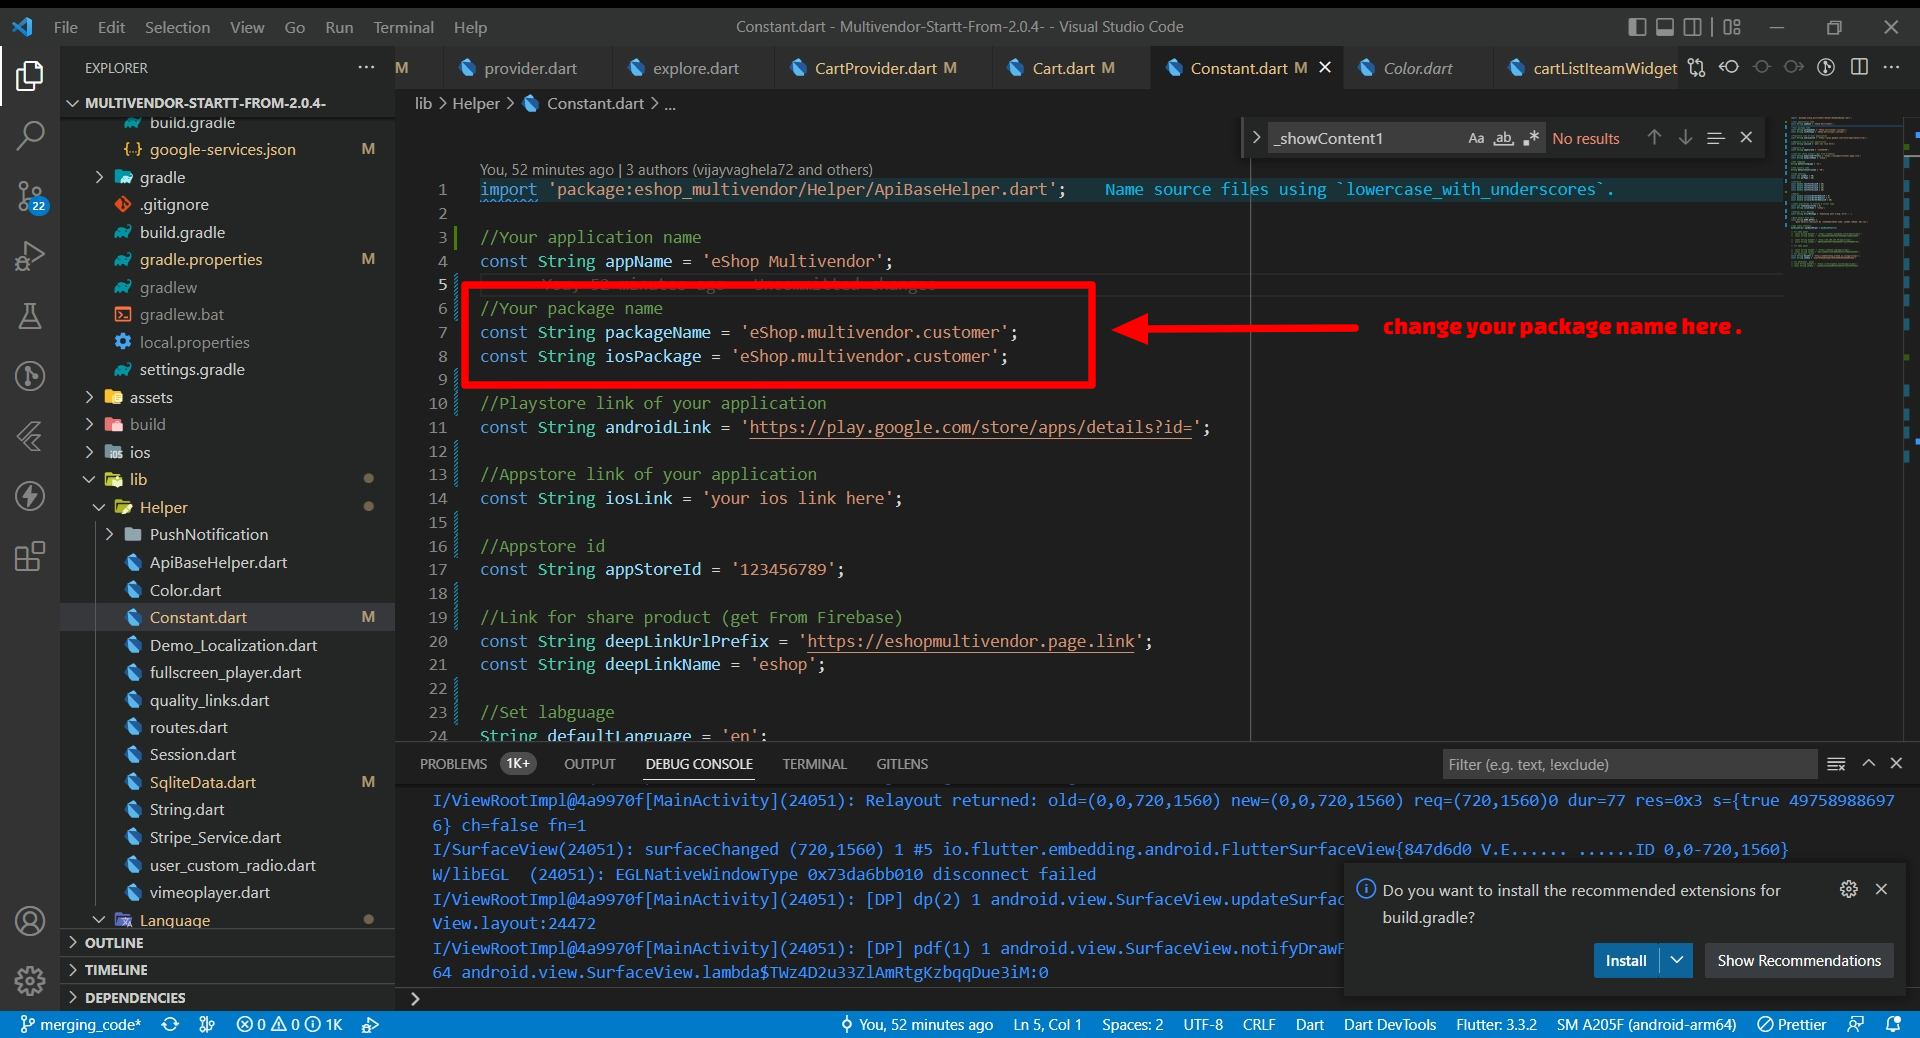
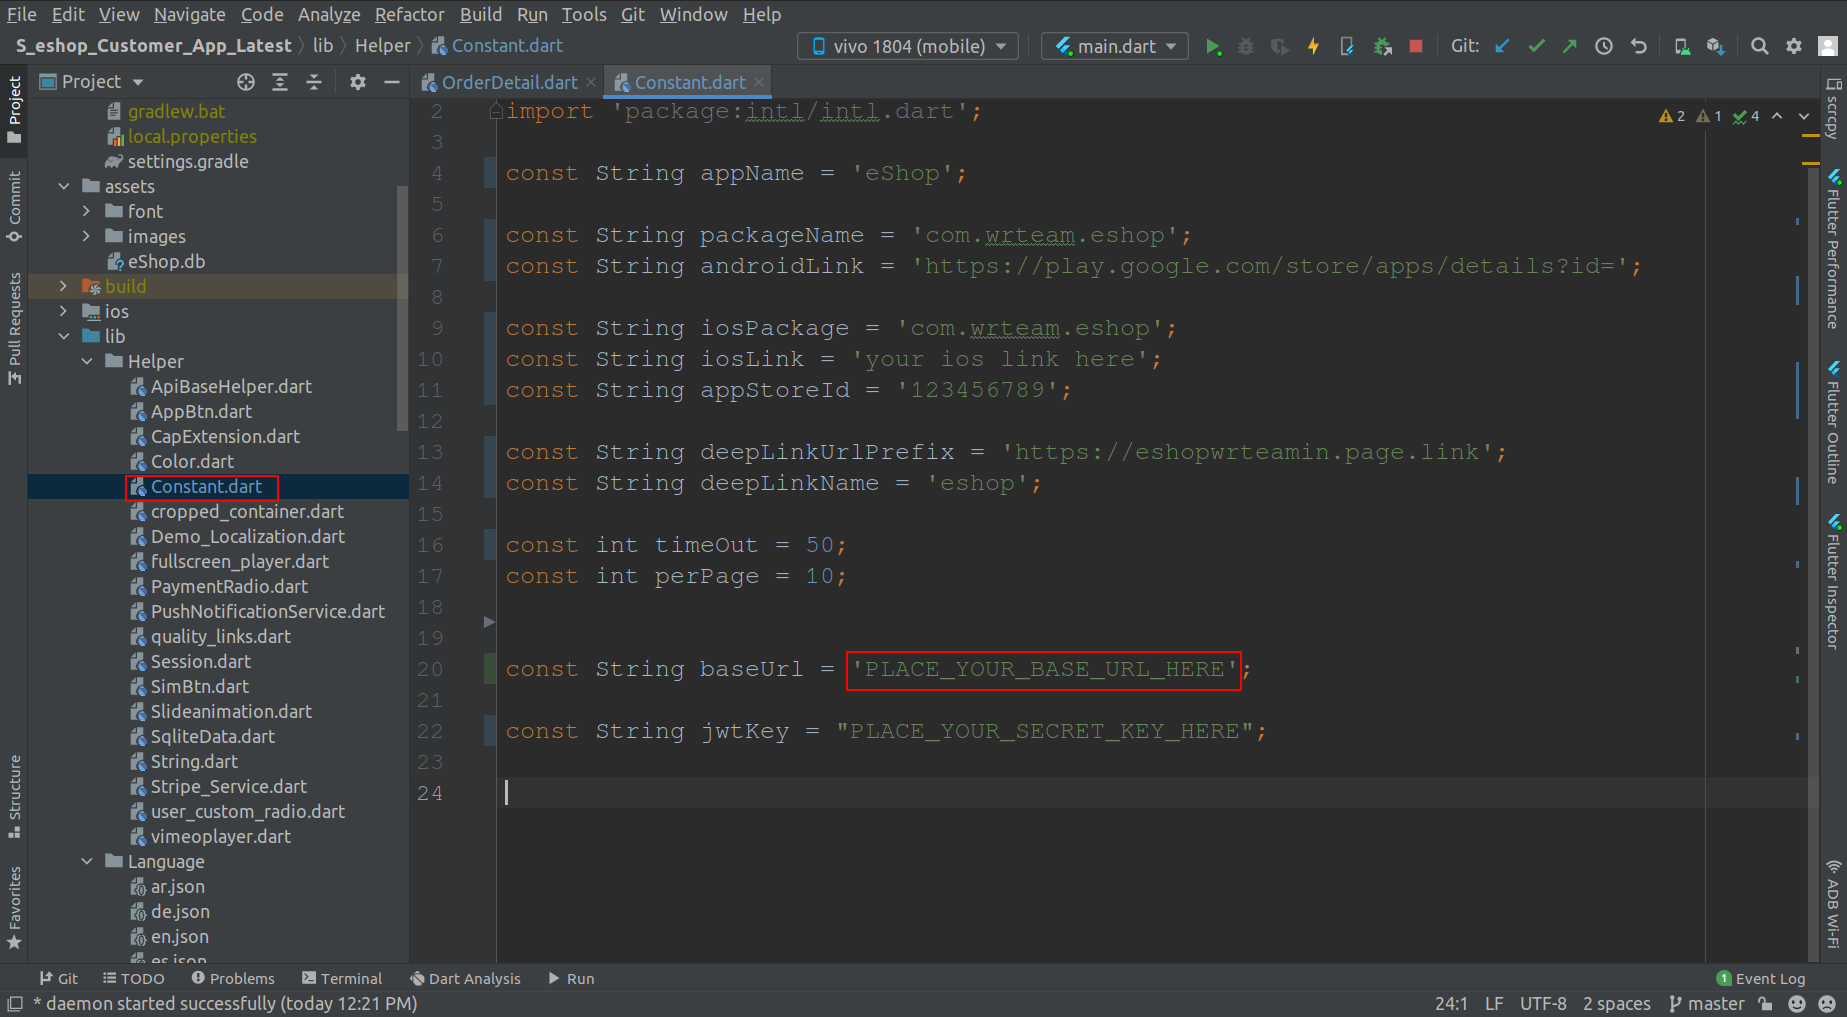
- lib\Helper\Constant.dart

How to Change Images in app
(Check Video)
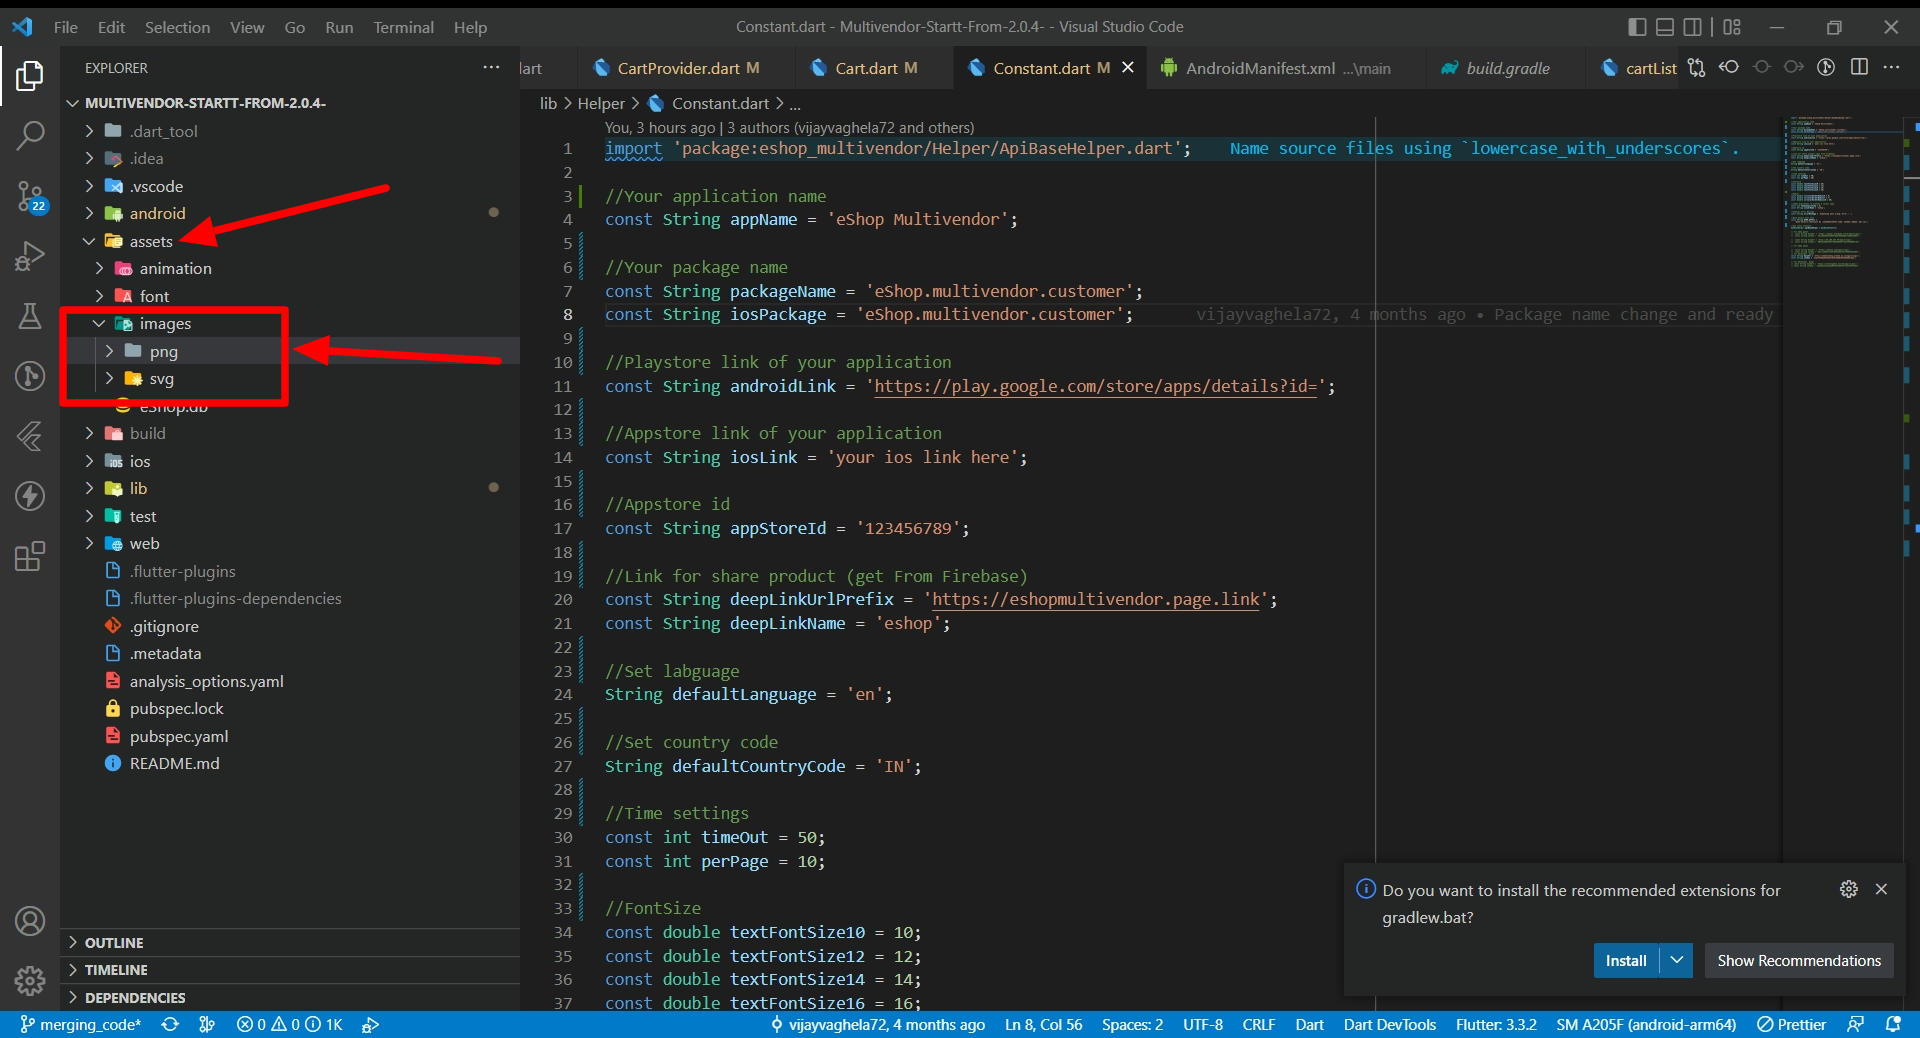
- Go to Assets > images folder. here you have 2 folders 1.png 2.svg. you can change your image to exist image with same name.
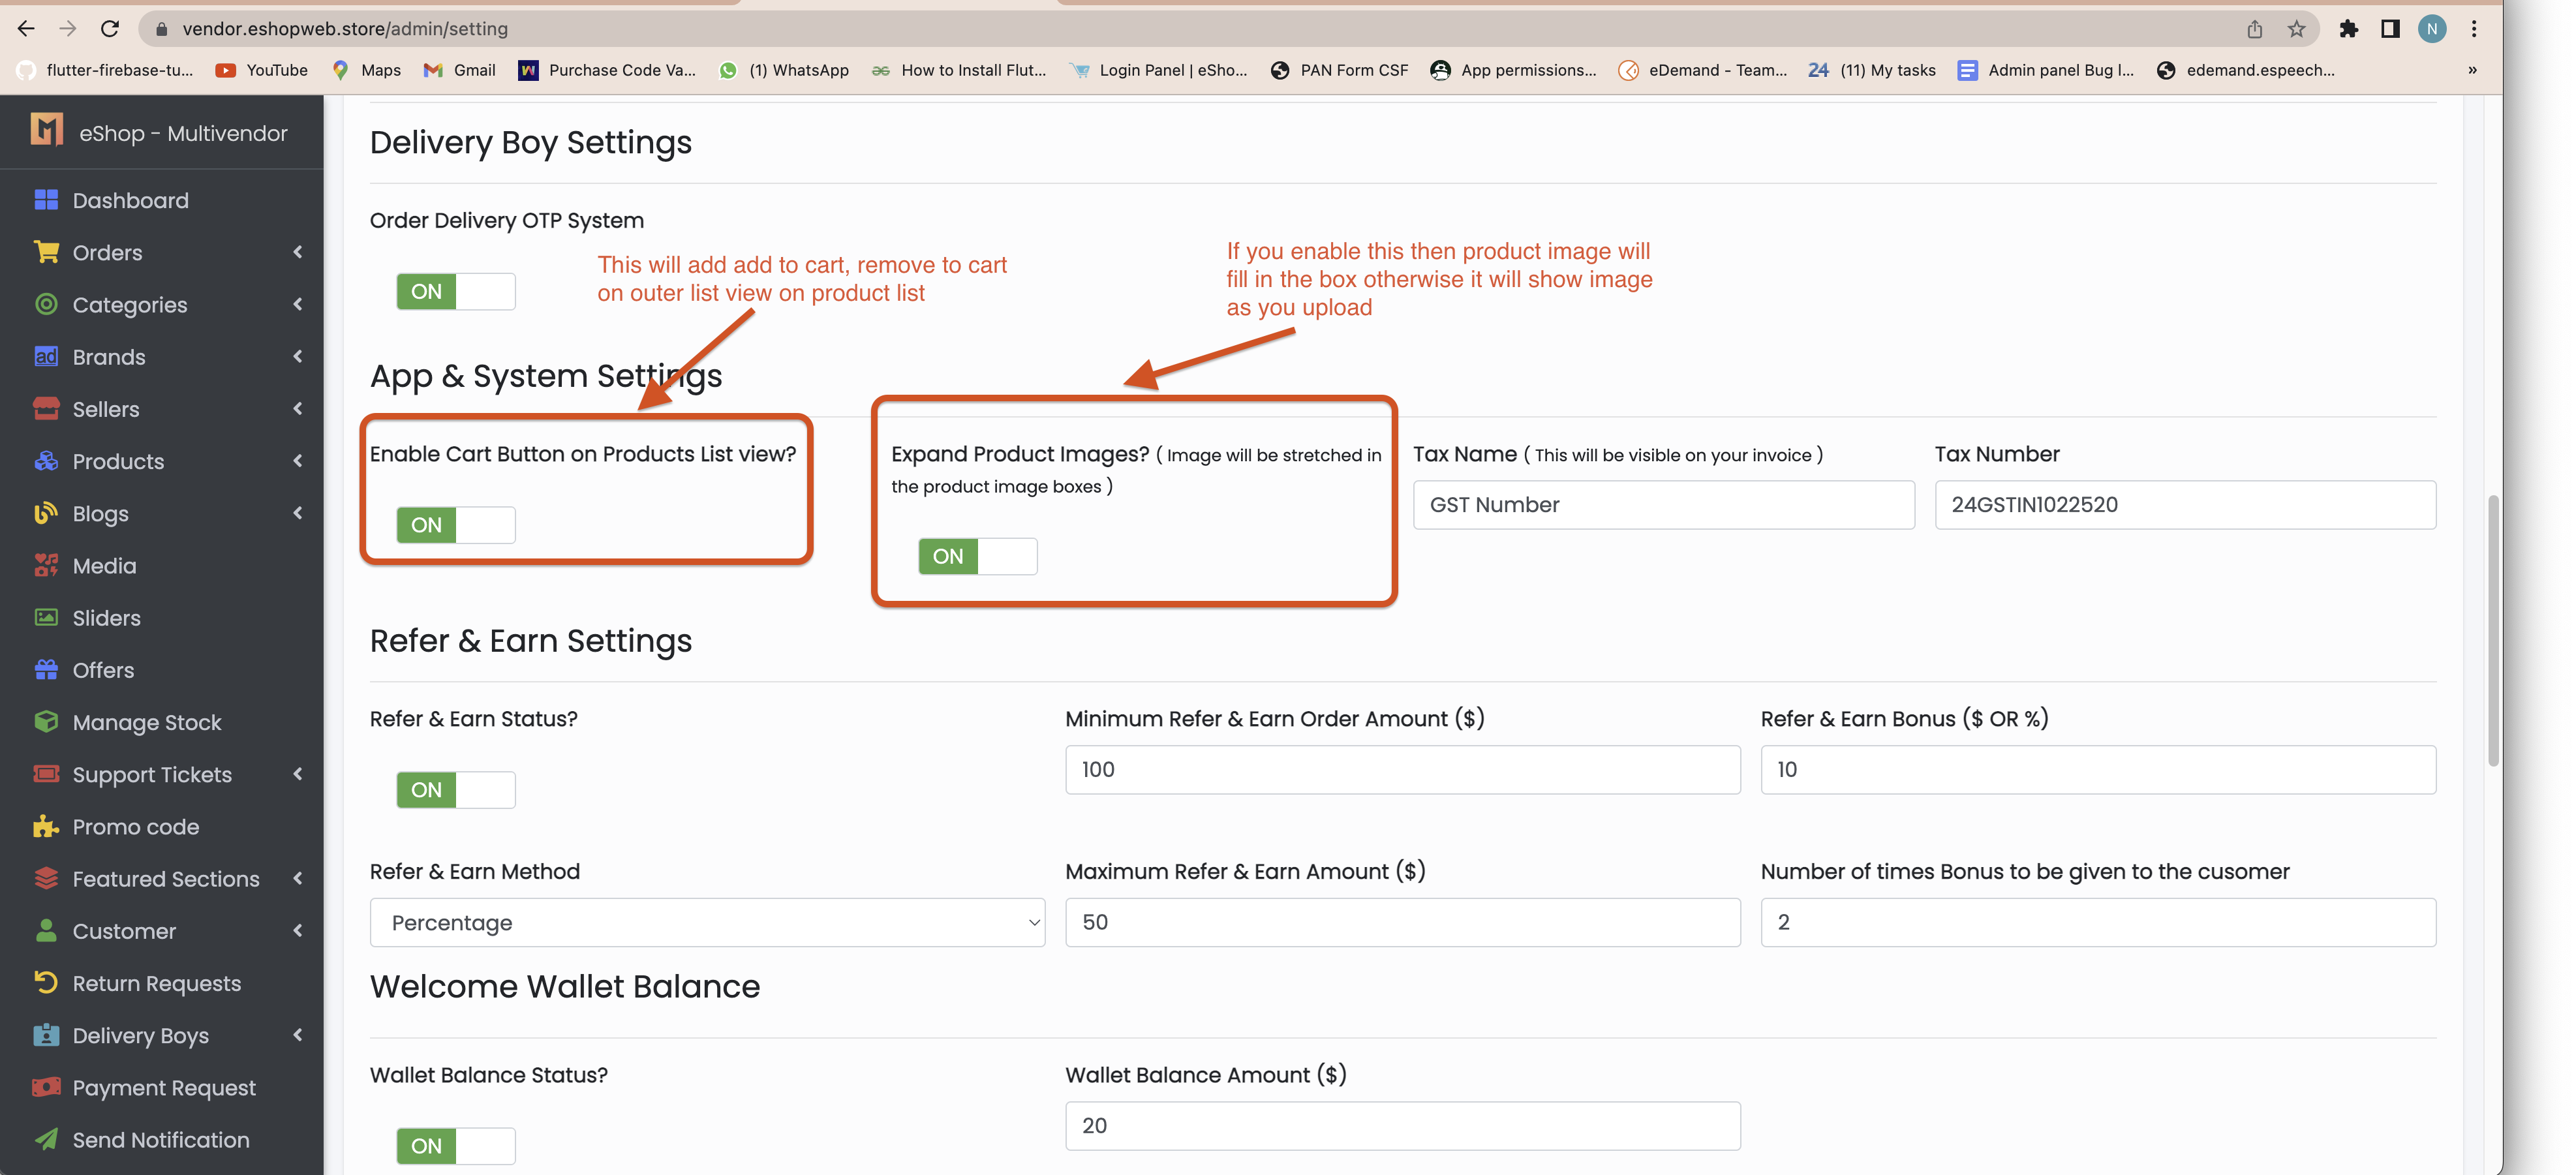
How to Fit xy(fill) product image in box
- There is two possibility either you can show image as you upload in panel without stretch in app.or you can fill product image in box with stretch
- it depend on you, if you upload image with background then it is preferrable to fill image
- and if you upload project with all same background then you can set fill image false
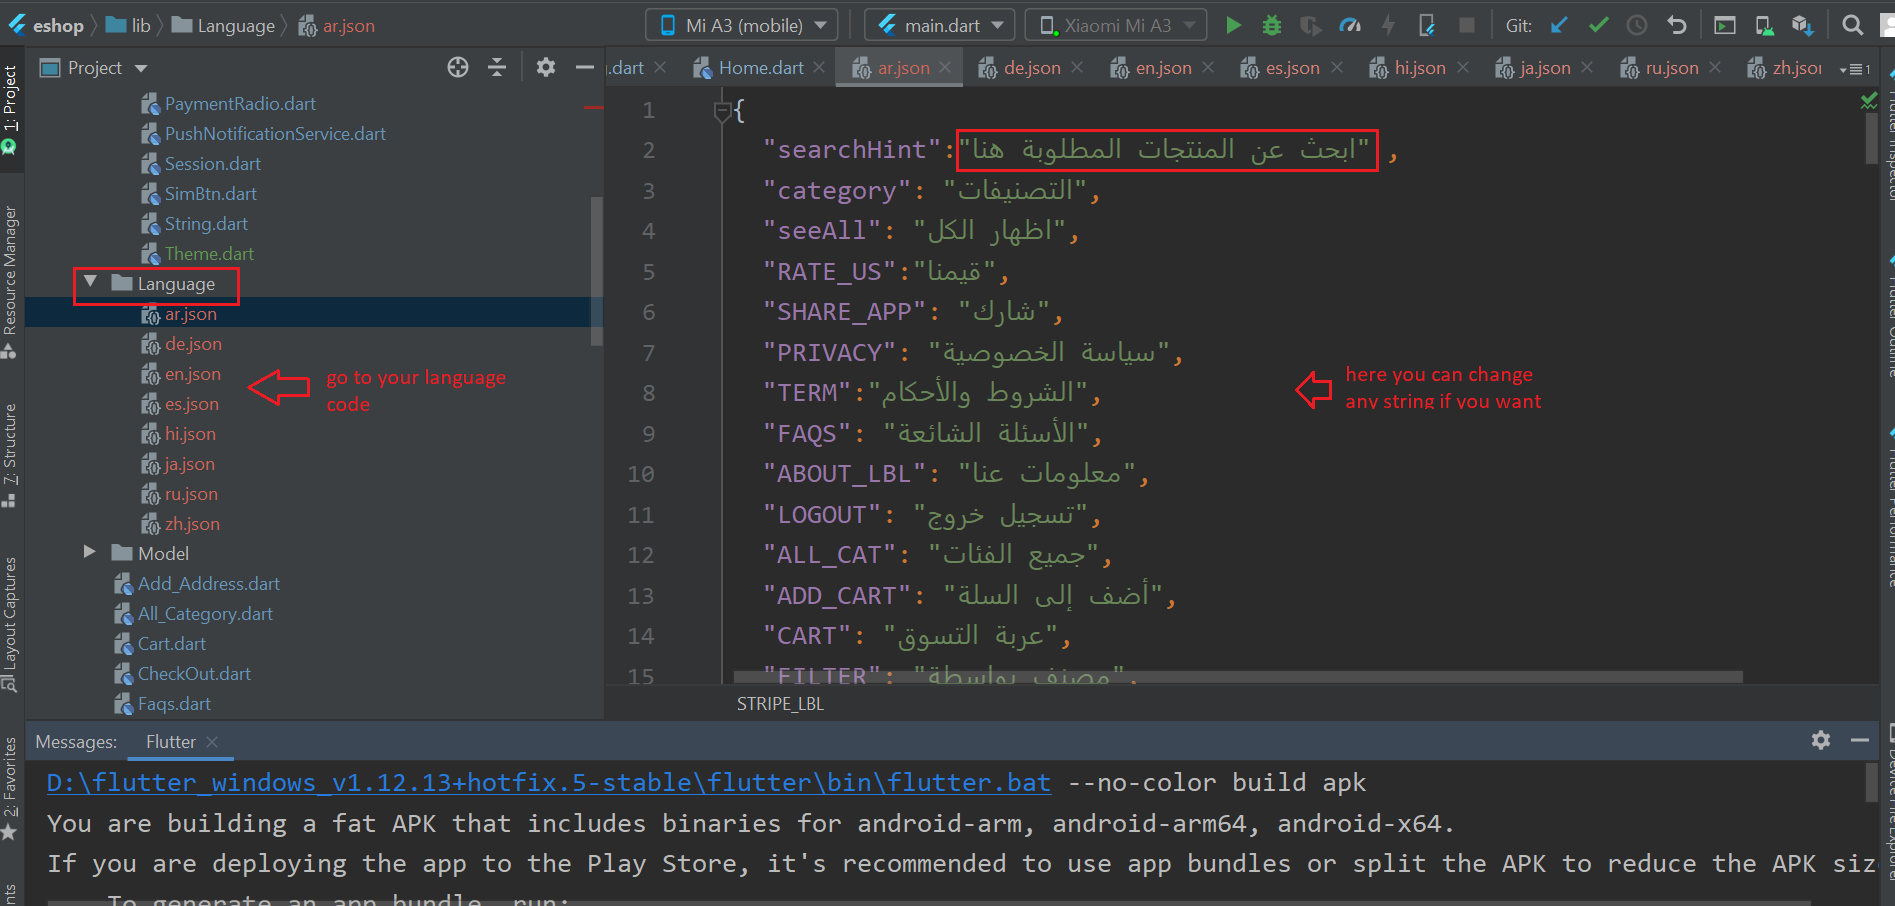
How to Change language String value
(Check Video)
- Go to assets > languages > go to your language code.here you can change any string as you want
How to Add/Remove language
(Check Video)
- To Add New Languge
- If you want to Add new language then copy one json file from language folder and add it to languge folder then rename it to language code of your new language
- now open that json file and change value of string to your language string. remember here you need to add all string in file if any one string is missing in any file then when you change that language then it will give you error. so add all string in all json file.
- Go to lib > Helper > Constant.dart file. Add your language name, language code and language image in below list
- To remove language
- Remove language from below list.
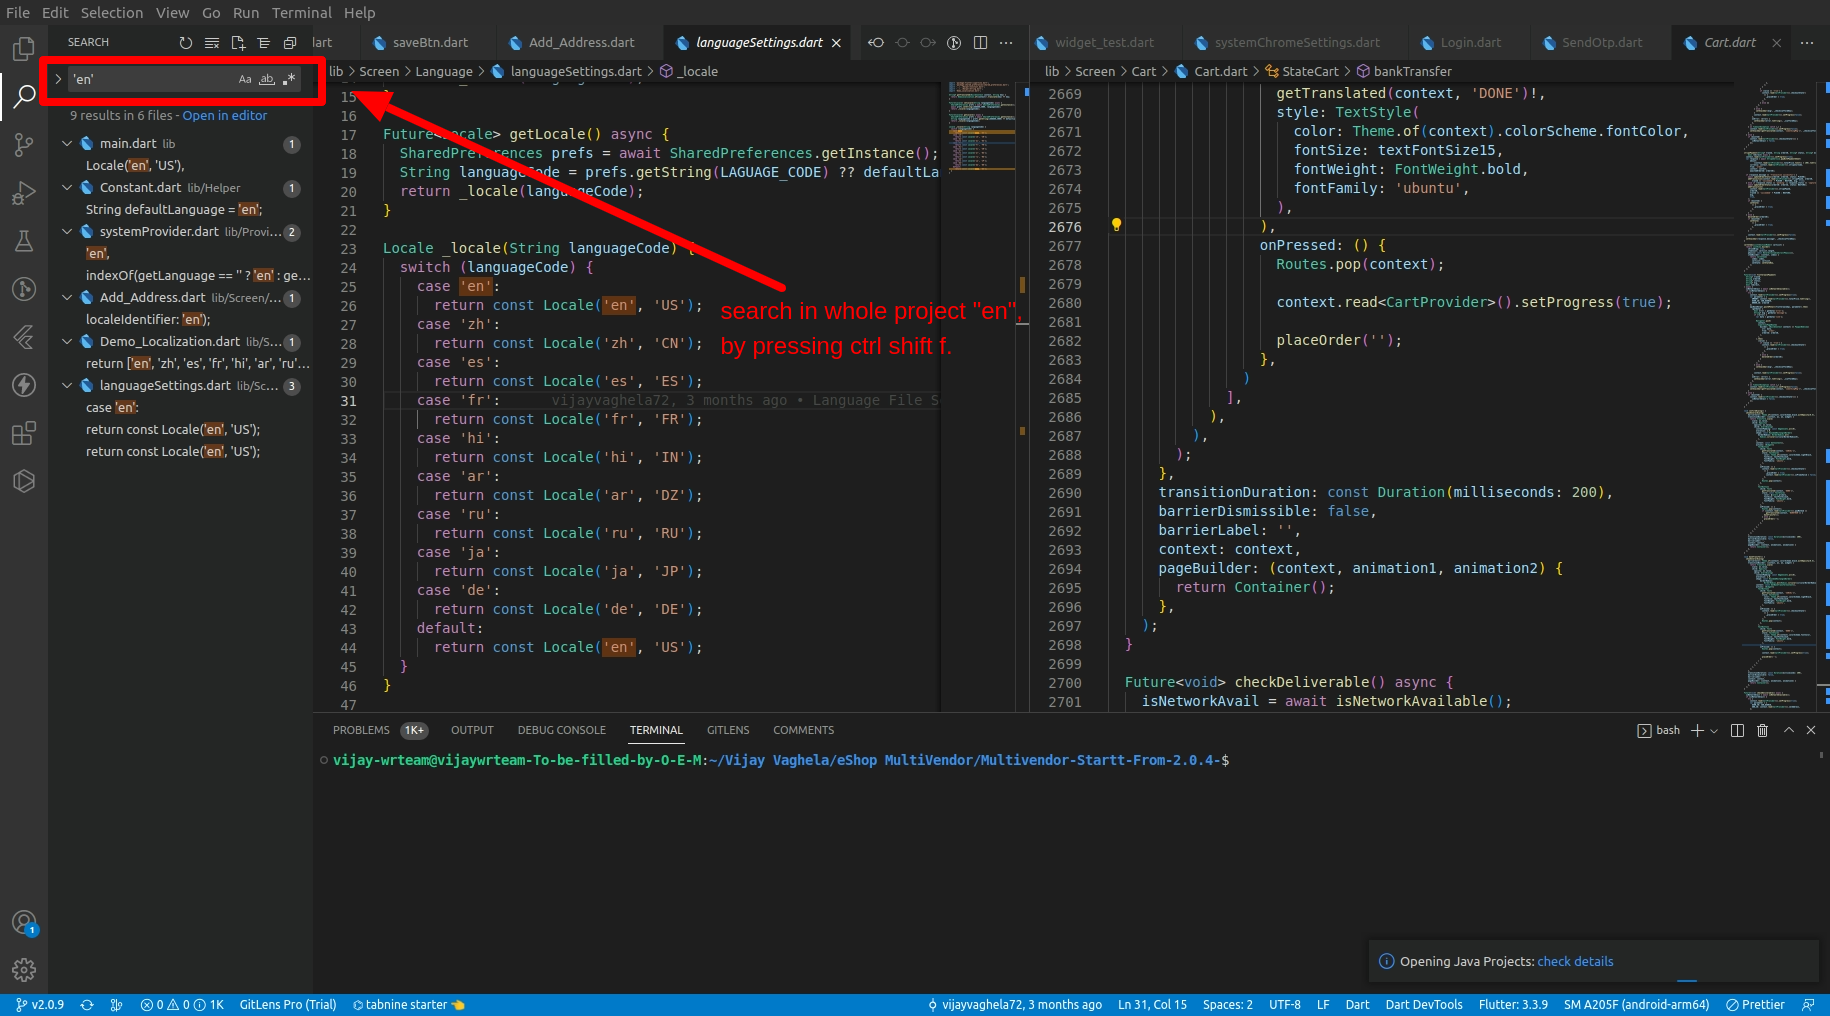
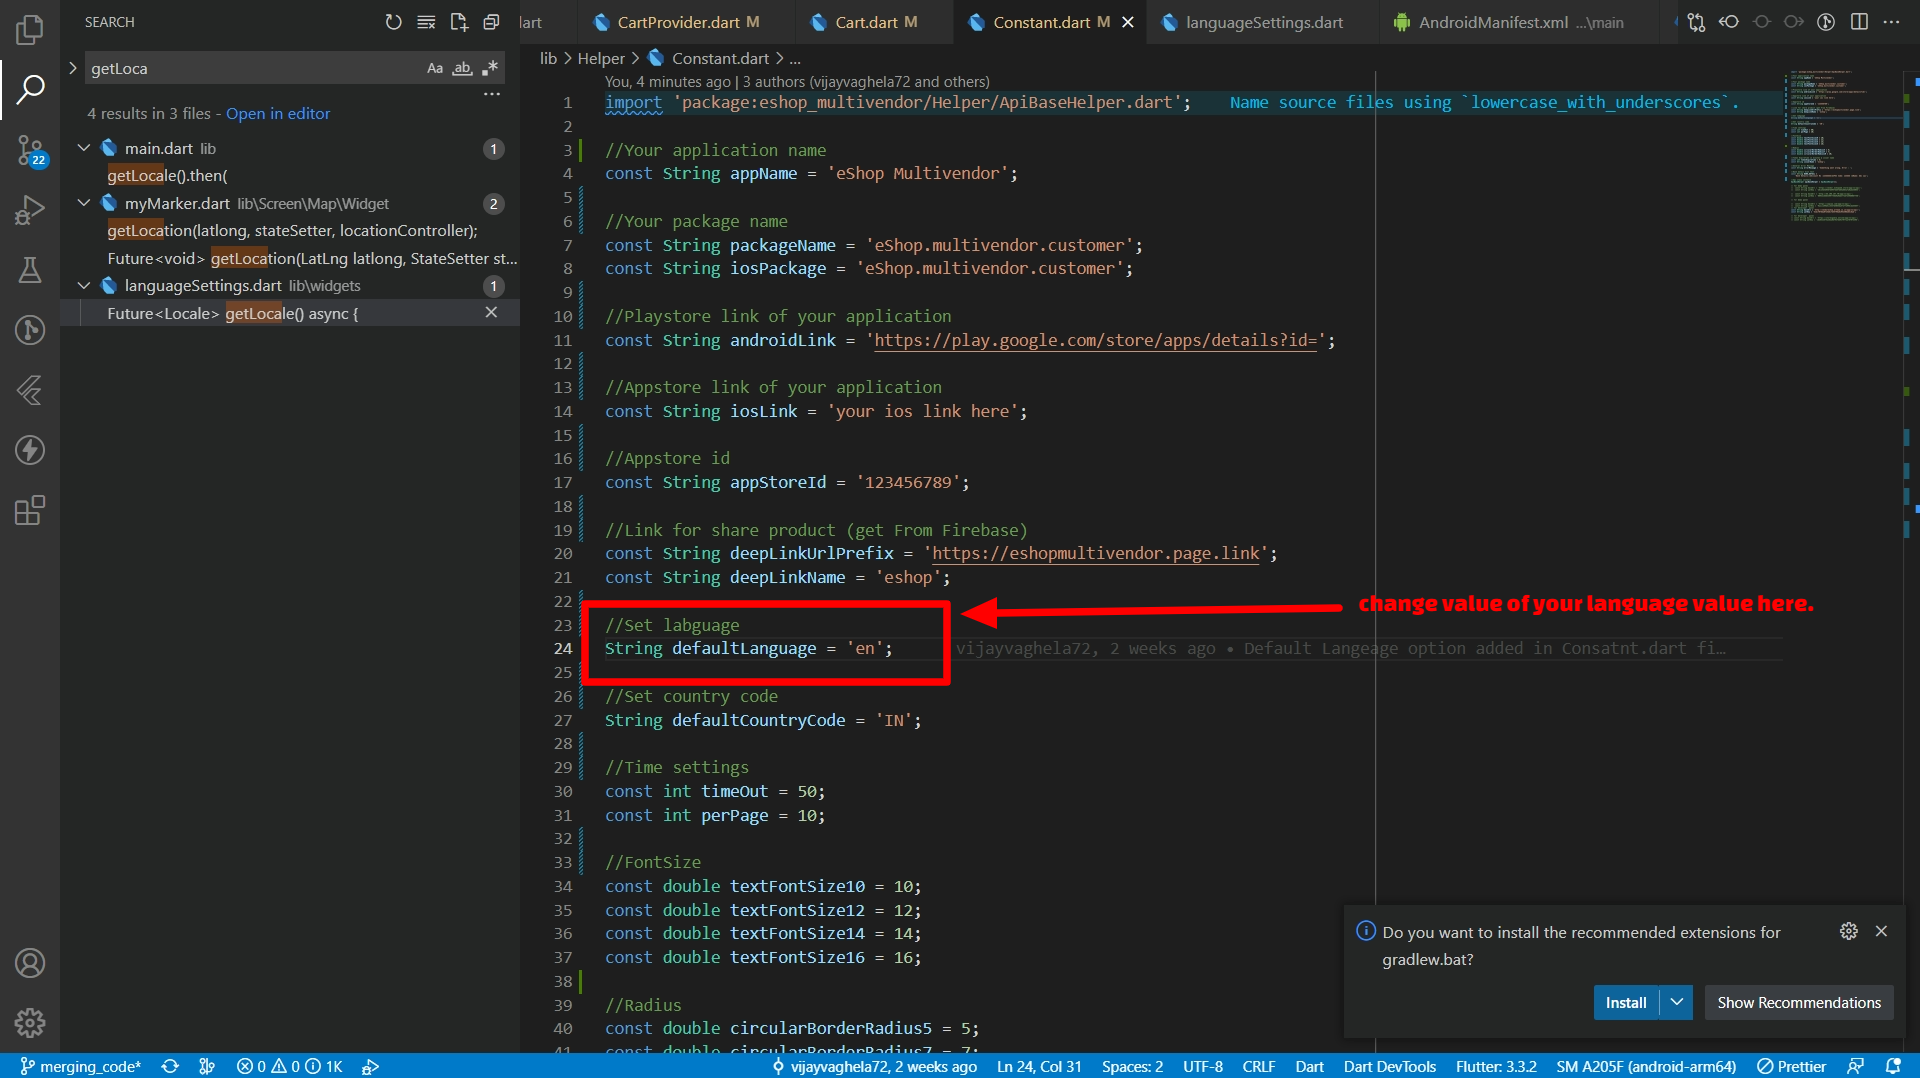
How to change default language of app
- Go to lib > appConstants.dart inside that defaultLanguageCode and defaultLanguageName variable is availble. here you have to change default language code "en" and language name "English" to your language code and name.
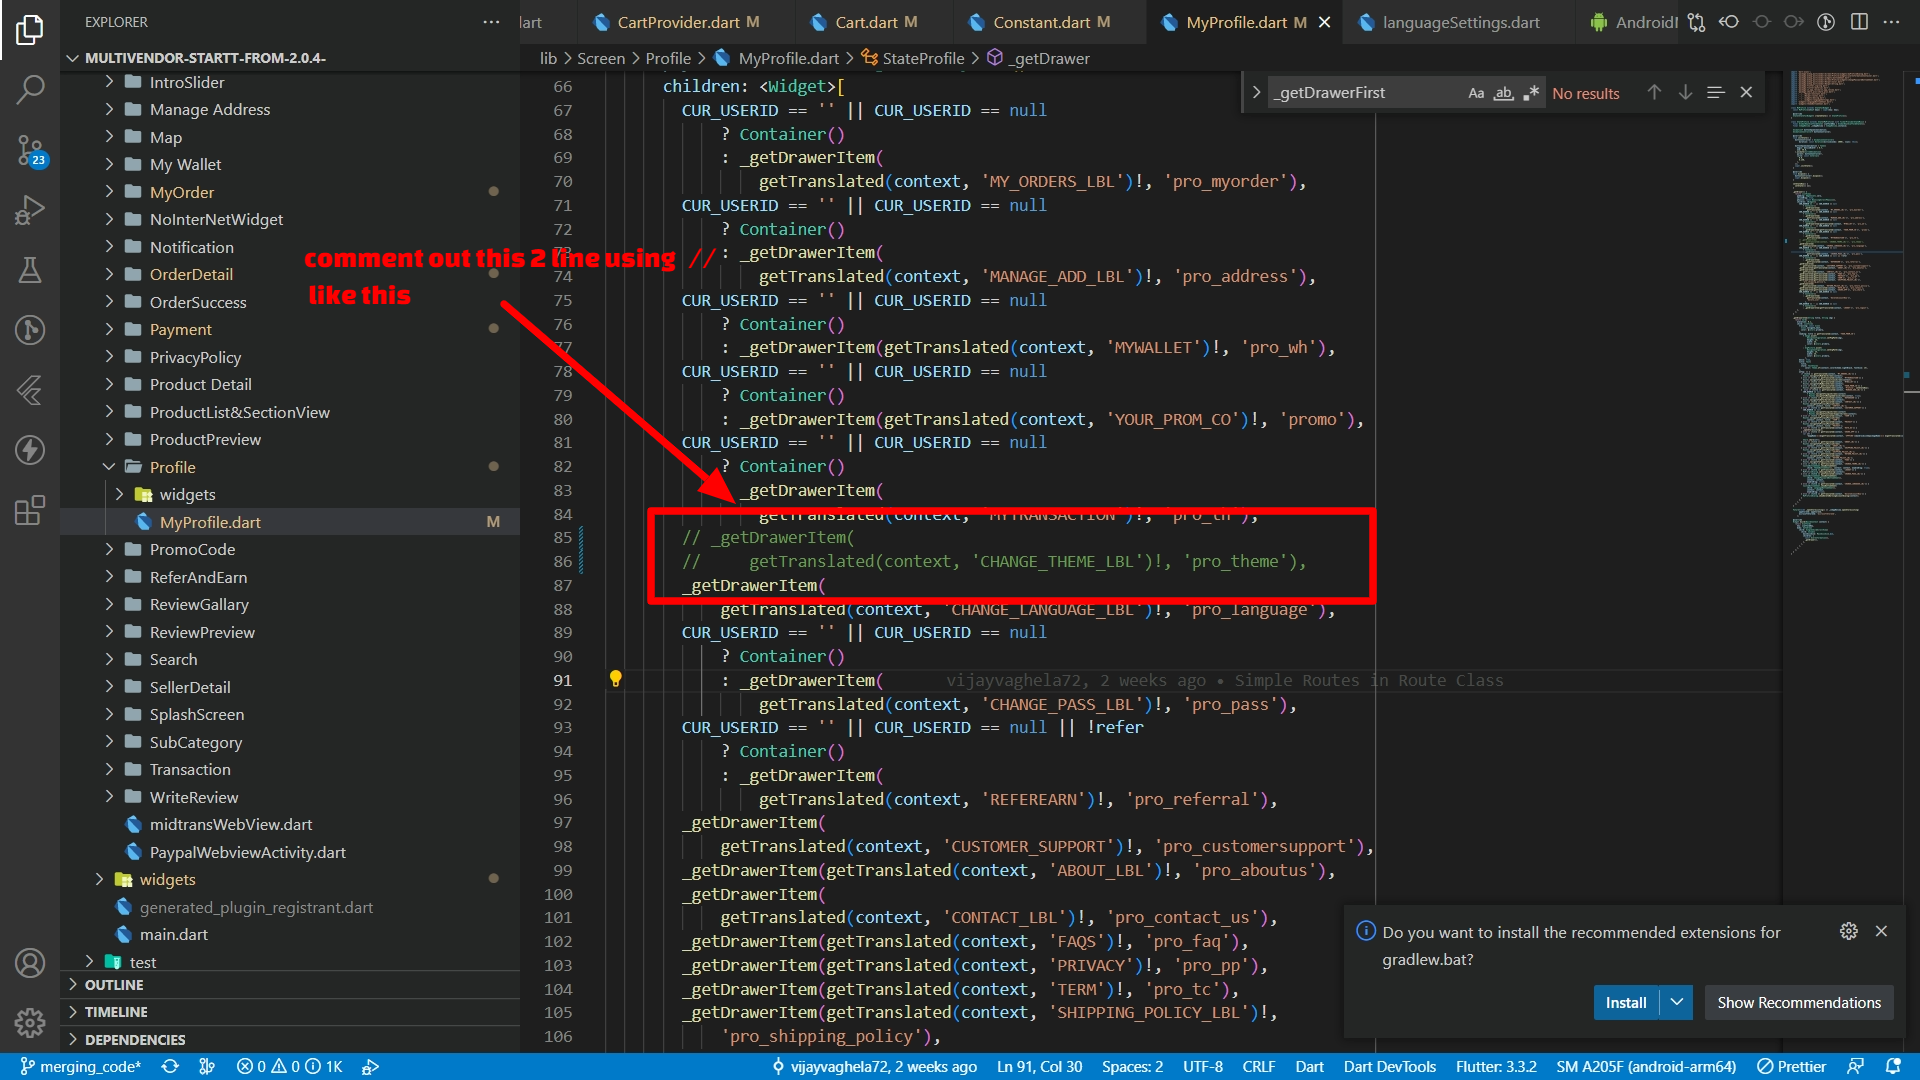
How to Remove Dark Theme
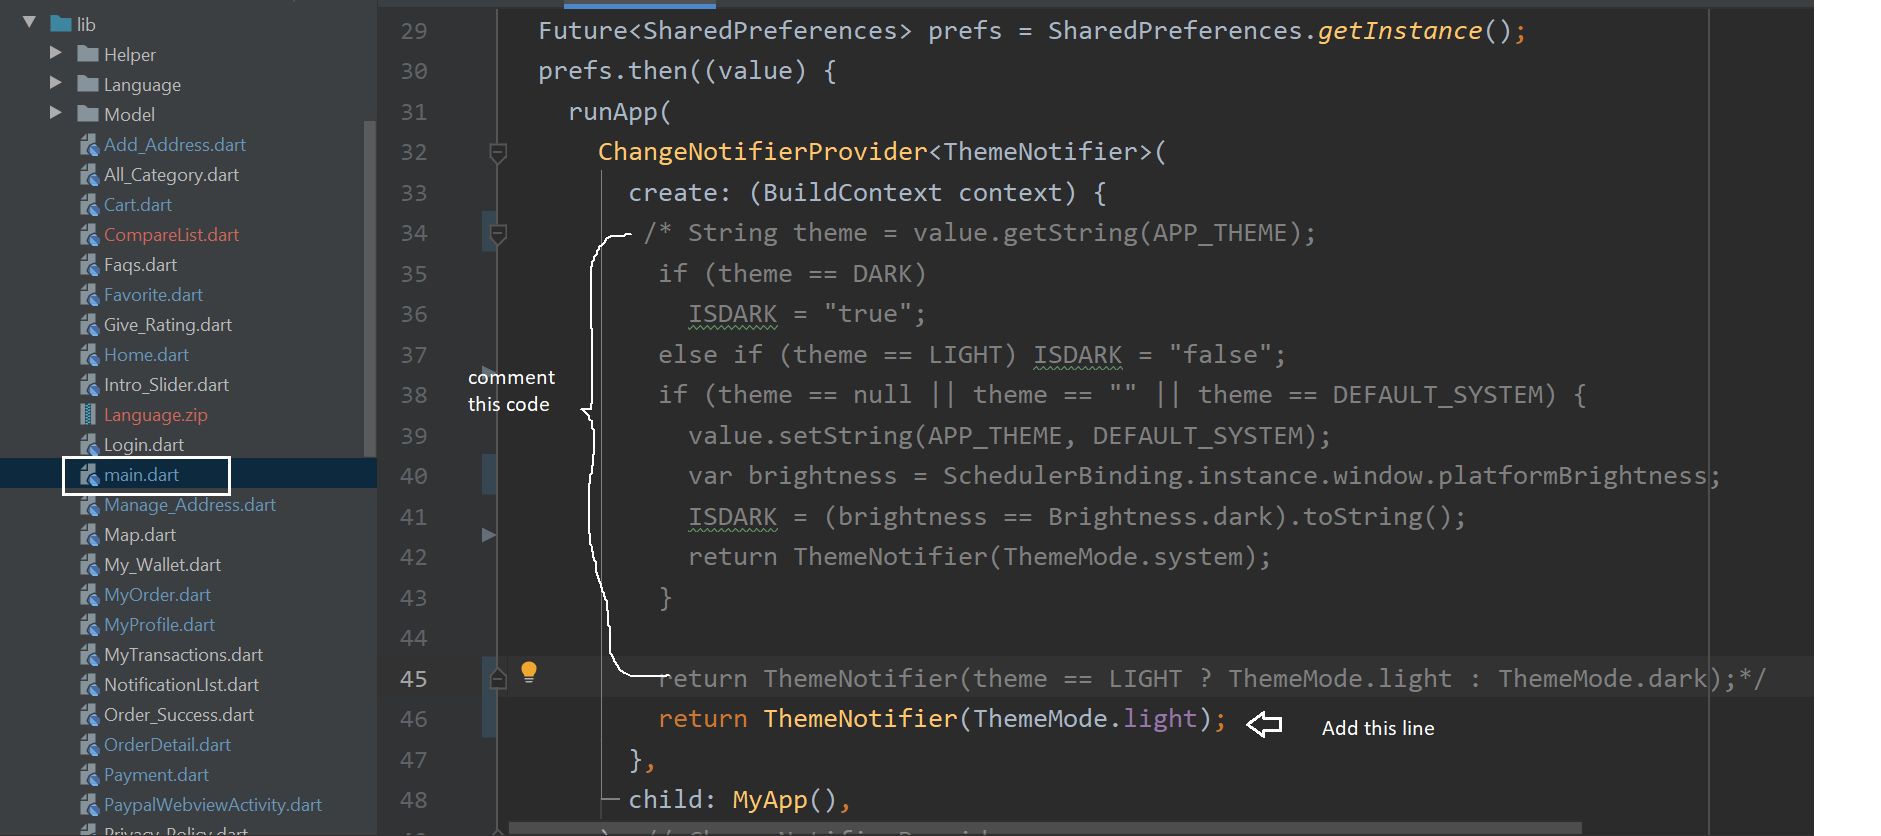
- Go to lib > MyProfile.dart inside that go to _getDrawer() method. here you have to comment change theme by doing double slash before change theme tile as shown in below image
- now go to main.dart here in void main() method above runapp you have to add one line and comment above code as shown in below image
How to Change App font
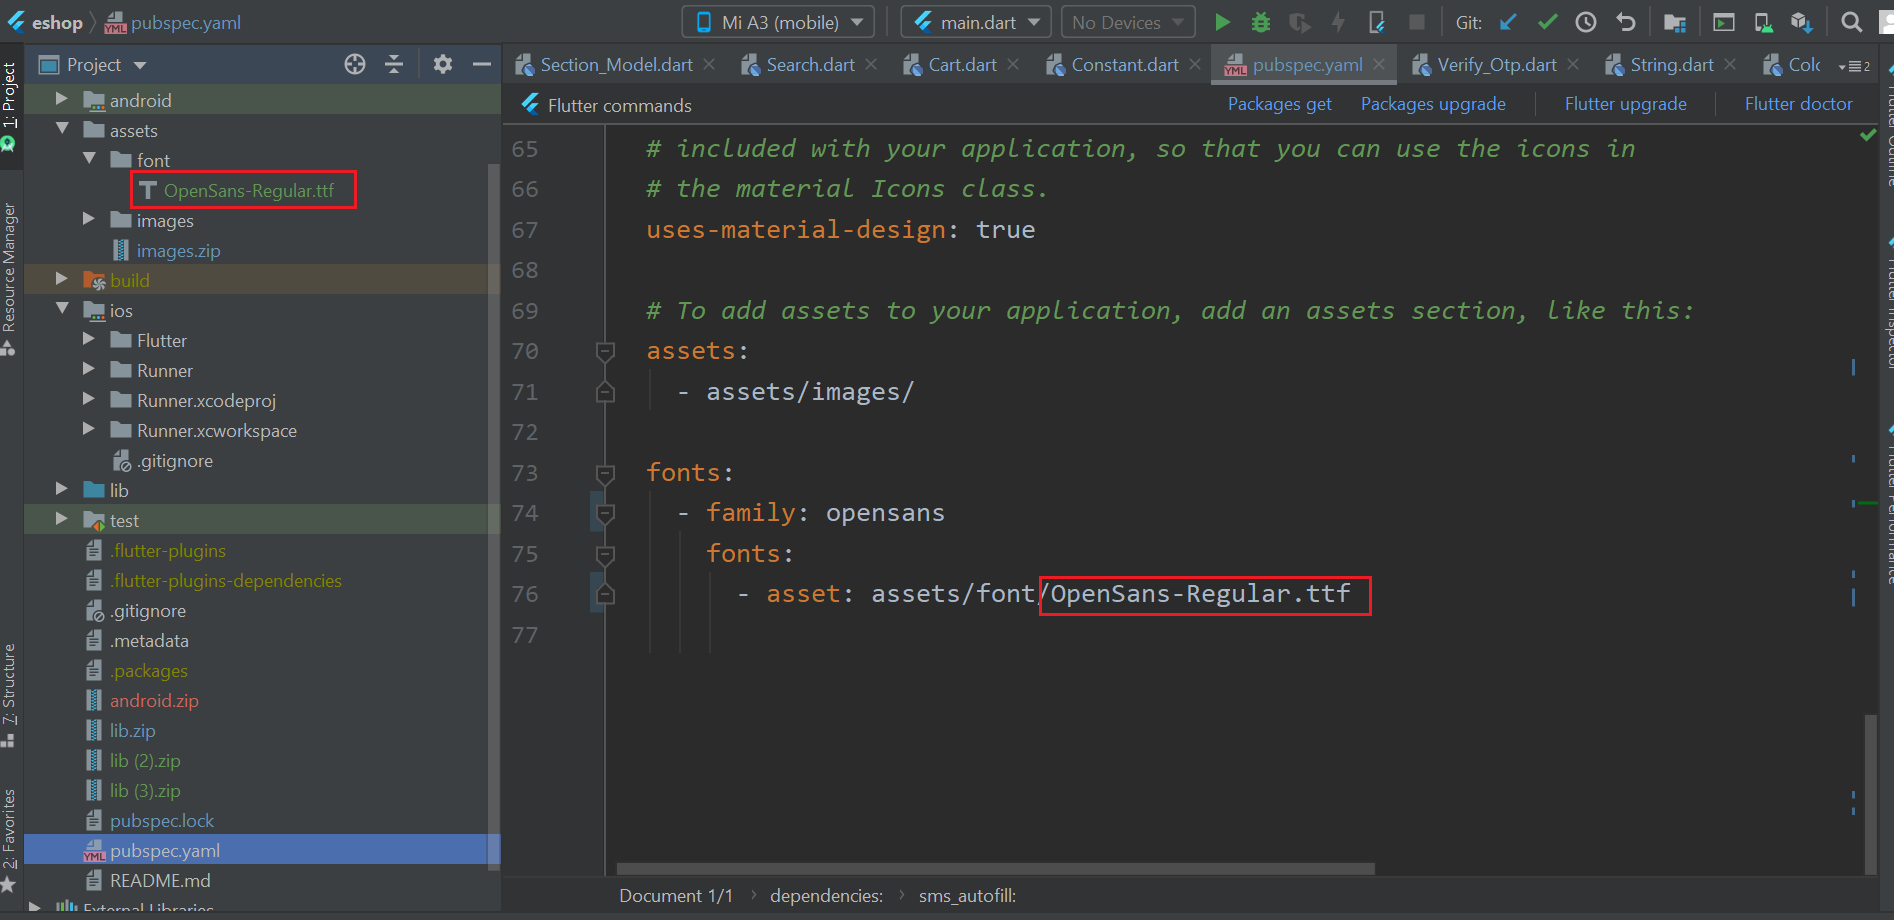
- Go to Assets > font folder .here you have to copy your font.now go to pubspec.yaml in font section change your font name as shown in below image.
How to Change server url
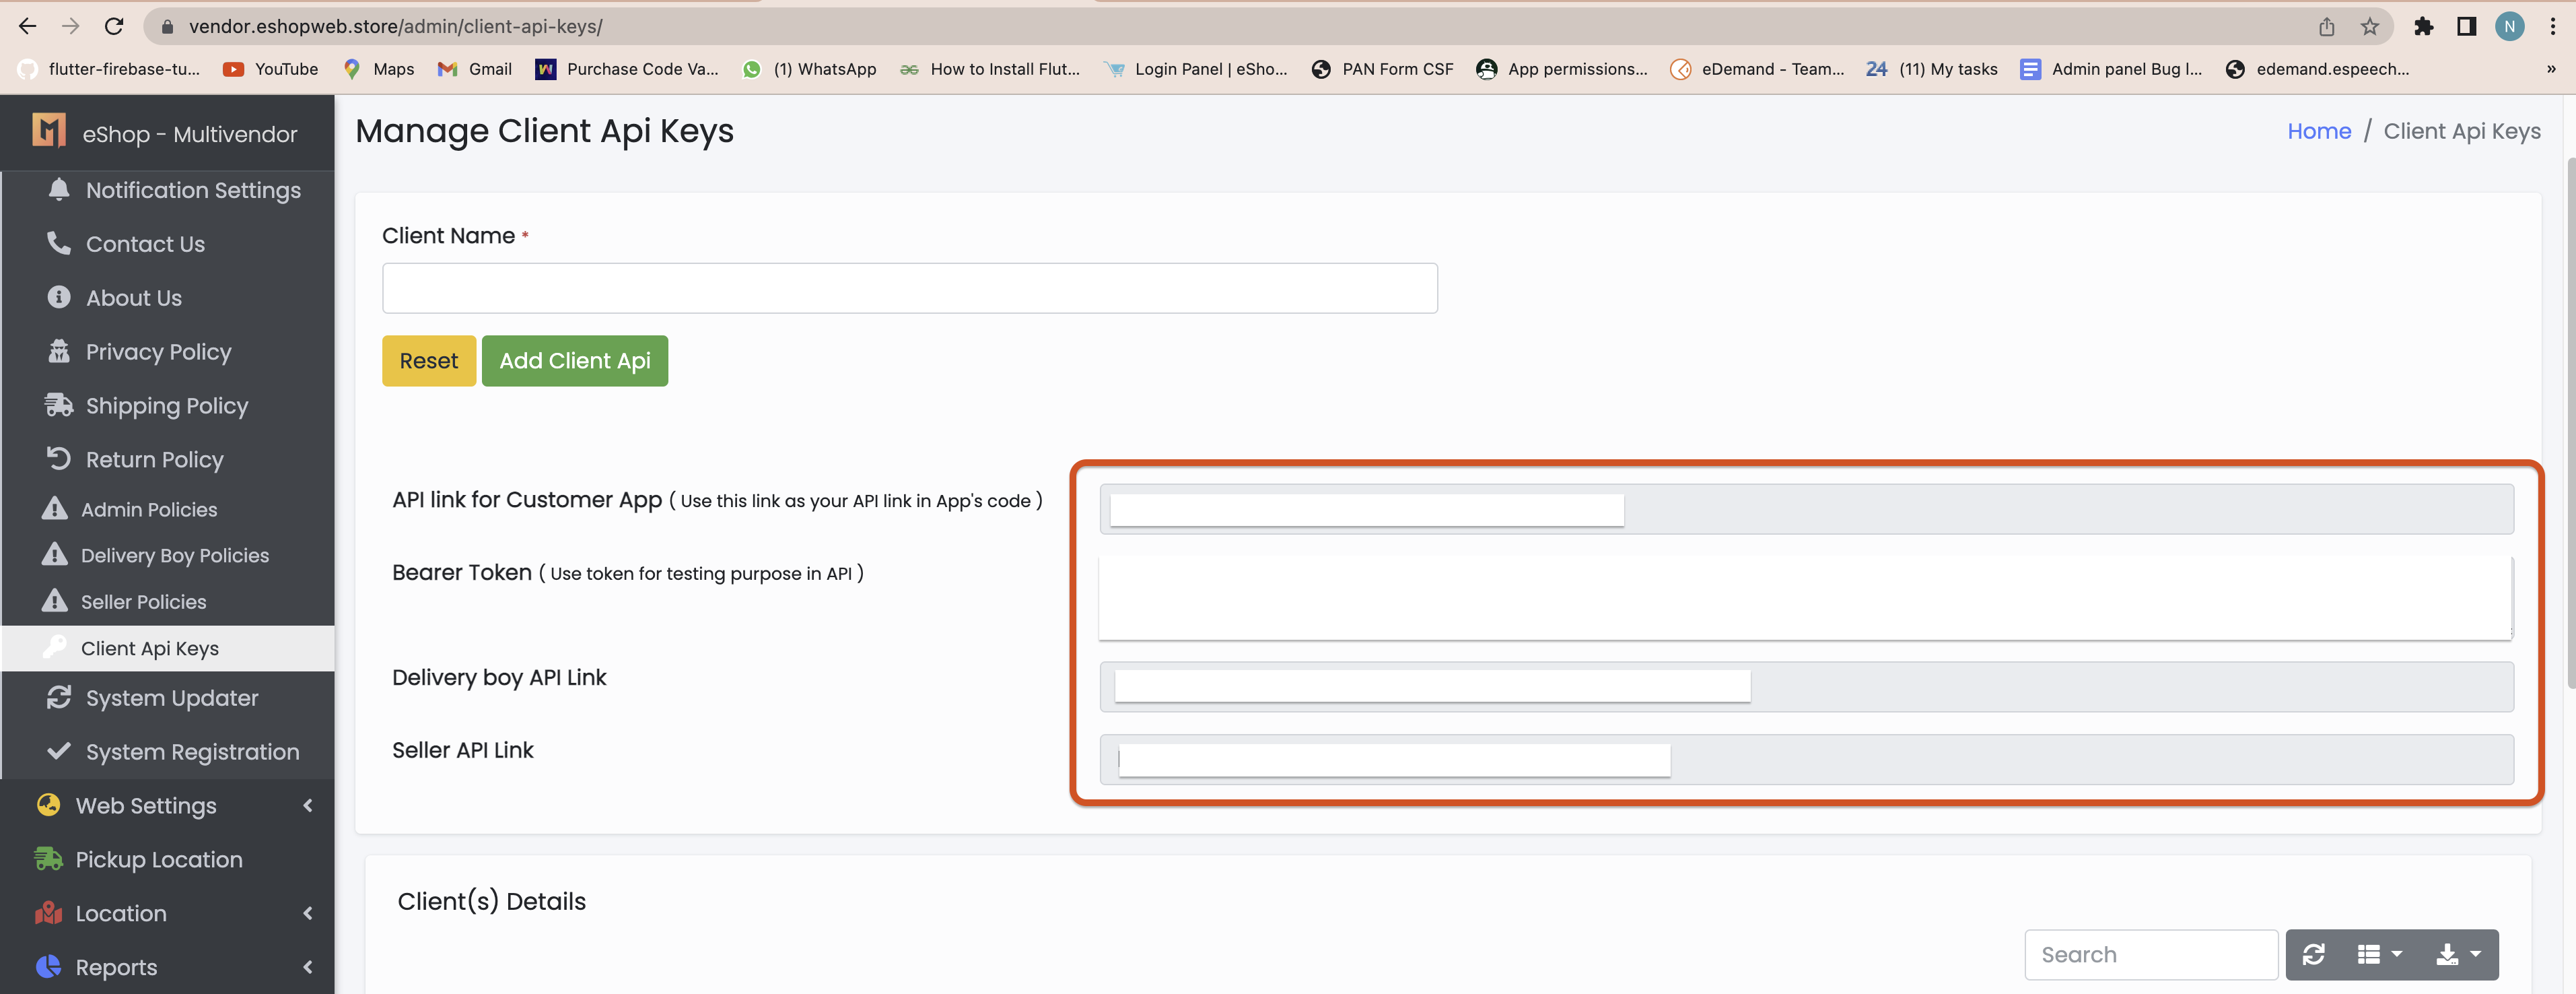
- go to your admin panel in that go to system and inside that client api keys, here you have to copy API link as shown in below fig and paste it in app baseURL.
- Go to lib > appConstants.dart. here you have to change your API server url. don't forget to add slash after api keyword
How to Create firebase project
(Check Video)
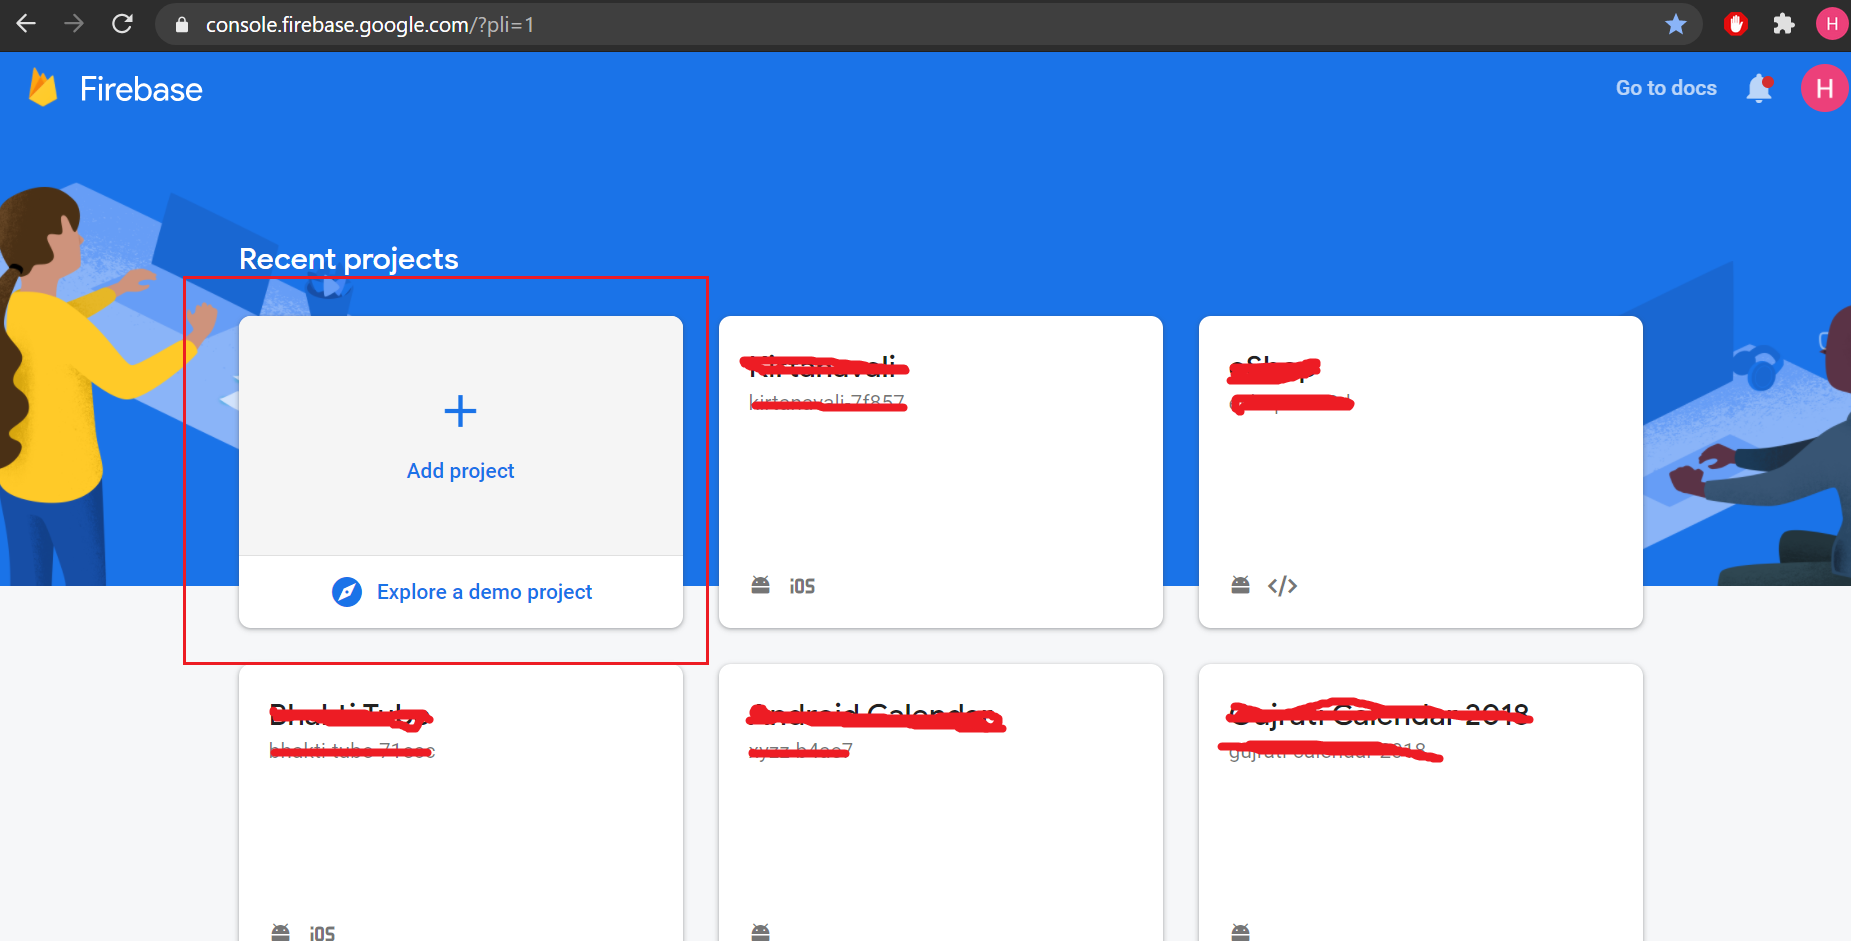
- Go to firebase console.and then click on add project.
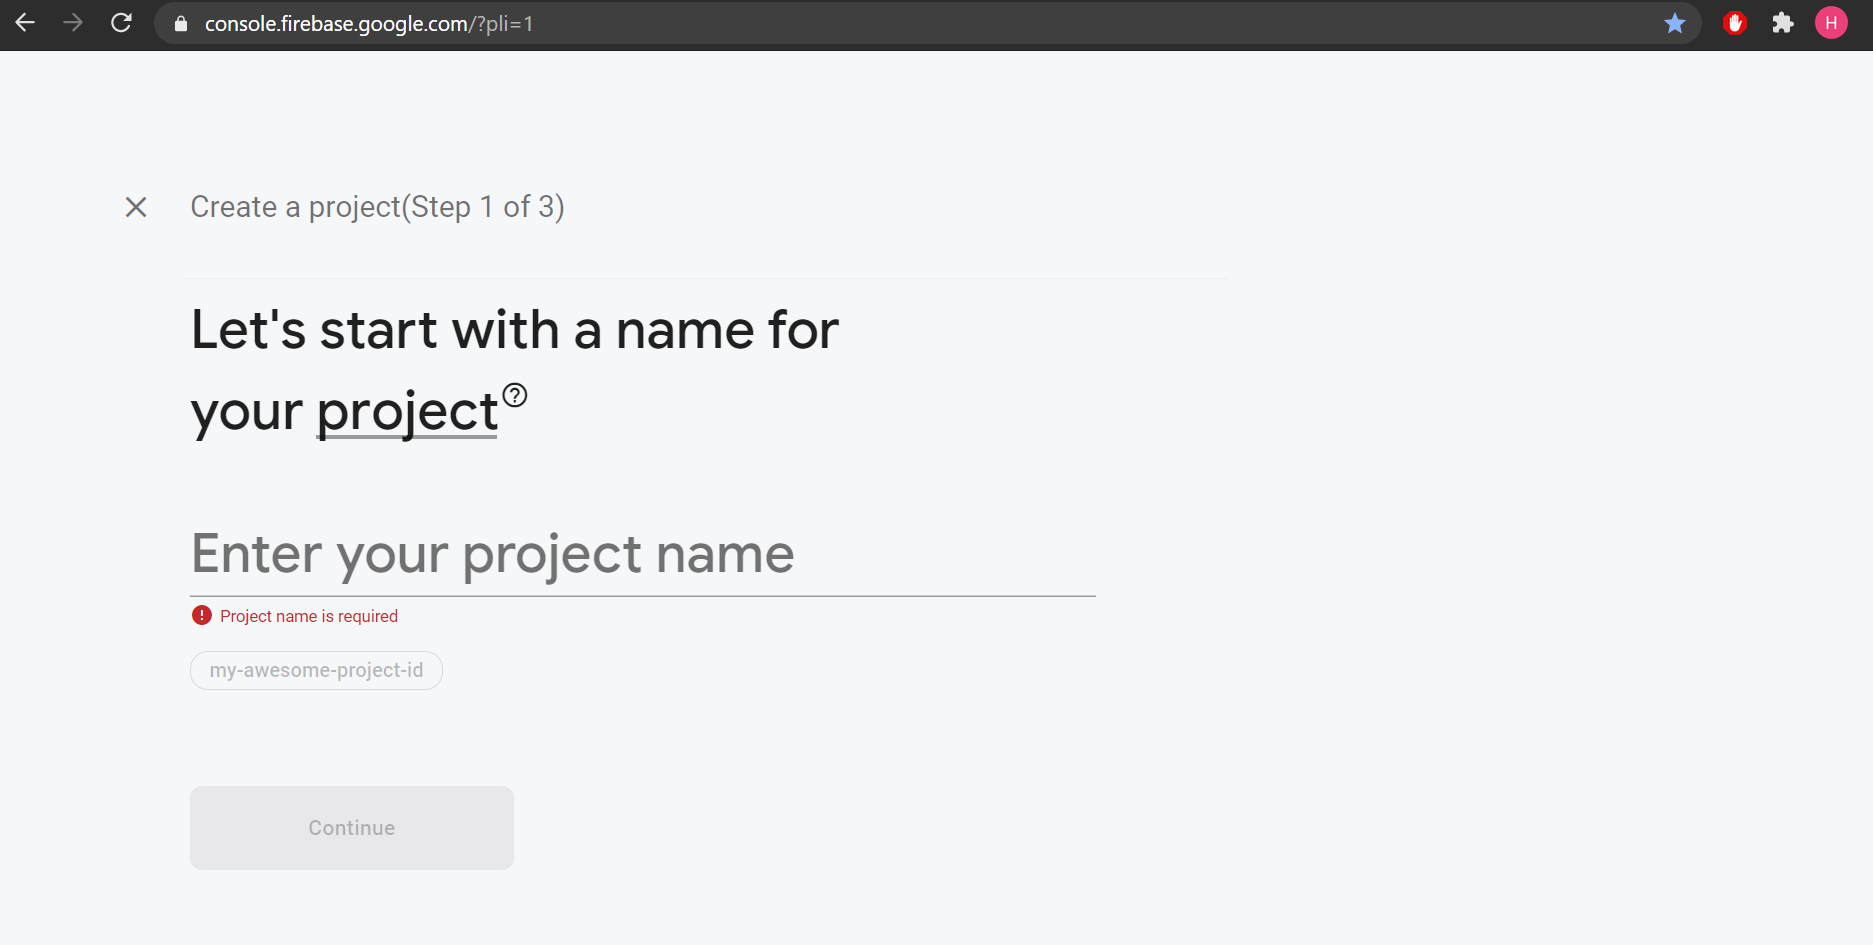
- after that below given step will come. here you have to enter your project details.Enter your project name and then press on continue.then select email and then press continue. >
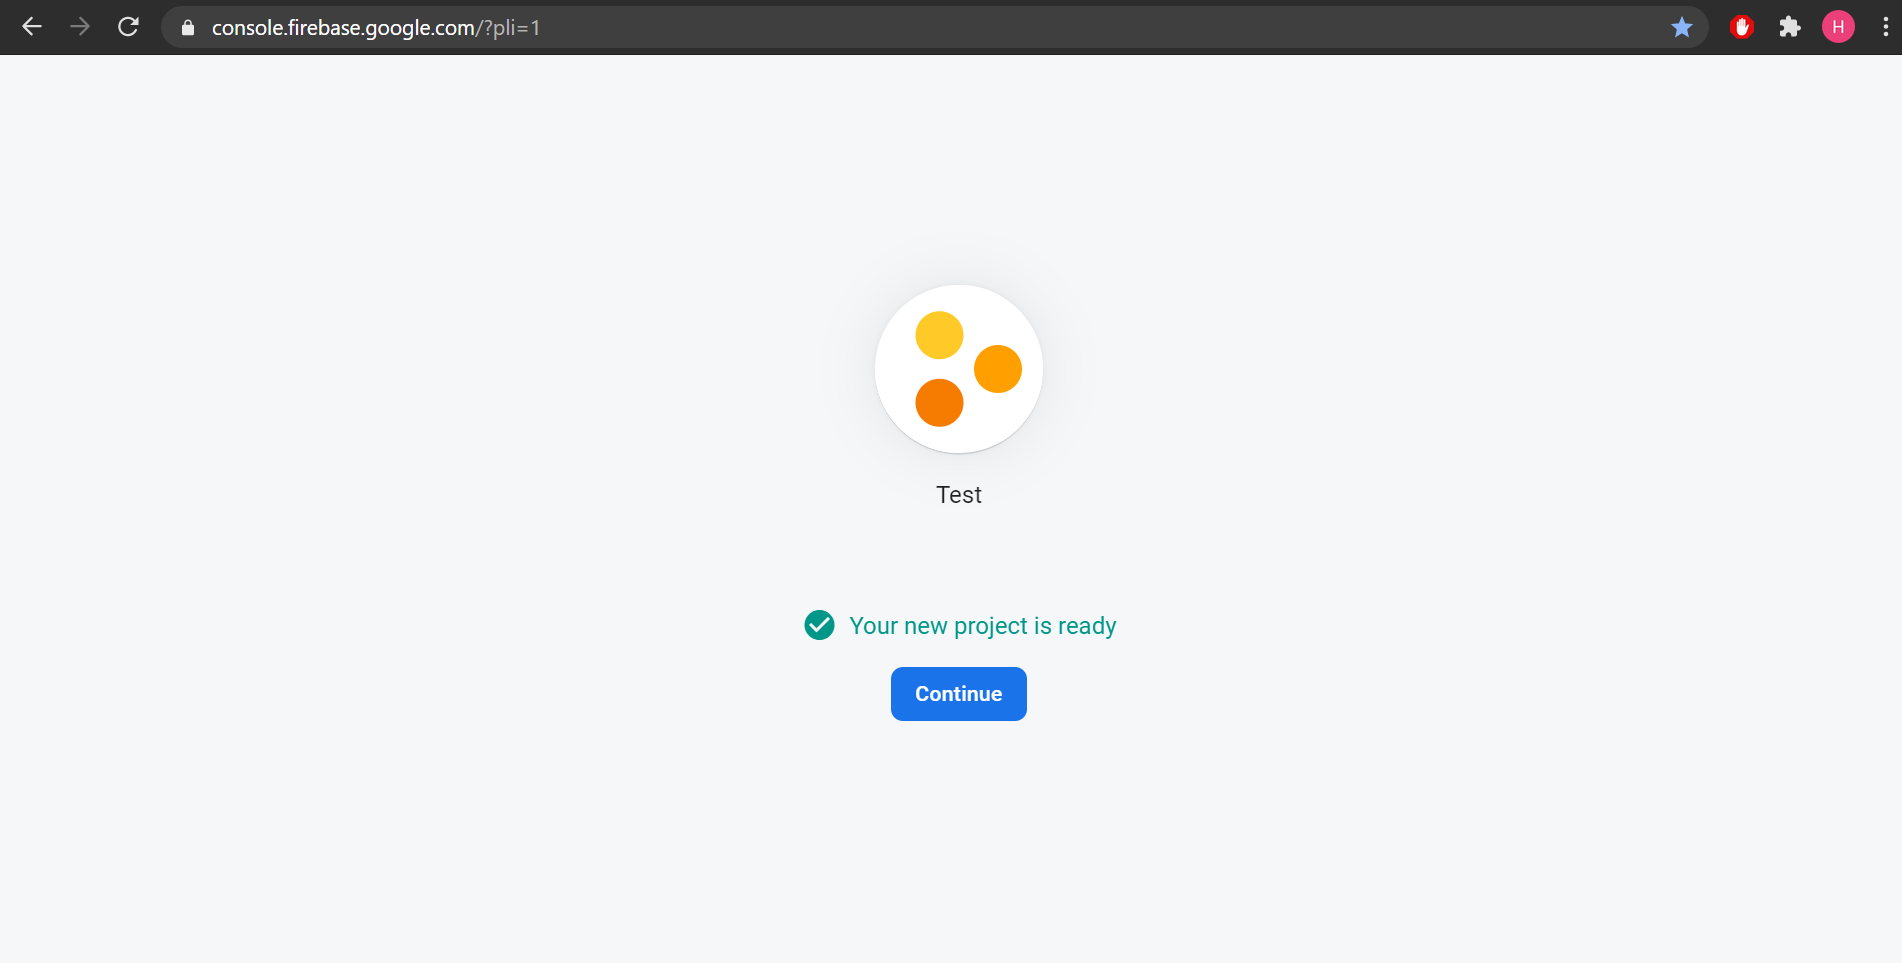
- after that your project is created
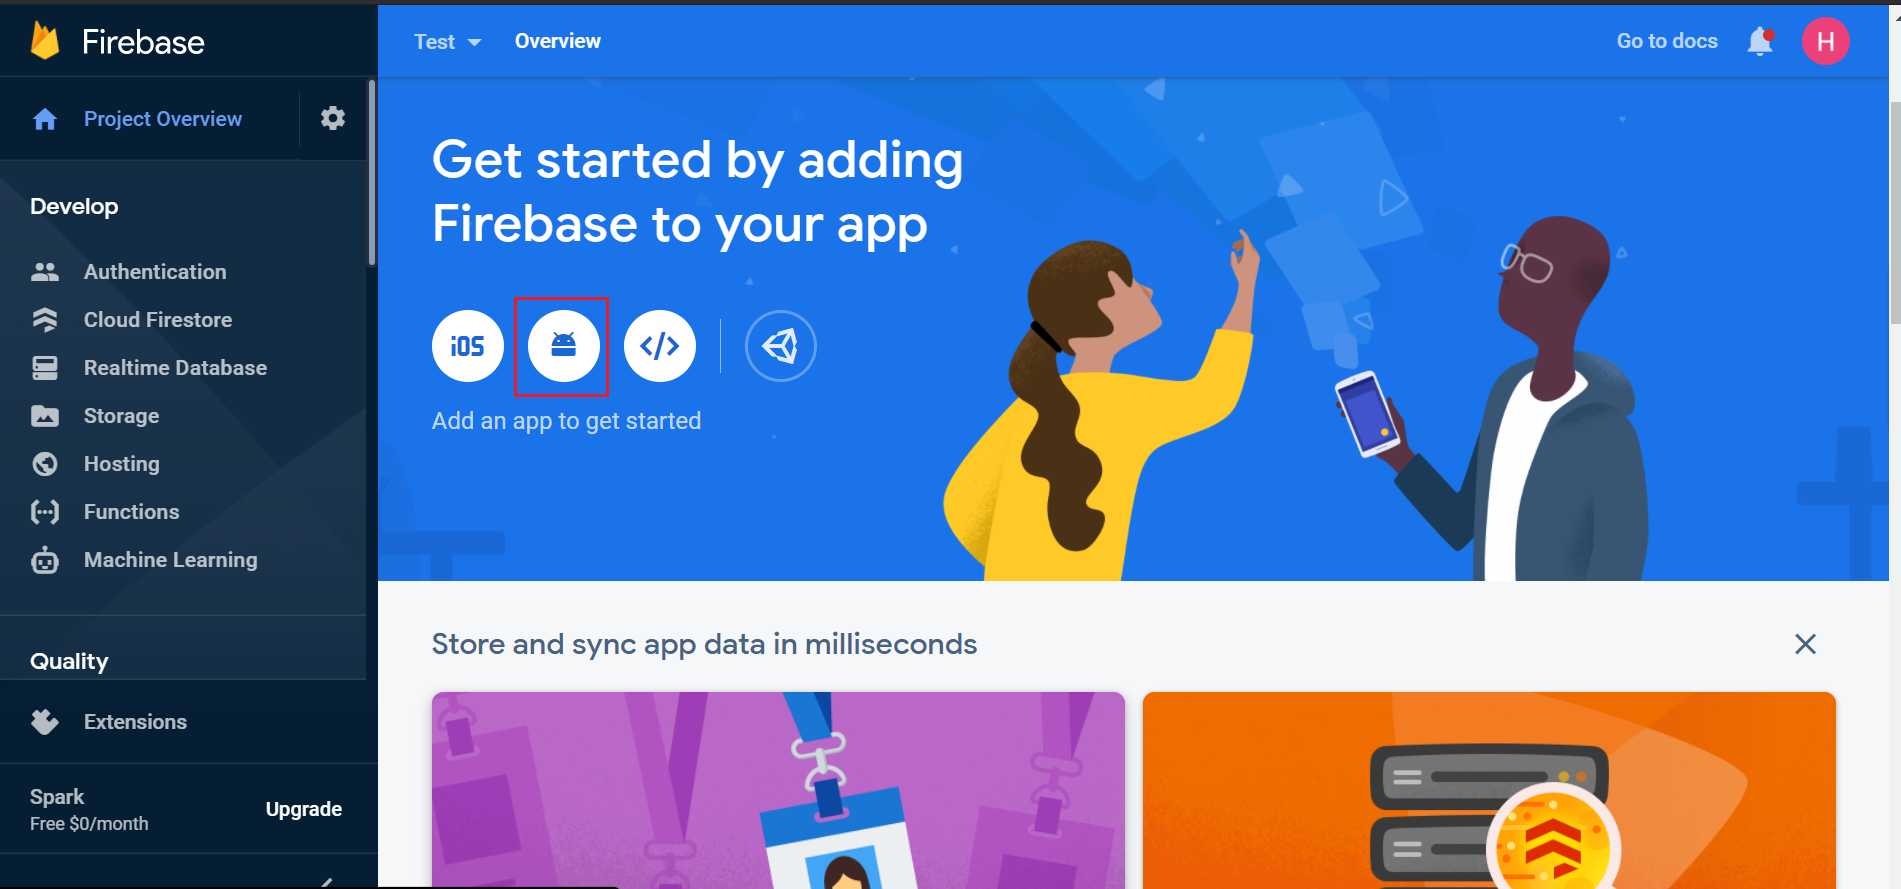
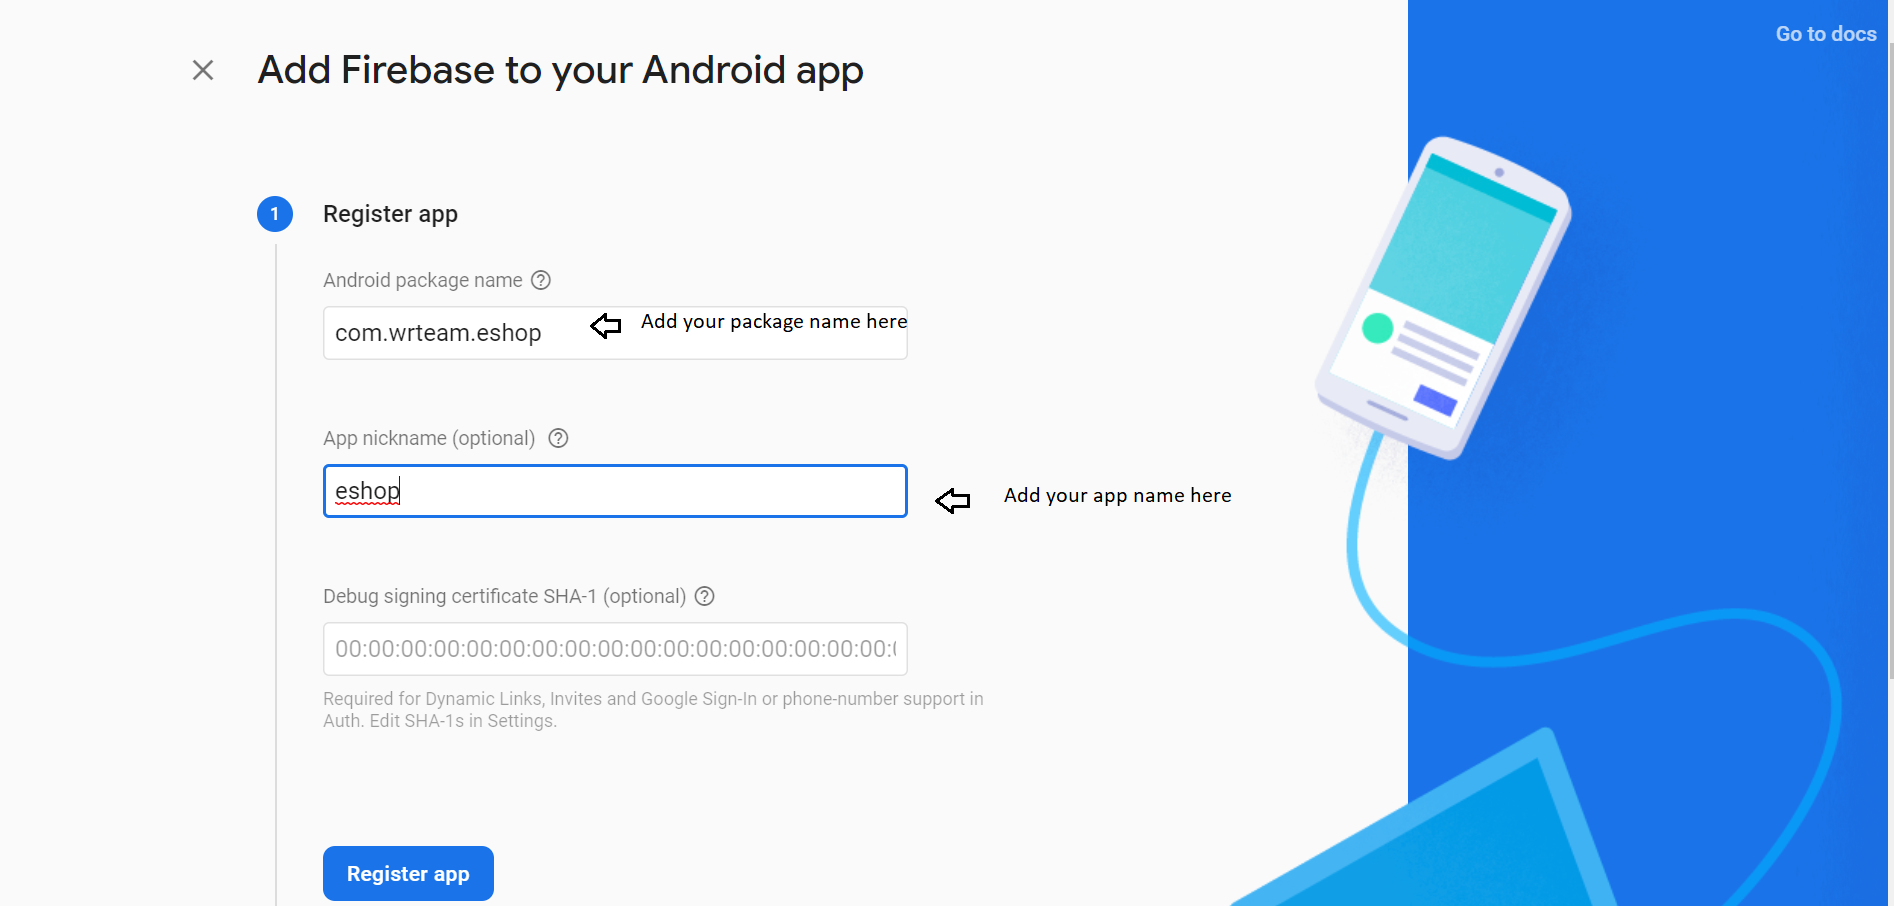
- For android,now first click on android
- after that below given screen will appear, in that you have to enter your packagename and appname.and then click register app.
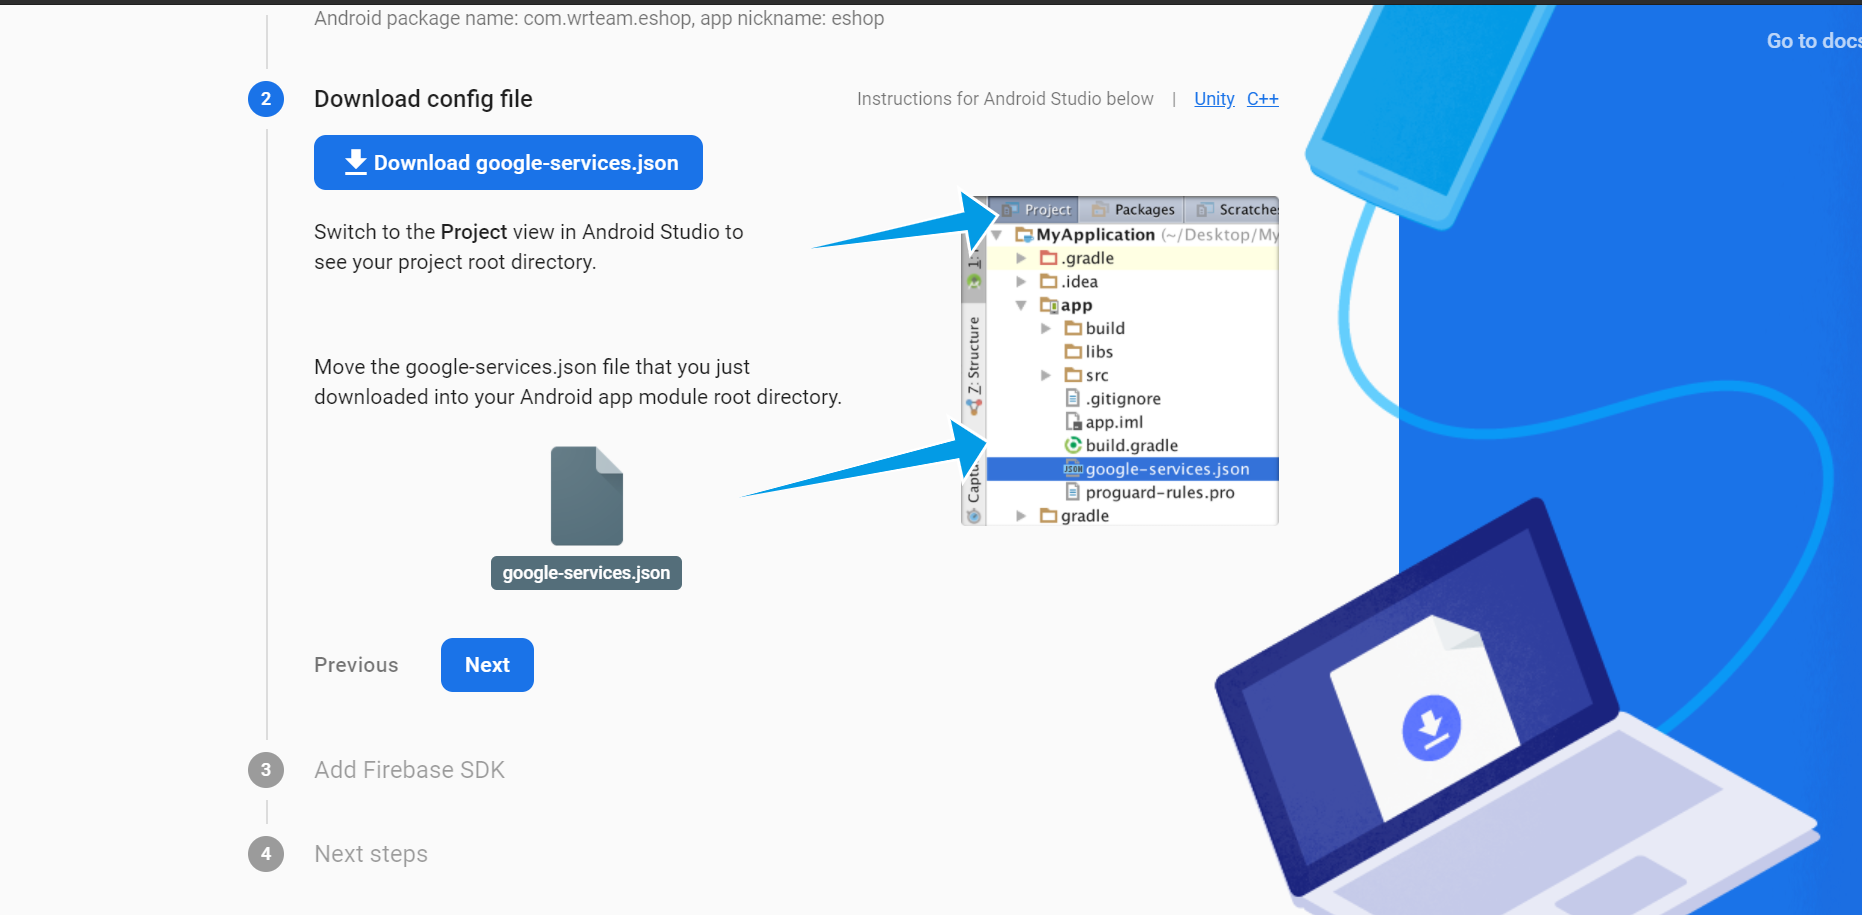
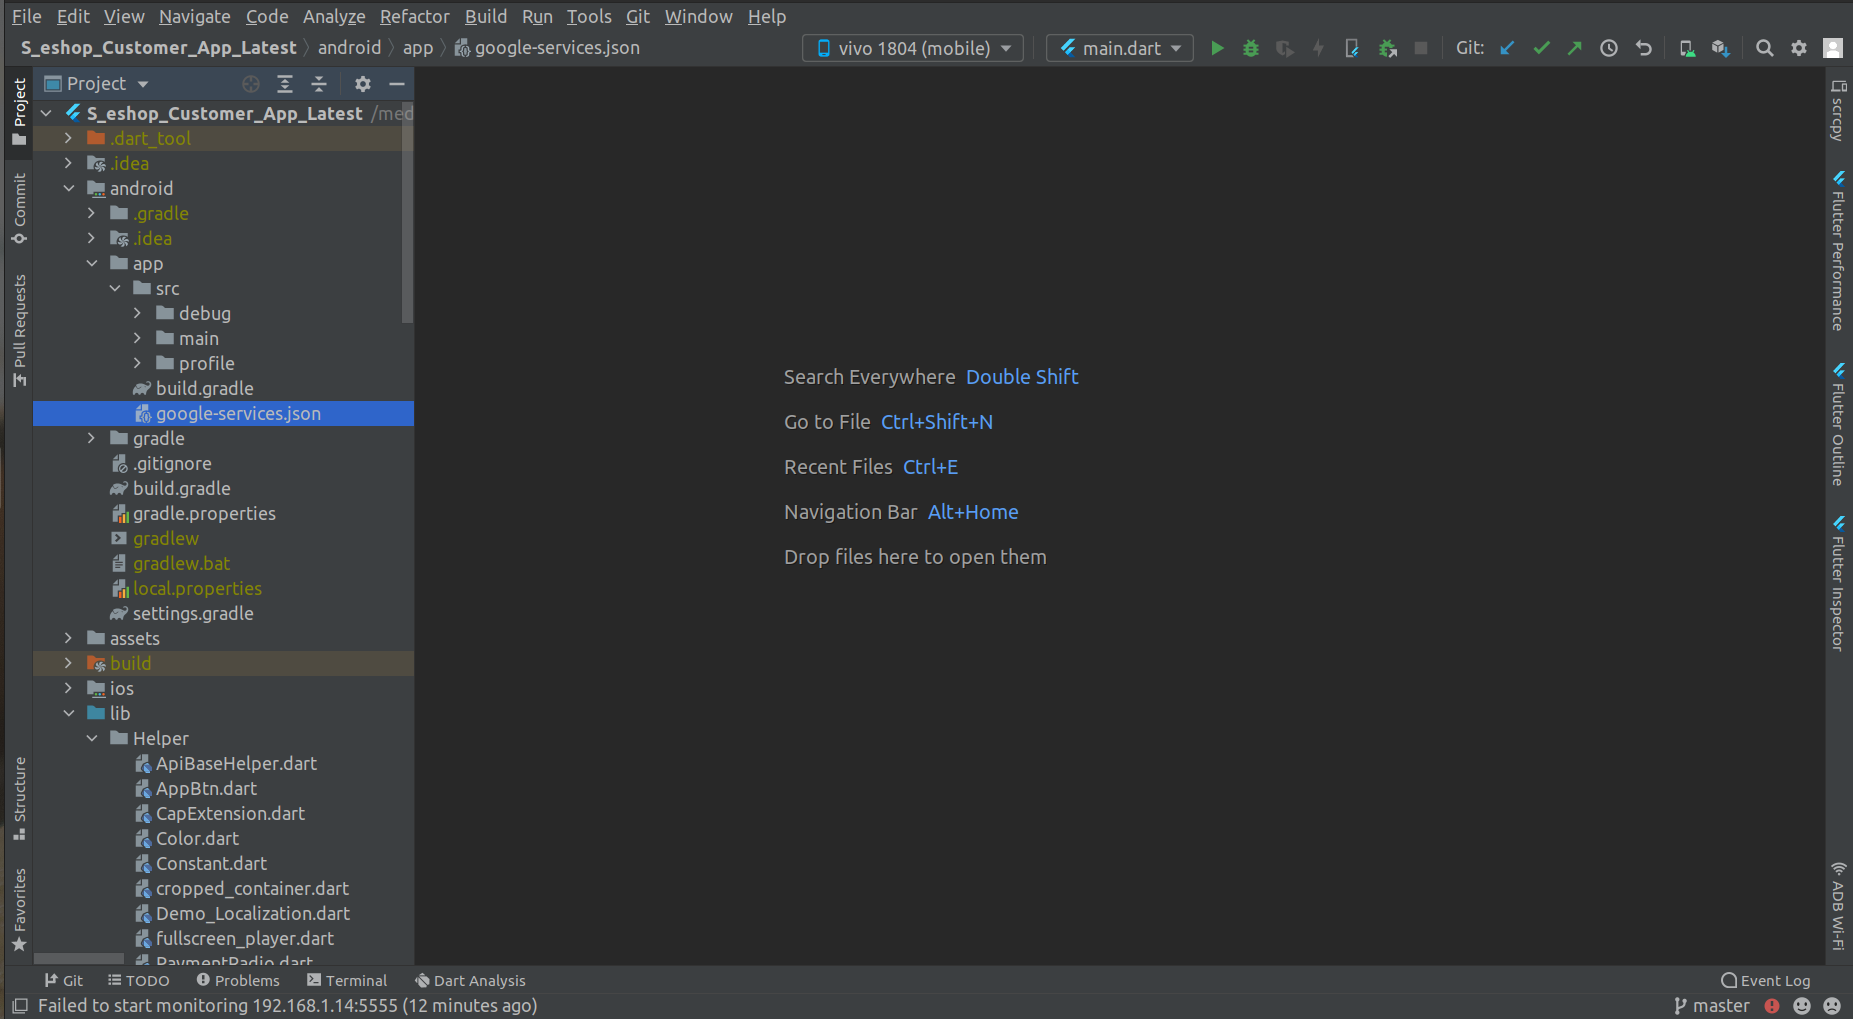
- after that below given screen will appear, now click on download google-services.json.after that open the file and copy content of file and replace in android > app > google-service.son.
- now click on next next and in last step press continue to the console button.
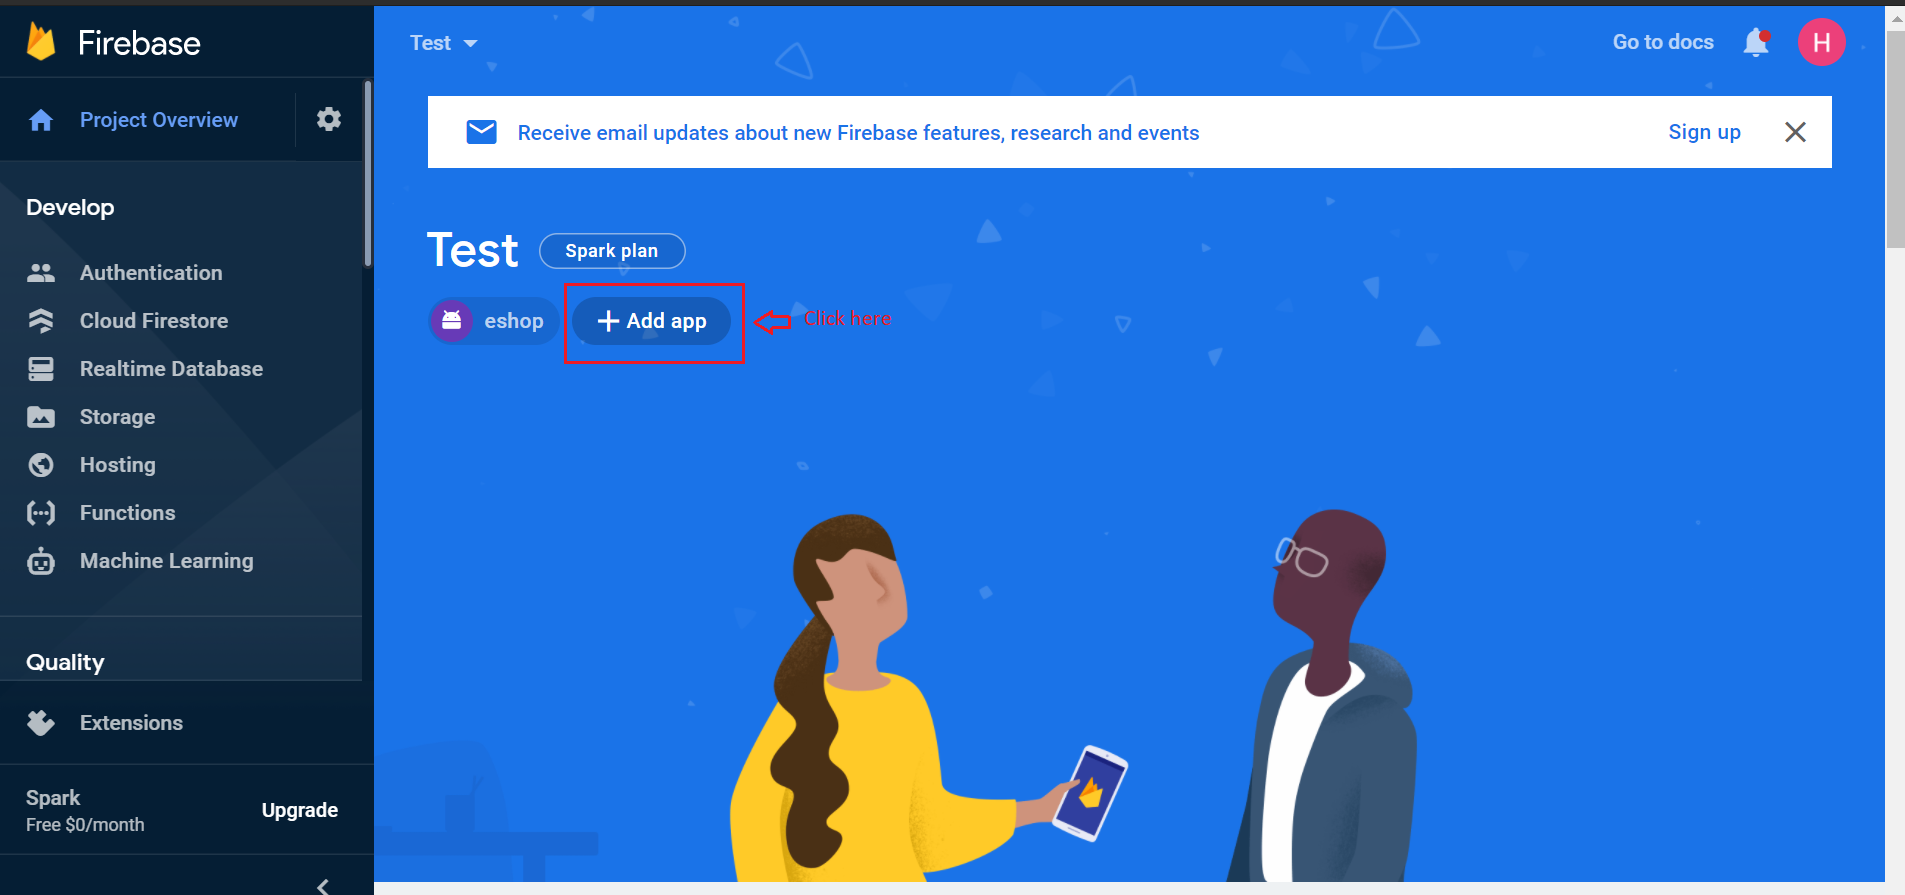
- for ios,perform below step. now click on add app.
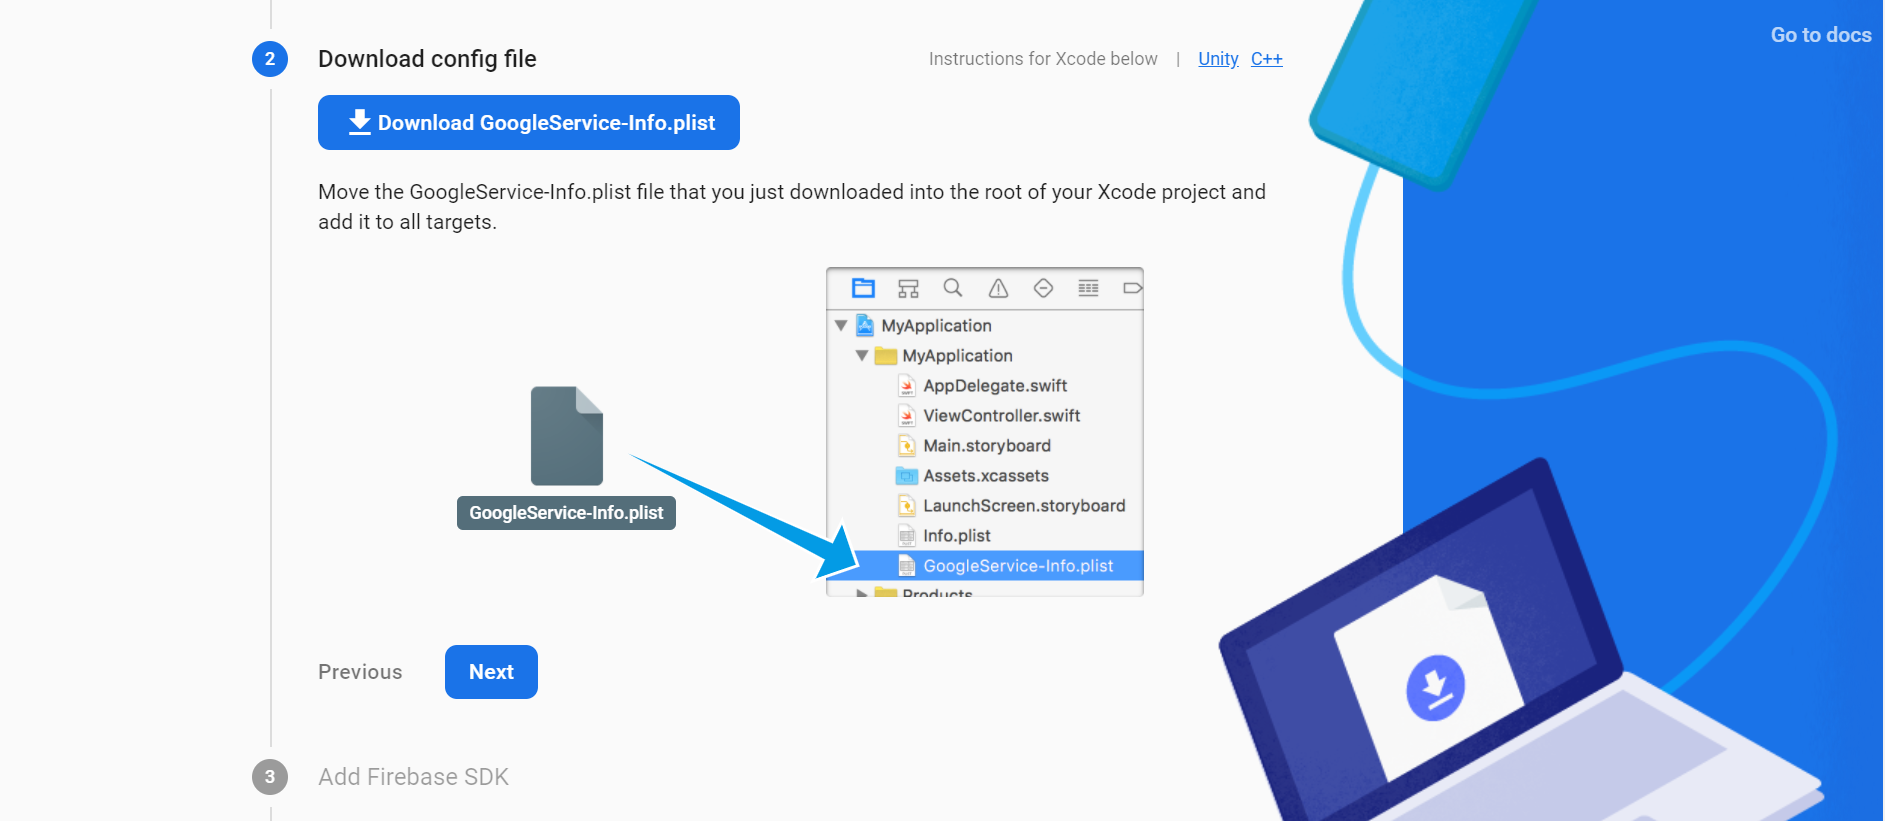
- and then click on ios button.in this same as android step will be come here you have to enter your appname.then next and on next screen download google service info.plist file.
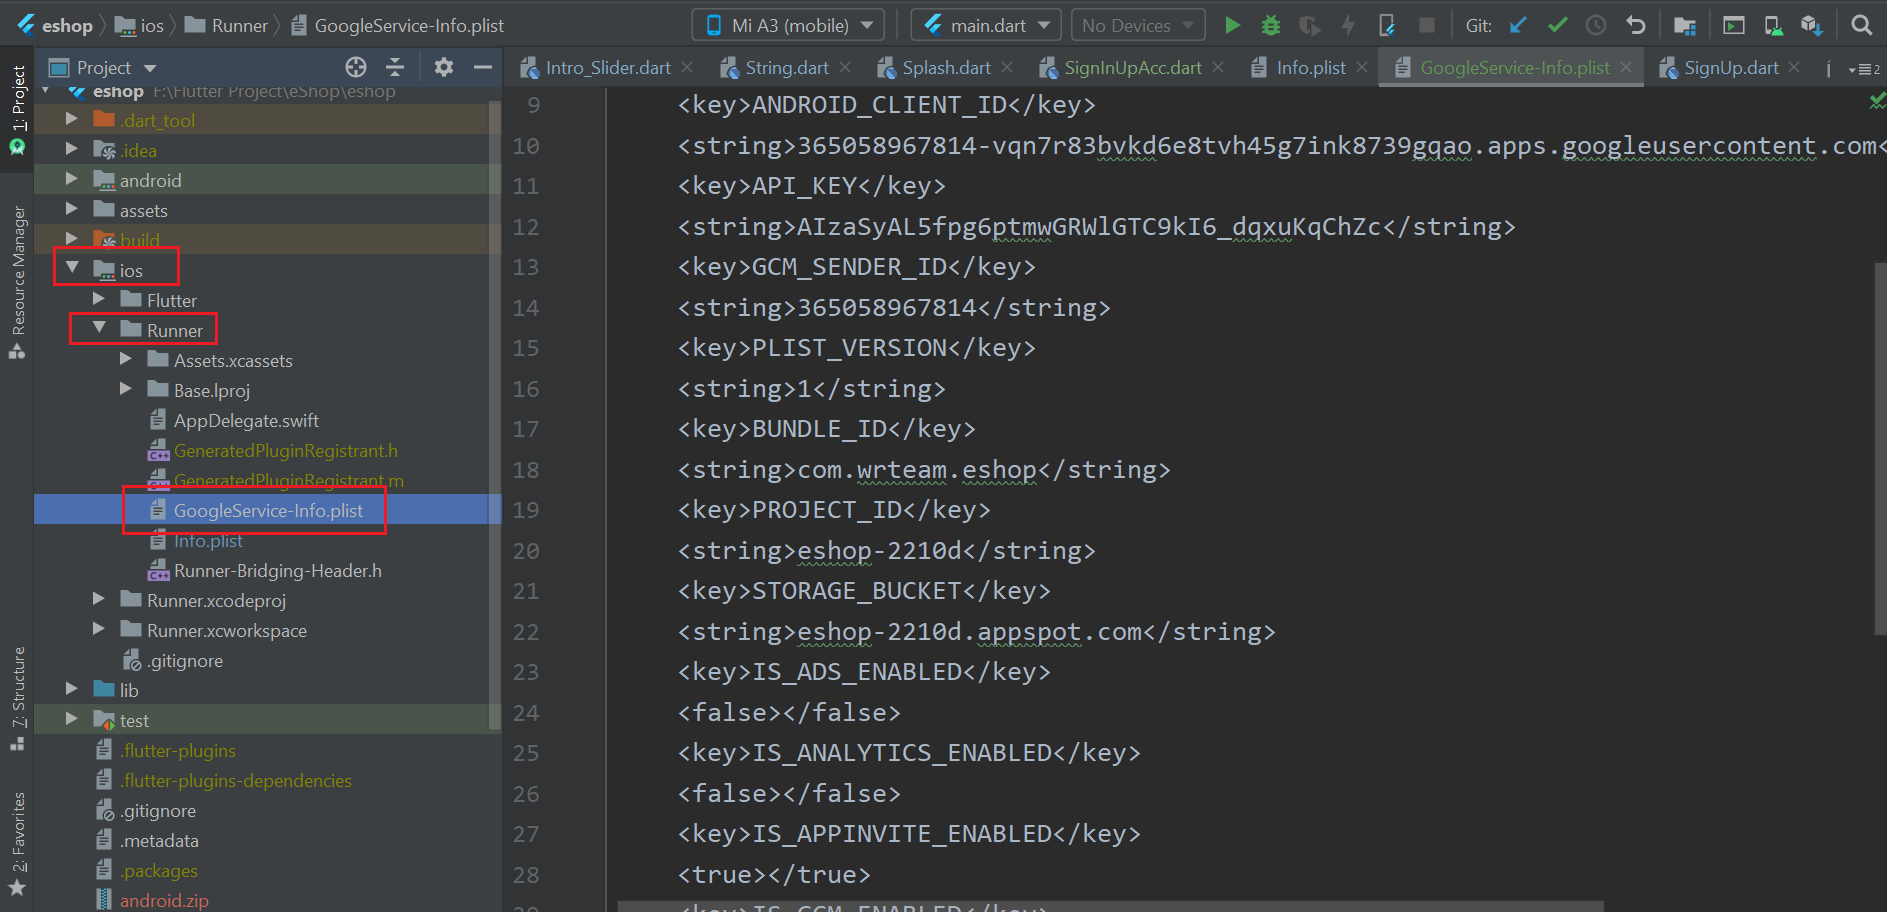
- now copy the content of that file and replace in ios > Runner > GoogleServie-info.plist
- now press next next on firebase console and that's it your project is created on ios.
How to enable Firebase Phone Authentication(OTP).
(Check Video)
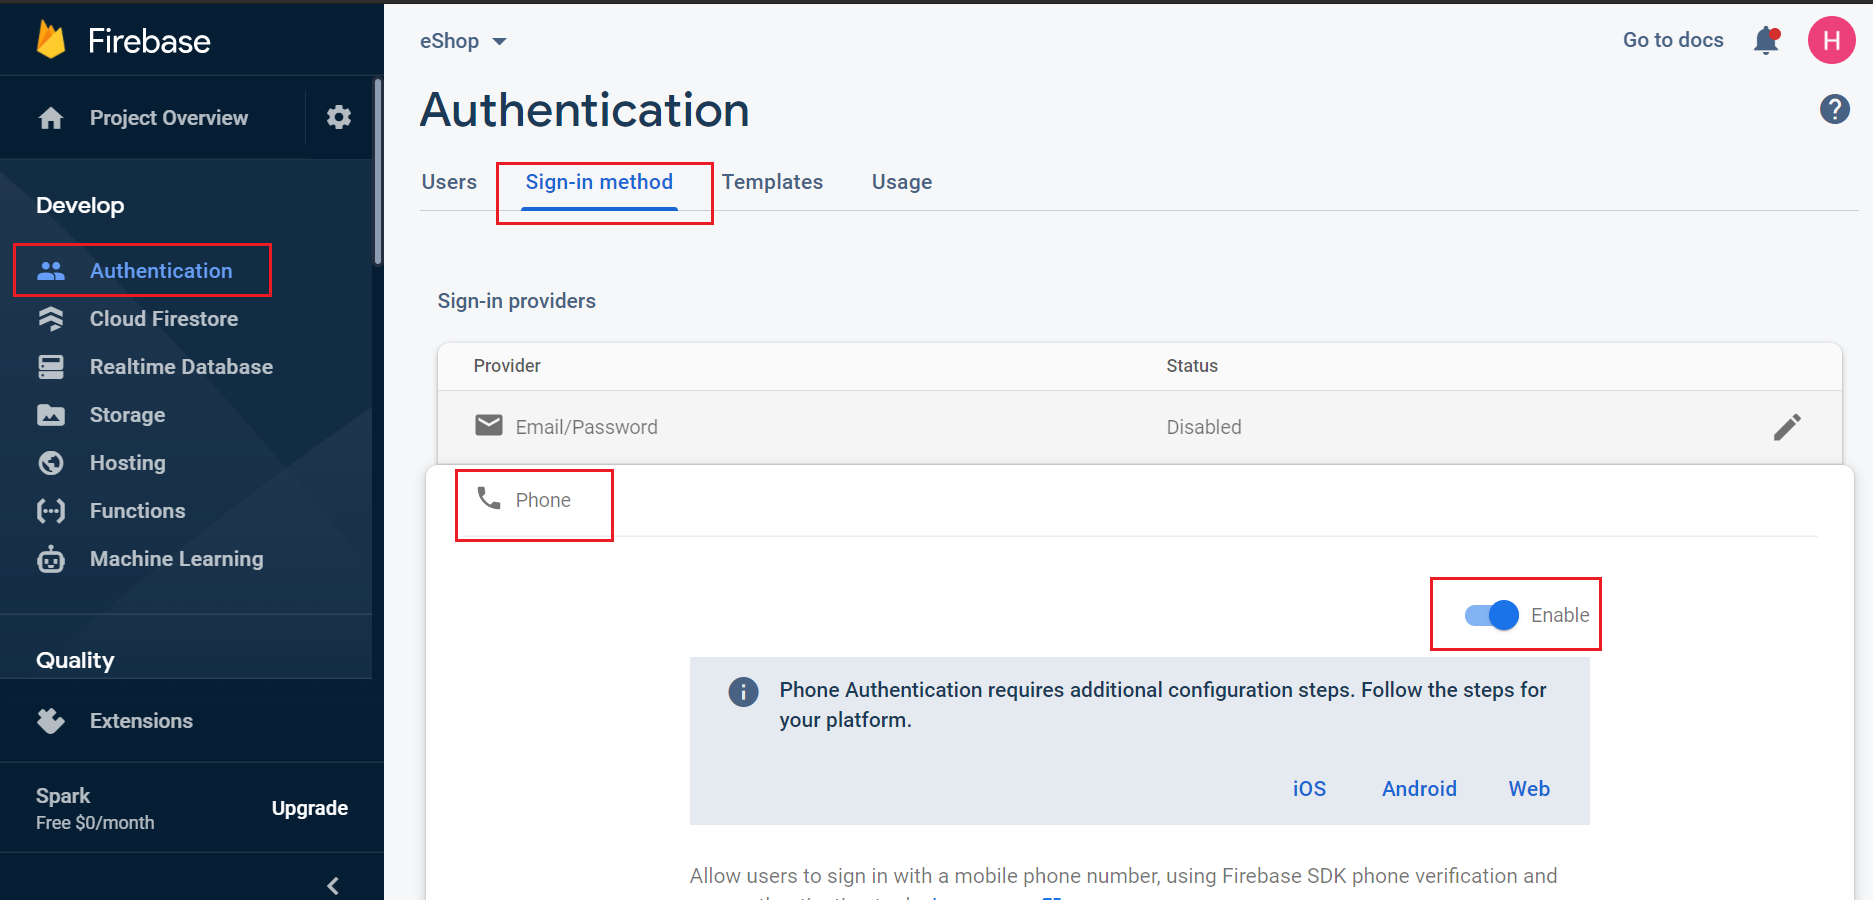
- Open your firebase console.
- Go to Authentication and open Sign-in method.
- Enable Phone Sign-in method and save.
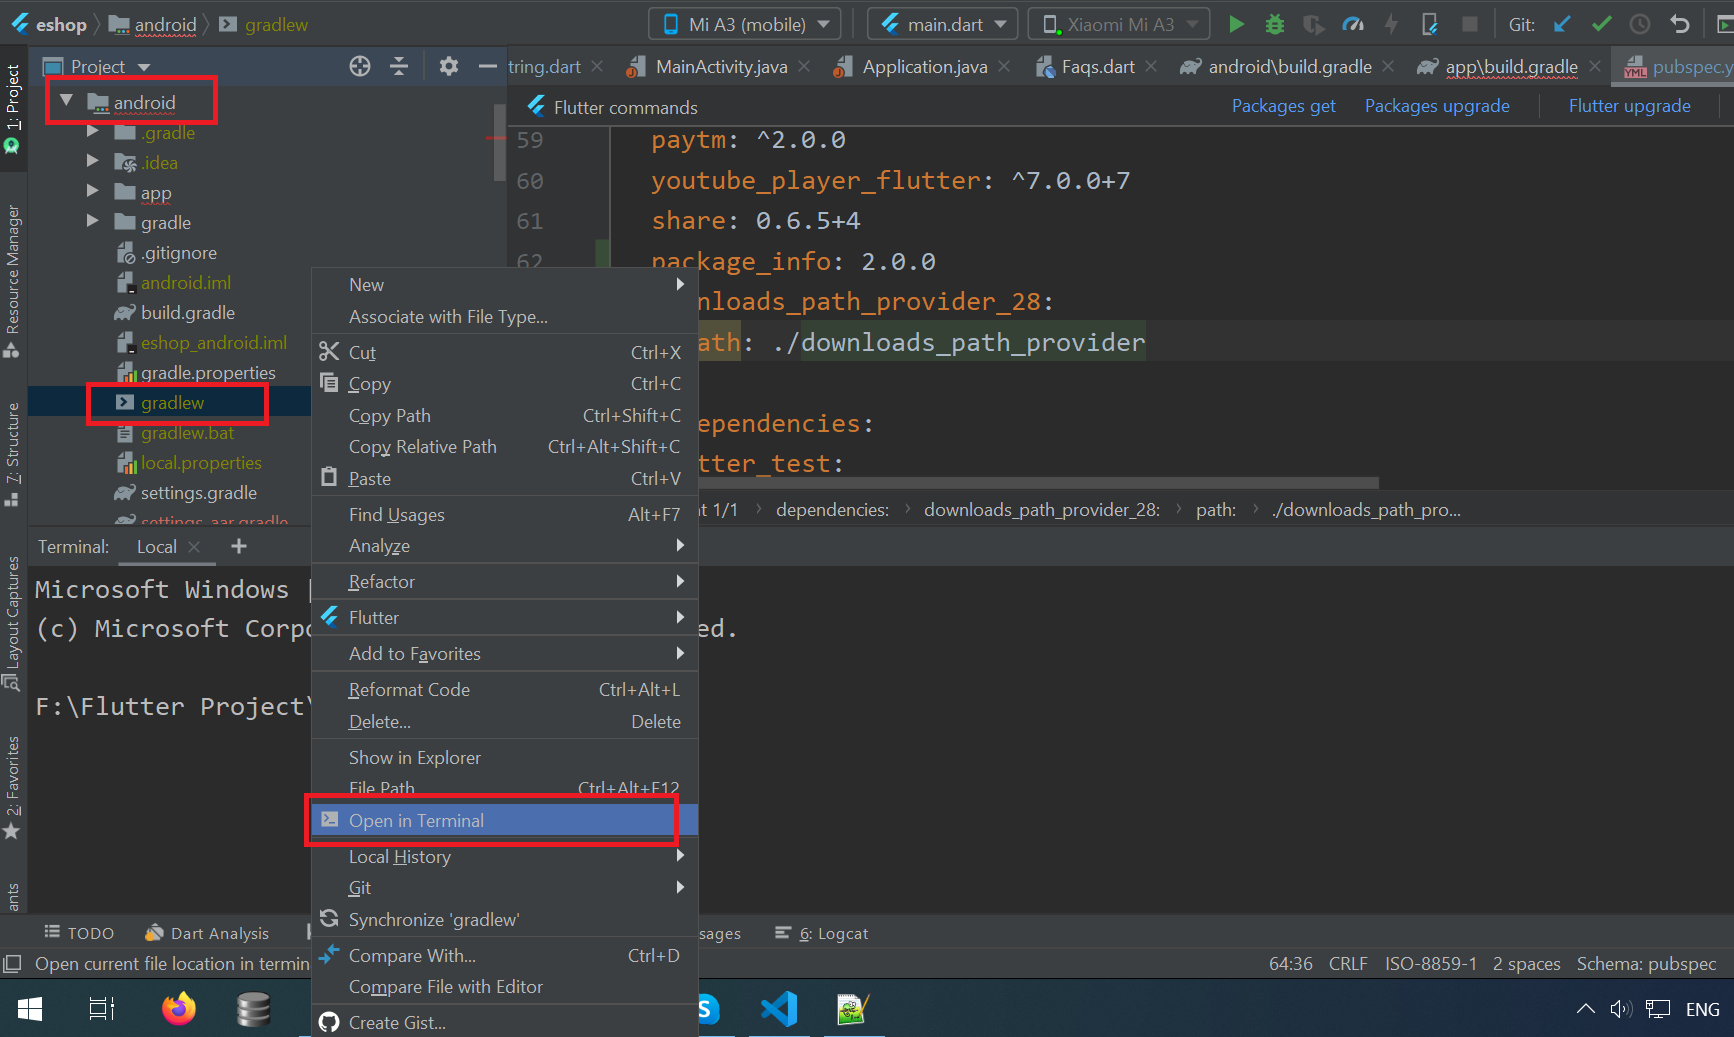
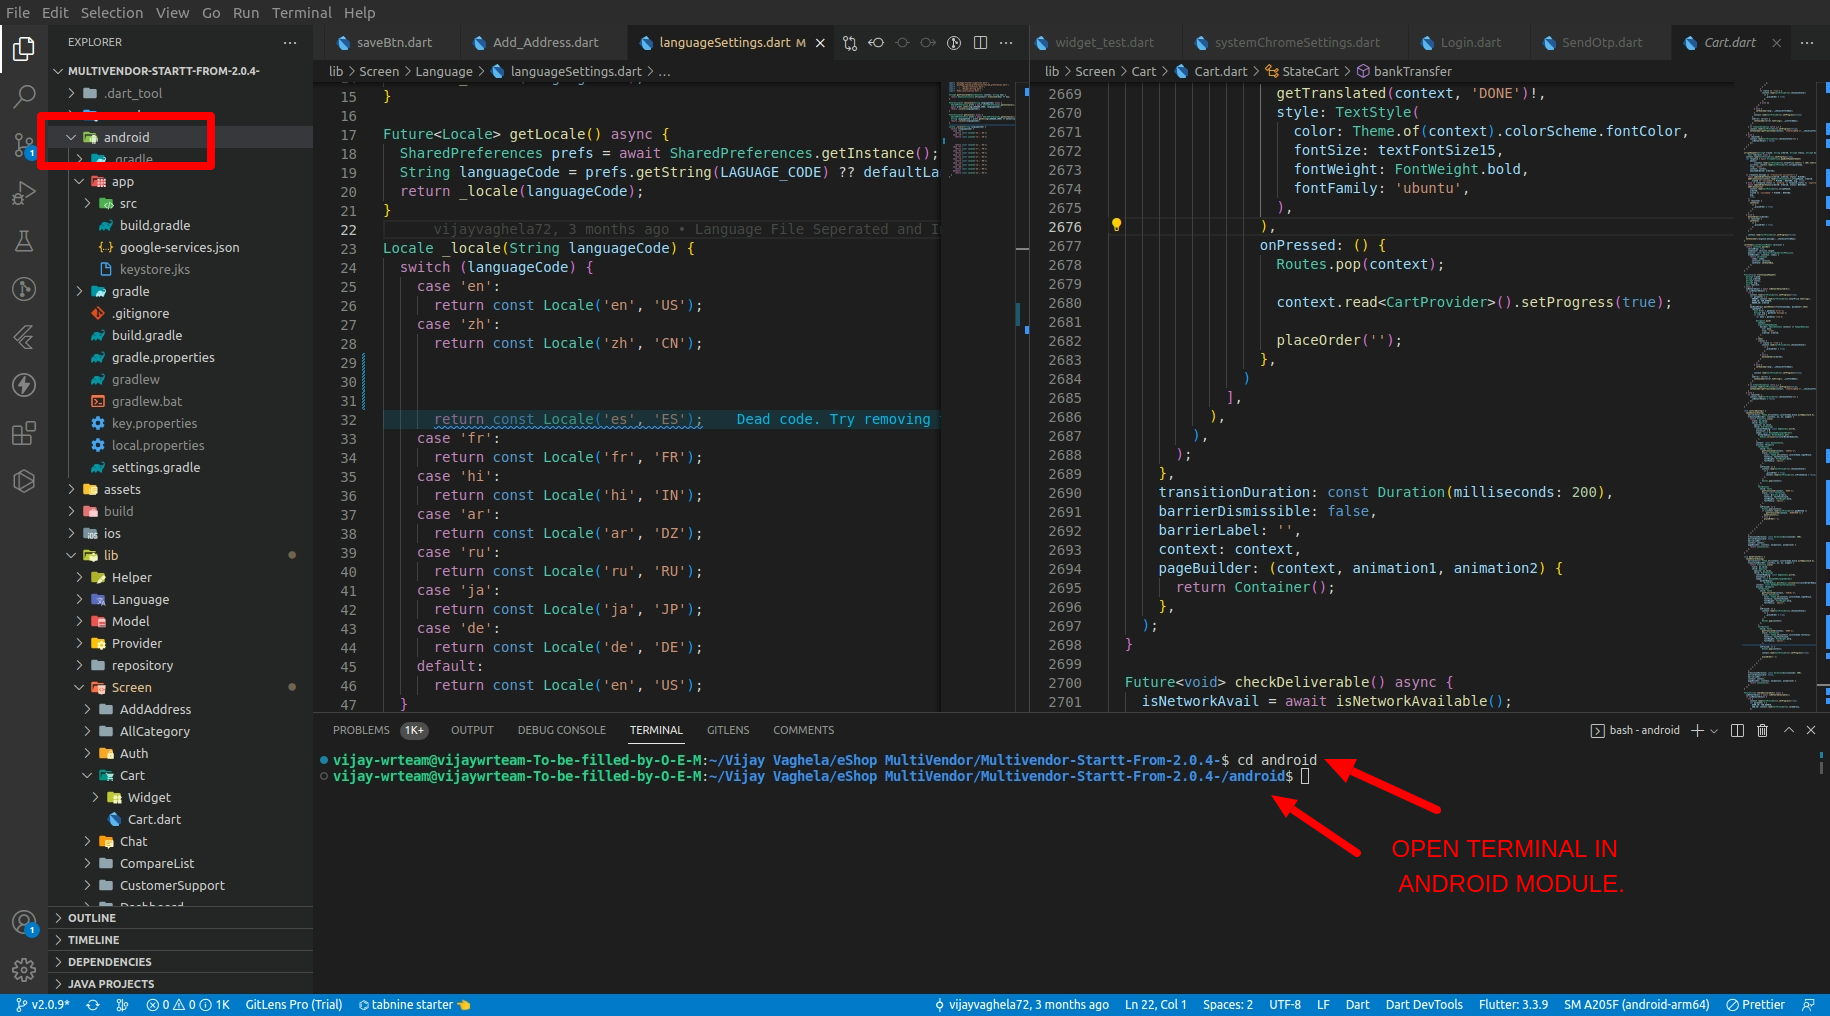
- Go to the android folder. Right click gradlew file and select Open in Terminal as shown in below image.
- else may you just open terminal in android module.
- Go to the terminal view and paste- gradlew signingReport as shown in below
- for mac it should be ./gradlew signingReport
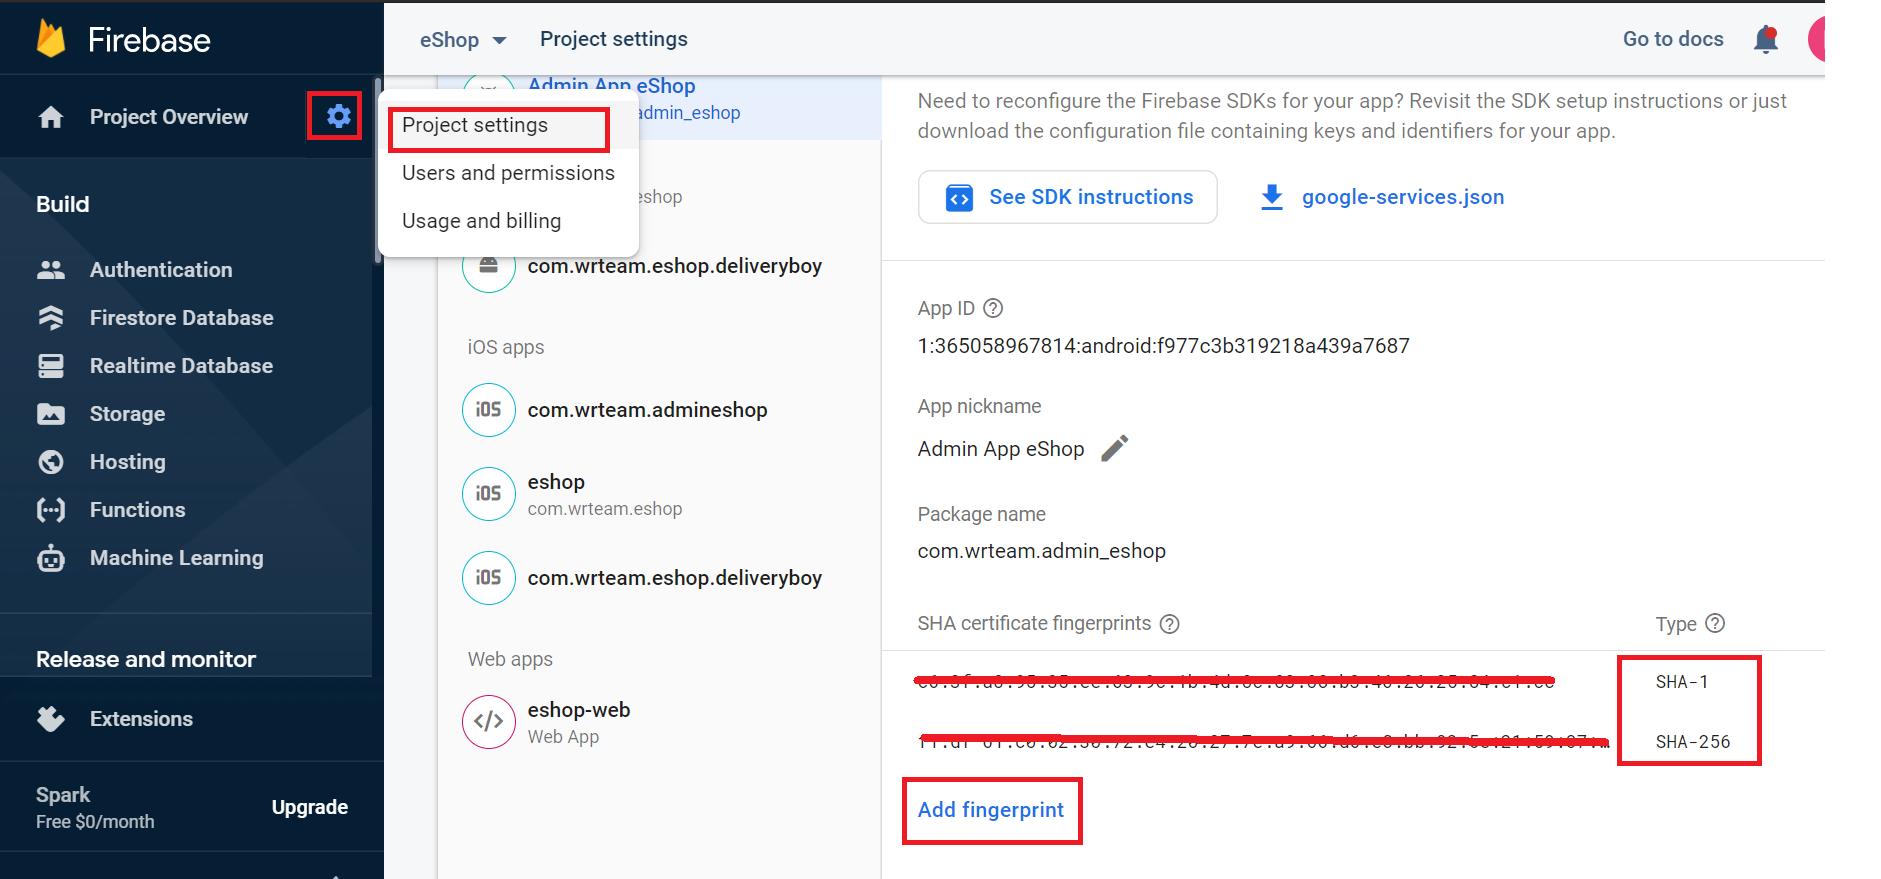
- now take debug sha and sha256 will print copy that and add it in firebase console.and also add sha-256 to firebase console.
- When we are releasing apk then we need to add release sha in firebase panel otherwise otp will not work.
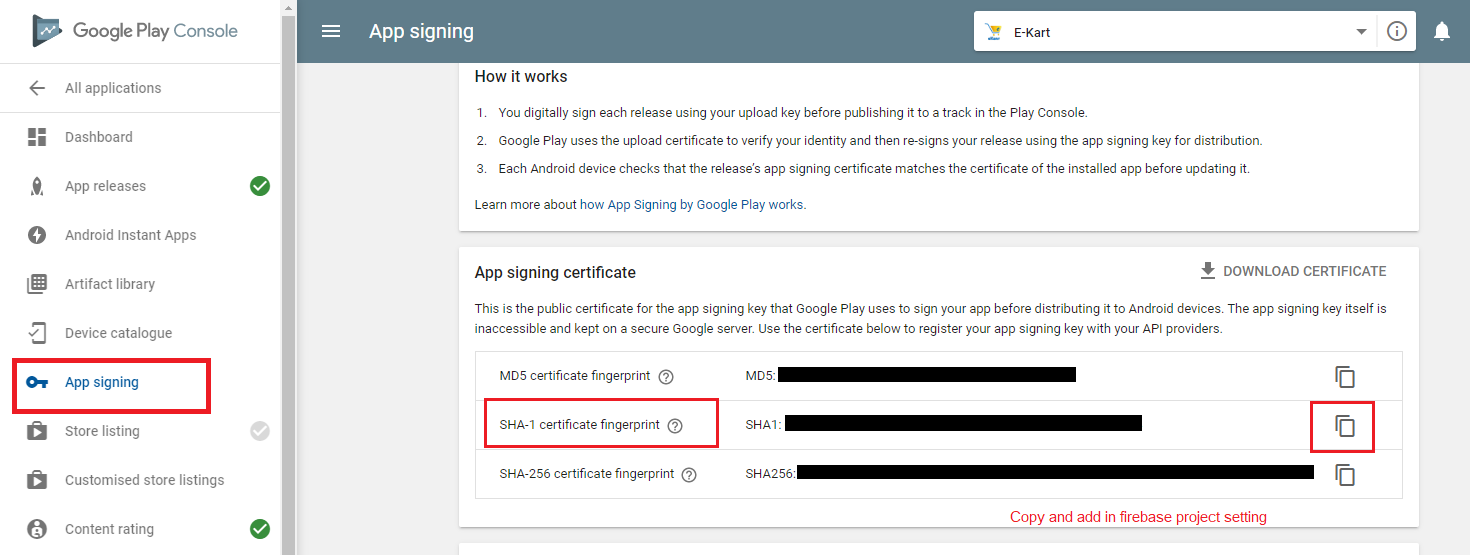
- after release you can get sha from play console here
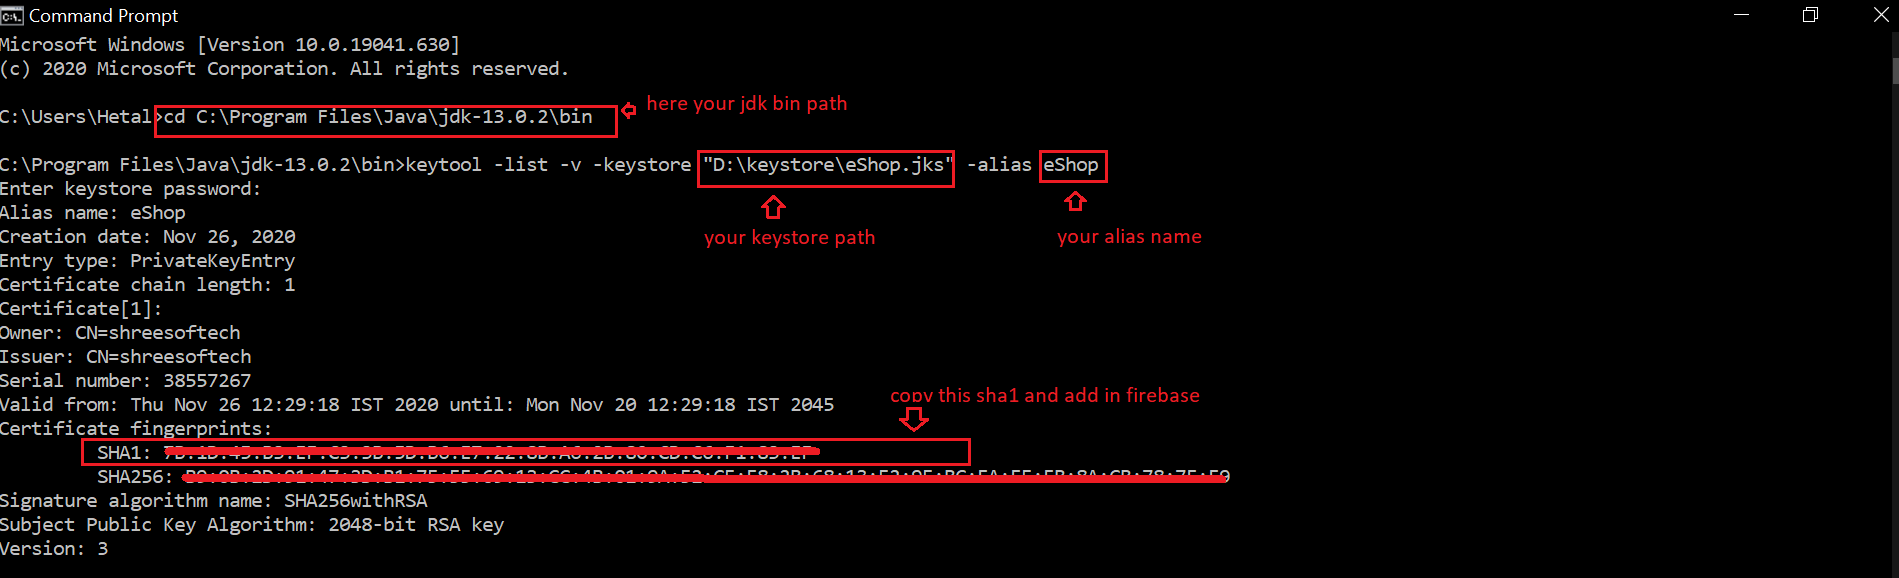
- or another way you can also get release sha from below given command in cmd
- go to run and type cmd
- here first go to java jdk bin path
- then here edit this command and replace your keystore path and alias in this command keytool -list -v -keystore "D:\keystore\eShop.jks" -alias eShop
- then it will ask for password.enter and then it will show your release sha
- for ios you need to set following.
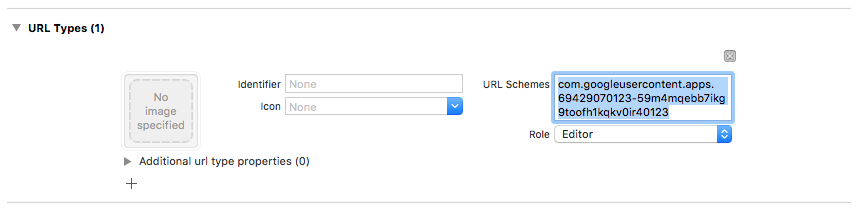
- Open your project configuration: double-click the project name in the left tree view. Select your app from the TARGETS section, then select the Info tab, and expand the URL Types section.
- Click the + button, and add a URL scheme for your reversed client ID. To find this value, open theGoogleService-Info.plist configuration file, and look for the REVERSED_CLIENT_ID key. Copy the value of that key, and paste it into the URL Schemes box on the configuration page. Leave the other fields blank.
- When completed, your config should look something similar to the following (but with your application-specific values):

Remember:
Add custom URL schemes to your Xcode project:
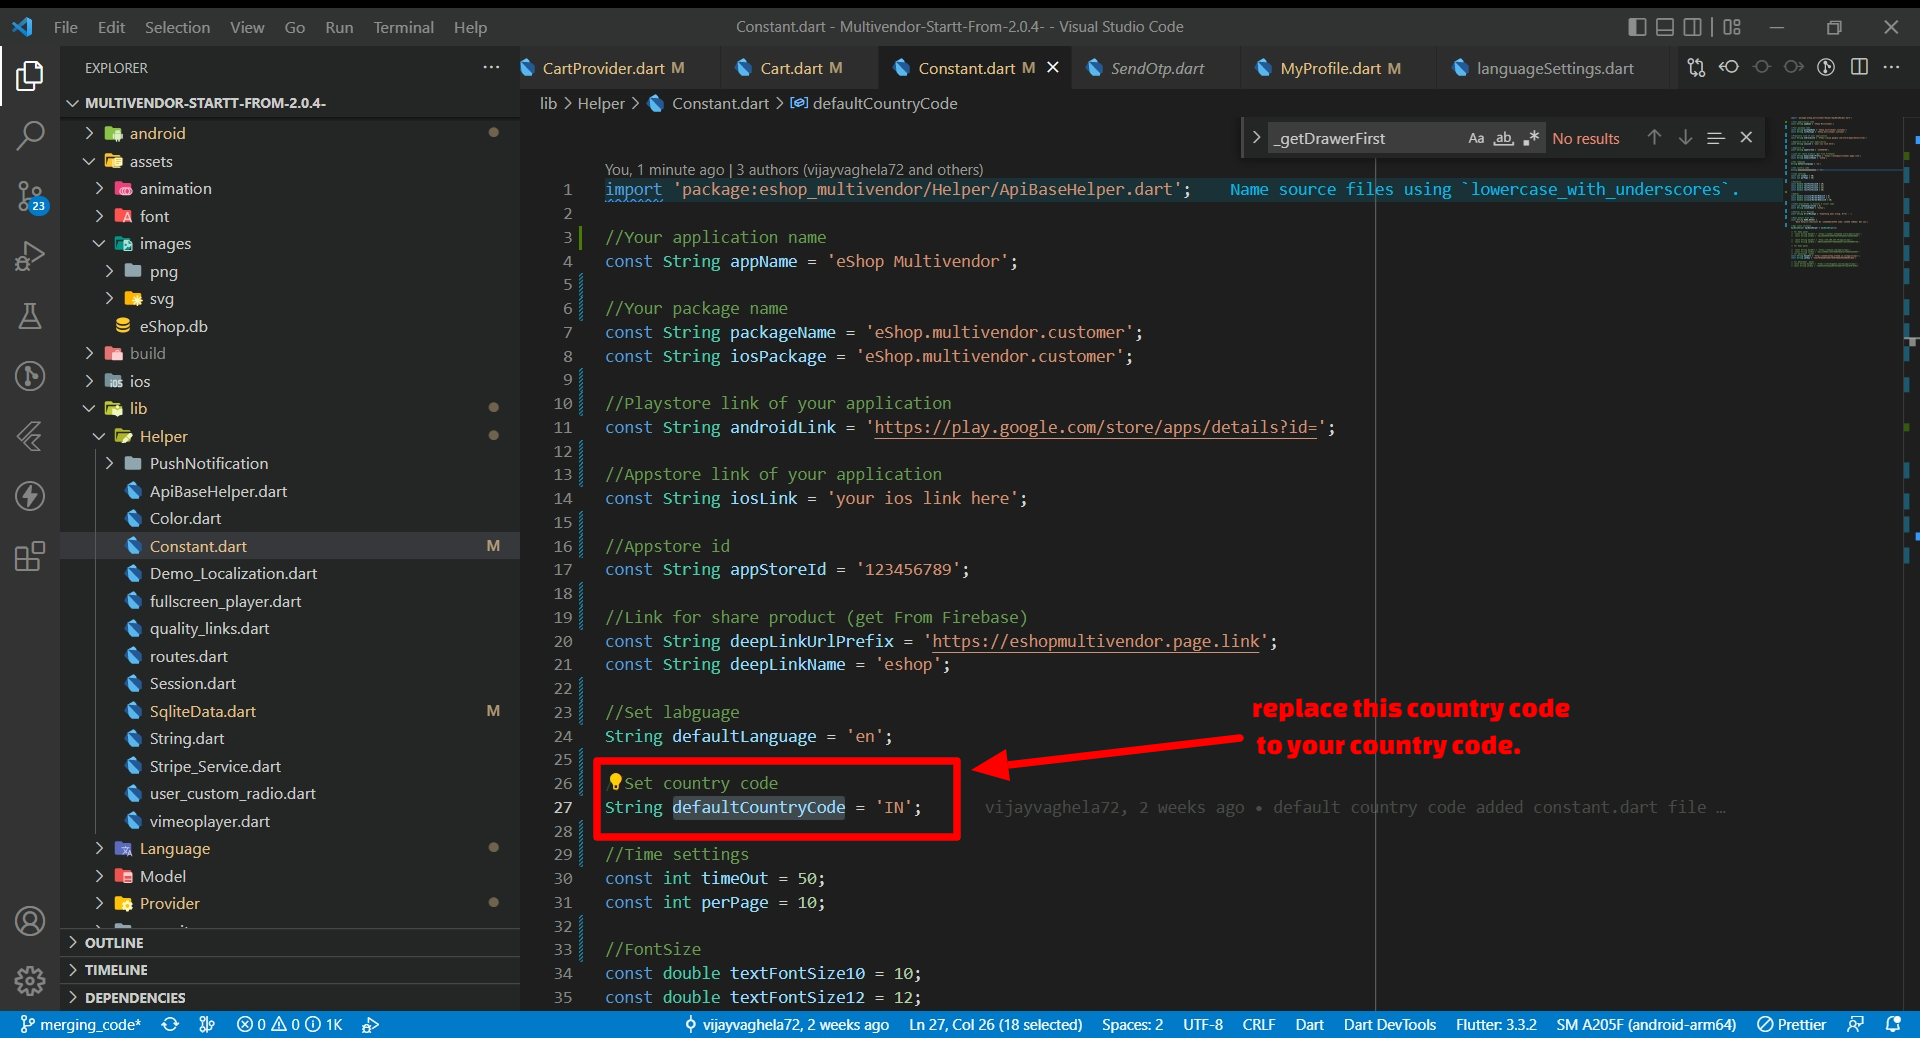
How to Change default country code for OTP.
- goto System > Store Setting .
How to Enable Firebase Blaze billing
- Firebase Phone Authentication OTP not being sent in Android because of BILLING_NOT_ENABLED, it’s because Firebase has changed the criteria since 1st September. Sadly it now requires Blaze (paid) plan to make use of Phone Authentication SMS OTPs now. The daily 10 free SMS are still there, but only in Blaze plan.
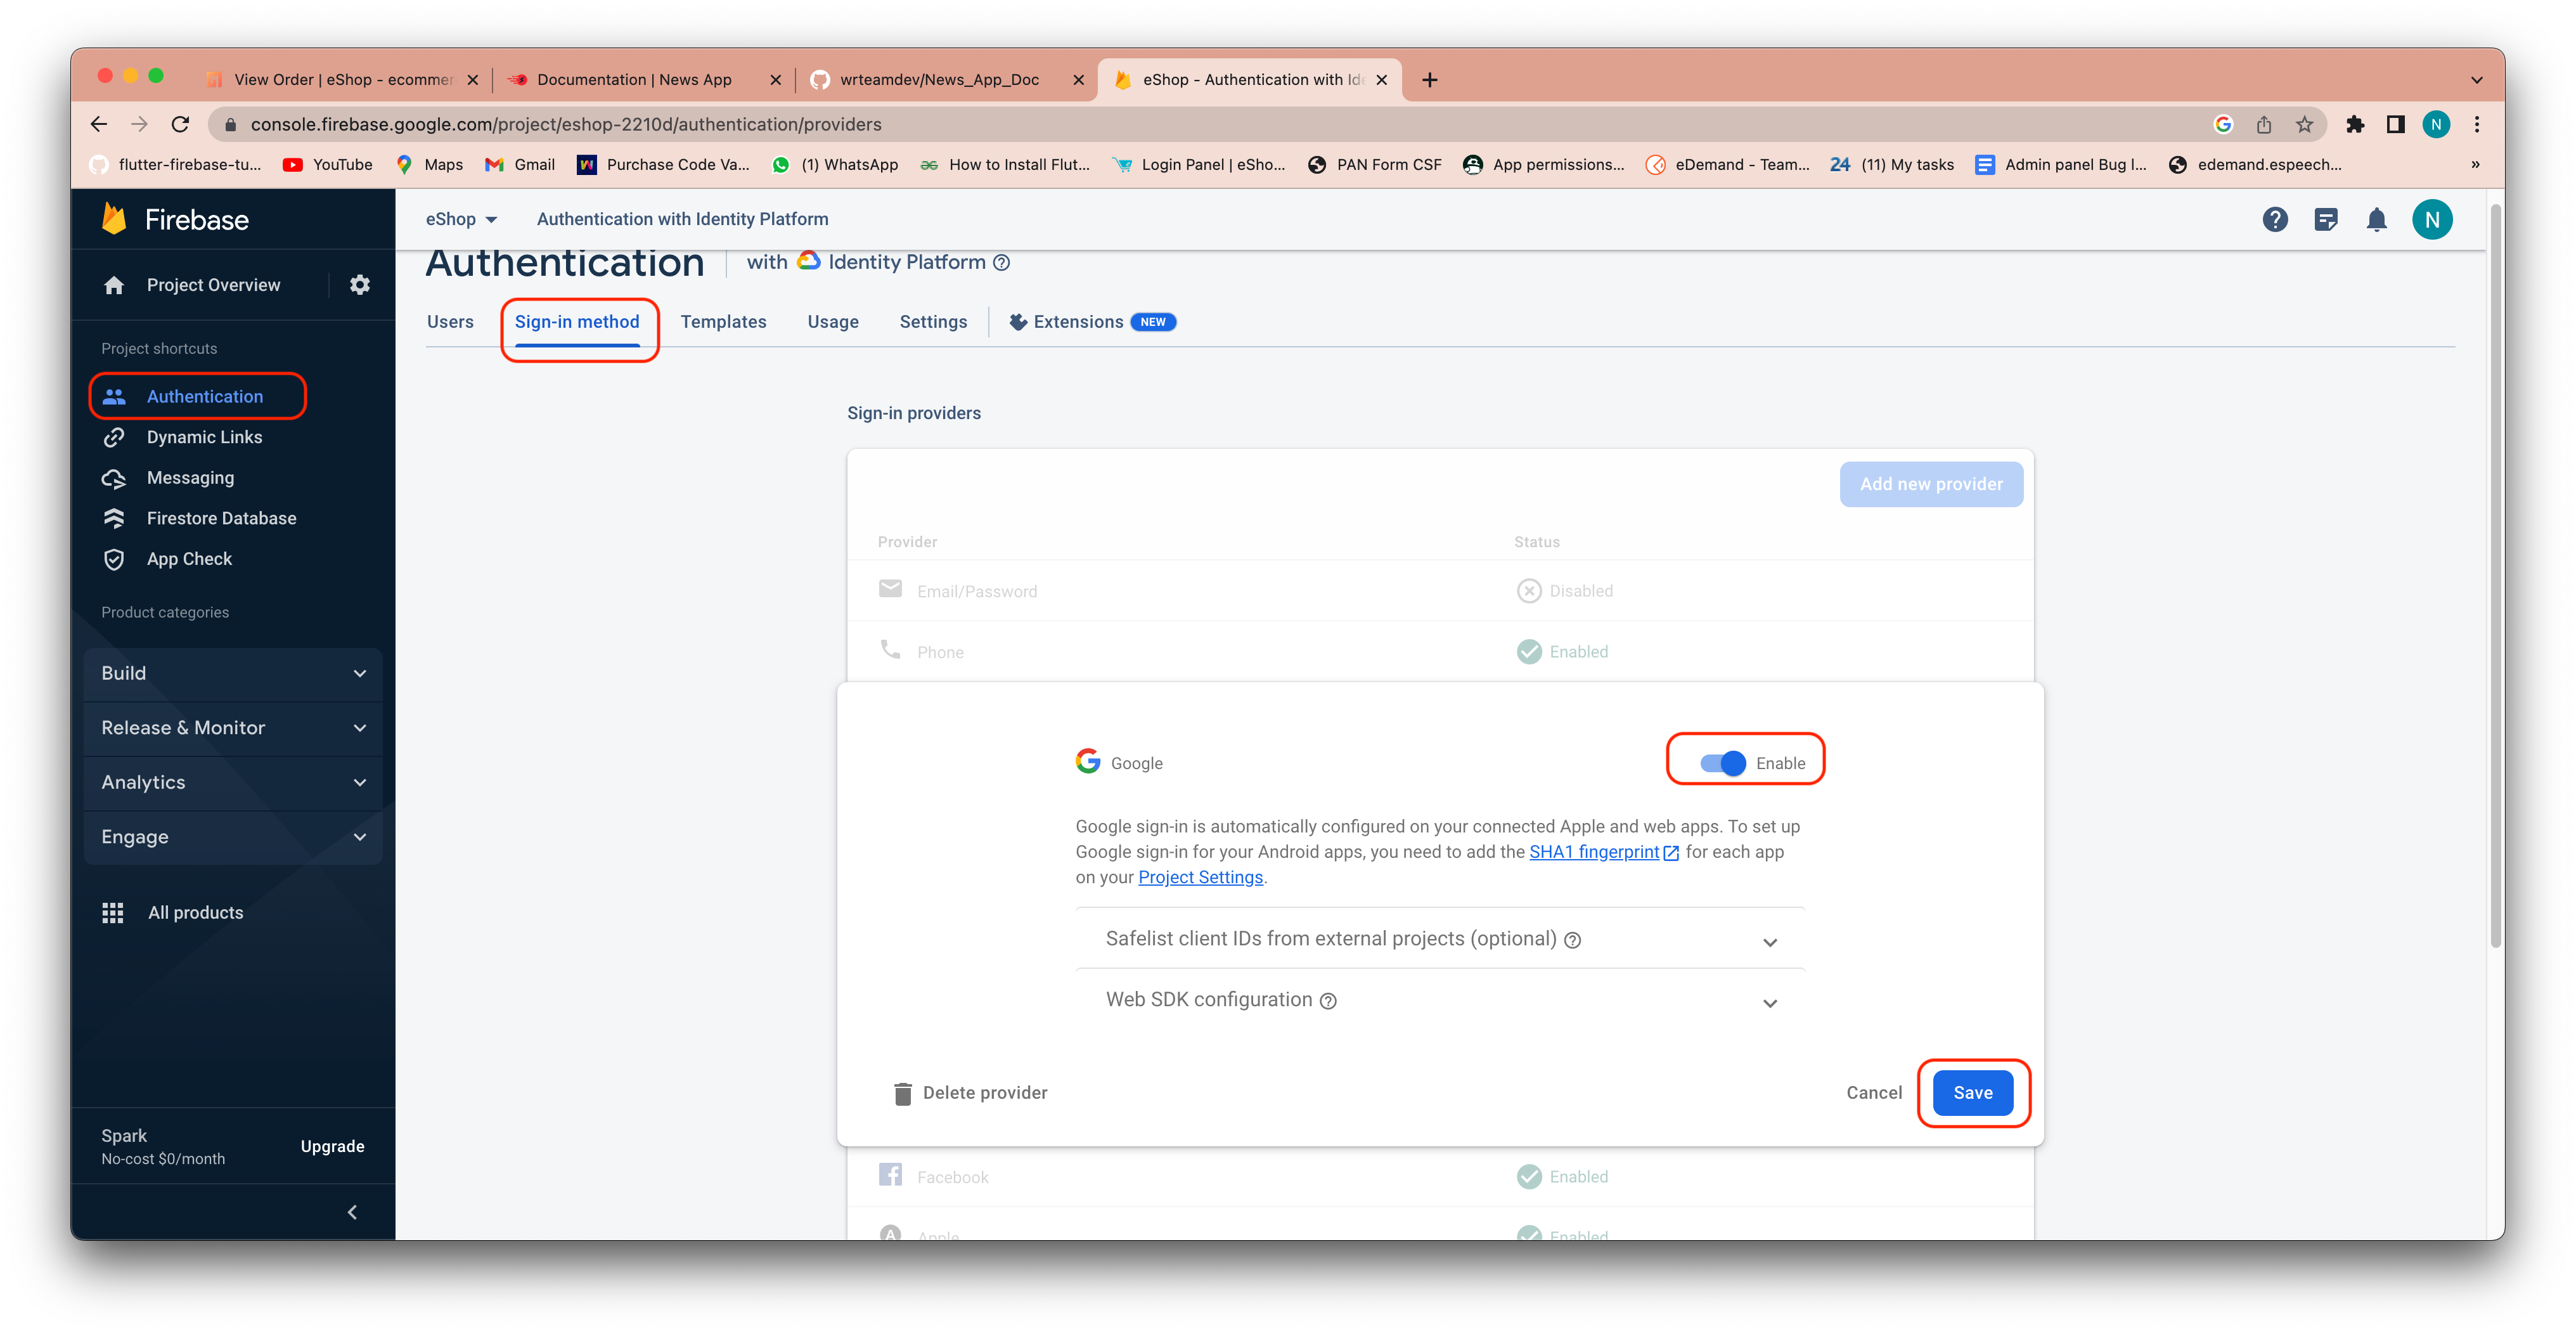
Steps to Authenticate firebase using Google
- Open your firebase console.
- Go to Sign-in method in Authentication.
- Go to the Google and enable the google sign_in automatically.
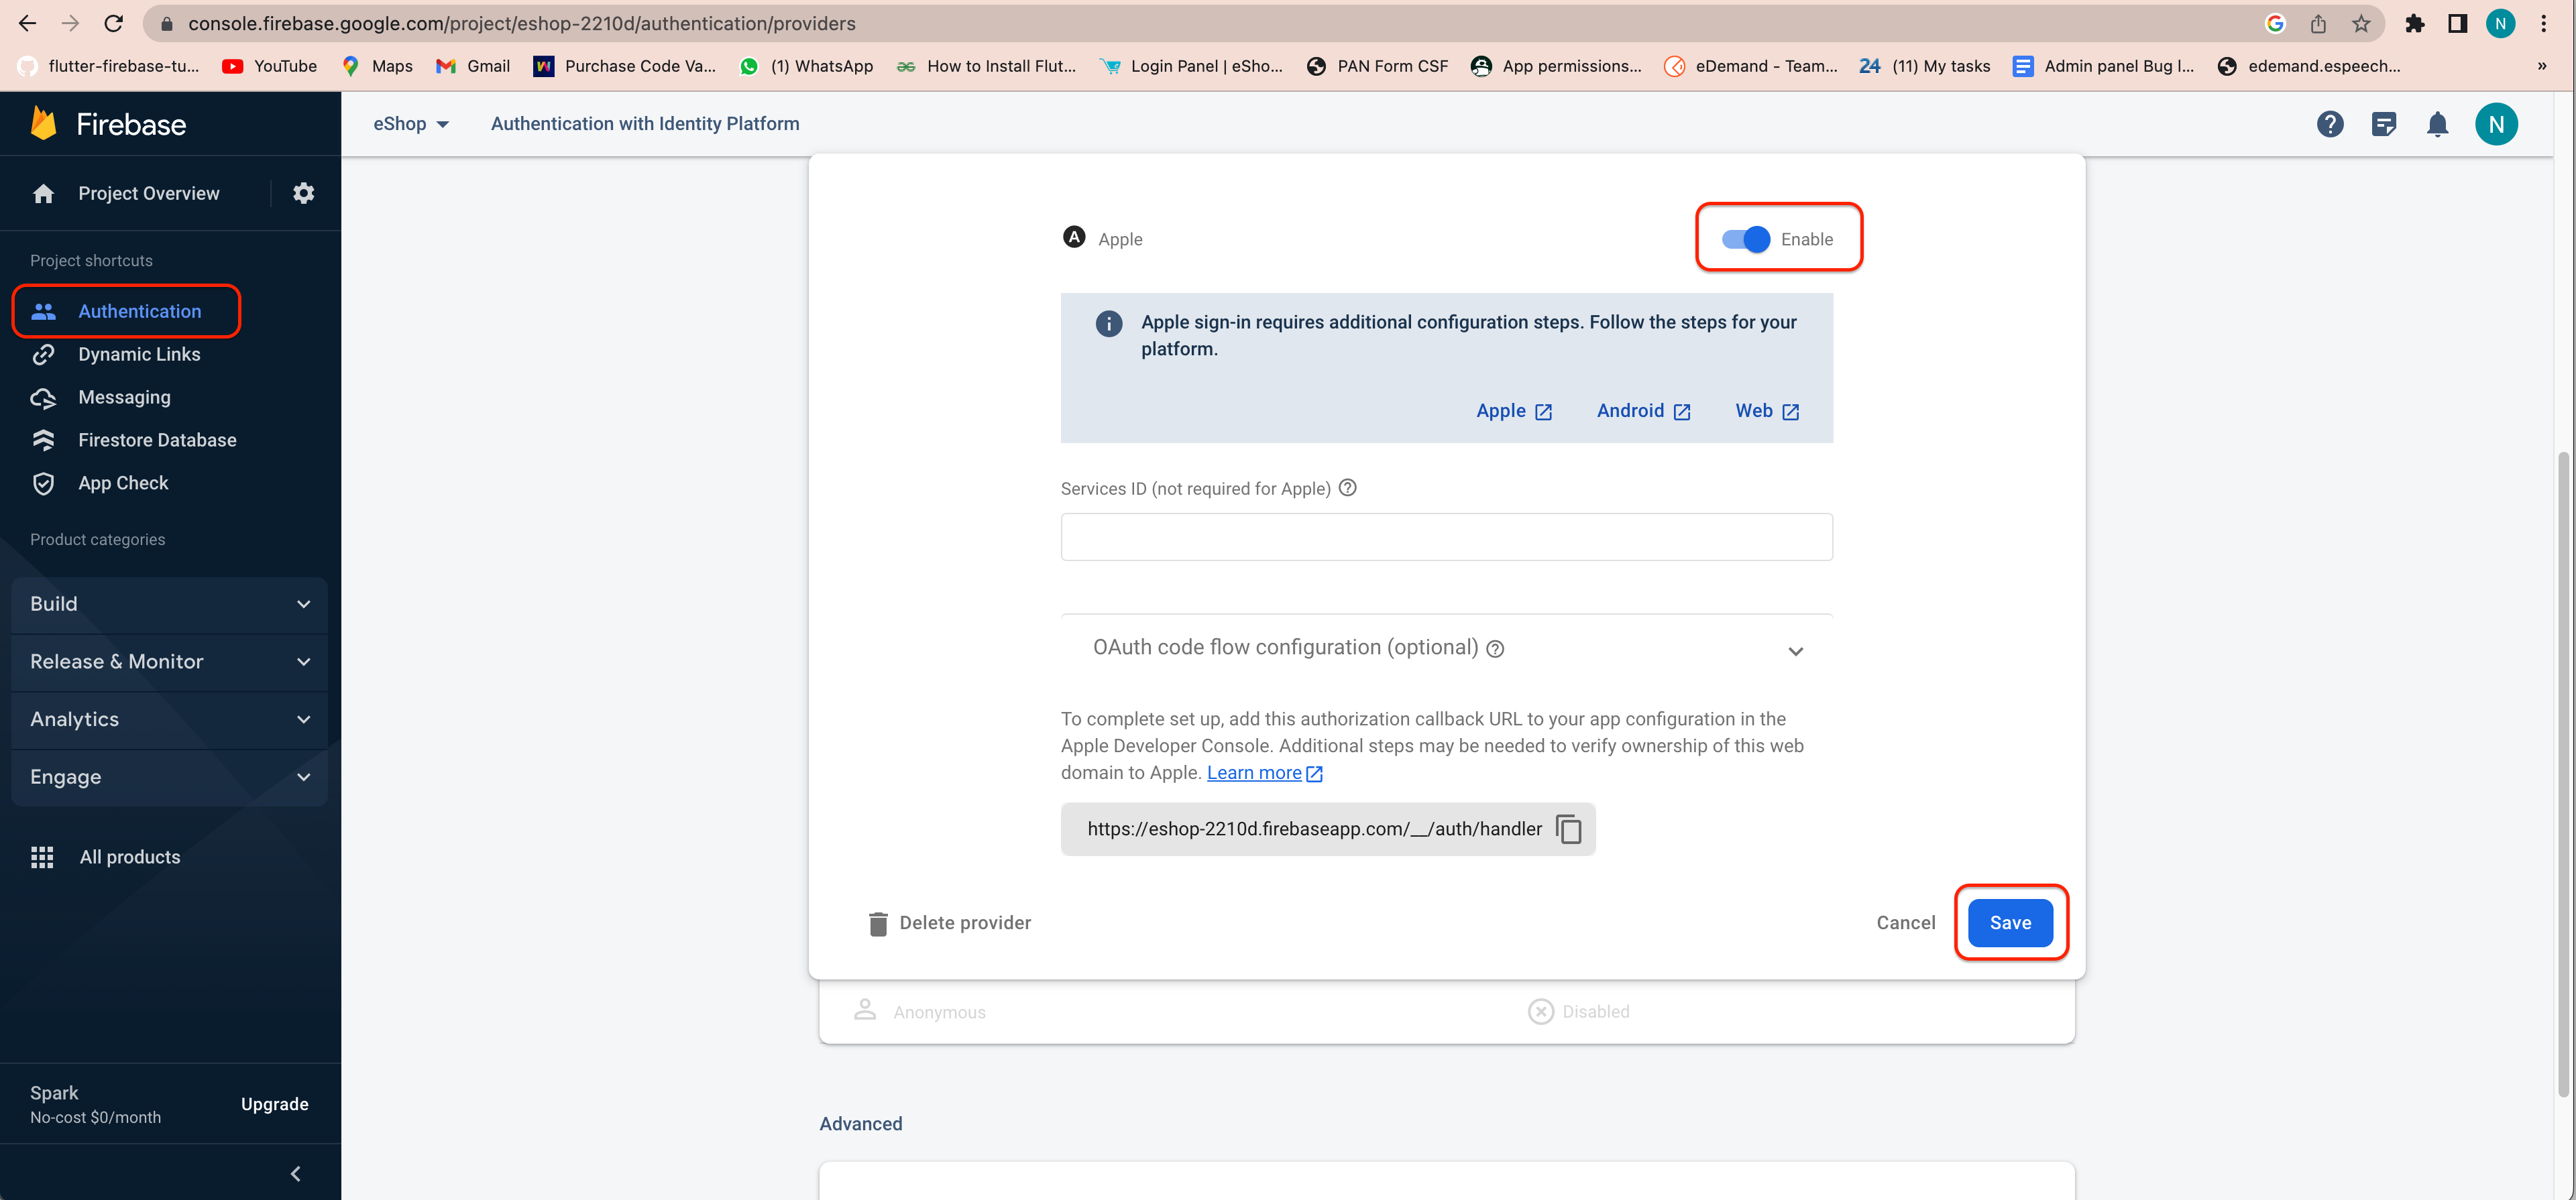
Steps to Authenticate firebase using Apple
- Open your firebase console.
- Go to Sign-in method in Authentication.
- Go to the Apple and enable apple sign in.
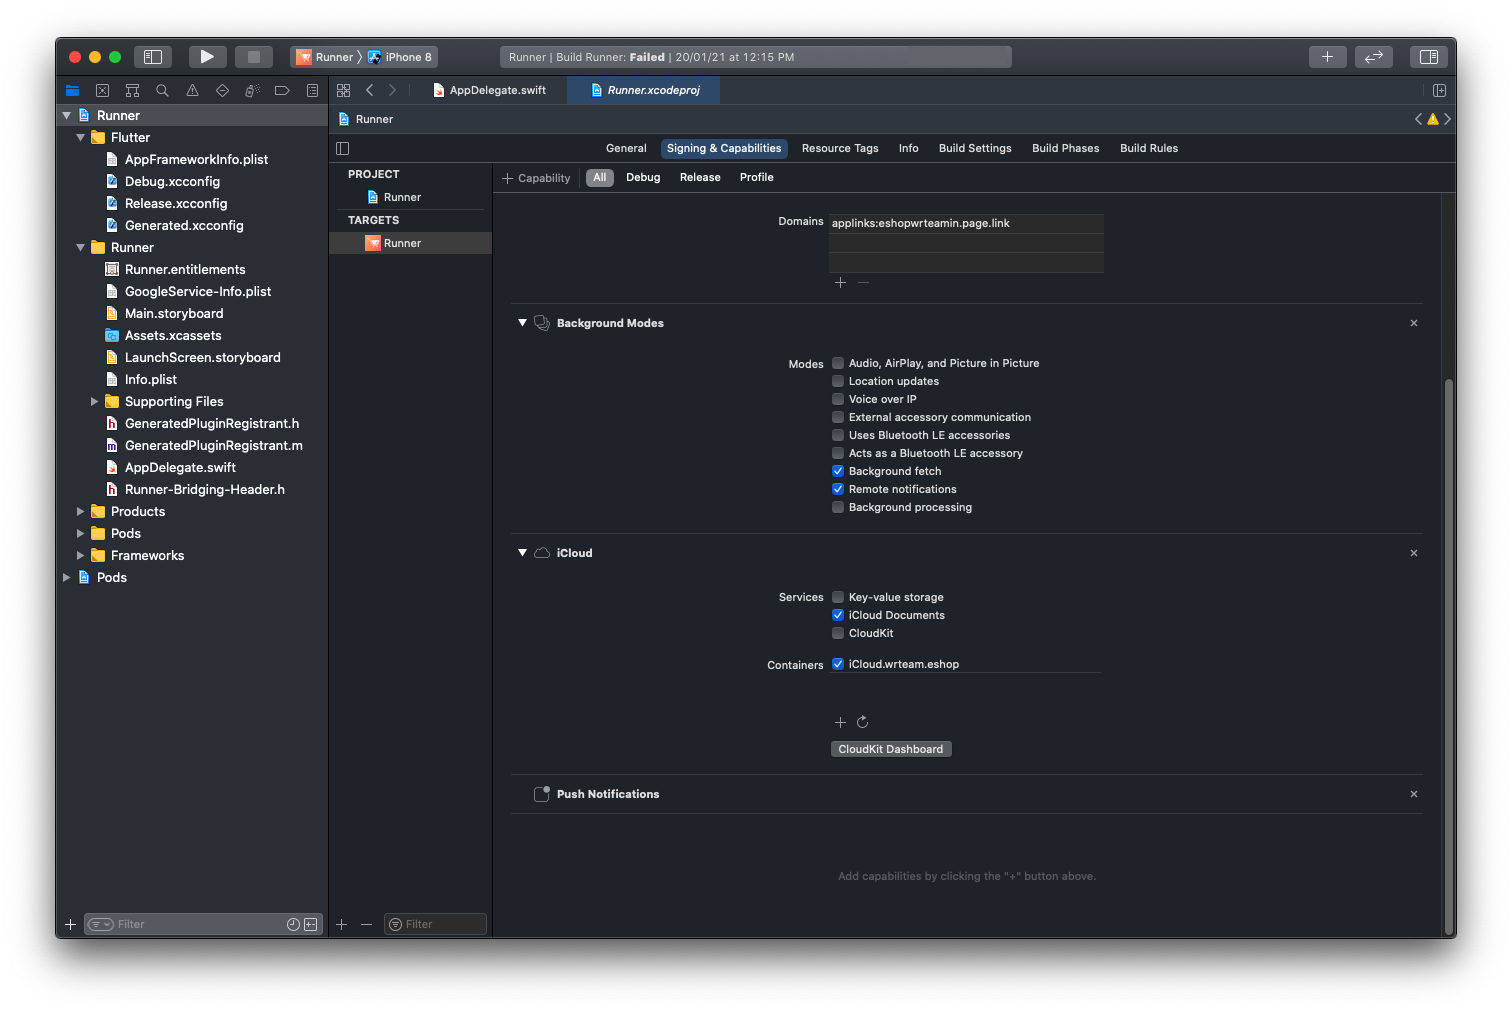
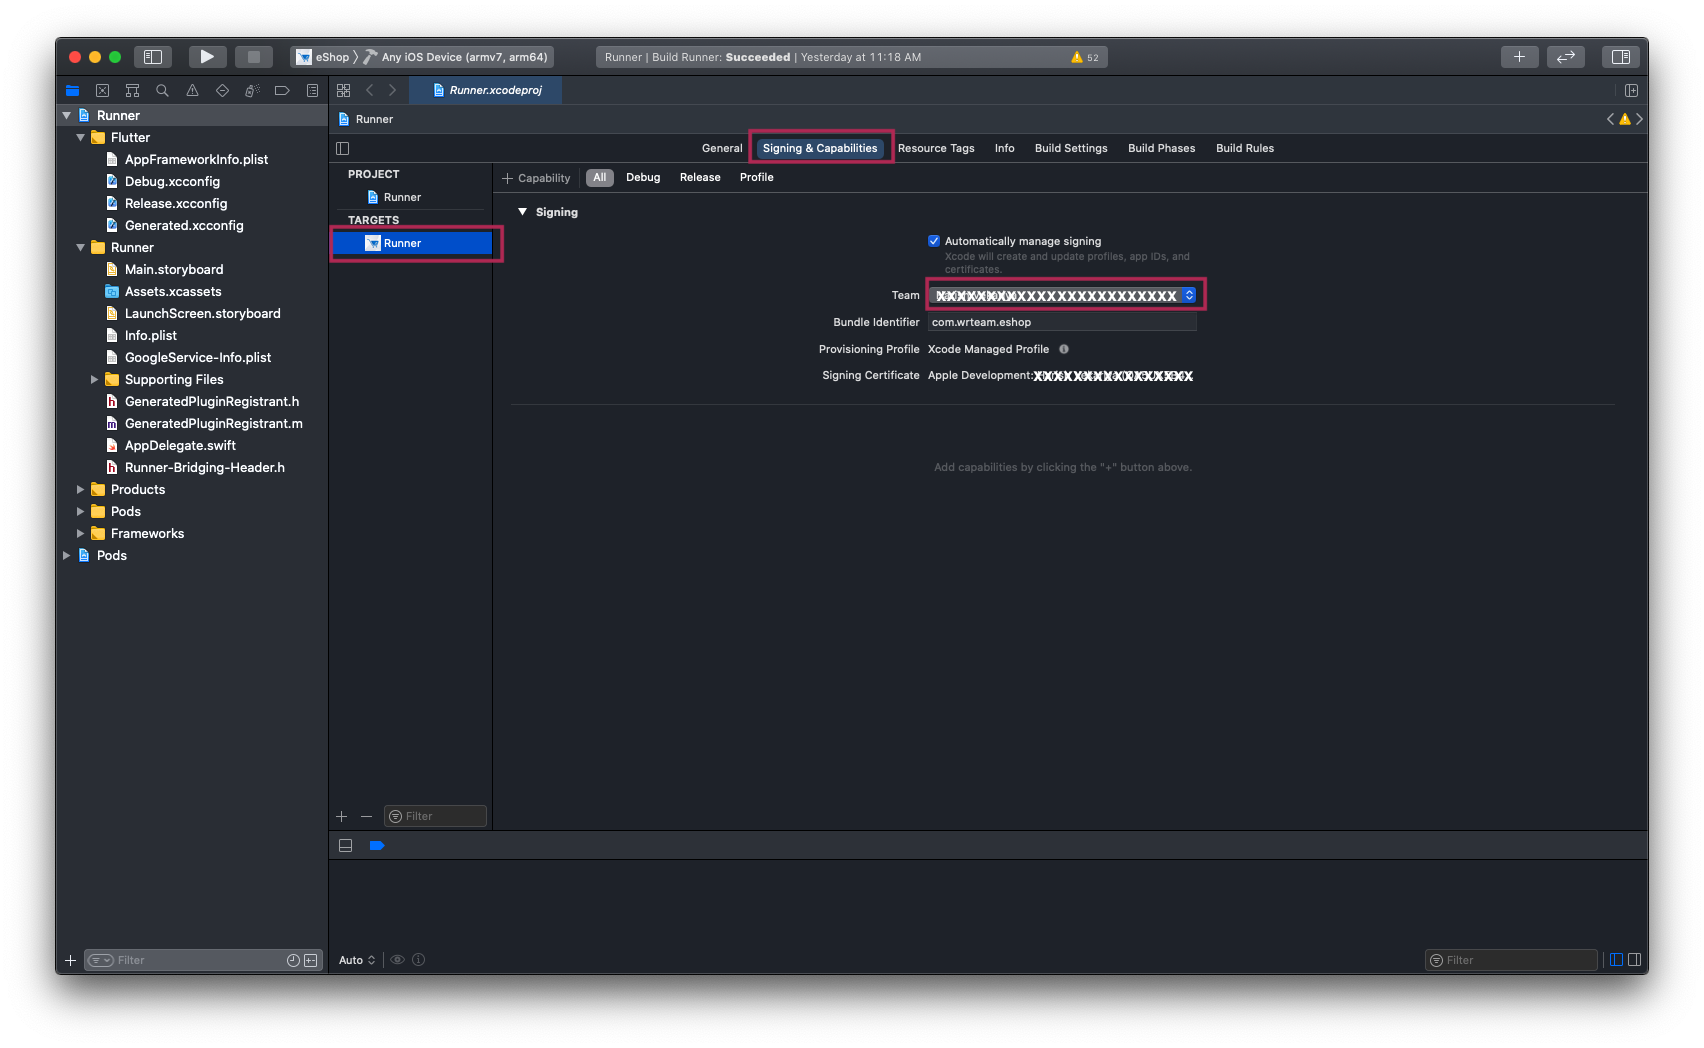
- In Xcode, select the Signing & Capabilities tab, and add "Sign
In With Apple" as a new Capability then select a team on the
Code Signing section.
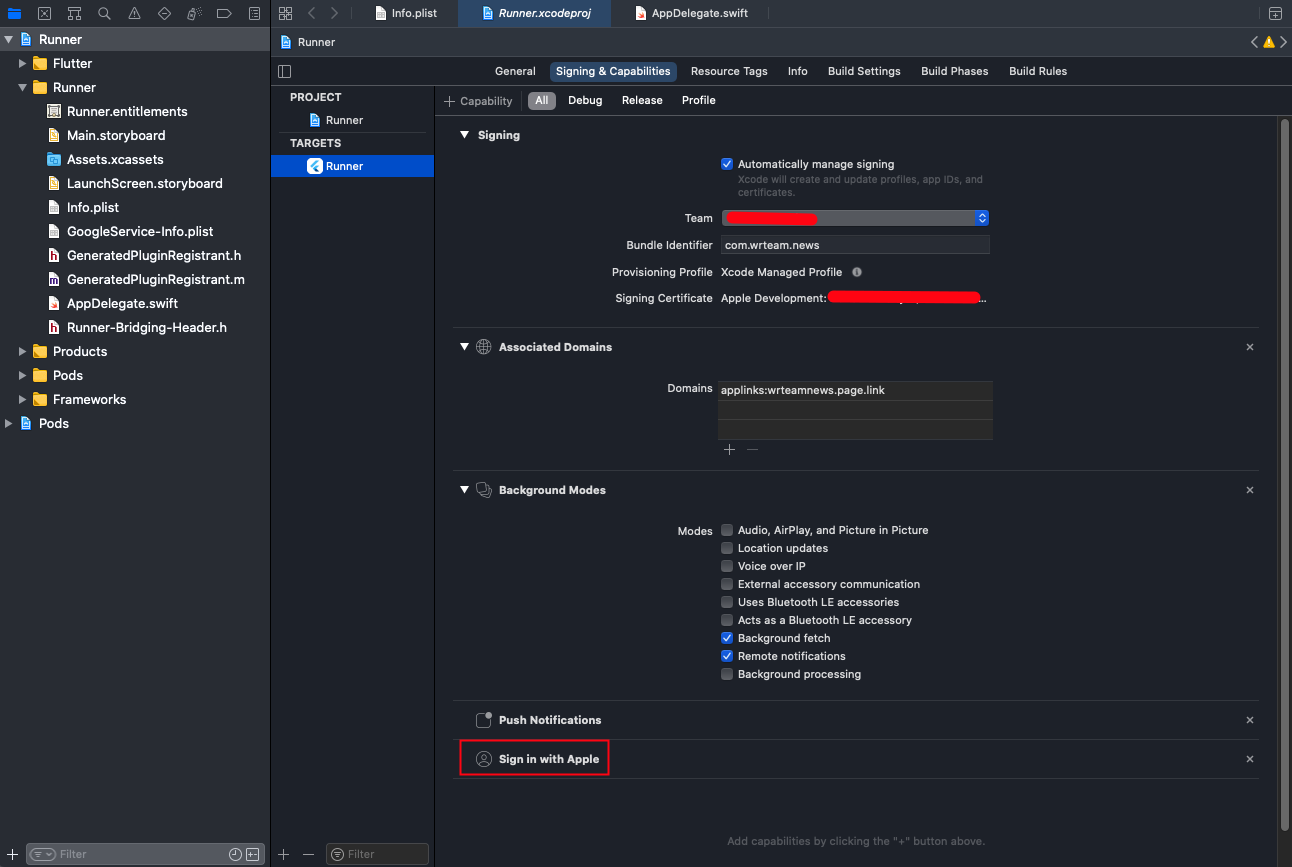
- This will generate and configure an App ID in the "Certificates, Identifiers & Profiles" section of the Apple Developer portal.
How to set Notification
- for ios your need to perform below given step
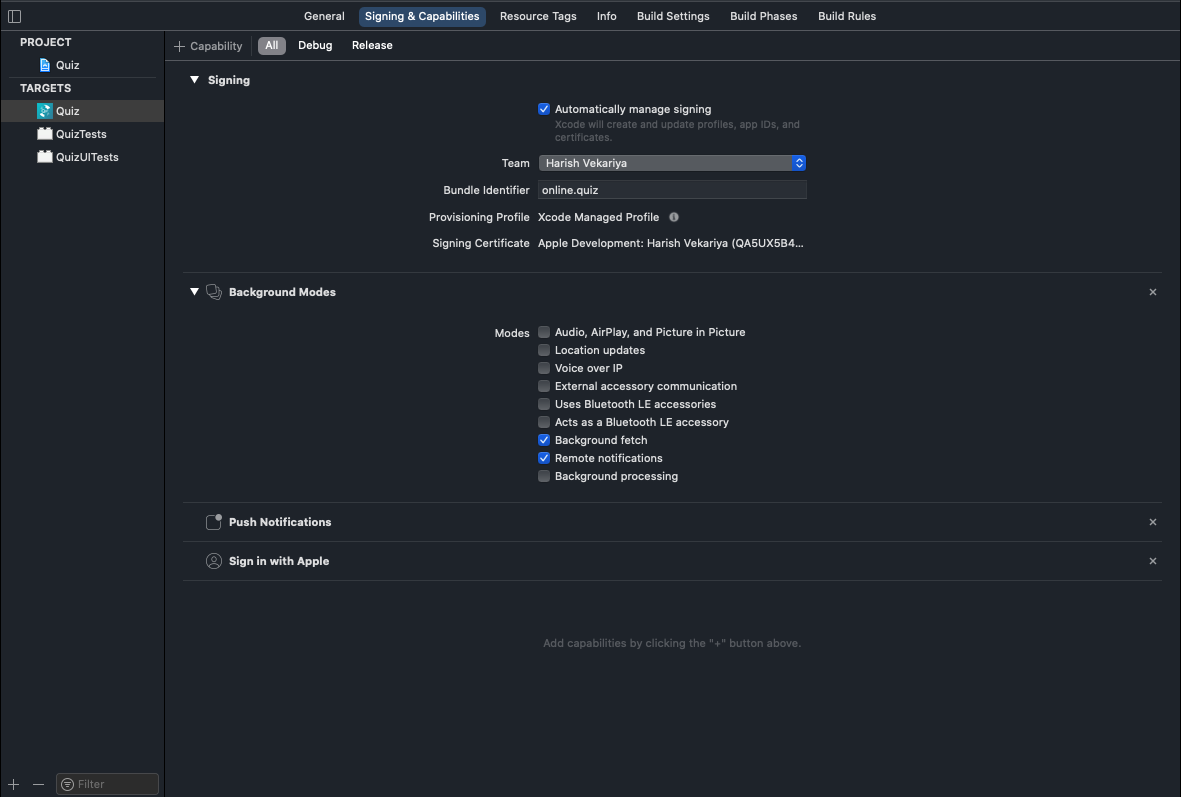
- In Xcode, open the project.
- In the Project Navigator (the left-hand menu), select the project icon that represents your app.
- In the top-left corner of the right-hand pane in Xcode, select your app's target.
- Navigate to the Capabilities tab.
- Enable Push Notifications.
- Check Remote Notifications and Background Fetch from Enabling Background Modes.
- APNs (Apple's Push Notification service) currently supports two types of connections: token-based (.p8) and certificate-based (.p12).you can follow either one of them
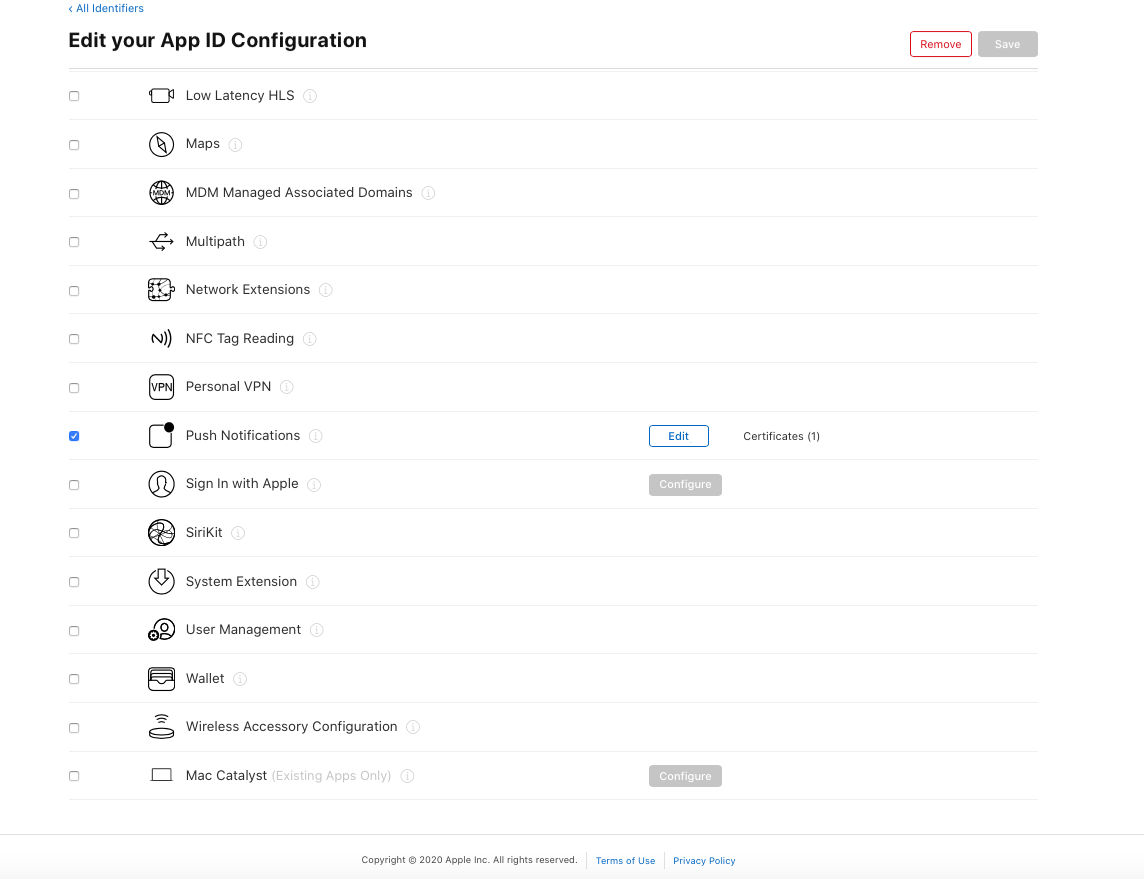
- Log in to the Apple Developer Portal.
- Navigate to Certificates, IDs & Profiles > Identifiers > App IDs and click the App ID associated with your app.
- On the screen for your App ID, check Capabilities > Push Notifications.
- Select App ID in next page & click continue.
- And then create Development SSL Certificate & Production SSL Certificate by adding CSR certificate. follow Apple's Create a certificate signing request instructions.
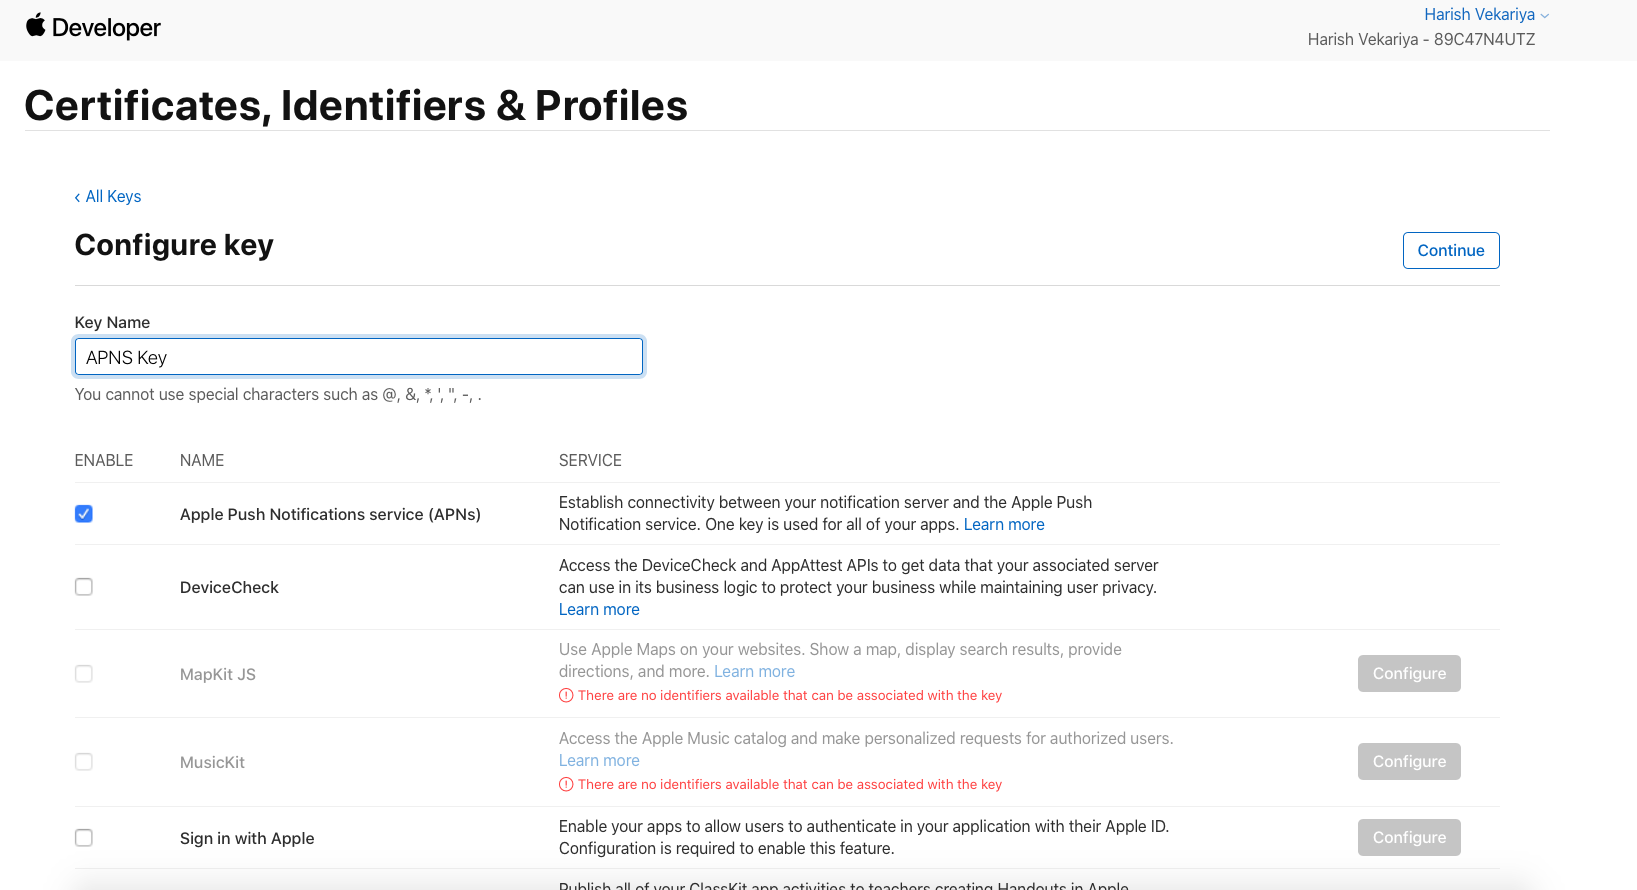
- Navigate to Certificates, IDs & Profiles > Keys Section and add a Universal key for Notifications,which you can use for more than one apps as well. >
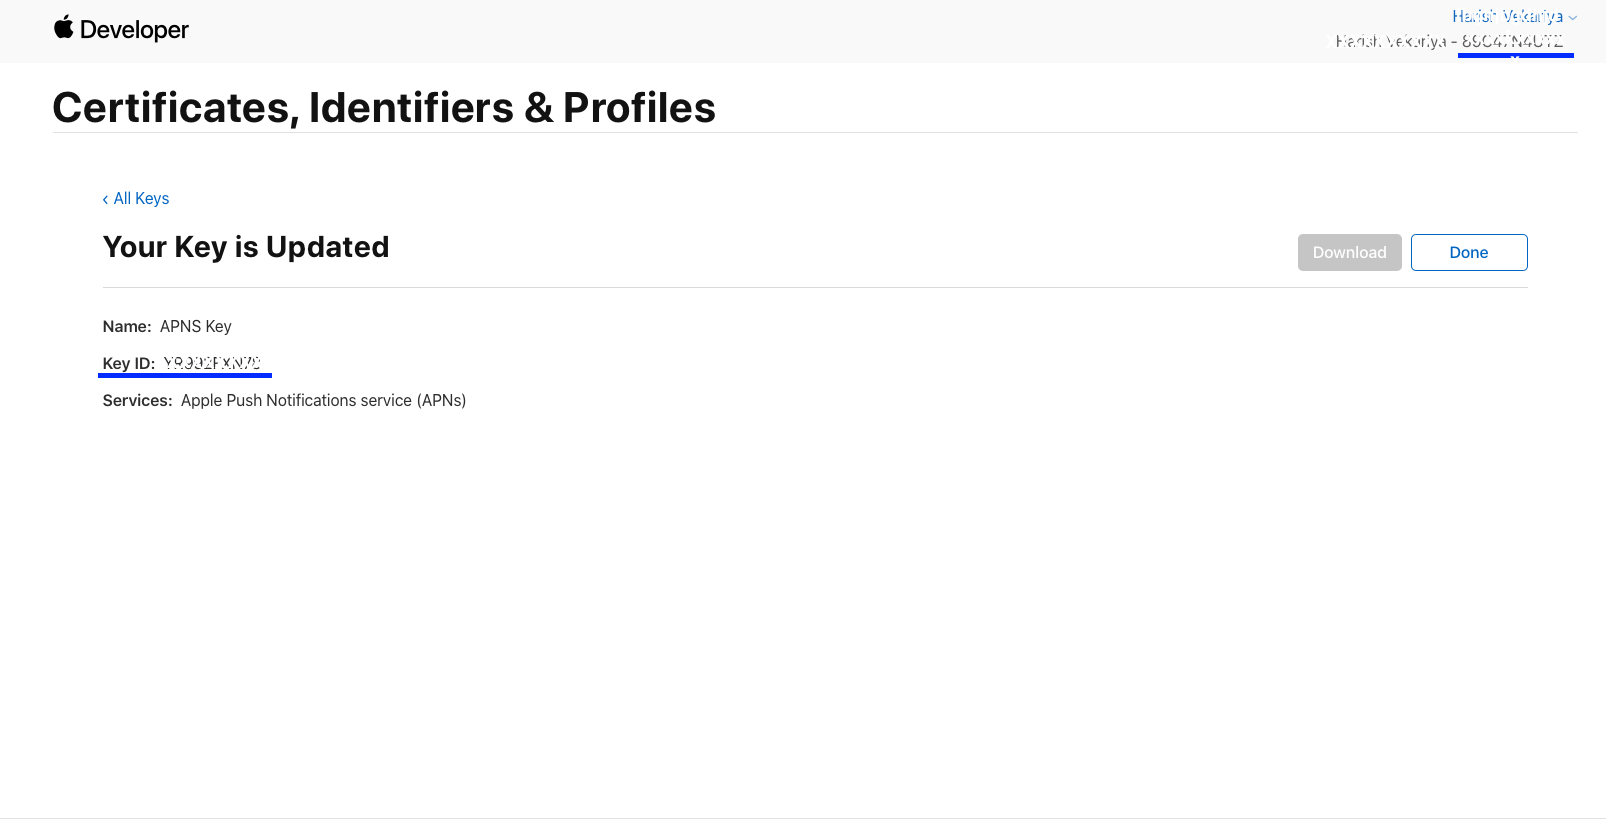
- Just save and Download & keep it safe, as it will be downloaded only once.
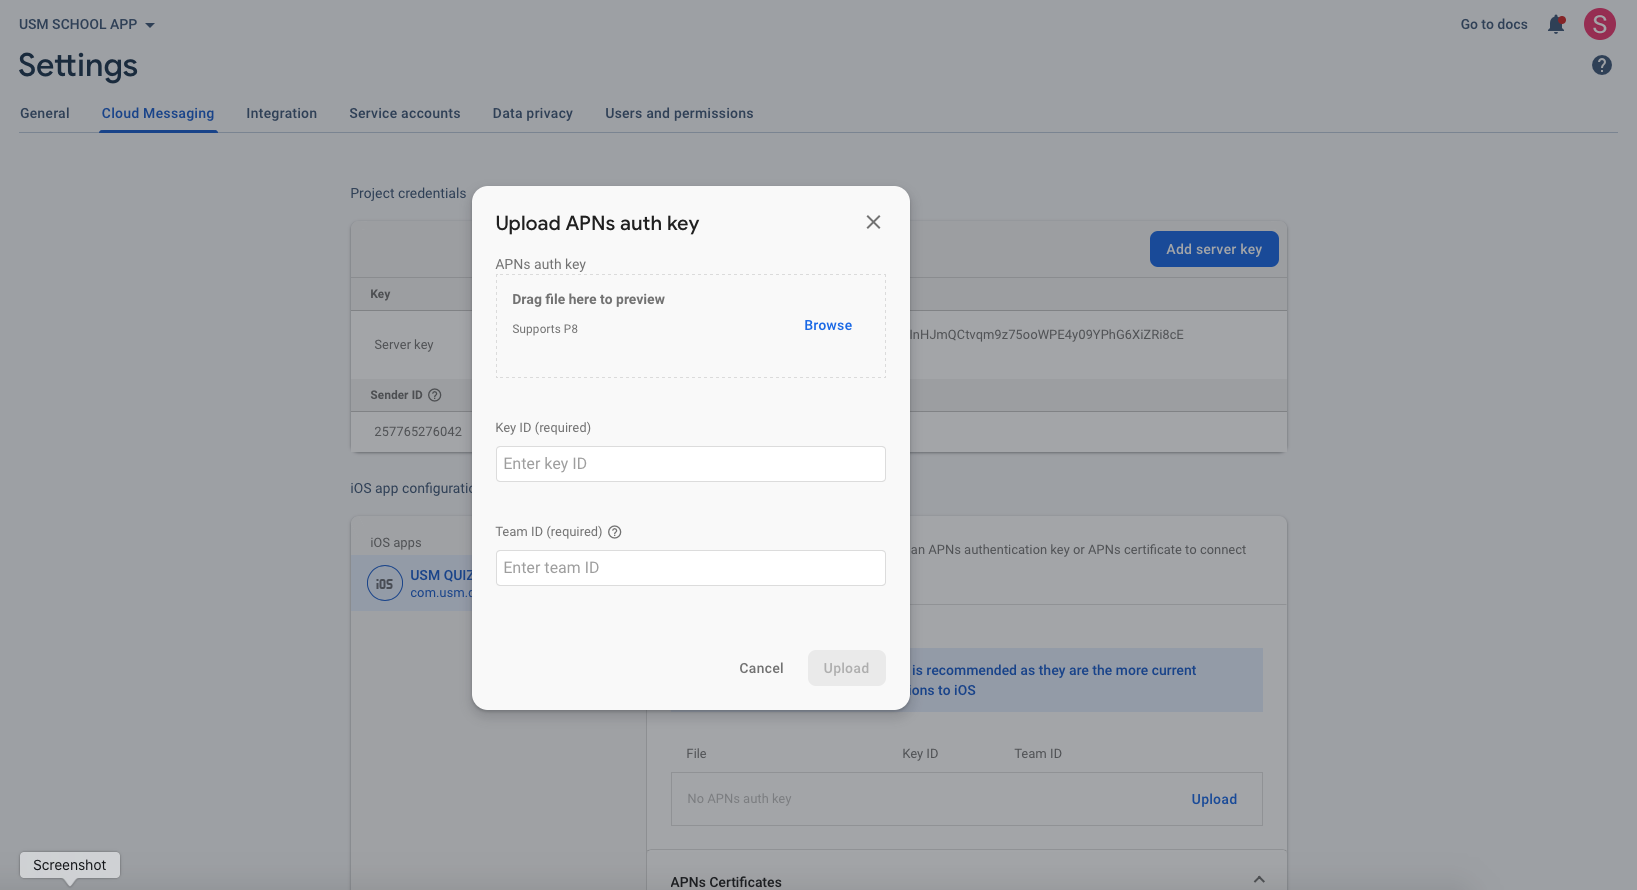
- Then go to Firebase and add this .p8 file along with Your Key ID and Team ID.
- Log in to the Apple Developer Portal.
- Navigate to Certificates, IDs & Profiles > Identifiers > App IDs and click the App ID associated with your app.
- On the screen for your App ID, check Capabilities > Push Notifications.
- Click Save and respond to the Modify App Capabilities dialog box that appears.
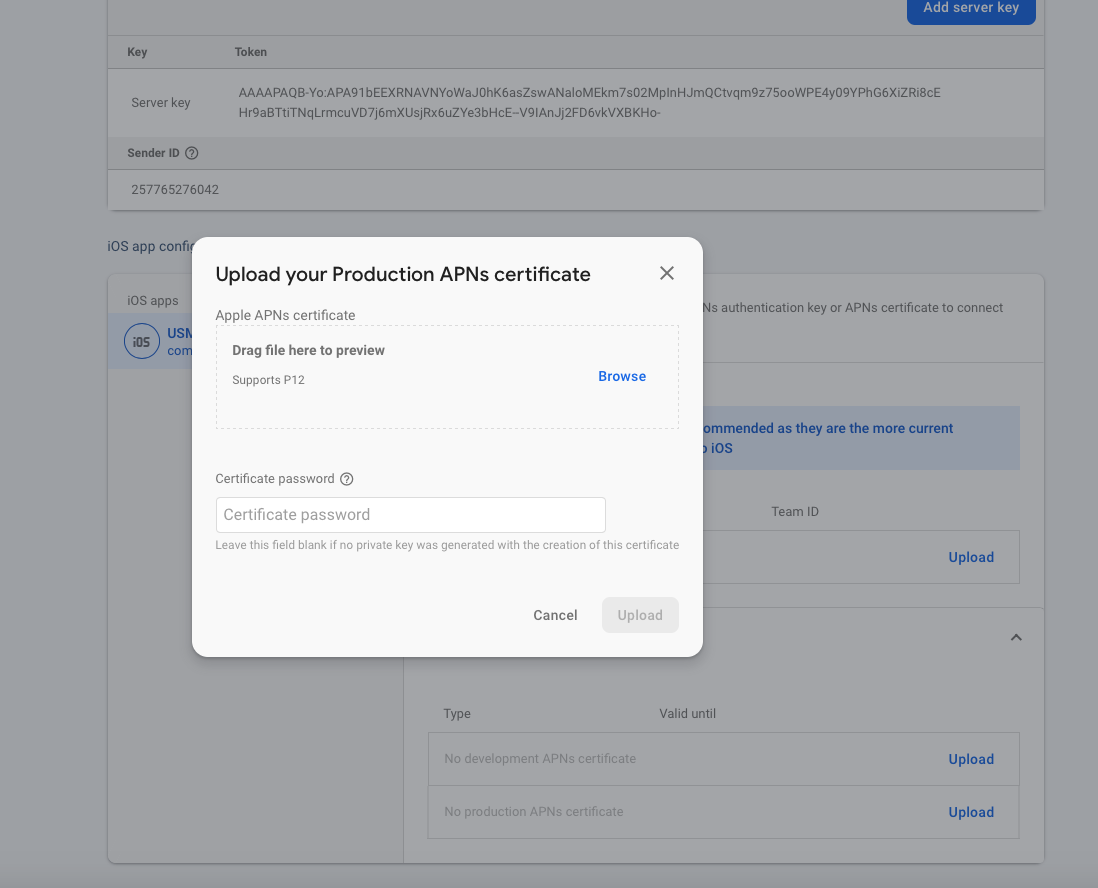
- To create the certificate, we will use to communicate with Apple when sending push notifications:
- In a new browser tab, follow Apple's Create a certificate signing request instructions.
- In the Apple Developer Portal, navigate back to your App ID.
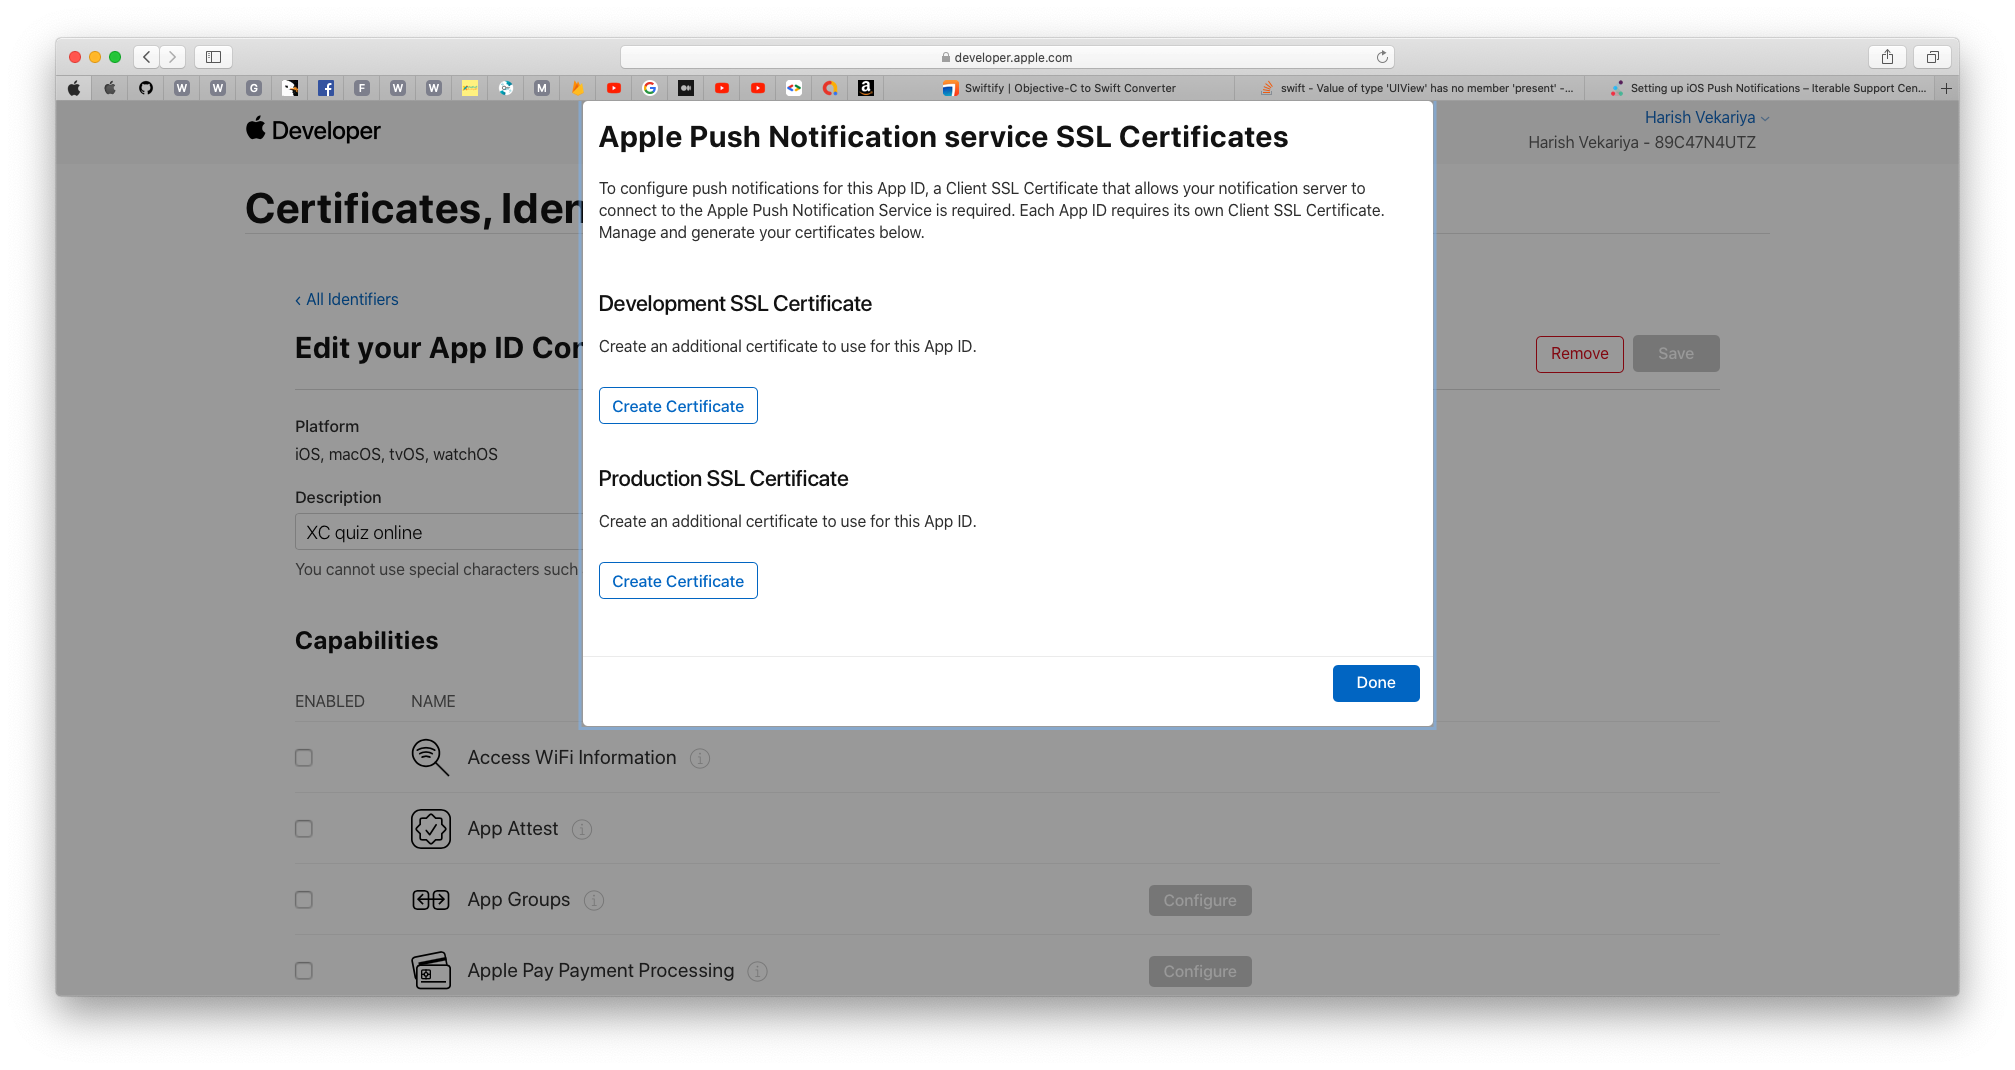
- Click Capabilities > Push Notifications > Configure.
- Click one of the following buttons:
- Development SSL Certificate > Create Certificate (for testing push notifications while developing an iOS app)
- Production SSL Certificate > Create Certificate (for sending push notifications in production)
- Click Choose File and select the certificate signing request you created above.
- Click Continue.
- Click Download to download the certificate.
- Use this file to export a .p12 file in the next step.
- Navigate in the Apple Developer Portal to Certificates, IDs & Profiles > Provisioning Profiles.
- Click the provisioning profile you'd like to edit.
- Edit the provisioning profile as necessary, and click Save.
- Click Download, and double-click the downloaded provisioning profile to install it.
- Make sure your Xcode project is configured to use the provisioning profile as necessary.Next, export the downloaded certificate (.cer file) as a .p12 file that can be uploaded to firebase:
- On your Mac, double-click the .cer file to open it in Keychain Access.
- In Keychain Access, in the lower-left corner, select Category > Certificates.
- Select the certificate to export.
- Choose File > Export Items.
- Enter a name in the Save As field.
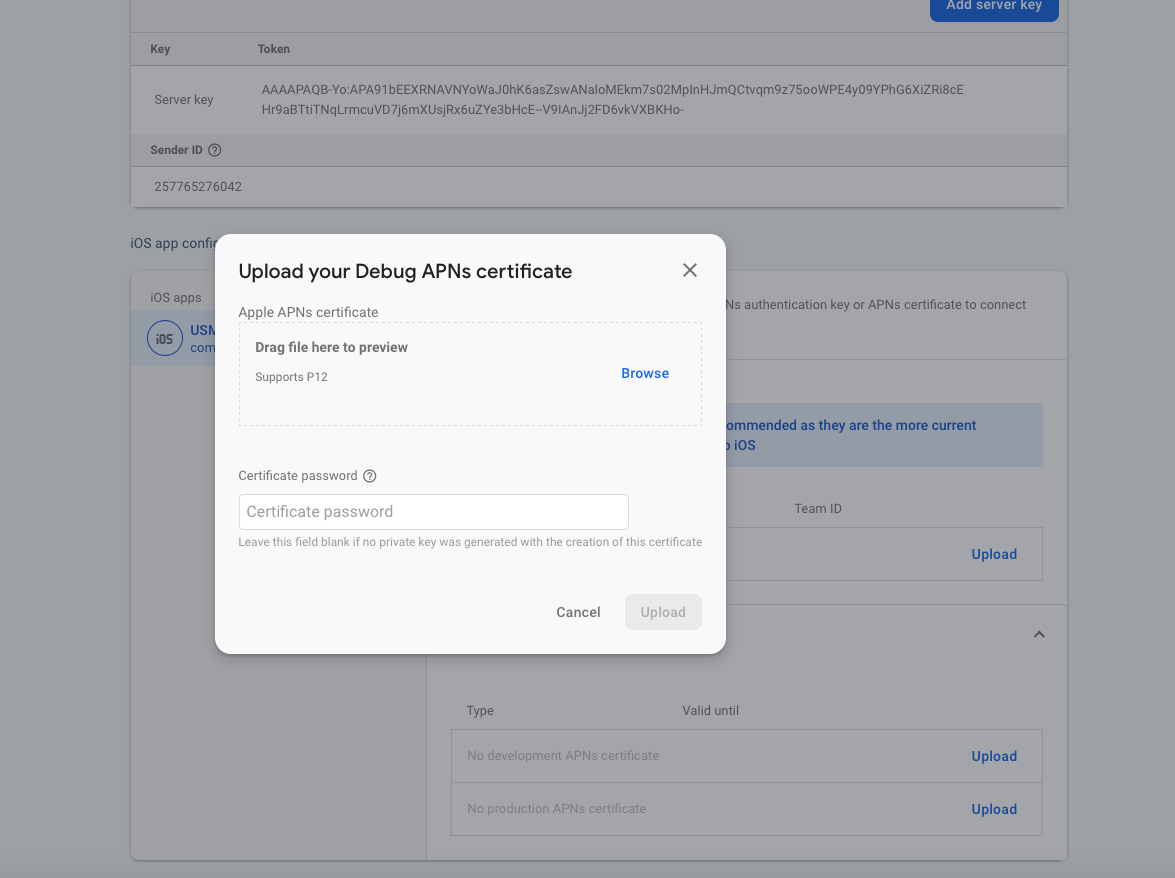
- Accept the default .p12 file format and click Save. Respond to the prompts, and enter a password for the file if necessary.
- Keep track of this file, since you'll upload it to firebase in a later step.
For Token-based (.p8).
FOR certificate-based (.p12) :
Steps For Manage Native Link
(Check Video)
- Open your admin panel.
- Go to System > Store Settings.
- add android playstore link, ios appstore link, one word scheme and Host name. (Note: after release apps in appstore and playstore don't forgot to add your link in admin panel)
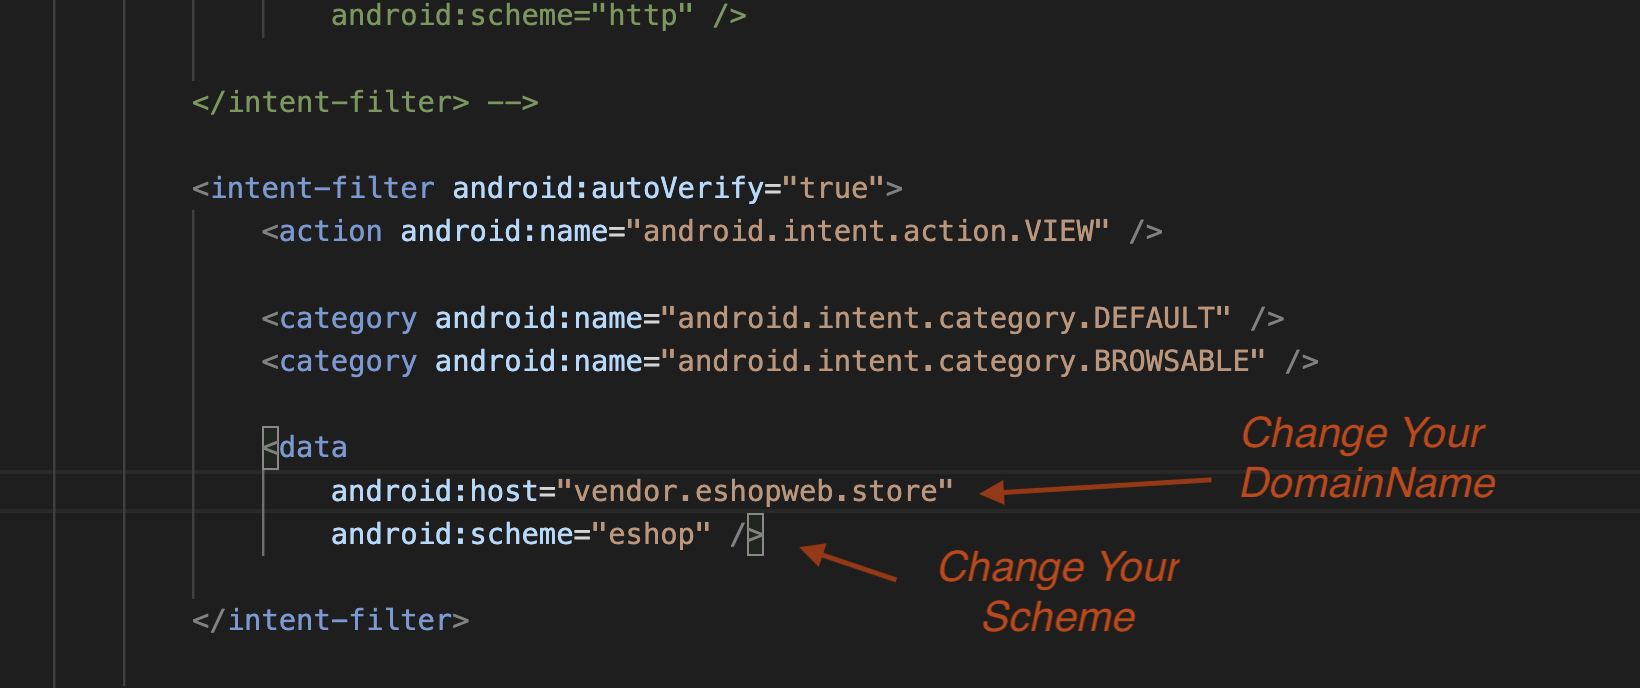
- For android go to android > app > src > main > AndroidManifest.xml and change scheme and your DomainName here
- For ios go to ios > Runner > Info.plist and change scheme
- Change your DomainName in lib > appConstants.dart.


How to Add Map API key for Address
(Check Video)
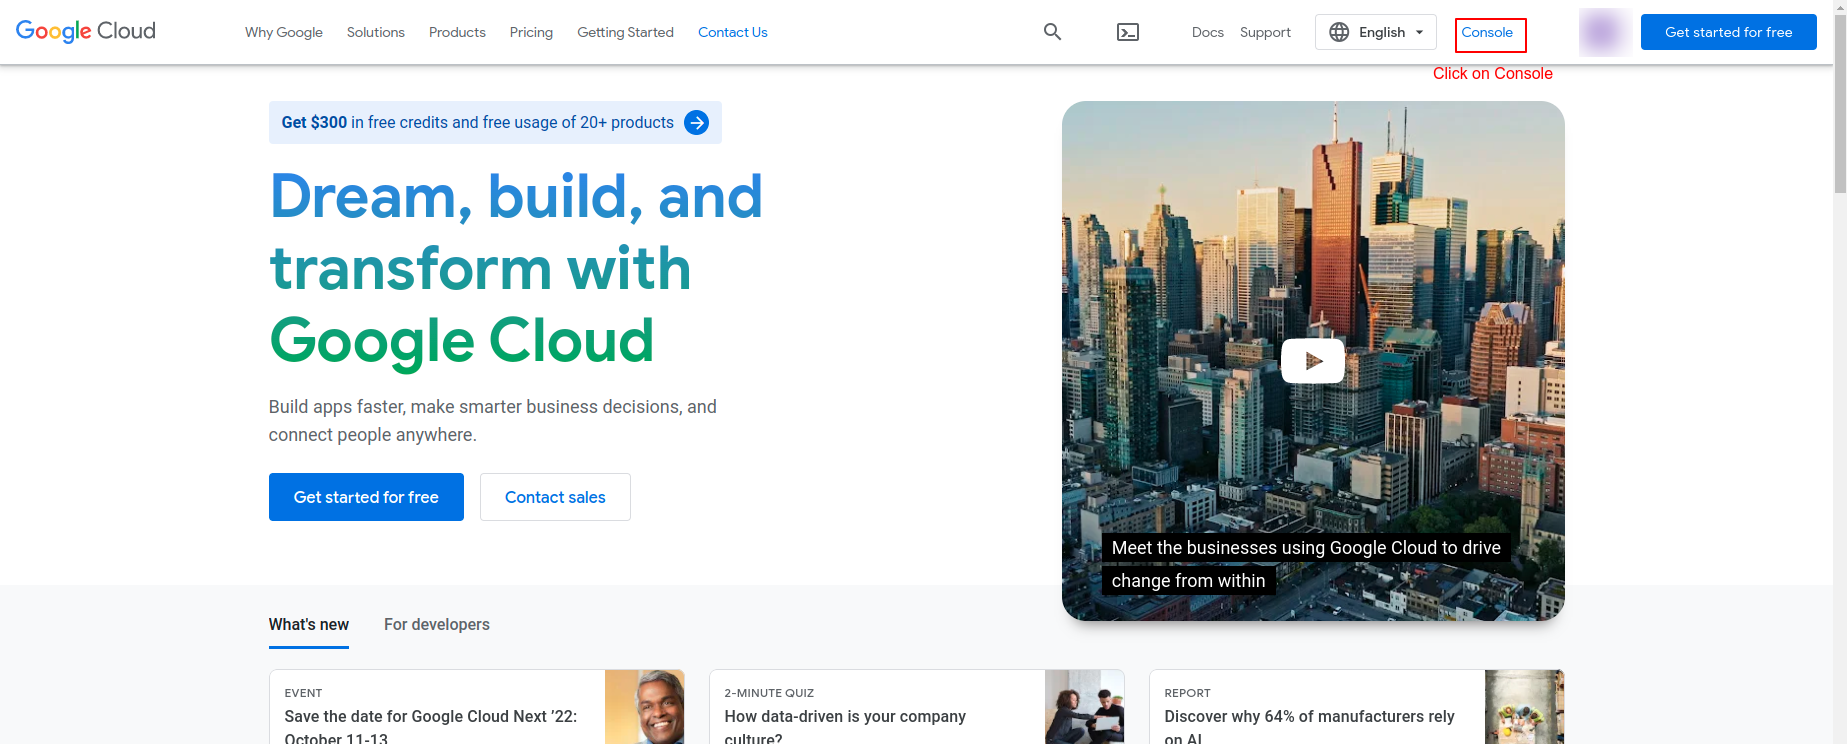
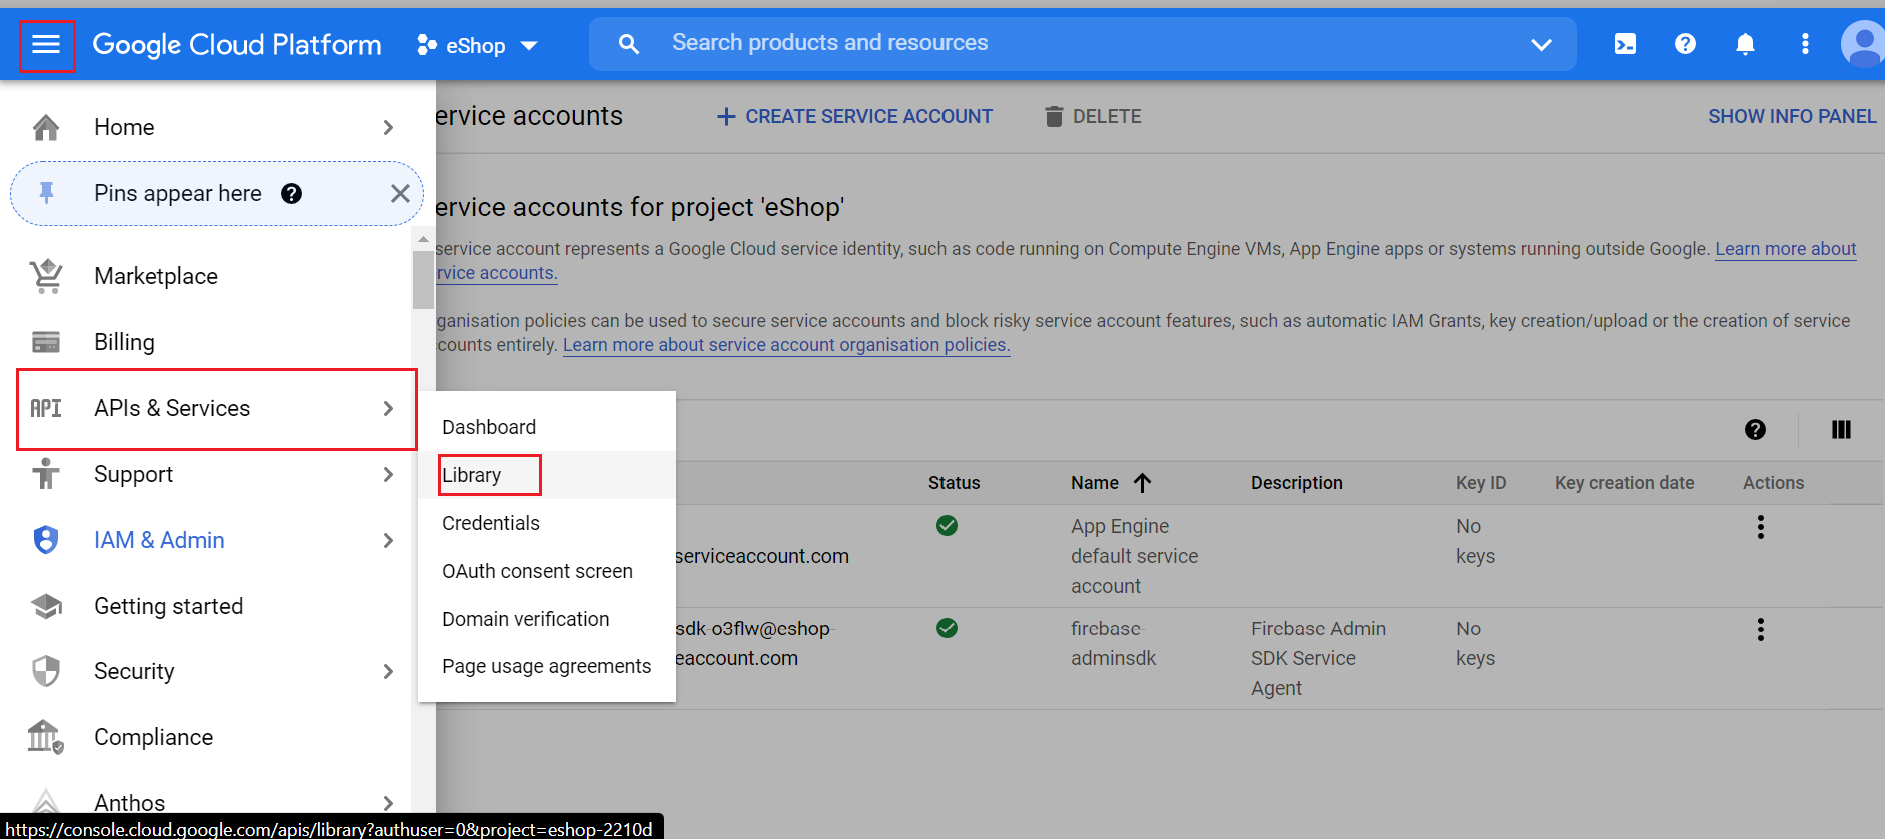
- Go to Google Cloud Platform. Click here
-
Click on console.
-
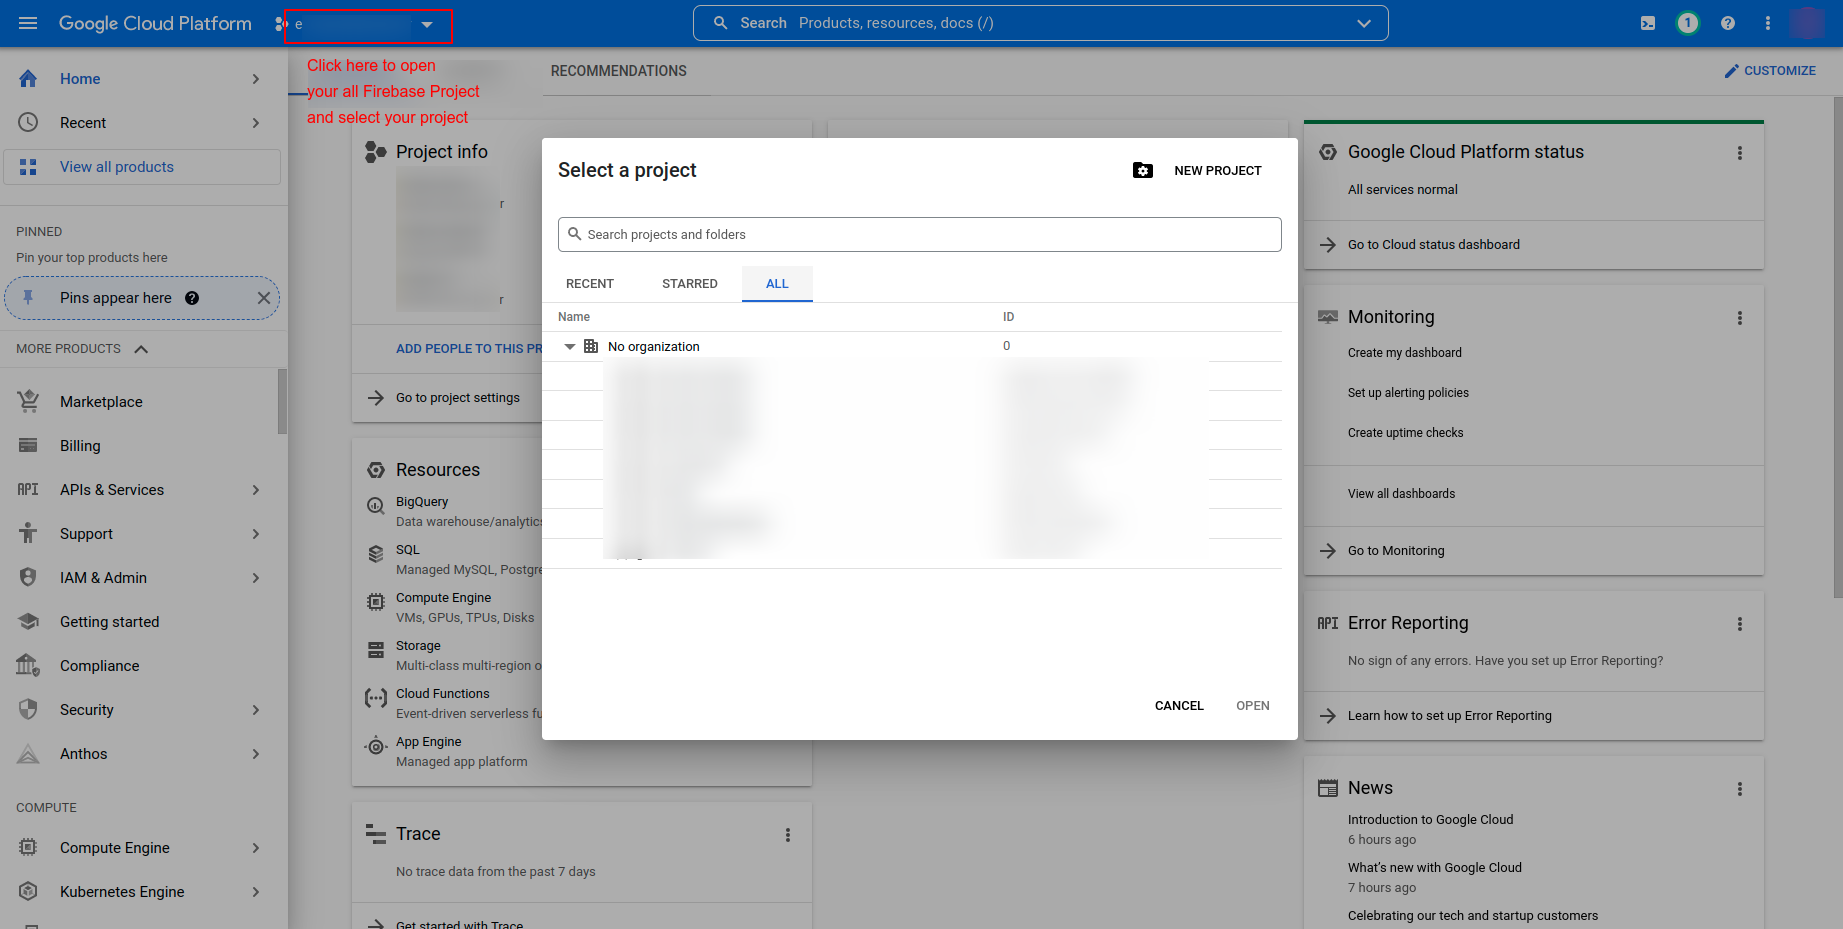
Select your Firebase Project
-
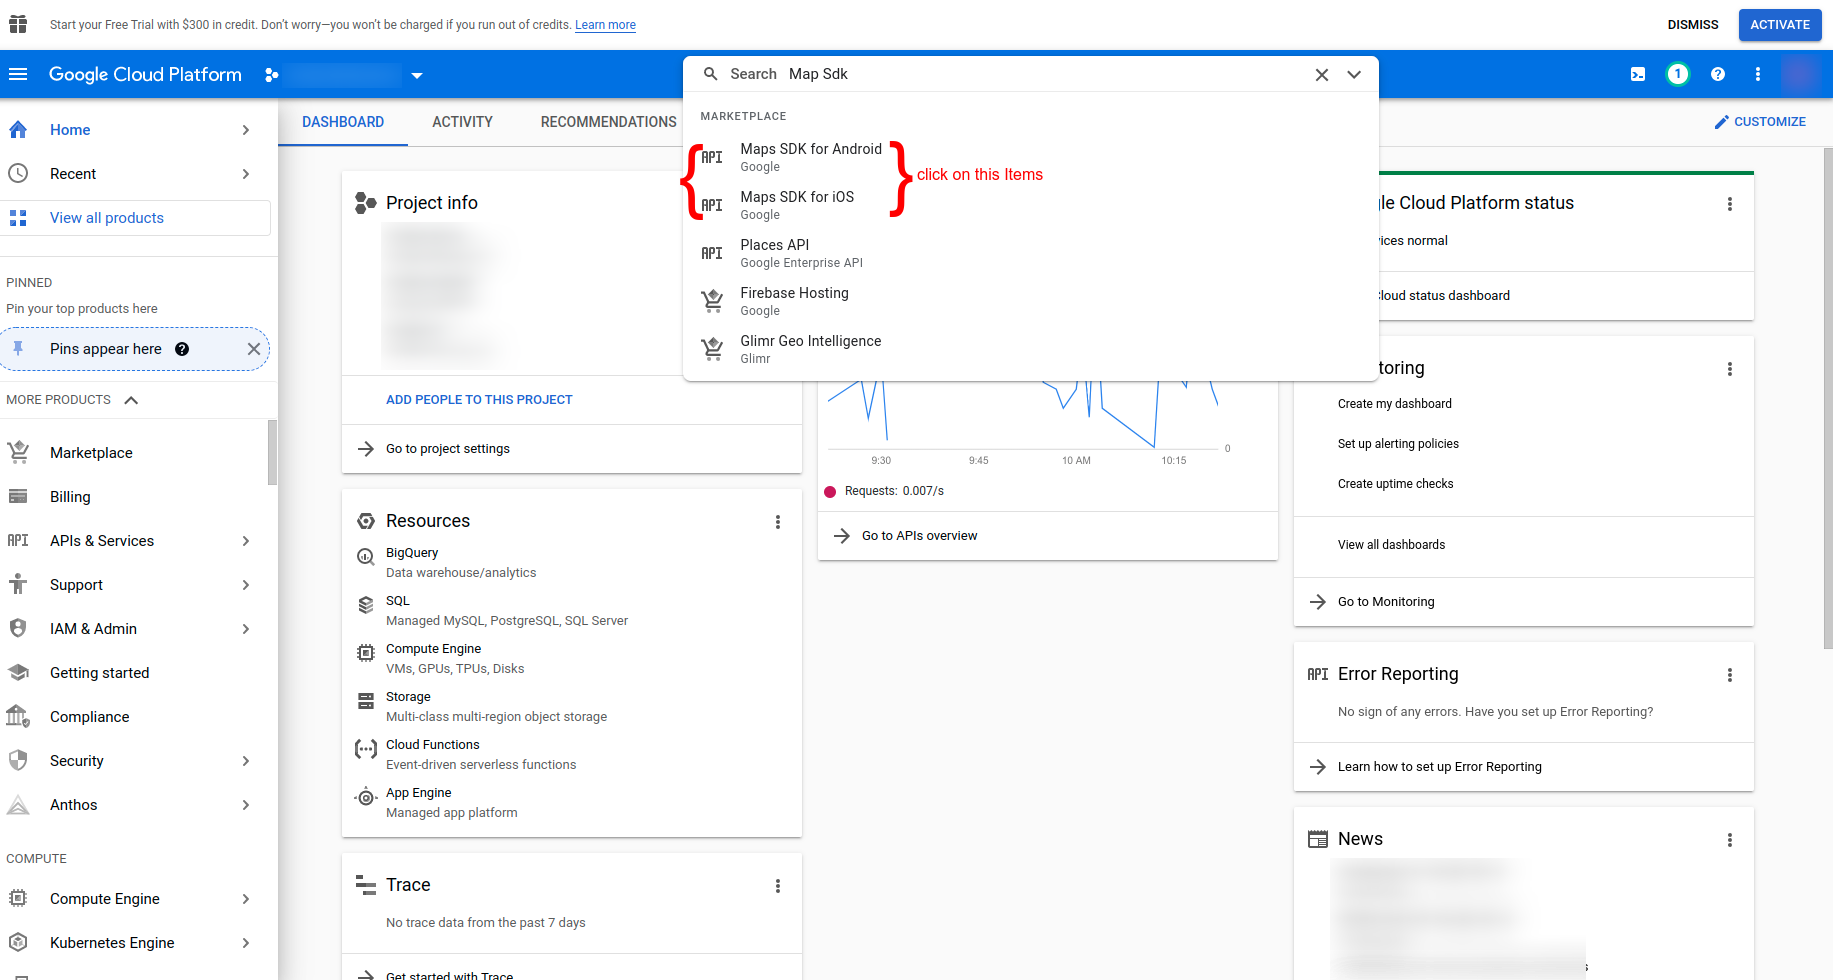
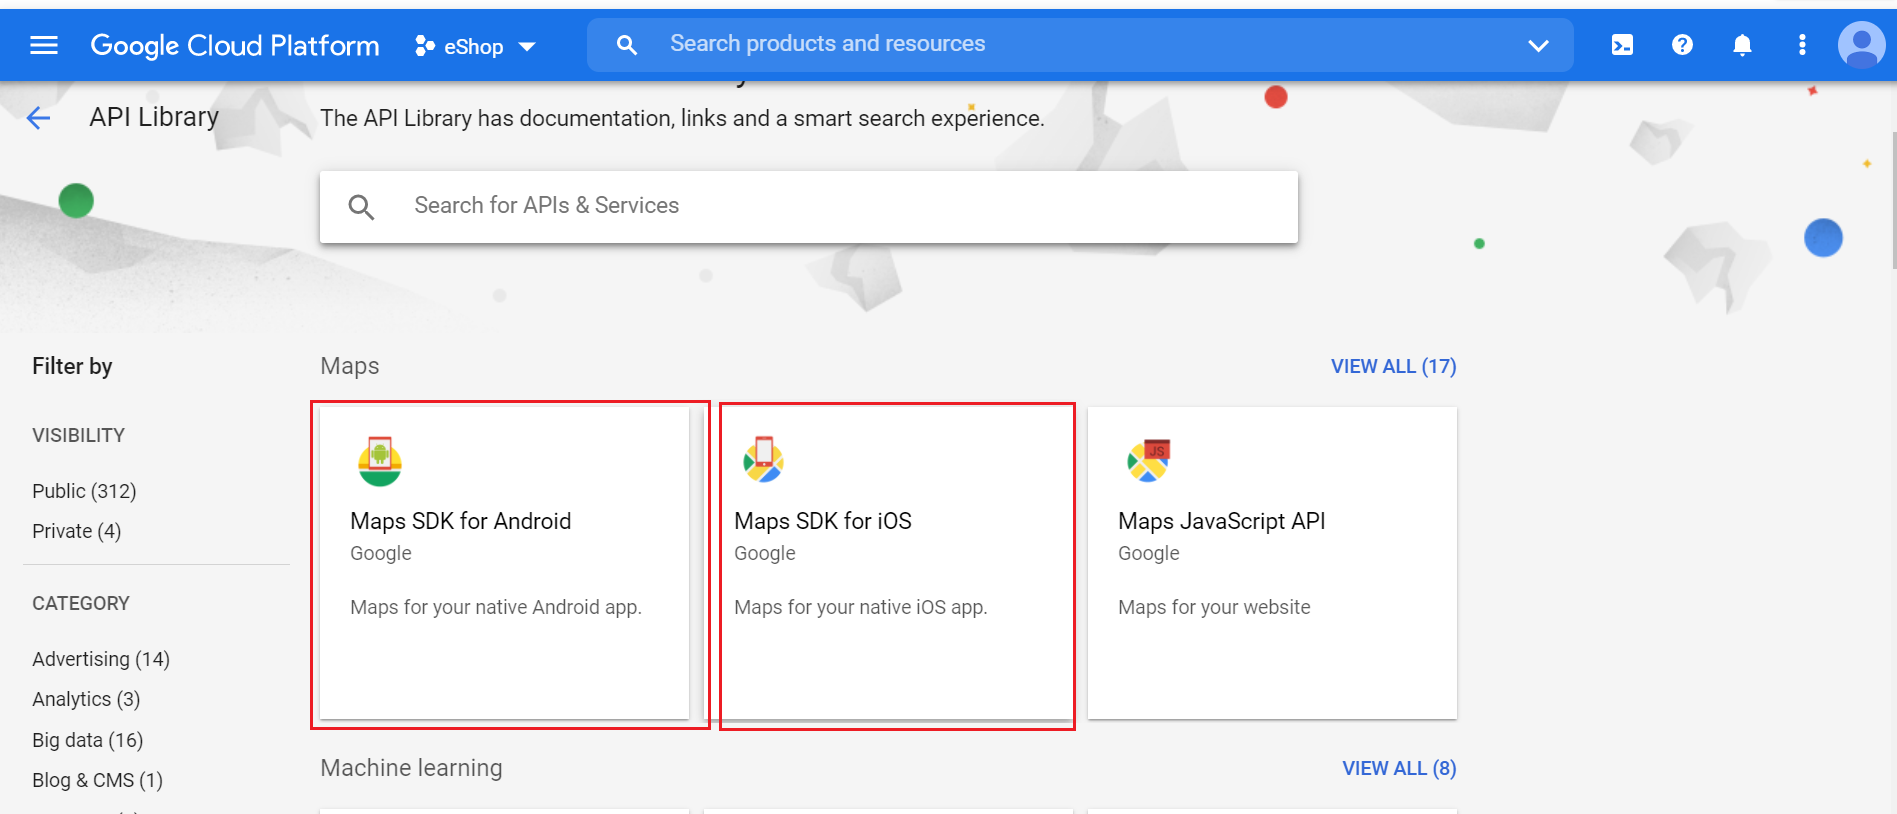
Search for APIs, which are shown in below image.
-
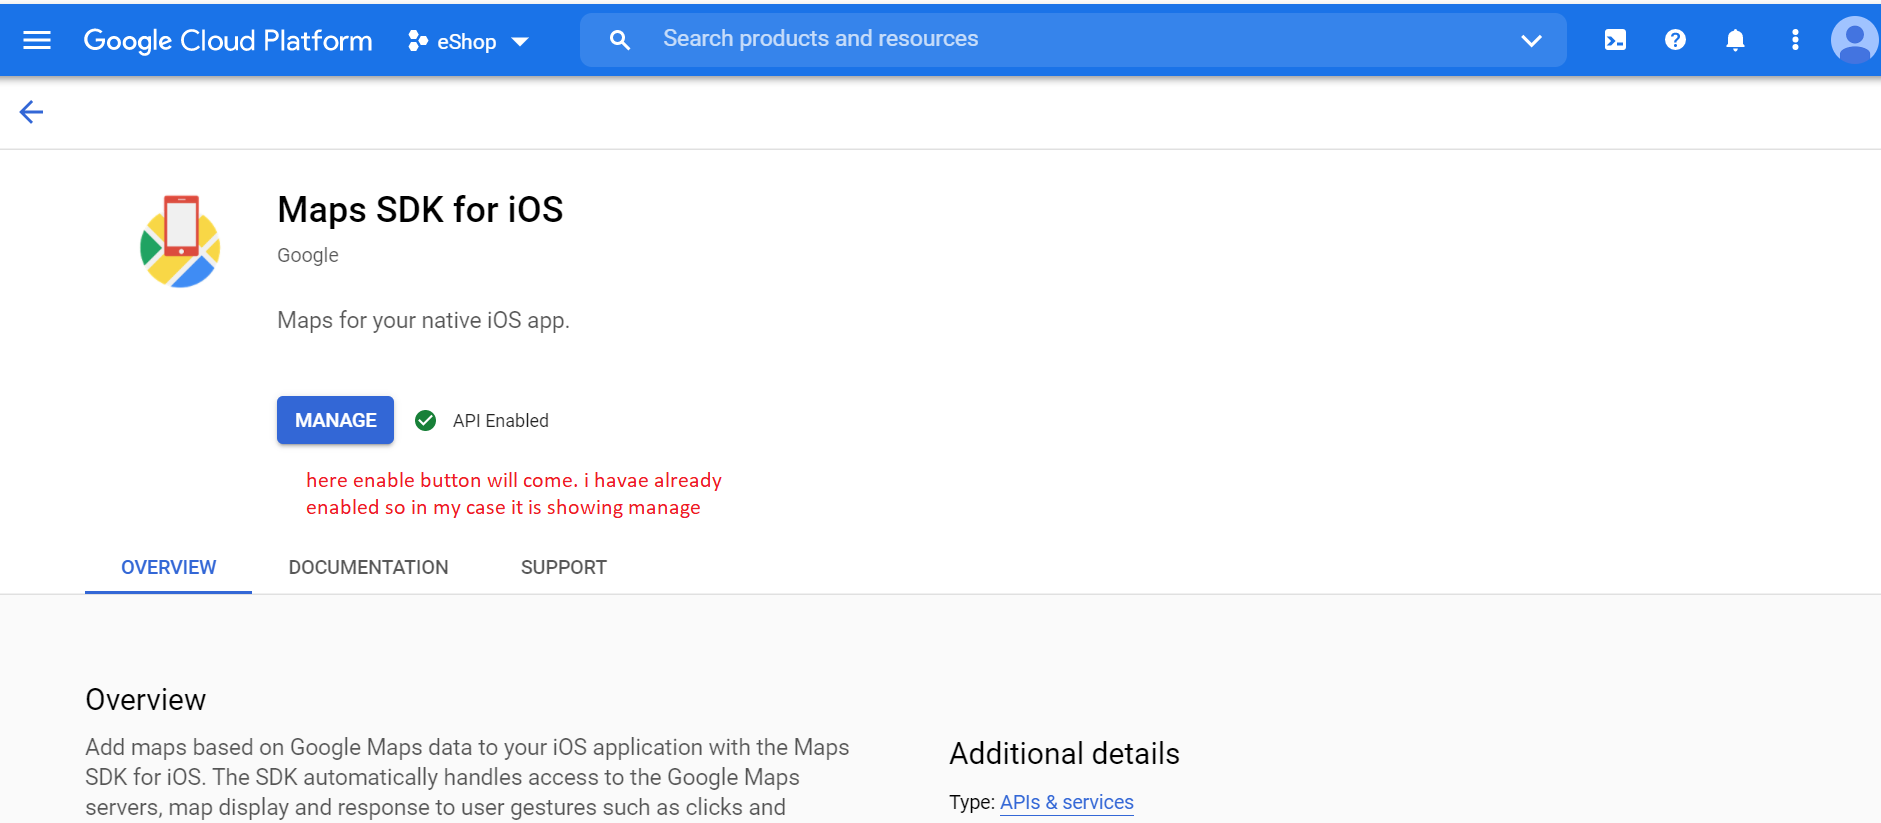
Click on Enable to, enable that APIs

-
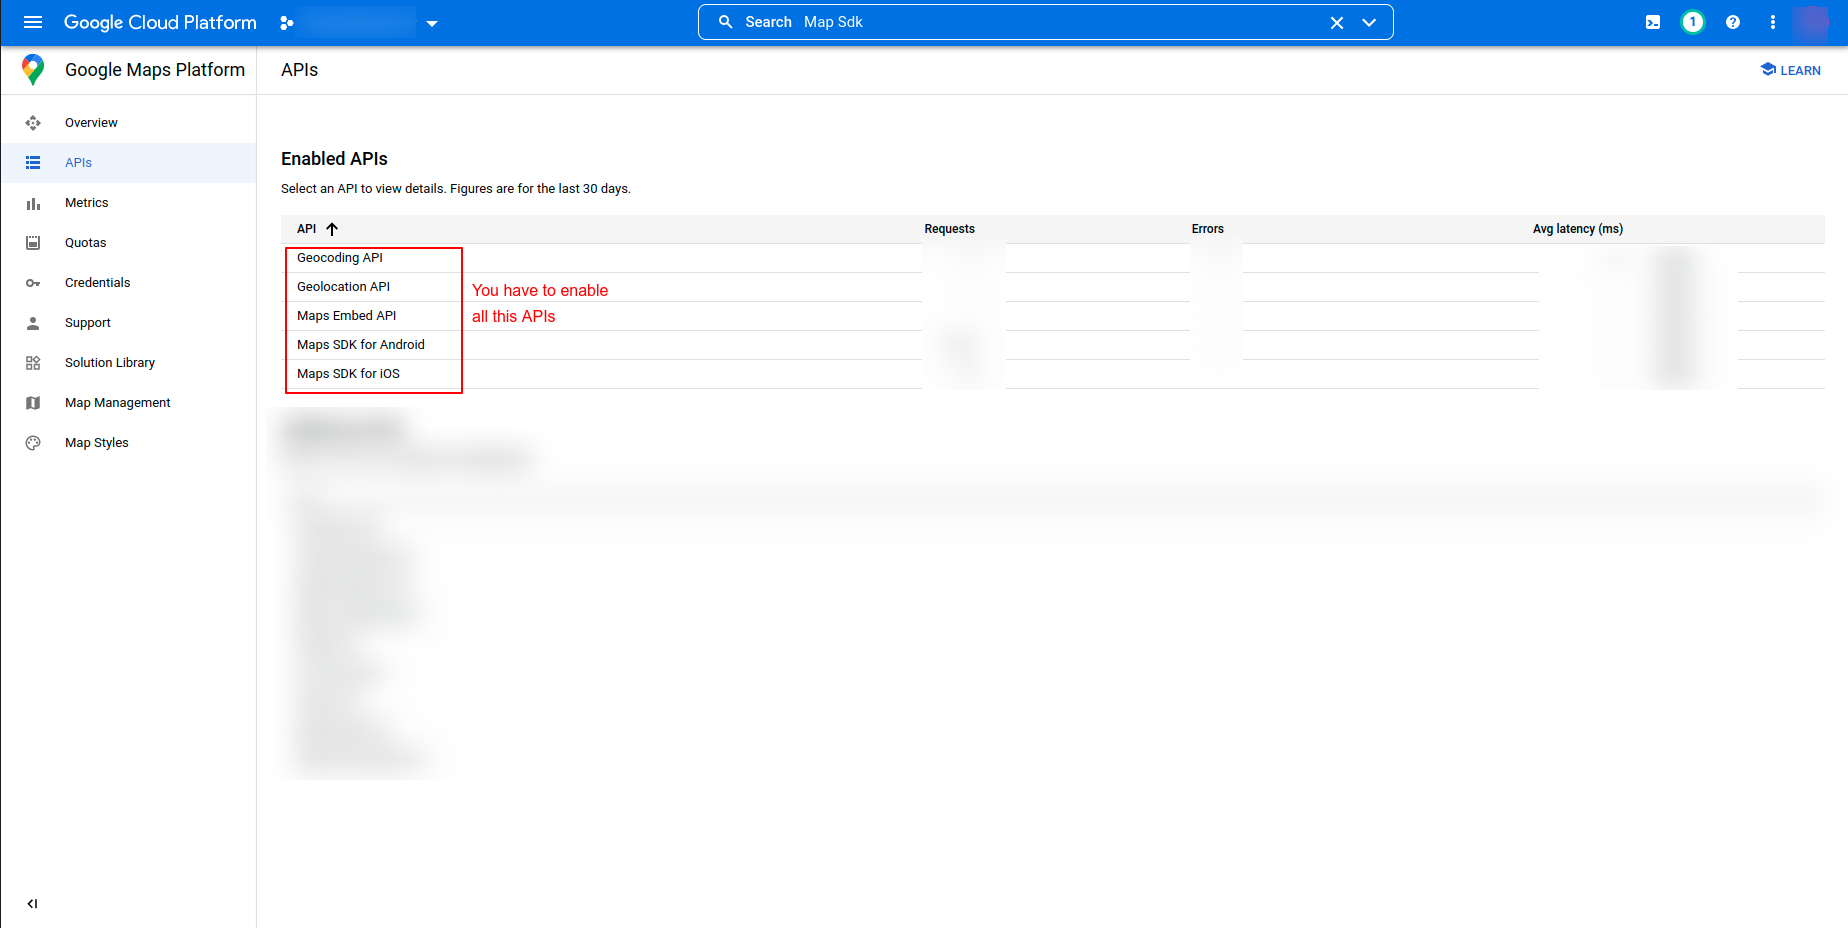
Do above steps for below listed API. (enable all below APIs one
by one by
searching)
-
Go to Credential Tab. you will find your Androiod and iOS API
keys.
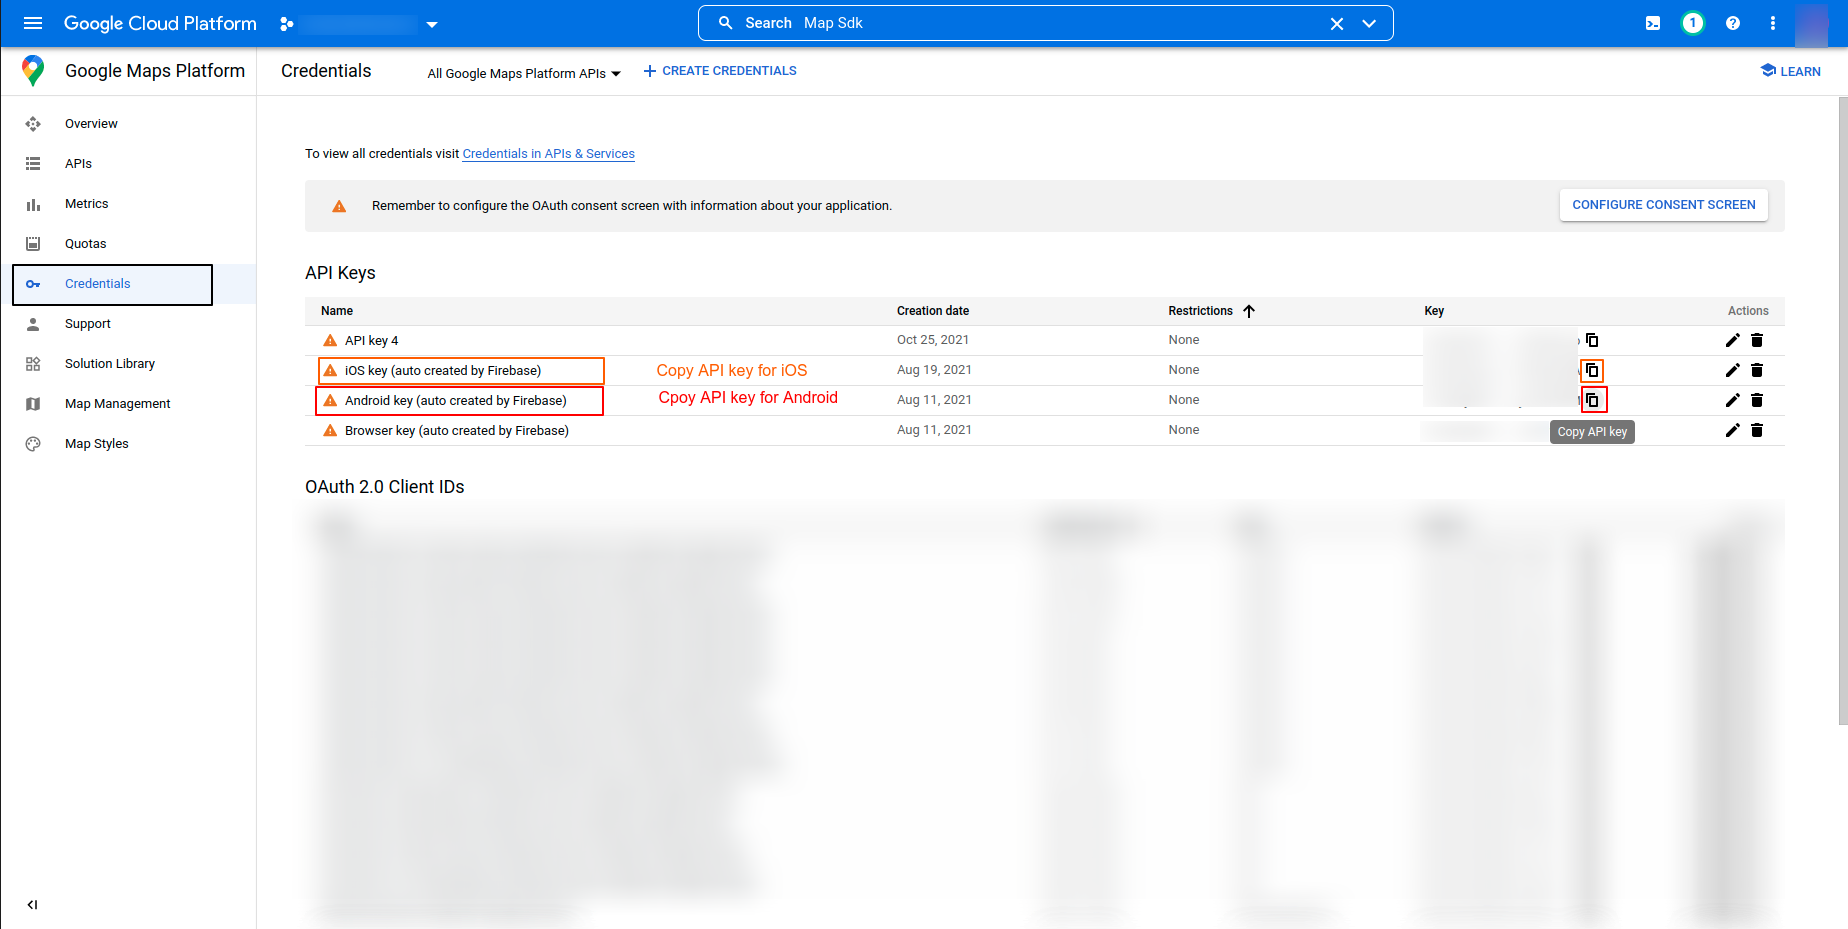
-
You have to setup those above API keys for both Platform.
- Android Setup
-
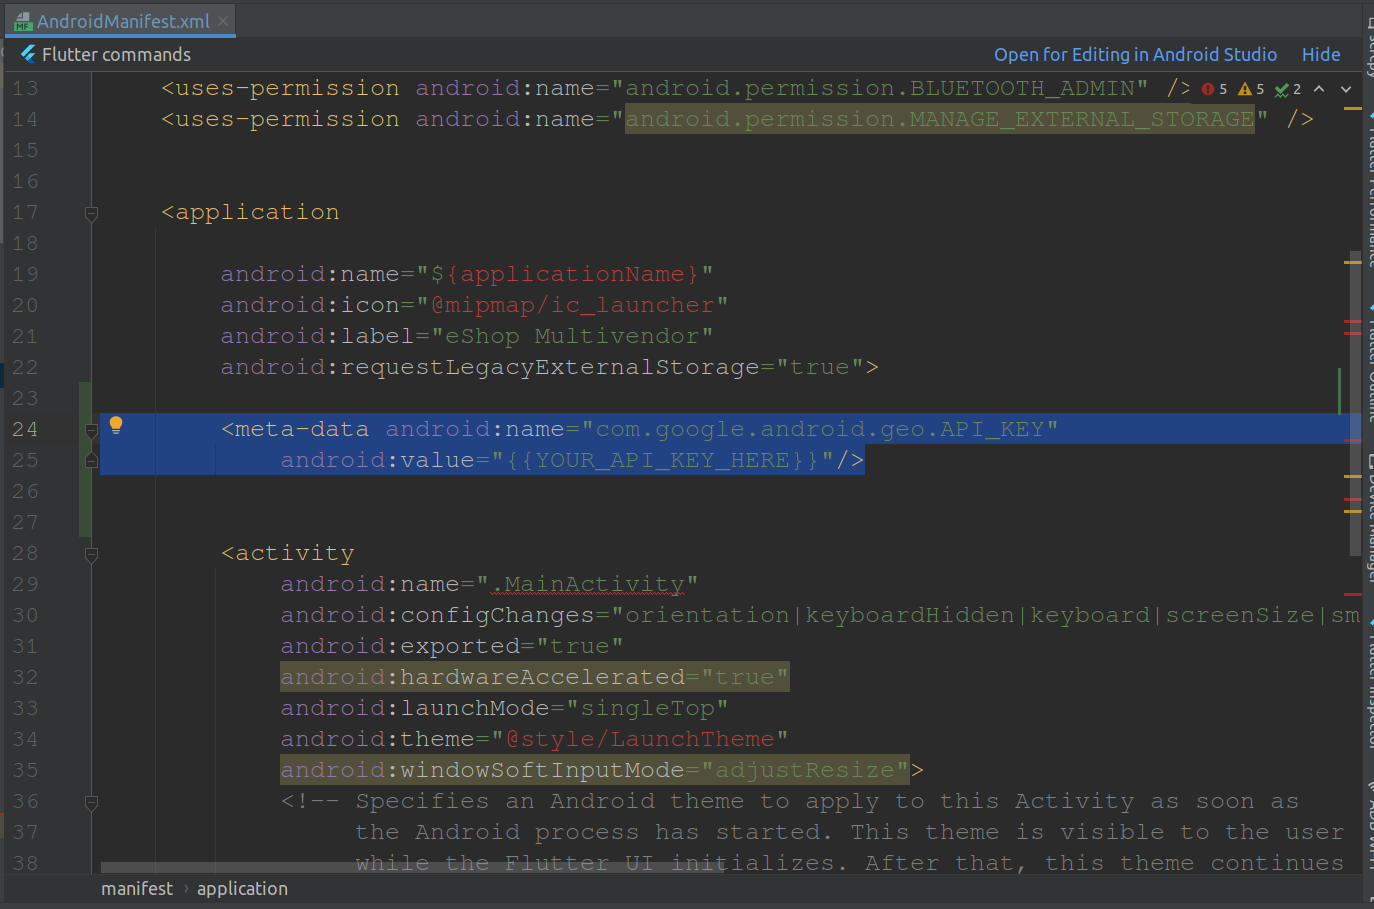
Next, open android ‣ app ‣ src ‣ main ‣
AndroidManifest.xml and
paste the Google Maps meta data tag into your
application tag
before
the activity tag, placing the API key you copied
before to
replace
{{YOUR_API_KEY_HERE}}.
<meta-data android:name="com.google.android.geo.API_KEY" android:value="{{YOUR_API_KEY_HERE}}" />
Note: For the value field, please paste in your API
Key from the Google
Maps
API registration process. -
Next, open android ‣ app ‣ src ‣ main ‣
AndroidManifest.xml and
paste the Google Maps meta data tag into your
application tag
before
the activity tag, placing the API key you copied
before to
replace
{{YOUR_API_KEY_HERE}}.
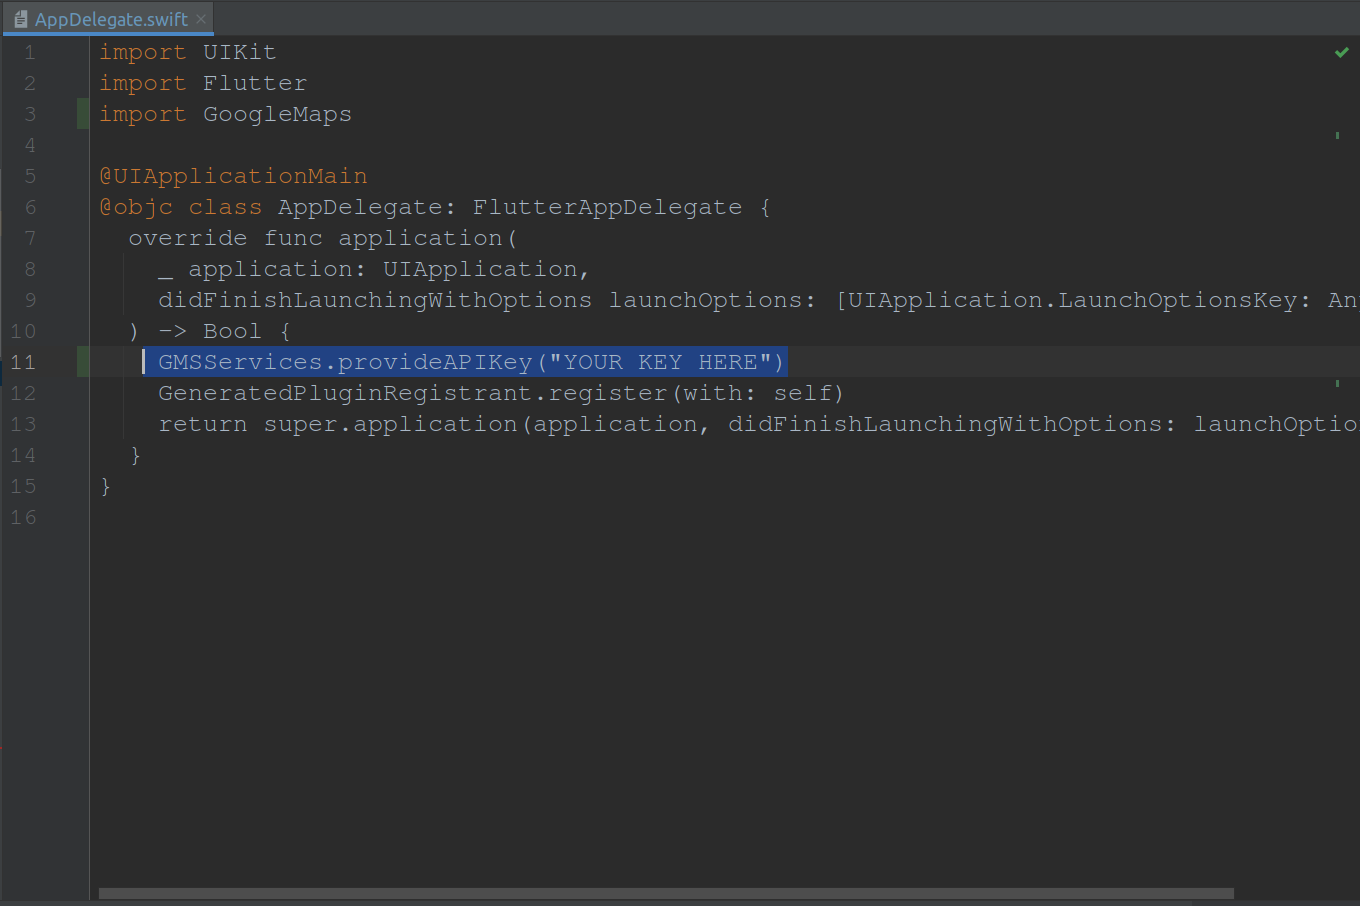
- iOS Setup
-
Next, open the ios ‣ Runner ‣ AppDelegate.swift
file and paste the
following
code at shown in image.
GMSServices.provideAPIKey("YOUR KEY HERE")
-
Next, open the ios ‣ Runner ‣ AppDelegate.swift
file and paste the
following
code at shown in image.
Note: Again, for the value field please paste in your
API Key from the
registration process. - Android Setup
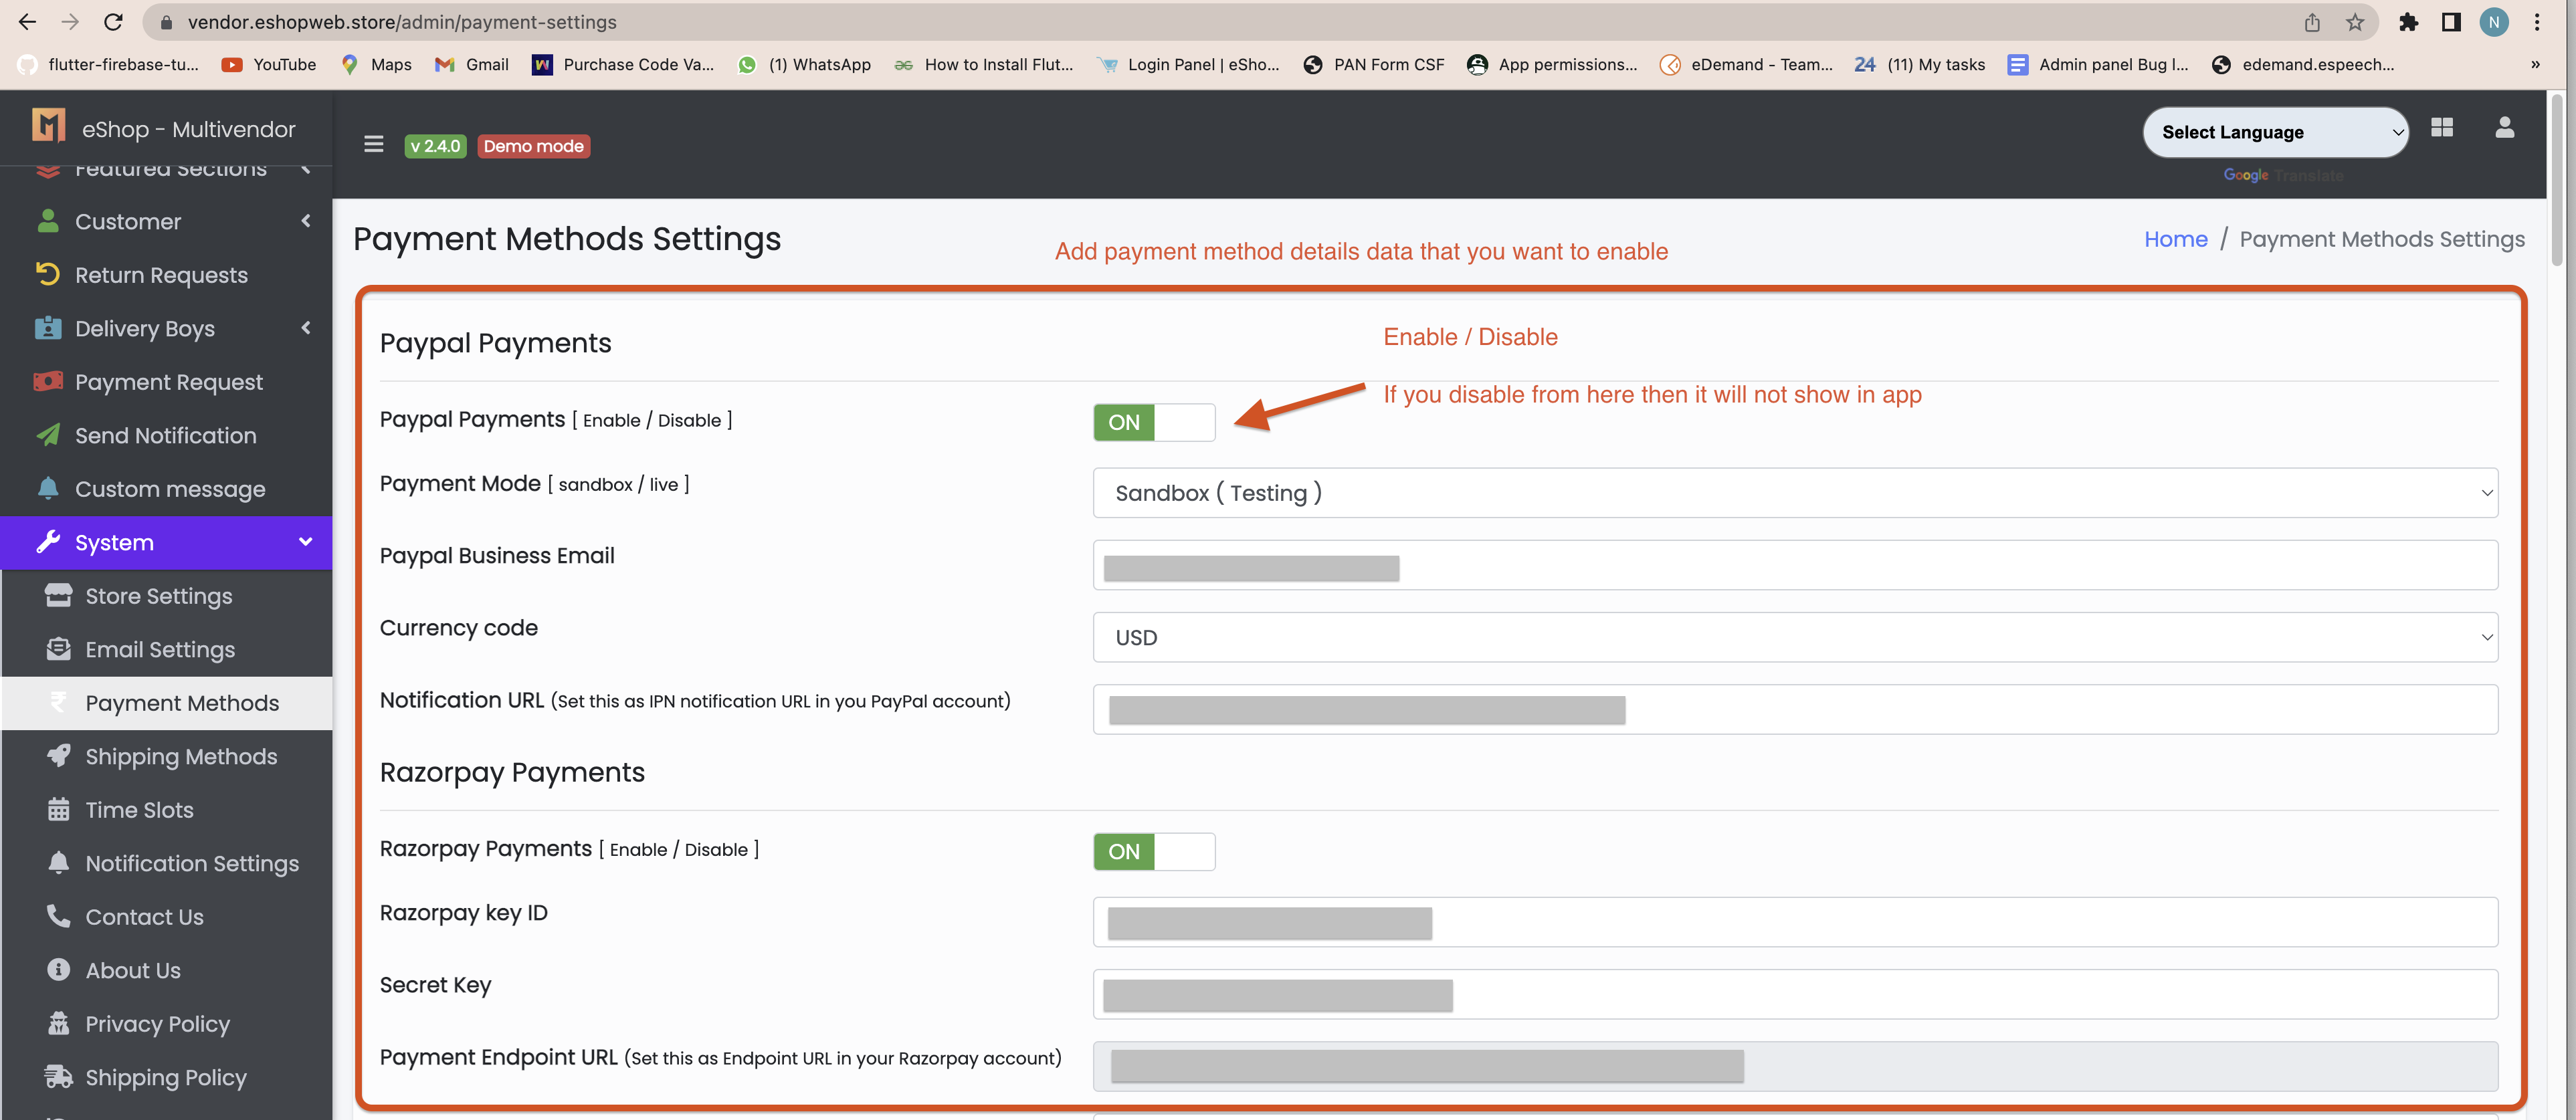
How to manage payment gatway and add Credential in admin panel
- go to the panel, in that system > payment mehod. for any payment method you have to add just key id and secrect key.and if you don't wanat to use then disable from here.
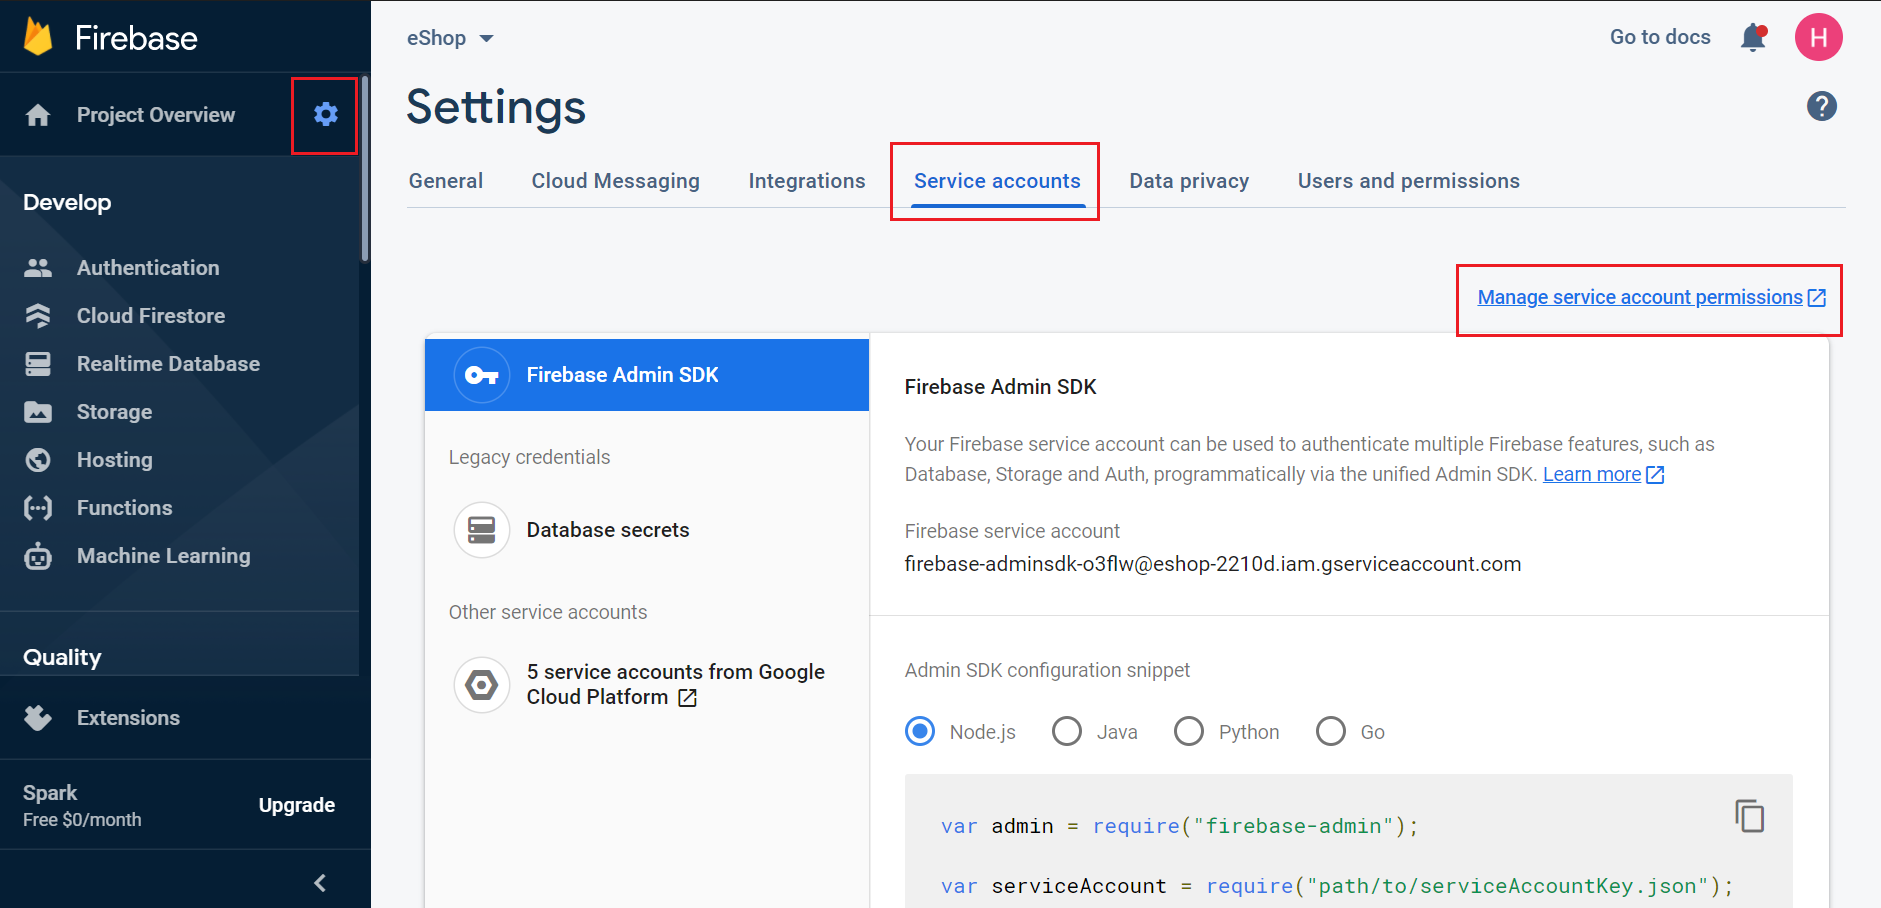
Enable Map SDK From Cloud Plateform.
- Open your firebase project.
- Go to Project Setting and follow below steps :
- if you want in both platform then you have to enable it for both android and ios otherwise only one
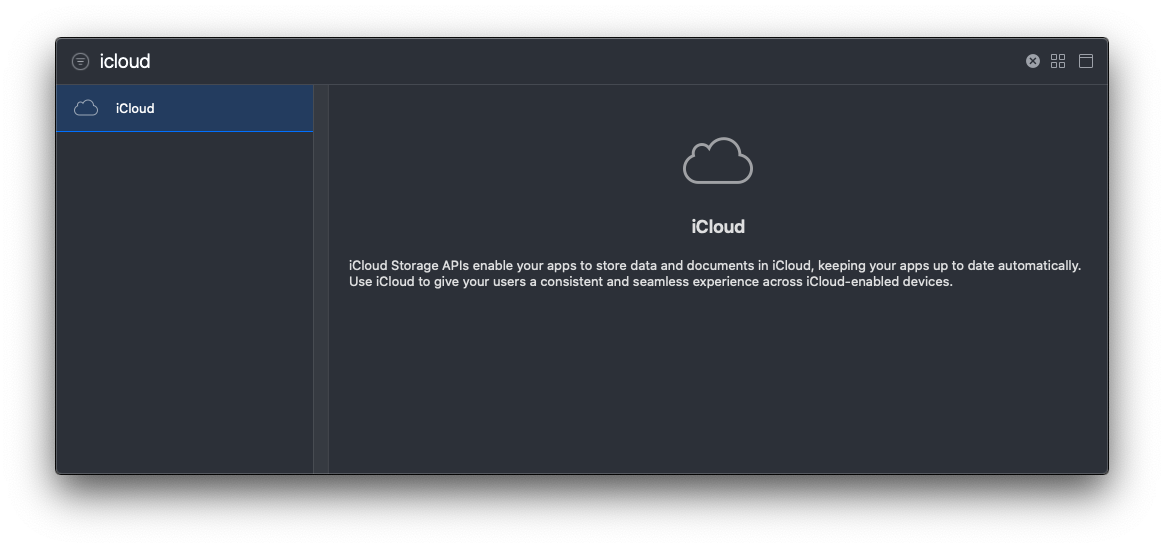
Enable cloud kit in ios for multiple file upload
- This step is only needed in ios for multiple file select because in ios Any iOS version below 11.0, will require an Apple Developer Program account to enable CloudKit
- This feature we are using for image upload in my orders for review product image upload
- step to perform here.
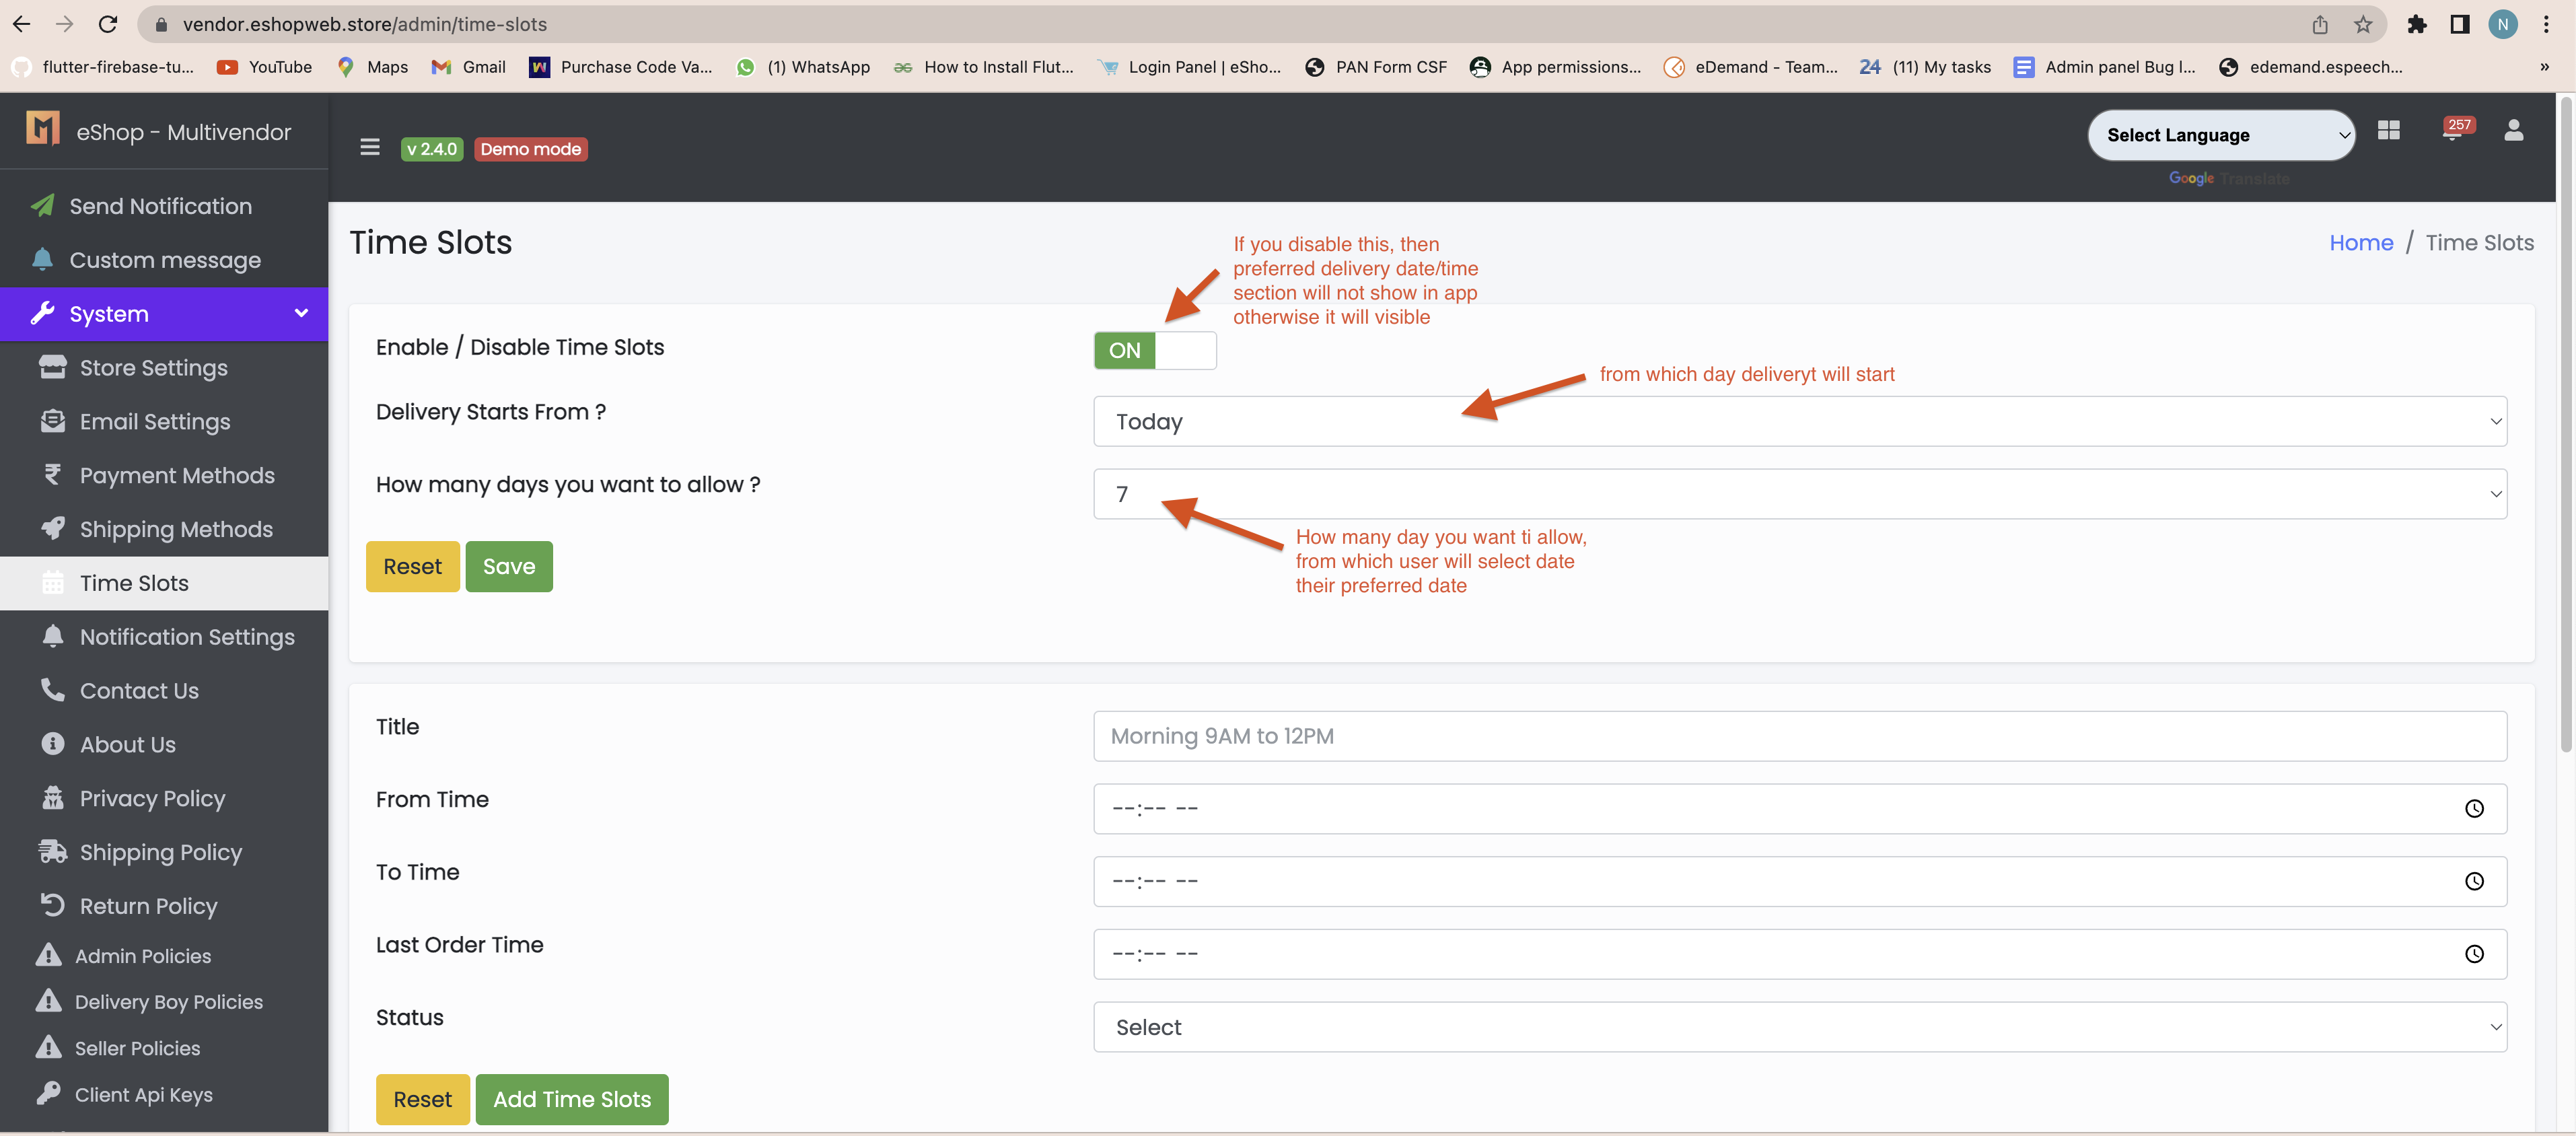
How to manage preferred delivery date/time
- First login to admin panel.
- Go to System > TimeSlot
How to set Currency code for Application
- Select your Country supported Locale value from here
- Go to System > Store setting

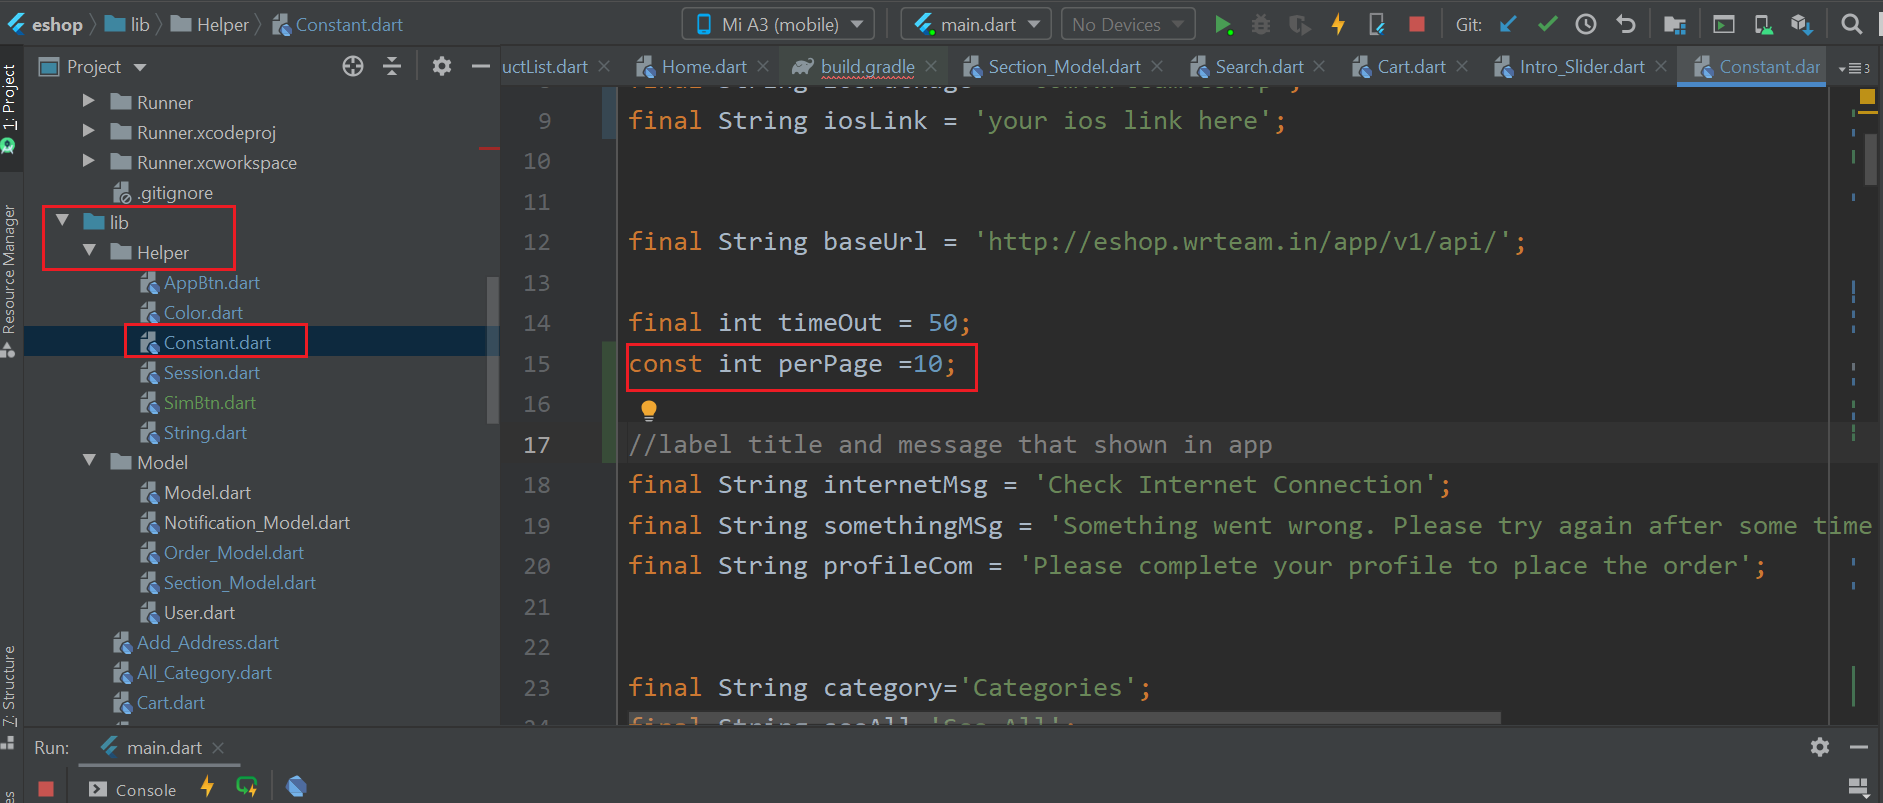
How to Increase Product Load Limit
- you can chnage at a time when request send to server how many item will fetch.go to lib > helper > Constant.dart
- Please check below given image.
< /ol>
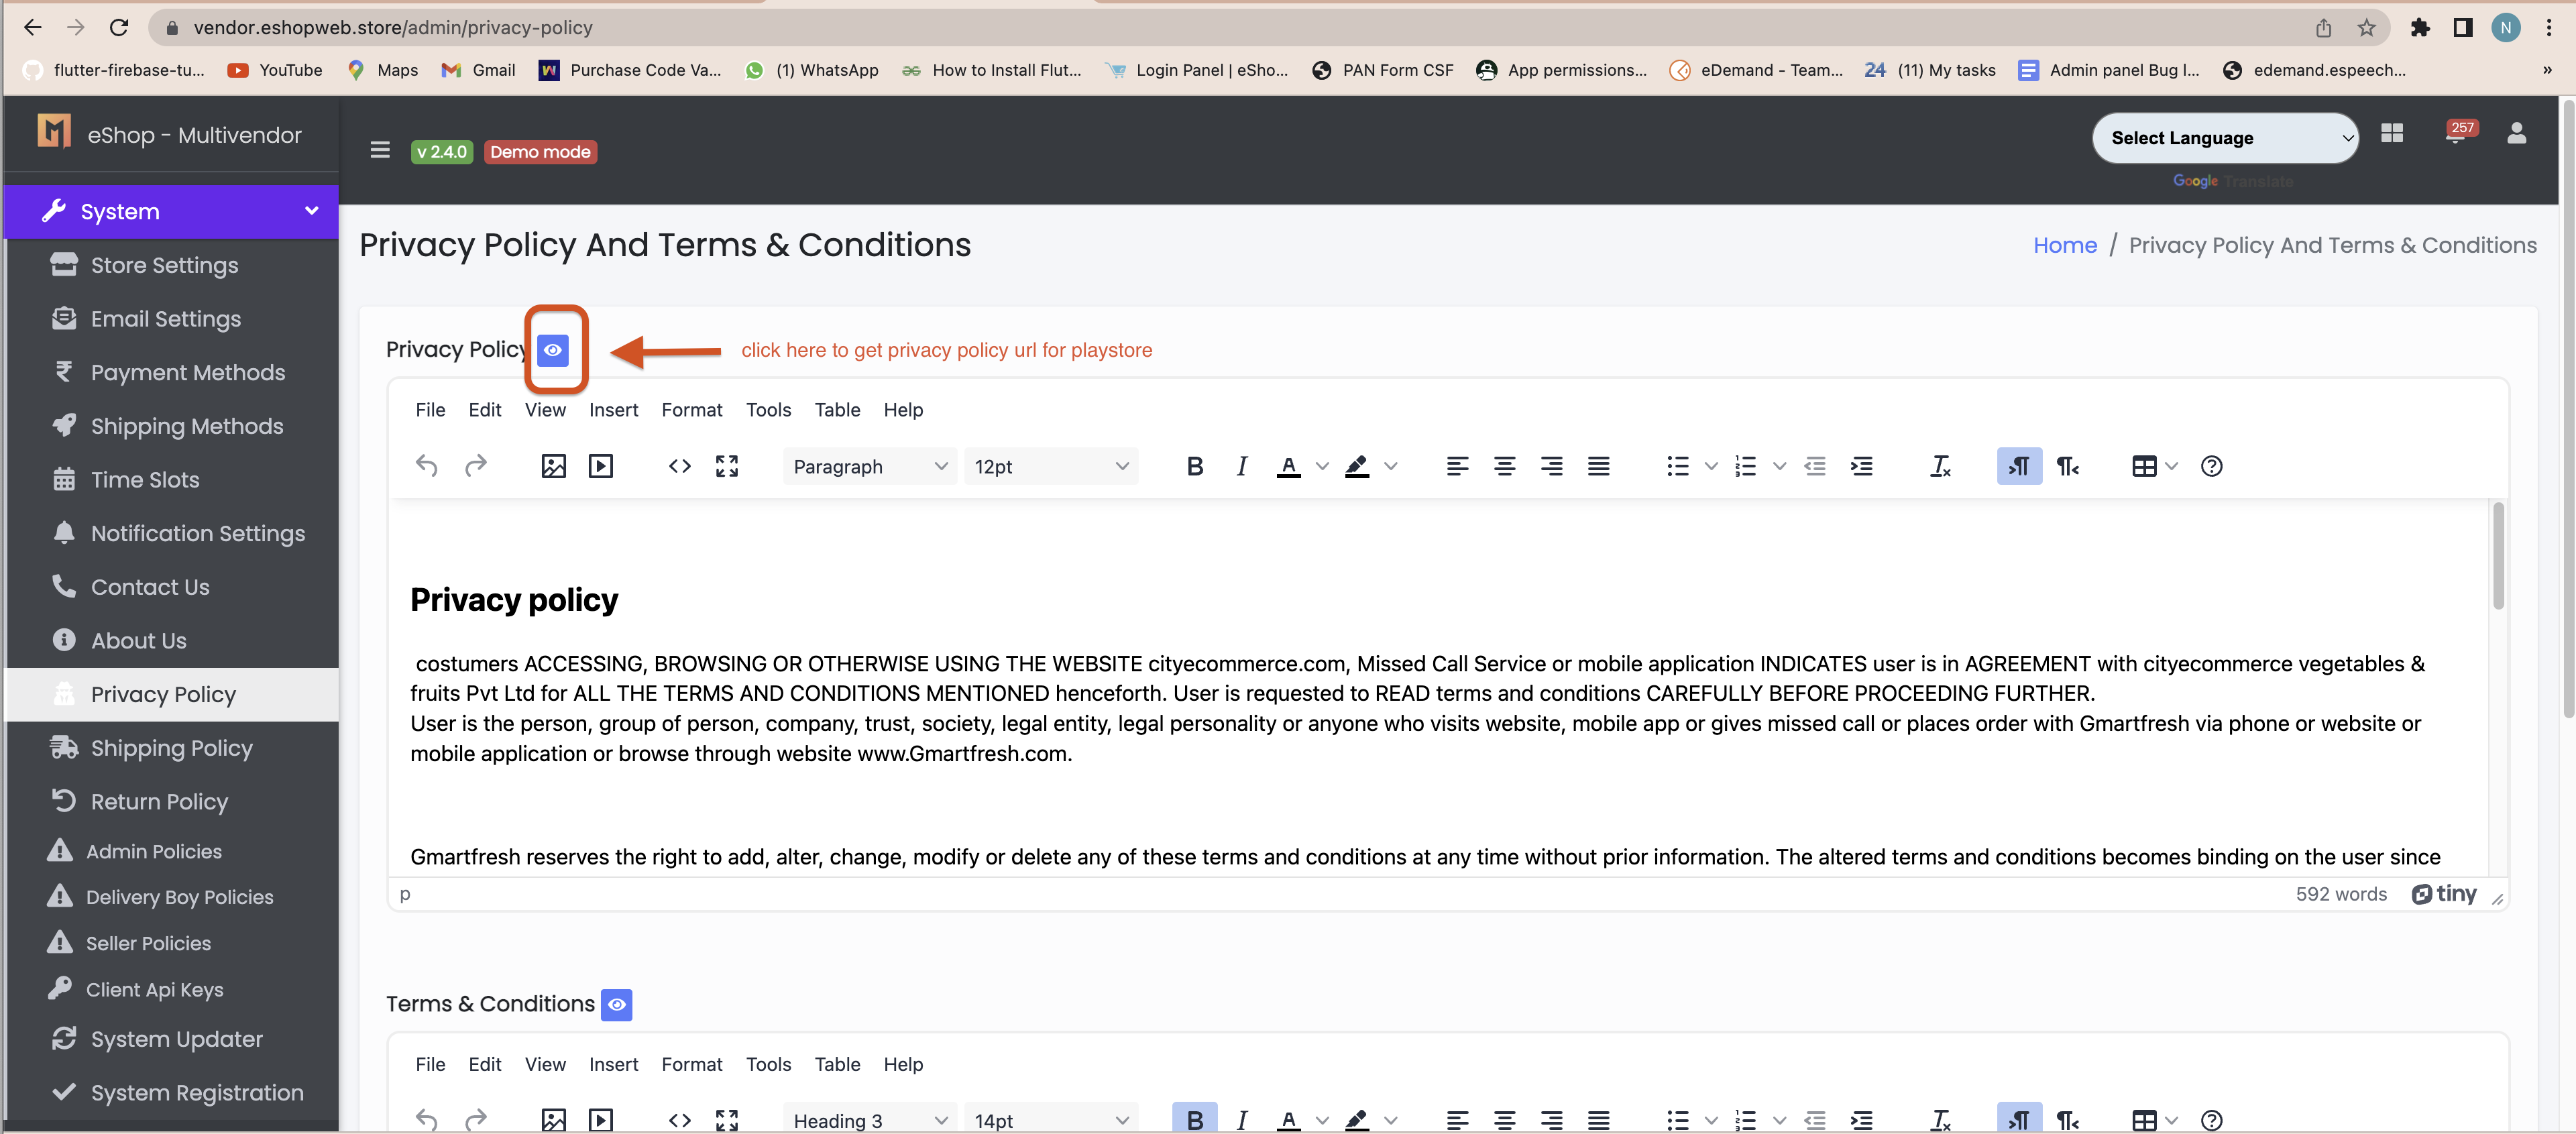
Get Privacy-Policy URL for PlayStore.
- First login to admin panel.
- System > Privacy Policy
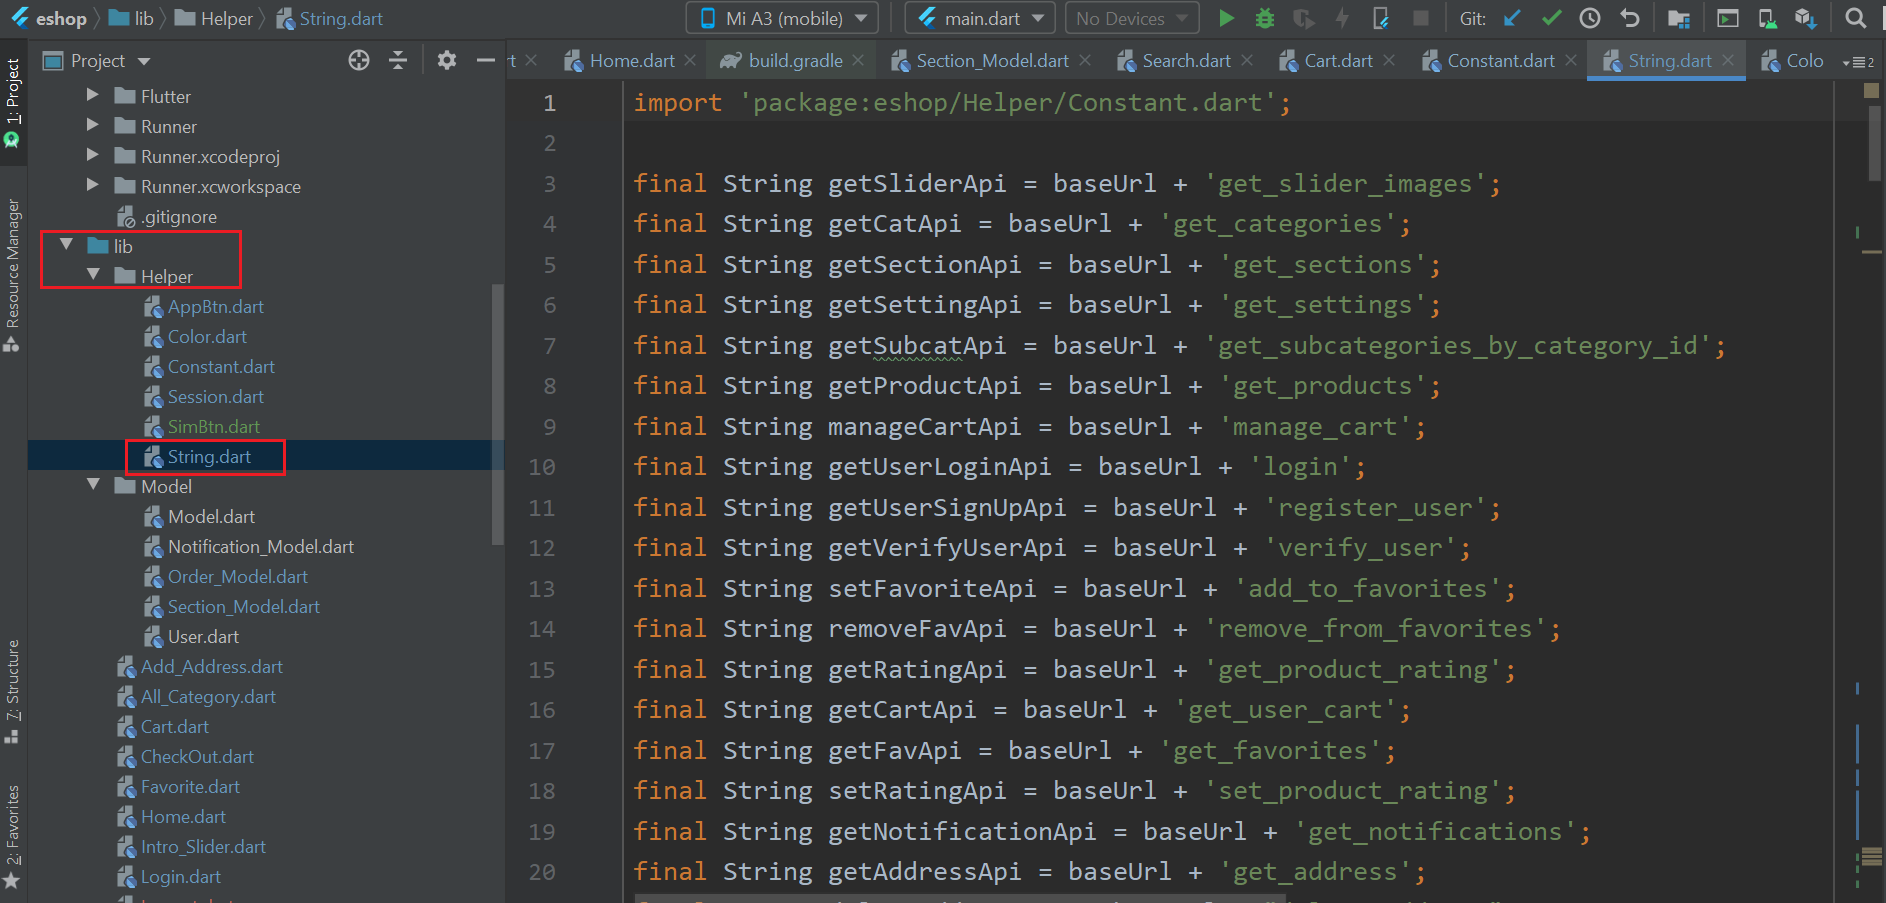
Change Api Parameter
- You can change or add api parameter from lib > Helper > String.dart. here all list of api and api paramater is listed that is used in app.
How to generate release apks
(Check Video)
-
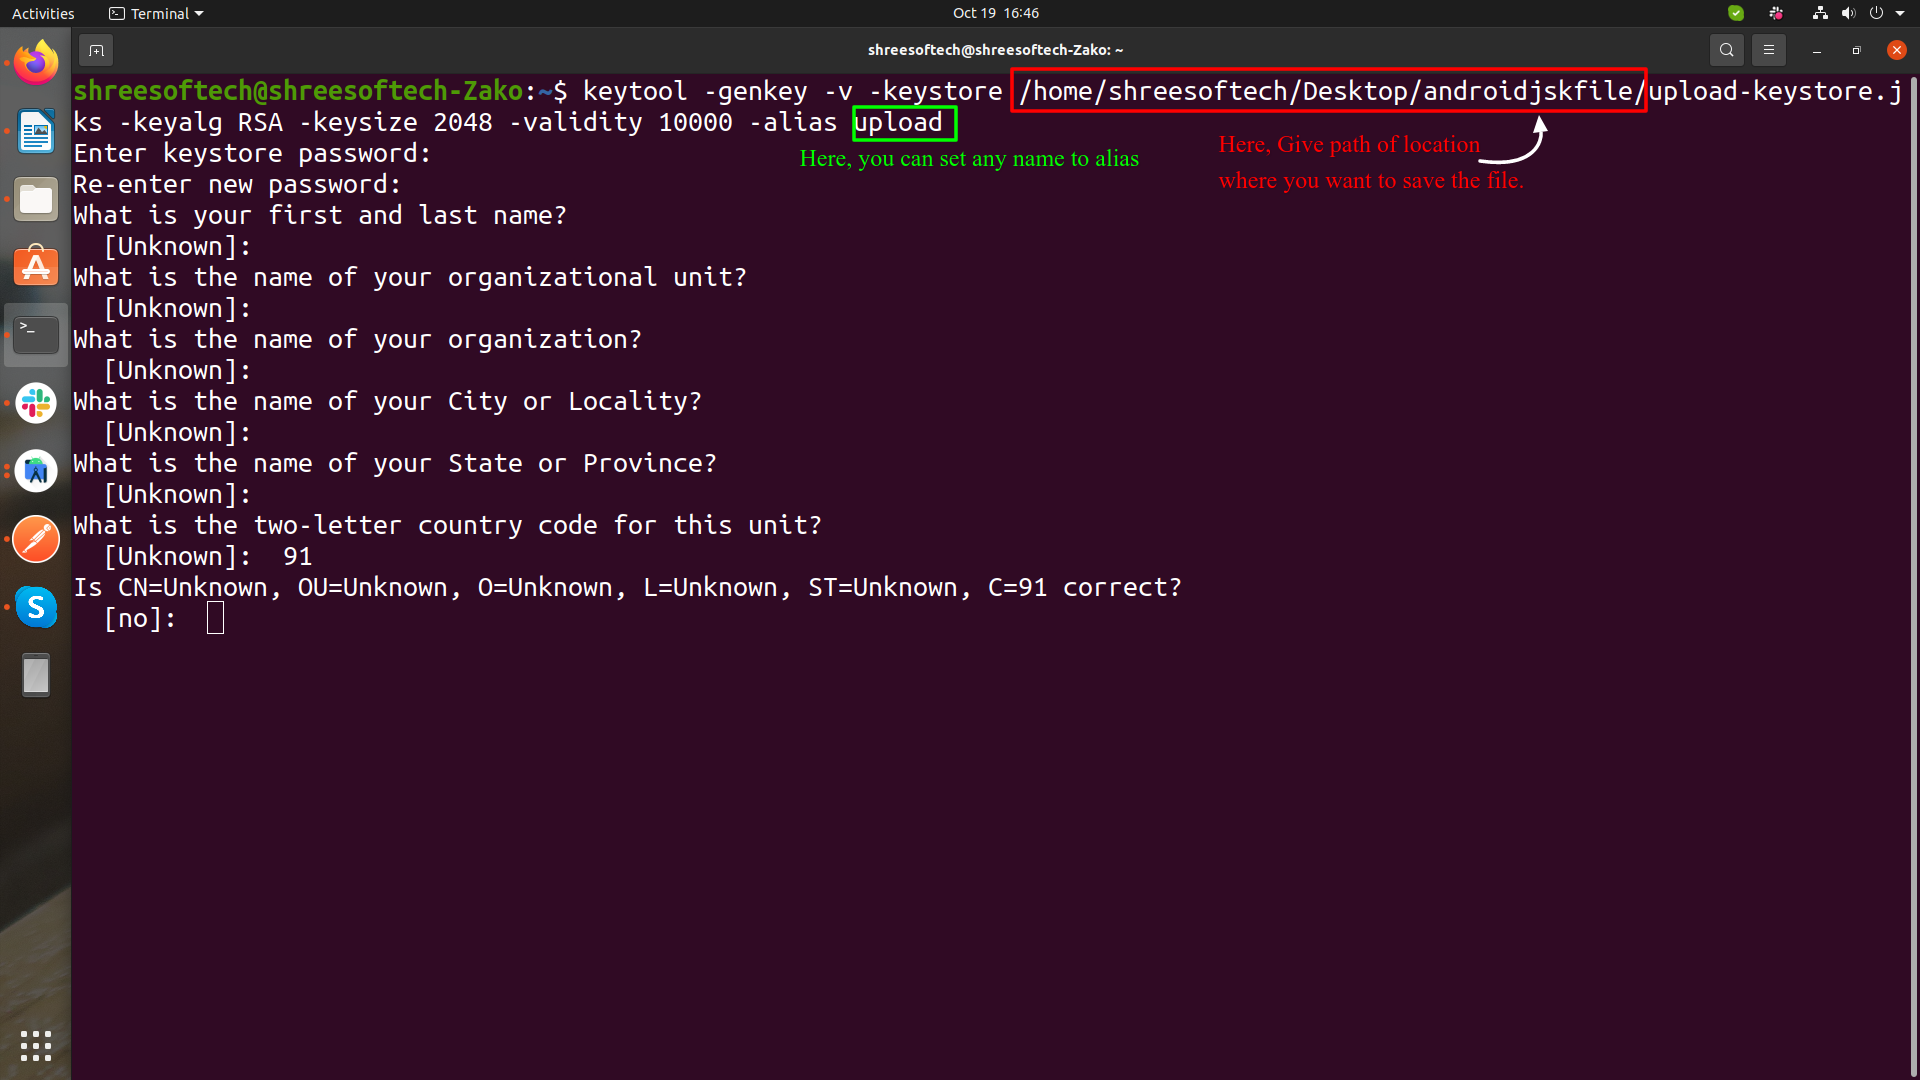
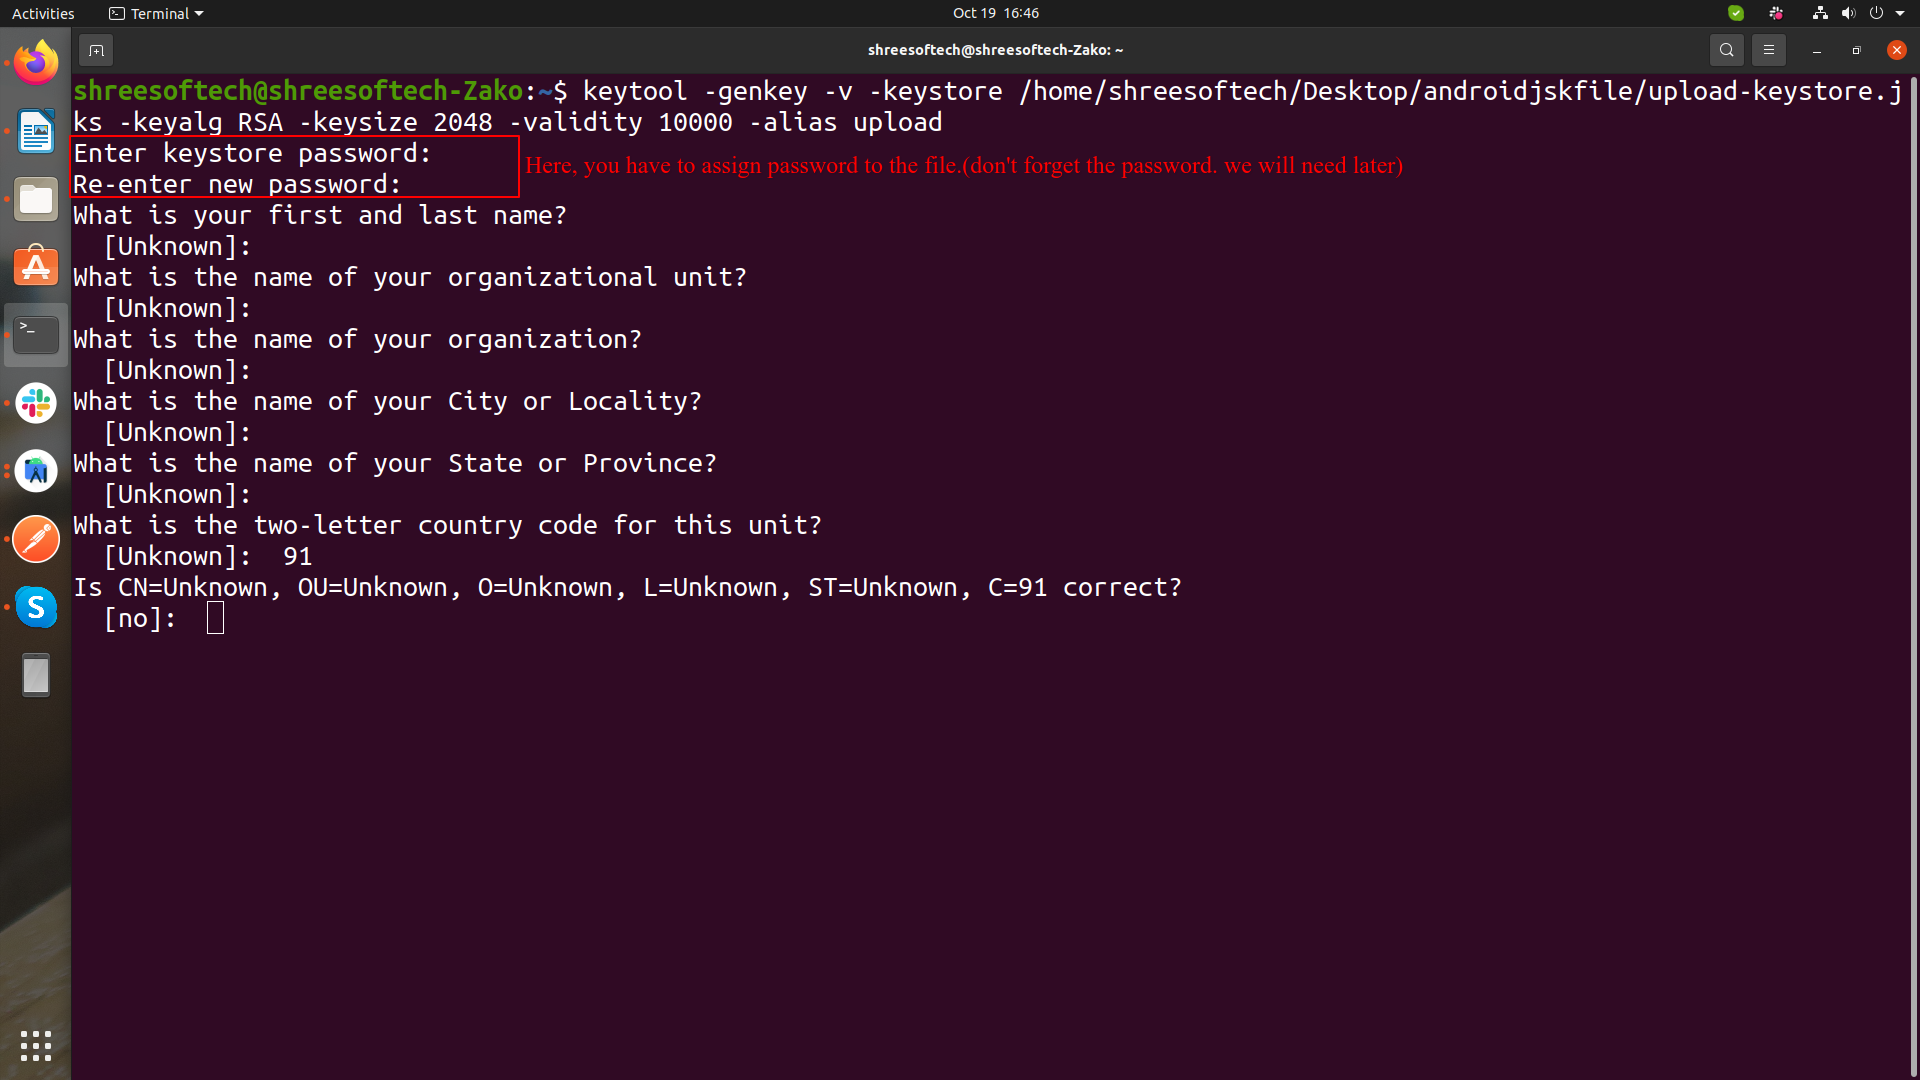
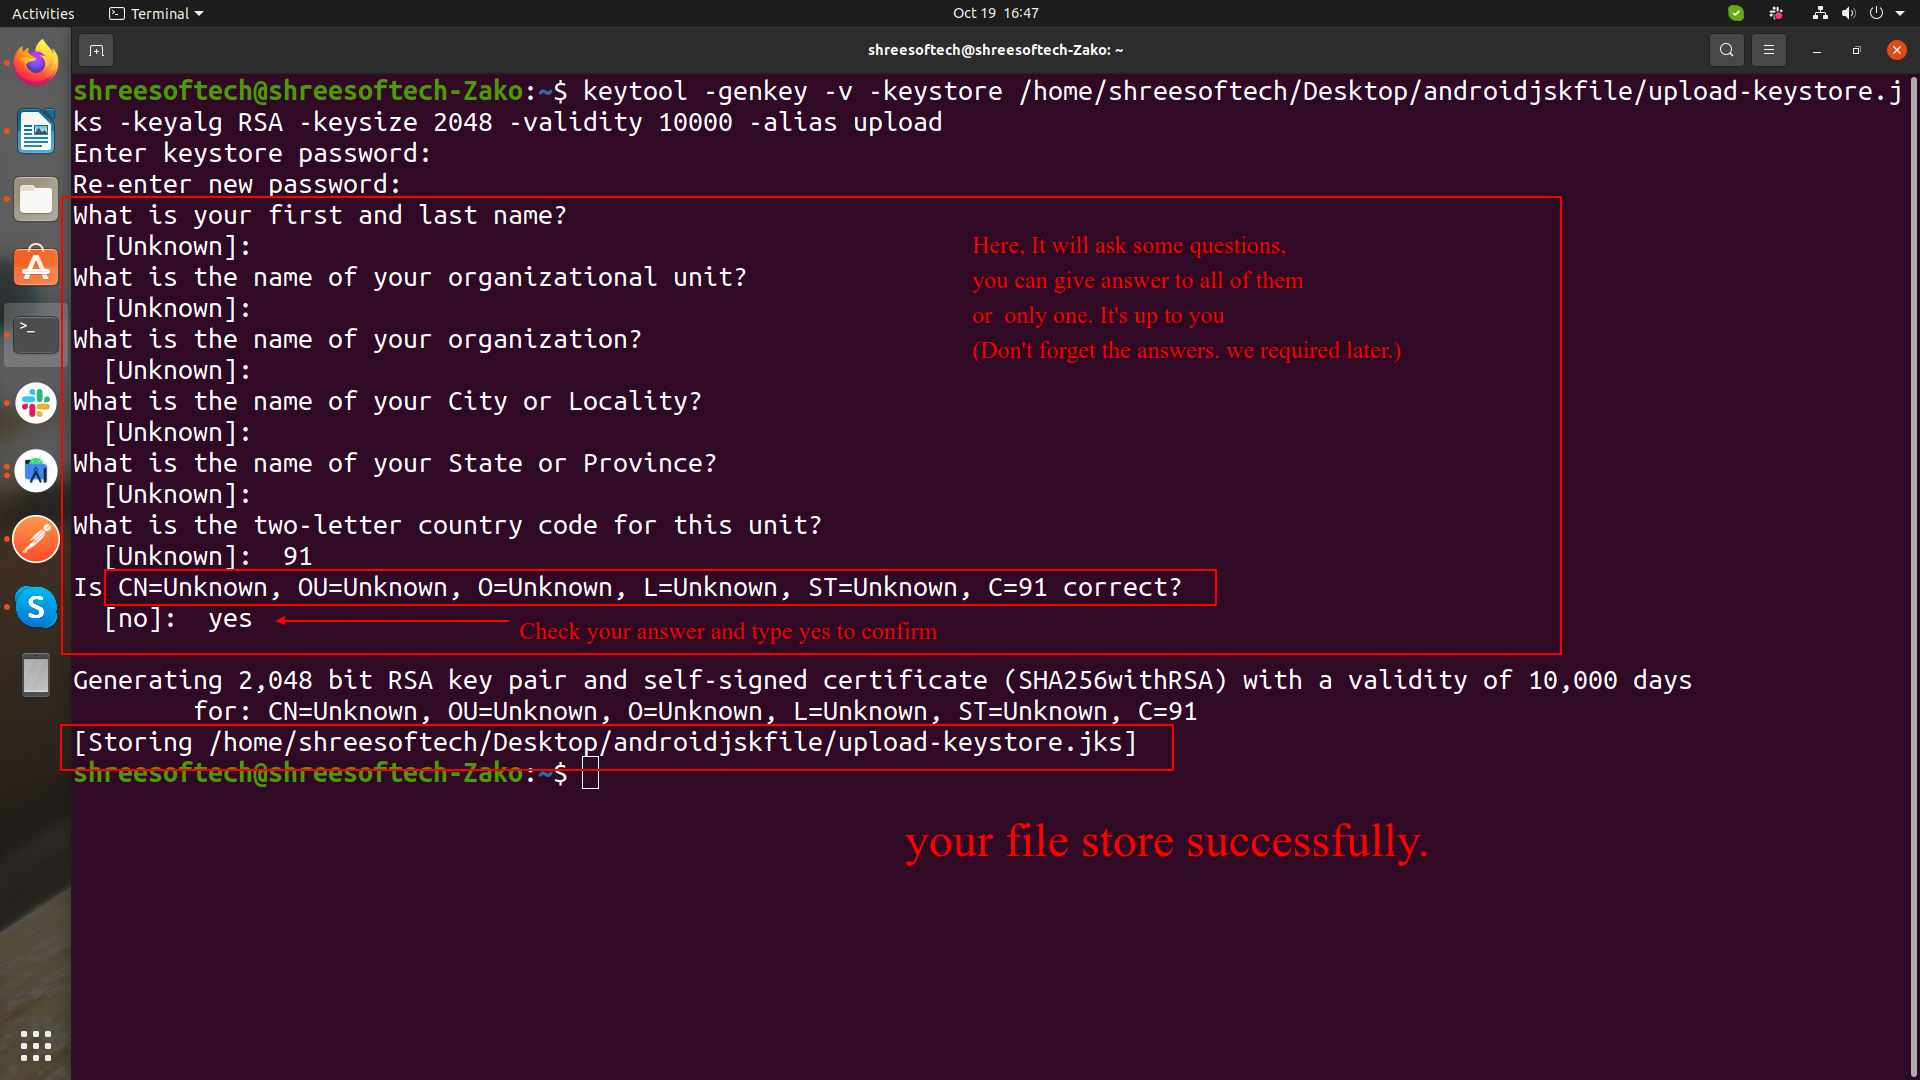
Create an upload keystore
Running the following at the command line:
-
On Mac/Linux, use the following command:
keytool -genkey -v -keystore ~/upload-keystore.jks -keyalg RSA -keysize 2048 -validity 10000 -alias upload
-
On Windows, use the following command:
keytool -genkey -v -keystore c:\Users\USER_NAME\upload-keystore.jks -storetype JKS -keyalg RSA -keysize 2048 -validity 10000 -alias upload
-
On Mac/Linux, use the following command:
-
Reference the keystore from the app
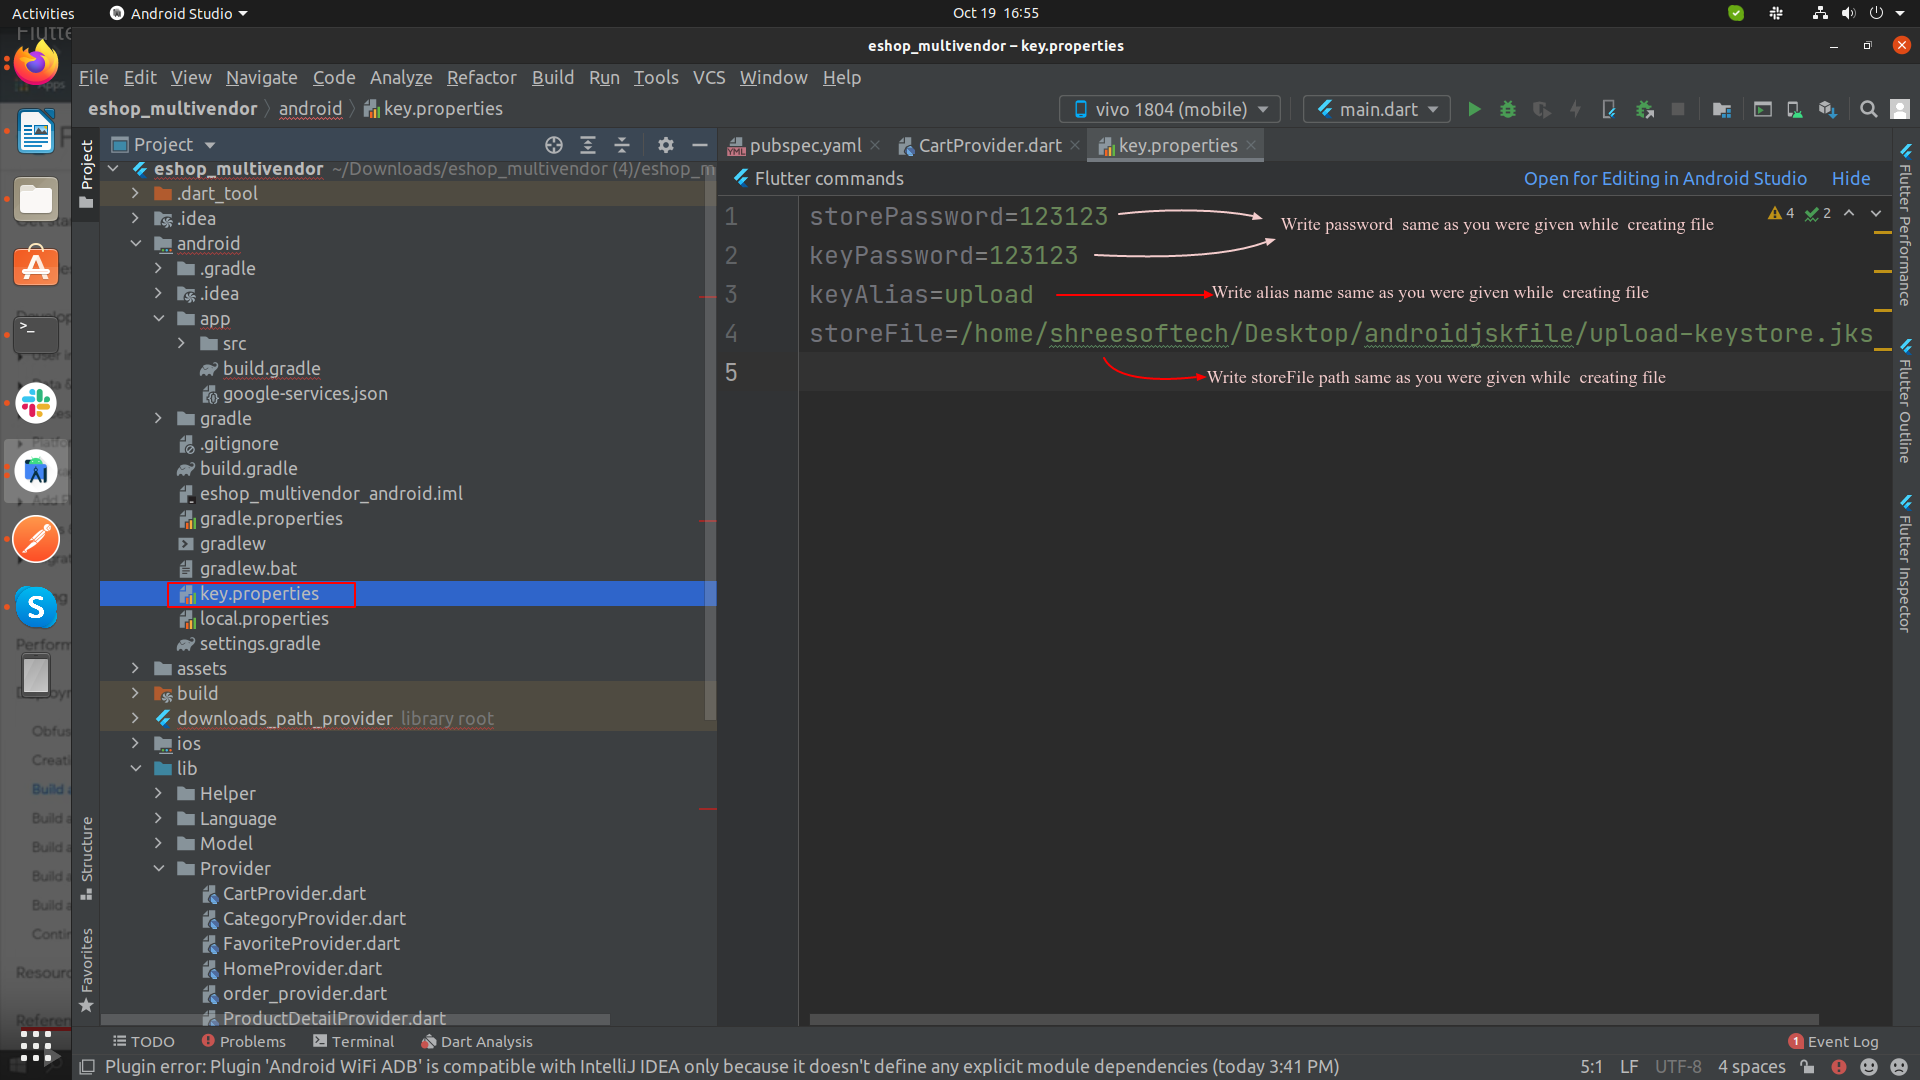
Create a file named [project]/android/key.properties that contains a reference to your keystore:
Copy below code, Paste in to key.propertirs file and change as per shown in image.
storePassword=
keyPassword=
keyAlias=upload
storeFile=location of the key store file, such as /Users/user name/upload-keystore.jks
-
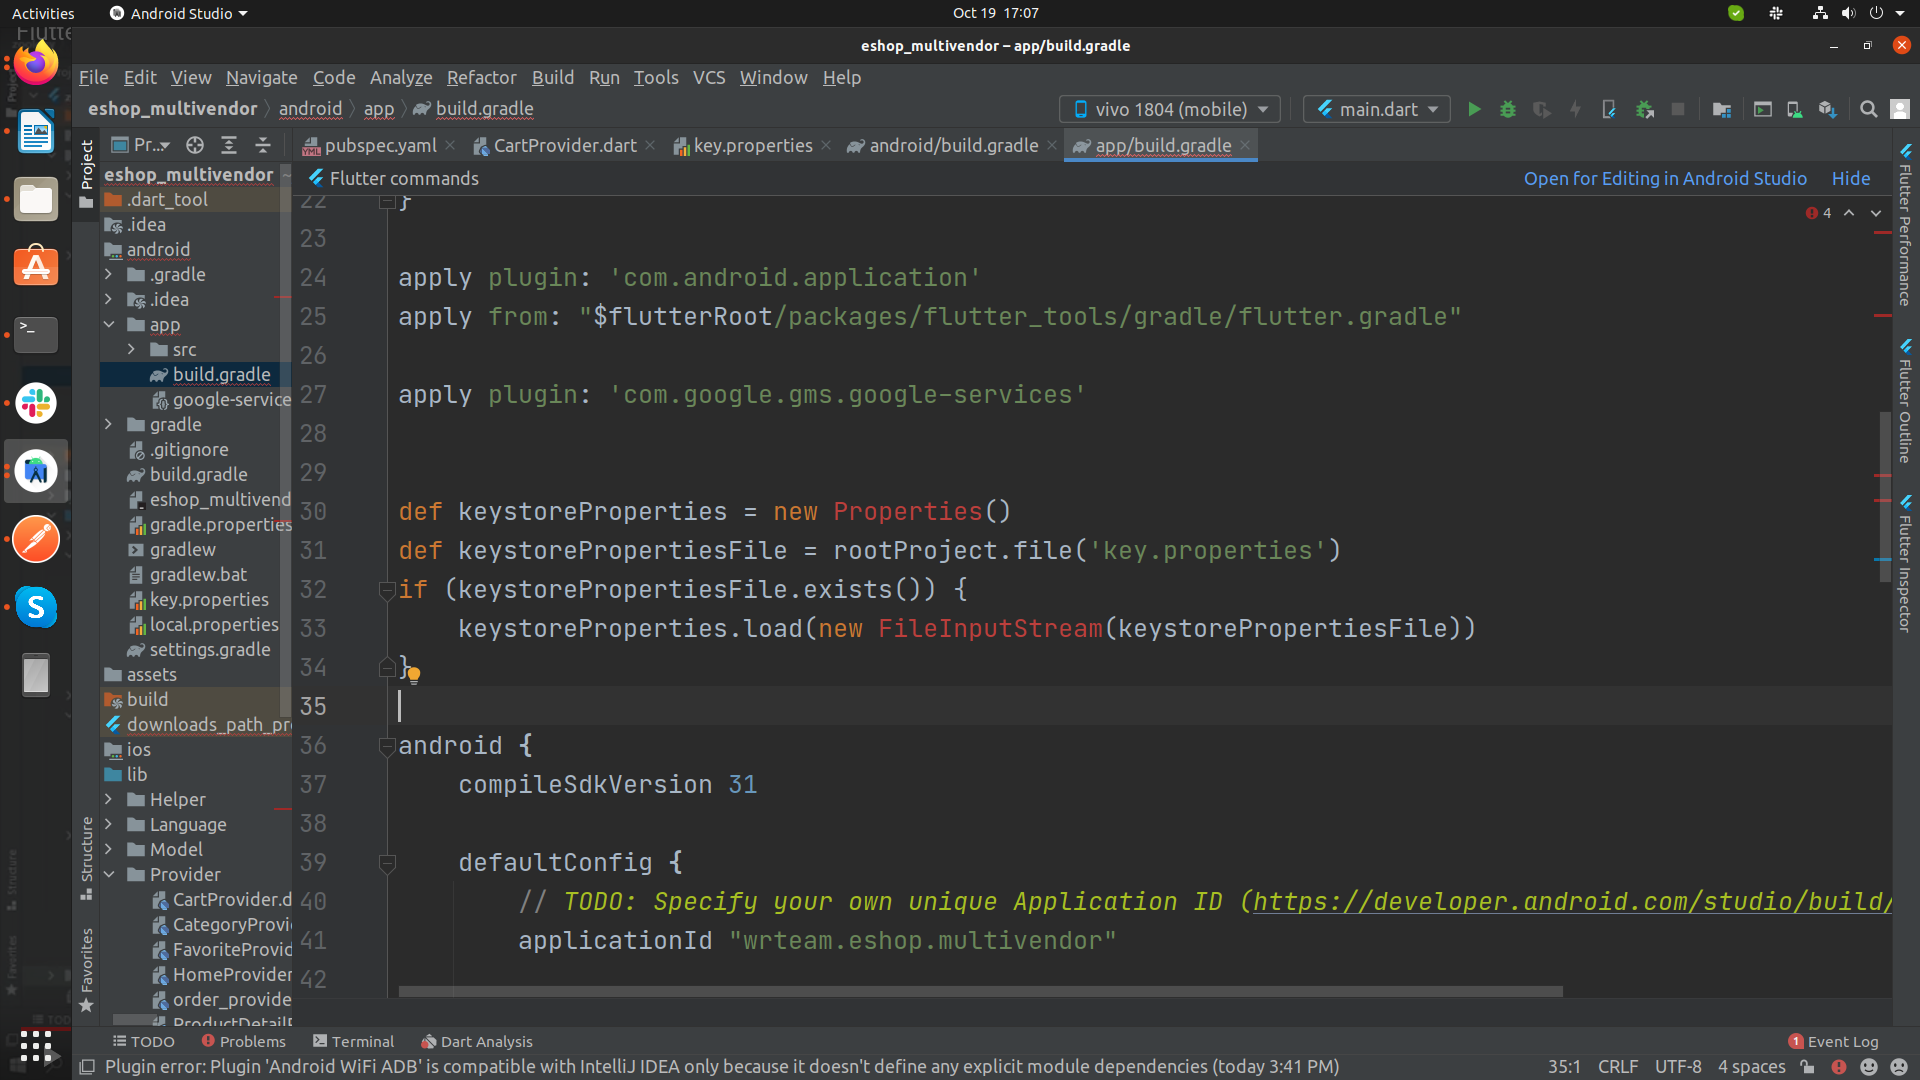
Configure signing in gradle
Configure gradle to use your upload key when building your app in release mode by editing the [project]/android/app/build.gradle file.
-
Add the below keystore information from your properties
file before the
android block:
def keystoreProperties = new Properties()
def keystorePropertiesFile = rootProject.file('key.properties')
if (keystorePropertiesFile.exists()) {
keystoreProperties.load(new FileInputStream(keystorePropertiesFile))
}
-
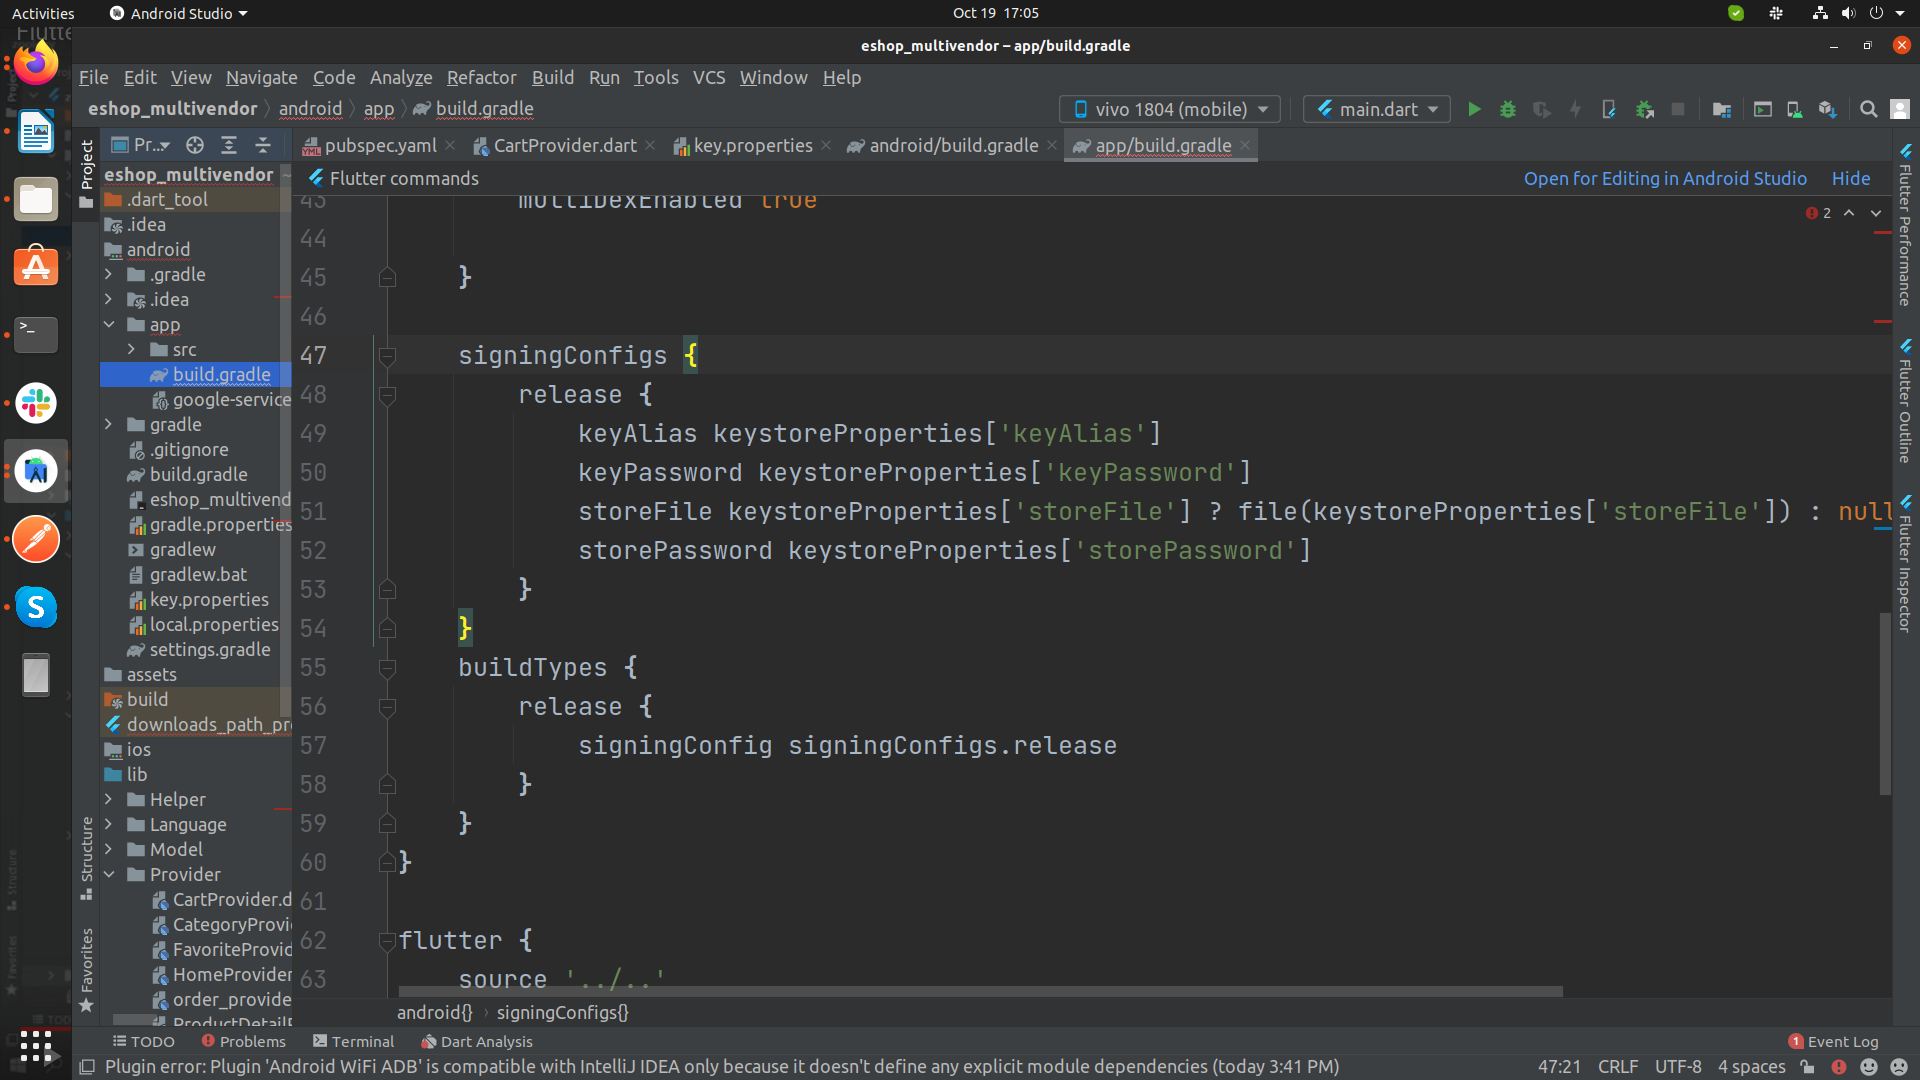
Find the buildTypes block:
And replace it with the following signing configuration info:
signingConfigs {
release {
keyAlias keystoreProperties['keyAlias']
keyPassword keystoreProperties['keyPassword']
storeFile keystoreProperties['storeFile'] ? file(keystoreProperties['storeFile']) : null
storePassword keystoreProperties['storePassword']
}
}
buildTypes {
release {
signingConfig signingConfigs.release
}
}
-
Add the below keystore information from your properties
file before the
android block:
-
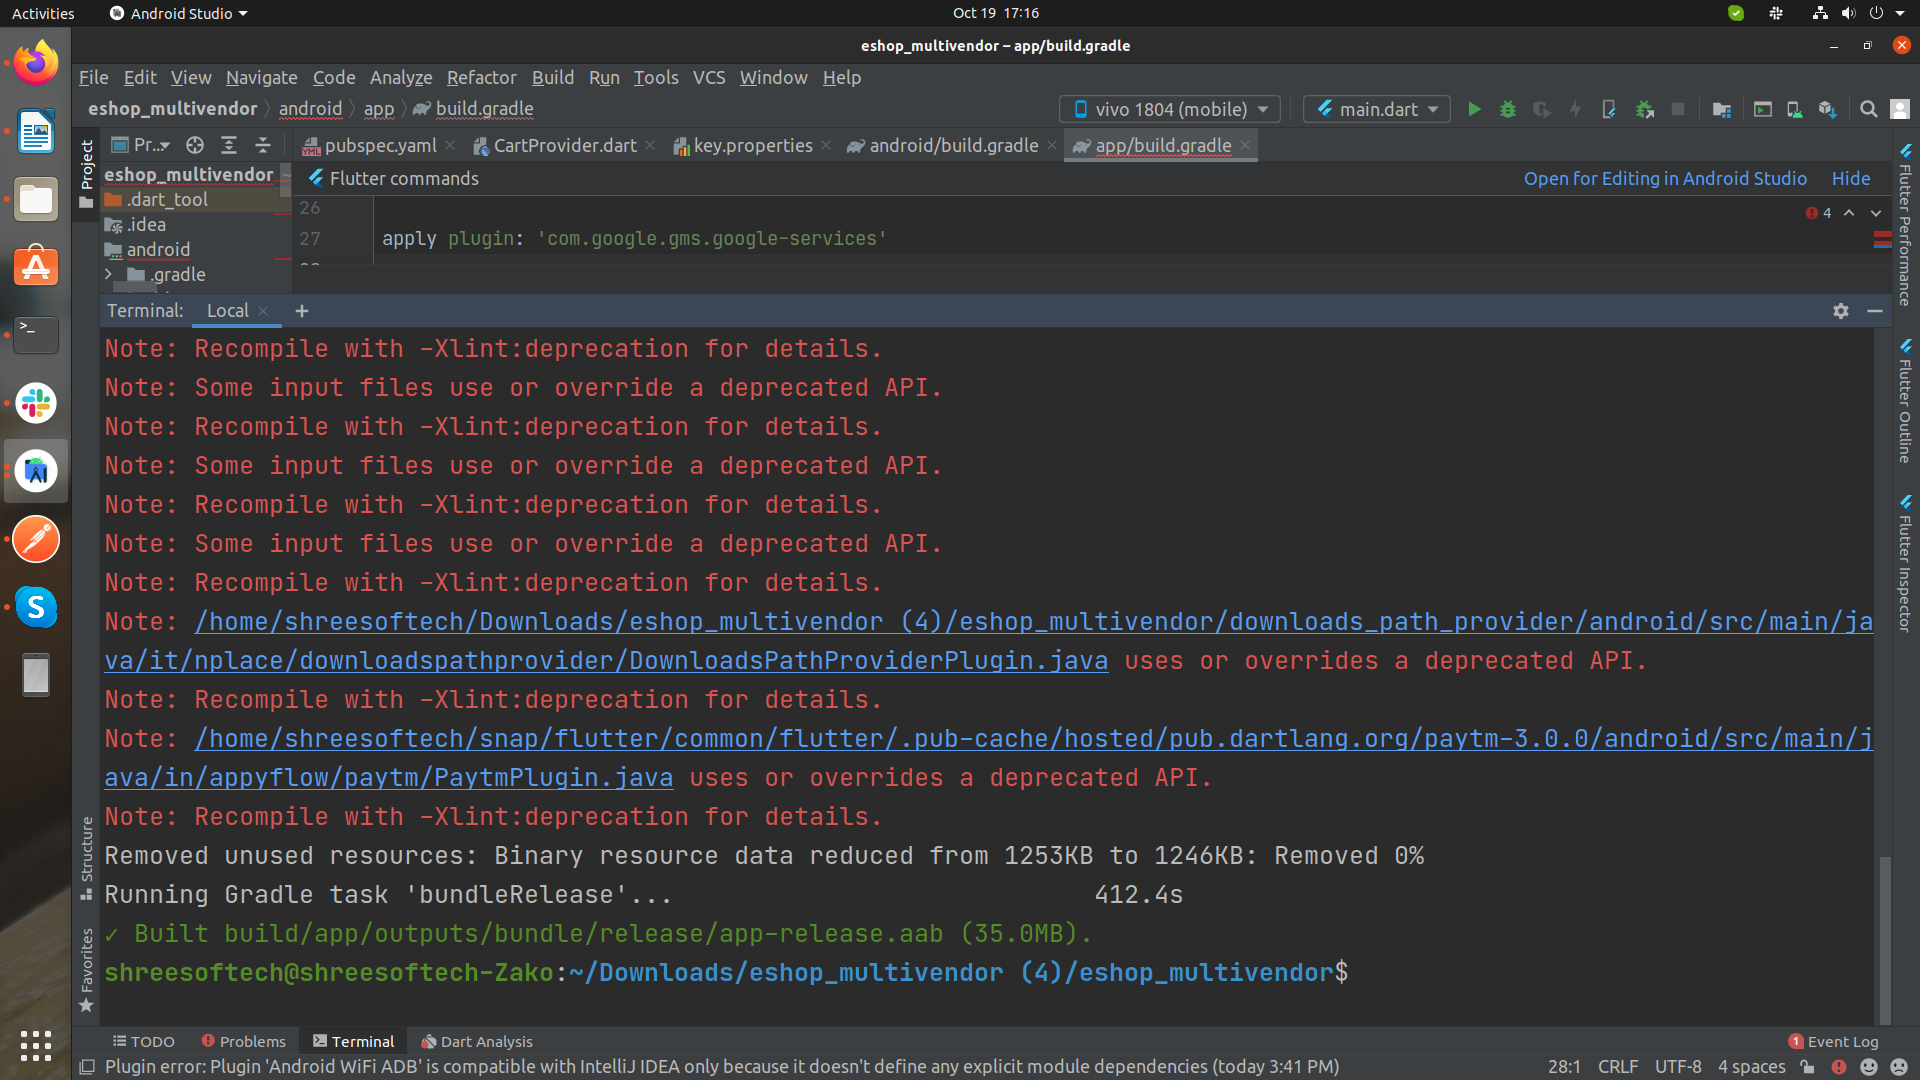
Run following commands in Terminal as per your need:
-
To generate an APK
flutter build apk -
To generate an App Bundle
flutter build appbundle
-
To generate an APK
How to solve Data Safety issue in Play Store?
Please refer this video link for solve this issue.Steps to Publish iOS App to App Store
- Open your Project's Runner.xcworkspace file in Xcode, and Add your Team [Your Apple Developer ID] and also Insert GoogleService-Info.plist file [Downloaded From Firebase Project] inside folder named Runner.
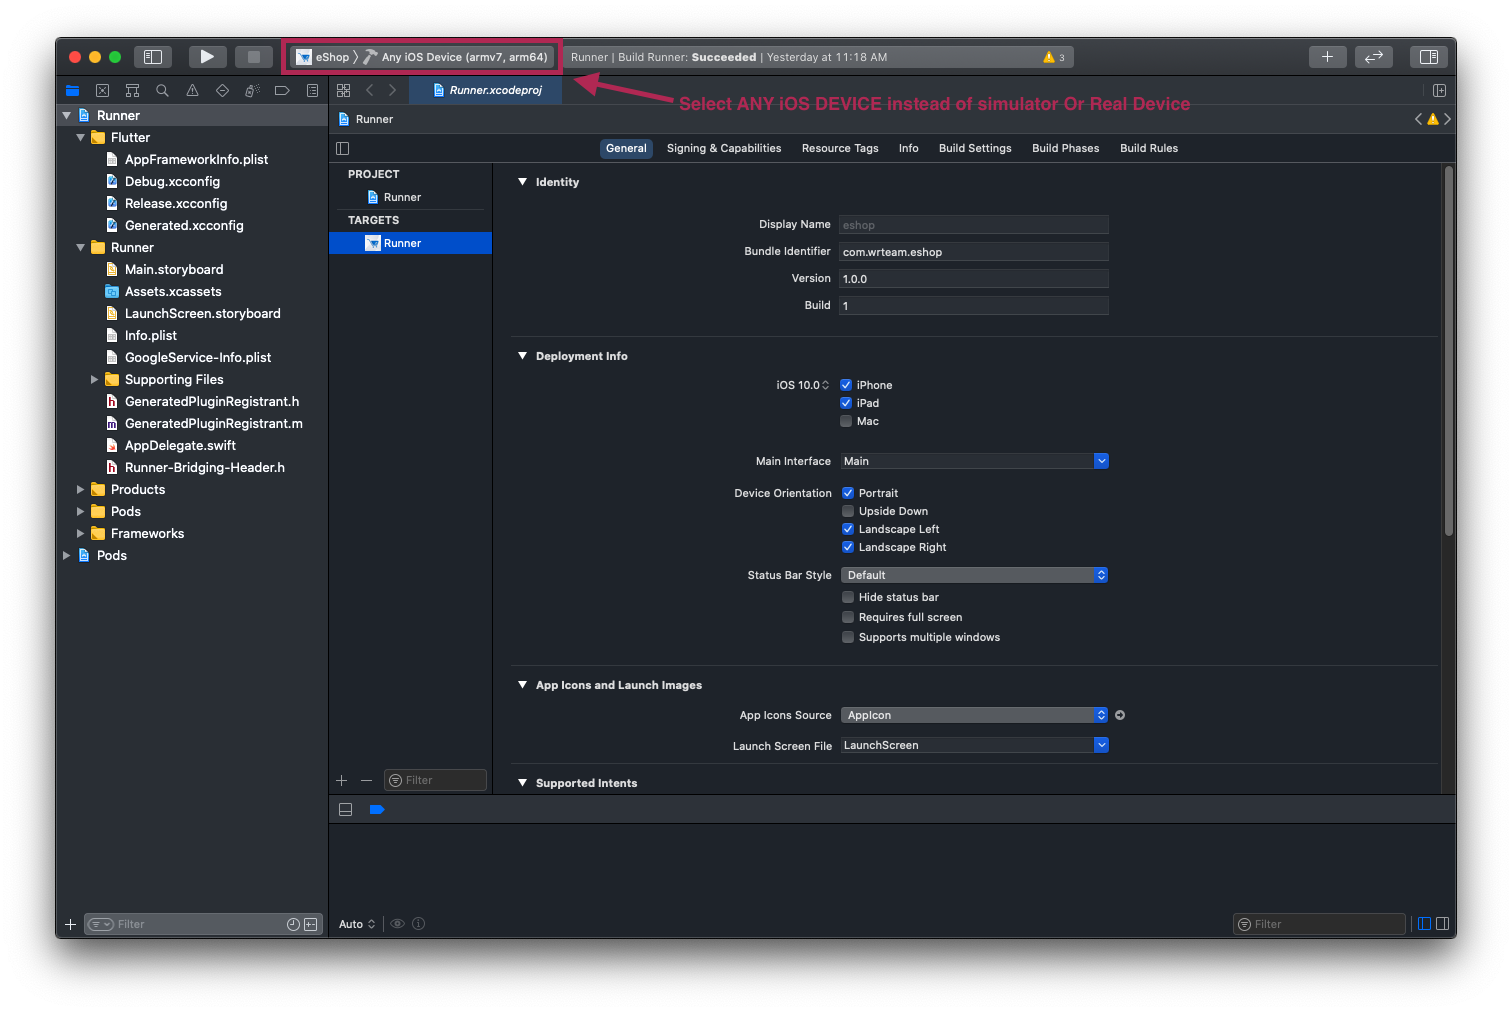
- and then Select Any iOS Device (armv7,arm64) as shown in image below.
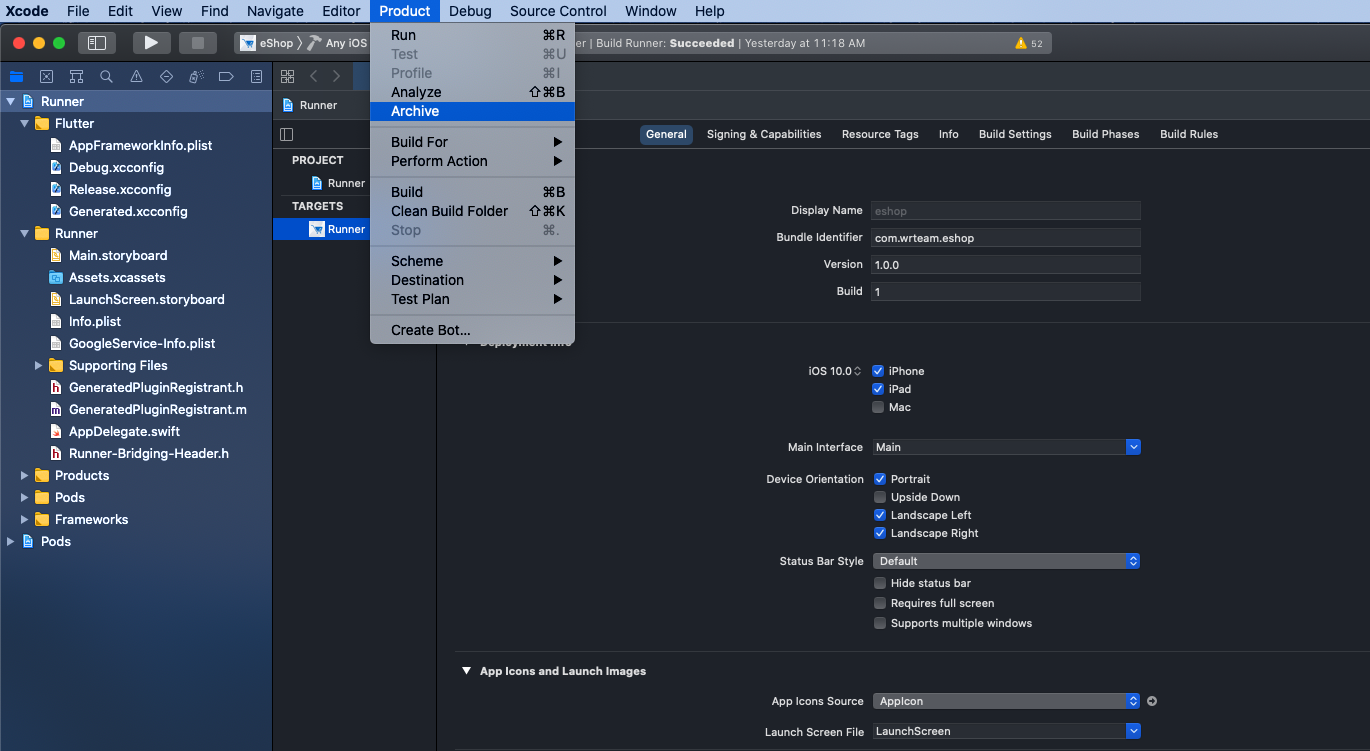
- After that Select Archive From Product Menu of Xcode as shown below.
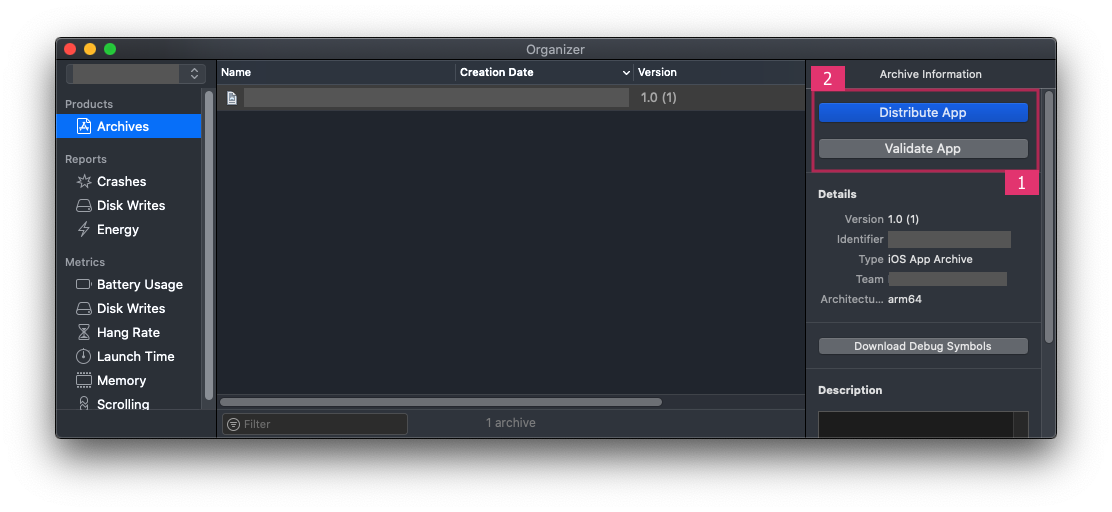
- Once Build / Archive Generated, pop up window will be shown. Validate app First, and After Successfull Validation of App, You Can Distribute App to AppStore.
- After SuccessFull Submission of Build File, it will be Reflected to your Apple Developer Account in which we have created app with same Bundle ID. Click here for Detailed Help
Need Support?
Its our pleasure to serve our service and support. please contact our support team.
Head of Customer Support : Shivani Bhanderi
Microsoft Teams: Shivani Bhanderi
To help our customers, we constantly be in touch with every customer if they need any assistance regarding our product. We offer our customers a support from Mon – Fri 9.00am to 6.00pm IST (GMT +5.30) – We are a Team located in India – Asia.
Typically we reply our customers for all the questions and queries within 24 hours of time via comments, support forum or emails.
Your Feedback
Dear valuable customer, Thank you very much for choosing our product. It's our pleasure to serve top-notch service to you. Please give us your honest feedback that will help us to make a more strong and reliable product by click here Rate Us. Thank you very much.
Contact Us
WRTeam has creative and dedicated group of developers who are mastered in Apps Developments and Web Application Development with a niche in delivering quality solutions to customers across the globe. Contact us today to find out how we can help you or for freelance work.
Visit Us : https://wrteam.in
Microsoft Teams: Shivani Bhanderi
Mail Us : support@wrteam.in
Thank you very much.
Rating
If you like our app, we will highly appreciate if you can provide us a rating of 5. You can rate us from your CodeCanyon Menu > Download page.