Note

We recommended for web deploy in main domain and admin panel in sub domain

Whenever you seek support for WRTeam products via Skype or WhatsApp, please share your purchase code and Codecanyon username. This information is required for verification in our system. Without it, we are unable to provide support in accordance with Codecanyon policy.

Server Requirement

  1. Php Version : 8.2

  2. Set max_upload_size to 100M in your php version

Installation

  1. Login into you cPanel.
  2. Go to database in your cPanel
  3. Enter database name and Create a new database.
  4. Create Database user.
  5. Assign Database to the user.
  6. Open File manager now.
  7. Go to public_html or public_html/youreDemand.in folder in the file manager, whichever folder your domain points to.
  8. Upload the downloaded zip in public_html or public_html/youreDemand.in folder.
  9. unzip or extract the Code vX.X - upload this on server.zip file that you have just uploaded.
  10. verify that all these files are in public_html or public_html/youreDemand.in folder.
  11. To find the Purchase code you can visit this link: Where is My Purchase code?
  12. visit http://youreDemand.in/install

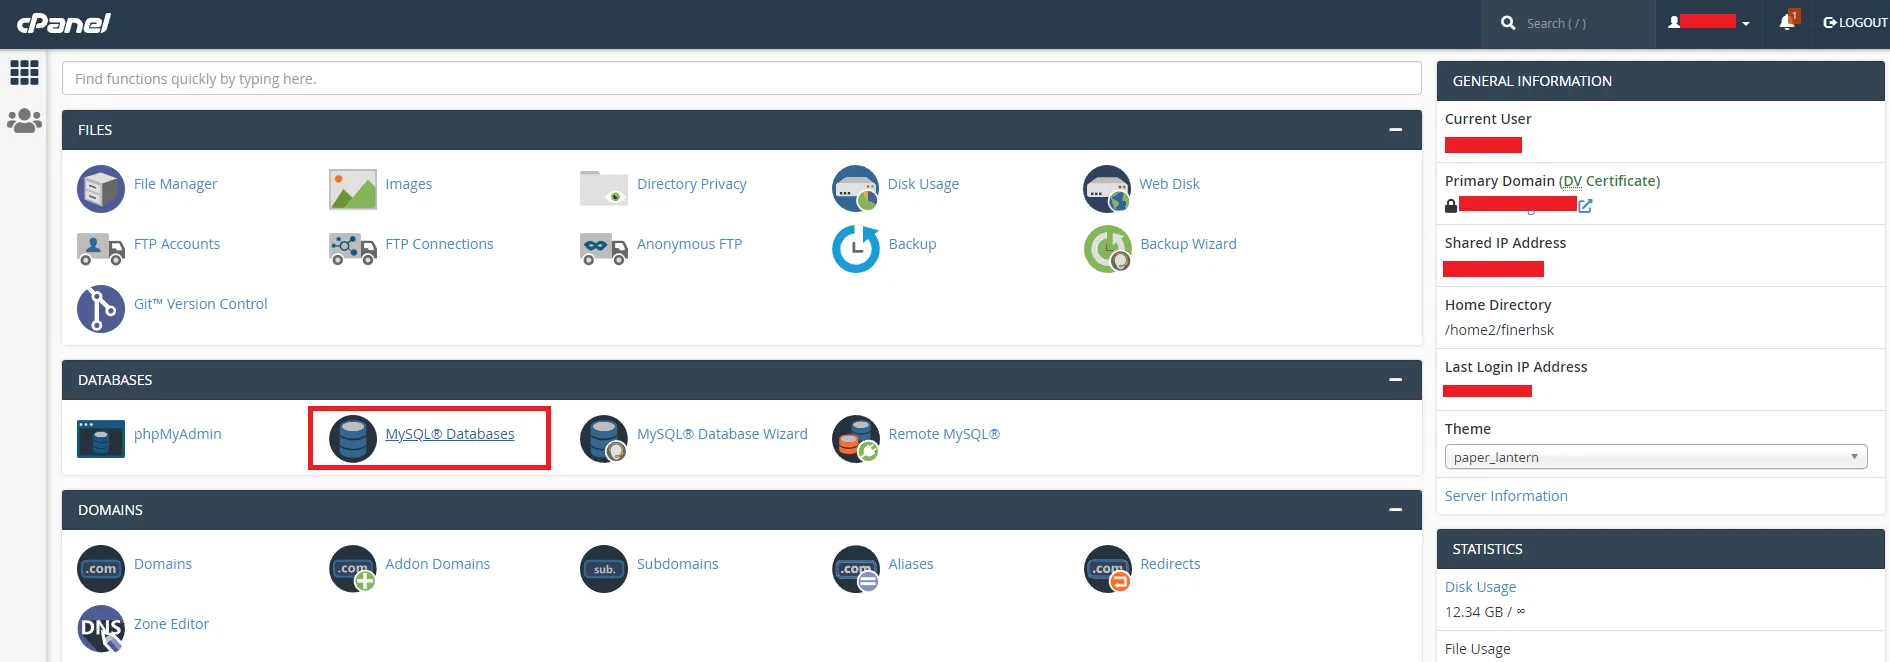
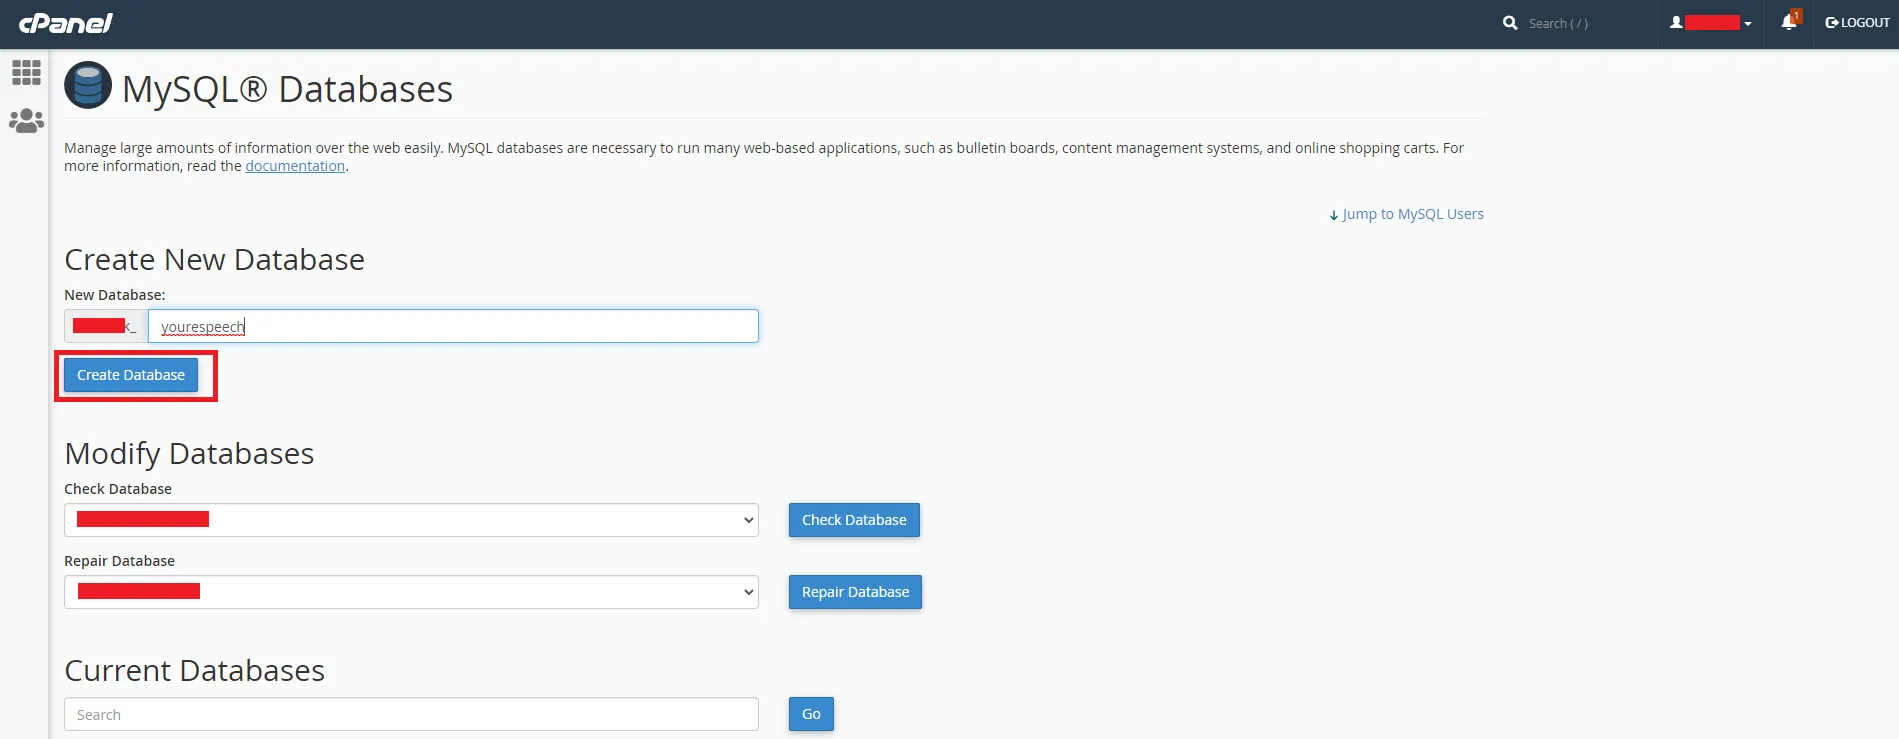
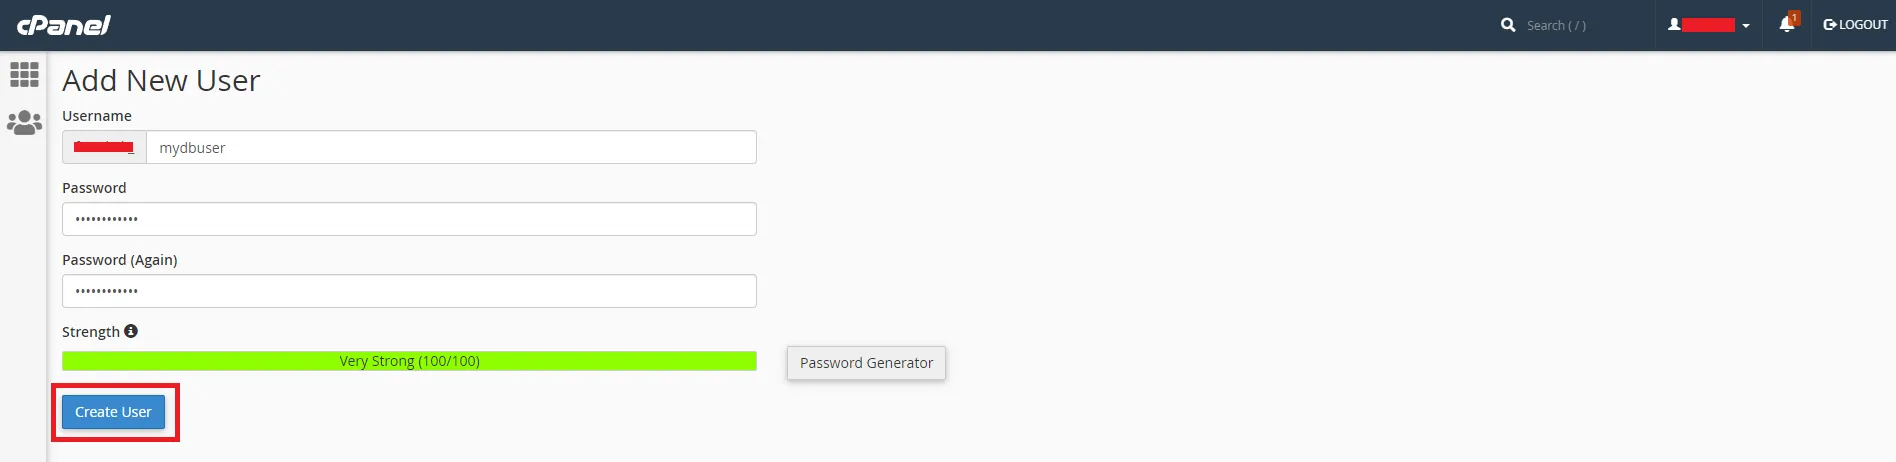
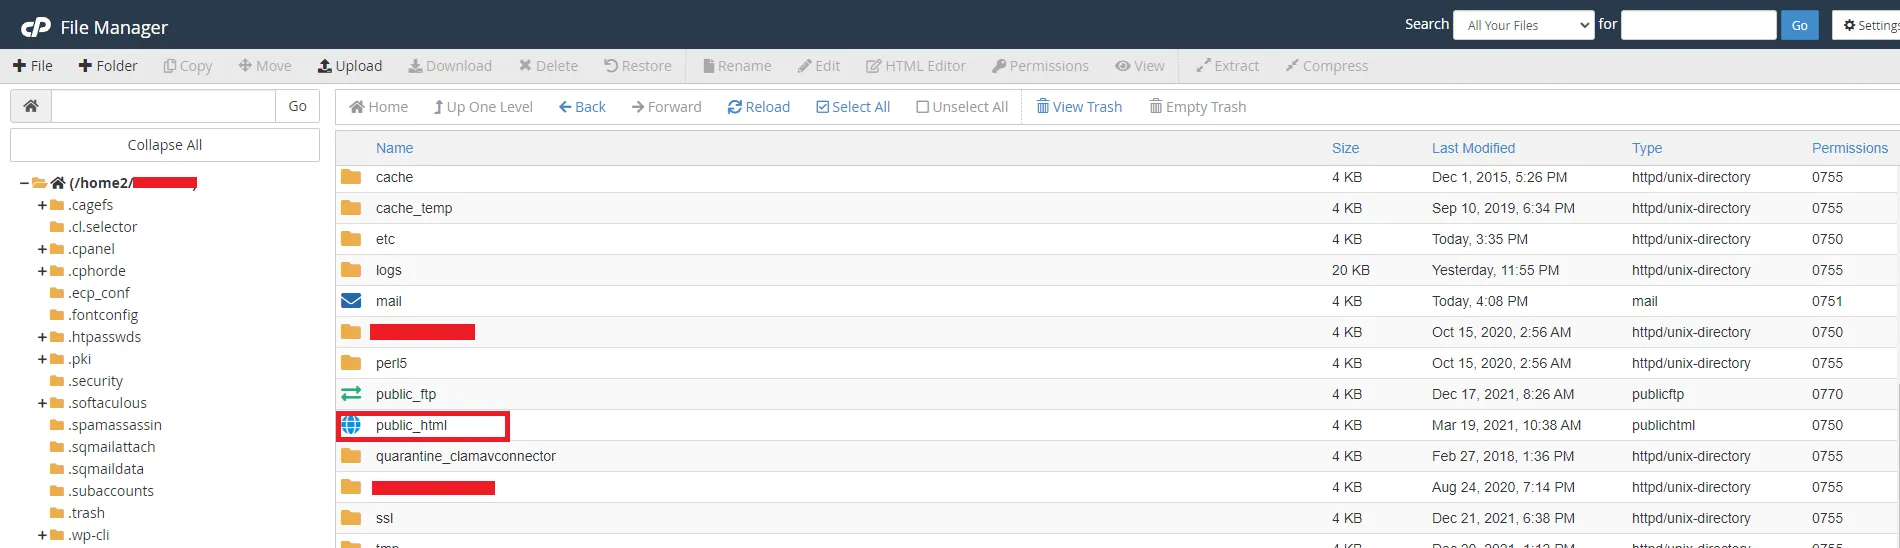
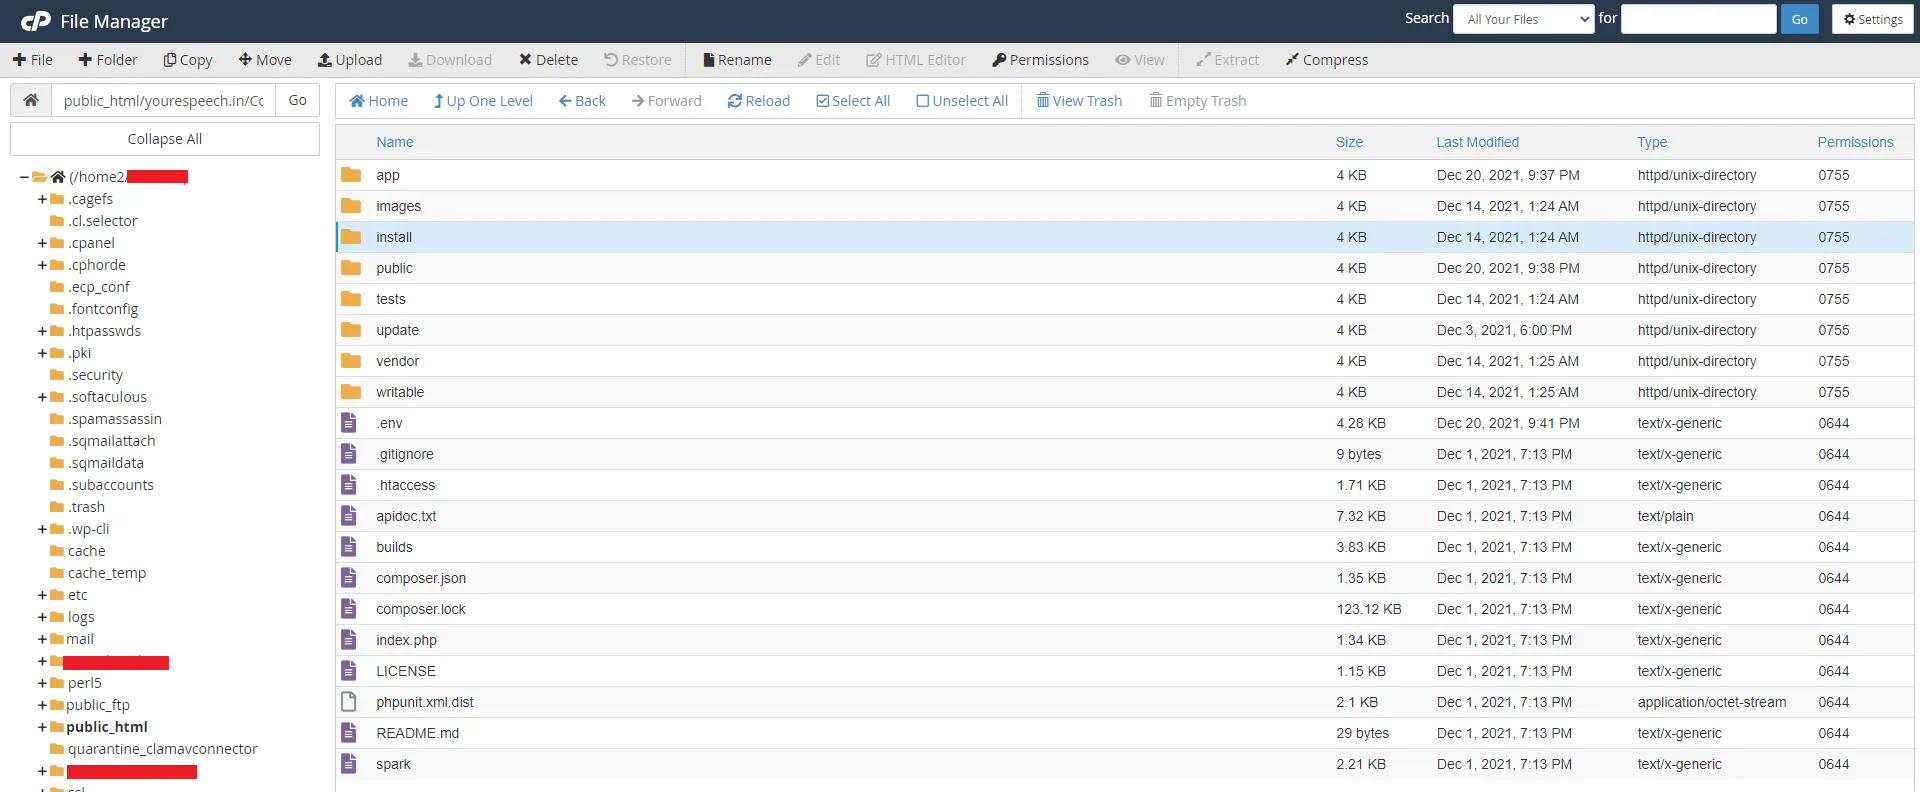
After following the above steps you have successfully created a Database, User for the Database, and uploaded Ready to Install files. Kindly gather that database information and fill in the form as suggested.

  1. Database Hostname : Enter the hostname.
  2. Database Username : Enter the username that have access to the database.
  3. Database Password : Enter the password.
  4. Database Name : Enter the name of database.
  5. Admin Mobile : Enter the mobile number (The mobile number will be used further for user authentication)
  6. Admin Password : Enter the password number(The password will be used further for user authentication)

Now click Install. Thats it! You are ready to run your App : http://youreDemand.in/

Firebase Configuration

  1. Create Firebase Project
  2. A. Goto >> Firebase console << .
    B. Register a new account or try to log in with existing google accout.

    C. Once logged in, you can see firebase console dashboard. Click on Add Project.Provide a project name, and then select country and then after that click on Create Project. For example, see the below image.

    D. Once the project has been created, it will automatically redirect to Firebase dashboard screen.

    E. Now you need to add web project/application to the firebase project.

    F. Goto Authentication and open " Sign-in method " Tab

    G. Now go to Authentication , -> In Authentication go to settings -> In "Authorized domains", localhost and a Firebase domain are automatically added. -> Here we've to add domain name without http:// and https://

    J.Goto Project settings in firebase dashboard option.,


    K.Goto Project settings and scroll down you will find created web App there you find config option that will have firebase settings for front end.

    L.here you have to set all details

    M.You need to set this details in eDemand admin panel -> Firebase Settings Page from Settings page


    Where to find Vapid key
    1. Open the Cloud Messaging tab of the Firebase console Settings pane and scroll to the Web configuration section.
    2. In the Web Push certificates tab, click Generate Key Pair. The console displays a notice that the key pair was generated, and displays the public key string and date added.
    Or look at steps by steps images below
    1. Open Project settings
    2. Choose Cloud Messaging, scroll down to Web configuration. In Web Push certificates you can find Vapid key ( If it doesn't exists, click Generate Key Pair to create )


    N.You need to set this details in firebase-messaging-sw.js file

    Note:: If firebase-messaging-sw.js not exist inside your root folder then create a file with firebase-messaging-sw.js name inside your project folder.

    firebase.initializeApp
    ({
    apiKey: "Your apiKey",
    authDomain: "Your authDomain",
    projectId: "Your projectId",
    storageBucket: "Your storageBucket",
    messagingSenderId: "Your messagingSenderId",
    appId: "Your appId",
    measurementId: "Your measurementId"
    });

    View firebase-messaging-sw.js and put content in file

    Note:: Upload json file In firebase configuration


Configure eDemand

Note

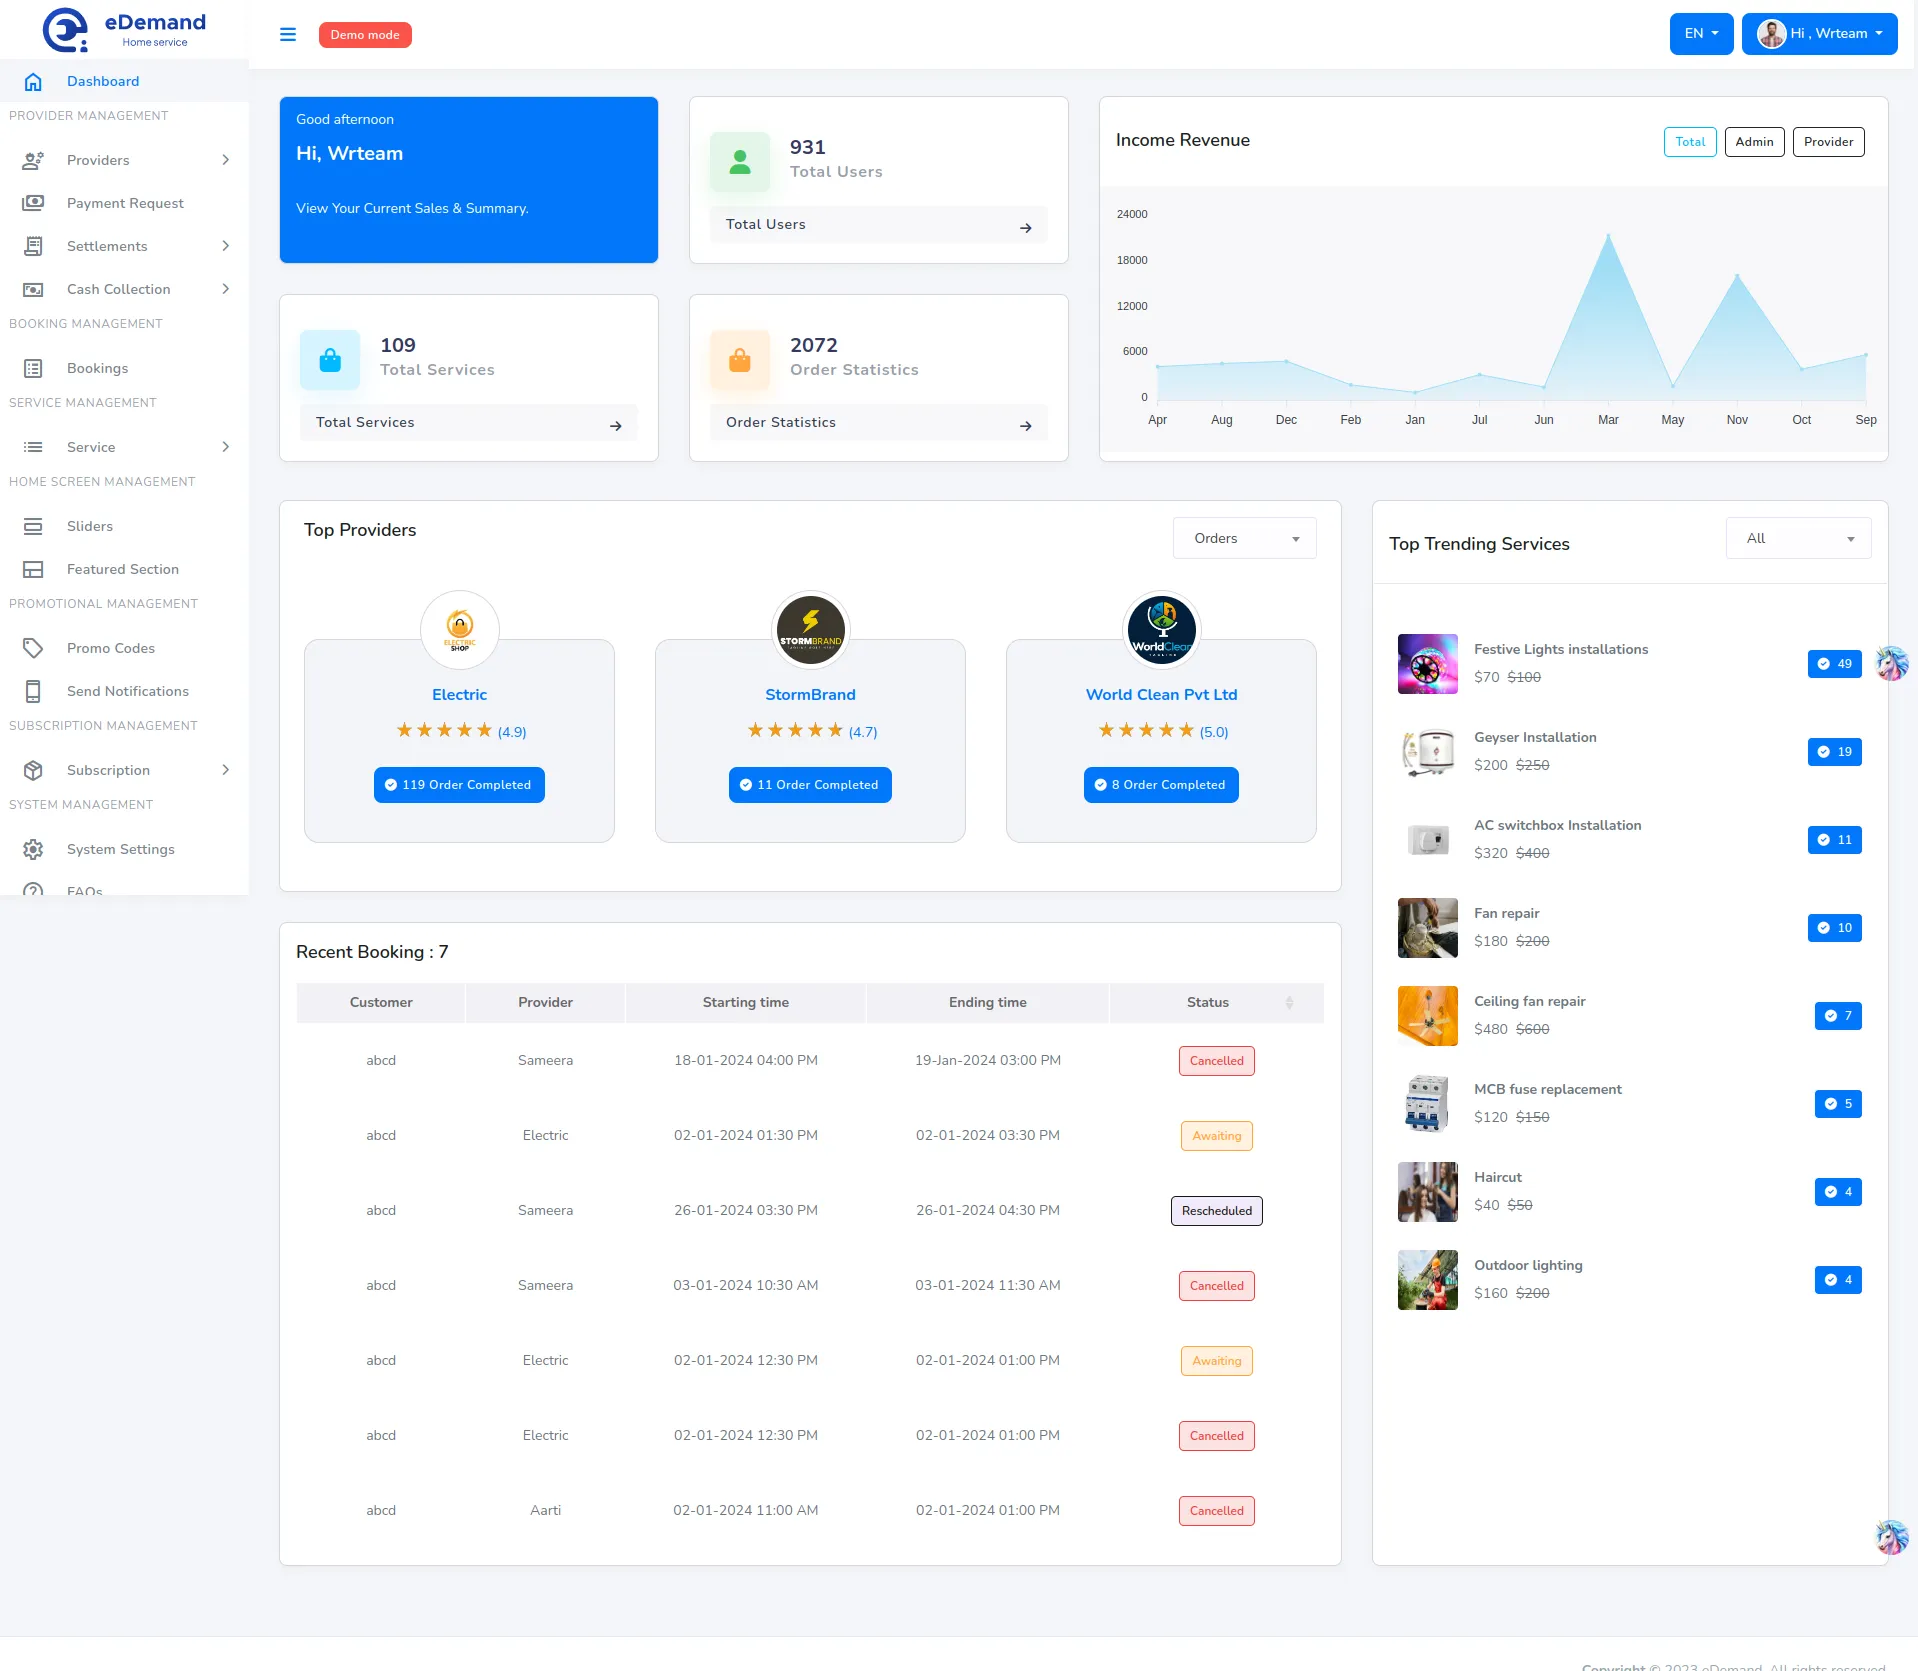
In order to Configure eDemand you must have Admin Account.

Use the given guide to configure and customize eDemand as you need.
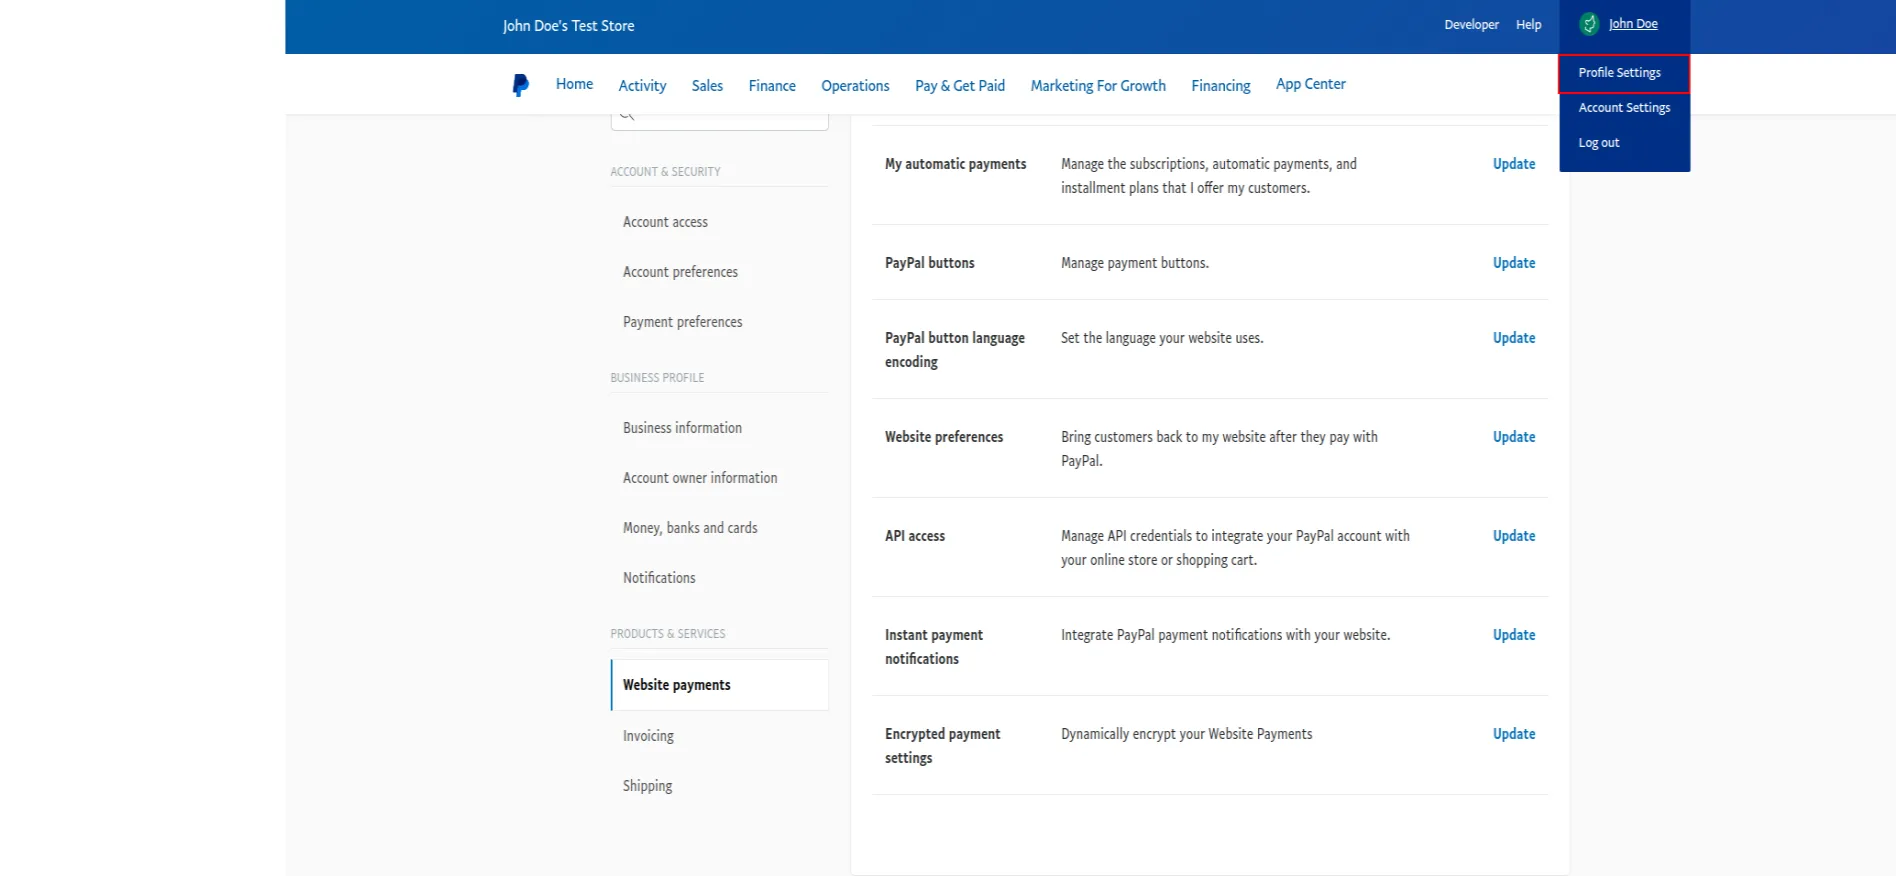
Login as admin by

  1. Enter Admin Login id and Password. Click Login
  2. Great! You have logged in as Admin.
  3. Follow the steps given below to customize eDemand.

General Settings

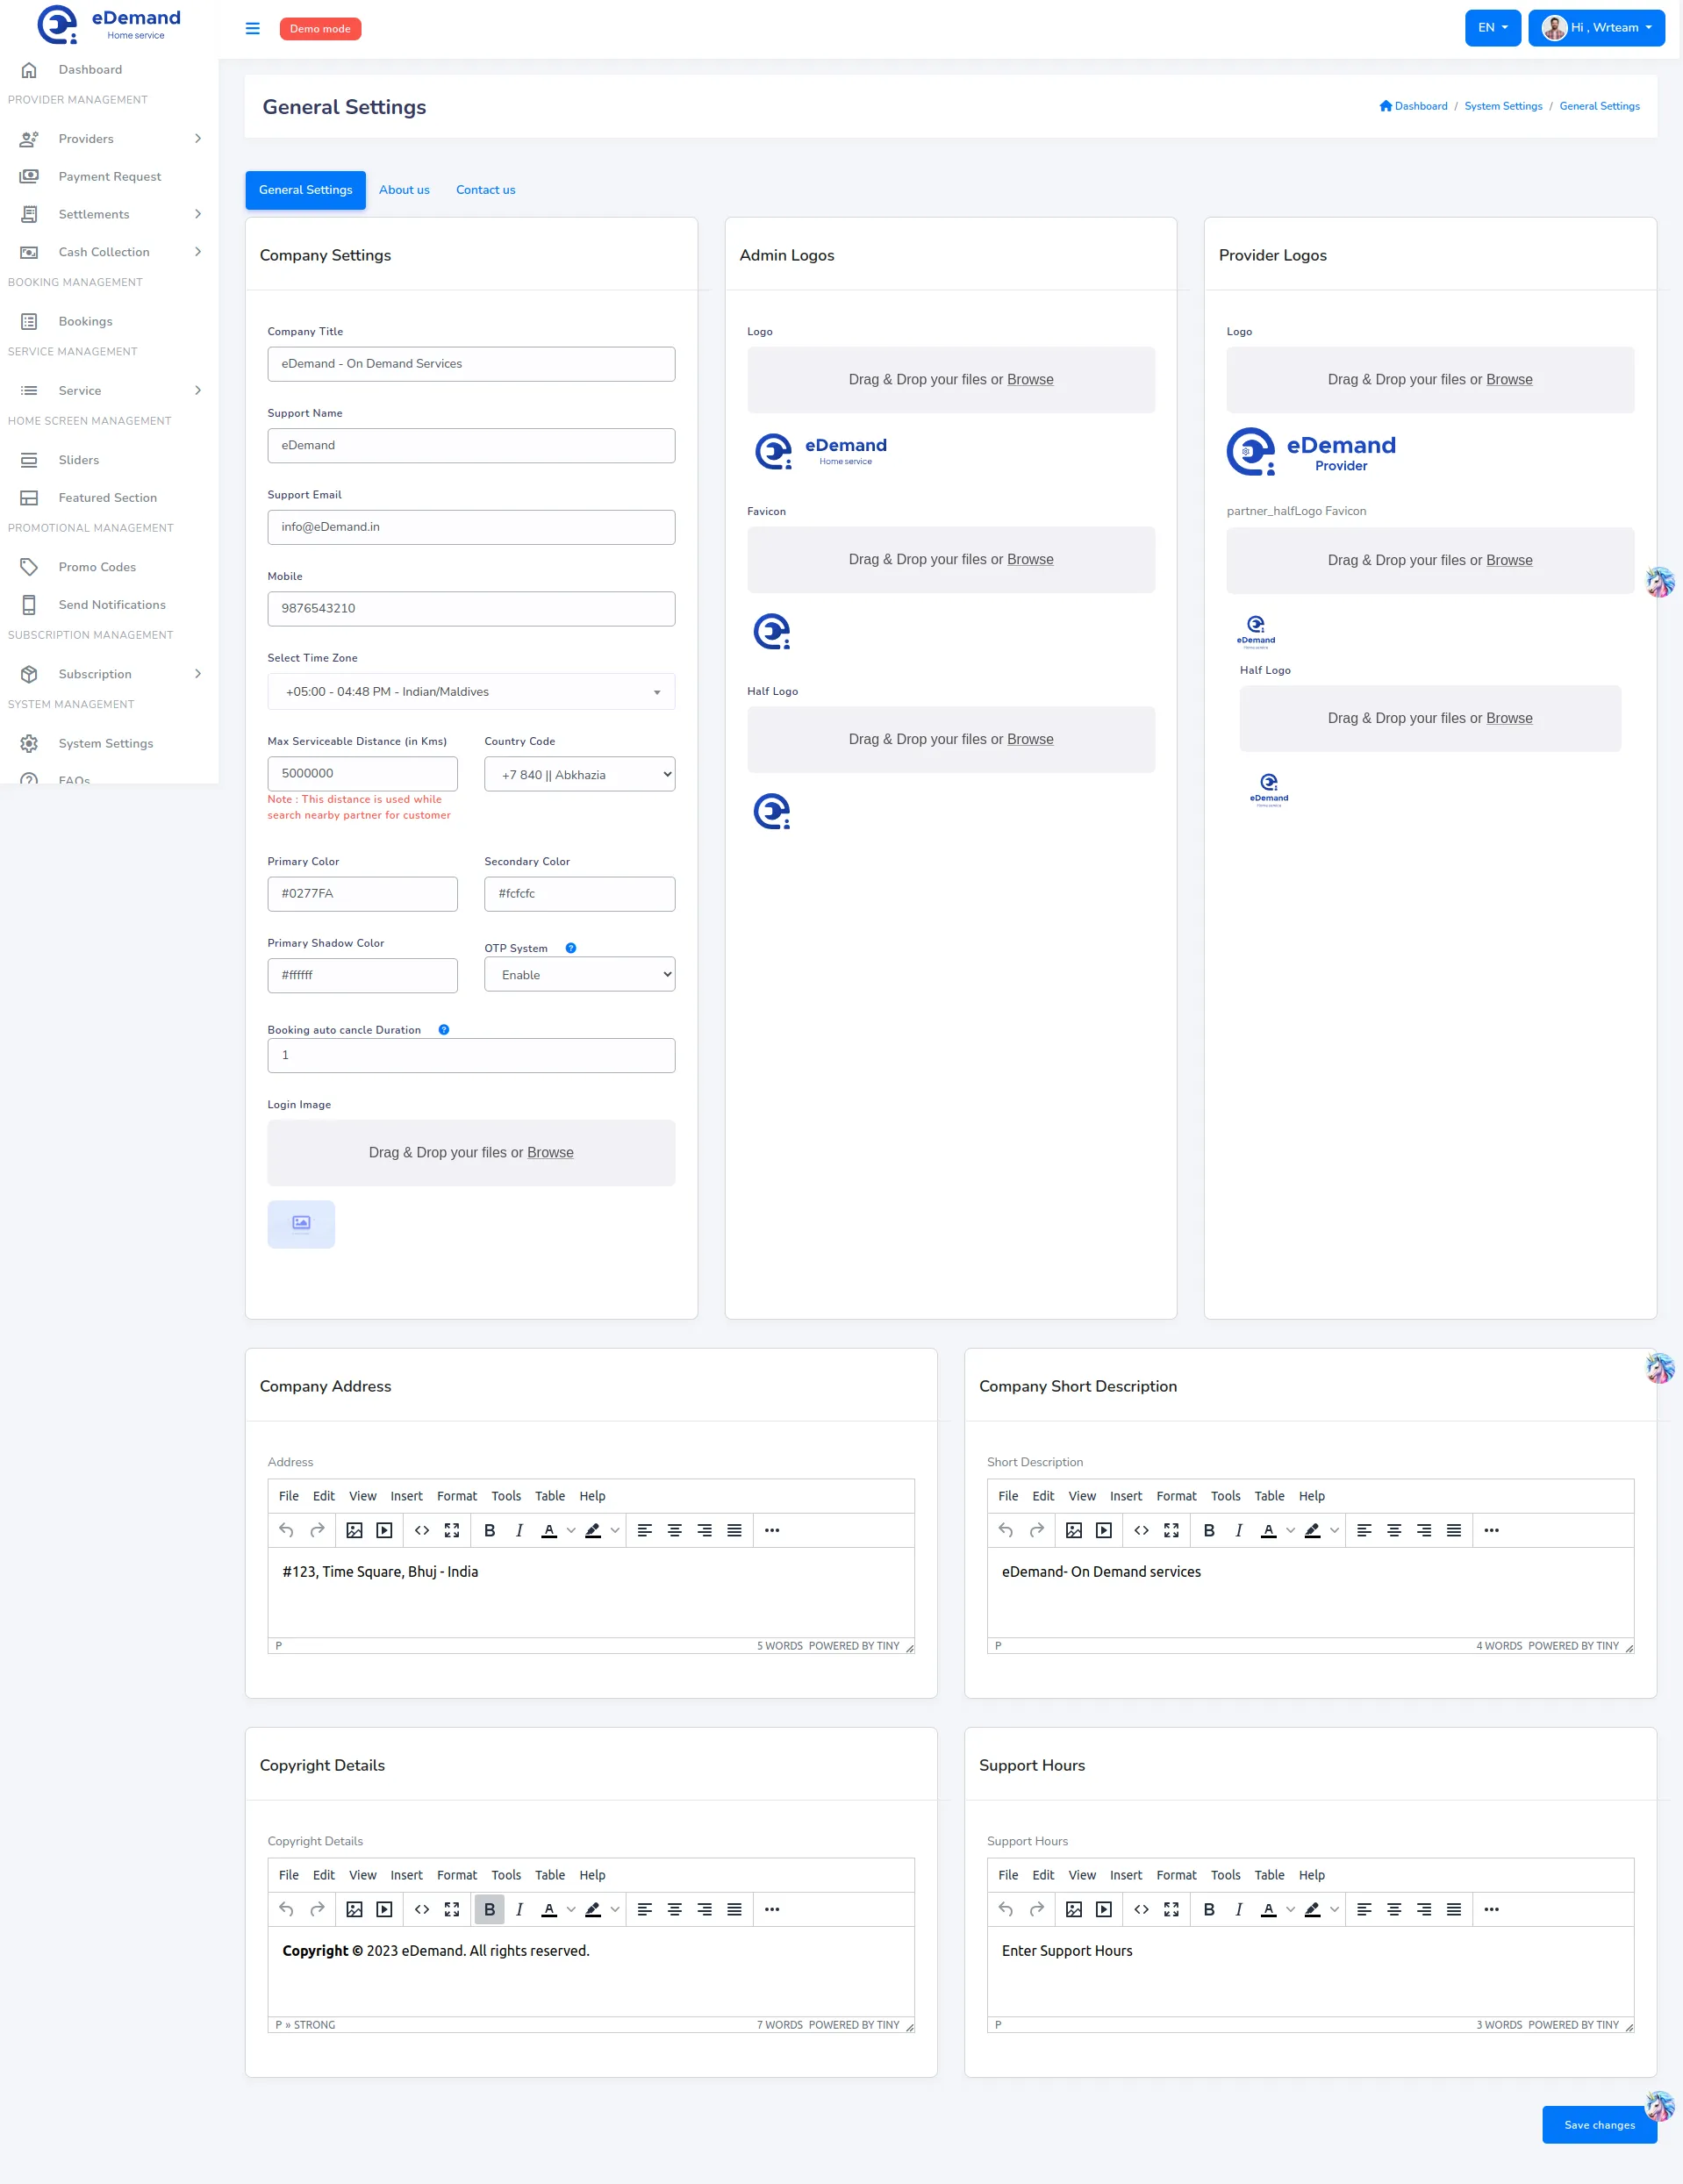
All the General Settings like Company Title, Support Name, Support Email, favicon, Half Logo, Currency Symbol, TimeZone, Phone, Site Colors, Address, Description, Copyright Details, And Support Hours. Just go to Settings -> General.

Google Map Api Keys

Email Settings

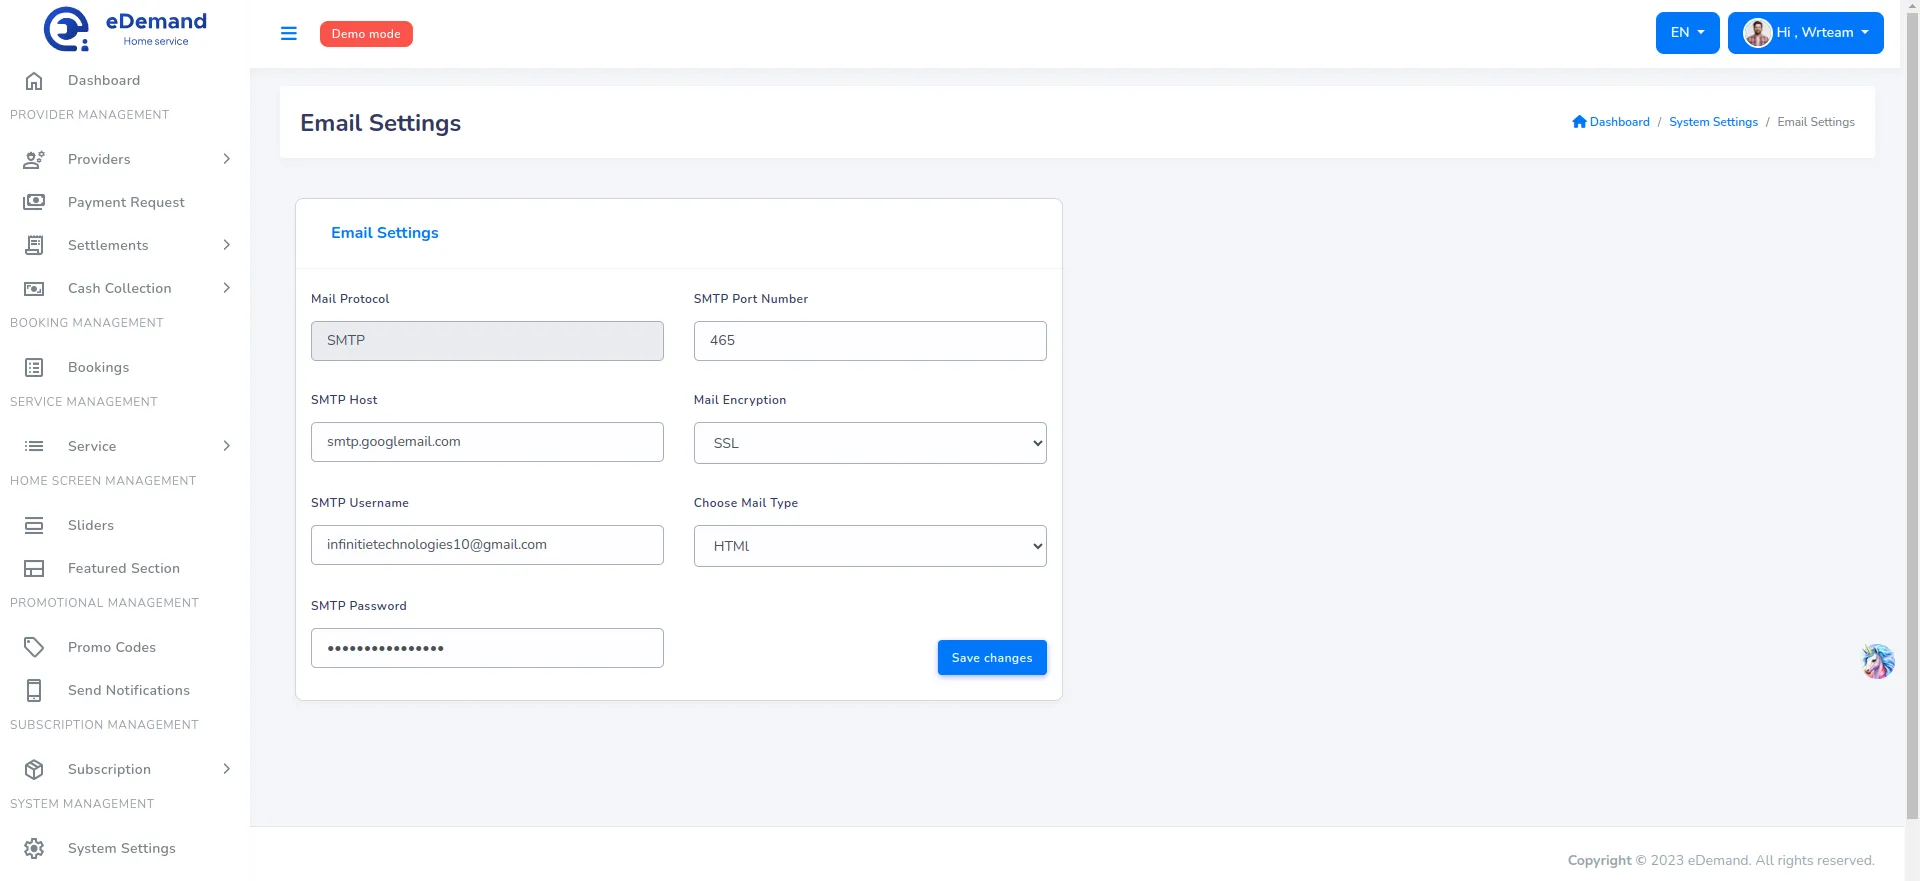
Configure Email settings. Just go to Settings -> SMTP (Email).

  1. Type the host name.
  2. Type SMTP user name.
  3. Type SMTP Password.
  4. Enter SMTP Port no.
  5. Select SMTP Encryption Type
  6. Select Mail type (HTML,TEXT)

Terms And Conditions

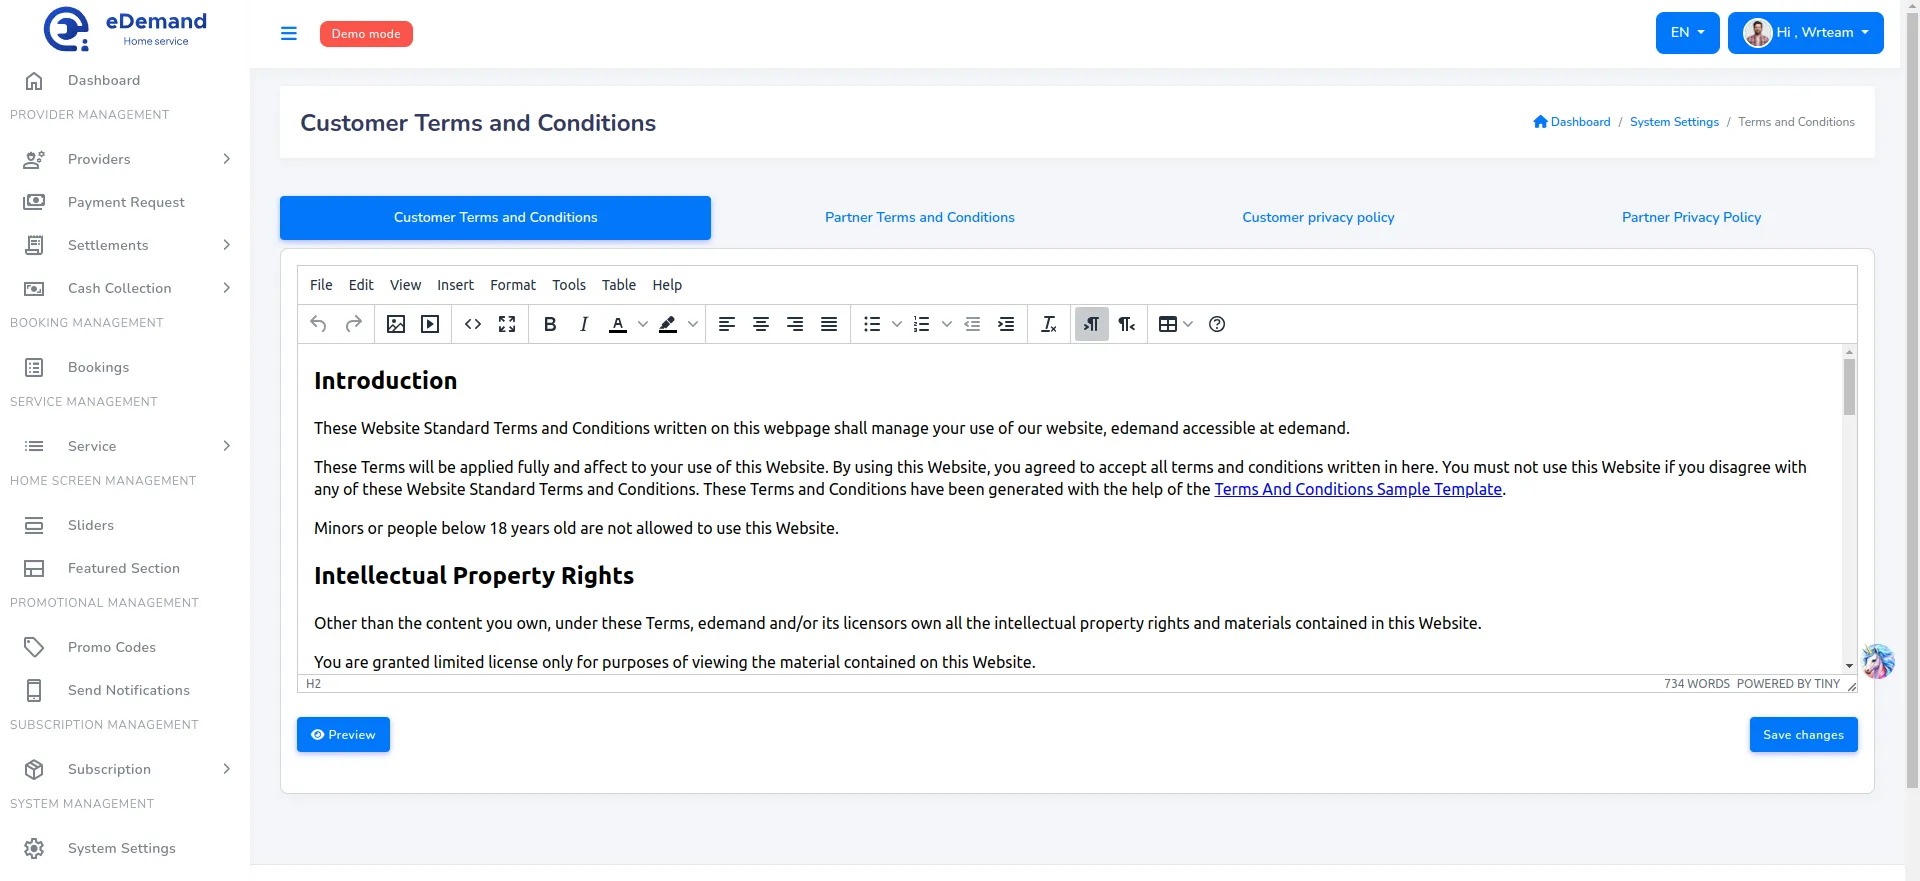
Configure Terms And Conditions settings. Just go to Settings -> Terms and Conditions.

  1. Enter all Terms and conditions under Terms and conditions section.

Privacy Policy

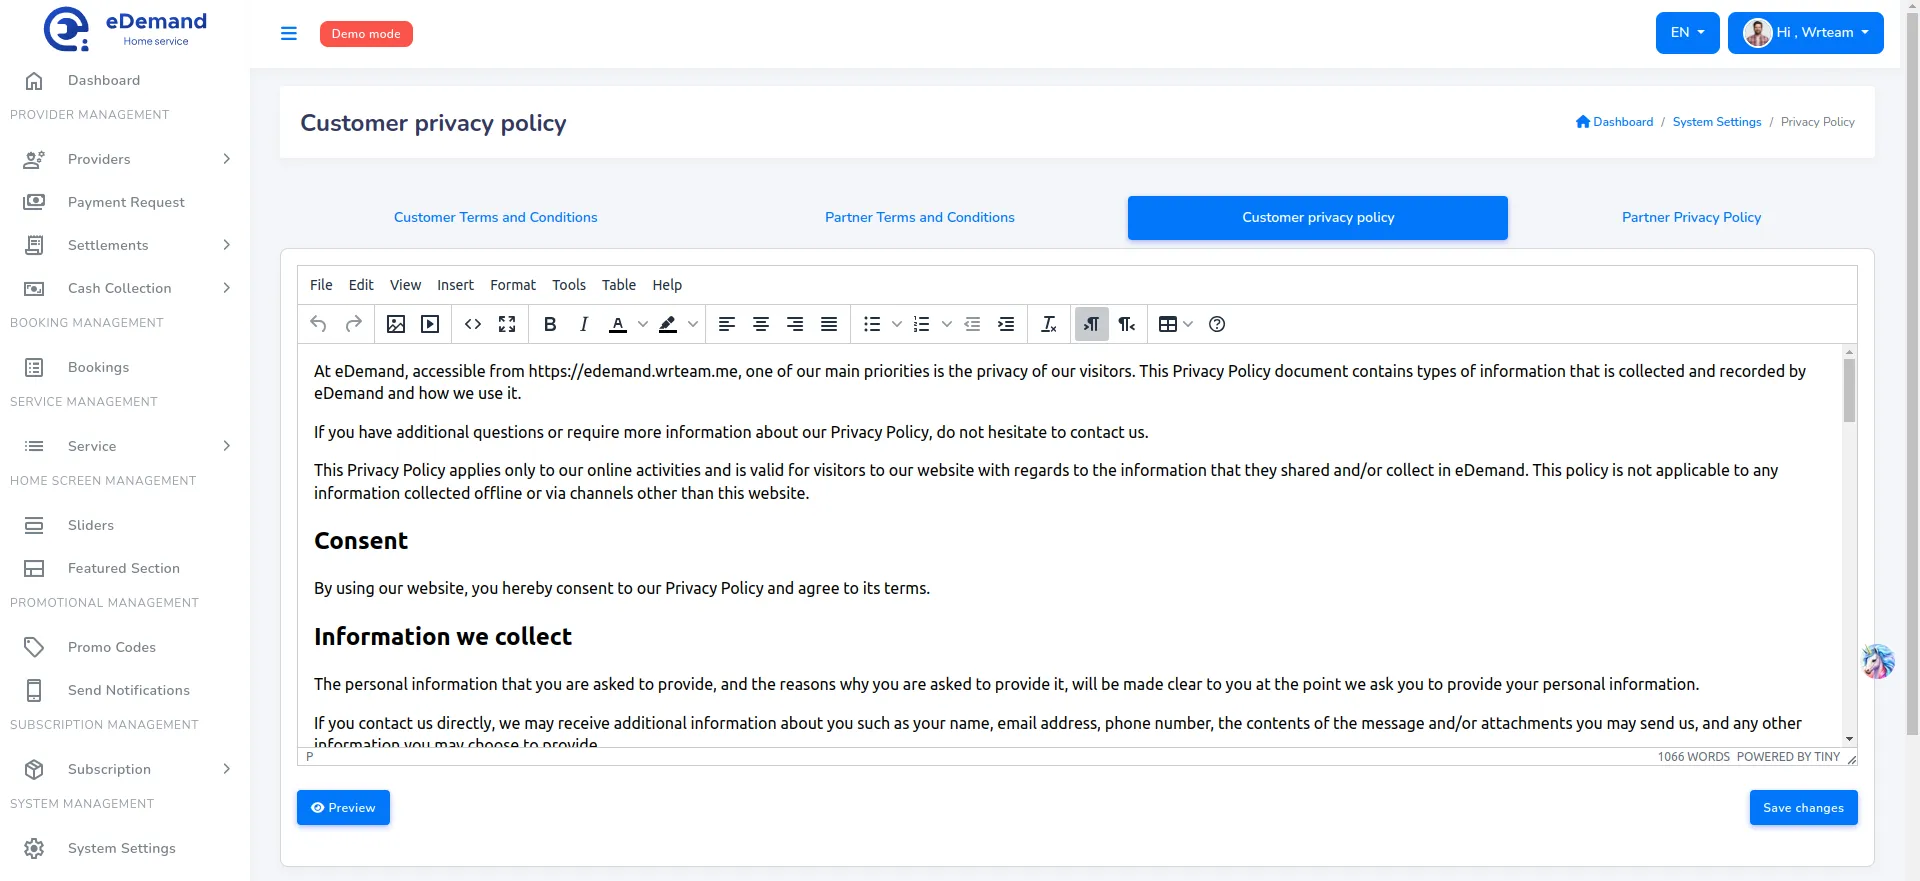
Configure Privacy Policy settings. Just go to Settings -> Privacy Policy.

  1. Enter all Privacy Policy under Privacy Policy section.

Payment Gateway Settings.

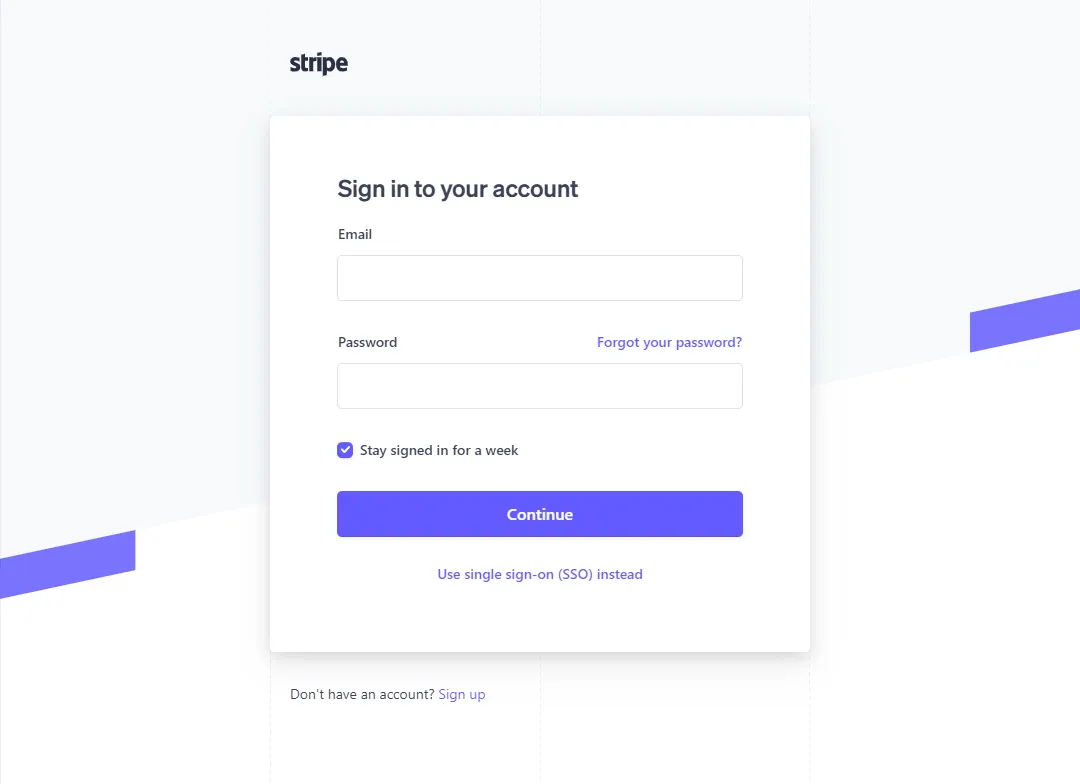
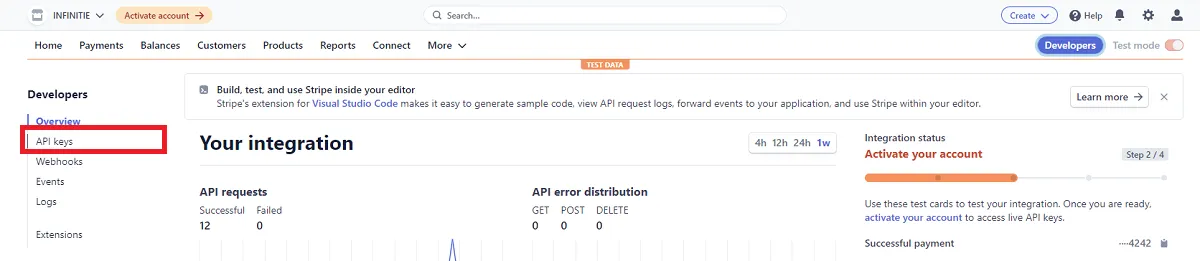
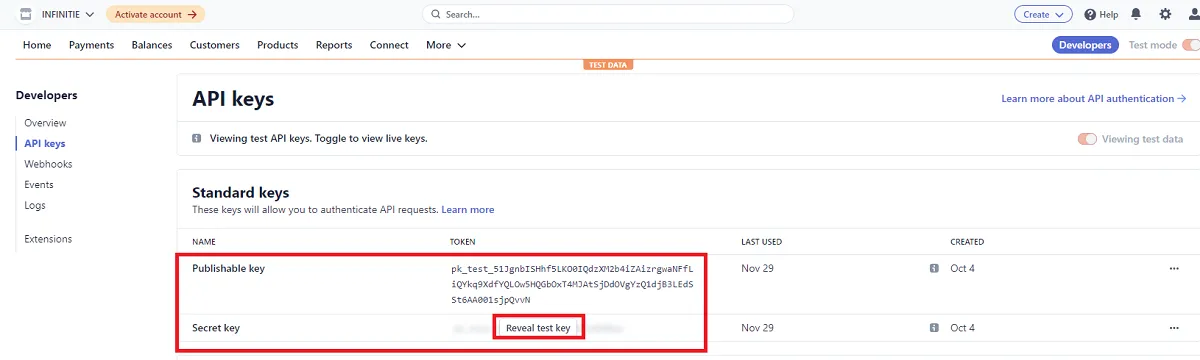
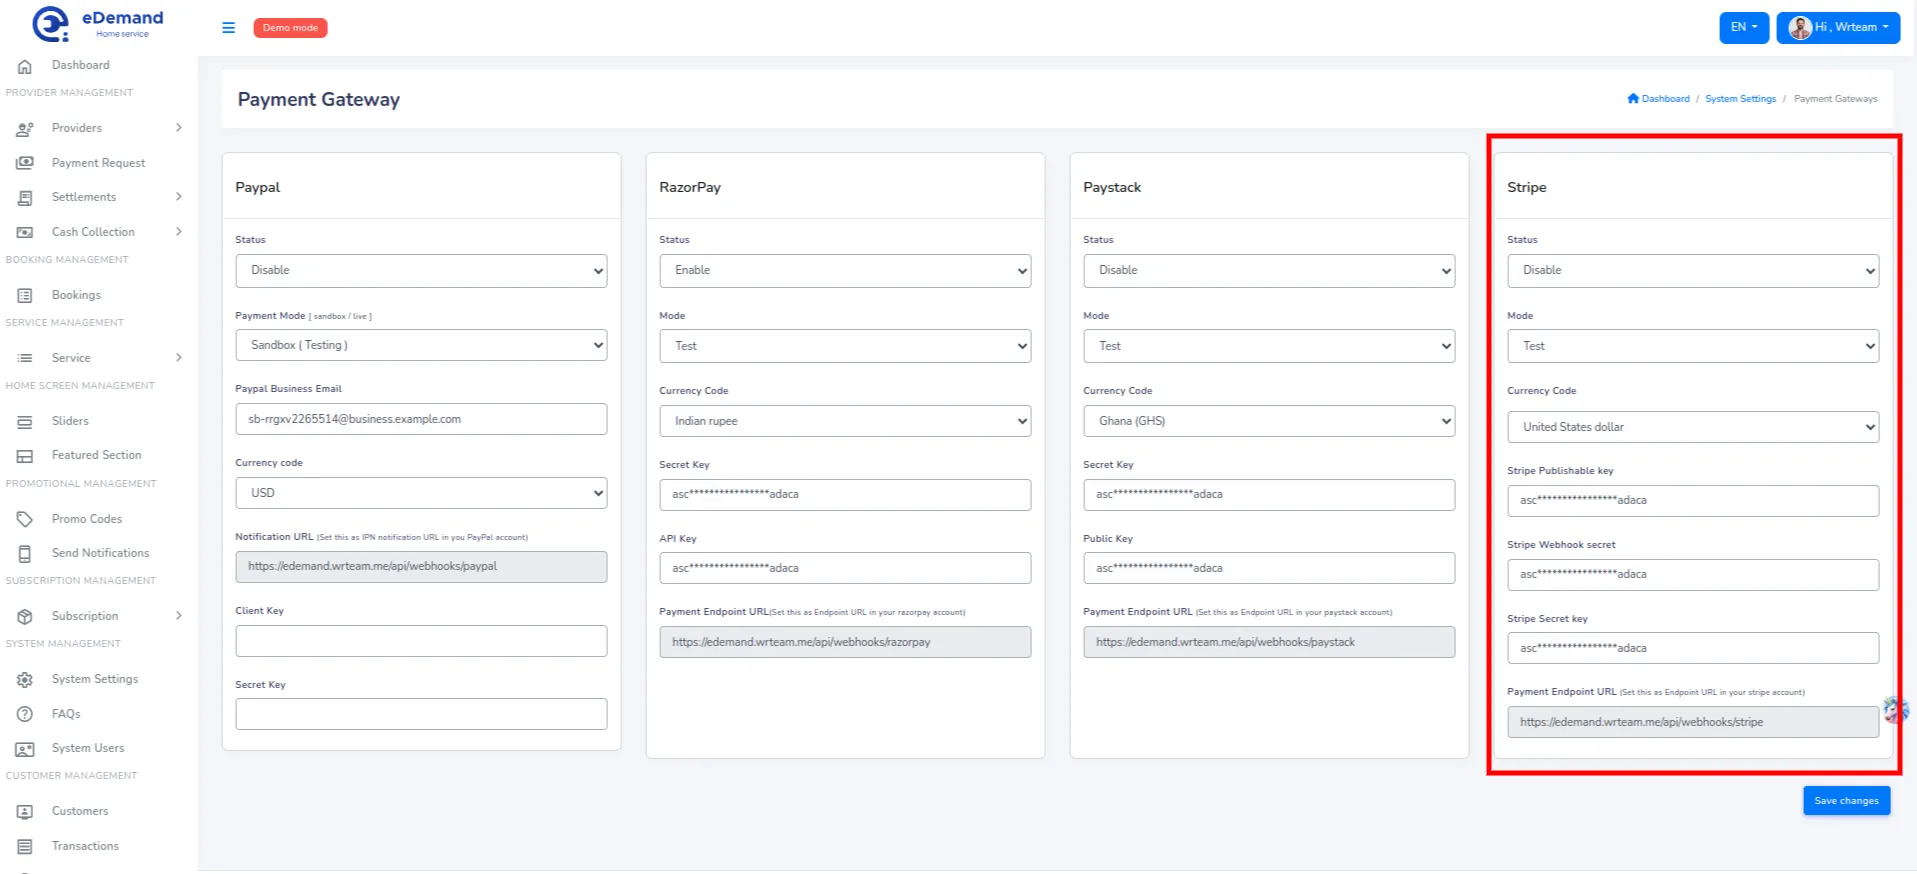
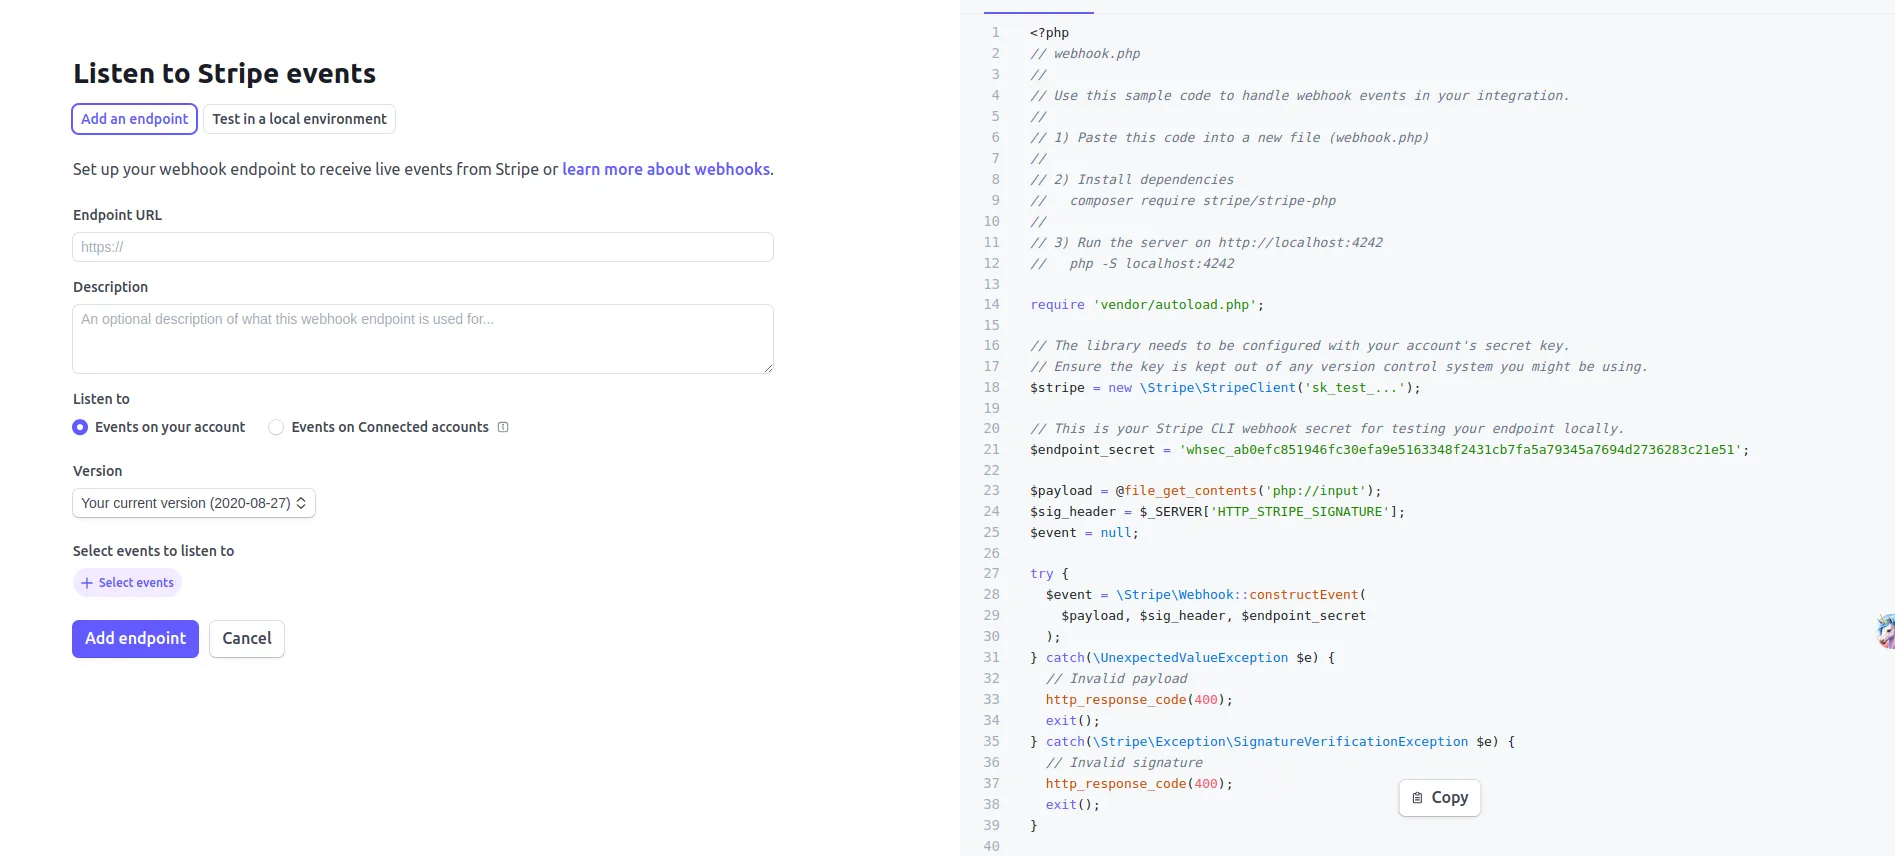
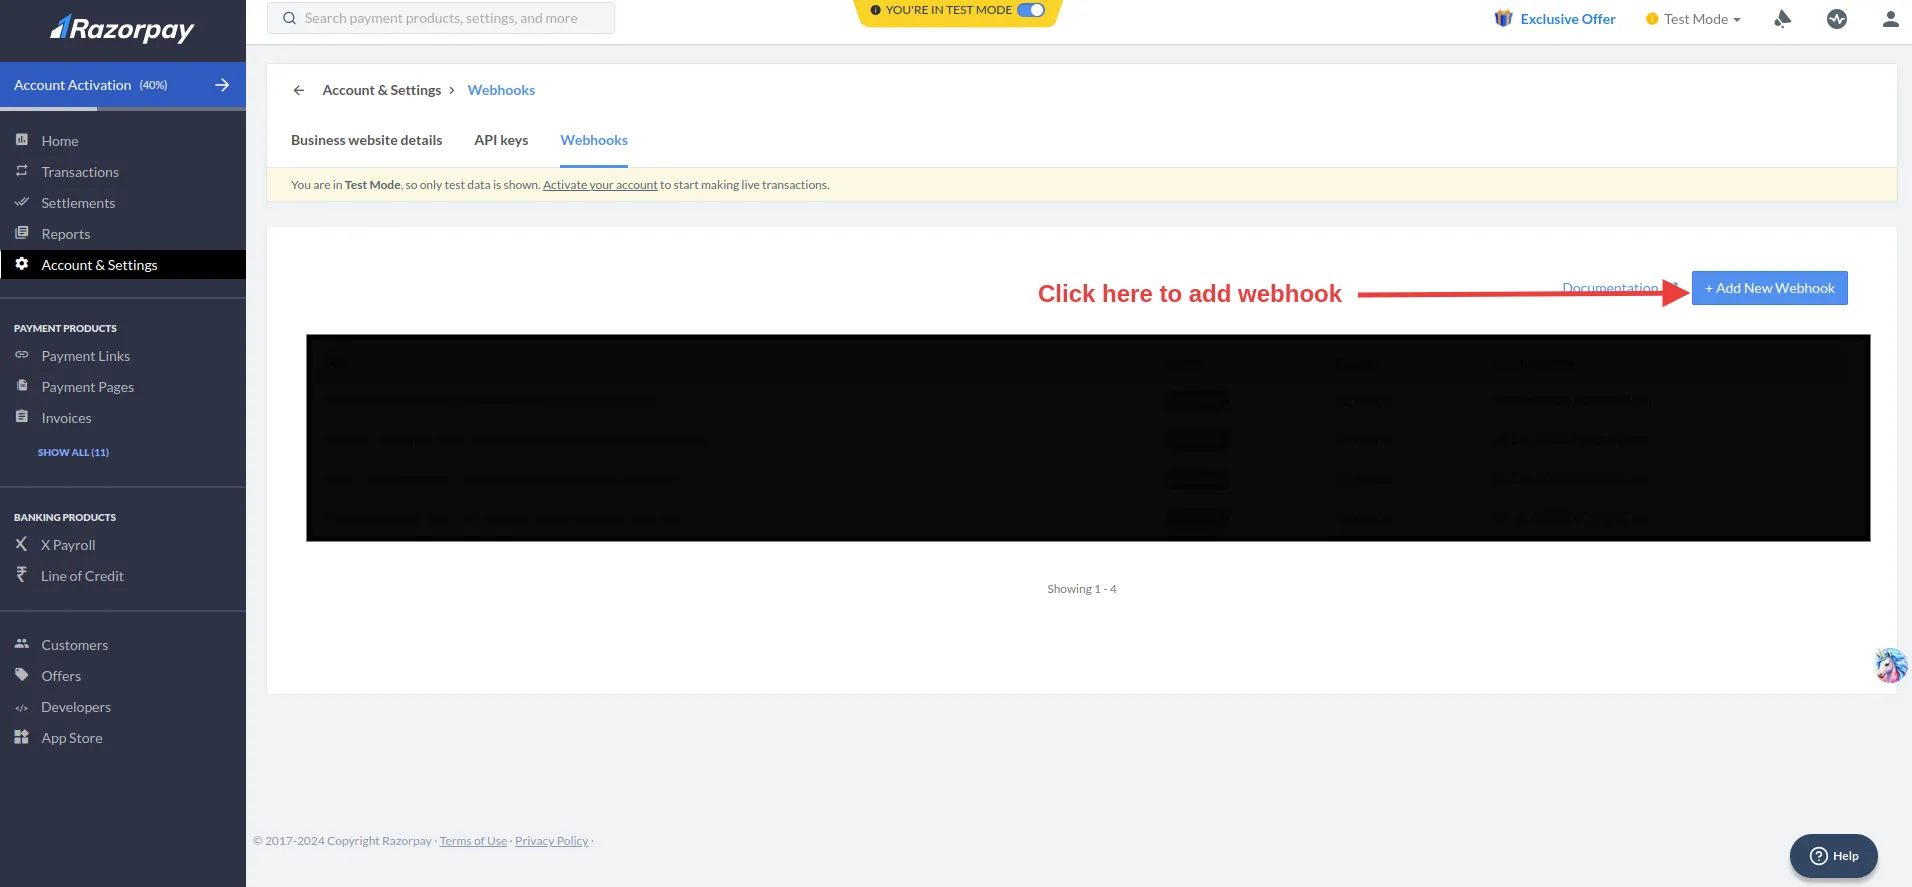
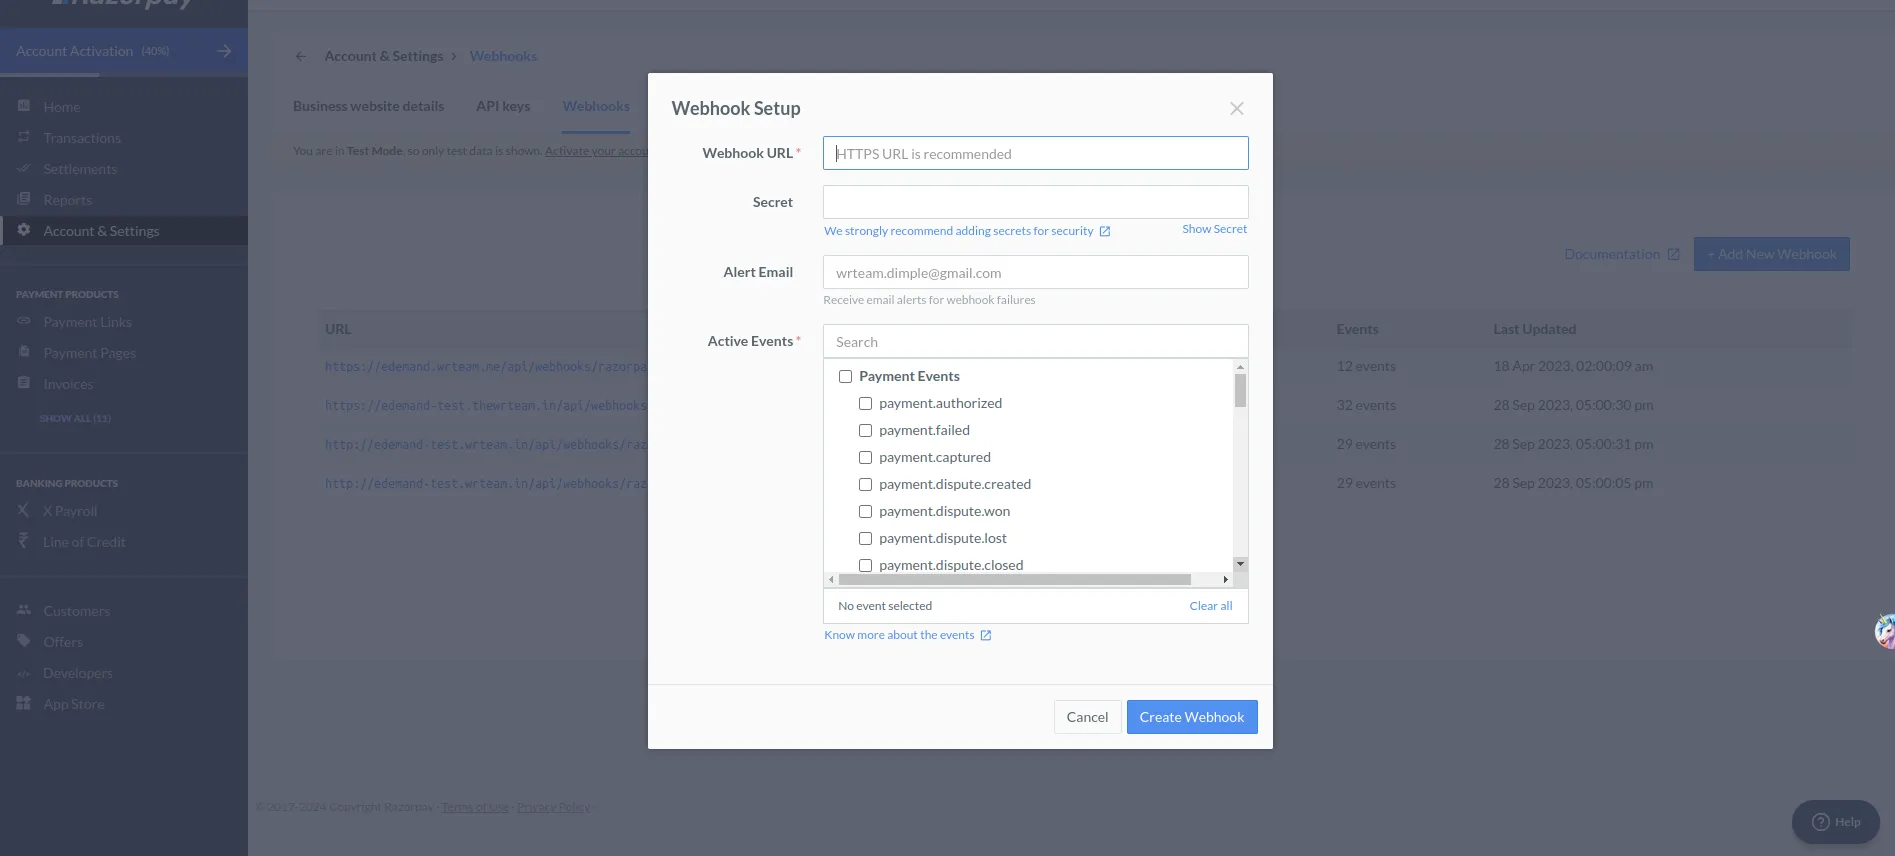
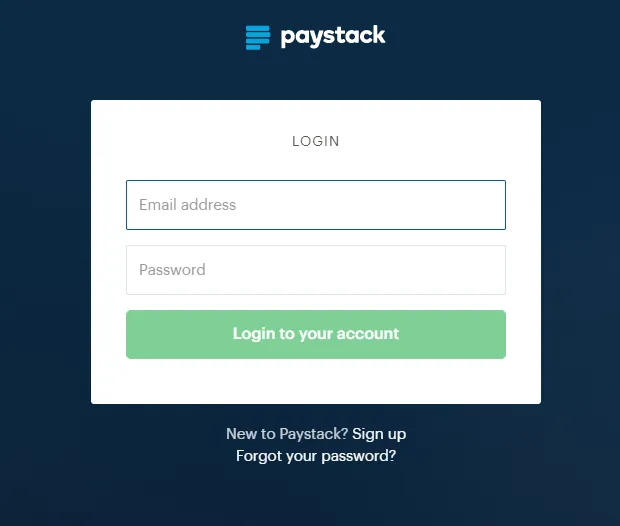
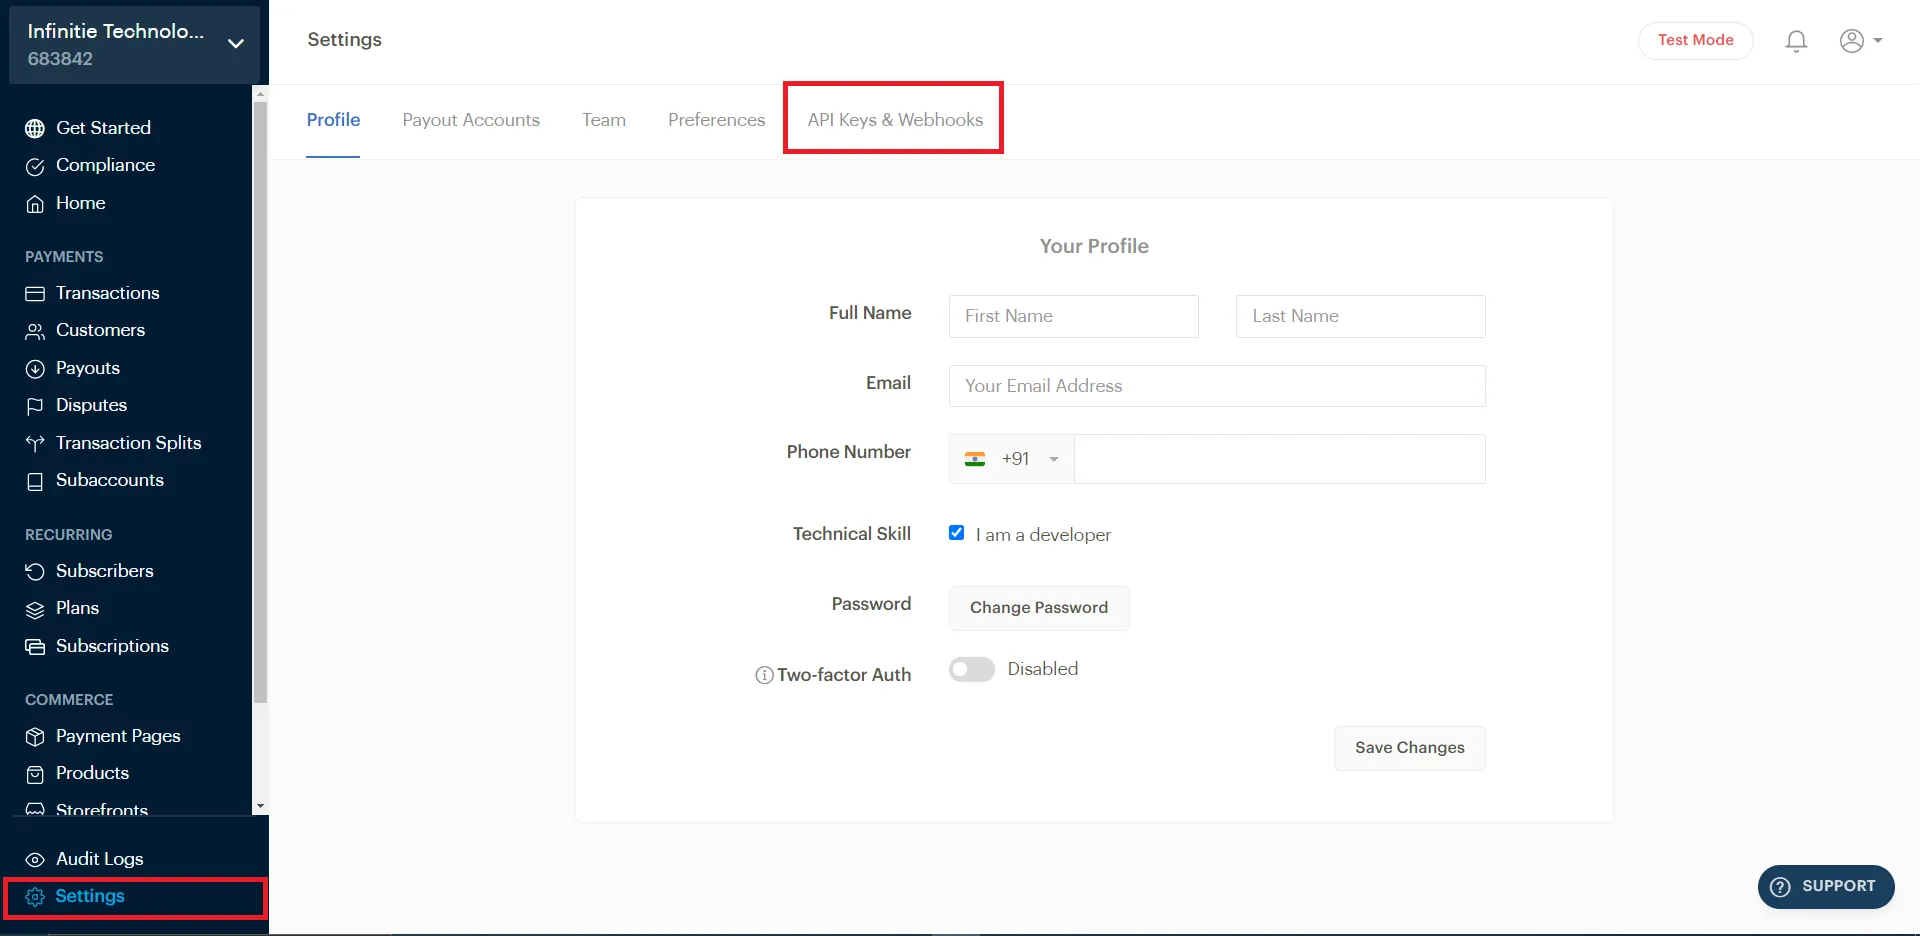
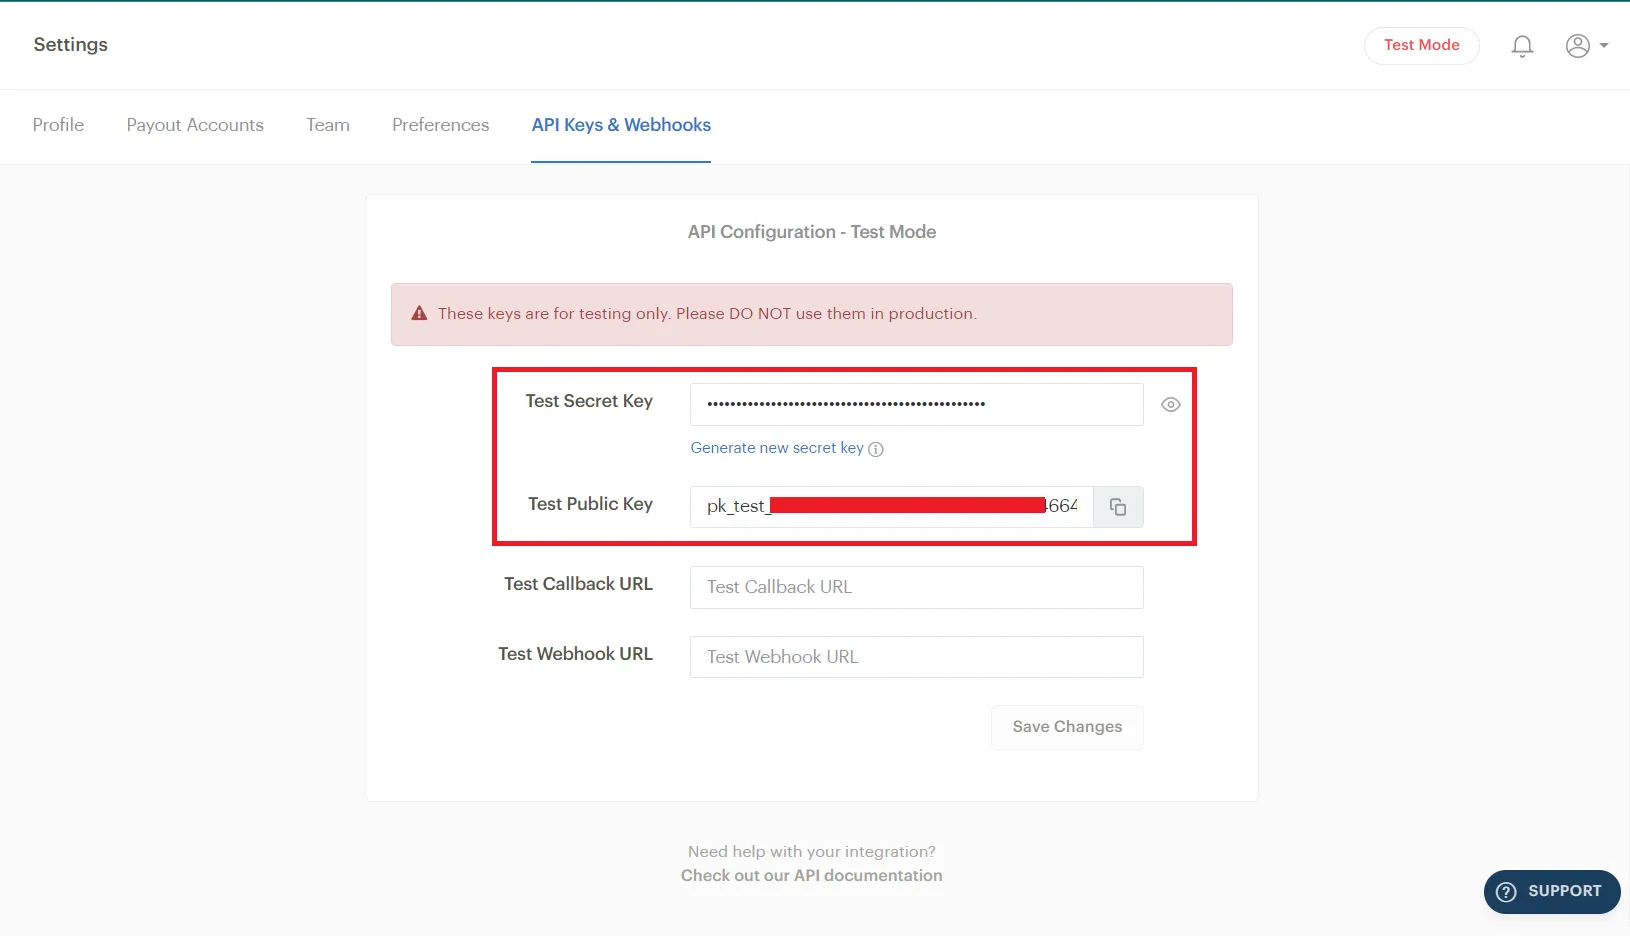
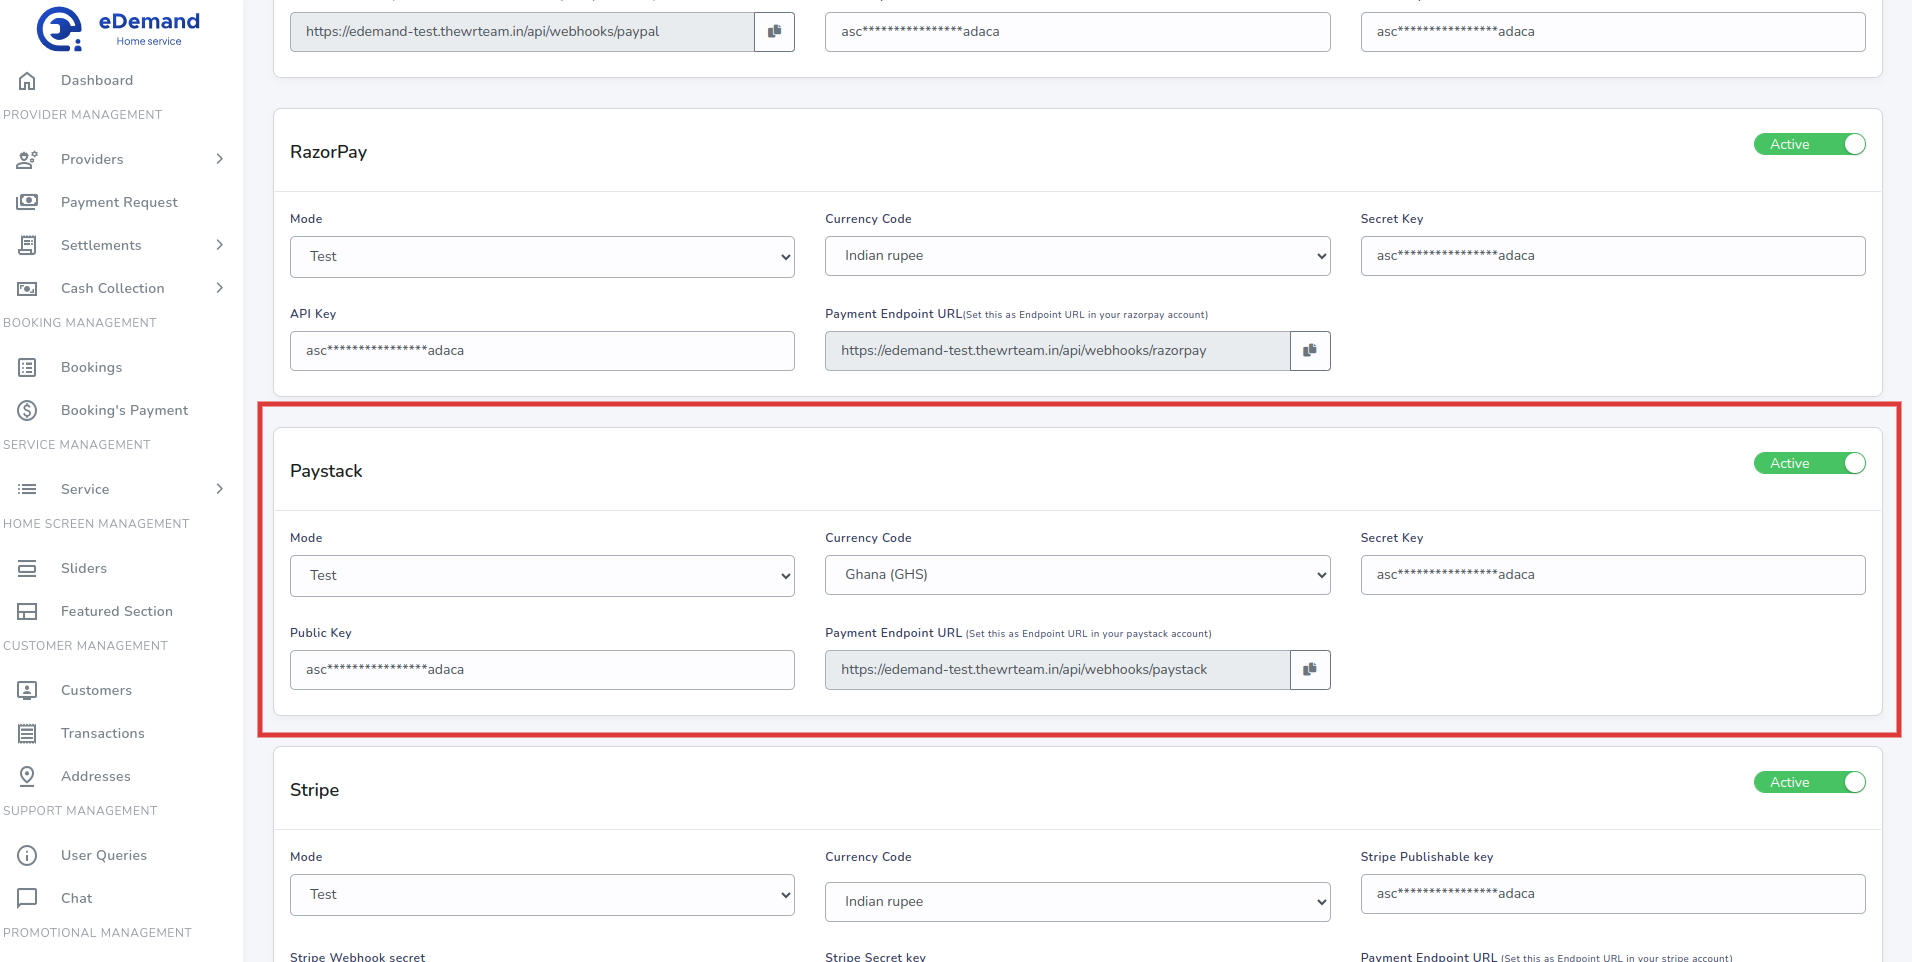
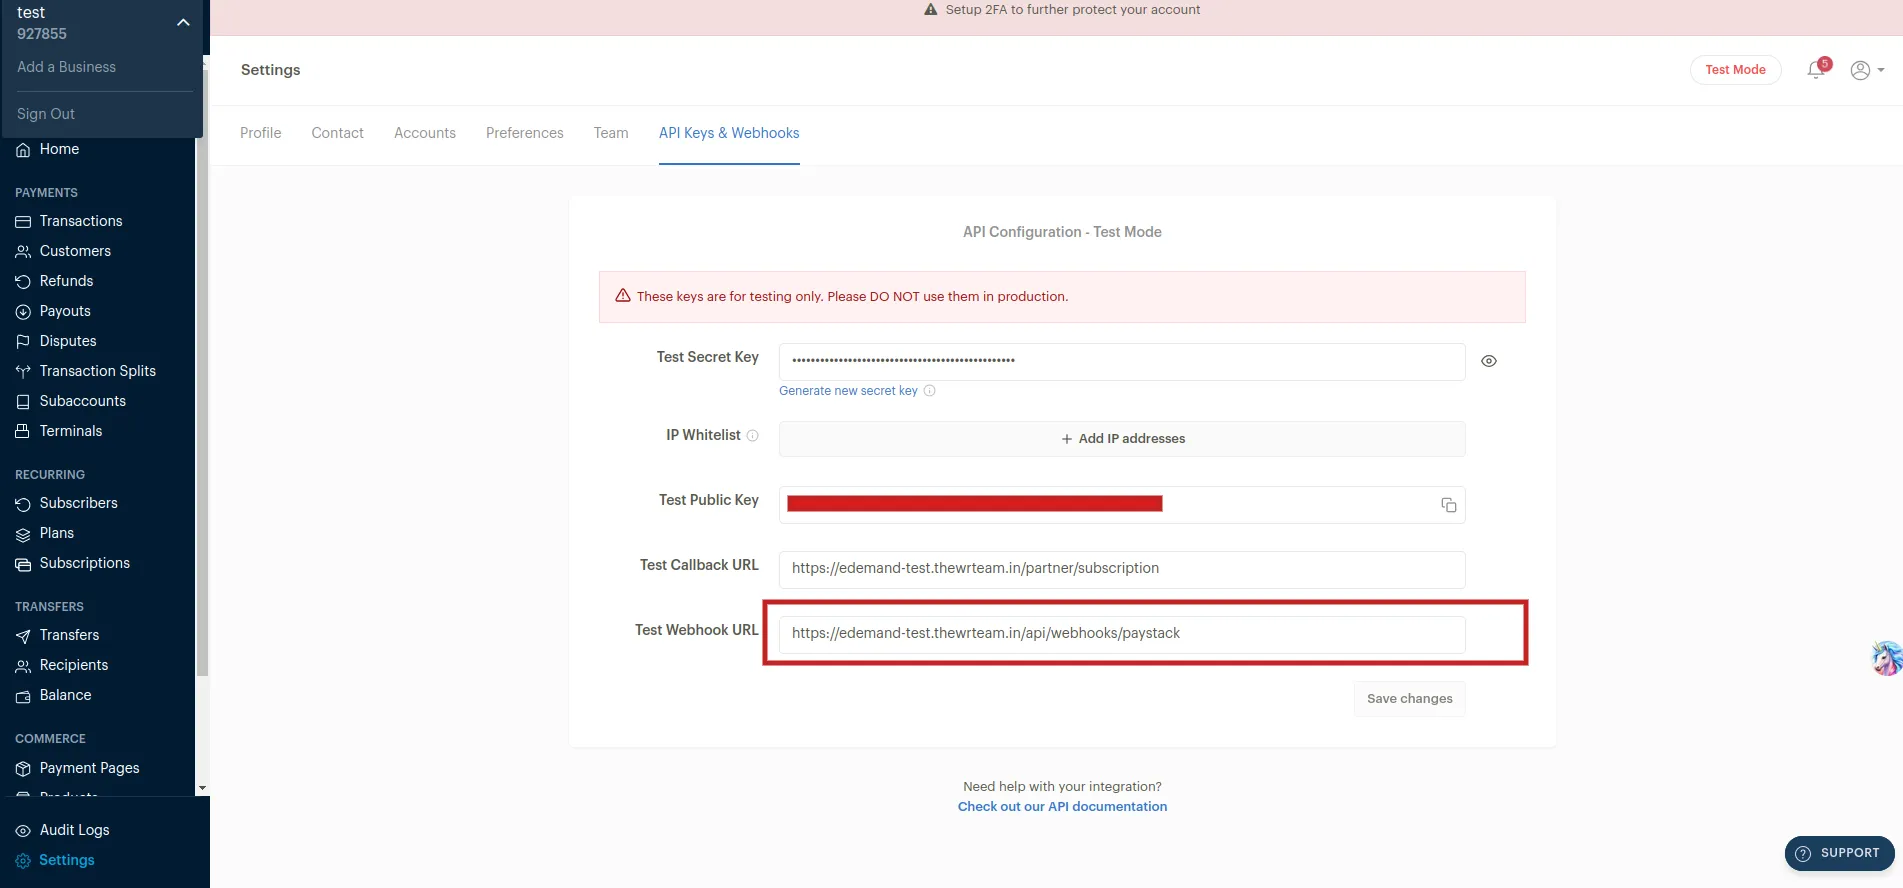
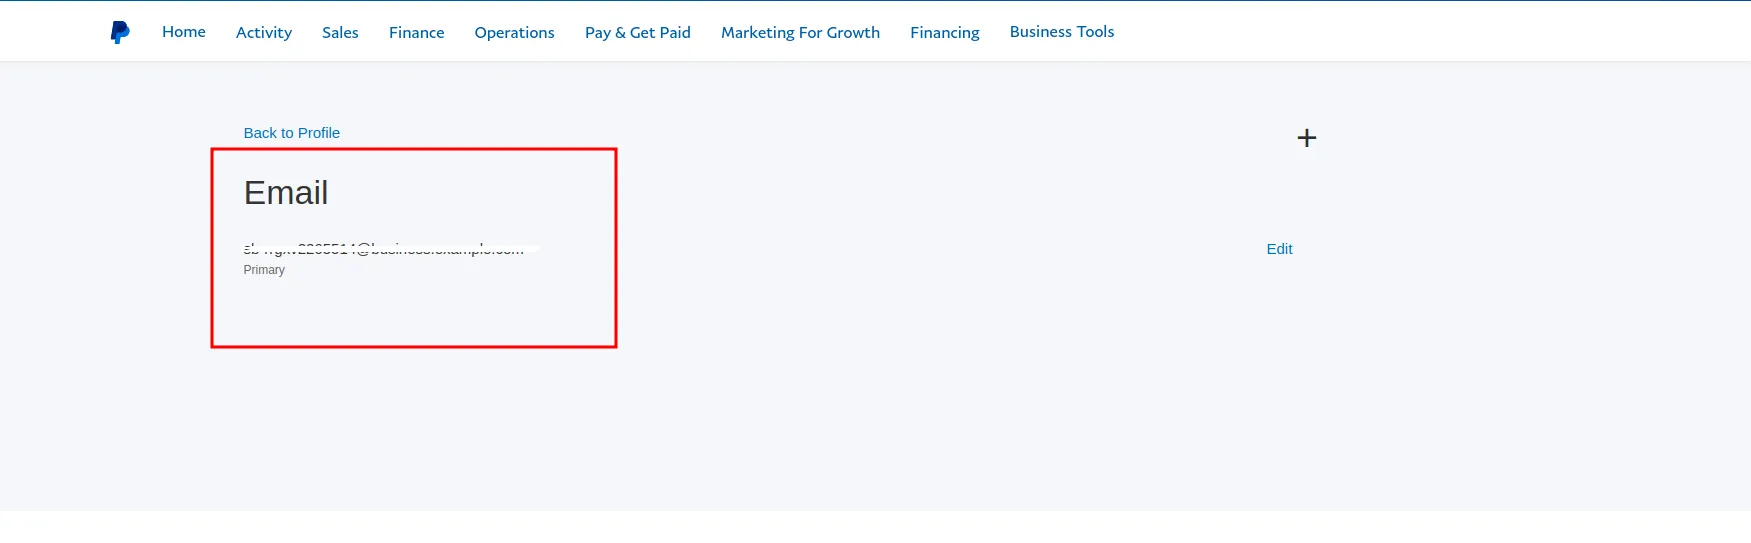
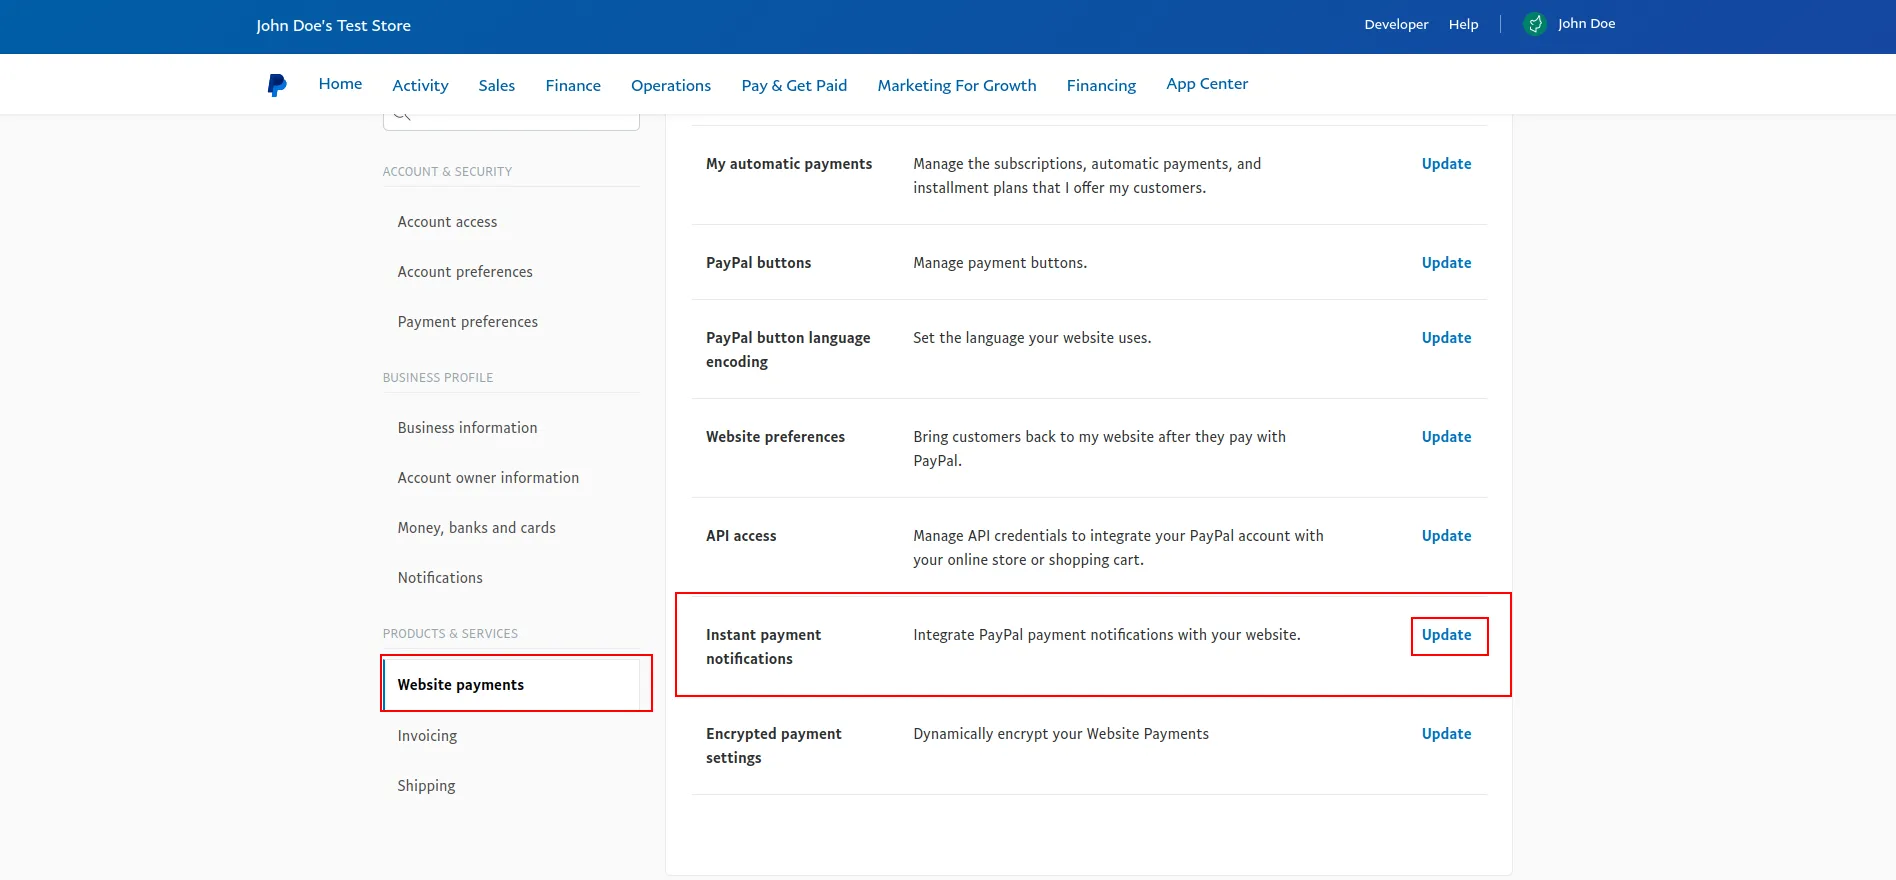
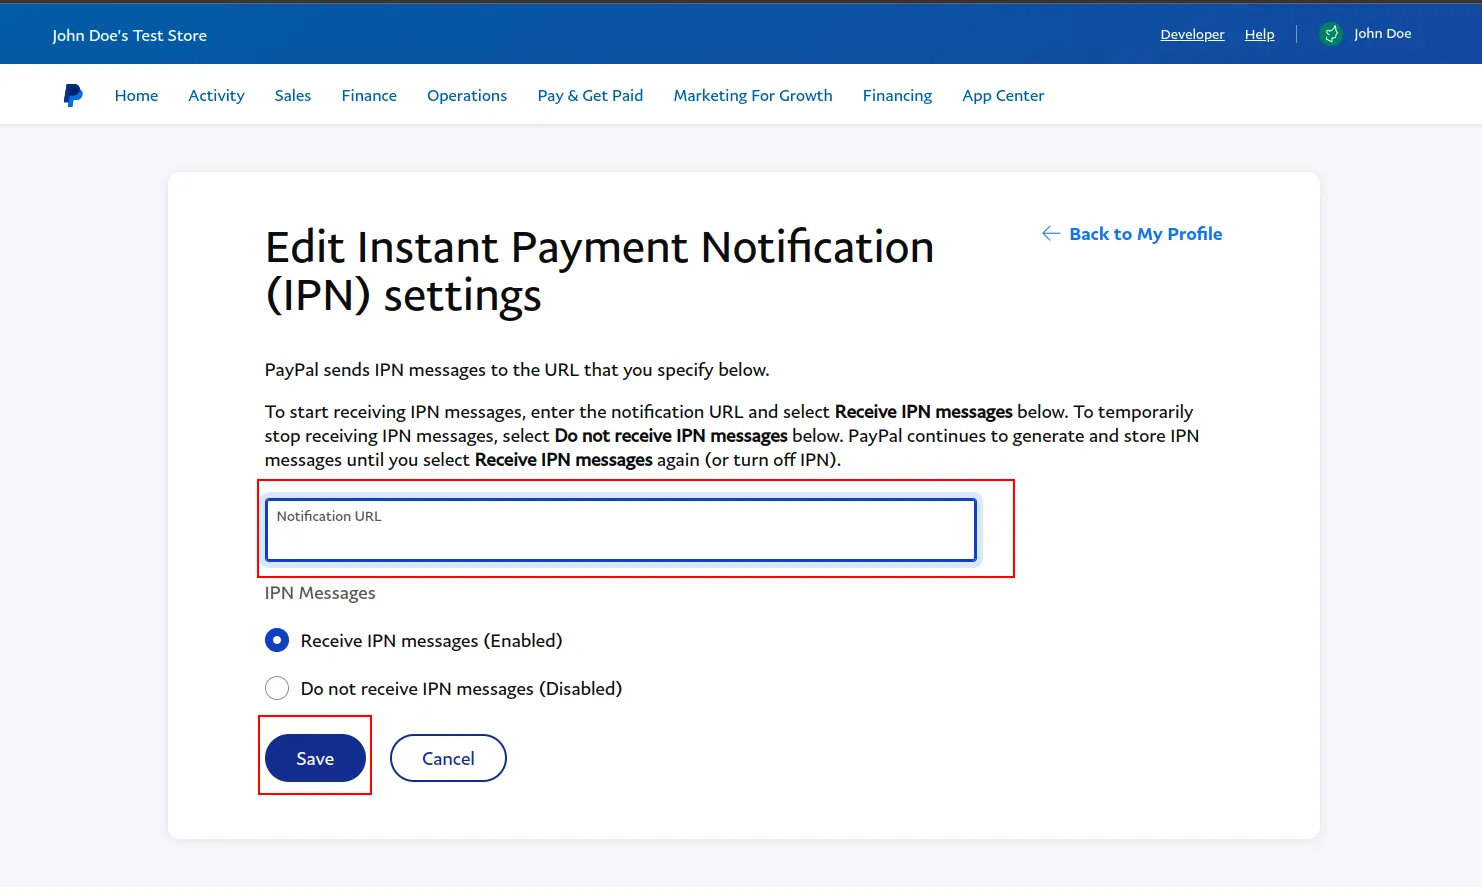
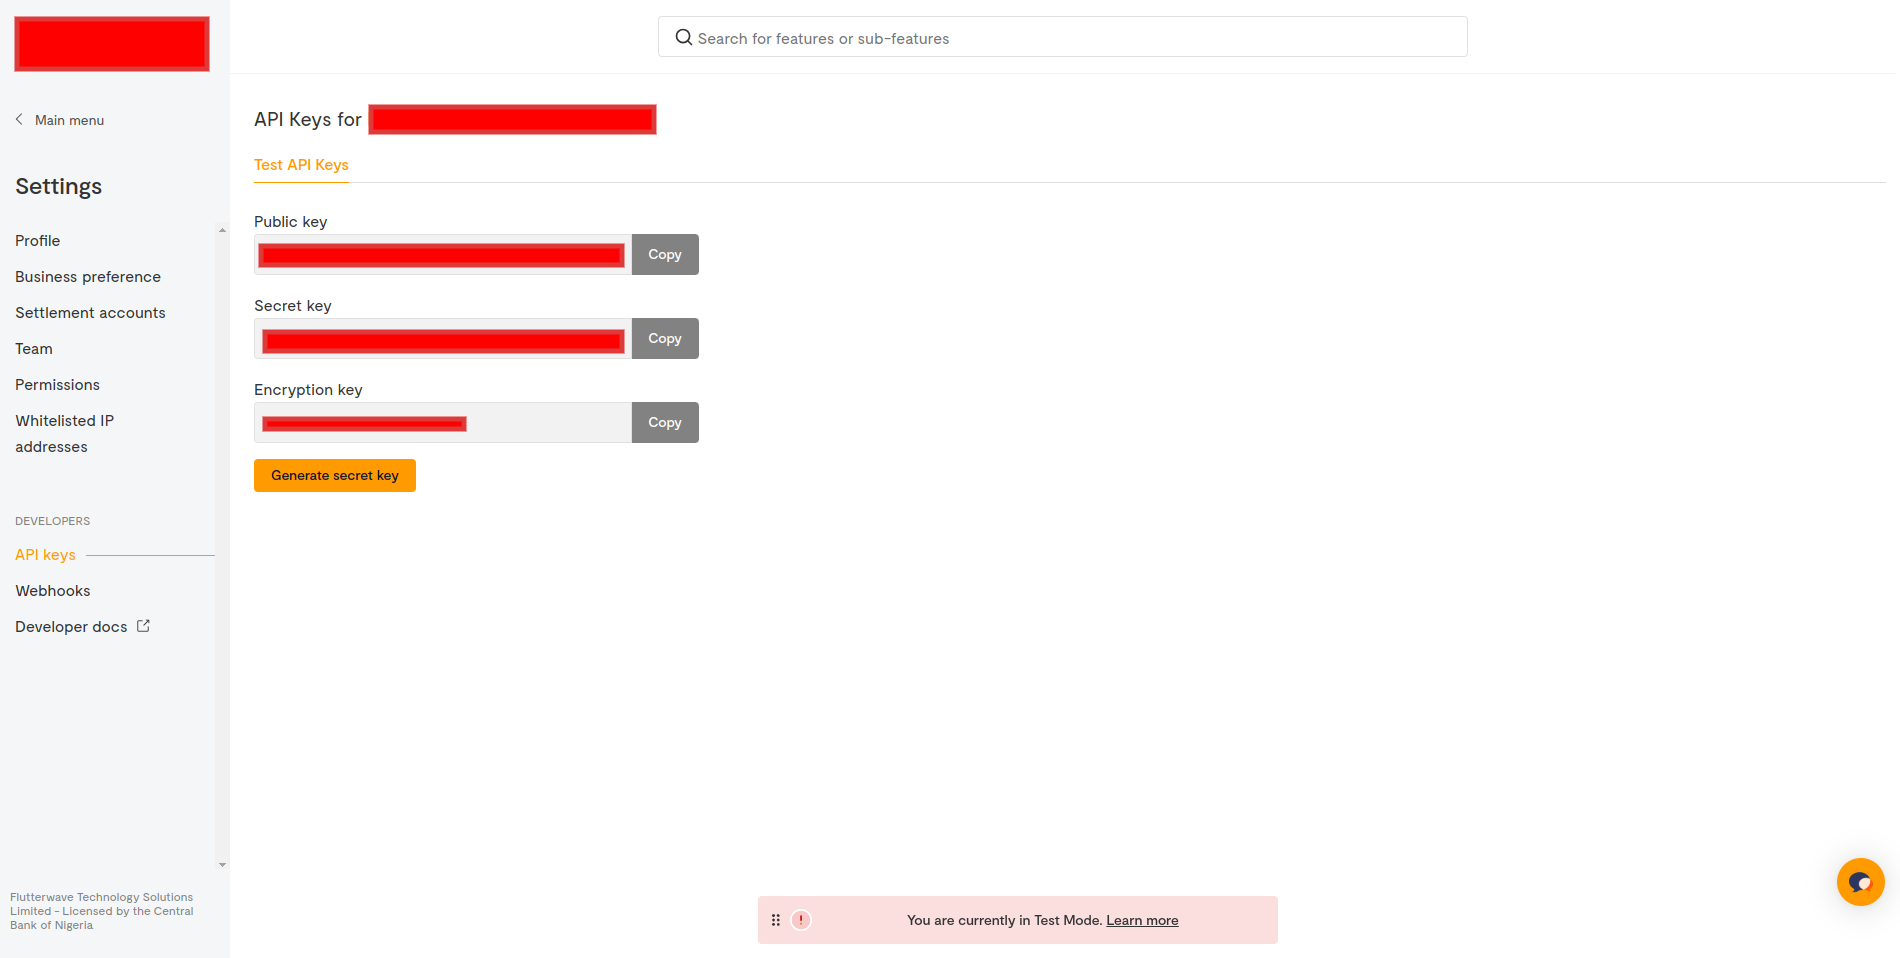
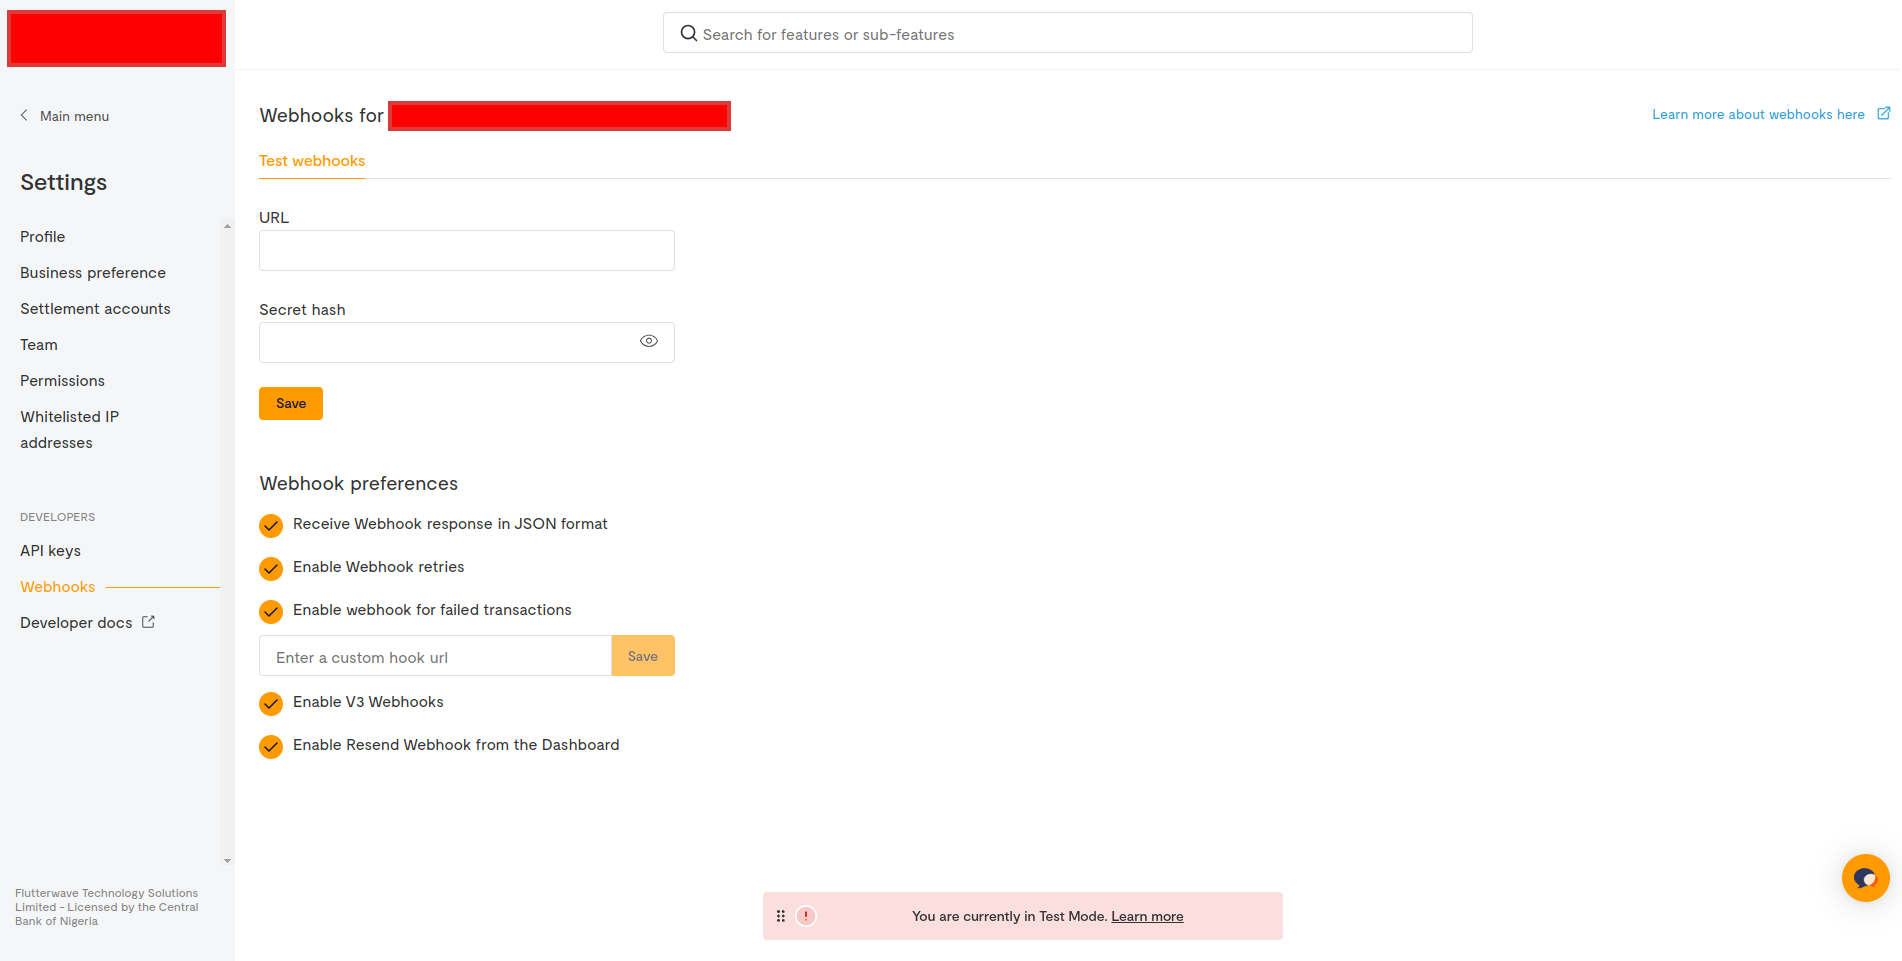
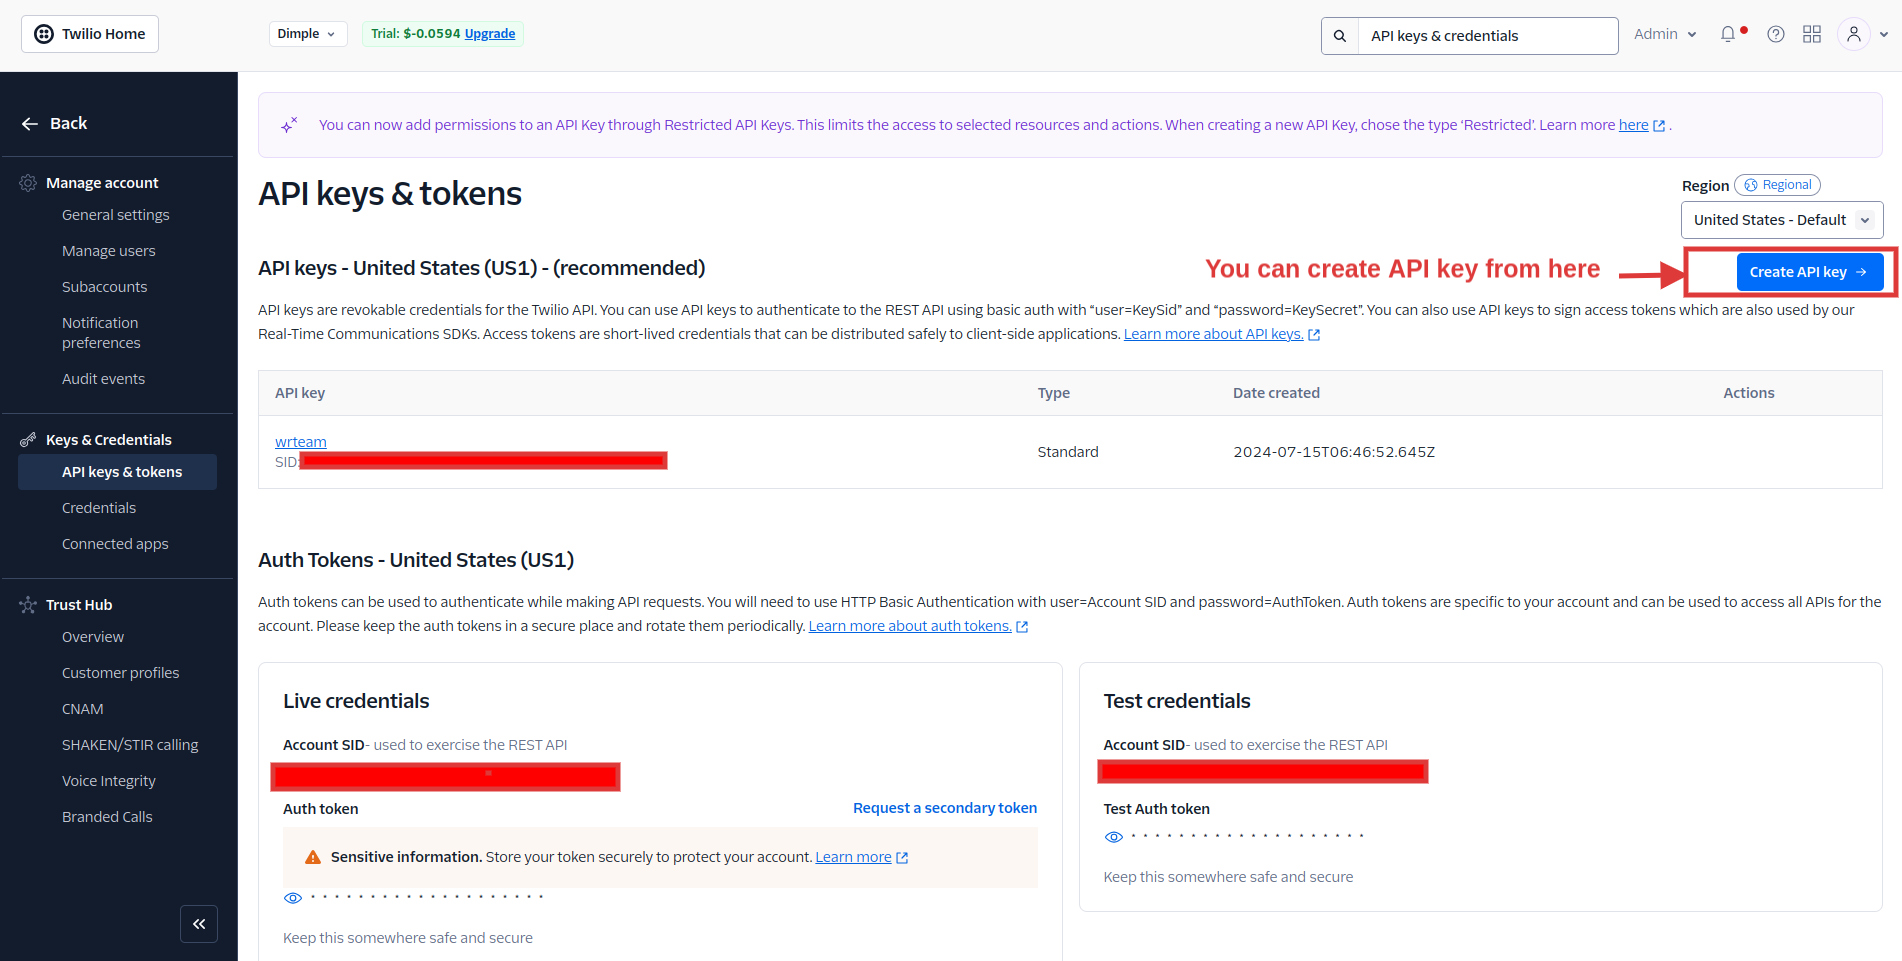
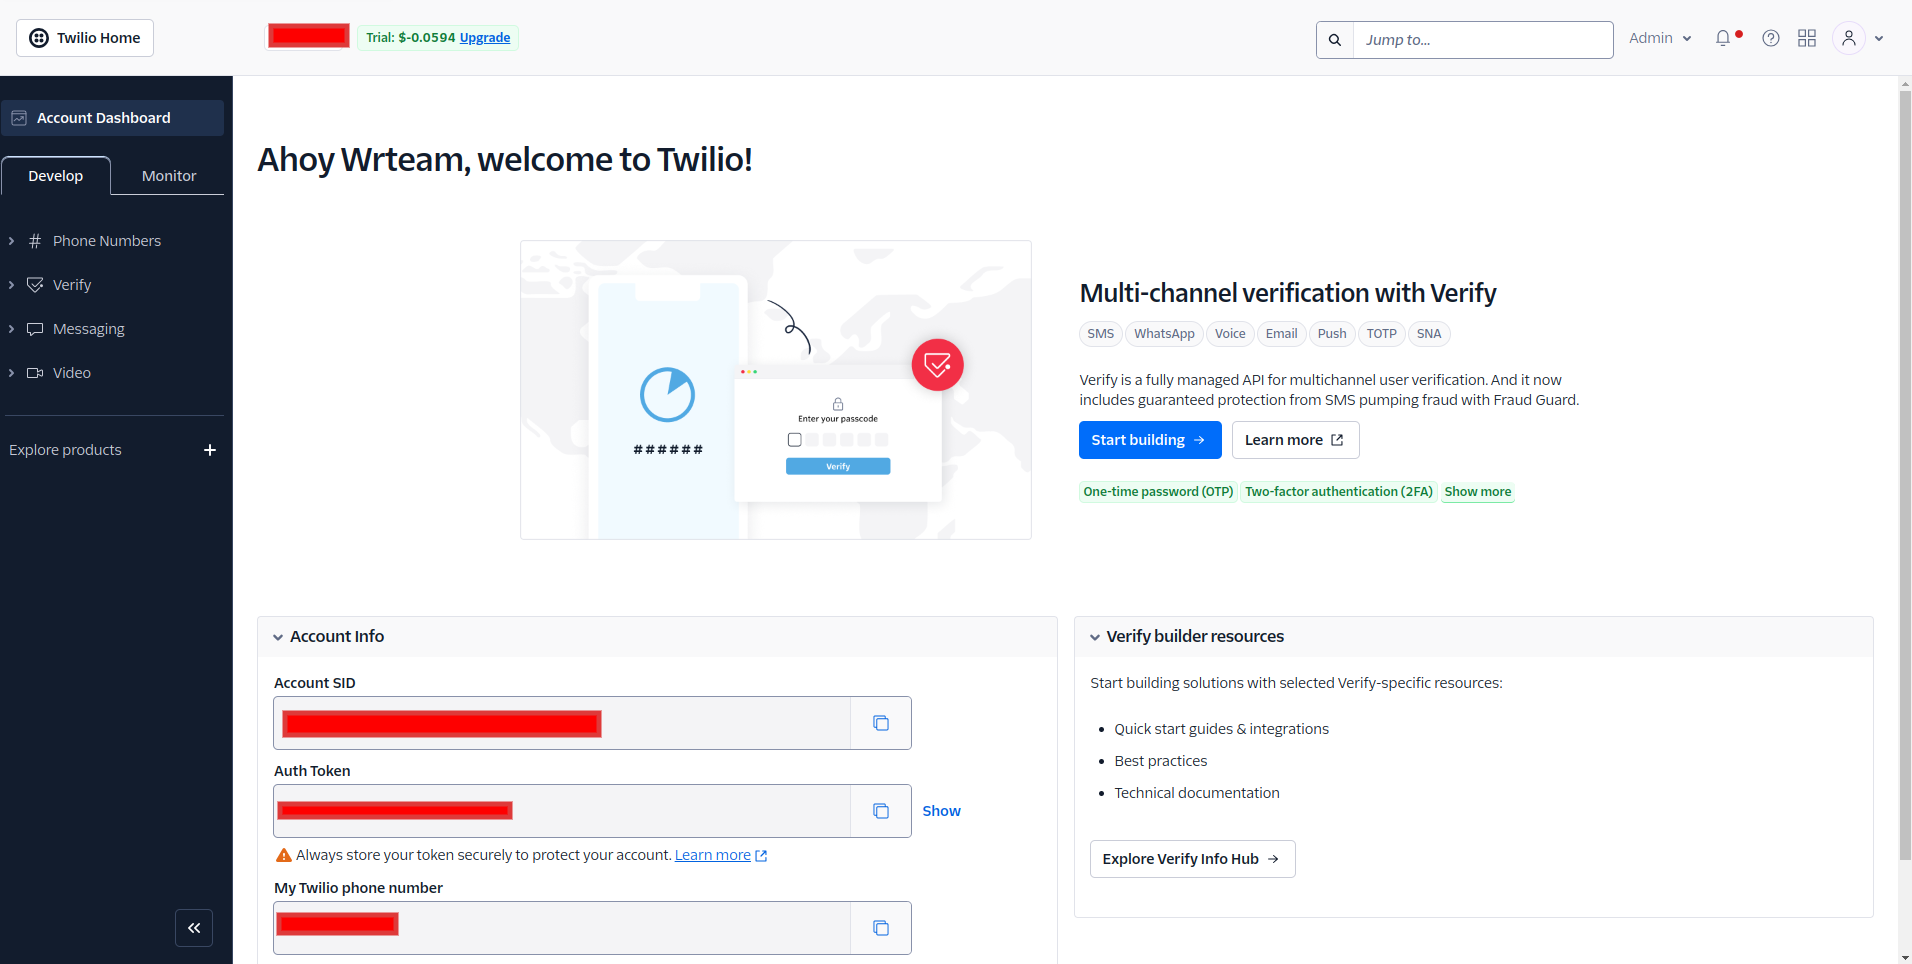
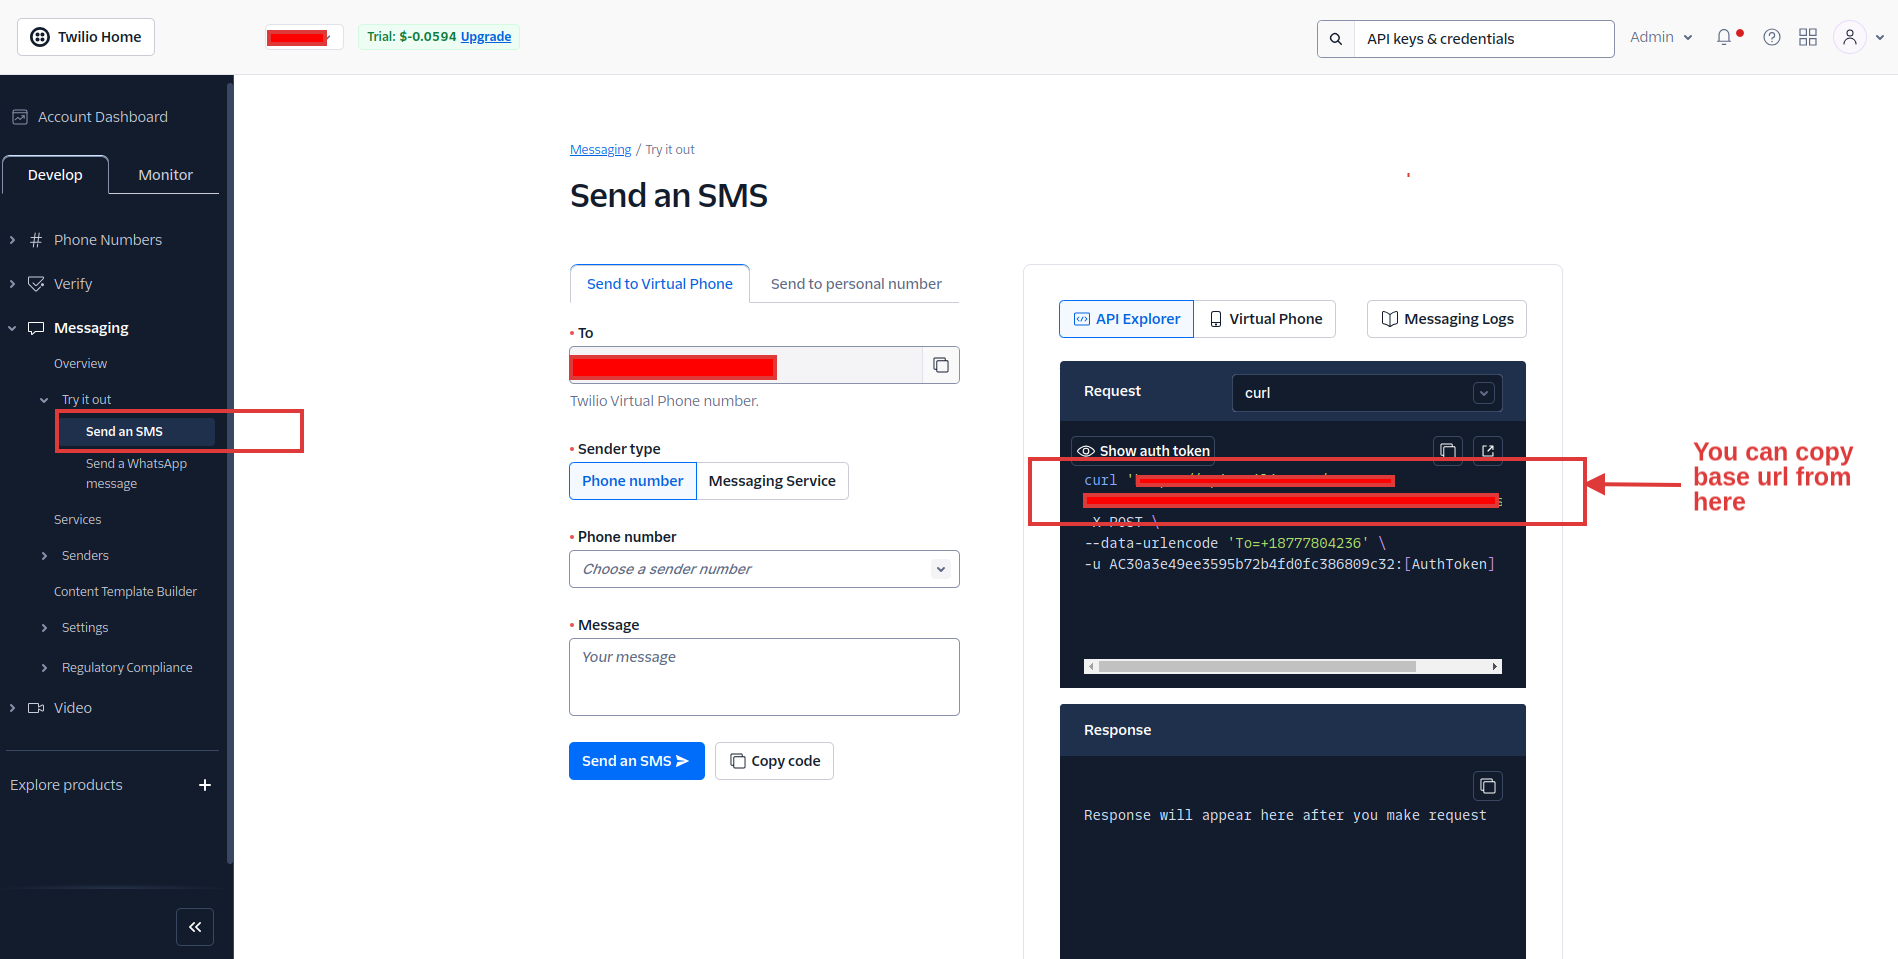
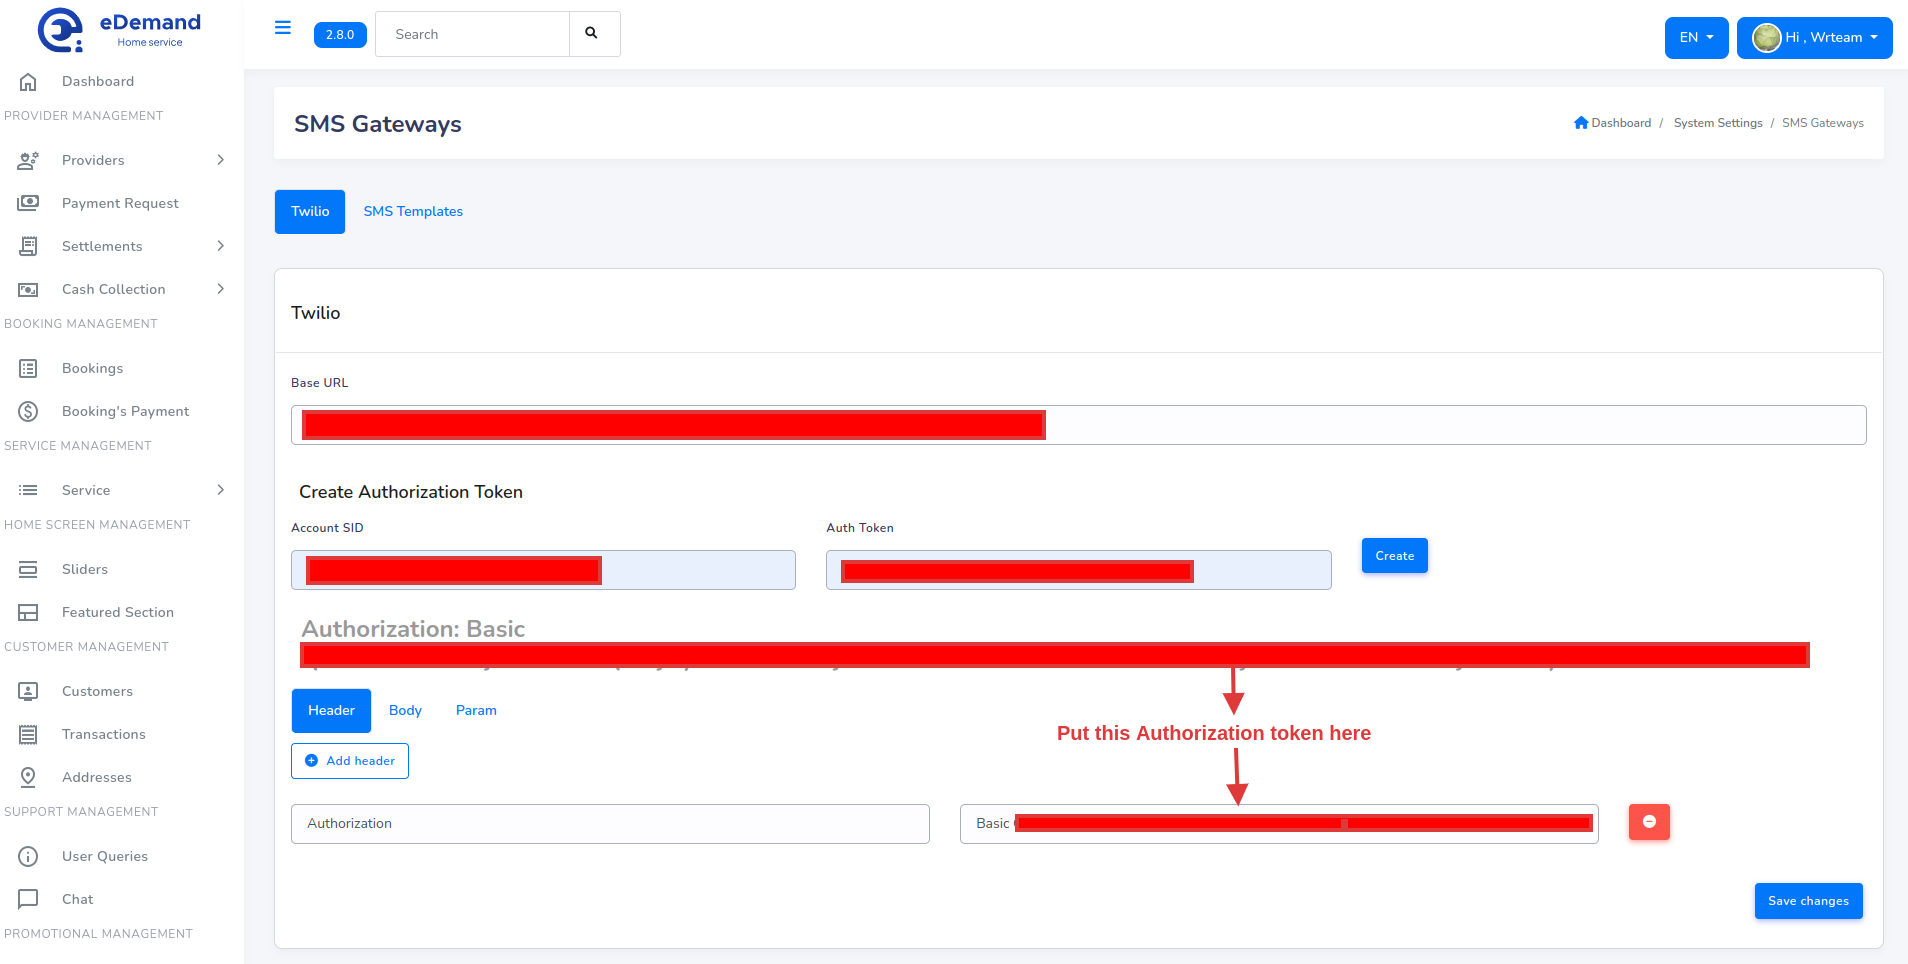
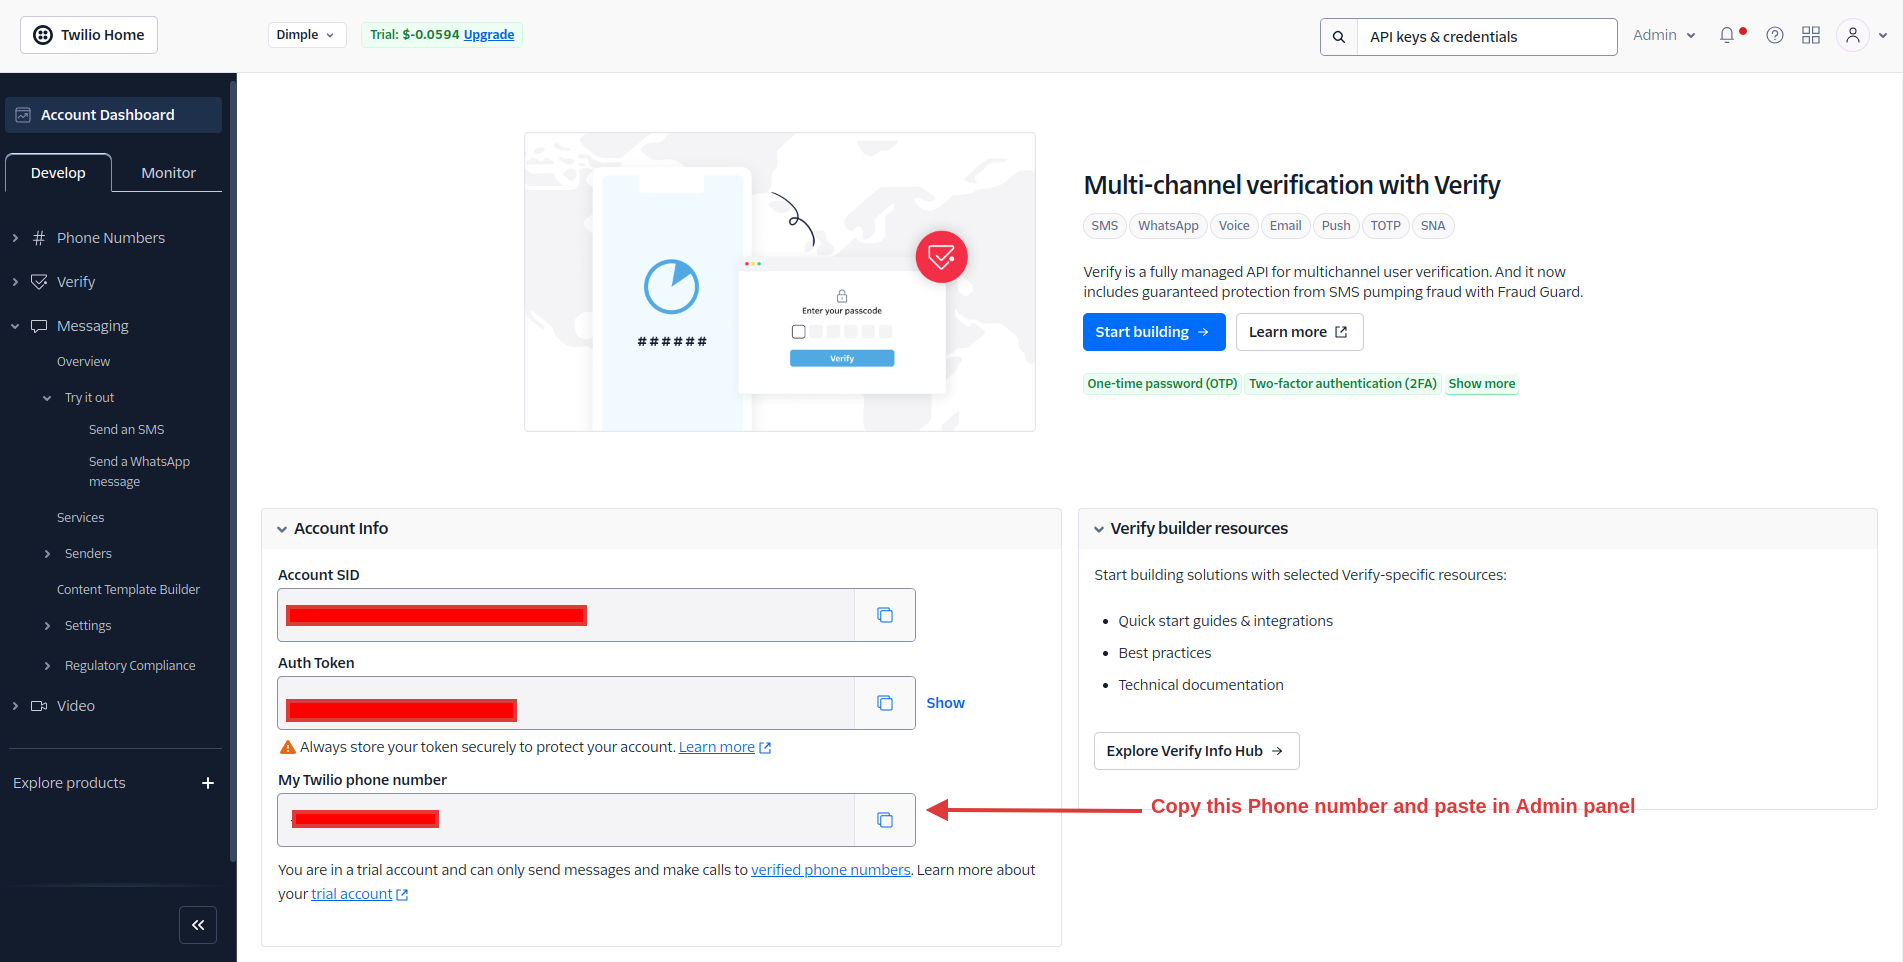
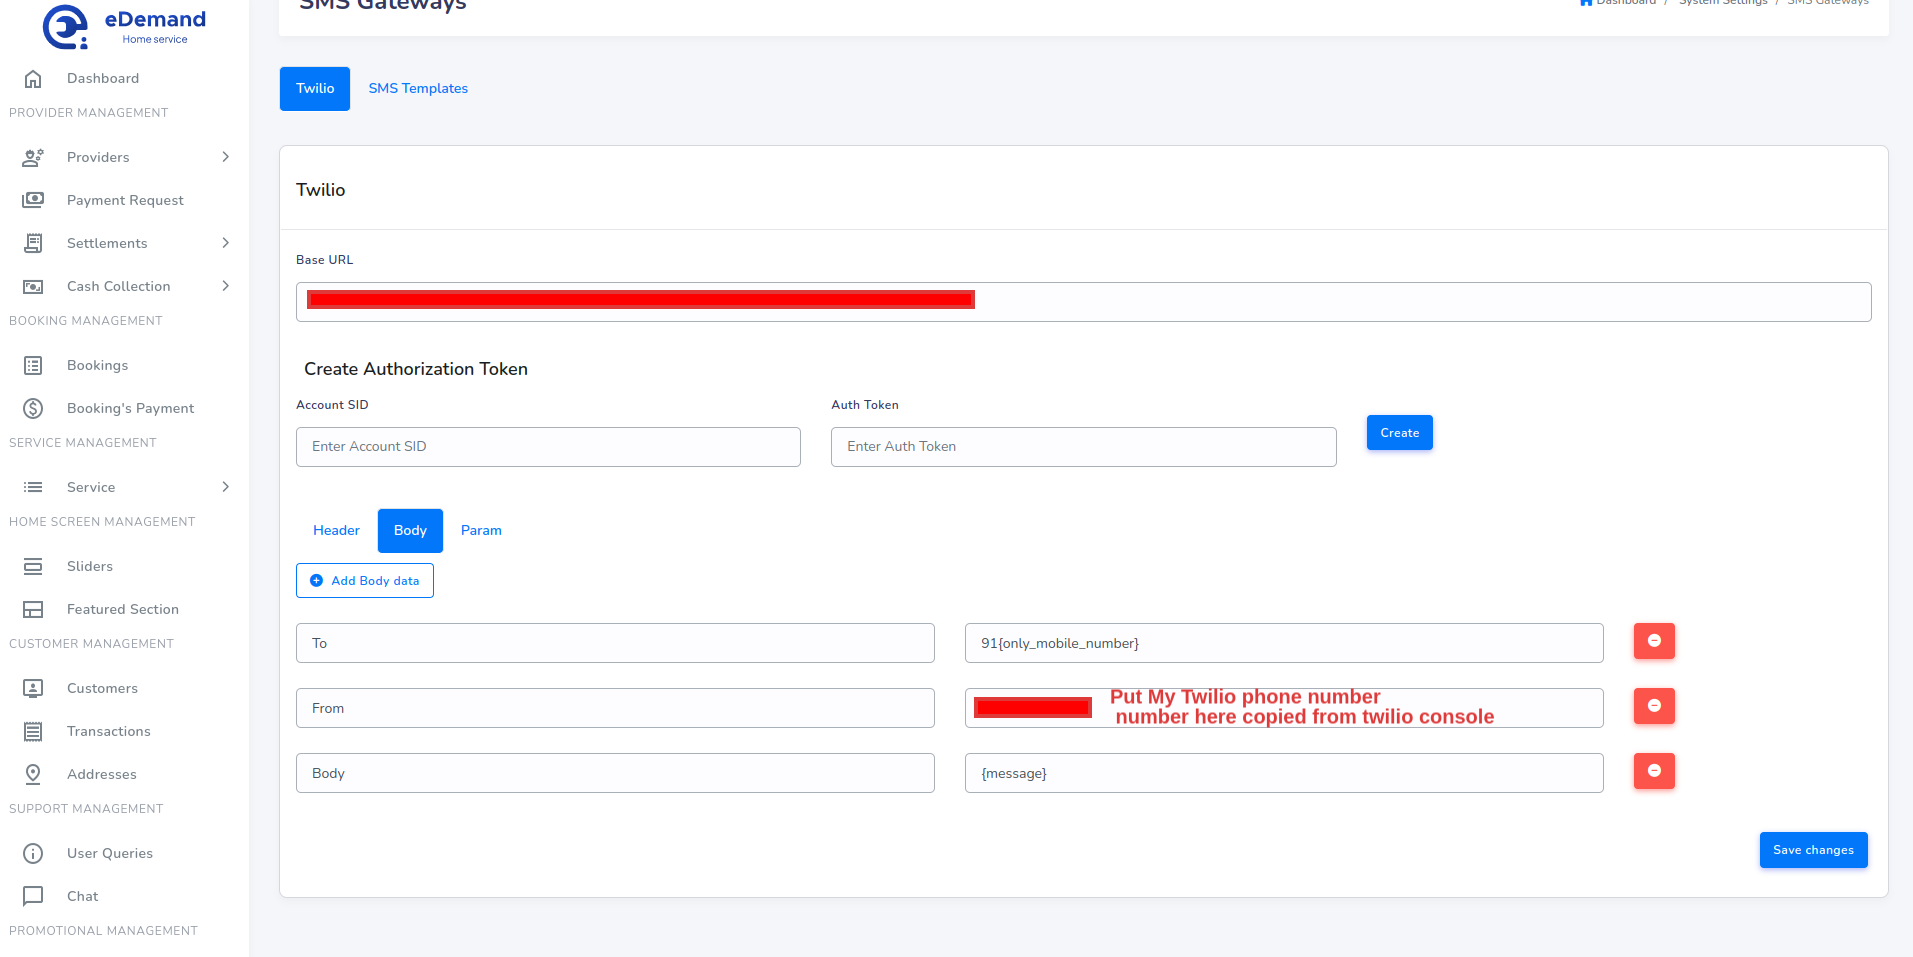
Verity of options available for paymemts, just follow the below steps to configure the payment gateways for eDemand.

Strpe

  1. Go to https://dashboard.stripe.com/login and sign in with your Stripe account
  2. Sign in with your account
  3. Click on Developers on top right of the browser
  4. Click Api keys on left Navigation bar
  5. Click Reveal Key and copy Publishable key and Secret Key.
  6. Paste all Stripe Credentials here. (settings -> Payment Gateway Settings)
  7. Set Webhook

Razorpay

  1. Go to https://dashboard.razorpay.com/ and sign in with your Razorpay account
  2. Click Settings
  3. Click Api keys
  4. Genetare new key or regenerate key and copy it.
  5. Paste all Razorpay Credentials here. (settings -> Payment Gateway Settings)
  6. Set Webhook

Paystack

  1. Go to https://dashboard.paystack.com/ and sign in with your Paystack account
  2. Click settings and click API Keys & Webhooks
  3. Copy Credentials
  4. Paste all Paystack Credentials here. (settings -> Payment Gateway Settings)
  5. Set Webhook

Paypal

  1. Login to Paypal Dashboard
  2. Go to Account Settings -> Account Owner Information
  3. click on update in email section
  4. here is your business email
  5. Paste all Paypal Credentials here. (settings -> Payment Gateway Settings)

Paypal Webhook Settings

  1. Login to Paypal Dashboard
  2. Click Profile Settings
  3. Go to Website Payments -> instant payment notification
  4. click Edit Settings
  5. Copy paypal Webhook from Admin panel Settings->System Settings and paste here

Flutterwave

  1. Go to Flutterwave and sign in with your Flutterwave account
  2. Go to Developers -> API Keys
  3. Copy these Credentials and paste in Admin panel
  4. Set Webhook
  5. Paste all Flutterwave Credentials here. (settings -> Payment Gateway Settings)

SMS Gateway Settings

  1. Login to Twilio
  2. Firstly open your sms gateway account . You can find api keys in your account -> API keys & credentials -> create api key
  3. After create key you can see here Account sid and auth token
  4. For Base url Messaging -> Send an SMS
  5. check this for admin panel settings
  6. Make sure you entered valid data as per instructions before proceed

Configure Google API KEY

    Note

    You need to enable the billing to make work of map on admin panel. If its not dispalying the map thn you had miss some step on google console so please do proper setup for key.

    Note

    If map is not dispalying then it is your responsibiliy to do proper things.


    Installation and map setup is out of the scope.Please note it down.

  1. First step is to go to google developer console and follow this offical documentation of google.
  2. While following this Offical Documentation there you need to enable API You need to enable

    1) Javascript Map API

    these API
  3. Offical Documentation for creating API key

  4. Usage of Google Map API Key:
    • While adding or registering the partner we need to add location from map.
  5. Now, we need to restrict the APIs key for security purpose.For that you need to folow this official documentation from google Restrict API KEY

  6. Note

    After creating the GOOGLE API KEY for map and other work.Please do Restriction on that APi key by following the documentation provided by google.

    • Visit this documentation for enable or disable the APIs Here
    • Visit this documentation for API Restricting for security. Here
    • Then, Set created API KEY on System -> General Settings -> Google Map API KEY

Set Cron Job in your server

You can find your cron job url from admin panel

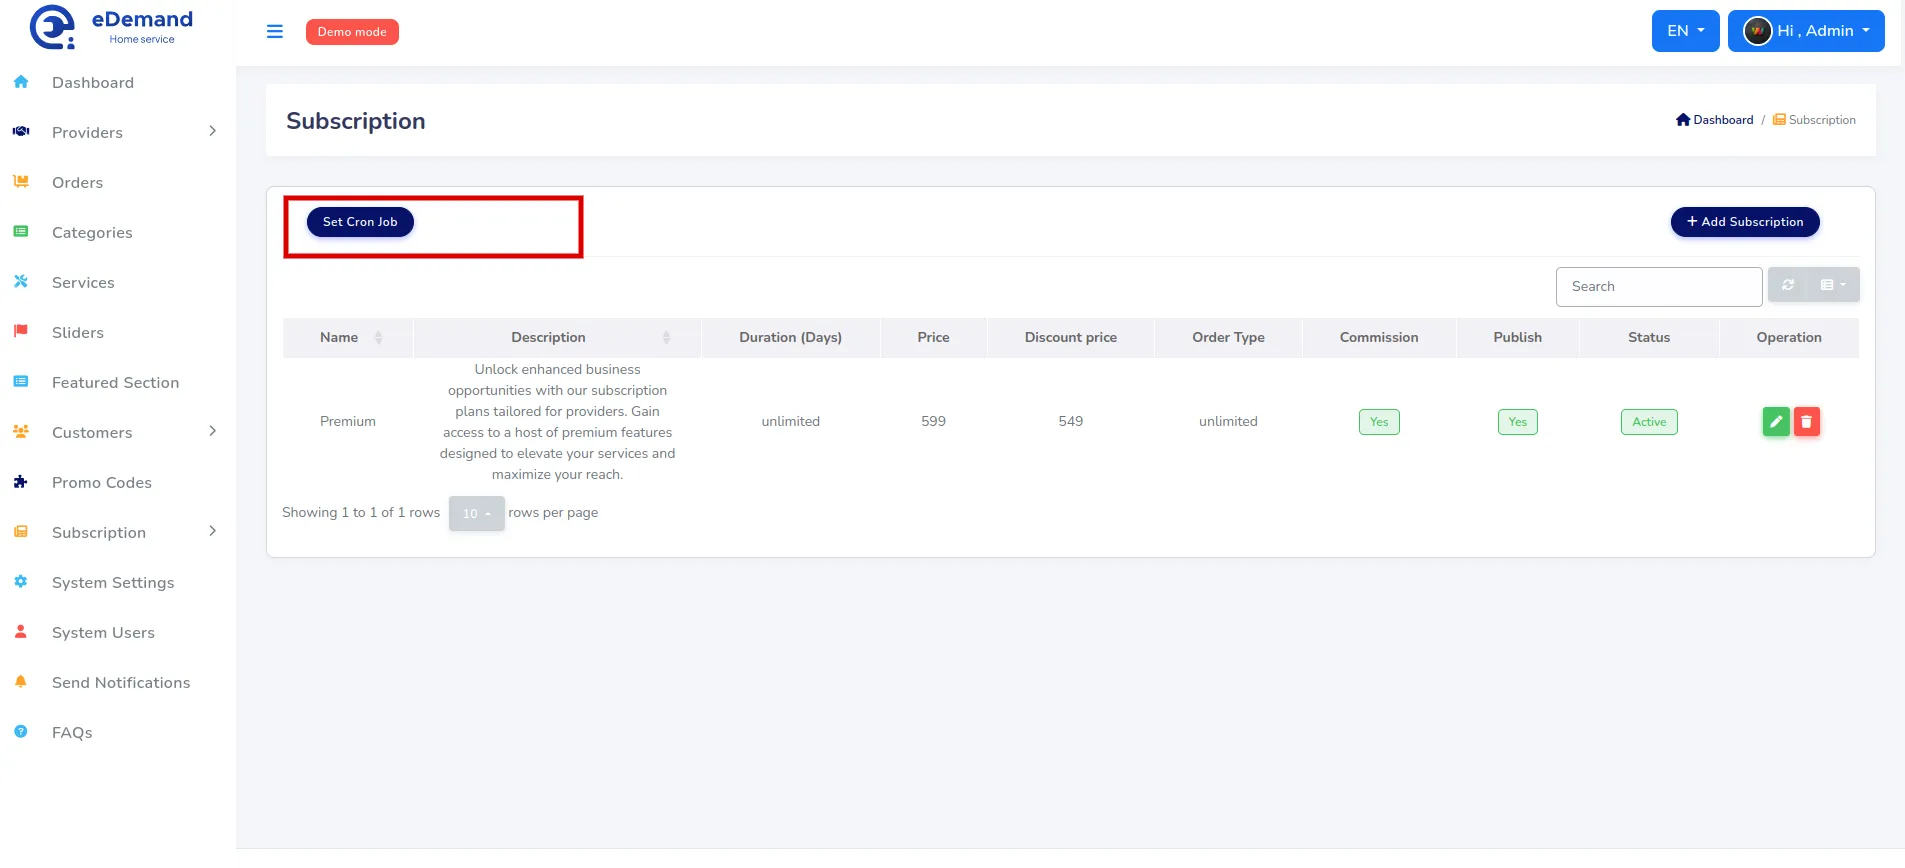
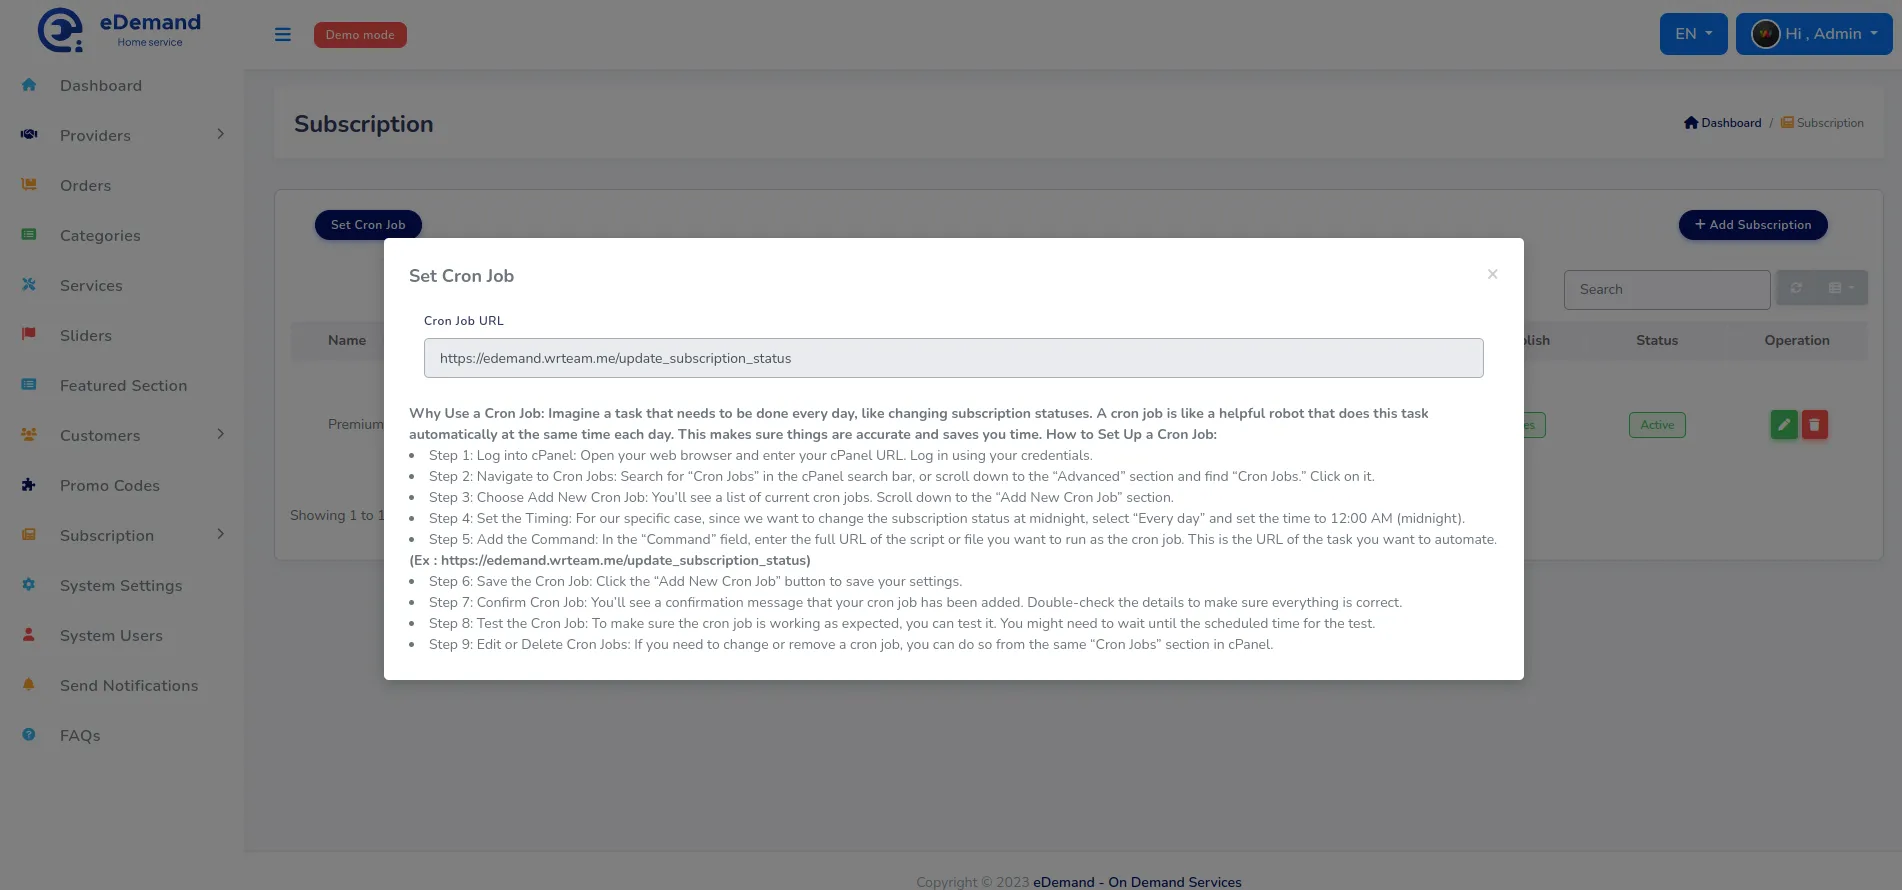
Why Use a Cron Job: Imagine a task that needs to be done every day, like changing subscription statuses. A cron job is like a helpful robot that does this task automatically at the same time each day. This makes sure things are accurate and saves you time. How to Set Up a Cron Job:

  • Step 1: Log into cPanel: Open your web browser and enter your cPanel URL. Log in using your credentials.
  • Step 2: Navigate to Cron Jobs: Search for “Cron Jobs” in the cPanel search bar, or scroll down to the “Advanced” section and find “Cron Jobs.” Click on it.
  • Step 3: Choose Add New Cron Job: You’ll see a list of current cron jobs. Scroll down to the “Add New Cron Job” section.
  • Step 4: Set the Timing: For our specific case, since we want to change the subscription status at midnight, select “Every day” and set the time to 12:00 AM (midnight).
  • Step 5: Add the Command: In the “Command” field, enter the full URL of the script or file you want to run as the cron job. This is the URL of the task you want to automate. (Ex : https://edemand.wrteam.me/update_subscription_status)
  • Step 6: Save the Cron Job: Click the “Add New Cron Job” button to save your settings.
  • Step 7: Confirm Cron Job: You’ll see a confirmation message that your cron job has been added. Double-check the details to make sure everything is correct.
  • Step 8: Test the Cron Job: To make sure the cron job is working as expected, you can test it. You might need to wait until the scheduled time for the test.
  • Step 9: Edit or Delete Cron Jobs: If you need to change or remove a cron job, you can do so from the same “Cron Jobs” section in cPanel.
  • Auto Update

    How to auto update your admin panel or web version to latest version?

    Note : If you are upgrading your from very old version then please update the system in sequence one after the another. Don't skip any version in between.
    1. Find update from vX.X to vX.X.X.zip file from downloded PHP source code.You will findfile on this location: eDemand admin - current_version/Updates/your_required_version_update_file.zip
    2. Visit 
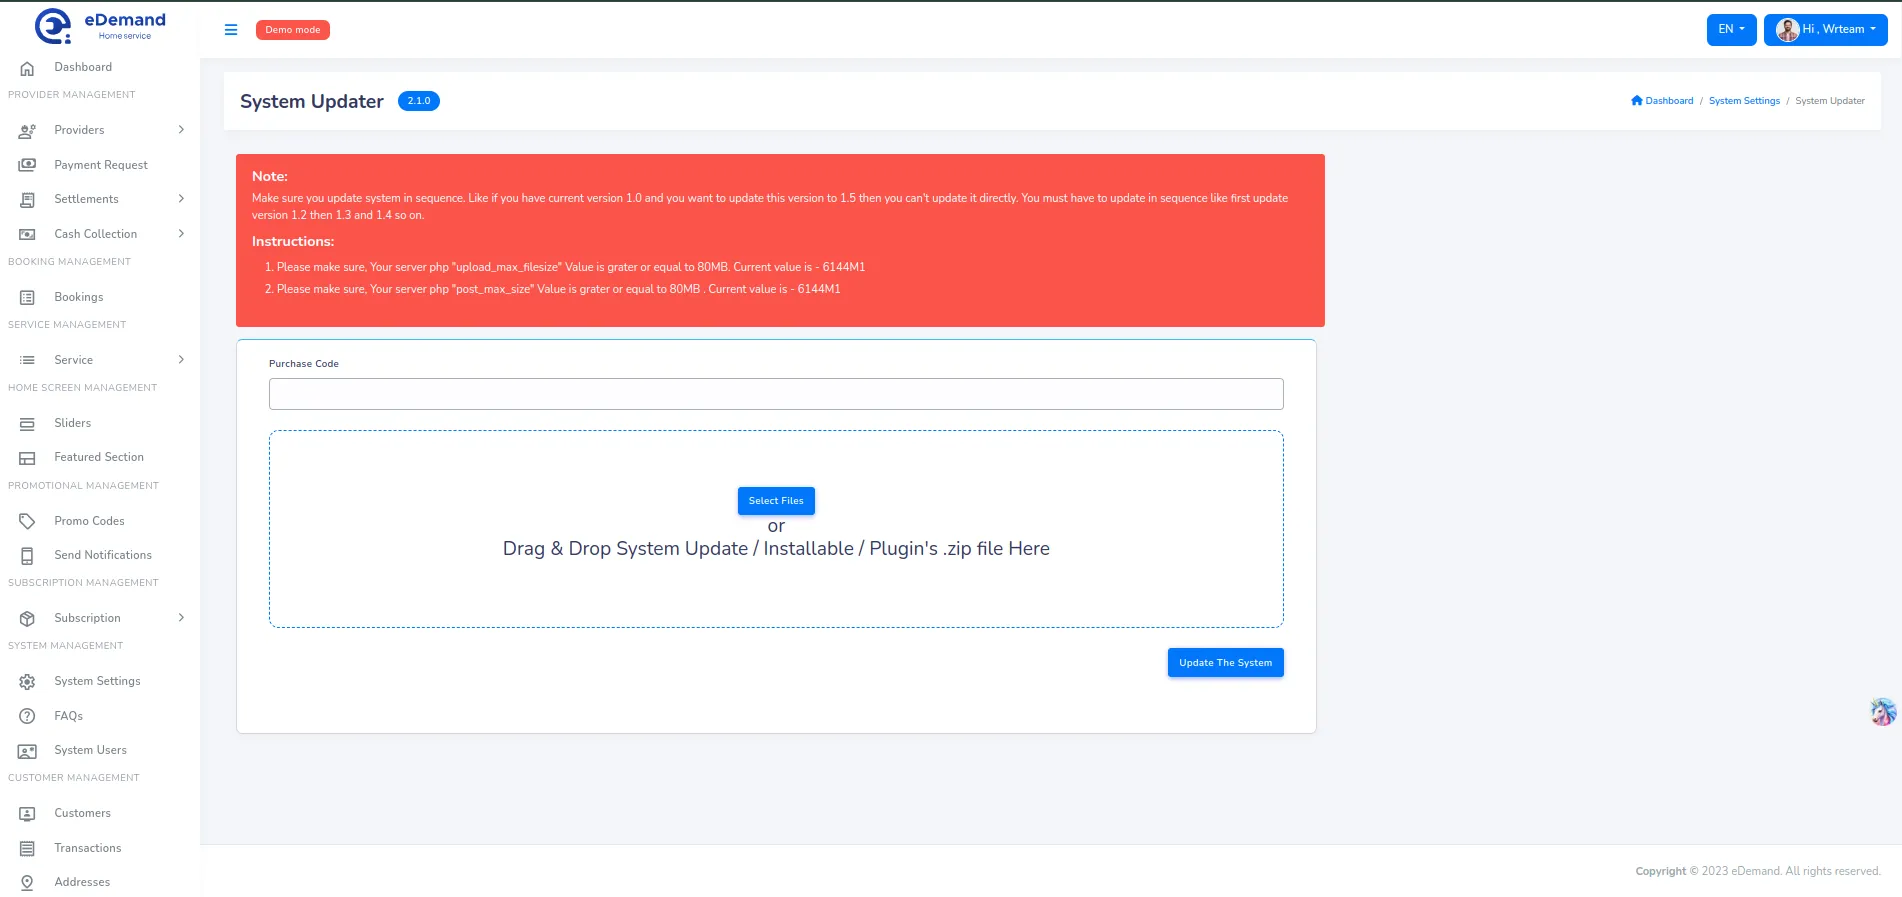
your_url/admin/settings/updater
    3. You will see simple instructions, current version to latest version information and "Update The System" button.
    4. Upload update.zip file.
    5. Click on that Update Button.
    6. That's all. You have successfully updated your system from older version to newer one.