Quiz Online Admin Panel
1. How to Install Quiz Online on Your shared hosting?
- Create your domain or subdomain in your shared hosting
- Create an empty database in your shared hosting and remember this credentials:
i. database name
ii. database username
iii. database password - Upload the source code you have downloaded from CodeCanyon and unzip it.
- Now navigate to the url where your project is located.
ex. mydomain.com or subdomain.mydomain.com - The installation screen should appear and guide you in the process.
Thats it! Now you are ready to run your Quiz Online : https://quizdemo.wrteam.in
Default Login Details
User: admin
Pass: admin123
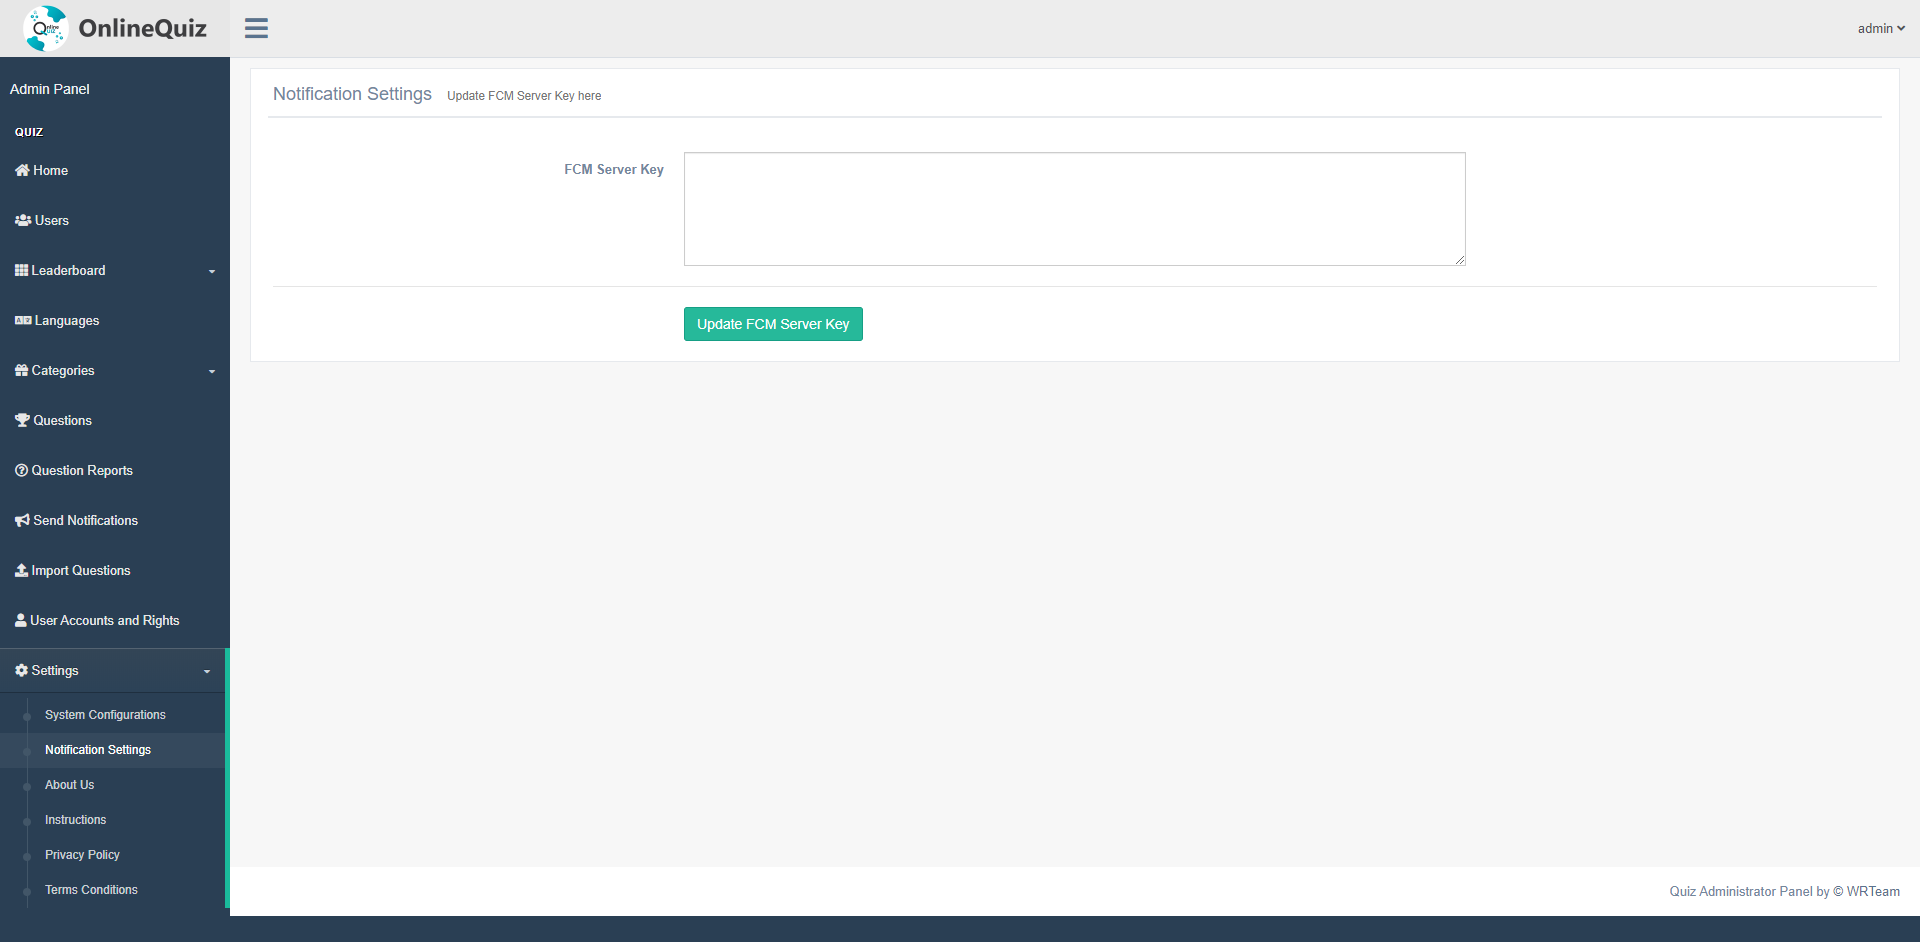
Notification Management
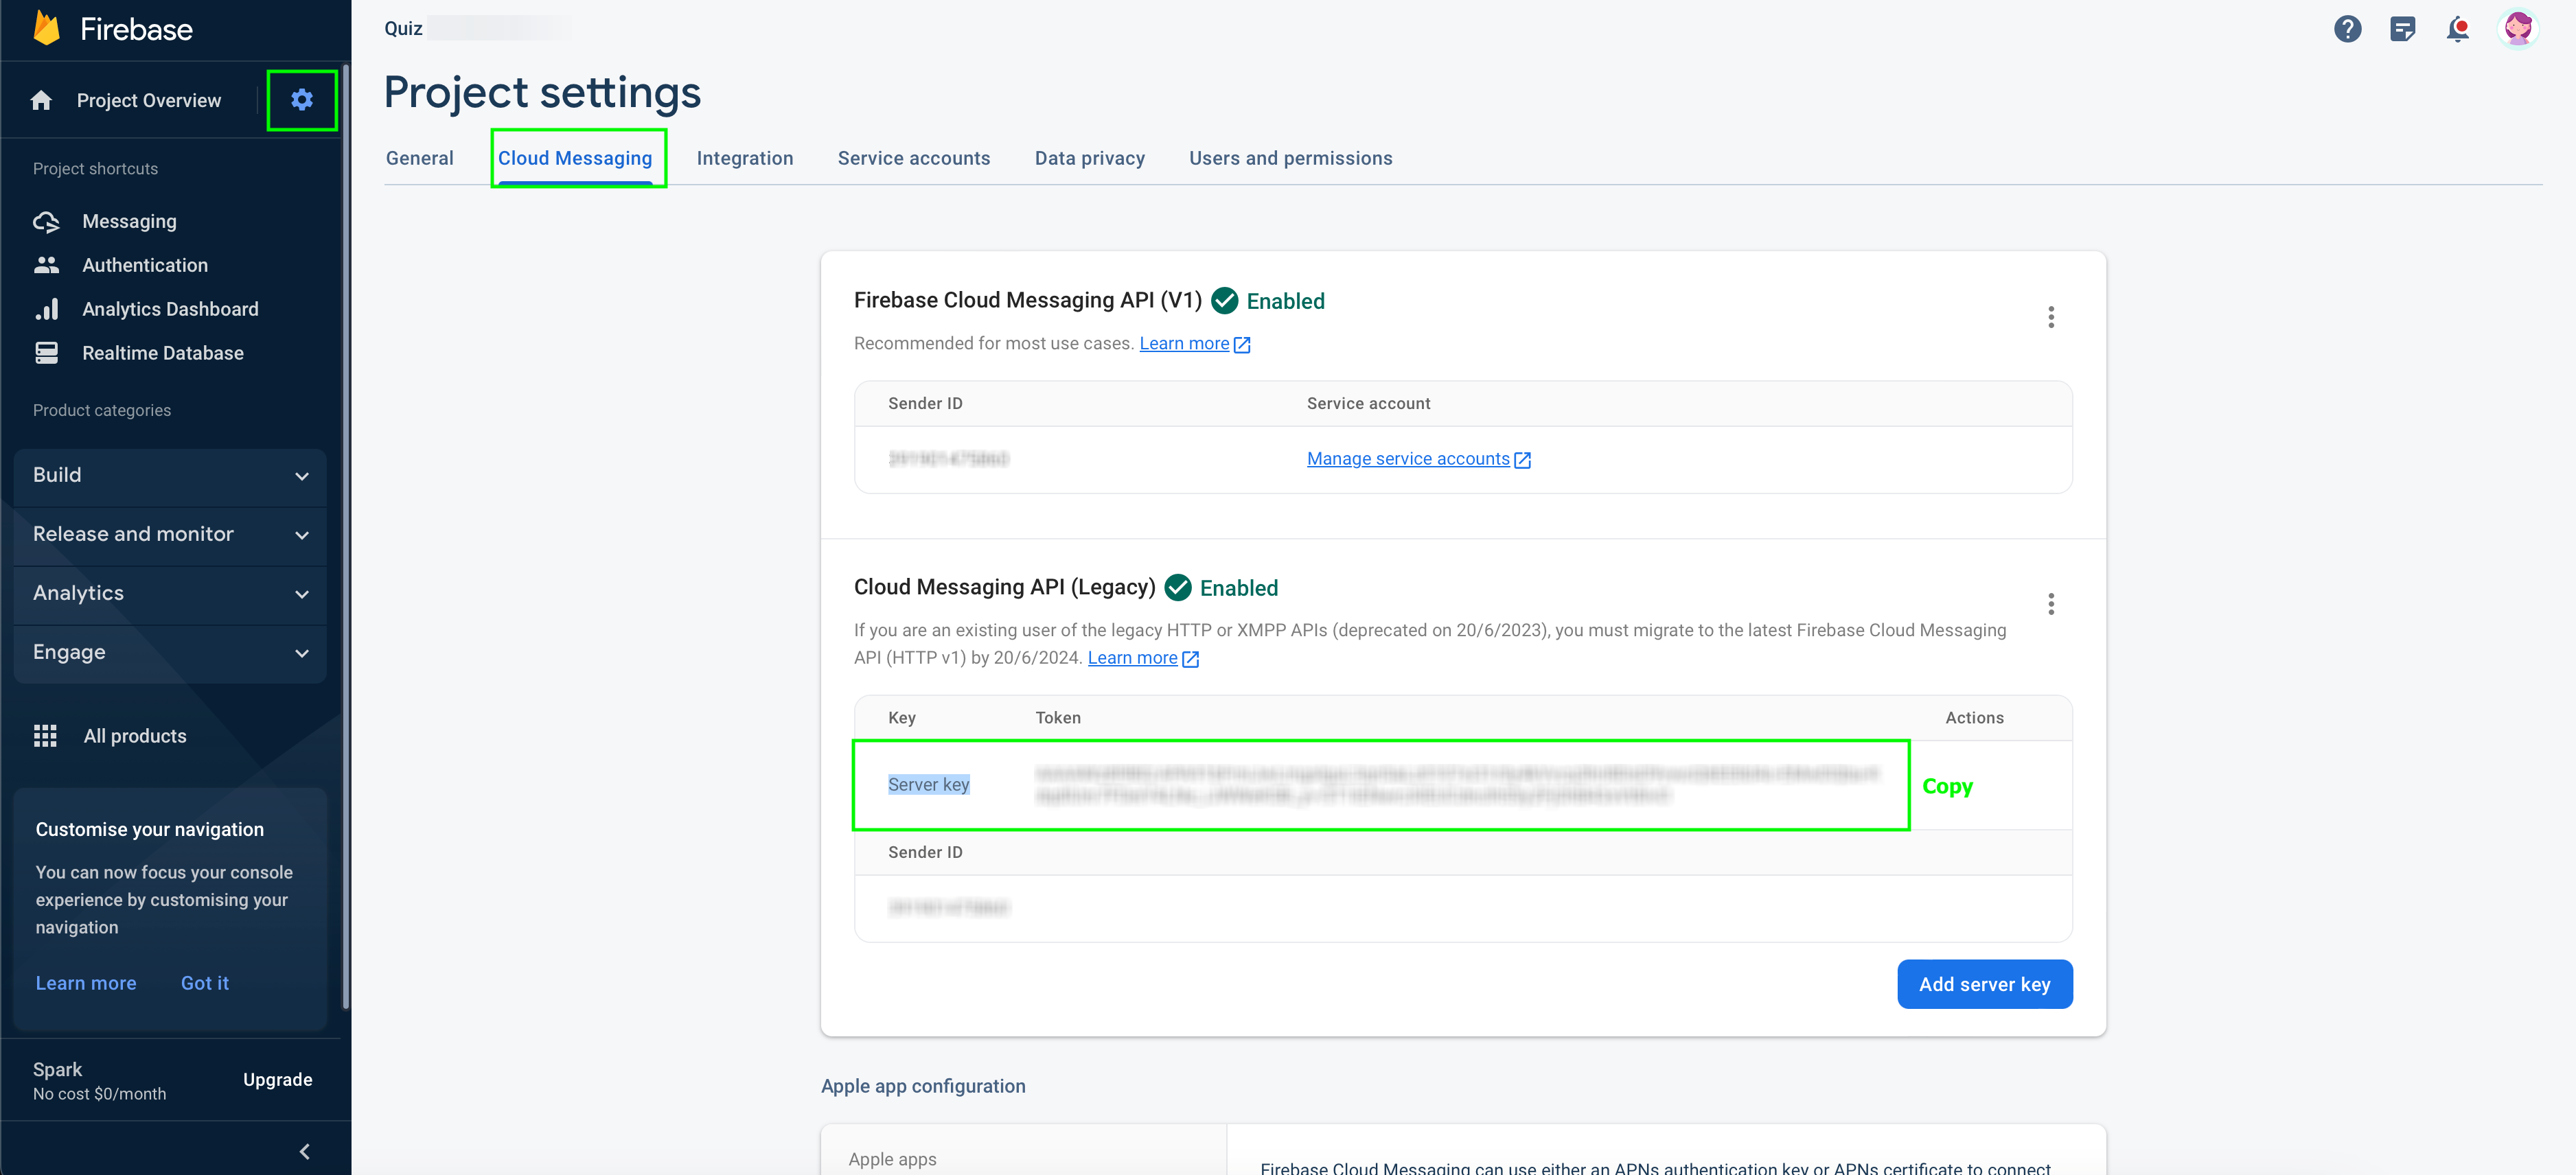
First Of all,we need to set the FCM server key from Firebase console
Set System Configurations
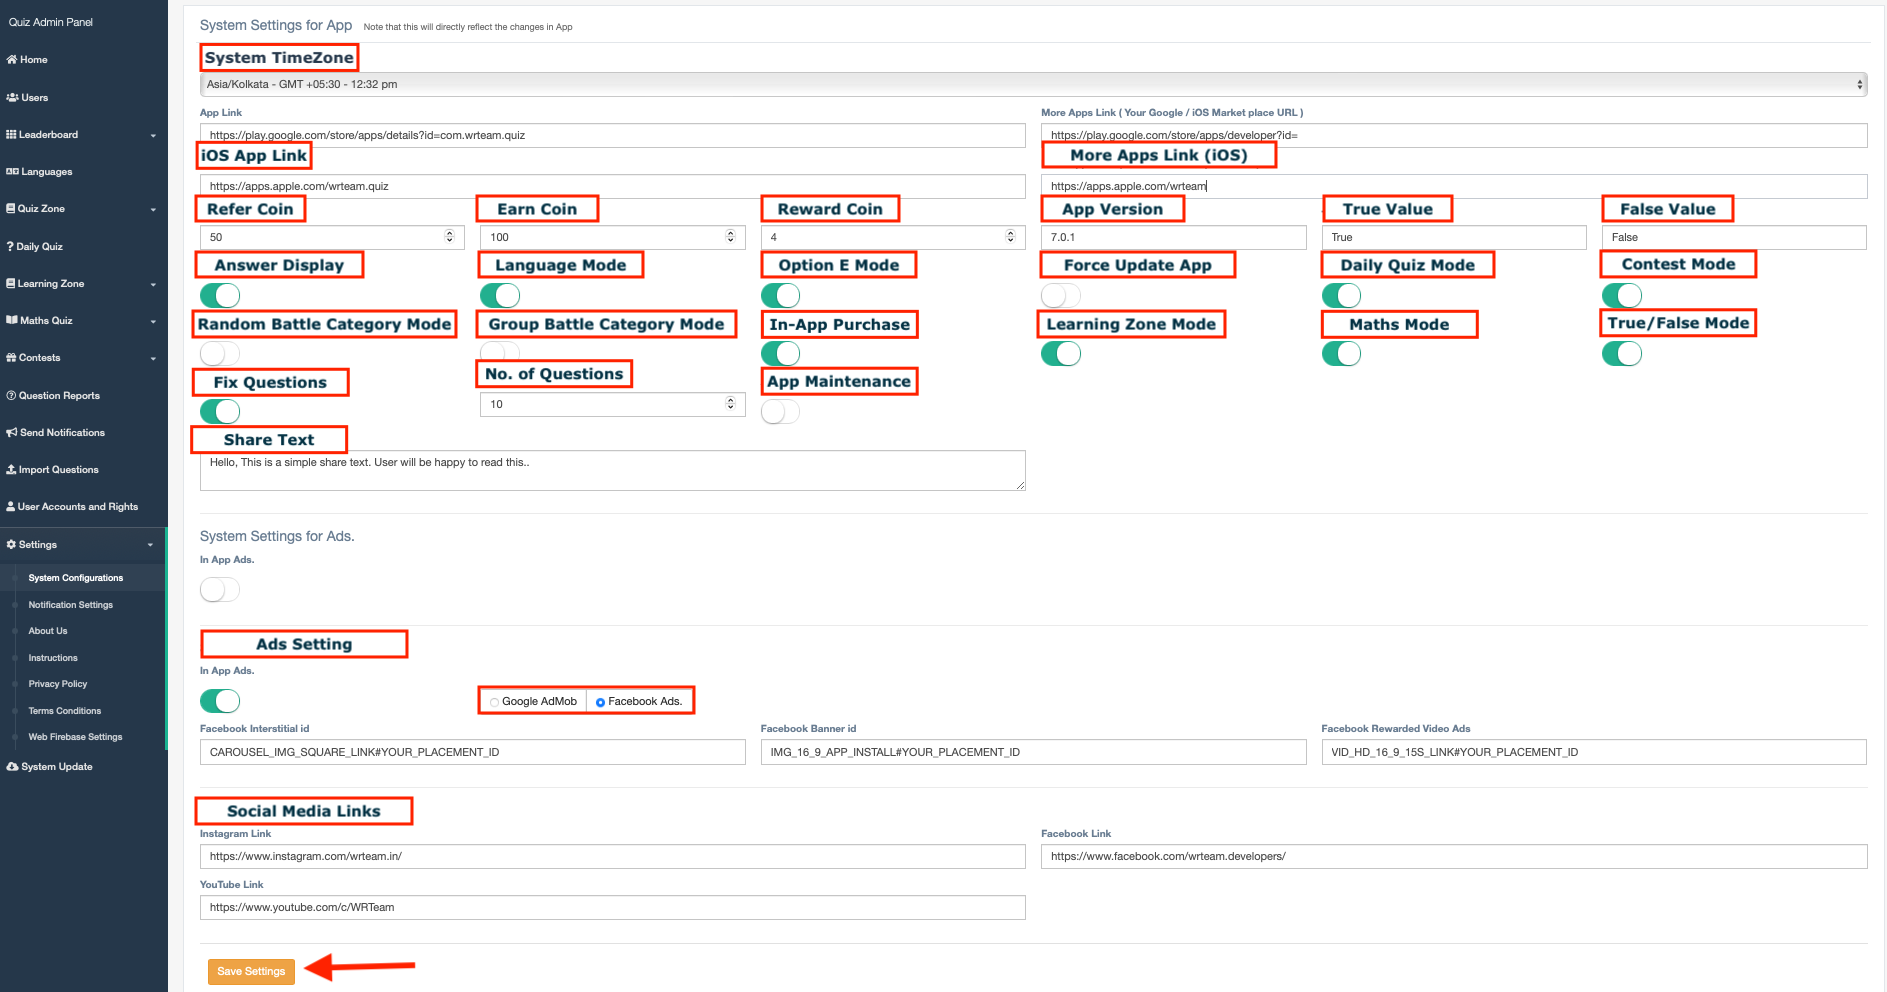
Set Configurations for you app. All the changes are made here will directly reflect in the App
From here you can set System & App Timezone, App Play store or market place Link, Enable / Disable Answer Display, Language Mode, Option E Mode, Force Update App, Daily Quiz Mode, Contest Mode, Battle Random Category Mode, Battle Group Category Mode & In App Purchase. Manage App Version and Update Shareapp Text. Set fix Question in level

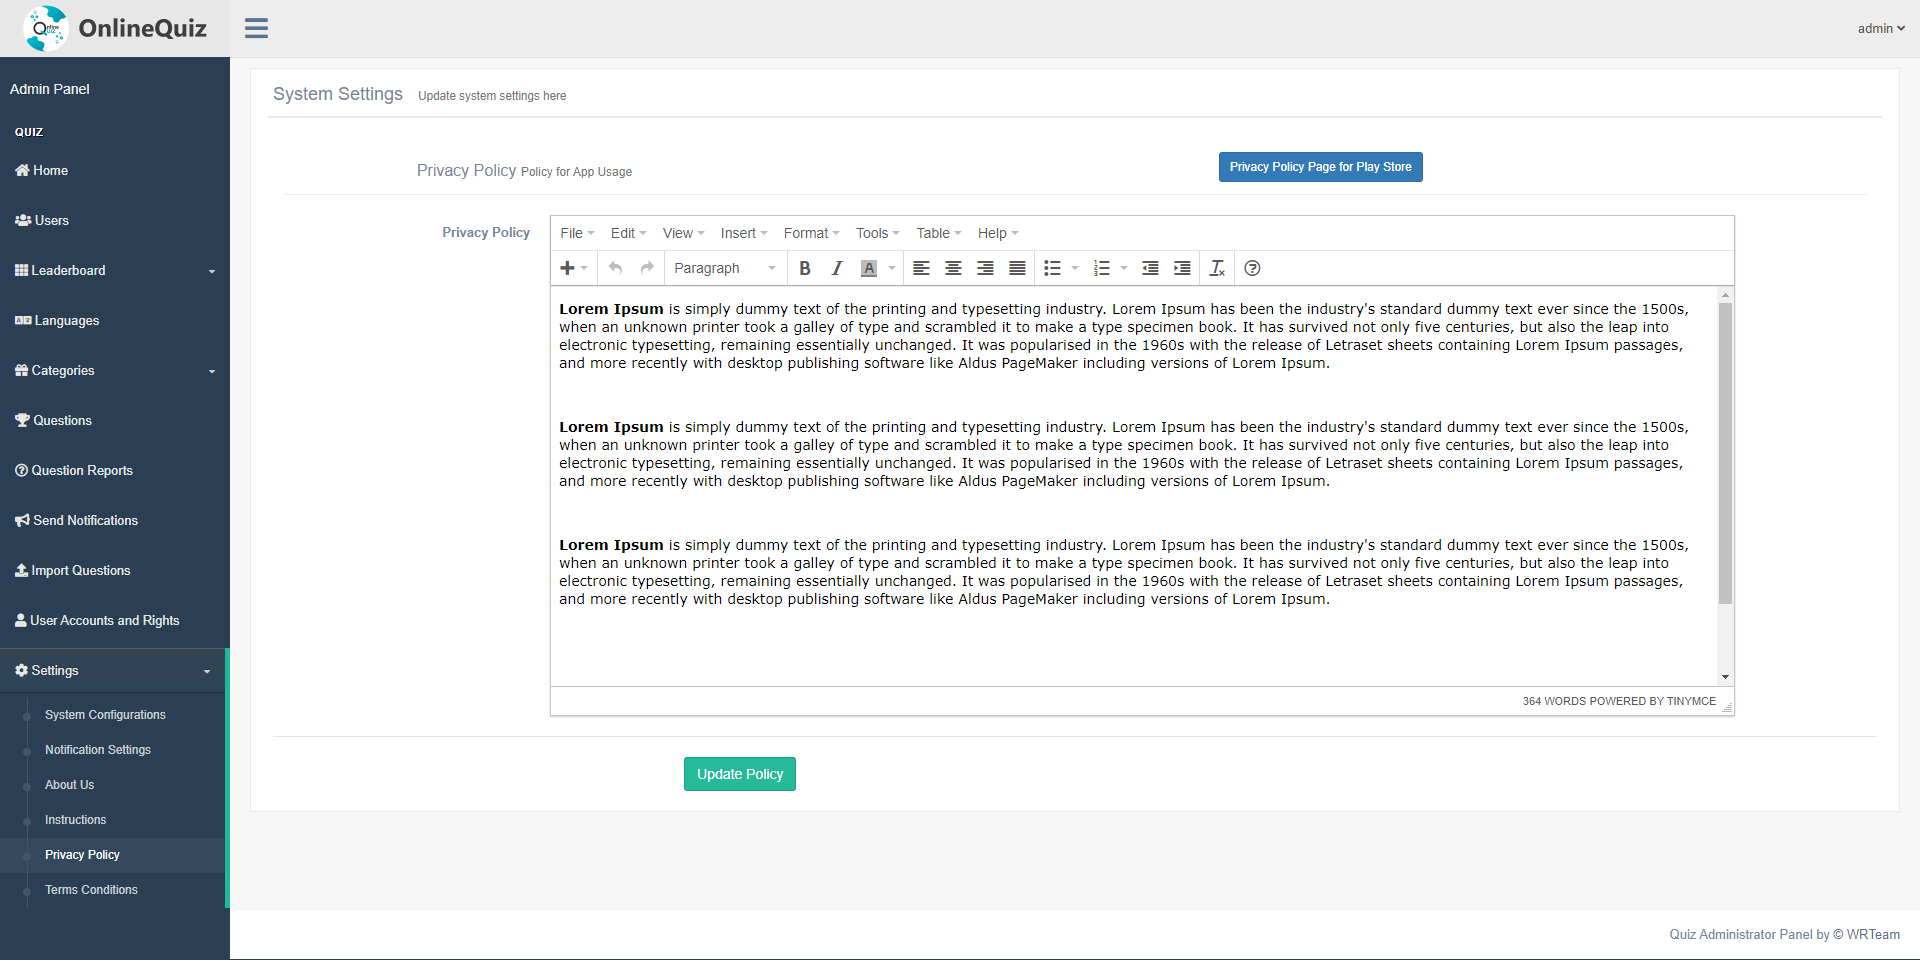
Set Privacy Policy
Set Privacy Policy for your website and app.
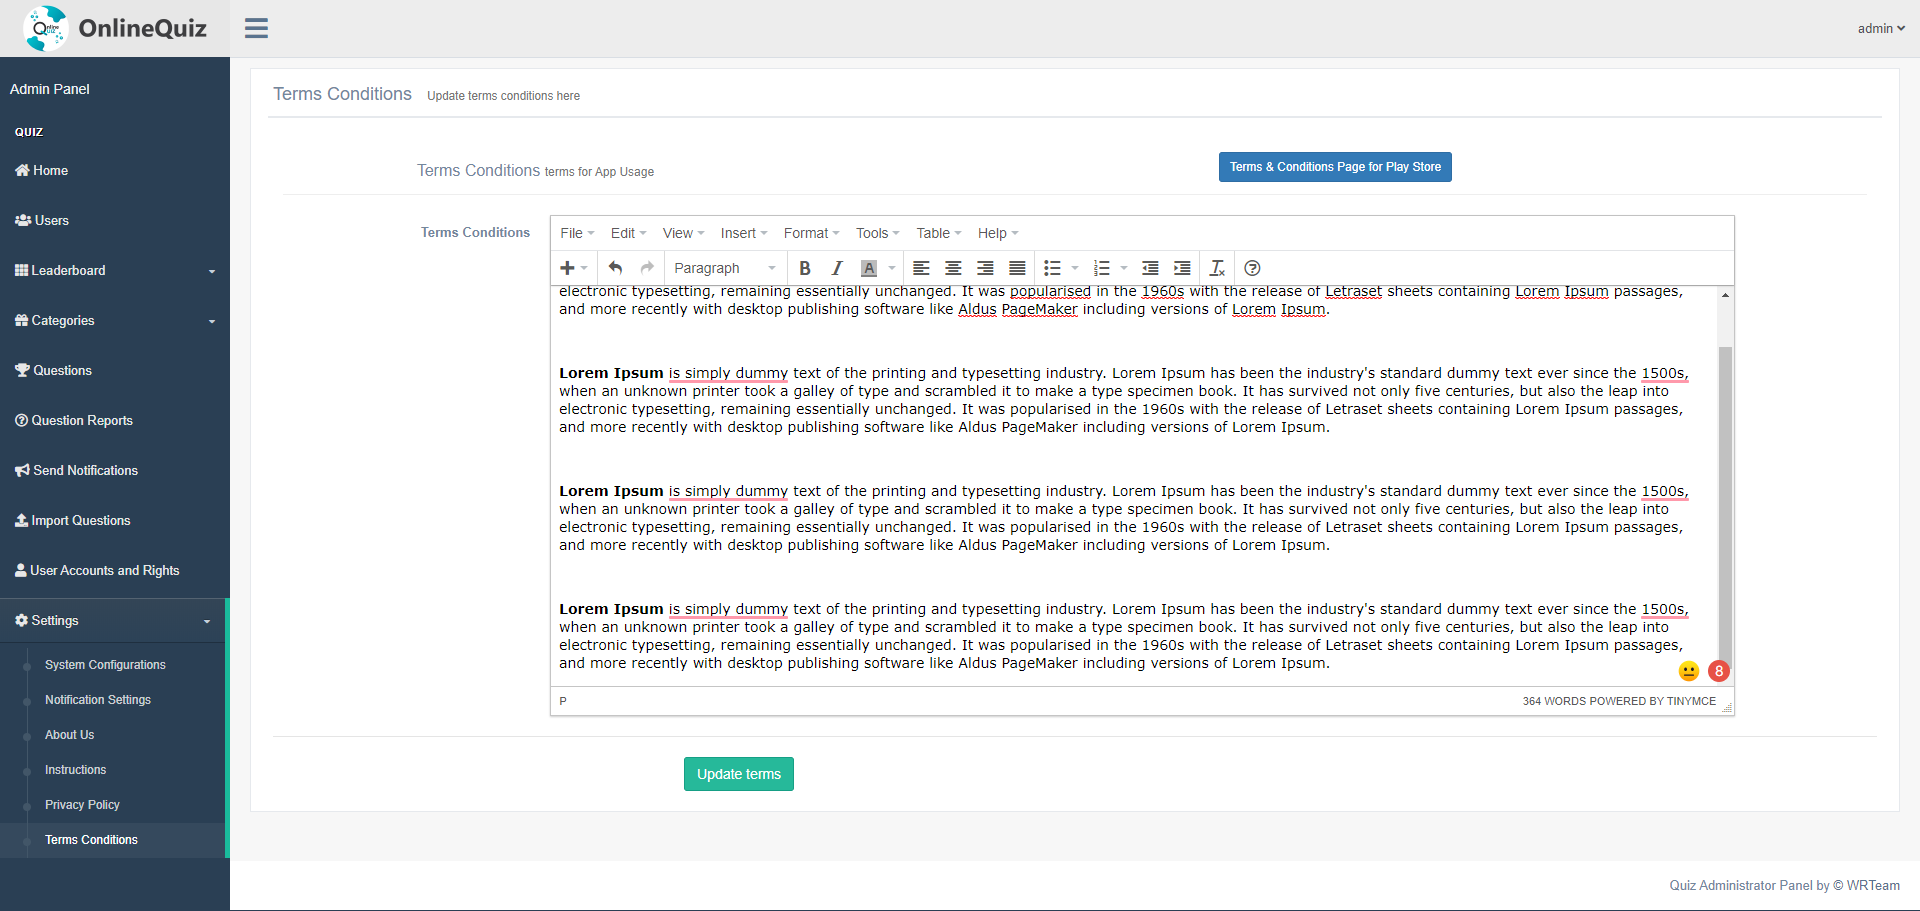
Set Terms Conditions
Set Terms Conditions for your website and app.
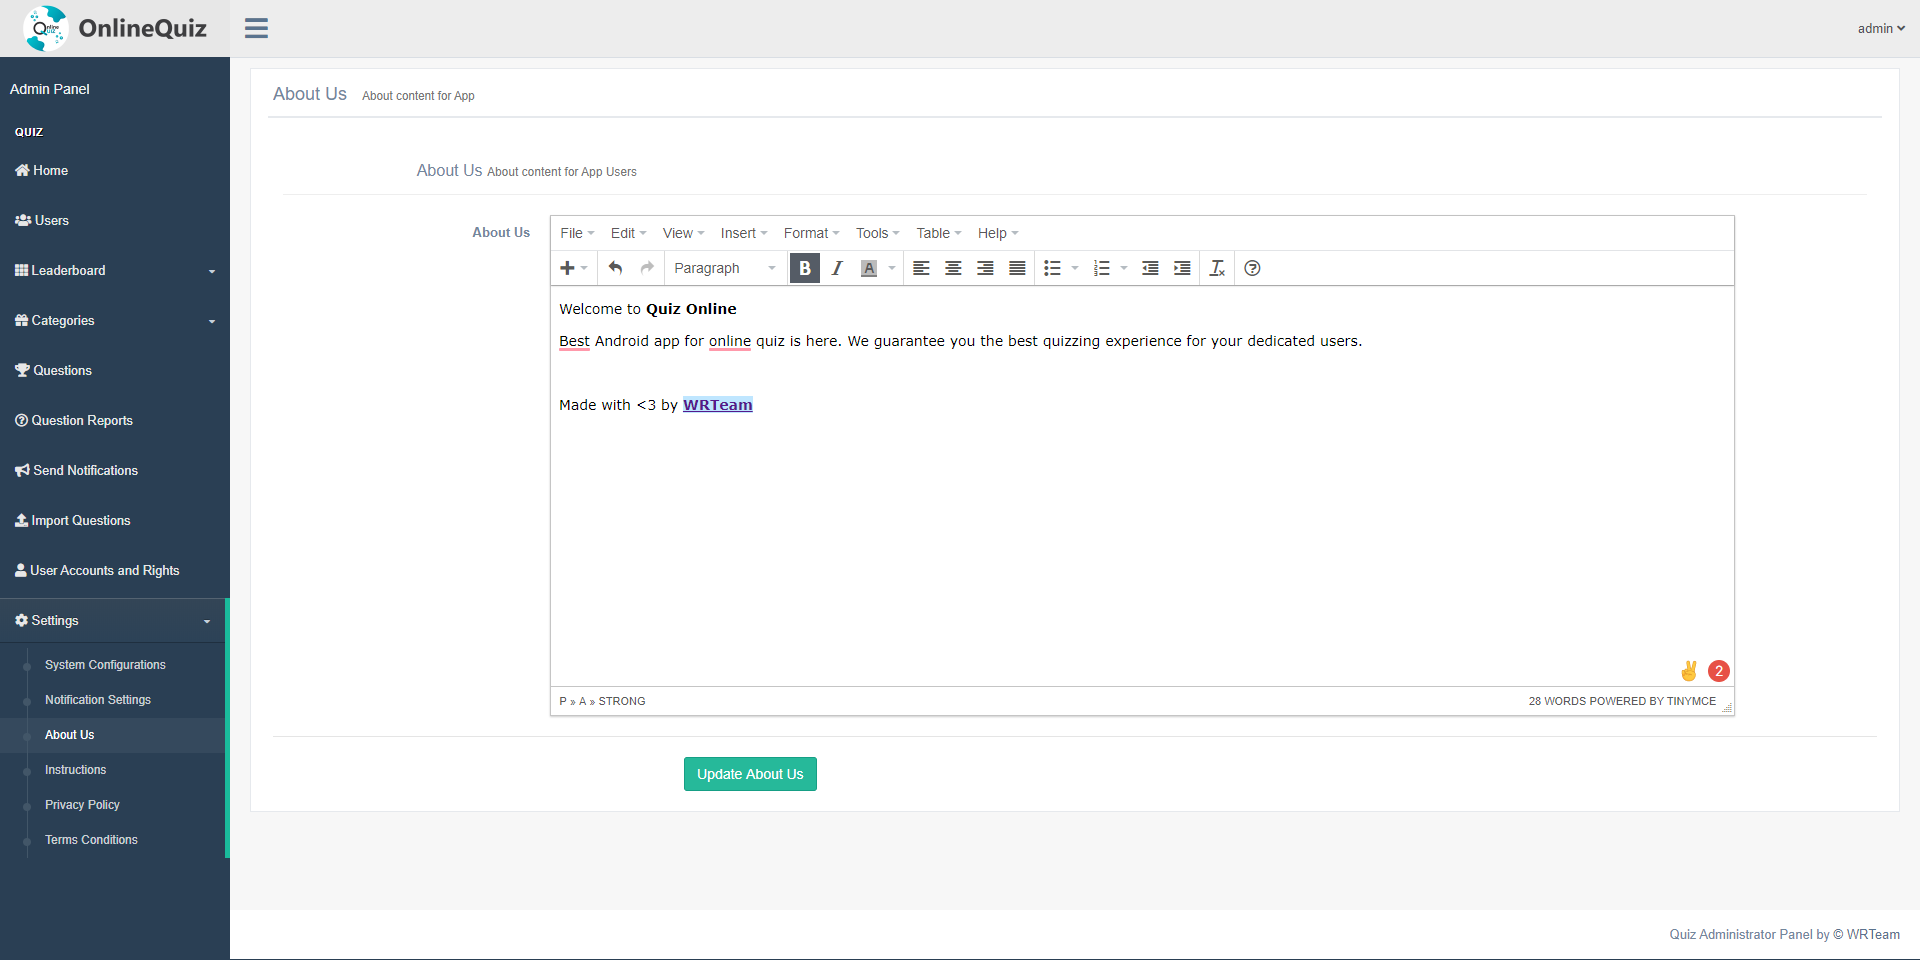
About Us Content
Set and manage your about us content for app.
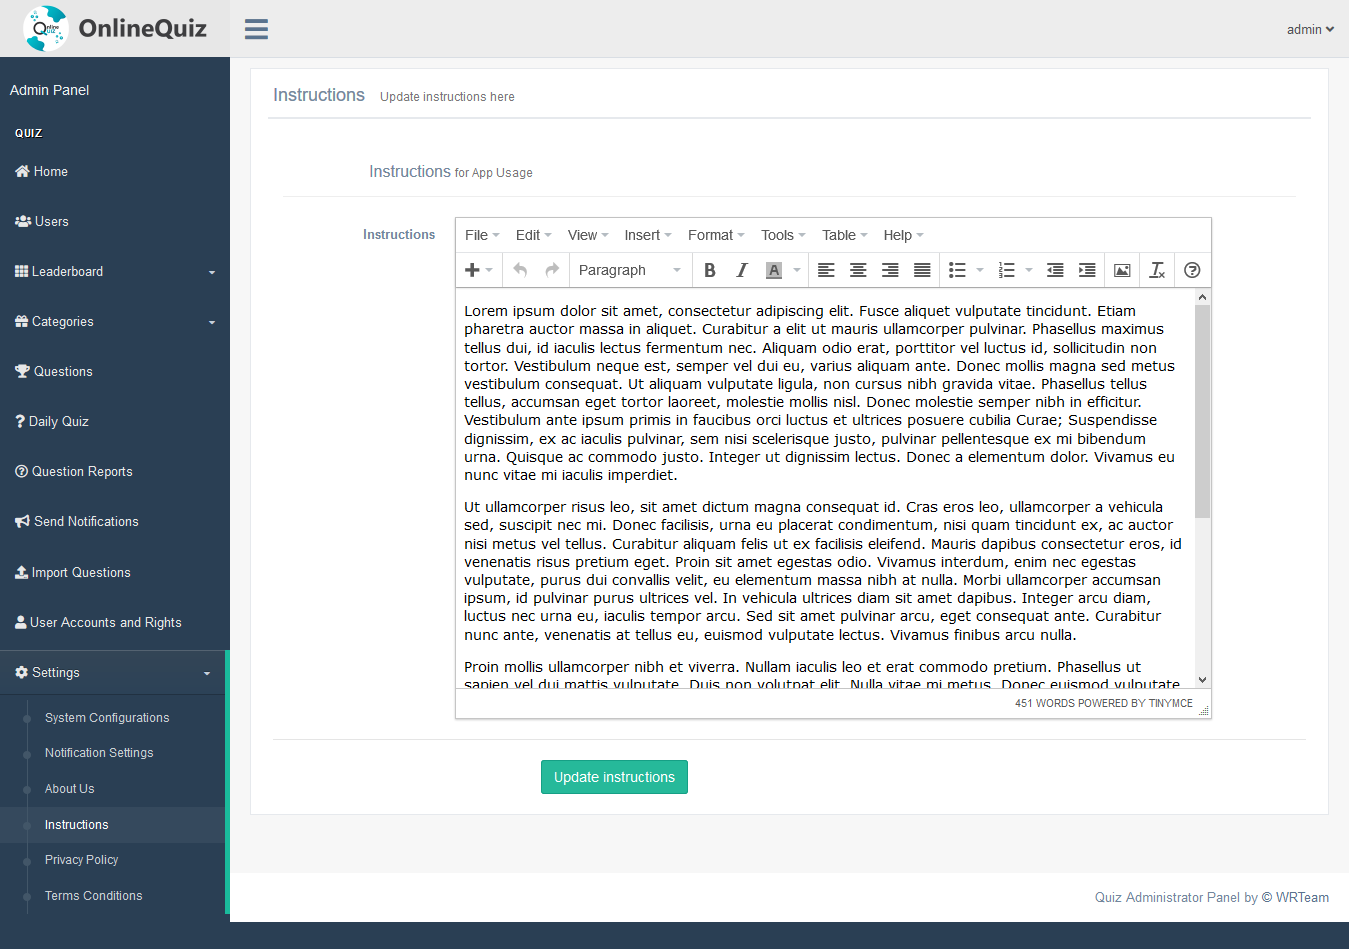
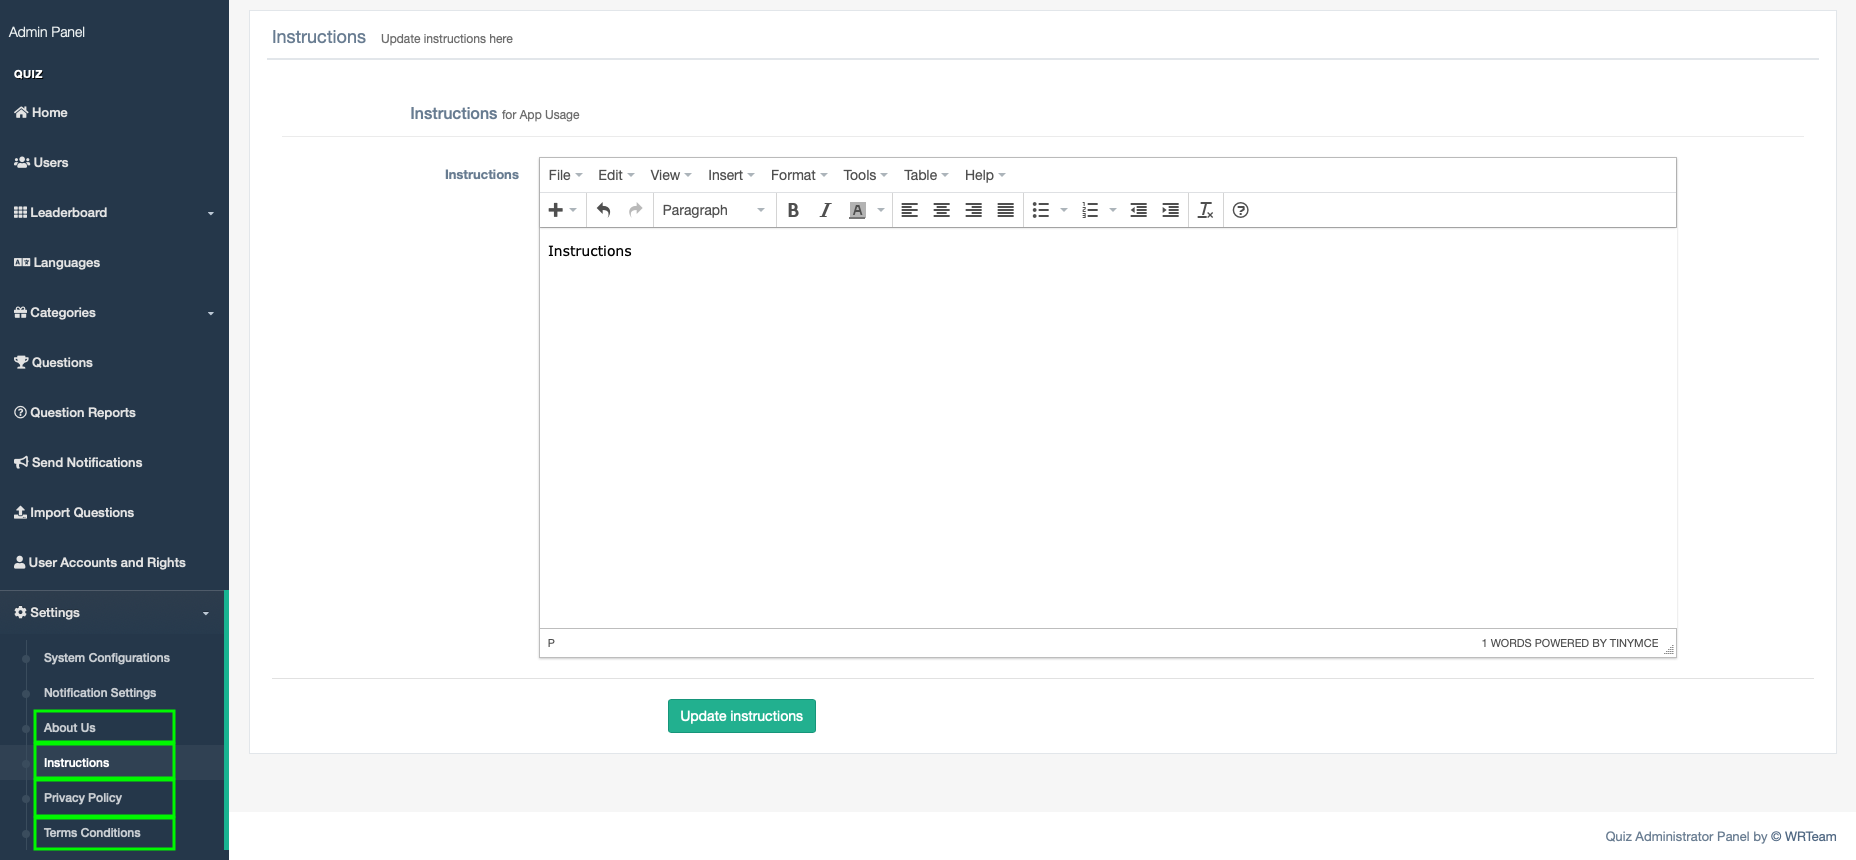
7. Instructions Content
Set and manage your instructions content for app.
Quiz Online iOS
- How to Setup & Run Code?
- How to change server url & Access key in application?
- How to change Launch screen / Splash screen in application?
- Firebase Function Integration
- Authenticate Using Email and Password on iOS With Firebase.
- Authenticate Using Google Sign-In & OTP Based Login on iOS With Firebase.
- Authenticate Using Facebook Login on iOS with Firebase.
- Authentication Using Sign in with Apple with Firebase
- How to Add / Change In-App purchase Ids and Coins in app?
- How to Configure System? ( How to Set App Link , Link for More Apps of Your own , Maintain Your App Version , Text to Share App , TimeZone , etc. )
- Where to Set About Us, Instructions , Terms Conditions and privacy Policy ?
- Want to costomize some values?
- Want to costomize Home Screen Runtime values?
- Want to costomize Setting Alert? like remove Background music Or any other option From Settings?
- How to Remove Level Lock feature from Application?
- How to add / change Admob Banner/Rewarded id?
- How to Remove Admob/FB Ads?
- How to Set Notification Settings?
- How to Set Daily Quiz Settings?
- How to Set Contest Settings?
- How to change Maintenance Alert GIF?
- Note
How to Setup & Run Code?
- Open Terminal > write command cd [Path Of Quiz Project] & Press Enter & just Install Pods by using Command pod install
- go to Quiz in Finder > Open Quiz.xcworkspace File in Xcode
Settings To Do Before Running your Code
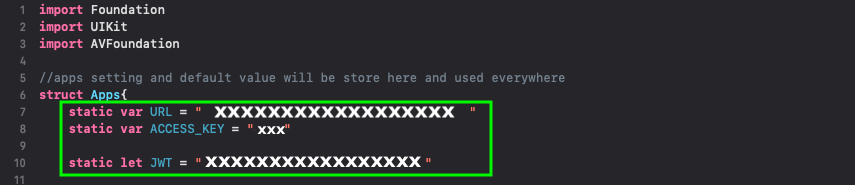
How to change admin page url, Access key and JWT Key in application?
- go to Quiz > Quiz.xcworkspace > Quiz > ExtensionFile > QuizSetting.swift
- JWT is just like password you can create by your own & it must be same in Quiz App and PHP side as well -> Go To PHP Setting
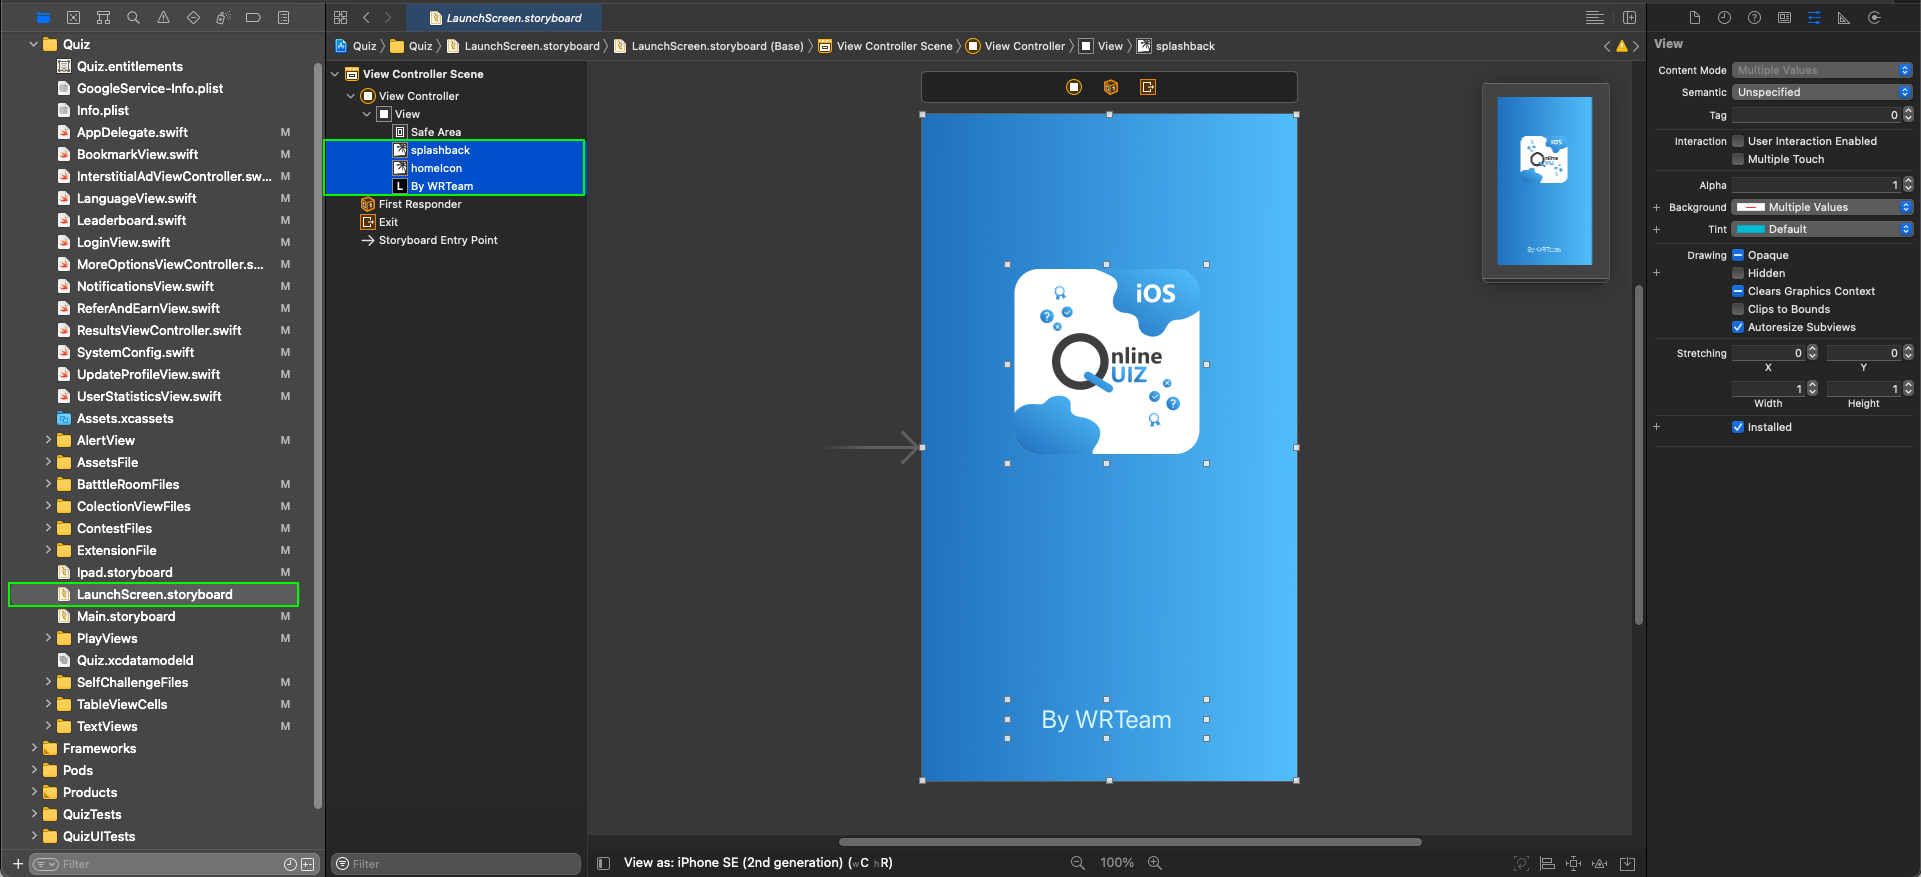
How to change Launch screen / Splash screen in application?
- go to Quiz > Quiz.xcworkspace > Quiz > LaunchScreen.storyboard file.
- Change Background Color Image & App Logo Image and Label Text there as Shown below.
Firebase Function Integration
Create a Firebase project
-
1. In the Firebase console, click Add project, then select or enter a Project name.
If you have an existing Google Cloud Platform (GCP) project, you can select the project from the Project name dropdown menu. Otherwise, enter a new Project name.
2. (Optional) Edit the Project ID.
- Firebase automatically provisions resources for your Firebase project. When the process completes, you'll be taken to the overview page for your Firebase project in the Firebase console.
- Now that you have a project, you can add your iOS app to it:
1. Click Add Firebase to your iOS app and follow the setup steps. If you're importing an existing Google project, this may happen automatically and you can just download the config file.
2. When prompted, enter your app's bundle ID. It's important to enter the bundle ID your app is using; this can only be set when you add the app to your Firebase project.
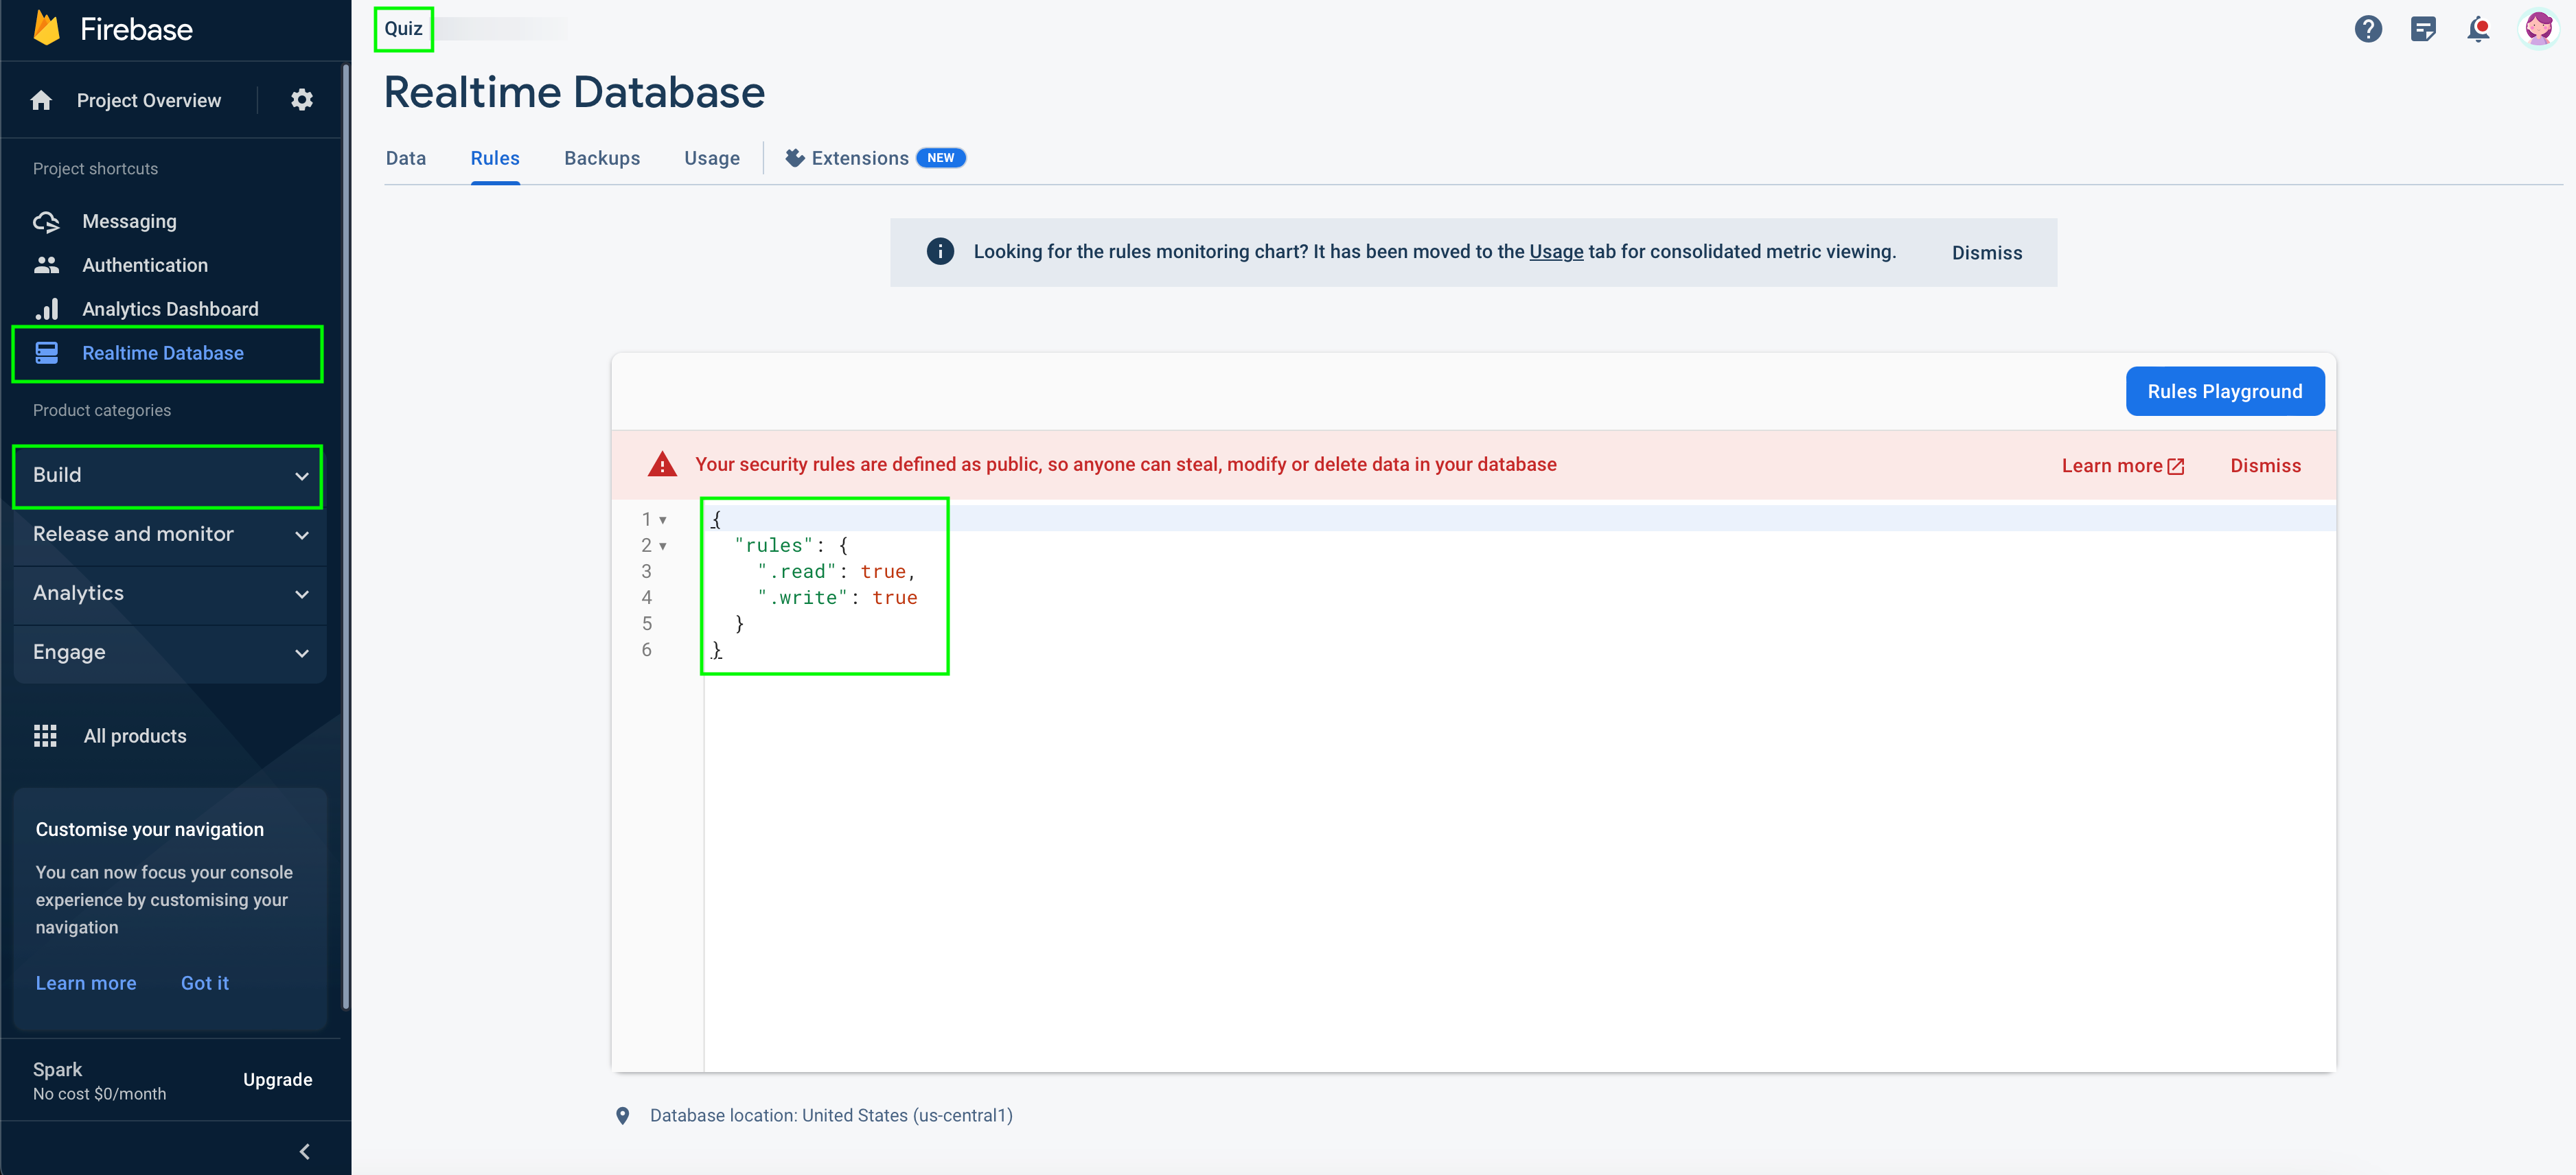
3. Go to Database Tab, Then Select Realtime Databse > Rules > Set .read and .write to true.
4. Add the Firebase iOS configuration file to your app: - Click Download GoogleService-Info.plist to obtain your Firebase iOS config file
(GoogleService-Info.plist).
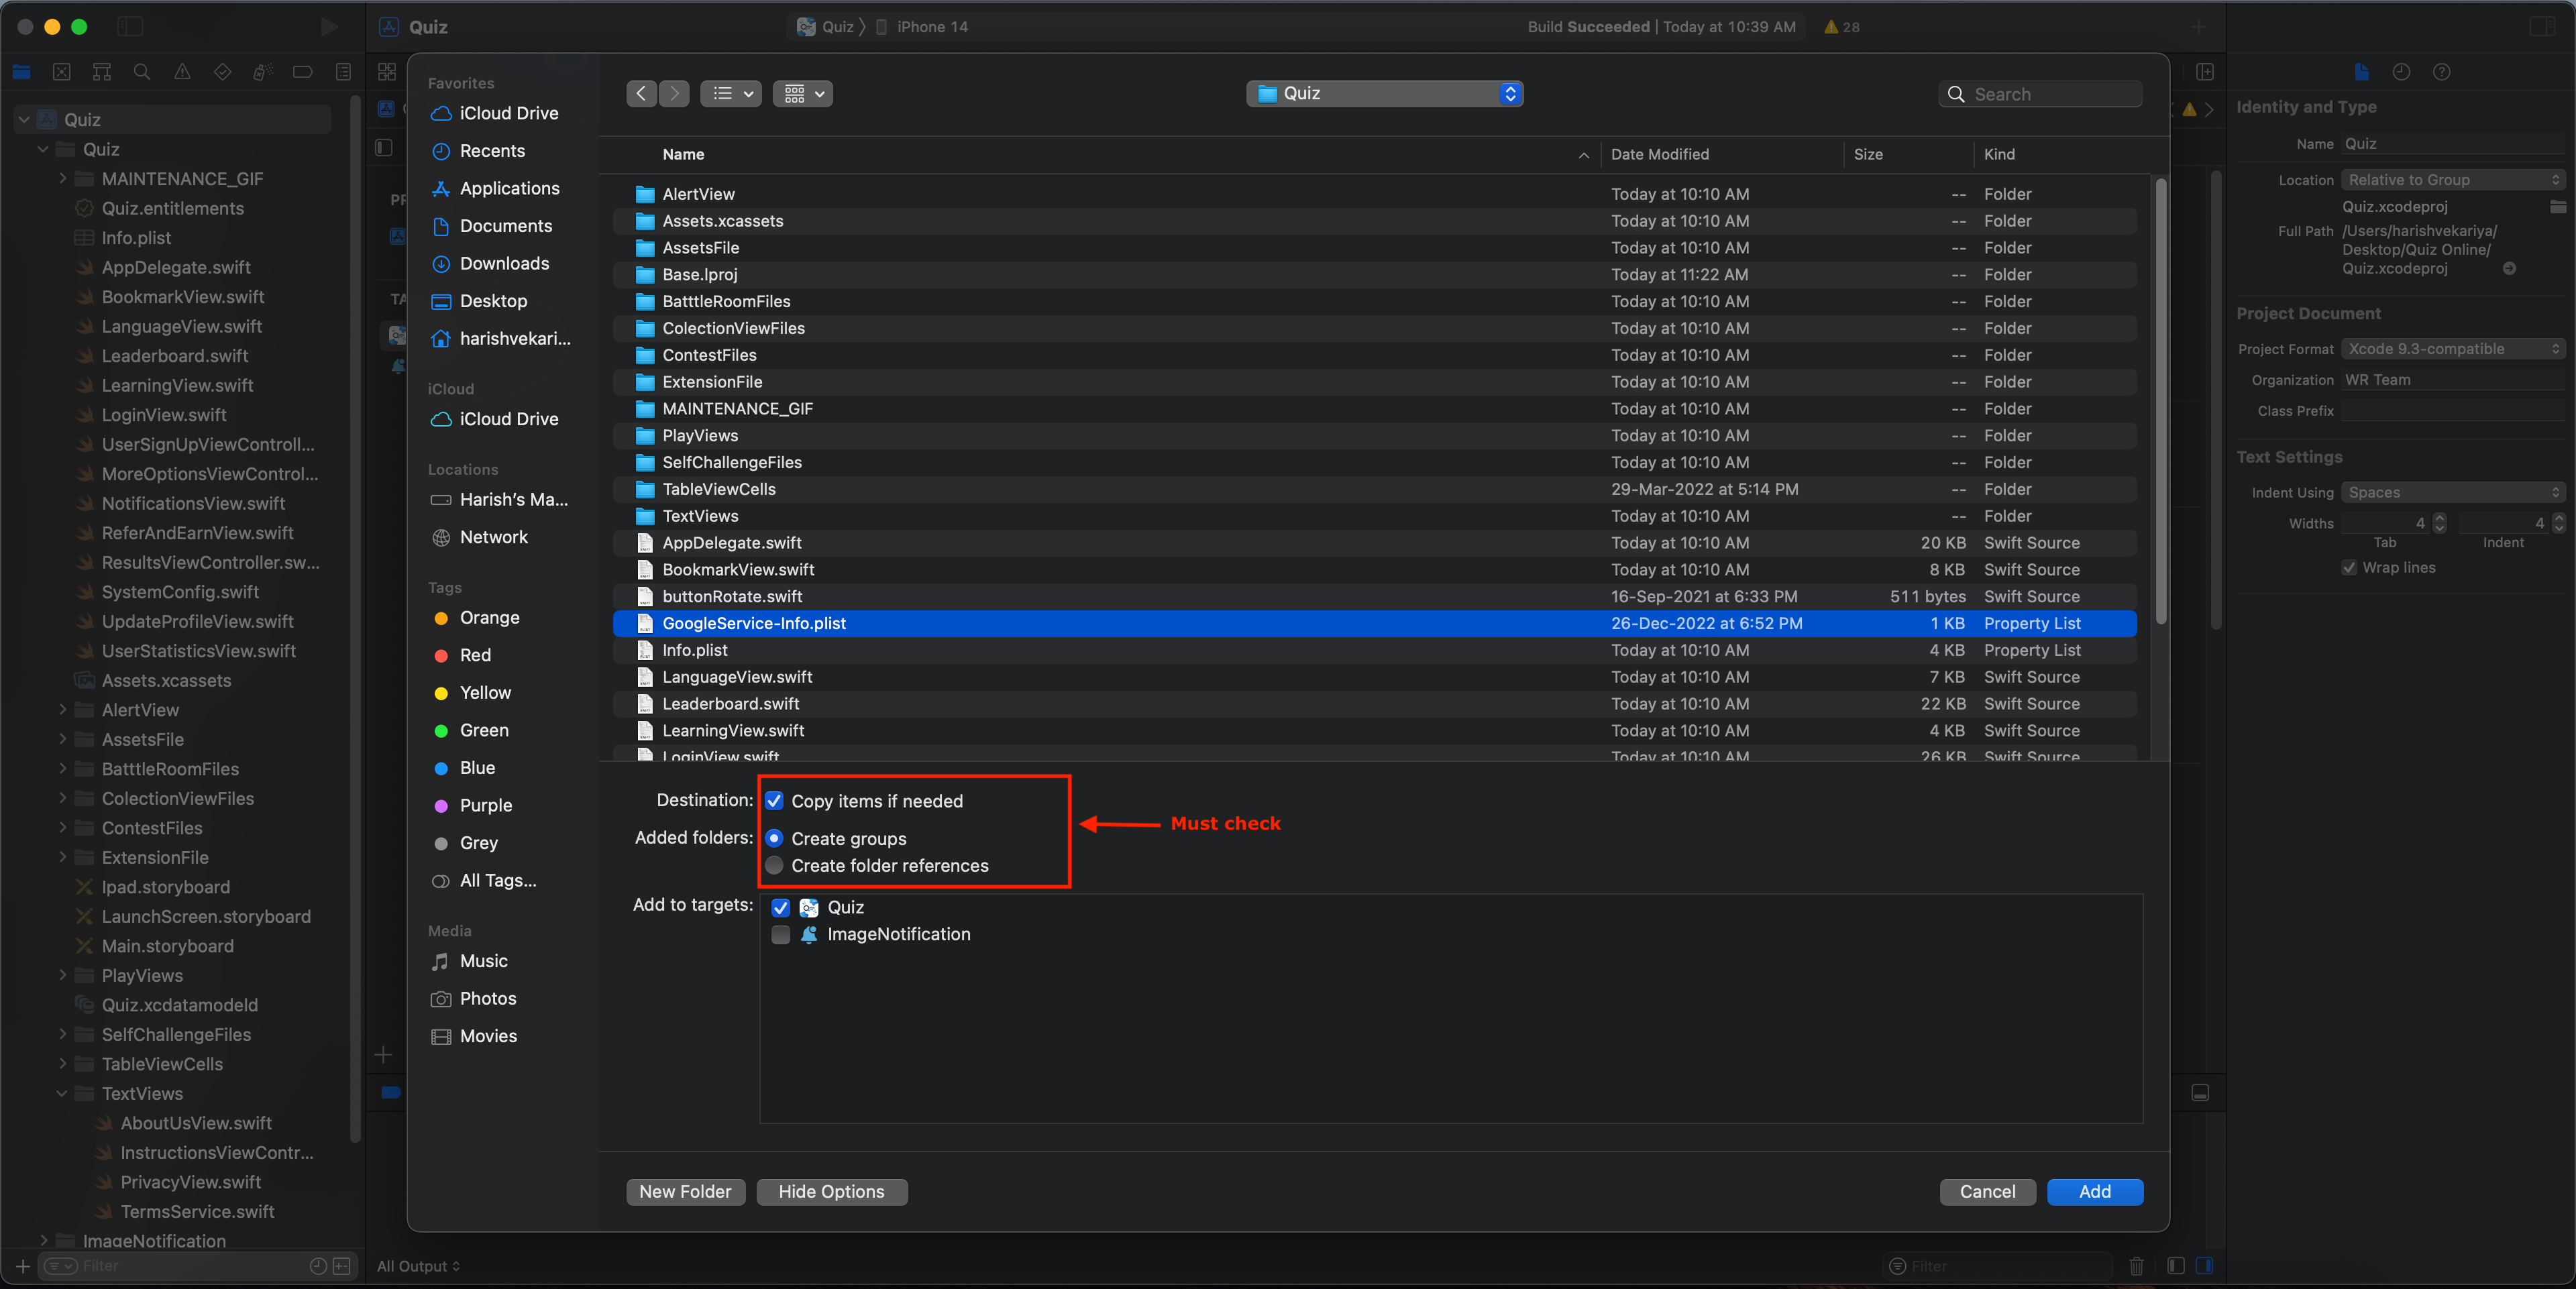
You can download your Firebase iOS config file again at any time. - Move your config file into the root of your Xcode project. If prompted, select to add the config file to all targets. Step 1 - Add Files to Quiz
- * Note: The Firebase config file contains unique, but non-secret identifiers for your project. Visit Understand Firebase Projects to learn more about this config file. 5. After you add the initialization code, run your app to send verification to the Firebase console that you've successfully installed Firebase.
- Visit Understand Firebase Projects to learn more about best practices and considerations for adding apps to a Firebase project, including how to handle multiple build variants.
Firebase automatically assigns a unique ID to your Firebase project. Visit Understand Firebase Projects to learn about how Firebase uses the project ID. 3. Follow the remaining setup steps in the Firebase console, then click Create project (or Add Firebase, if you're using an existing Google project).

Step 2 - Select your GoogleService-Info.plist from Files [make sure to move it to Quiz Folder from Downloads folder first]
Authenticate Using Email and Password on iOS With Firebase.
Implement Email Sign-In
- In the Firebase console, open the Authentication section.
- On the Sign-in method tab , enable the Email/Password sign-in method.
- You can change Sender Name , From , Subject , Message From Authentication Section , In Templates Tab > Email Address Verification and Password reset.
Authenticate Using Google Sign-In & OTP Based Login on iOS With Firebase.
Implement Google Sign-In
1. Add custom URL schemes to your Xcode project:
- a. Open your project configuration: double-click the project name in the left tree view. Select your app from the TARGETS section, then select the Info tab, and expand the URL Types section.
- b. Click the + button, and add a URL scheme for your reversed client ID. To find this value, open the
GoogleService-Info.plistconfiguration file, and look for theREVERSED_CLIENT_IDkey. Copy the value of that key, and paste it into the URL Schemes box on the configuration page. Leave the other fields blank.
When completed, your config should look something similar to the following (but with your application-specific values):

Authenticate Using Facebook Login on iOS
- 1. If you haven't yet connected your app to your Firebase project, do so from the Firebase console
- 2. On the Facebook for Developers site, get the App ID and an App Secret for your app.
- 3. Enable Facebook Login:
- a. In the Firebase console, open the Auth section.
- b. On the Sign in method tab, enable the Facebook sign-in method and specify the App ID and App Secret you got from Facebook.
- c. Then, make sure your OAuth redirect URI
(e.g. my-app-12345.firebaseapp.com/__/auth/handler)is listed as one of your OAuth redirect URIs in your Facebook app's settings page on the Facebook for Developers site in the Product Settings > Facebook Login config.
Add Facebook Id at Info.plist file

At Info > URL Types

Authentication Using Sign in with Apple with Firebase
- In the Firebase console, open the Authentication section.
- On the Sign-in method tab , enable the Apple sign-in method.
To configure code project, perform the following steps in Xcode:
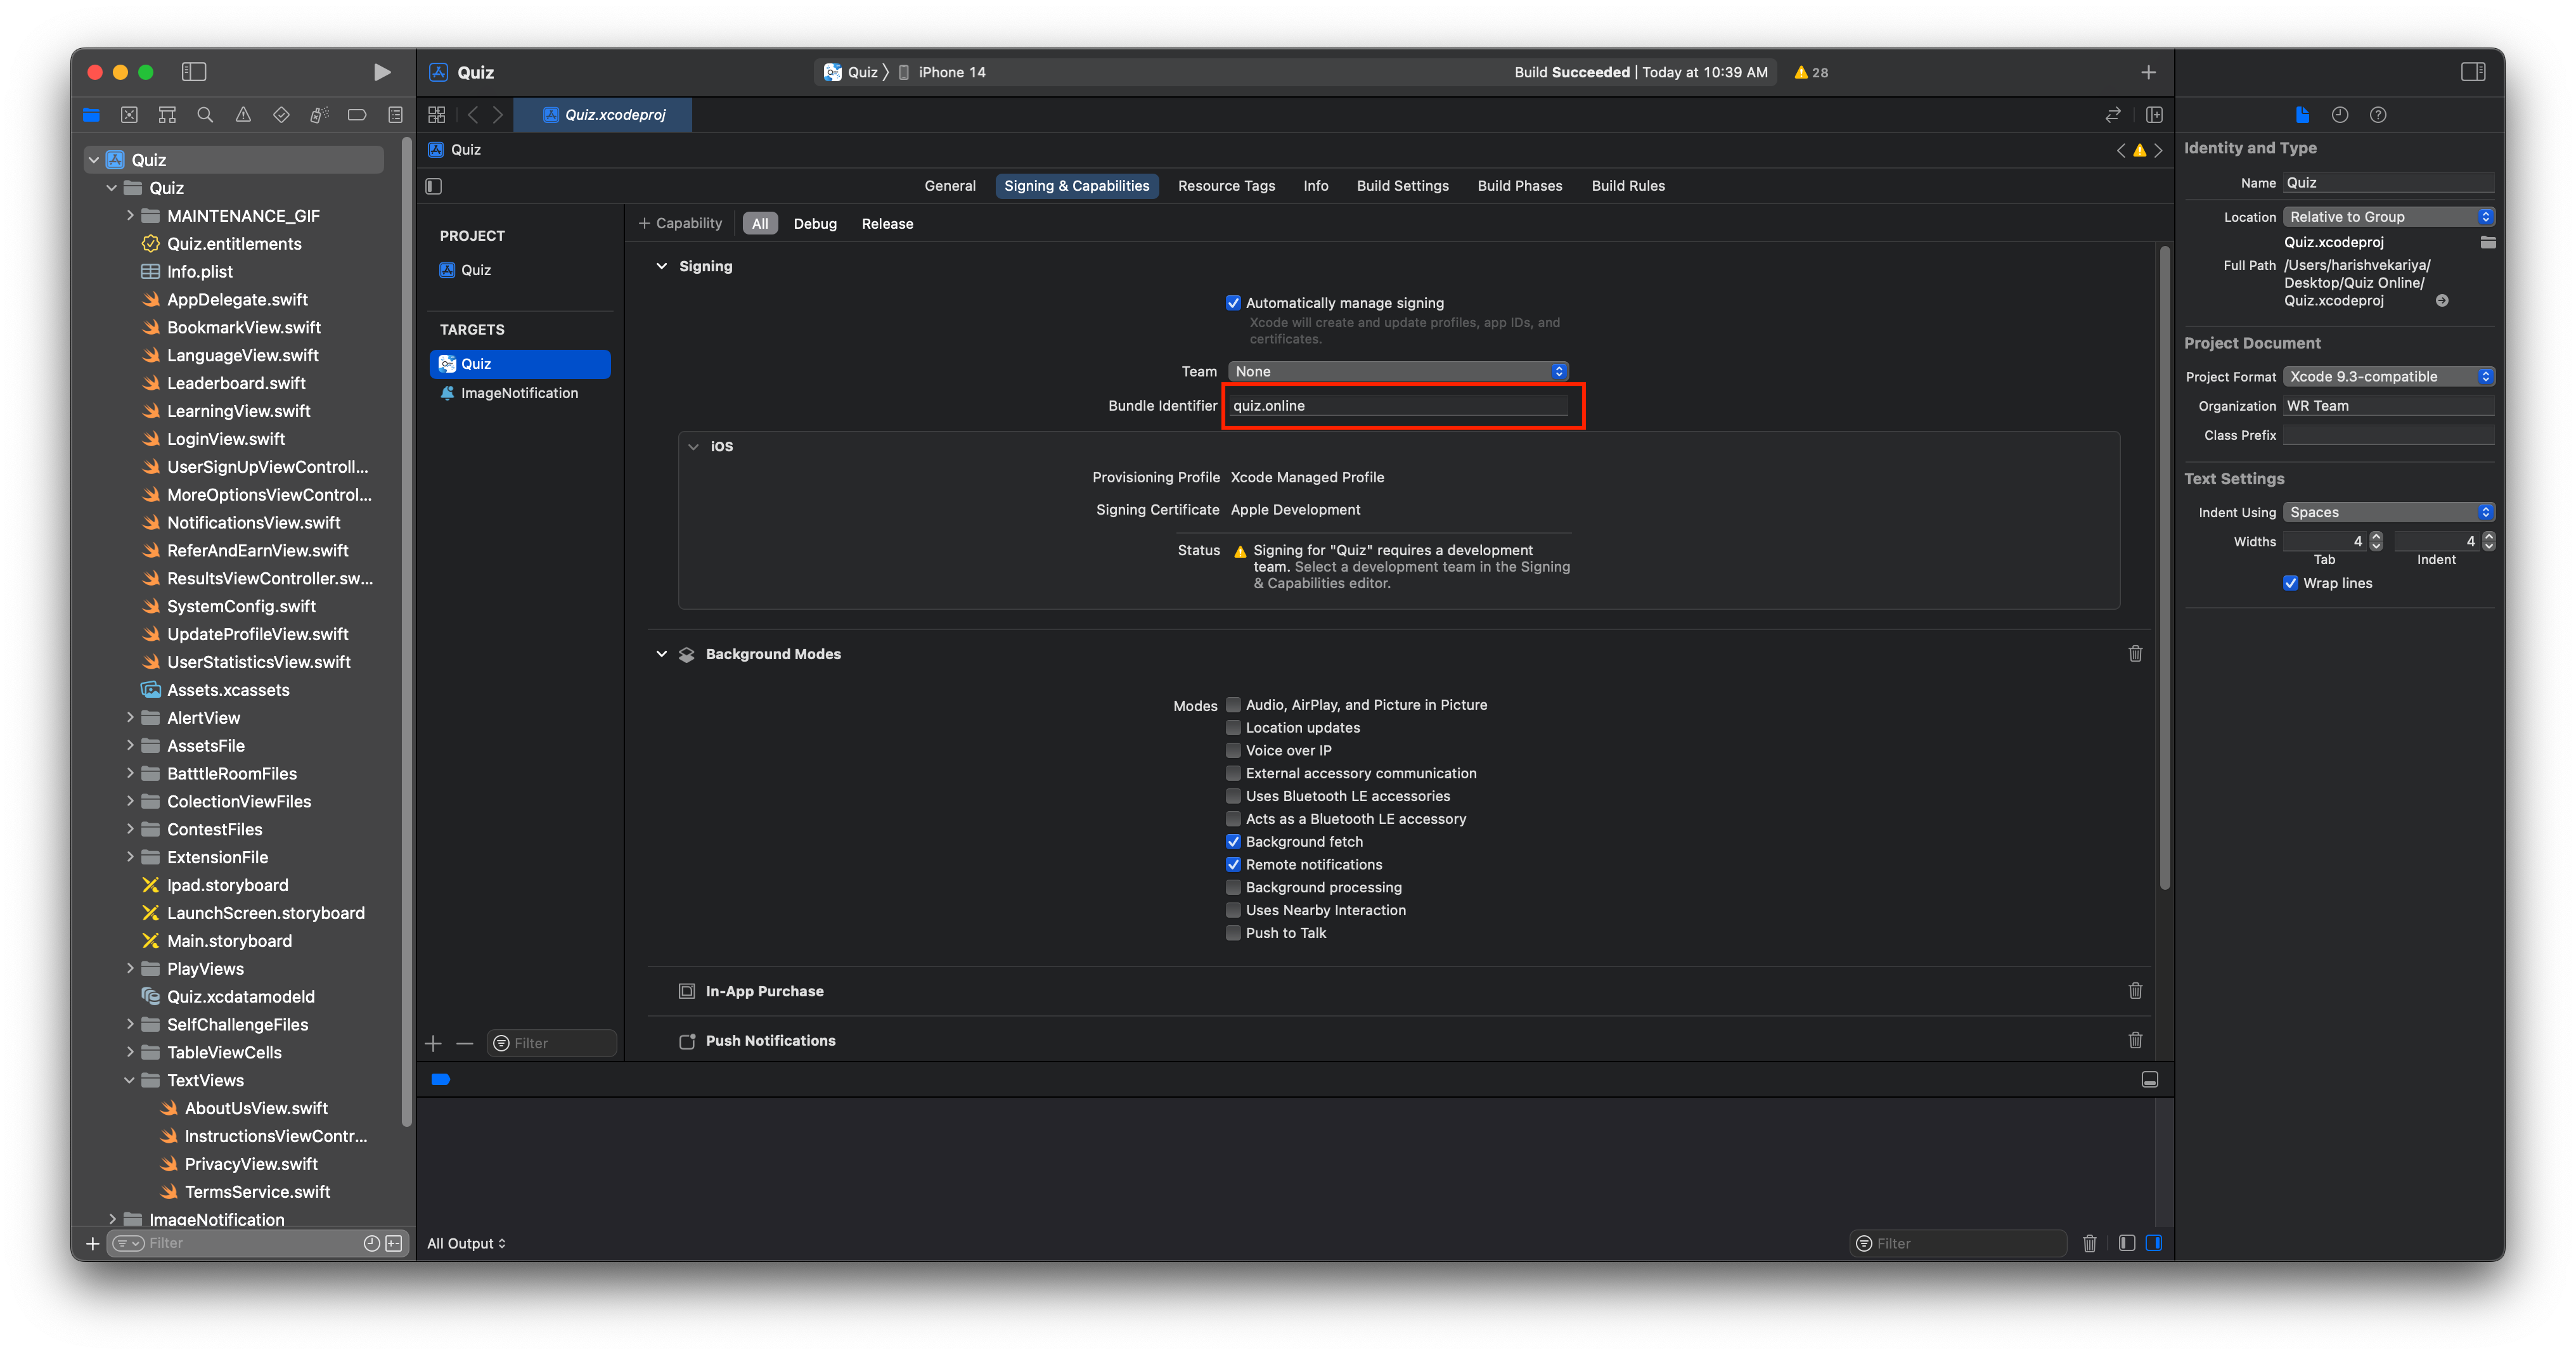
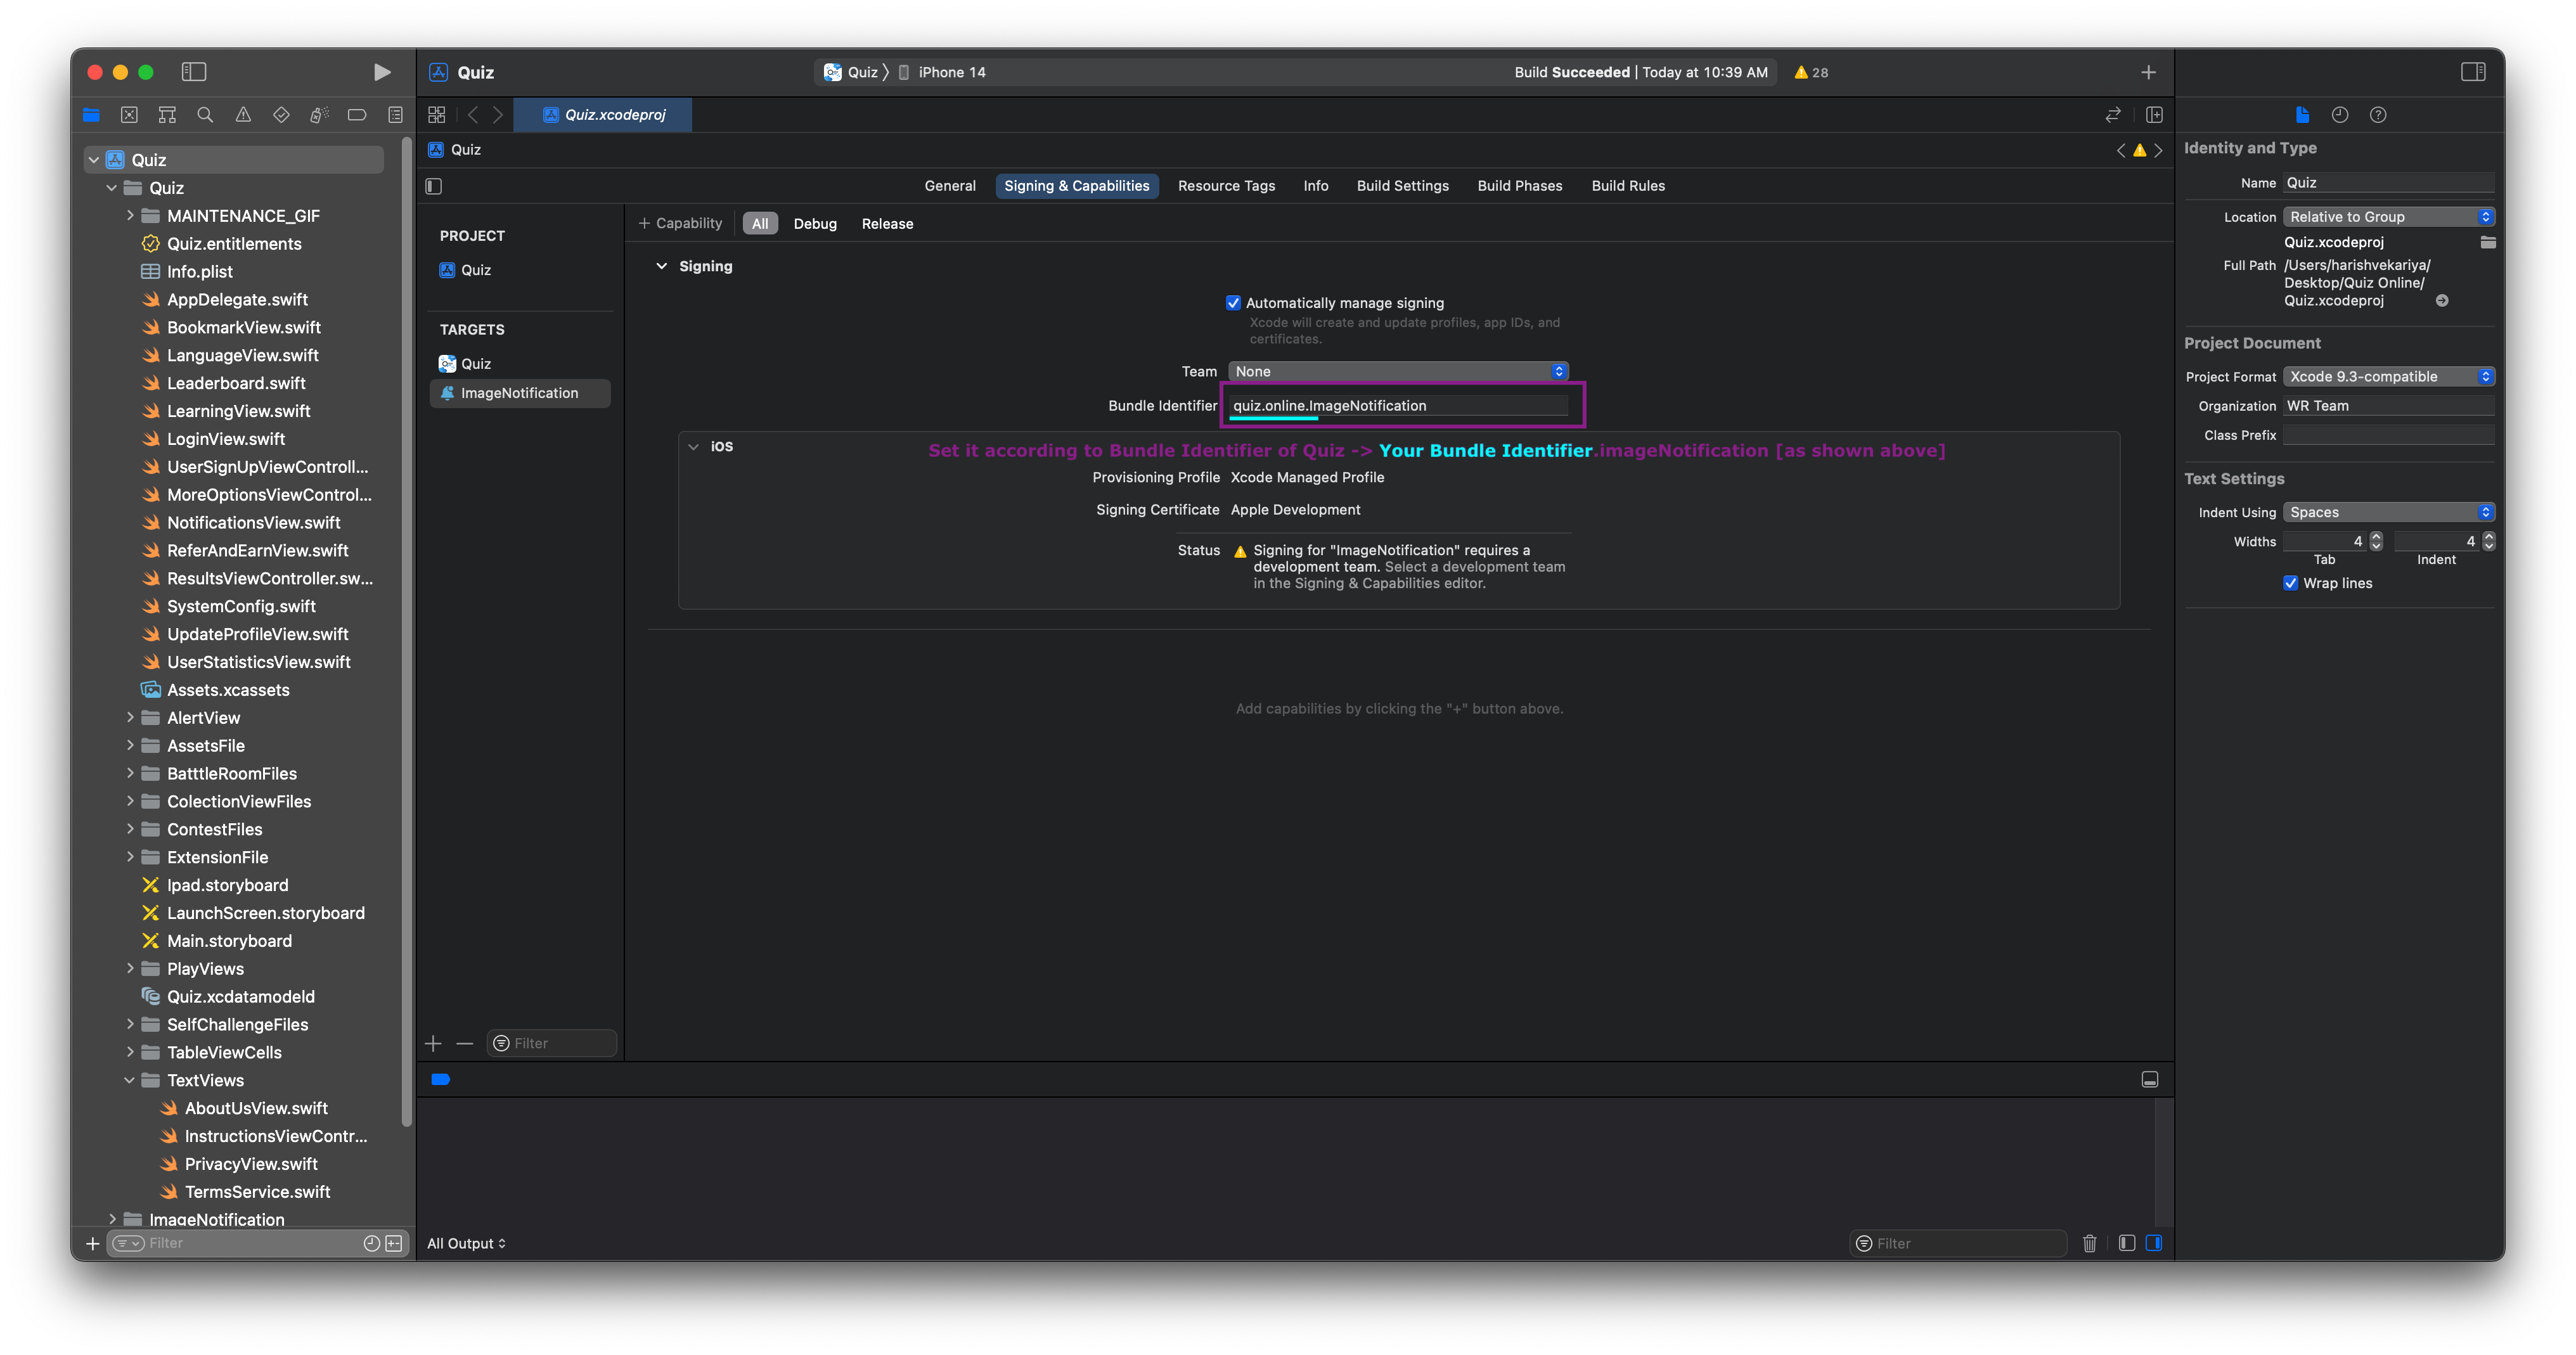
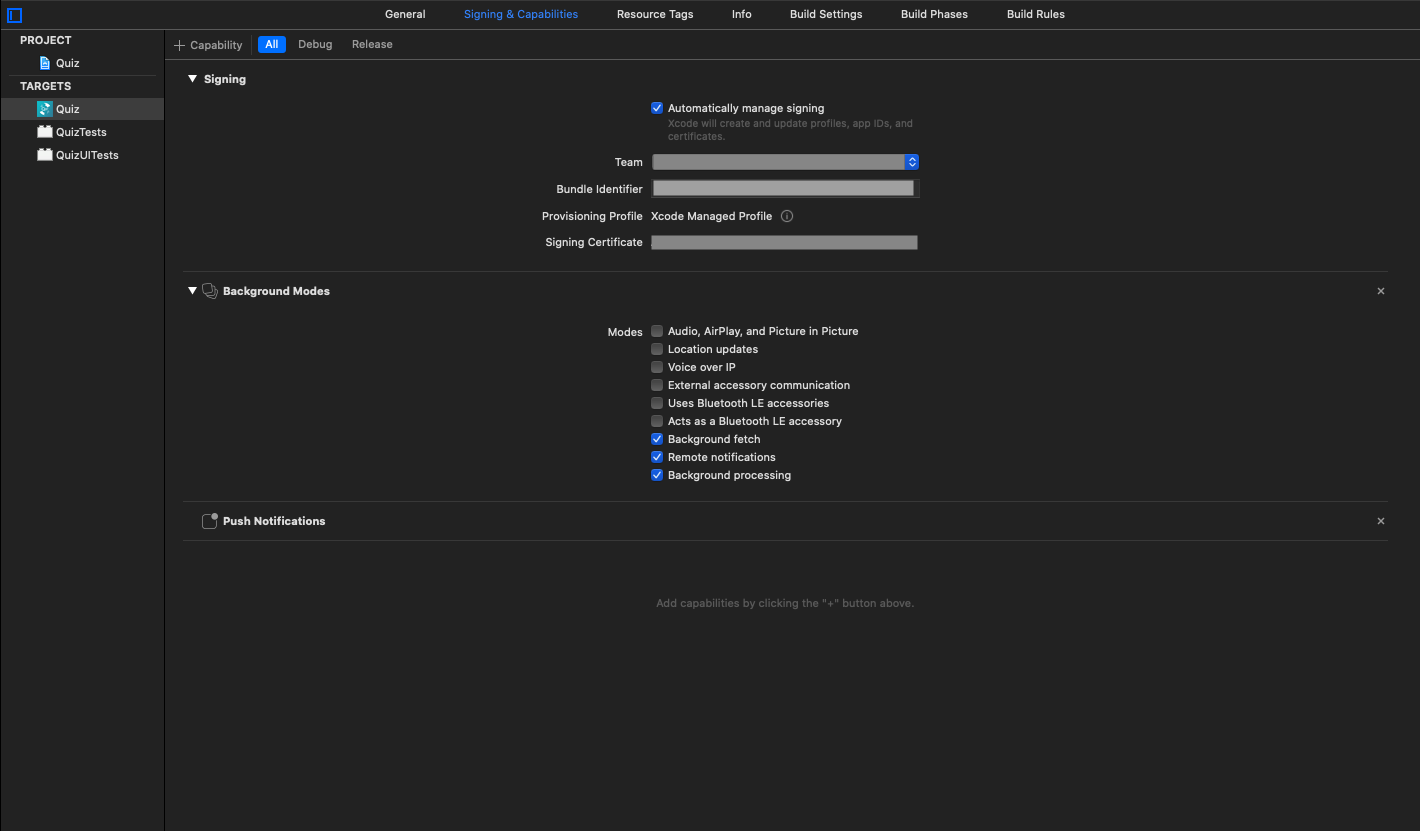
On the Signing & Capabilities pane, set the bundle ID to a unique identifier (you must change the bundle ID to proceed).
Add your Apple ID account and assign the target to a team so Xcode can enable the Sign in with Apple capability with your provisioning profile.
Add Capability by clicking the + button. Search for Sign In with Apple Capability in Capability Library.

Choose a run destination from the scheme pop-up menu that you’re signed into with an Apple ID and that uses Two-Factor Authentication.
If necessary, click Register Device in the Signing & Capabilities pane to create the provisioning profile.
In the toolbar, click Run, or choose Product > Run (⌘R).
How to Add / Change in-app purchase Ids and Coins in app?
For in-app purchase setup in your AppStore Account > Your App, Please Follow Steps Mentioned Here
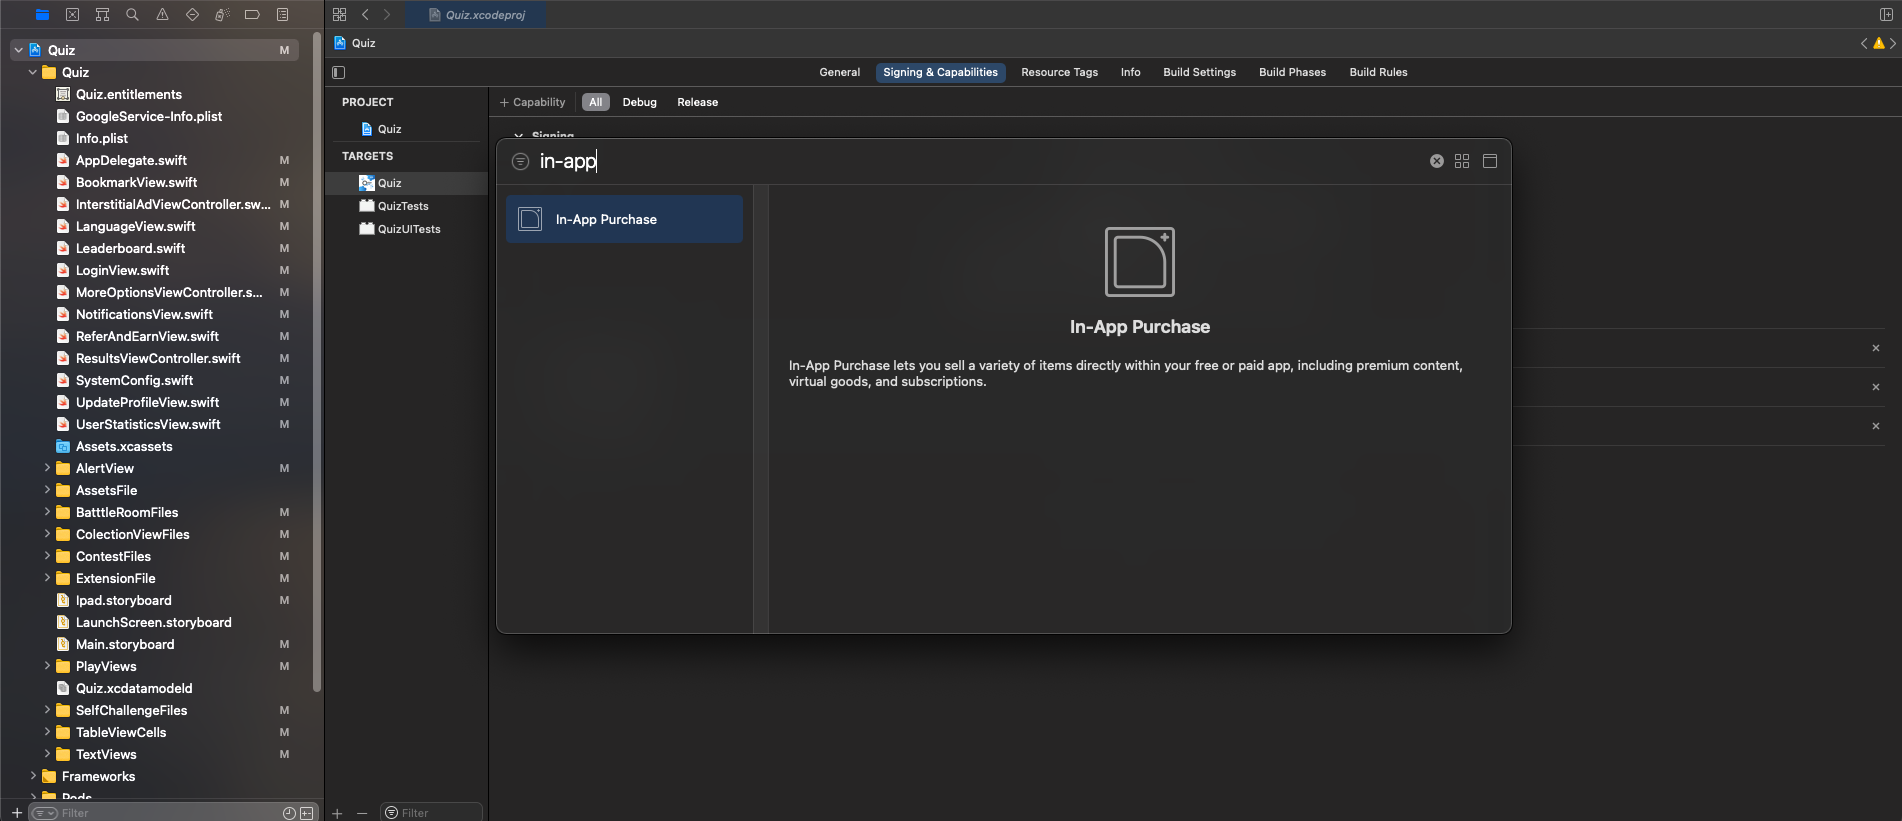
After successful setup of In-App Purchase in your AppStore Connect > Your App, Now Add Capability by clicking the + button. Search for In-App Purchase in Capability Library & add it.
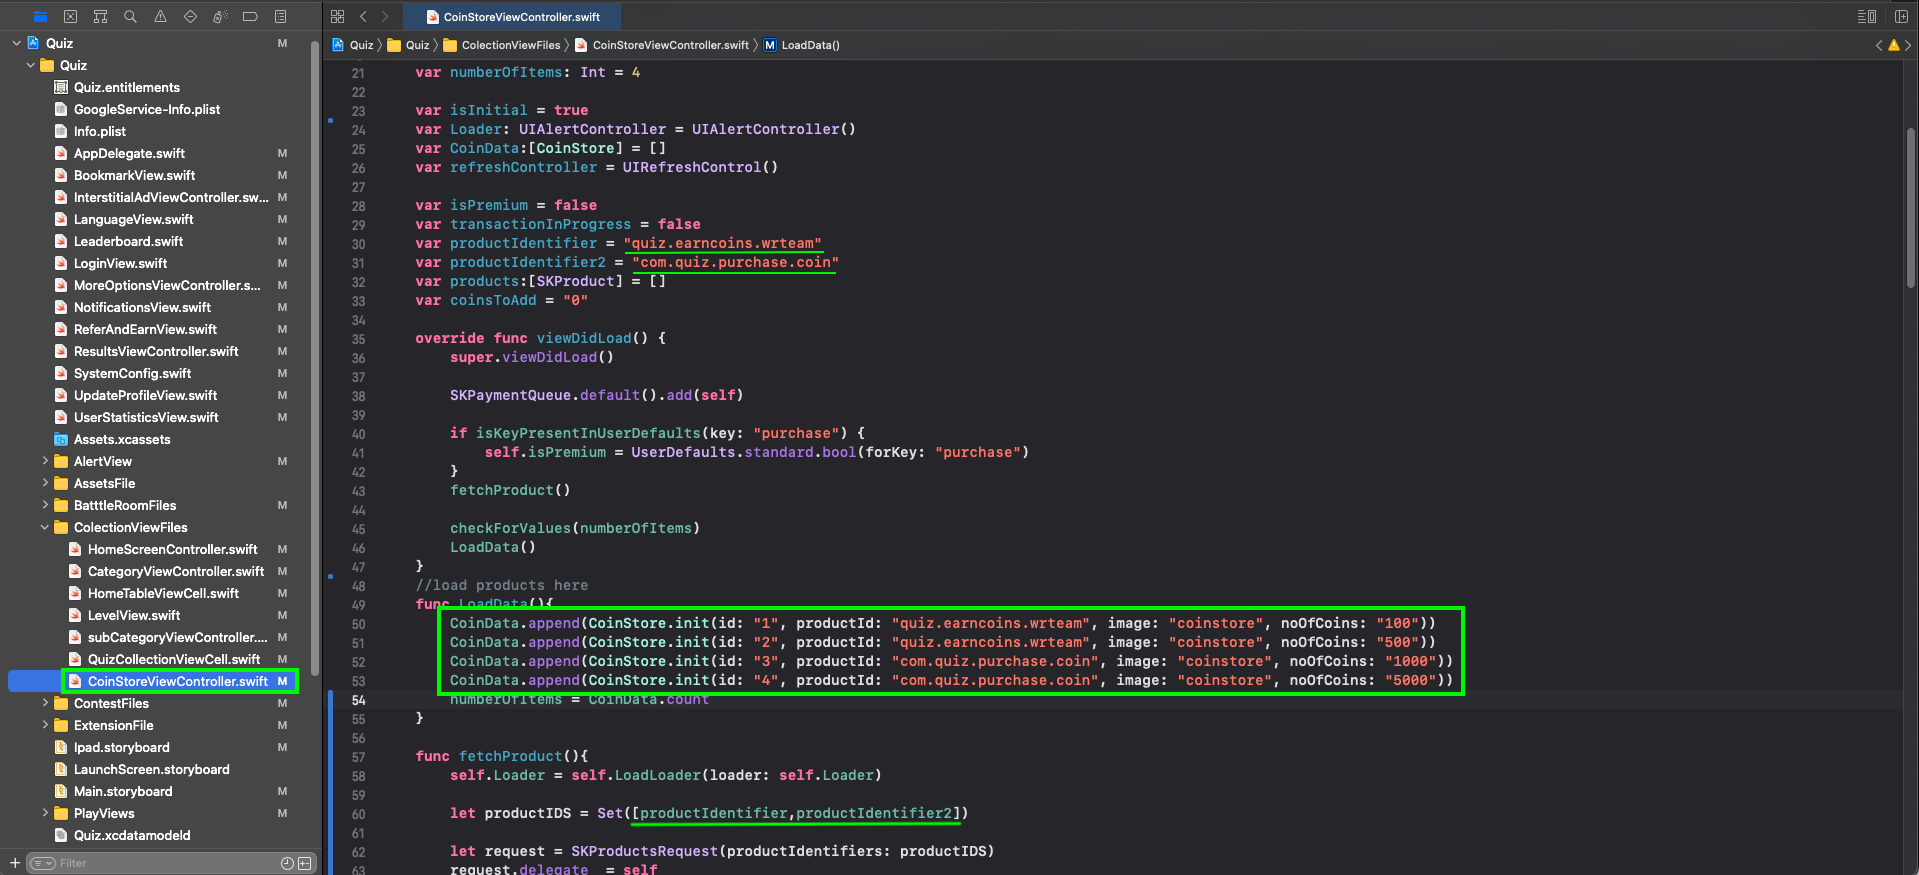
Go to Quiz > CollectionViewFiles > CoinStoreViewController.swift file.
You will find var productIdentifier & productIdentifier2 there. Change value of it same as you have prepared in your Appstore Connect Account > Your App > In-App Purchase & add all that Product Ids there in productIDS of fetchProduct() function in the same file.
You can add as much Products you want. Here we have added only 4 Products with 2 different Product Ids and you can also add different Imageset in Assets folder & you will be able to customise number of coins also as shown below.
How to Configure System? (How to Set App Link , More Apps of Your own , Maintain Your App Version , Text to Share App , TimeZone , etc. )
-> System Timezone - As Per your Requirement. -> iOS App Link - Link of Your AppStore App(you will get it Once your App is Live on Appstore). -> More Apps Link (iOS) - Link of Your AppStore Profile to find Your Other apps. -> Refer Coin & Earn Coin - Admin can set values of Refer Coin for A Friend Who uses your Refer Code & Earn Coin for User whose Refer Code is going to be used by Friends. -> Reward Coin - As it's name suggests, here you can set value of Coins to be earned by watching Reward Ads during Play Quiz. -> App Version - Admin can set current Version of App for Force Update as it takes latest version from Appstore. -> Force Update - You can enable / disable Force App Version Update Dialogue in your App. -> True & False Value - Incase You are using specific Language other than English, Then you can set Values for True & False here. -> Answer Display - Enable this If you want users to see Correct Answer while they choose Wrong one from Given Options. -> Language Mode - Enable / Disable Language in your App -> Option E Mode - Enable / Disable Option E in your App -> Daily Quiz Mode - Enable / Disable Daily Quiz in your App -> Contest Mode - Enable / Disable Contest in your App -> Random Battle Category Mode - Enable / Disable Category for Random Battle in your App -> Group Battle Category Mode - Enable / Disable Category for Group Battle in your App -> In-App Purchase - Enable / Disable In-App Purchase in your App -> Learning Zone Mode - Enable / Disable Learning Zone in your App -> Maths Mode - Enable / Disable Maths Quiz in your App -> True/False Mode - Enable / Disable True/False Quiz in your App -> Fix Questions in Level and Total Number of Questions per Level - Enable this If you want Fix Number of Questions for Every Level and If You are enabling it, it will set Limit for all Level Questions as the Value You Add in Total Question per Level here. -> App Maintenance & App Maintenance Message - Admin can enable it when there is some Process Running @ admin panel & users are not supposed to Opeate App @ that time. & Admin should add message for Maintenance, which will be visible on App & user will be able to Operate App once App Maintenance is Disabled from here. -> Custom Share App text - This Text will be used when your app user shares App. -> System Setting for iOS Ads - you can choose Fb / Google Admob Ads & add Banner, Interstitial, Reward & Open Ads[for Admob Only] Ids here. NOTE: Admob App ID should be entered in info.plist only. -> Social Media Links - Add Instagram,Facebook & Youtube Link of your Own & it will be reflected in MoreOptions.swift file there. Make Sure none of fields are blank here, even if You don't have any specific value, then You can put any dummy value for testing too. @ the End, Don't forget to click Save Settings.
Where to Set About Us, Instructions , Terms Conditions and privacy Policy ?
Don't forget to click Save Settings.
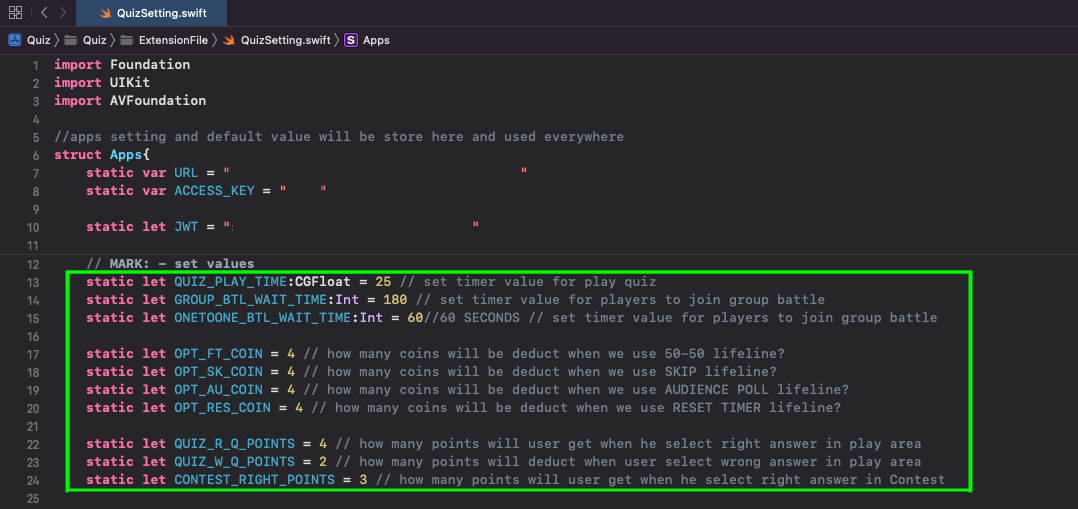
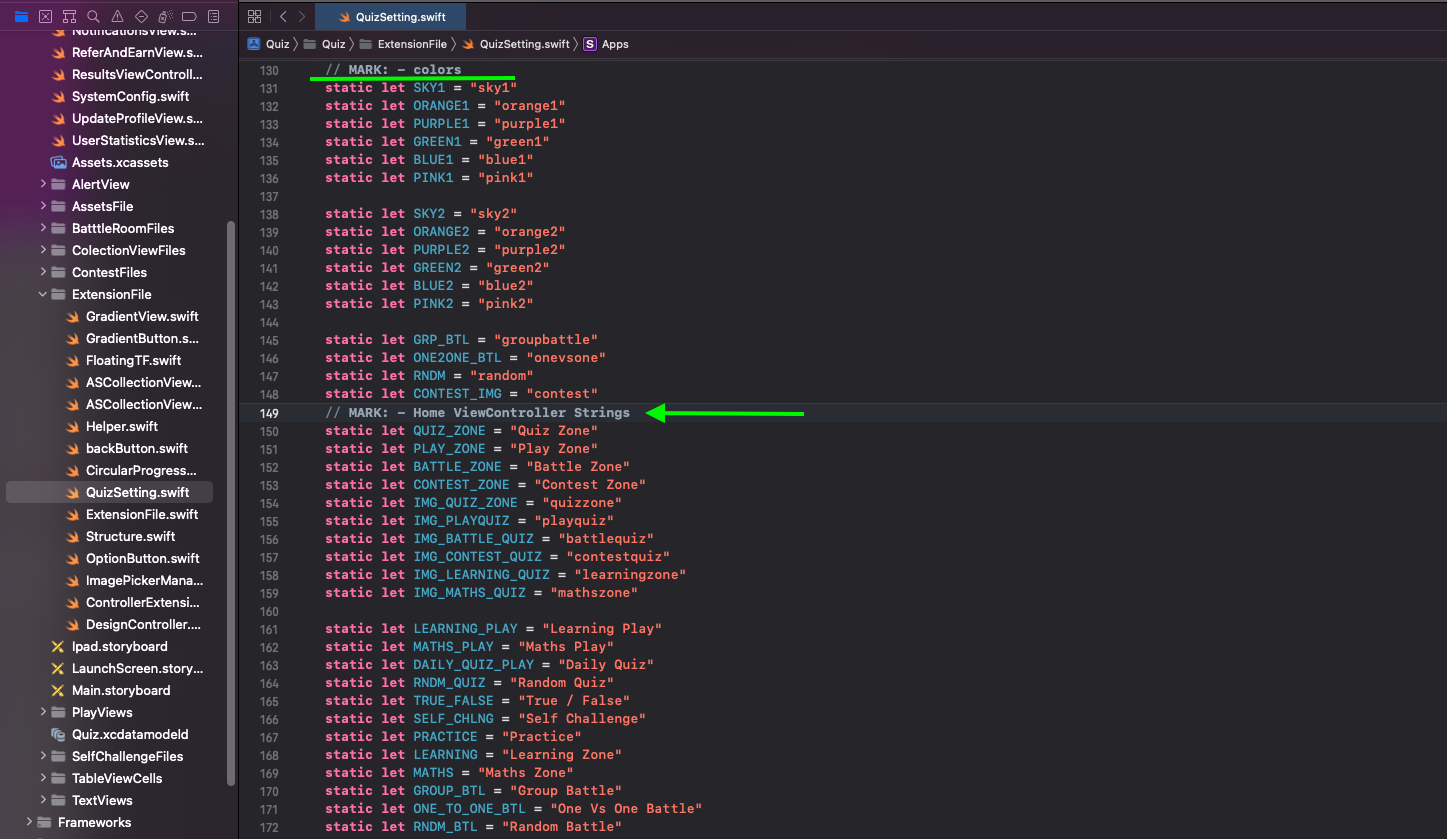
Want to costomize some values? like timer value in Seconds to Play Quiz, Players to Join Group & OneVsOne Battle,Right & Wrong Answer Points & Lifeline Coin Values, etc...?
Want to costomize Home Screen Runtime Values?
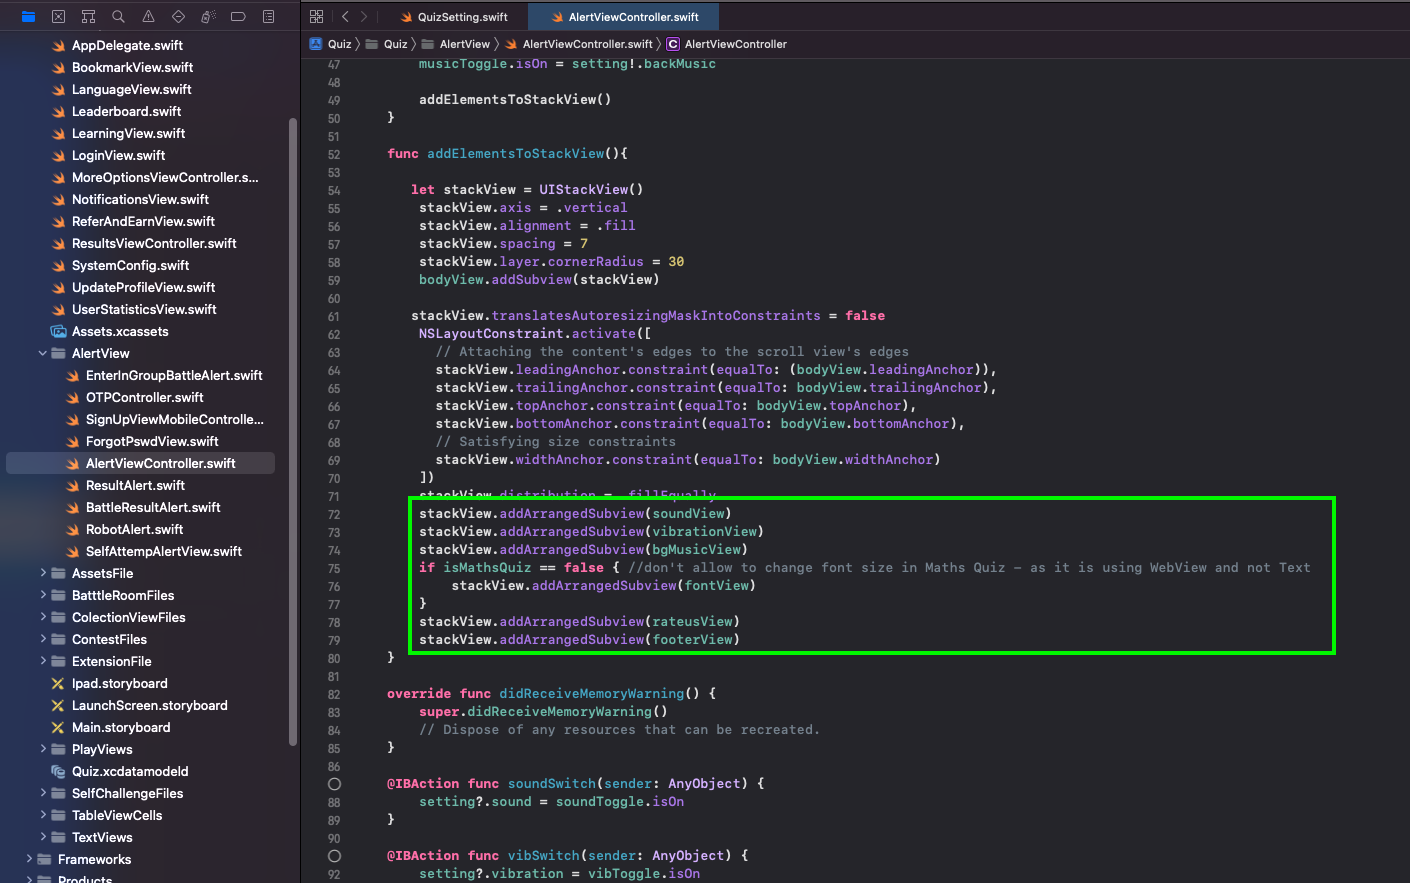
Want to costomize Setting Alert? like remove Background music Or any other option From Settings?
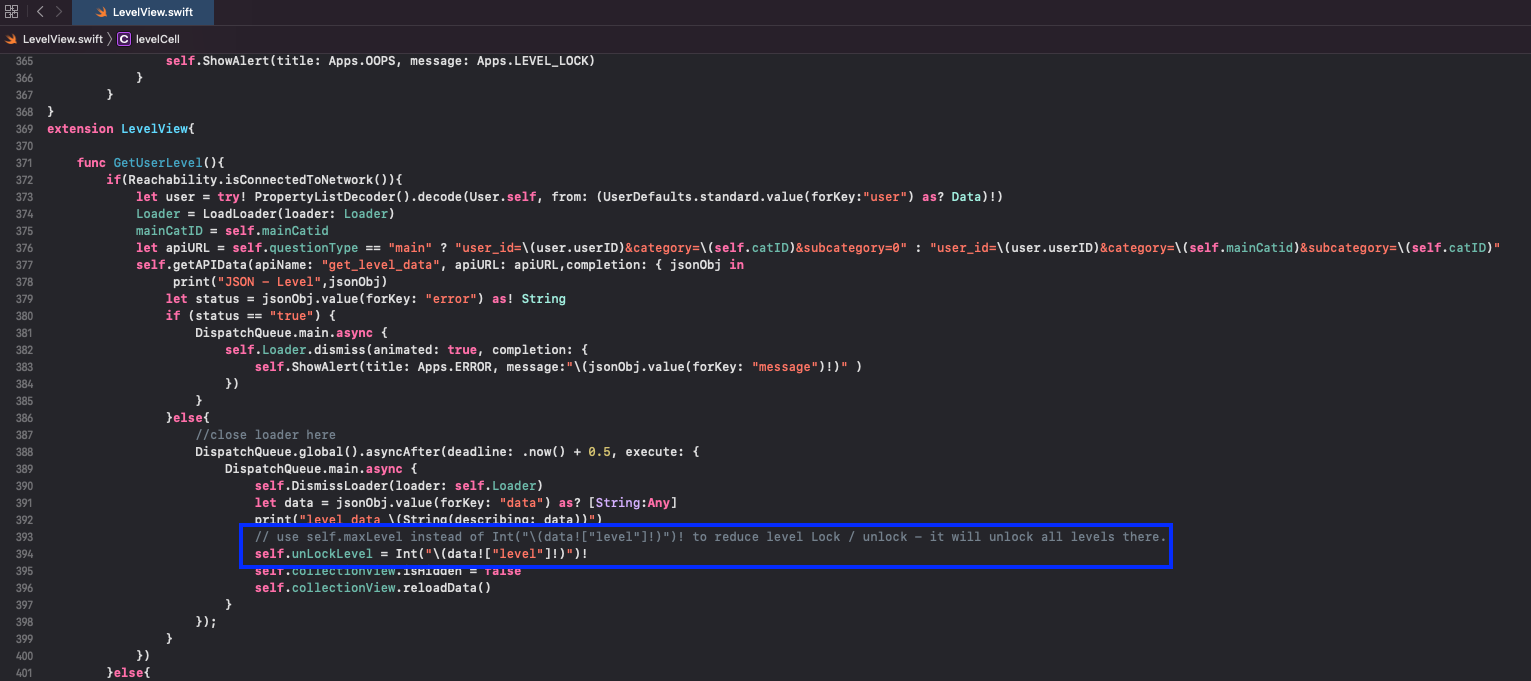
How to Remove Level Lock feature from Application?
Find extension LevelView & change value of self.unLockLevel from Int("\(data!["level"]!)")! to self.maxLevel
How to change admob id?
Update your Info.plist


How to Remove Admob/FB Ads?
Alternatively you can turn On / Off Ads From Admin Panel & also can switch Between Admob and Fb Ads & still if you want to Remove it completely, follow steps below.To Remove Ads in ios app you have to go through following steps ,
1. remove GADApplicationIdentifier key and its value from info.plist
2. remove BANNER_AD_UNIT_ID,REWARD_AD_UNIT_ID,INTERSTITIAL_AD_UNIT_ID,AD_TEST_DEVICE variables from ExtensionFile > QuizSetting.swift and remove wherever this variables are used throughout project.
3. remove import GoogleMobileAds header file wherever used, throughout project, and on the same swift files - you will find objects of type GADInterstitial , GADBannerView,requestAppOpen,GADAppOpenAd and related properties of an object, delegates GADBannerViewDelegate,GADFullScreenContentDelegate and func RequestInterstitialAd(),Ad(),watchAd() throughout the project & also remove extension in MoreOptionsView.
4. For reward ads - Change alert message and concept by your own in ShowAlertForNotEnoughCoins() In some Play Areas.
5. remove pod 'Google-Mobile-Ads-SDK' from podfile
6. remove Google-Mobile-Ads-SDK throughout podfile.lock file
7. Install pods using Terminal
How to Set Notification Settings?
In Xcode2). Push Notifications If you haven't added it already! As Shown below.
In Firebase 1). You can Copy Server Key from Project Credentials Inside Cloud Messaging Tab 2). Upload APNs Authentication key / Certificate inside IOS app Configuration on the same tab.
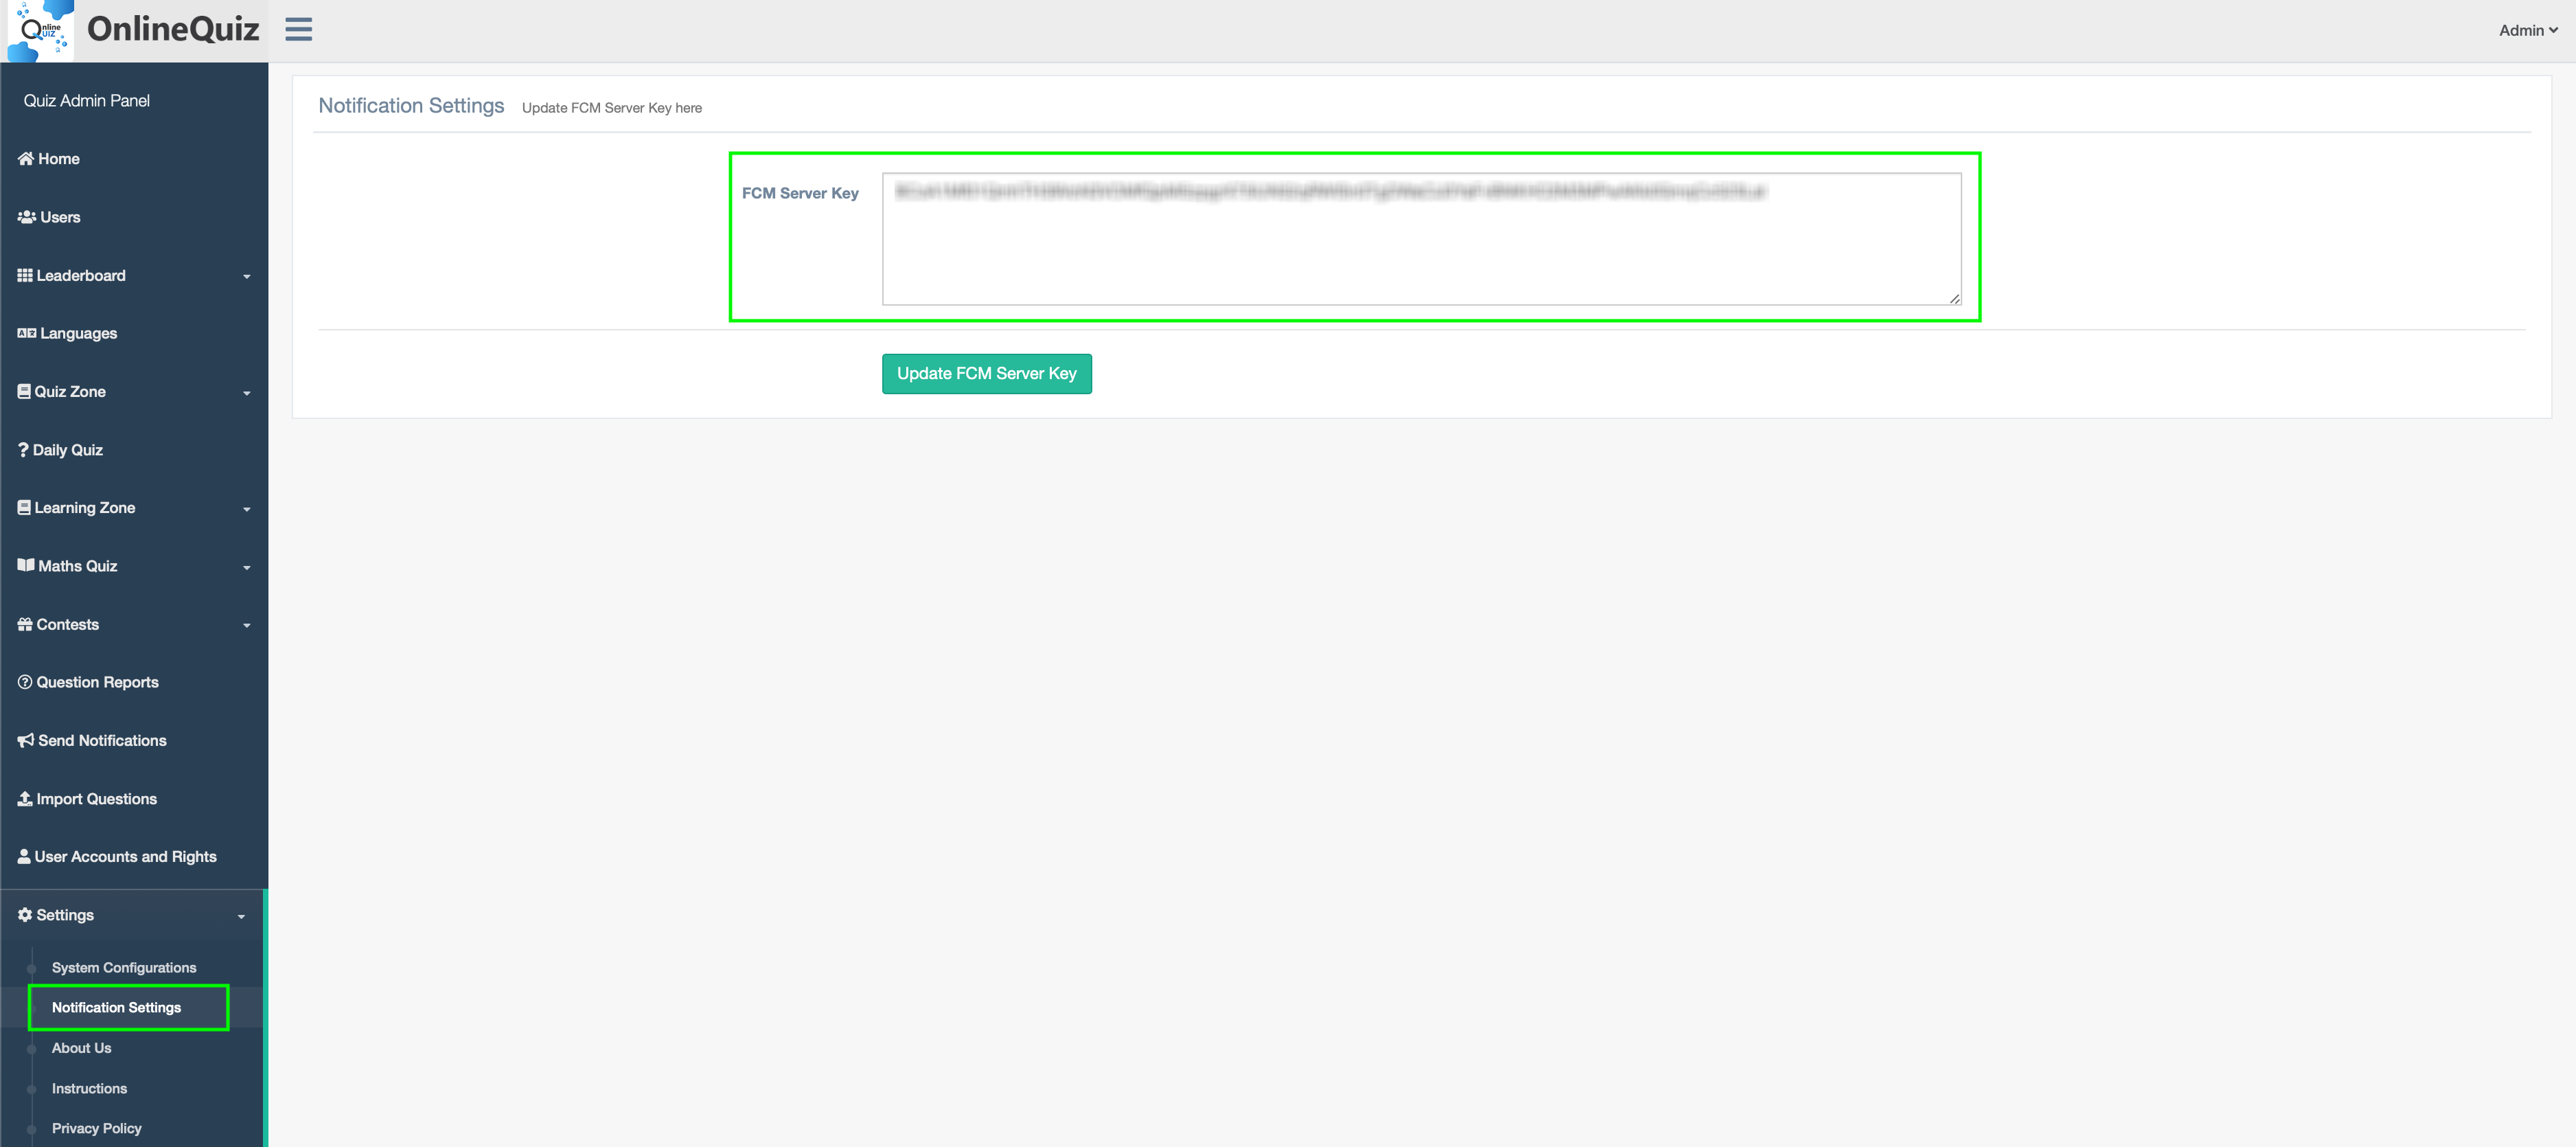
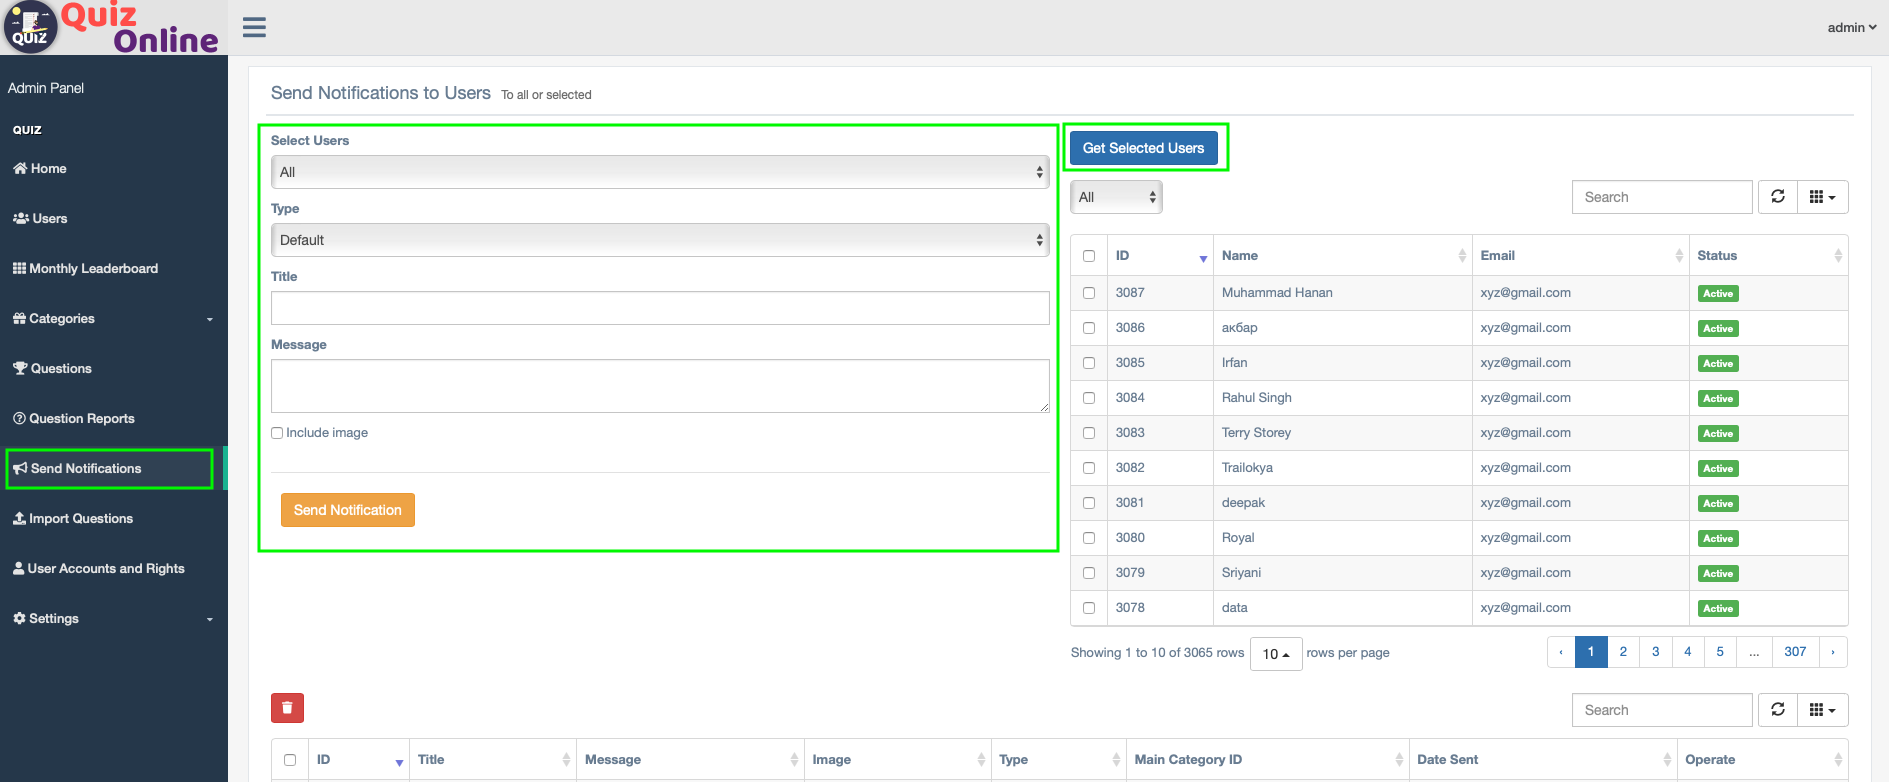
In Admin Panel
2). Select Type As Default or Main Category. Incase you select Main Category, you have to select Main category from given List of Categories.
3). Set Title and Message as you want. 4). If you want to attach an image file to your Notification, Just Check include image & Choose File from your System. & Click Send Notification. That's it !!
How to Set Daily Quiz Settings?
In Admin Panel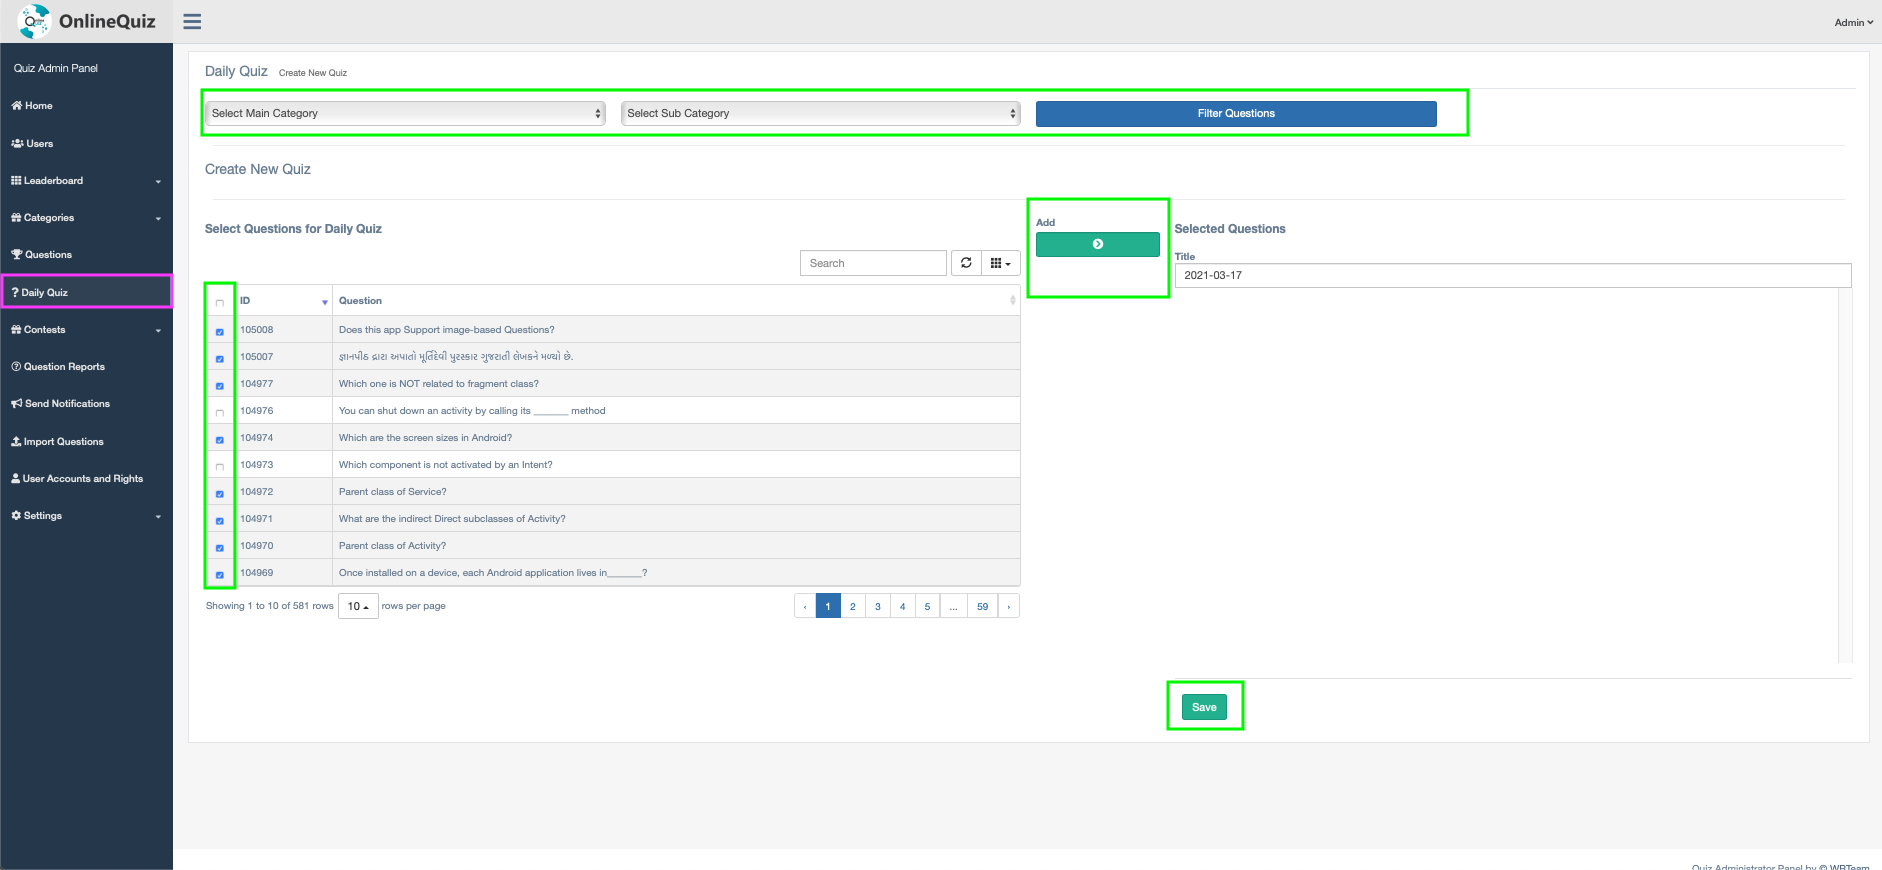
How to Set Contest Settings?
In Admin Panel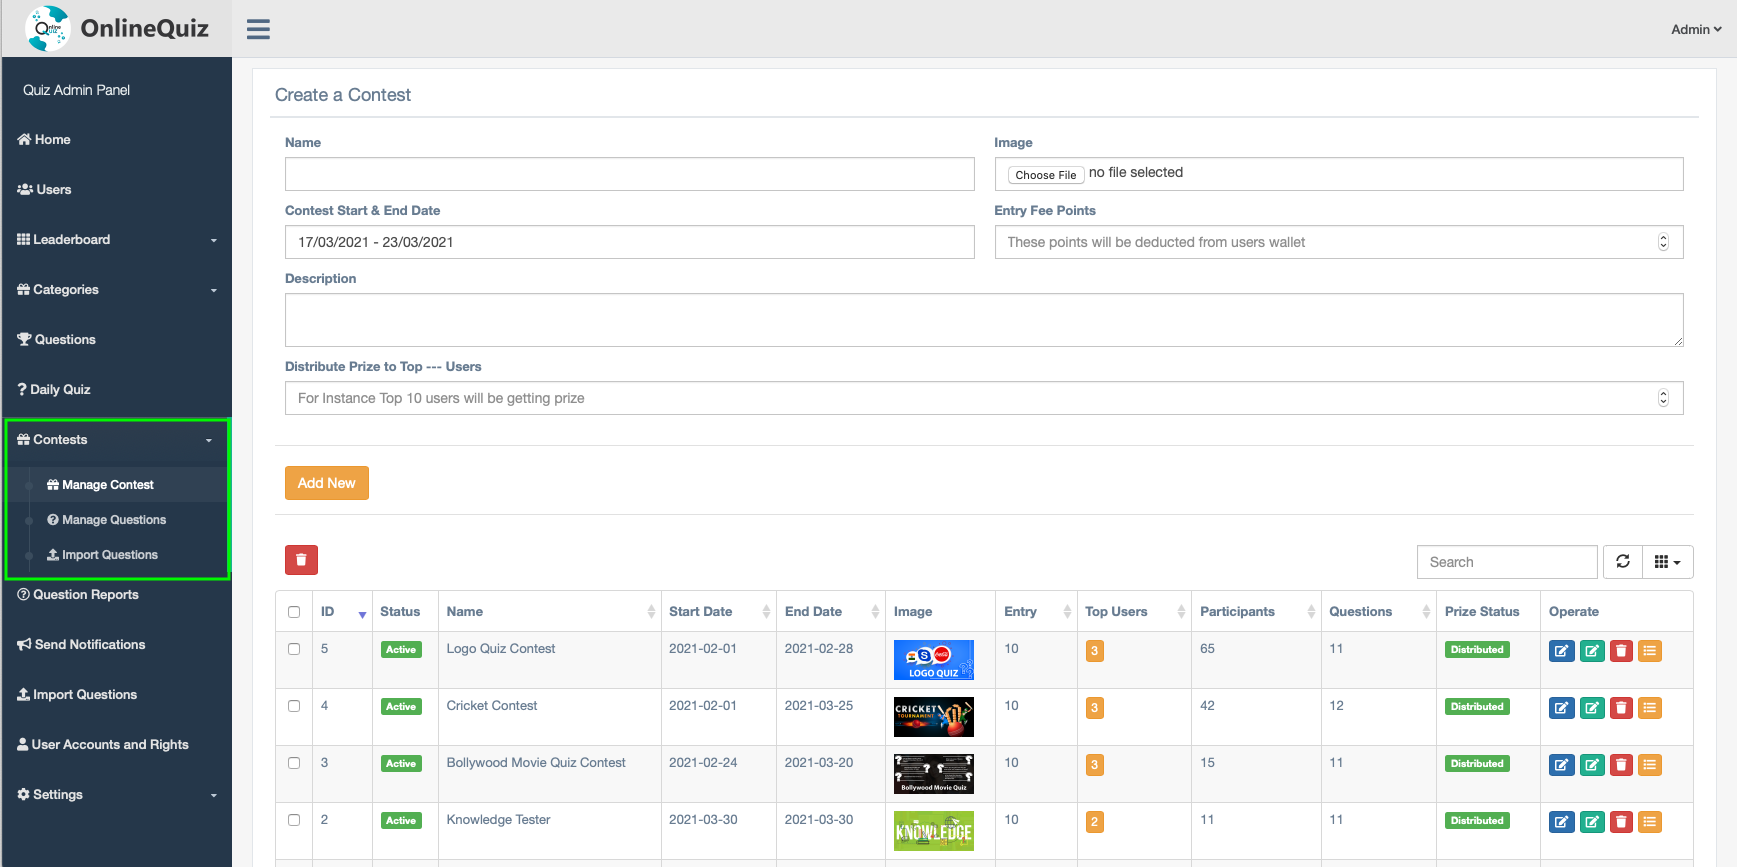
In Xcode

How to change Maintenance Alert GIF?
In Quiz-Online > Quiz > AlertView > MaintenanceAlert.swift file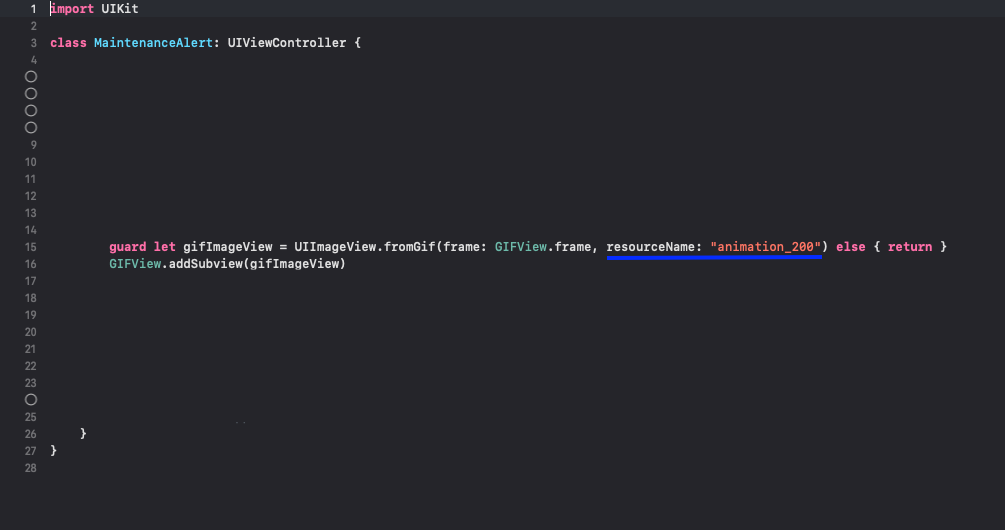
Note: If you are changing any object positioning or something in Design. make sure you change in both files Main.storyboard & Ipad.storyboard for Ipad.
Note: Regarding Installation of App Version after 7.0.1
Uninstall any previous version of app (i.e. 7.0.0, 6.0.1, 5.5, etc.) before running this version of app in real device / simulator as there is some change in Core/Local Data element Names.
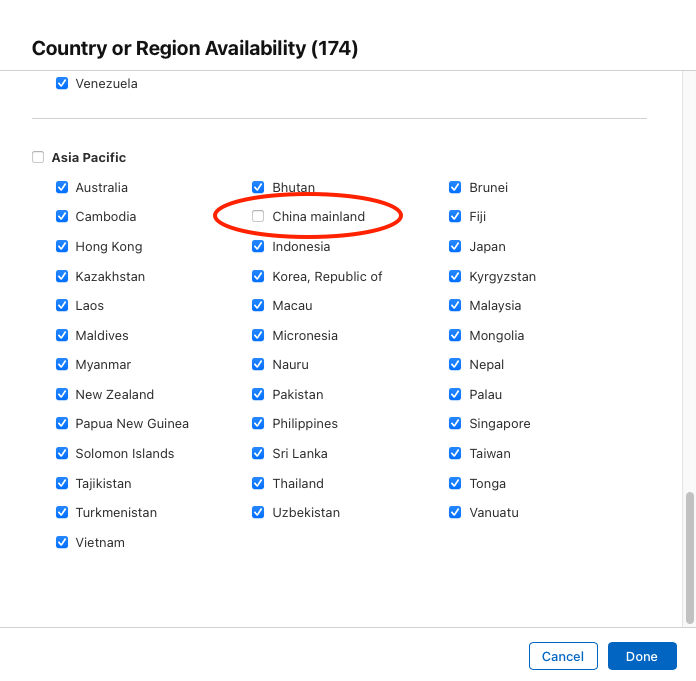
Note: Regarding Deployement of App/Build on Appstore -> To Prevent Rejection from Appstore, Don't forget to Unmark China Mainland from availability of App on Appstore. because We are using CallKit in Project, which is not allowed there.
Need Support?
Its our pleasure to serve our service and support. please contact our support team.
Customer Support : Skype Name : Devanshi Gor
To help our customers, we constantly be in touch with every customer if they need any assistance regarding our product. We offer our customers a support from Mon – Fri 9.00am to 6.00pm IST (GMT +5.30) – We are a Team located in India – Asia.
Typically we reply our customers for all the questions and queries within 24 hours of time via comments, support forum or emails.
Your Feedback
Dear valuable customer, Thank you very much for choosing our product. It's our pleasure to serve top-notch service to you. Please give us your honest feedback that will help us to make a more strong and reliable product by click here Rate Us. Thank you very much.
Contact Us
WRTeam has creative and dedicated group of developers who are mastered in Mobile Application Development and Web Application Development with a niche in delivering quality solutions to customers across the globe. Contact us today to find out how we can help you or for freelance work.
Visit Us : https://wrteam.in
Mail Us : support@wrteam.in
Thank you very much.