Quiz Online Admin Panel
1. How to Install Quiz Online on Your shared hosting?
- Create your domain or subdomain in your shared hosting
- Create an empty database in your shared hosting and remember this credentials:
i. database name
ii. database username
iii. database password - Upload the source code you have downloaded from CodeCanyon and unzip it.
- Now navigate to the url where your project is located.
ex. mydomain.com or subdomain.mydomain.com - The installation screen should appear and guide you in the process.
Thats it! Now you are ready to run your first Quiz Online : https://quizdemo.wrteam.in
Default Login DetailsUser: admin
Pass: admin123
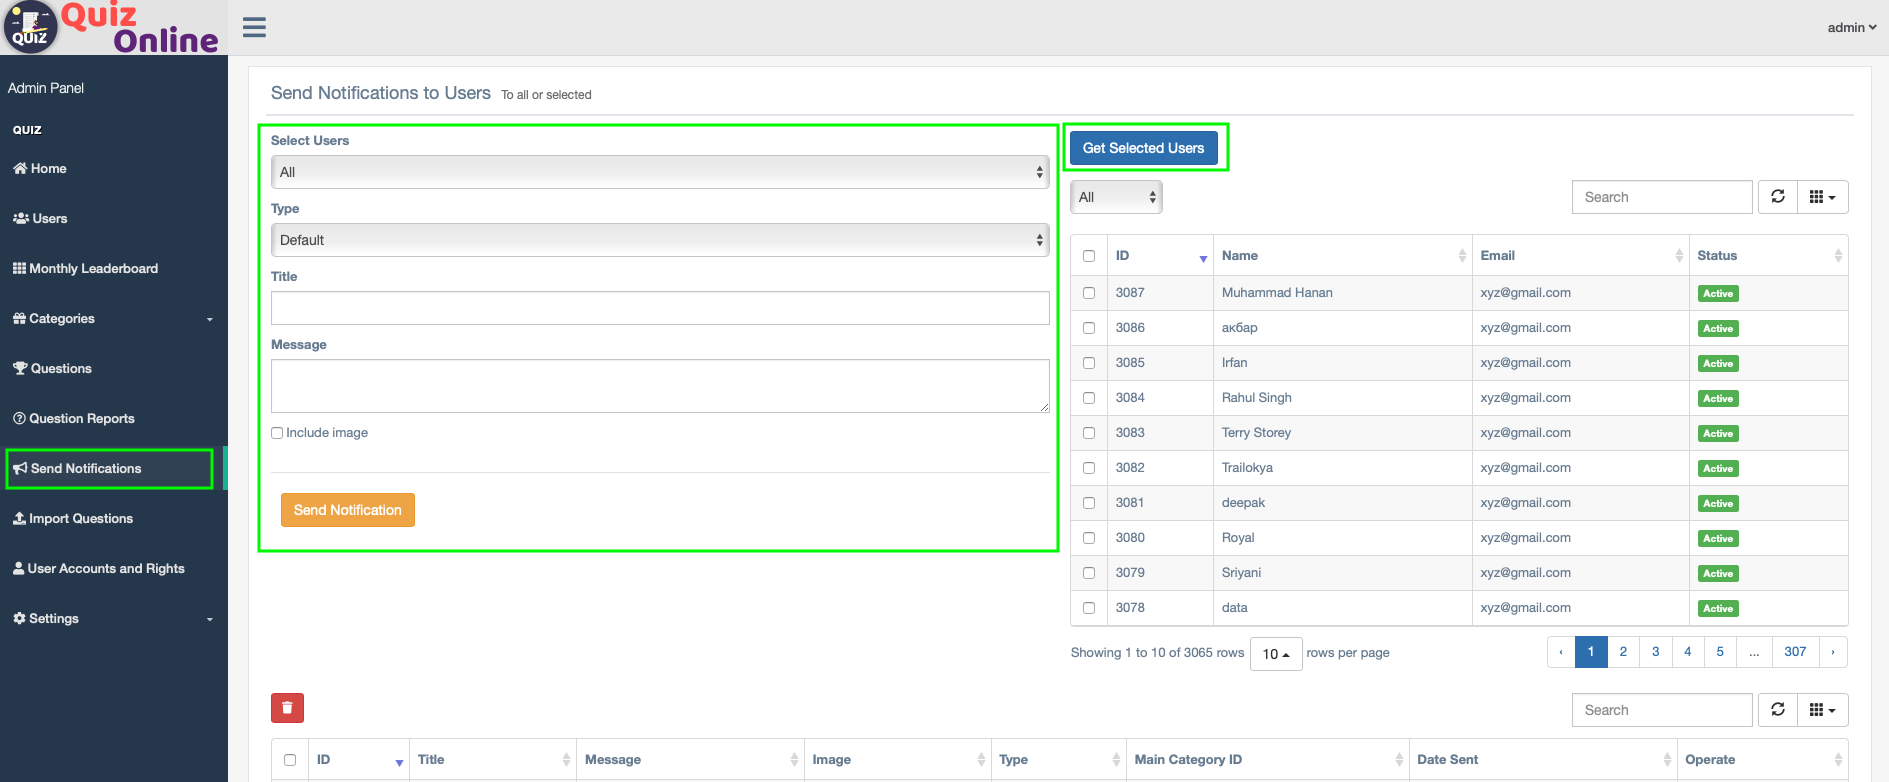
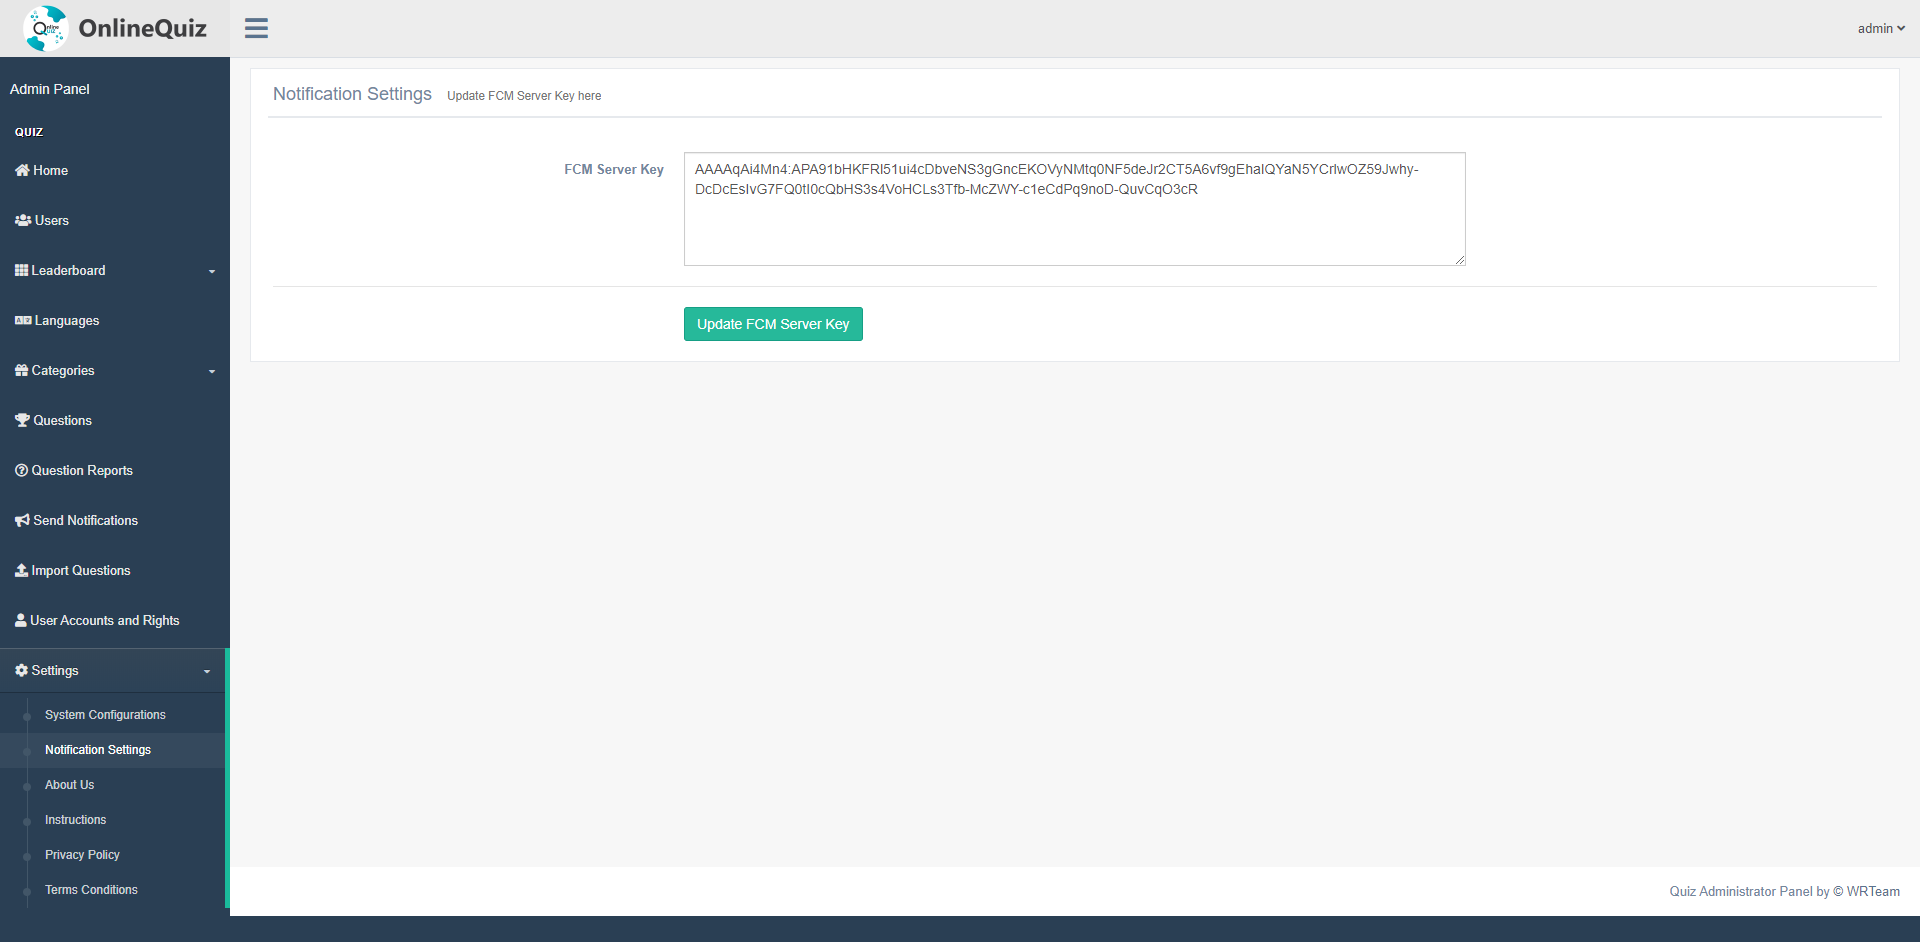
Notification Management
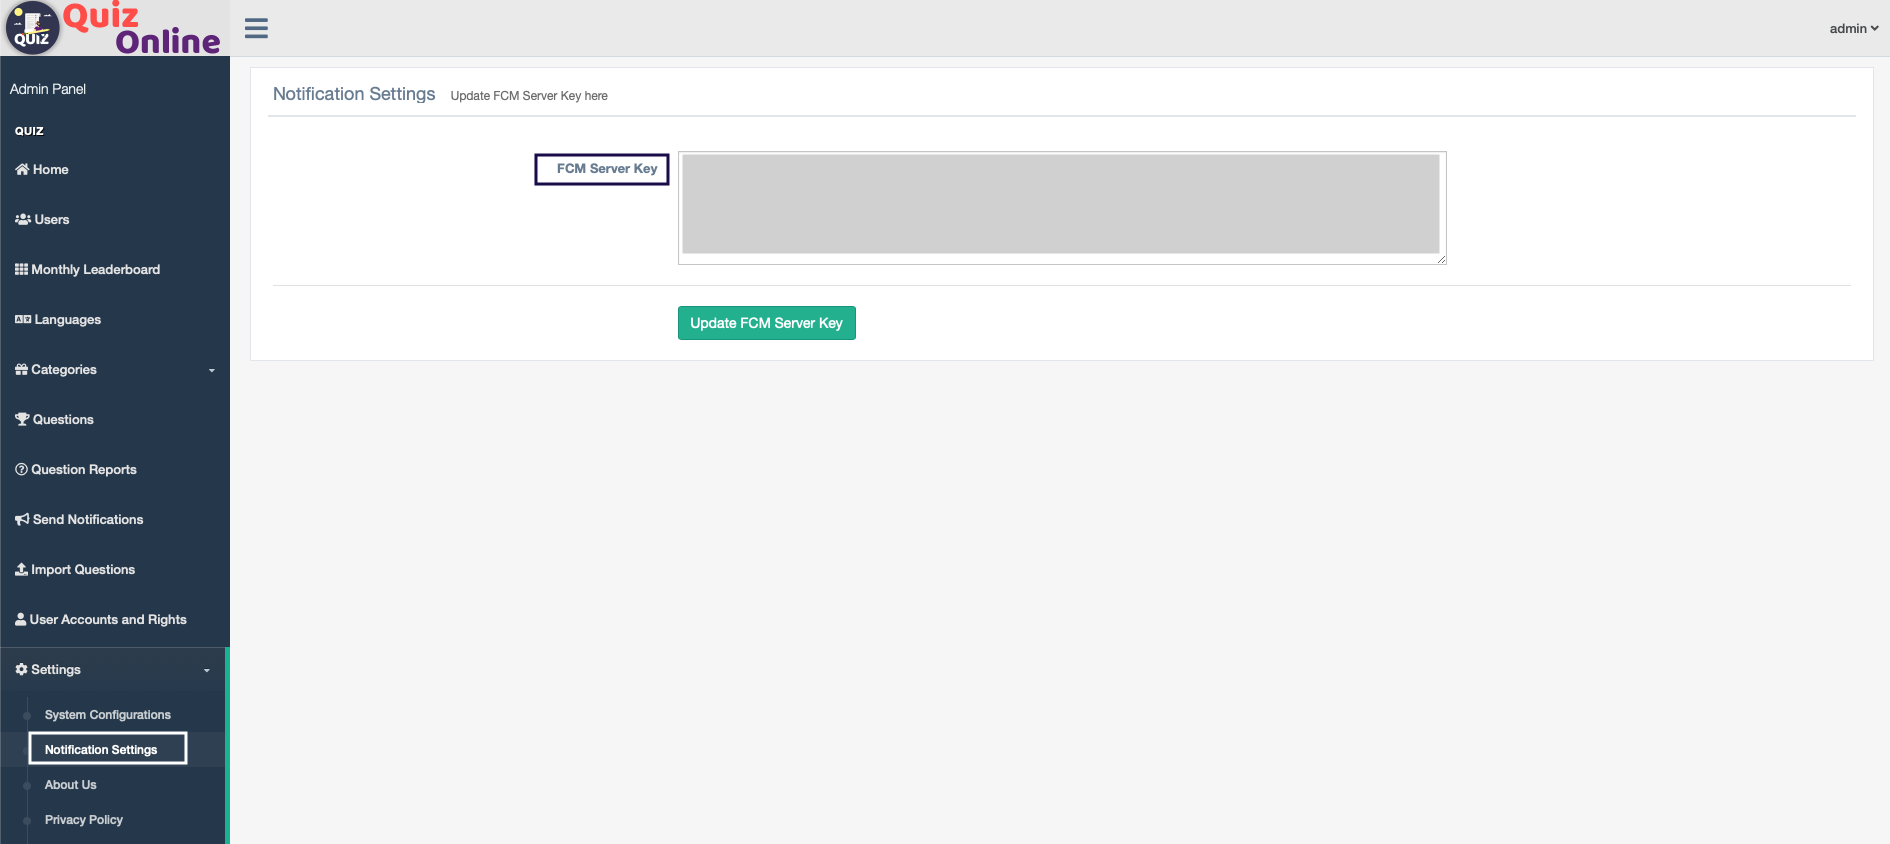
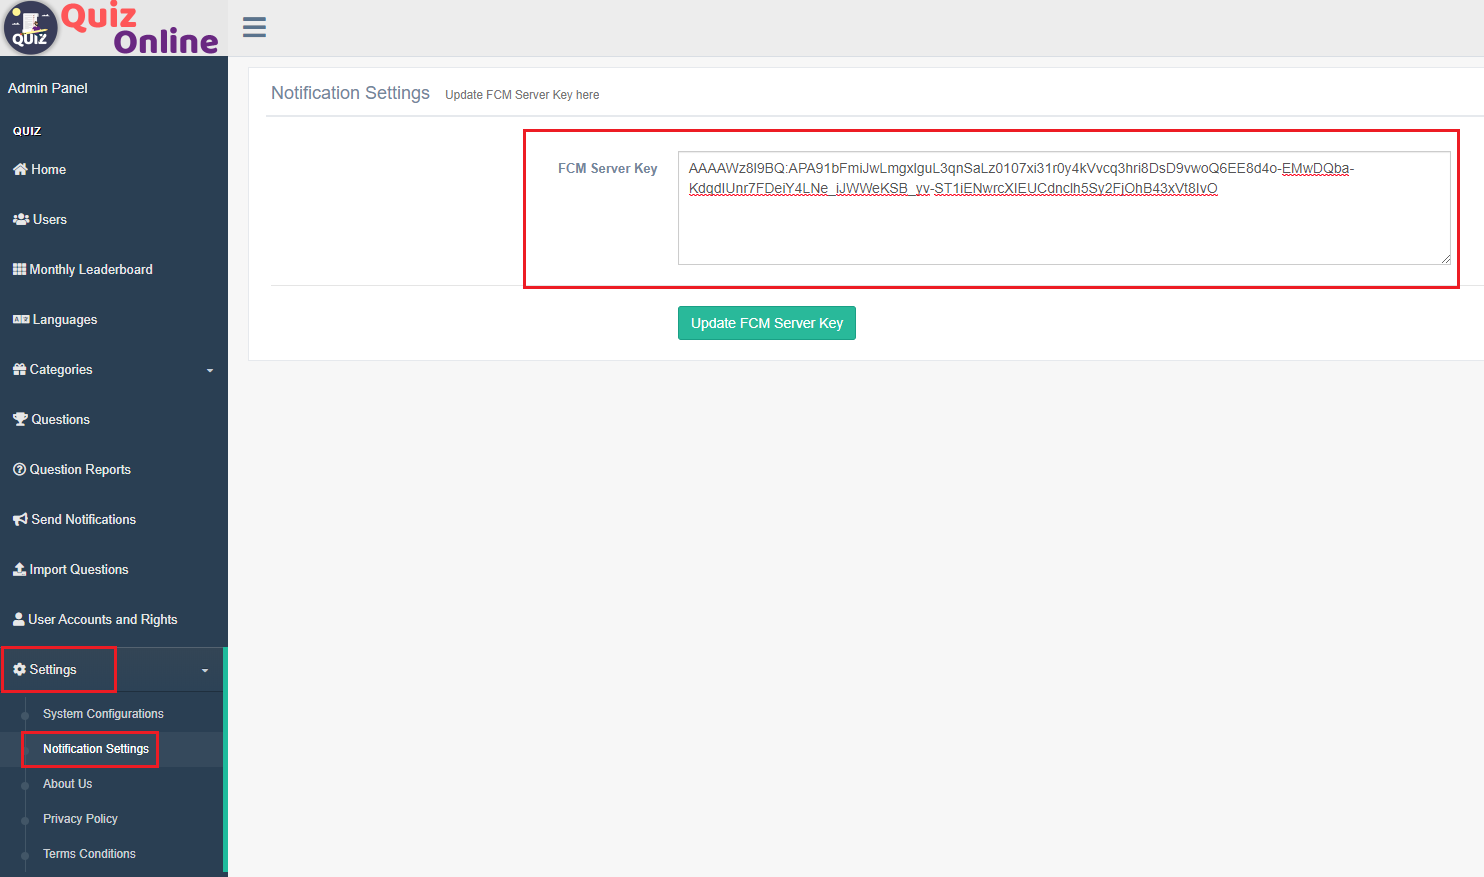
First Of all,we need to set the FCM server key from Firebase console
Set System Configurations
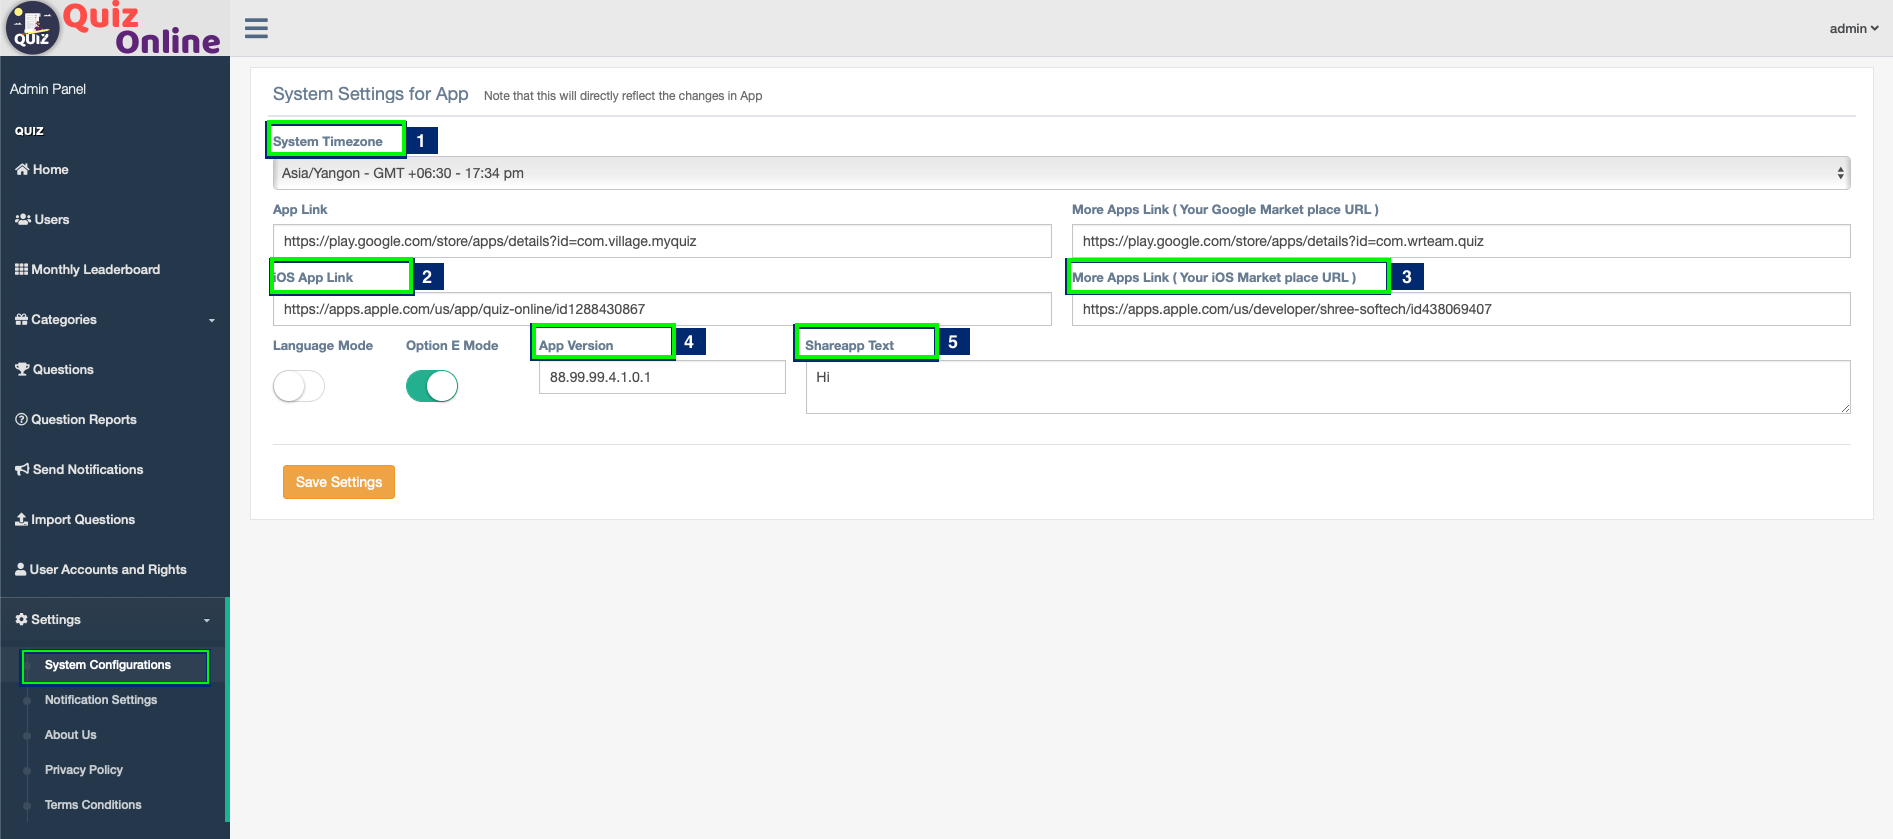
Set Configurations for you app. All the changes are maded here will directly reflect in the App
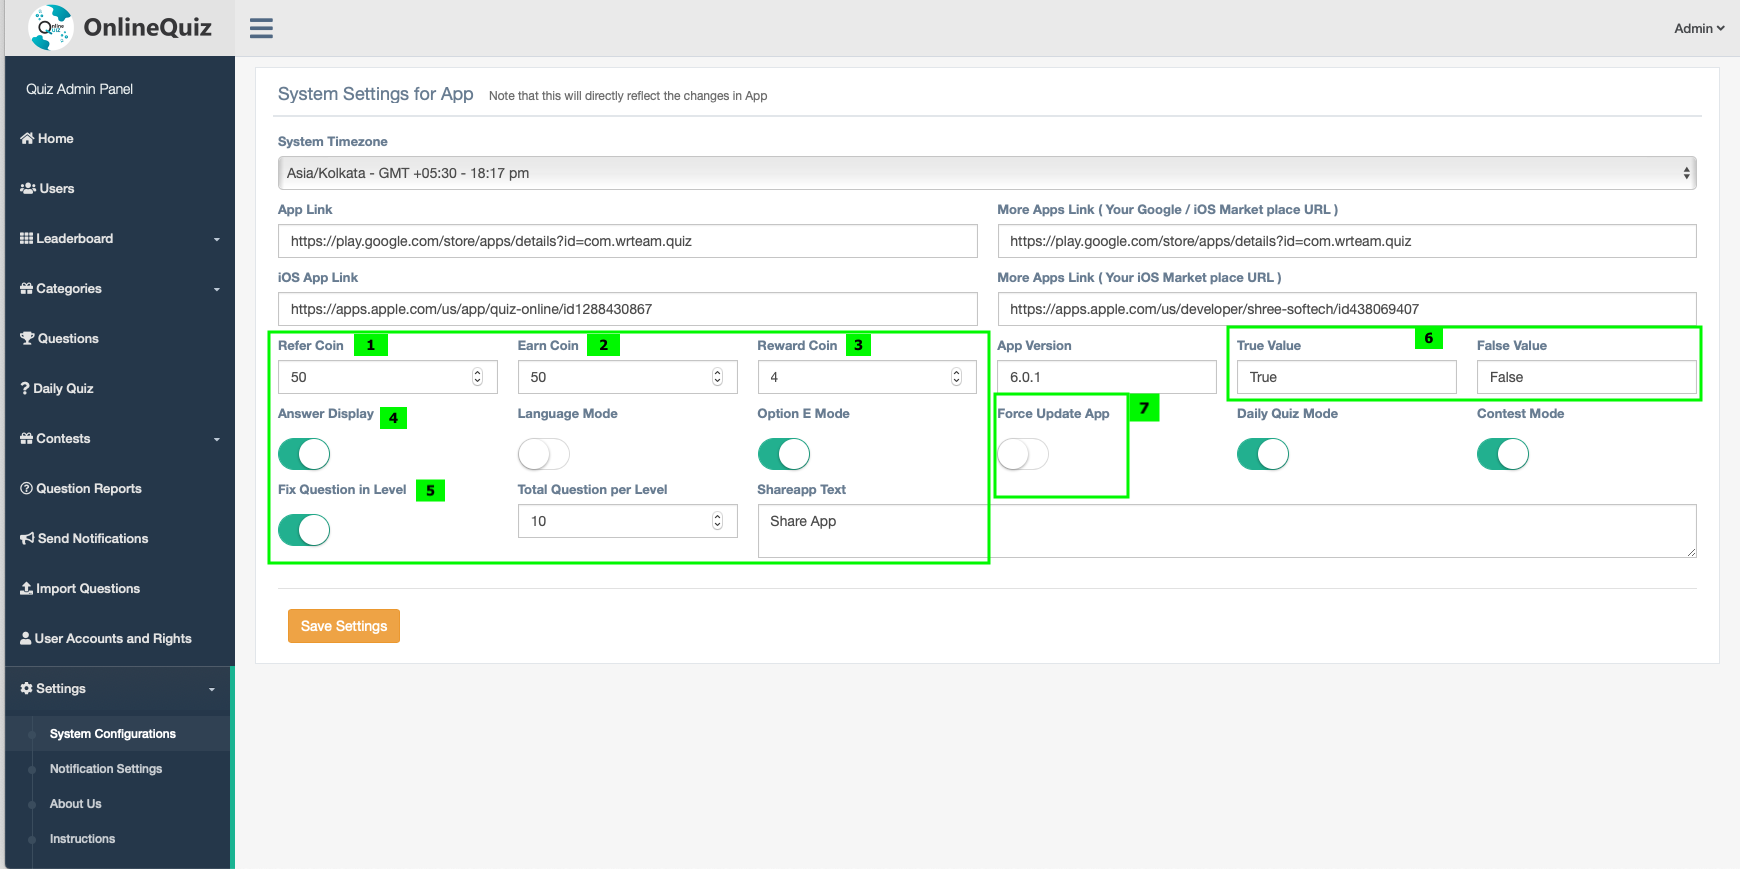
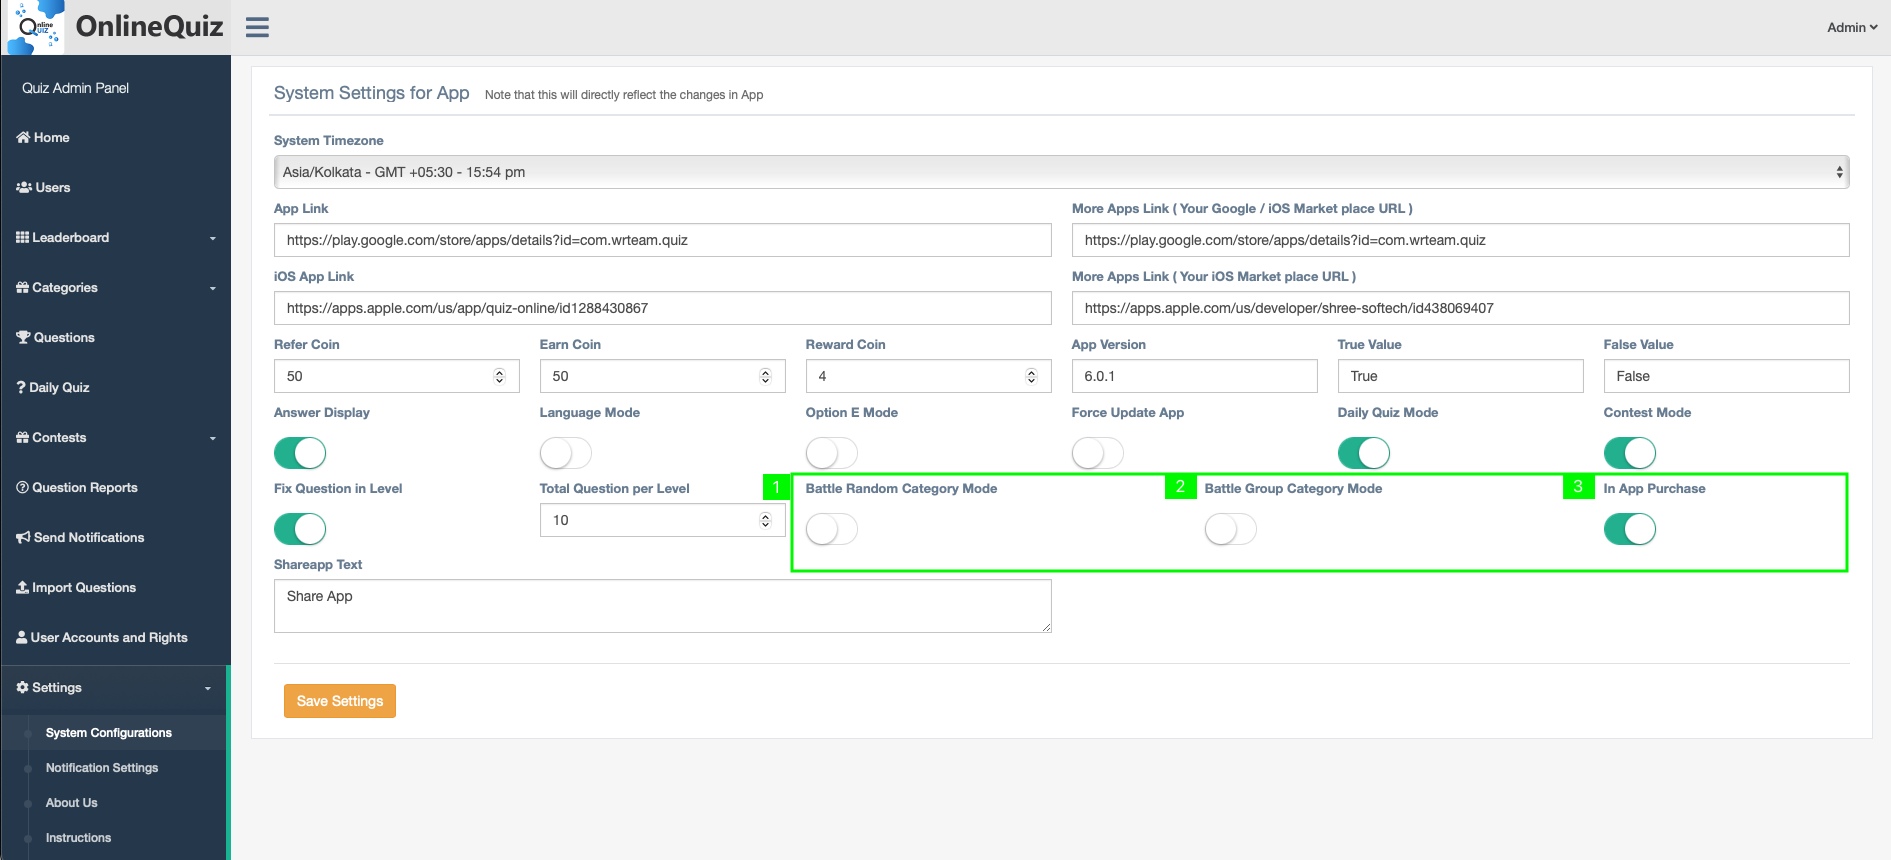
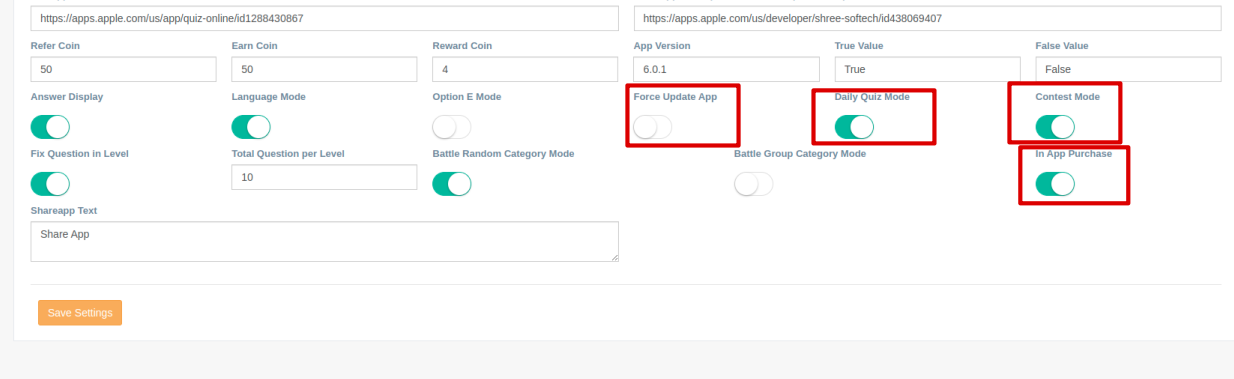
From here you can set System & App Timezone, App Play store or market place Link, Enable / Disable Answer Display, Language Mode, Option E Mode, Force Update App, Daily Quiz Mode, Contest Mode, Battle Random Category Mode, Battle Group Category Mode & In App Purchase. Manage App Version and Update Shareapp Text. Set fix Question in level

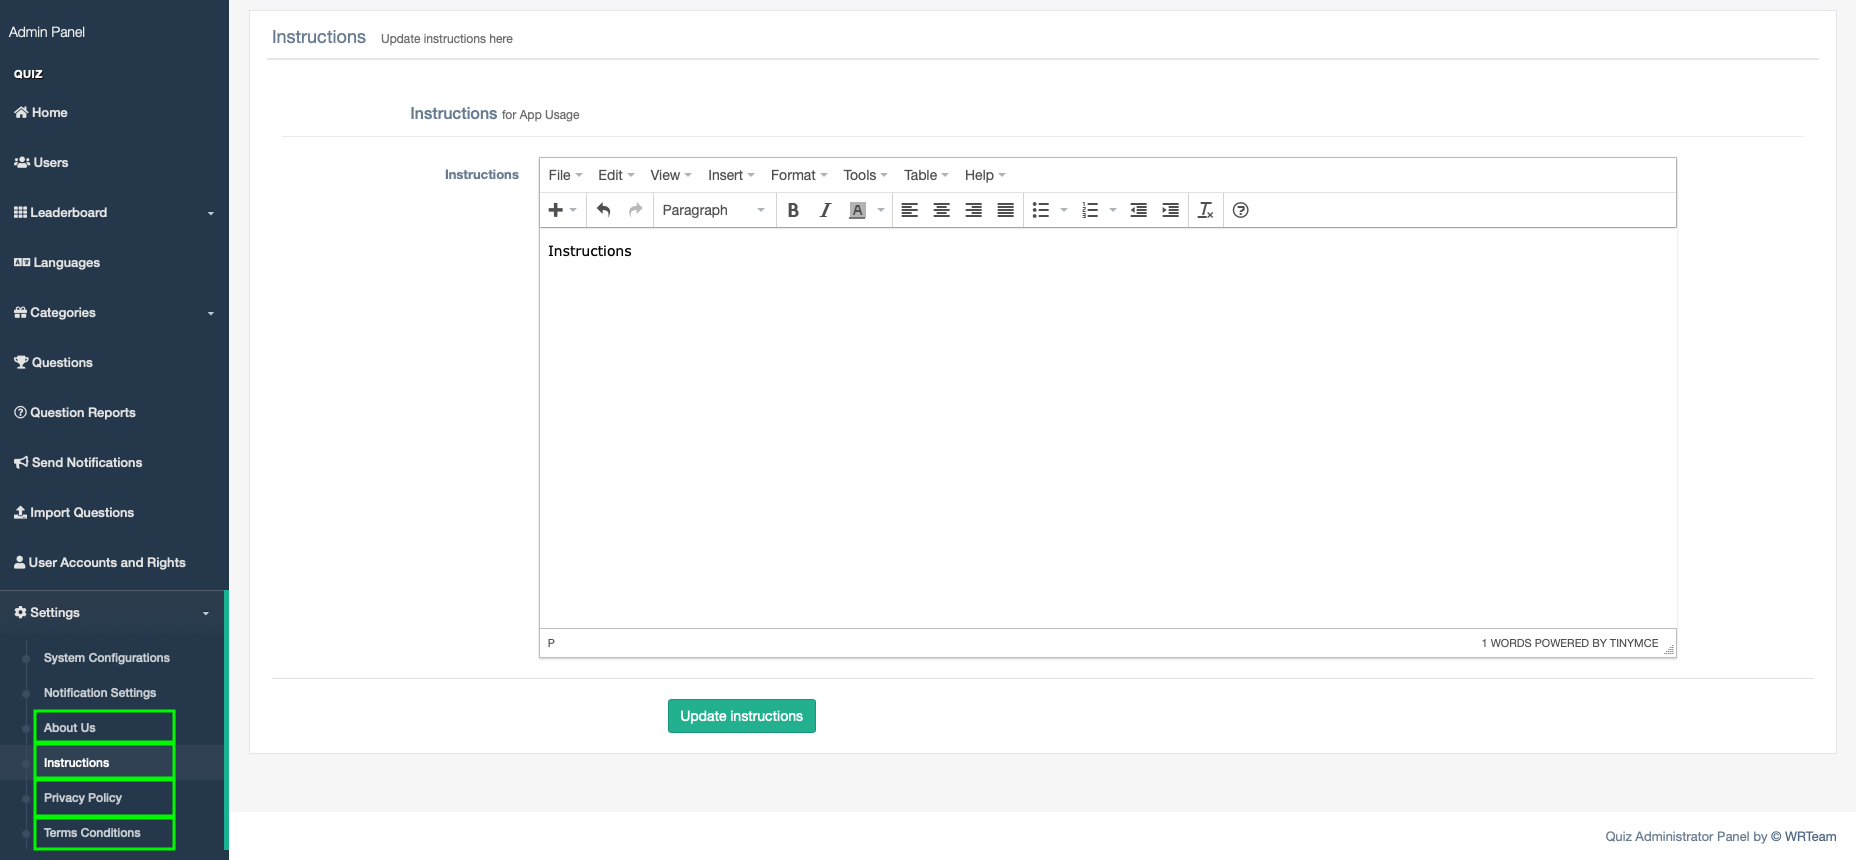
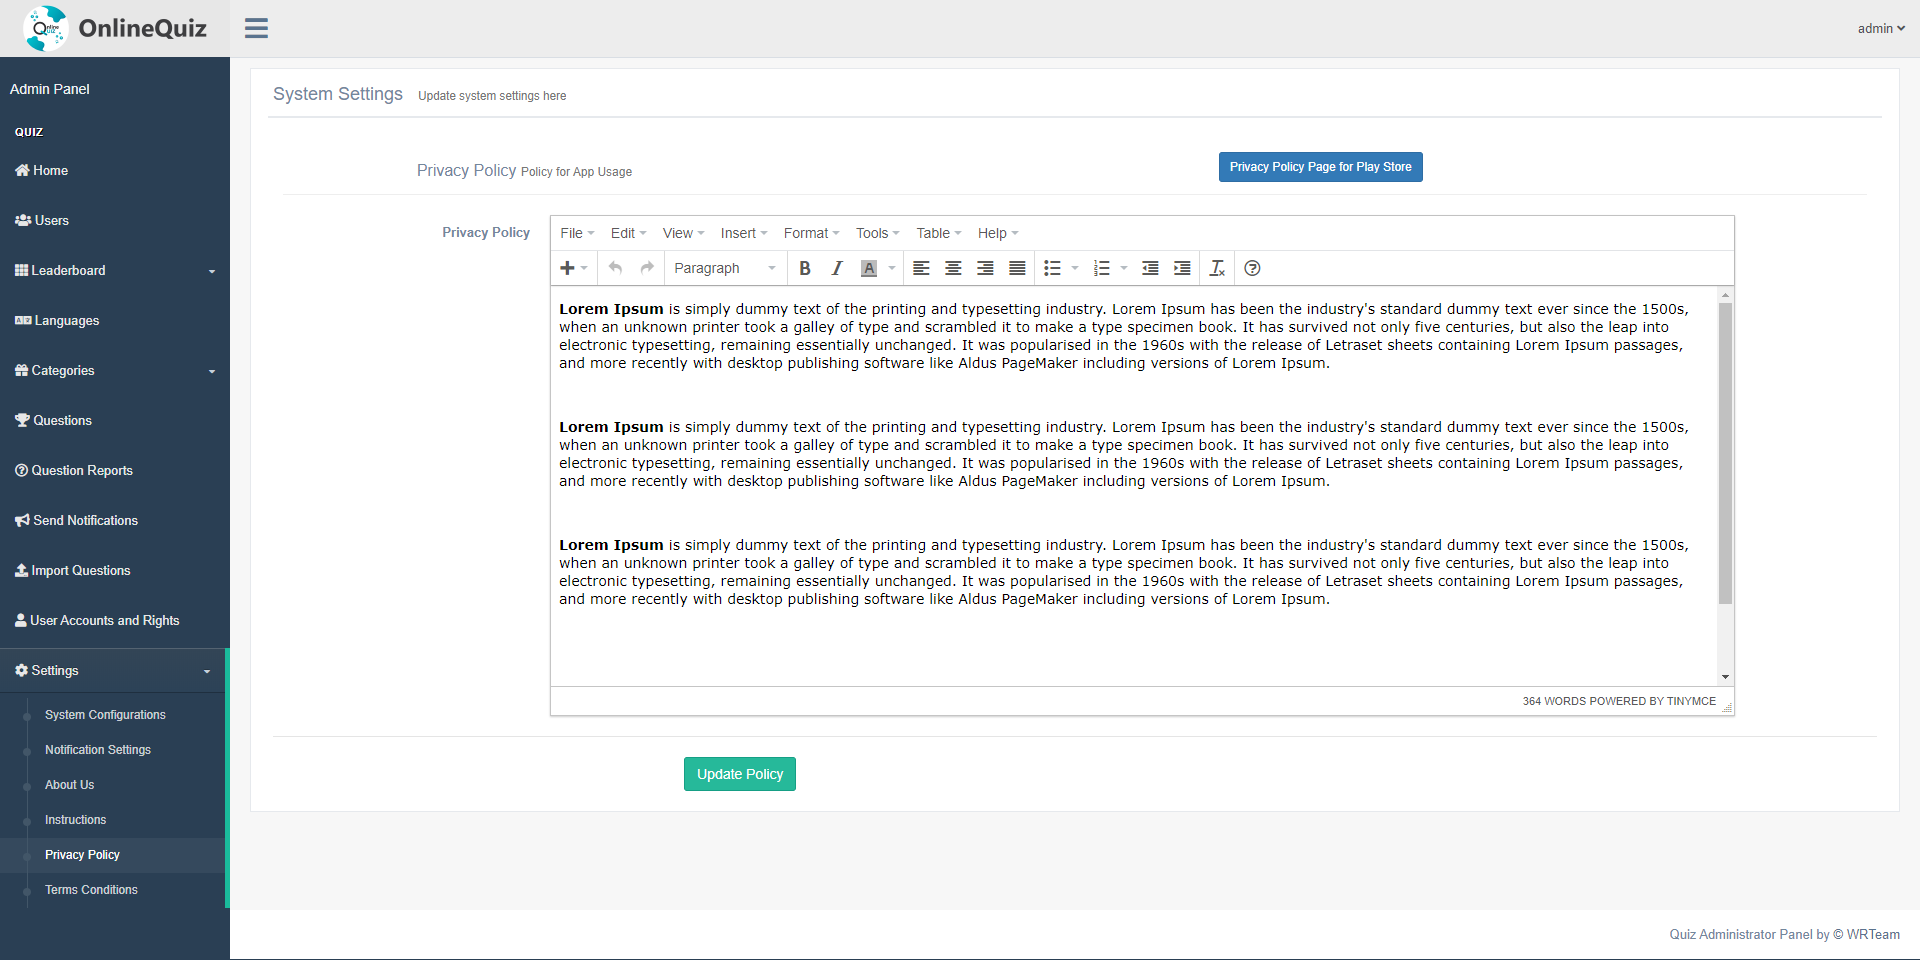
Set Privacy Policy
Set Privacy Policy for your website and app.
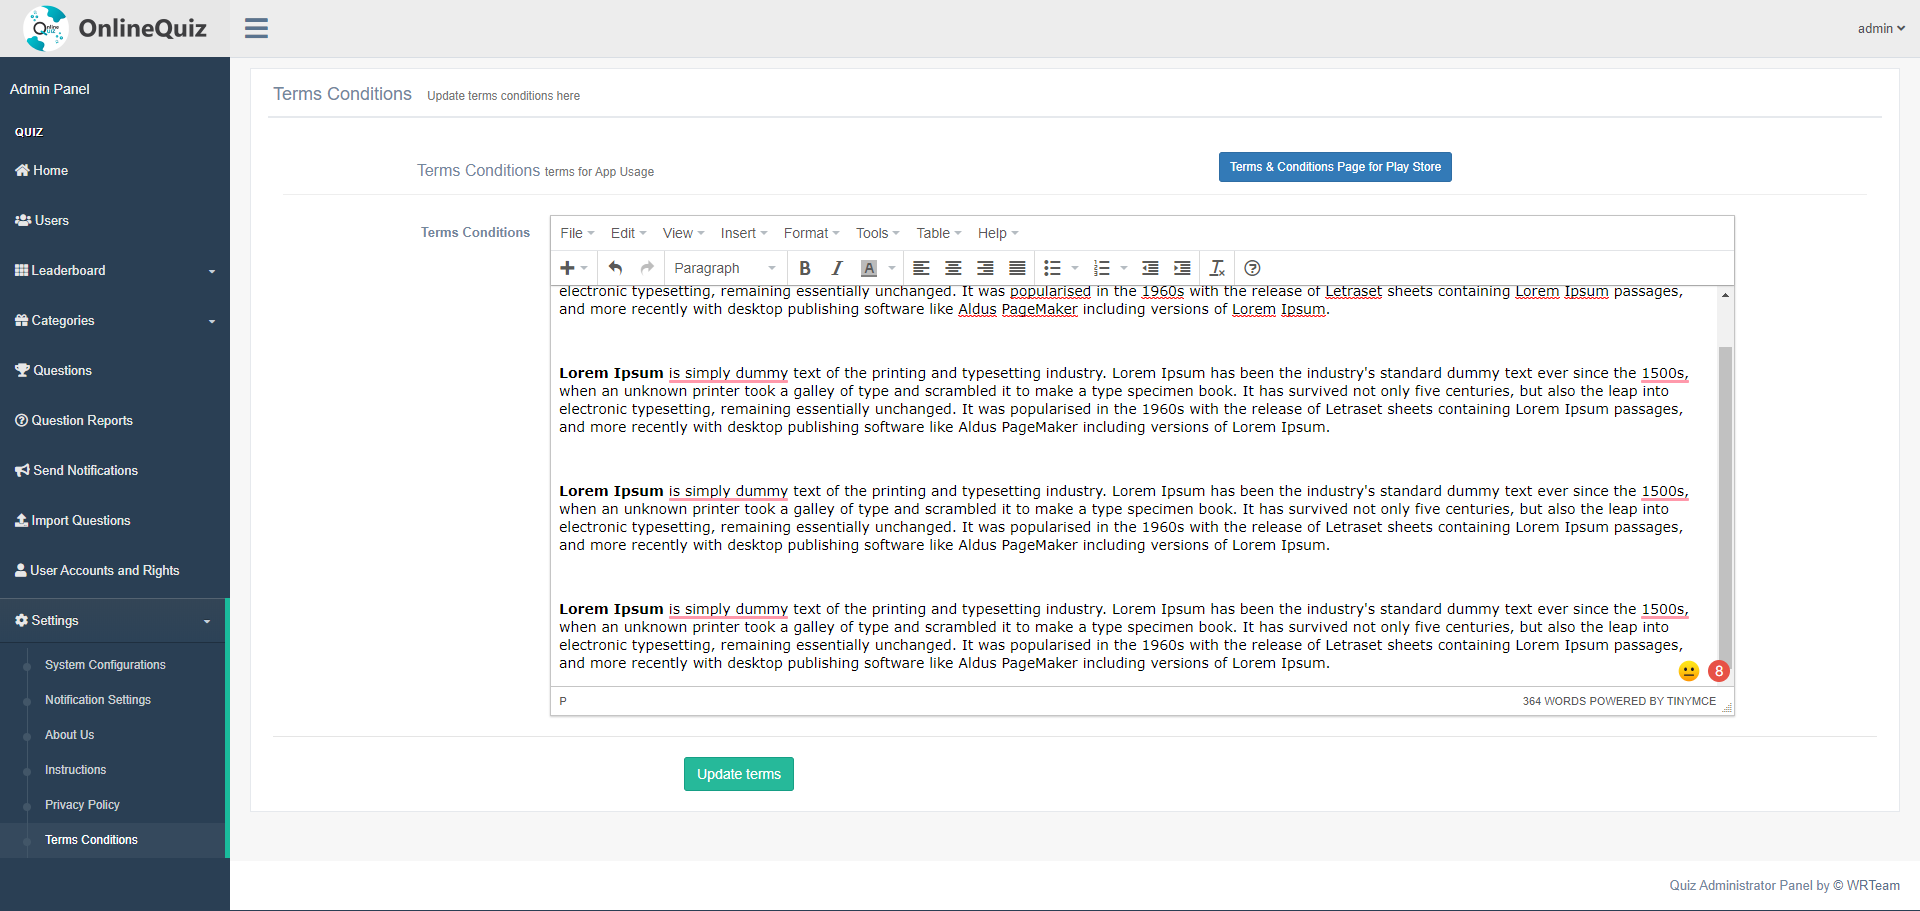
Set Terms Conditions
Set Terms Conditions for your website and app.
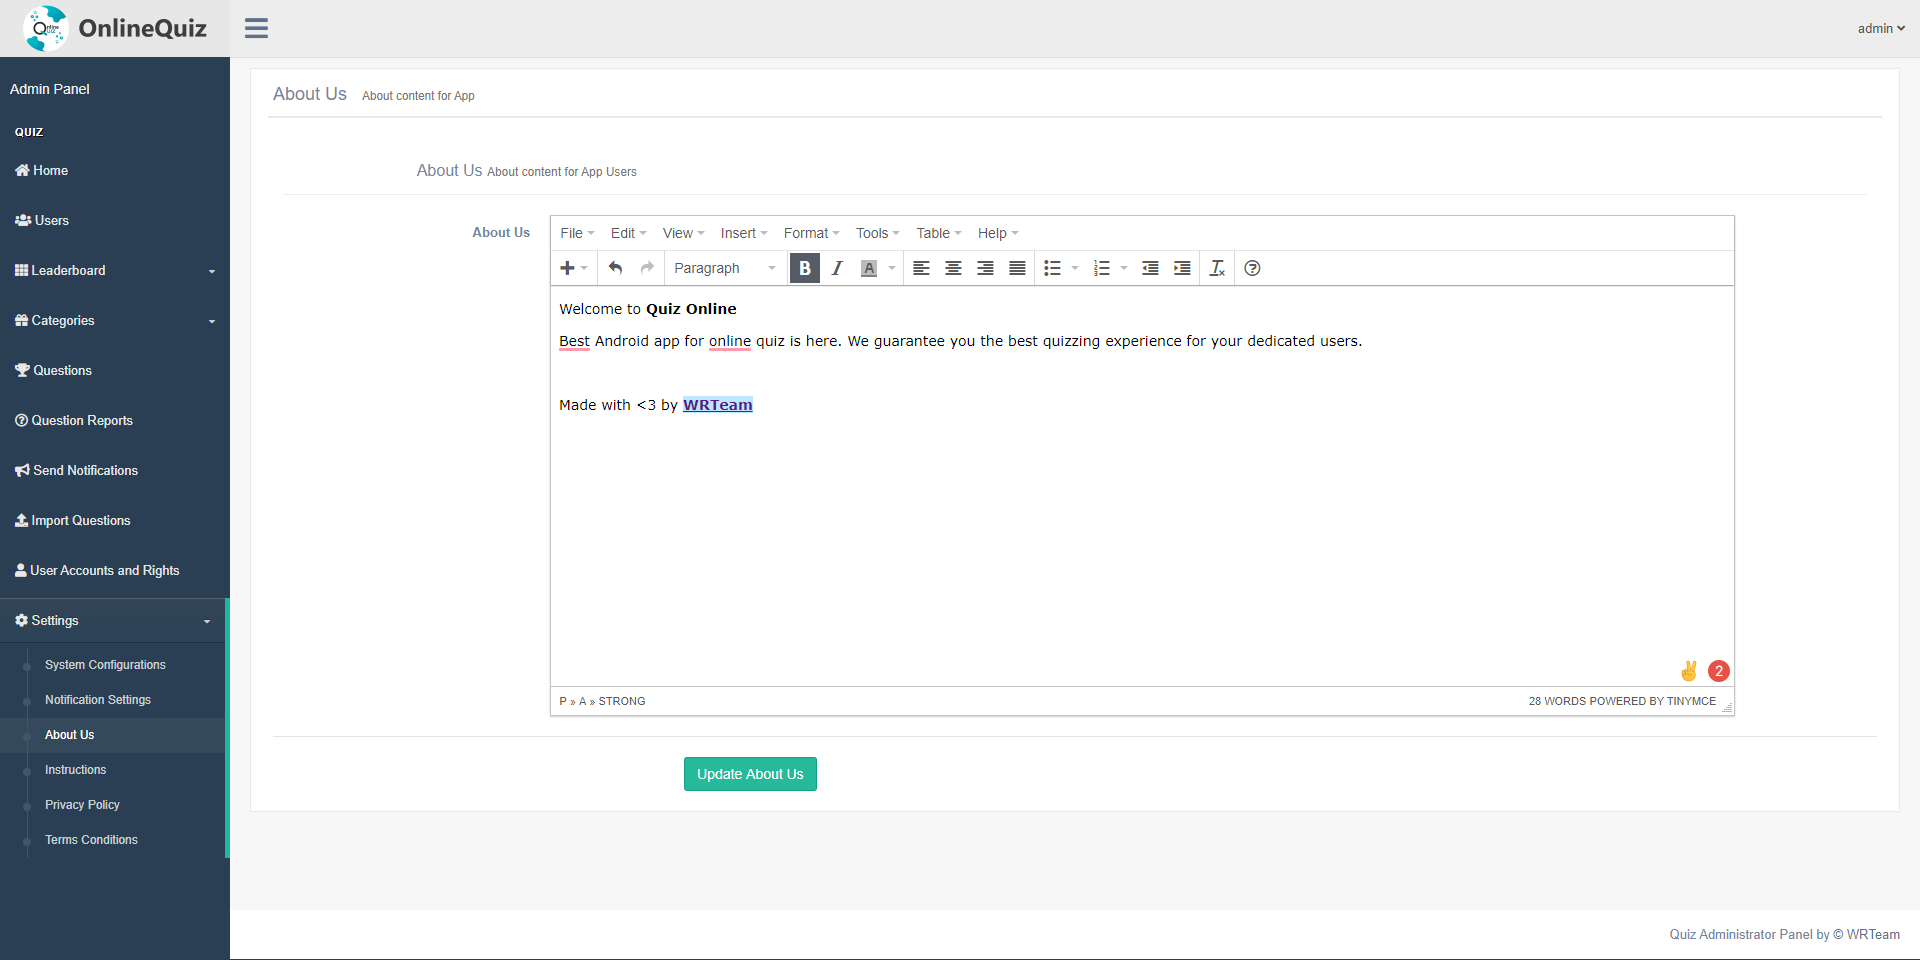
About Us Content
Set and manage your about us content for app.
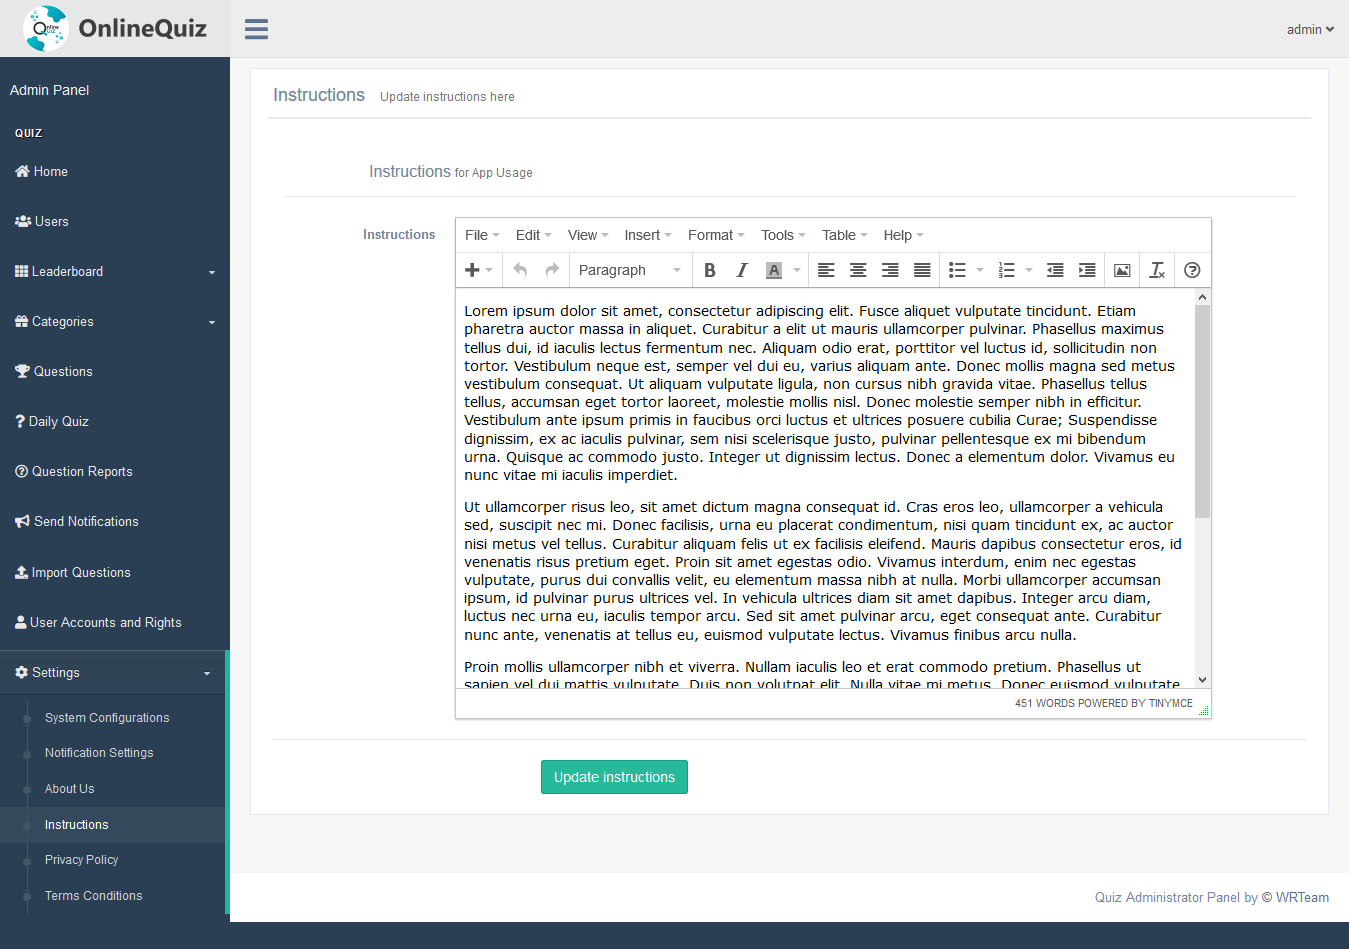
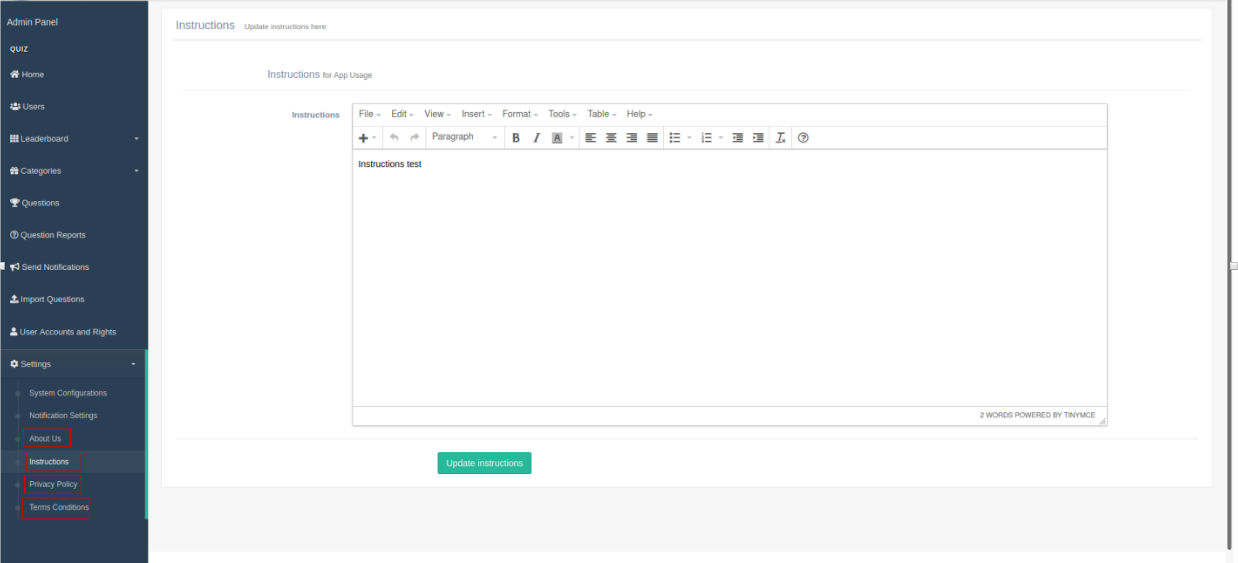
7. Instructions Content
Set and manage your instructions content for app.
Quiz Online App
- How to change the app name?
- How to change the Privacy Policy?
- How to set country code default?
- How to change package name?
- How to change server url to application?
- Create Firebase Project for Application.
- Realtime Database.
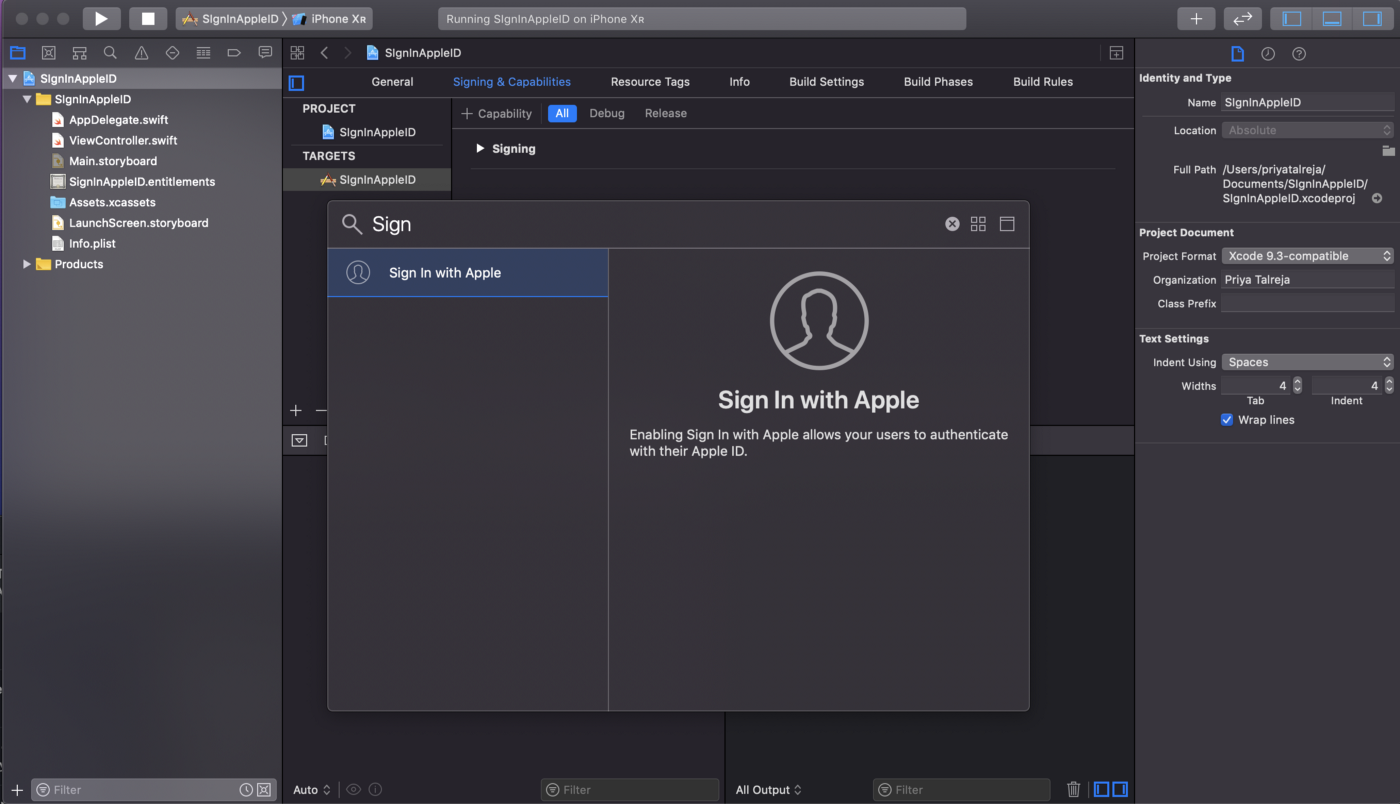
- Authenticate Using Email and Password on Android With Firebase.
- Authenticate Using Google Sign-In on Android With Firebase.
- Authenticate Using Mobile Sign-In on Android With Firebase.
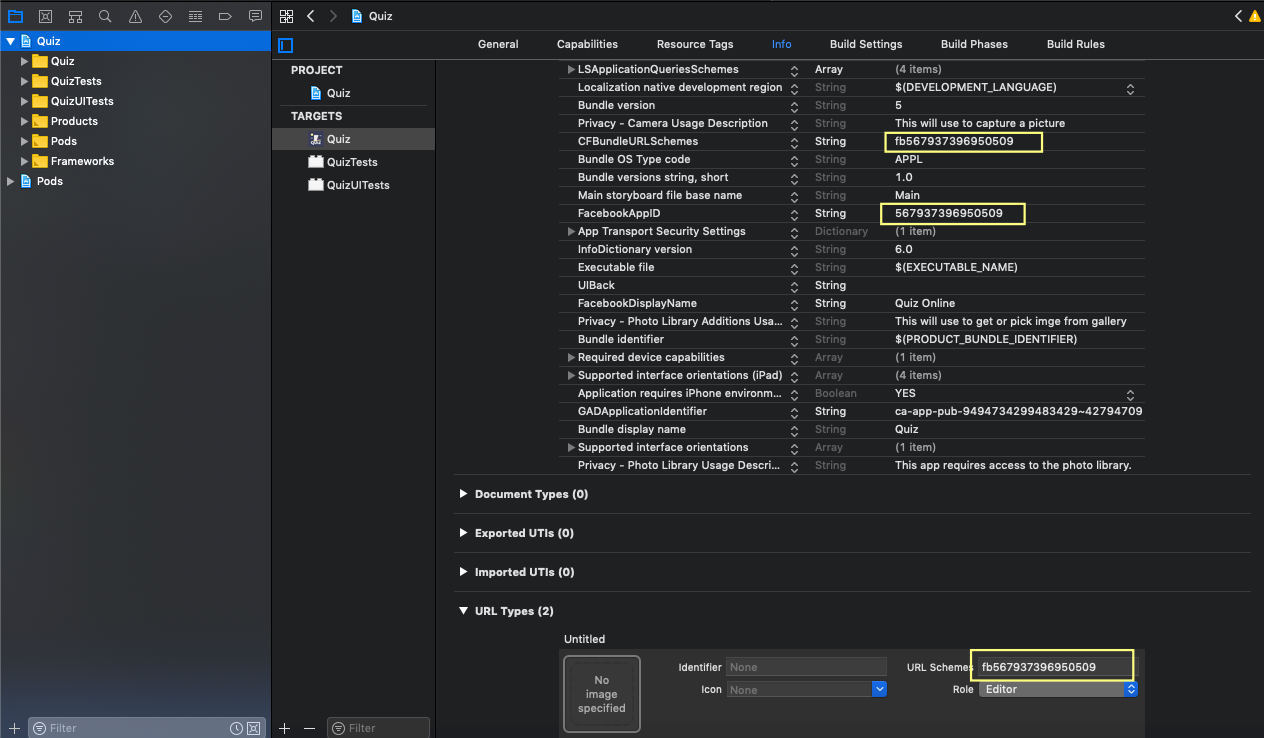
- Authenticate Using Facebook Login on Android with Firebase.
- How to Integrate Firebase Cloud Messaging in app?
- How to Change IN-APP Purchase key and Coins in app?
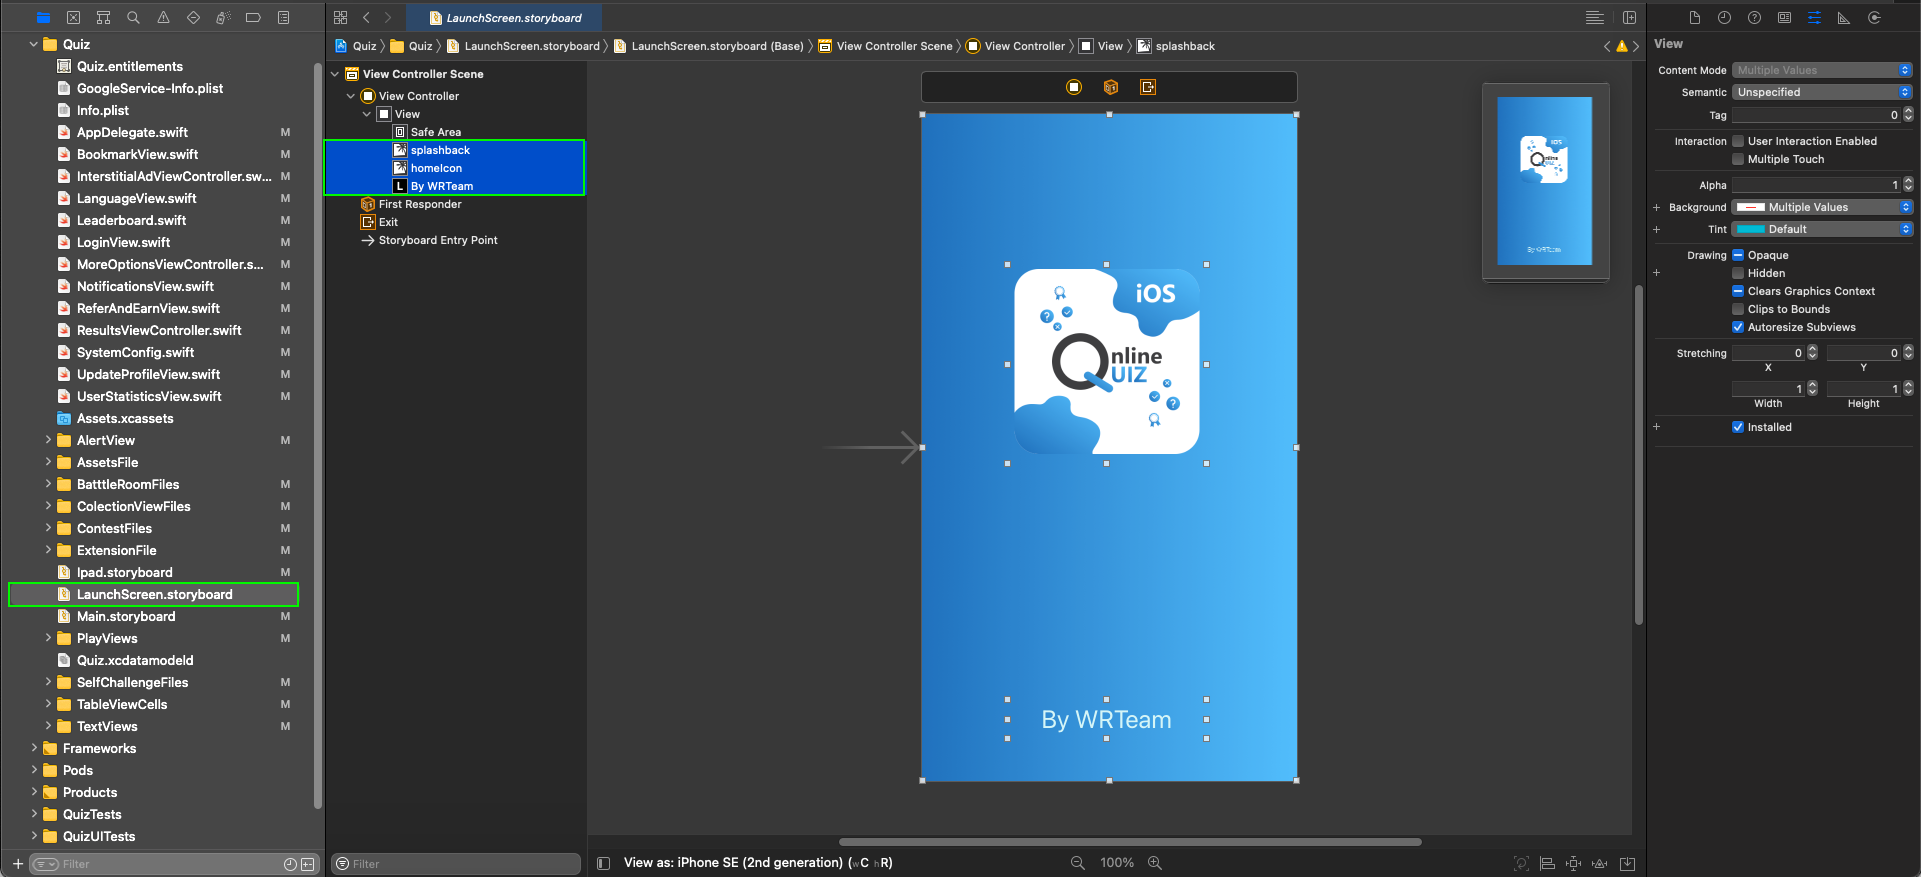
- How to Change Arc in NavigationView?
- Want to change TextToSpeech language in Application?
- How to config your values within app?
- How to Remove Level Lock feature from Application?
- How to Remove Admob Ads open feature from Application?
- Want to costomize some value? like maximum questions per level etc..?
- System Settings for Application.
- How to add change Admob and Facebook Banner/Rewarded id?
- How to add Facebook Audience Network with Mediation?
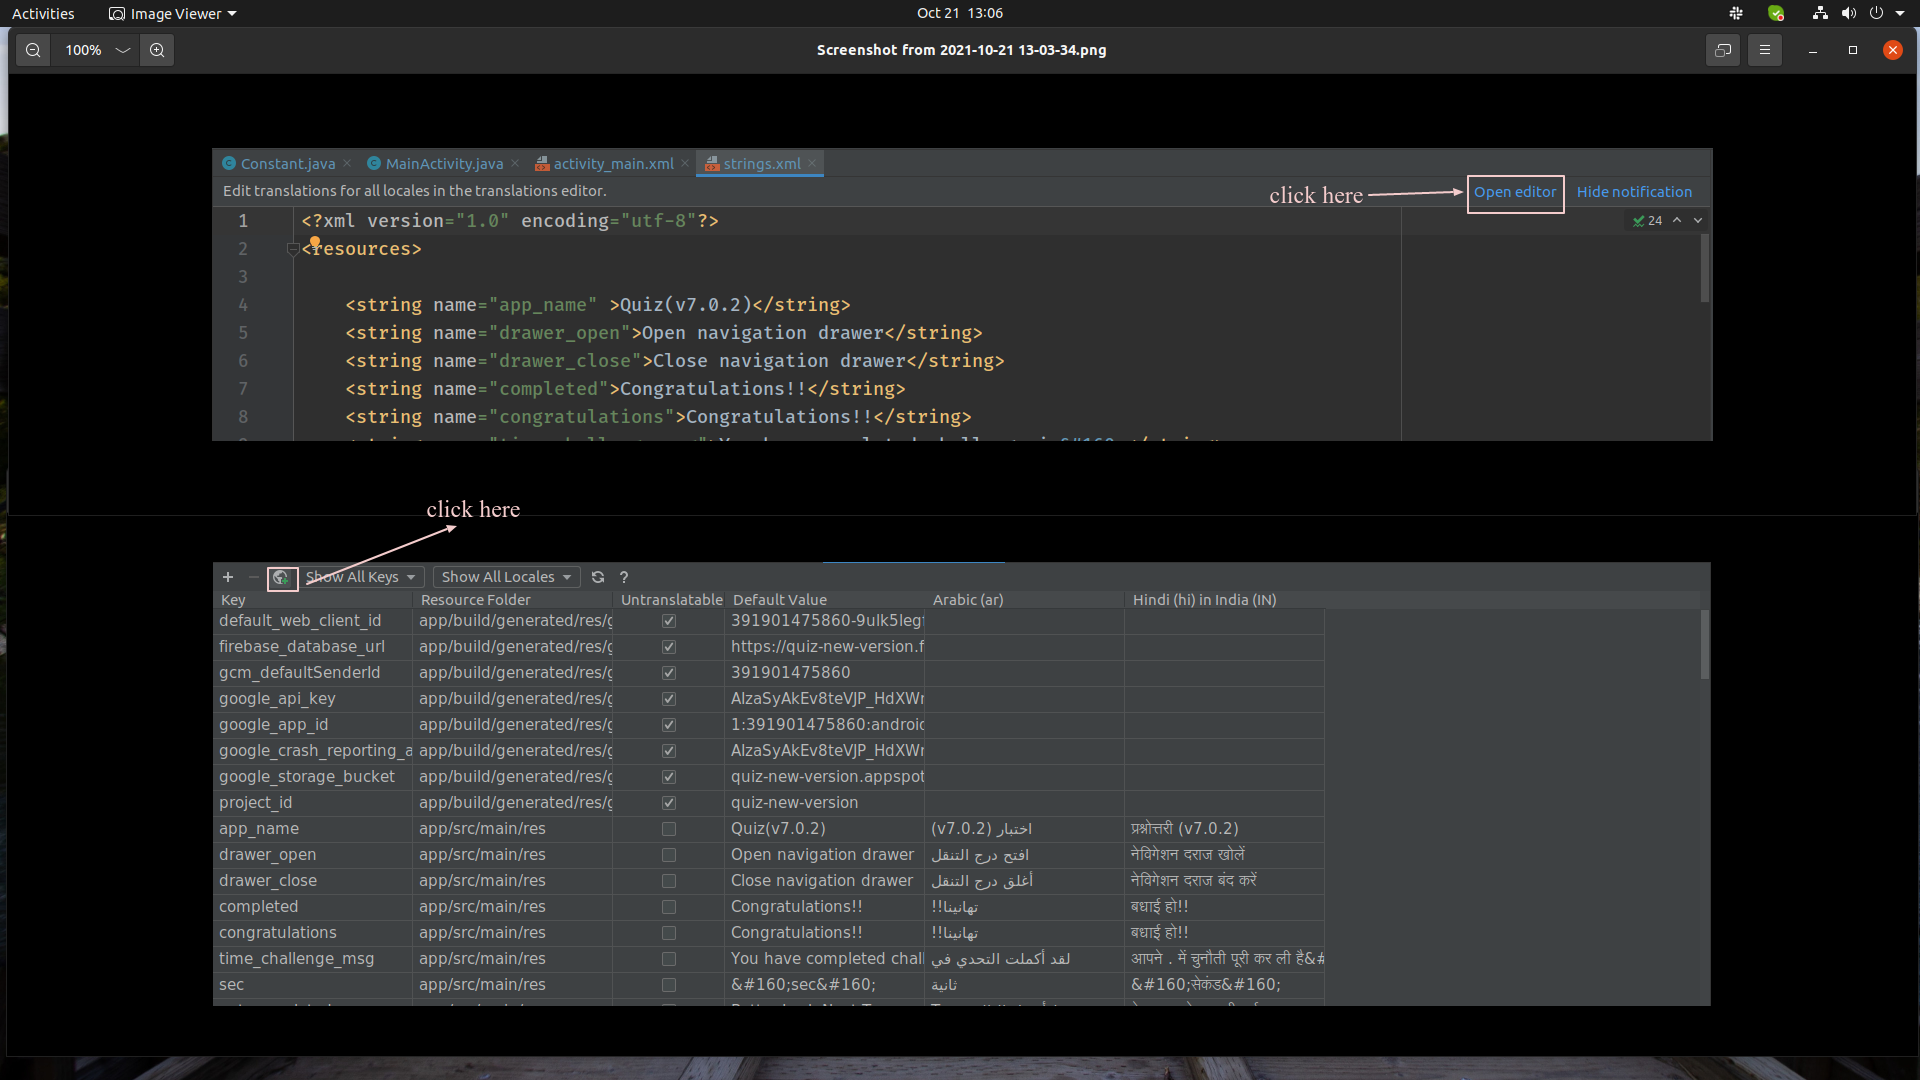
- How to add string file from your language?
- Need Support?
- Your Feedback
- Contact Us
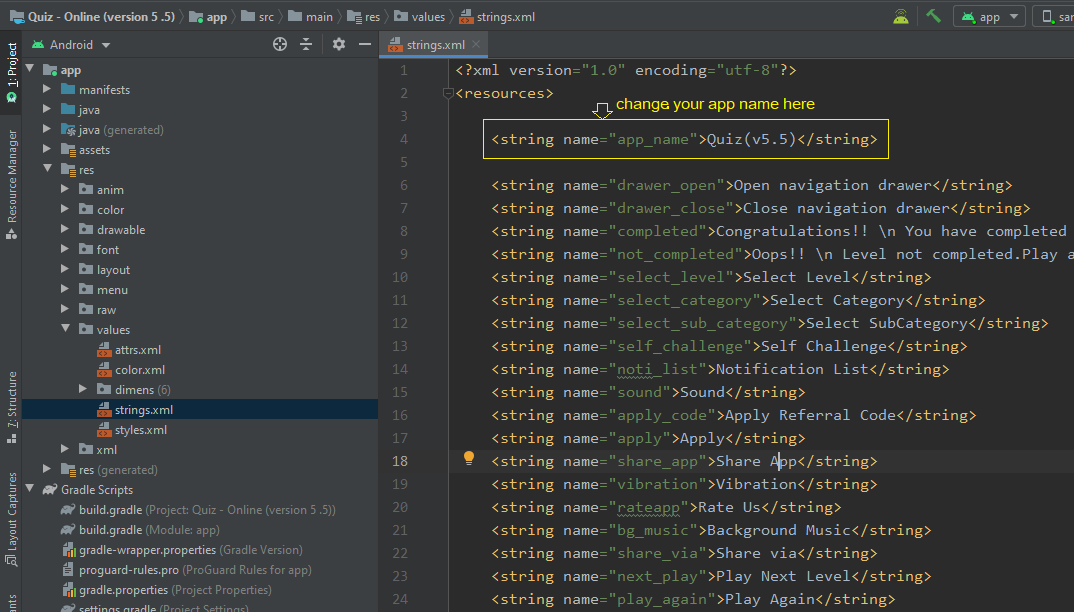
How to change app name?
- Open Android Studio > app > res > values > strings.xml
- Enter your app name inside "app_name" string tag:
<string name="app_name">Quiz</string> - You can also change other string text here.
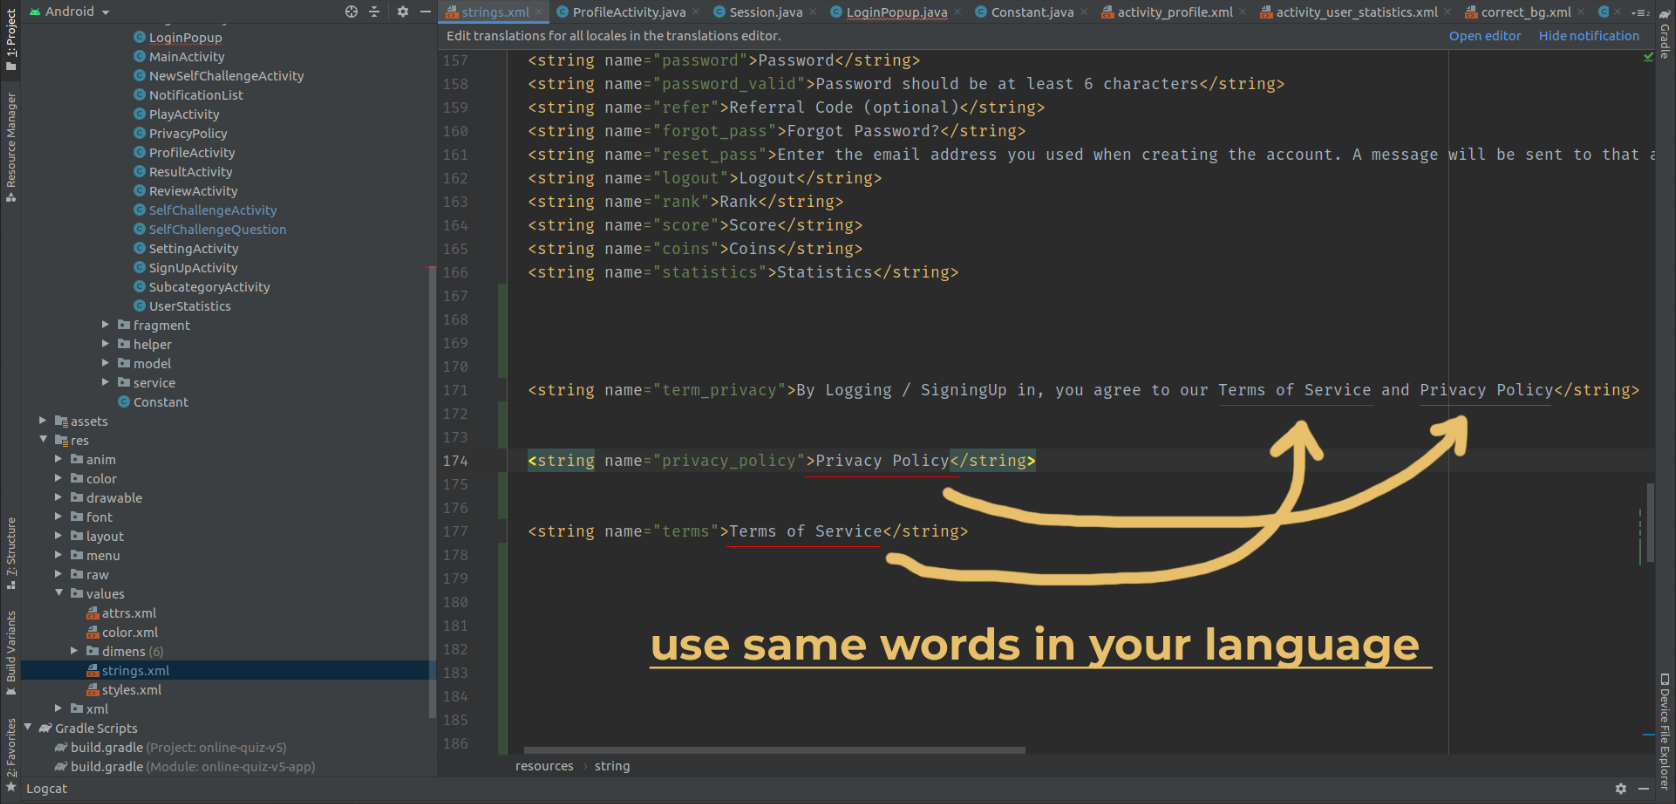
How to change the Privacy Policy?
- Open Android Studio > app > res > values > strings.xml
- Enter your Privacy Policy inside "term_privacy" string tag:
<string name="term_privacy">By Logging / SigningUp in, you agree to our Terms of Service and Privacy Policy</string> - Use Same Word in your Languge in
<string name="privacy_policy">And<string name="terms"> - If you Don't Use Same Word in your Language Application Will crash.
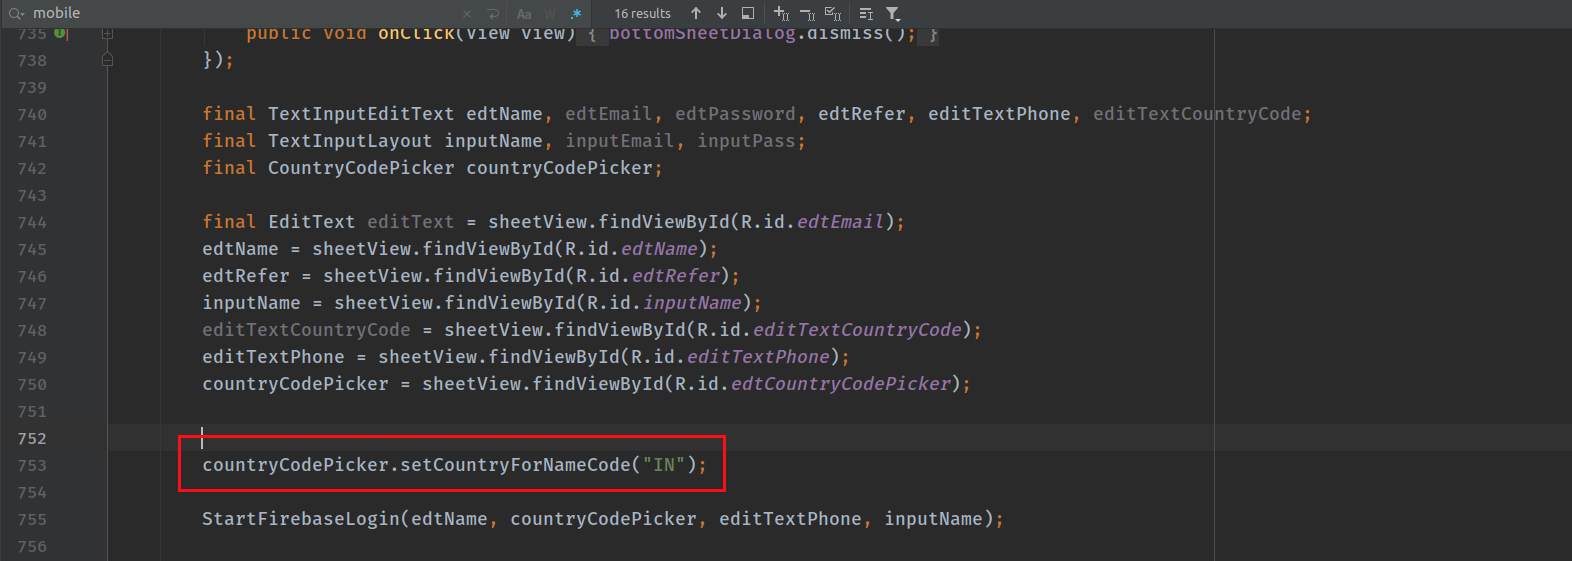
How to set country code default?
- Go to fragment > LoginActivityFragment.java
- You will get county code here, Copy code from table.
- Go to Line number 753 replace your country code in line number 753 between "IN".
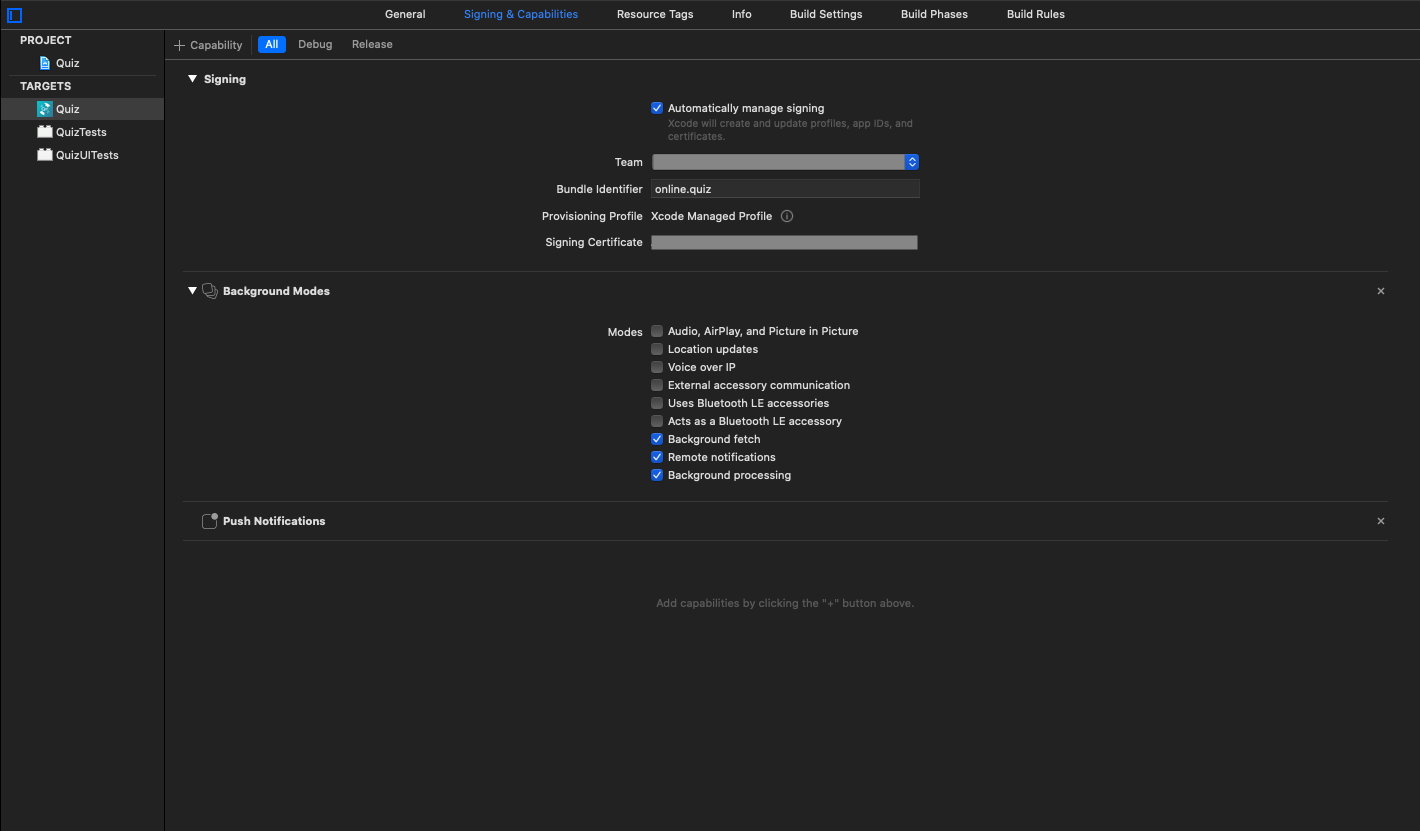
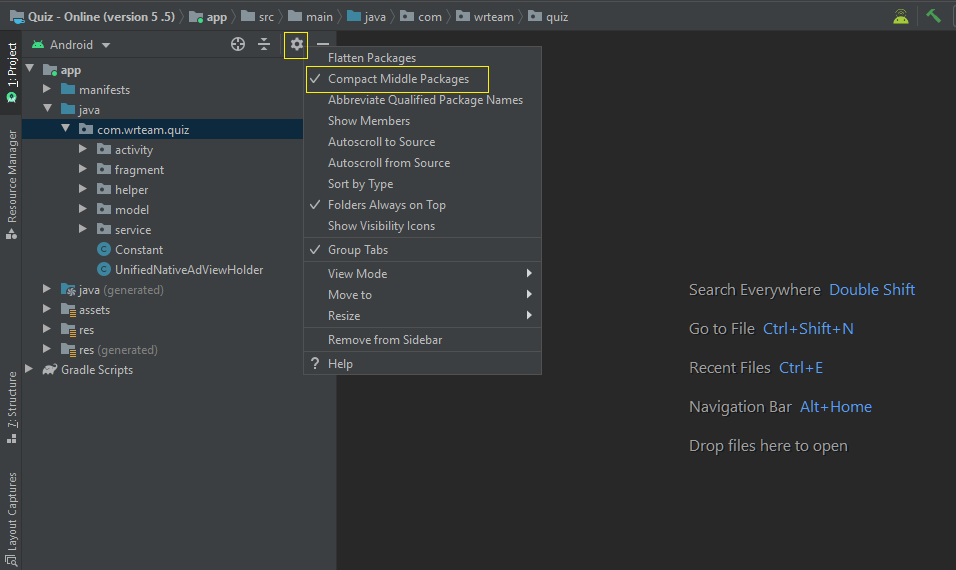
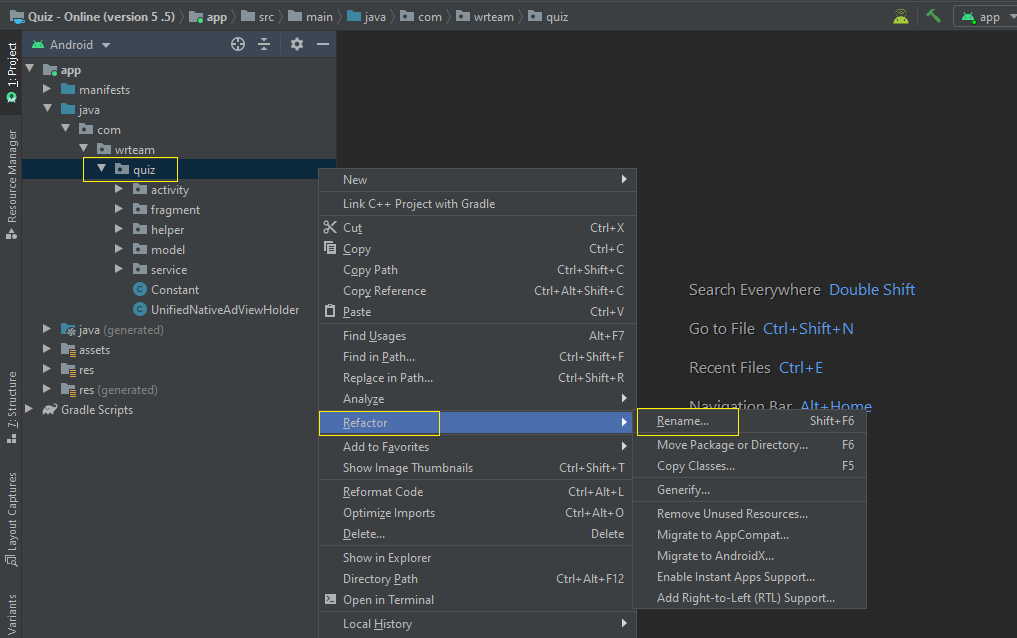
How to change the package name?
You can change it easily from Android Studio. Here are the steps:
- In the Android pane, click on the little gear icon.Uncheck/Deselect the Compact Empty Middle Packages option.
- Your package directory will now be broken up in individual directories.
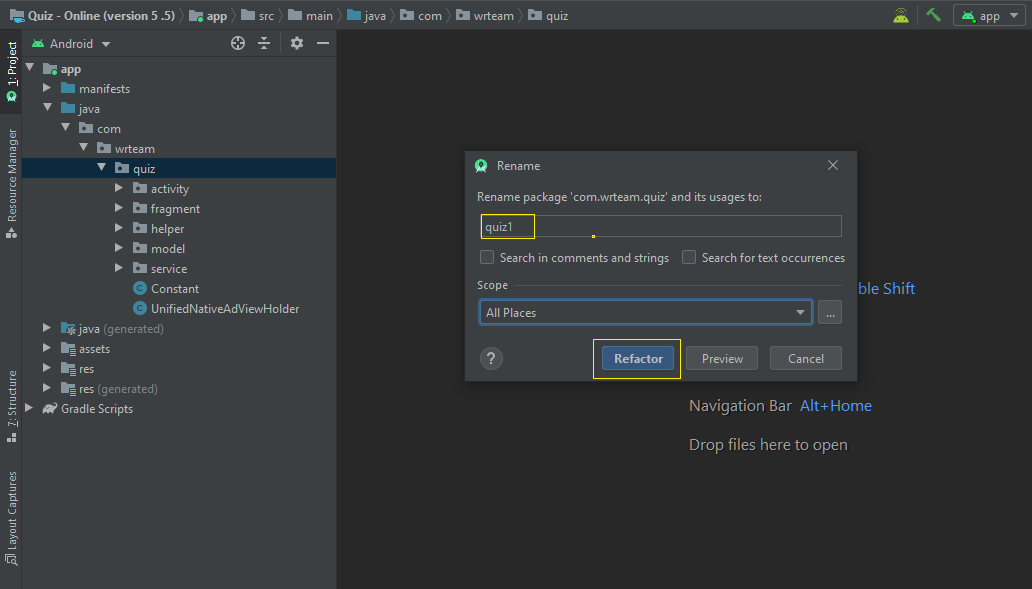
- Individually select each directory you want to rename, and: Right-click itSelect RefactorClick on RenameIn the Pop-up dialog.
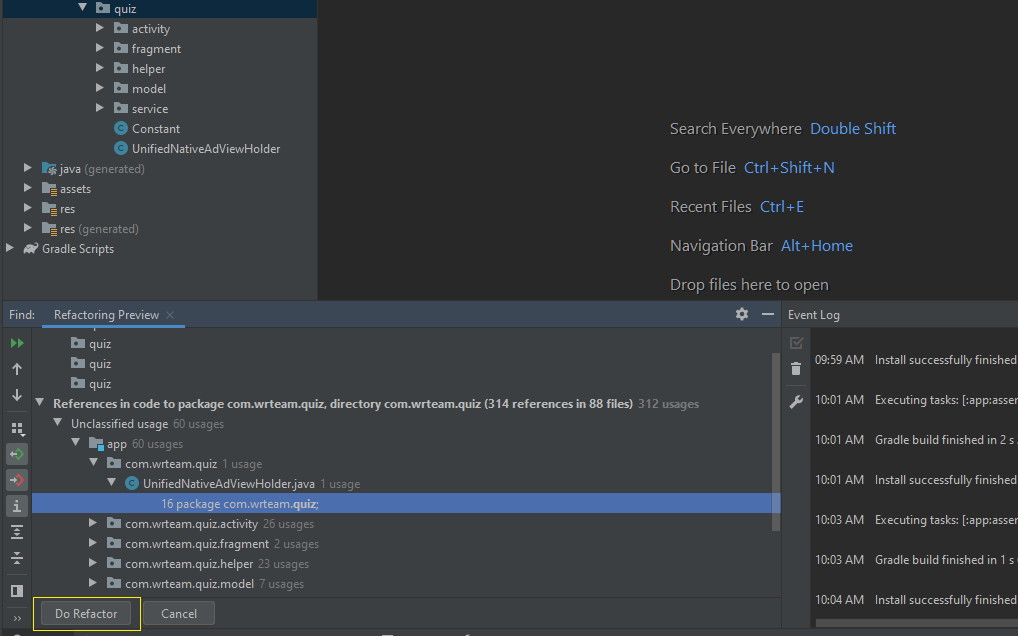
- Click on Rename Package instead of Rename Directory Enter the new name and hit RefactorAllow a minute to let Android Studio update all changes.
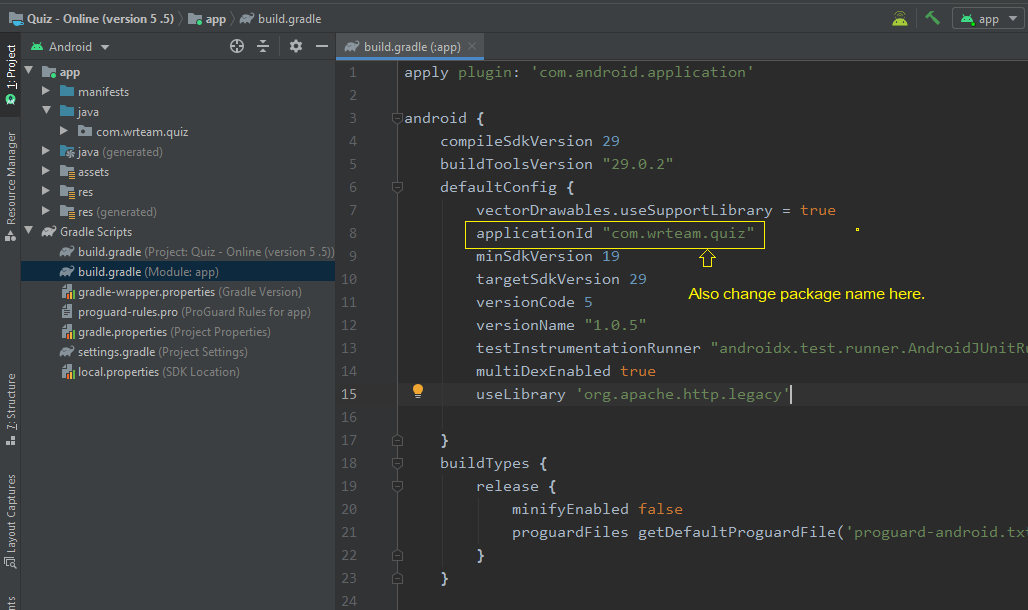
- Now open your build.gradle (Usually 'app' or 'mobile'). Update the applicationId to your Package Name and Sync Gradle, if it hasn't already been updated automatically.
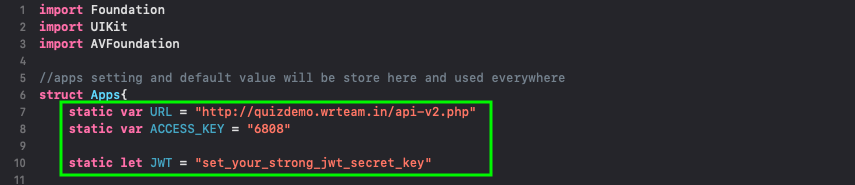
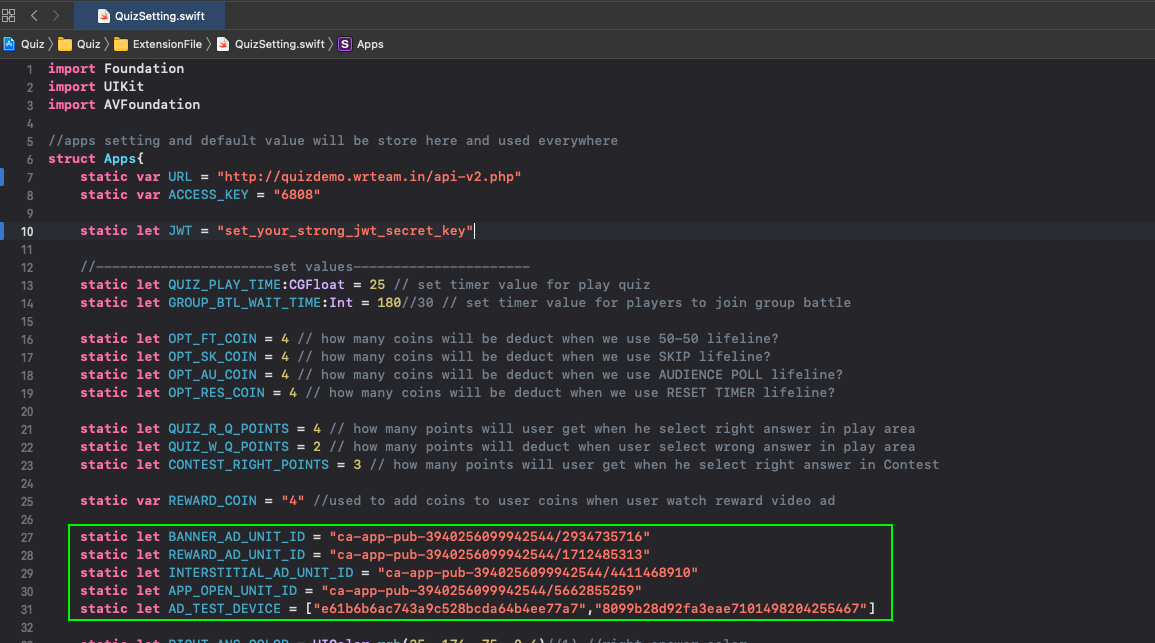
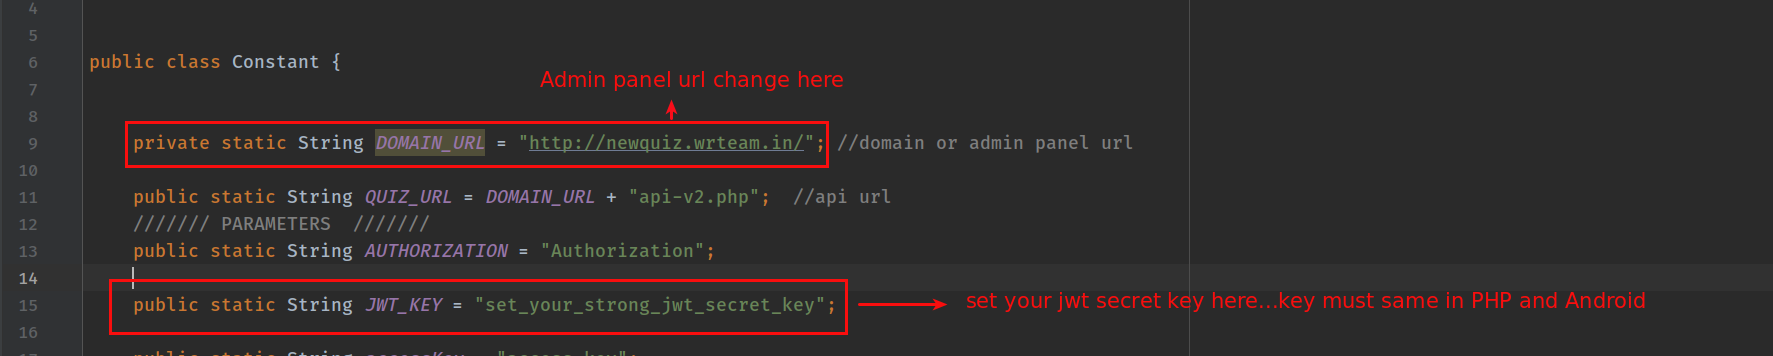
How to set JWT Key and Admin panel url in Android and PHP
- go to android >app >java > com.wrteam.quiz > Constant.java
- JWT Key is just like password you can create your own and it must be same in Quiz App as well as Php side.
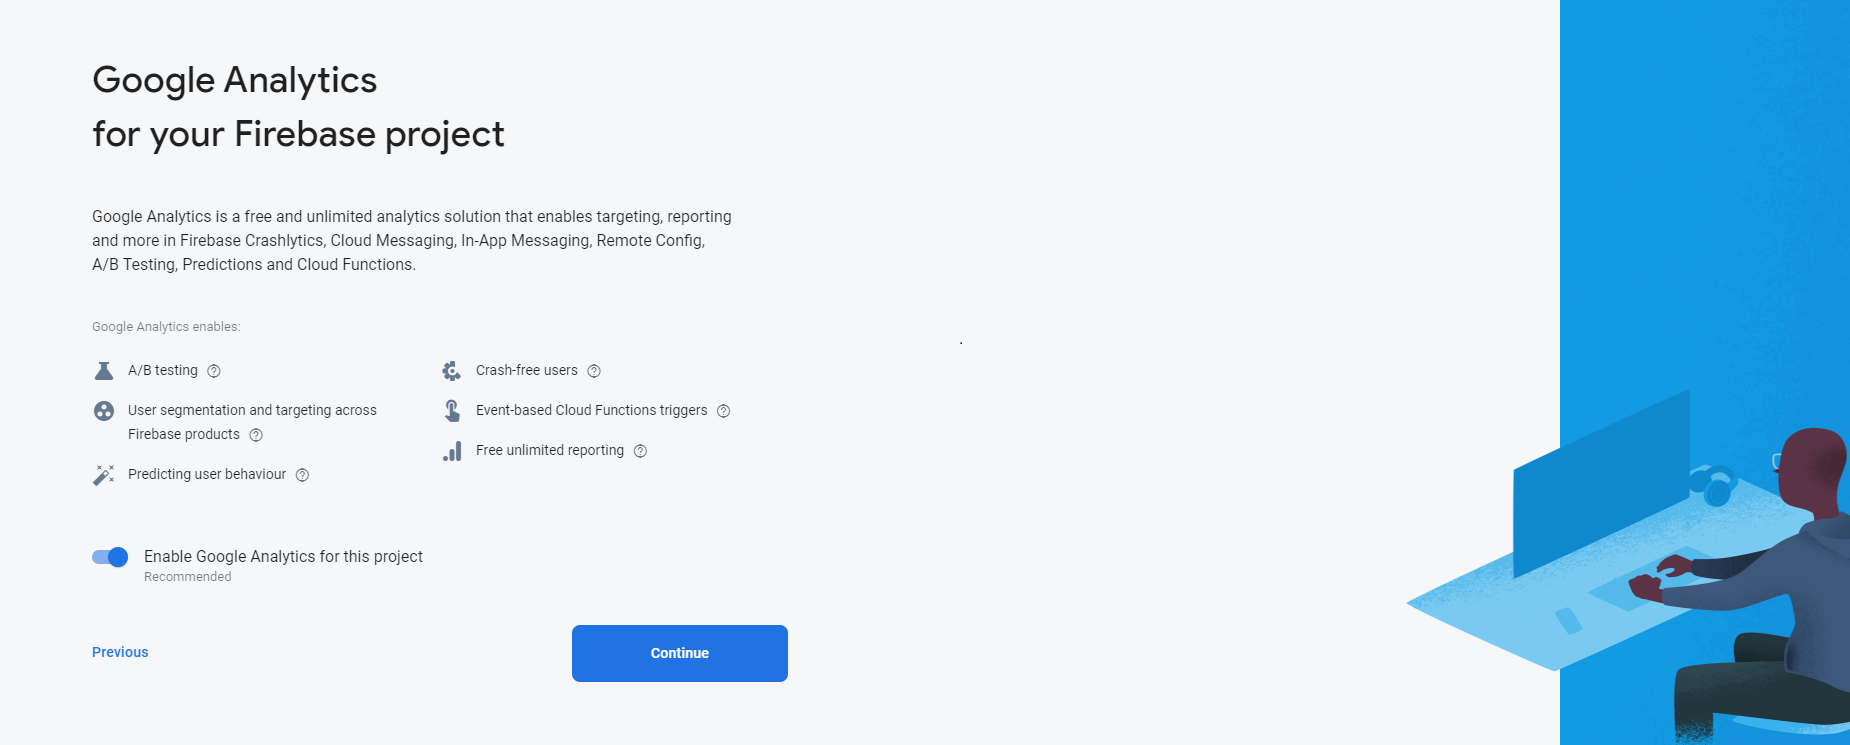
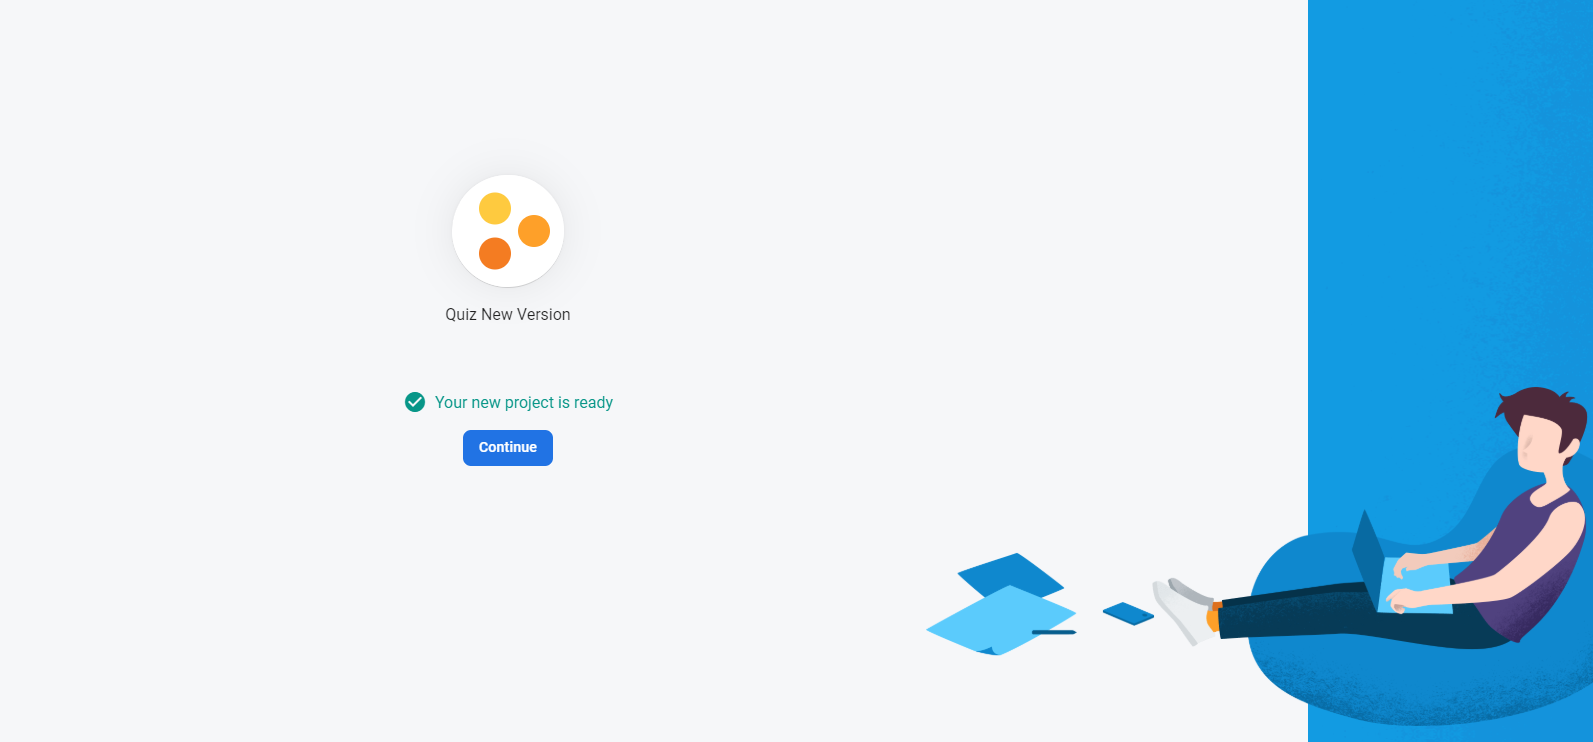
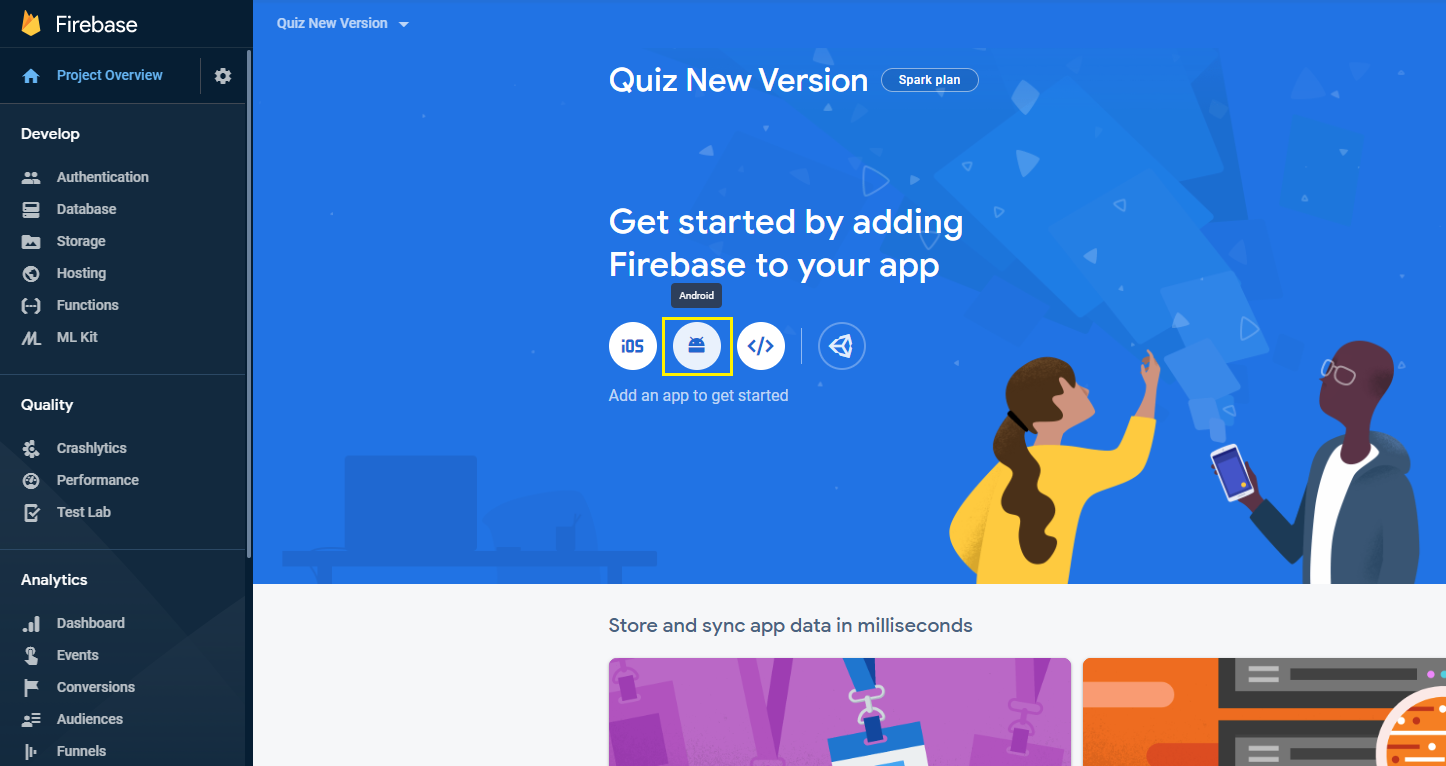
Create Firebase Project for Application.
- We need Firebase project for Firebase PushNotification, Google Sign-In and Facebook Login.
- here is steps for craete project.


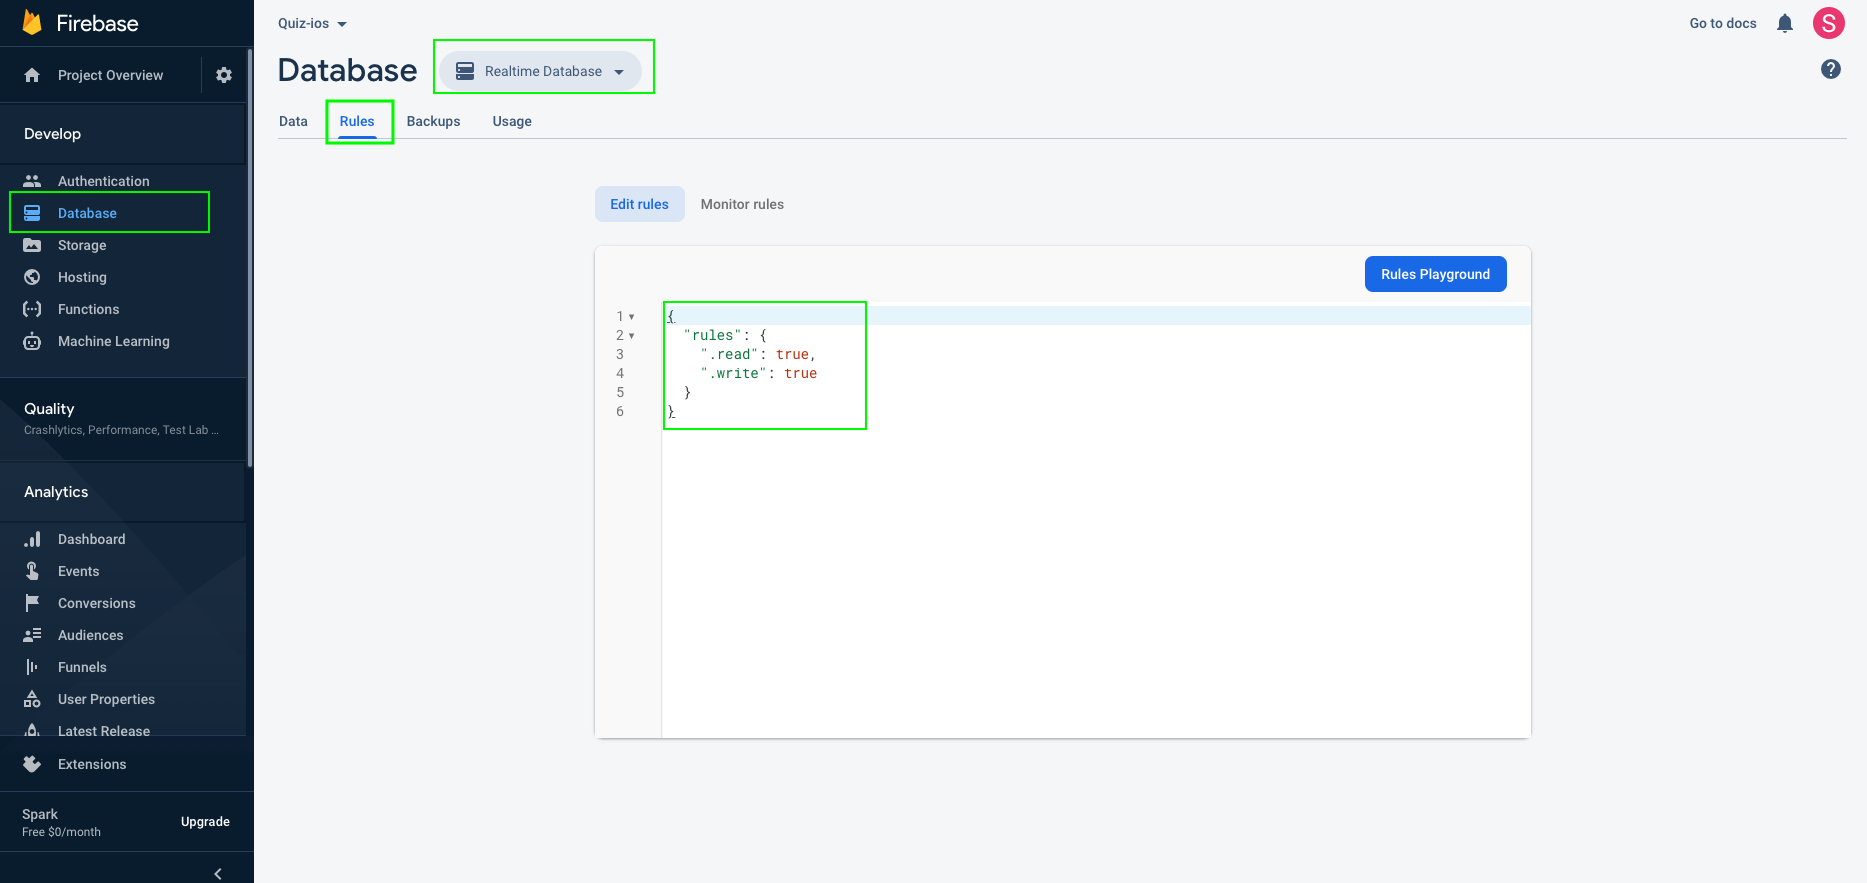
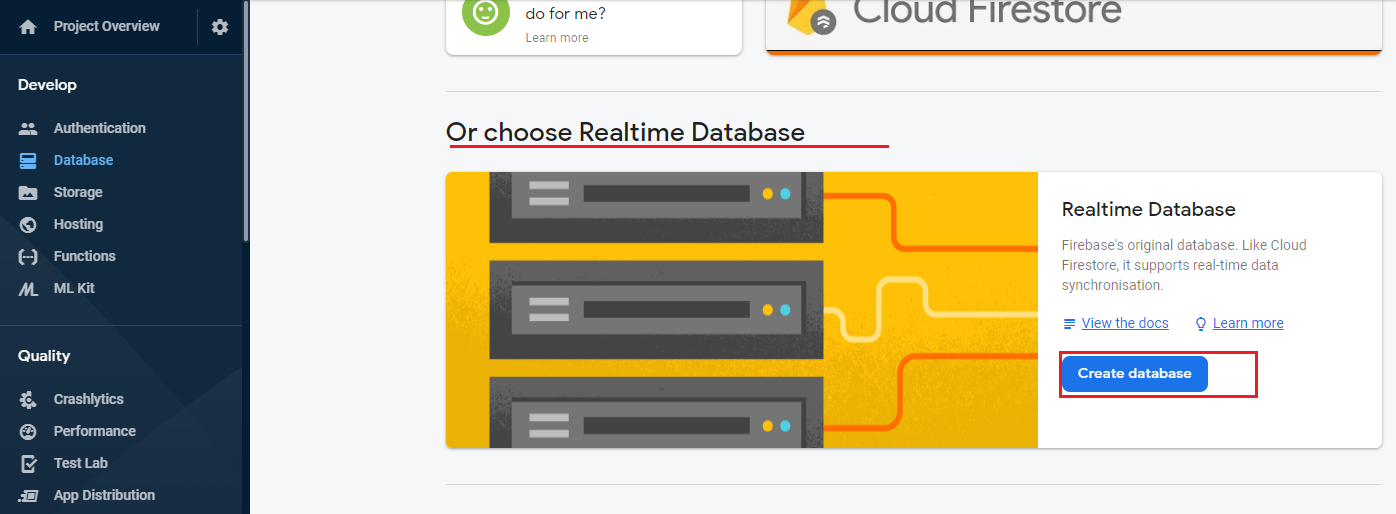
Enable Realtime database in firebase console.
- Realtime database we use for battle feture.
- Use Database Default Location (us-central1) If you change then Battle Mode Not Working.
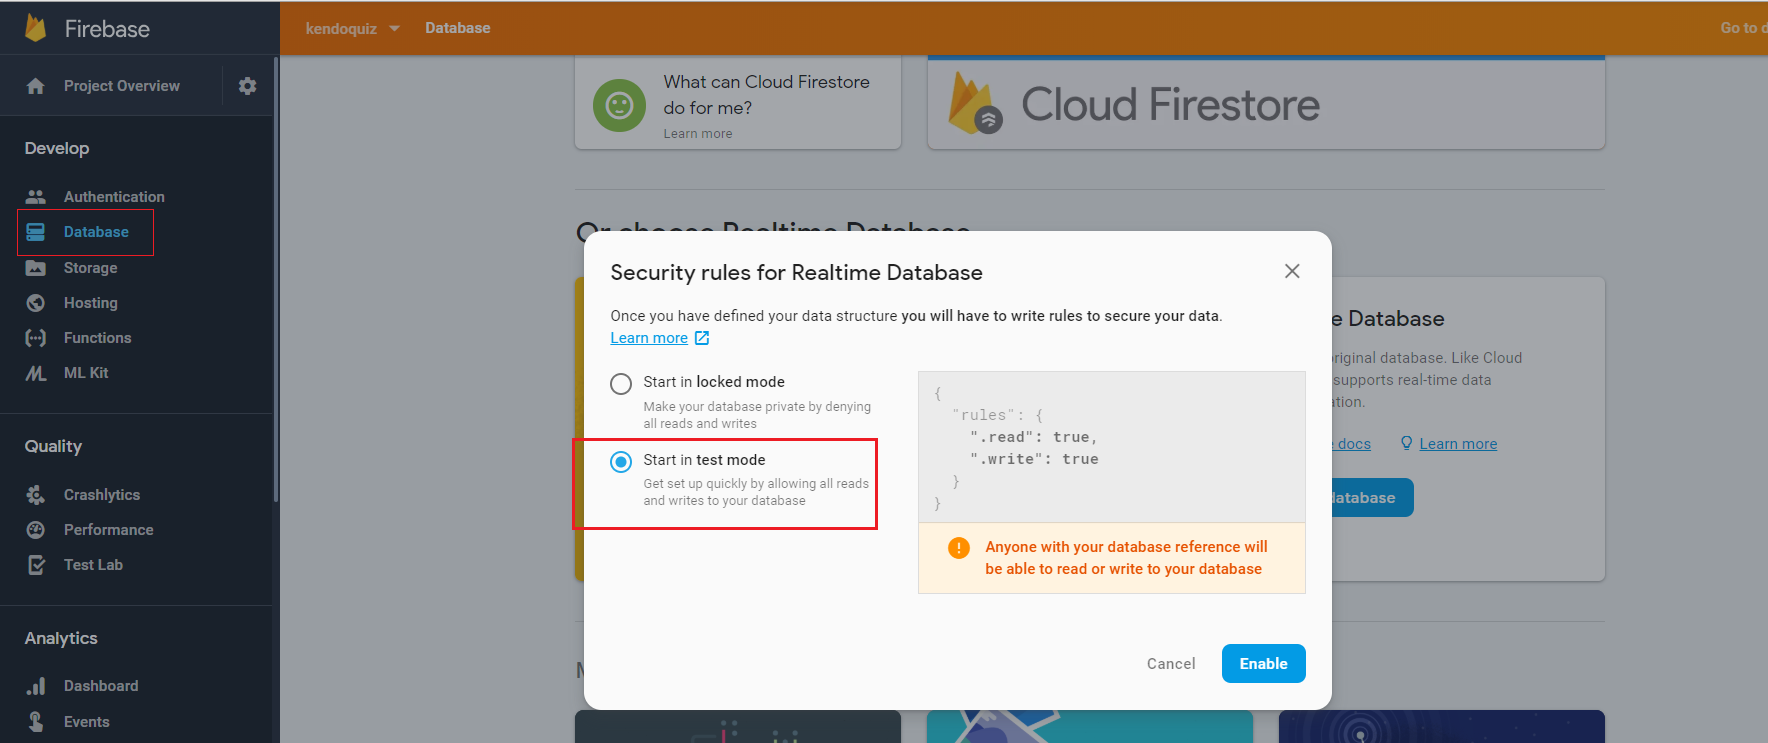
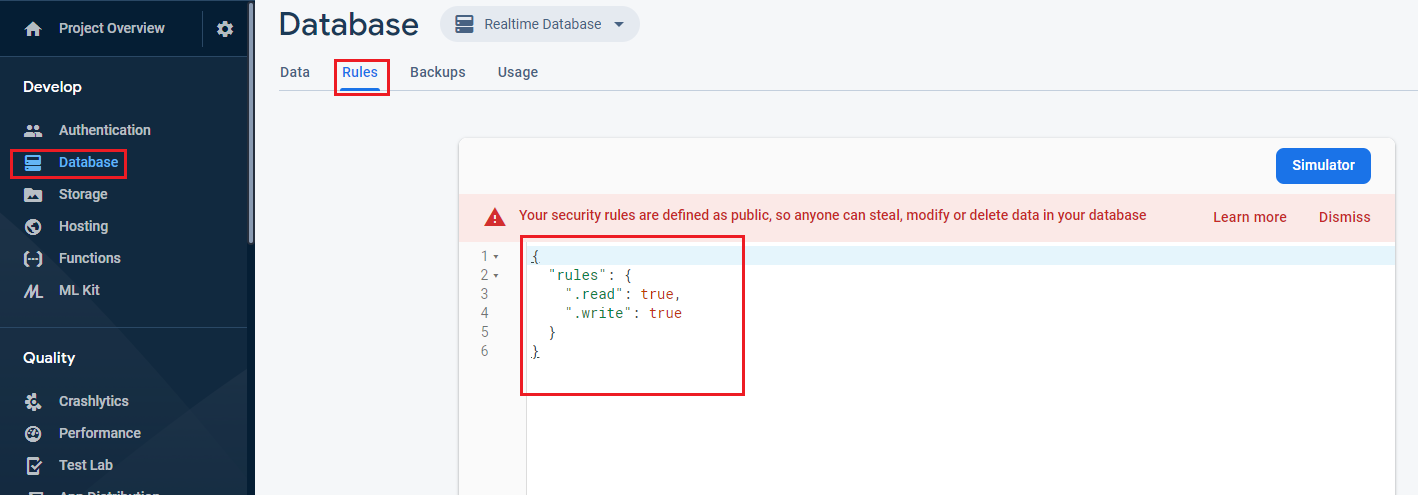
- Realtime database rules must be true like below.because if user dont have read and right permission then they cannot play battle game.
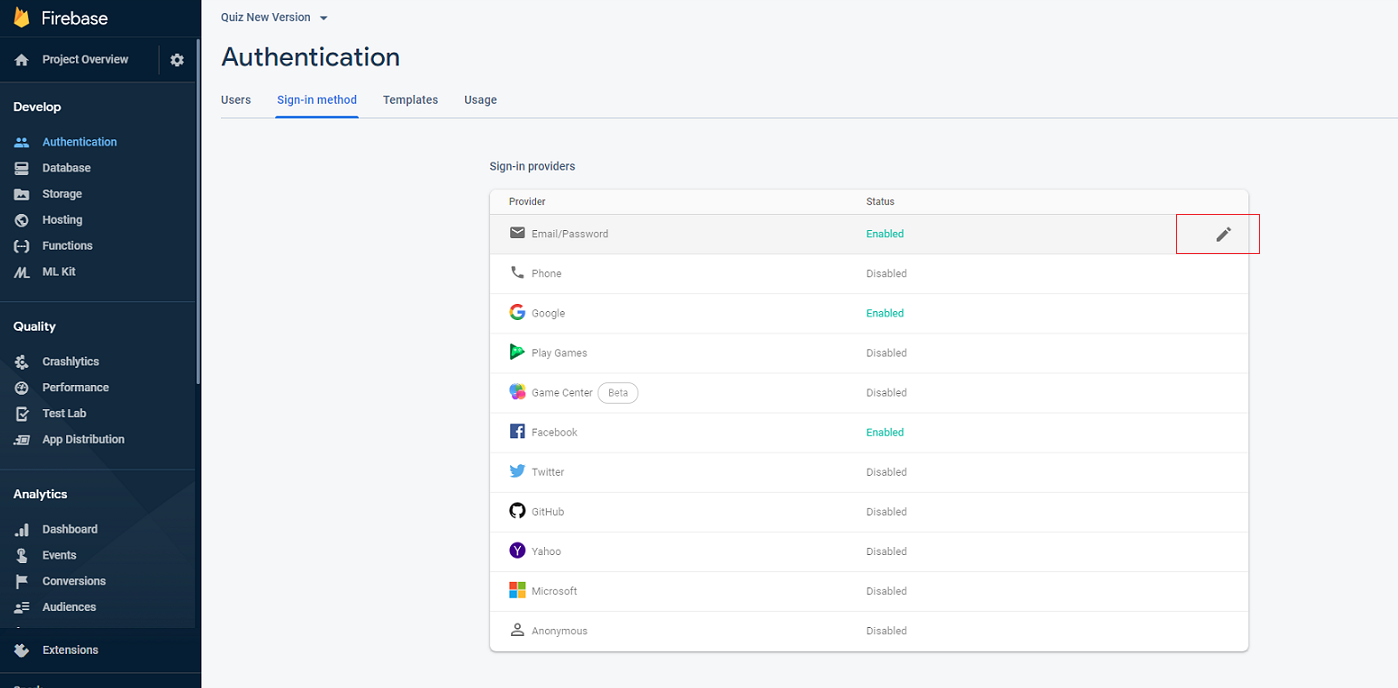
Authenticate Using Email and Password on Android With Firebase.
- First of all we have to enable Google Sign-In method in firebase console.
- Now open your project in firebase console.
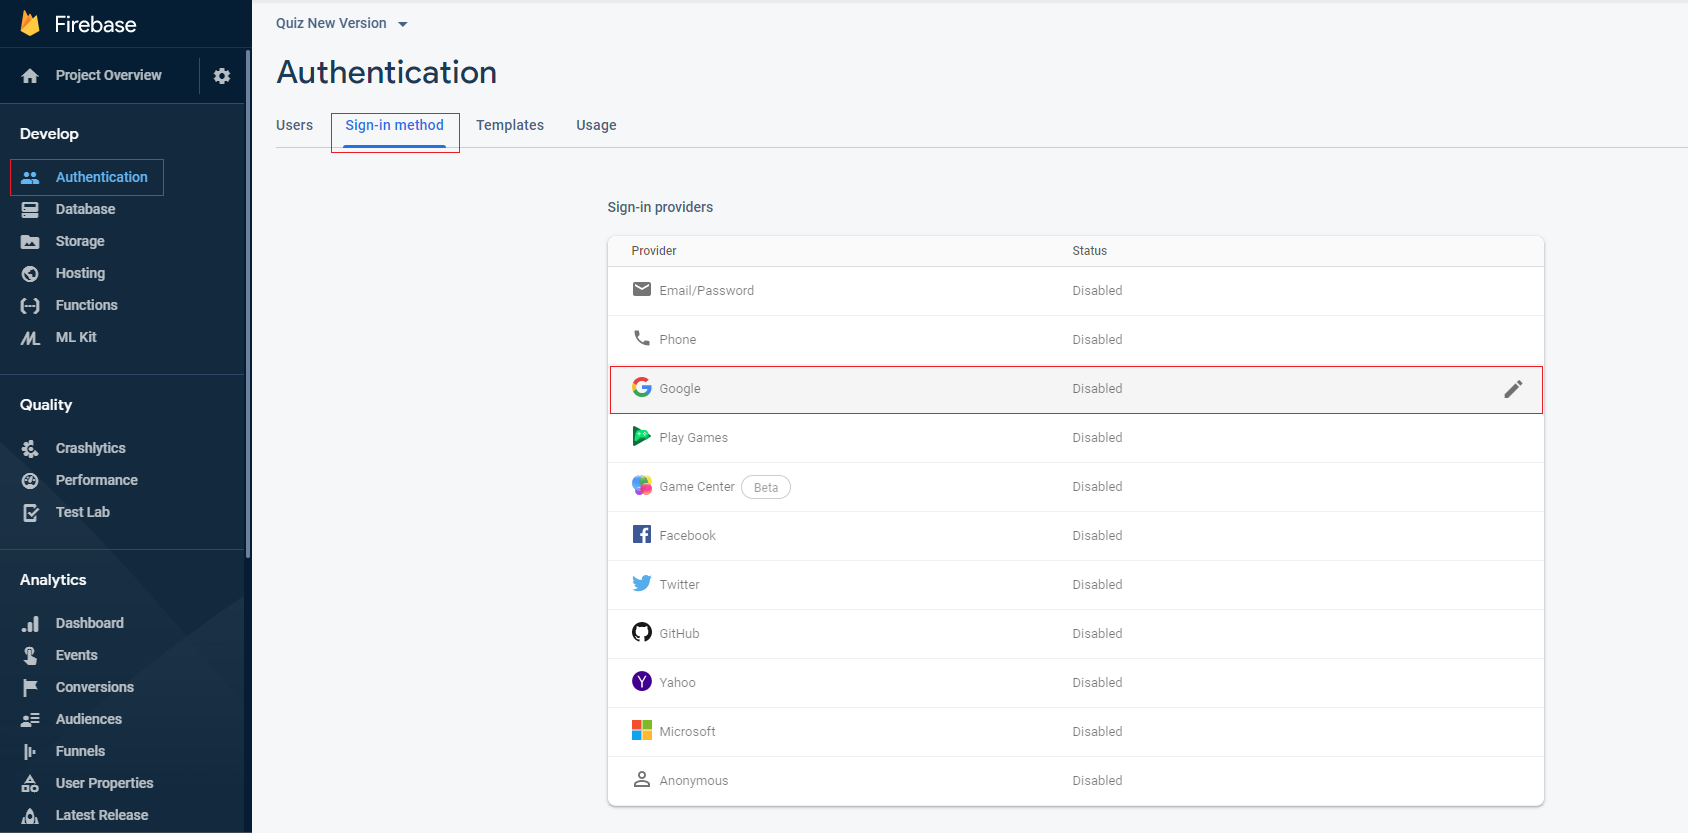
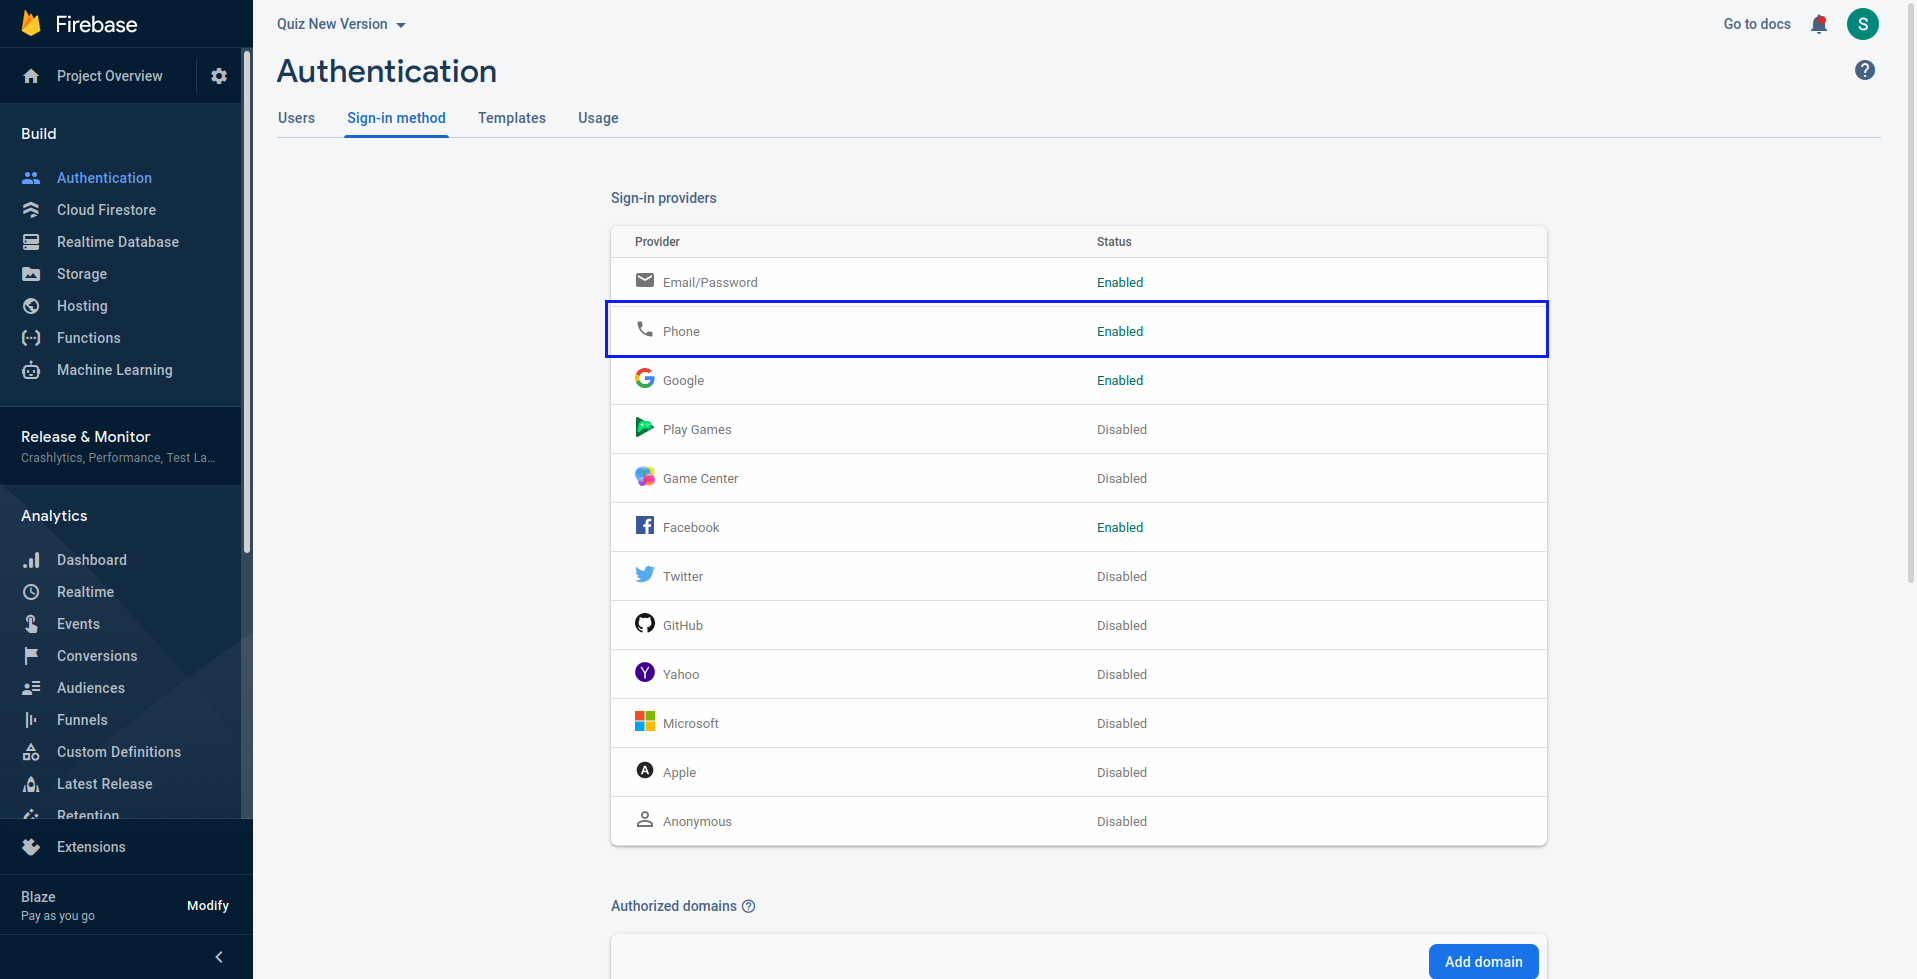
- In the Firebase console, open the Auth section.
- On the Sign in method tab, enable the Email/password sign-in method and click Save.
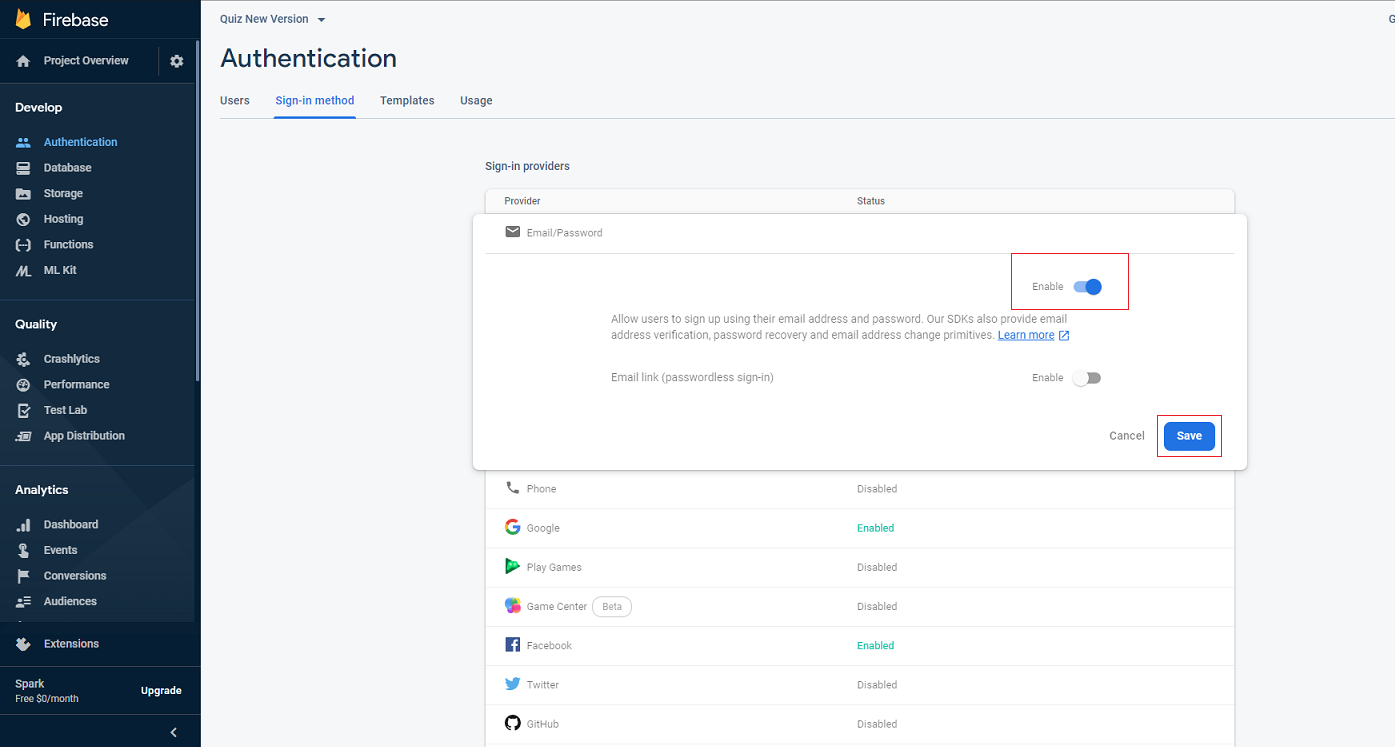
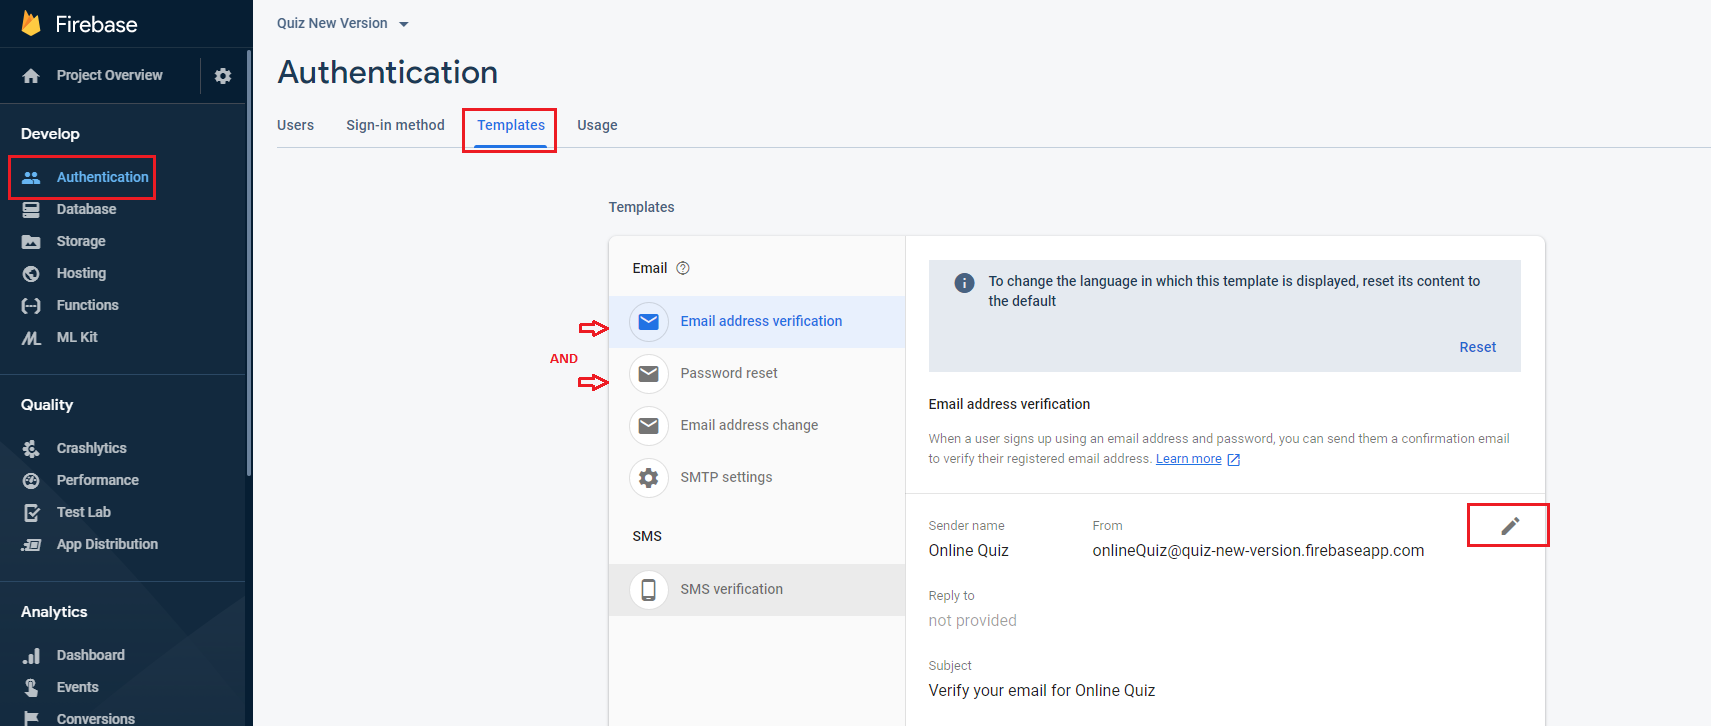
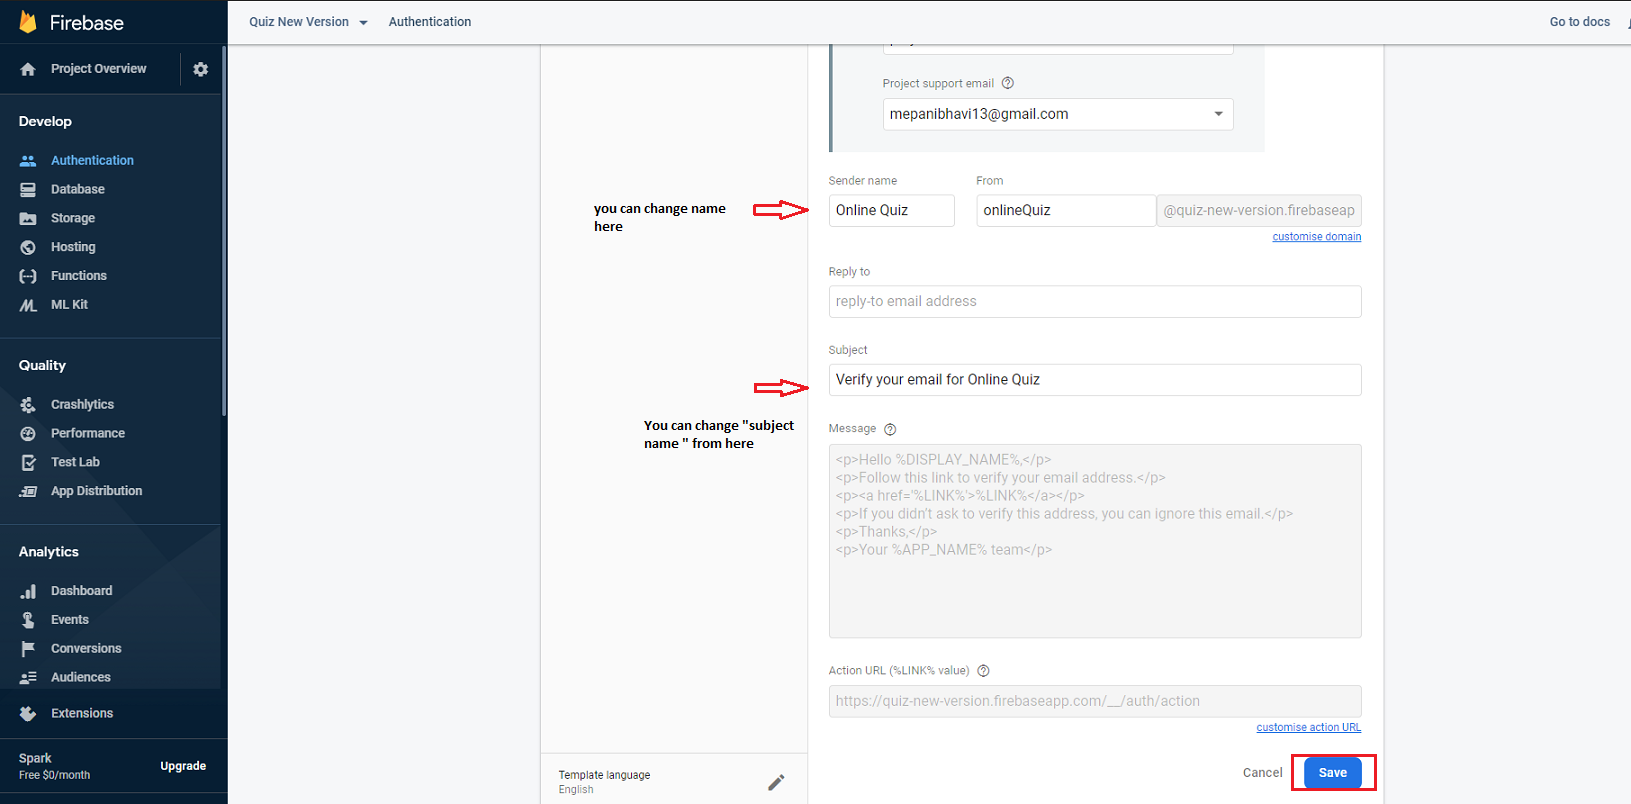
Only Change sender Name and Subject for verify email and reset Password.
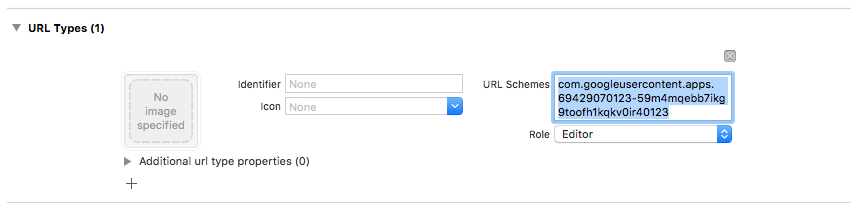
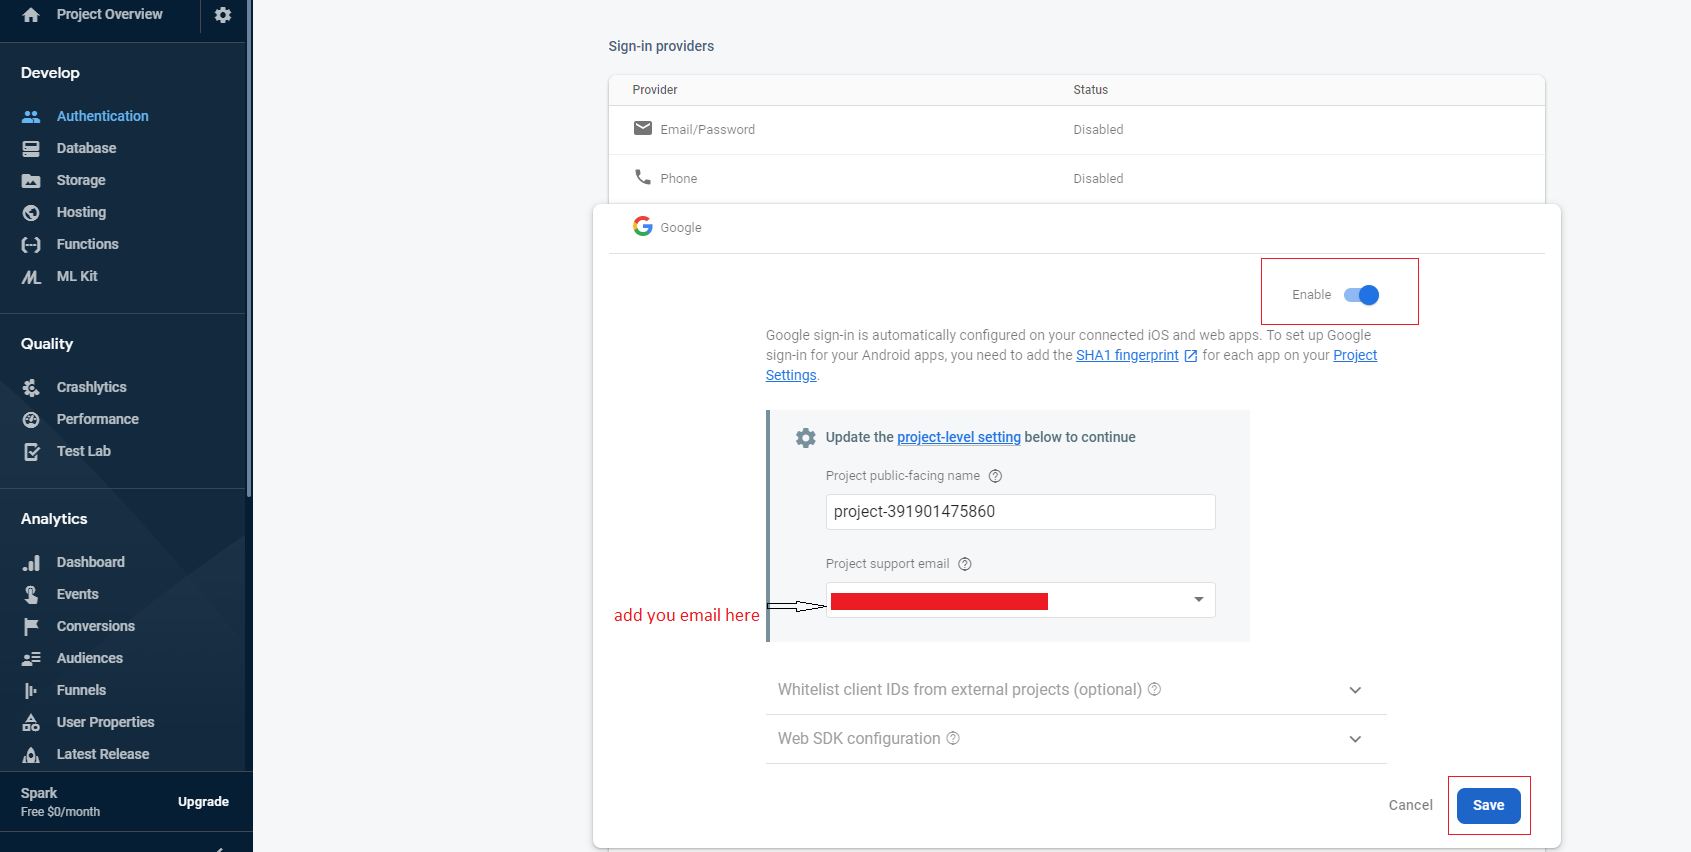
Authenticate Using Google Sign-In on Android With Firebase.
- First of all we have to enable Google Sign-In method in firebase console.
- Now open your project in firebase console.
- Search Android Device Verification and Enable.
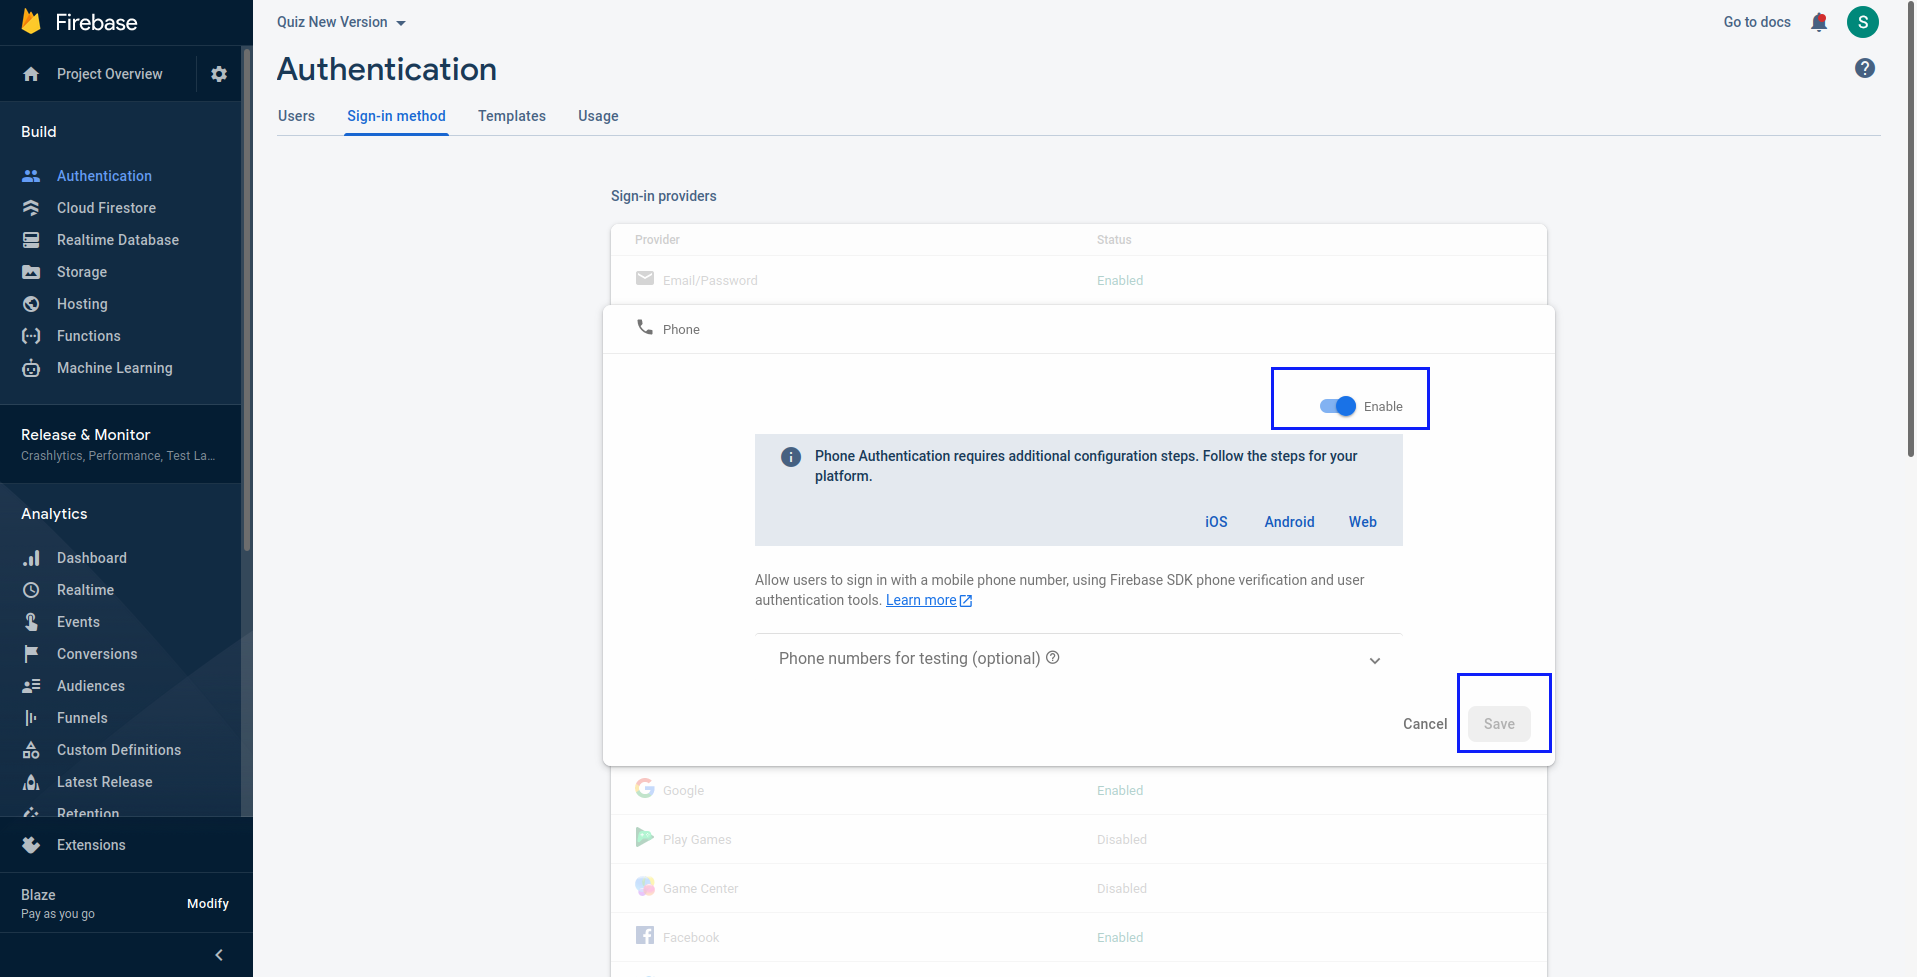
Authenticate Using Mobile Sign-In on Android With Firebase.
- First of all we have to enable Phone Sign-In method in firebase console.
- Now open your project in firebase console.
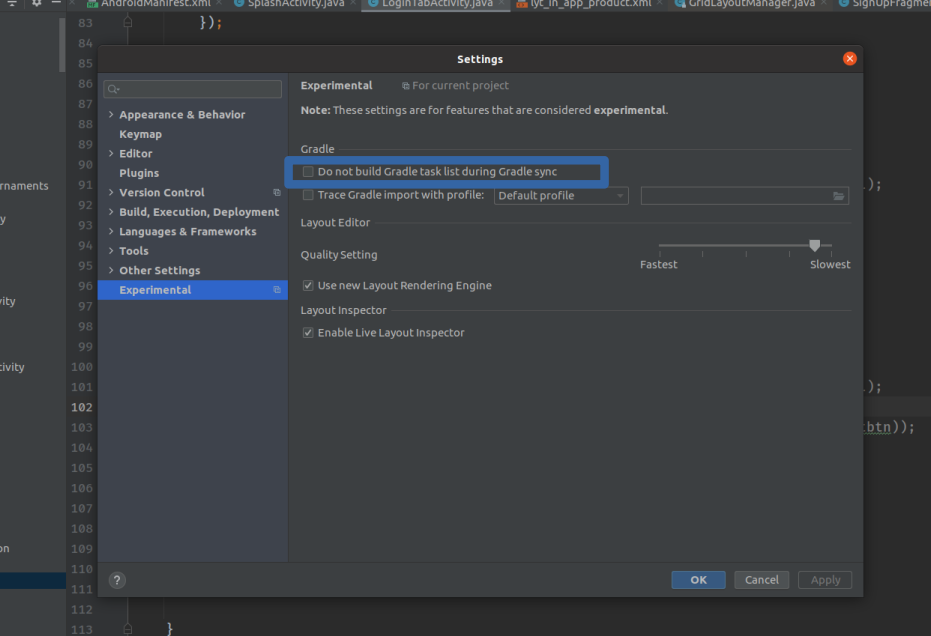
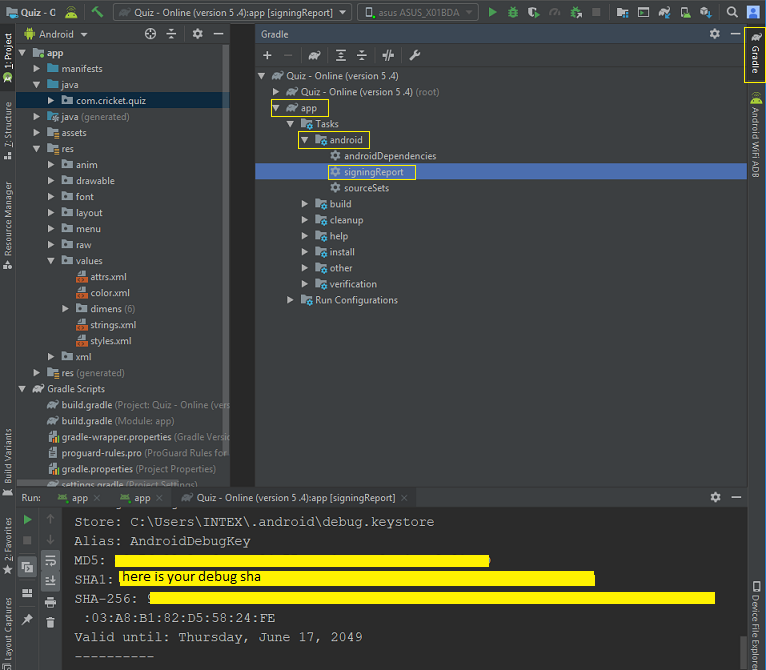
- Do This setting for get SHA-1 KEY goto File ---> Setting ---> Experimental Unchecked below setting.
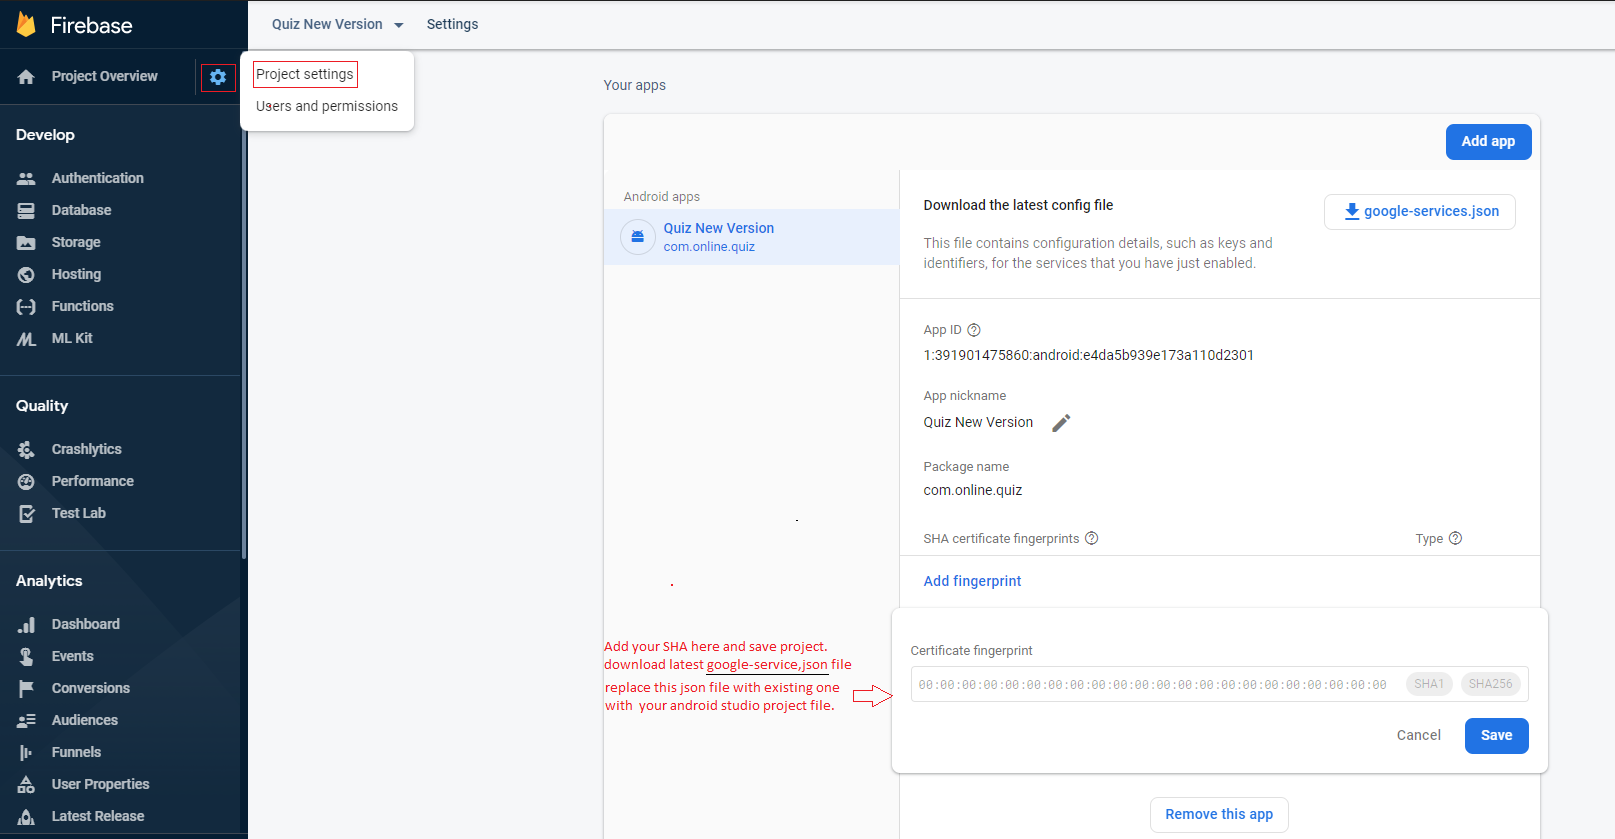
- If you haven't yet specified your app's SHA-1 & SHA-256 fingerprint, do so from the Settings page of the Firebase console.
- After you integrate Google Sign-In, your LoginActivity has code for login you don't have to add anything extra.
- If you want to read code for google sign-in for android you can read here.
- Steps for Integrating Google Sign-In into Your Android App
- Refer this video for Google sign-in.
- Note There was three type of SHA-1.
- Debug SHA-1 : you can get this sha from your android stuido.
- Release SHA-1 : when you create keystore(.jks) file for generate sign apk. you can get release sha from your key store file. Use this Desktop App for get release sha from keystore file. KeyStore Explorer. Add this sha in your firebase project when you test realese apk.
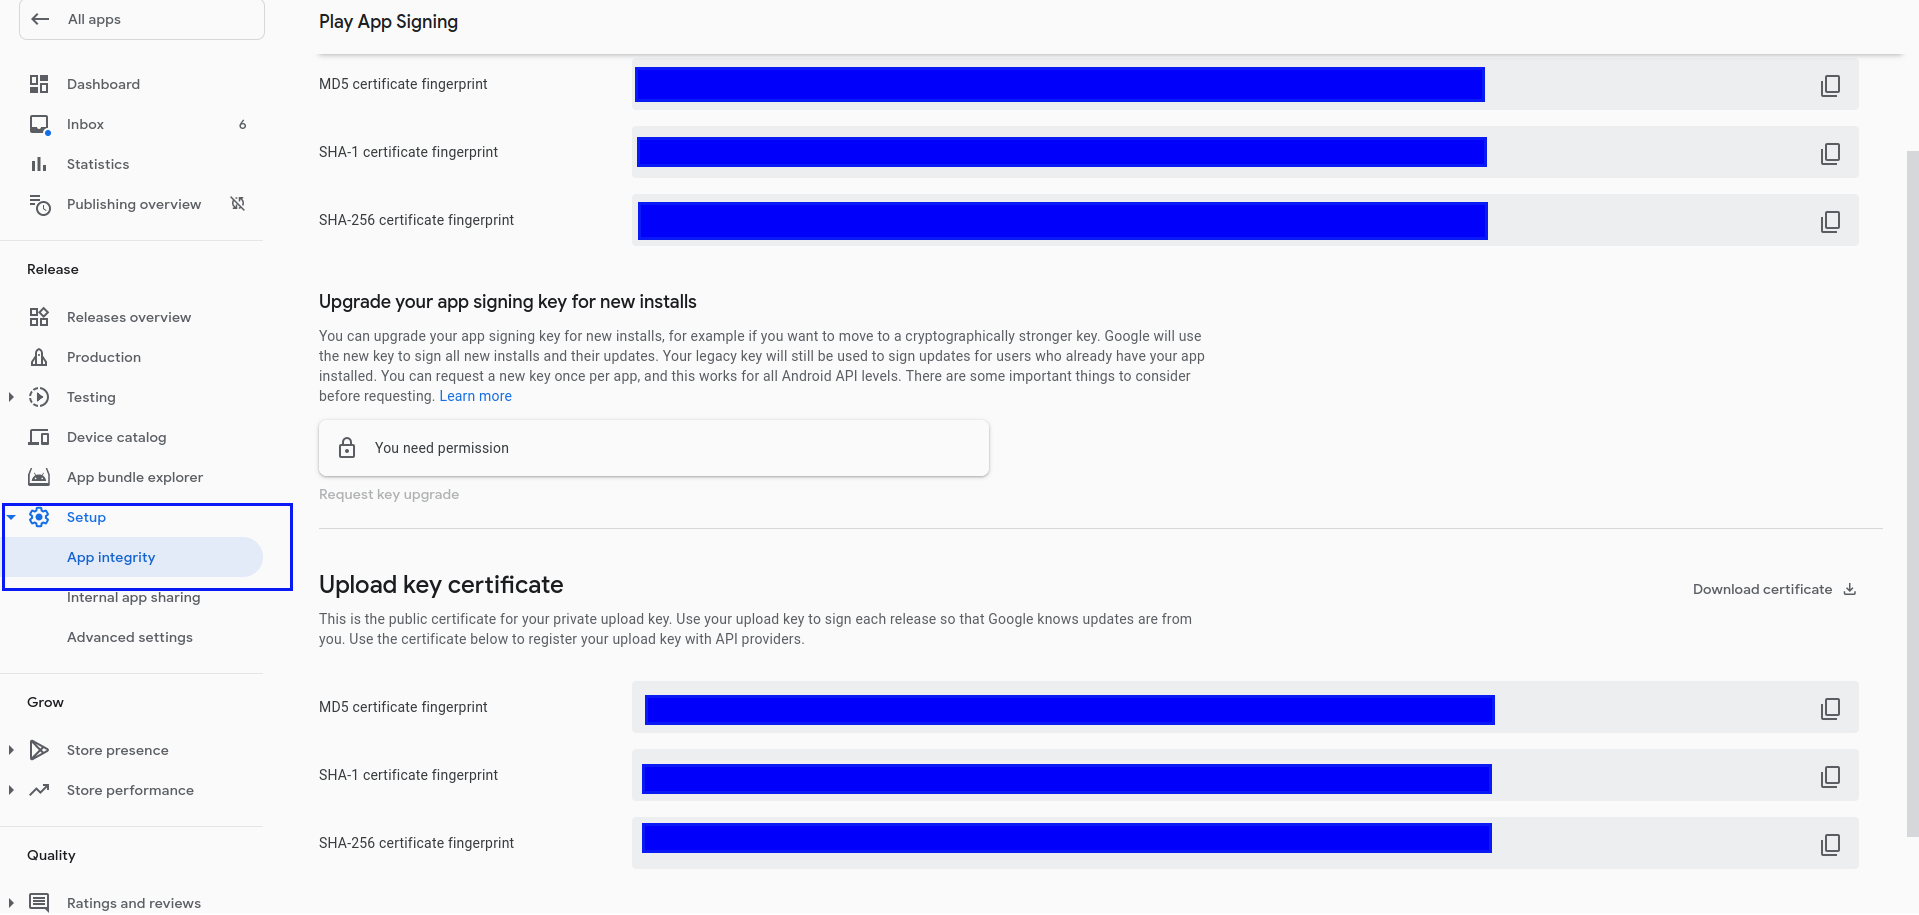
- Sign SHA-1:You have add this sha when you publish your app on playstore. You can get this sign sha from your PlayConsole. Without Sign sha your google login not work when your app published on PlayStore.
- For App signing certificate go to > Play Console > Select your App > Release Management > App Signing
Authenticate Using Facebook Login on Android with Firebase.
- first create project for your application , go to Facebook for Developers
- Go to Facebook Quick Start Integrate the Facebook SDK
- On the Facebook for Developers site, get the App ID and an App Secret for your app.
- In the Firebase console, open the Auth section. Enable Facebook Login.
- On the Sign in method tab, enable the Facebook sign-in method and specify the App ID and App Secret you got from Facebook.

- Then, make sure your OAuth redirect URI (e.g. my-app-12345.firebaseapp.com/__/auth/handler) is listed as one of your OAuth redirect URIs in your Facebook app's settings page on the Facebook for Developers site in the Product Setting > Facebook Login config
- Add the dependencies for Firebase Authentication and Facebook Login SDK to your app-level build.gradle file:

- Edit Your Resources and Manifest
- Create strings for your Facebook app ID and for those needed to enable Chrome Custom Tabs. Also, add FacebookActivity to your Android manifest.
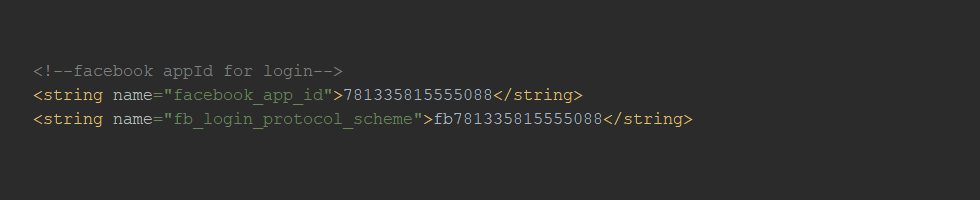
- Open your app >res >values >strings.xml file.
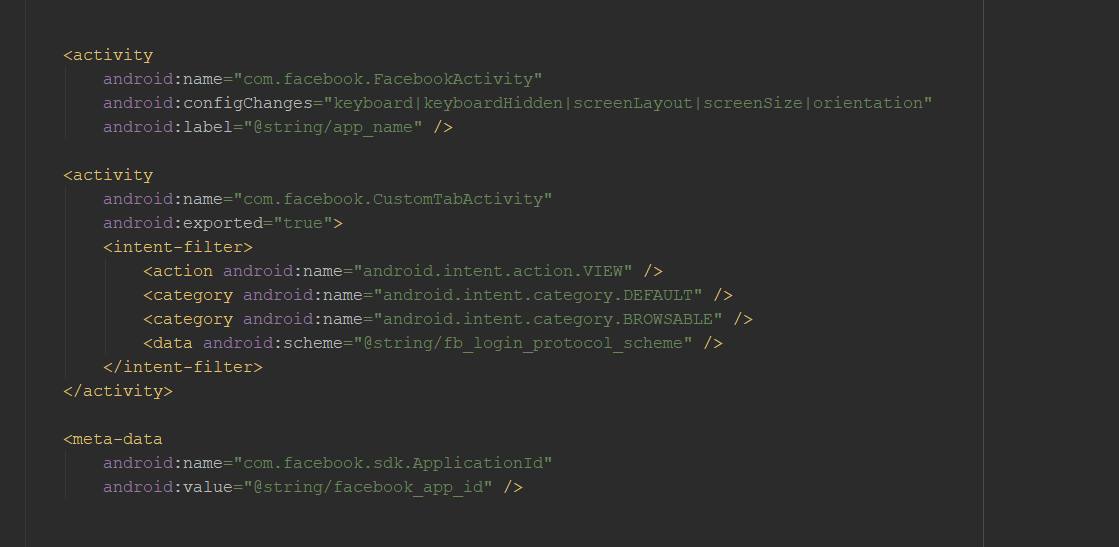
- Open the app >manifest >AndroidManifest.xml file.
- Add the following meta-data element, an activity for Facebook
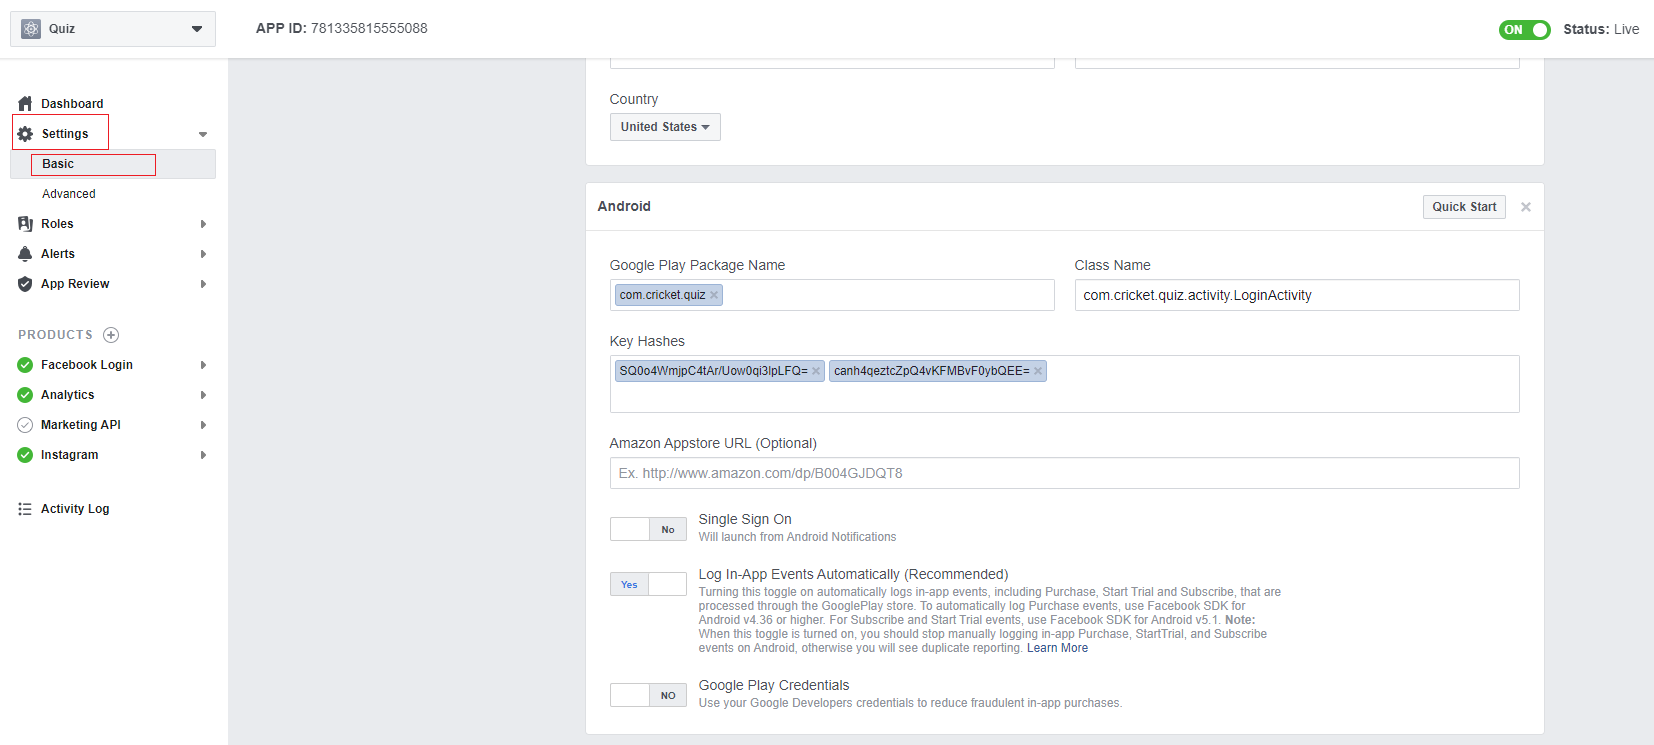
- Associate Your Package Name and Default Class with Your App
- Provide the Development and Release Key Hashes for Your App
- To ensure the authenticity of the interactions between your app and Facebook, you need to supply us with the Android key hash for your development environment. If your app has already been published, you should add your release key hash too.
- Generating a Development Key Hash
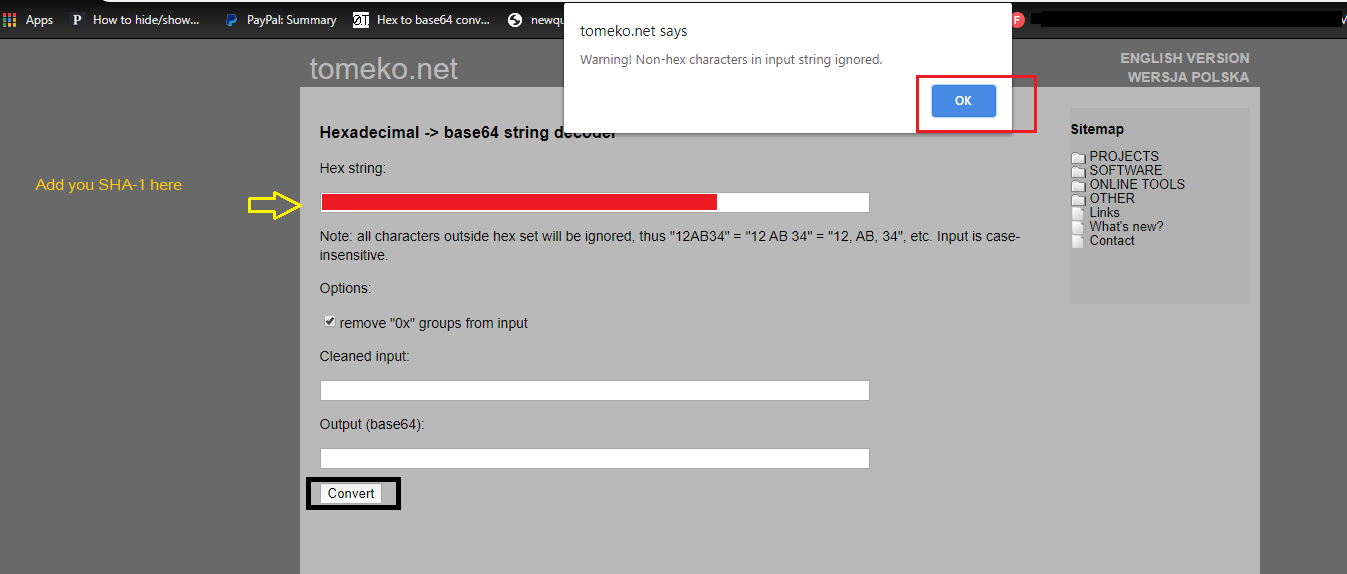
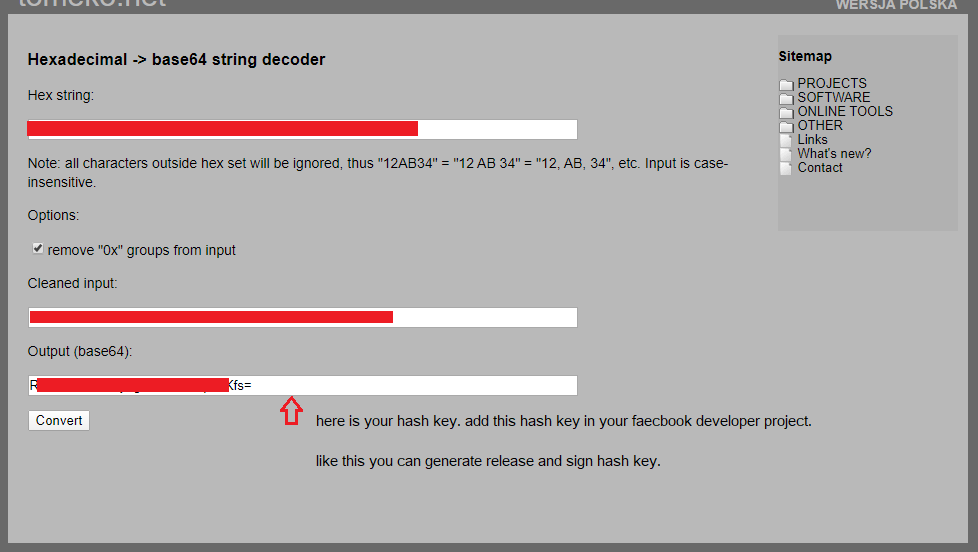
- We will use SHA-1 key to generate hashkey for facebook login.
- you can generate hash online. Here is external link for generate key has for facebook login.Key hash Genrate Link
- Refer this video for Facebook Login.
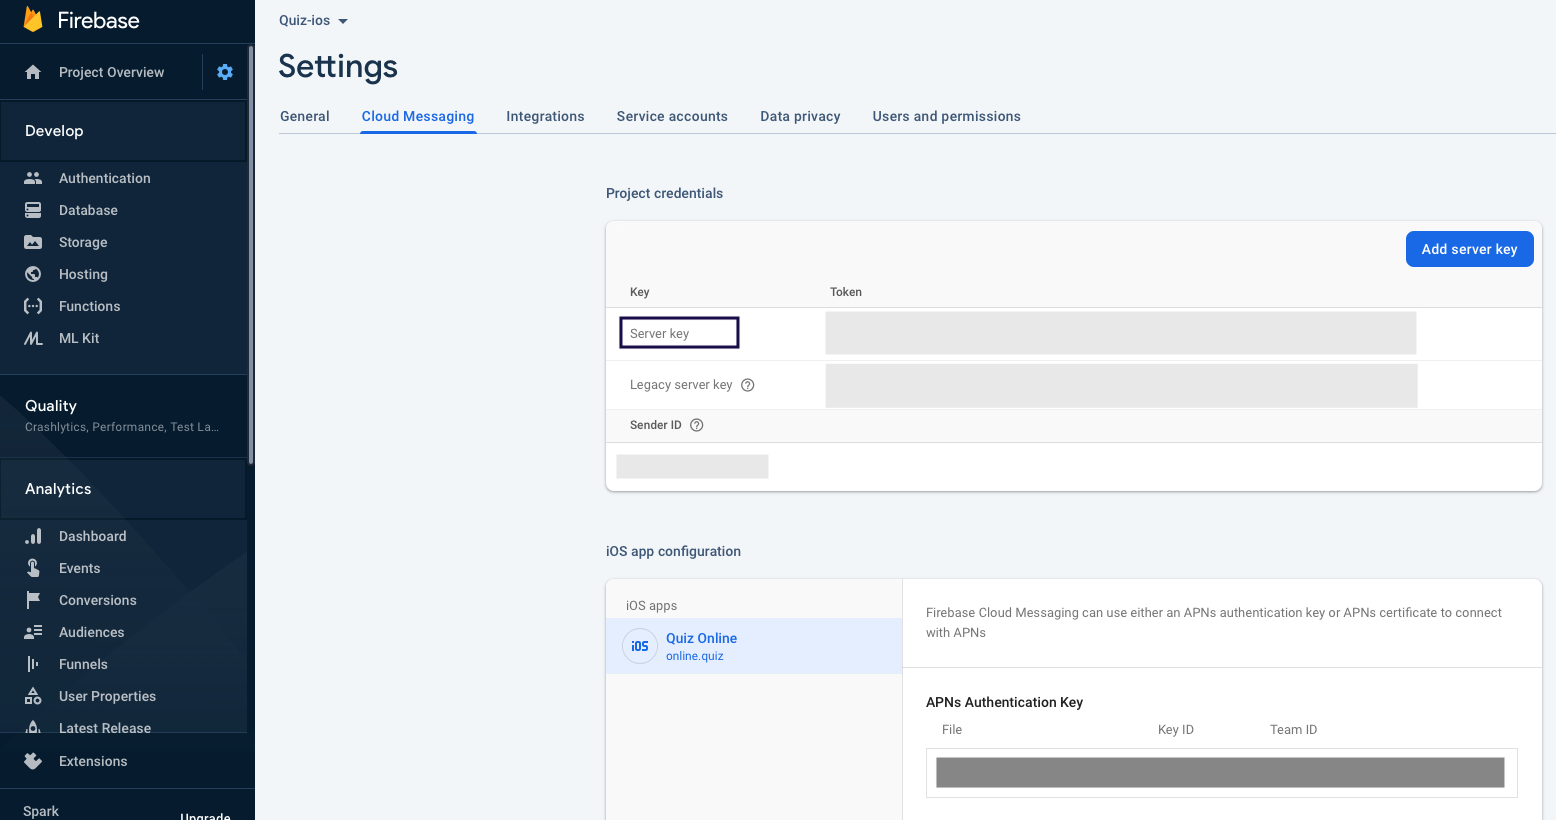
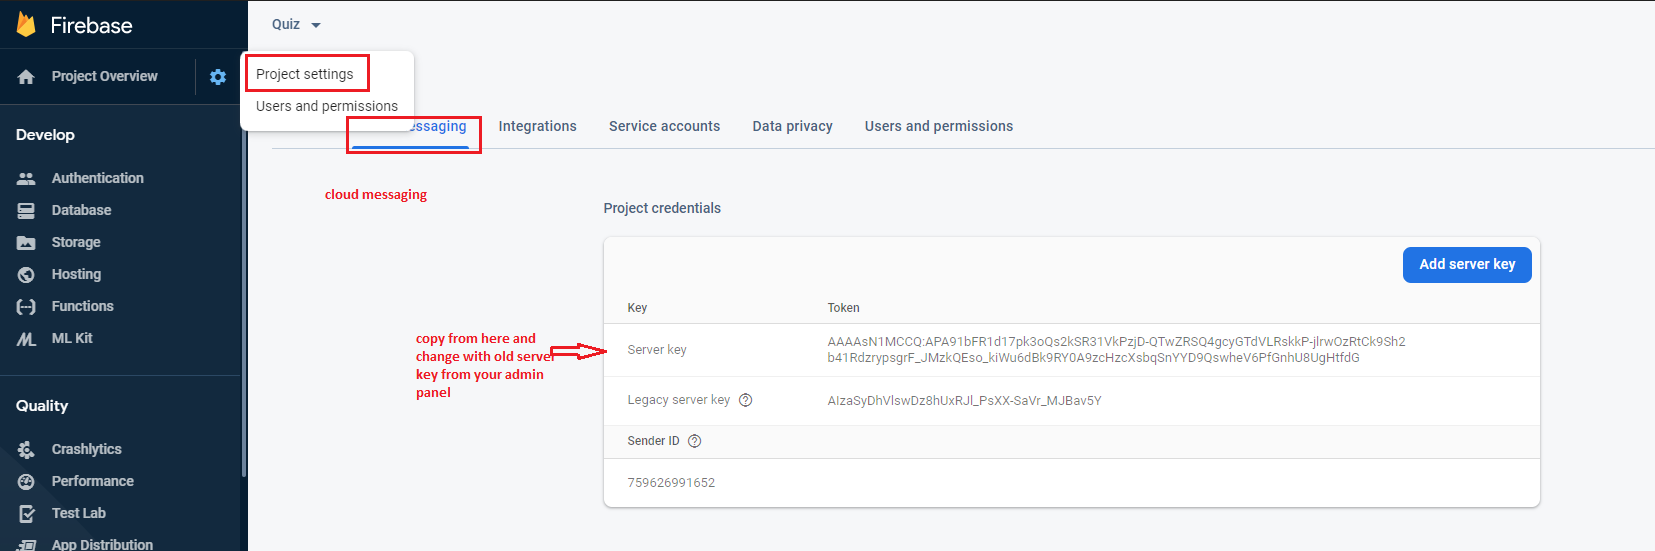
How to Integrate Firebase Cloud Messaging in app?
- Integrating Firebase Cloud Messaging
- For FCM Notification first you have to register your application with firebase.
- Create Firebase Project for Application. If you already created firebase project then you dont have to do that again.
- Firebase dependency, service class and all nacessary class are already included in project.
- So, you dont have to do extra code here.
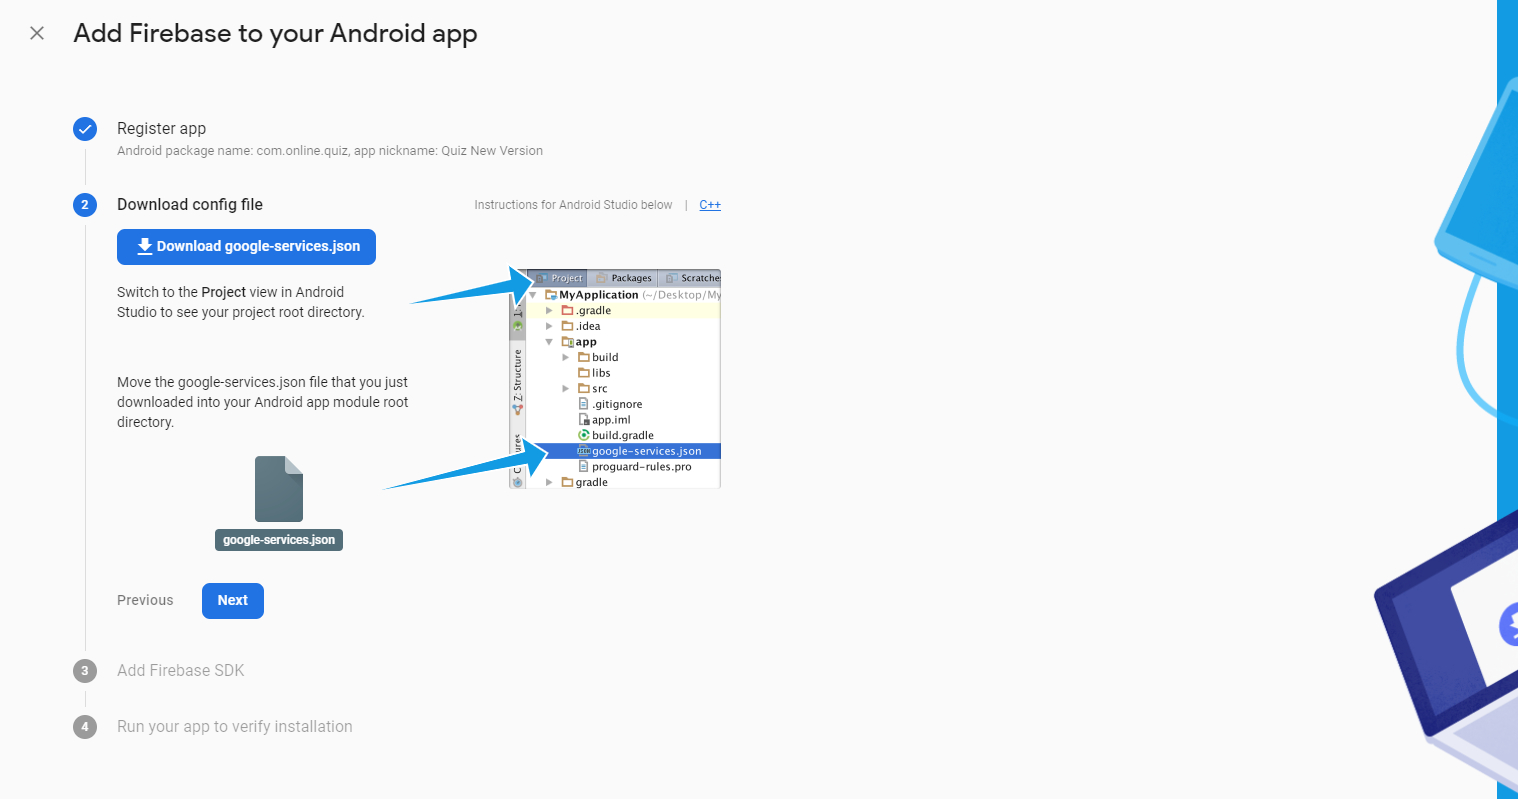
- Just download Google-service.json and replace with existing file.
- Sending Messages from PHP Backend
- Add Firebase Server Key in notification setting. Get server key from your firebase project and set in panel.
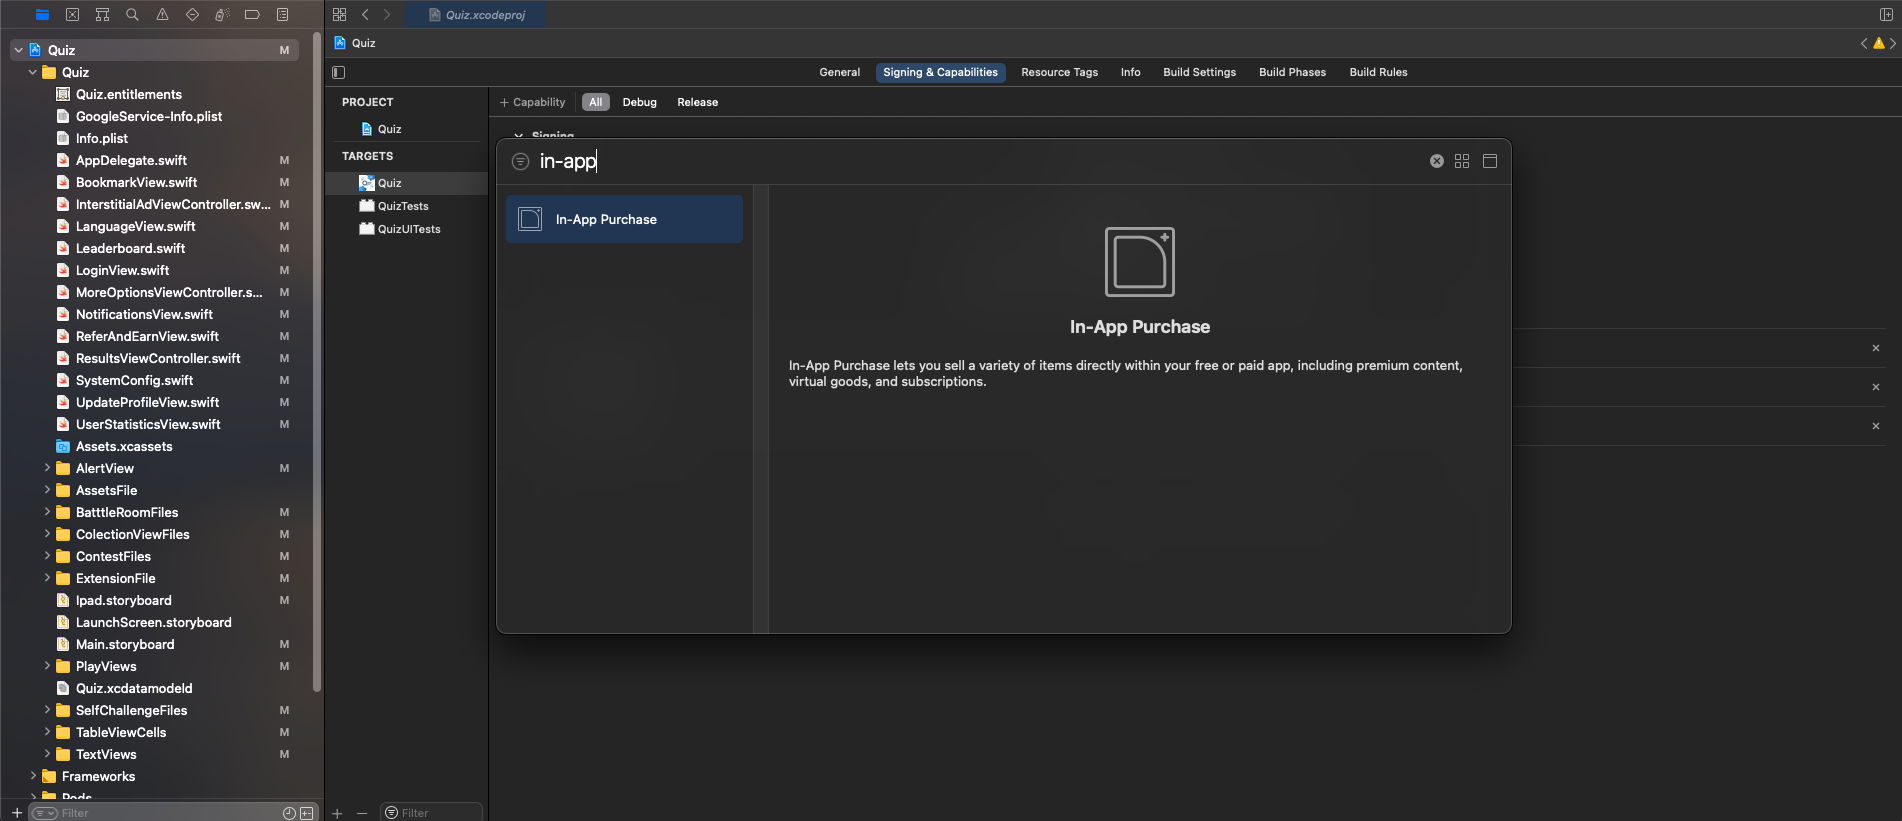
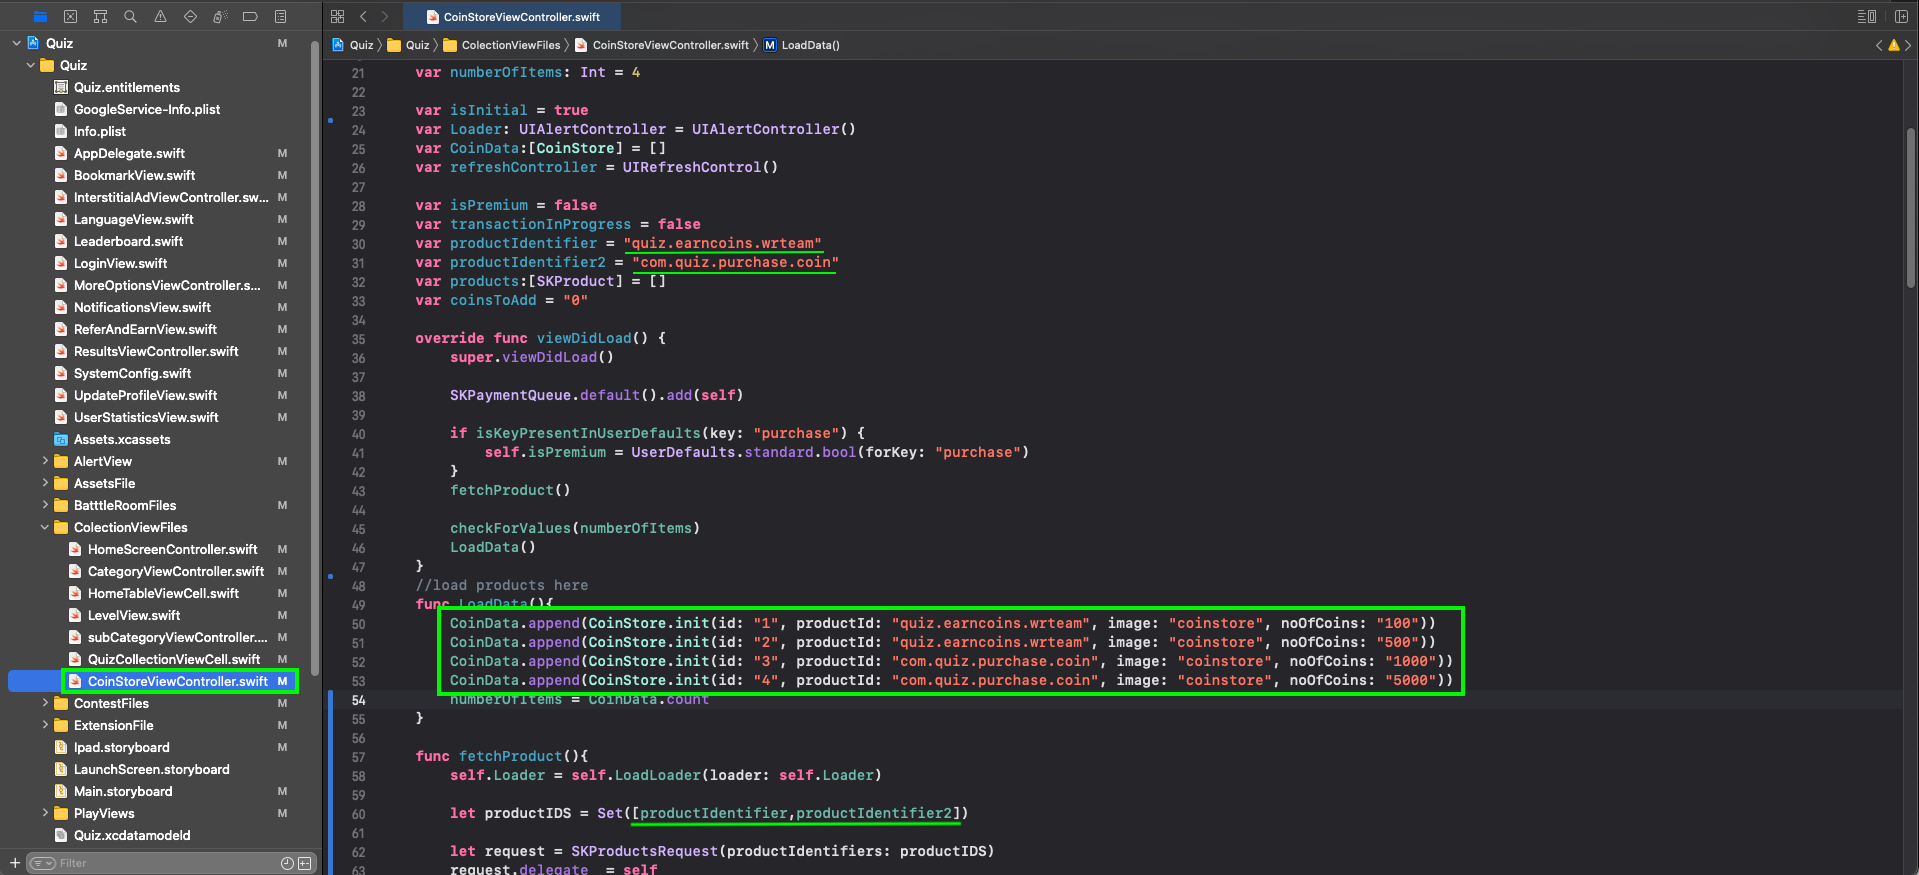
How to Change IN-APP Purchase key and Coins in app?
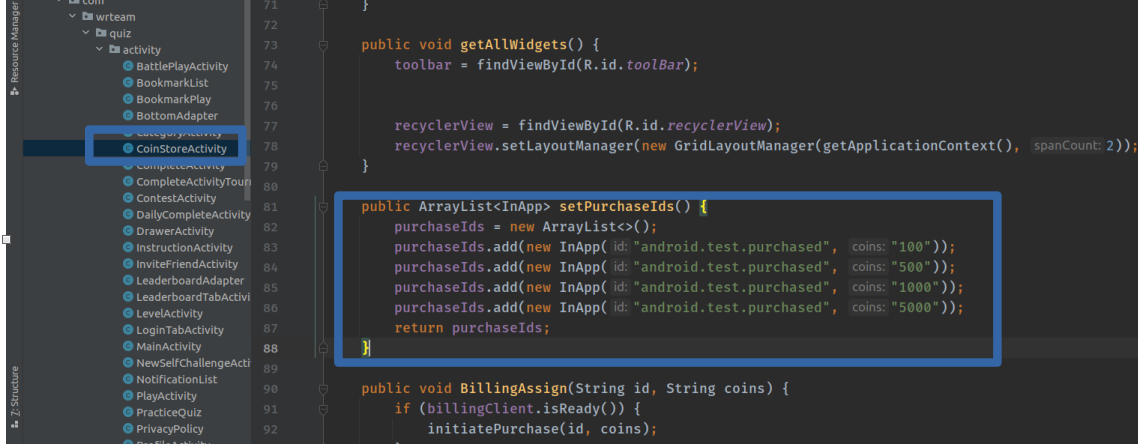
How to Create Product in Google Play Console
Follow this Link you can get How to Create In-App Purchase Product.Click Me
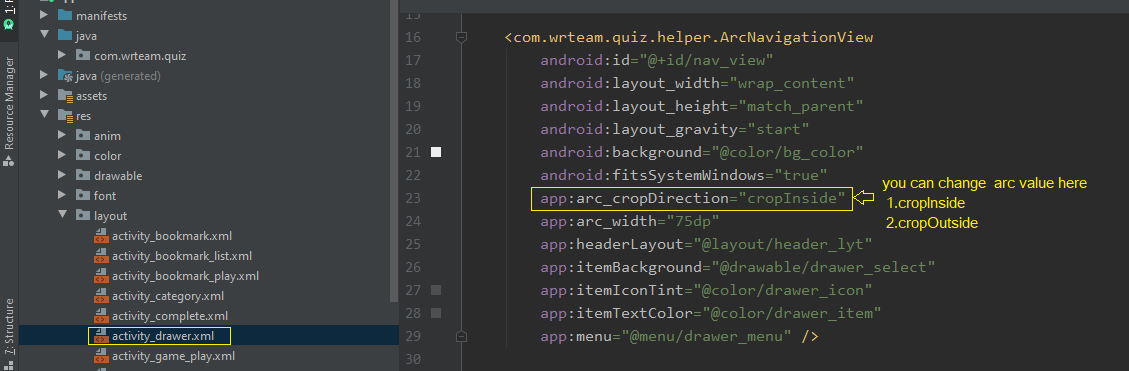
How to Change Arc in NavigationView?
- There is two type arc style for navigation view in quiz you can set according your own.
- cropInSide
- cropOutSide
- You have to just change "arc_cropDirection" value in xml file.
- go to android > app > res > layout > drawer_activity.xml
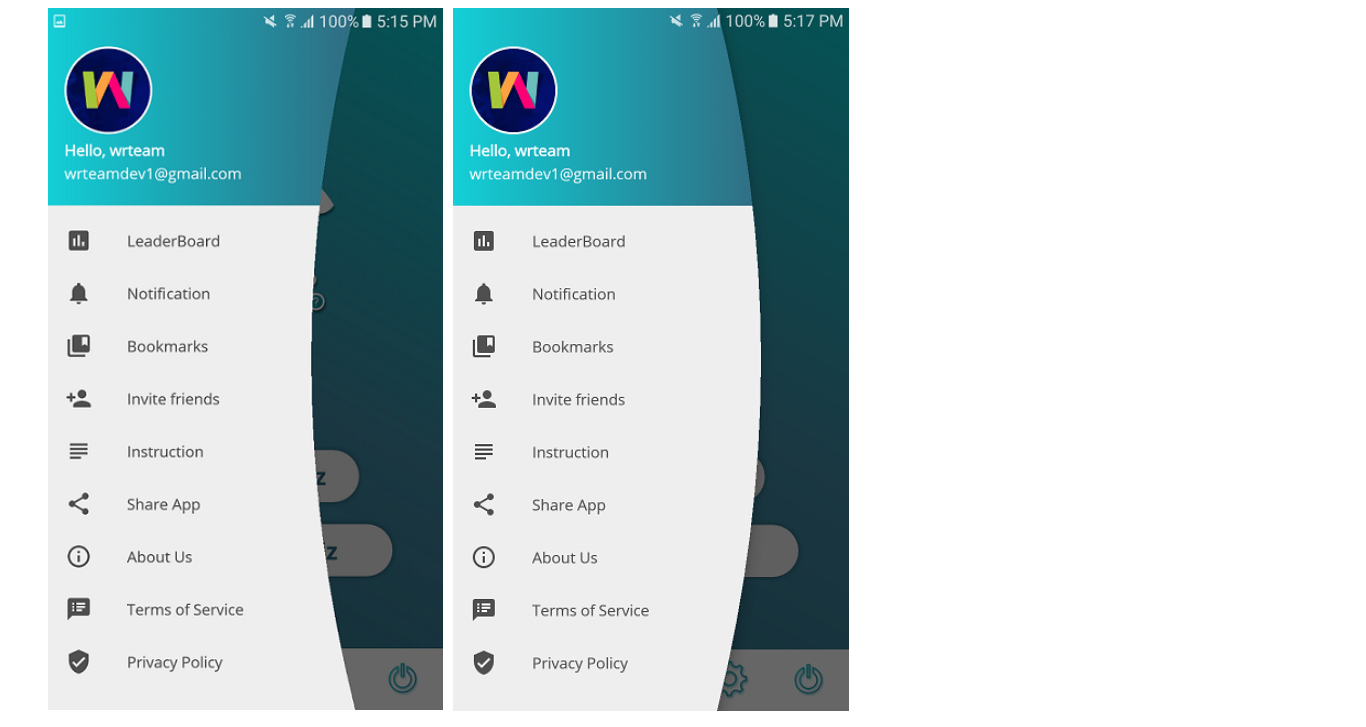
- Use Default Drawer
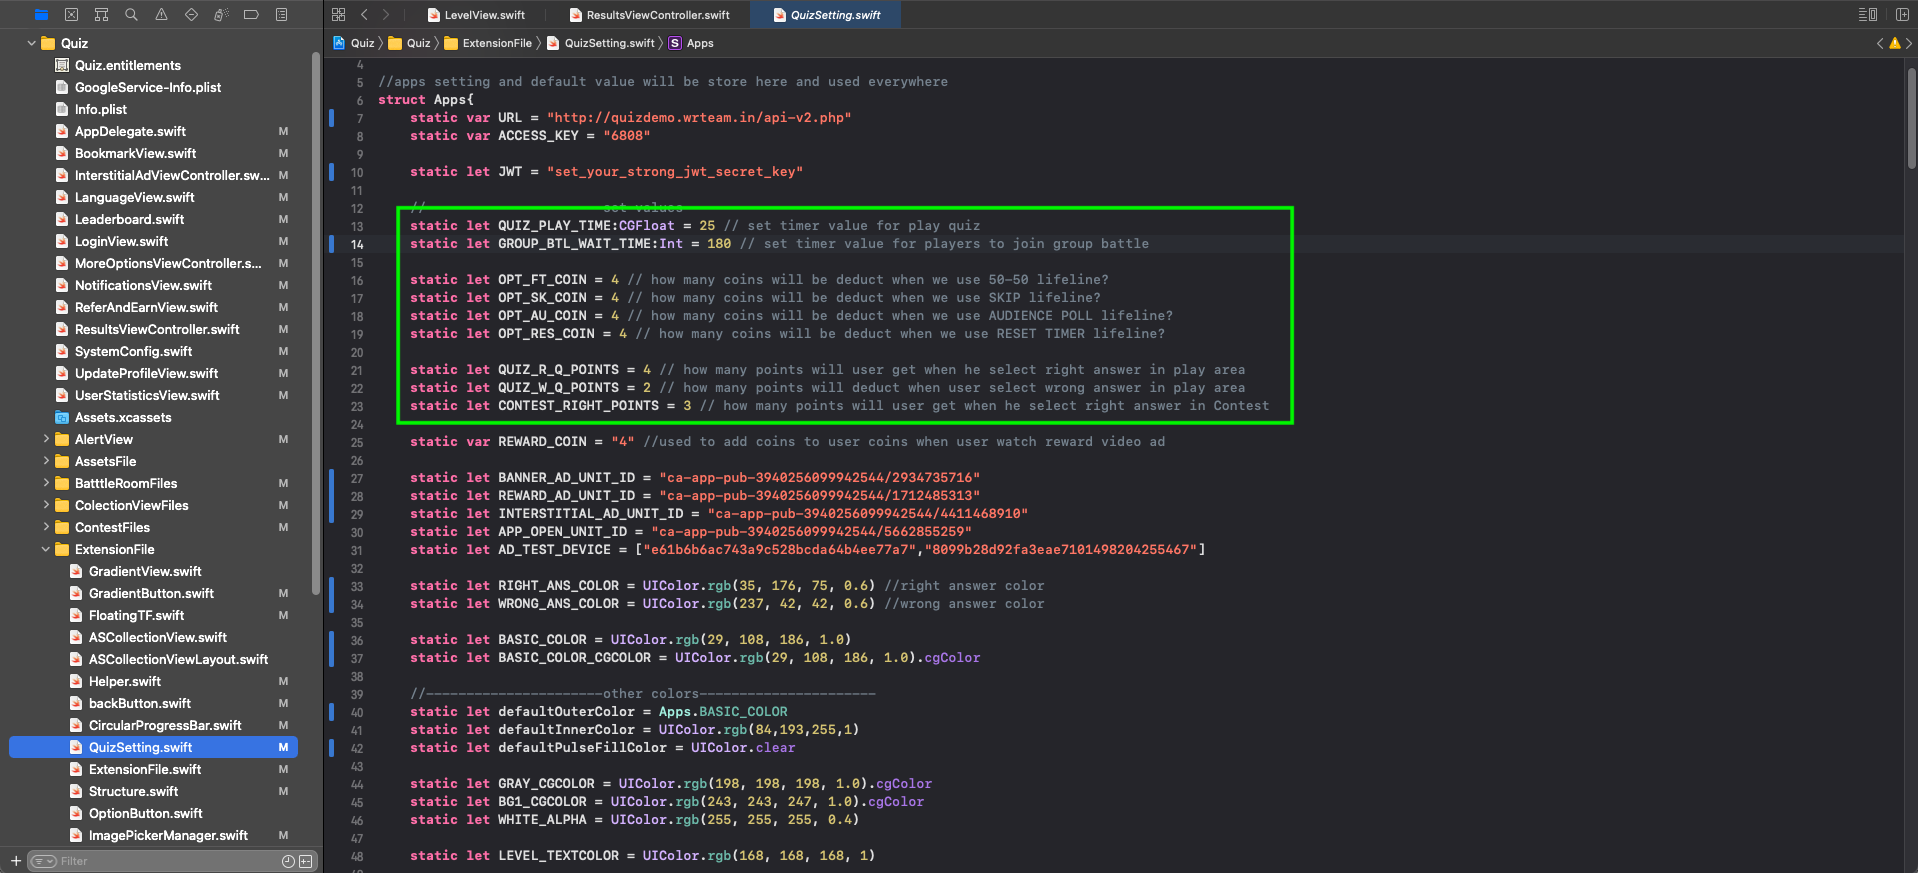
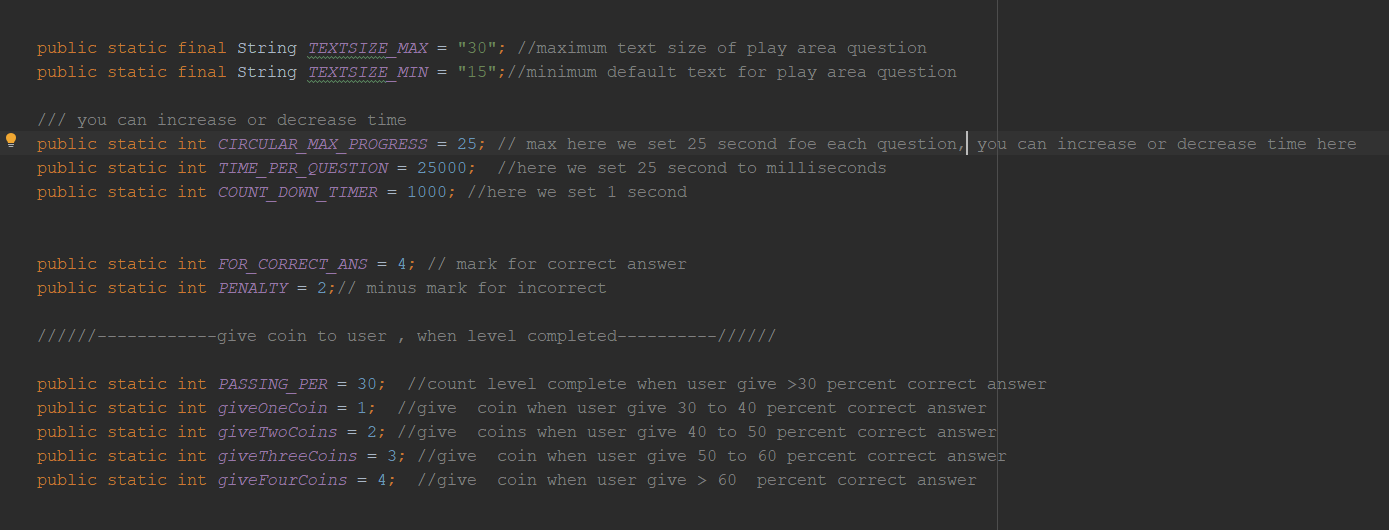
Want to costomize some value? like how many correct answers you need to complete current level etc...?
- go to android >app >java > com.wrteam.quiz > Constant.java
- Here we define maximum correct answers you need to complete level, rewarded coin when level completed , some static values and more.
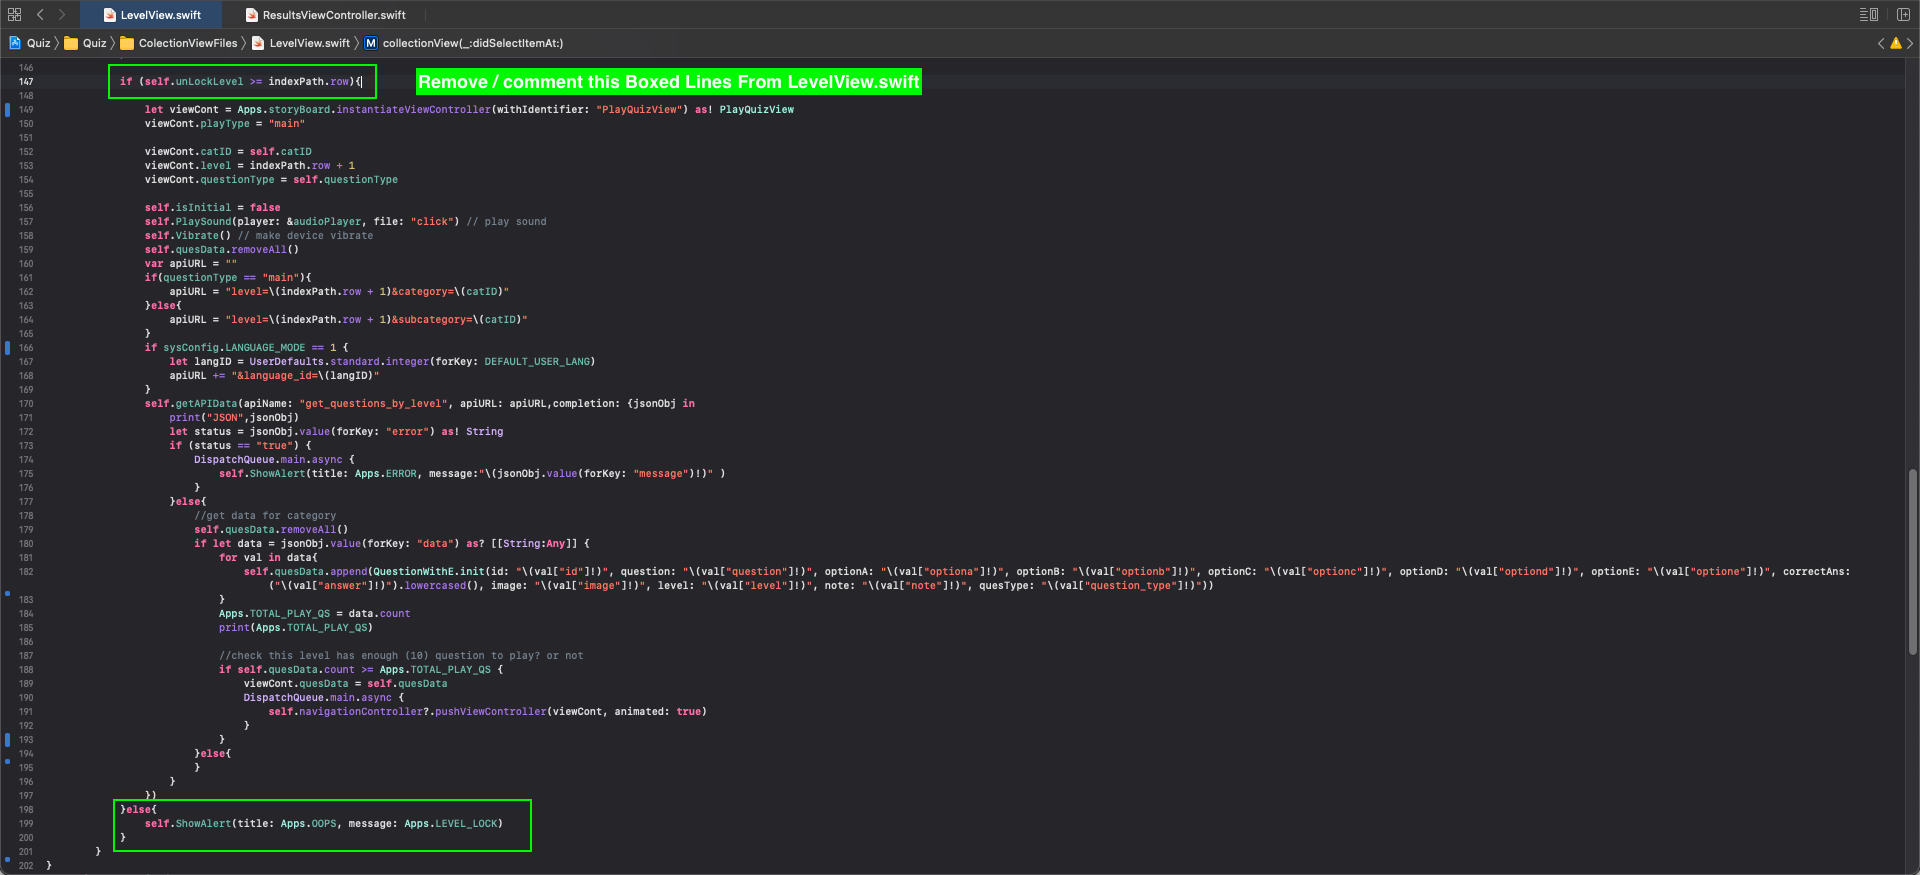
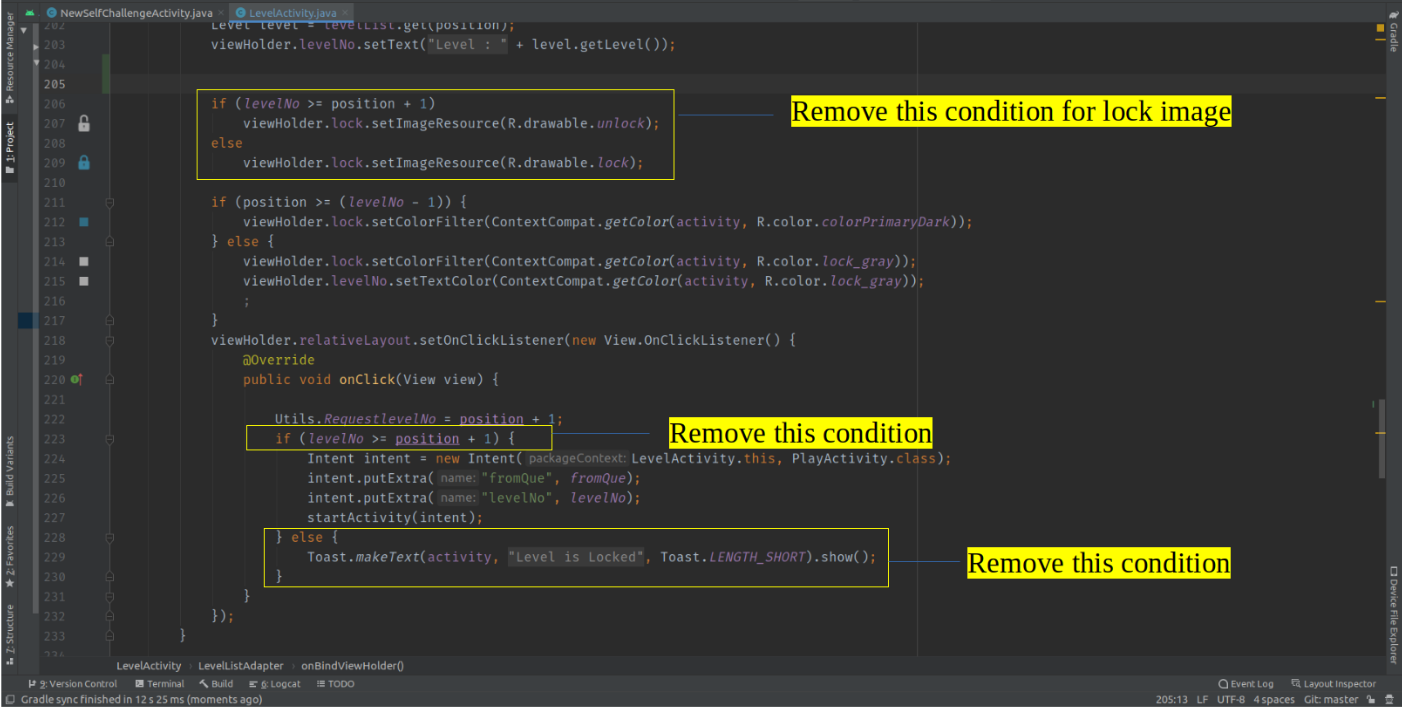
How to Remove Level Lock feature from Application?
- go to android >app >java > com.wrteam.quiz > activity >LevelActivity.java
- In LevelActivity class there is adapter for levelList, inside adapter there was some condition for level lock.if you dont want add in your app, then remove it.see below image.
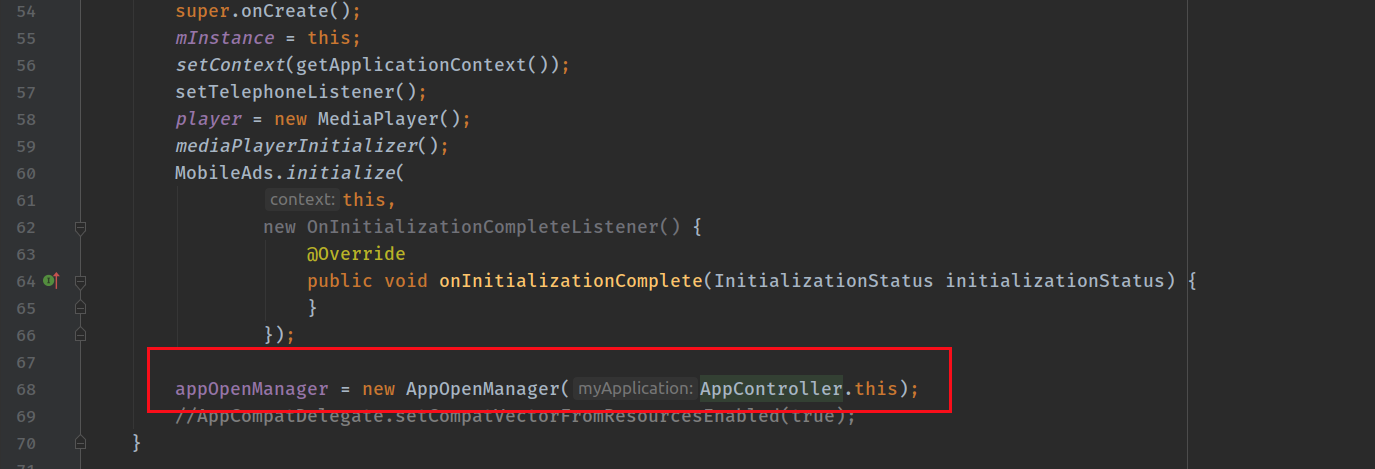
How to Remove Admob Ads open feature from Application?
- go to android >app >java > com.wrteam.quiz > helper >AppController.java
- Remove below image line your admob ads open will removed.
Constant
- go to android >app >java > com.wrteam.quiz > Constant.java
- Here we define some static values and more.
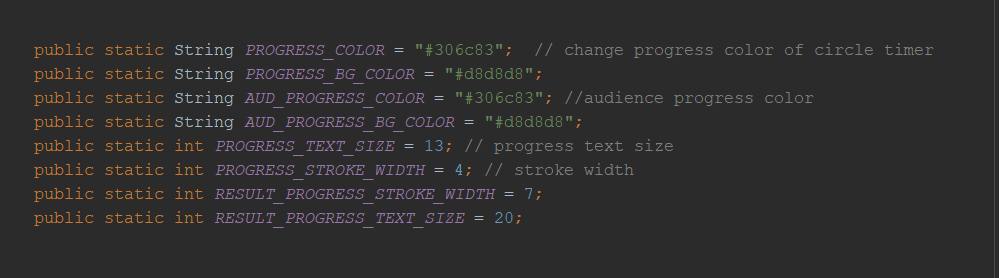
How to change circular progress width, color, textSize etc?
- We have two Indicator class in application CircleTimer.java and AudienceProgress.java.
- Now Go to android > app> java > com.wrteam.quiz > helper> Constants.java
- Here you can set background color, progress color,width,strock width, text attributes and many more.
- In dimen.xml ,we set circle's hight and width.
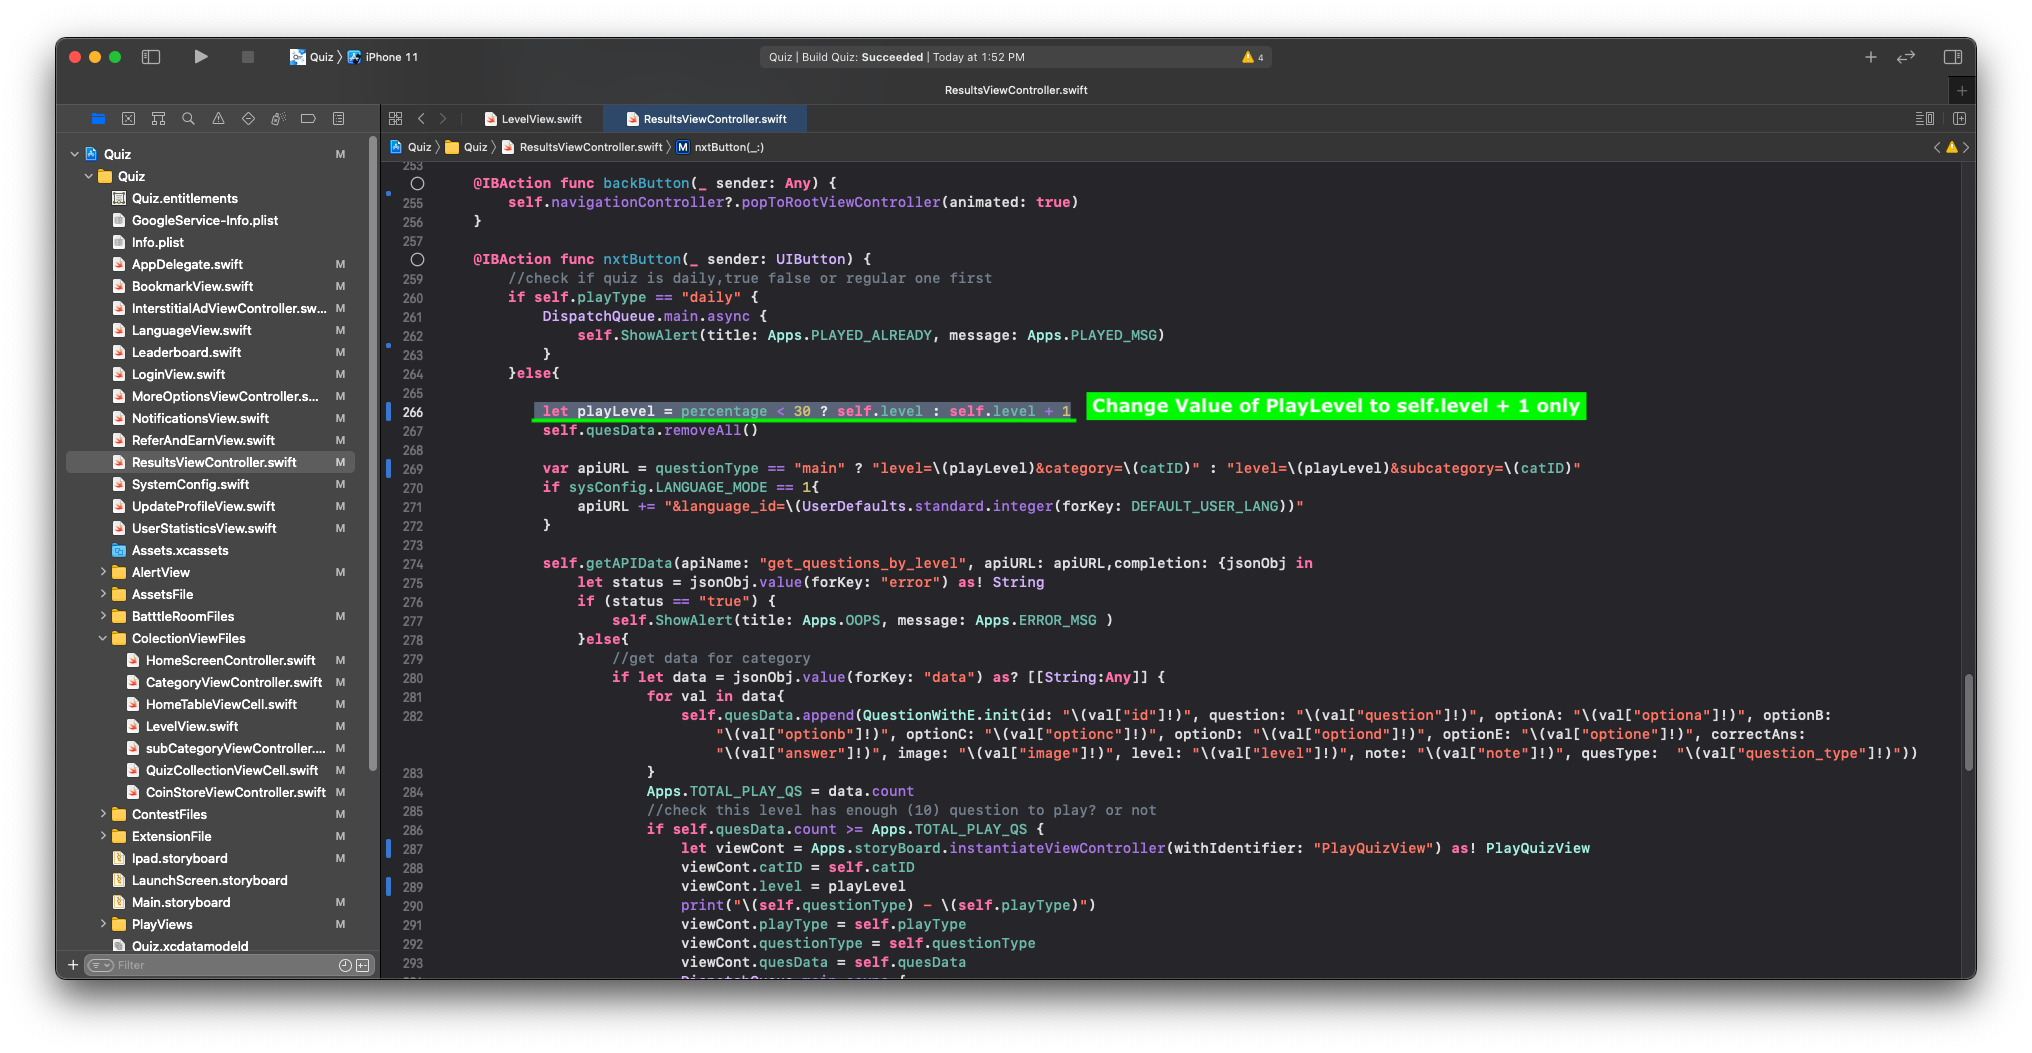
How to change Time , complete level configs, mark for correct and incorrect, textSize etc?
System Settings for Application.
- Answer Display:= When User Give Wrong Answer You Can Enable and Disable Answer Show Or Not.
- Language Mode:= Enable and Disable Language from admin panel.
- Option E Mode:= Enable and Disable Opation E from admin panel
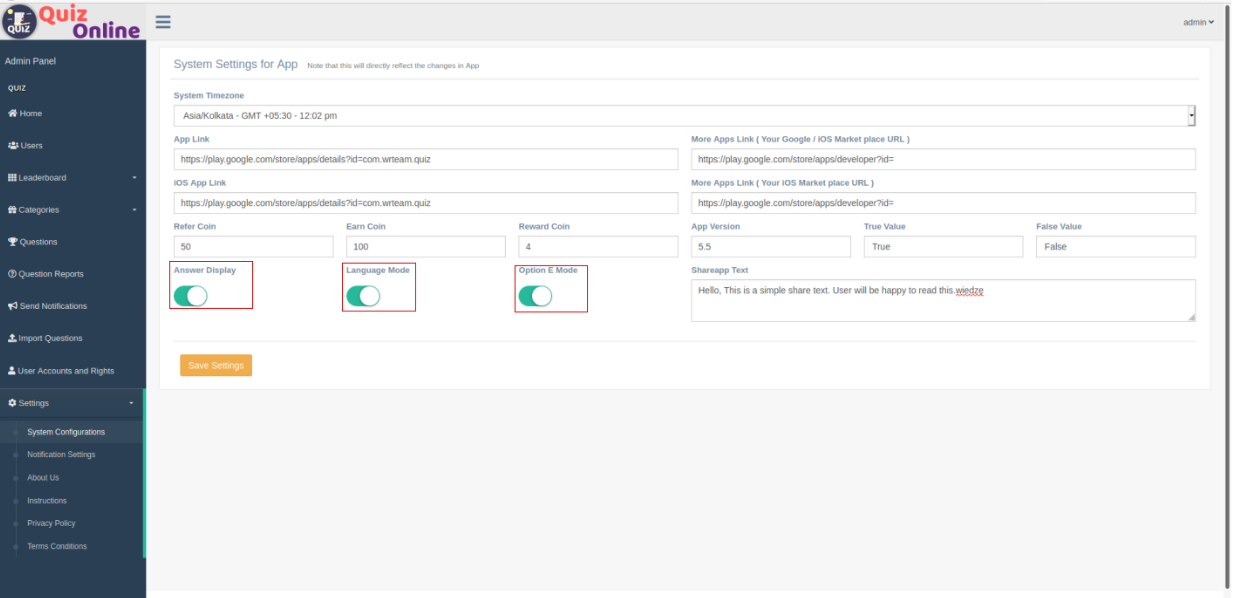
- You Can set Refer & Earn Coin from admin panel.
- You Can set Rward Coin(Watch Videos And earn Coin) from admin panel
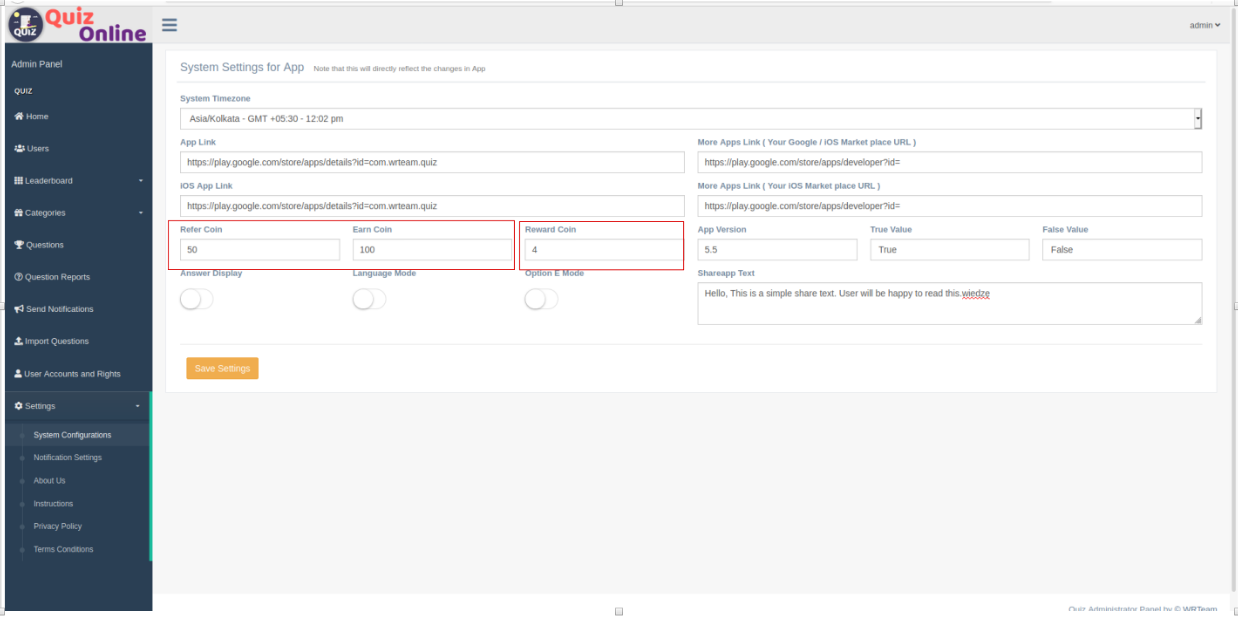
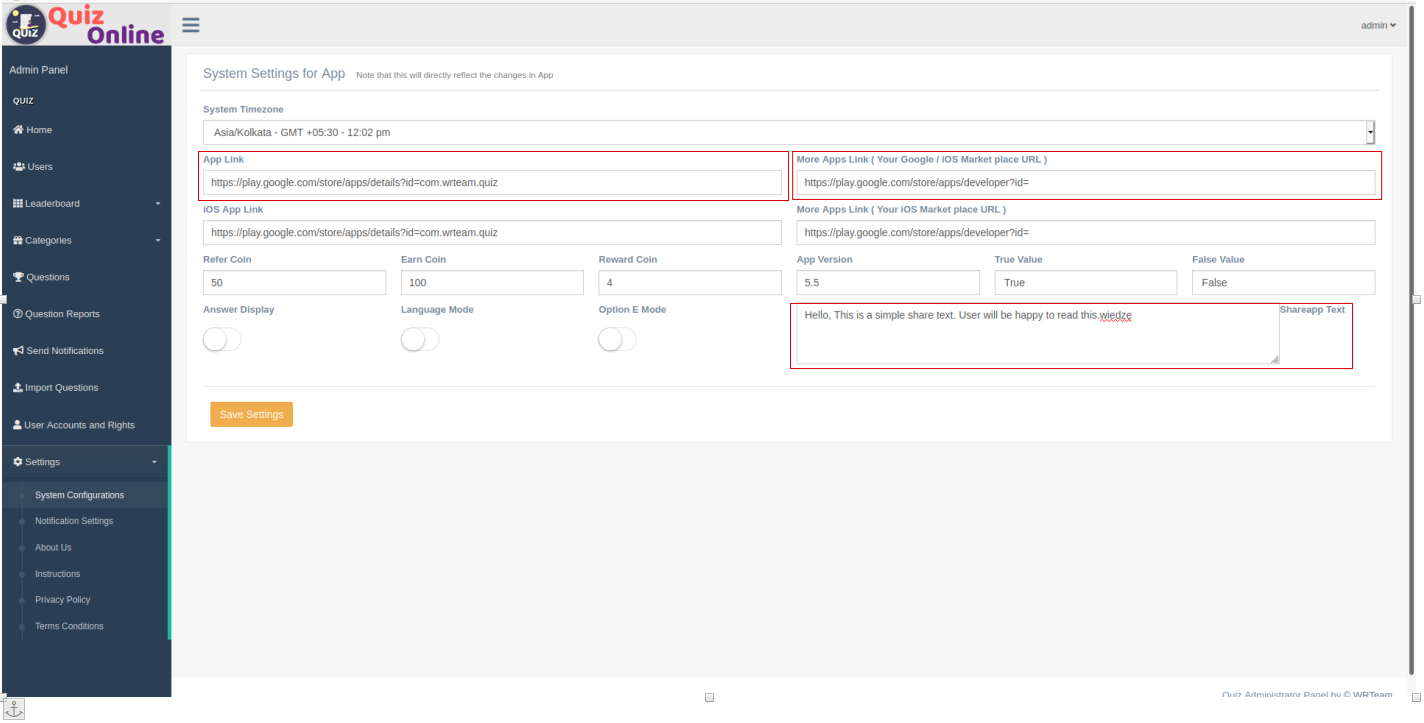
- App Link:= You have to set Your Application Playstore Link.
- More Apps Link := You Can set Your Developer Page link of Playstore.
- Shareapp Text:= You have to set Your Application Share Text.
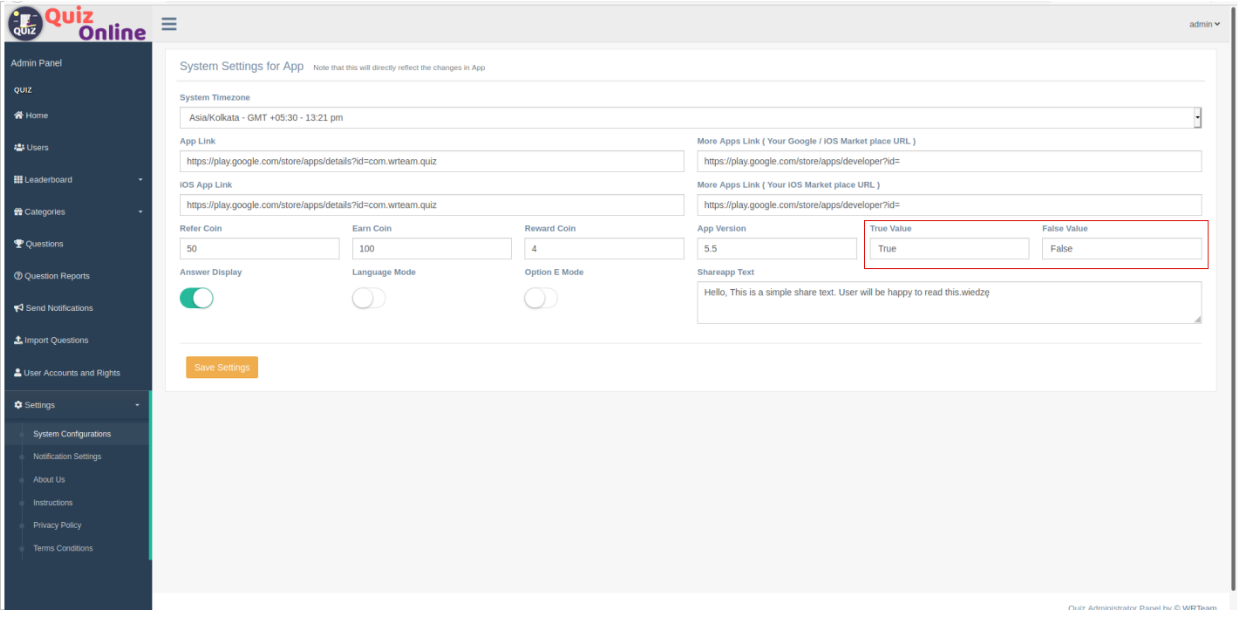
- You can change True and False Value.
- About Us:= Add Your Company Details It Will Reflect in Application About Us .
- Instructions:= Add Your Quiz Instructions It Will Reflect in Application Instrucations
- Privacy Policy:= Add Your Quiz Privacy Policy It Will Reflect in Application Privacy Policy
- Terms Conditions:= Add Your Quiz Terms Conditions It Will Reflect in Application Terms of Service
- Force Update App:= Here you can Enable and Disable Forcefully Update Dailog.
- Daily Quiz Mode:= Here you can Enable and Disable DailyQuiz button.
- Contest Mode:= Here you can Enable and Disable Contest Button.
- In-App Purchase Mode:= Here you can Enable and Disable In-App Purchase Button.
How to change admob id?
- Open Admin panel > Setting > System Configuration
- You have to replace your live AdmobId with Test admobId.
- You can also turn off Ads from in App ads.

How to add Facebook Audience Network with Mediation?
- Please Follow Below Link documentation Don't miss any step.
- Click Here to see Documentation.