Introduction
Thank you for purchasing code. It really means a lot and It's our pleasure to serve top-notch service to you. Thank you so much for choosing WRTeam . If you have trouble with the code and documentation please contact to our Support Team Here
Requirements
- If you don’t need SEO for the frontend site, shared hosting will be sufficient.
- If you want to use SEO for the frontend site, a VPS is necessary, as shared hosting does not provide the required resources.
- Node.js Support: The server must support Node.js , as it is essential for running the application with seo.
- Memory Requirements: The server should have at least 3-4 GB of free RAM to handle the application processes efficiently.
- SSH Root Access: The server must provide SSH root access to execute Node.js commands and manage the application.
Note: You only need to choose either Shared Hosting or VPS, depending on your SEO requirements. There is no need to purchase both.
For Admin Panel- PHP Version: The Admin Panel is built using Laravel Framework 10.0, which requires a minimum PHP version of 8.1.0 or higher.
- Flutter Version: Flutter stable channel 3.27.4 sdk version.
- Java Version: Java Development Kit (JDK) version 23.
How to Install News App on Your Server?
- Create your domain or subdomain in your server.
-
Create an empty database in your server and remember this credentials:
i. database name
ii. database username
iii. database password - Upload the source code you have downloaded from CodeCanyon and unzip it.
-
Now navigate to the url where your project is located.
ex. mydomain.com or subdomain.mydomain.com - The installation screen should appear and guide you in the process.
Thats it! Now you are ready to run your first News App
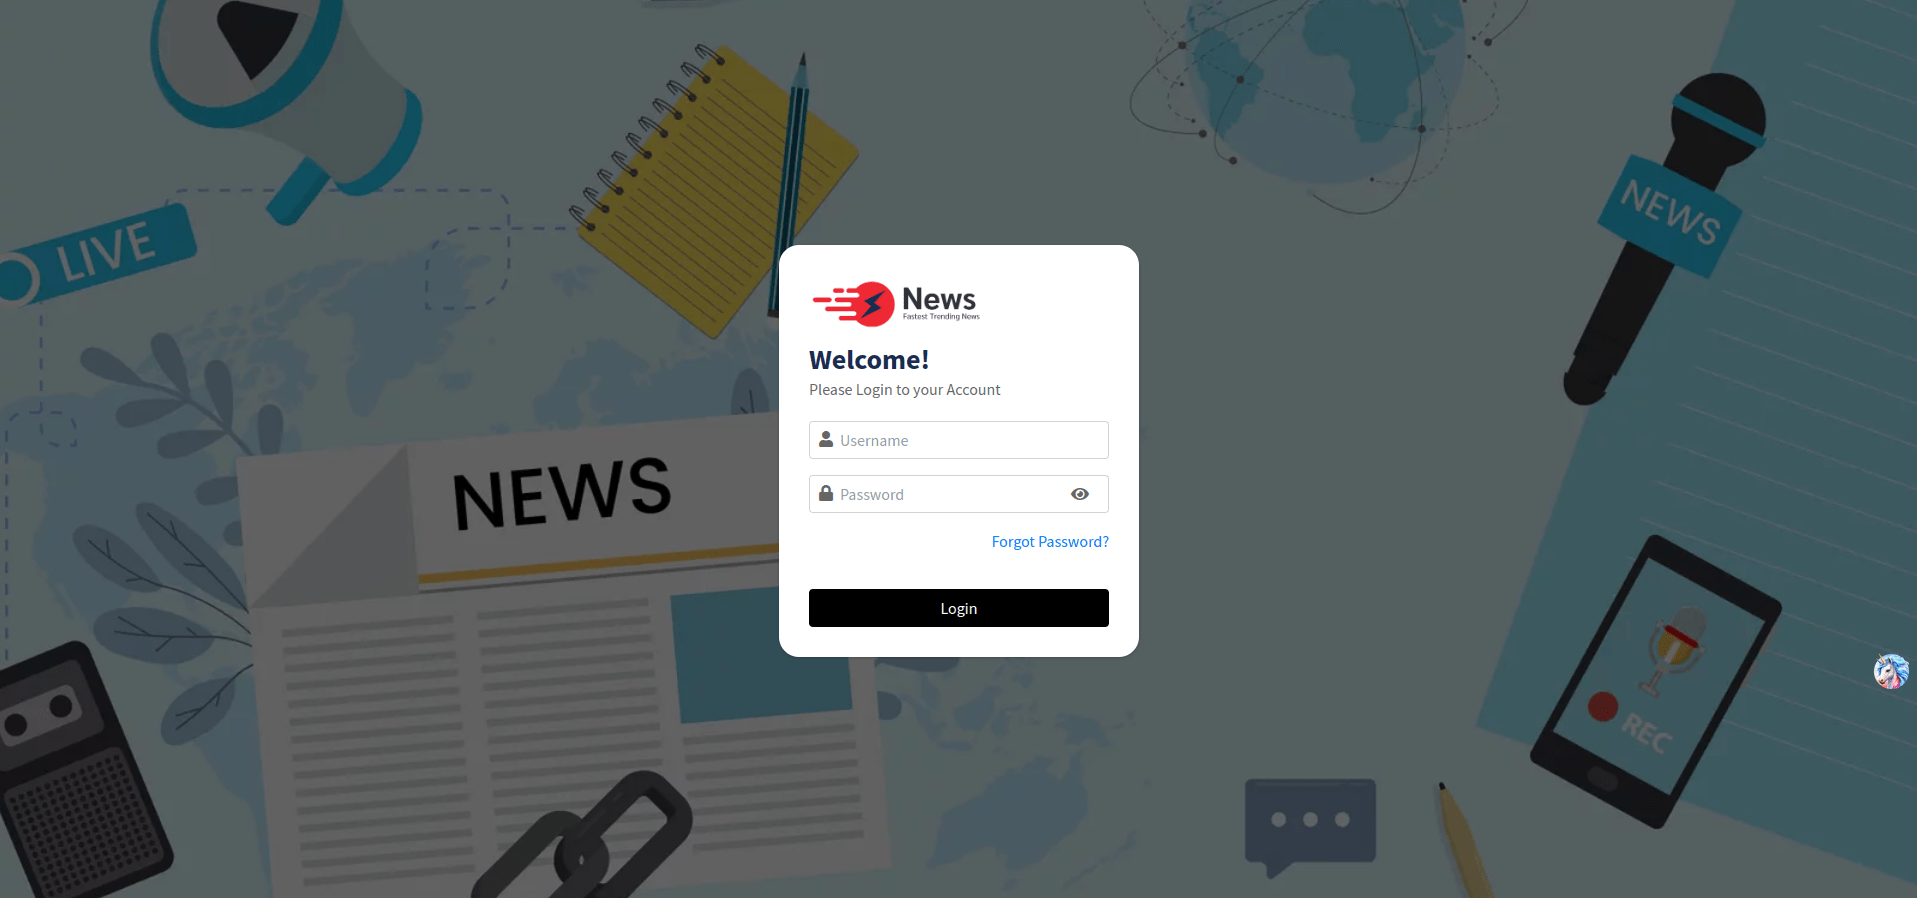
Default Login DetailsUser: admin
Pass: admin123
Notification Management
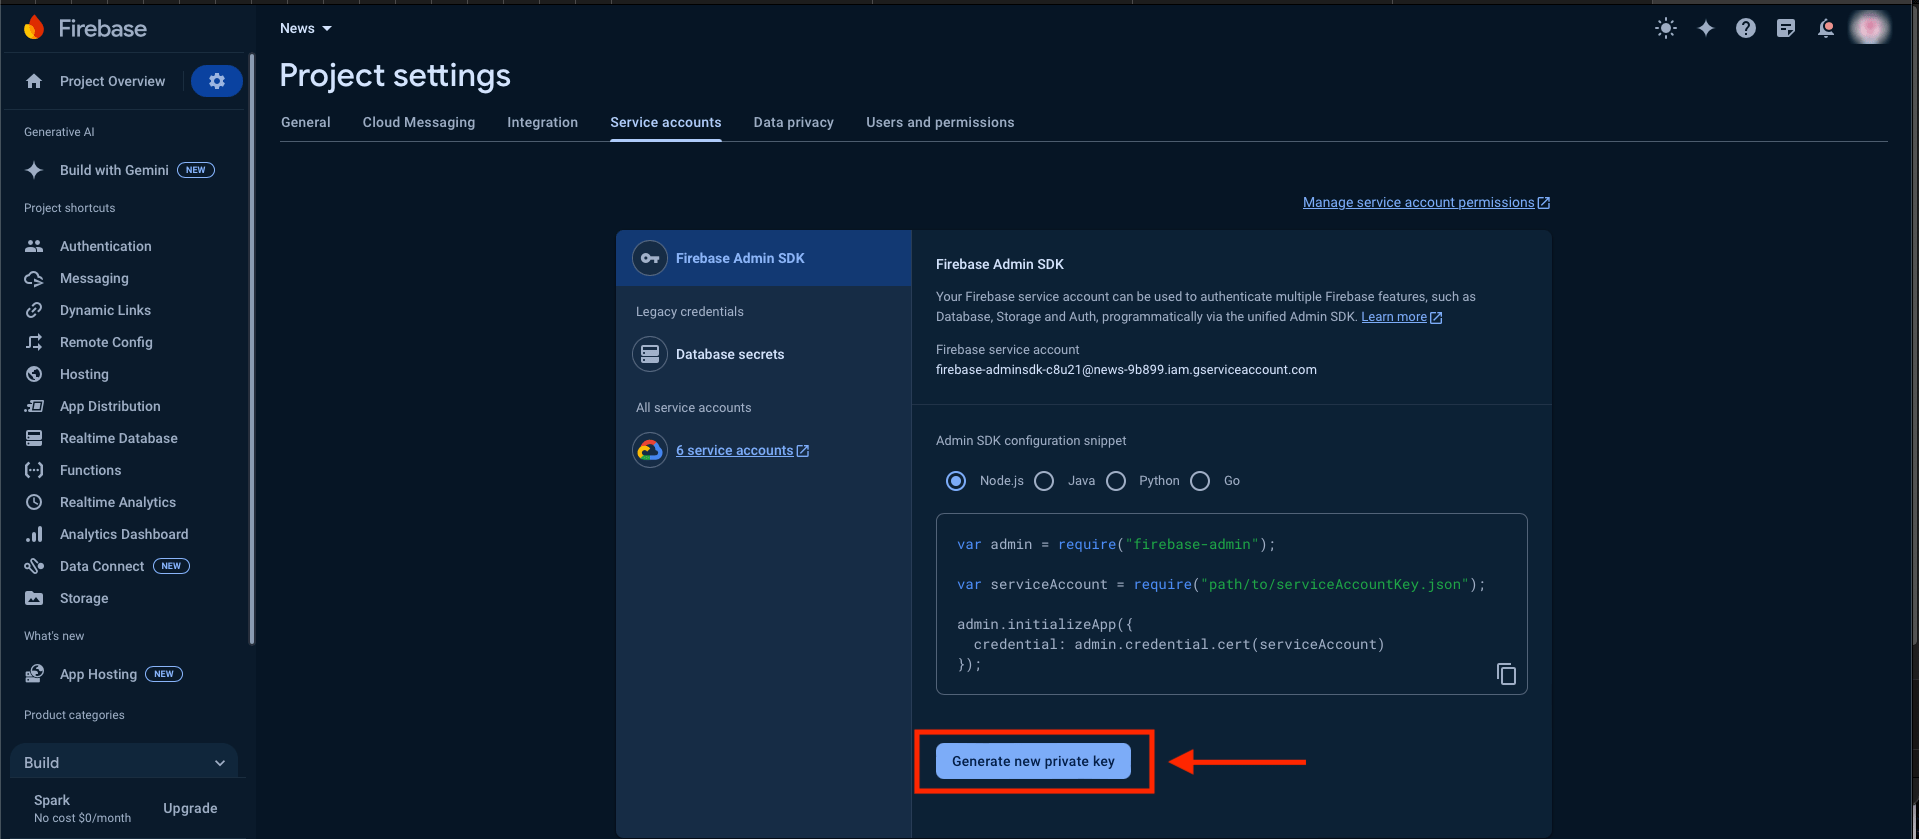
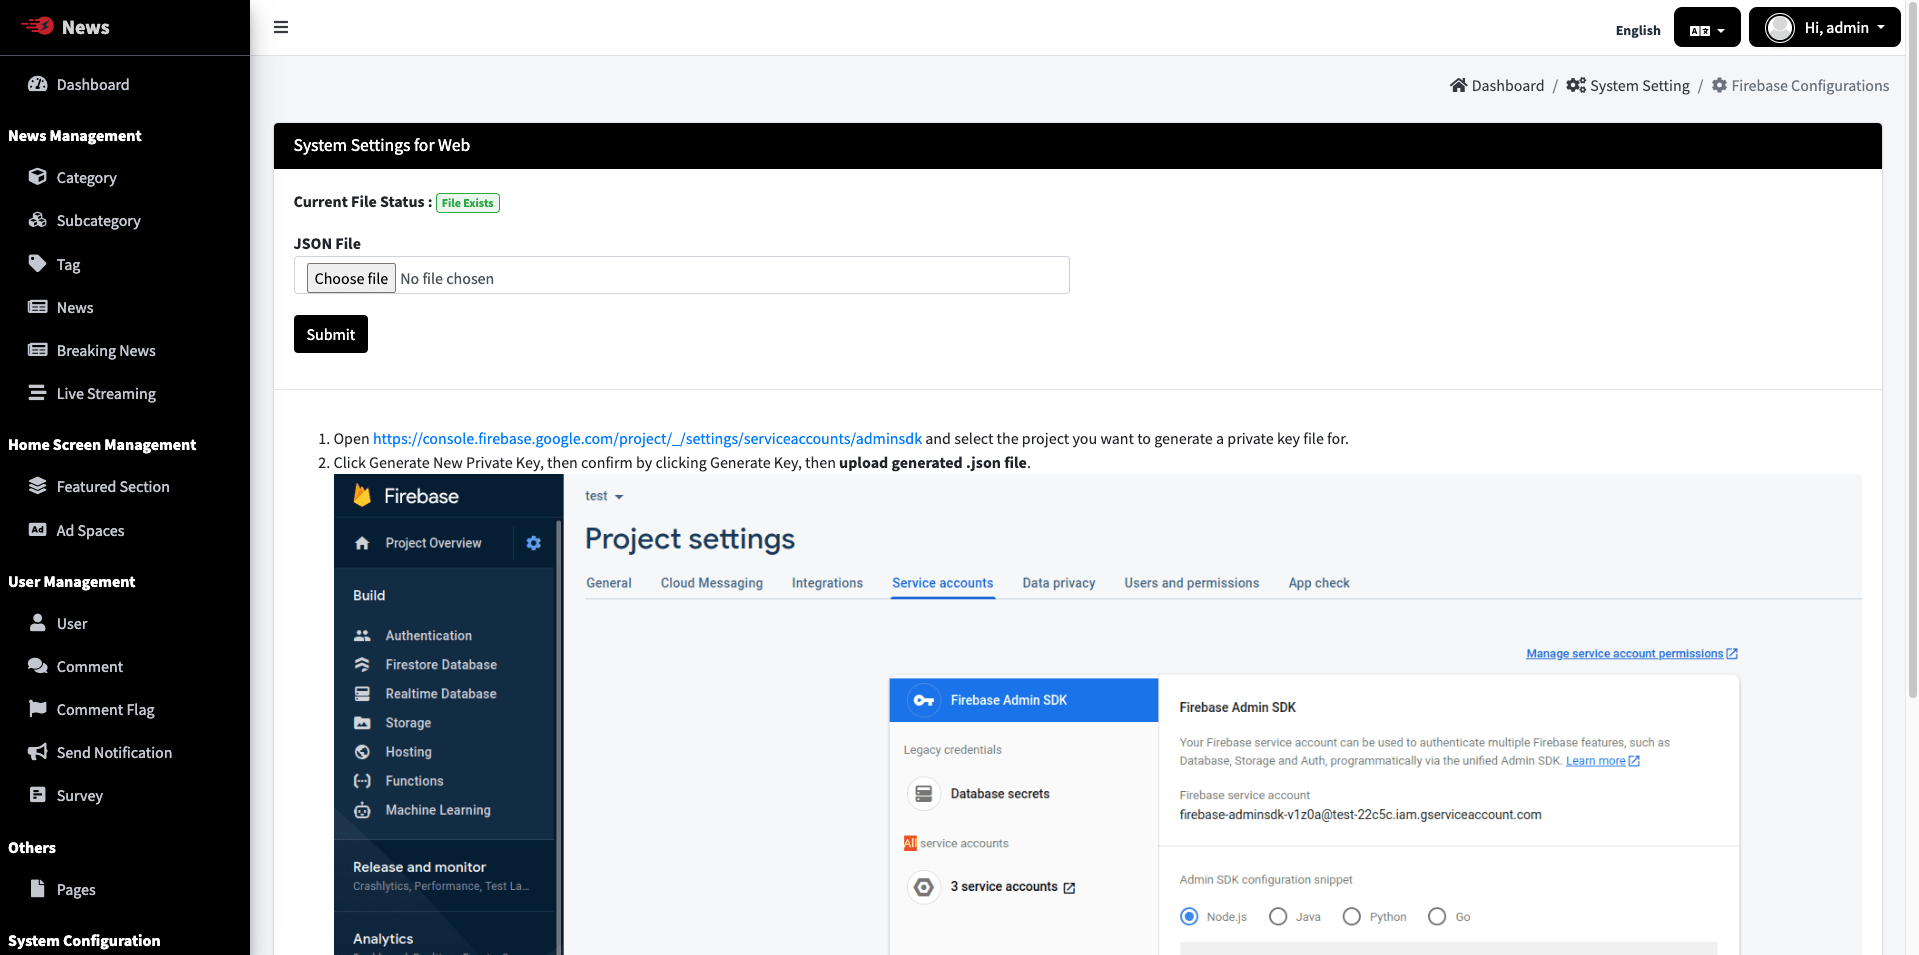
First Of all,we need to Download Private key json file from Service Accounts tab of your Firebase Project & Upload it here in System Setting > Firebase Configurations
Set System Configurations
Change the System Timezone, App Name & App Logo of News admin panel

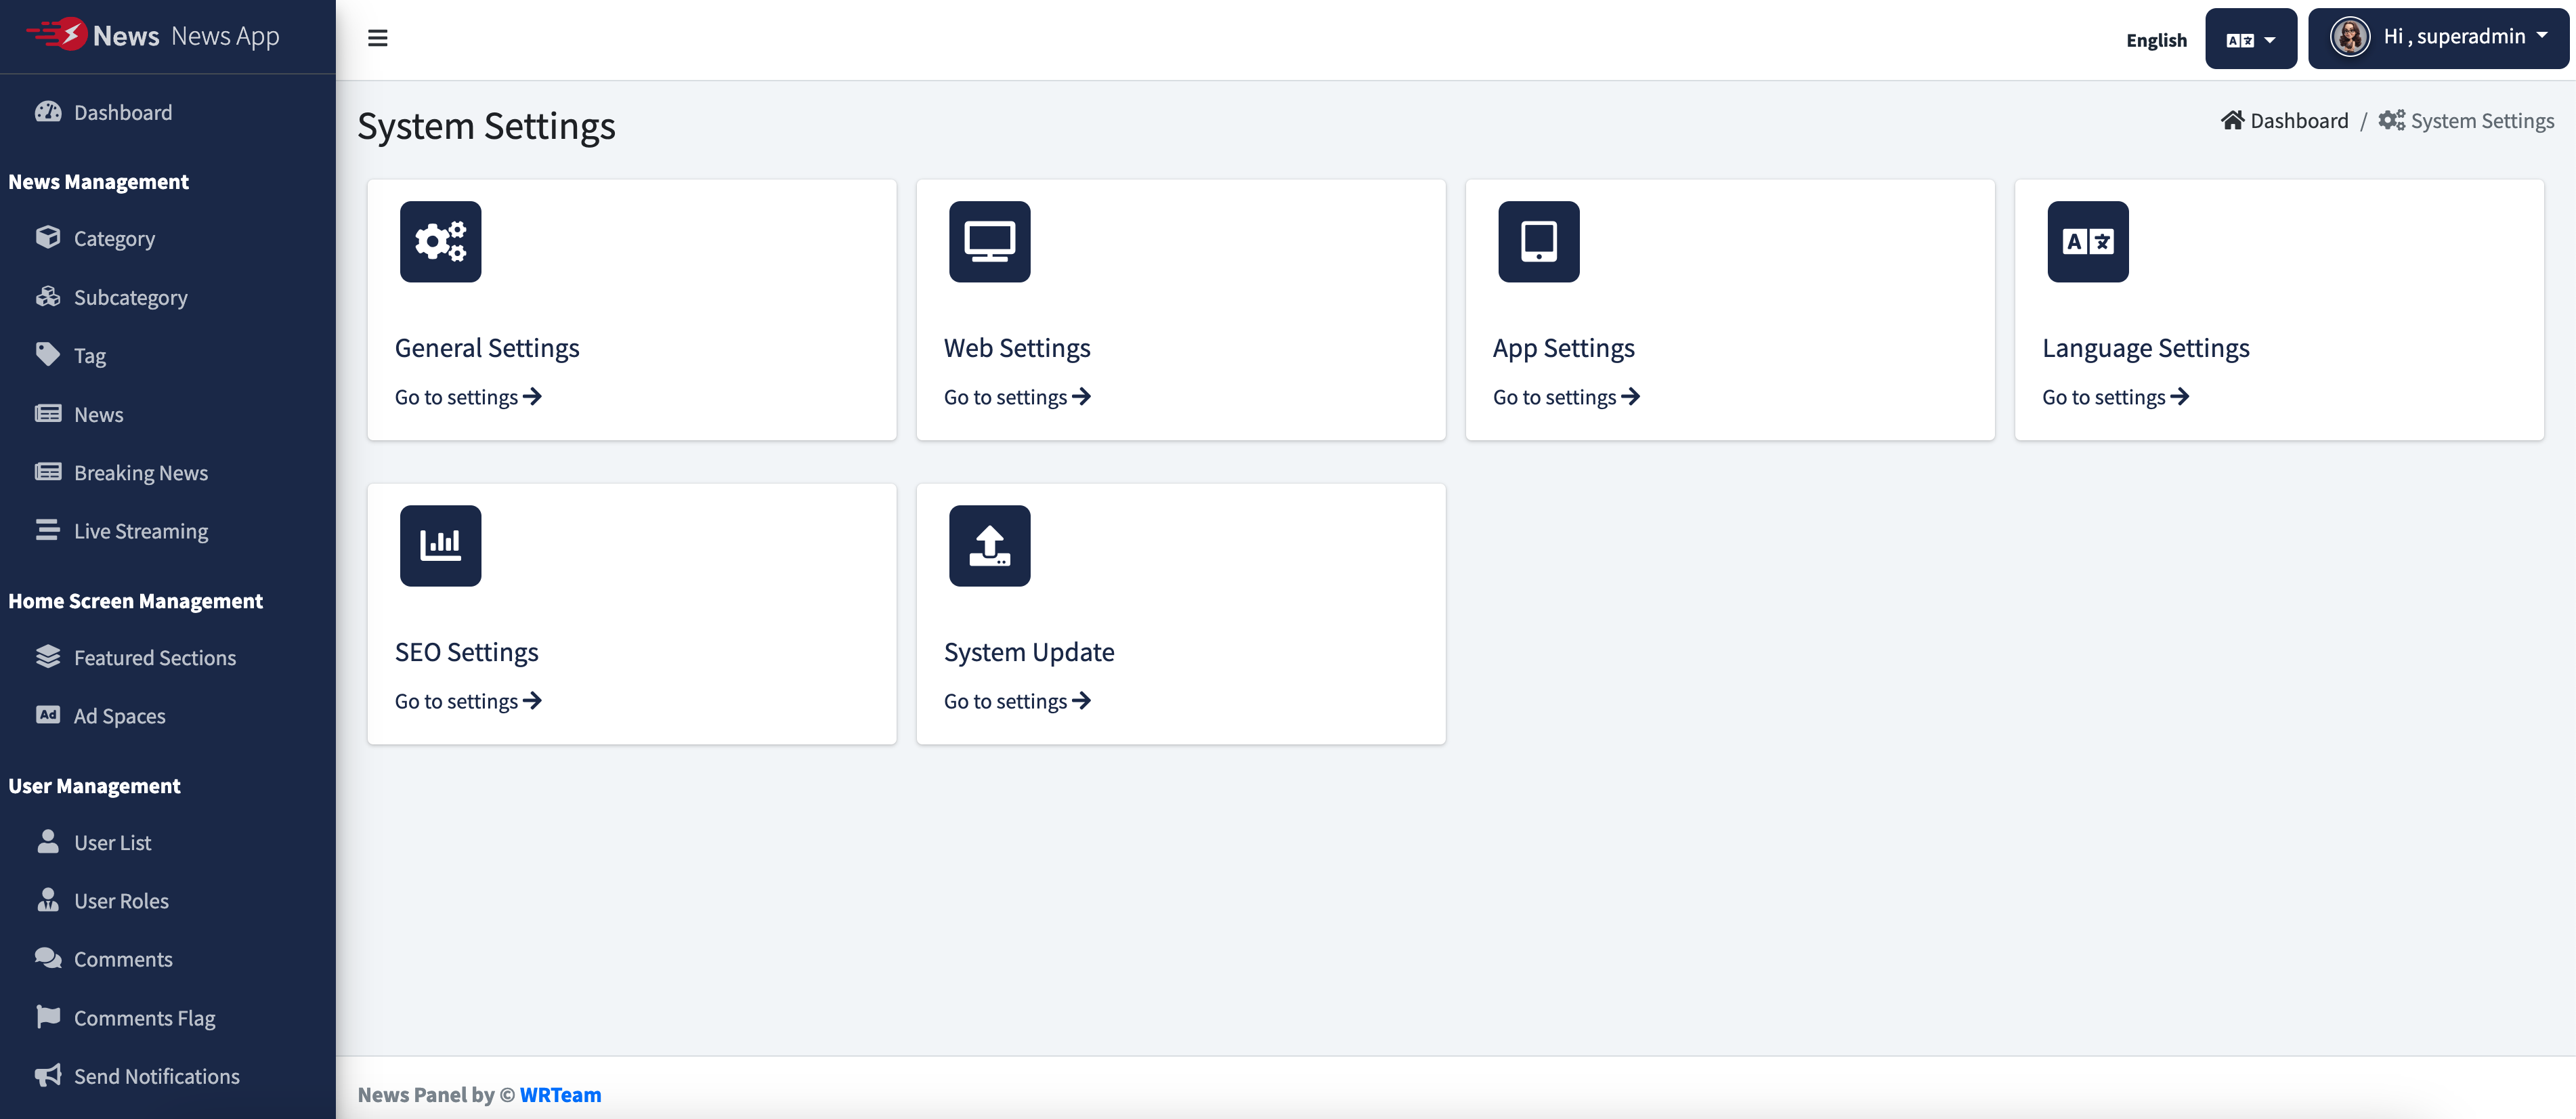
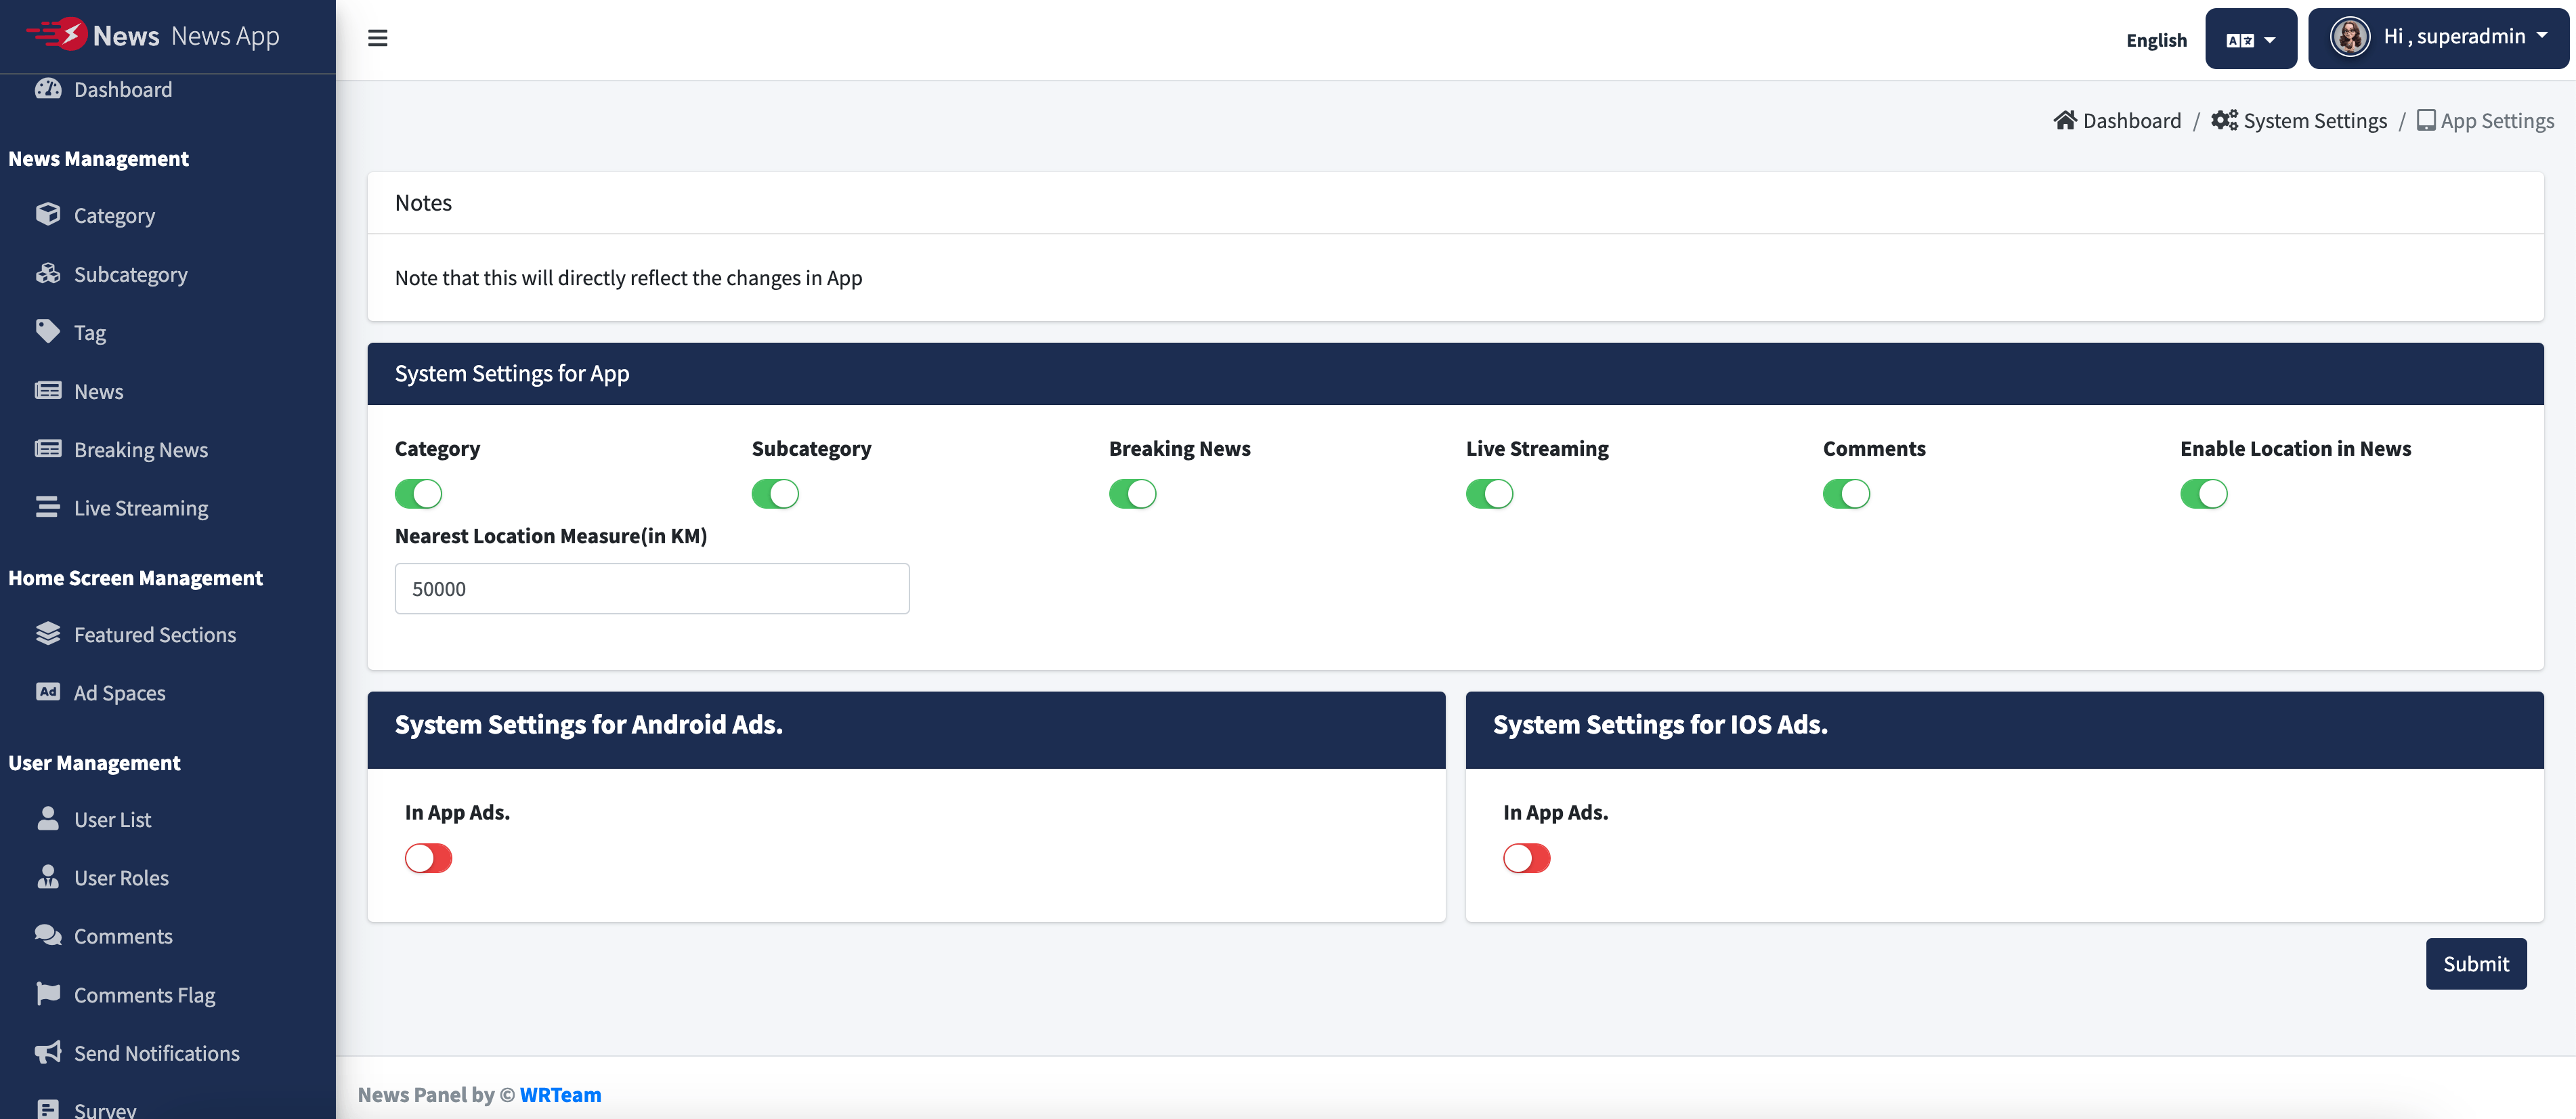
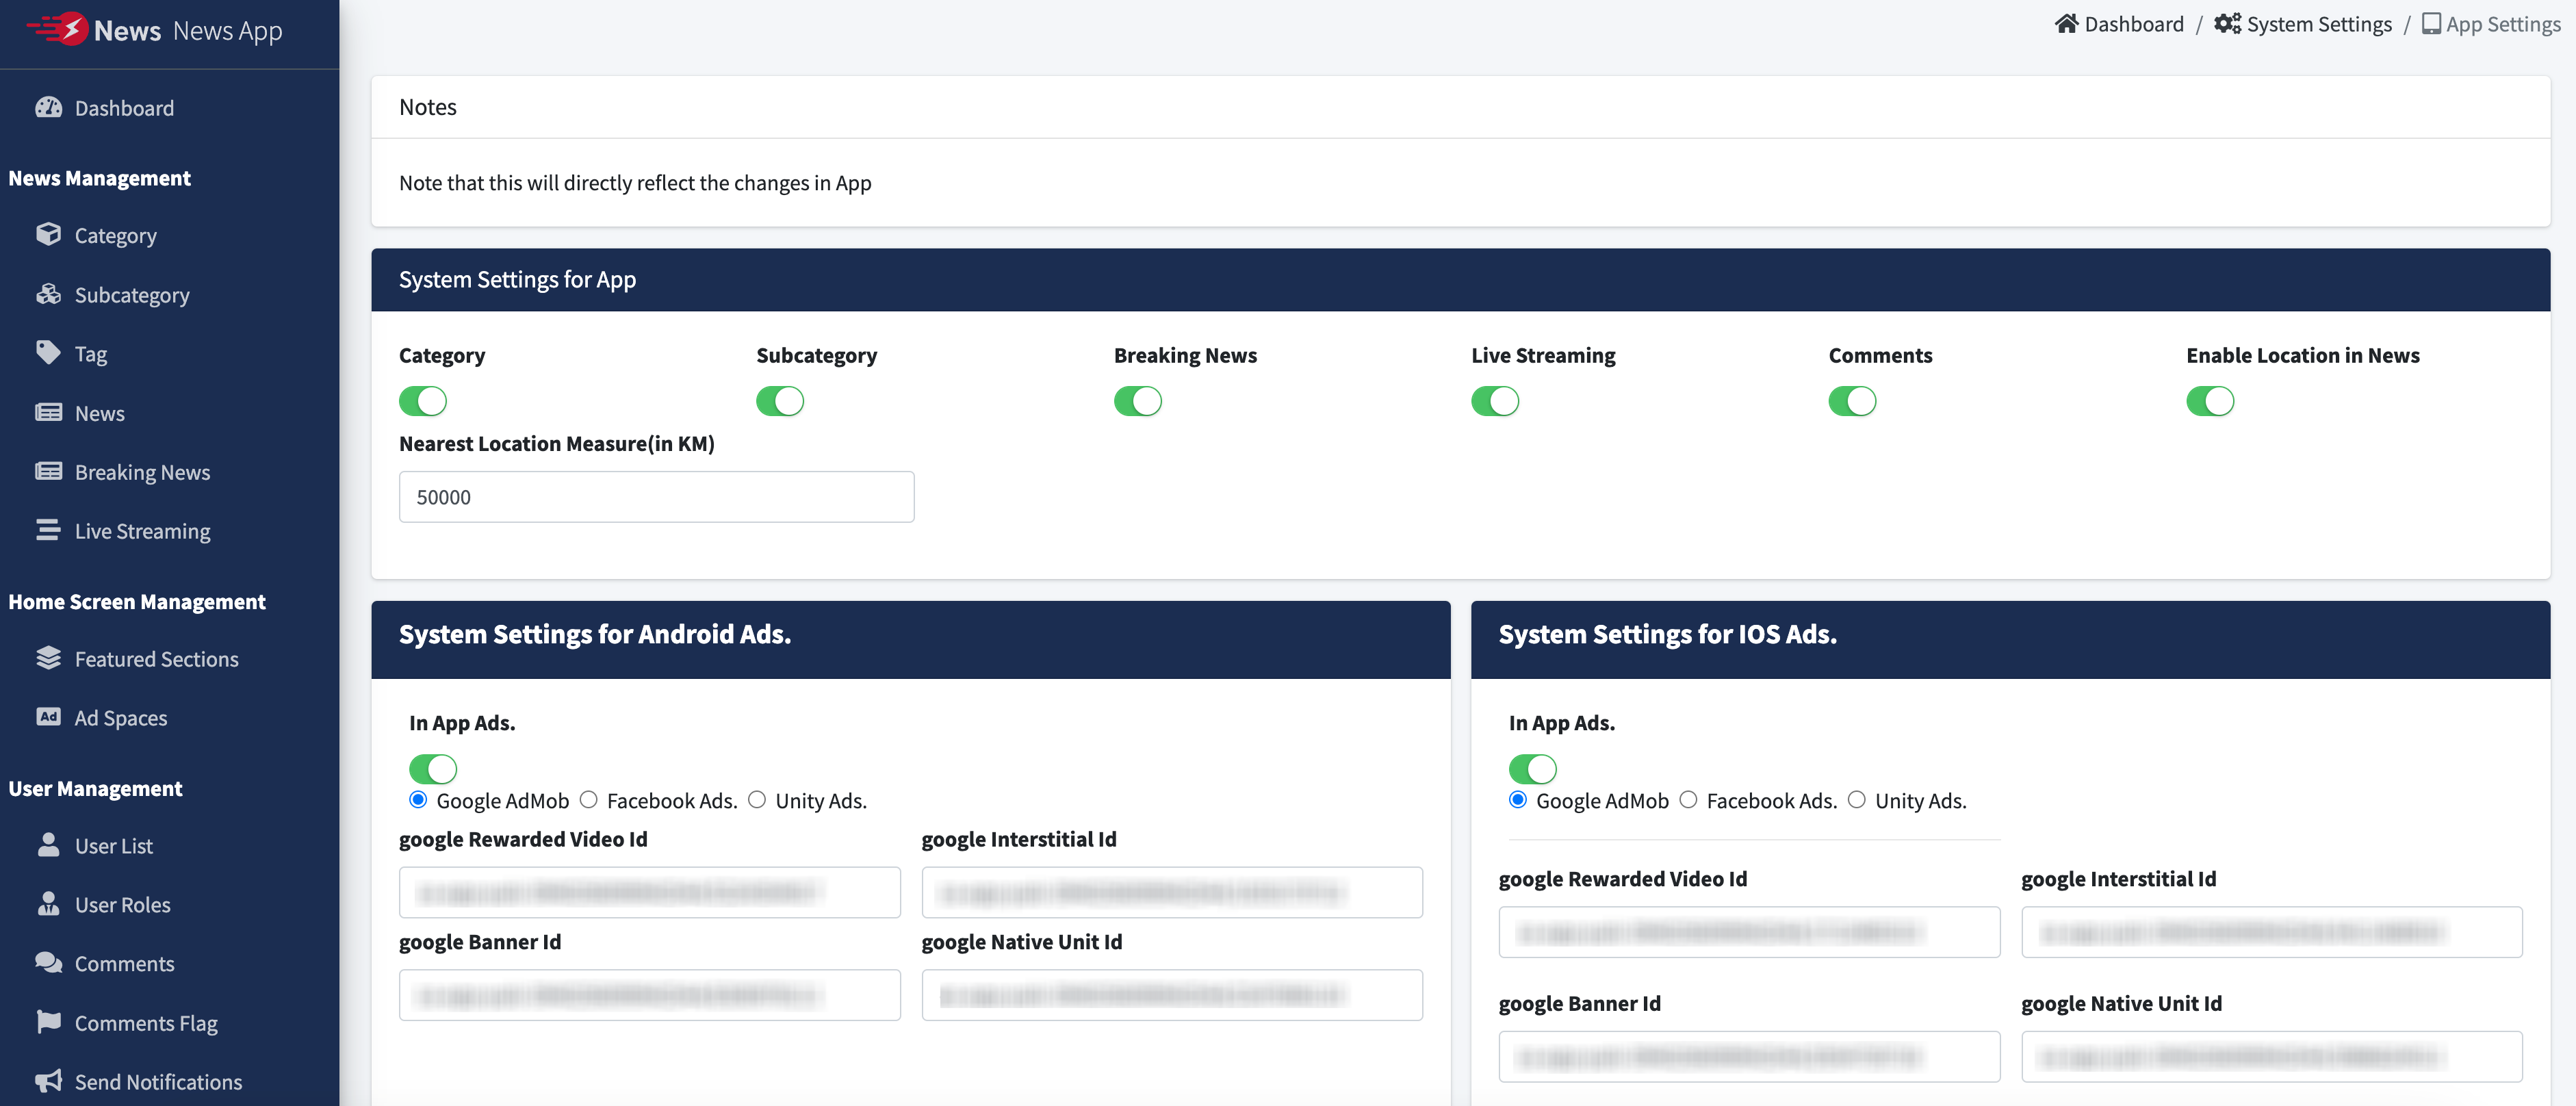
Set General Settings
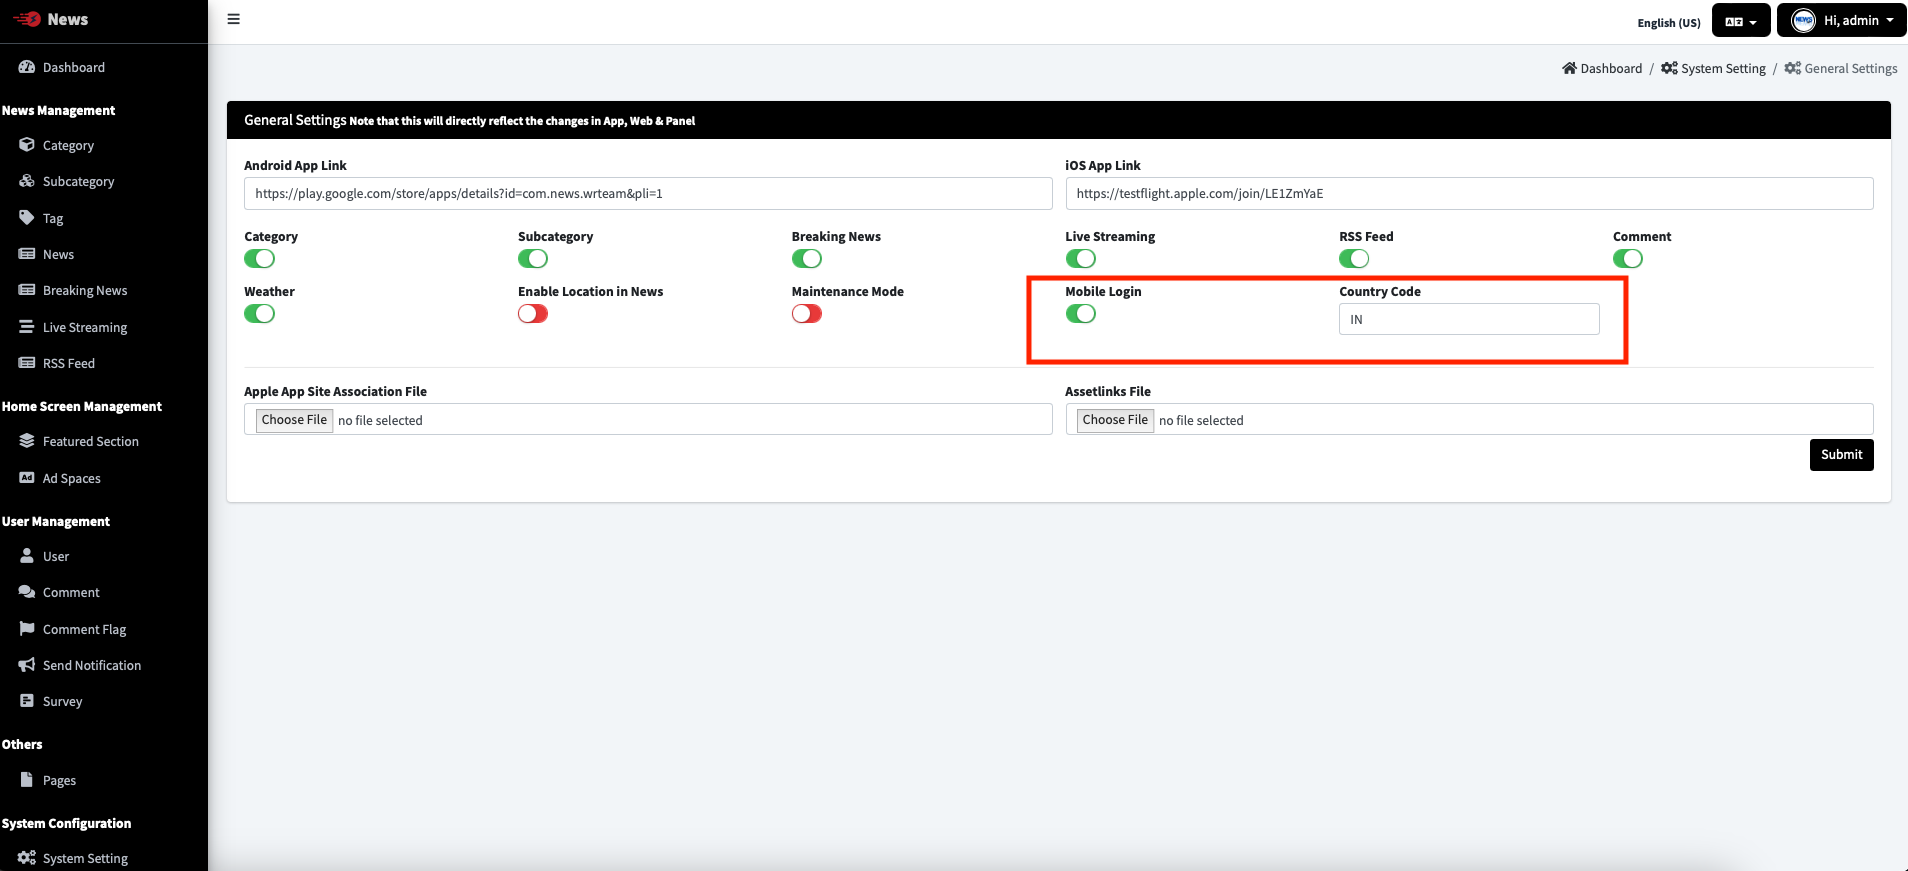
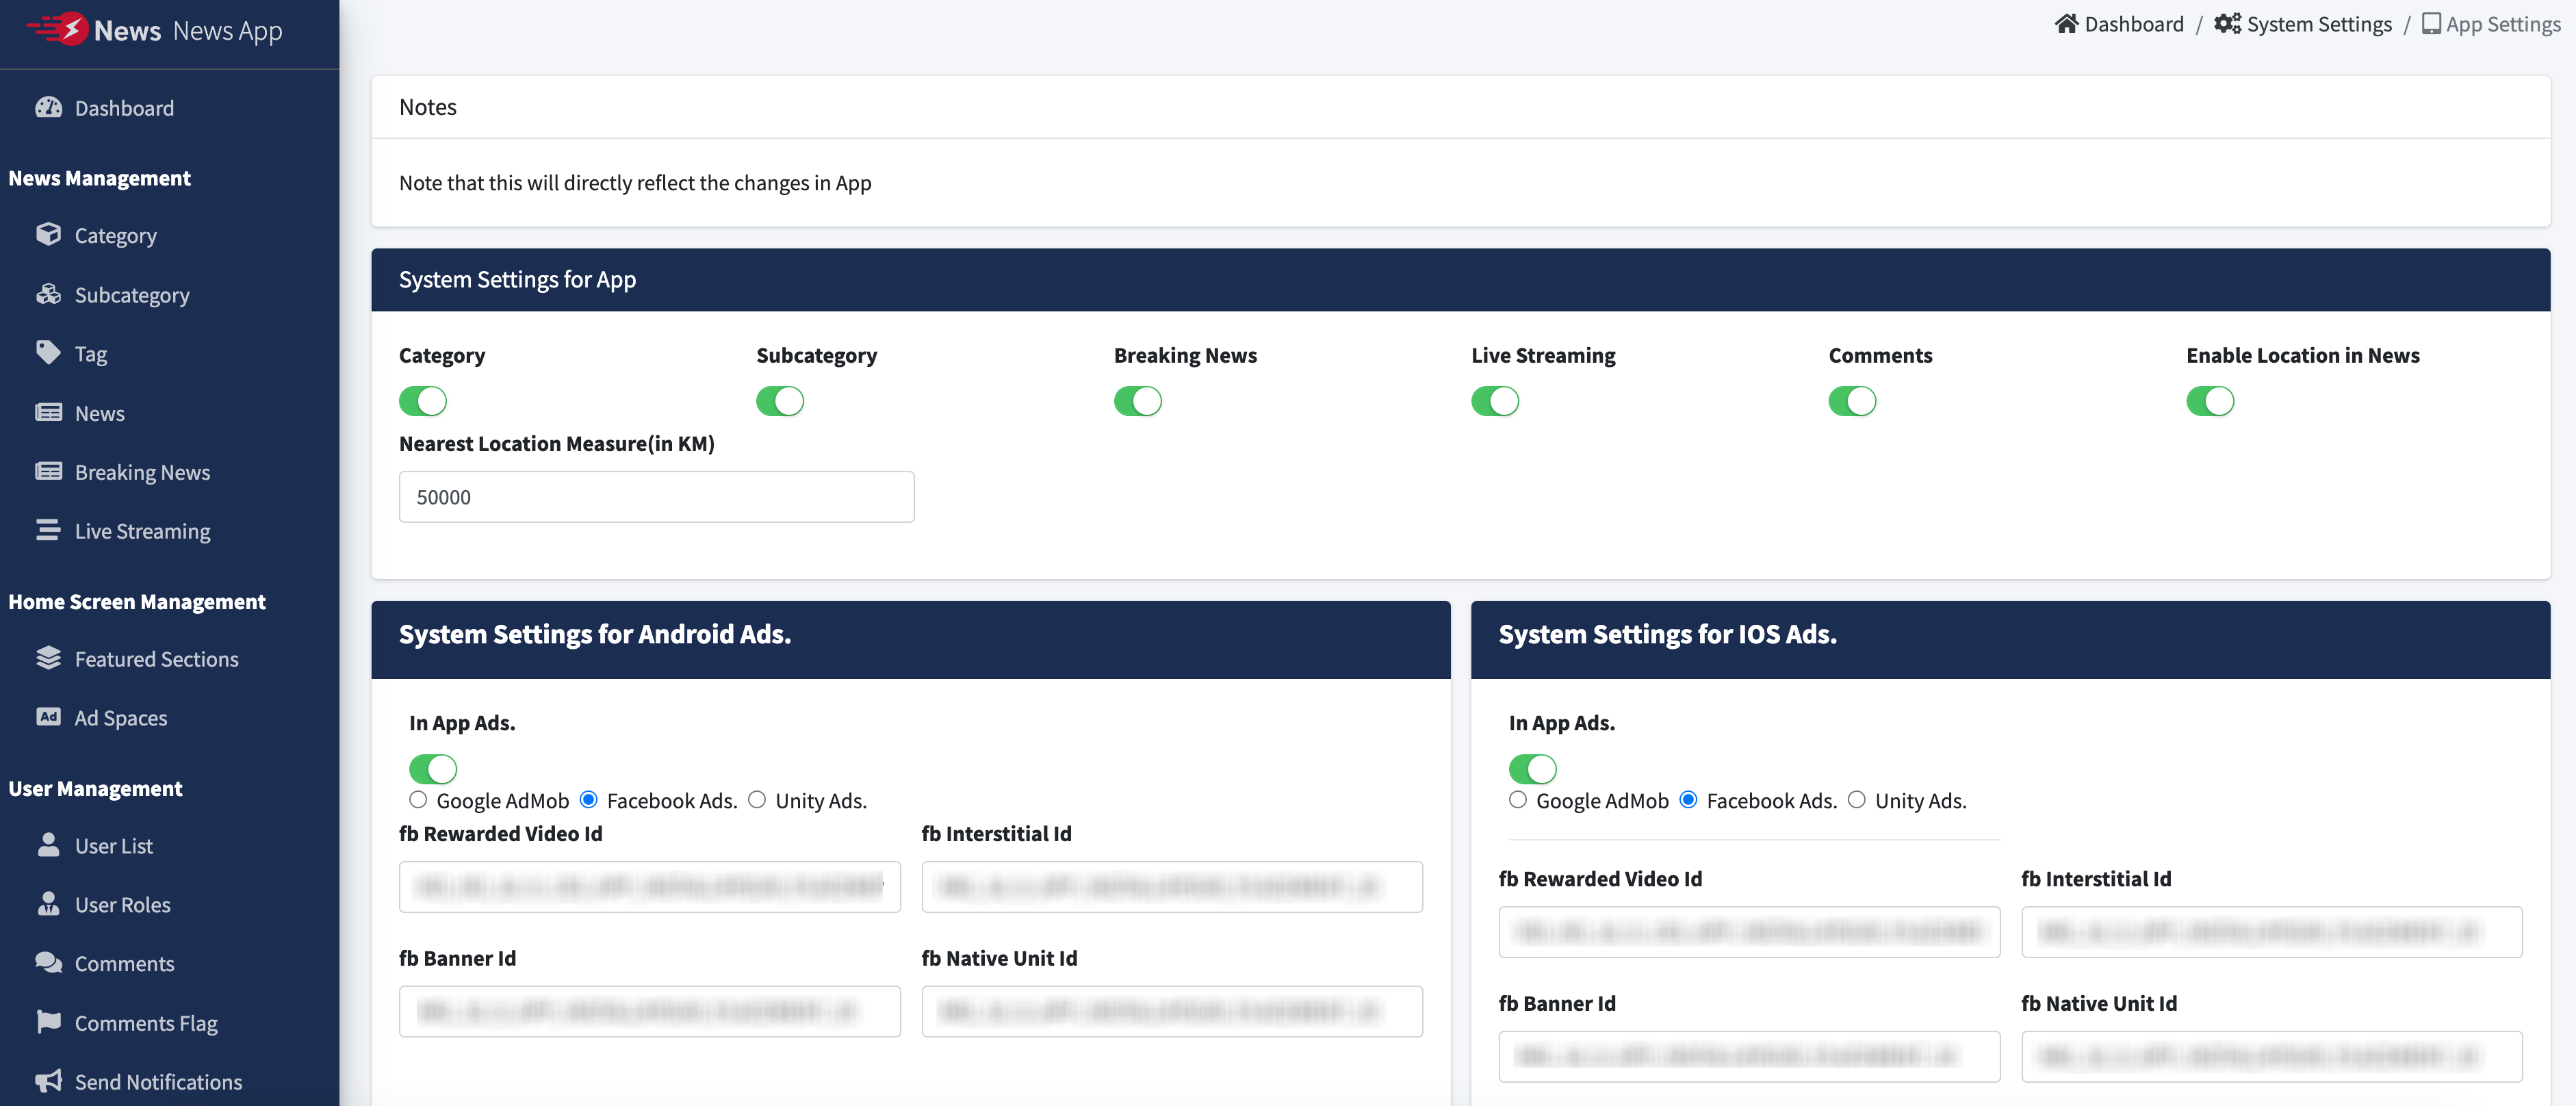
Goto System Settings > General settings & Enable / Disable Category, Subcategory, Breaking News, Live Videos, Comments, Mobile login and all for Web and Flutter App.

Location Wise News
Enable location from app settings and add Nearest Location Measure(in KM).
If location setting is enabled in app setting then only those news are appears in app and web which are falls in that radius which is set in Nearest location measure (in KM).

Add Location with Latitude & Longitude.

Assign location to news
 If you want location data, you can upload location.csv in csv folder. Go to
database->tbl_location->import & import location.csv file.
If you want location data, you can upload location.csv in csv folder. Go to
database->tbl_location->import & import location.csv file.


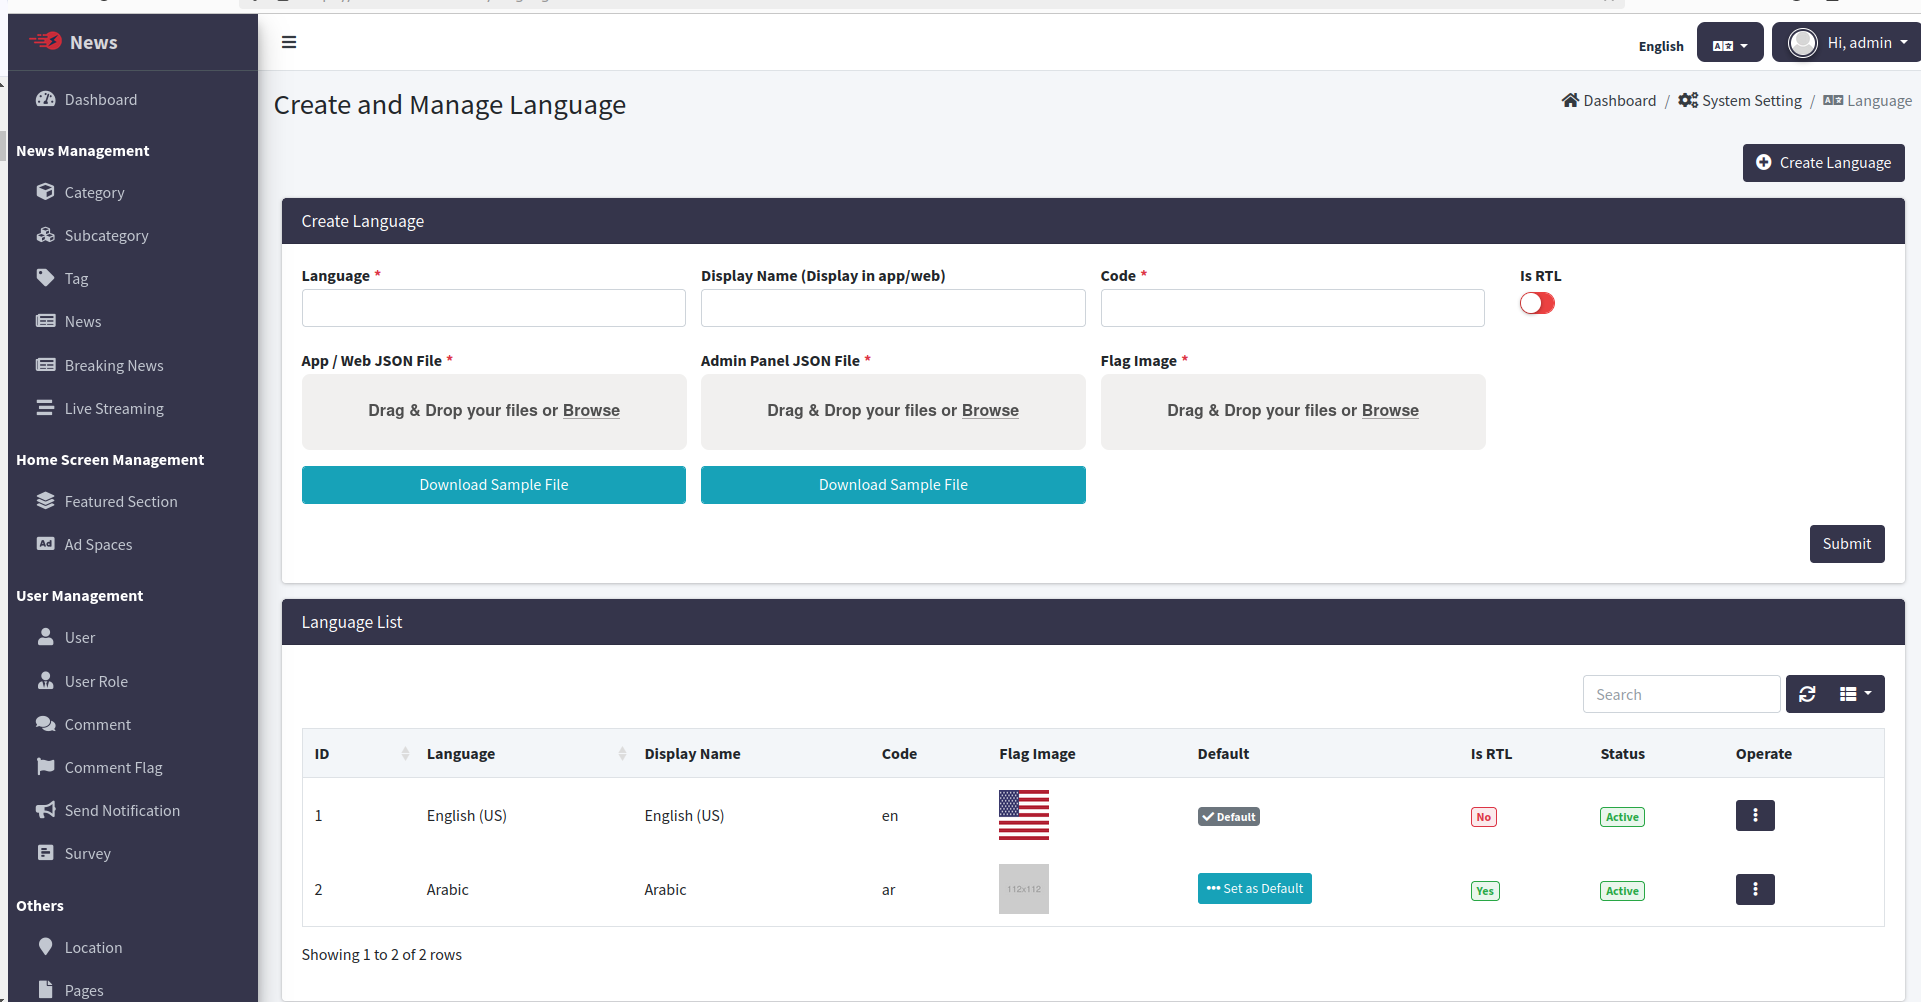
Set Language
Set Language for your website and app.
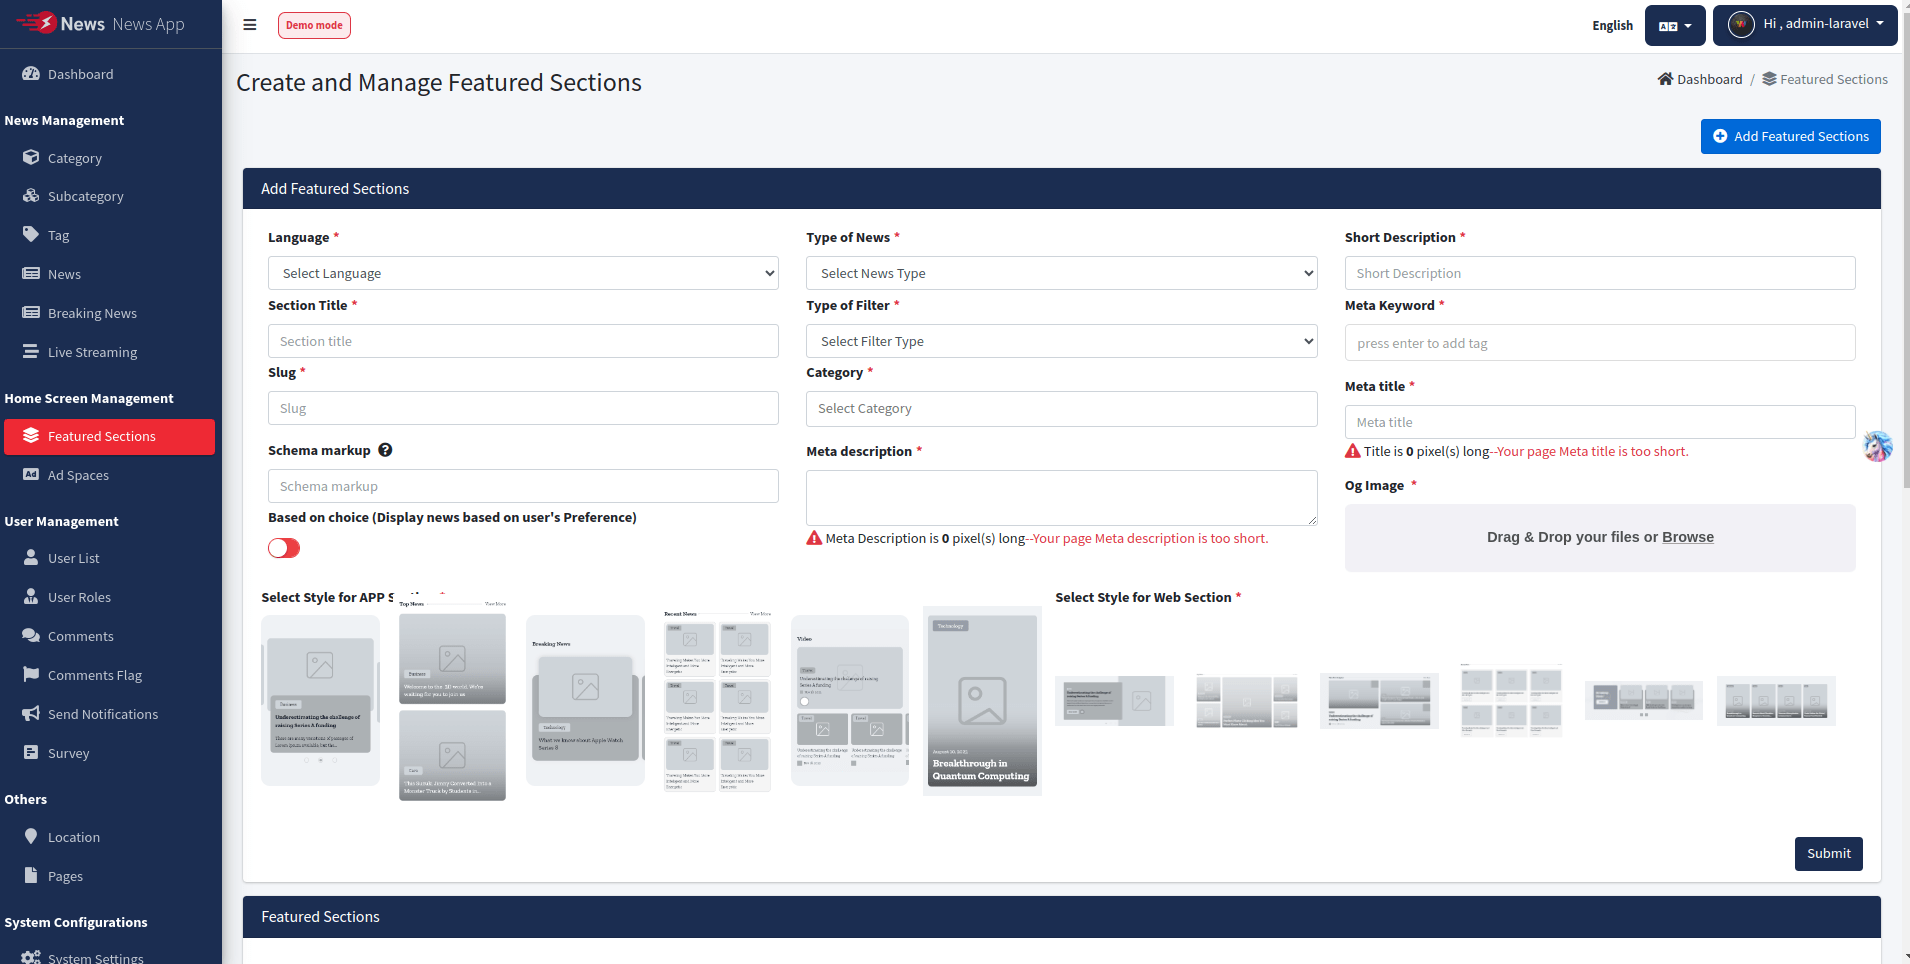
Featured Section
Set featured section for all active languages.
If you haven't set a featured section for a particular language, the frontend will have a blank homepage(app+web).
Privacy Policy
Set Privacy Policy for your website and app.
It is Compulsory to add Privacy Policy for App.
(Create Privacy Policy page for your different activated language by select Page Type-'Privacy Policy')
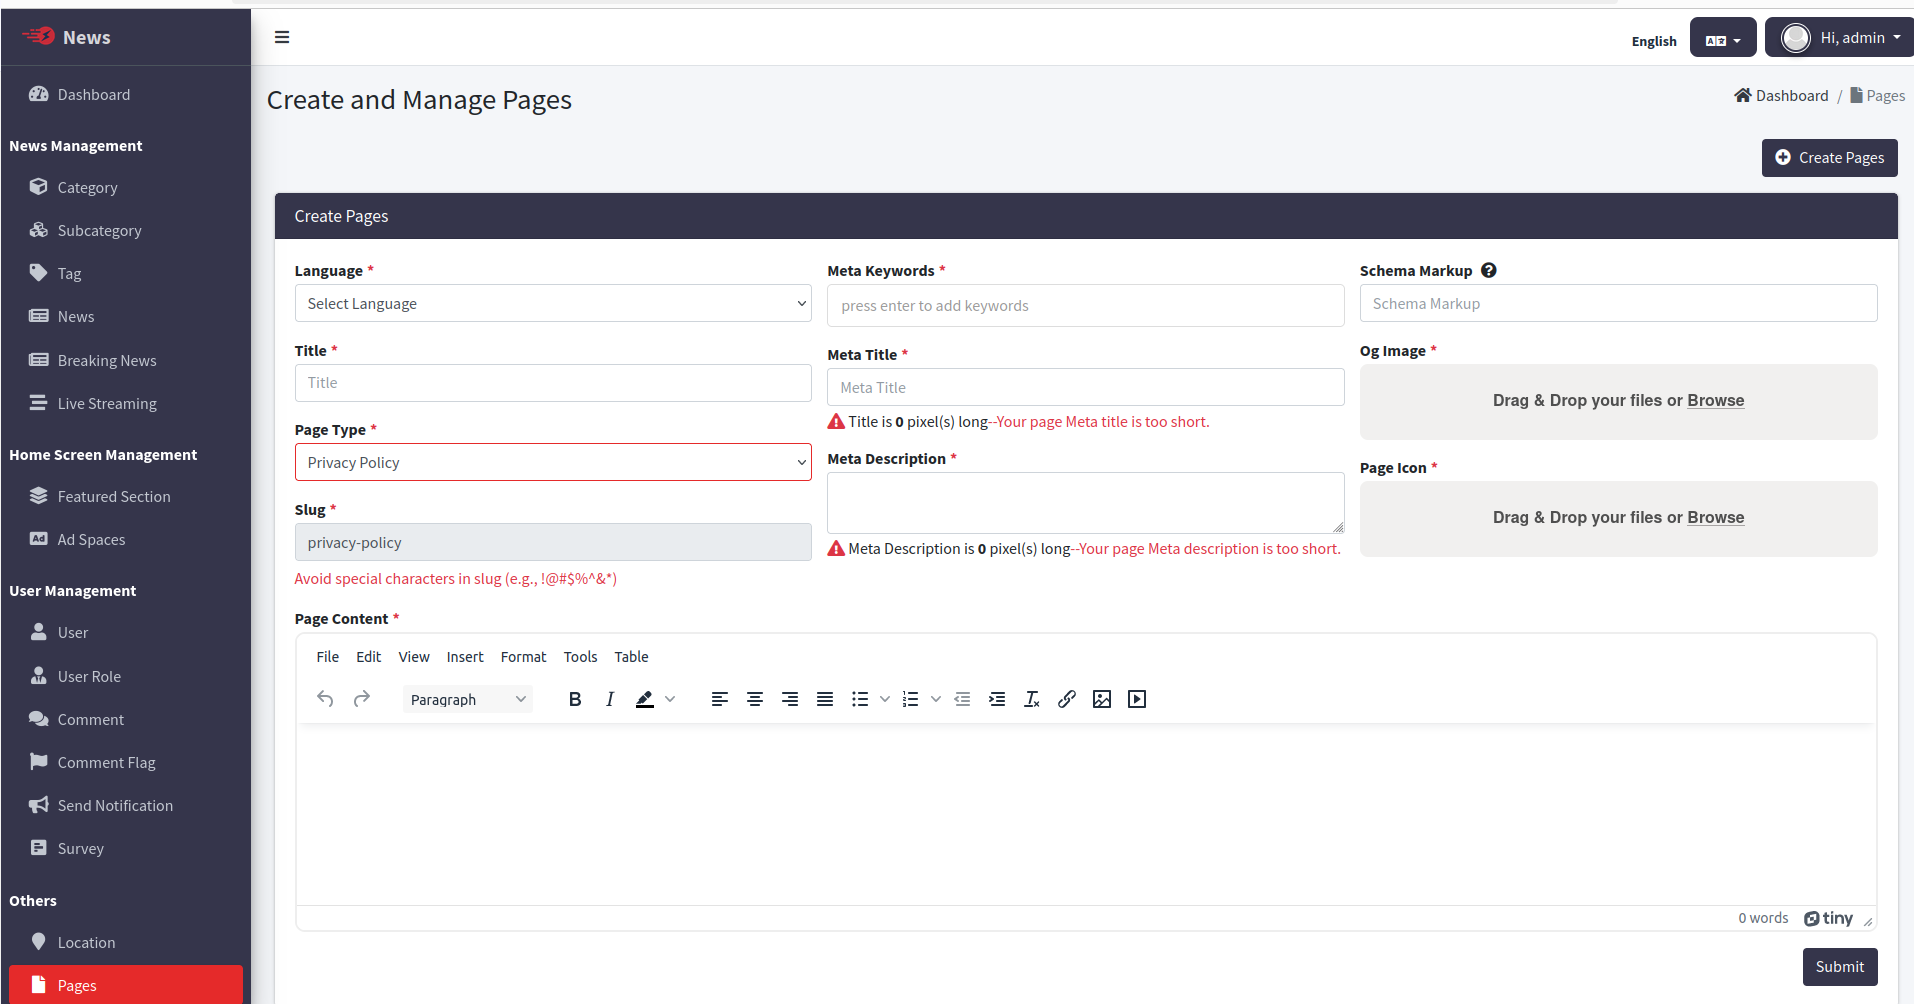
Terms Conditions
Set Terms Conditions for your website and app.
It is Compulsory to add Terms Conditions for App.
(Create Terms Conditions page for your different activated language by select Page Type-'Terms & Conditions')

Other Pages
Set and manage your content for app. (Create different page for your different activated language by select Page Type-'Custom')
NOTE: You need to Set title in your desired Language here only, as it is not translated from App.
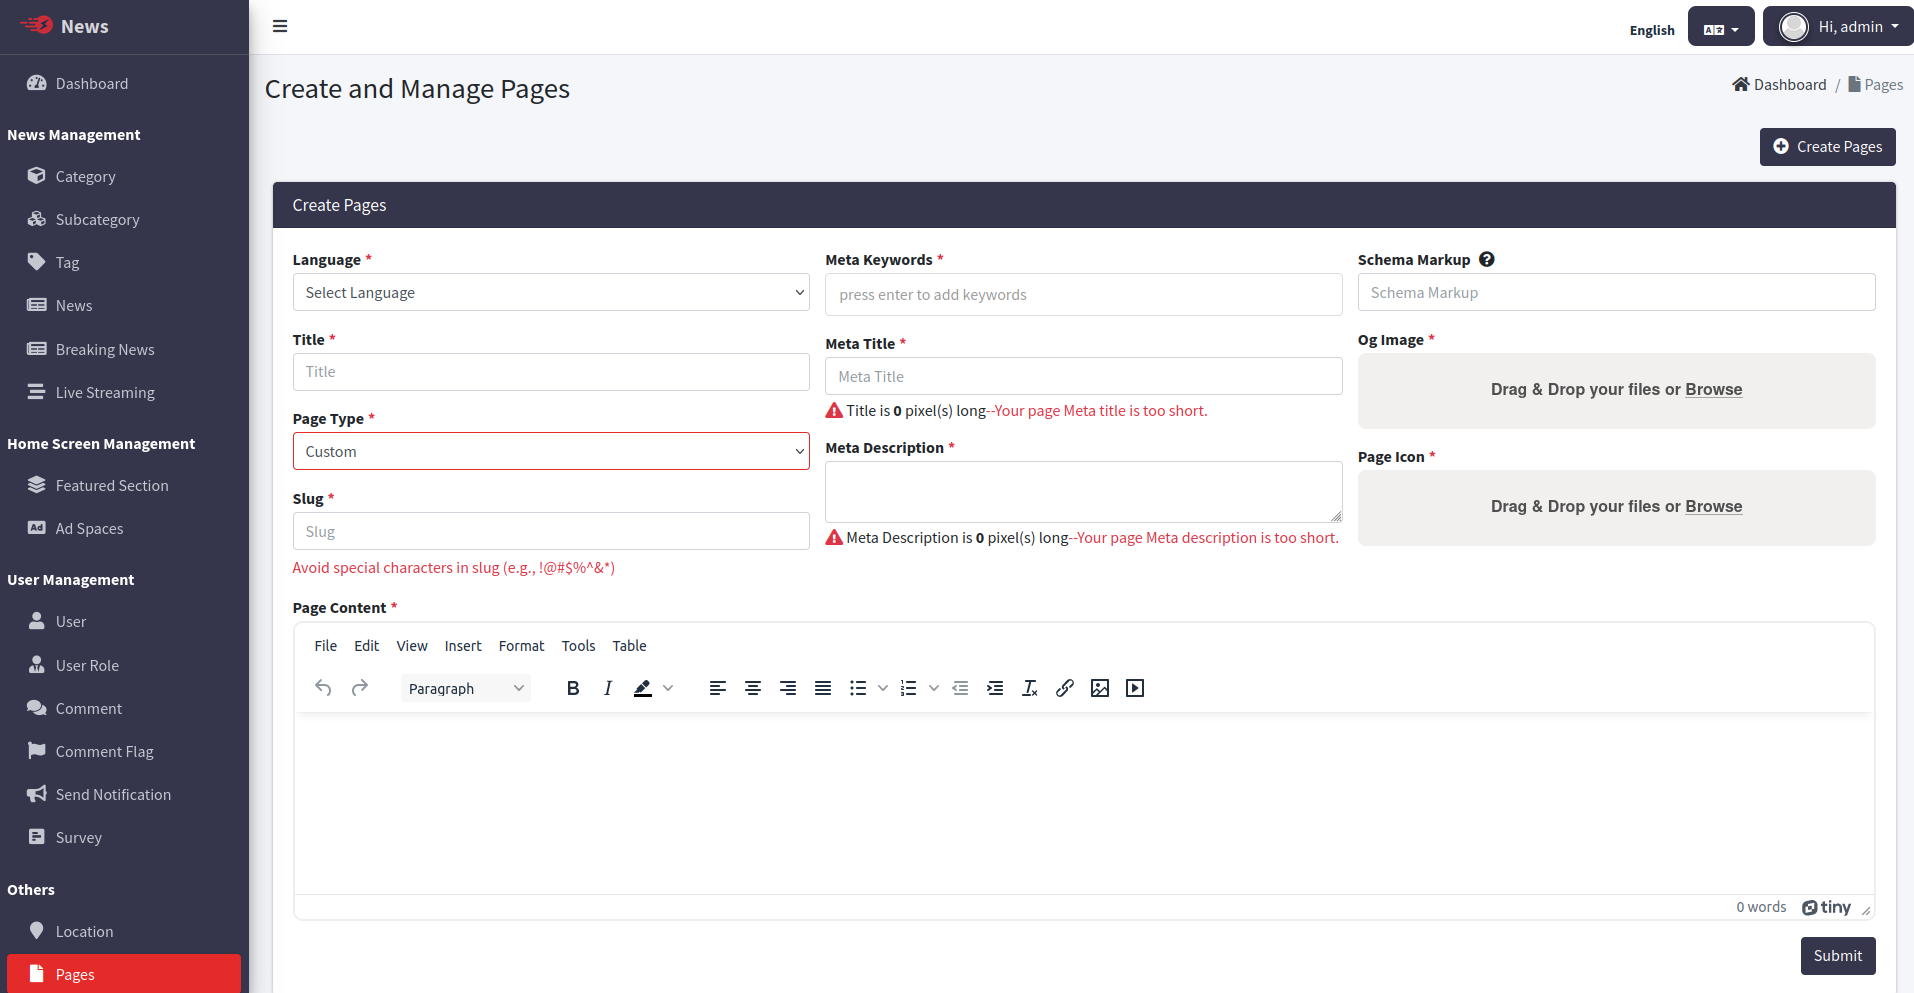
Ad Spaces
Set and manage your ad for app. (Create different Ads for your different activated language)
Give Access for Create and Manage News to Users
Give Access to Specific User from User List Tab > Operate > Tickmark on option Allow access to manage News ? to Enable Create & Manage News options in App [You will find Create News & Manage News in Profile Settings screen in App & Web both].
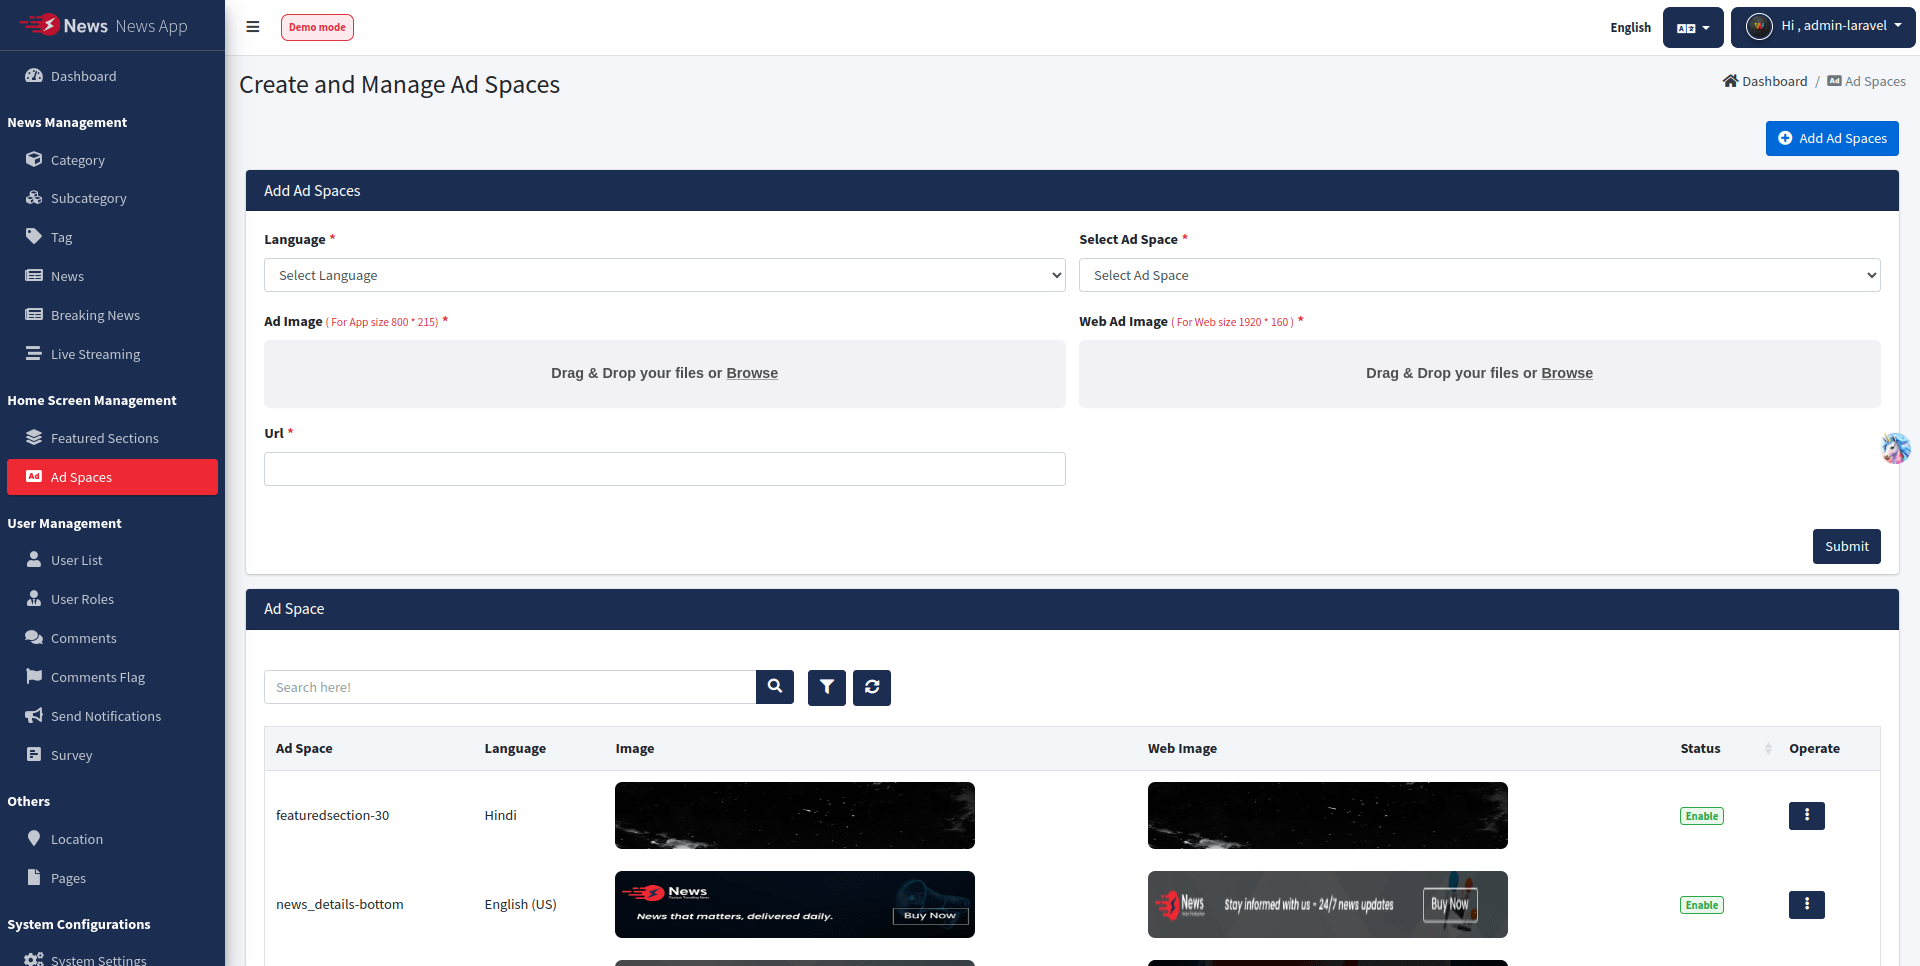
Survey Questions
Create and manage Survey Questions for app.
These Survey Question & Answers visible in App In between @ Category > List Of All / Subcategory Wise News.
Update System
Update system with latest version by uploading zip file.
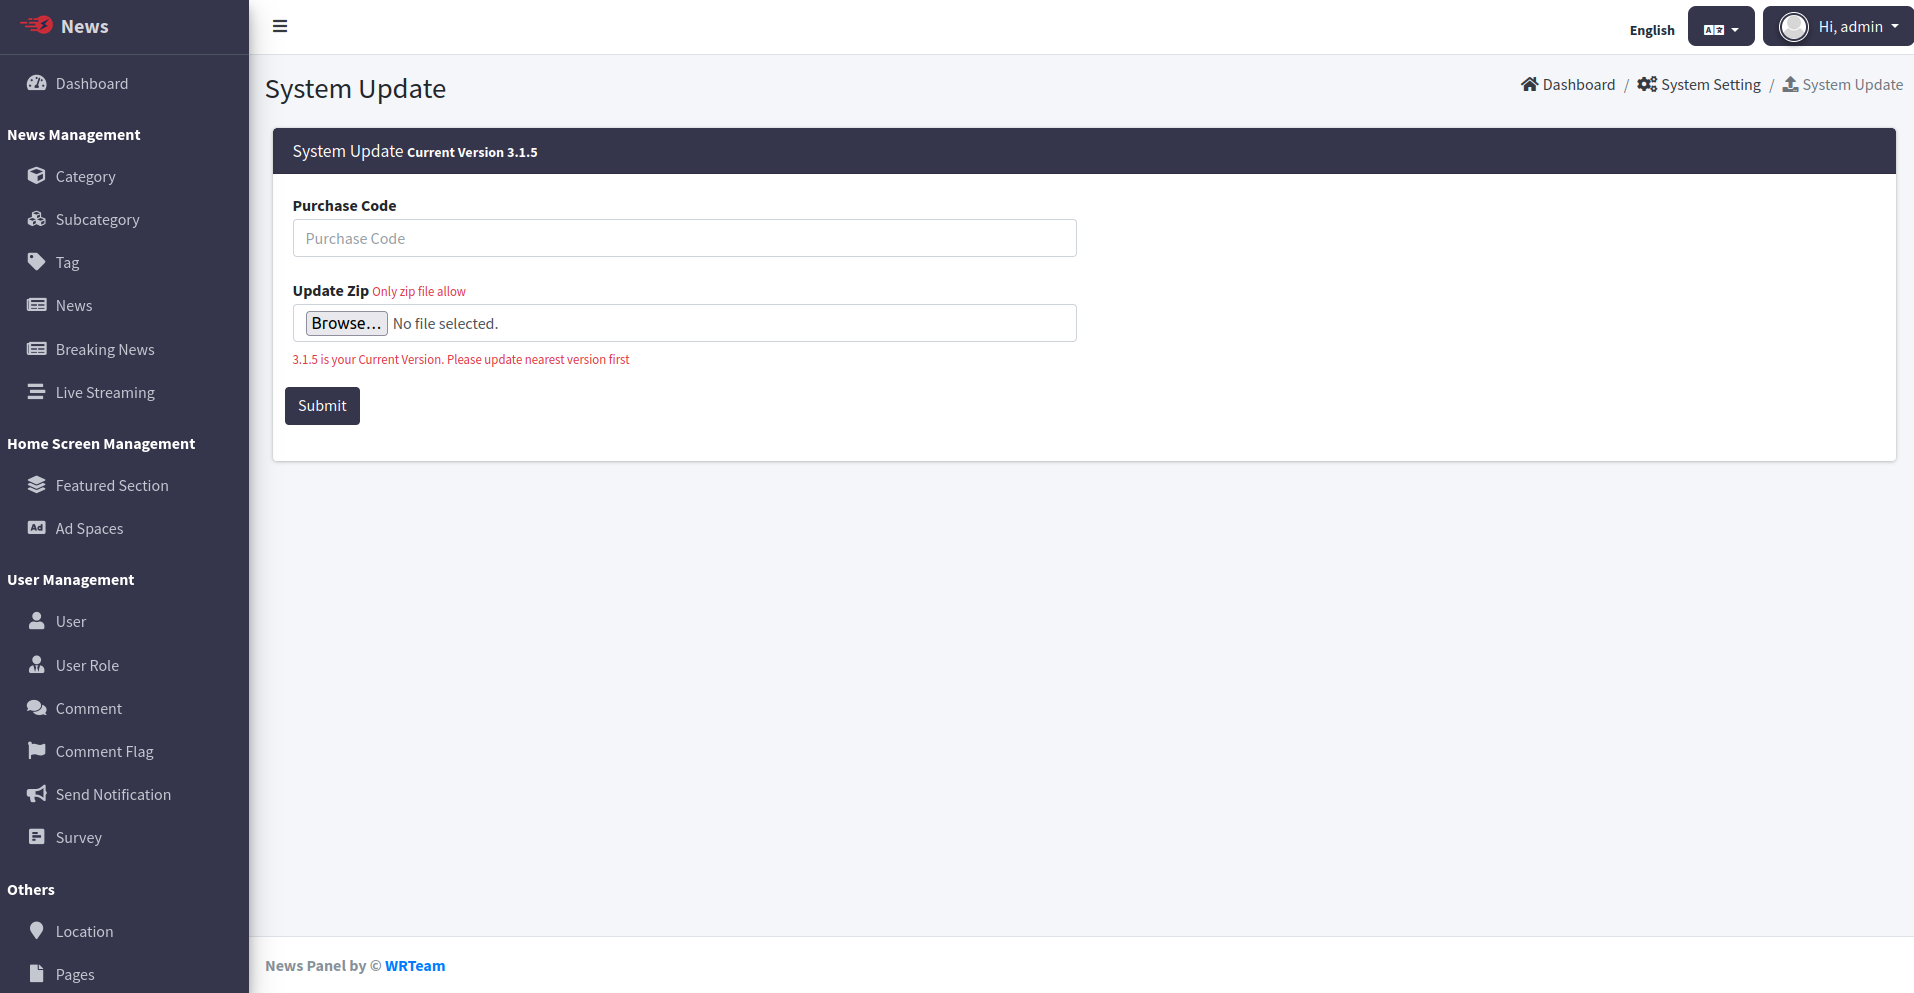
browse zip files from Update folder of Source code provided.
NOTE: update version sequence wise. i.e. 3.0.5 to 3.0.6 & then 3.0.6 to 3.0.7, not direct update from 3.0.5 to 3.0.7
News laravel
Important factor to consider before transitioning to Laravel.
Here are video tutorial for laravel fresh installation and update from codignator to laravel .
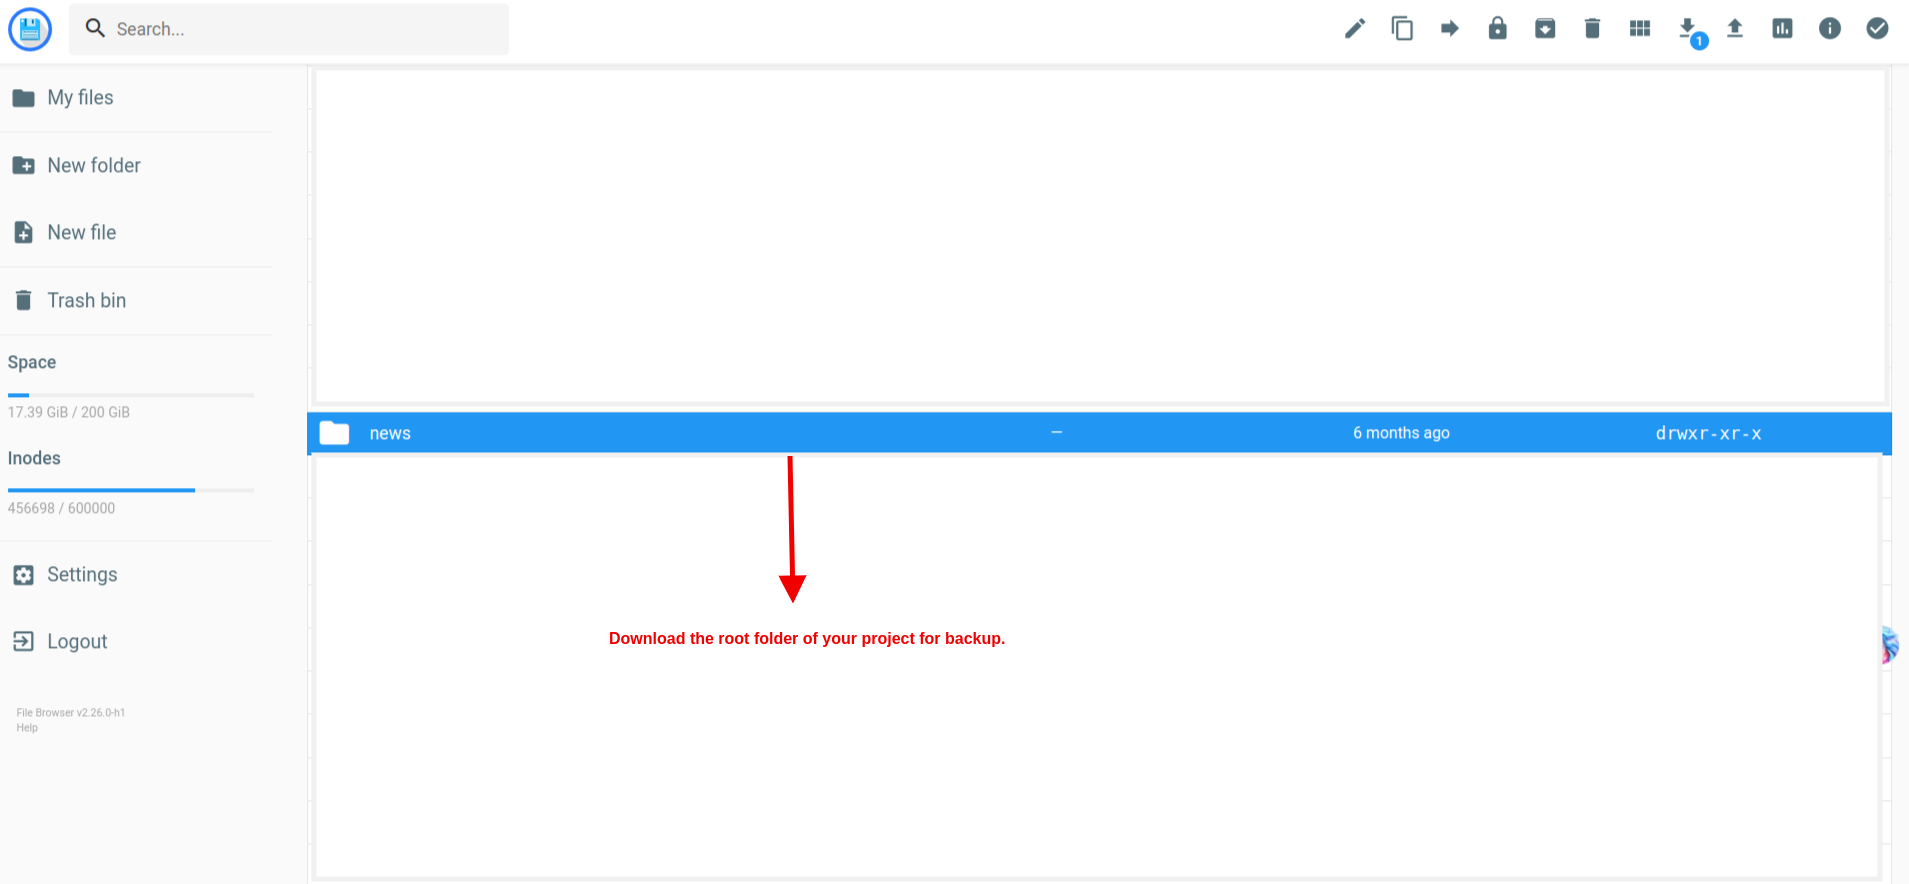
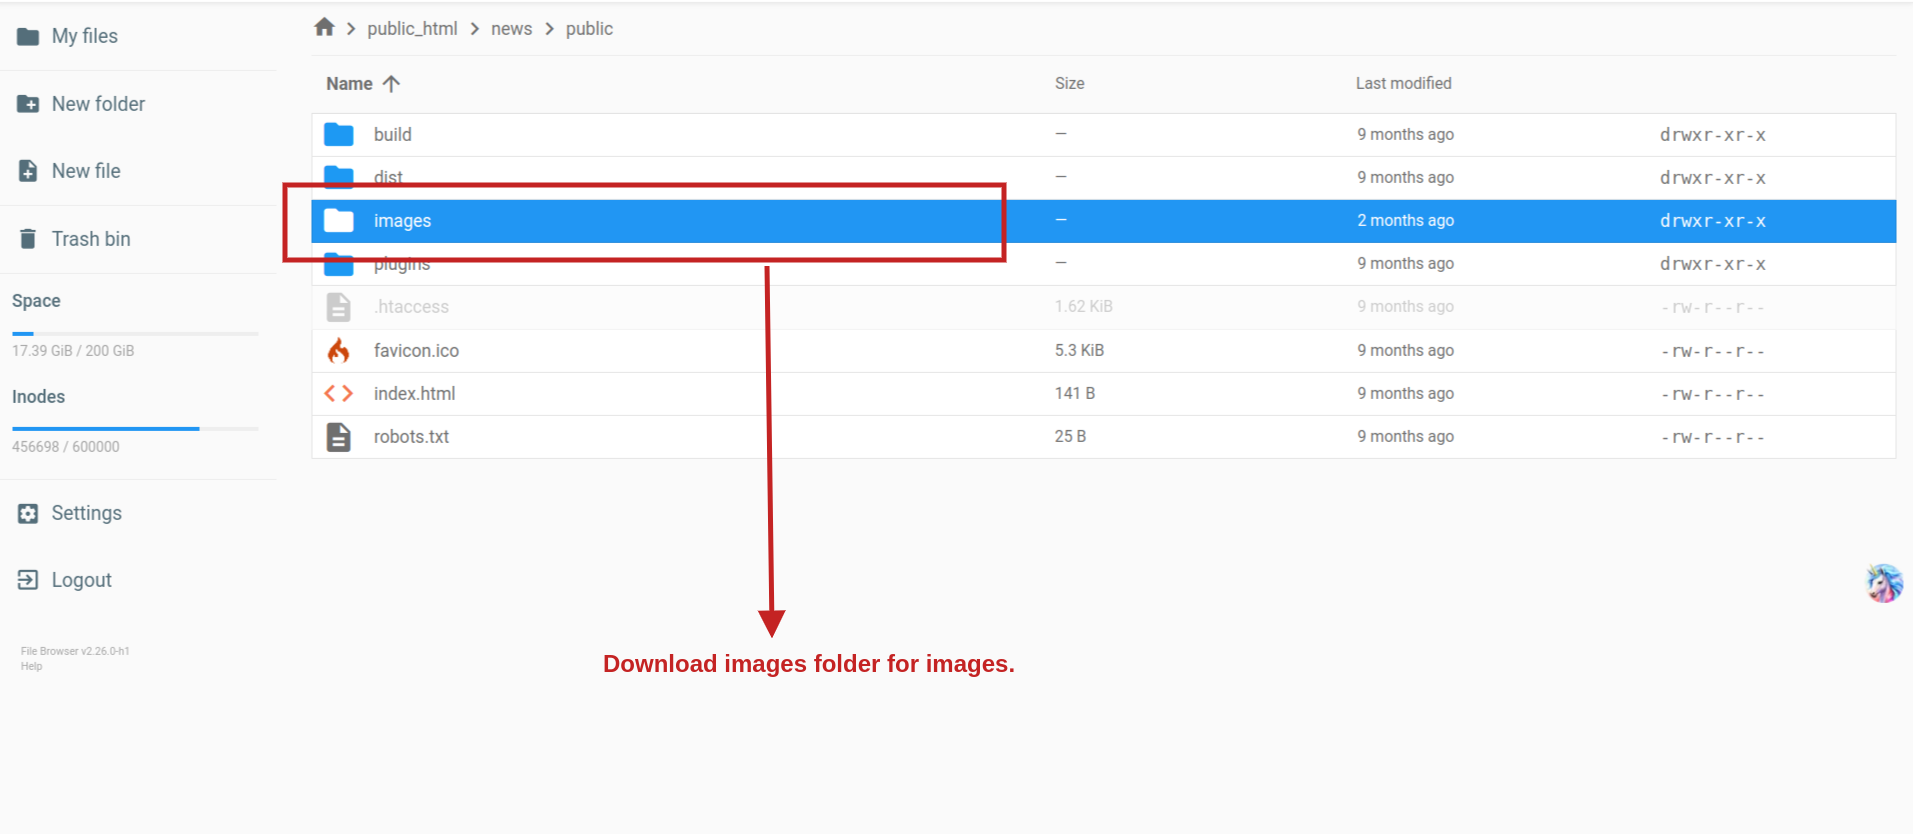
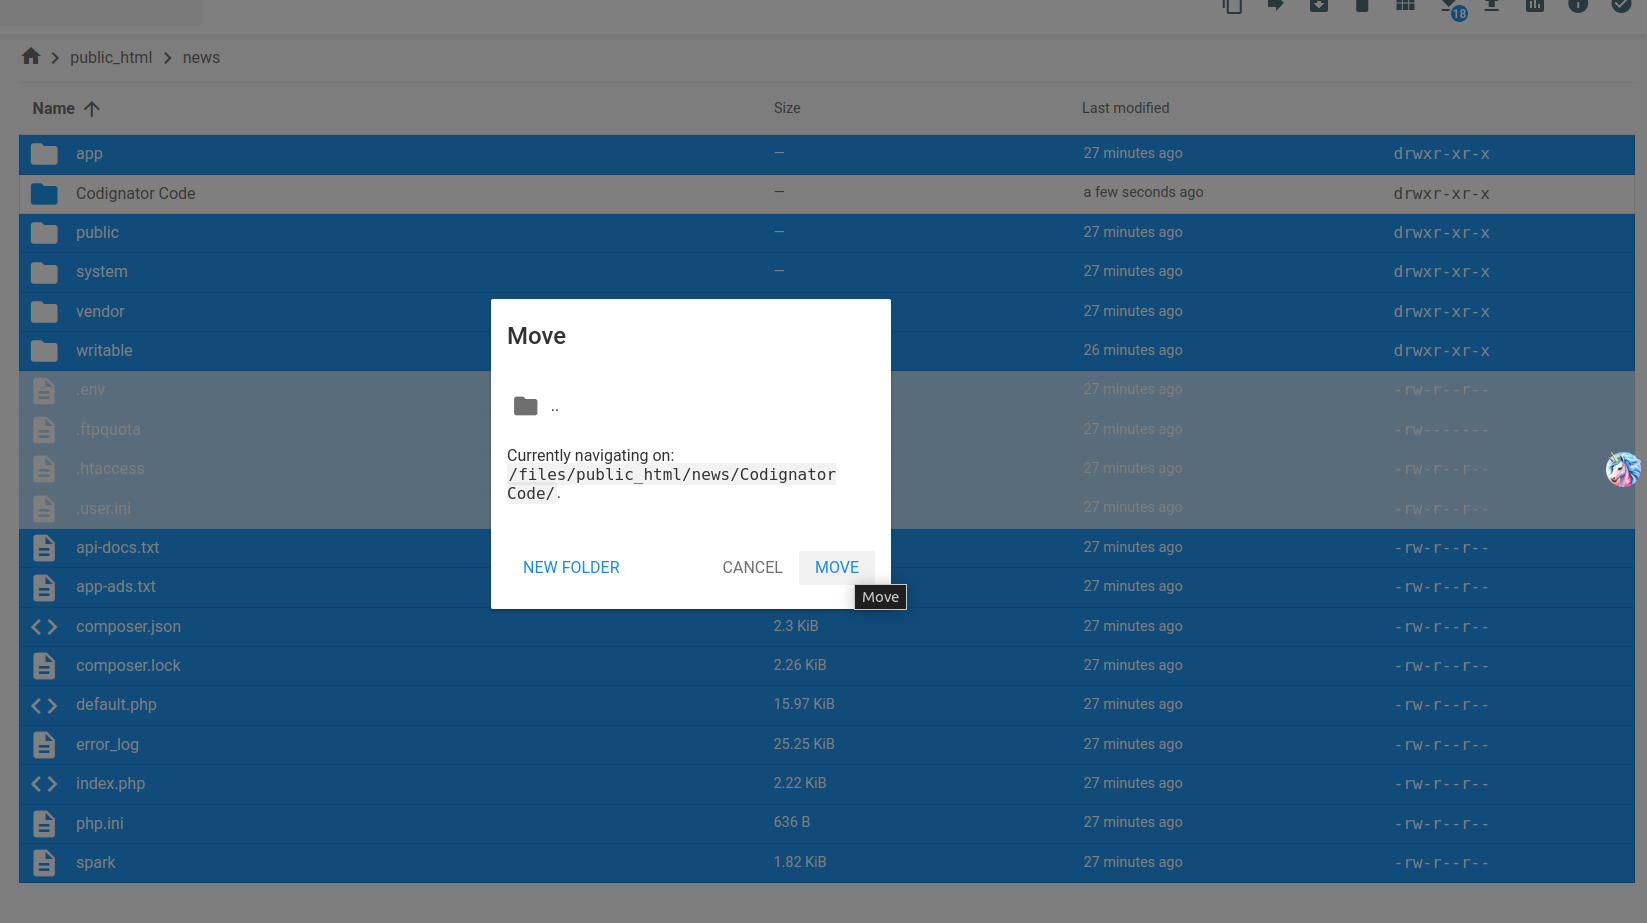
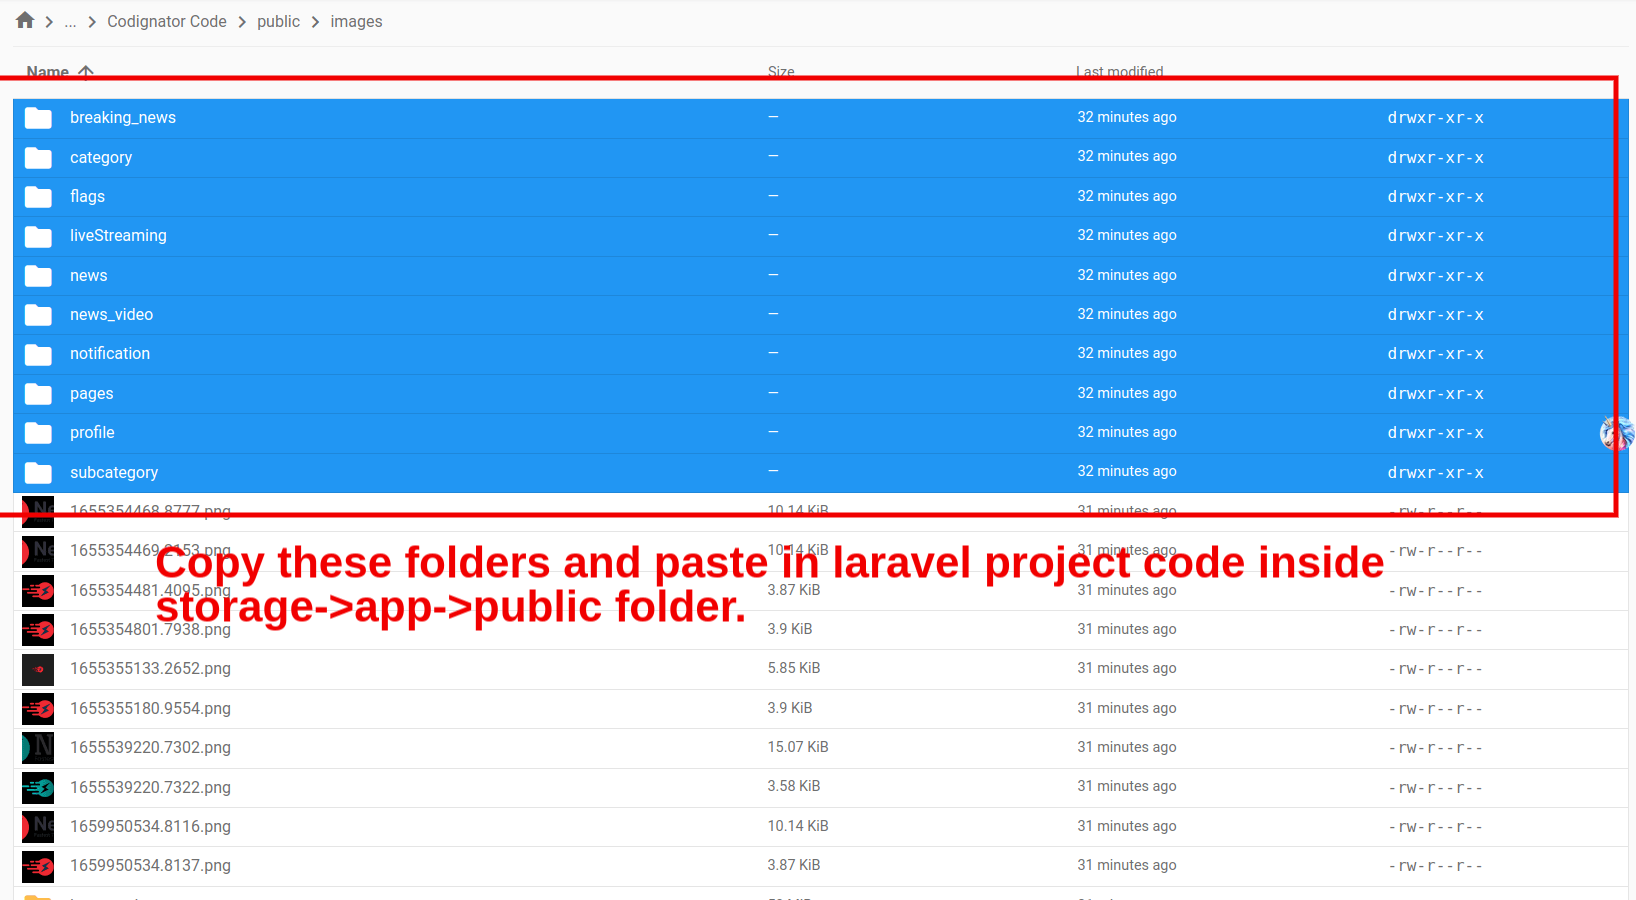
Take a backup of your project
- Download images folder which is located inside public folder .
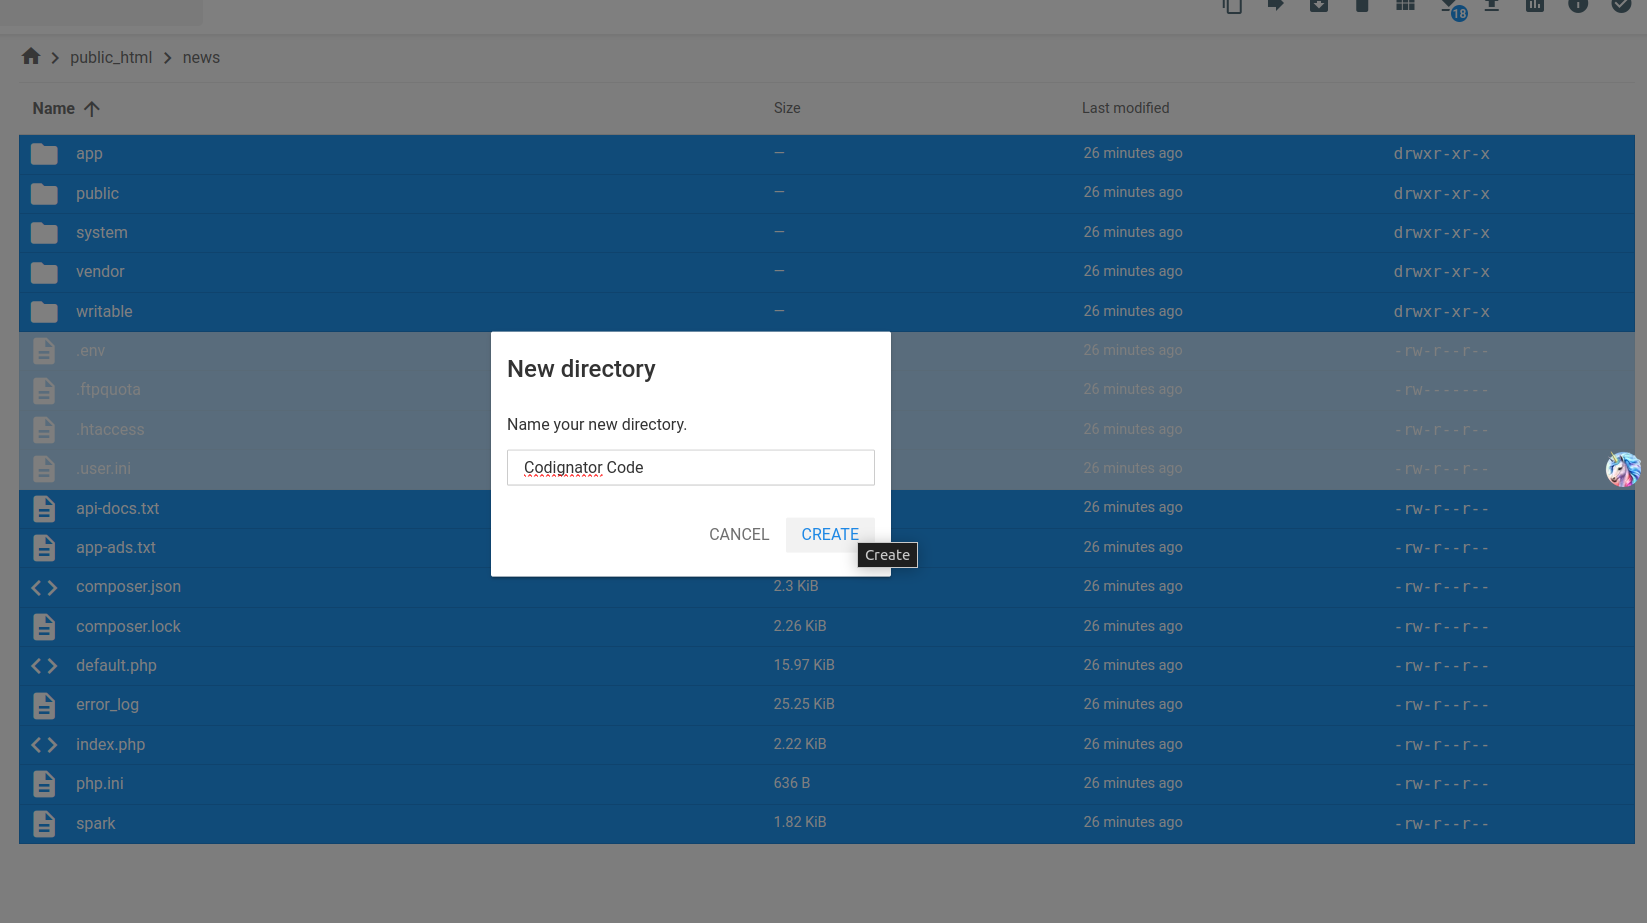
- Move the codigtor code into one folder and then upload laravel code and extract it.
- Upload the source code you have downloaded from CodeCanyon and unzip it in root folder.
- Copy all these folders from Codignator project and paste in laravel project folder->storage->app->public .
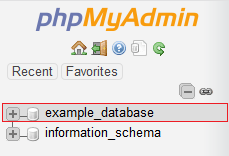
Take a backup of your Database.
These instructions explain how to export (back up) your entire database.
- Log into phpMyAdmin.
- Select the source database on the left panel.
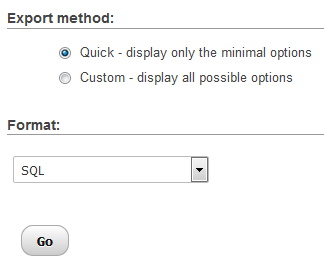
- Click on the Export tab in the top center panel.
- Select Quick or Custom export method.
- Choose the format you'd like to save the file as from the dropdown menu. SQL is most common.
- Click the Go button to continue.

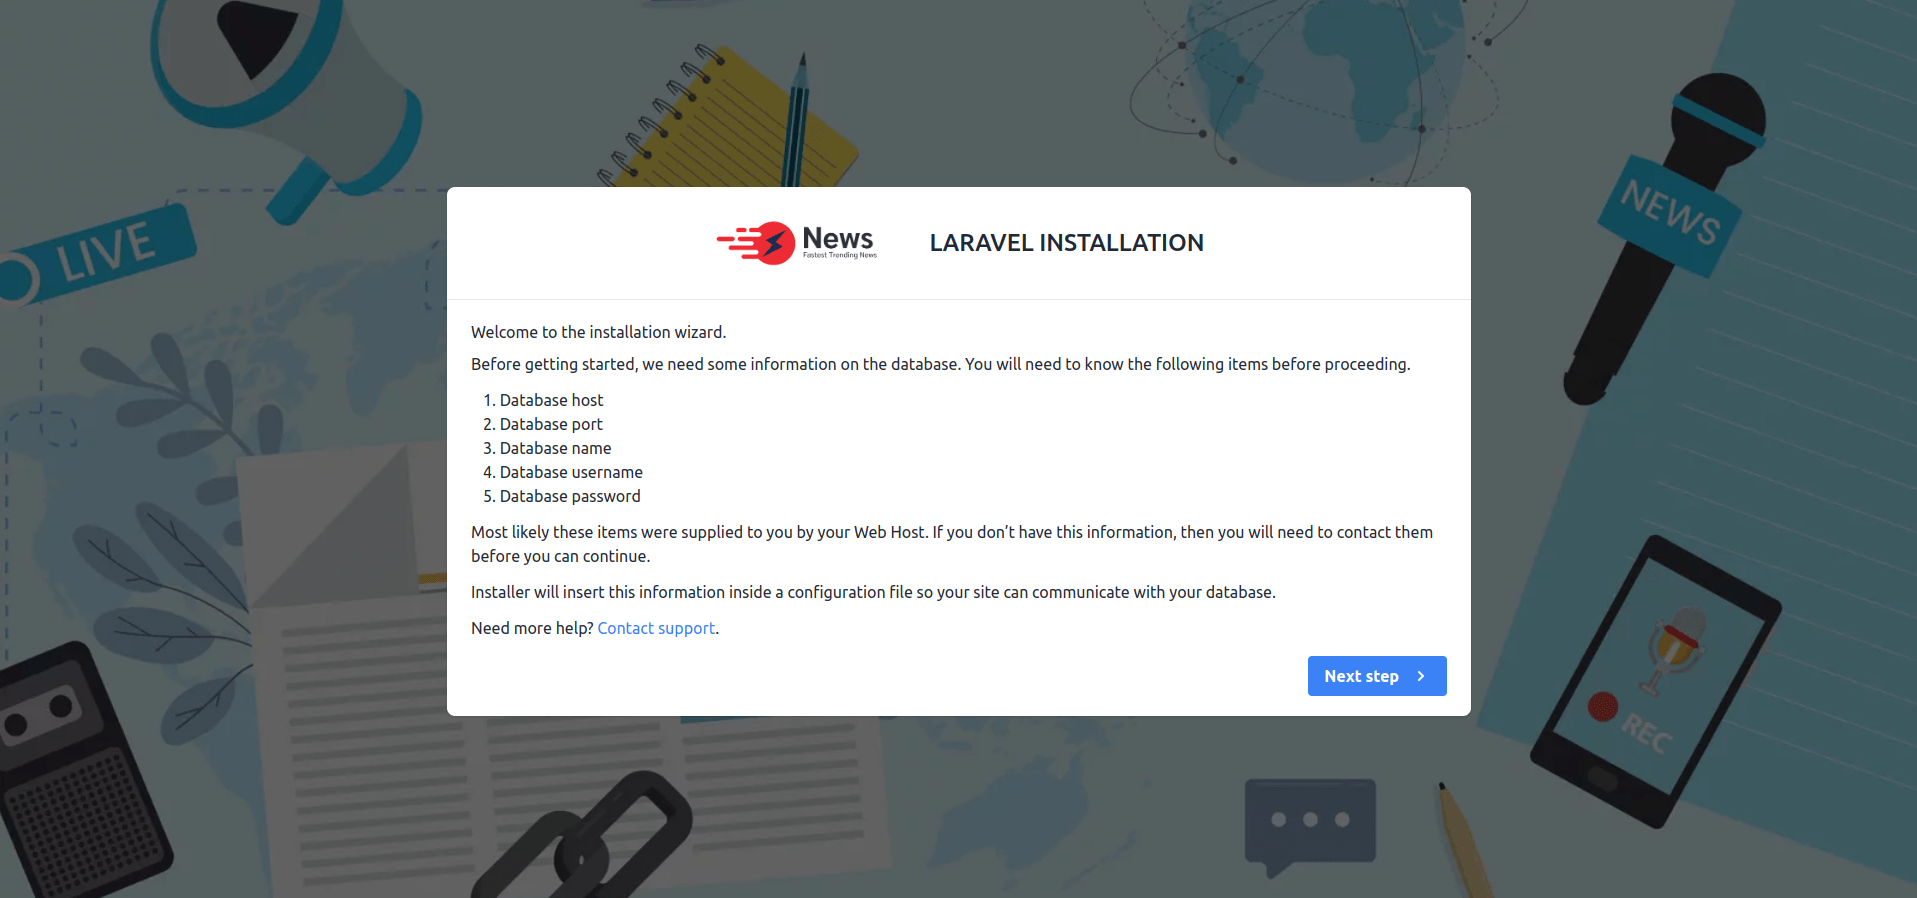
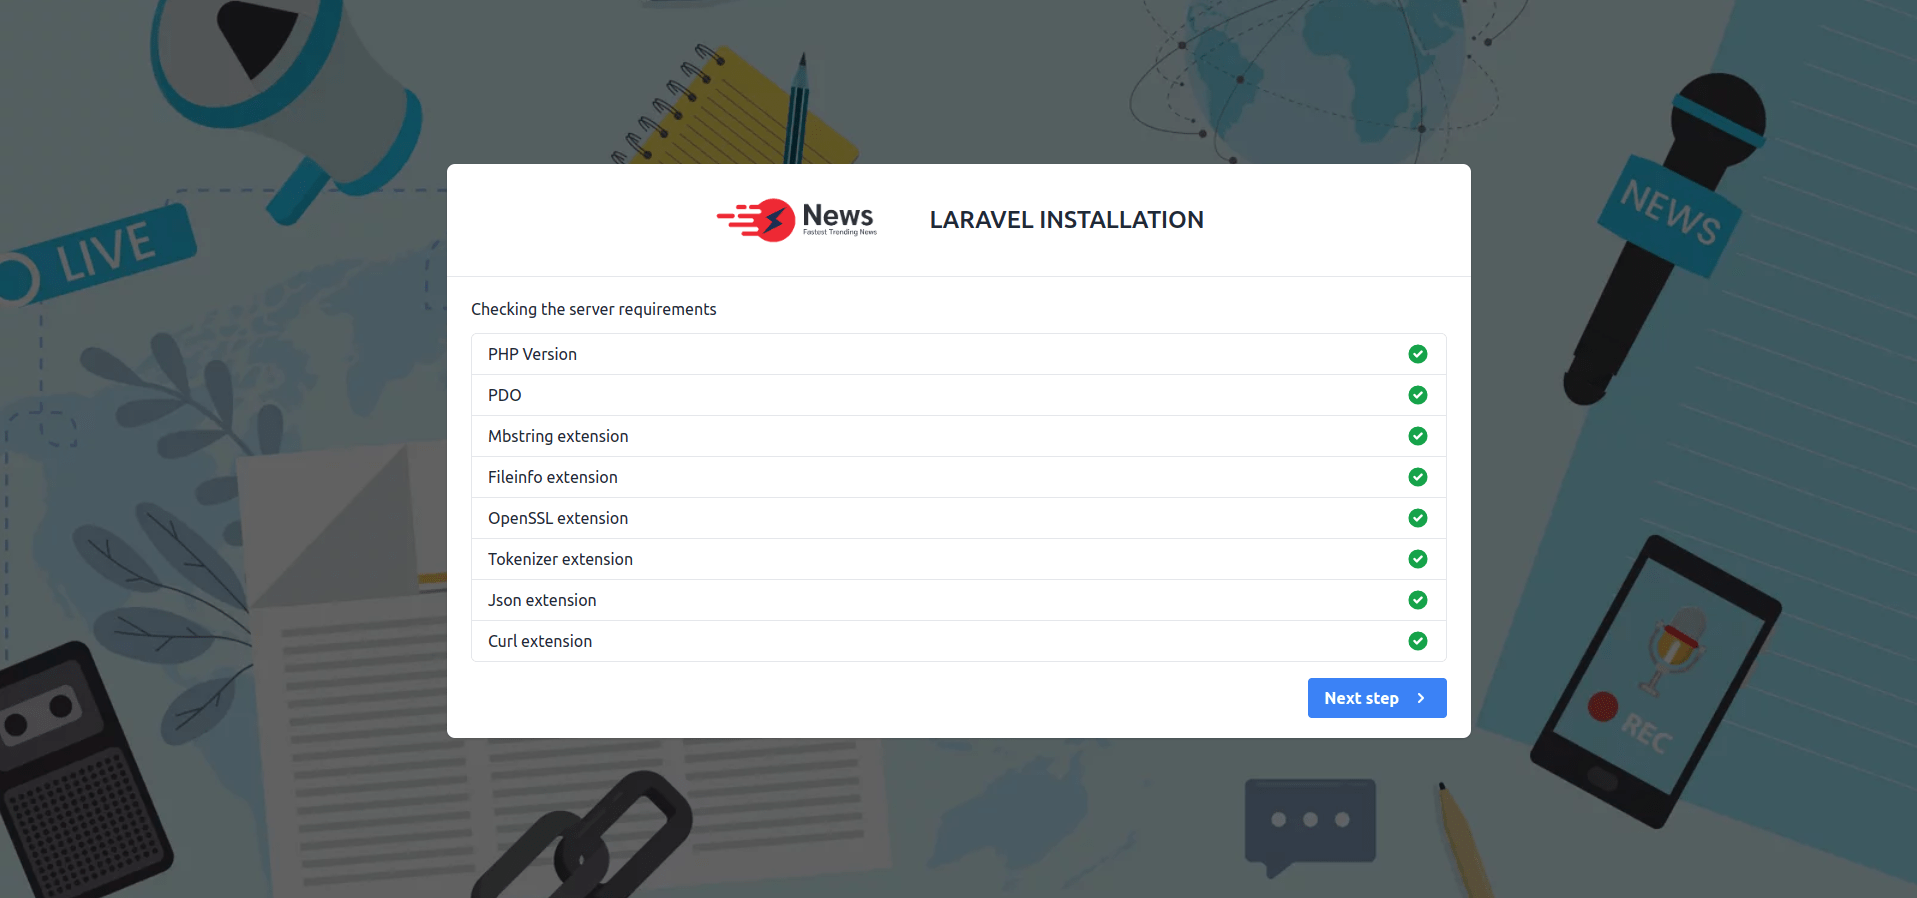
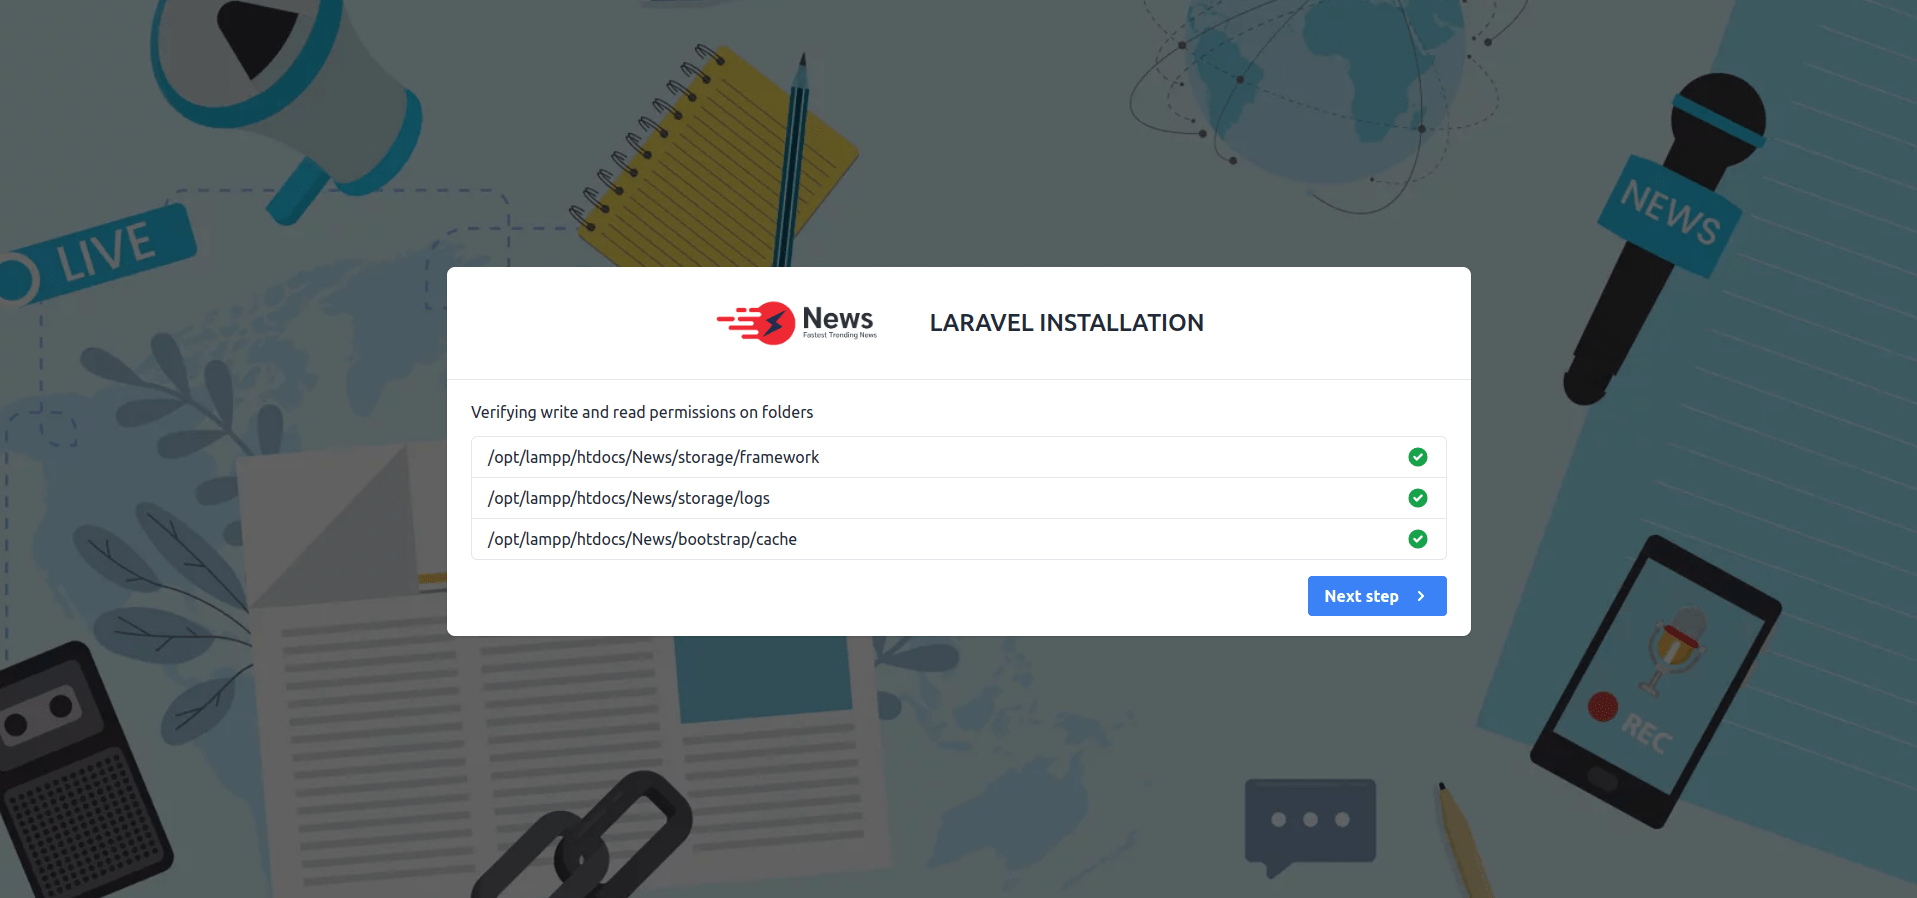
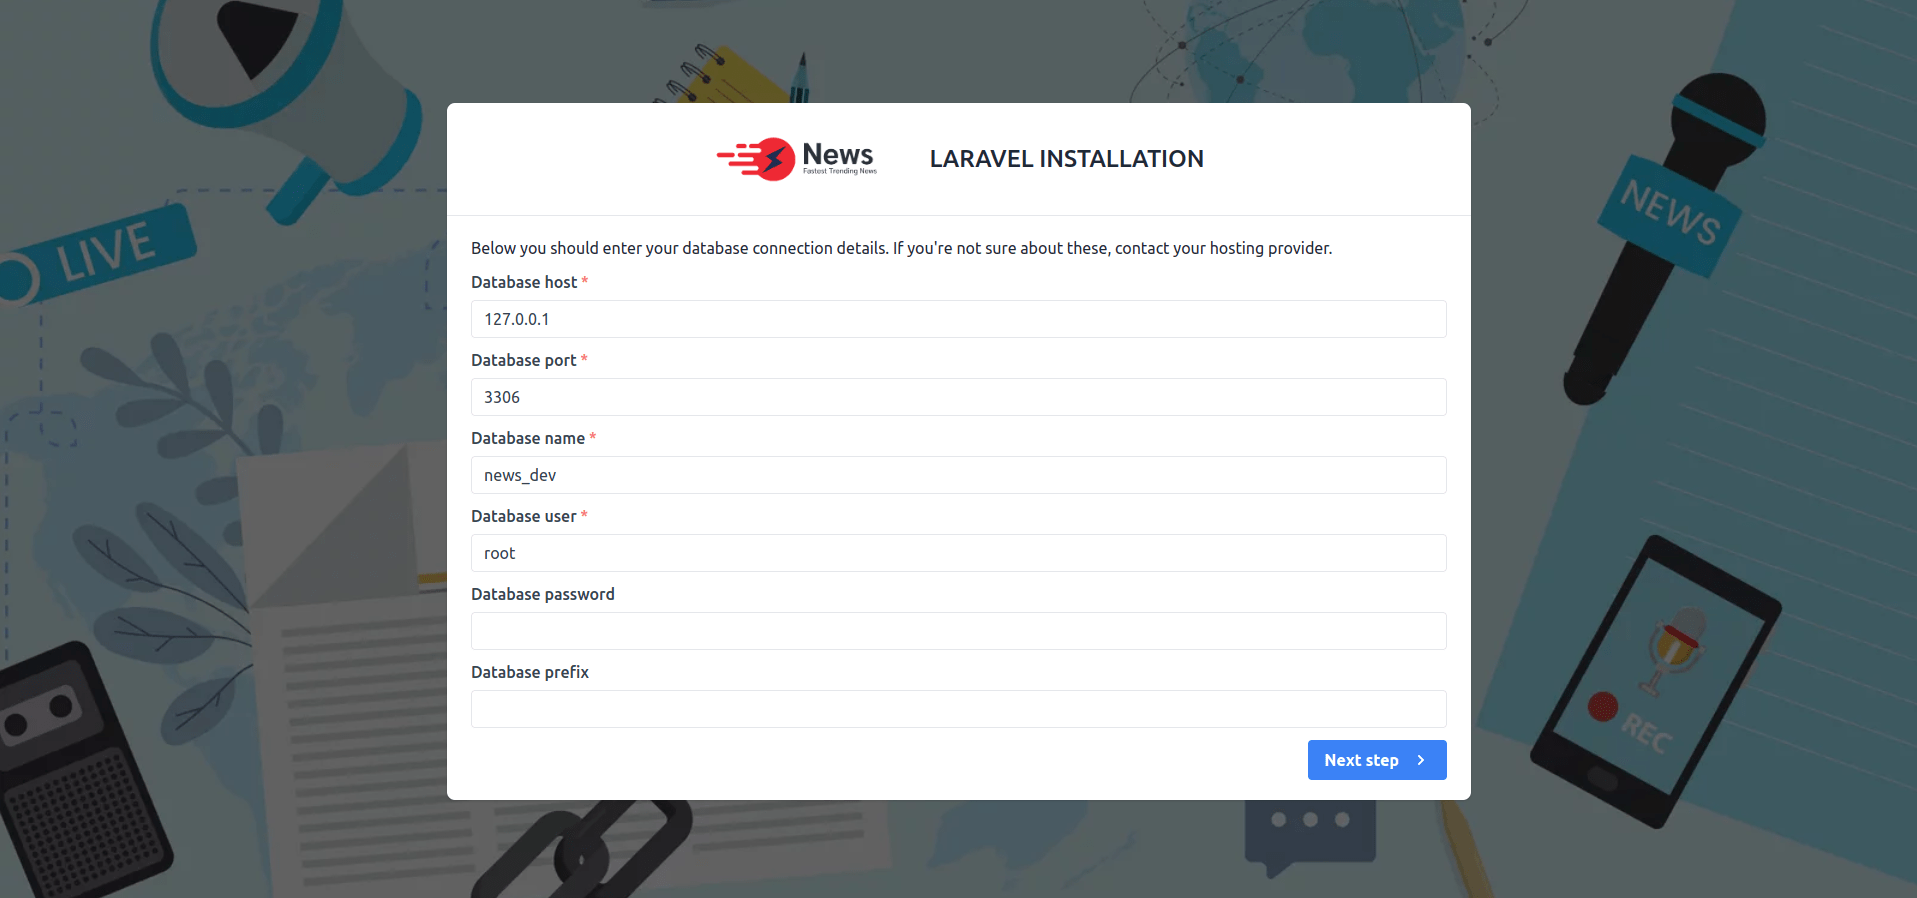
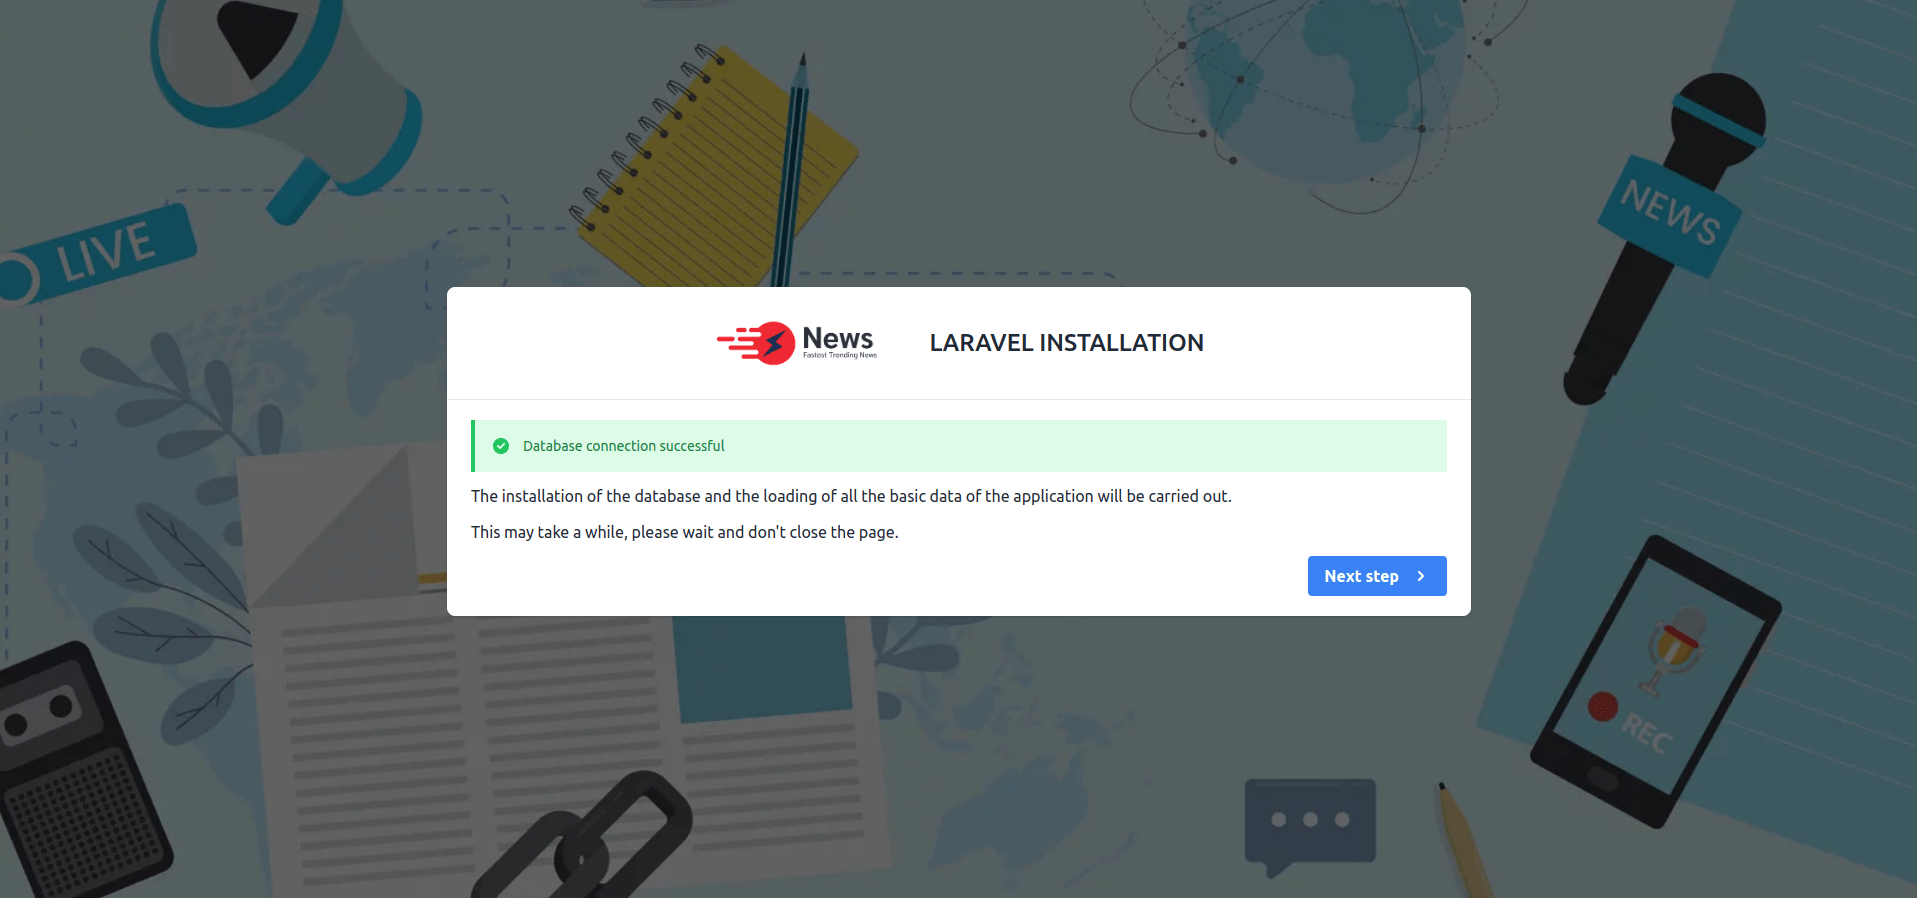
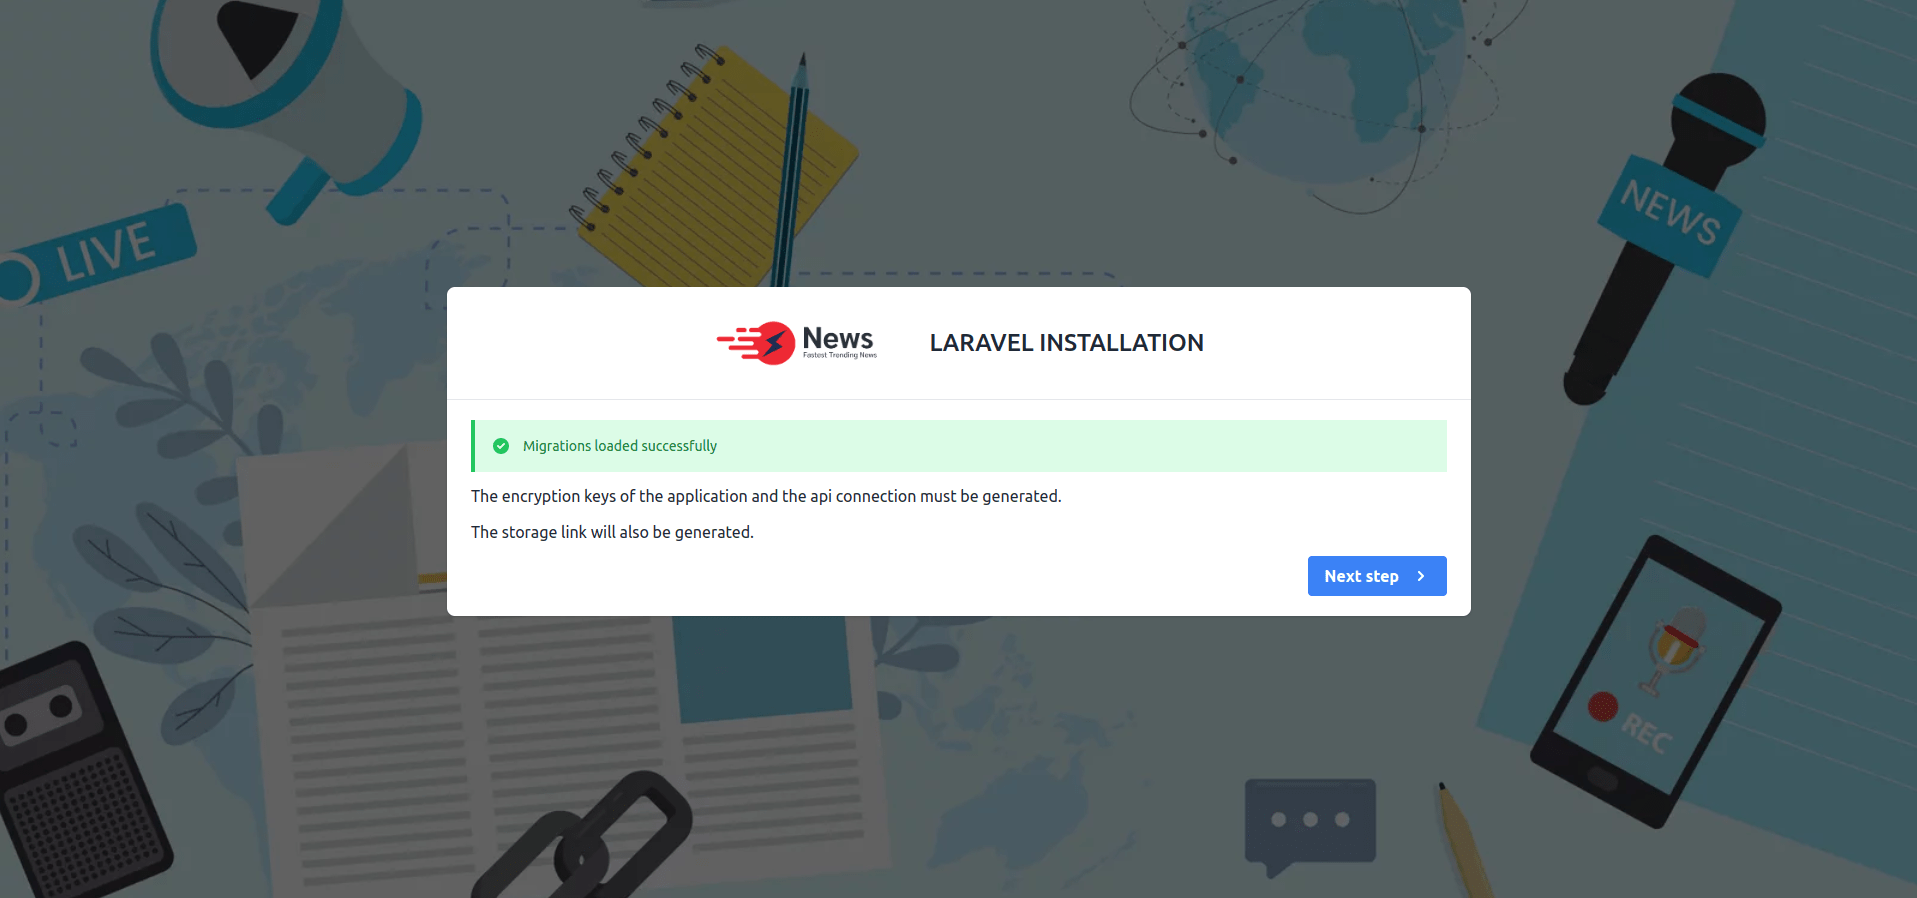
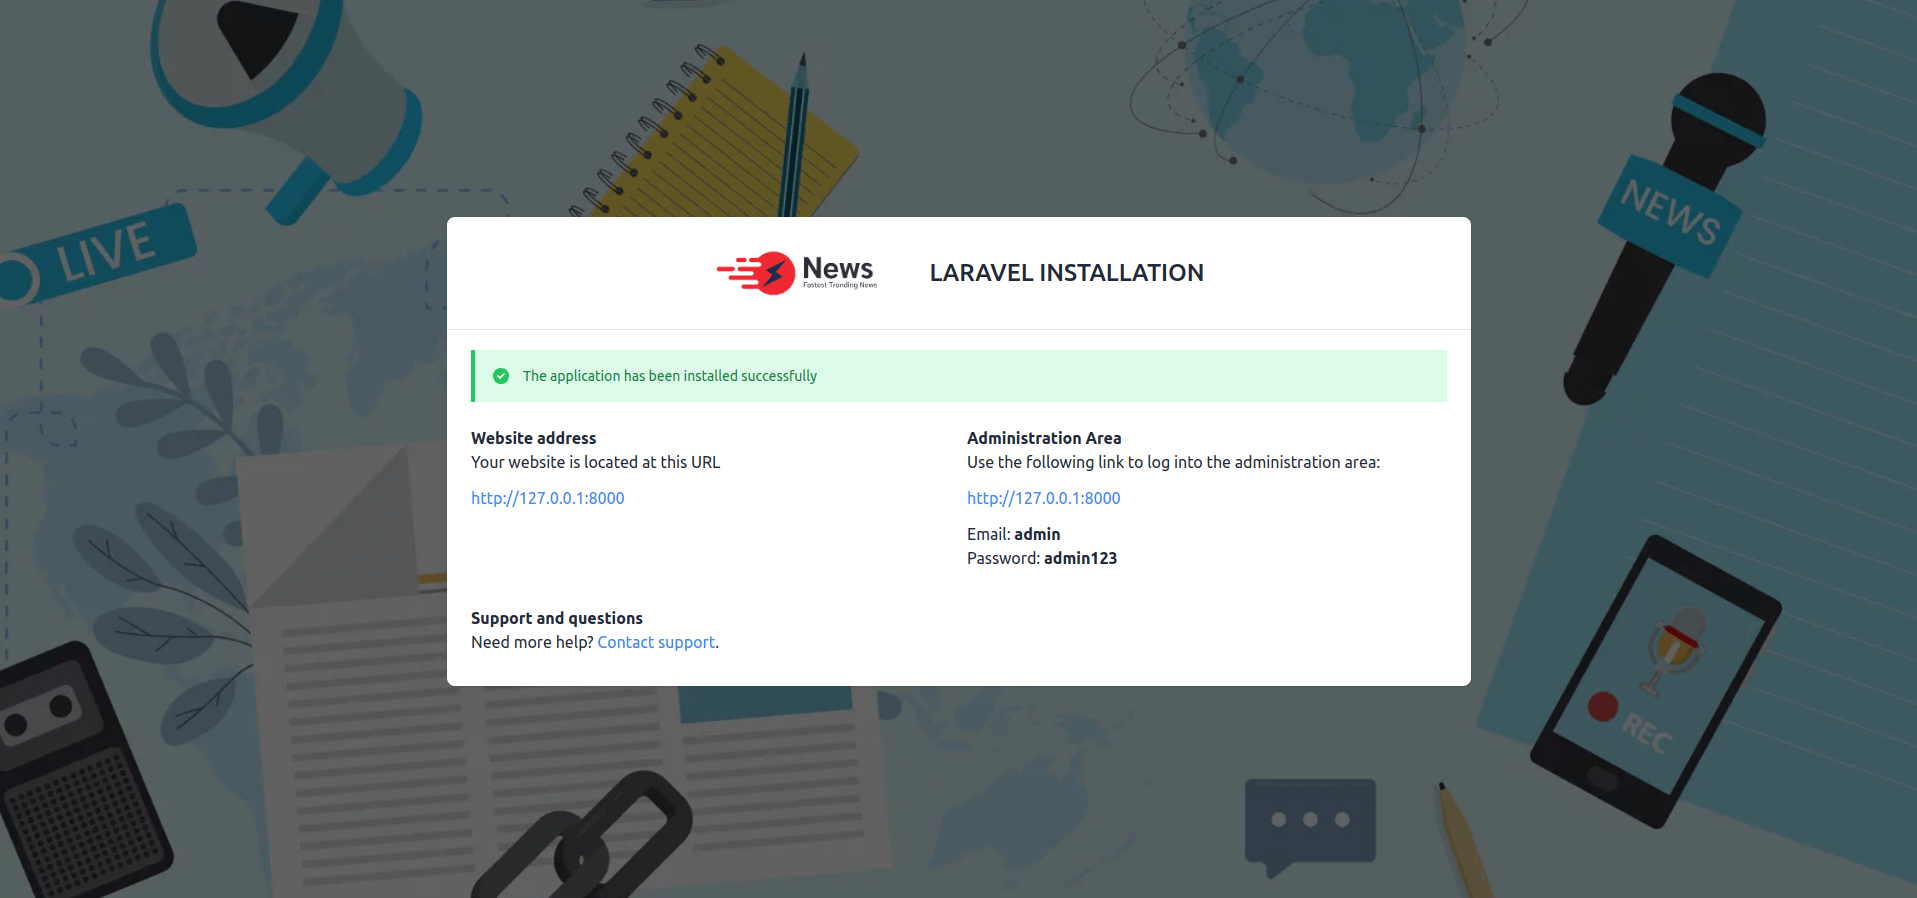
Install Laravel News Admin panel
- Upload the source code you have downloaded from CodeCanyon and unzip it.
-
Now navigate to the url where your project is located.
ex. mydomain.com or subdomain.mydomain.com - The installation screen should appear and guide you in the process.
- Step 1
- Step 2
- Step 3
- Step 4
- Step 5
- After successfull installation you will see login page.

News App
How to Setup Flutter
Explore the official Flutter website at https://docs.flutter.dev/get-started/install
for a complete installation guide for your platform.
Prefer video tutorials? Check out this
Playlist
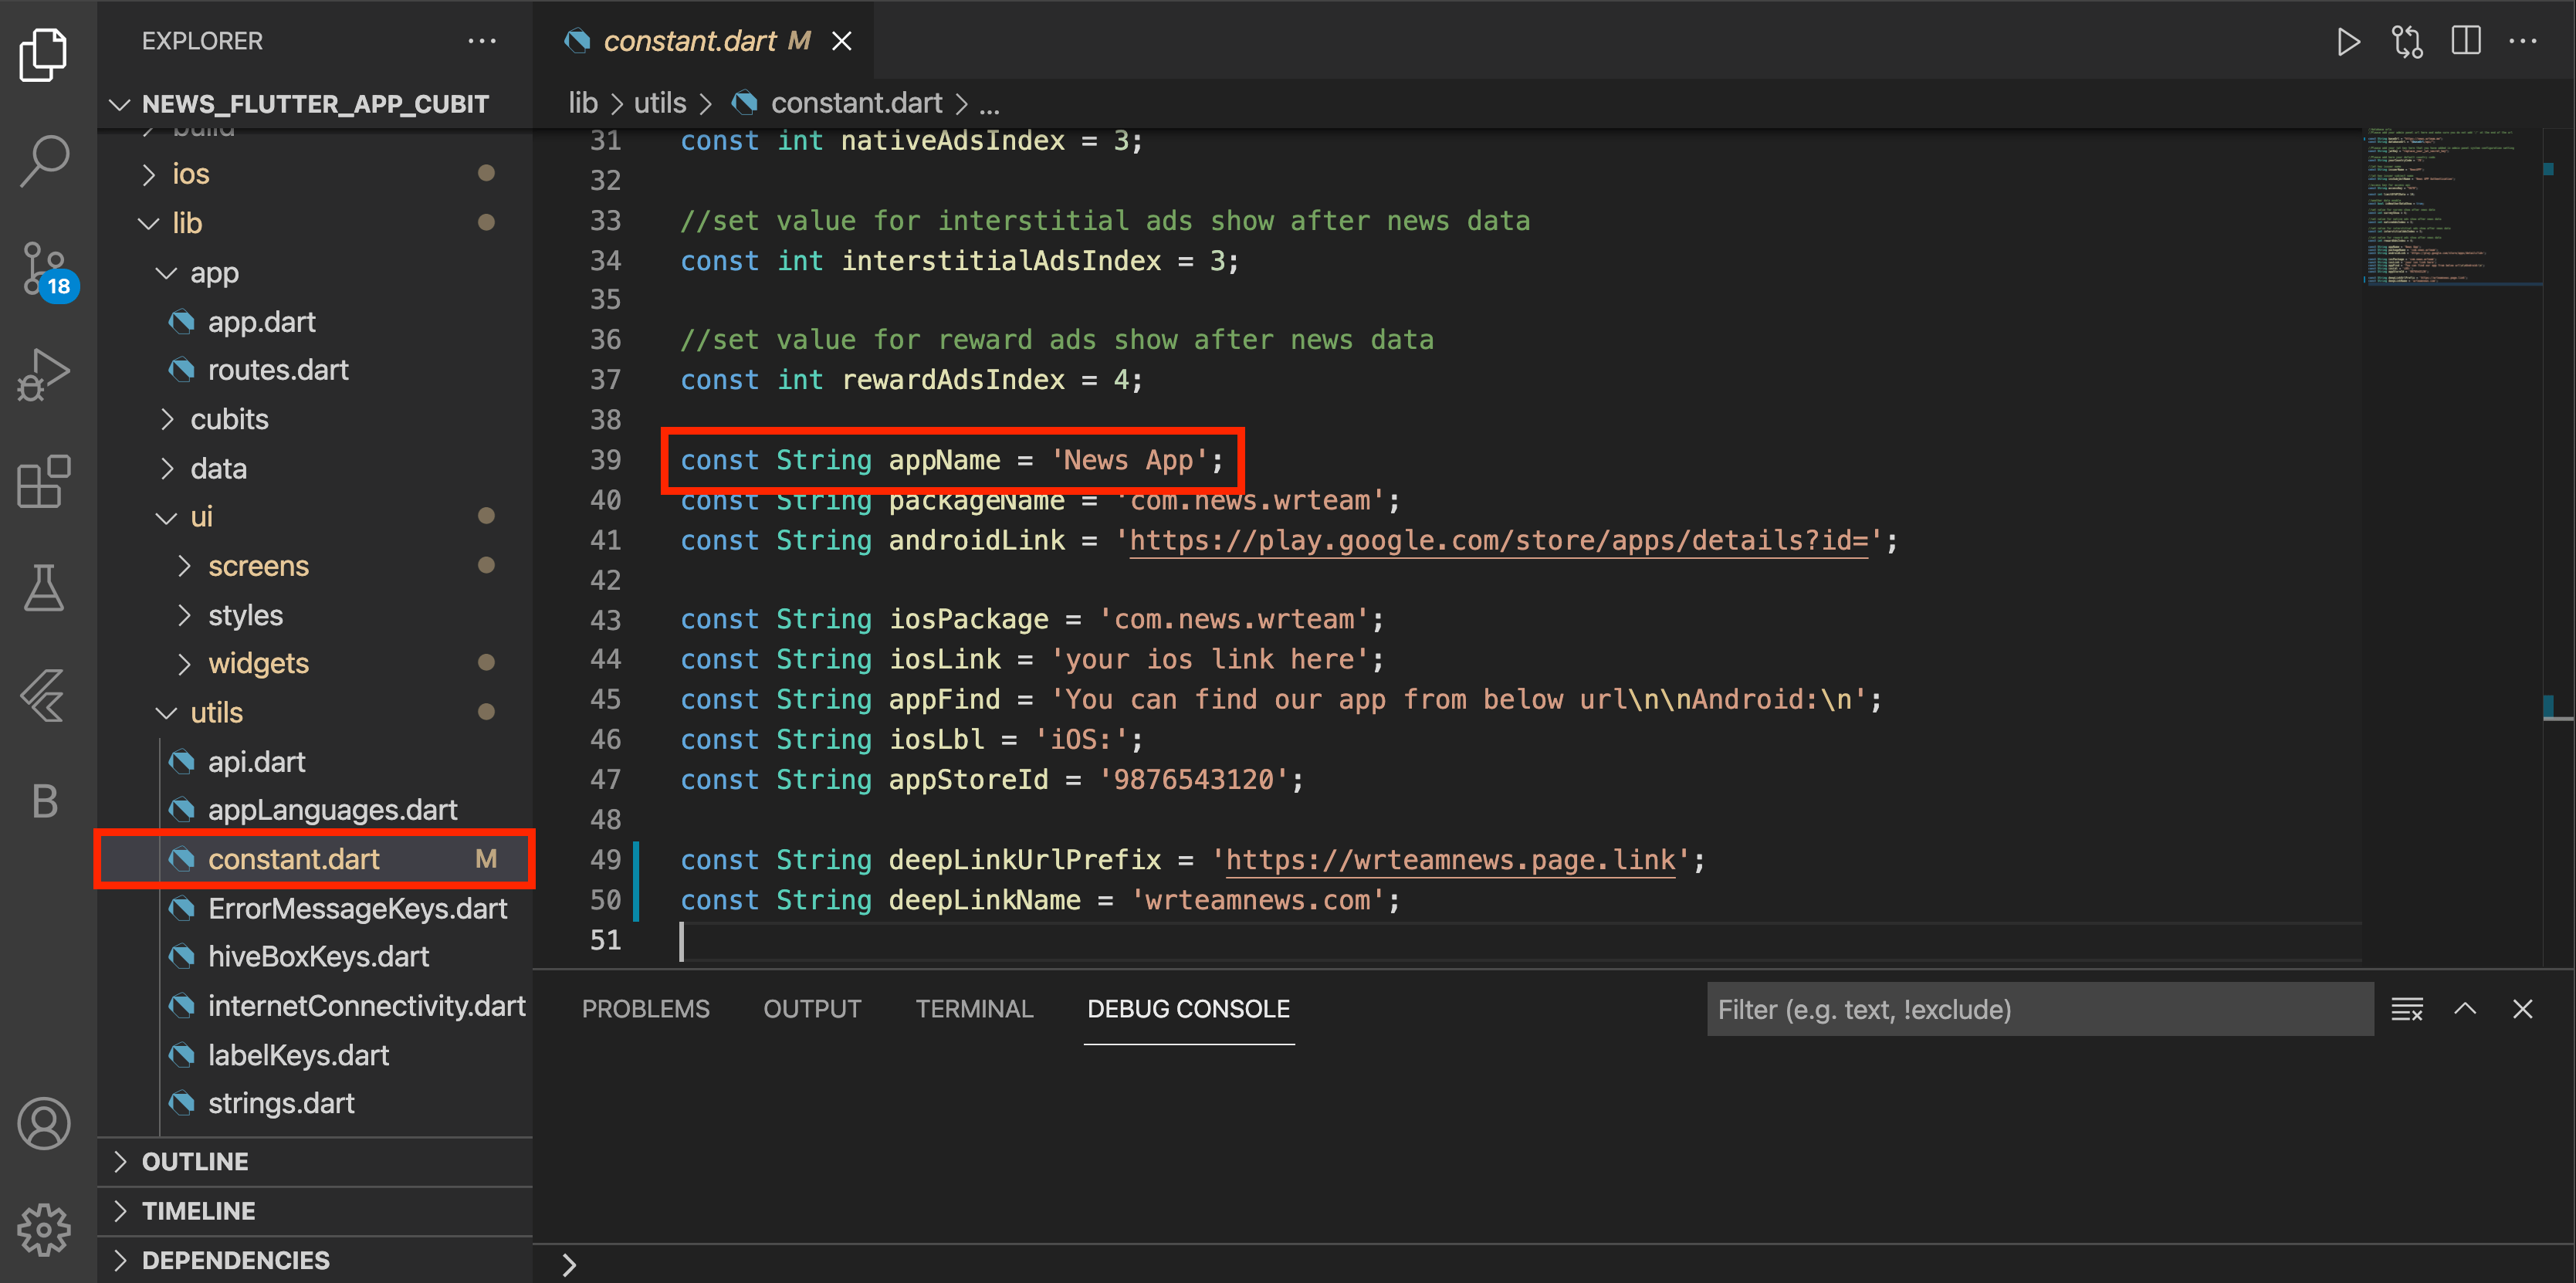
How to change App Name?
-
Open lib > utils > Constant.dart and change that string as shown as below image
-
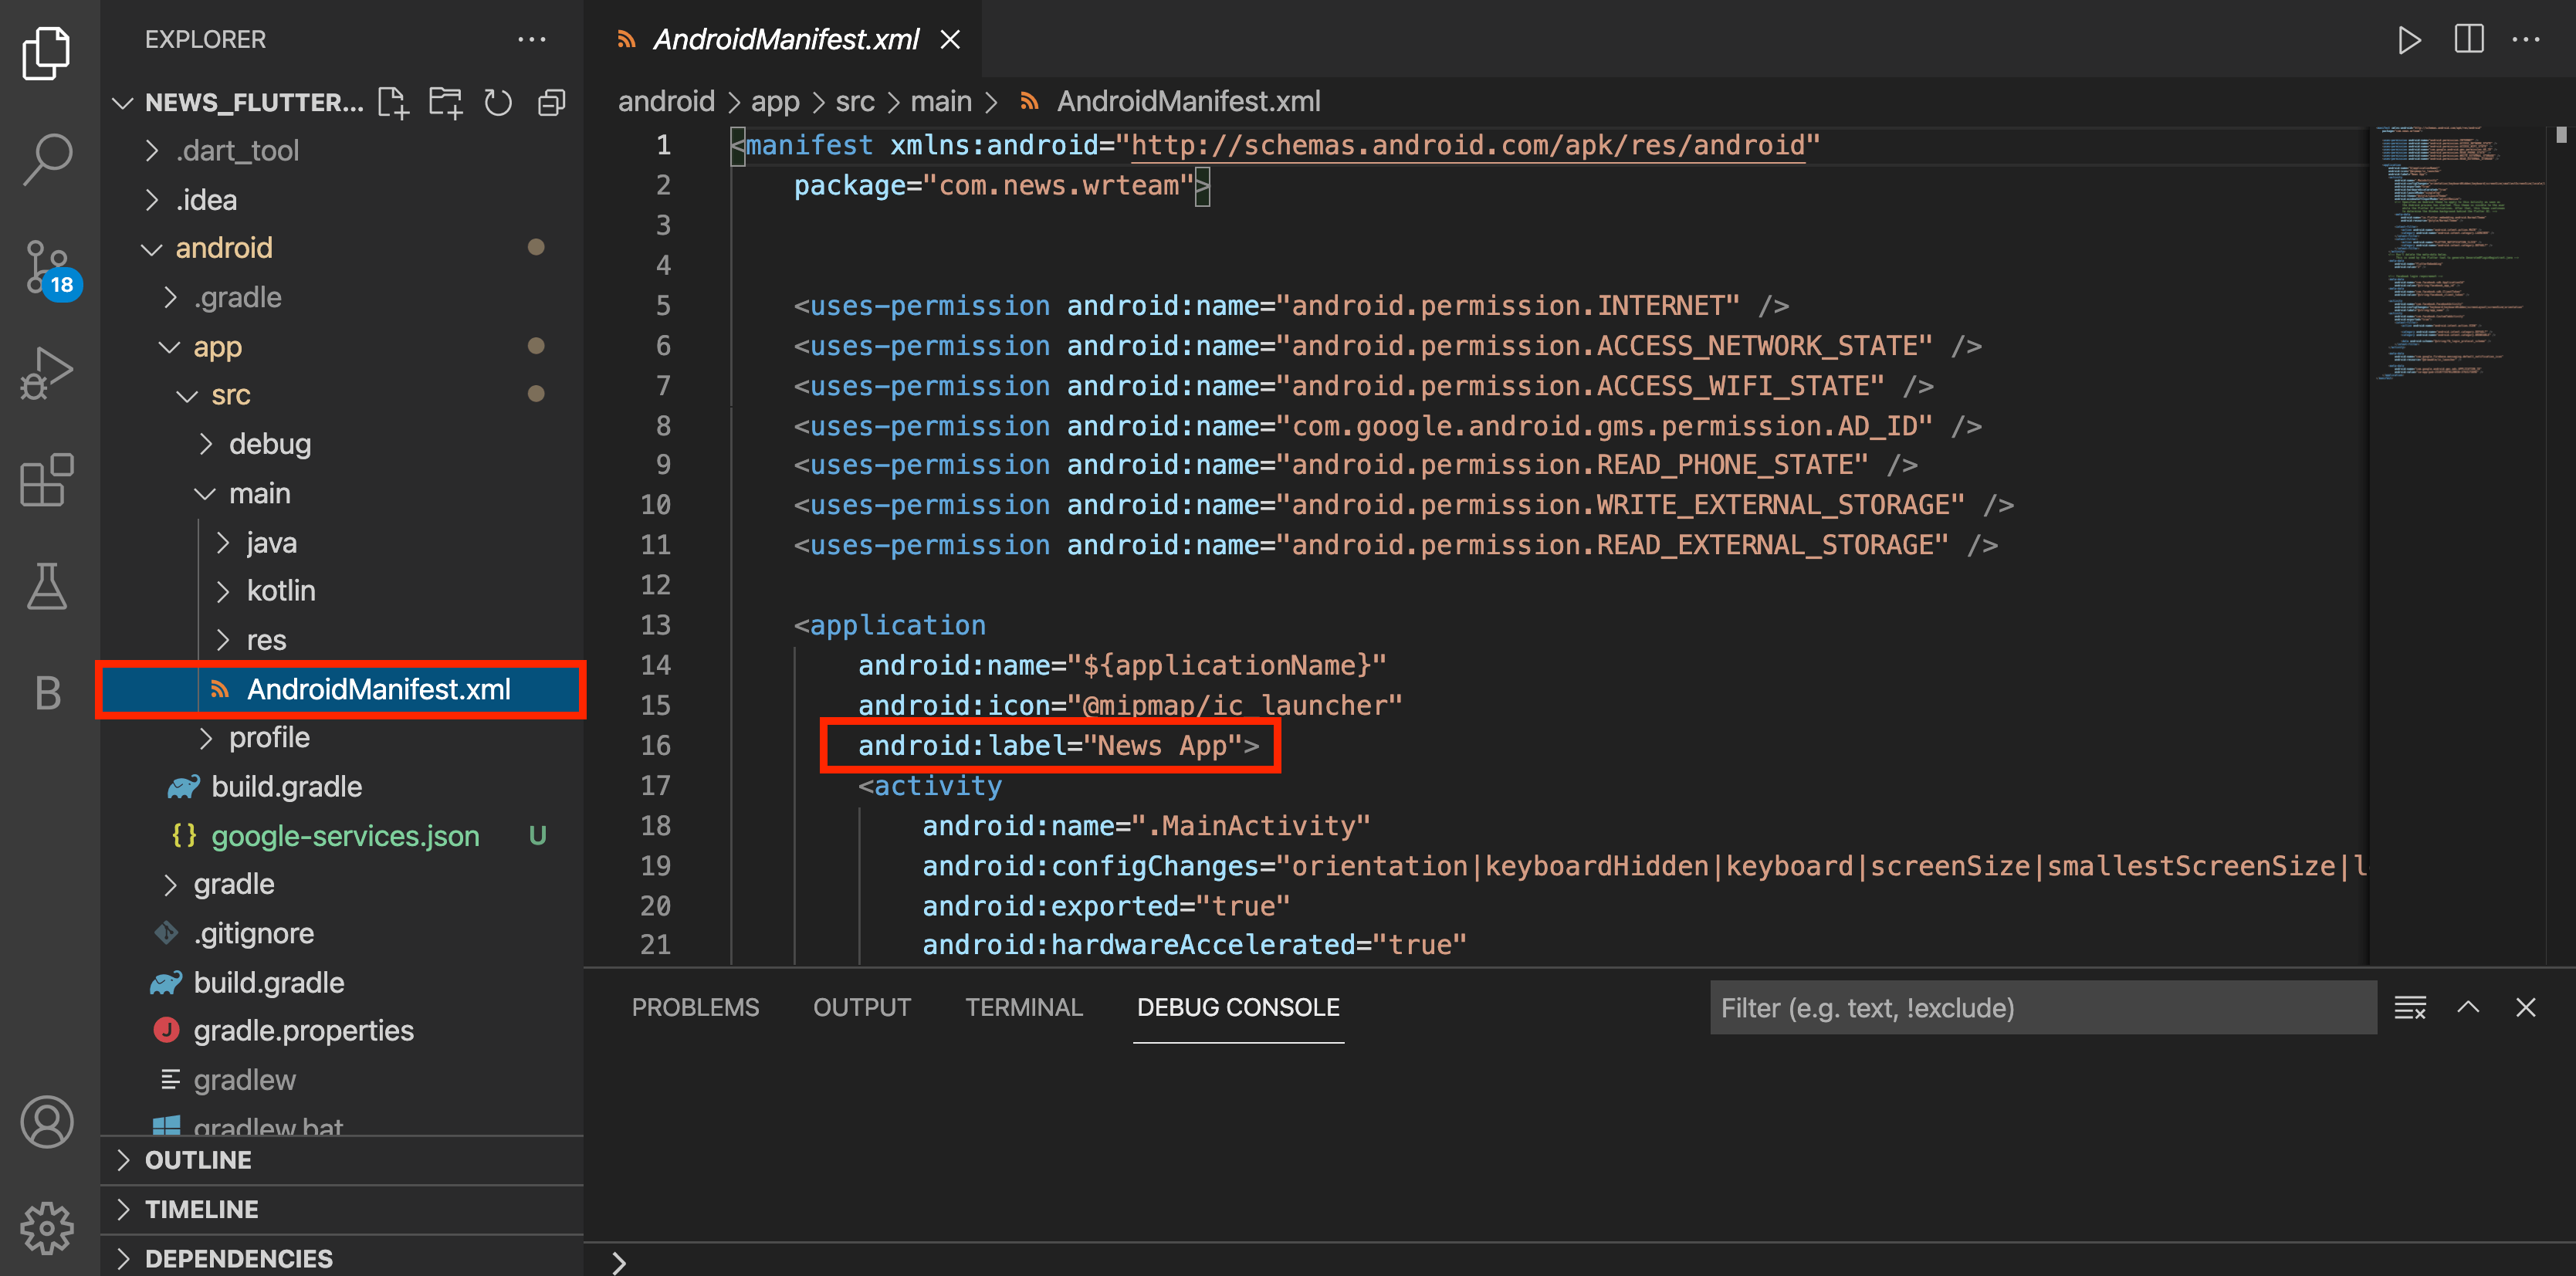
For Android, to change label that is shown below android app icon, open android
> app > src > main > open AndroidManifest.xml and inside that label change that
string as shown in below image
-
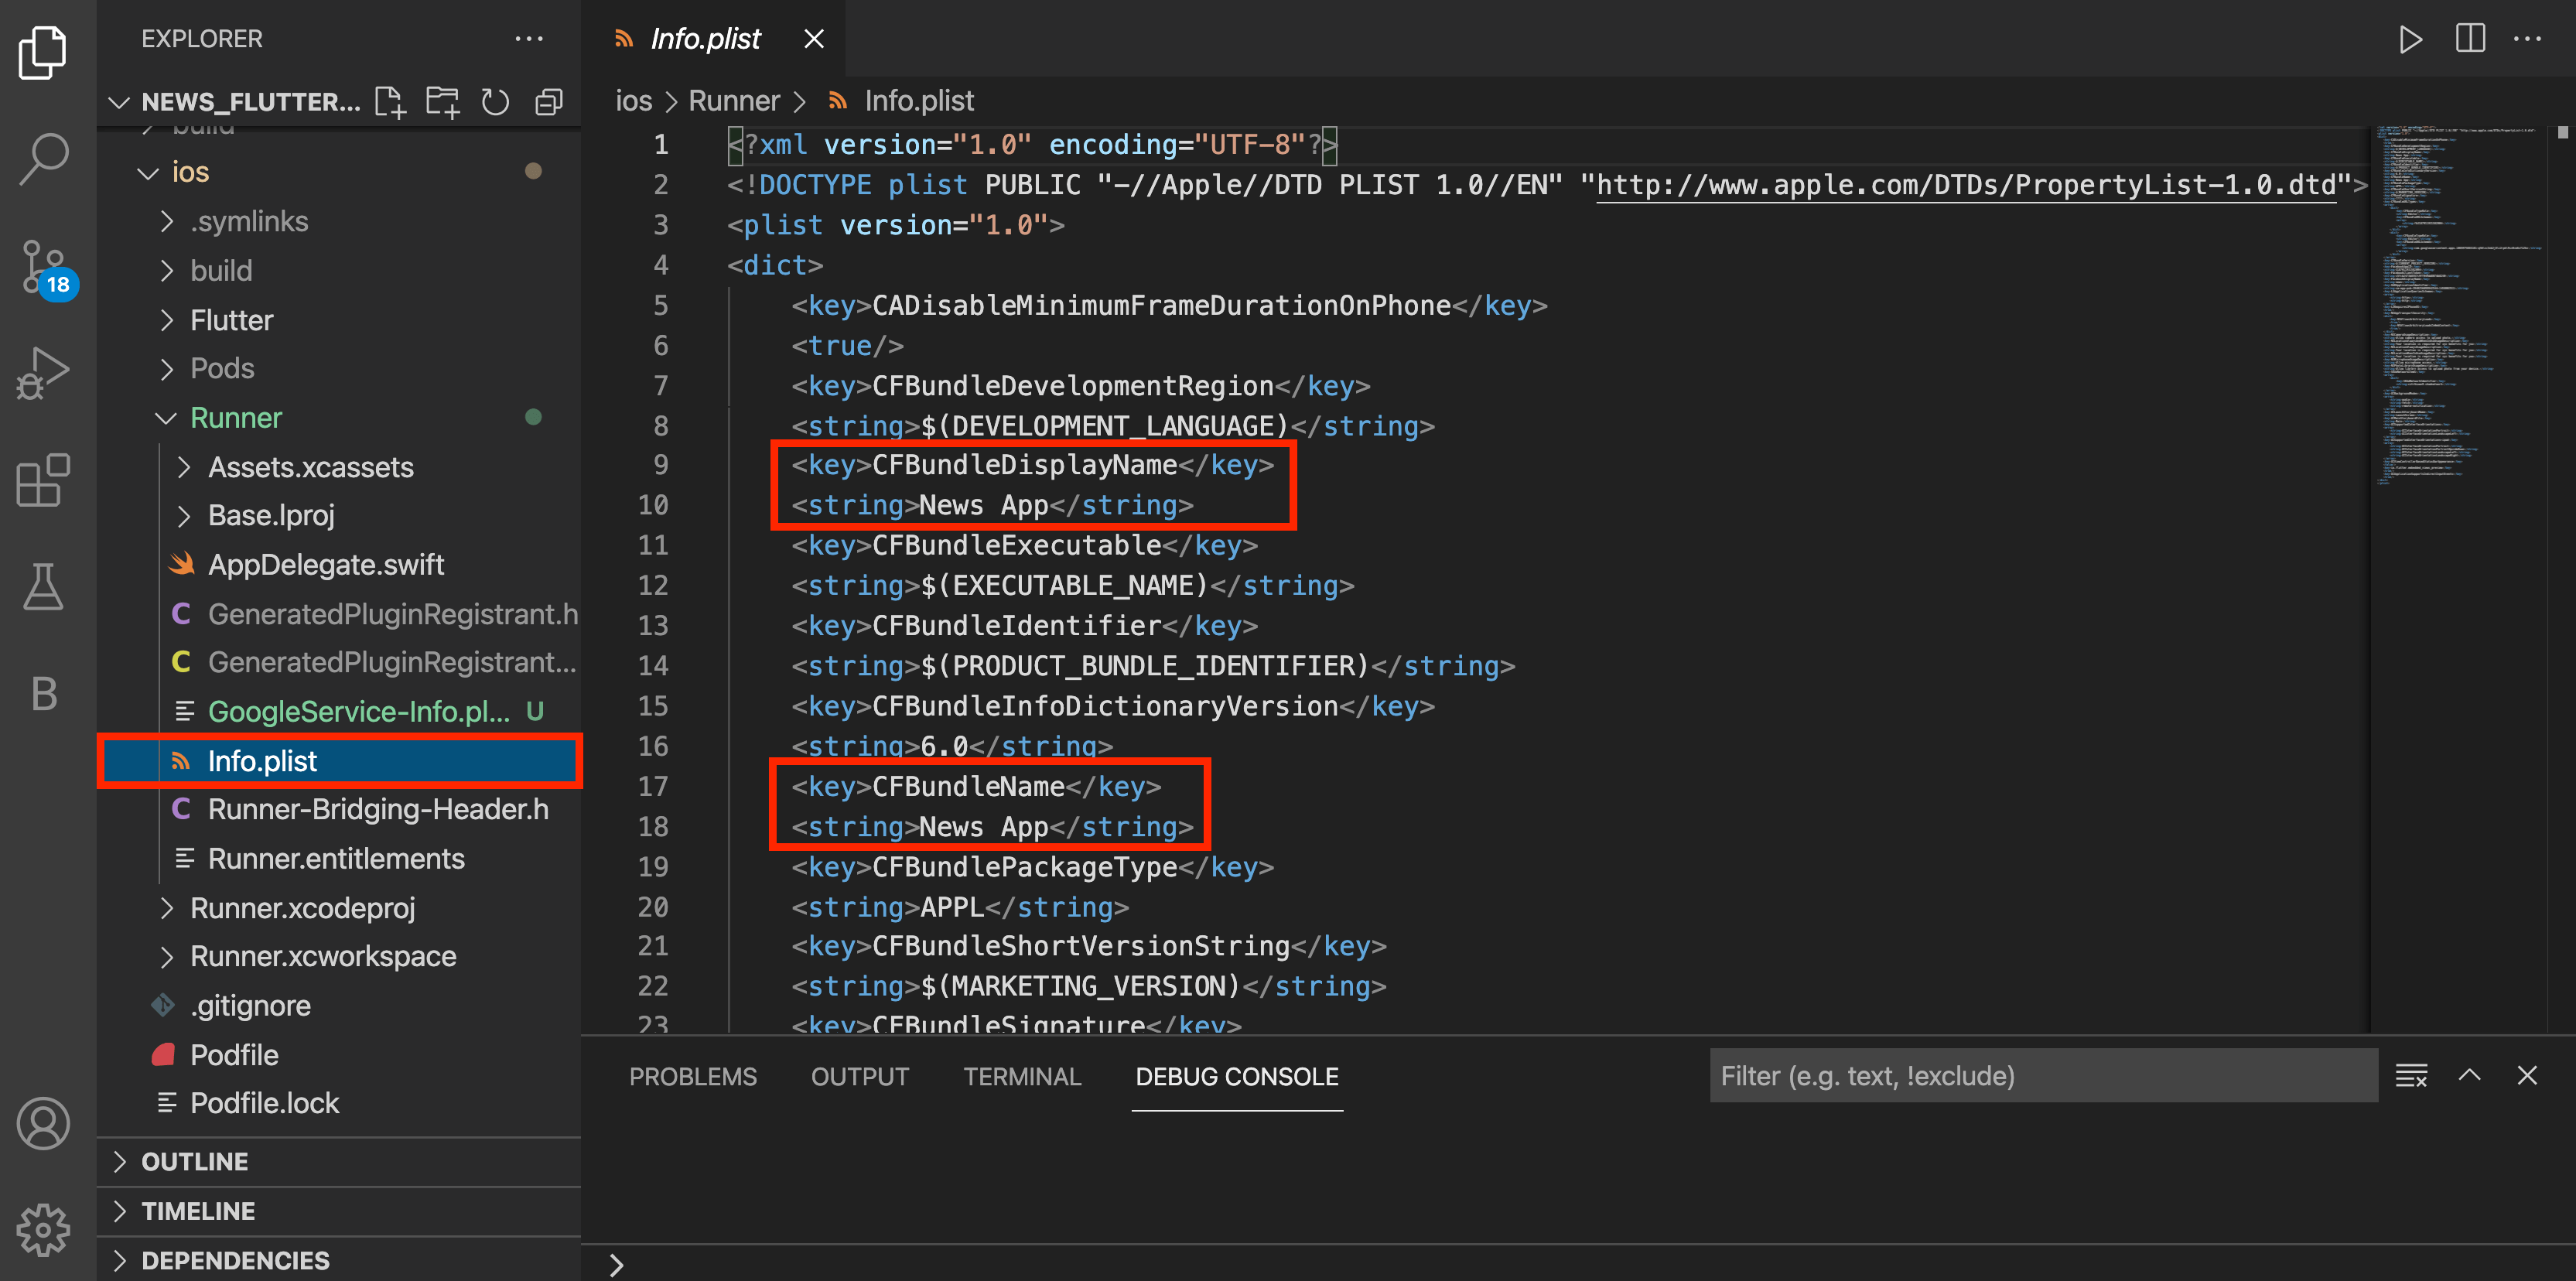
For iOS, to change label that is shown below ios app icon, open ios > Runner >
Info.plist inside that CFBundleDisplayName & CFBundleName change
that string as shown in below image
How to change app logo?
-
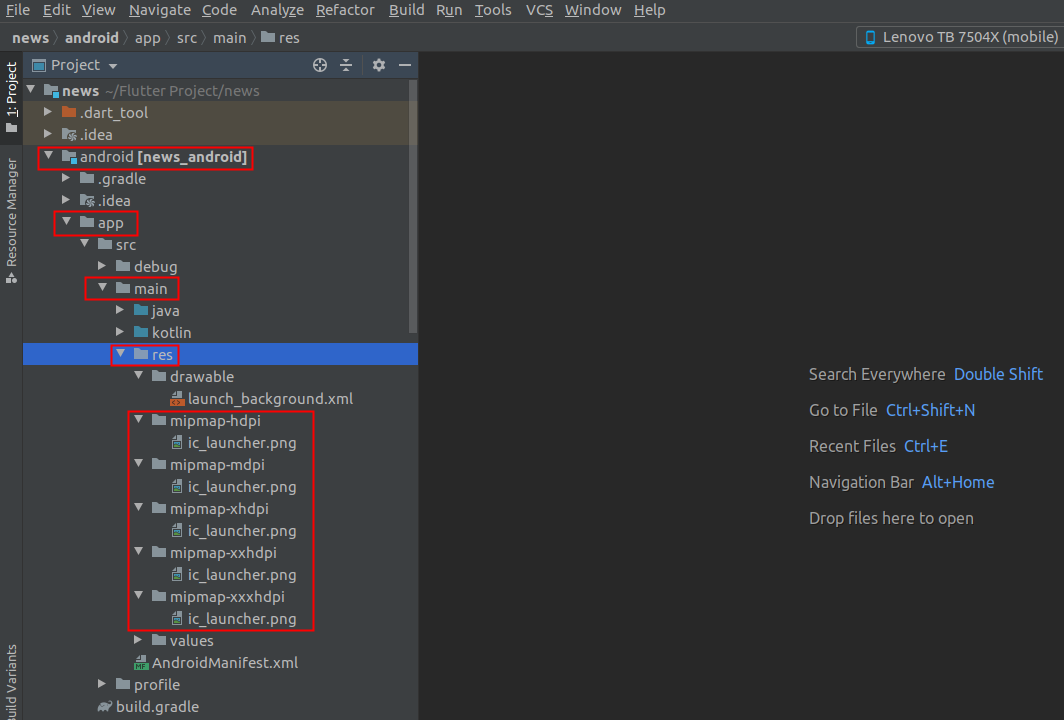
For Android, open android > app > src > main > res > mipmap add here your logo
according to device screen size.
-
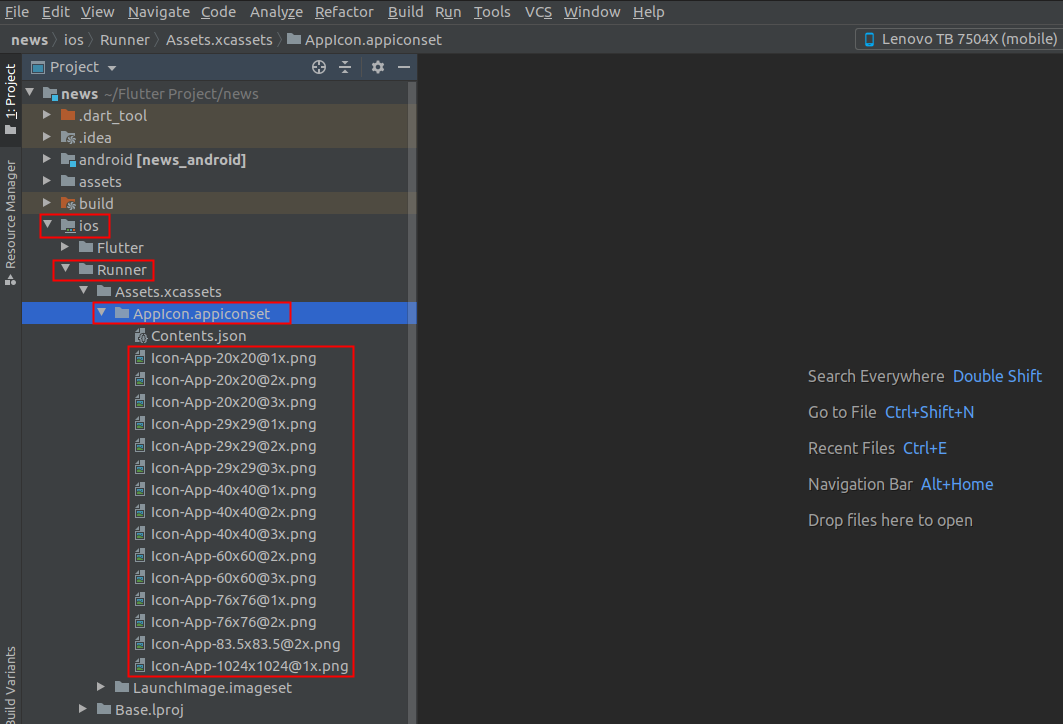
For iOS, open ios > Runner > Assets.xcassets > AppIcon.appiconset here you need
to put your logo according to different size.
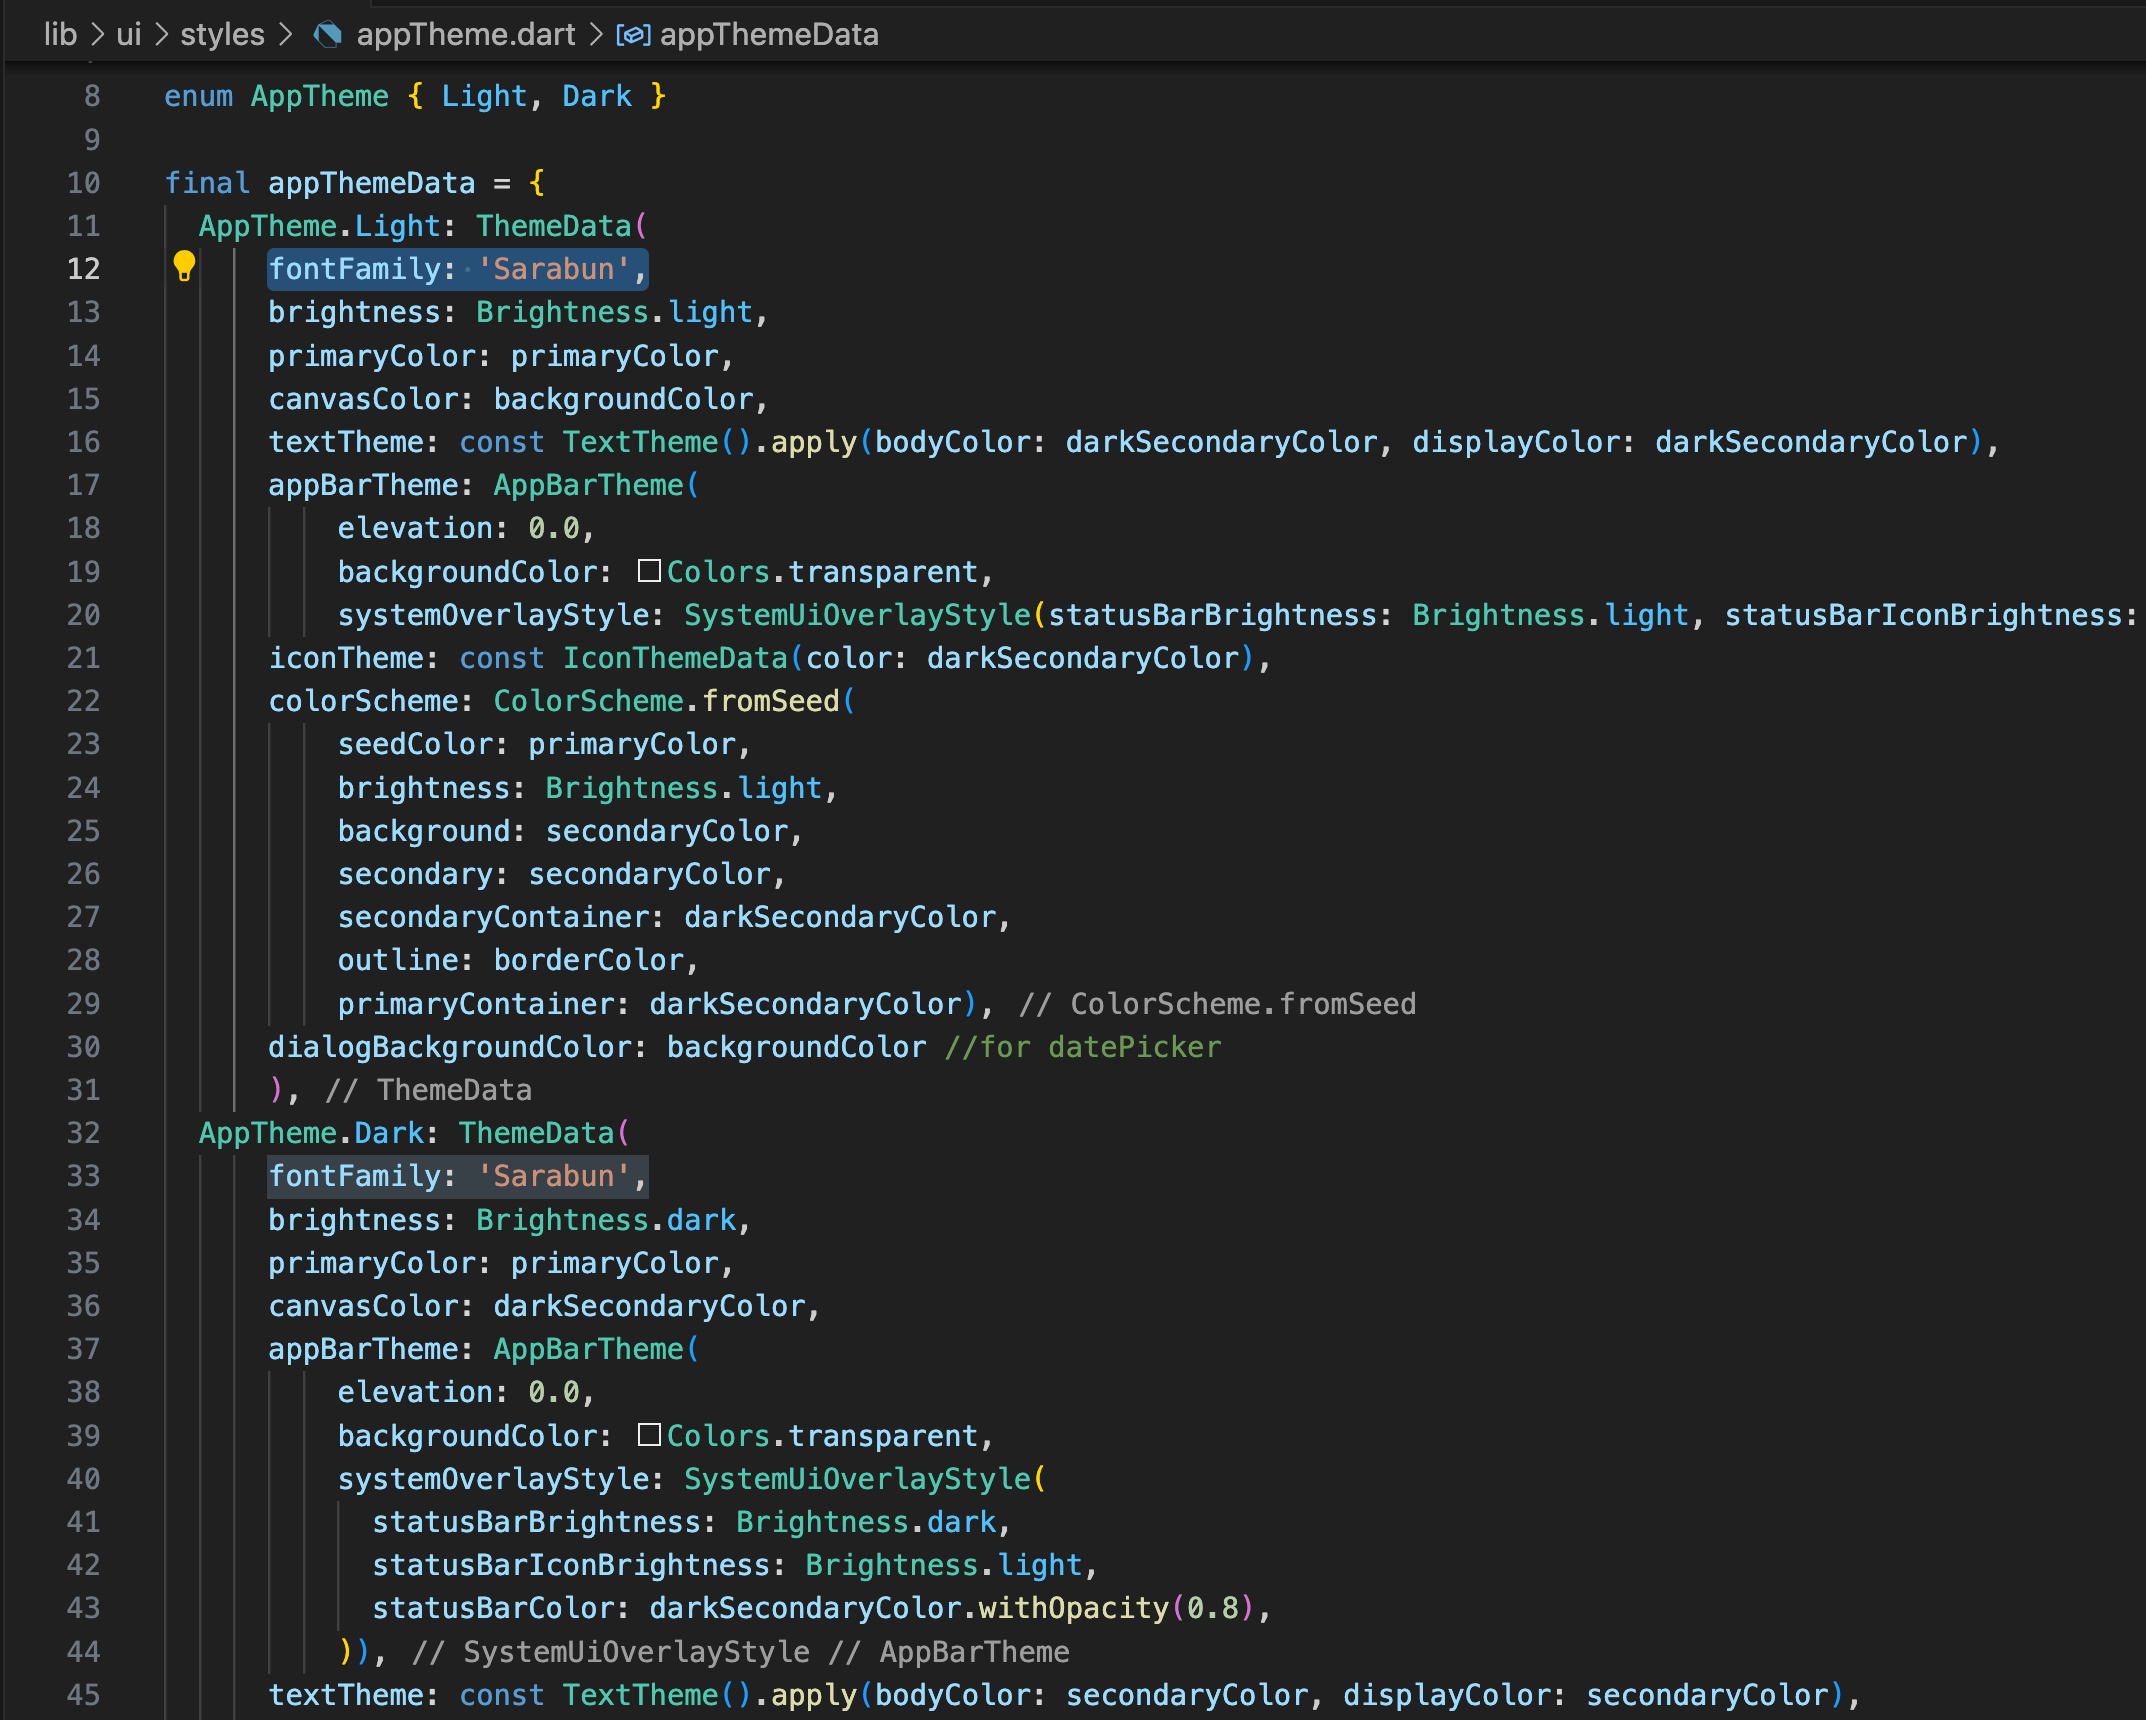
How to Change App color
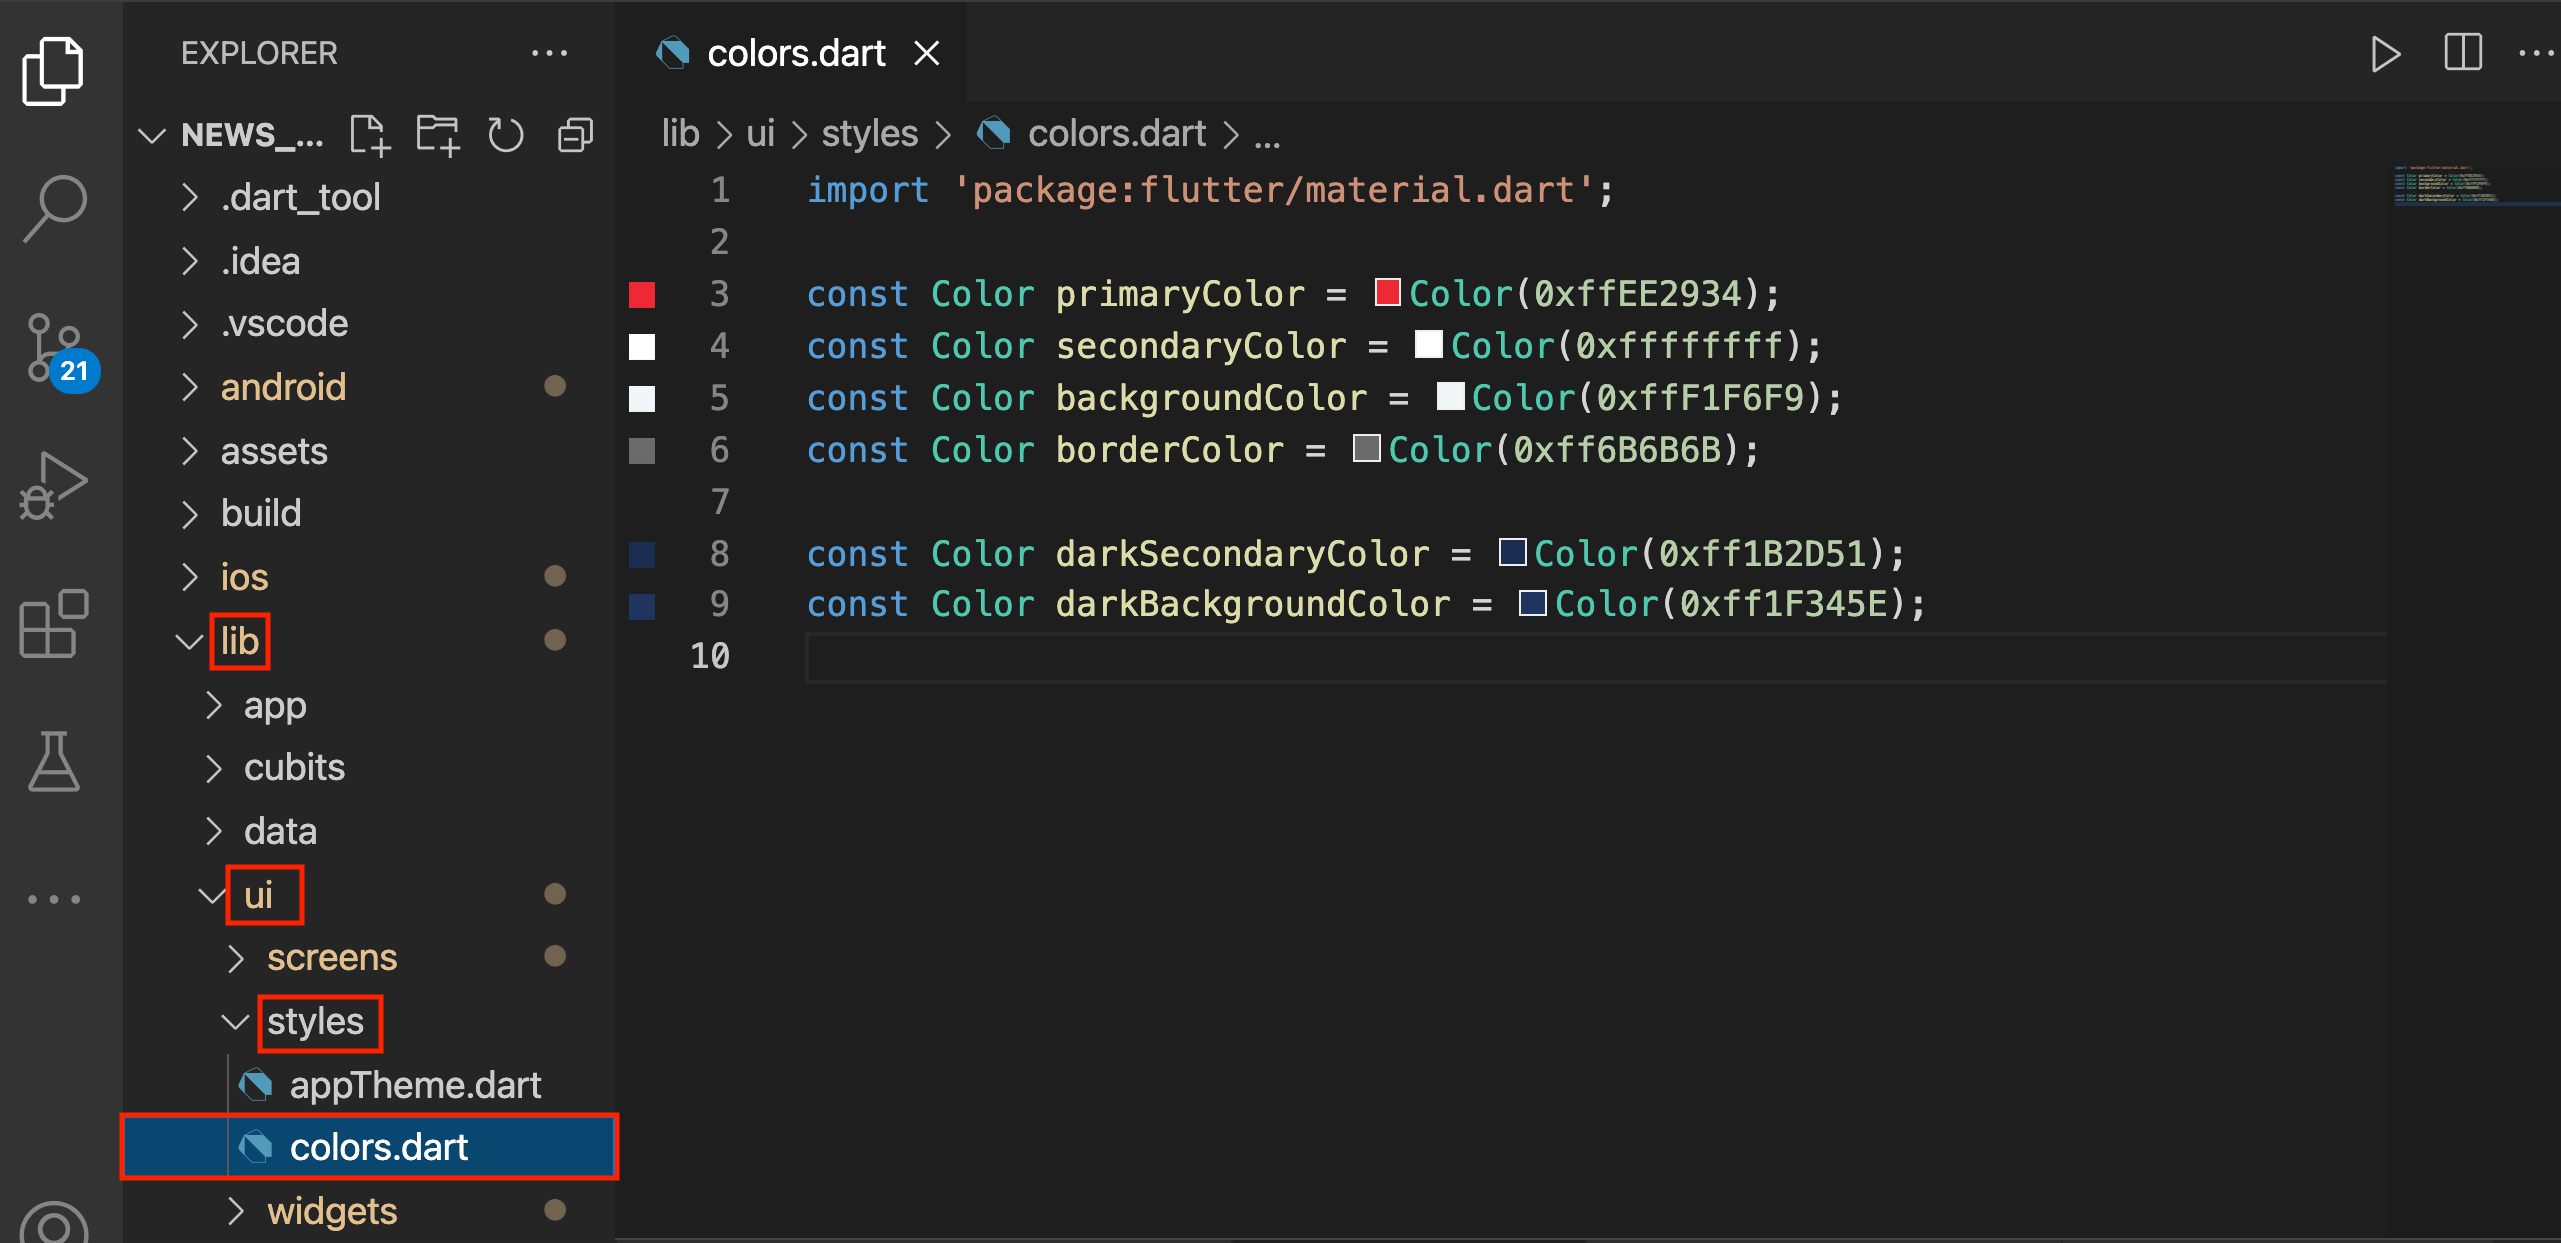
- To change App color, your need to add your color code in lib > ui > styles > colors.dart
- In flutter color code start from 0xff so you have to add your hex color after 0xff.your can change primary,second,fontcolor as shown in below image.
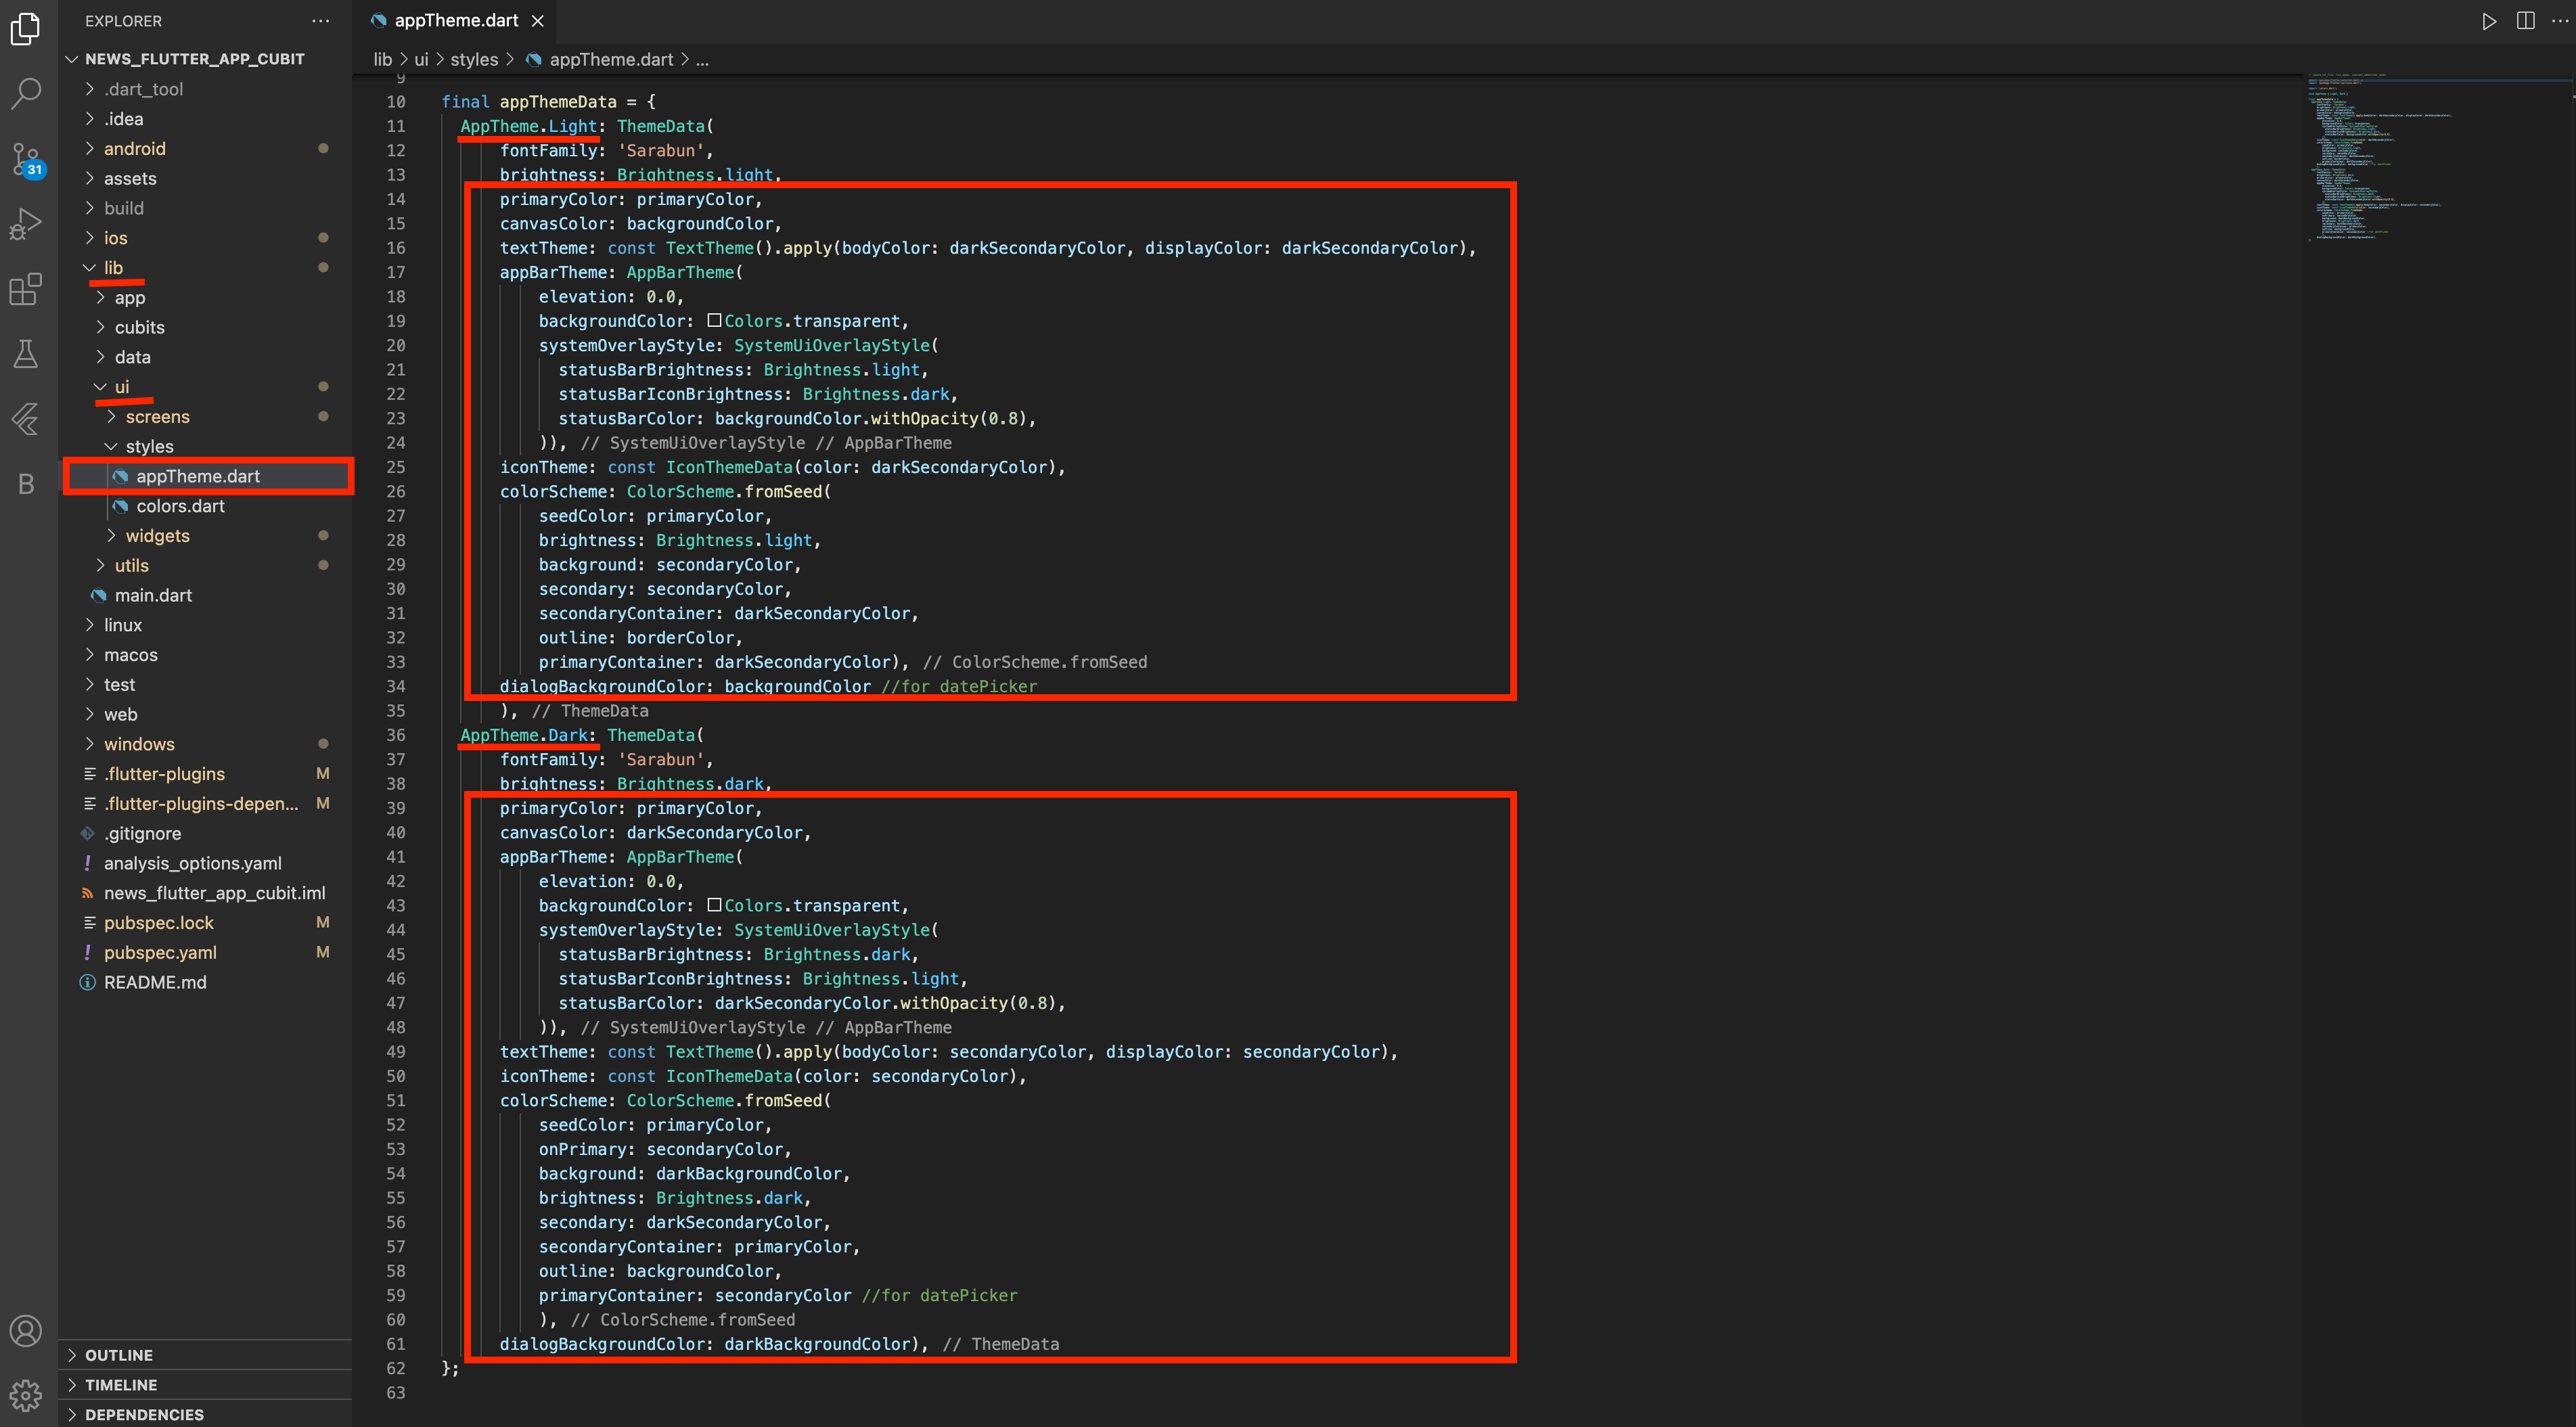
- And set that colors in appTheme.dart file there according to Light And Dark Theme for your App
How to change package name
-
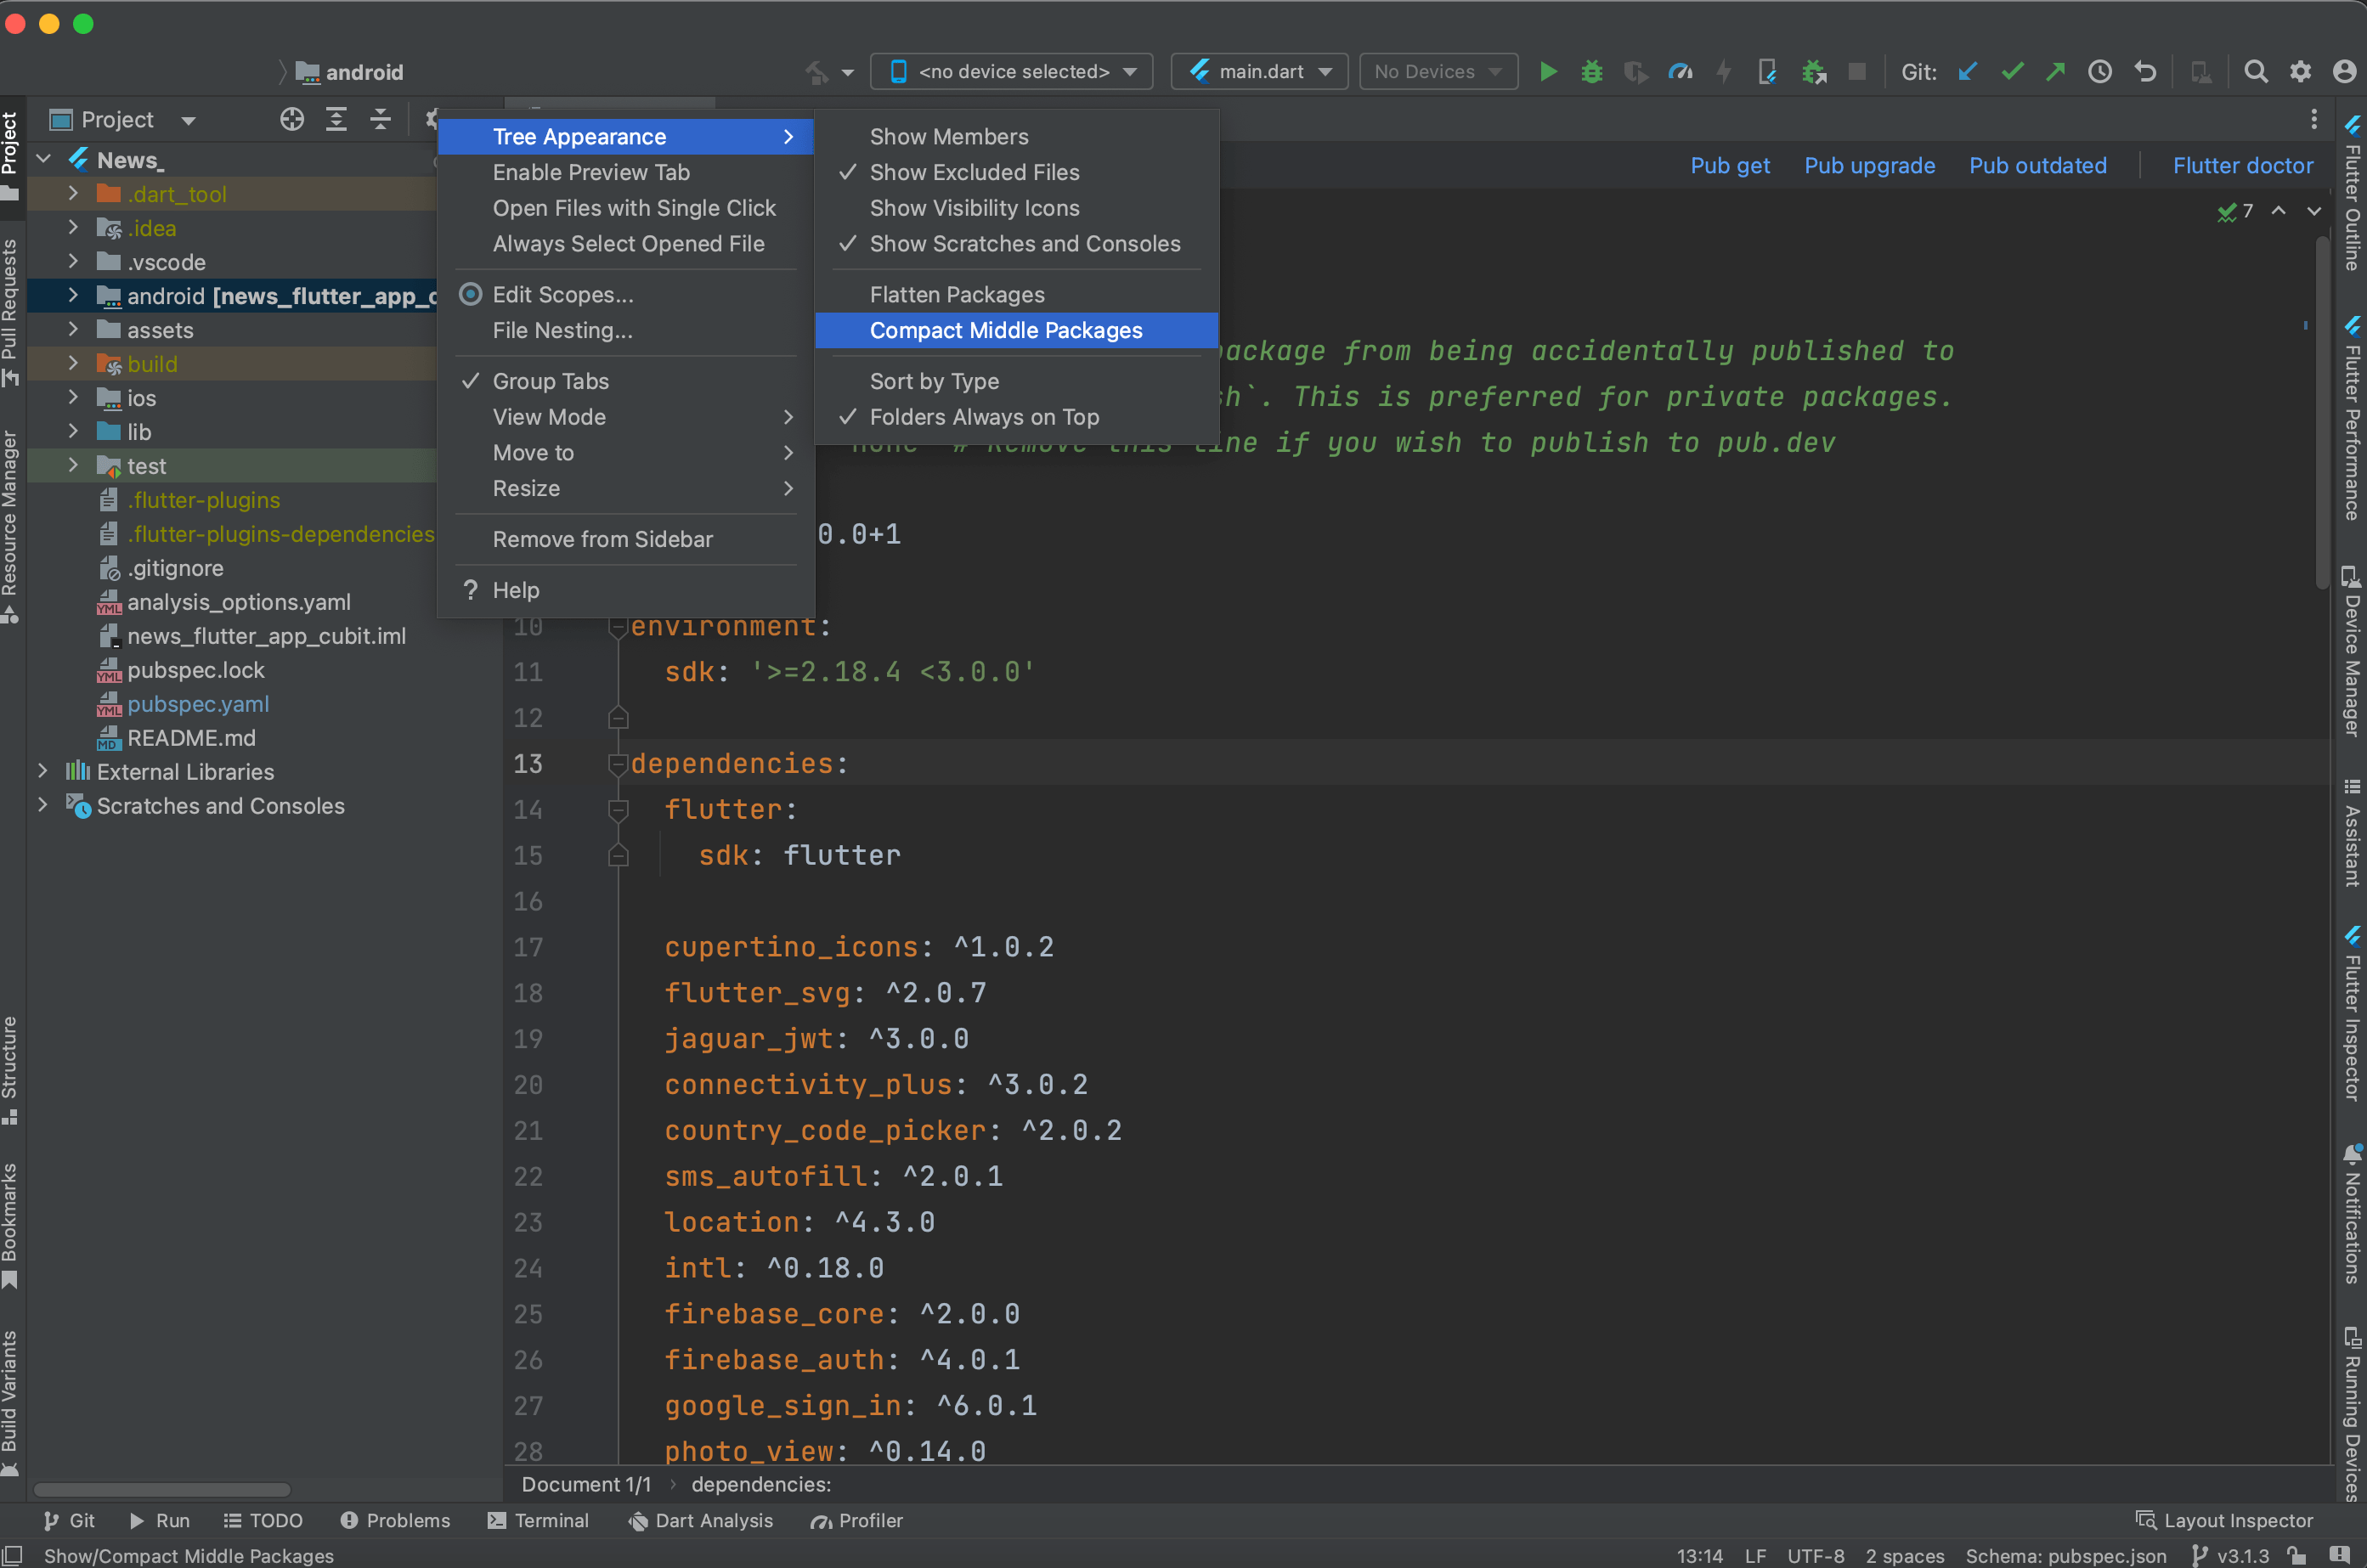
In the Android pane, click on the little gear icon. Go with Tree Appearance &
then Uncheck/Deselect the Compact Middle Packages option.
-
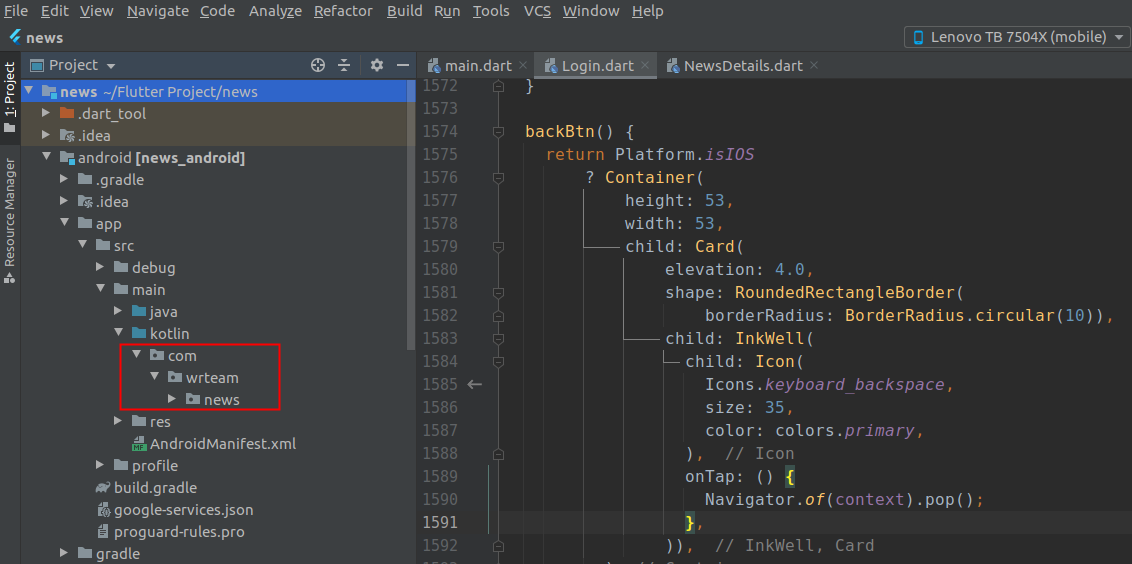
Your package directory will now be broken up in individual directories.
-
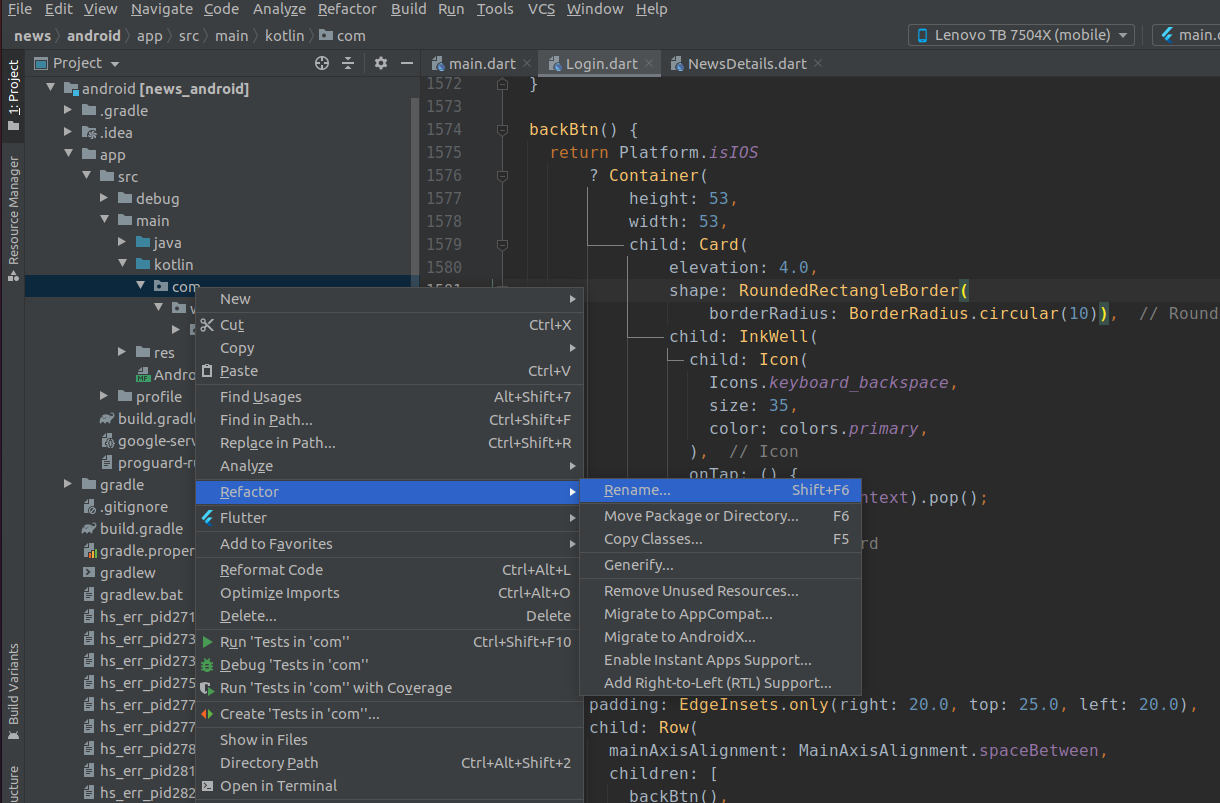
Individually select each directory you want to rename, and: Right-click it
Select Refactor Click on Rename current In the Pop-up dialog.
-
Enter the new name and hit Refactor.Allow a minute to let Android Studio update
all changes.

-
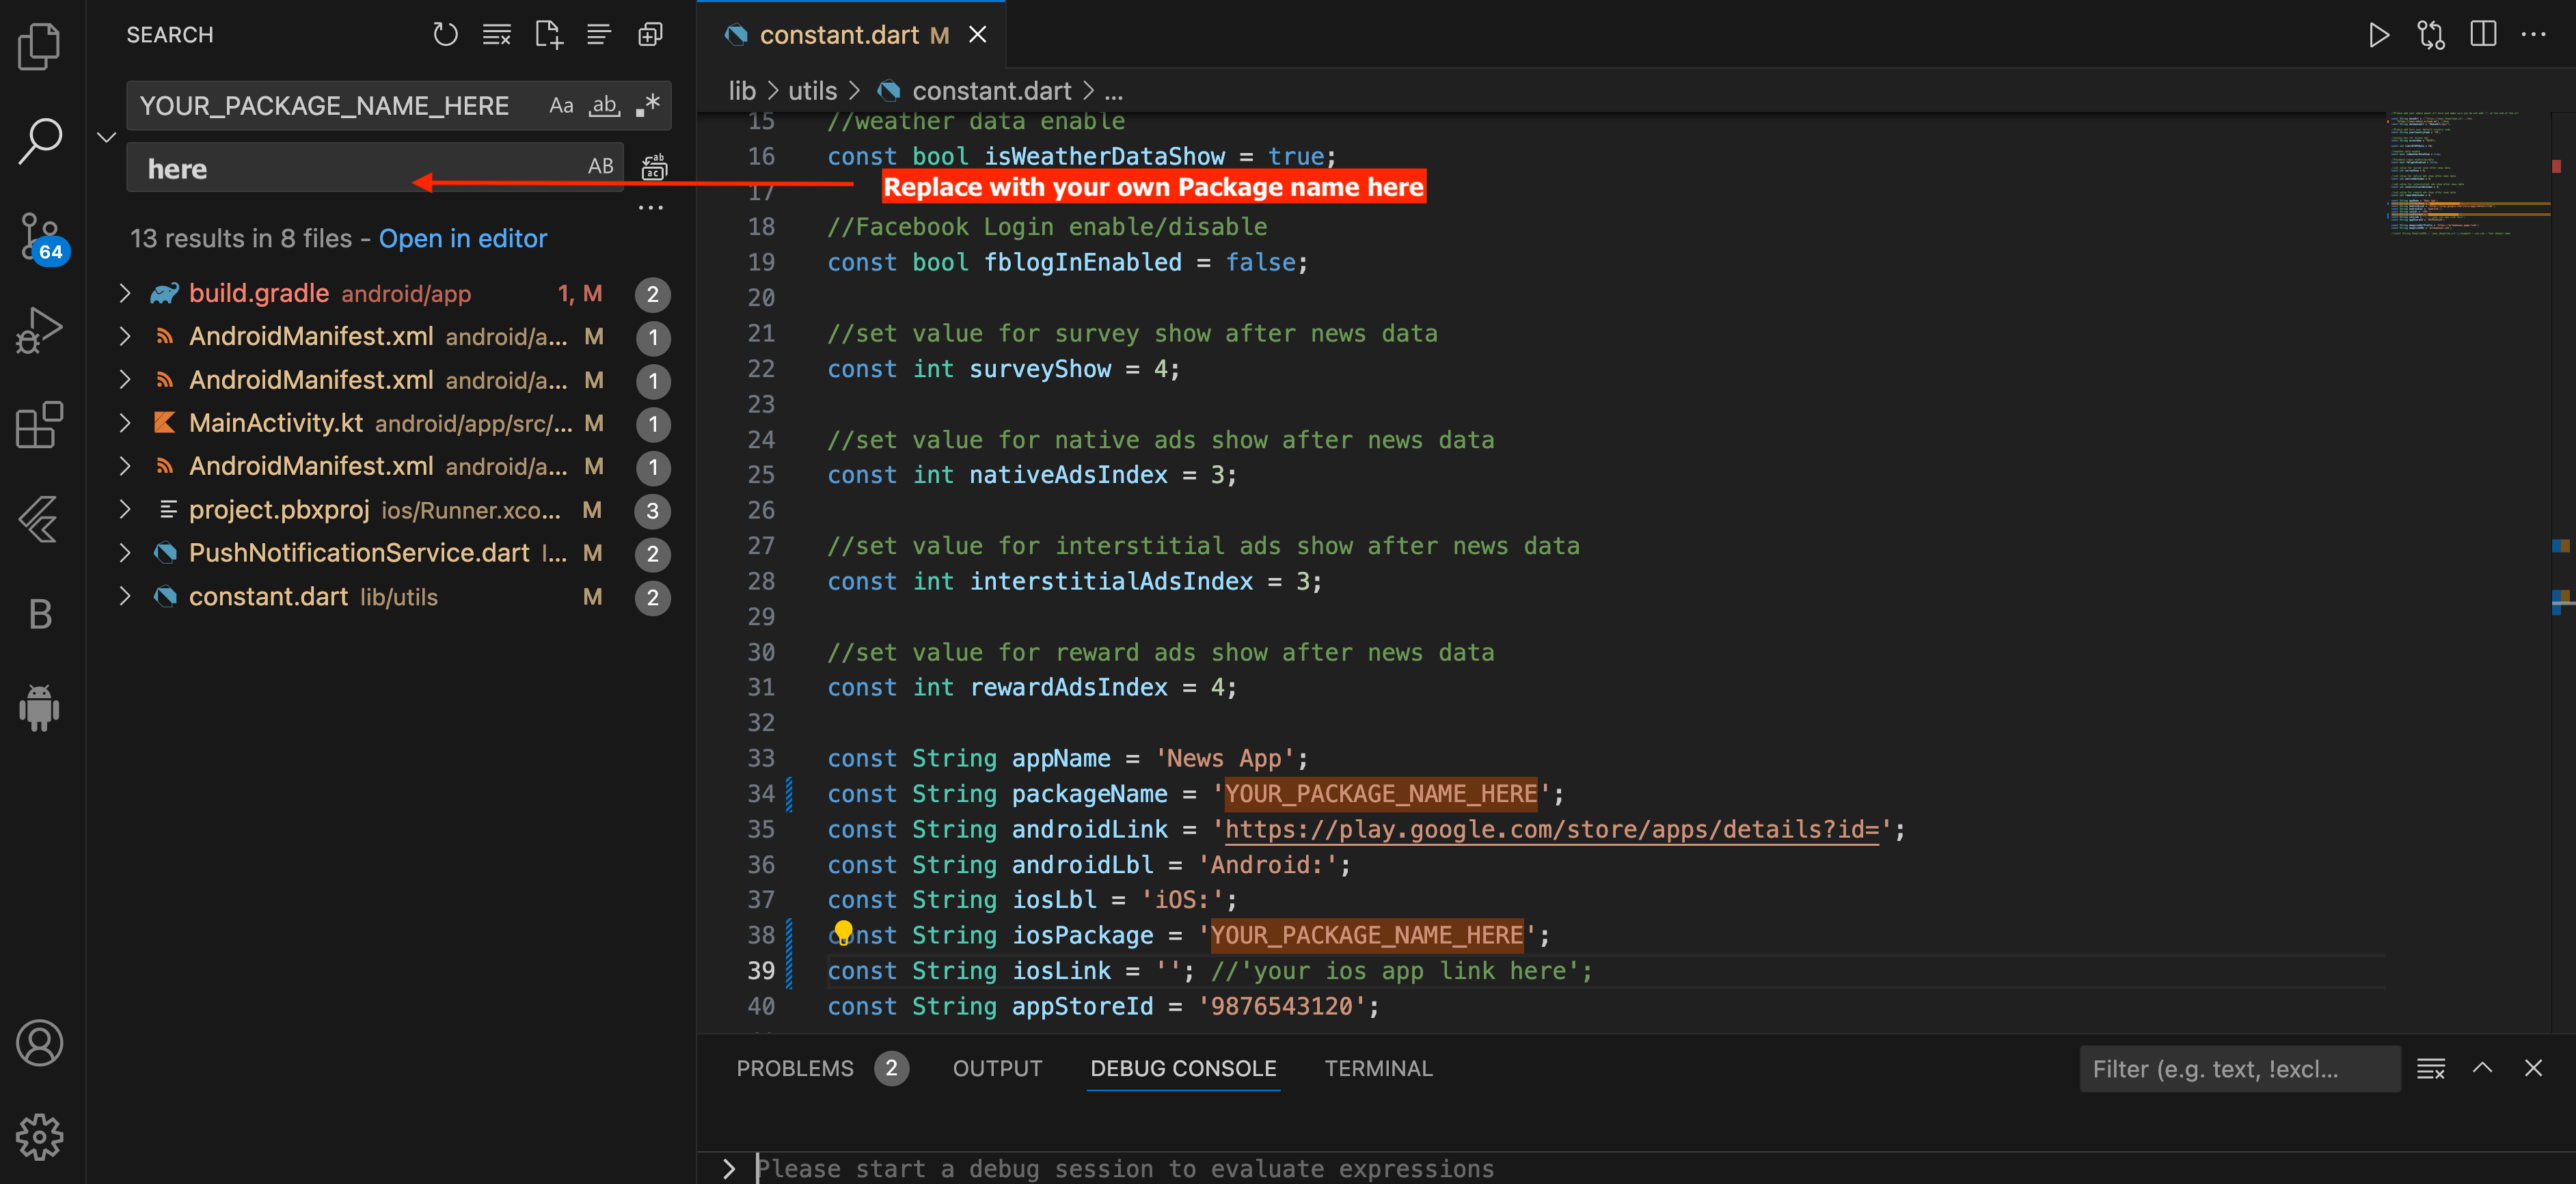
Now Search and Replace YOUR_PACKAGE_NAME_HERE with your new
package name in all files.
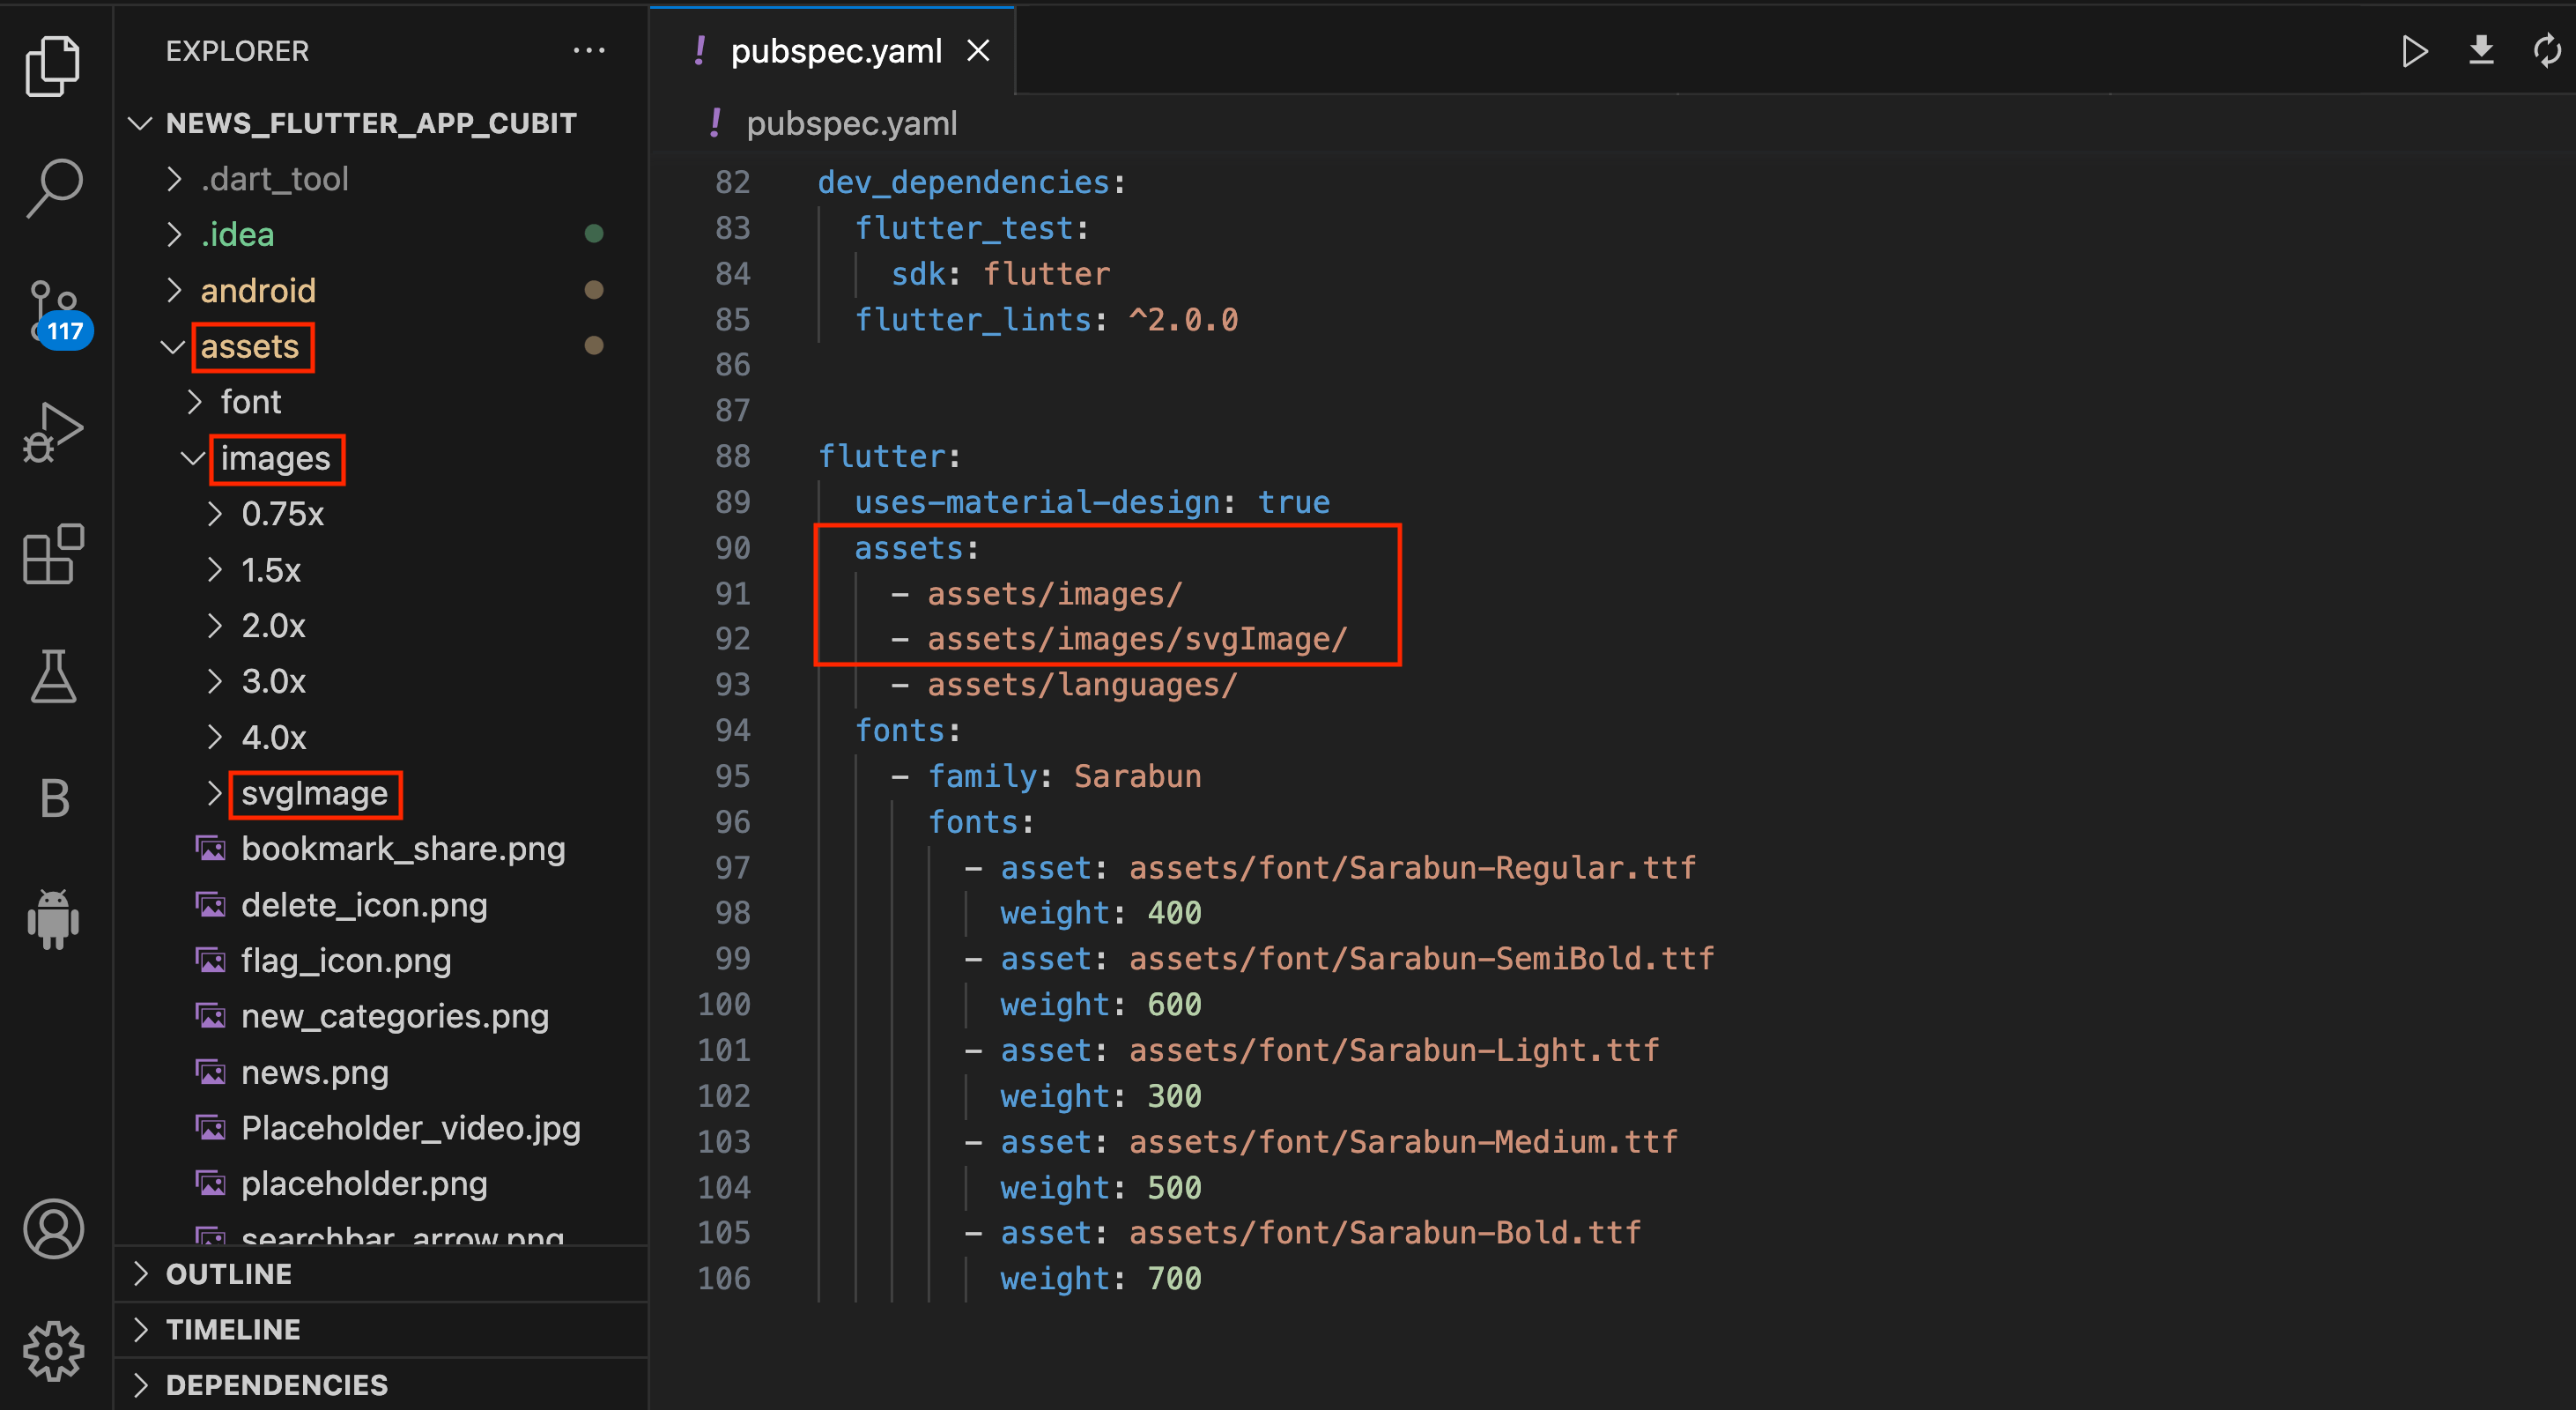
How to Change Images in App
-
Go to assets > images Folder. Here you have to change all image
for your App images according to different Folder different dimension images
used & mention other folders of images in pubspec.yaml file as
shown below.
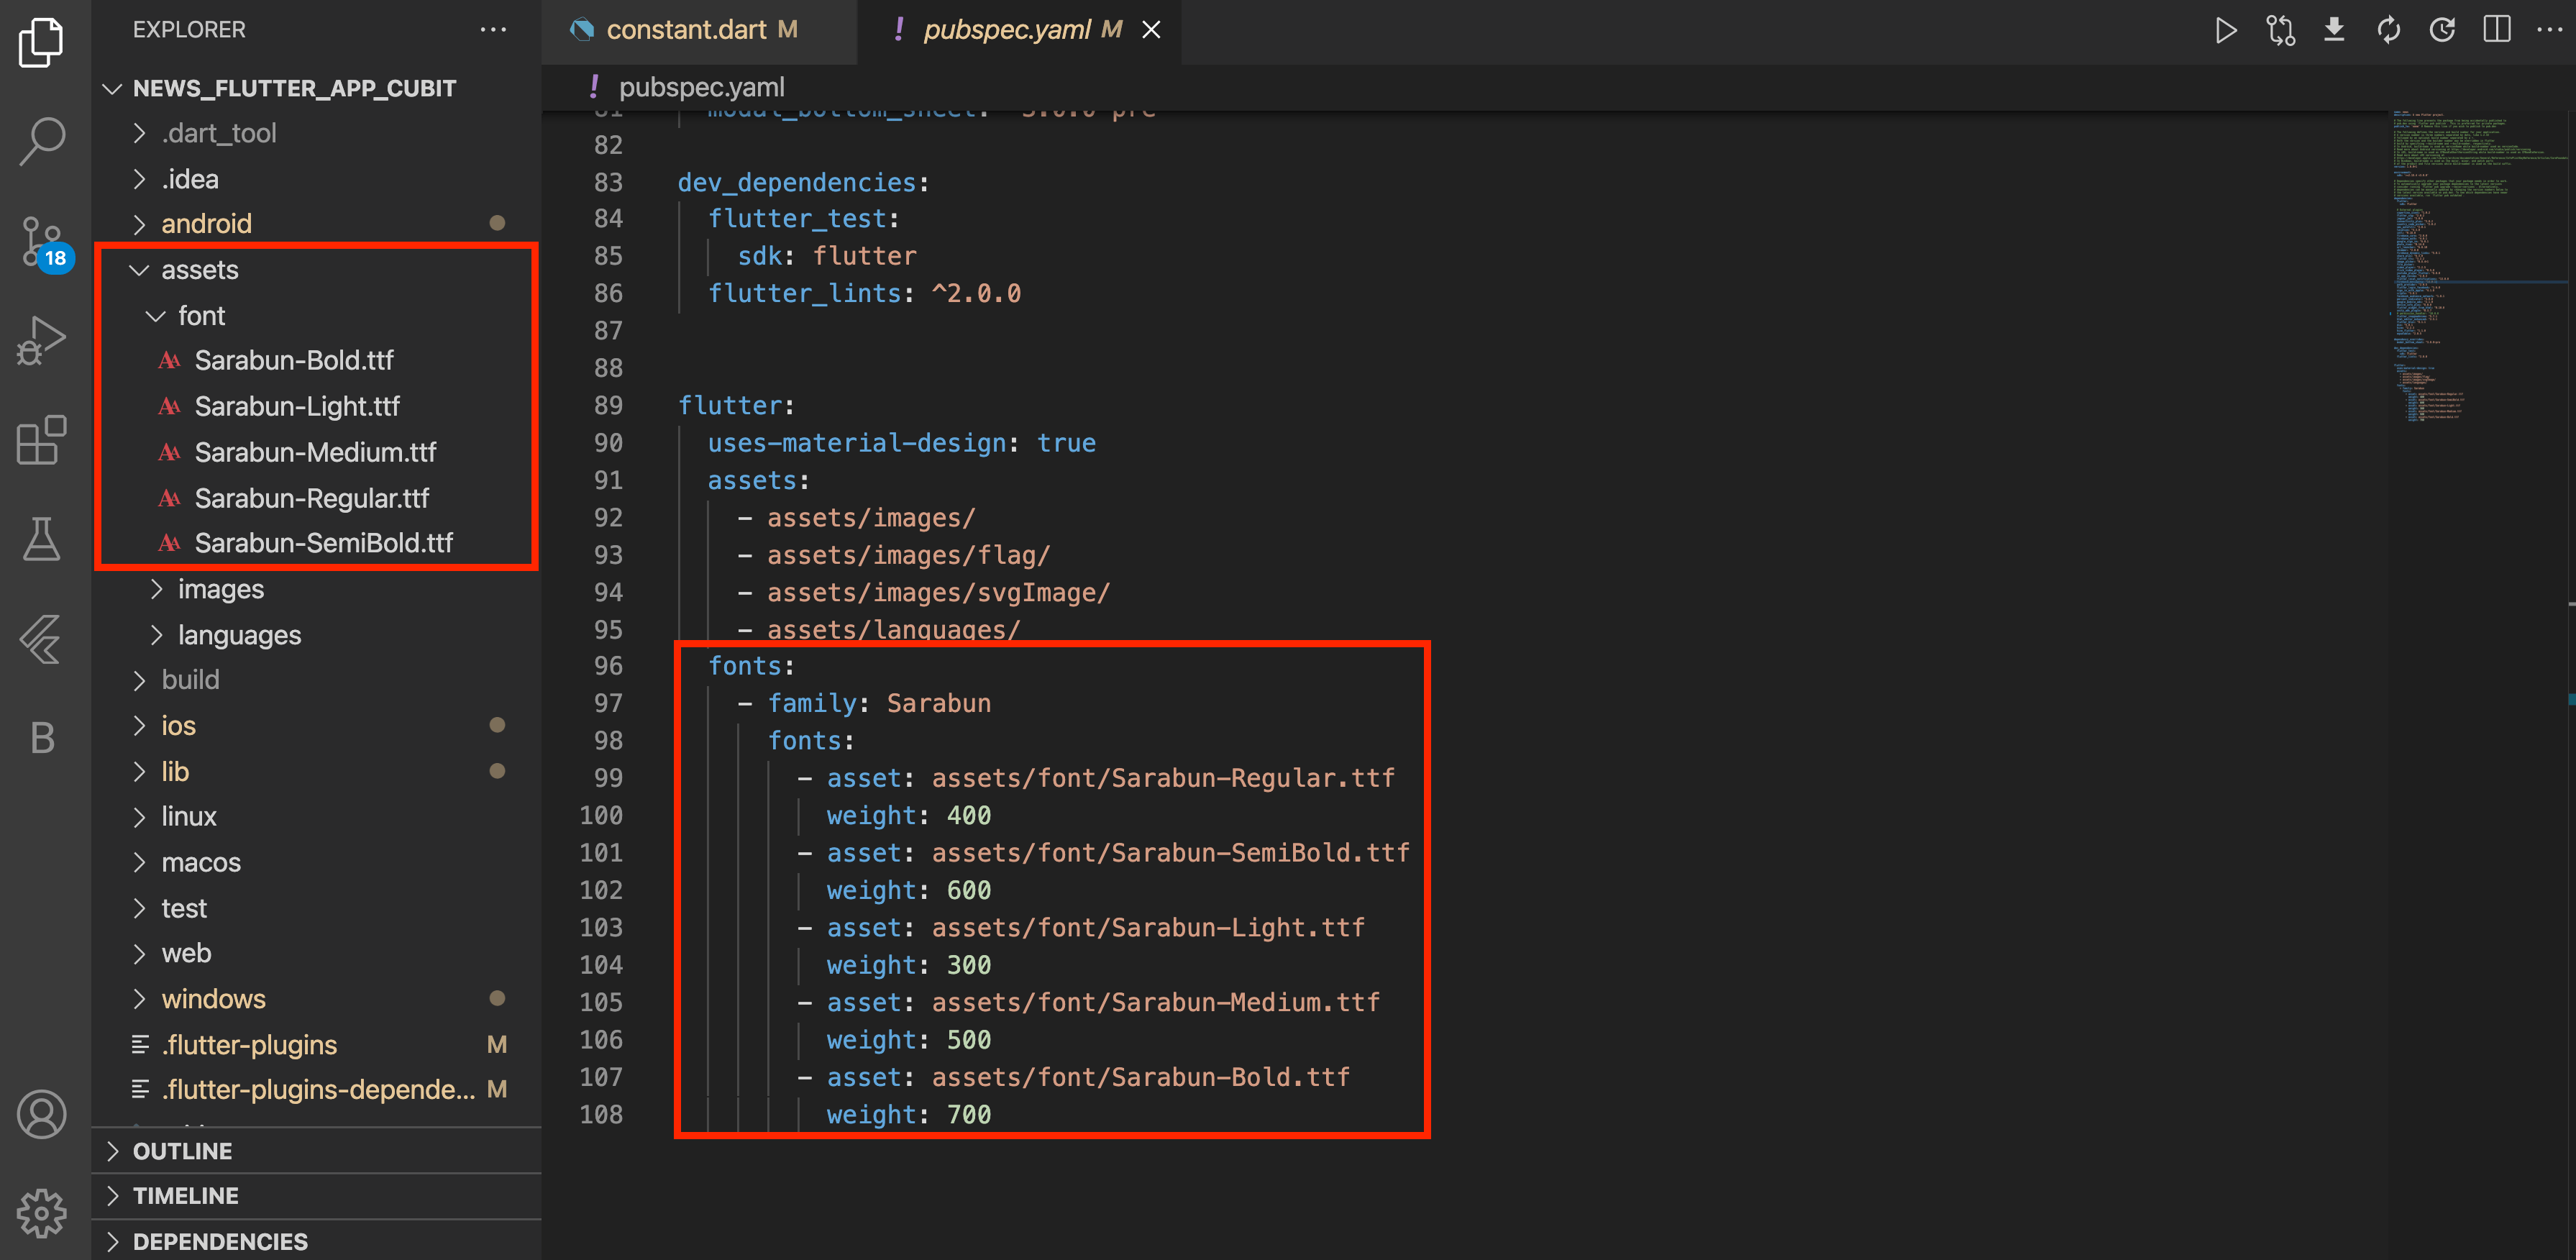
How to Change App Font
-
Go to assets > font Folder. Here you have to copy your font. Now
go to pubspec.yaml in fonts section change your font name as shown in
below image.
-
Go to lib > ui > styles File. Change your font name here
for both Themes Light & Dark.
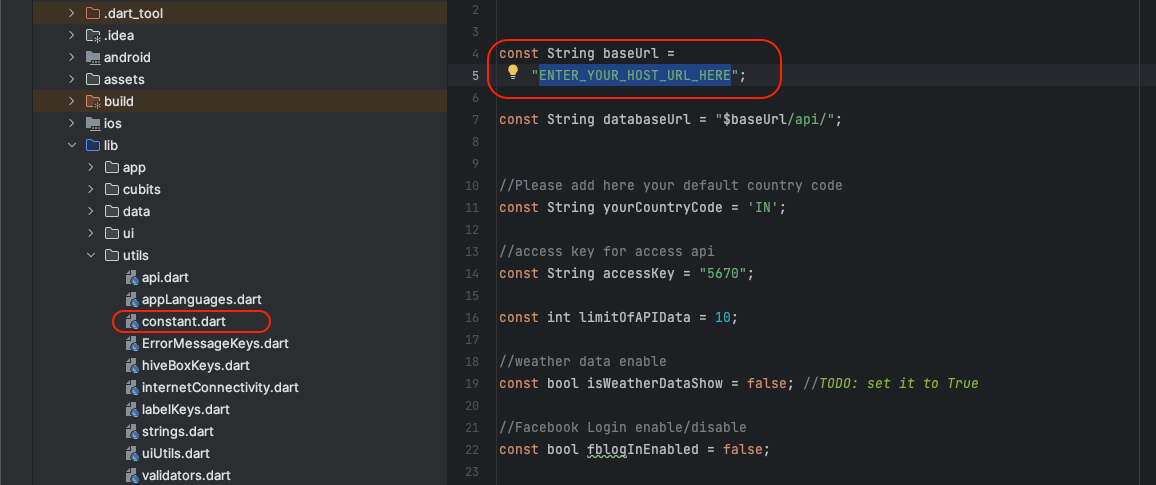
How to change Server URL
- Go to lib > utils > constant.dart. Here you have to change your admin panel URL (baseUrl).
-
System Settings for Application
- First login to admin panel.
- Settings > System Setting > General Settings
- Category Mode: Enable and Disable category from admin panel when you want to show or not category in application .
- Subcategory Mode: Enable and Disable sub category from admin panel when you want to show or not sub category in application .
- Breaking News Mode: Enable and Disable breaking news from admin panel when you want to show or not breaking news in application.
- Live Streaming News Mode: Enable and Disable live news from admin panel when you want to show or not live news in application.
- Commnents Mode: Enable and Disable comments from admin panel when you want to show or not comments in application.
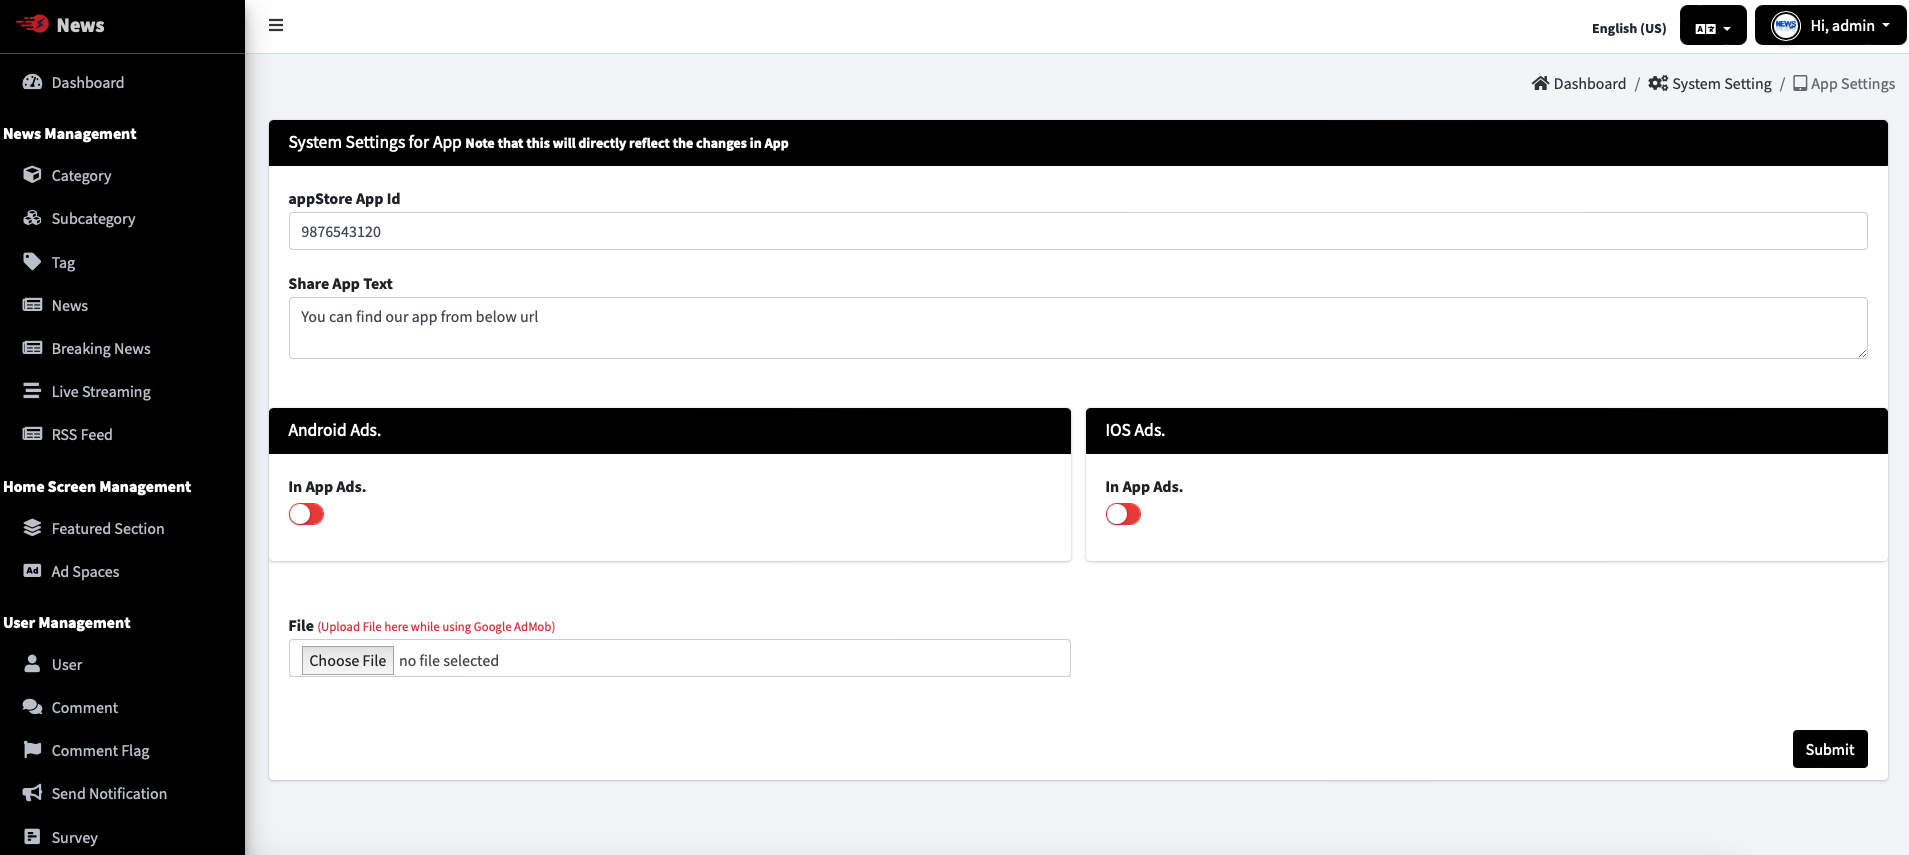
- Appstore App Id: Id will be used to append with appLink shared in application.
- Share App Text: Text to be added while sharing news from application.
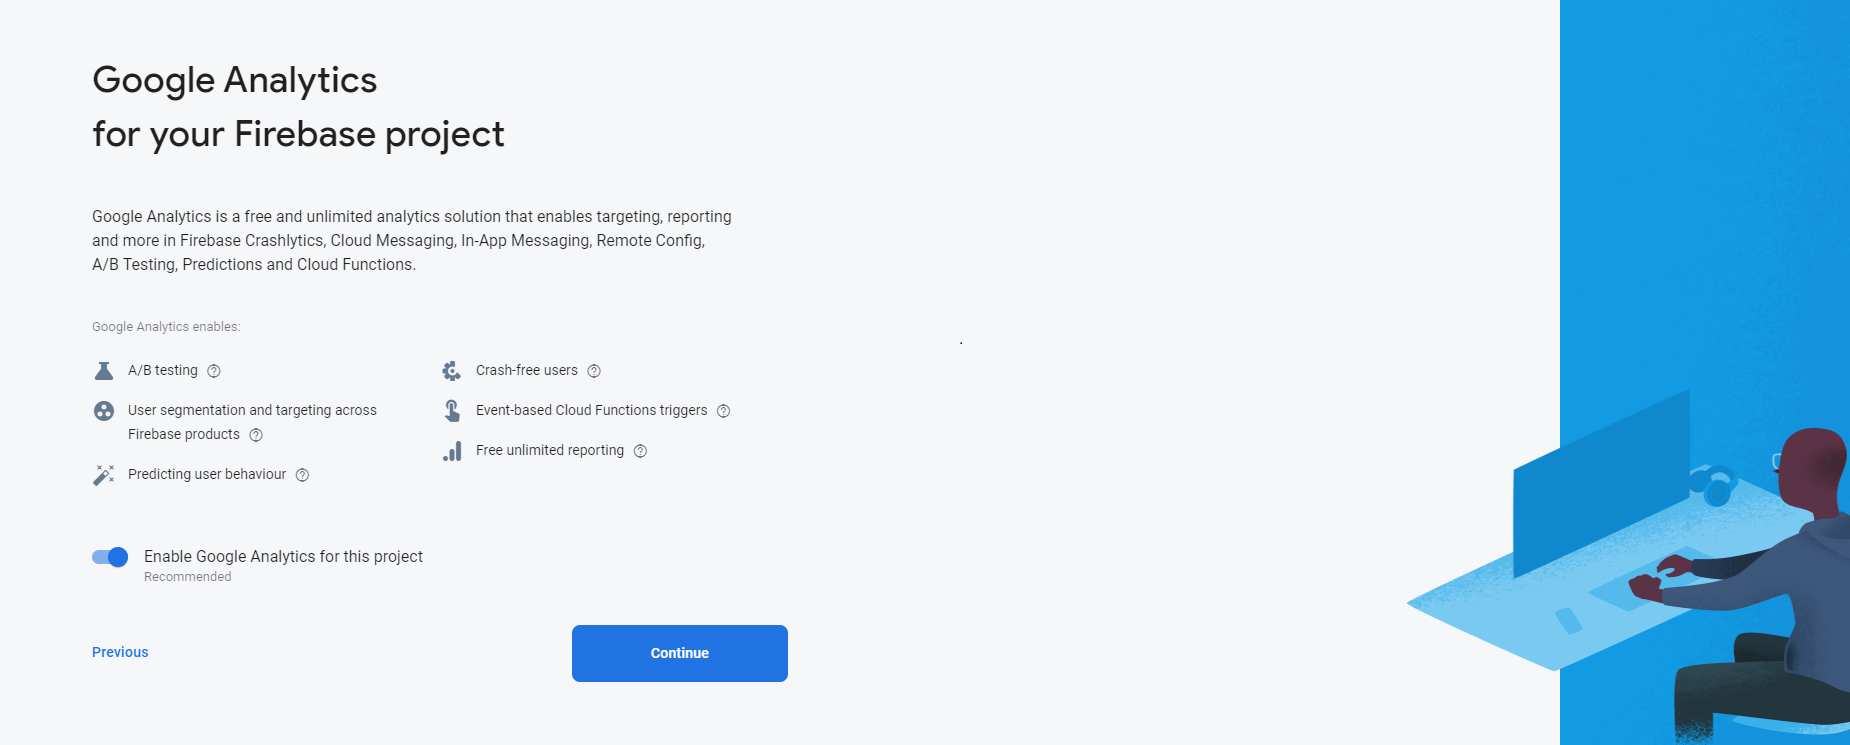
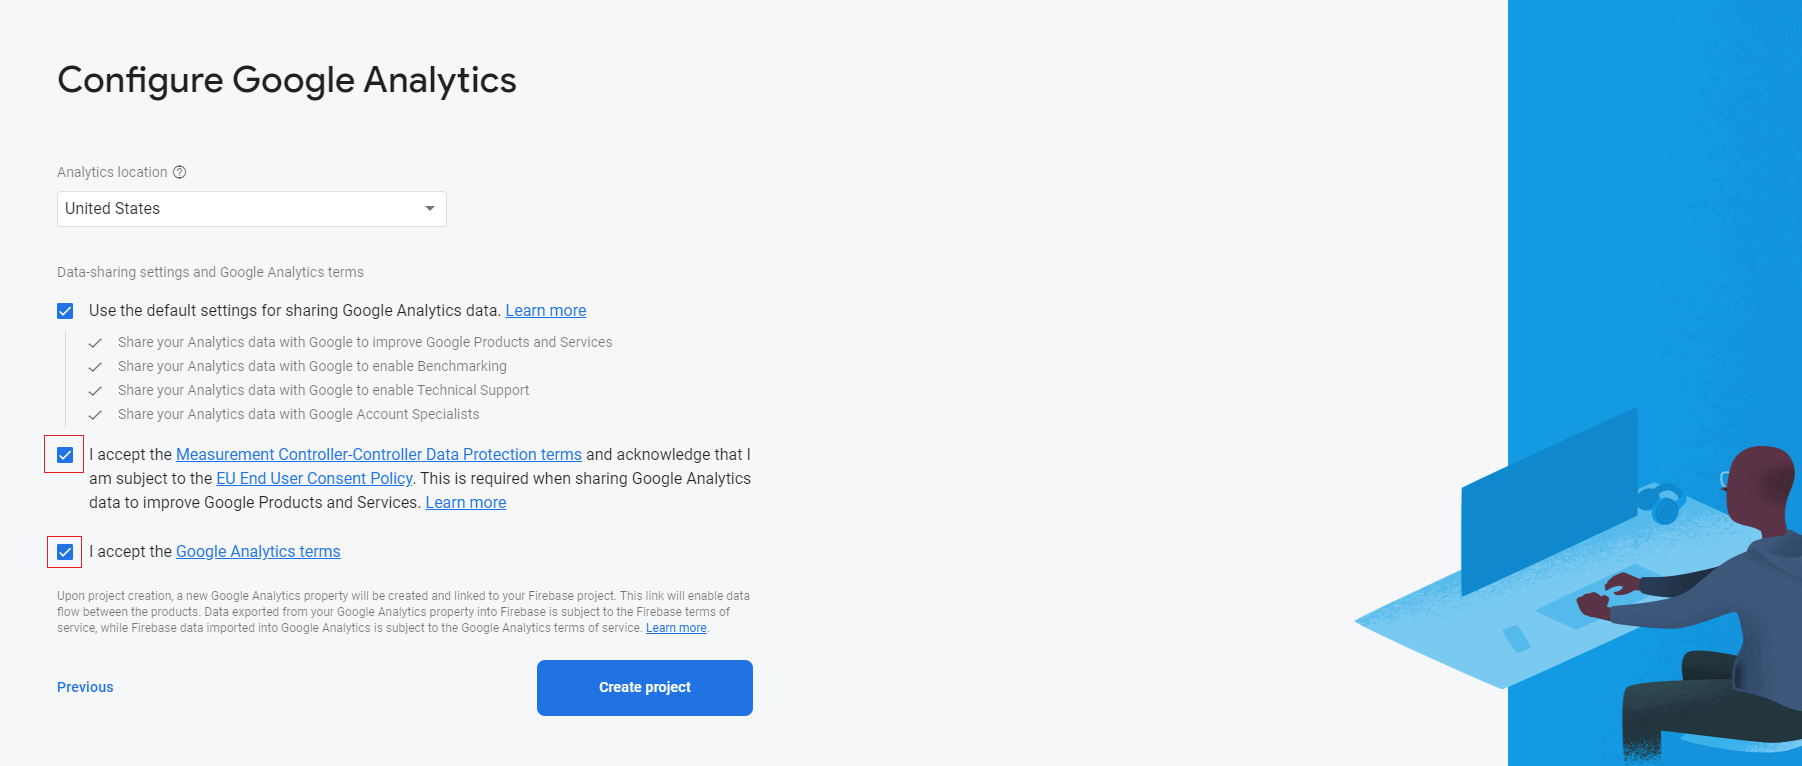
How to Create Firebase project
- Go to Firebase console.and then click on add project.
-
after that below given step will come. here you have to enter your project
details.Enter your project name and then press on continue.then select email and
then press continue.
-
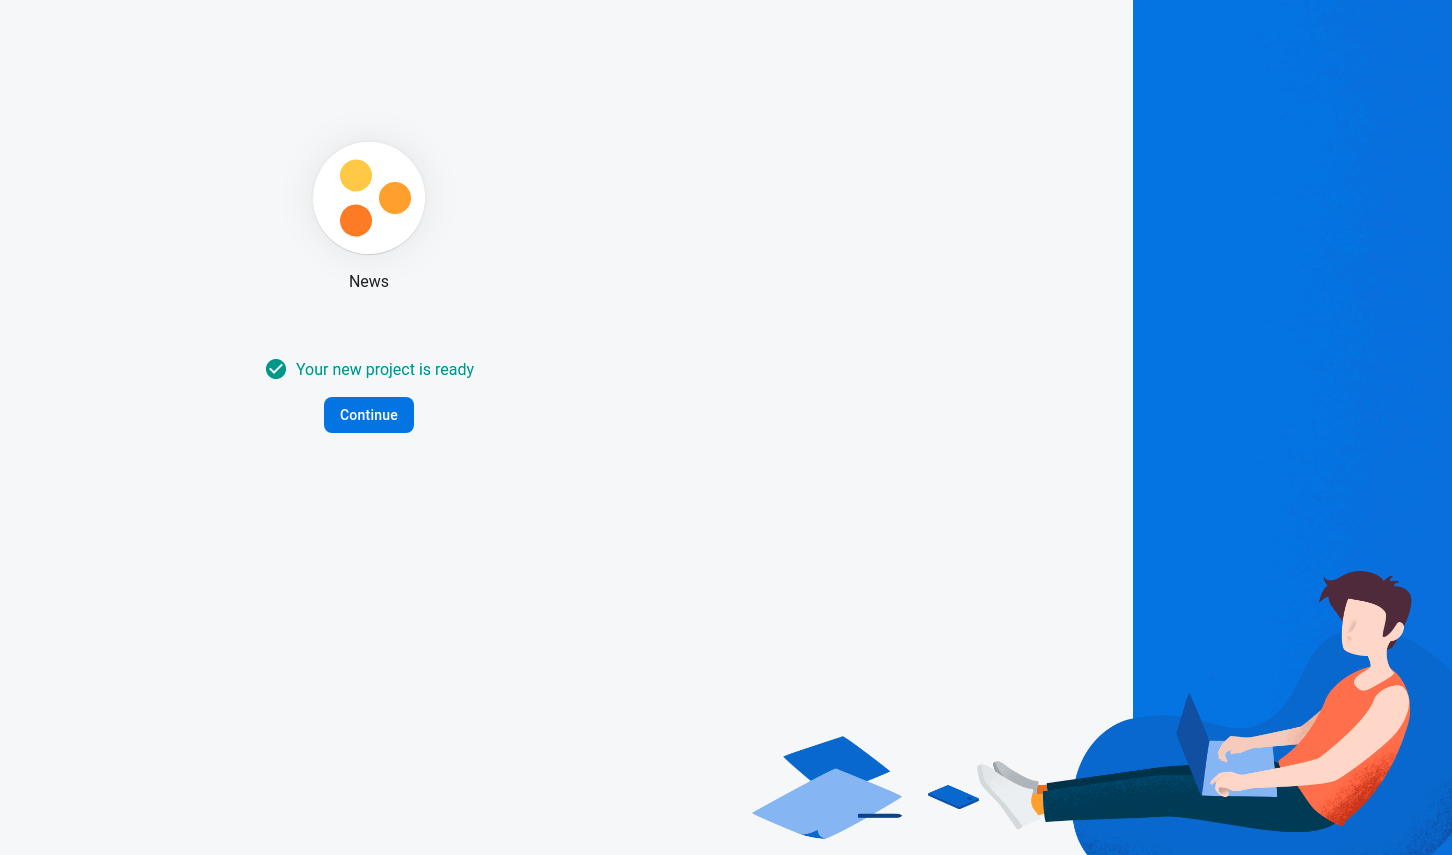
after that your project is created.
-
For android,now first click on android.
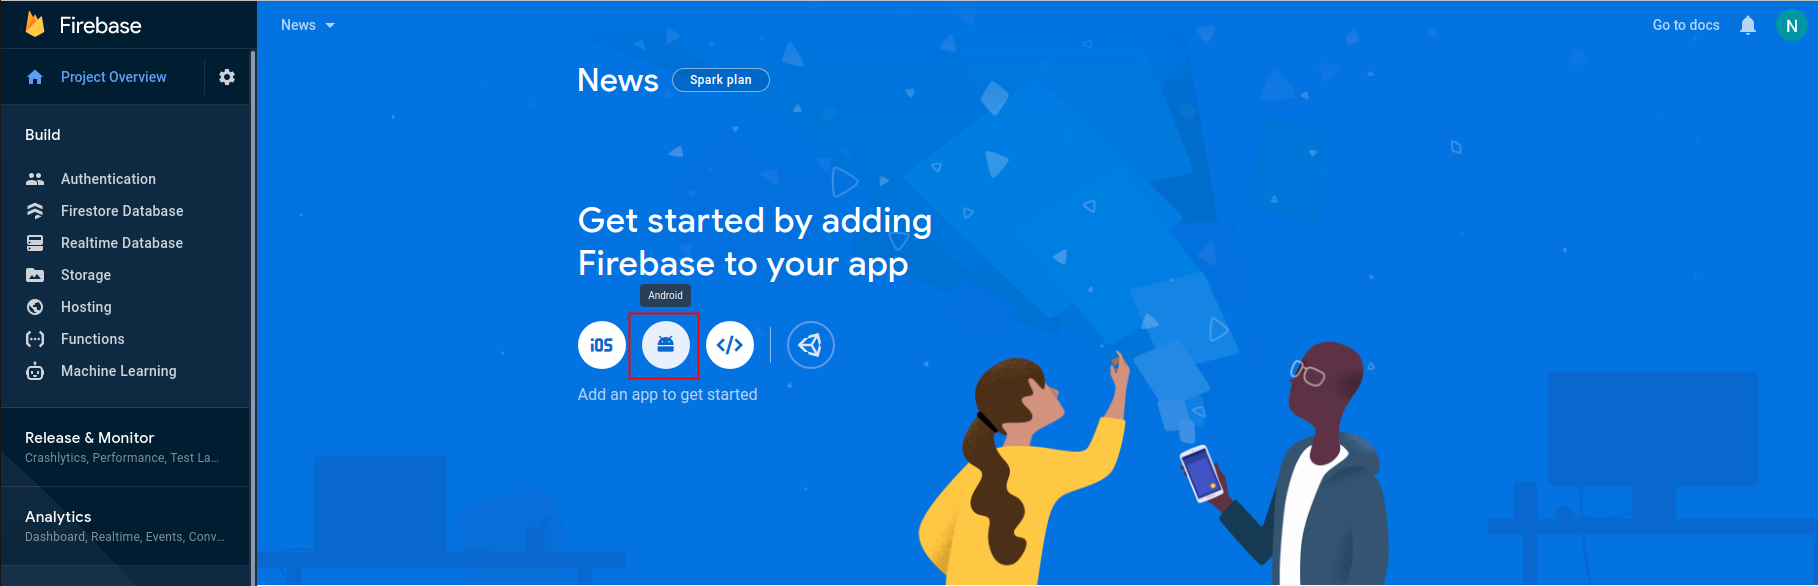
-
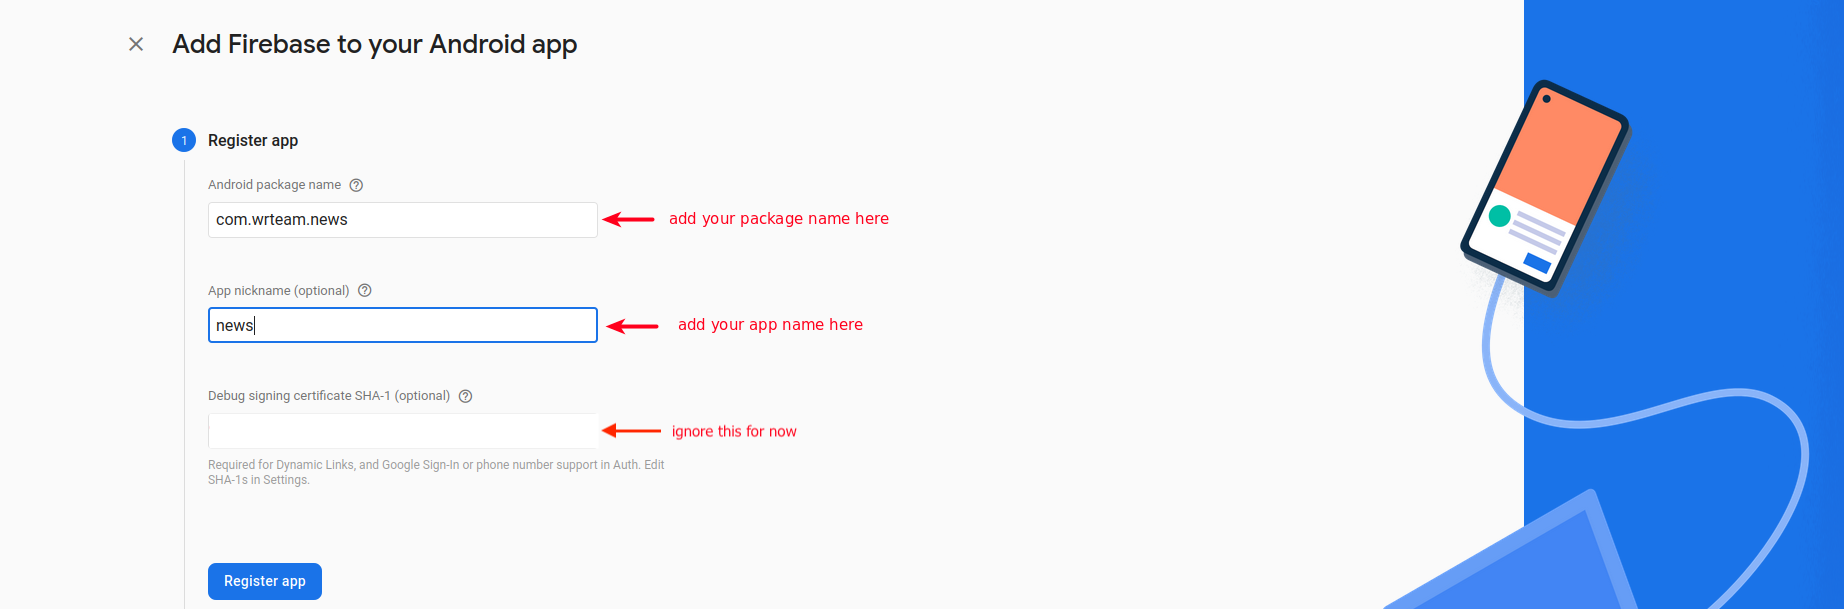
after that below given screen will appear, in that you have to enter your
Package Name and App Name and then click Register app.
-
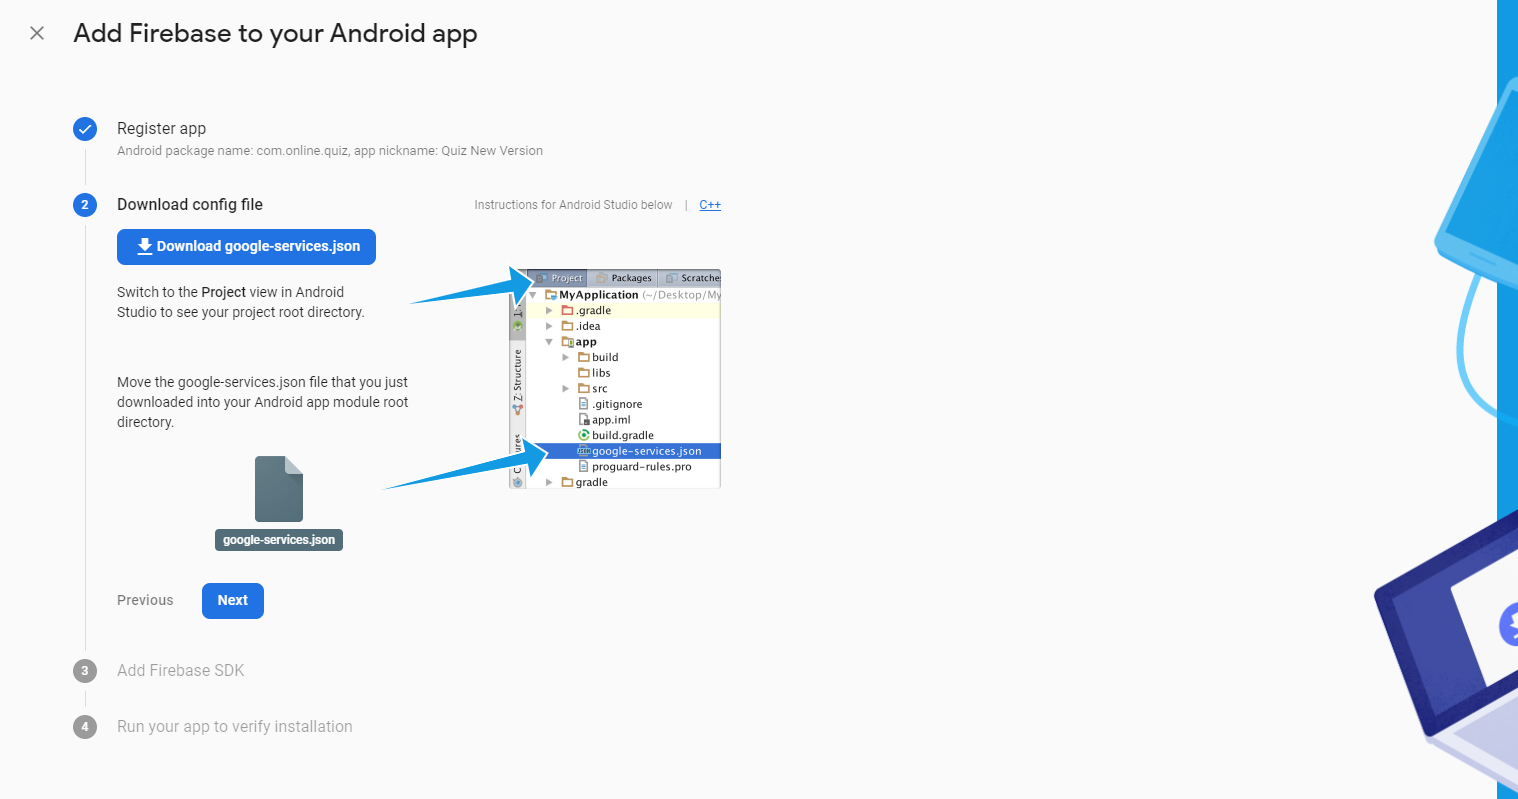
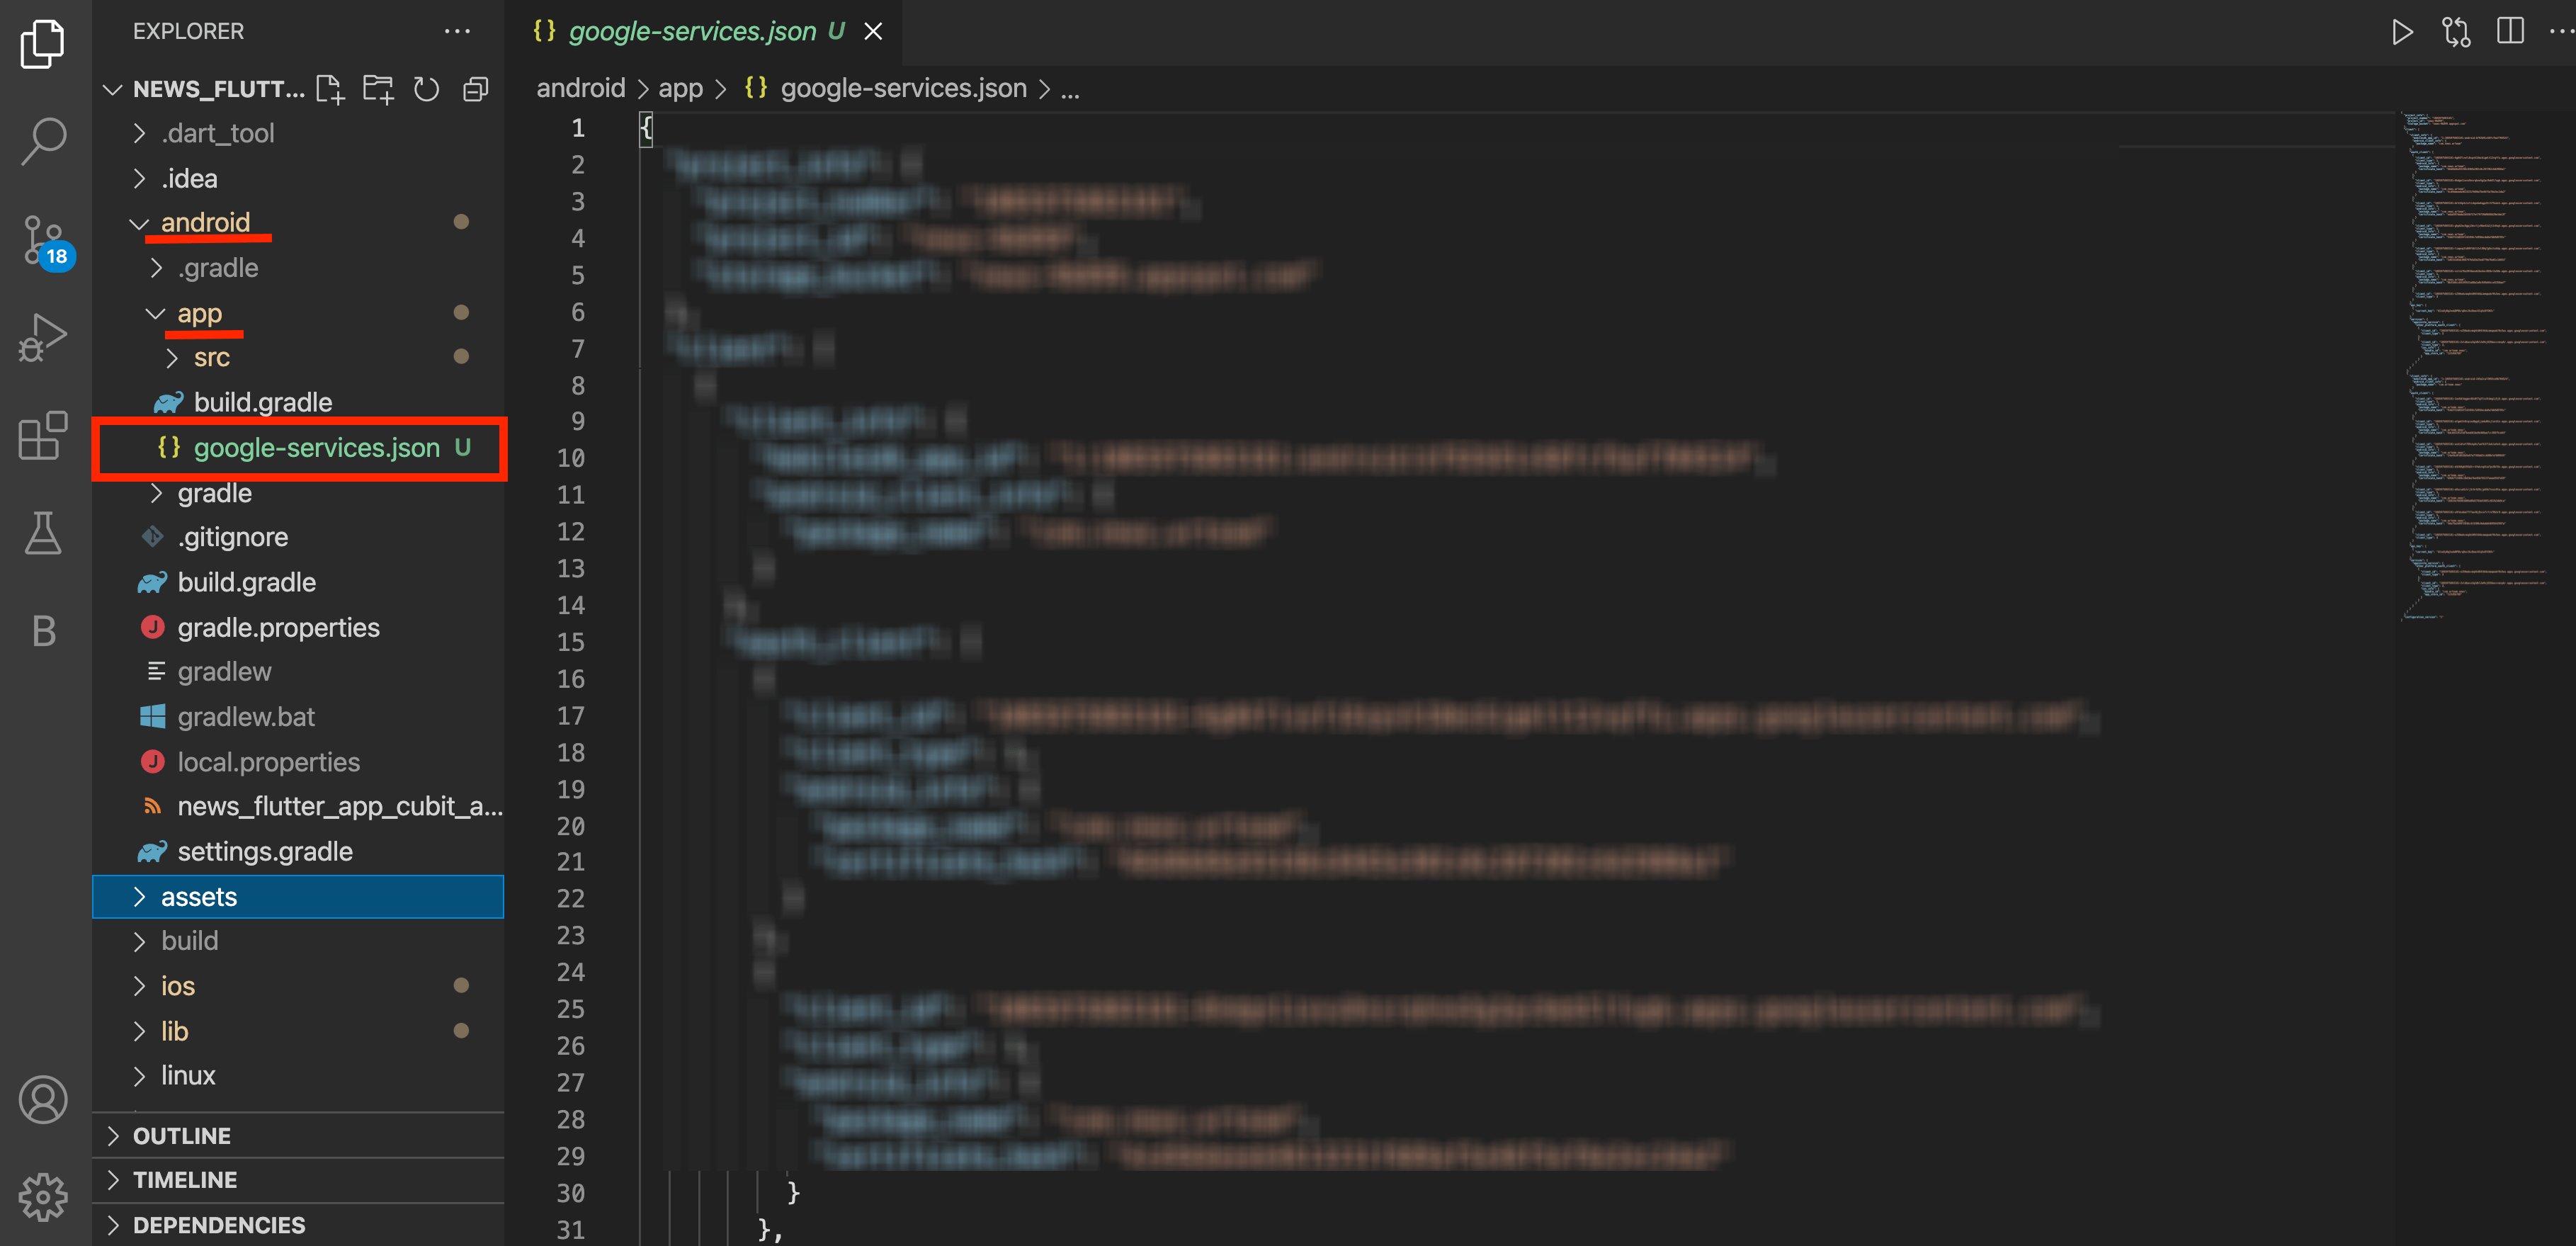
Now click on download google-services.json.after that add this file in android >
app Folder.
- now click on next next and in last step press continue to the console button.
-
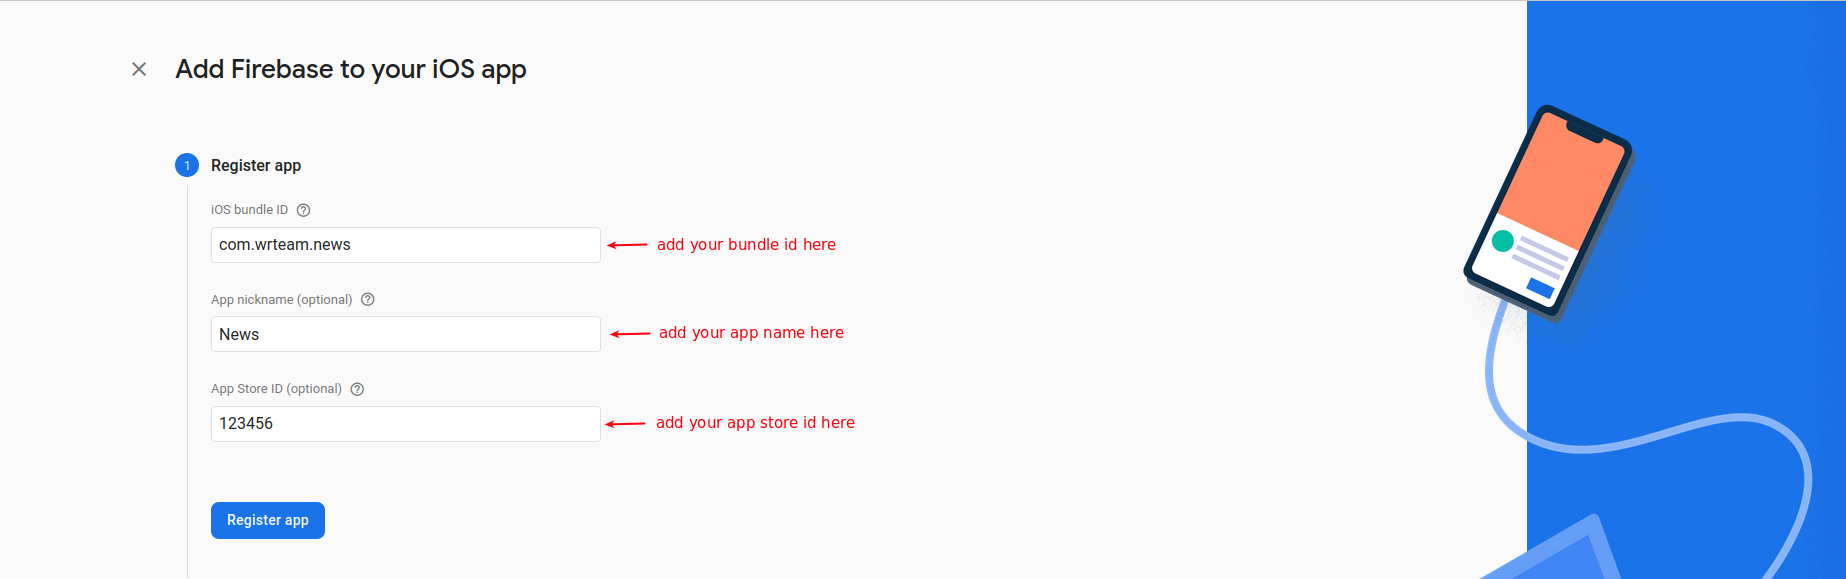
for ios,perform below step. now click on add app.
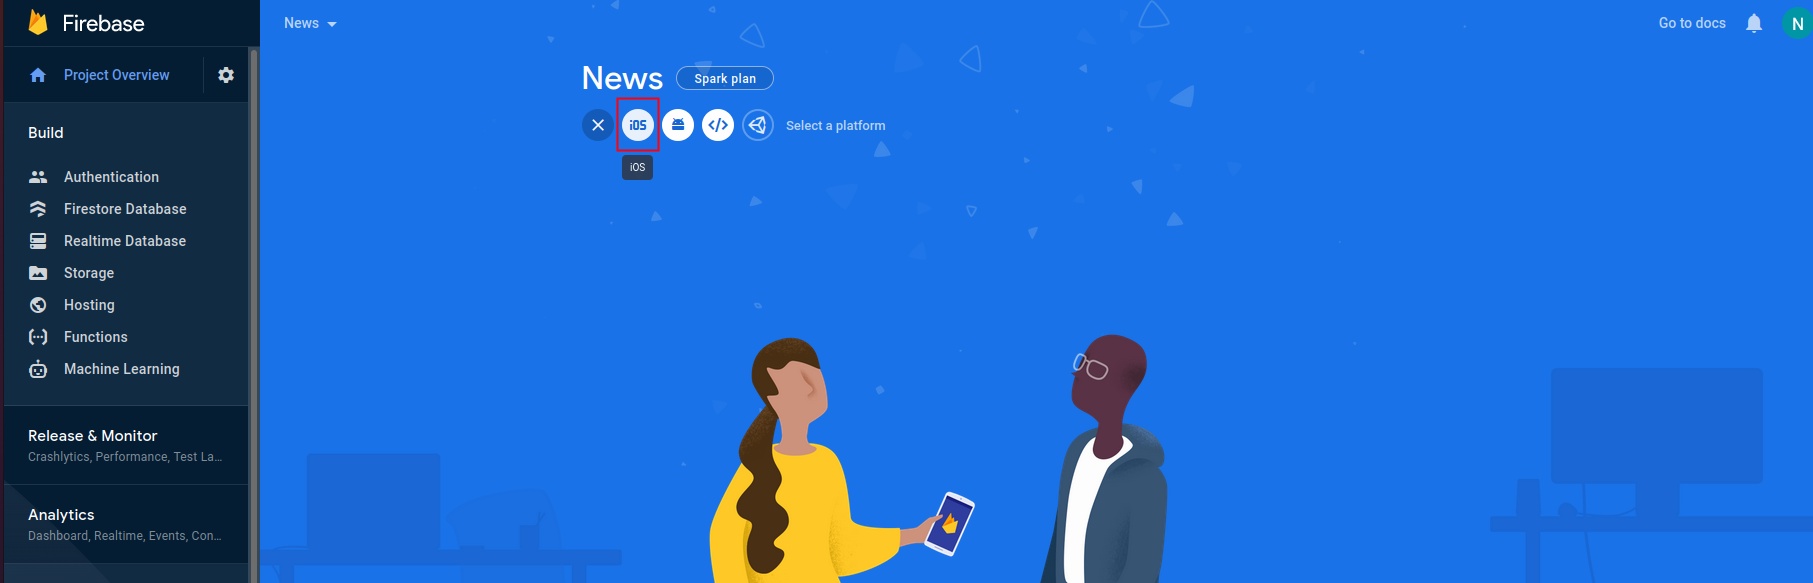
-
and then click on ios button.in this same as android step will be come here you
have to enter your appname.then next and on next screen download google service
info.plist file.
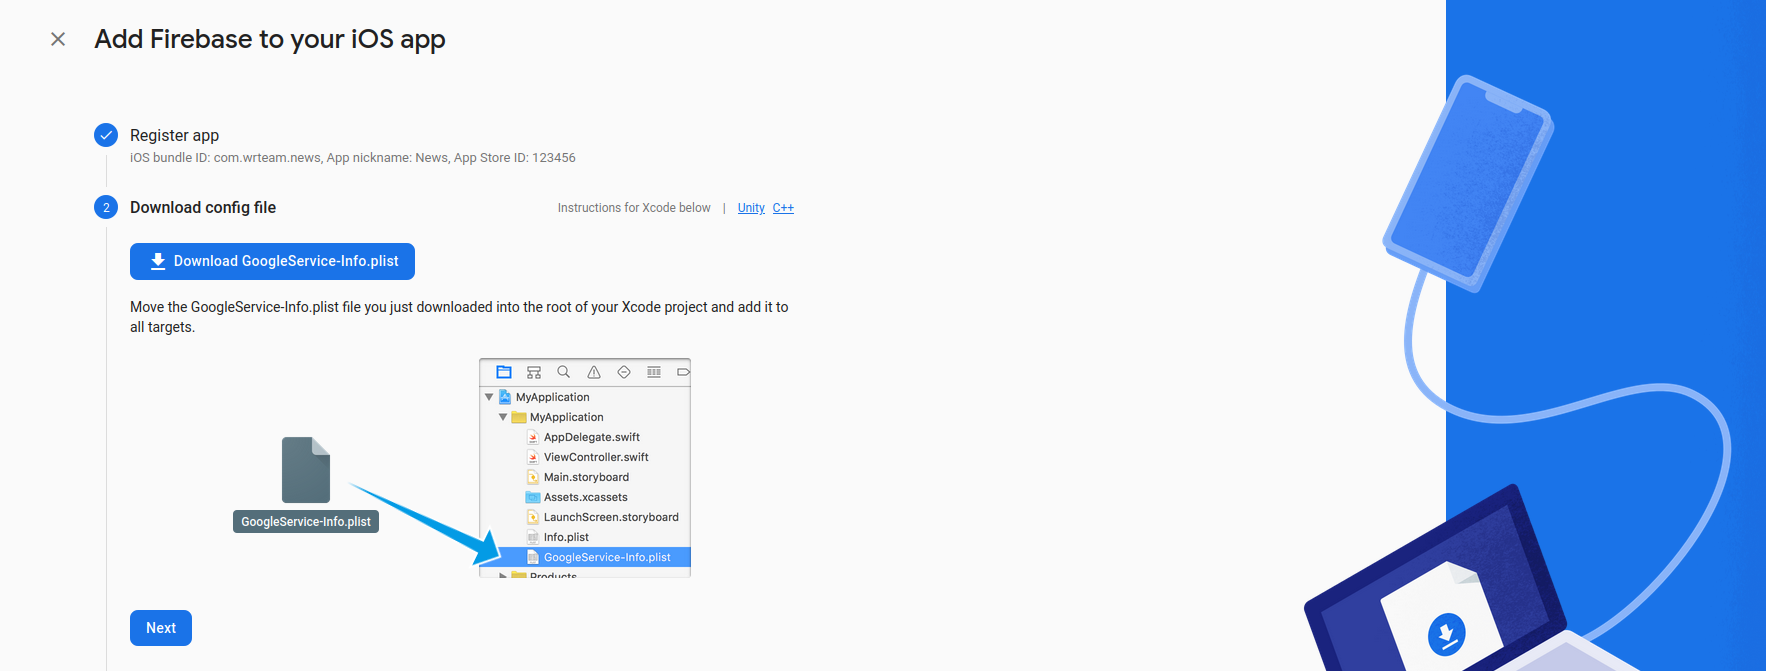
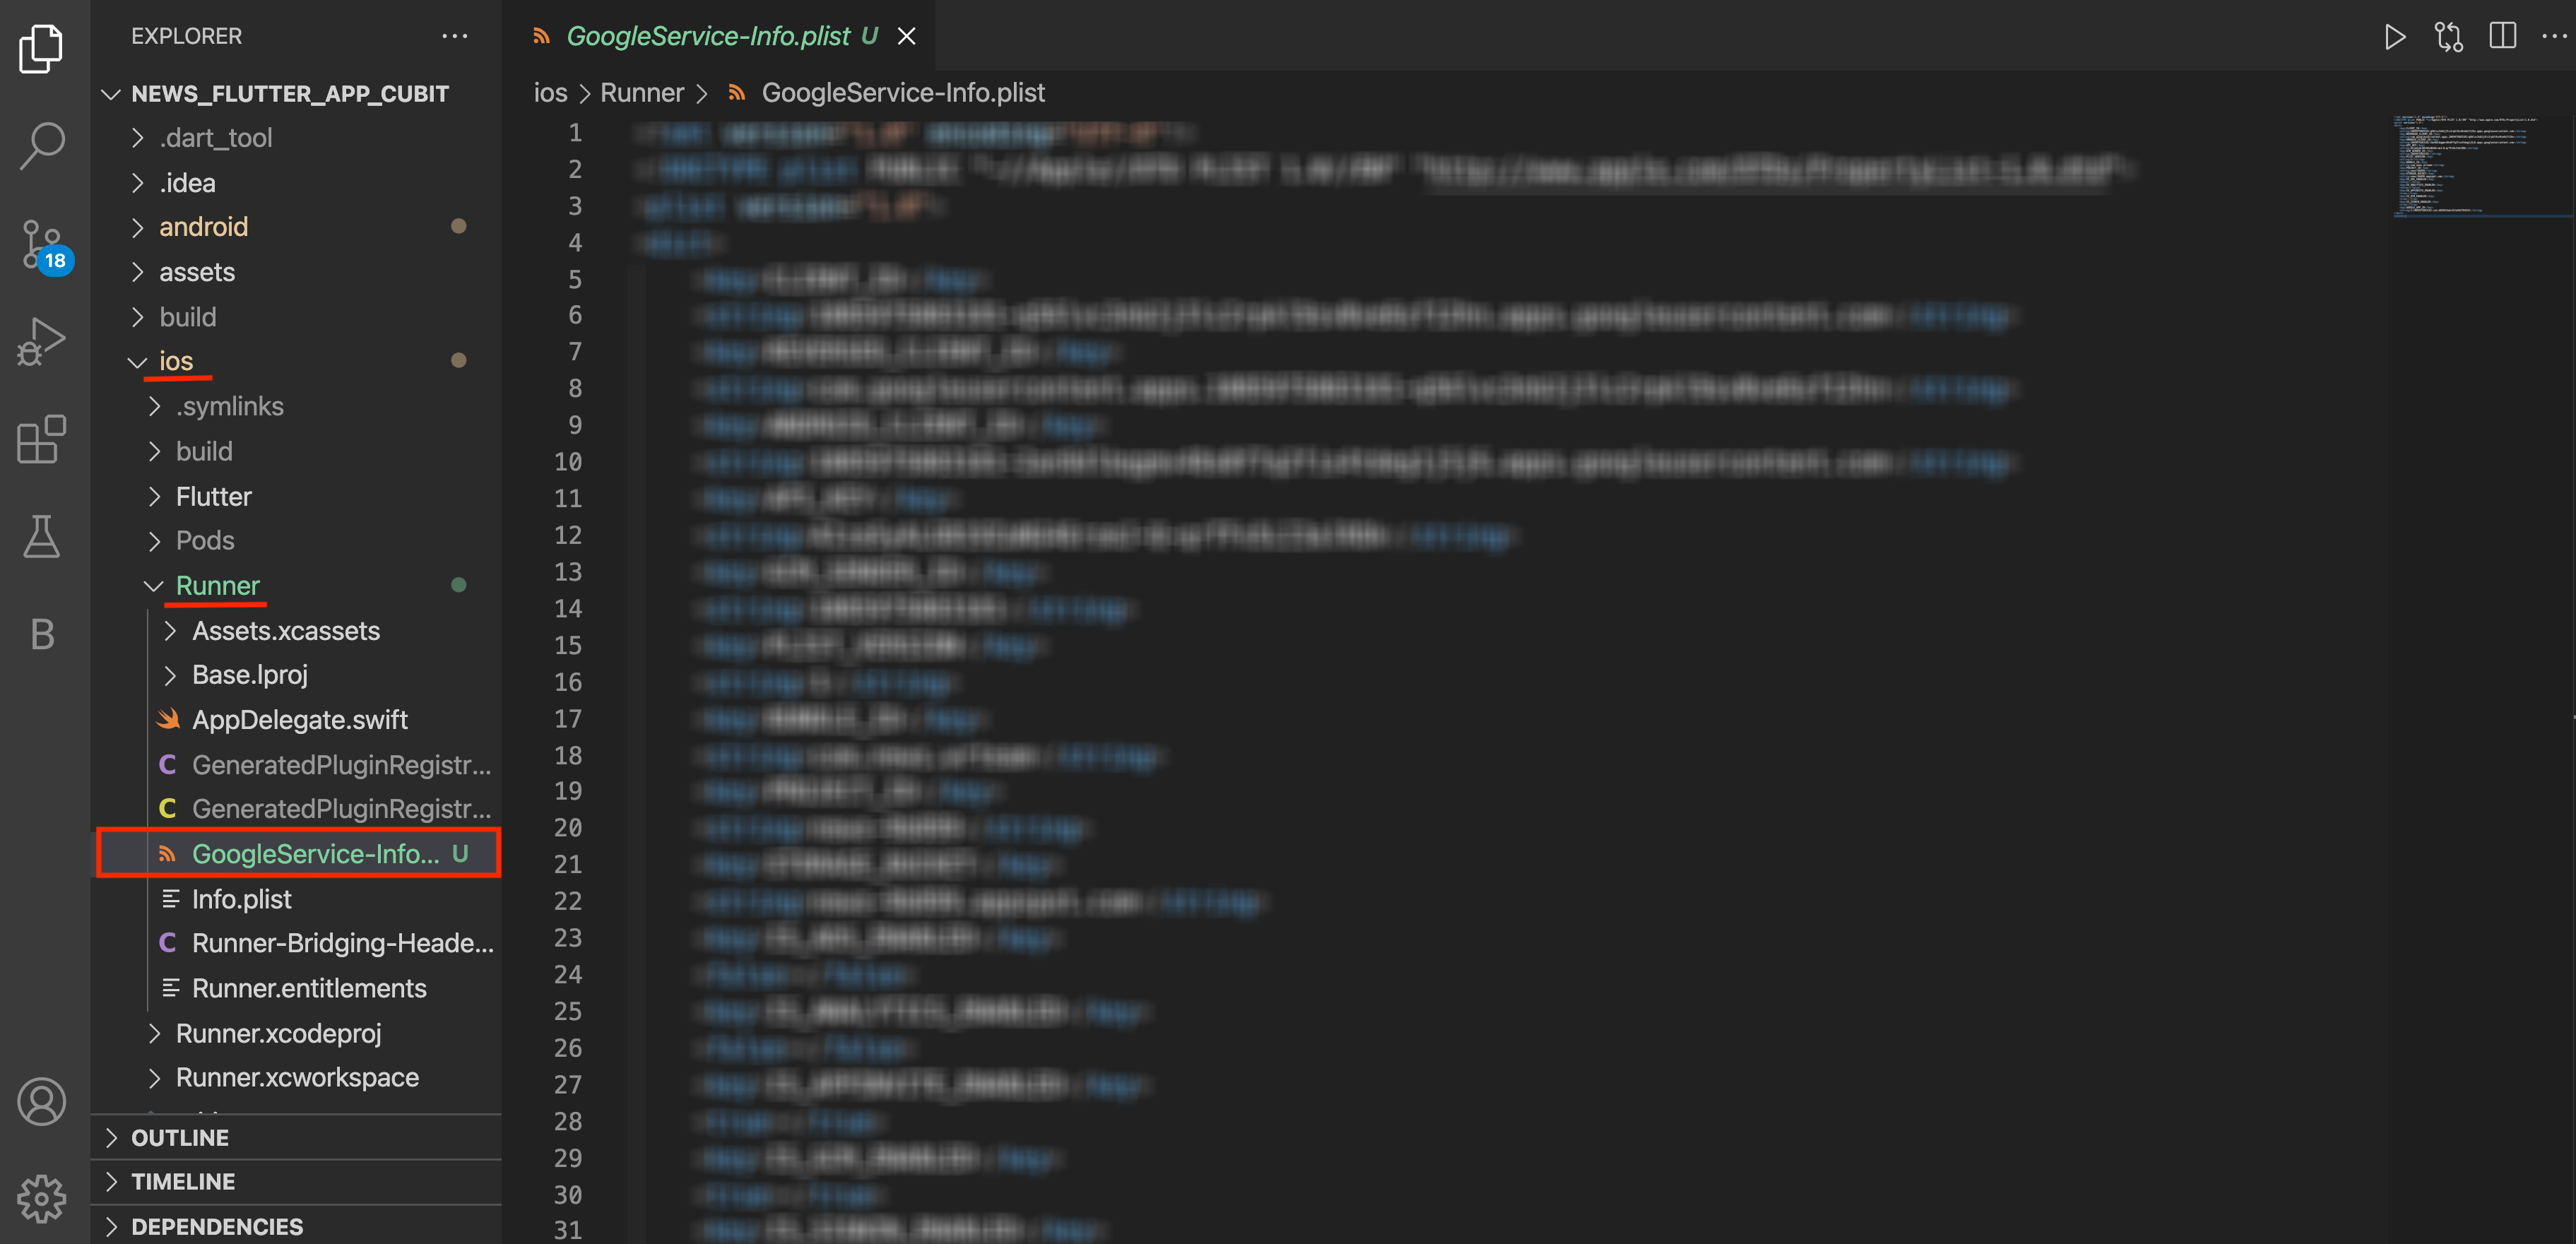
- now copy the content of that file and replace in ios > Runner >
GoogleService-info.plist.
- now press next next on firebase console and that's it your project is created on ios.
Steps to Authenticate firebase using Email and Password
- Open your firebase console.
- Go to Sign-in method in Authentication.
-
Go to the Email/Password and in that enable to allow user to sign in using Email
and Password and Email link both.
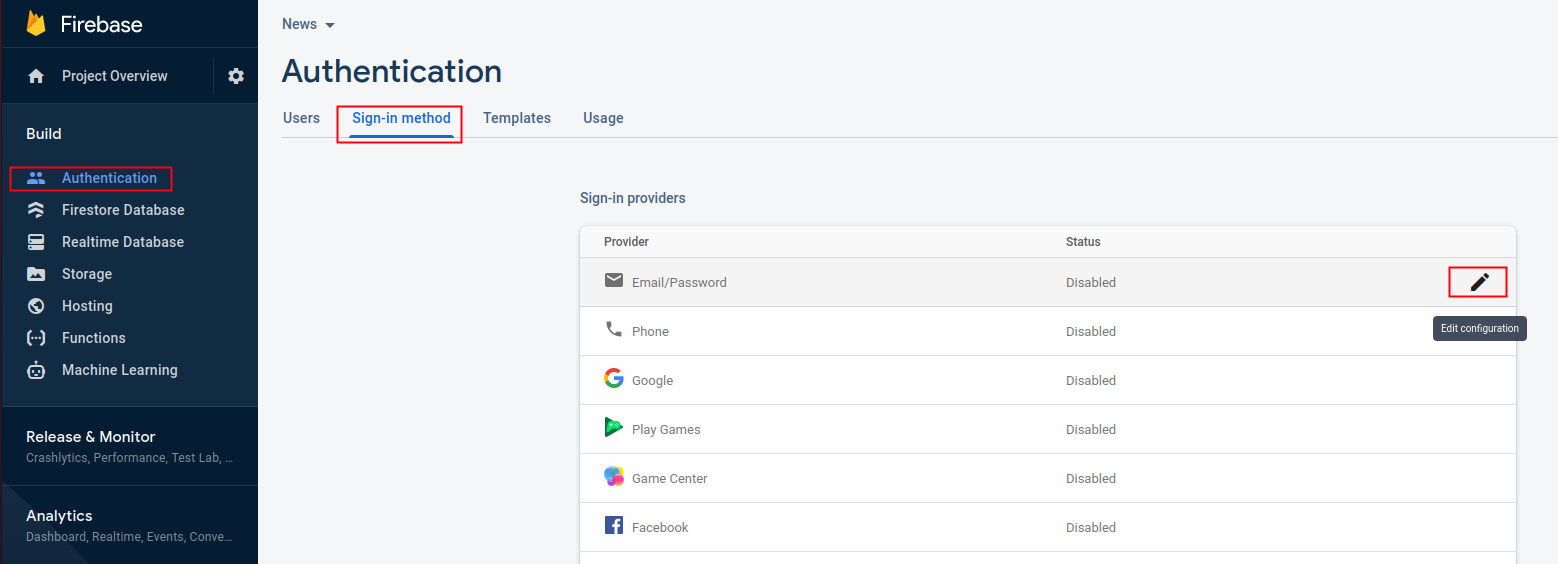
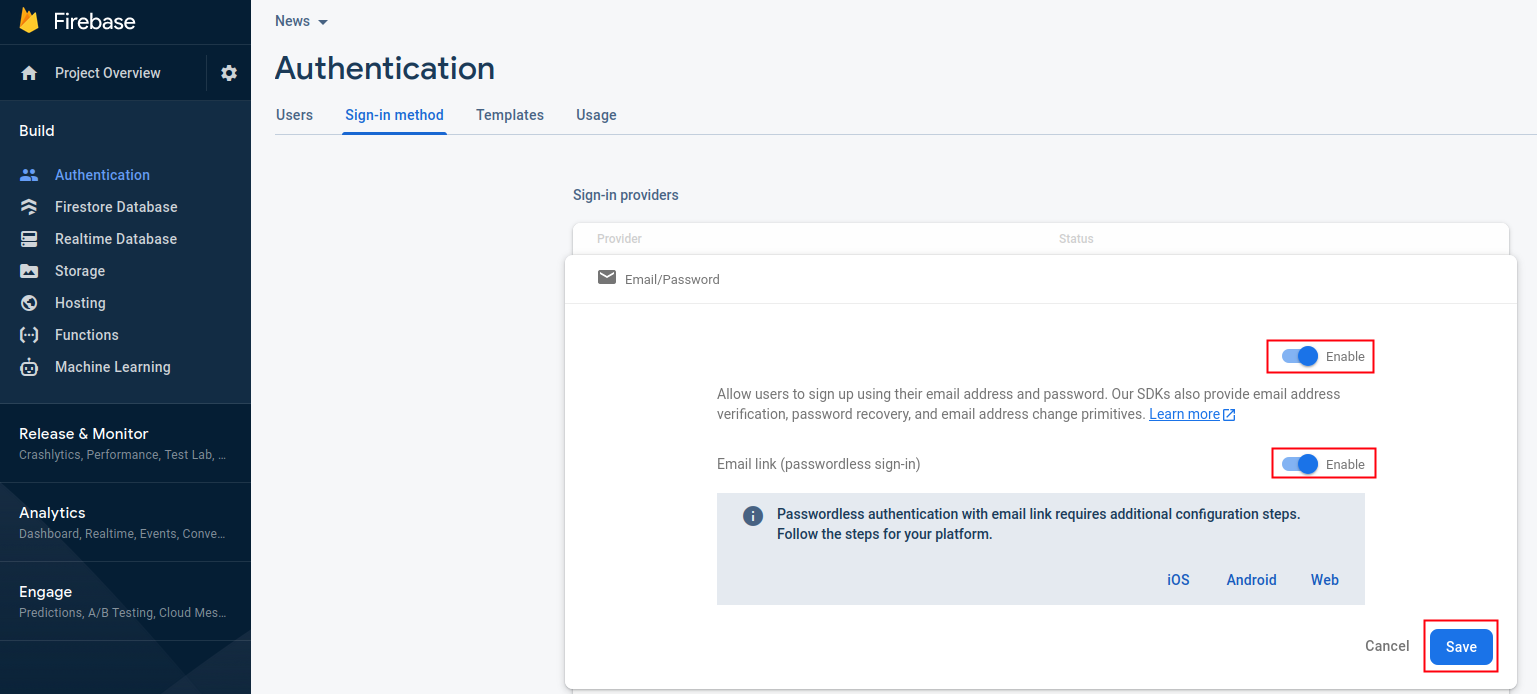
after press on save button email authentication will be enabled in your app. -
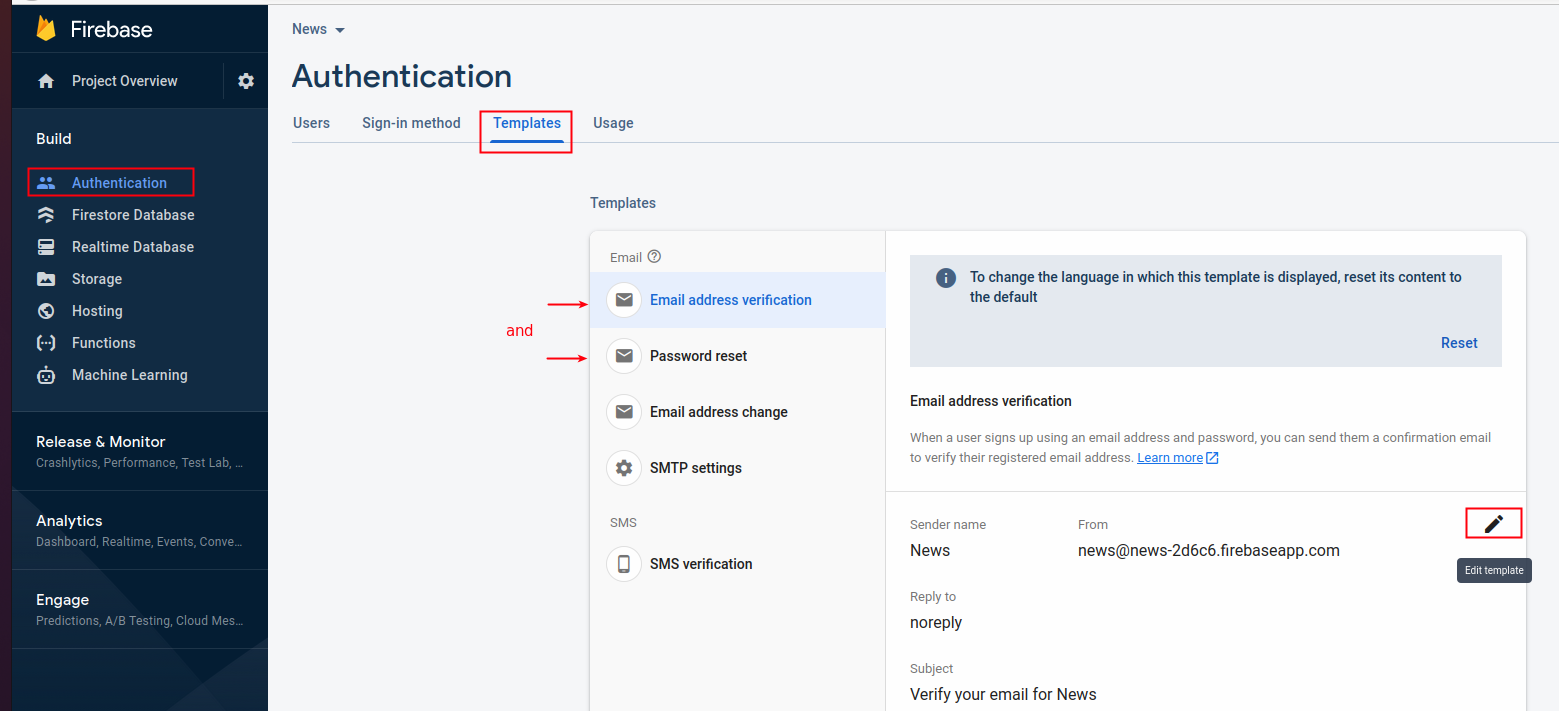
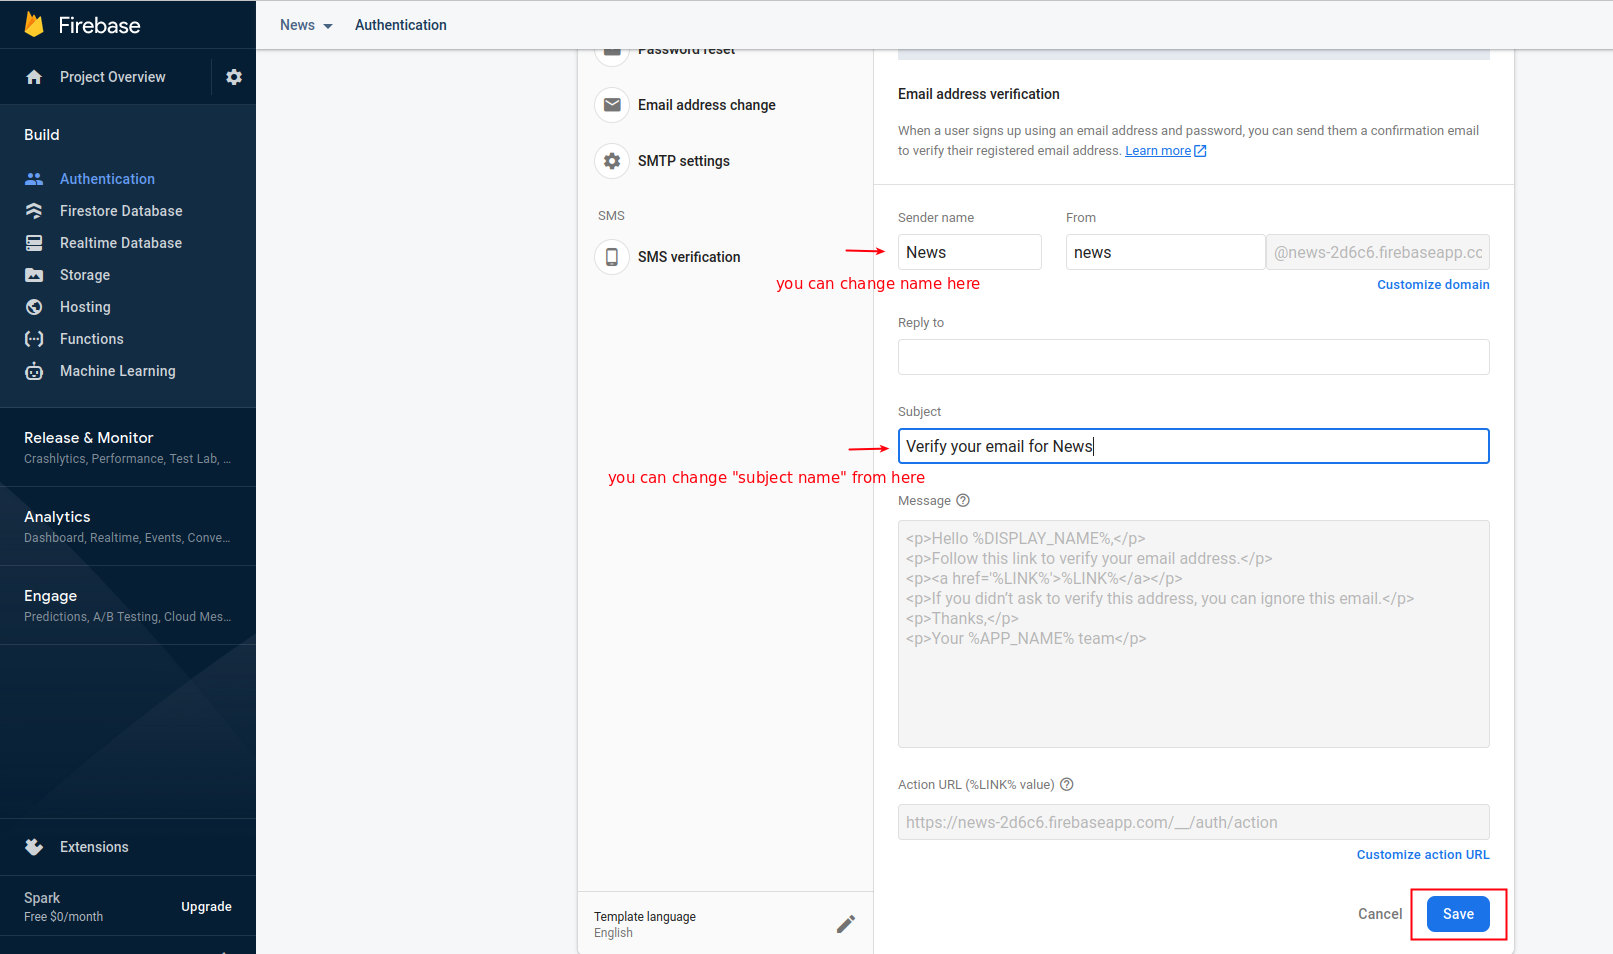
Change sender name and subject for verify email and reset password.
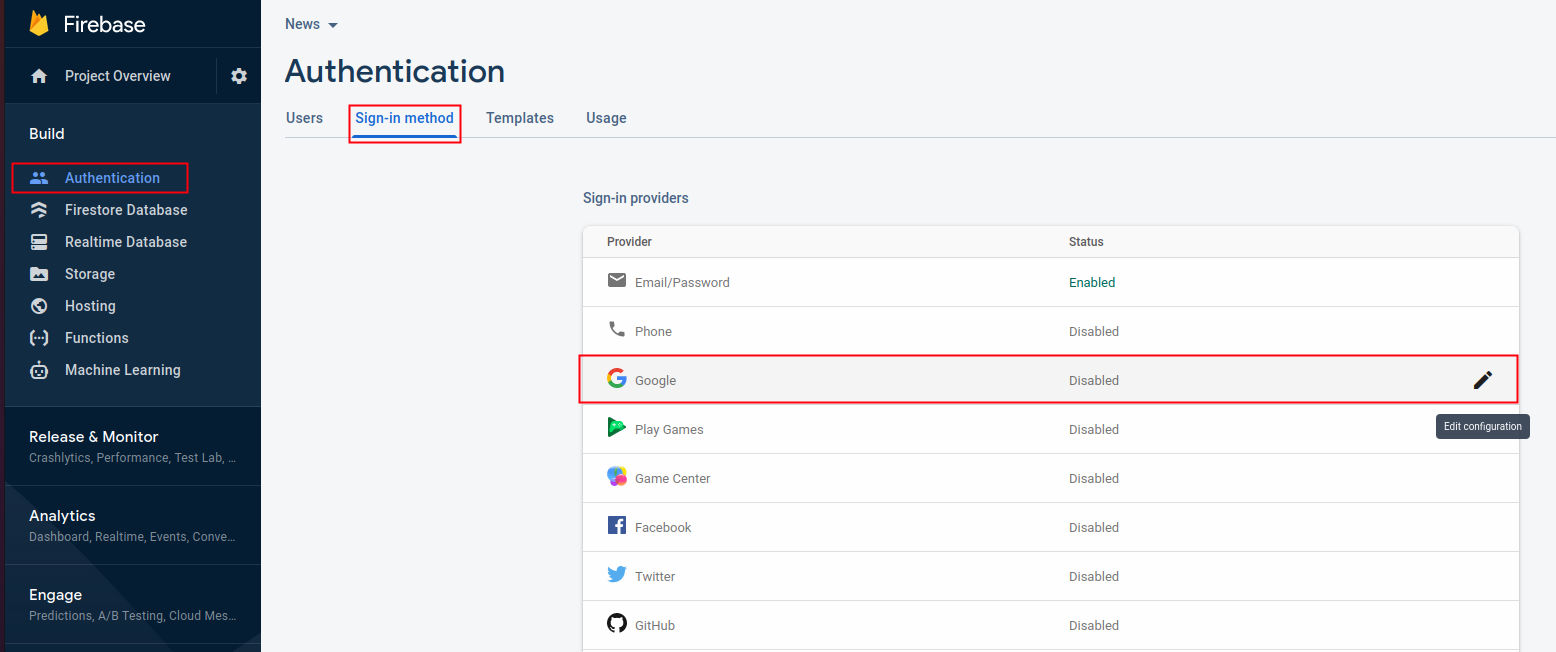
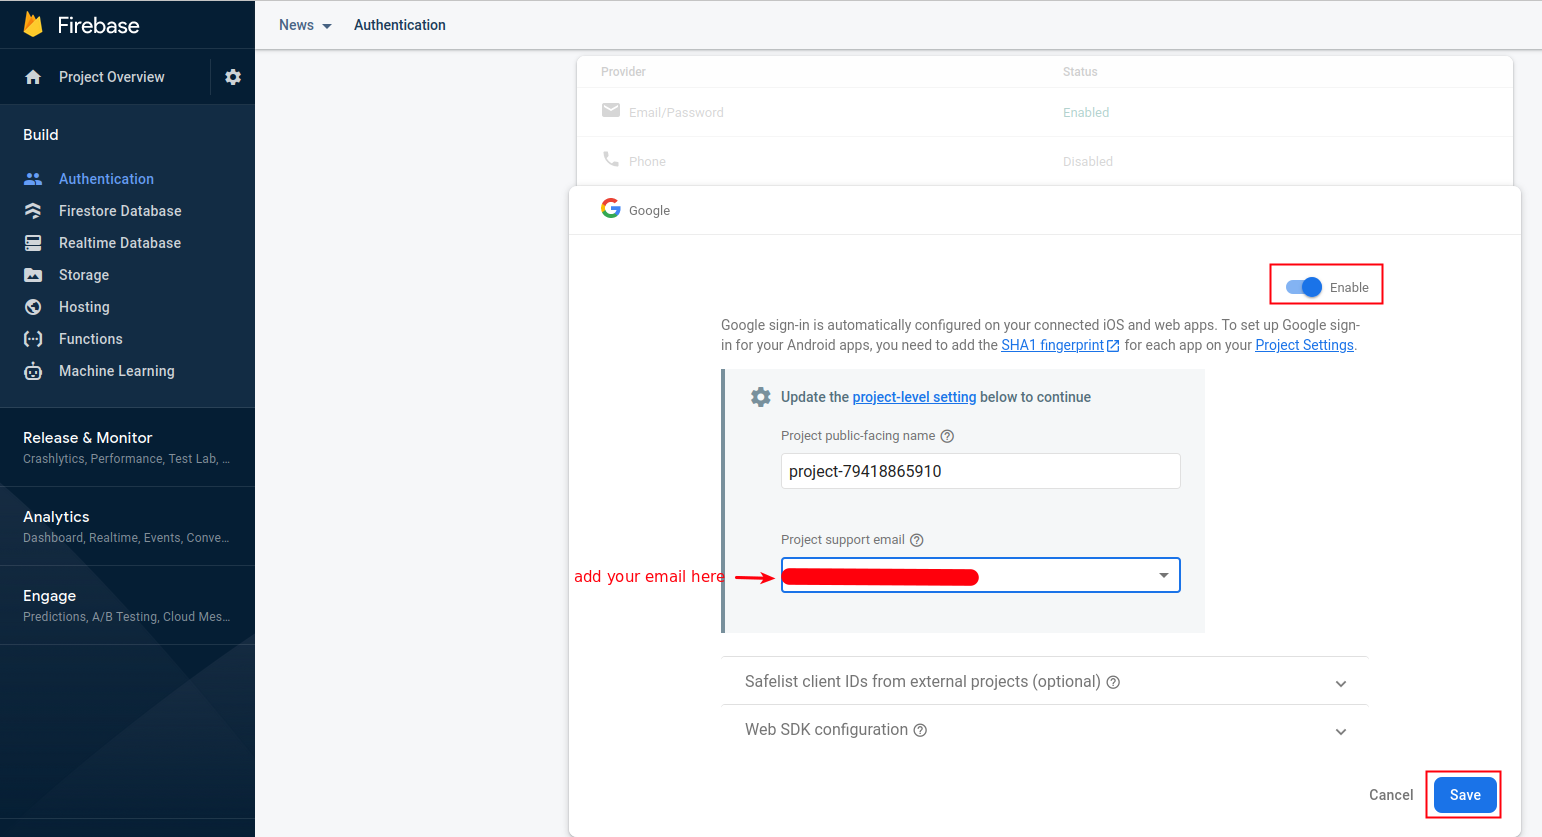
Steps to Authenticate firebase using Google
- Open your firebase console.
- Go to Sign-in method in Authentication.
-
Go to the Google and enable the google sign_in automatically.
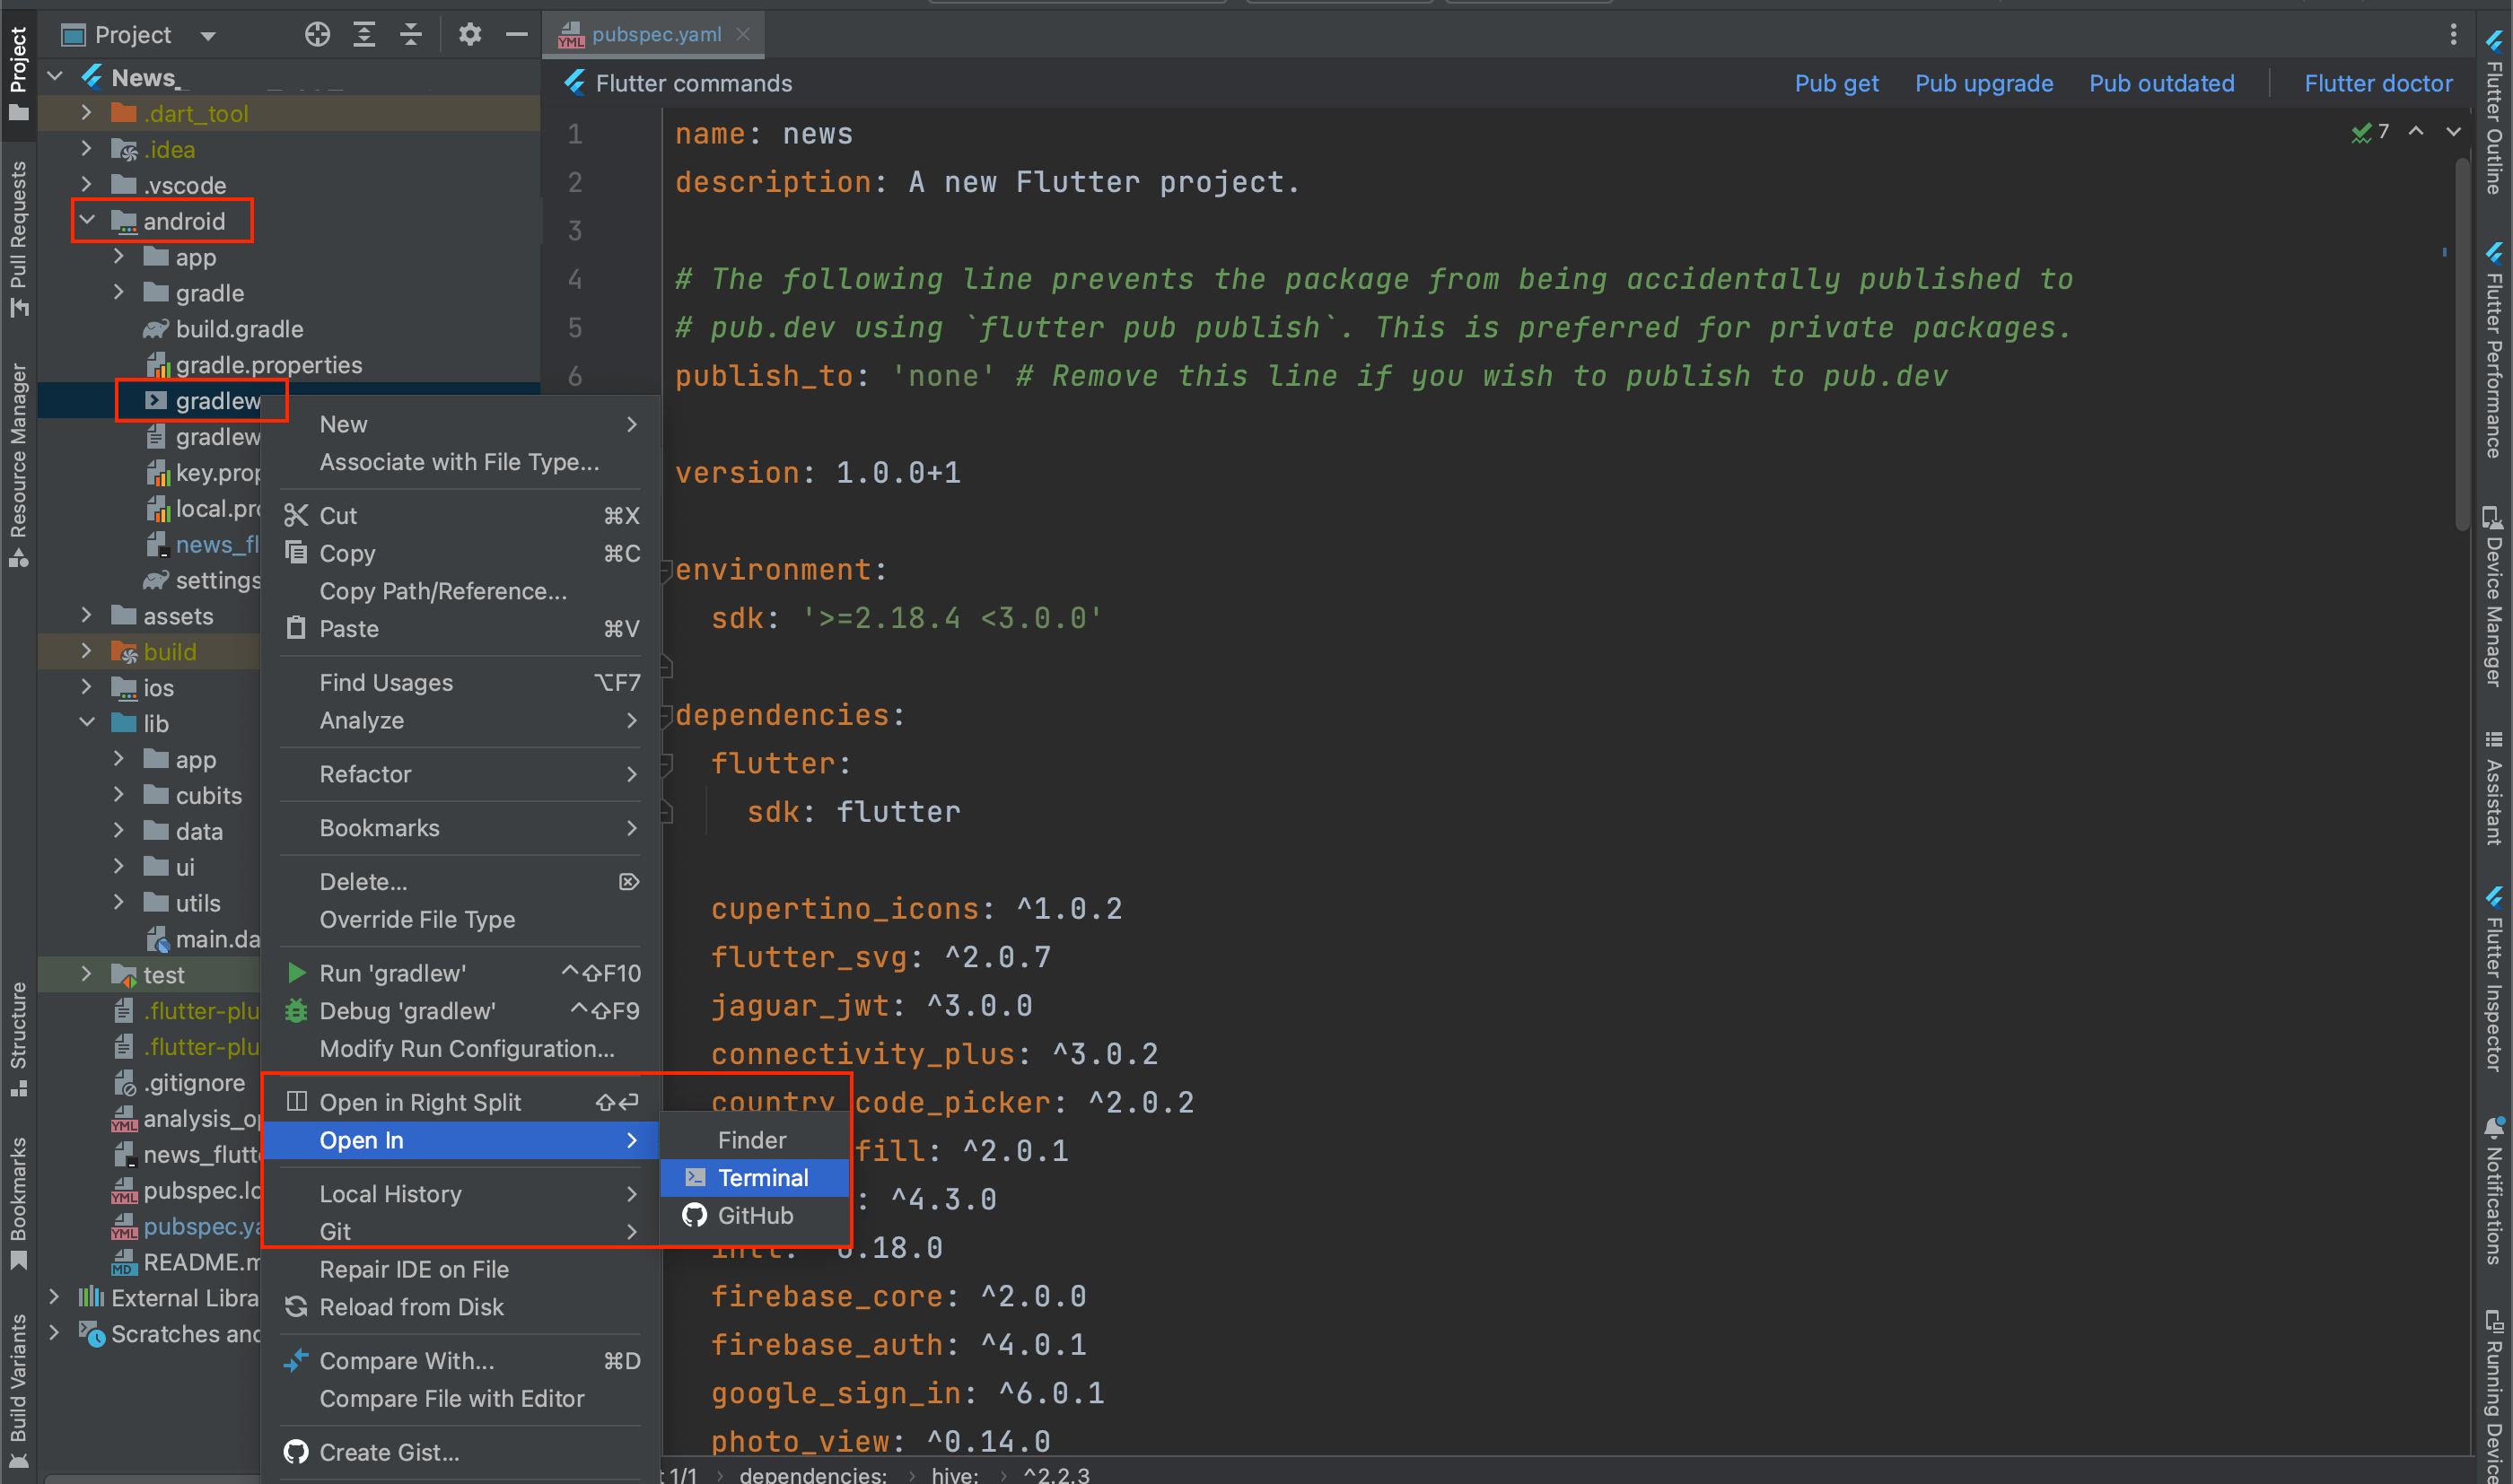
- Download & Install JDK x64 Installer from here & set JAVA_HOME from here if you haven't yet.
-
click on android > gradlew in right click on open In > Terminal as shown in
image below.
-
write in terminal below command and debug SHA will print copy that and add it in
firebase console.
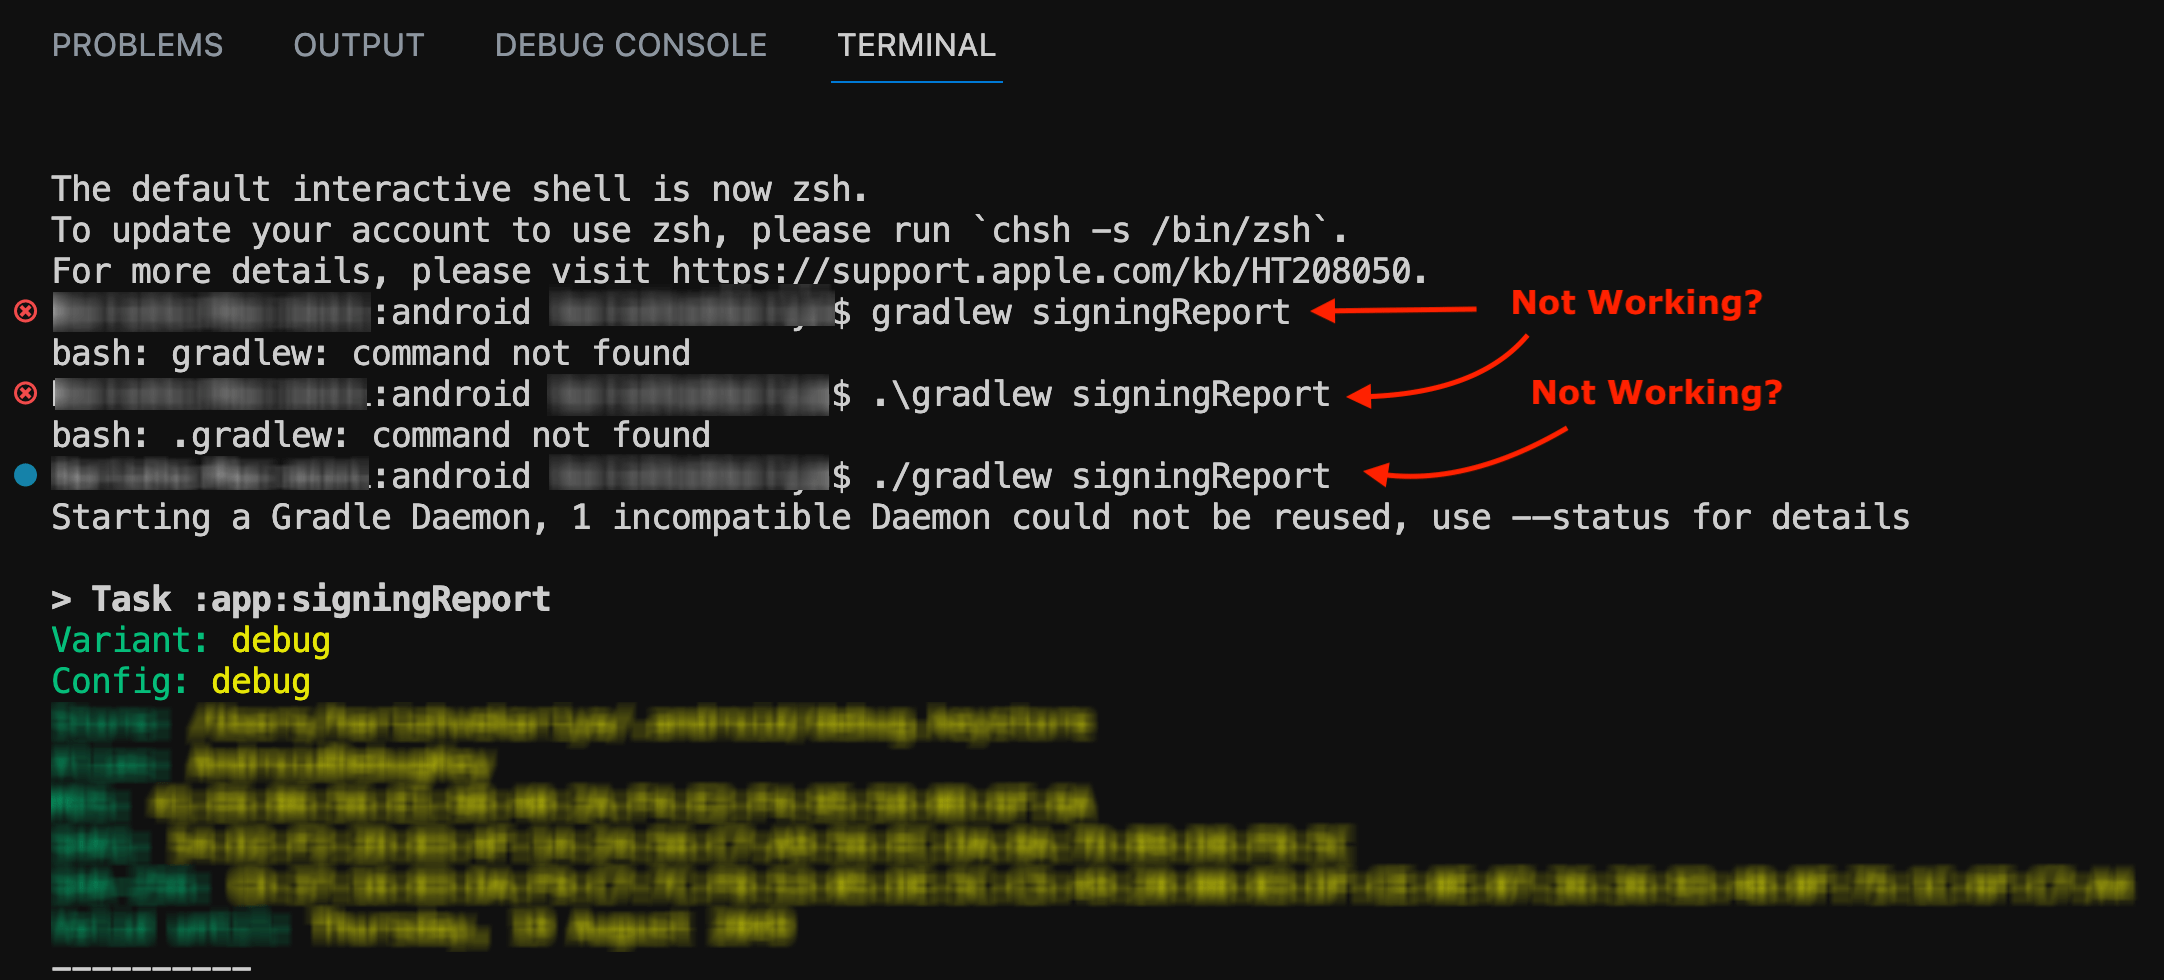
- after press on save button google authentication will be enabled in your app.
Authenticate Using Facebook Login on Android with Firebase.
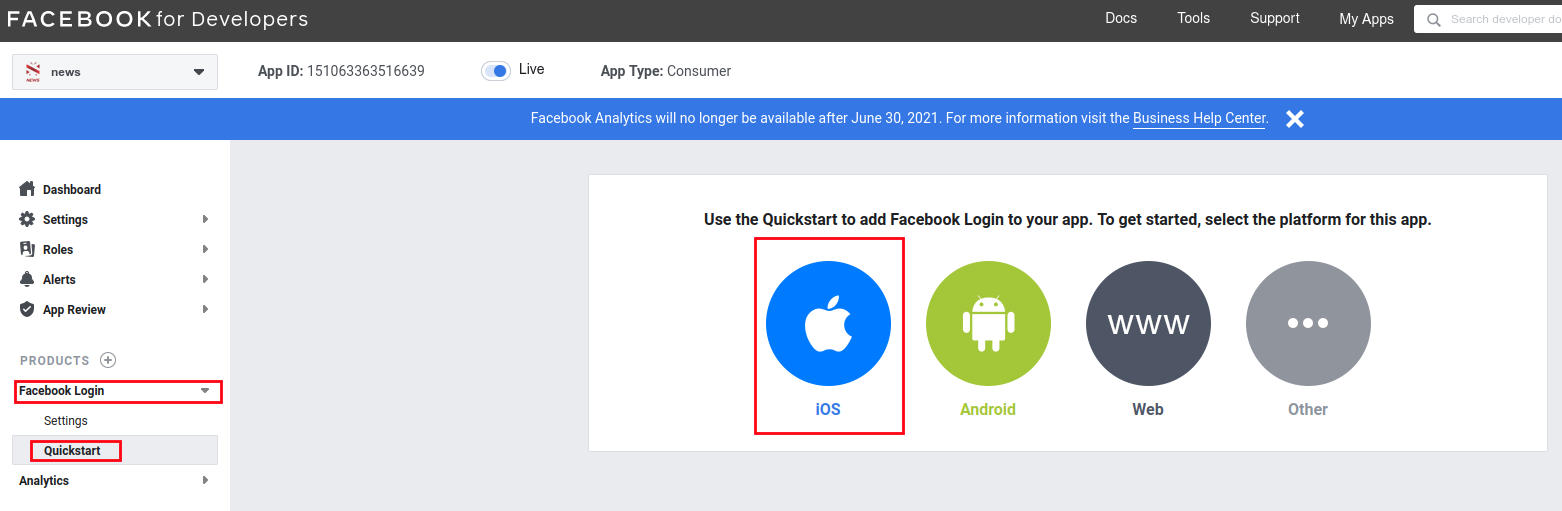
- first create project for your android application , go to Facebook for Developers
- Go to Facebook Quick Start Integrate the Facebook SDK
- On the Facebook for Developers site, get the App ID and an App Secret for your app.
- In the Firebase console, open the Auth section. Enable Facebook Login.
-
On the Sign in method tab, enable the Facebook sign-in method and
specify the App ID and App Secret you got from Facebook.
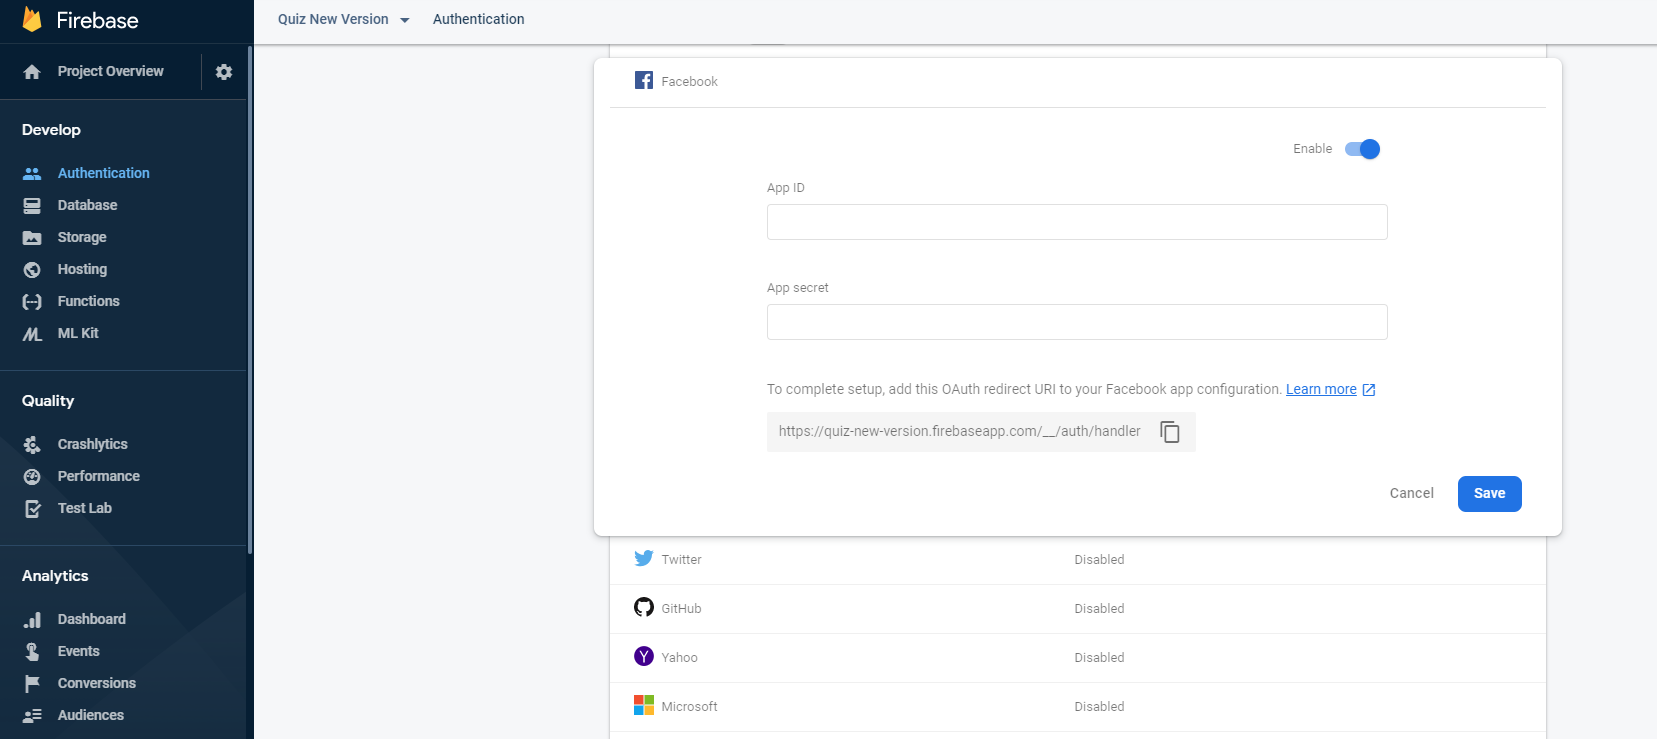
- Then, make sure your OAuth redirect URI (e.g. my-app-12345.firebaseapp.com/__/auth/handler) is listed as one of your OAuth redirect URIs in your Facebook app's settings page on the Facebook for Developers site in the Product Setting > Facebook Login config
-
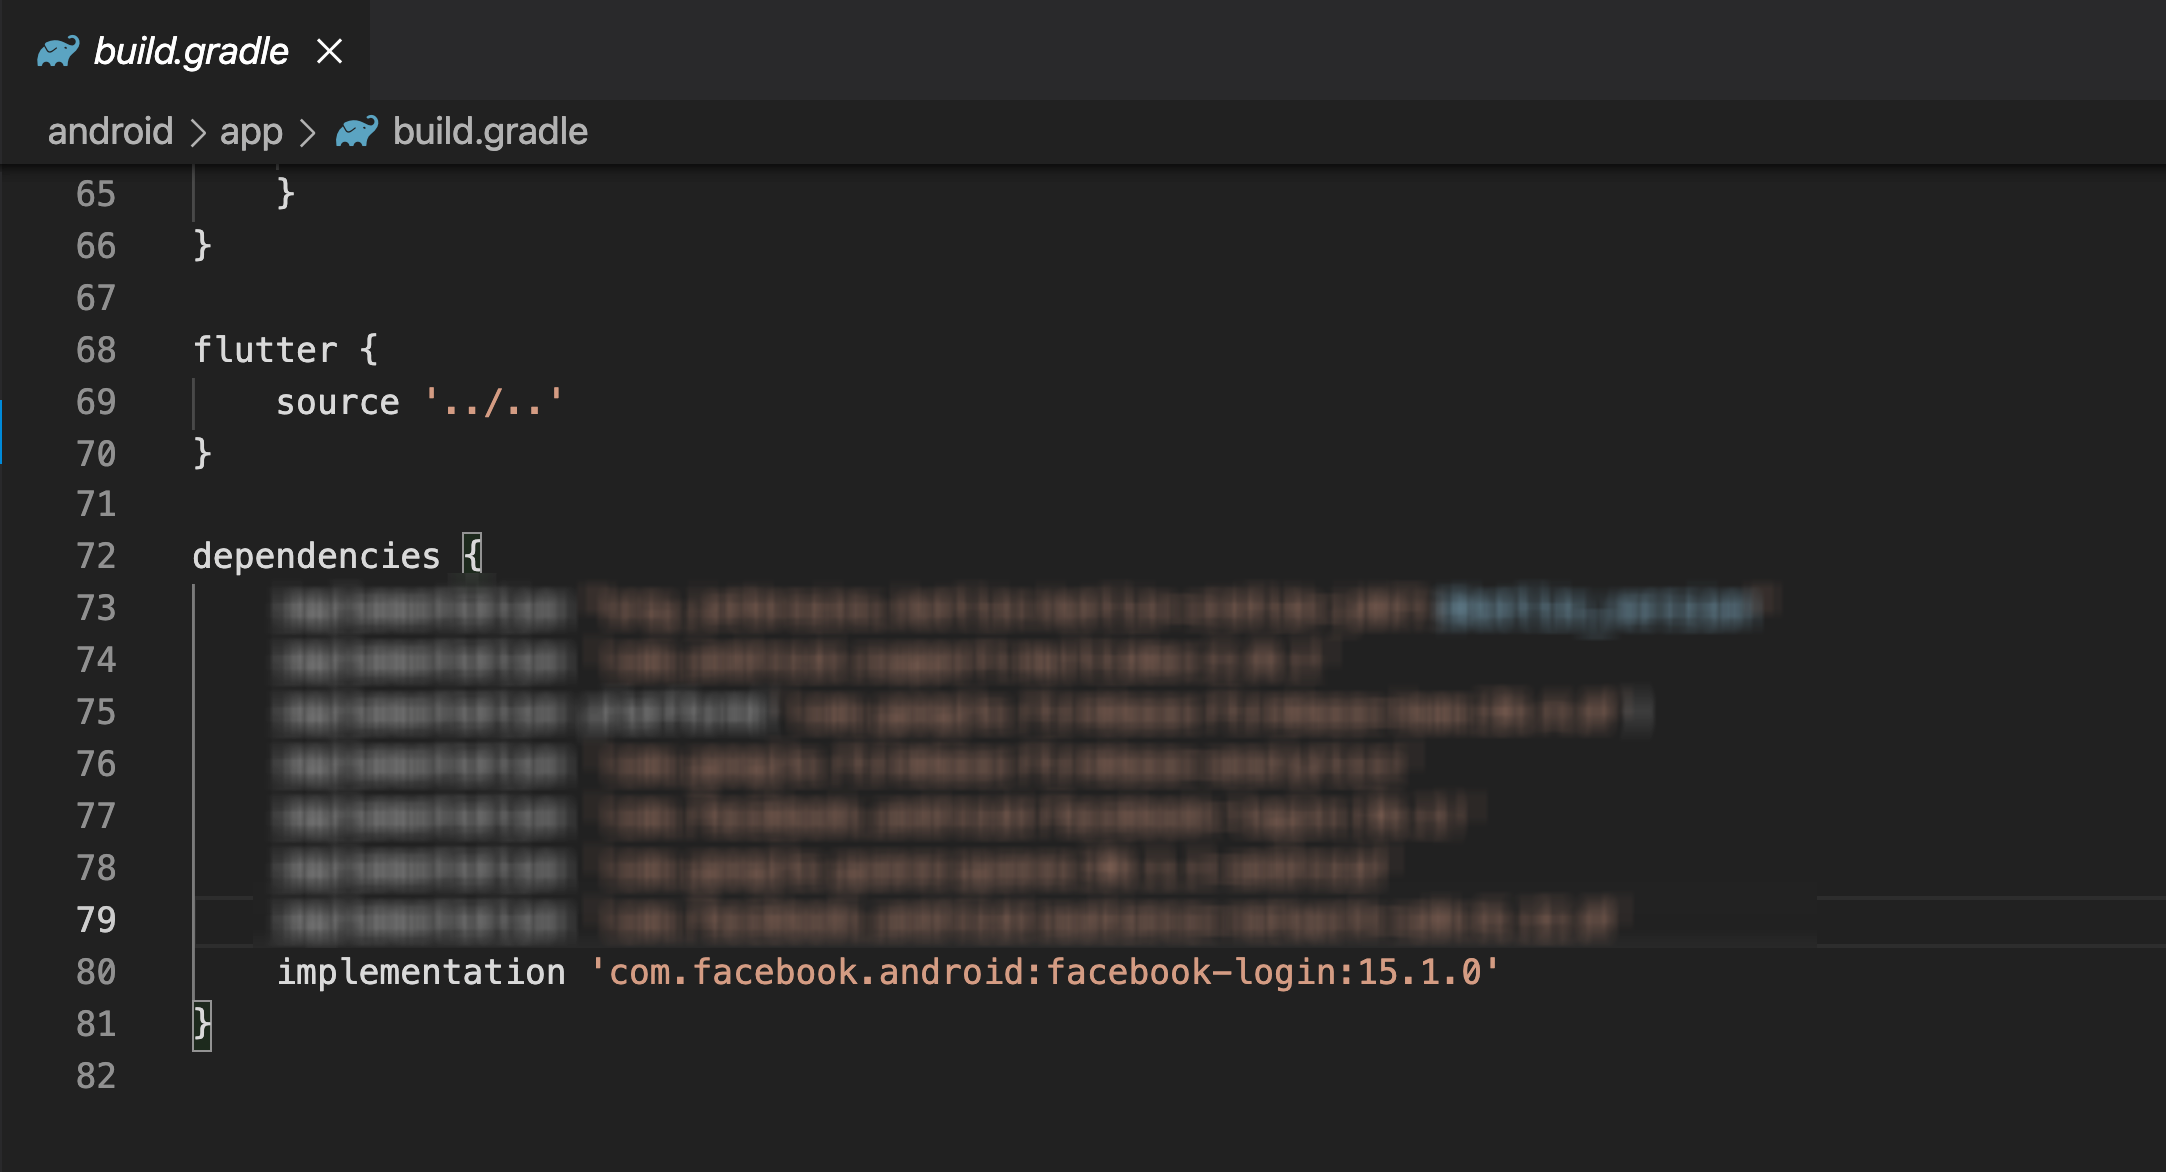
Add the dependencies for Firebase Authentication and Facebook Login SDK to your
app-level build.gradle file:
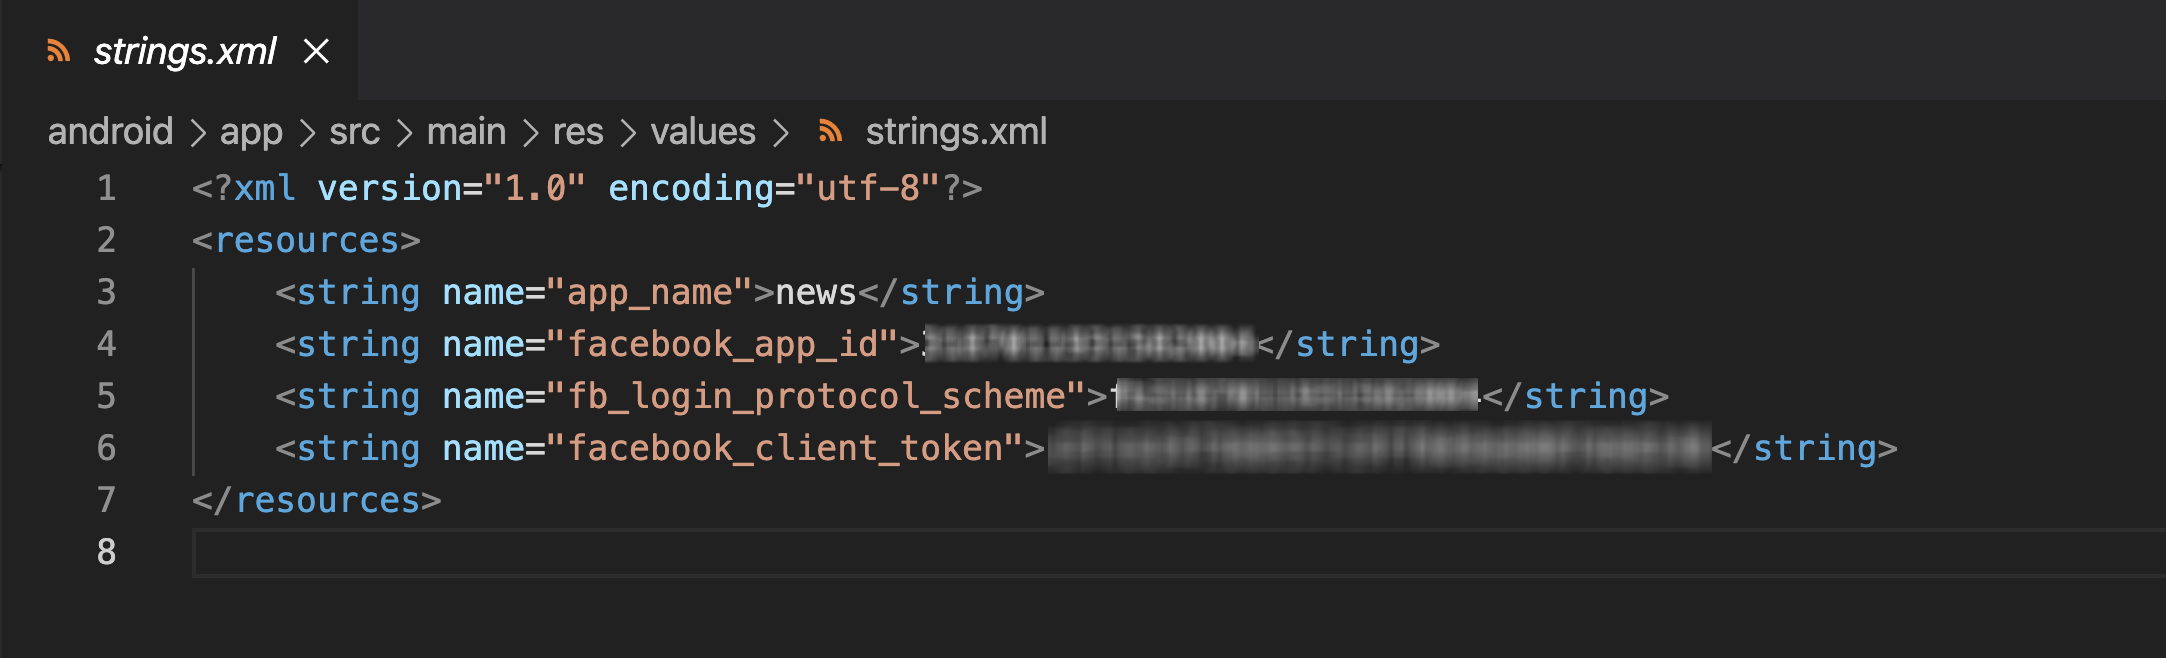
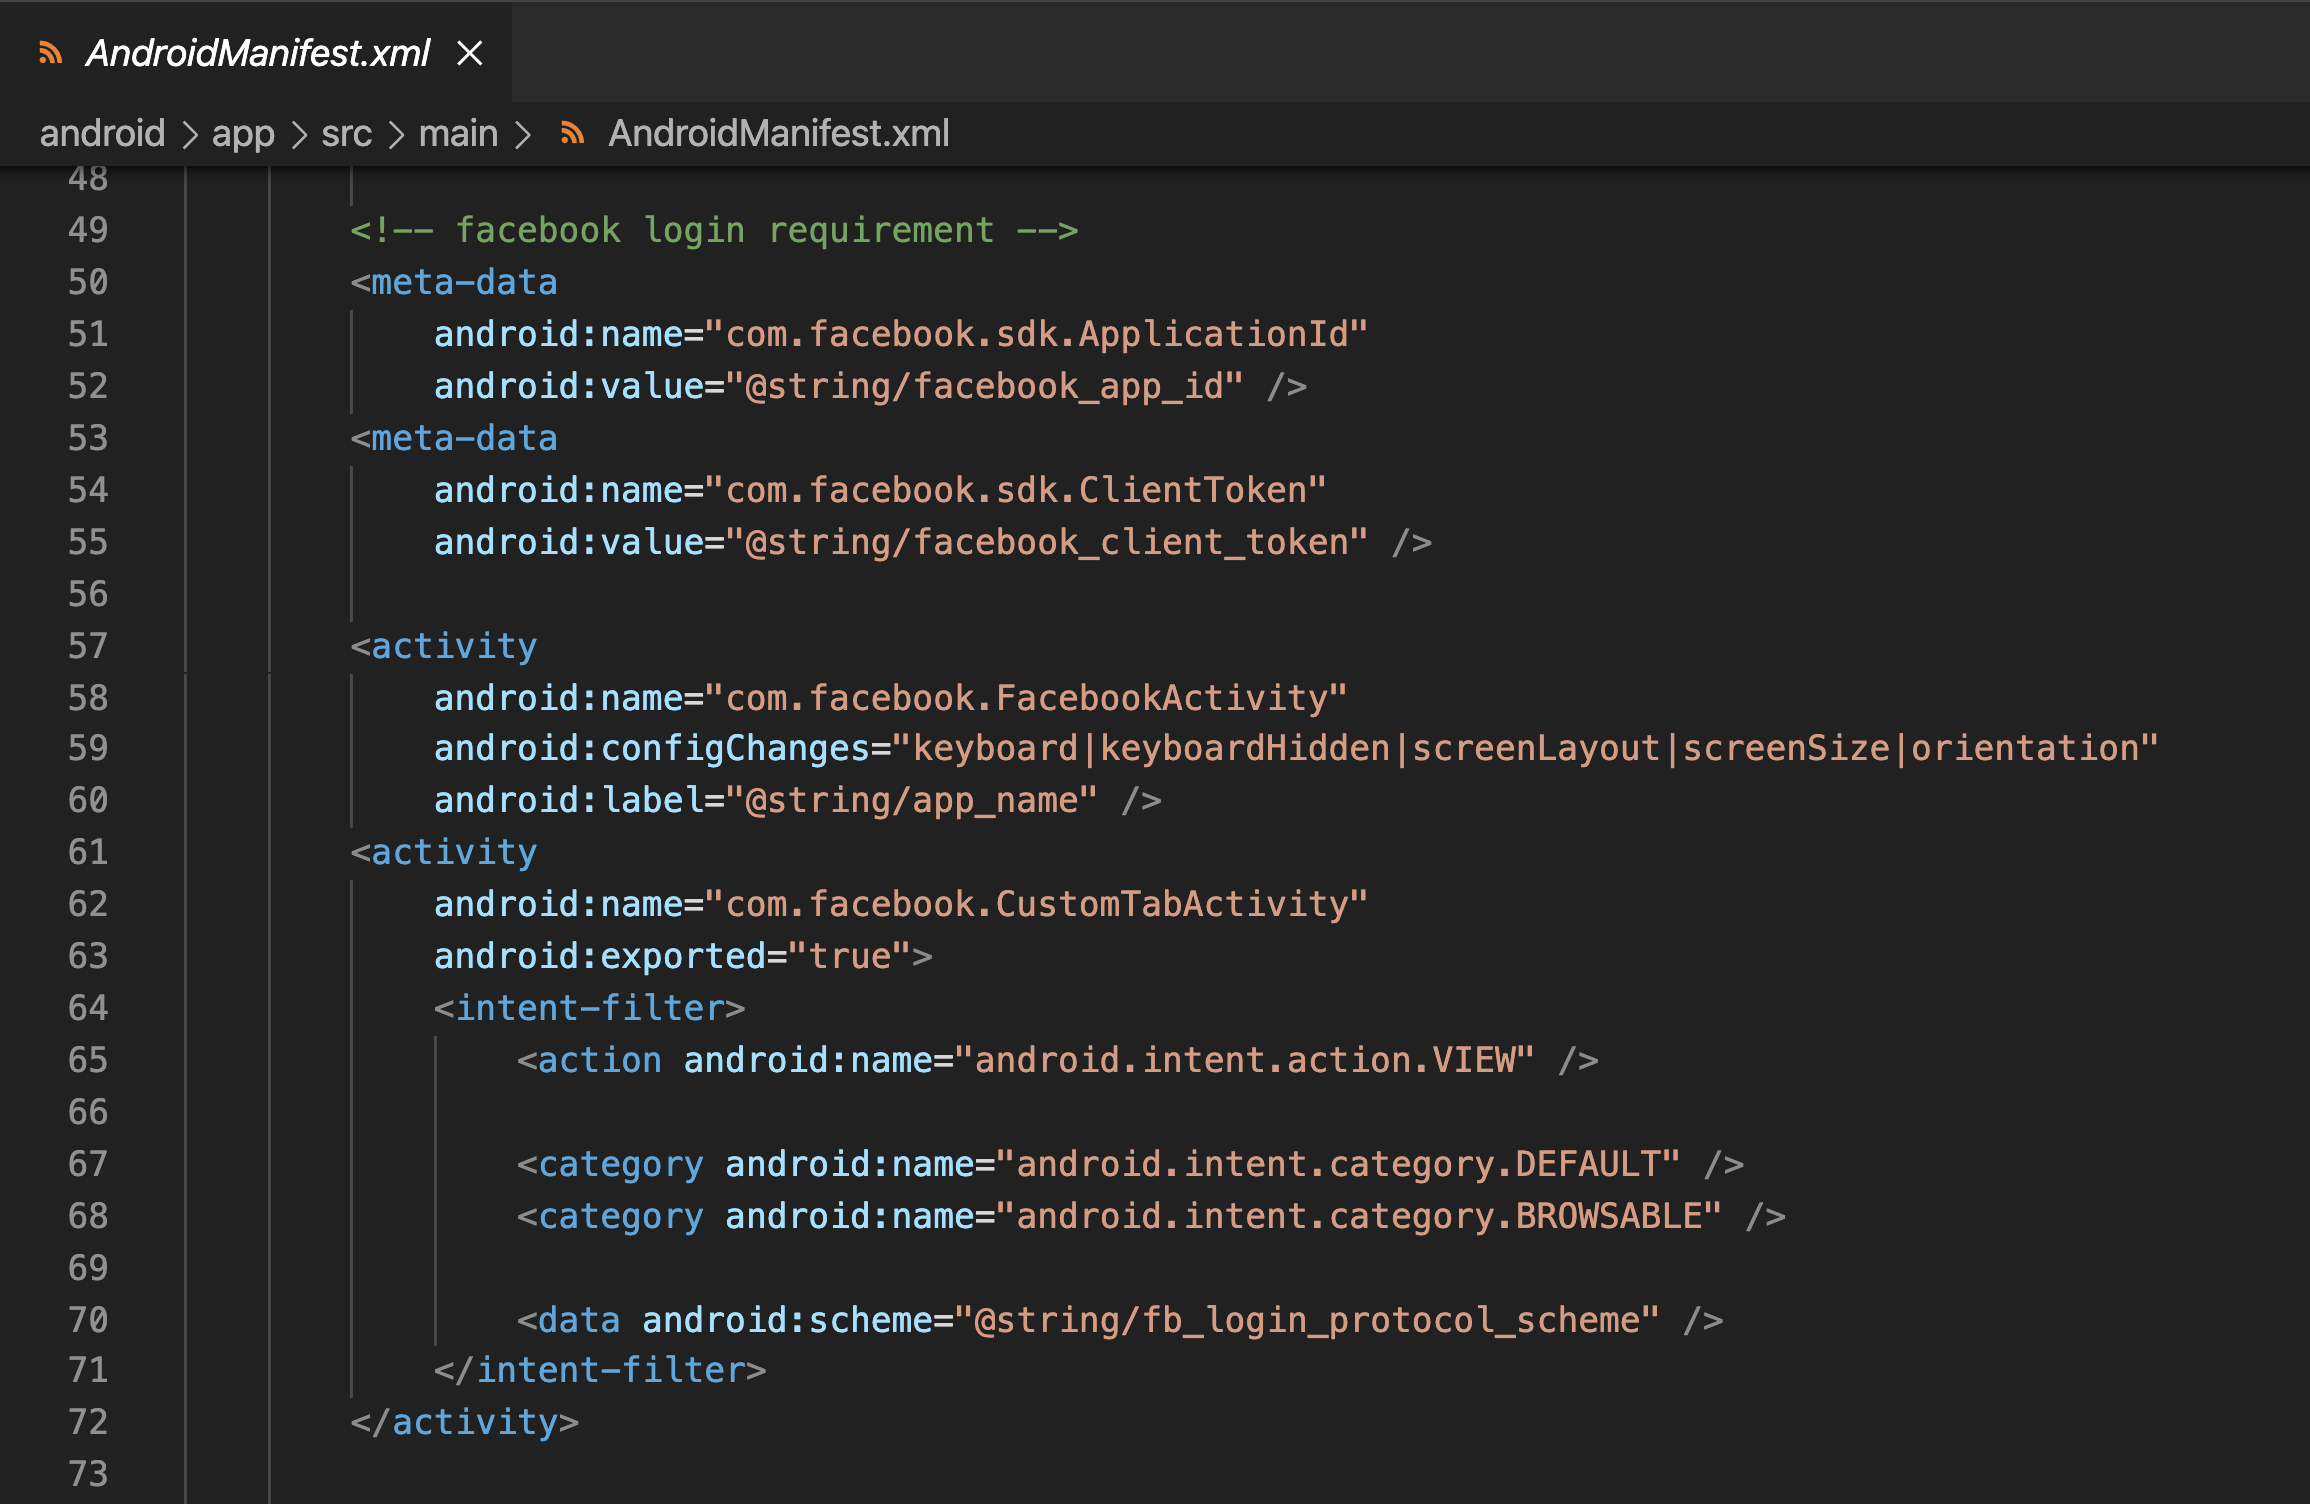
Edit Your Resources and Manifest - Create strings for your Facebook app ID and for those needed to enable Chrome Custom Tabs. Also, add FacebookActivity to your Android manifest.
-
Open android > app > src > main > res > values > strings.xml file.
- Open android > app > src > main > AndroidManifest.xml File.
-
Add the following meta-data element, an activity for Facebook
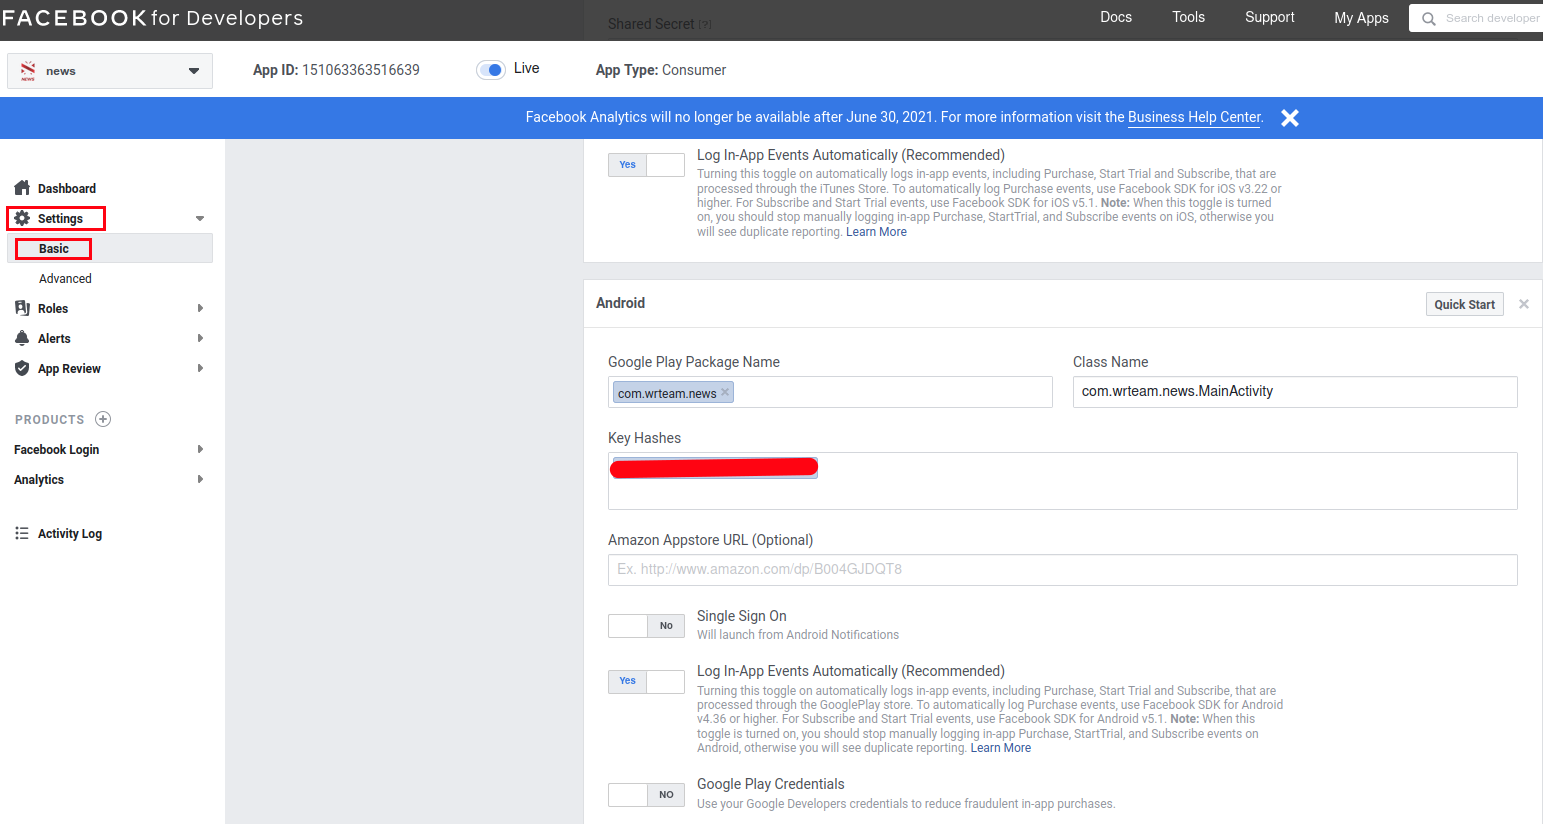
- Associate Your Package Name and Default Class with Your App
- Provide the Development and Release Key Hashes for Your App
-
To ensure the authenticity of the interactions between your app and Facebook,
you need to supply us with the Android key hash for your development
environment. If your app has already been published, you should add your
release key hash too.
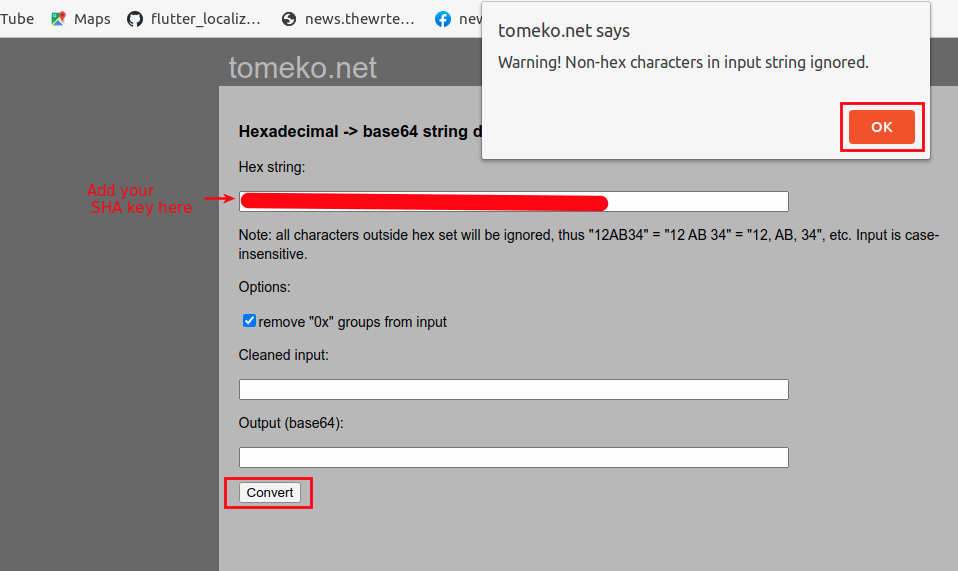
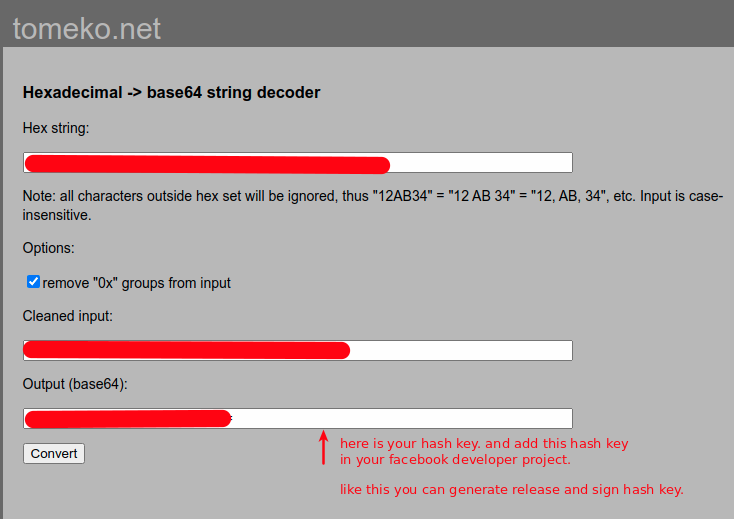
 Generating a Development Key Hash
- We will use SHA-1 key to generate hashkey for facebook login.
-
you can generate hash online. Here is external link for generate key has
for facebook login.Key hash Genrate Link
-
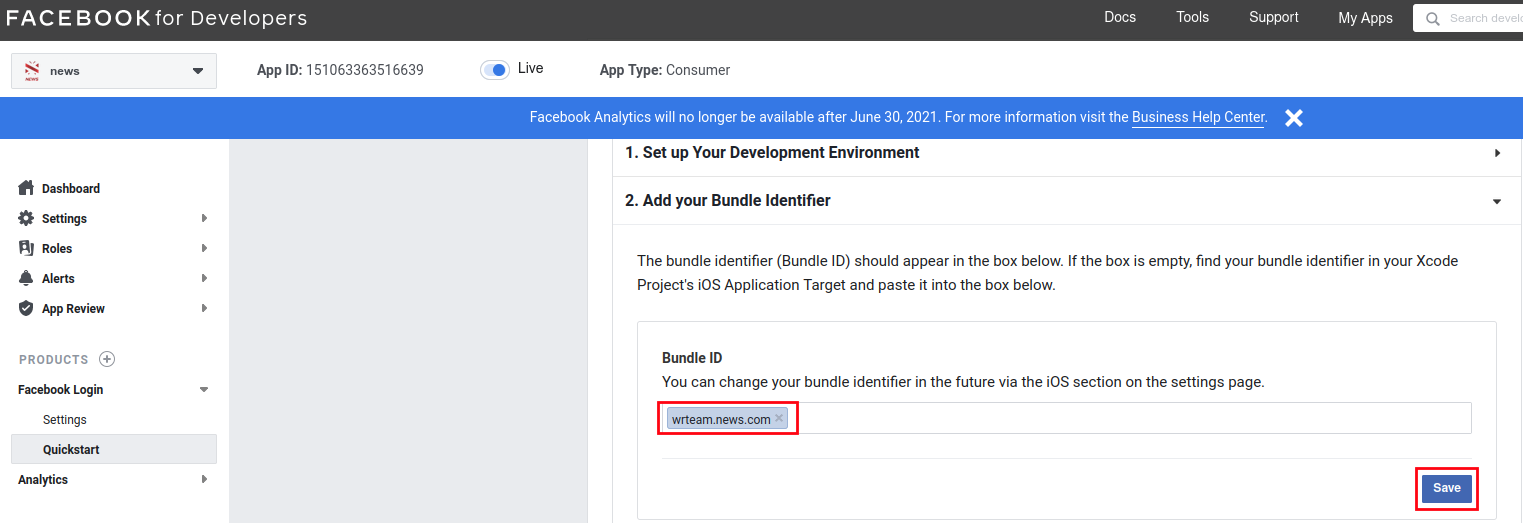
Create iOS application here.
-
Add your iOS Bundle Id as shown as below image
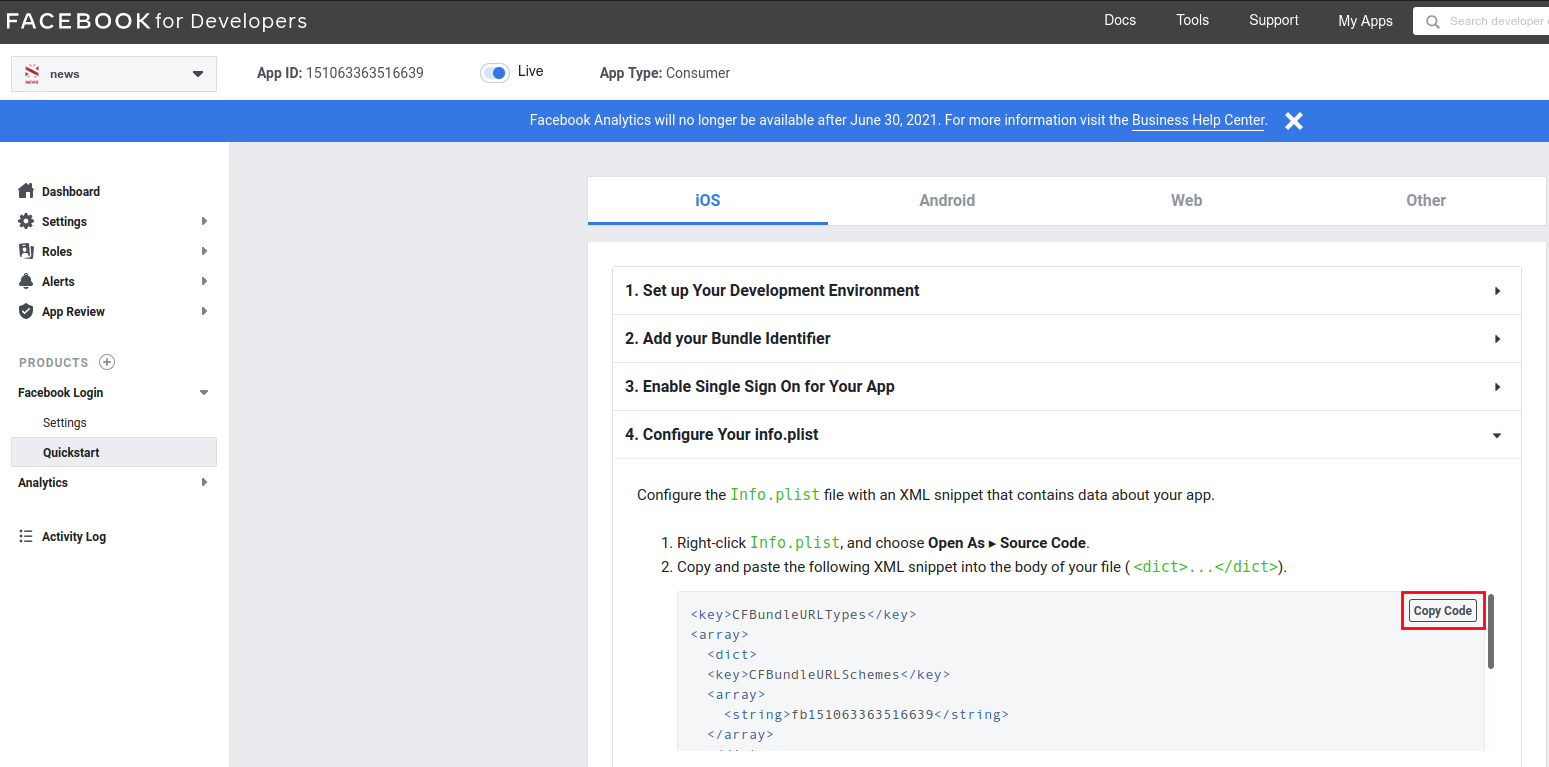
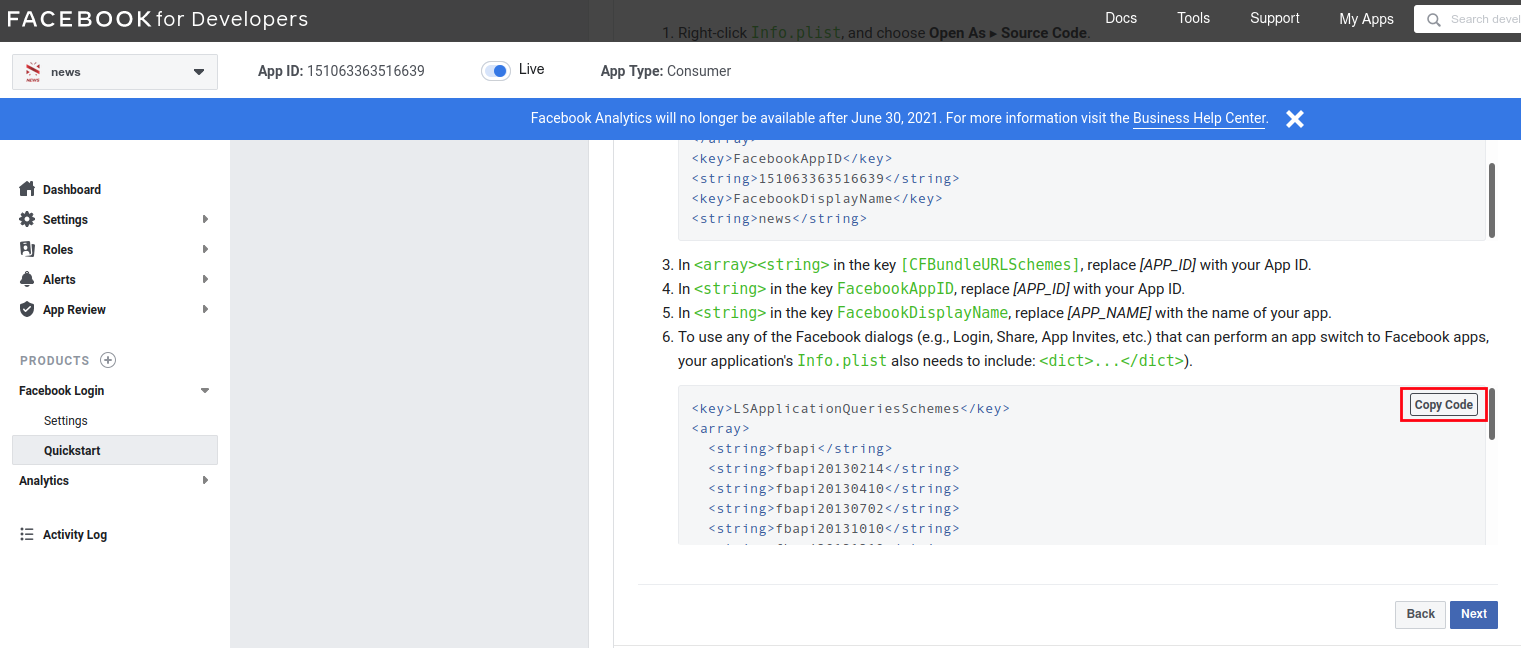
- Copy code shown in below image and paste into Info.plist file.
-
and after Configure your Info.plist file.
and finally iOS app in facebook authentication enabled.
How to enable Firebase Phone Authentication(OTP).
- Enable Mobile Login from Admin panel > System Setting > General Settings & Set
Country code there.
- NOTE: You need to enable Blaze Plan From Firebase for this - Refer this video
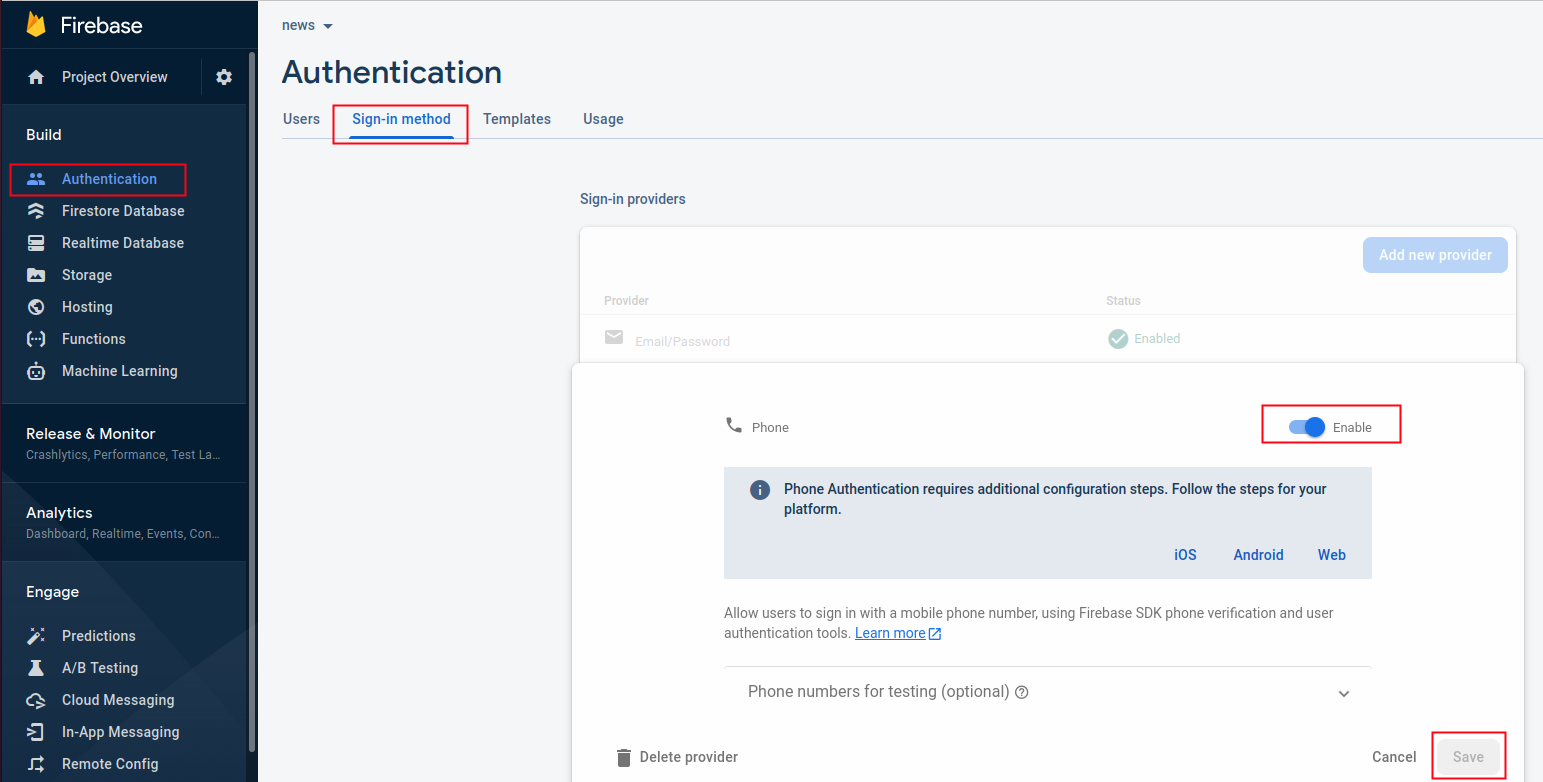
- Open your firebase console.
- Go to Authentication and open Sign-in method.
-
Enable Phone Sign-in method and save.
Steps to Authenticate firebase using Apple
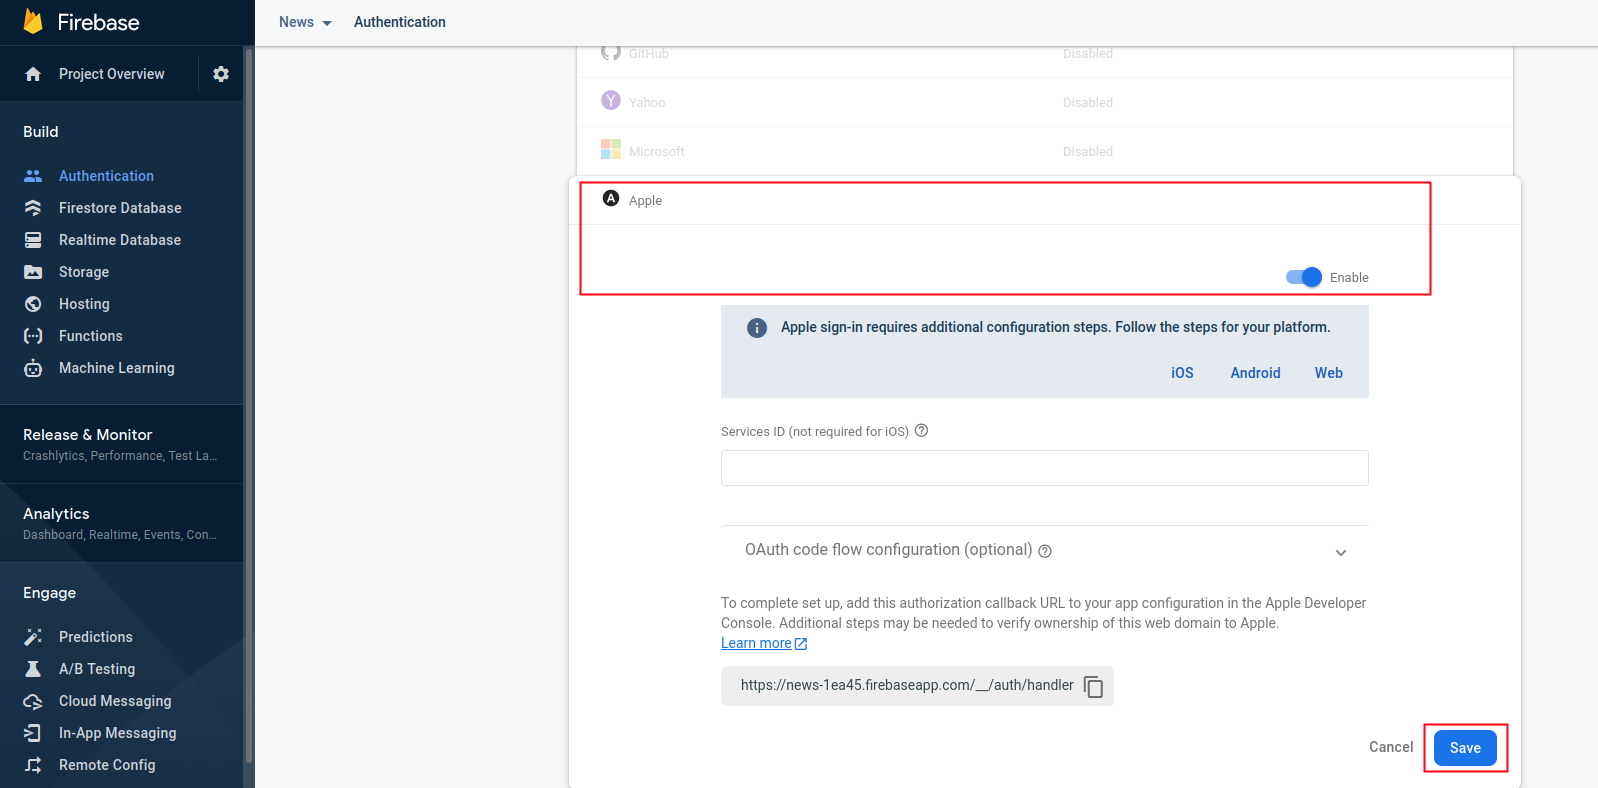
- Open your firebase console.
- Go to Sign-in method in Authentication.
-
Go to the Apple and enable apple sign in.
-
In Xcode, select the Signing & Capabilities tab, and add "Sign In With Apple" as
a new Capability then select a team on the Code Signing section.
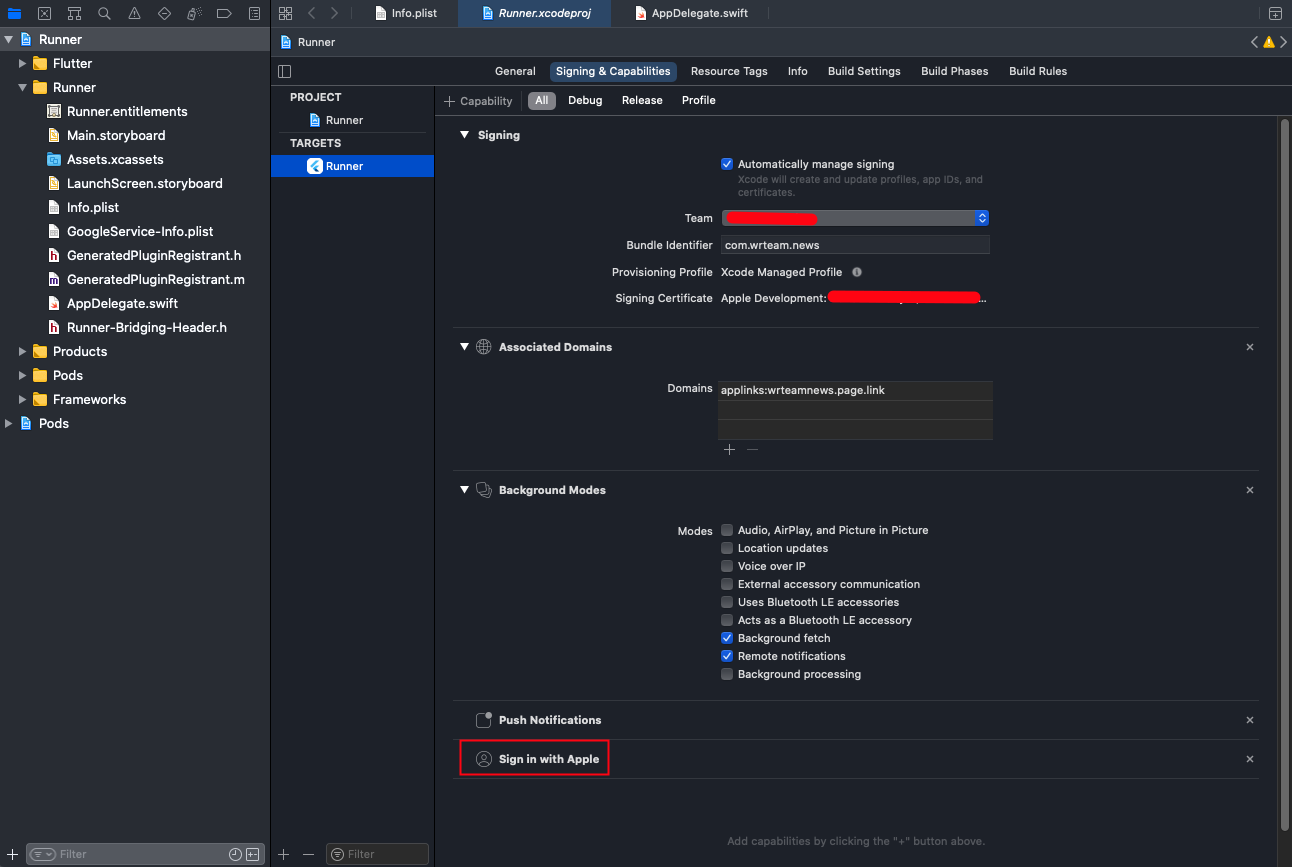
- This will generate and configure an App ID in the "Certificates, Identifiers & Profiles" section of the Apple Developer portal.
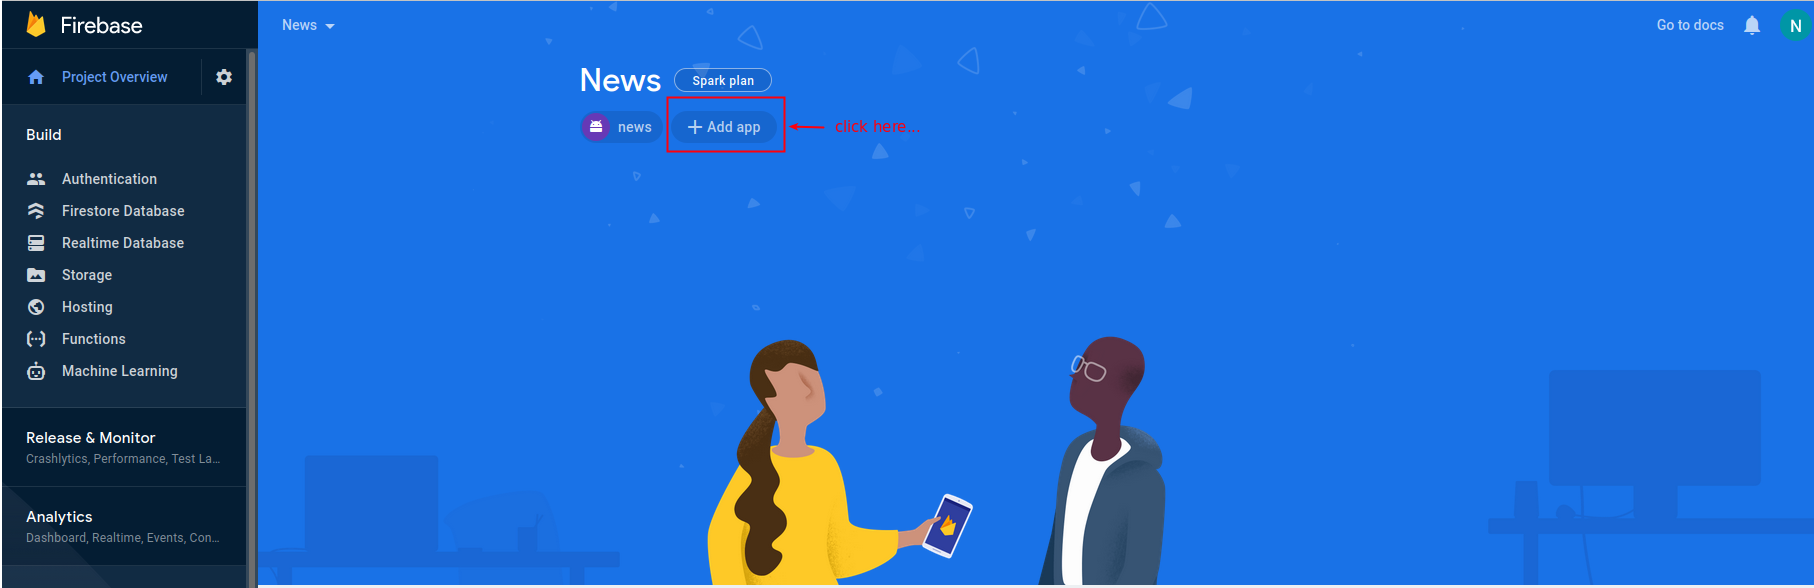
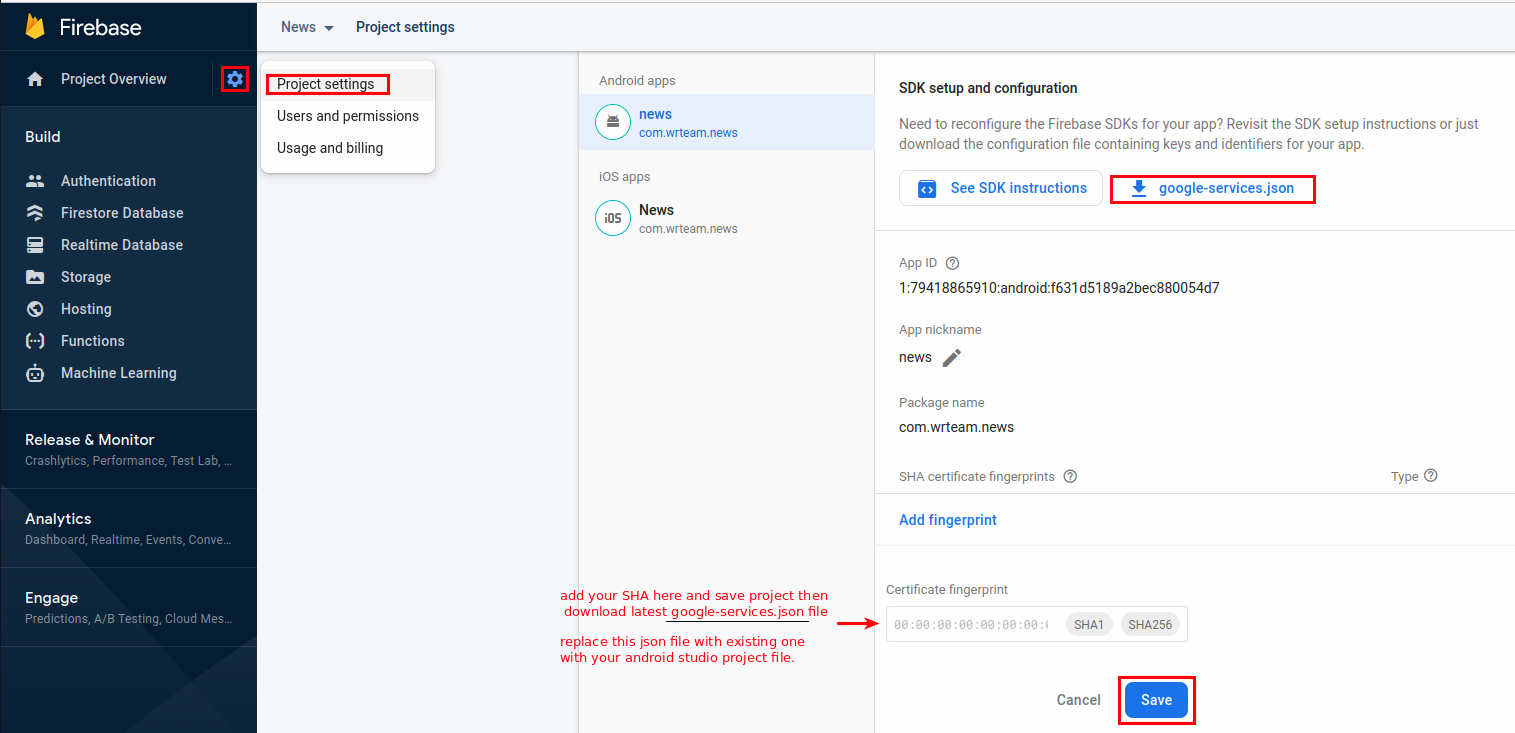
How to Integrate Firebase Cloud Messaging in App?
Integrating Firebase Cloud Messaging
- For Firebase Cloud Messaging Notification, first you have to register your application with Firebase.
- Create Firebase Project for Application. If you already created firebase project then you don't have to do that again.
- Firebase dependency, service class and all nacessary class are already included in project.
- So, you dont have to do extra code here.
- Just download Google-service.json and replace with existing File.
- for iOS your need to perform below given step
- In Xcode, open the project.
- In the Project Navigator (the left-hand menu), select the project icon that represents your app.
- In the top-left corner of the right-hand pane in Xcode, select your app's target.
- Navigate to the Capabilities tab.
- Enable Push Notifications.
-
Check Remote Notifications and Background Fetch from Enabling Background Modes.
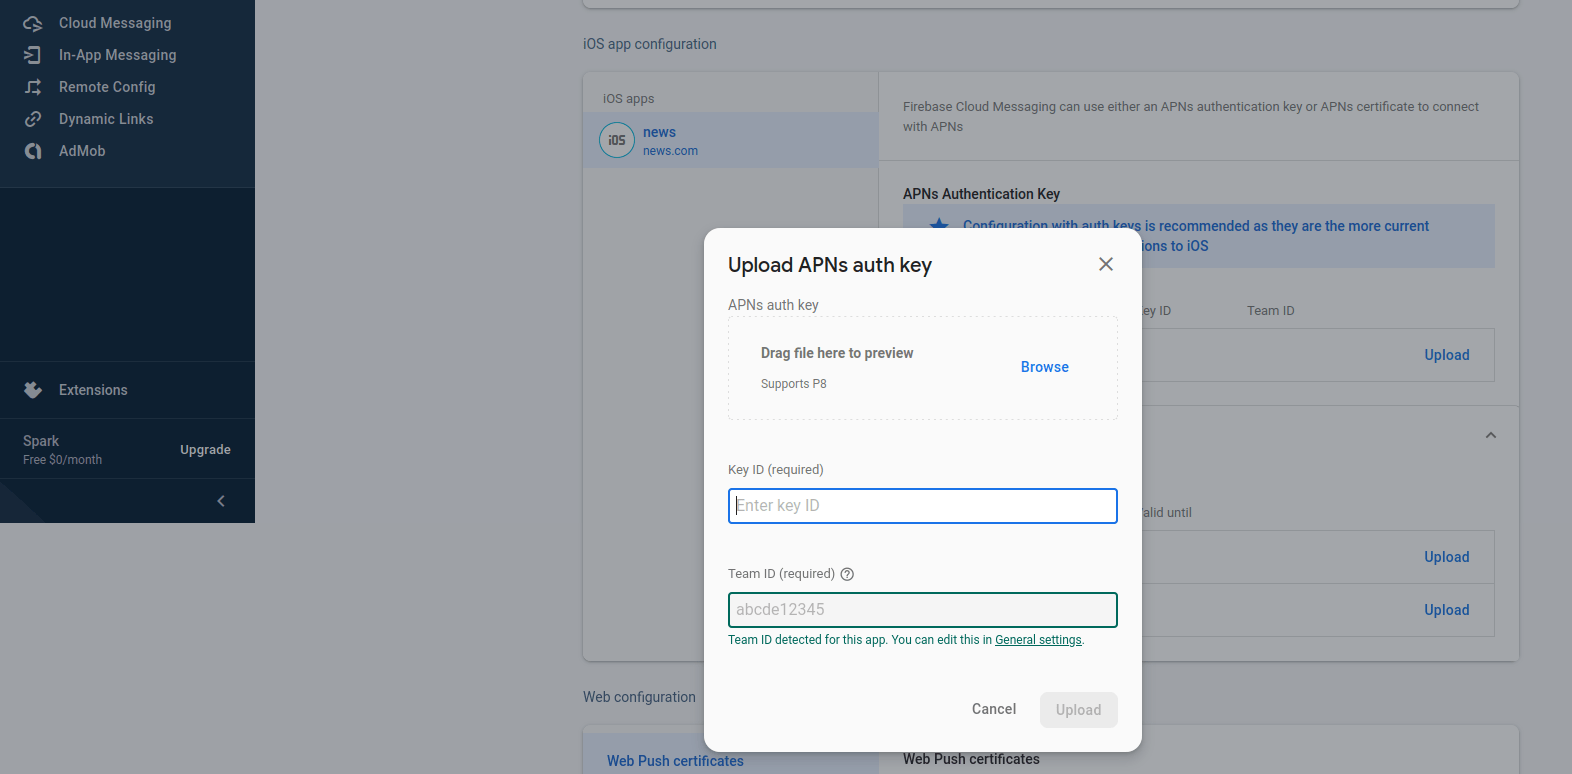
- APNs (Apple's Push Notification service) currently supports two types of connections: token-based (.p8) and certificate-based (.p12).you can follow either one of them.
For Token-based (.p8).
- Log in to the Apple Developer Portal.
- Navigate to Certificates, IDs & Profiles > Identifiers > App IDs and click the App ID associated with your app.
-
On the screen for your App ID, check Capabilities > Push Notifications.
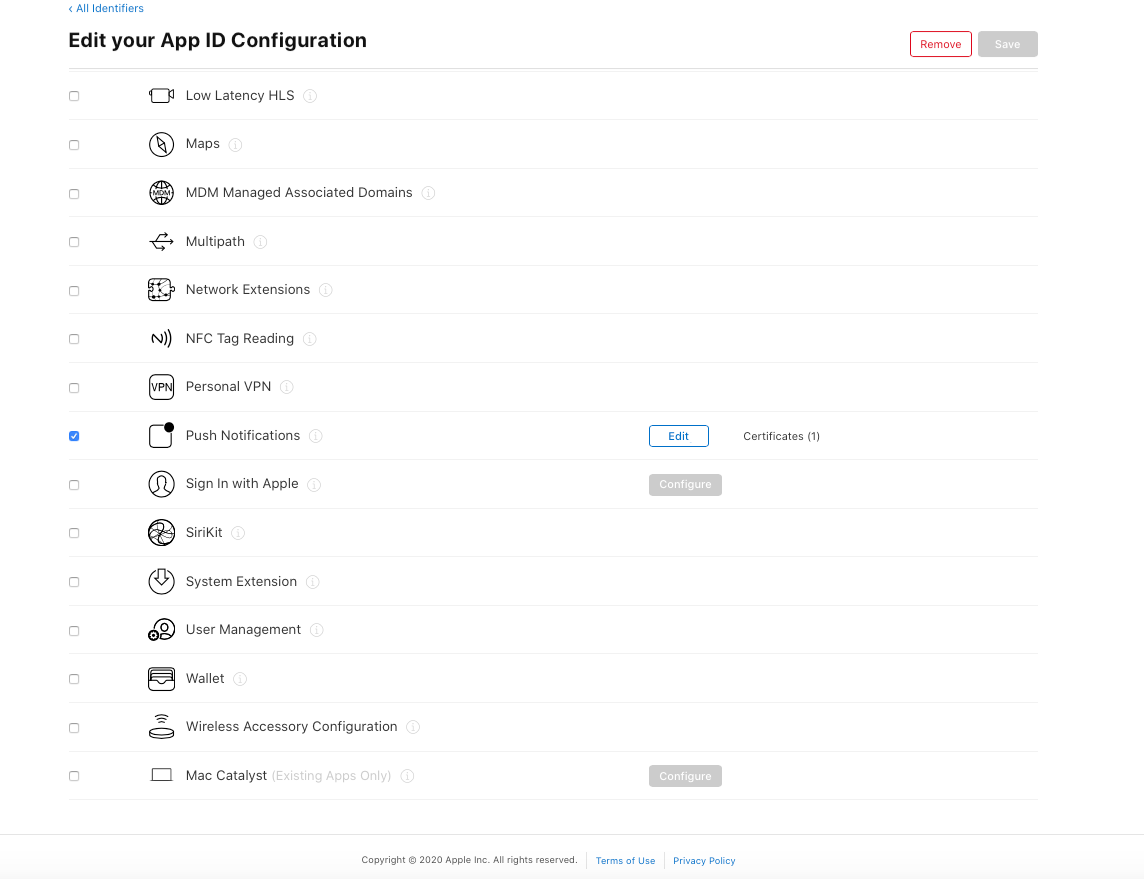

- Select App ID in next page & click continue.
- And then create Development SSL Certificate & Production SSL Certificate by adding CSR certificate. follow Apple's Create a certificate signing request instructions.
-
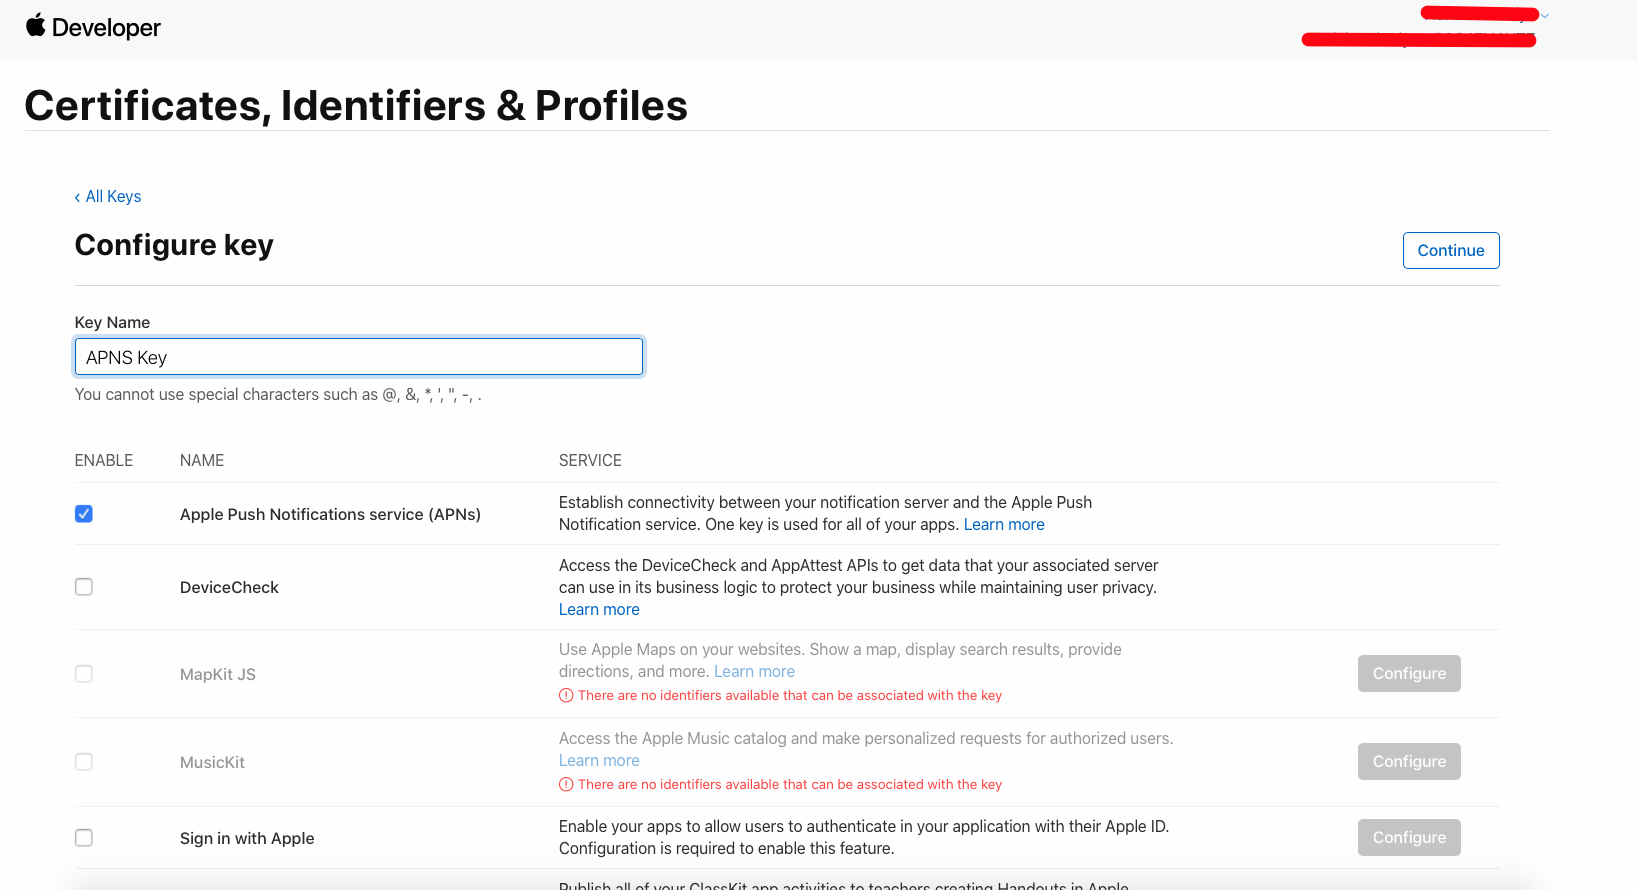
Navigate to Certificates, IDs & Profiles > Keys Section and add a Universal key
for Notifications,which you can use for more than one apps as well.
-
Just save and Download & keep it safe, as it will be downloaded only once.
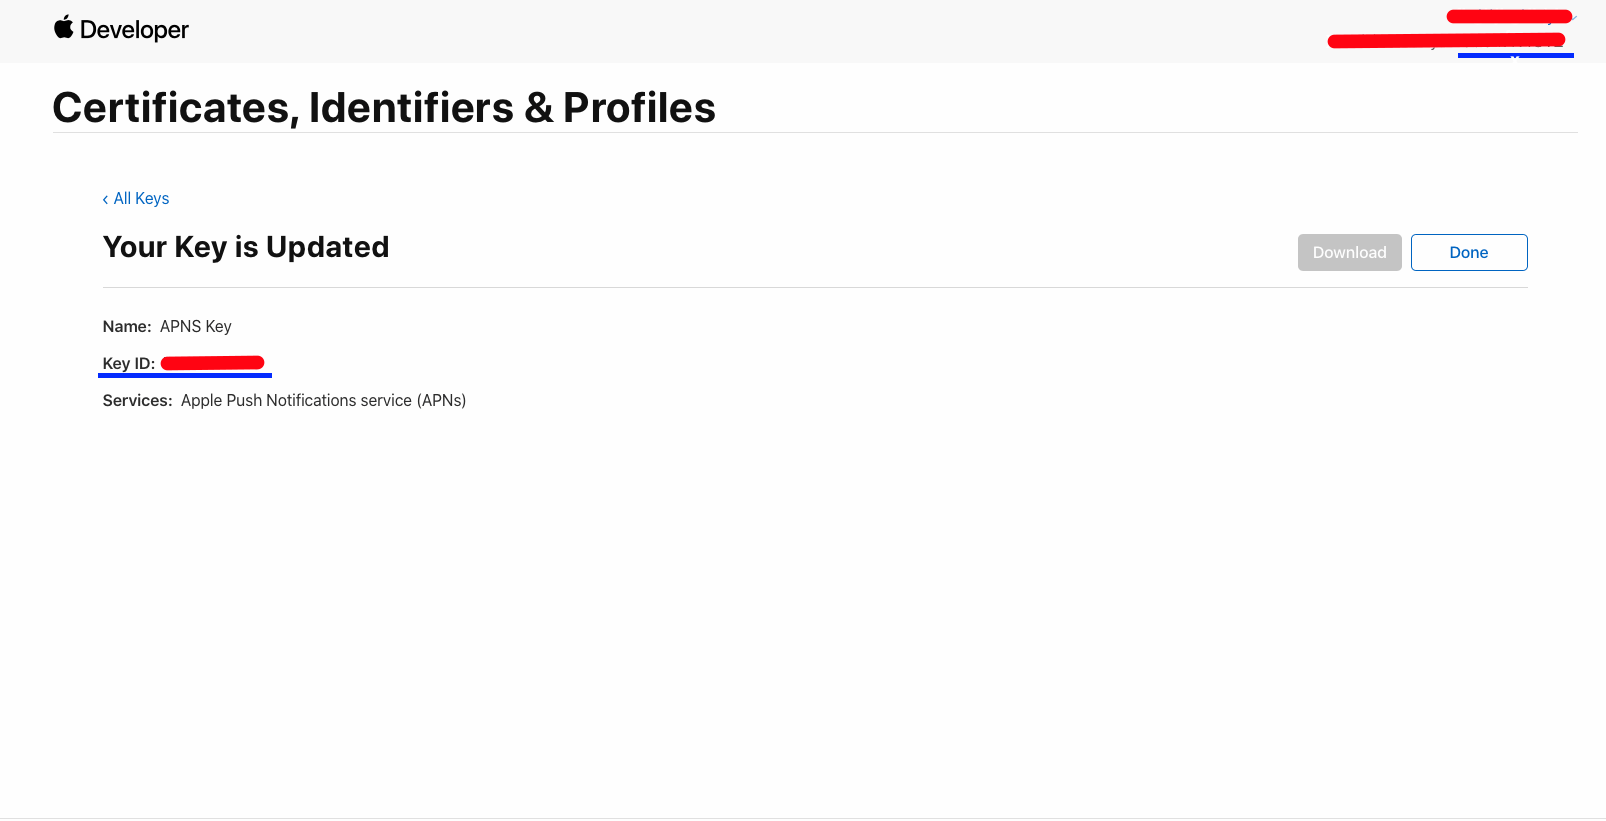
-
Then go to Firebase and add this .p8 file along with Your Key ID and Team ID.
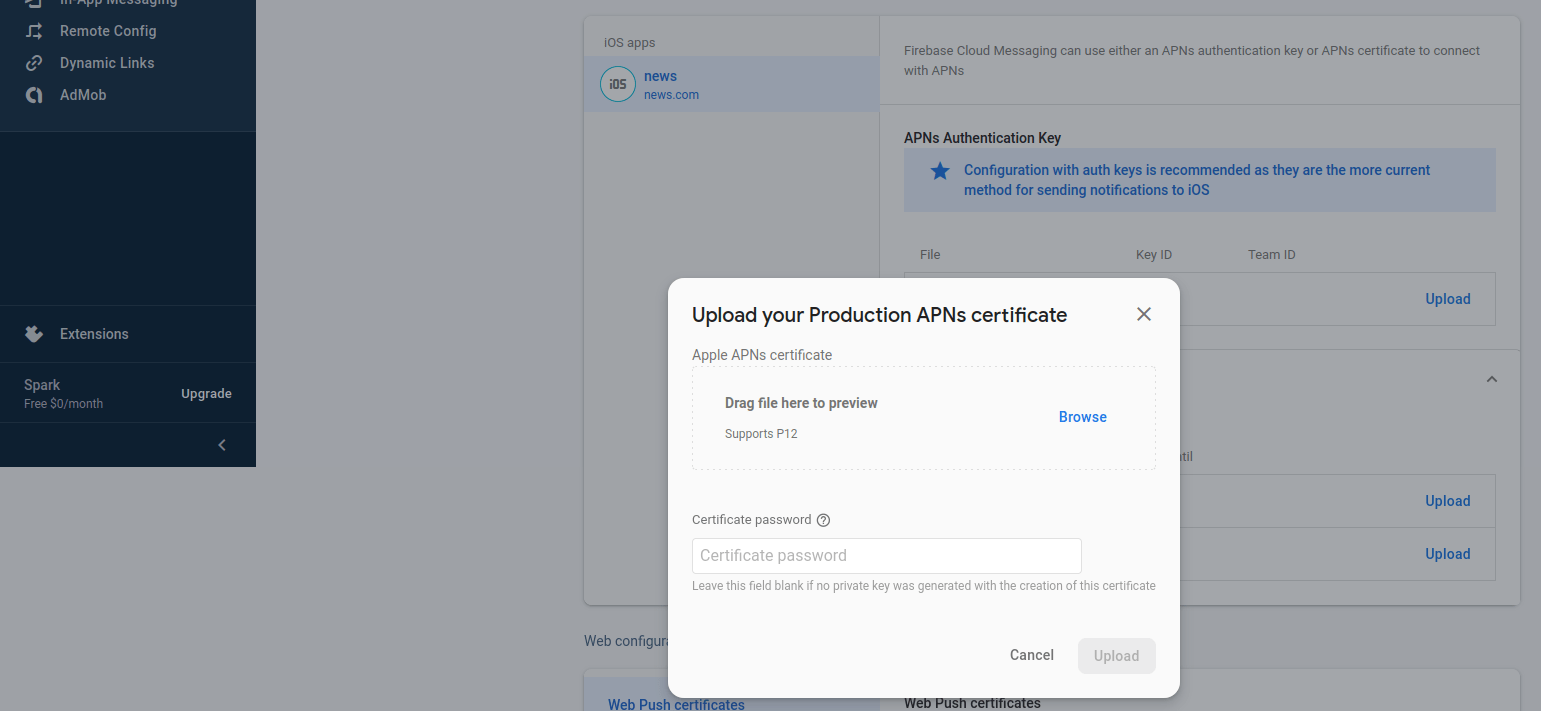
FOR certificate-based (.p12) :
- Log in to the Apple Developer Portal.
- Navigate to Certificates, IDs & Profiles > Identifiers > App IDs and click the App ID associated with your app.
- On the screen for your App ID, check Capabilities > Push Notifications.
- Click Save and respond to the Modify App Capabilities dialog box that appears.
- To create the certificate, we will use to communicate with Apple when sending push notifications:
- In a new browser tab, follow Apple's Create a certificate signing request instructions.
- In the Apple Developer Portal, navigate back to your App ID.
- Click Capabilities > Push Notifications > Configure.
-
Click one of the following buttons:
- Development SSL Certificate > Create Certificate (for testing push notifications while developing an iOS app).
- Production SSL Certificate > Create Certificate (for sending push notifications in production).
- Click Choose File and select the certificate signing request you created above.
- Click Continue.
- Click Download to download the certificate.
- Use this file to export a .p12 file in the next step.
- Navigate in the Apple Developer Portal to Certificates, IDs & Profiles > Provisioning Profiles.
- Click the provisioning profile you'd like to edit.
- Edit the provisioning profile as necessary, and click Save.
- Click Download, and double-click the downloaded provisioning profile to install it.
- Make sure your Xcode project is configured to use the provisioning profile as necessary.Next, export the downloaded certificate (.cer file) as a .p12 file that can be uploaded to firebase:
- On your Mac, double-click the .cer file to open it in Keychain Access.
- In Keychain Access, in the lower-left corner, select Category > Certificates.
- Select the certificate to export.
- Choose File > Export Items.
- Enter a name in the Save As field.
- Accept the default .p12 file format and click Save. Respond to the prompts, and enter a password for the file if necessary.
-
Keep track of this file, since you'll upload it to firebase in a later step.

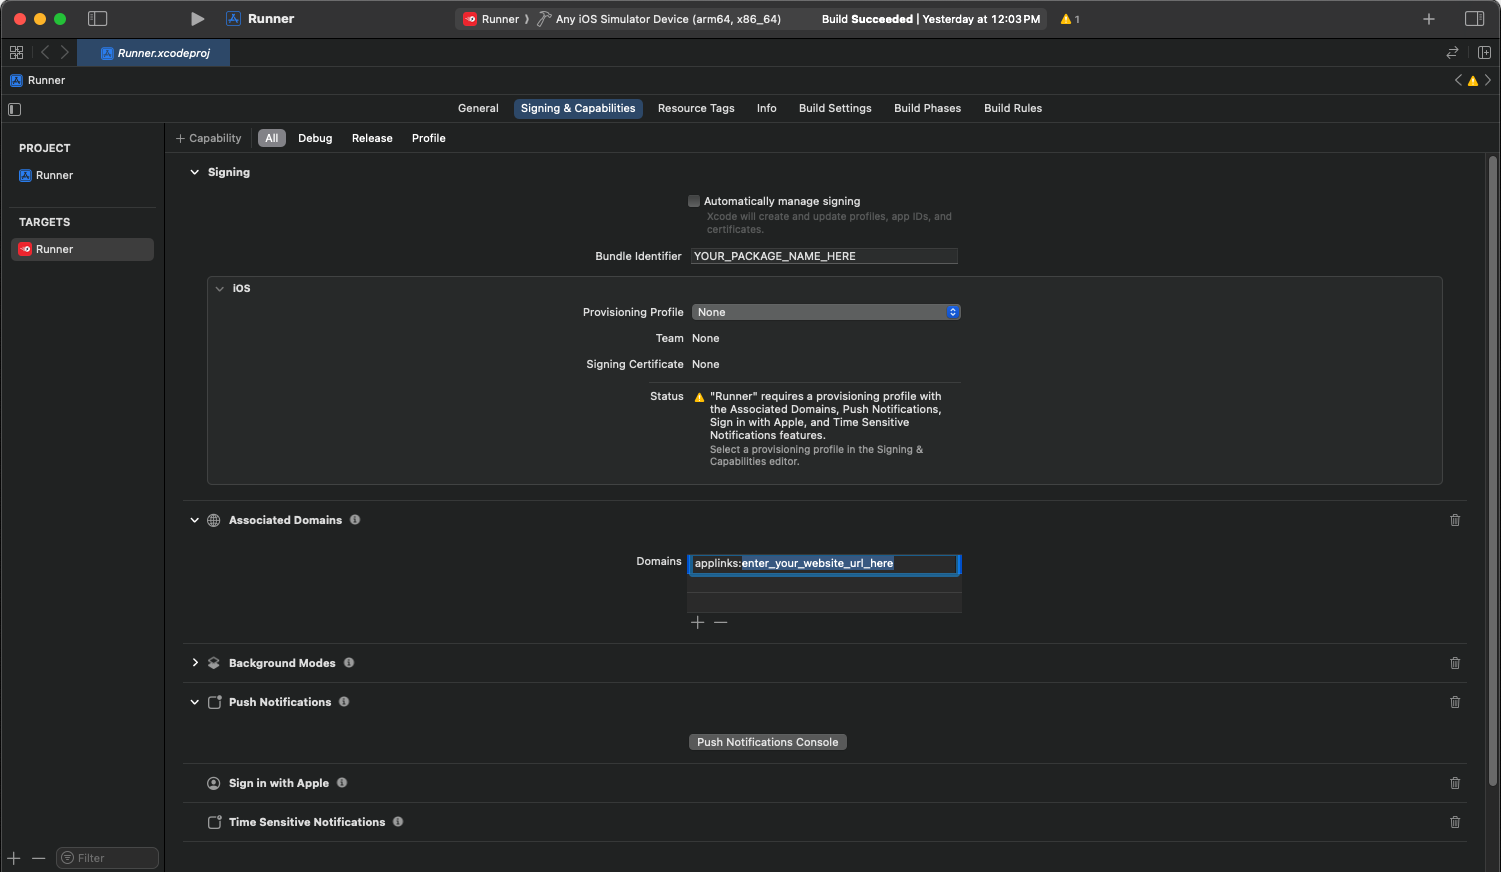
How to set Deep Link to Share news ?
- Go to lib > utils > Constant.dart file & Add your host url here [Without http ot https]
- Go to android > app > src > main > AndroidManifest.xml file & add your host url here [Without http ot https]
- Alternatively you may search for enter_your_website_url_here and
replace
with your host
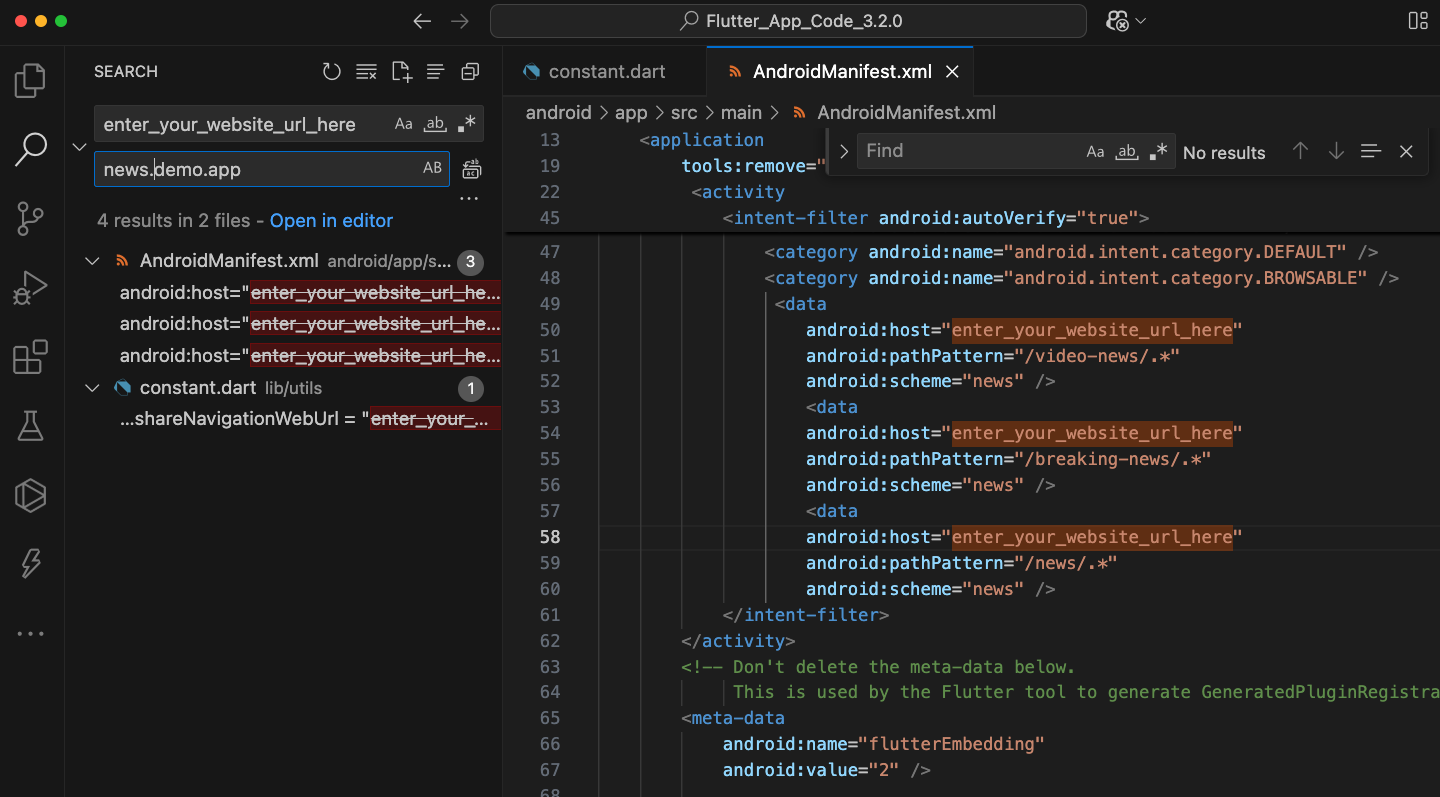
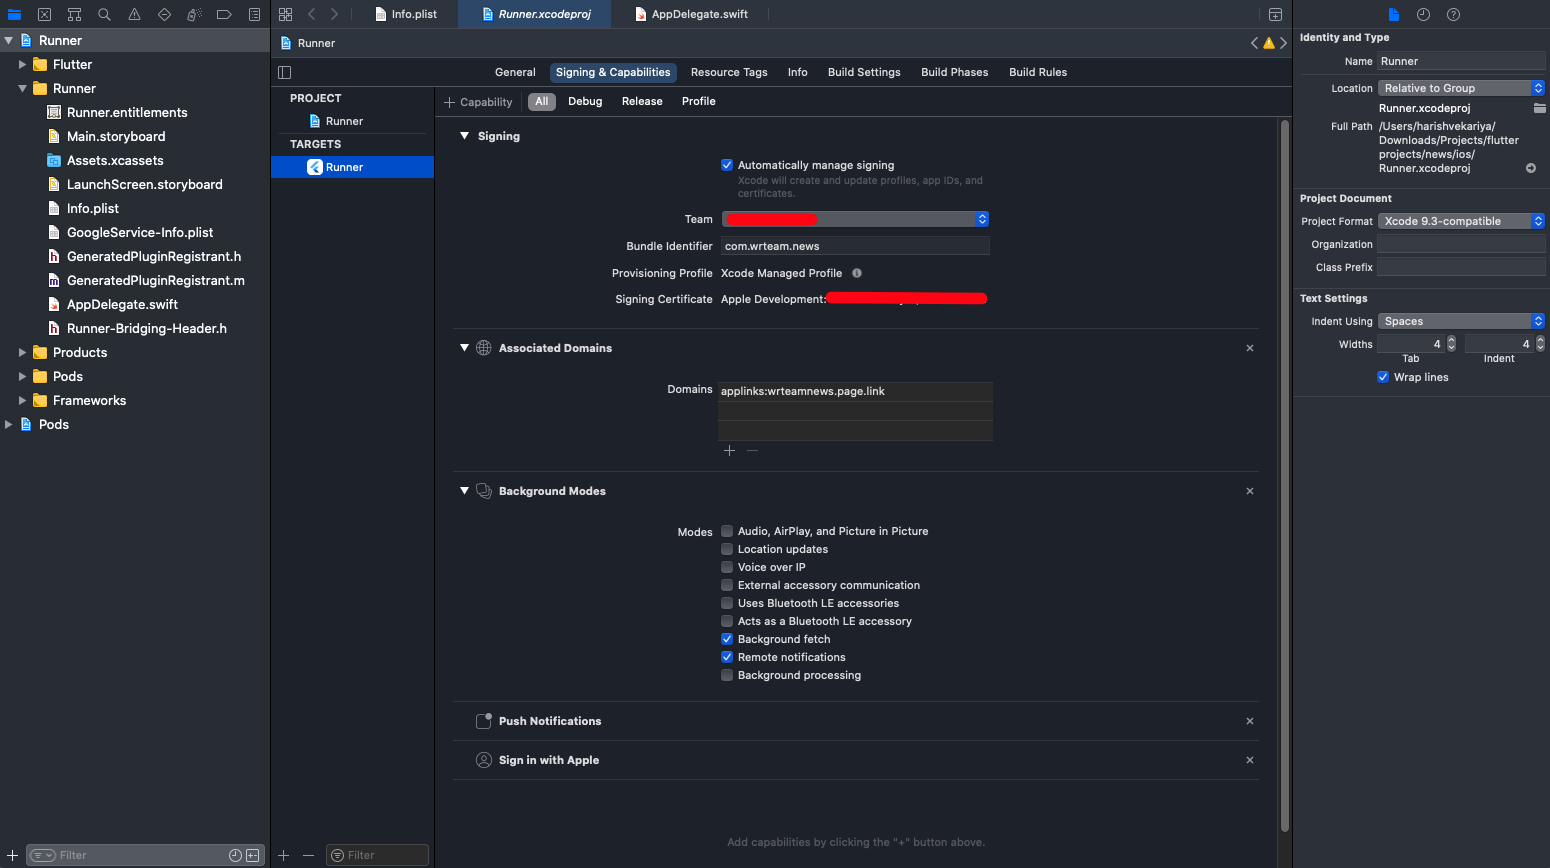
- Same way Set Associated domain in Signing & Capabilities section of Xcode
project for iOS
- Download this google files from the link : Server Side Deeplink Files
- Open both files in the any text editor and follow instructions given here.
For Android
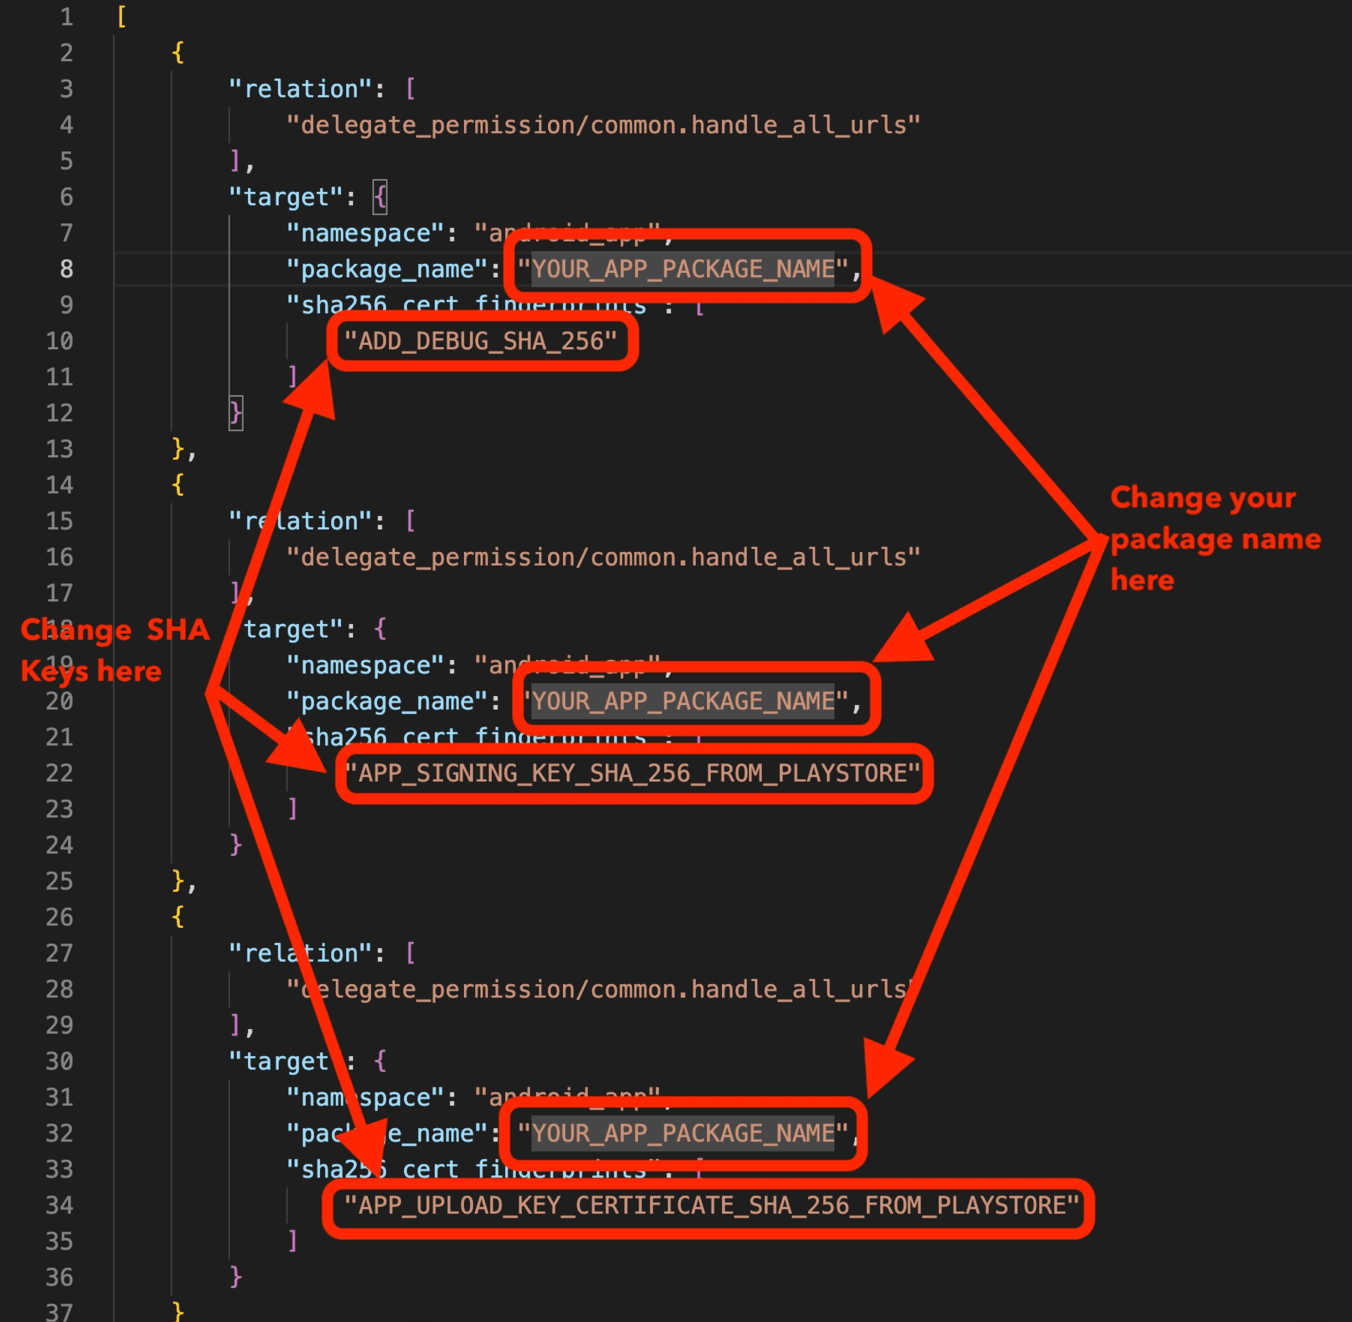 For iOS
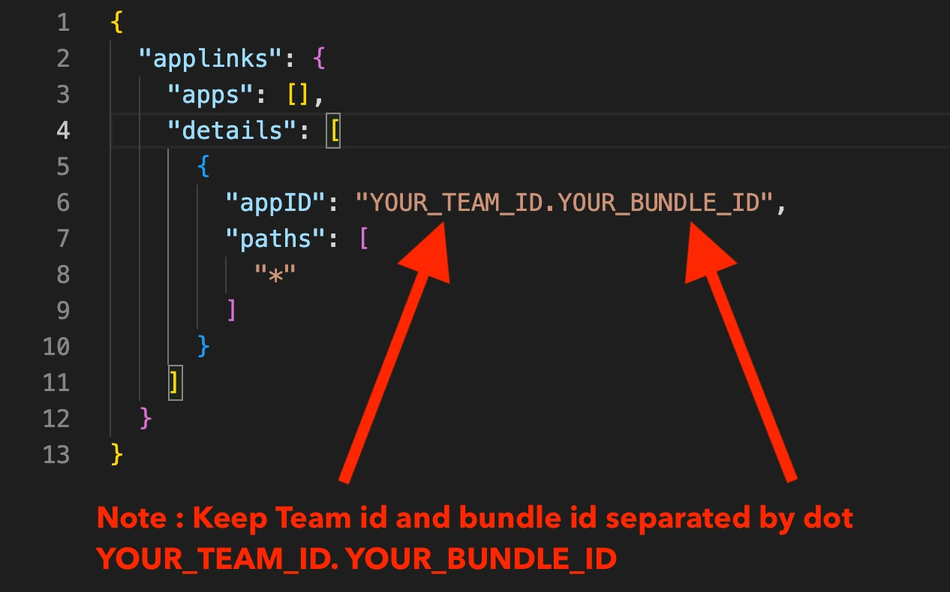
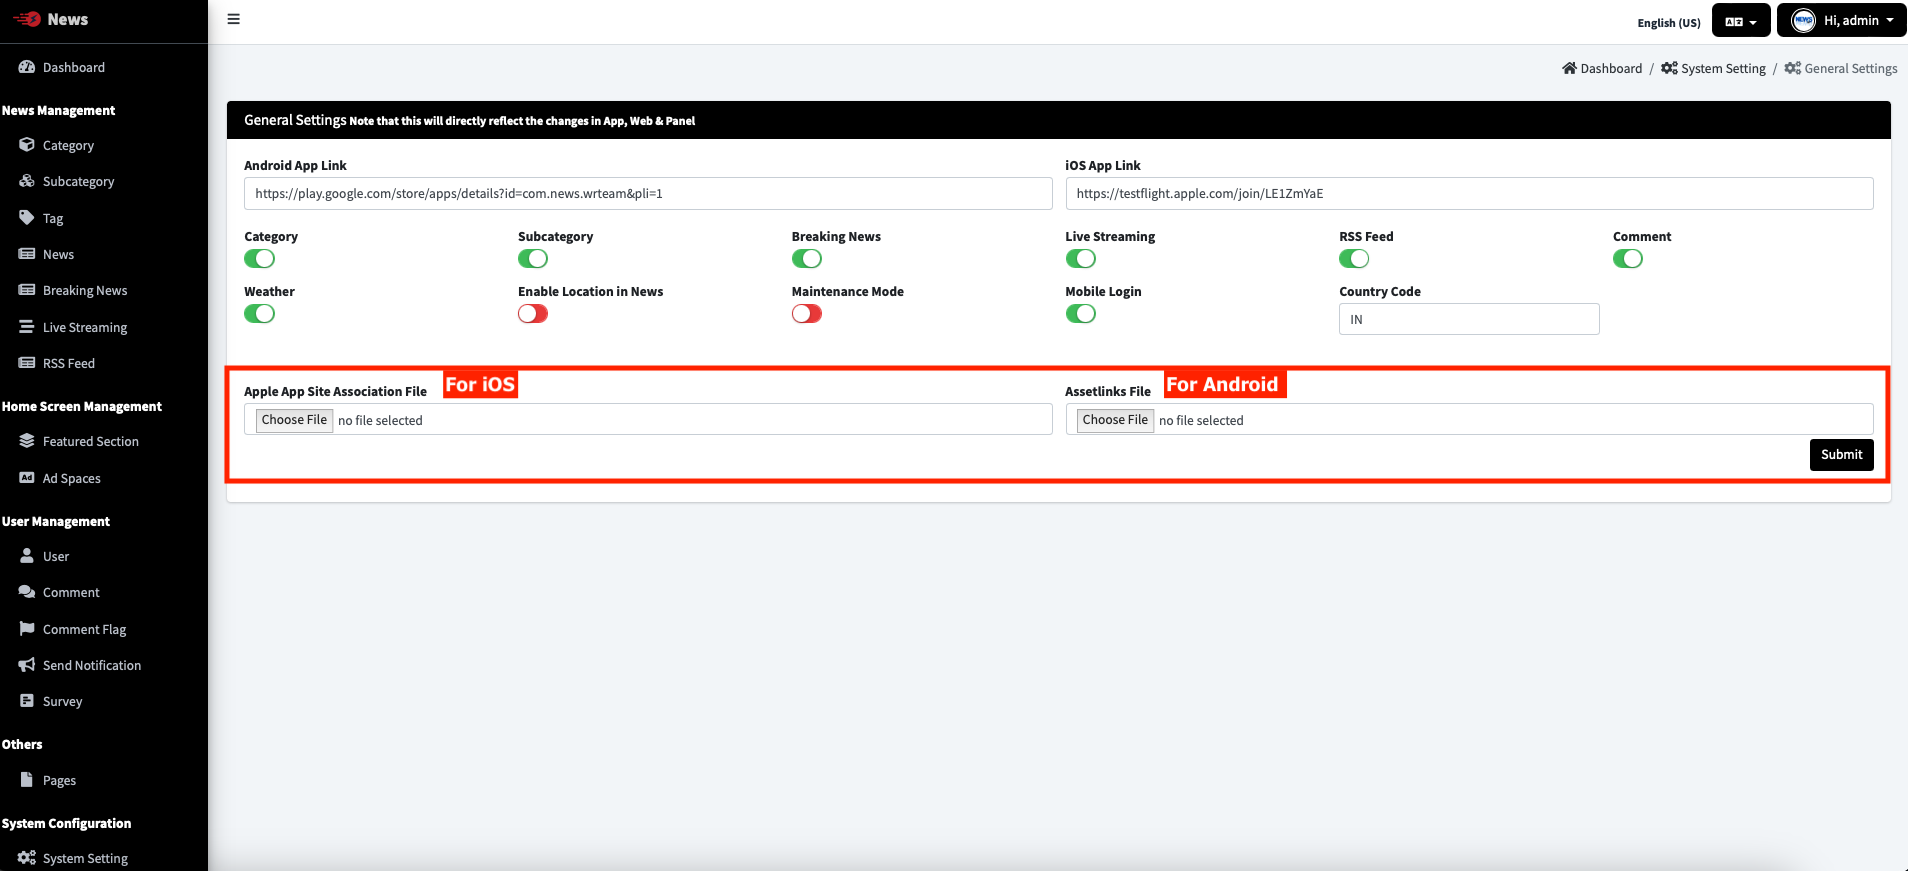
- Now Save & Upload both files at Admin panel > System Setting > General Settings
& Submit.
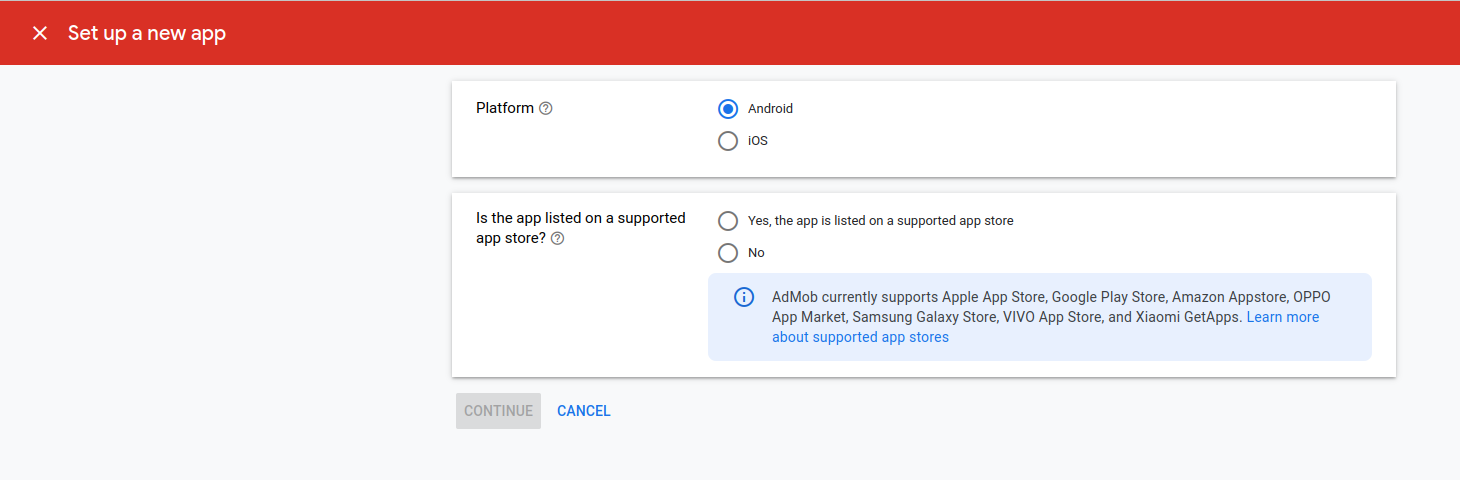
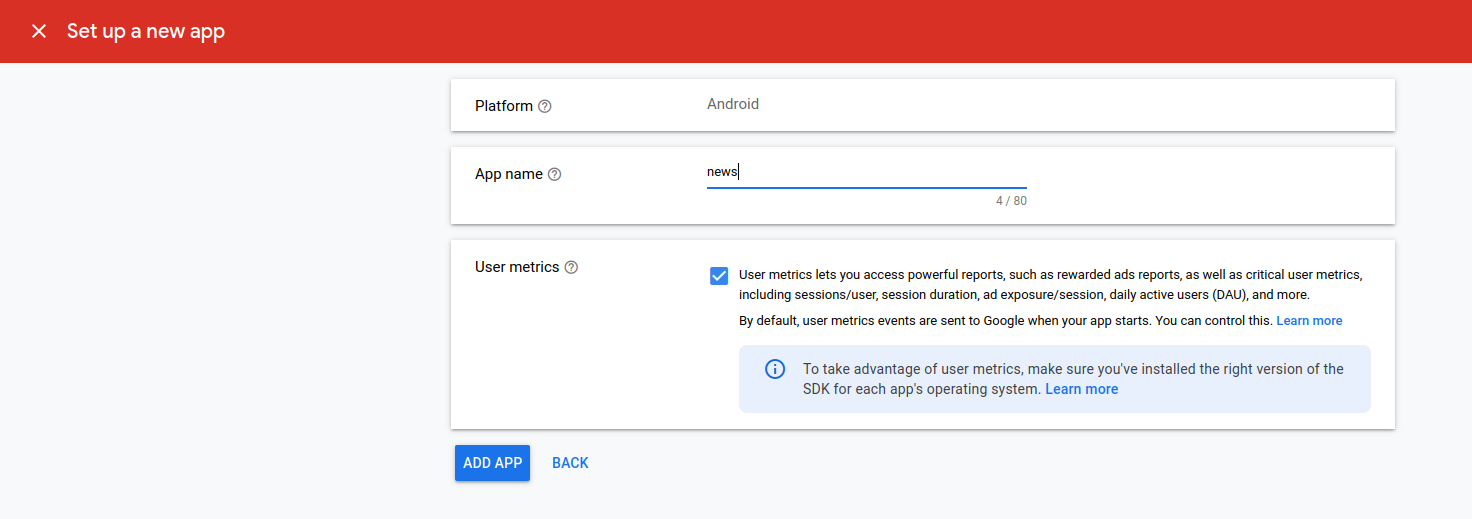
Set up admob in App
-
In the Admob console,
click add android app from the Apps menu.
-
Enter your app name and Enabling user metrics is not necessary to complete this
codelab. However, we recommend that you do because it allows you to understand
user behavior in more detail and click on ADD APP button.
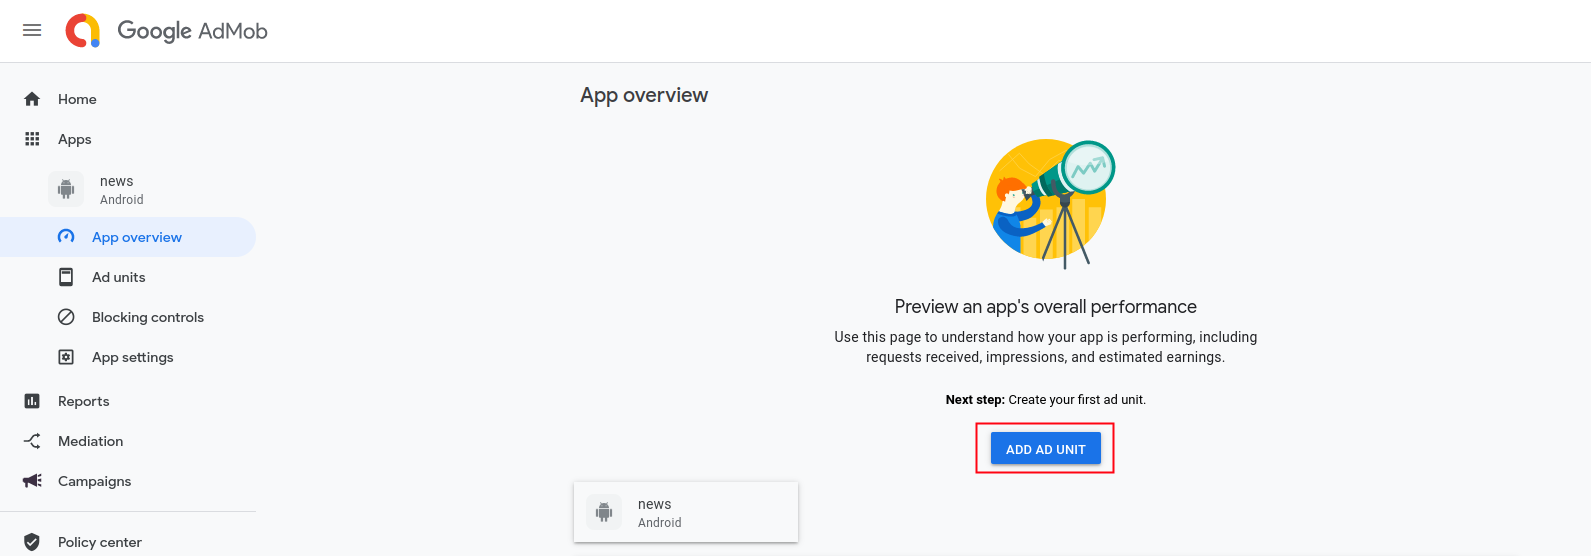
-
Create ad units.
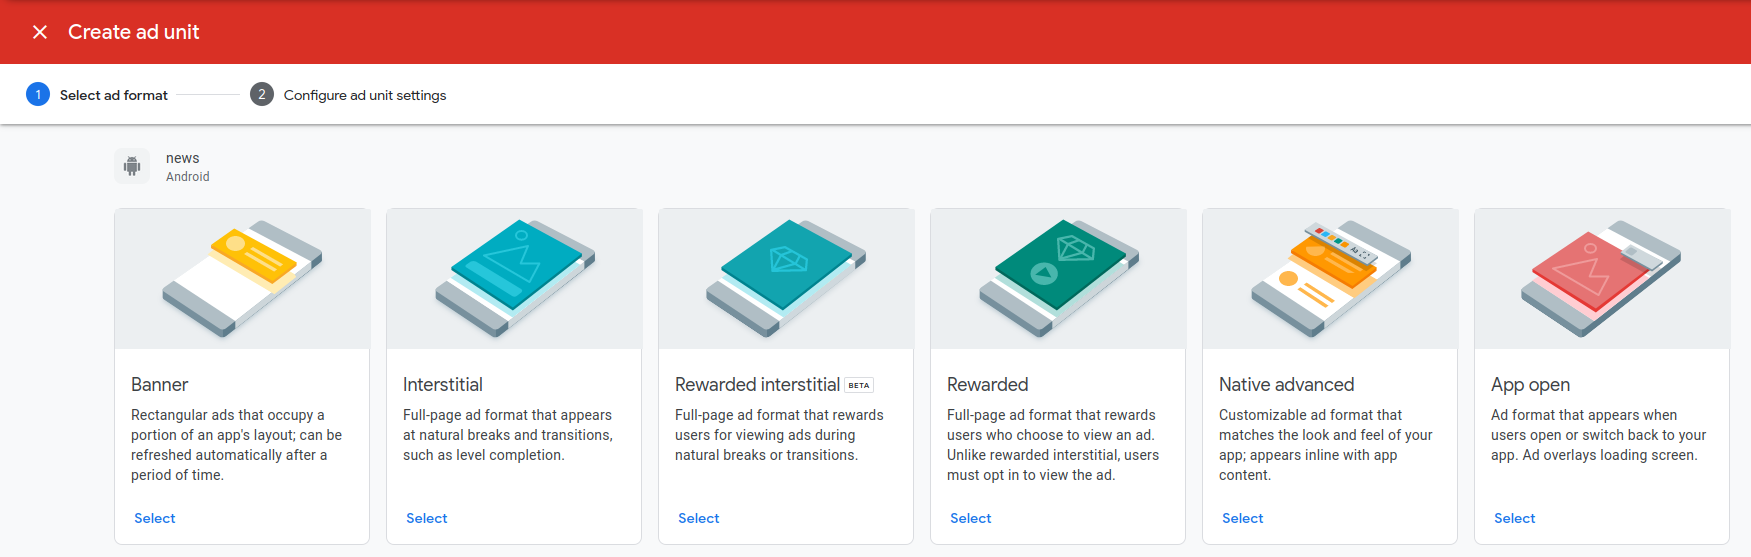
-
Select Banner unit ad and enter banner unit ad name then click on Create ad Unit
button.
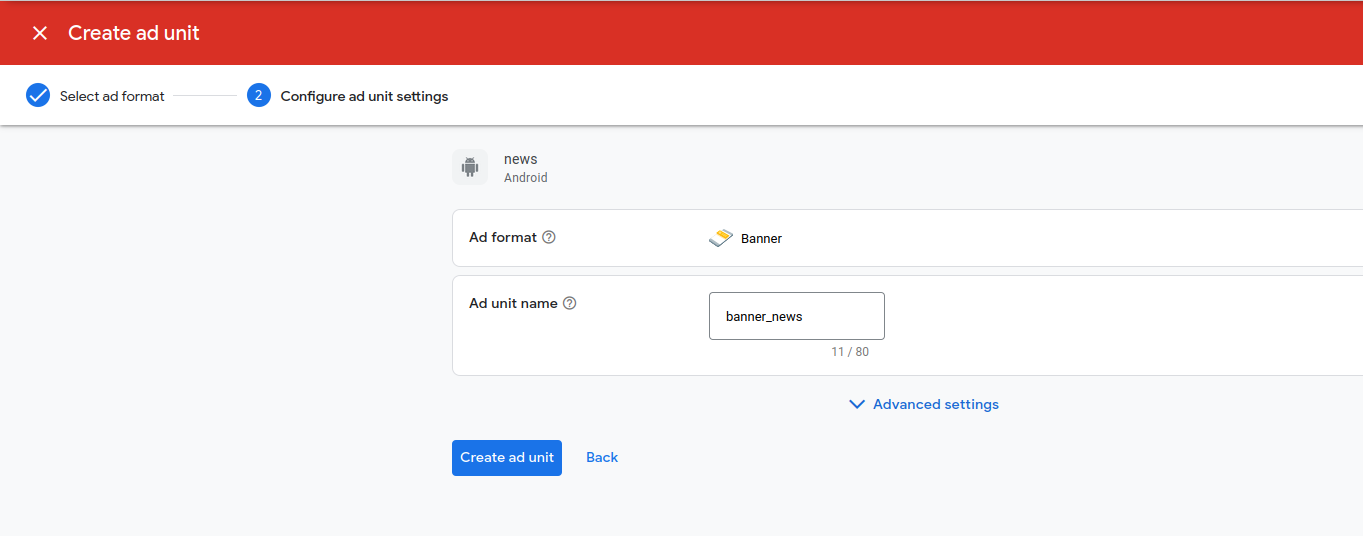
-
Then add another unit add shown in below image and Same as above create
Interstitial ads and native ads.
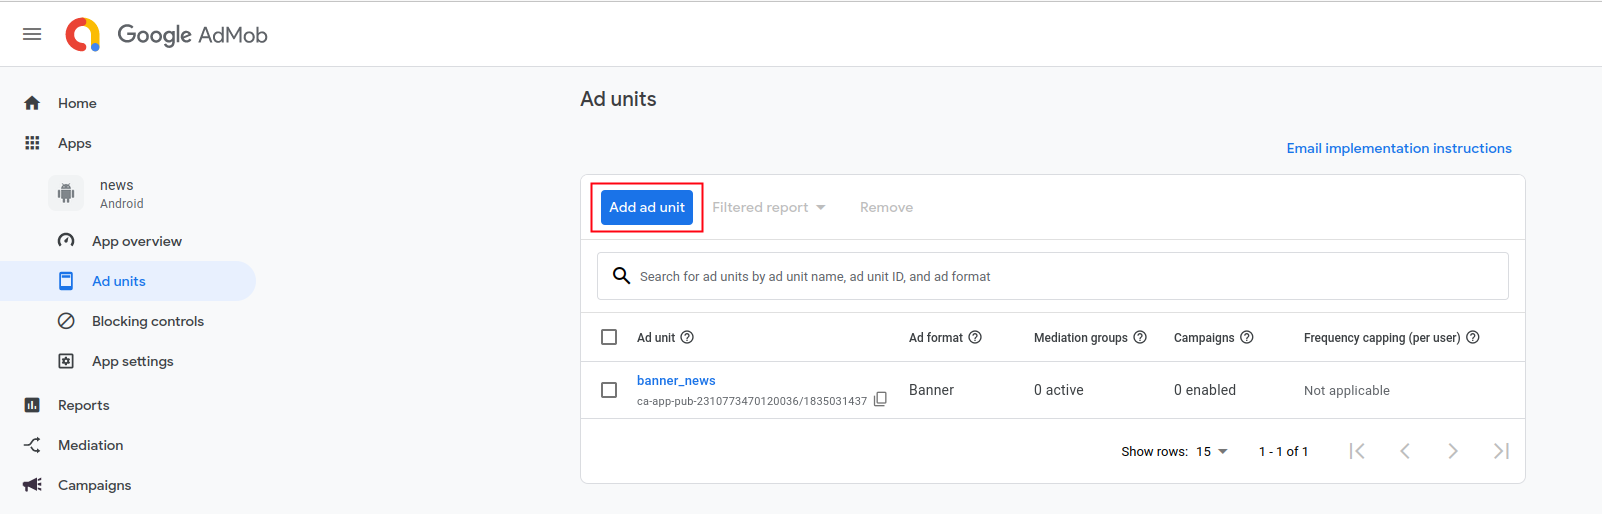
- Also add Google Admob ads appId as a value for android:name="com.google.android.gms.ads.APPLICATION_ID" in android/app/src/main/AndroidManifest.xml file.
- Add iOS App and add units in iOS app in same way.
- Also add Google Admob ads appId as a value for GADApplicationIdentifier in ios/Runner/info.plist File.
-
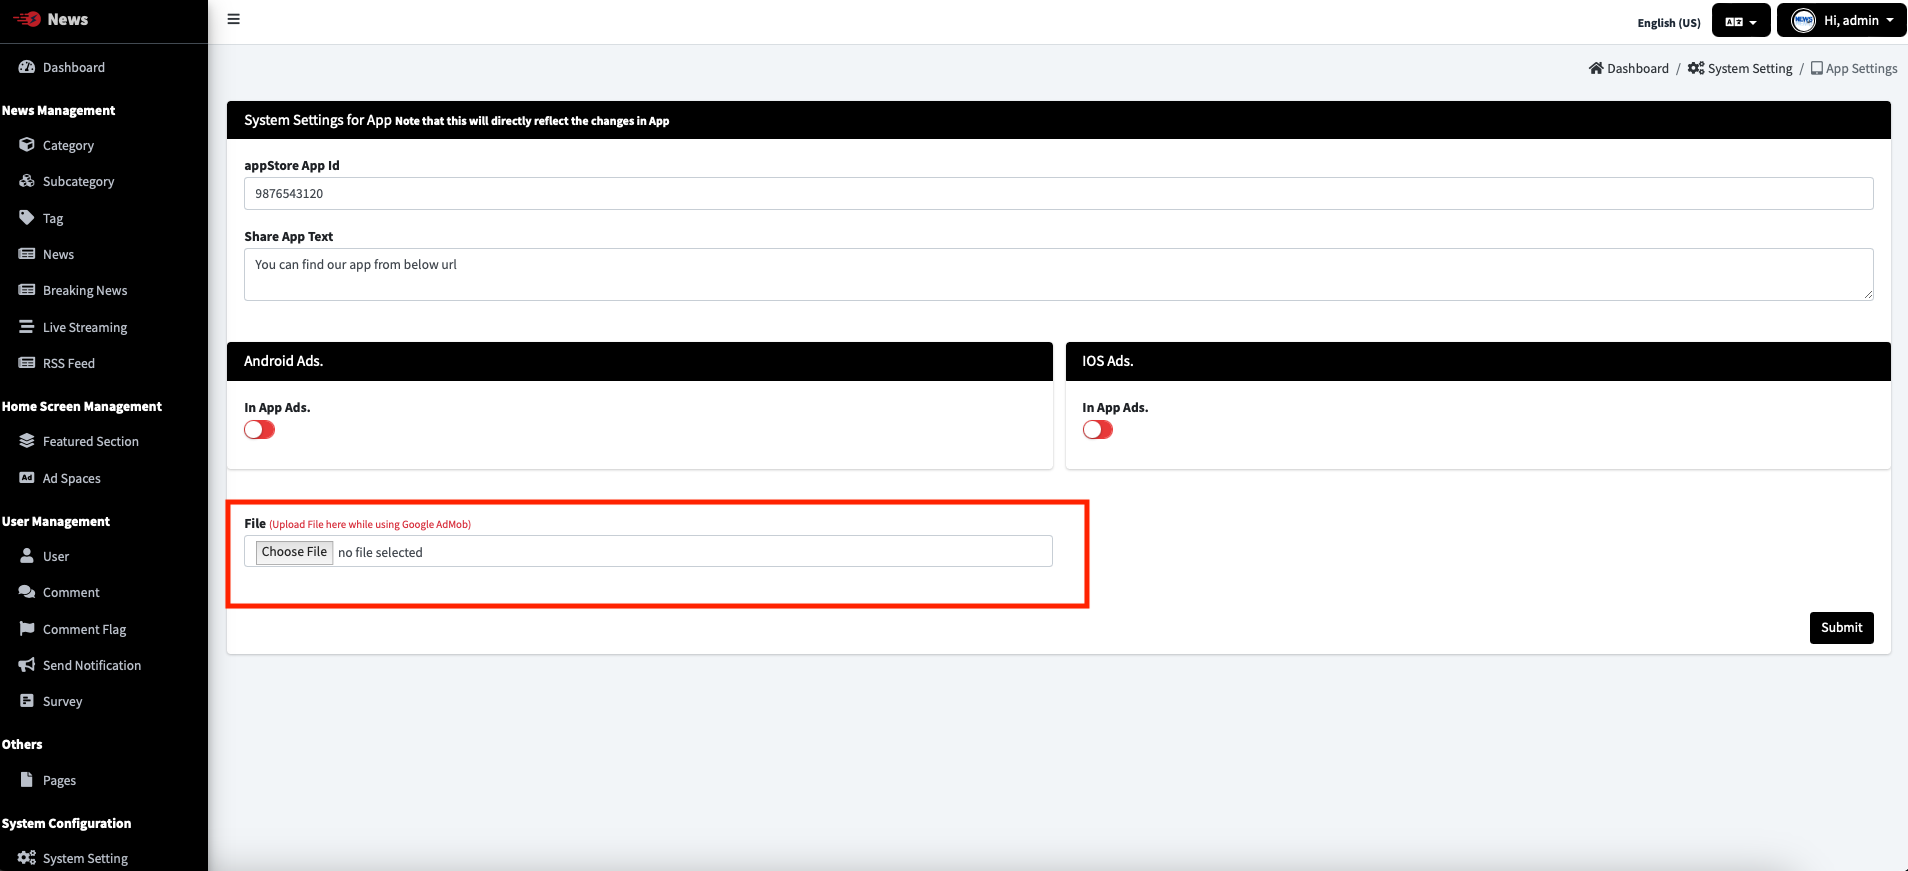
Add your ad unit id in admin panel Settings -> System Settings > App Settings.
- Now Follow this instructions from Admob, &
for mentioned step 3 there Domain Verification , Submit file at Admin
panel > System
Setting > General Settings
& Submit.
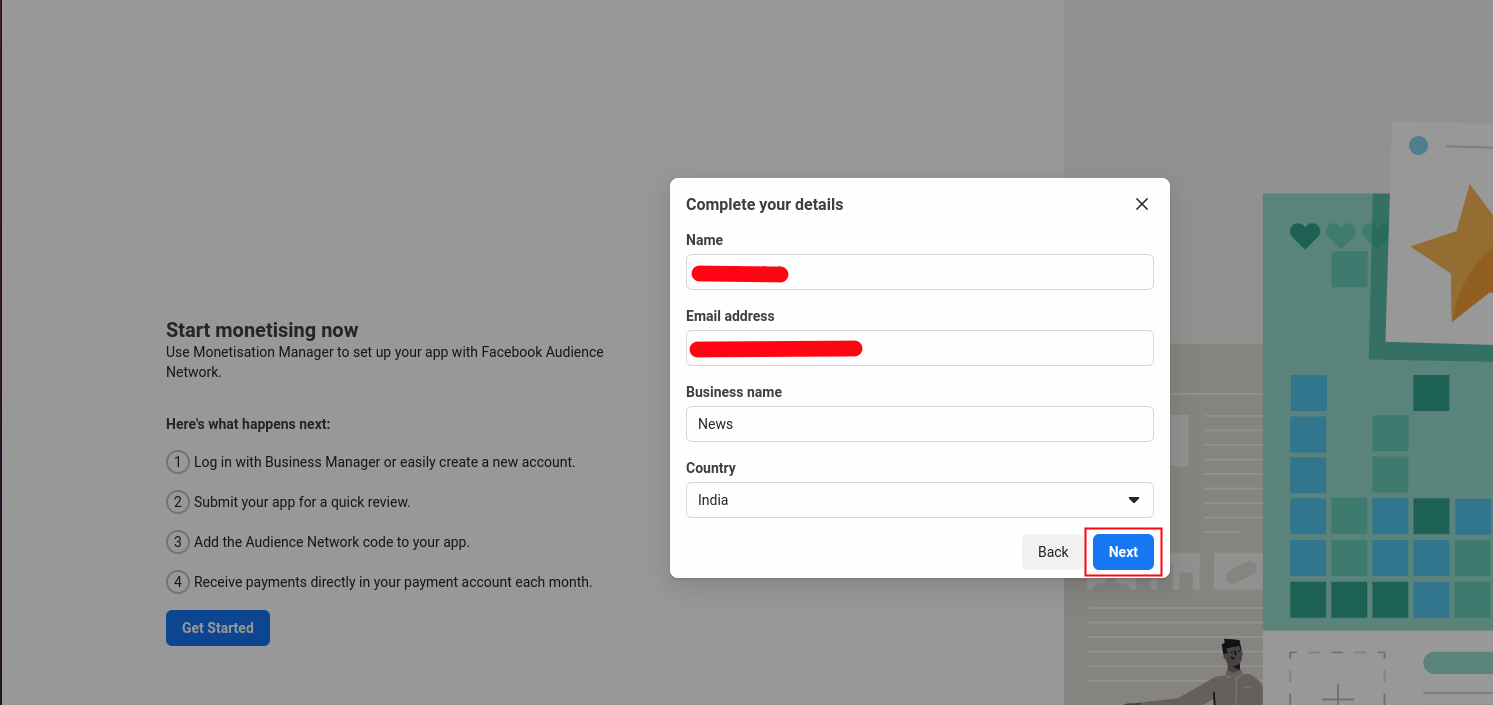
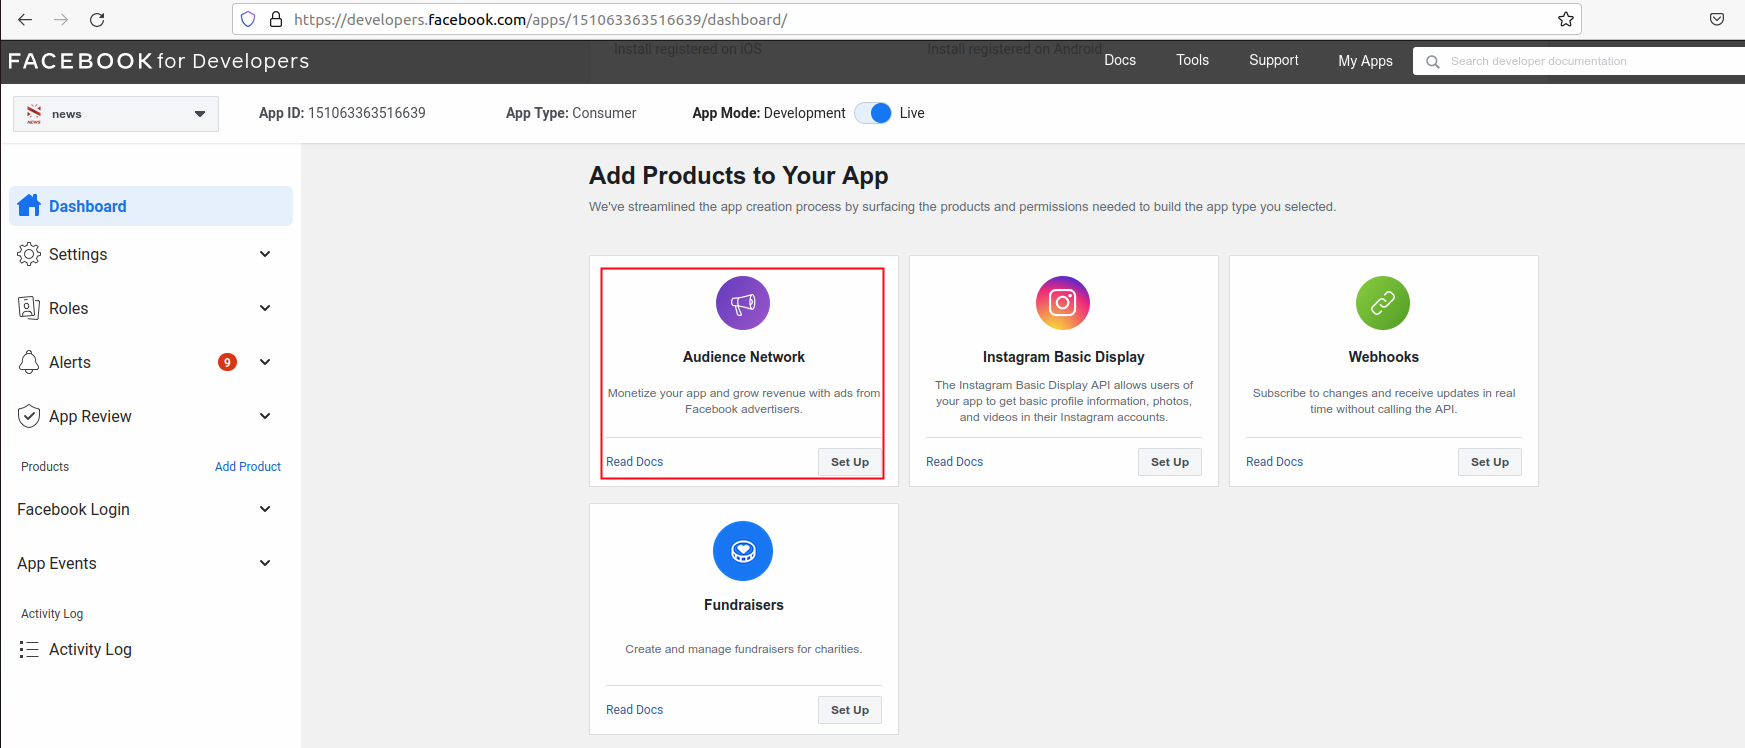
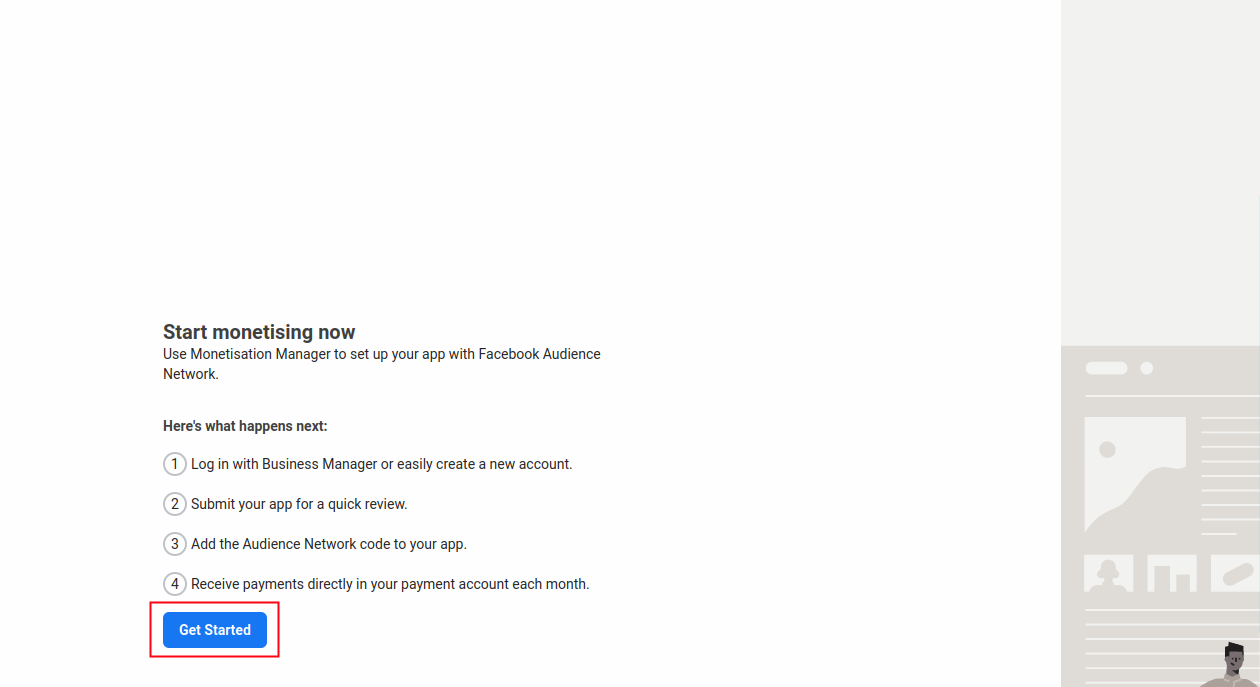
Set up Facebook Ads in App
- Go to Facebook for Developers.
-
Follow below next step and add name, email address, business name and country
and click on next button.
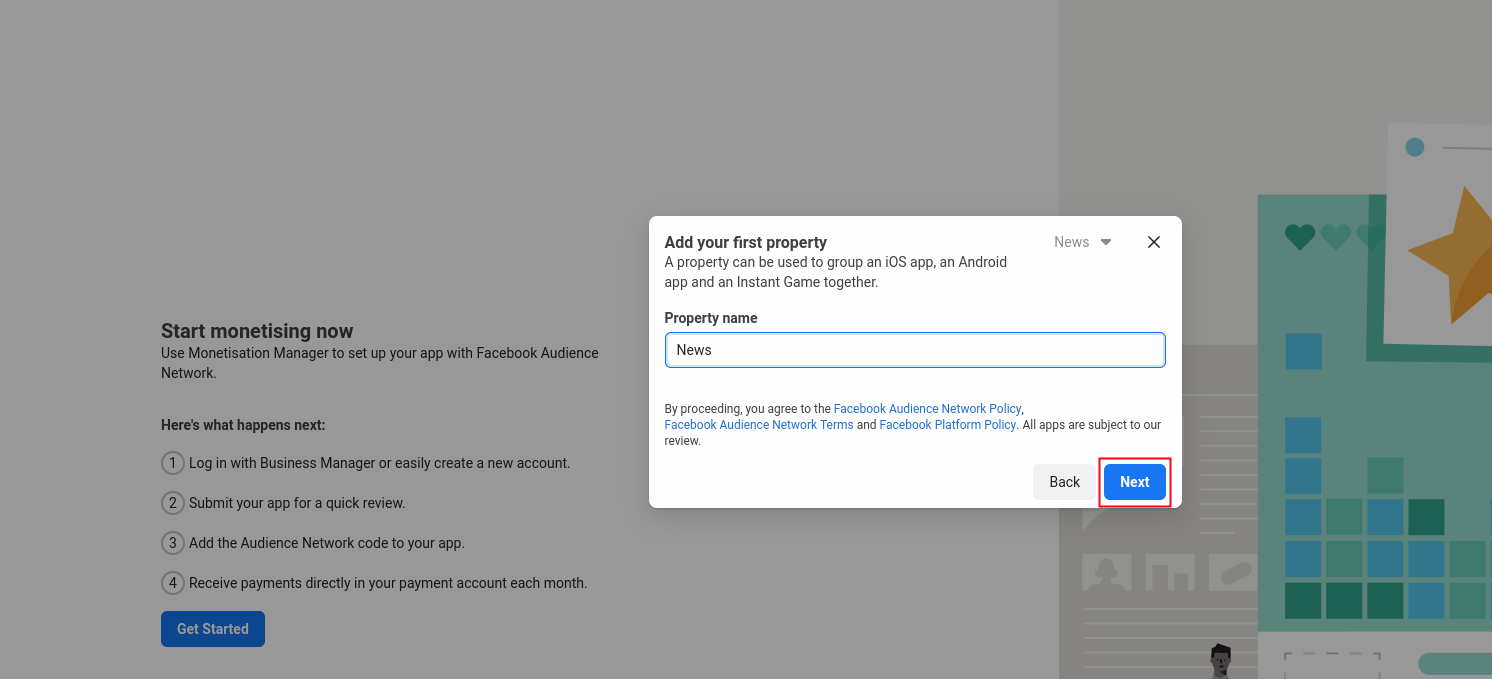
-
Add Property name like below image and click on next button.
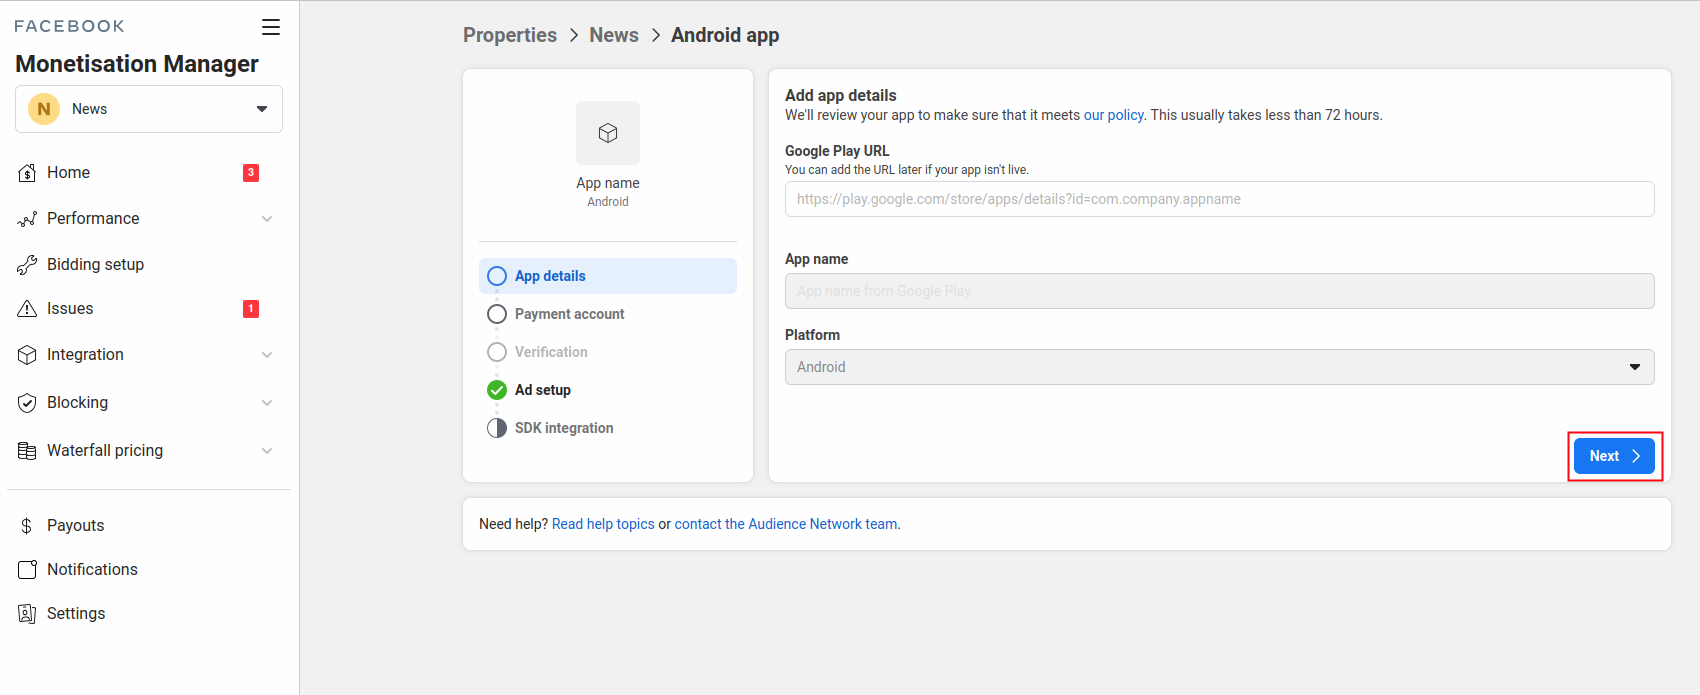
-
Fill Android App details and click on next button shown in below image.
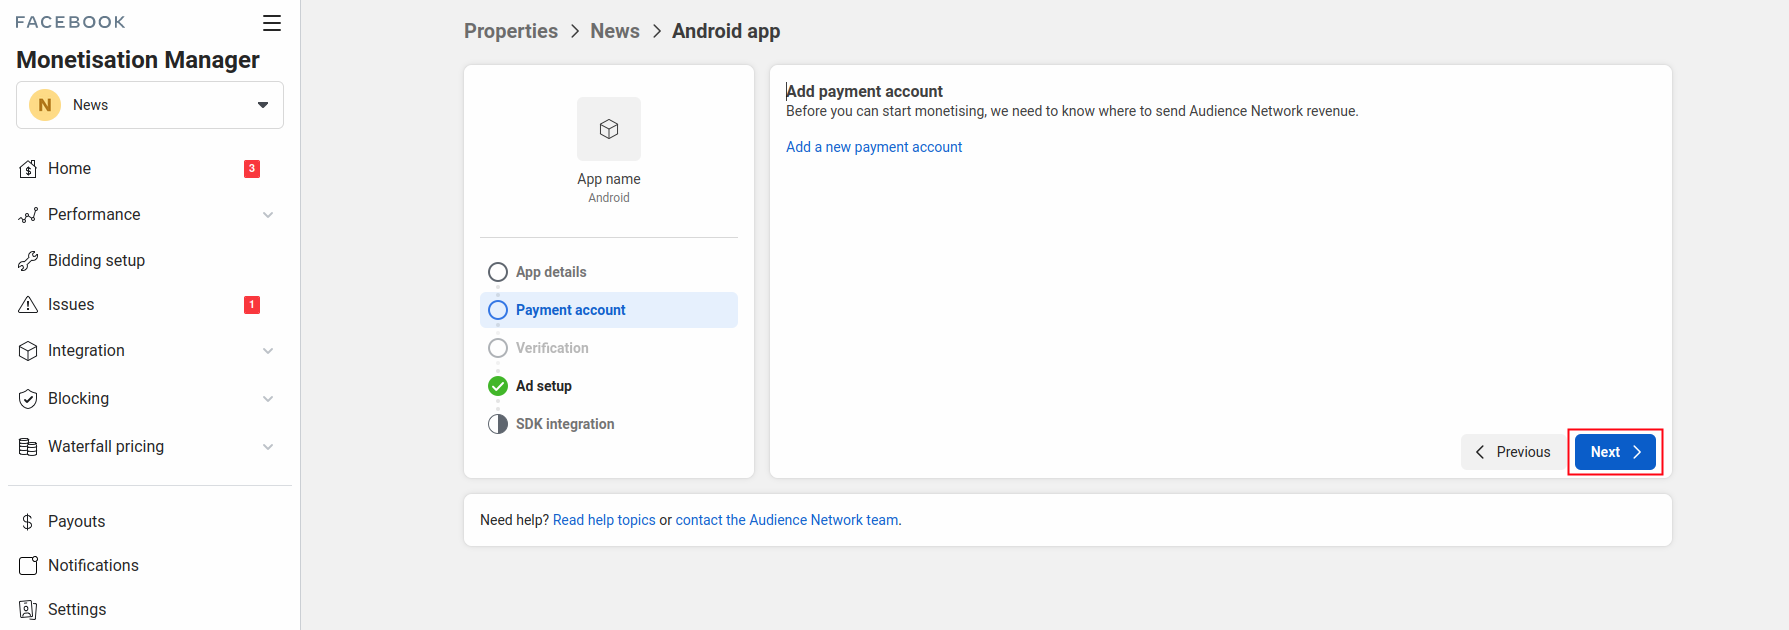
-
Add your payment account details for facebook live ads shown in App.
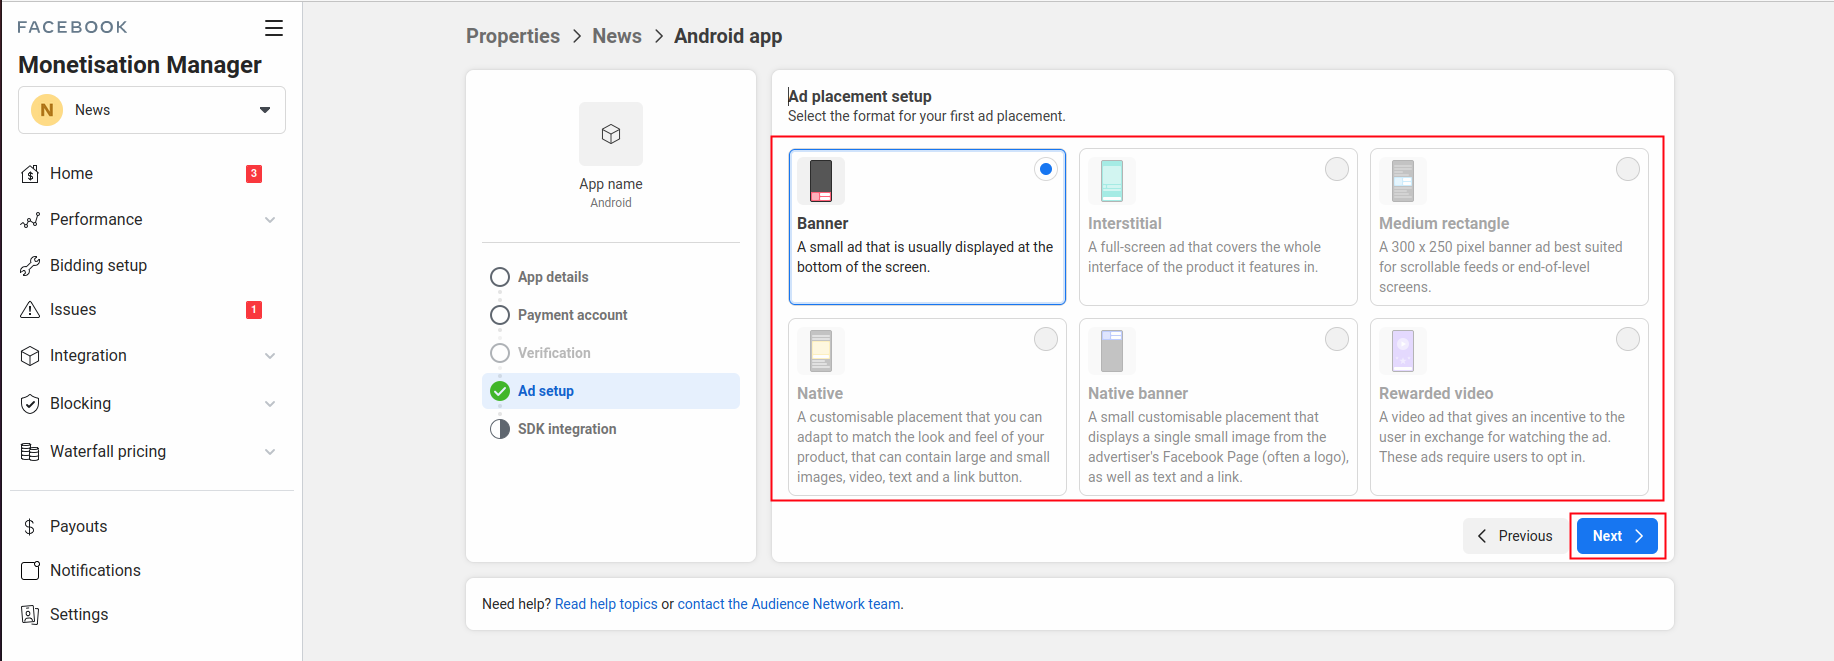
-
After that add banner,interstitial,native ads shown in below image.
- Same as Add iOS app and same as add ads in iOS app.
-
Copy your all ads and paste in admin panel in
settings in system configuration in System Settings > Android
Facebook Ads and IOS Facebook Ads.

- Note: Remove following mentioned line from Code When you are going to upload
your app to Play Store or AppStore.
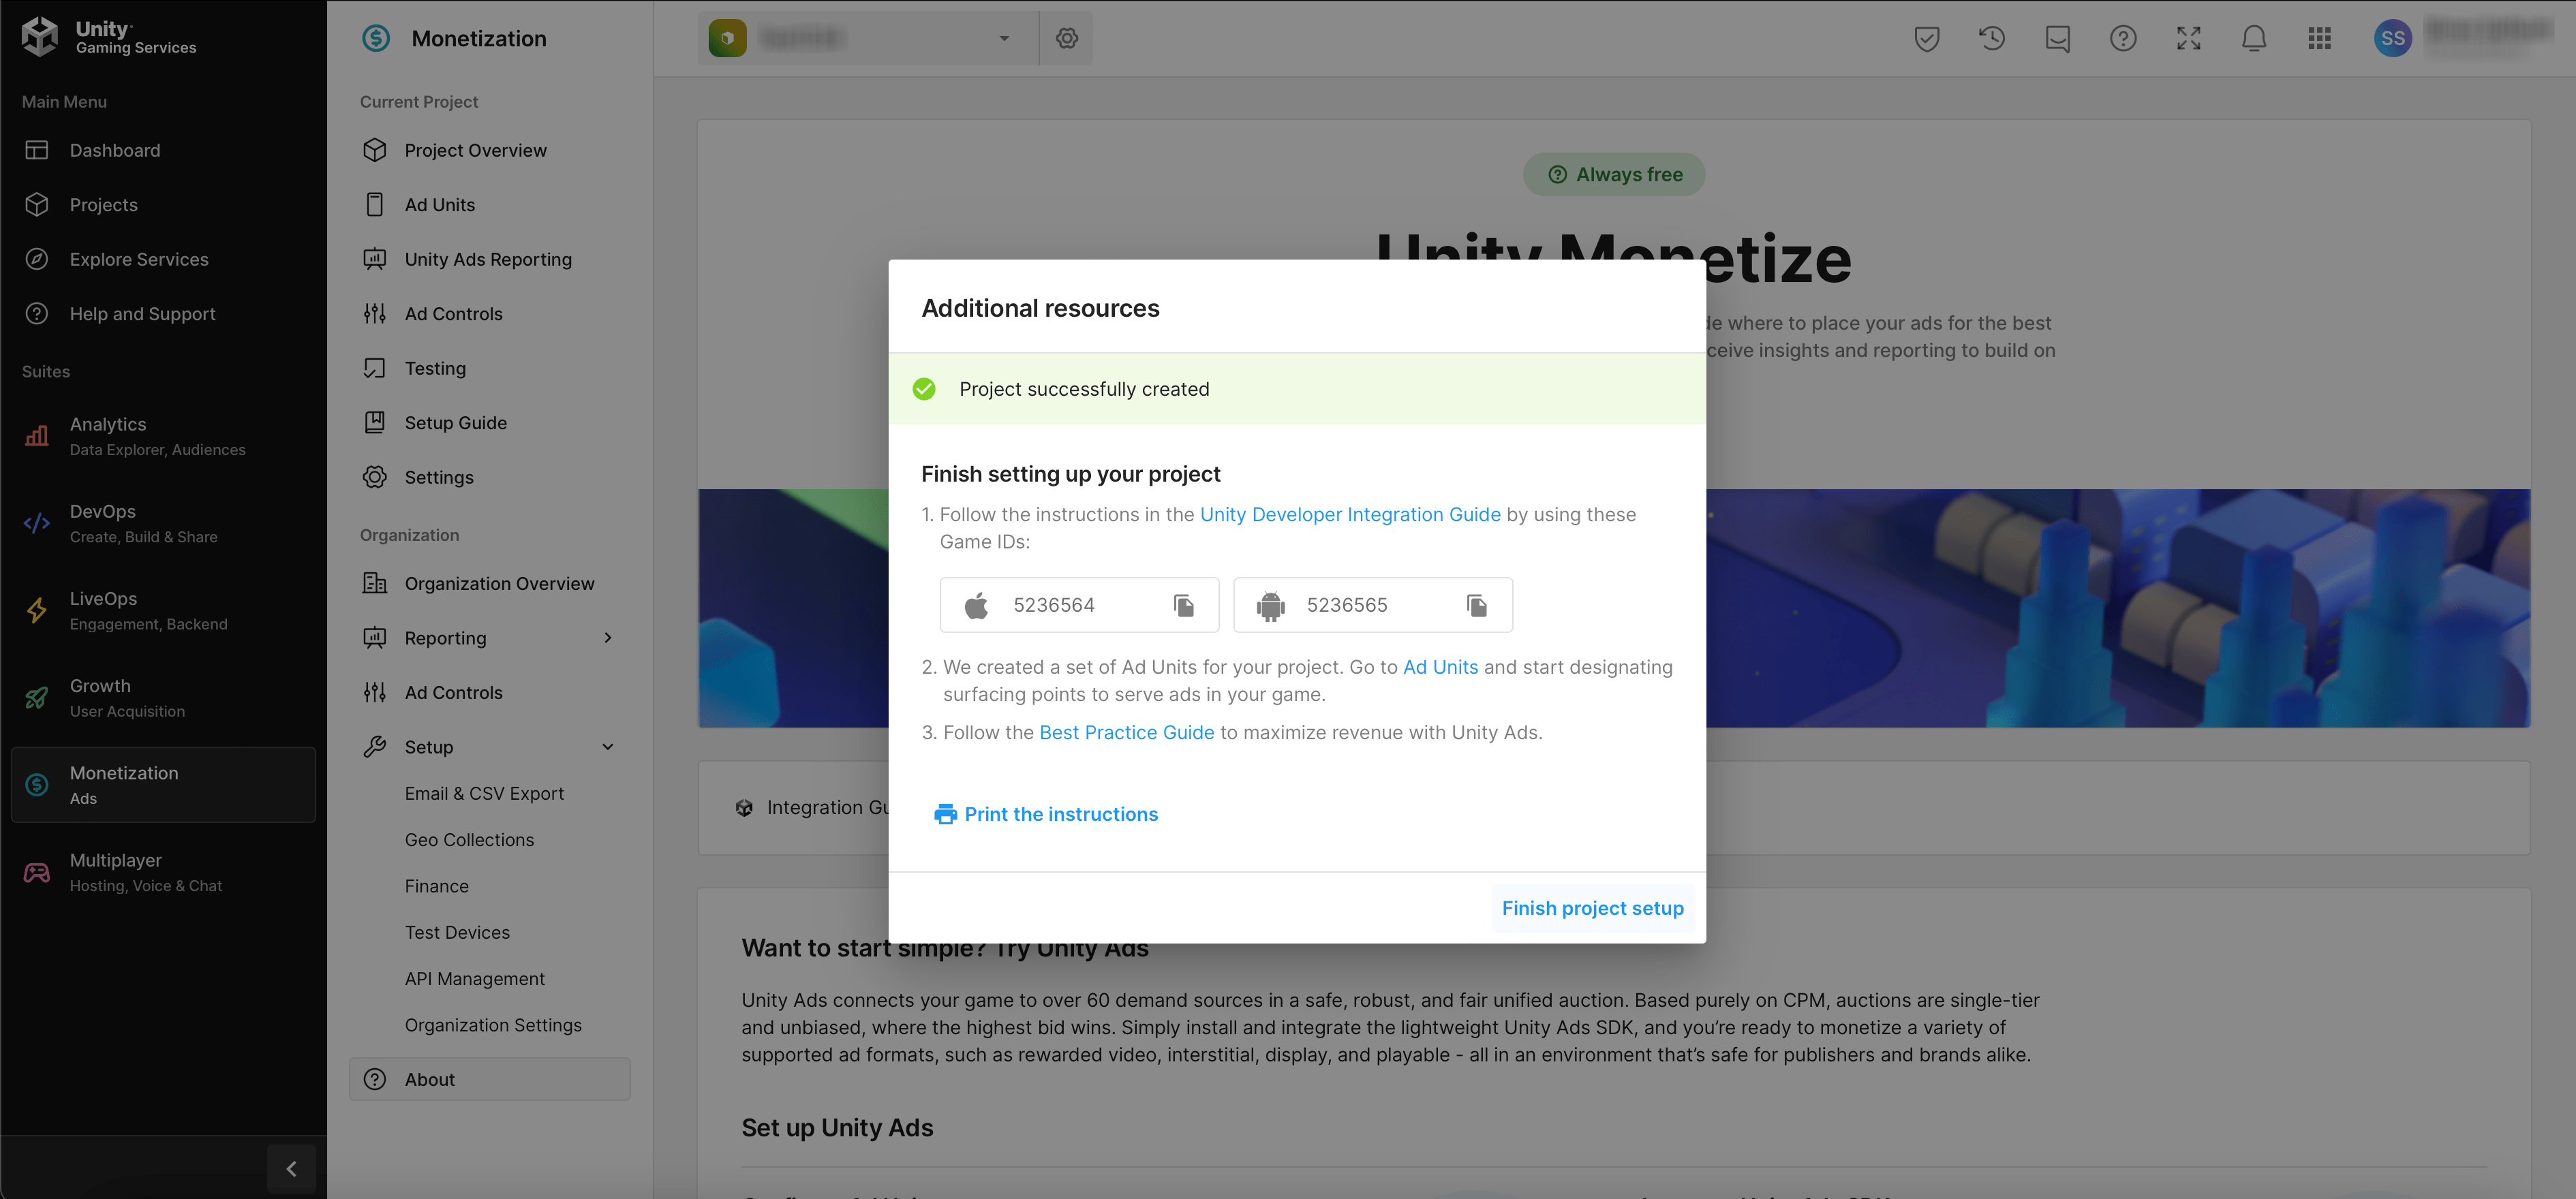
Set up Unity Ads in App
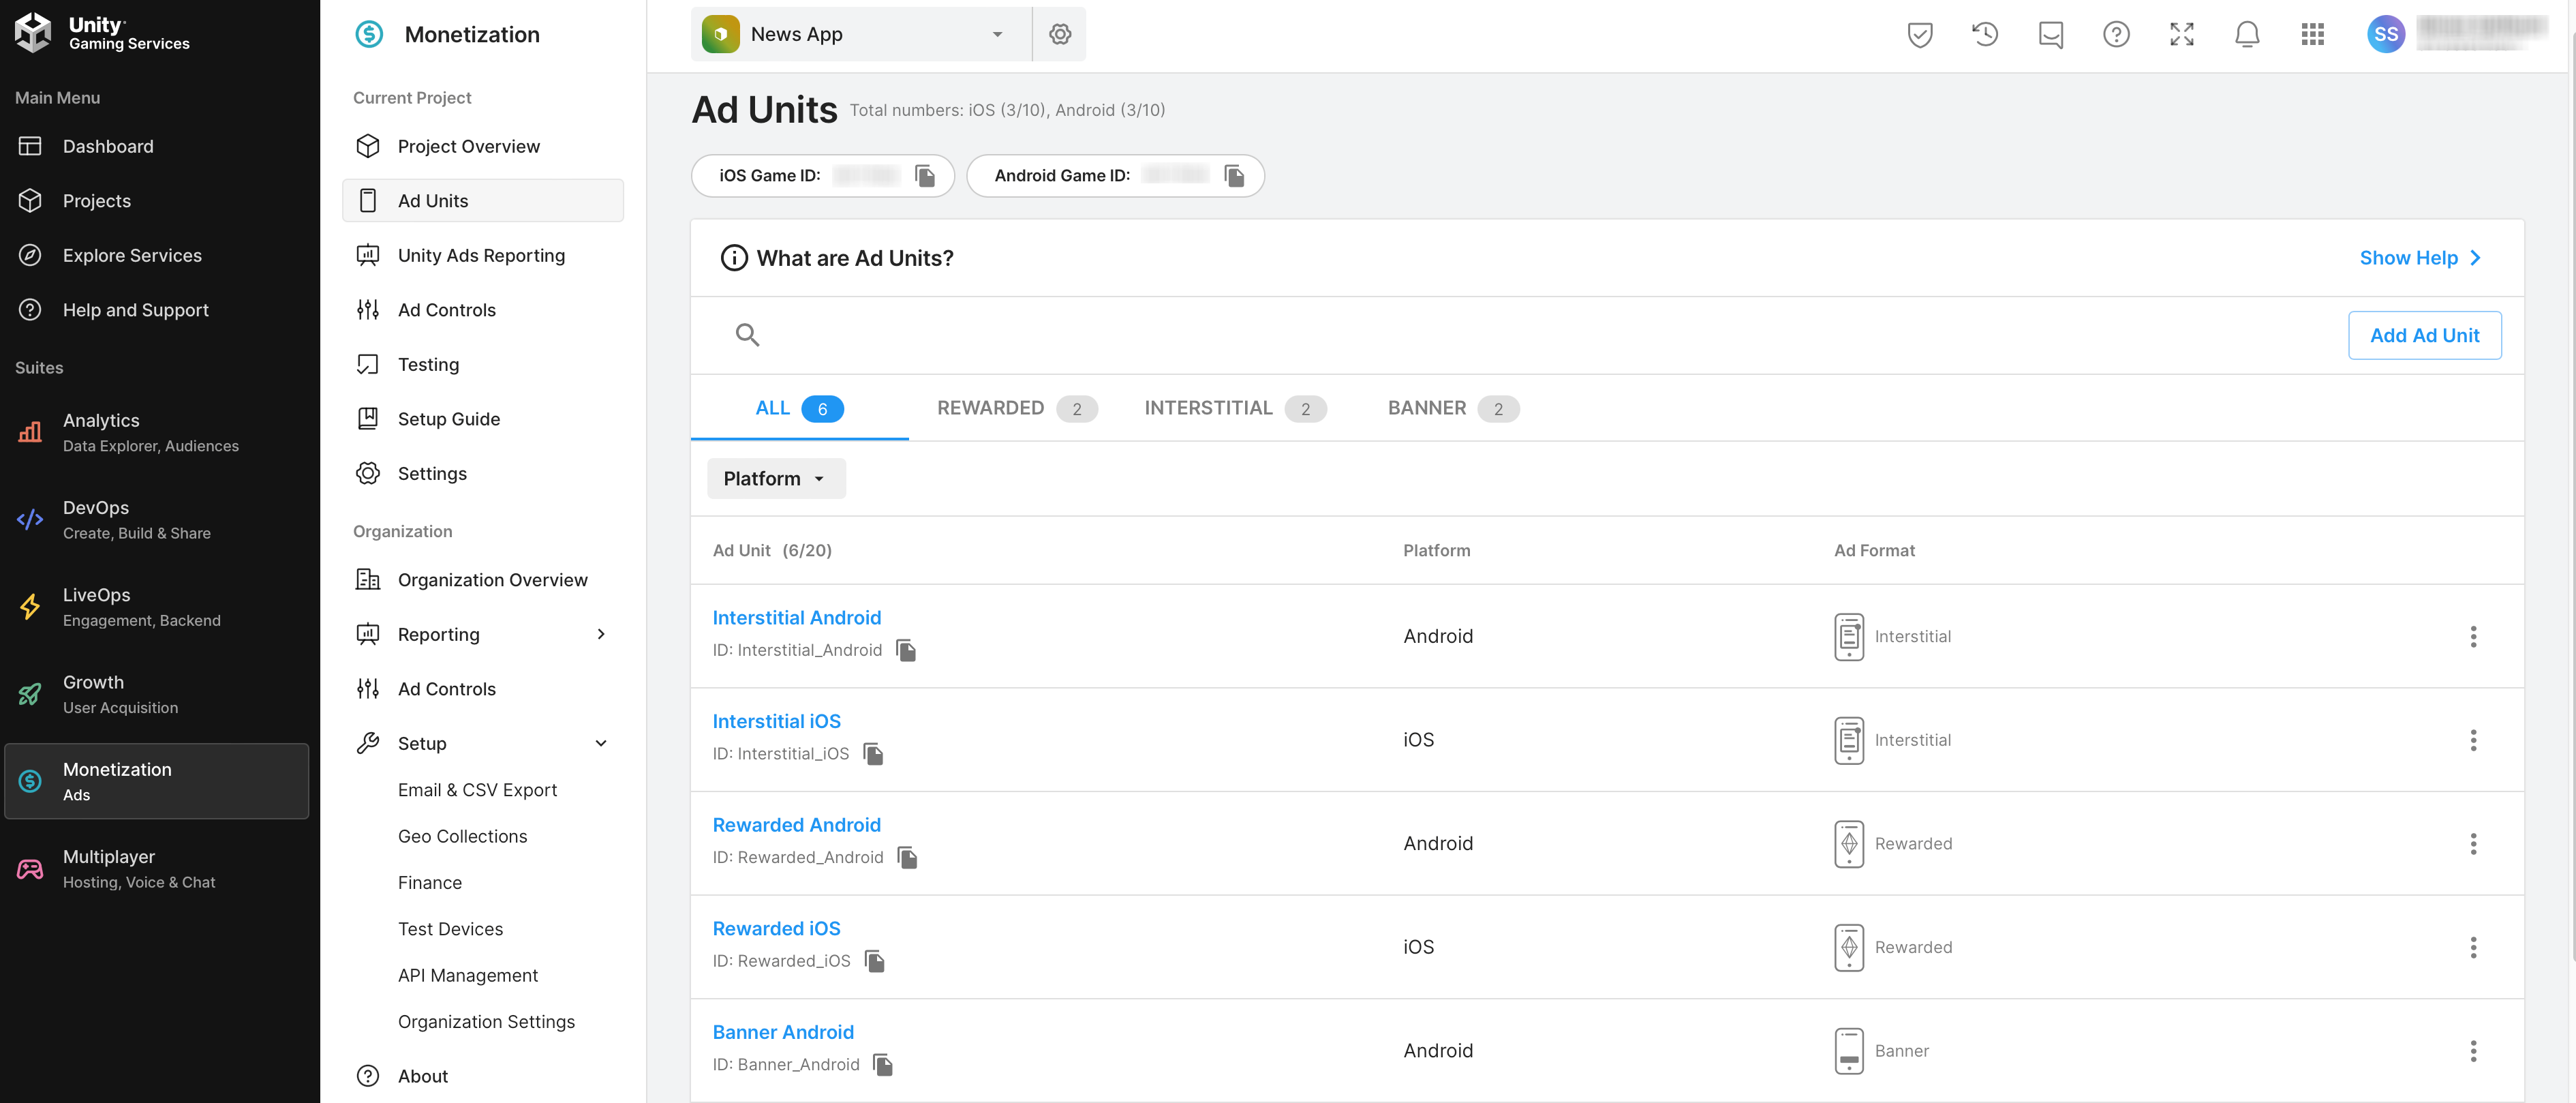
- Go to Unity Ads Dashboard, Sign in & Create New Project.
-
Go to Monetization > Setup Project & find Ad Units for both Android & iOS Apps

OR
-
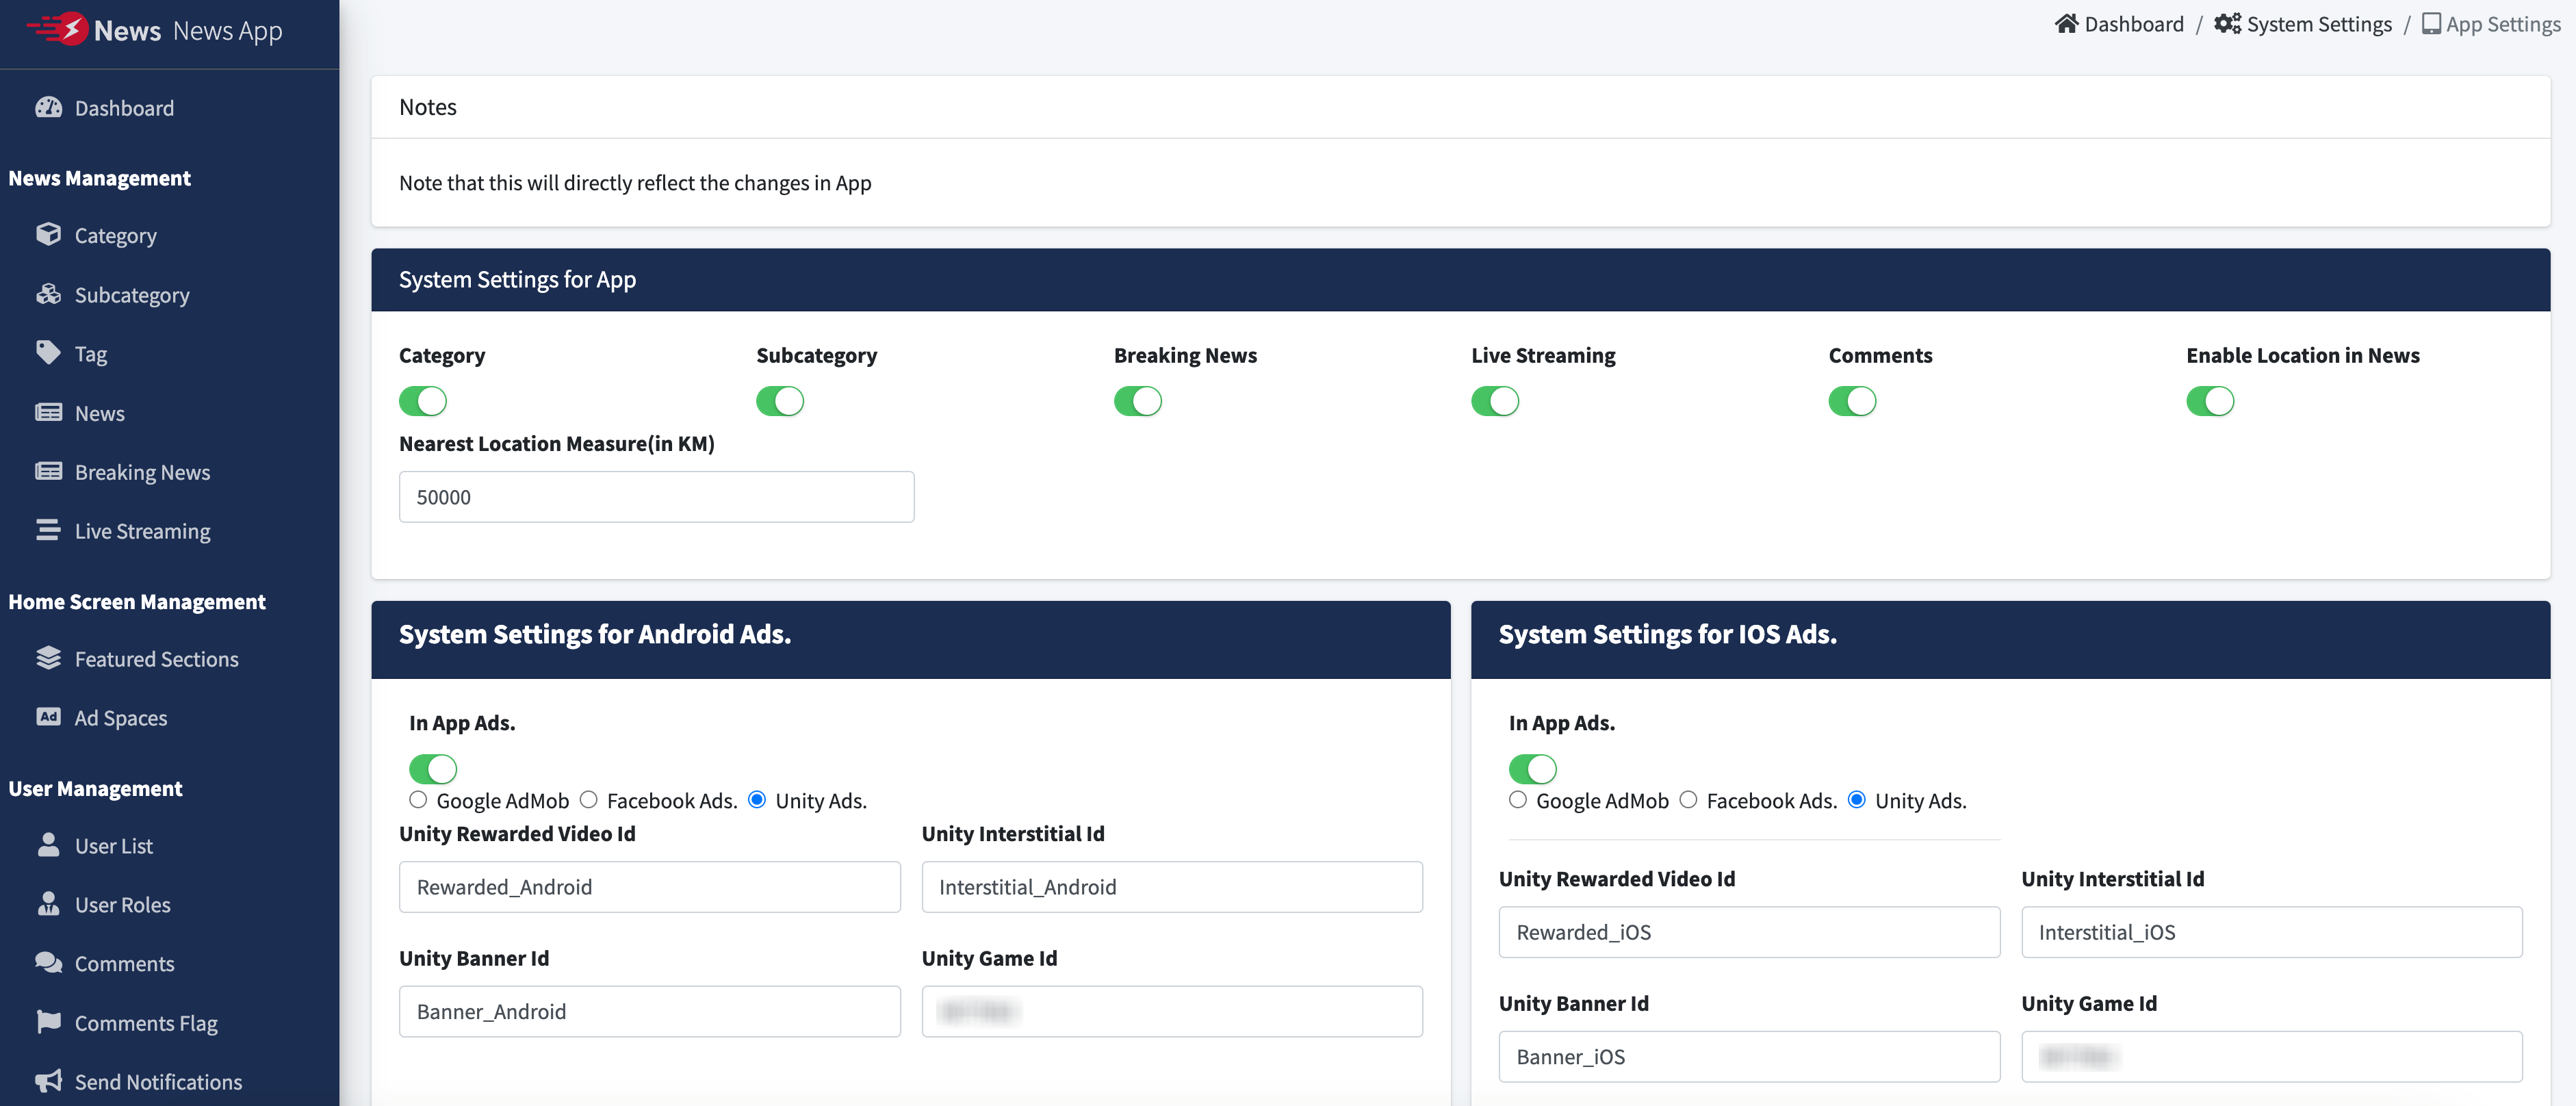
Fill Ads Details for Android & iOS @Admin Panel > System Setting > App
Settings.
-
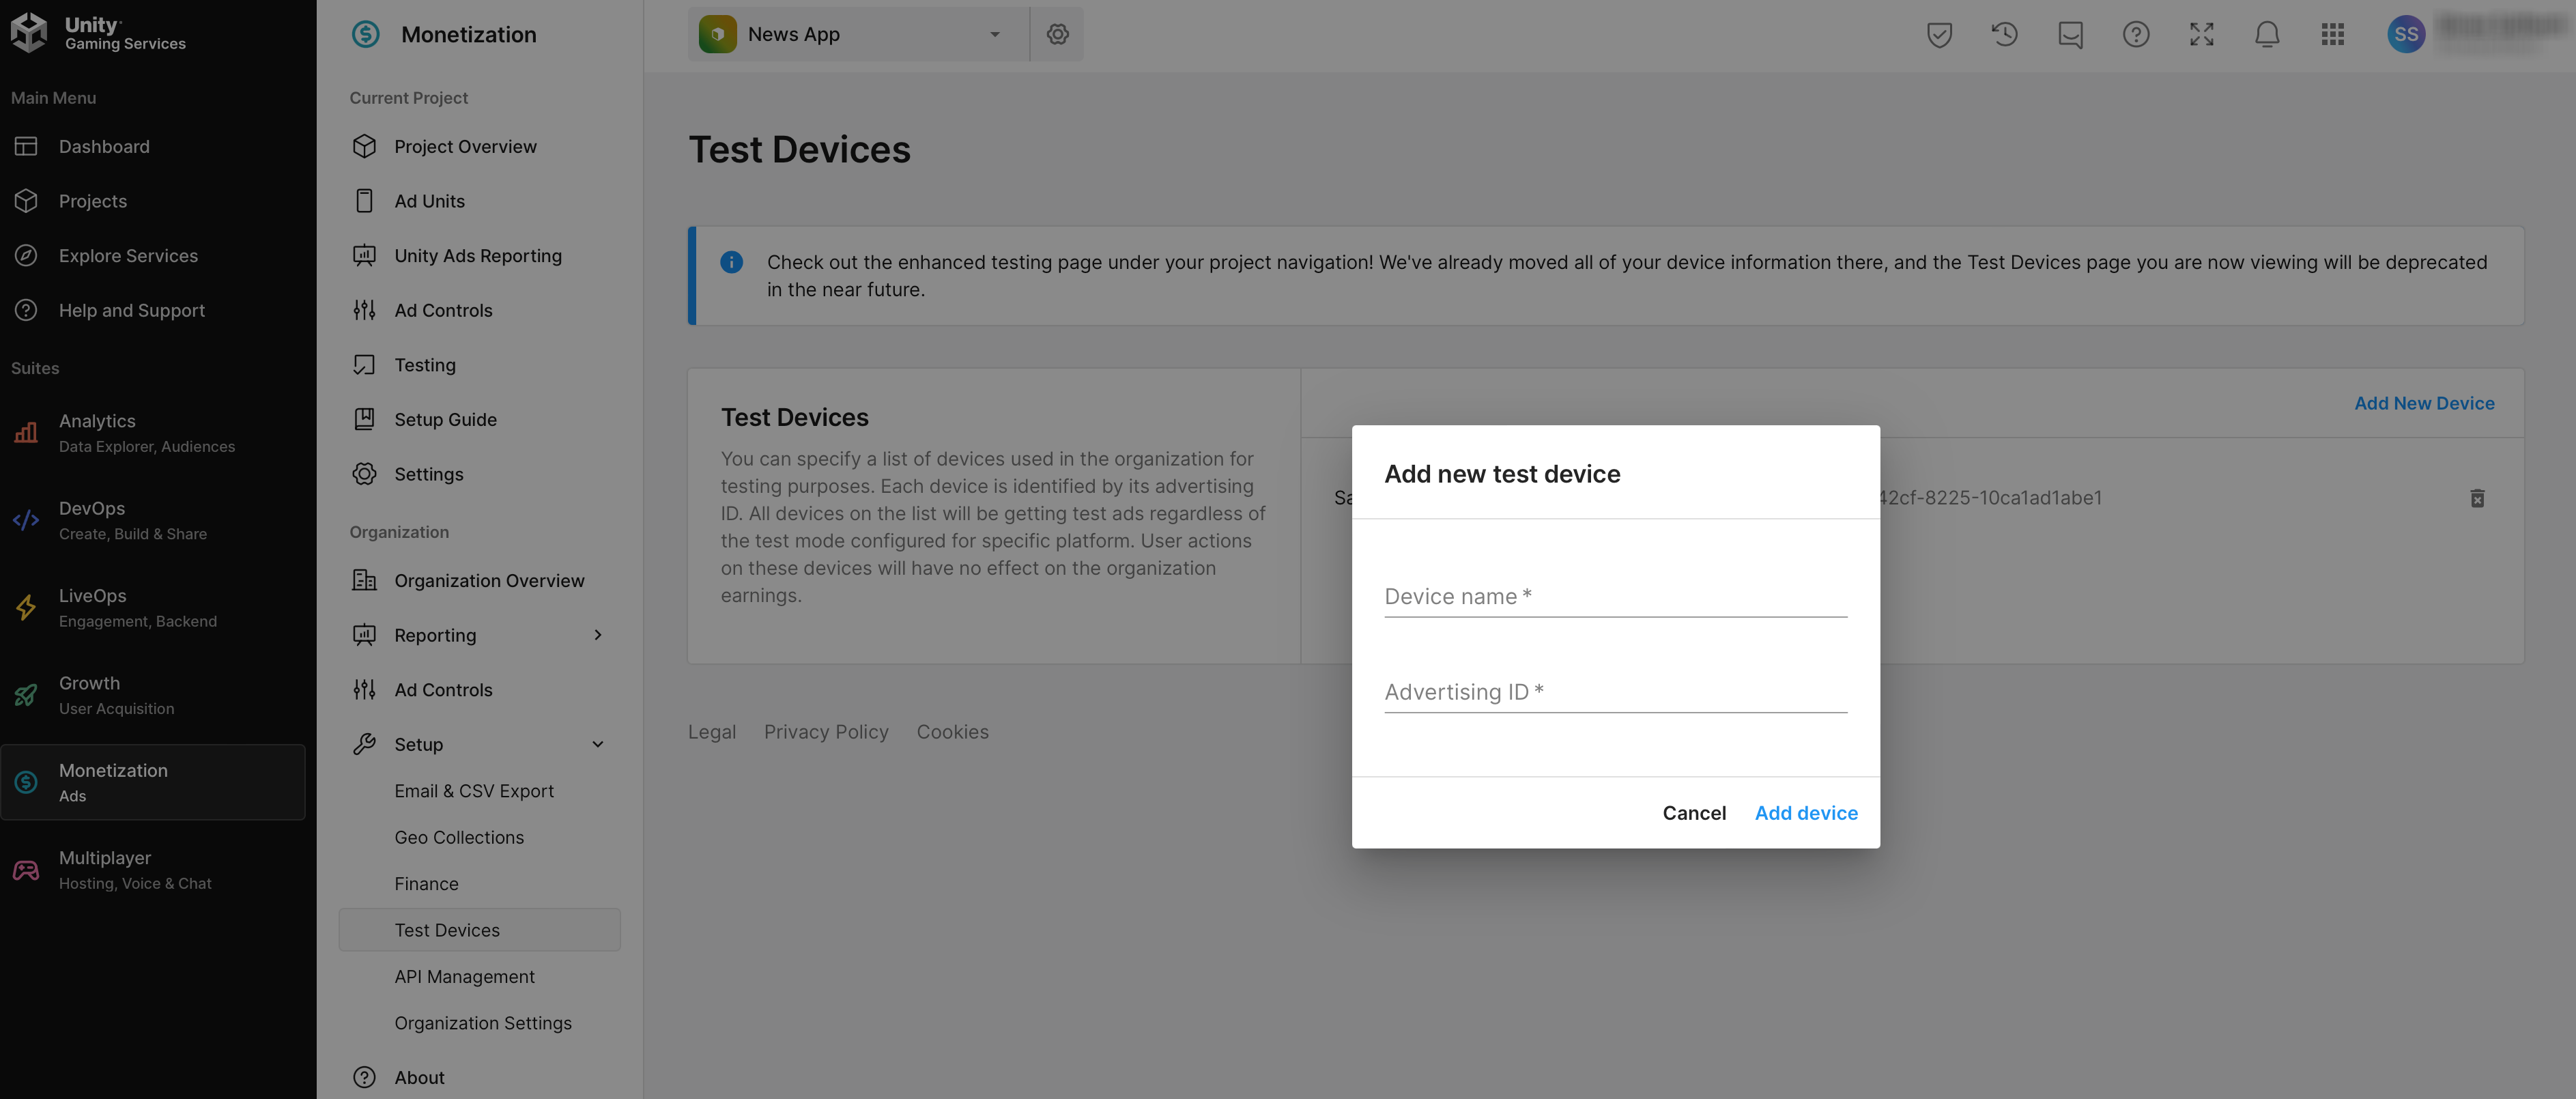
You can Add Test Devices @Unity Ads Dashboard.
-
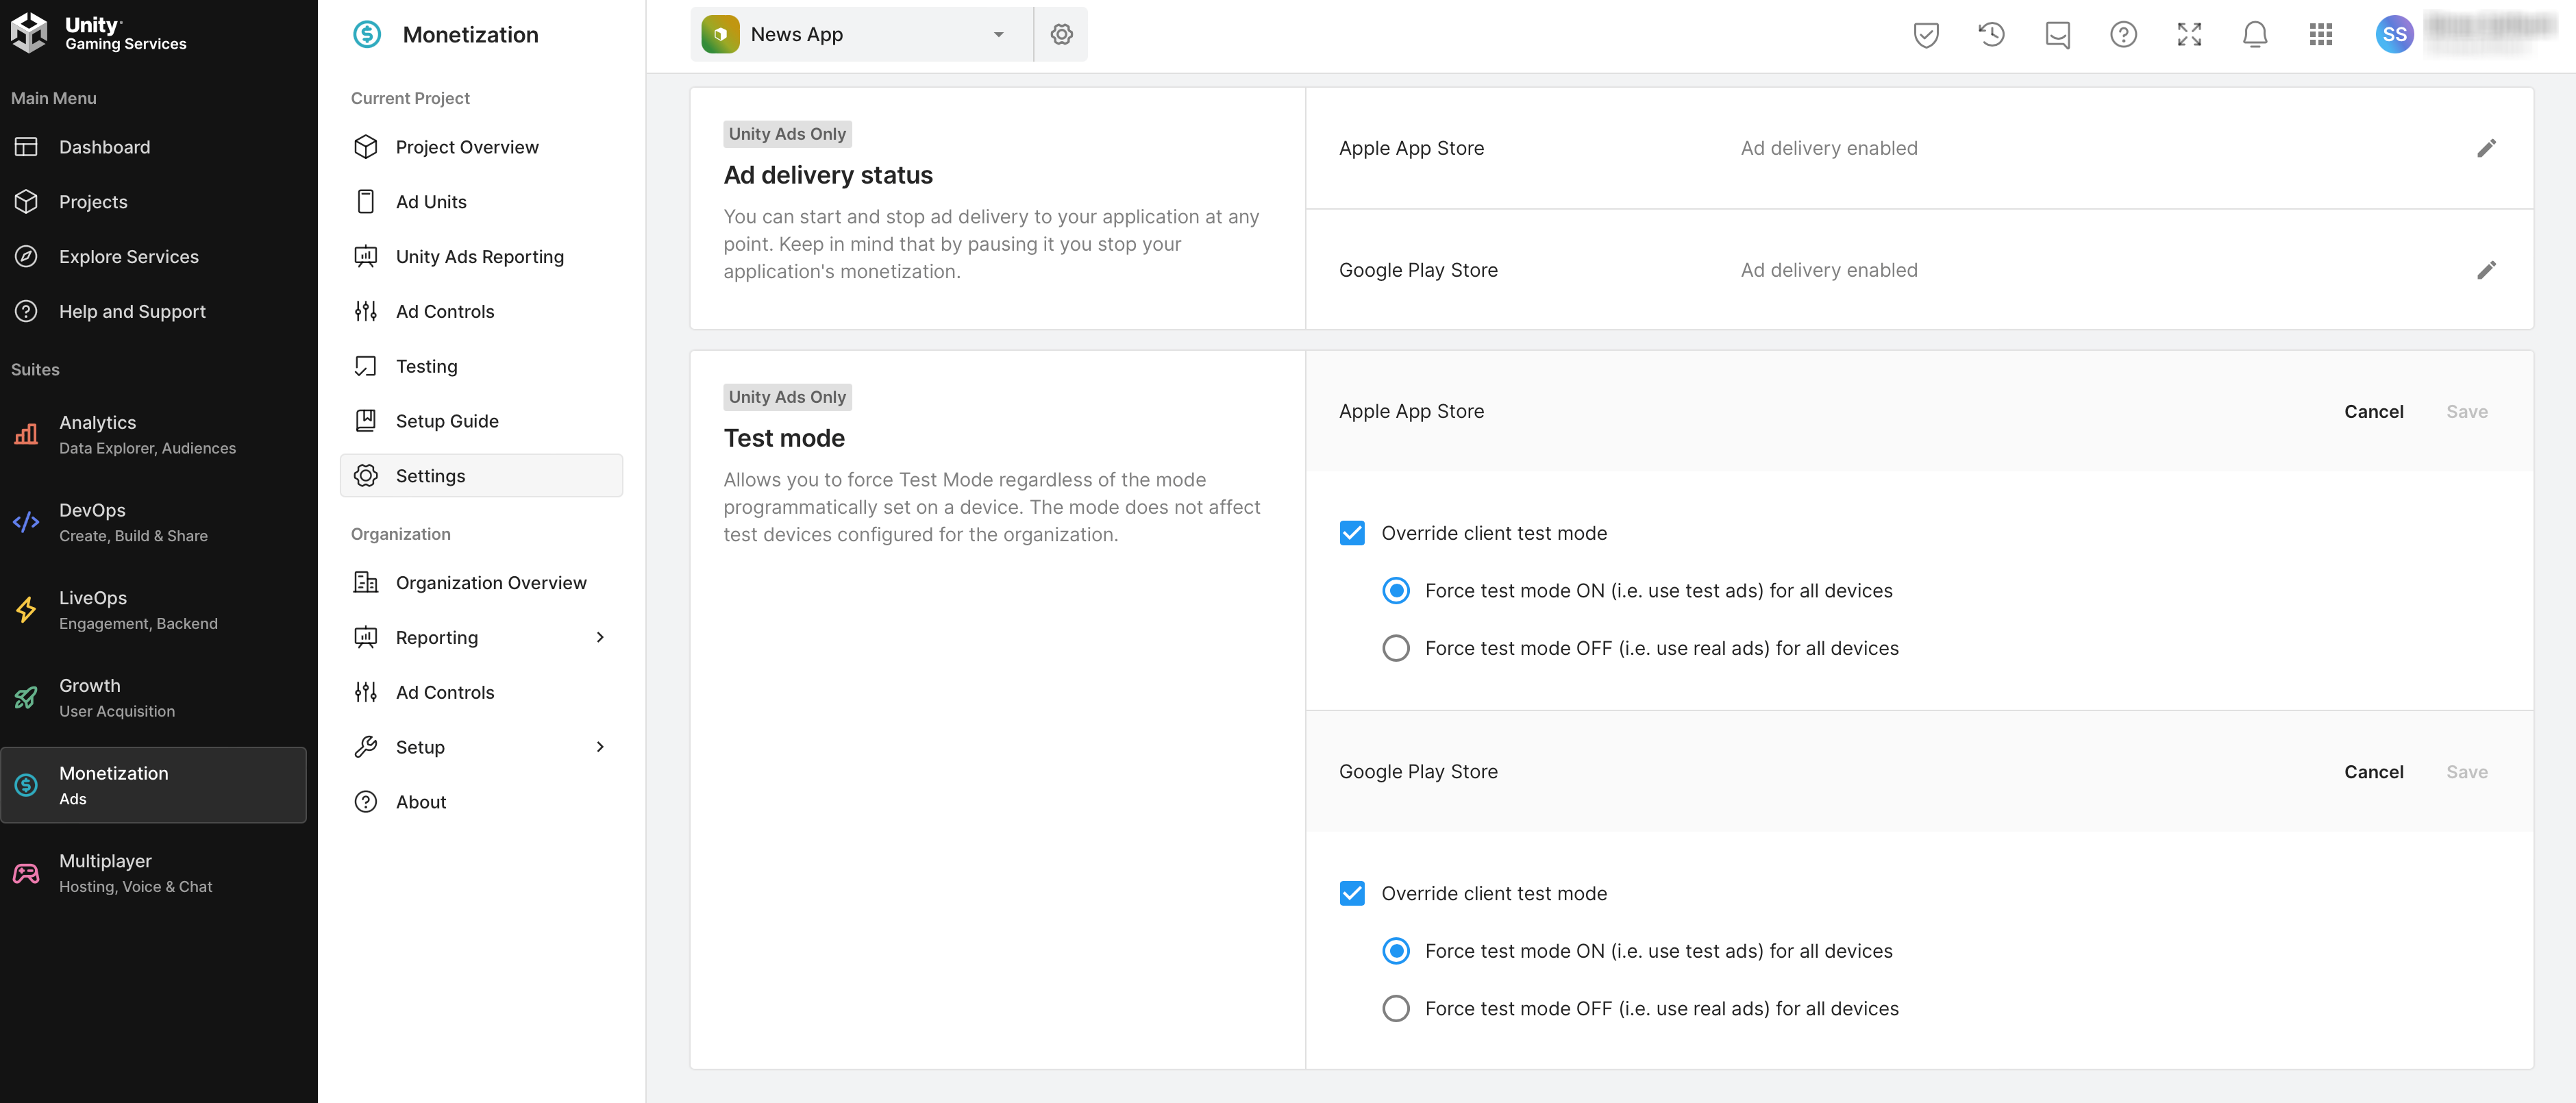
You can Enable Test Mode @Unity Ads Dashboard.
- For Further Unity Ads Help, Follow this Link
How to Set General Settings ?
- To Enable/Disable Facebook login,
Interval for Survey Questions & Interval for Ads types , you may find variables
@ lib > utils > Constant.dart File.
- And for all other Options , Go to Admin Panel > System Setting > General
Settings

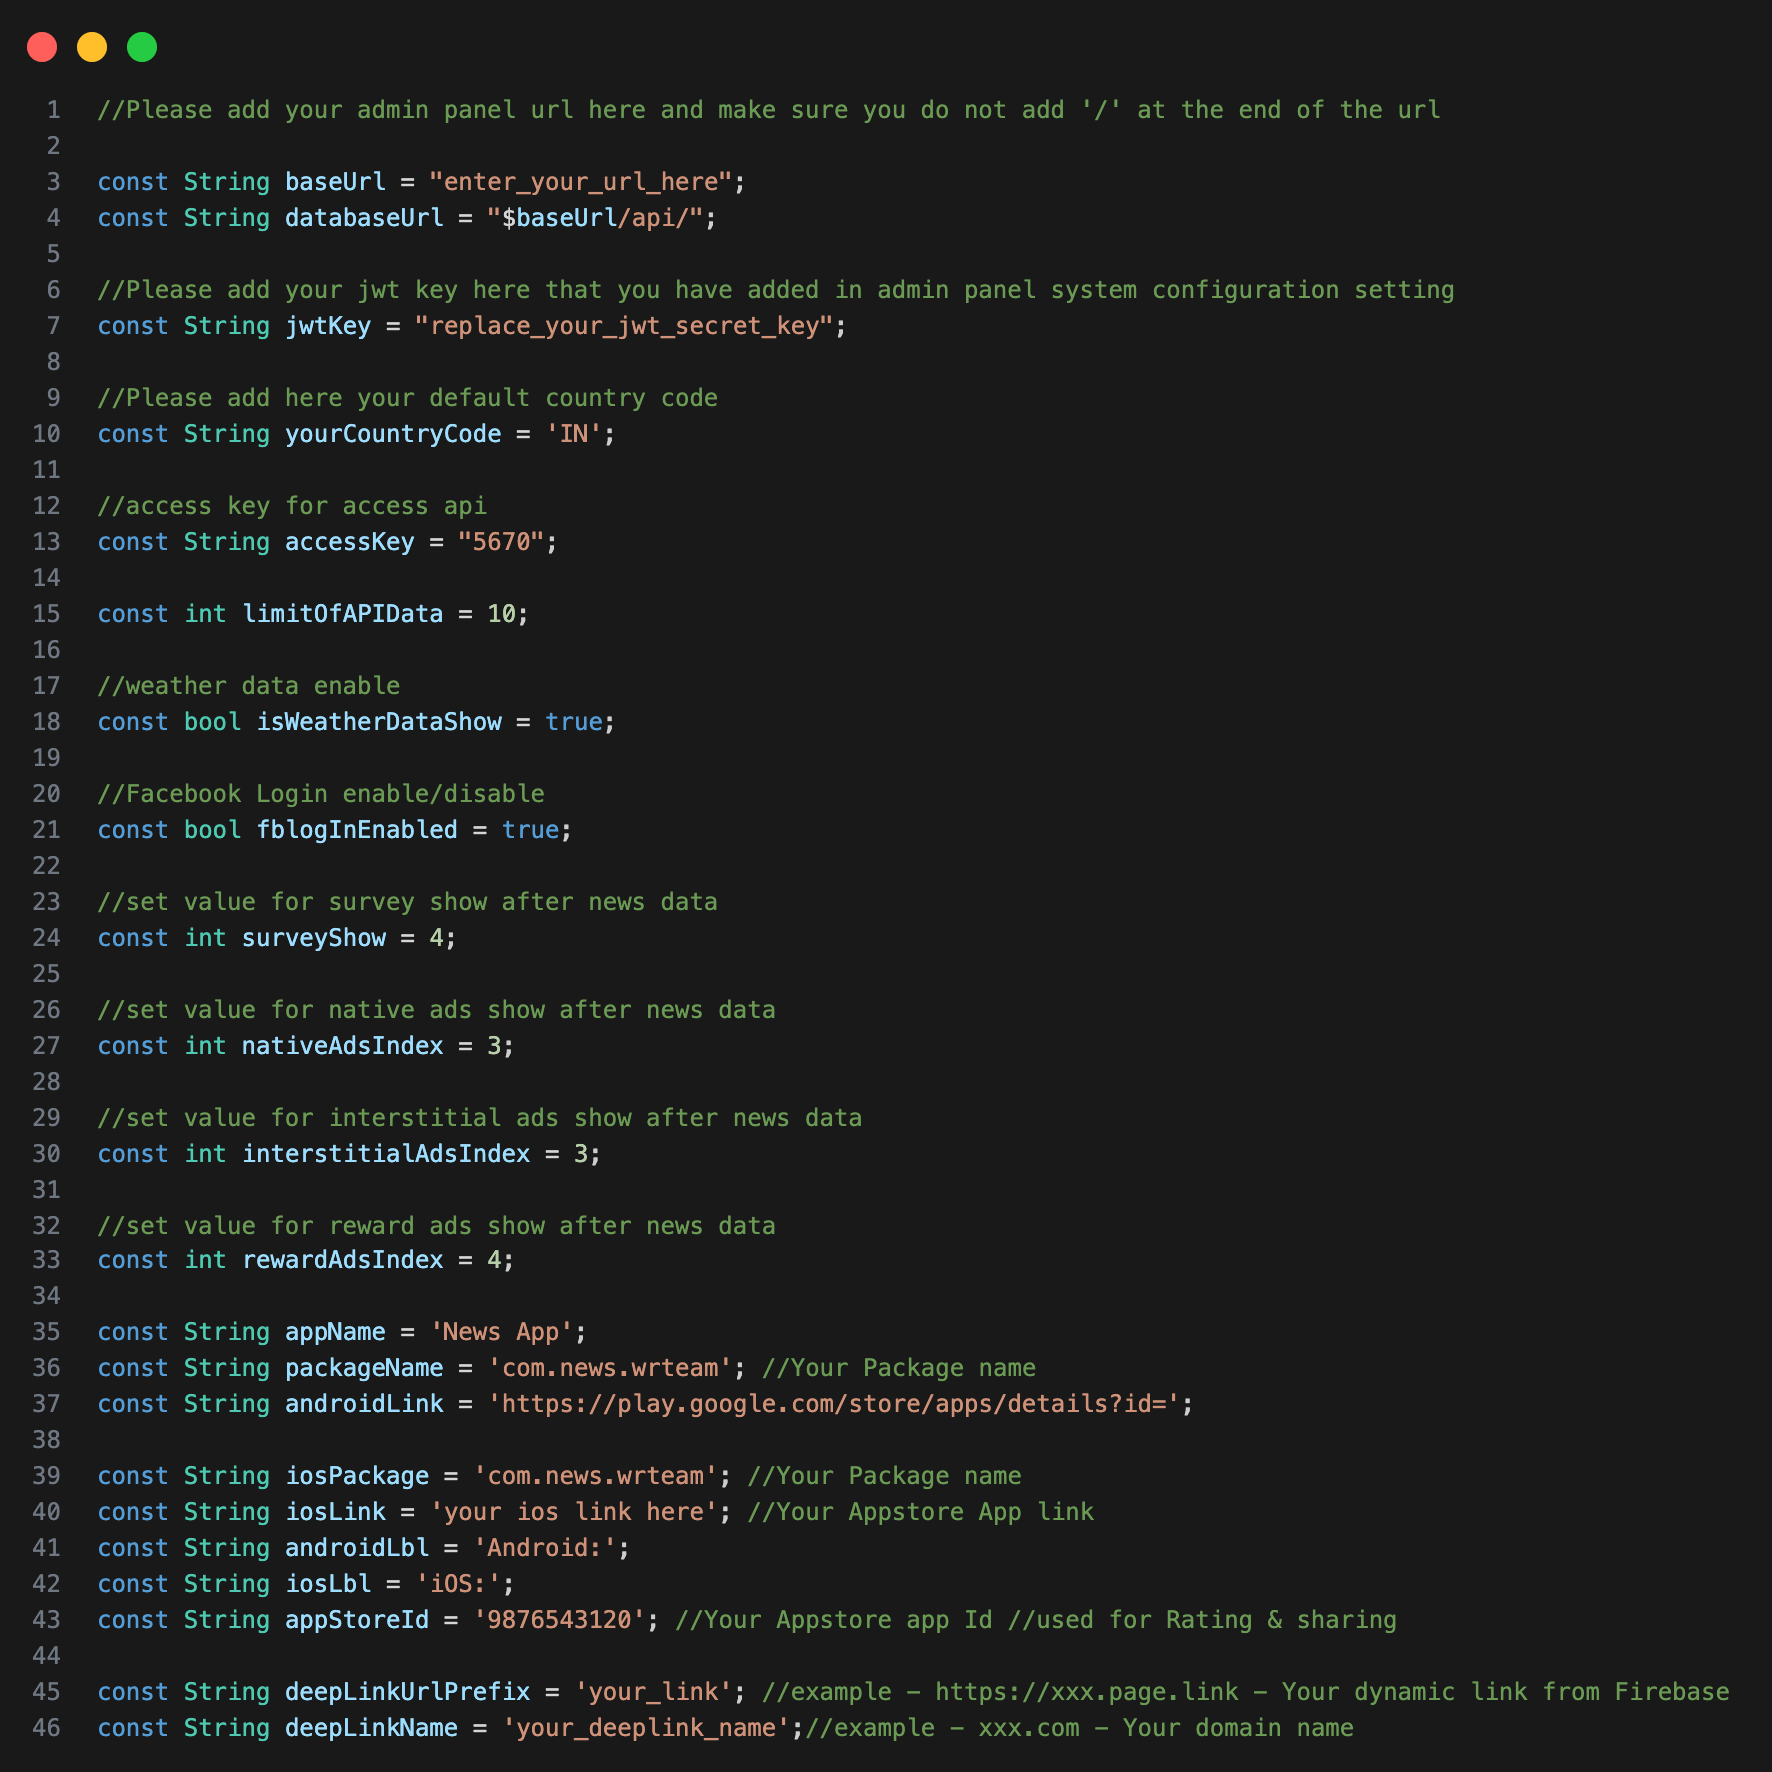
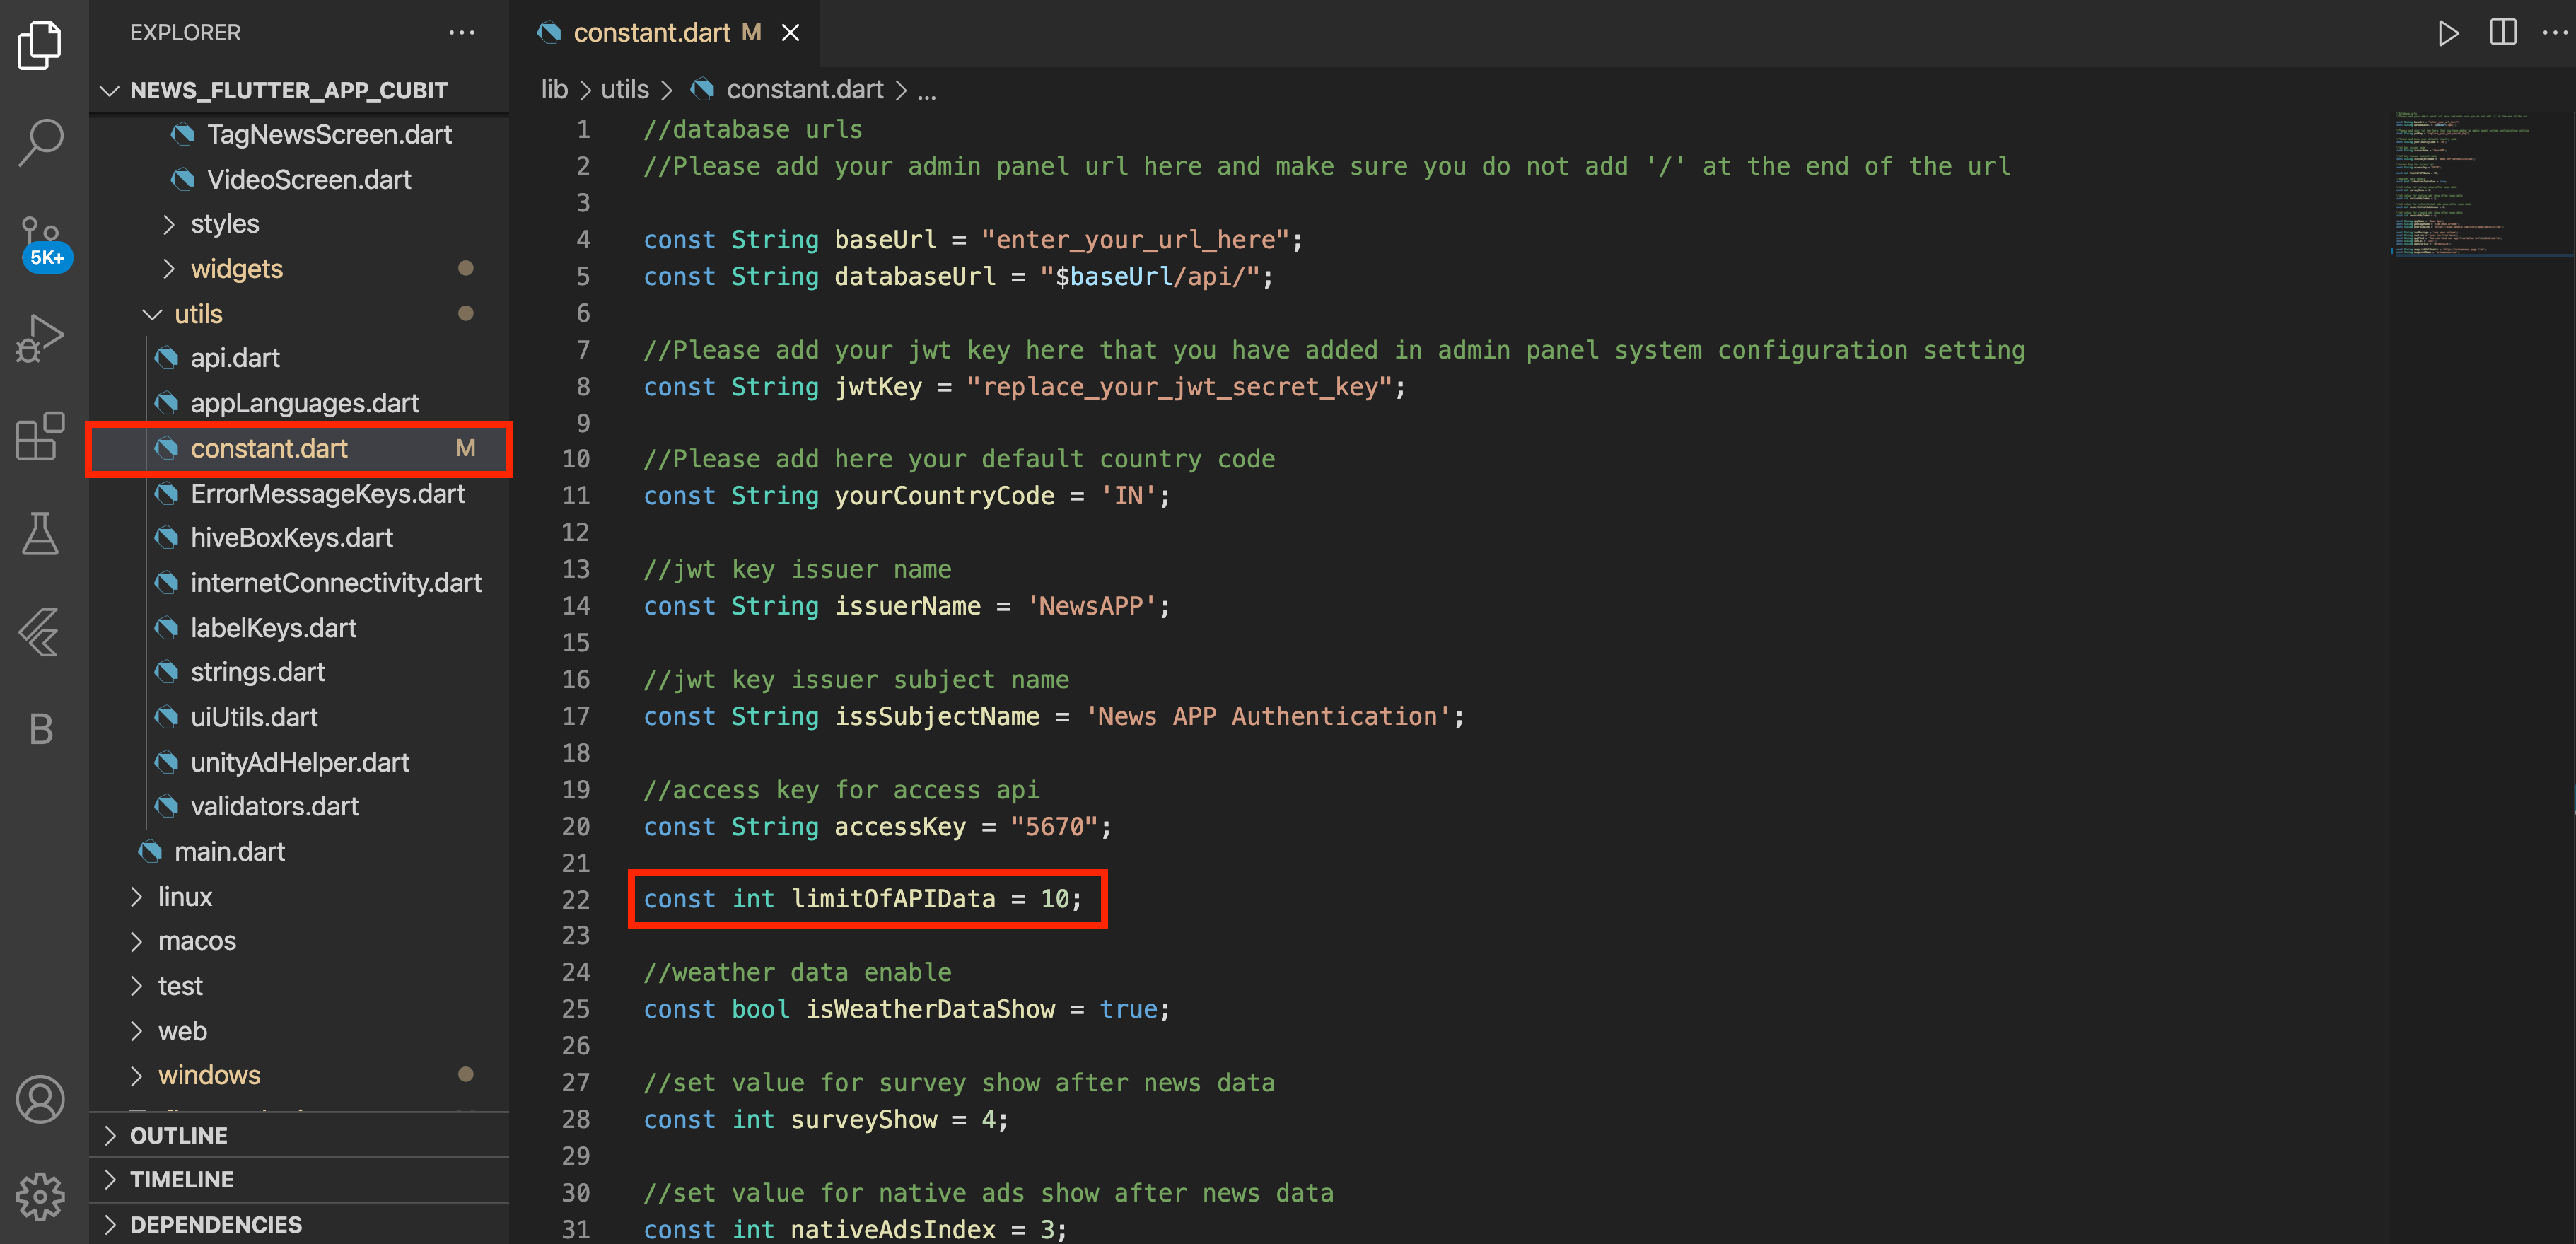
How to Increase Product Load Limit?
- you can change at a time when request send to server how many item will fetch at once.
- Go to lib > utils > Constant.dart File.
-
Please check below given image.
 & It is extended for some APIs like - categoryCubit.dart, bookmarkCubit.dart,
LikeAndDislikeCubit.dart, bookmarkCubit.dart, Search.dart.
& It is extended for some APIs like - categoryCubit.dart, bookmarkCubit.dart,
LikeAndDislikeCubit.dart, bookmarkCubit.dart, Search.dart.
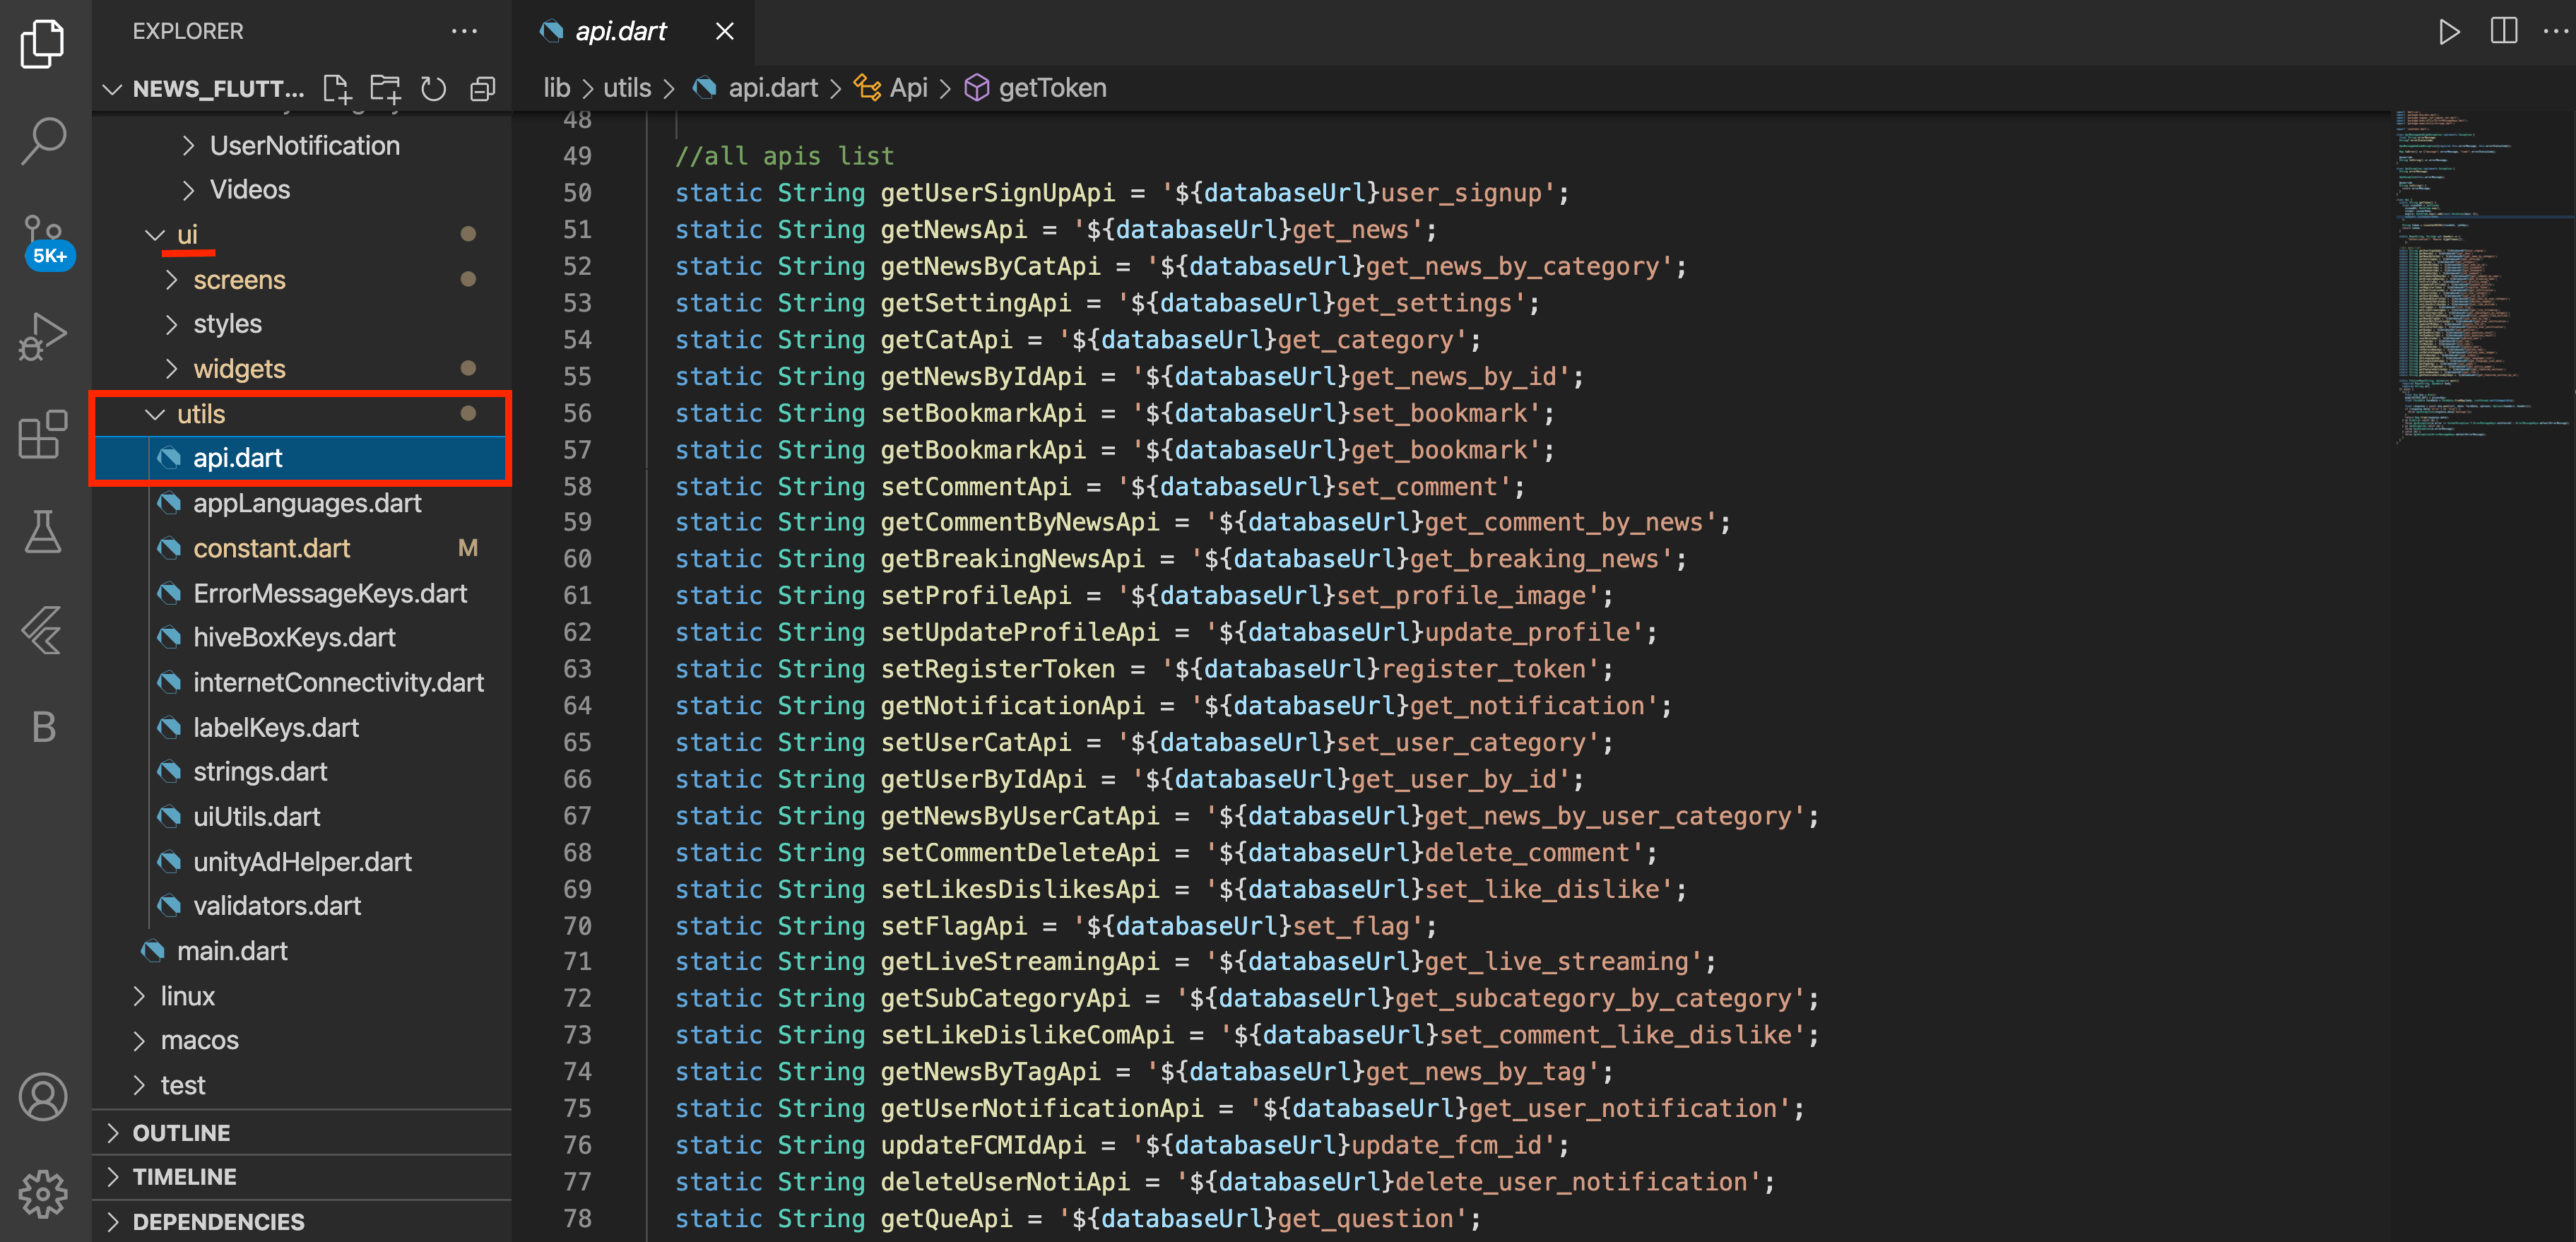
Change APi Parameter
-
You can change or add api parameter from lib > utils > api.dart. Here all list
of api and api paramater is listed that is used in App.
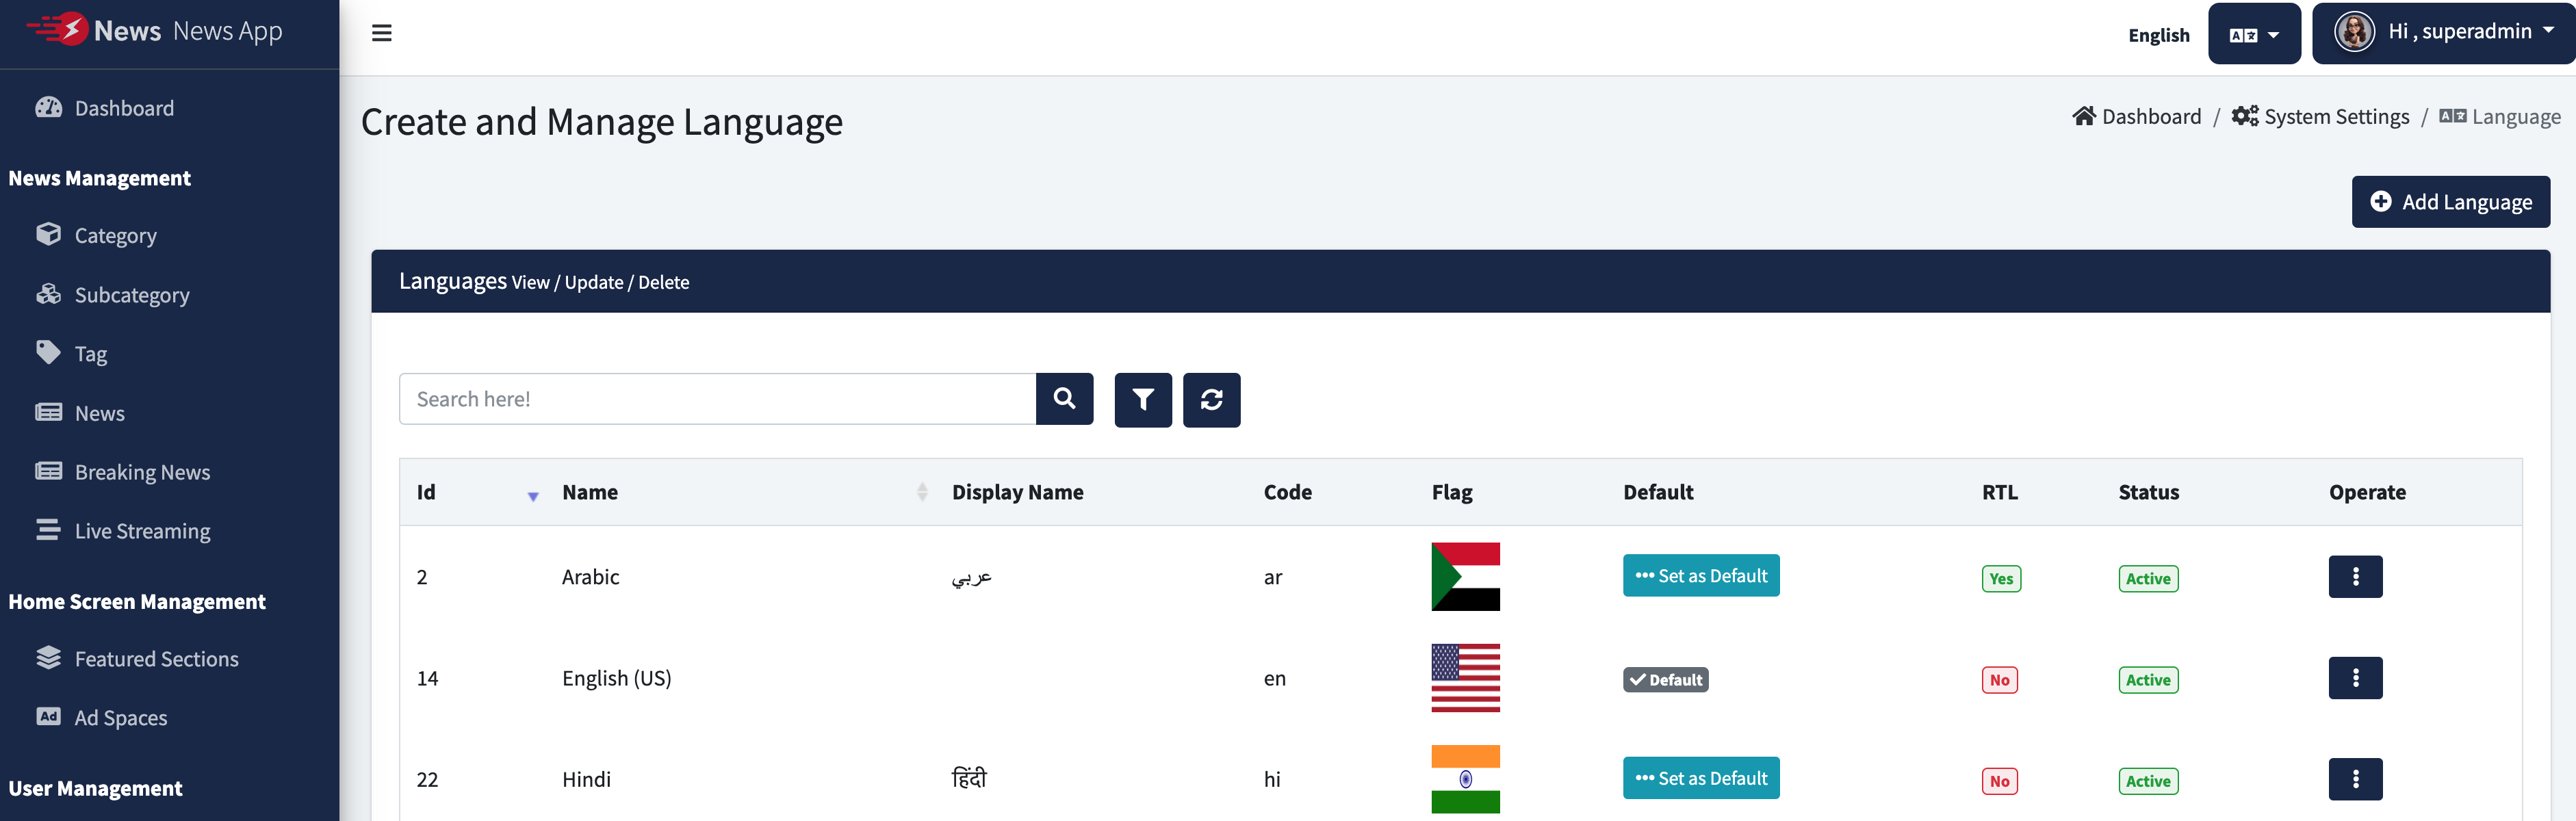
How to change Language
- Go to Admin Panel > Language > Add Languages with Flag, Display Name & Language JSON File
- set your default Language & it will be reflected @App side immediately.
Generate Release APK
- Before Generating apk, Change values at android > key.properties File according to your generated Release Key.
- On Mac/Linux, use the following command: keytool -genkey -v -keystore ~/upload-keystore.jks -keyalg RSA -keysize 2048 -validity 10000 -alias upload
- On Windows, use the following command: keytool -genkey -v -keystore c:\Users\USER_NAME\upload-keystore.jks -storetype JKS -keyalg RSA -keysize 2048 -validity 10000 -alias upload
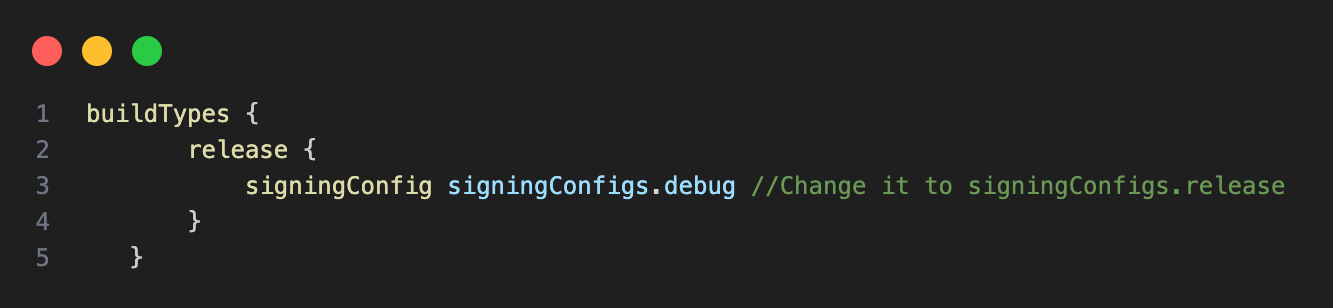
- And also change singingConfig from debug to release in android > app > build.gradle File as shown below.
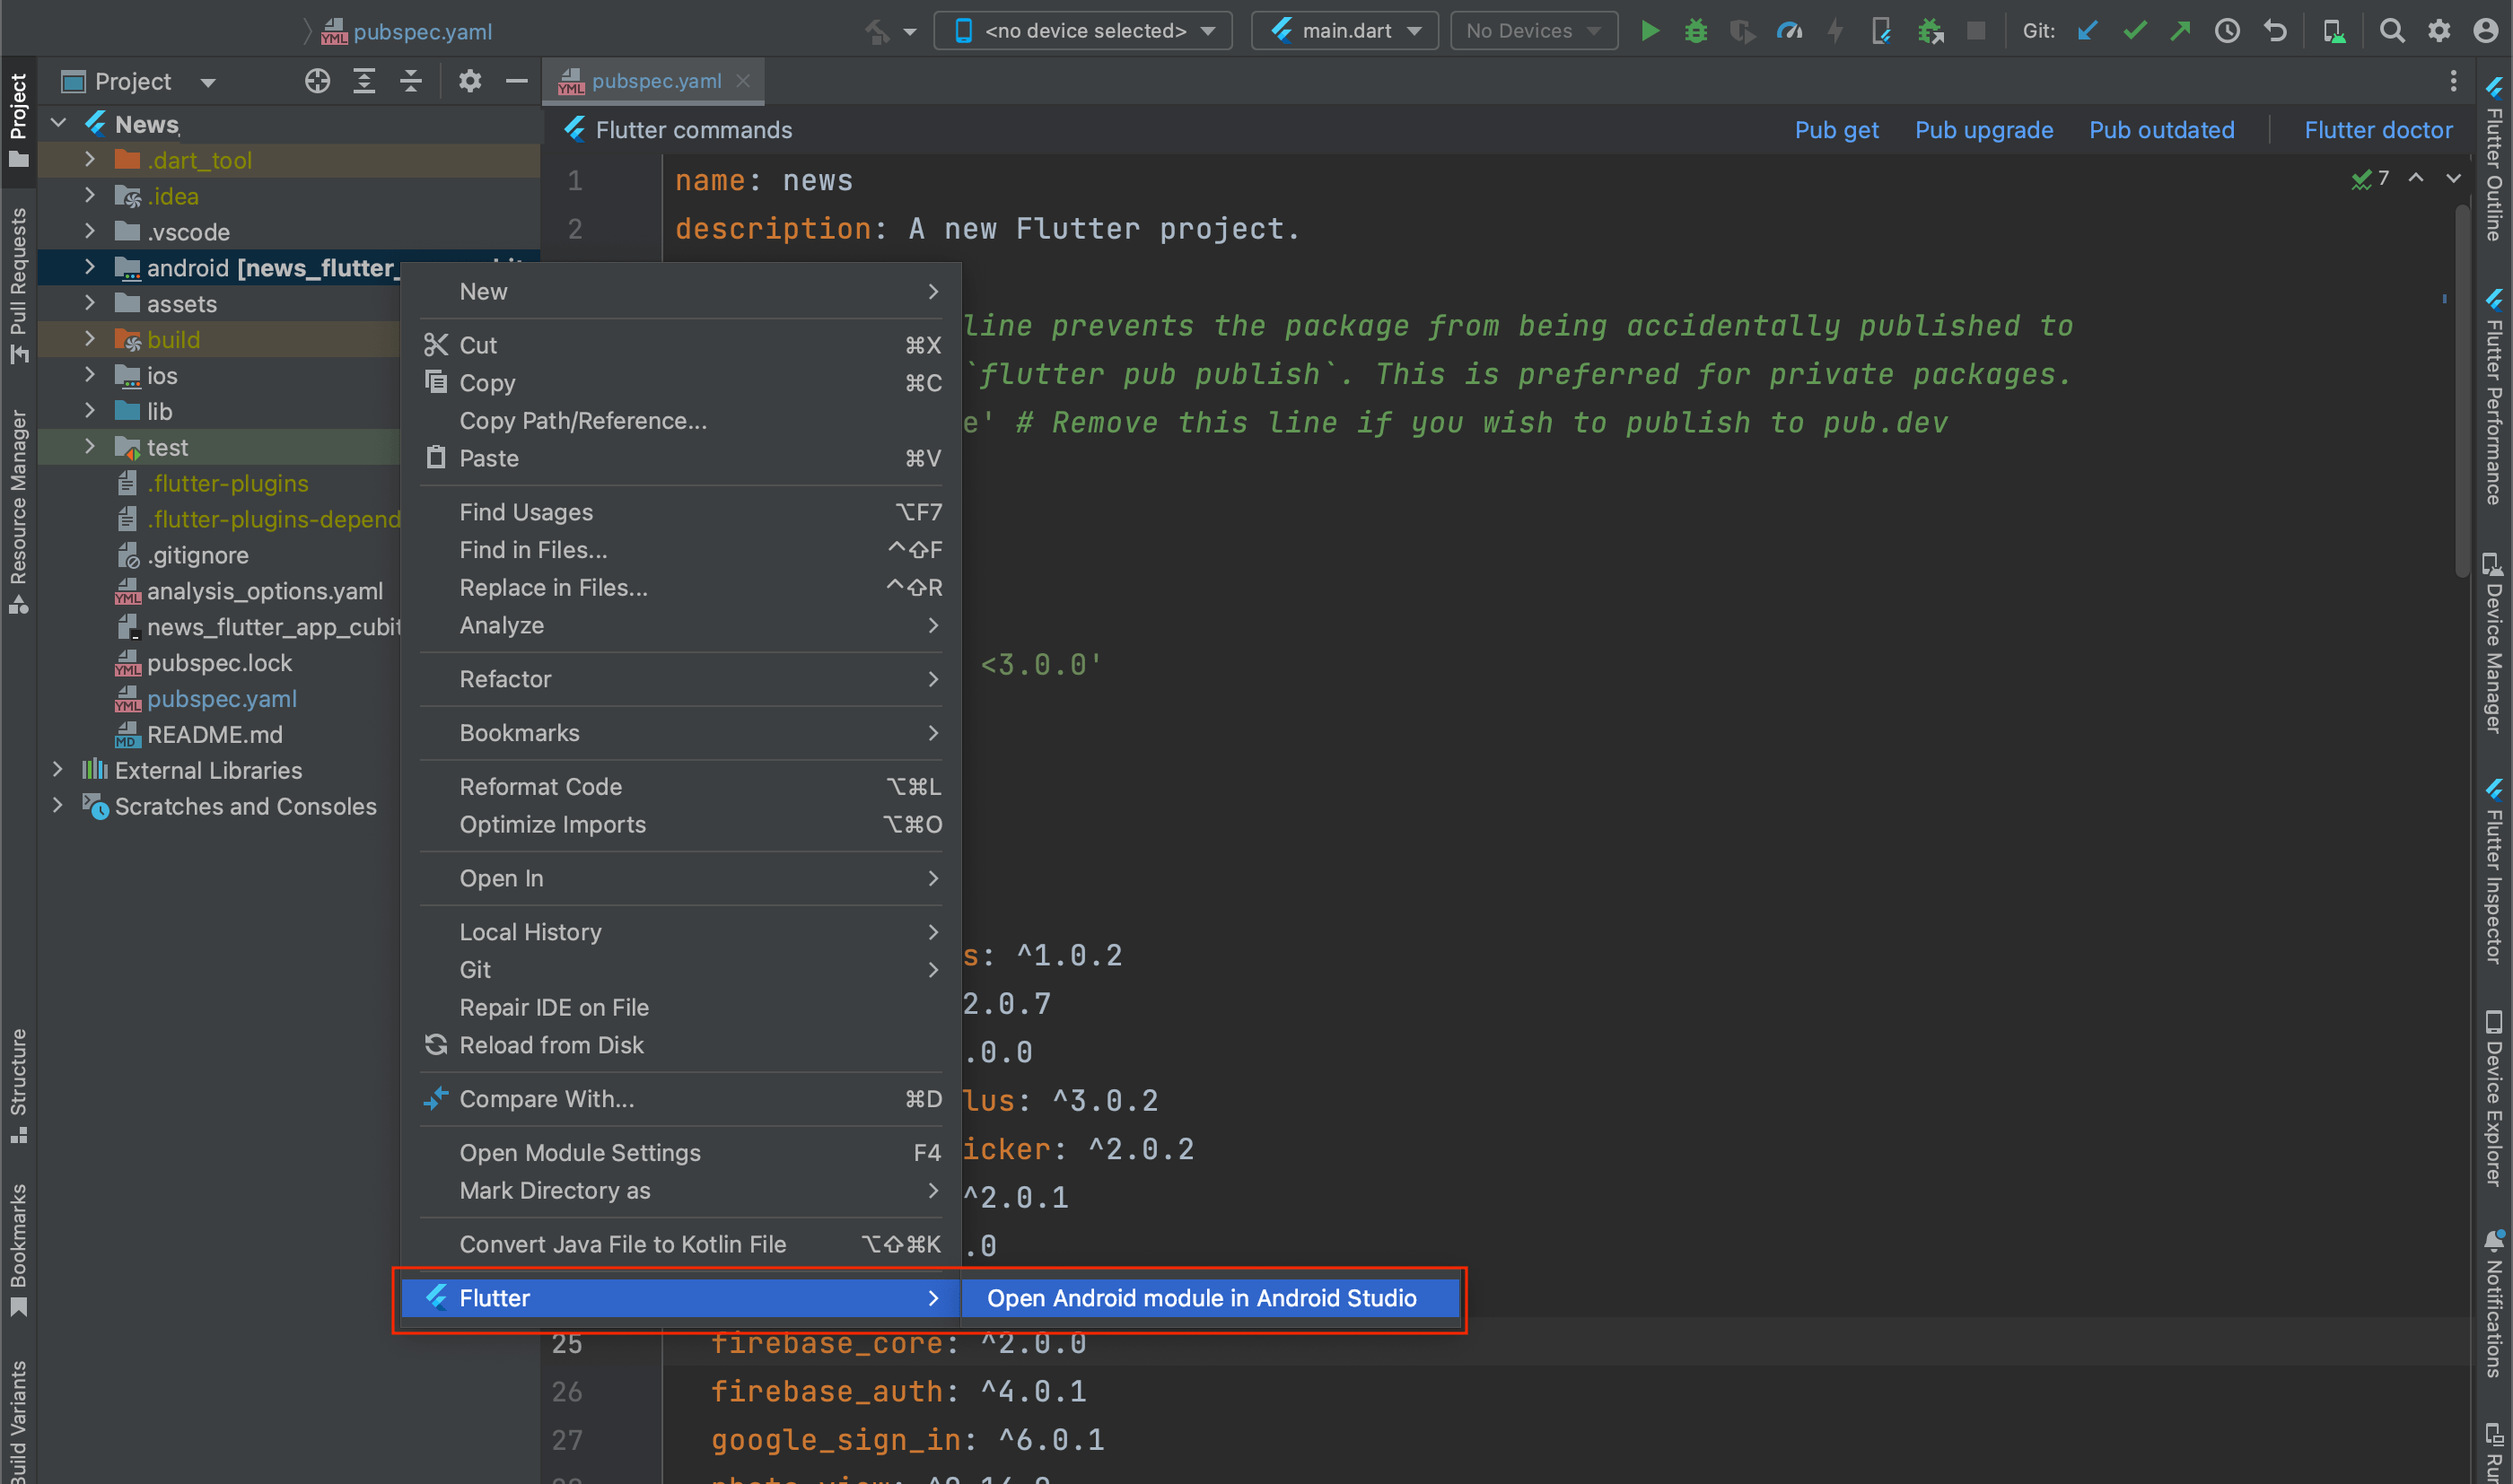
-
In your android studio, right click on you android module of your flutter
project.there is option Flutter > open Android module in Android Studio.then
generate release apk from that new module.
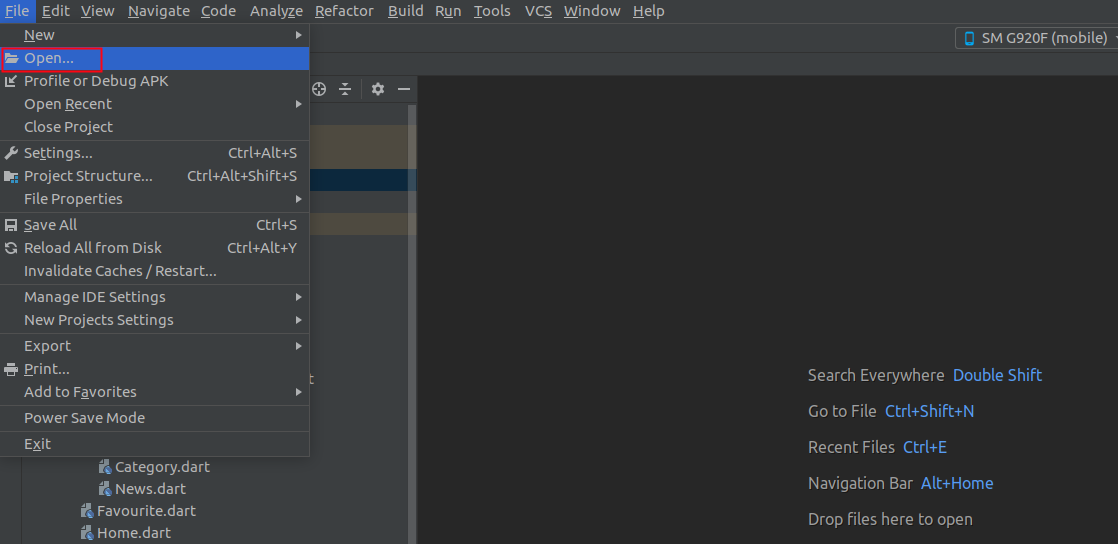
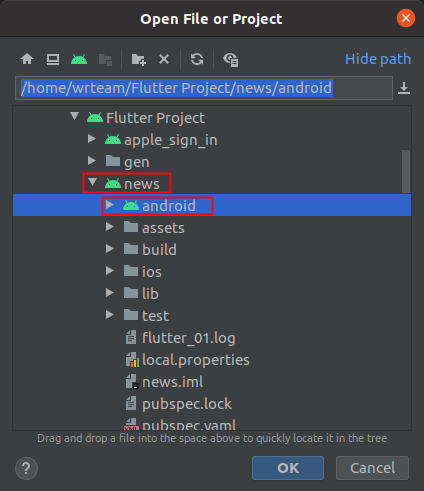
-
and if in your android studio, flutter option is disabled, then go to file
option in your android studio > open & locate your flutter project's android
module and open it. now generate relase apk from that new module.
-
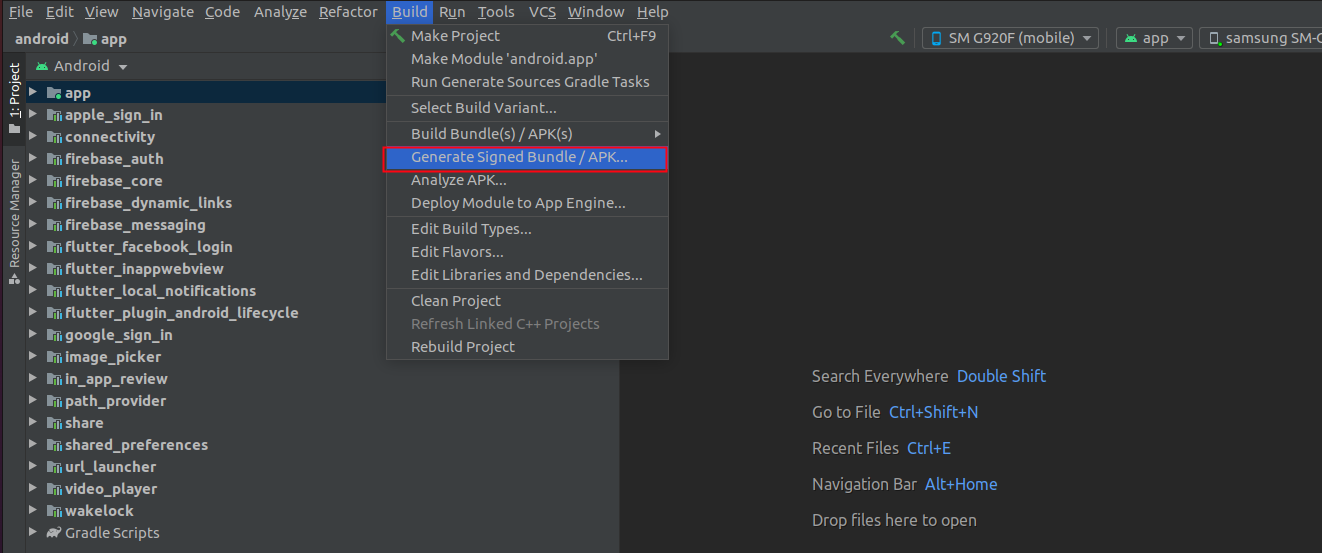
In Build menu there is option generate signed bundle/apk.
- For Further Help, Follow this Link
- if not generated yet ? Create an upload keystore by following commands at the
command line / Terminal :
Steps to Publish iOS App to App Store
-
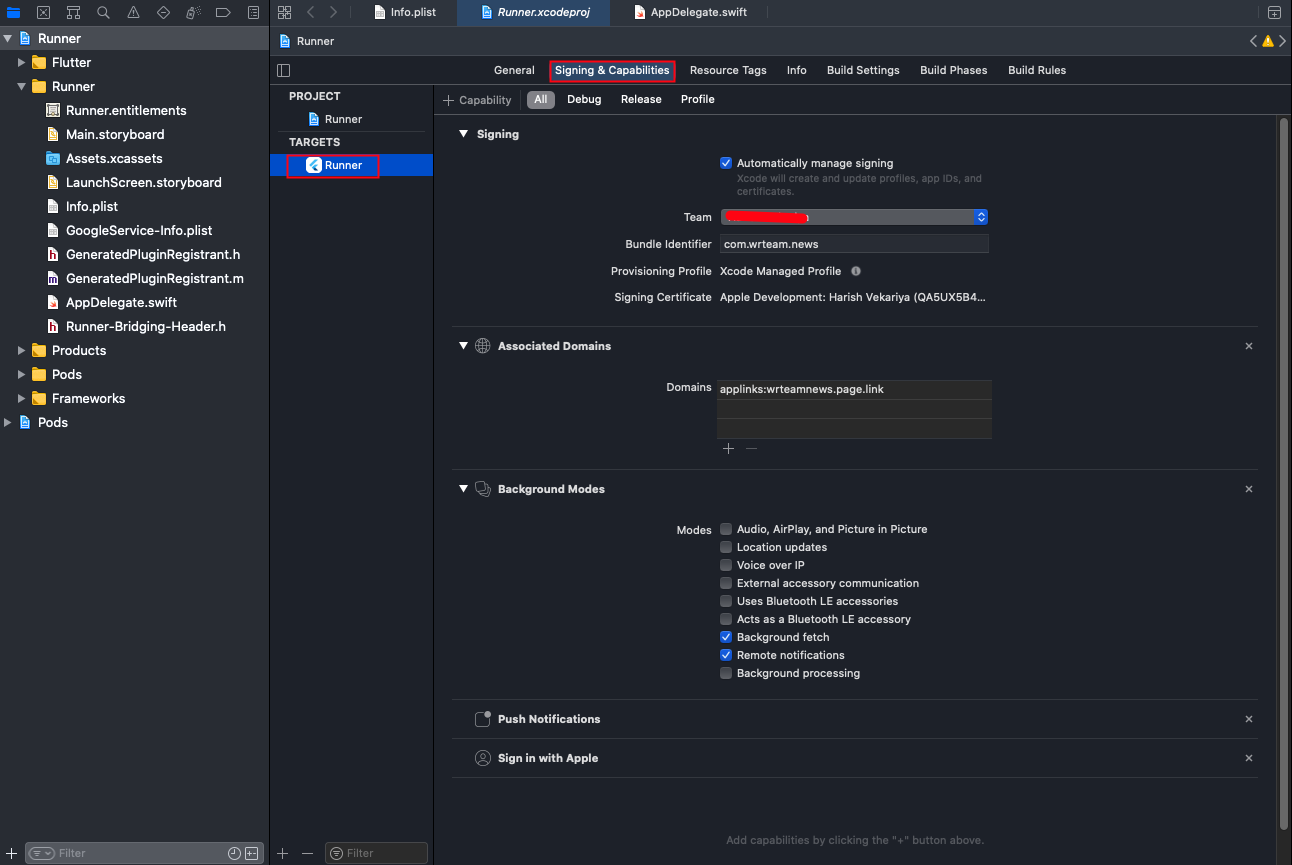
Open your Project's Runner.xcworkspace file in Xcode, and Add your Team [Your
Apple Developer ID] and also Insert GoogleService-Info.plist file [Downloaded
From Firebase Project] inside Folder named Runner.
-
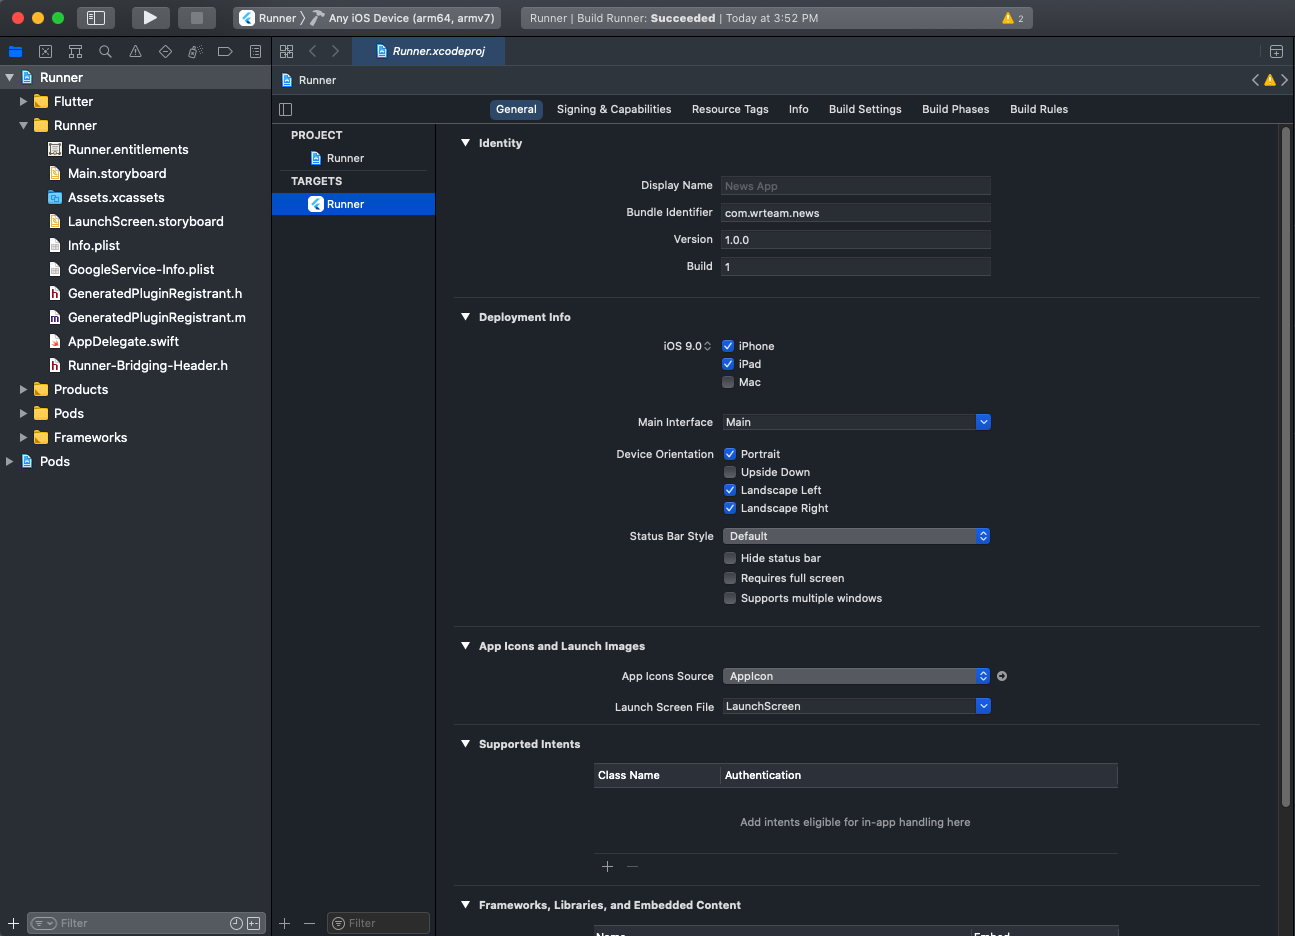
and then Select Any iOS Device (armv7,arm64) as shown in image below.
-
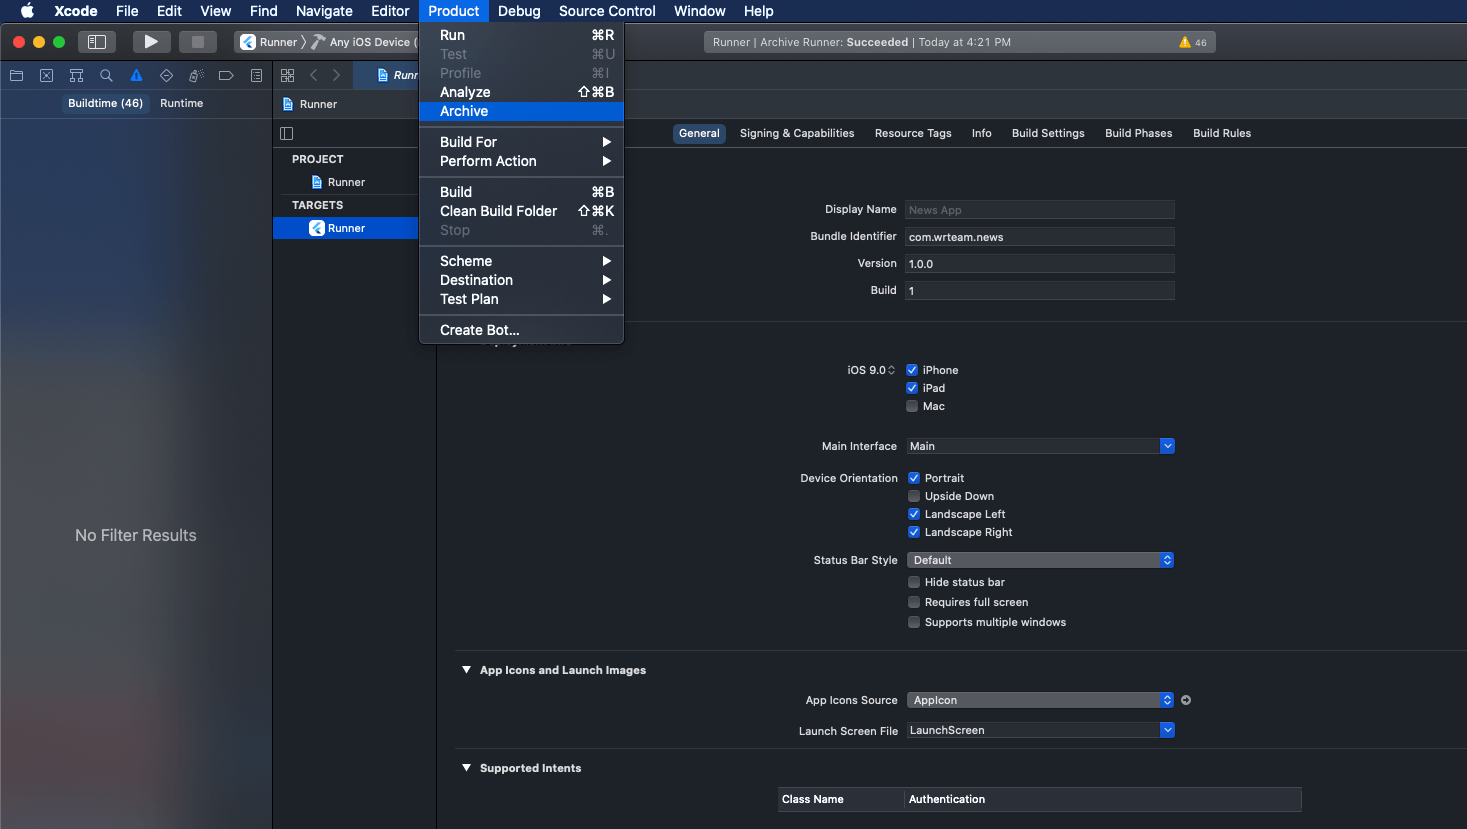
After that Select Archive From Product Menu of Xcode as shown below.
-
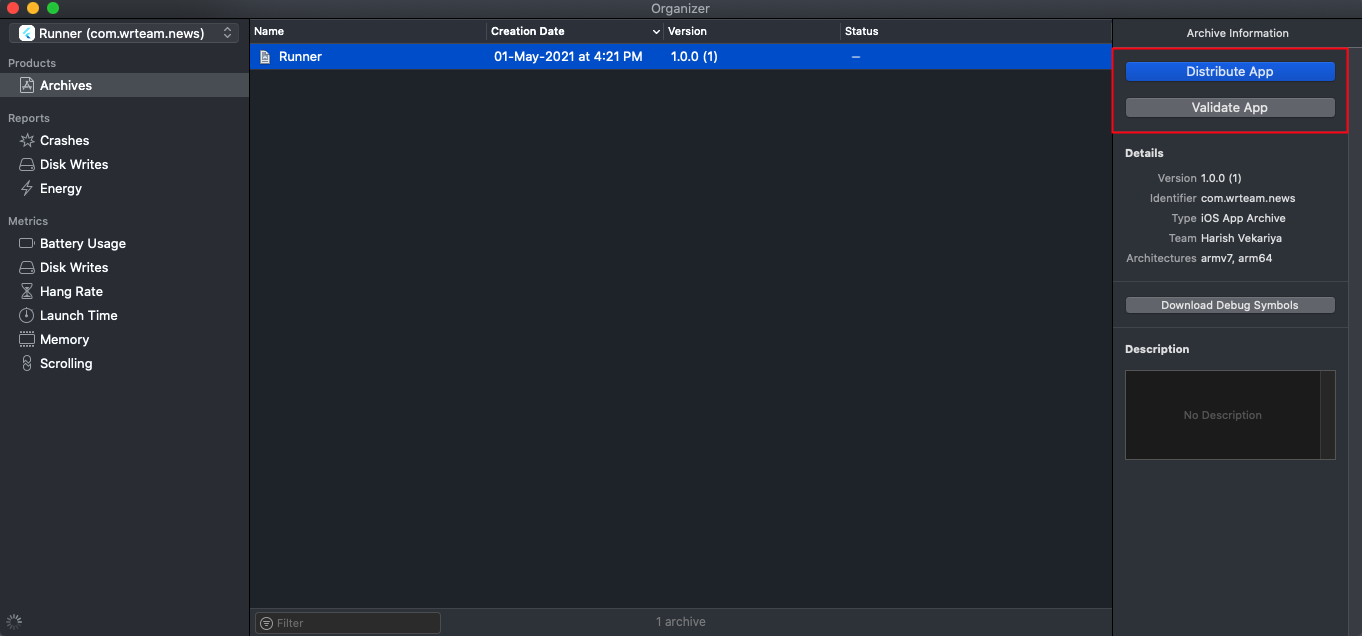
Once Build / Archive Generated, pop up window will be shown. Validate app First,
and After Successfull Validation of App, You Can Distribute App to AppStore.
- After Successful Submission of Build File, it will be Reflected to your Apple Developer Account in which we have created app with same Bundle ID. Click here for Detailed Help.
How to Solve Data safety issue in Playstore?
News Web App
MANDATORY
- Difference between SEO & without SEO web
- You can add meta title,meta description ,meta keywords for pages mentioned in admin -> system-settings -> seo-settings.
- If you have added meta title,meta description and meta keywords for news then meta title will render on title bar of every news detail page and this data will help search engines to rank up the page.
- You can share the news with its image and its title
- Meta title,meta description and meta keywords you have added in your .env file that will be same for every page.
- You can't share the news with its image and title.
- Deploy (WITH SEO) => Youtube Link
- Local Build and Deploy (WITHOUT SEO) => Youtube Link
- How to setup Web Version
- Install Node JS : Visit Node JS Official website : https://nodejs.dev/en/learn/how-to-install-nodejs/ for full installation guide.
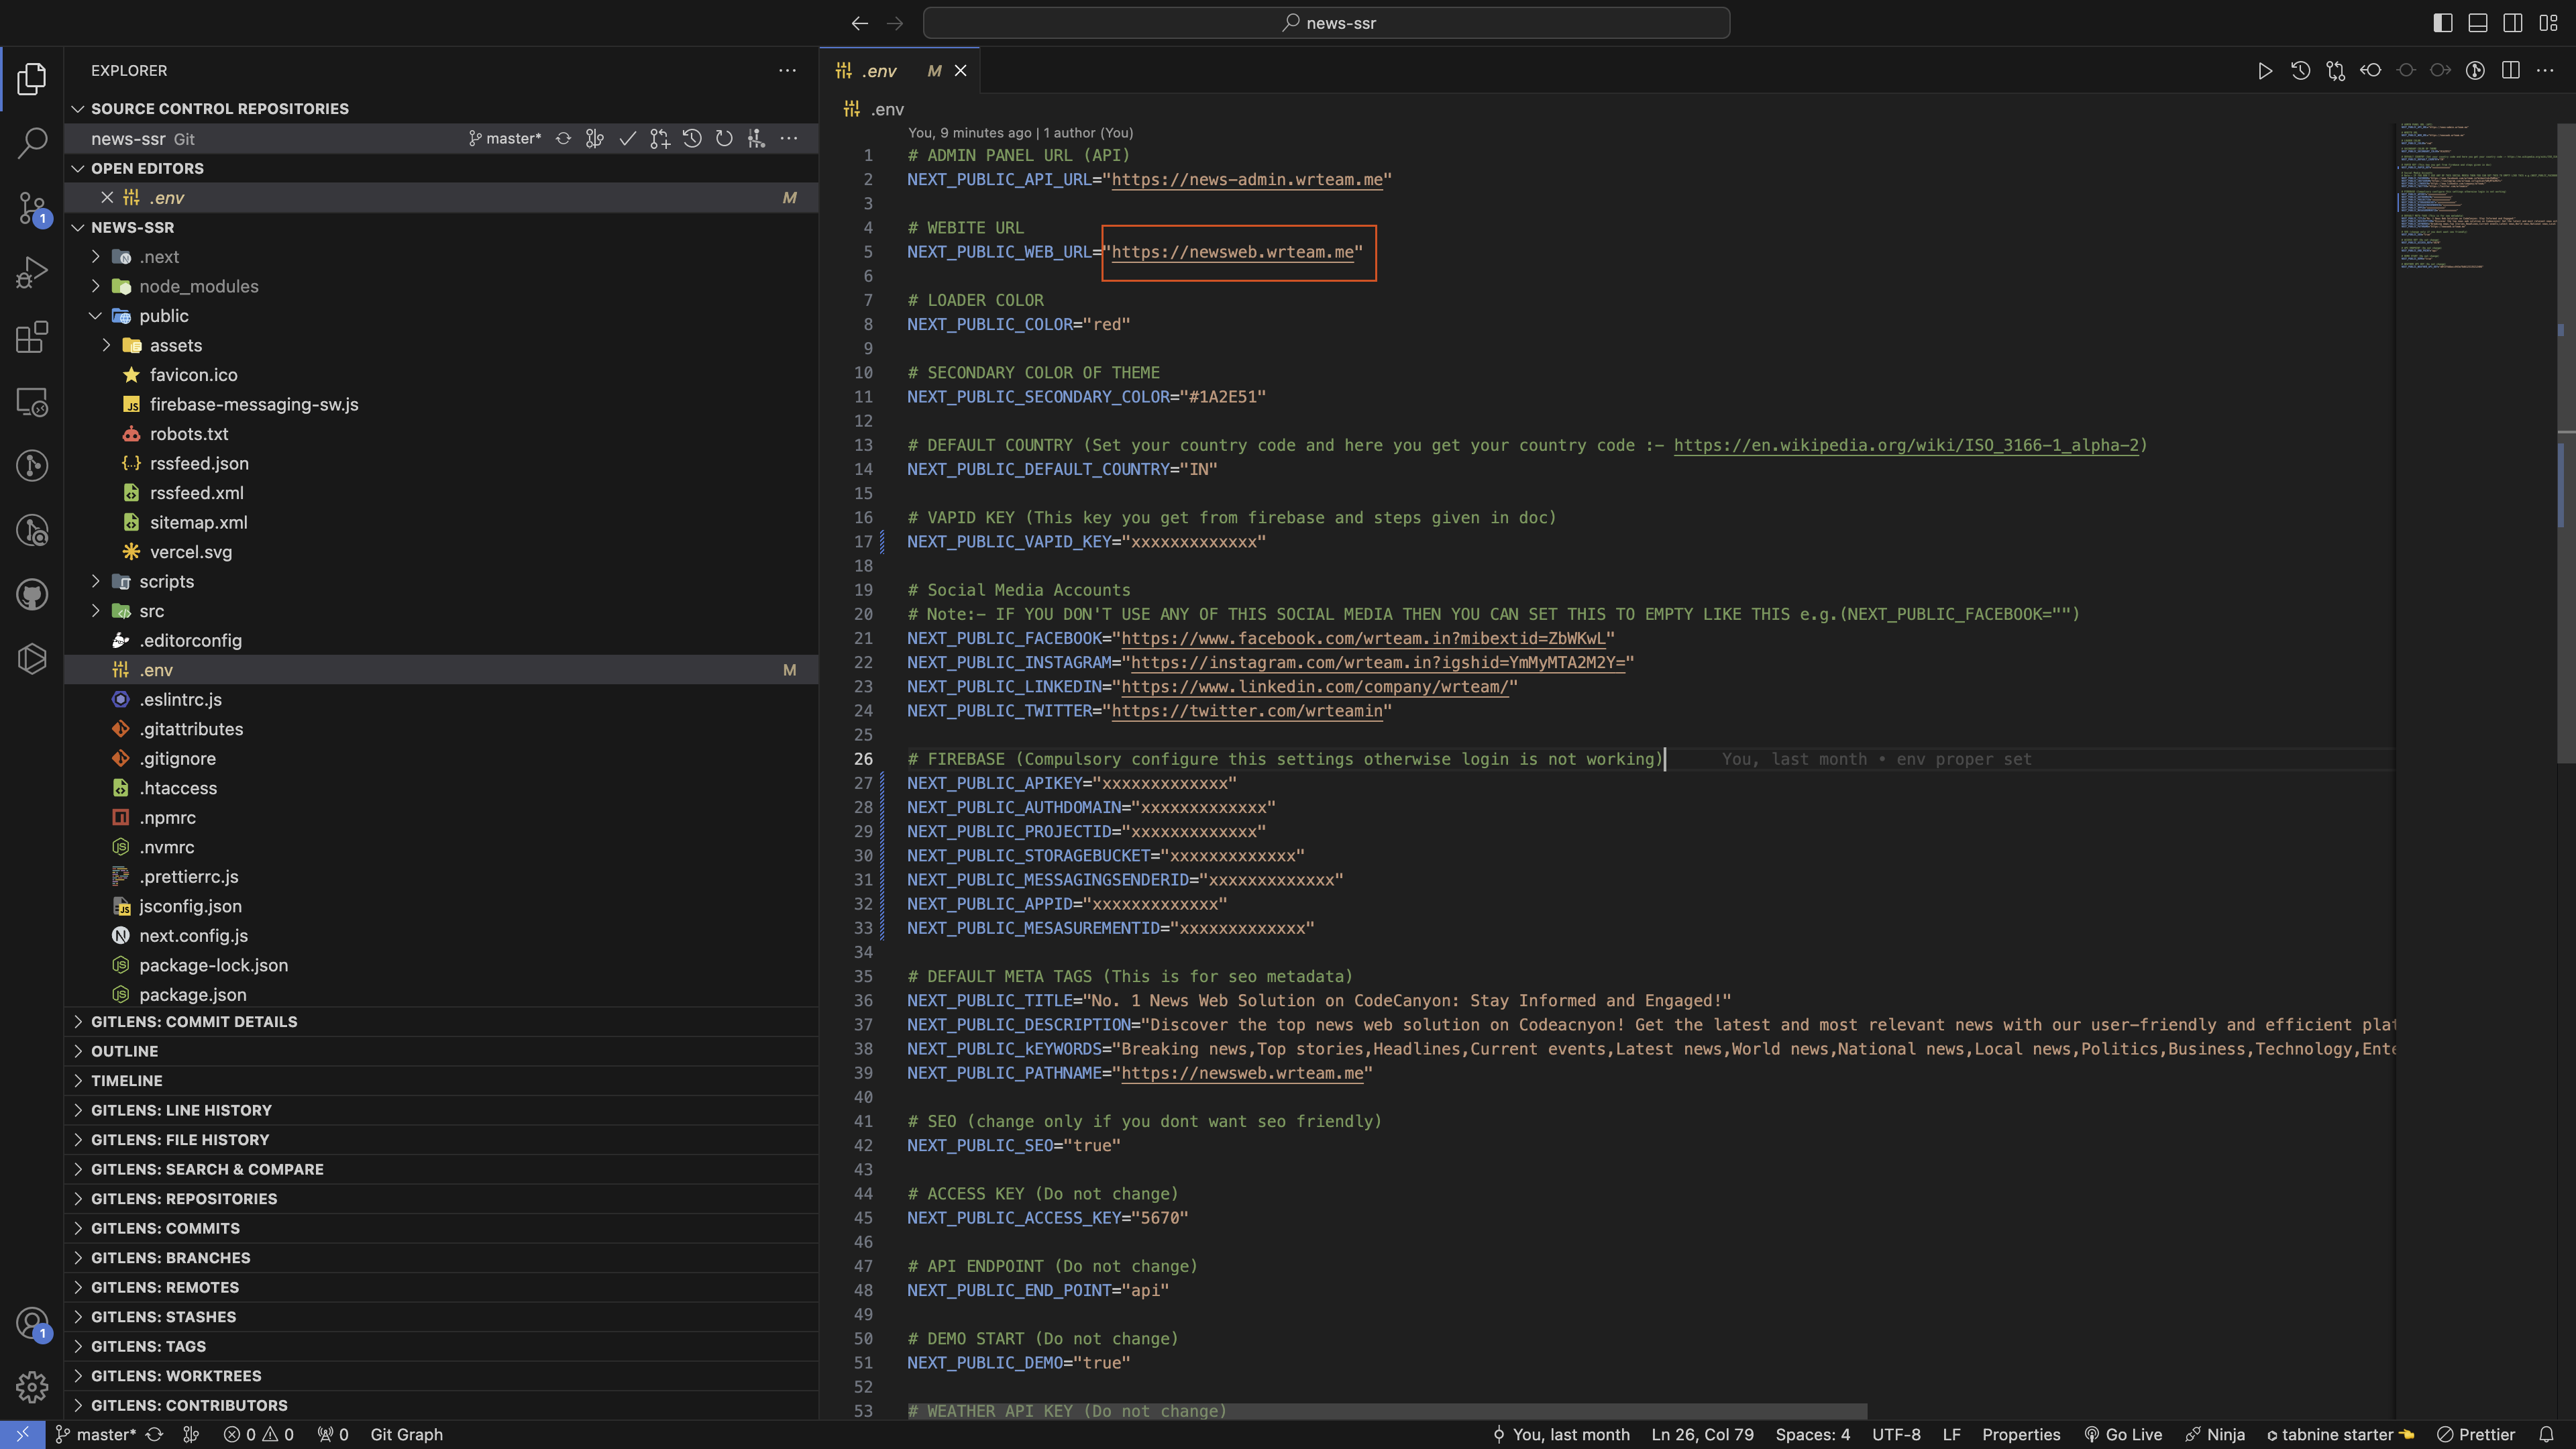
- Where to set API URL (Admin)
-
API Url is your admin panel url which is used to fetch the data from admin panel
Open .env file and change the following details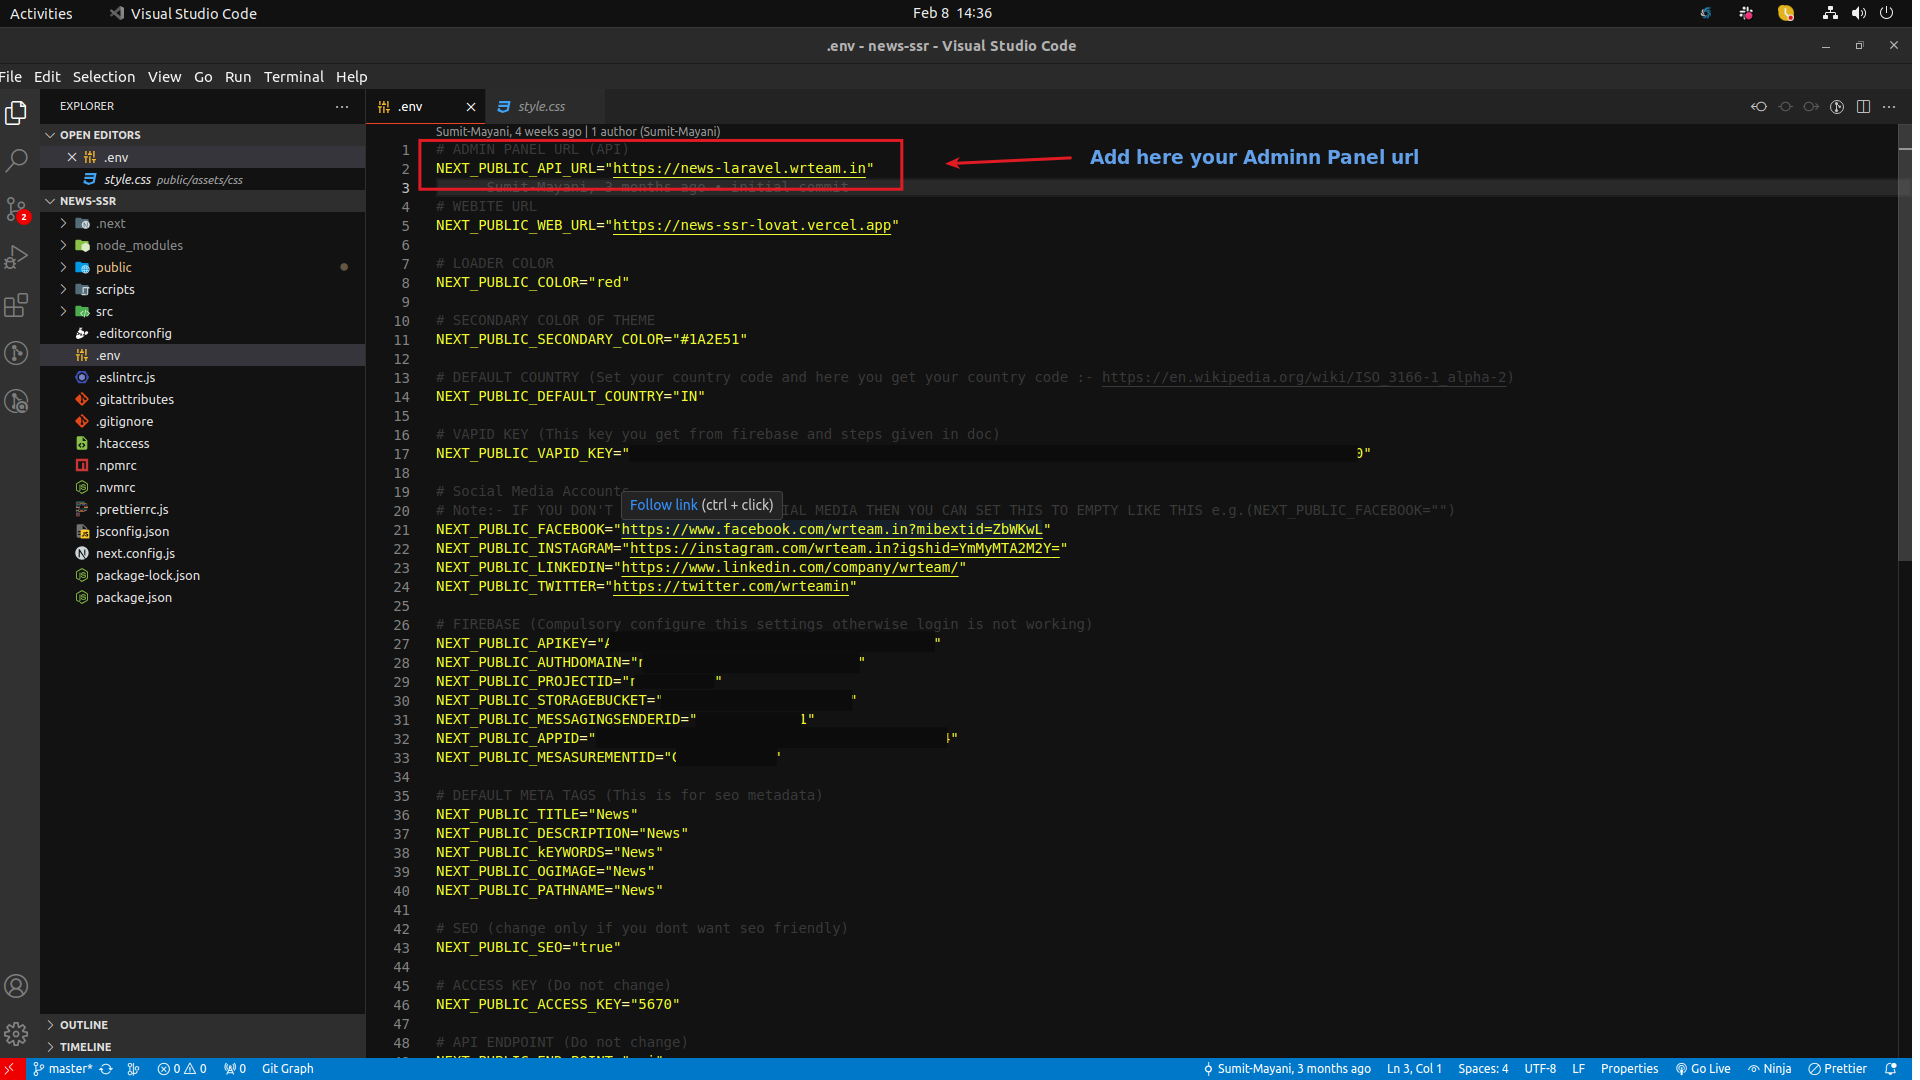
- How to Connect Firebase with your Web News.
-
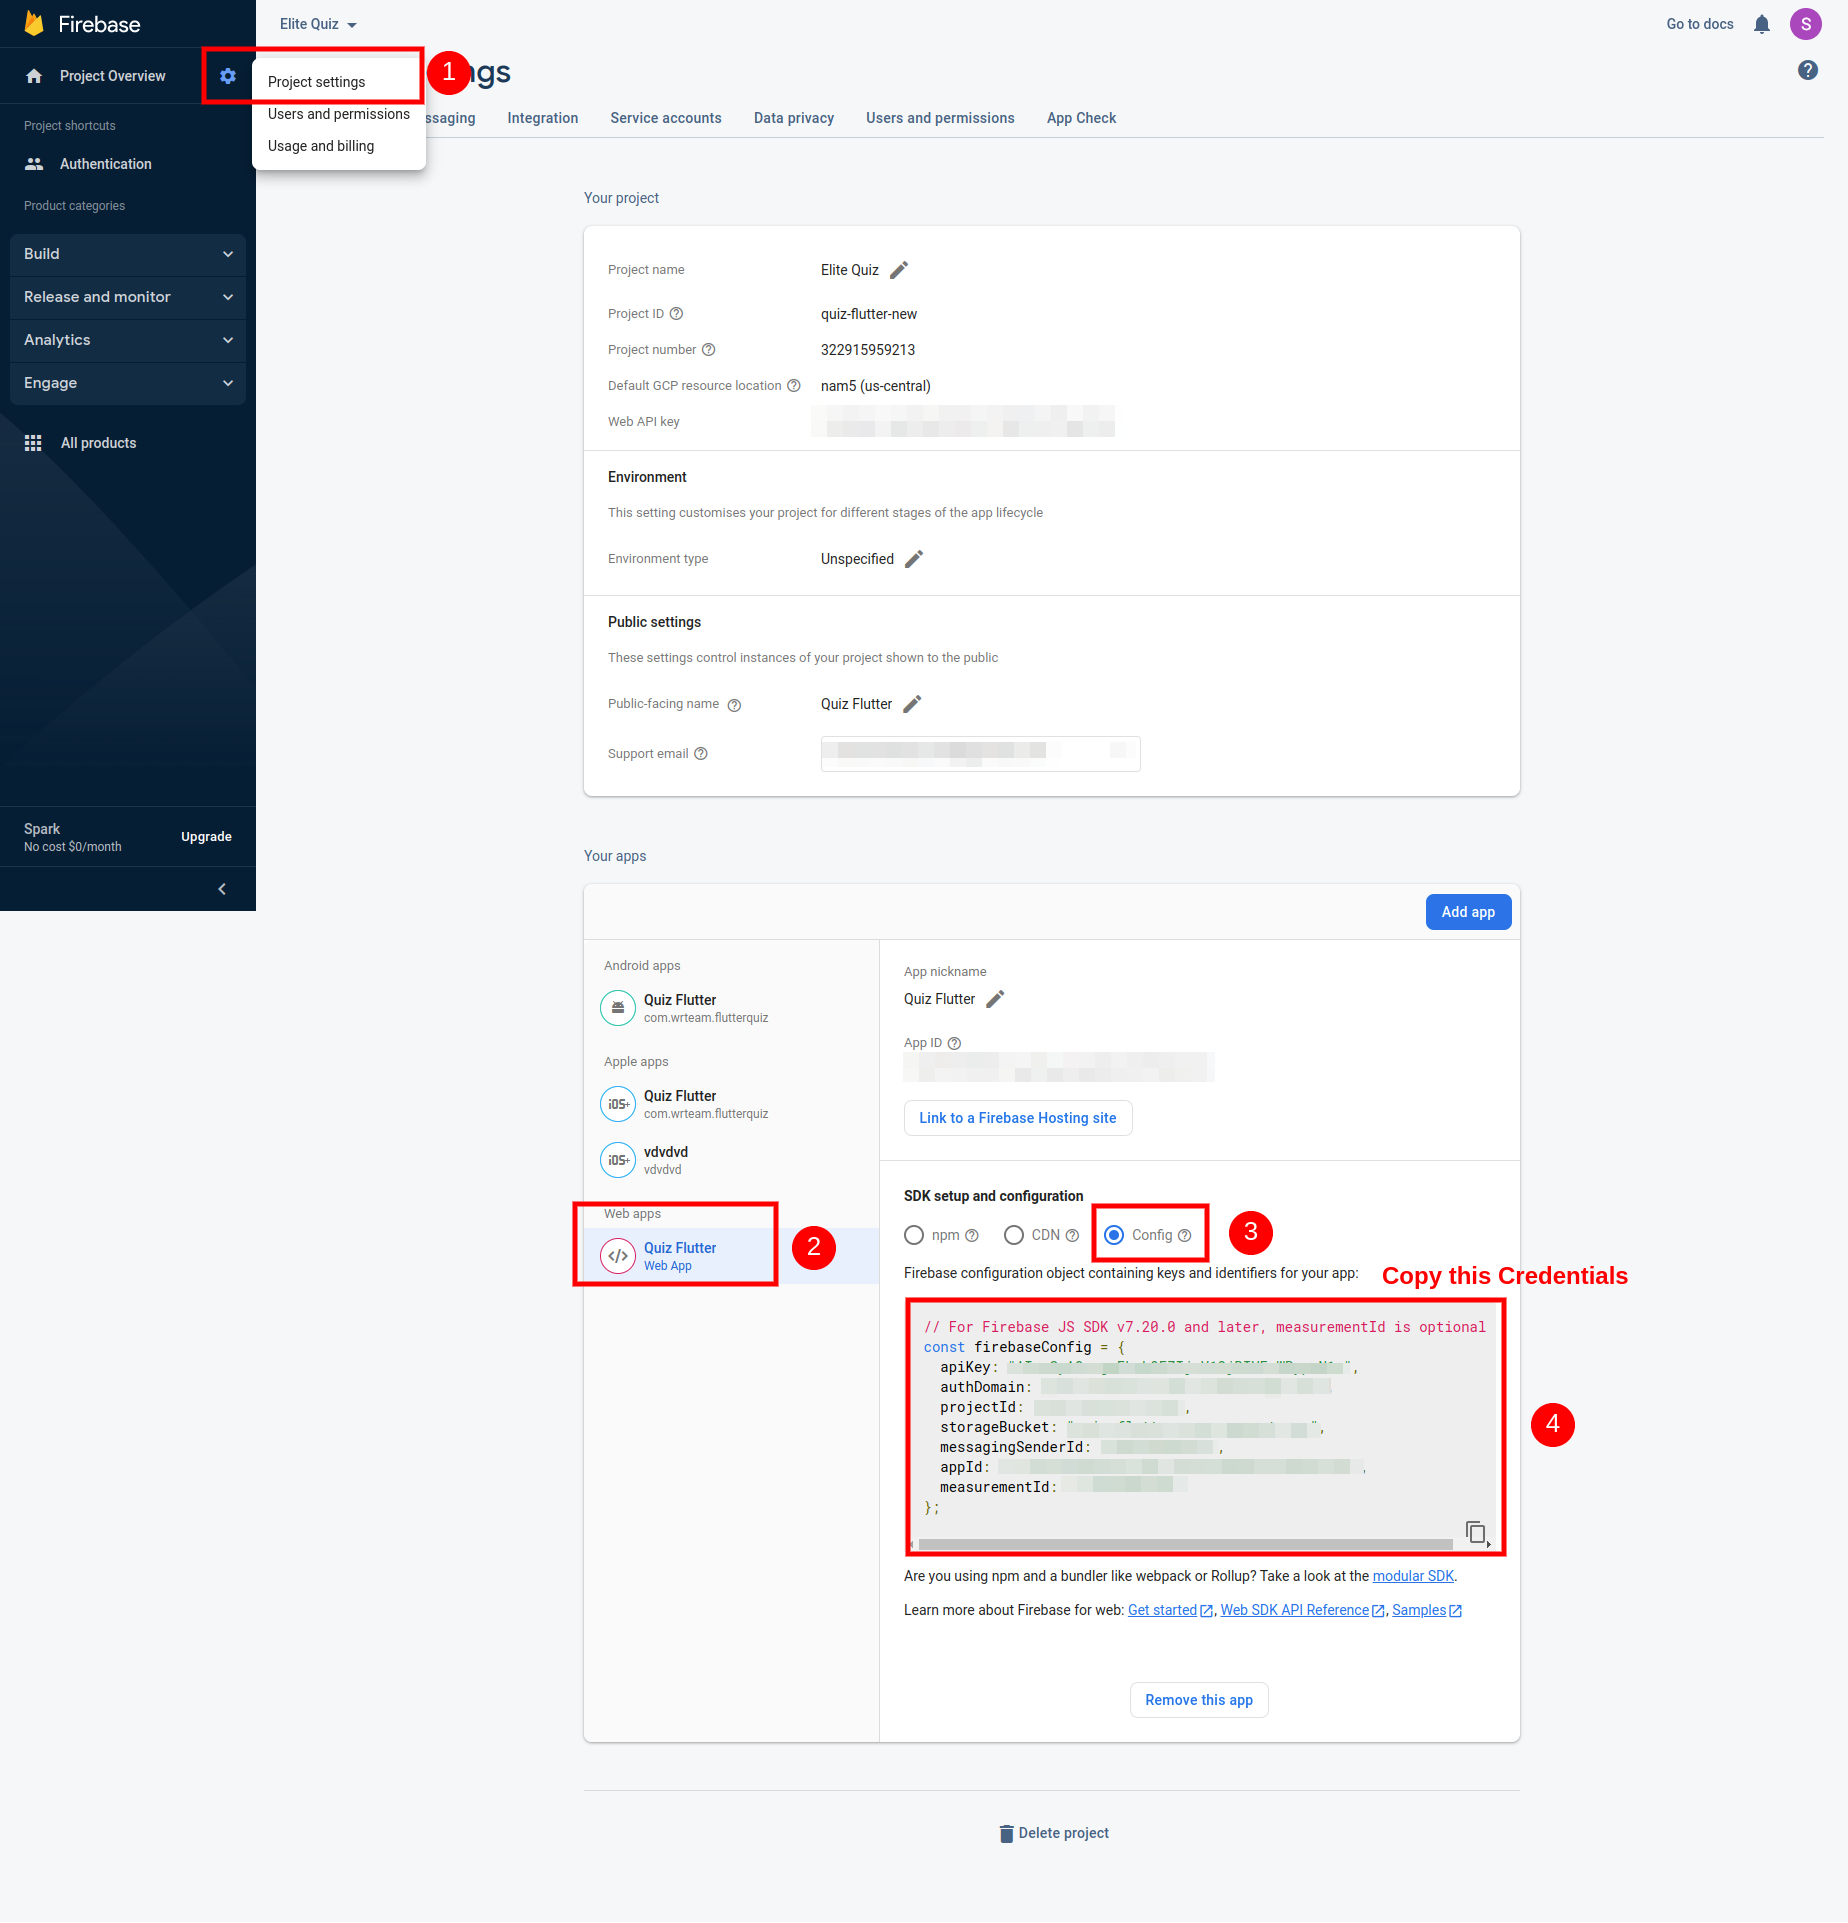
First you need to create a Web project inside your Firebase Project.
For that open your firebase project in console and click on this tiny web icon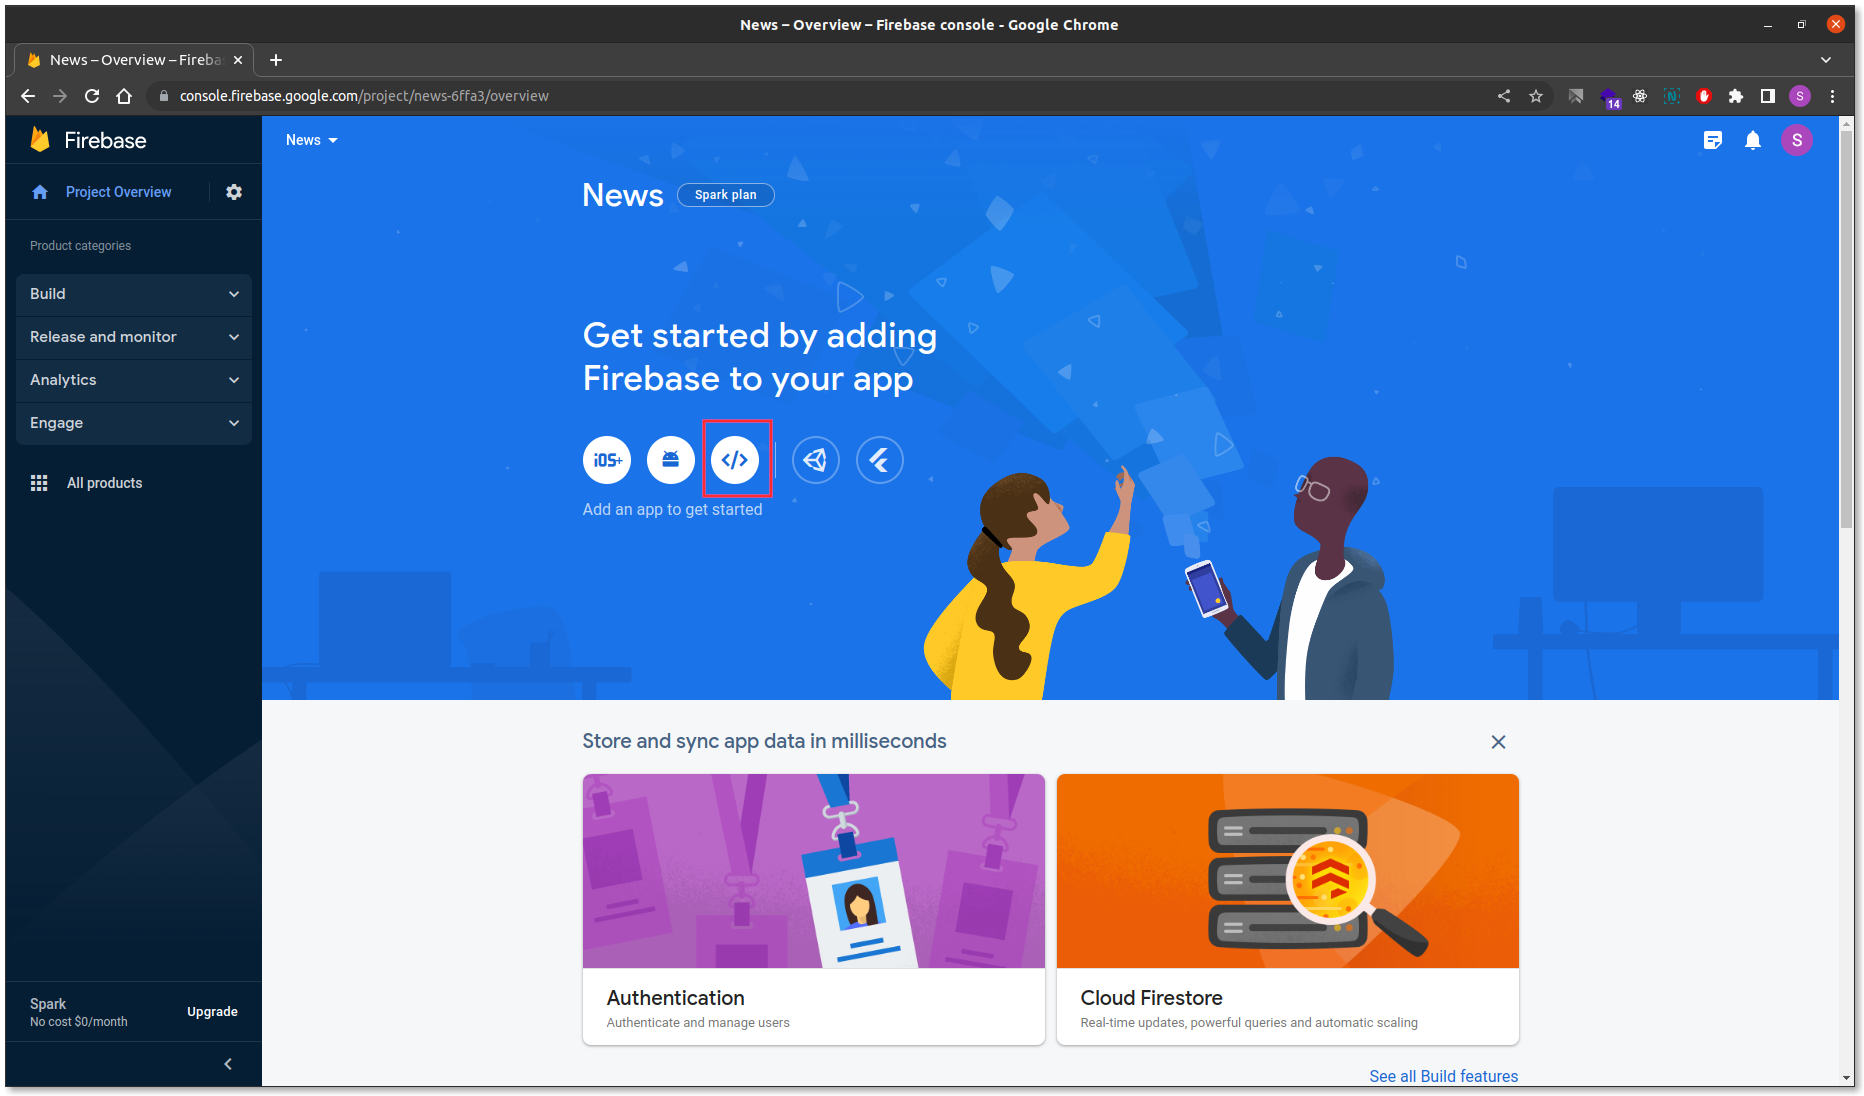
-
After clicking on Web app you will be able to see this Screen.
Add your web app name and also make sure you don't forget to check the checkbox.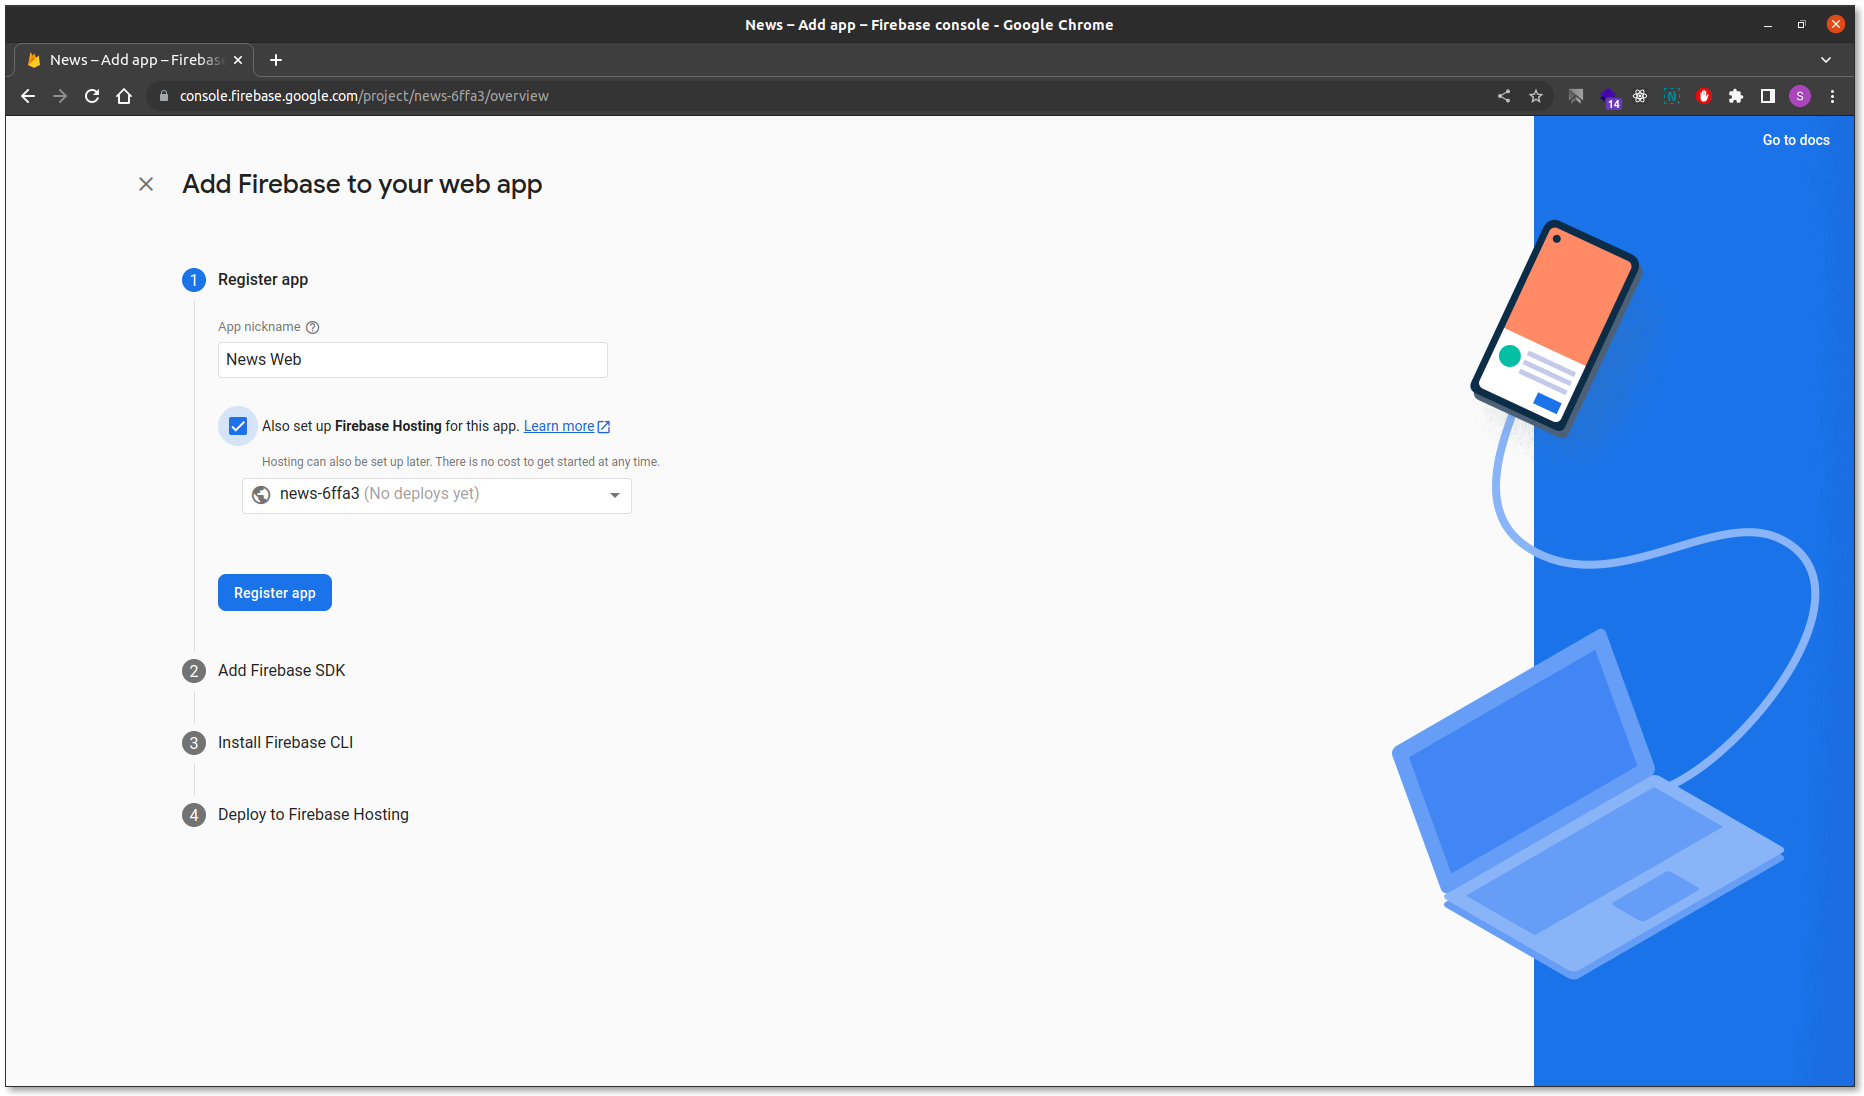
-
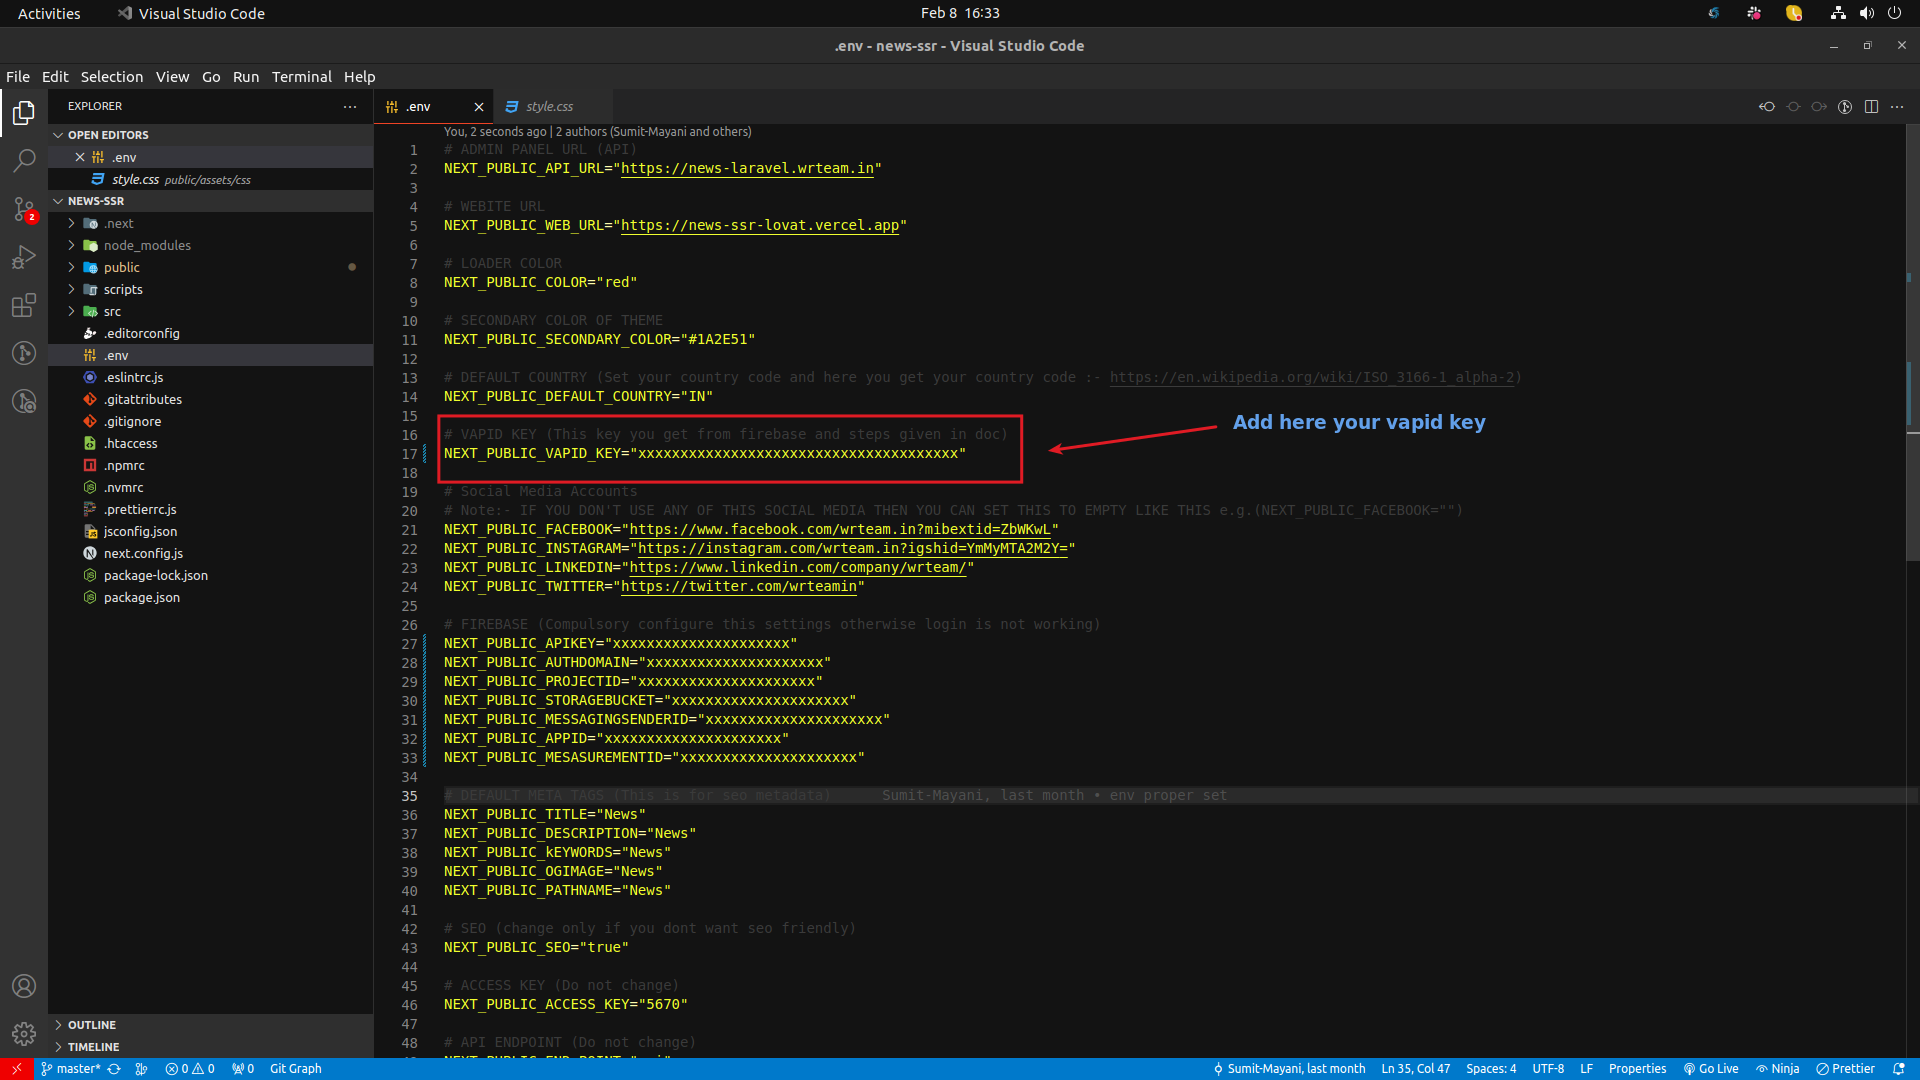
Now Copy this Firebase Credentials.
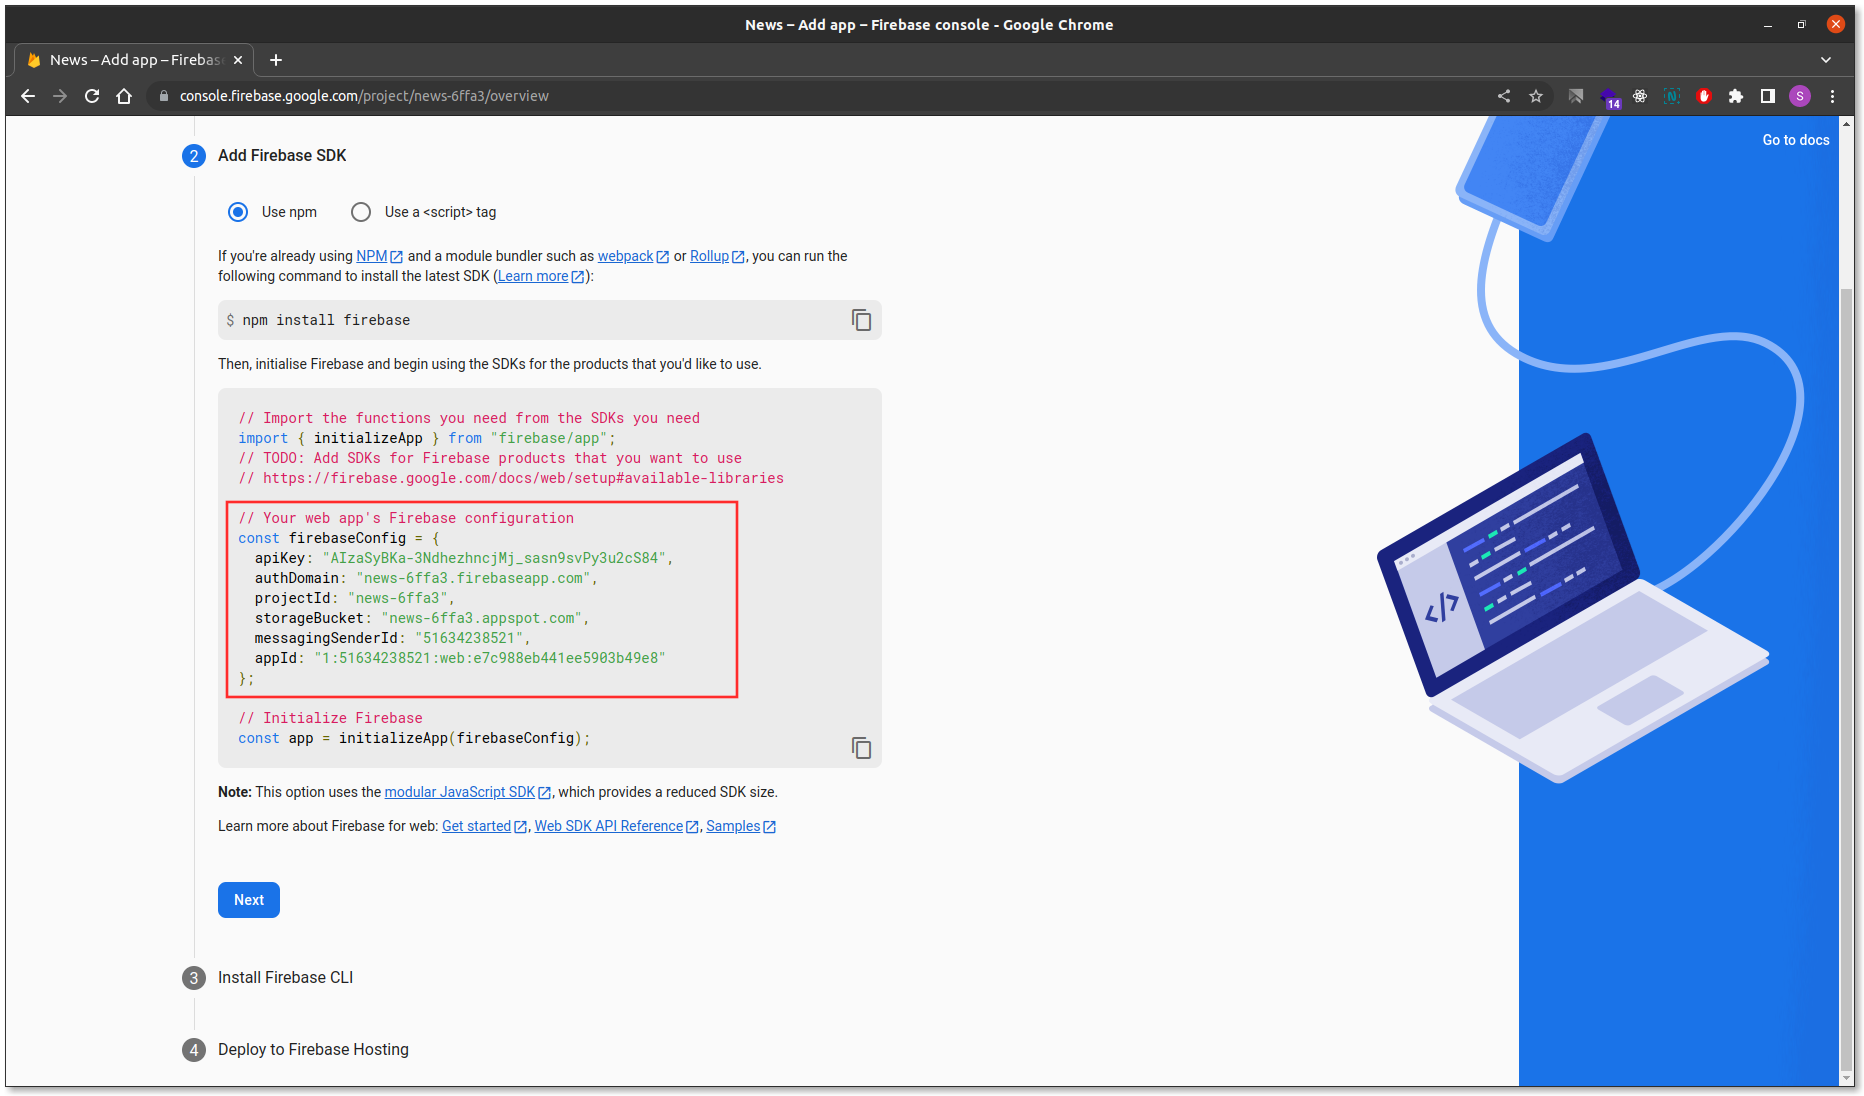
-
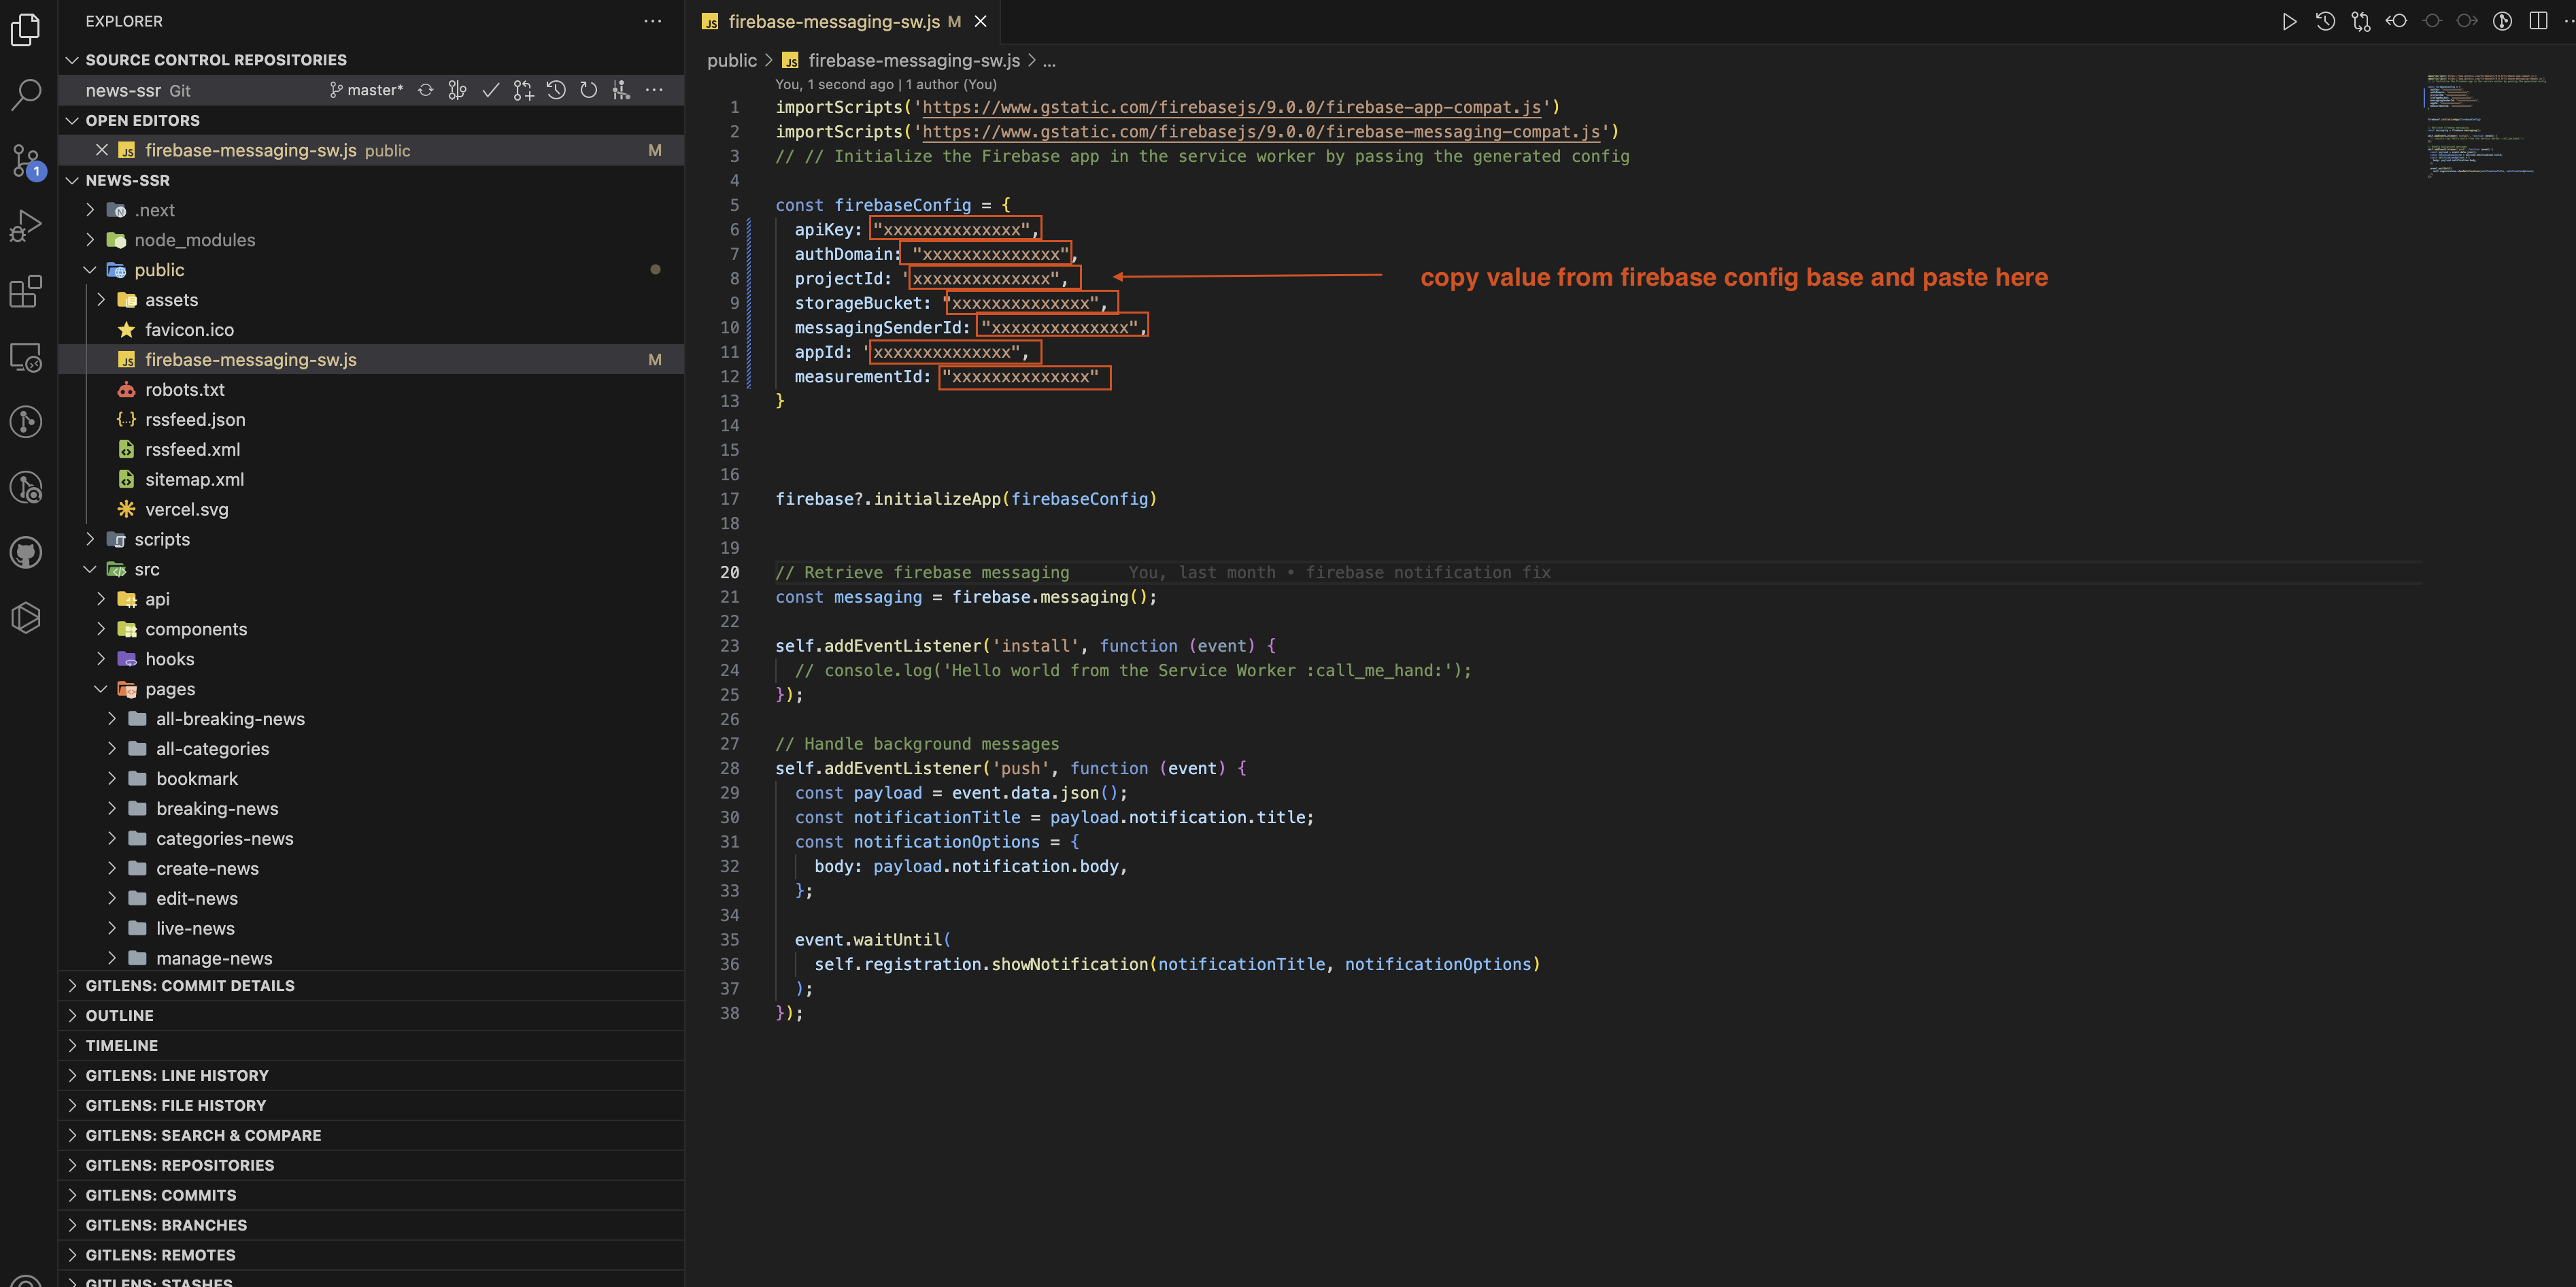
And paste this your Credentials in .env and
public/firebase-messaging-sw.js File.
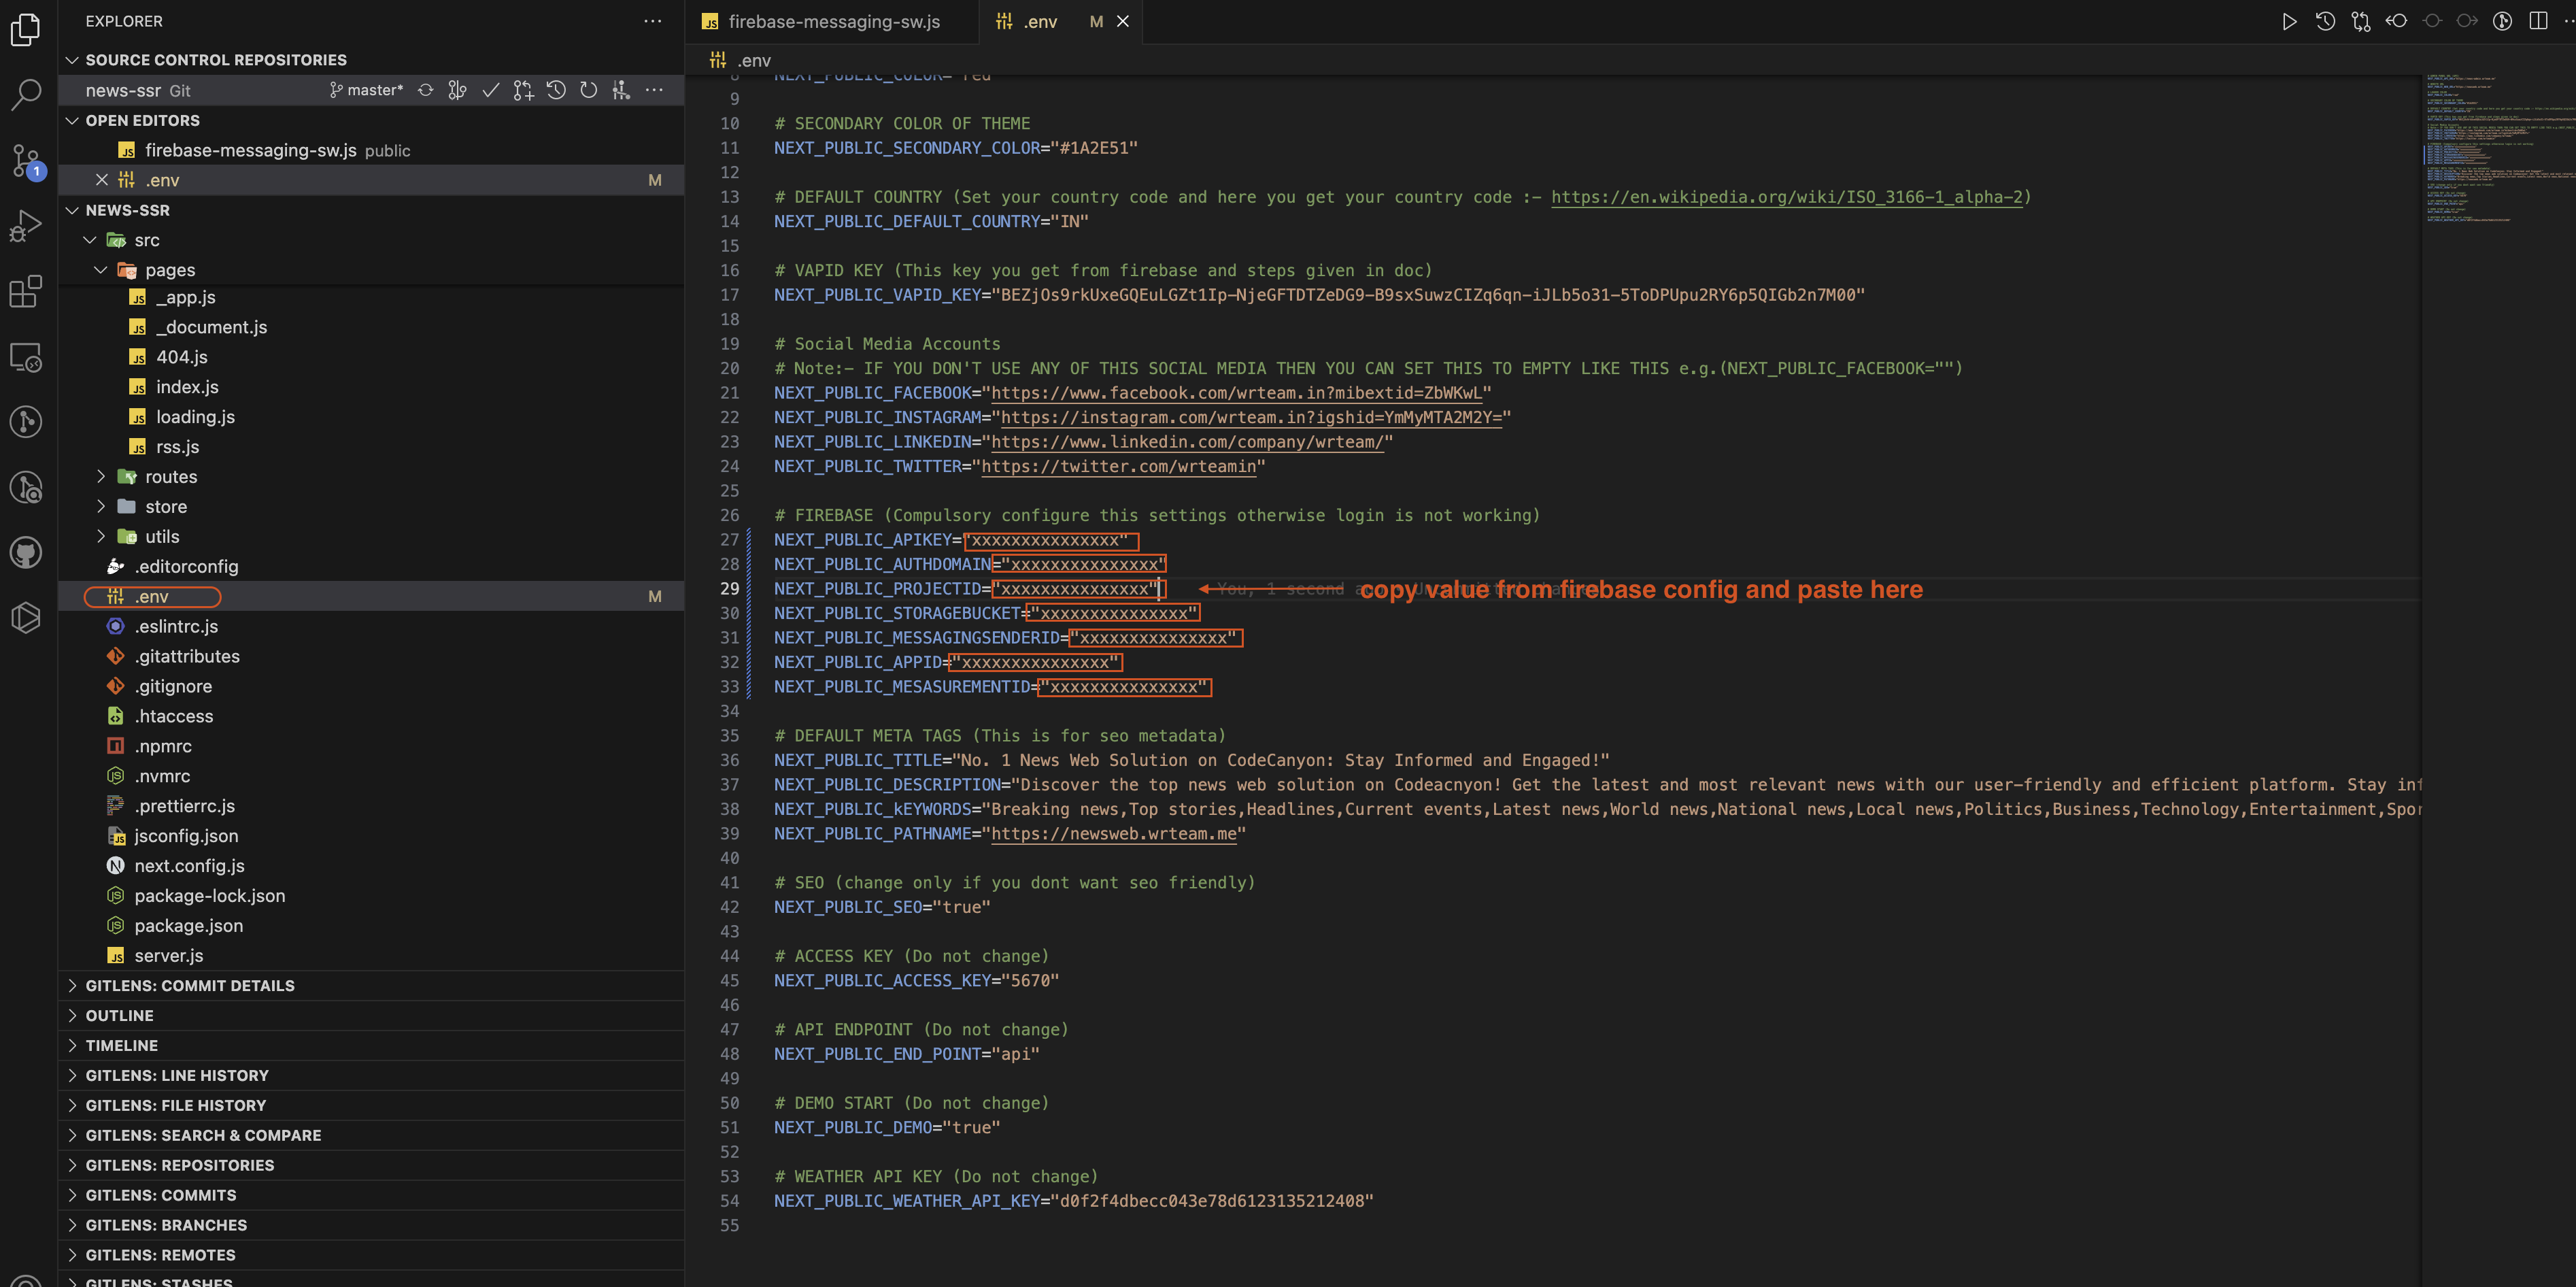
-
open firebase account go to project settings -> cloud messaging -> Web
configuration and select key and paste in .env file

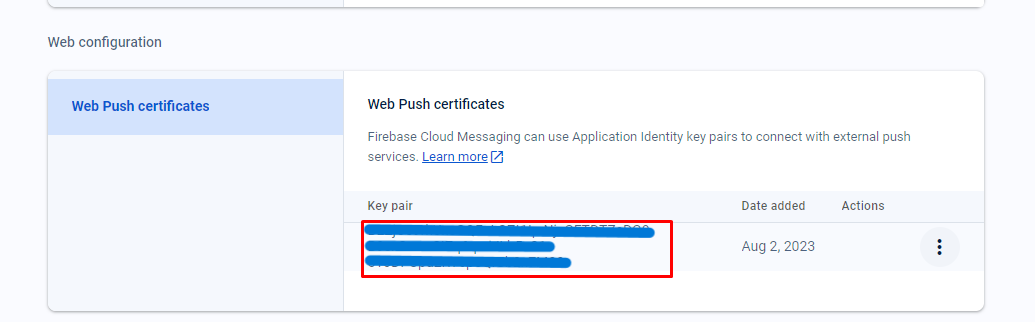
-
Note : Skip this Step if you have already copy pasted the credentials
If you have forget to copy your firebase credentials then you can always find your credentials by following this steps.
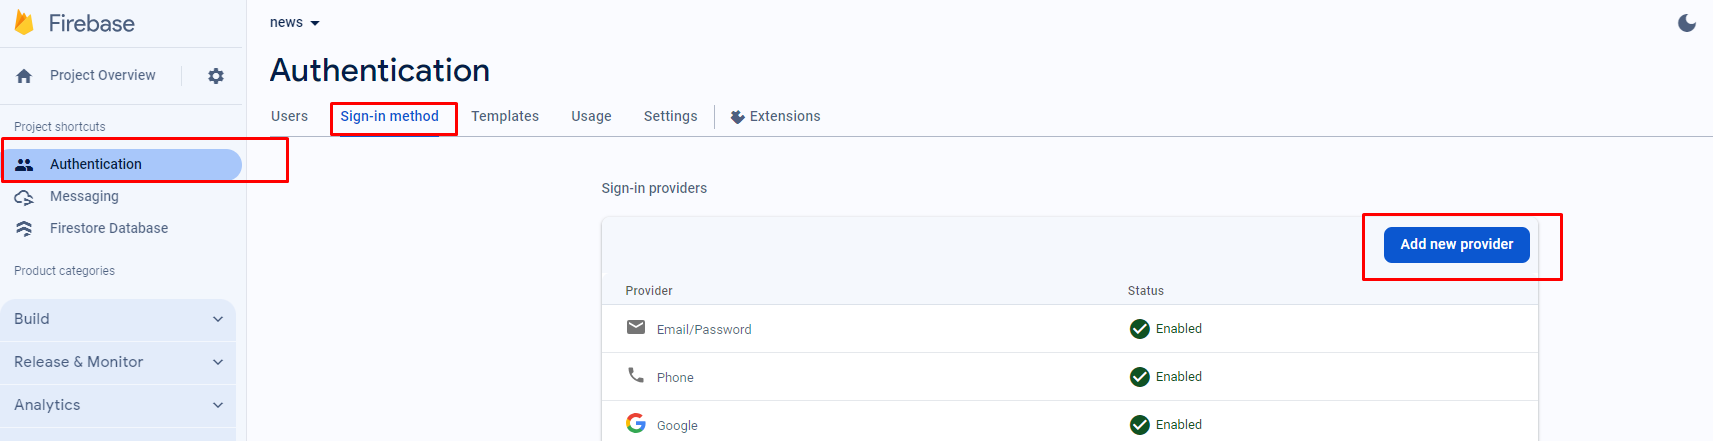
-
For Login Provider open authentication -> sign in method
-
Now you have to add your Web domain to your Firebase Project
1. Open your Firebase Project 2. Go you Authentication/settings/Authorized Domain 3. Click on Add Domain 4. One Popup will open add your domain name without http/https in that popup and click submit.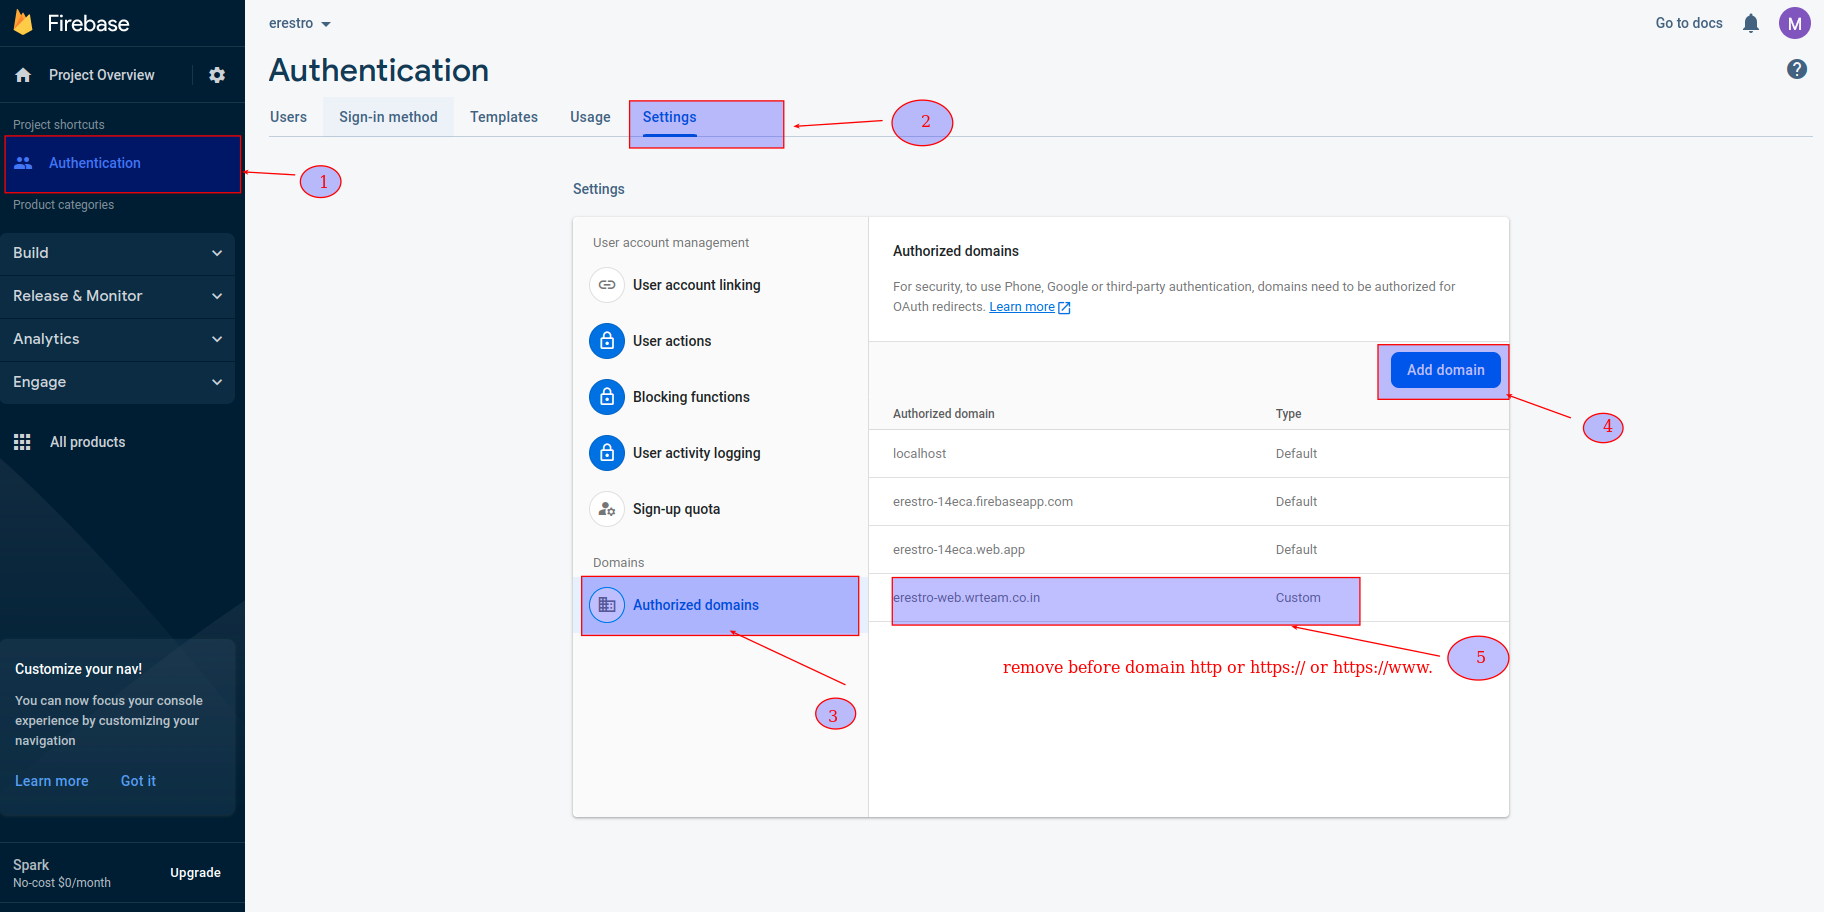
- Congratulations. You have successfully connected your Web application to your firebase project. Now you are good to go ahead.
- How to turn ON Mobile Login
-
Go to admin panel
system-settings -> general-settings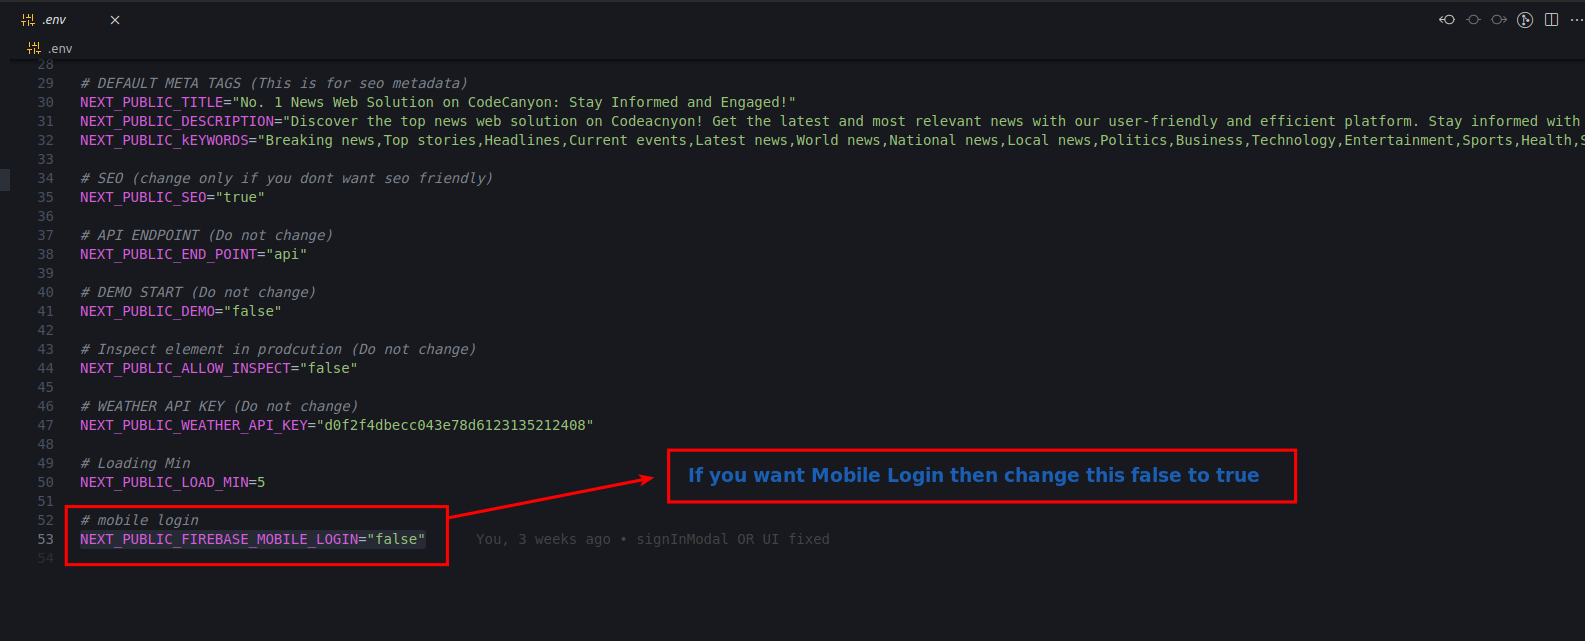
- How to turn ON Rss-Feed
-
Go to admin panel
system-settings -> general-settings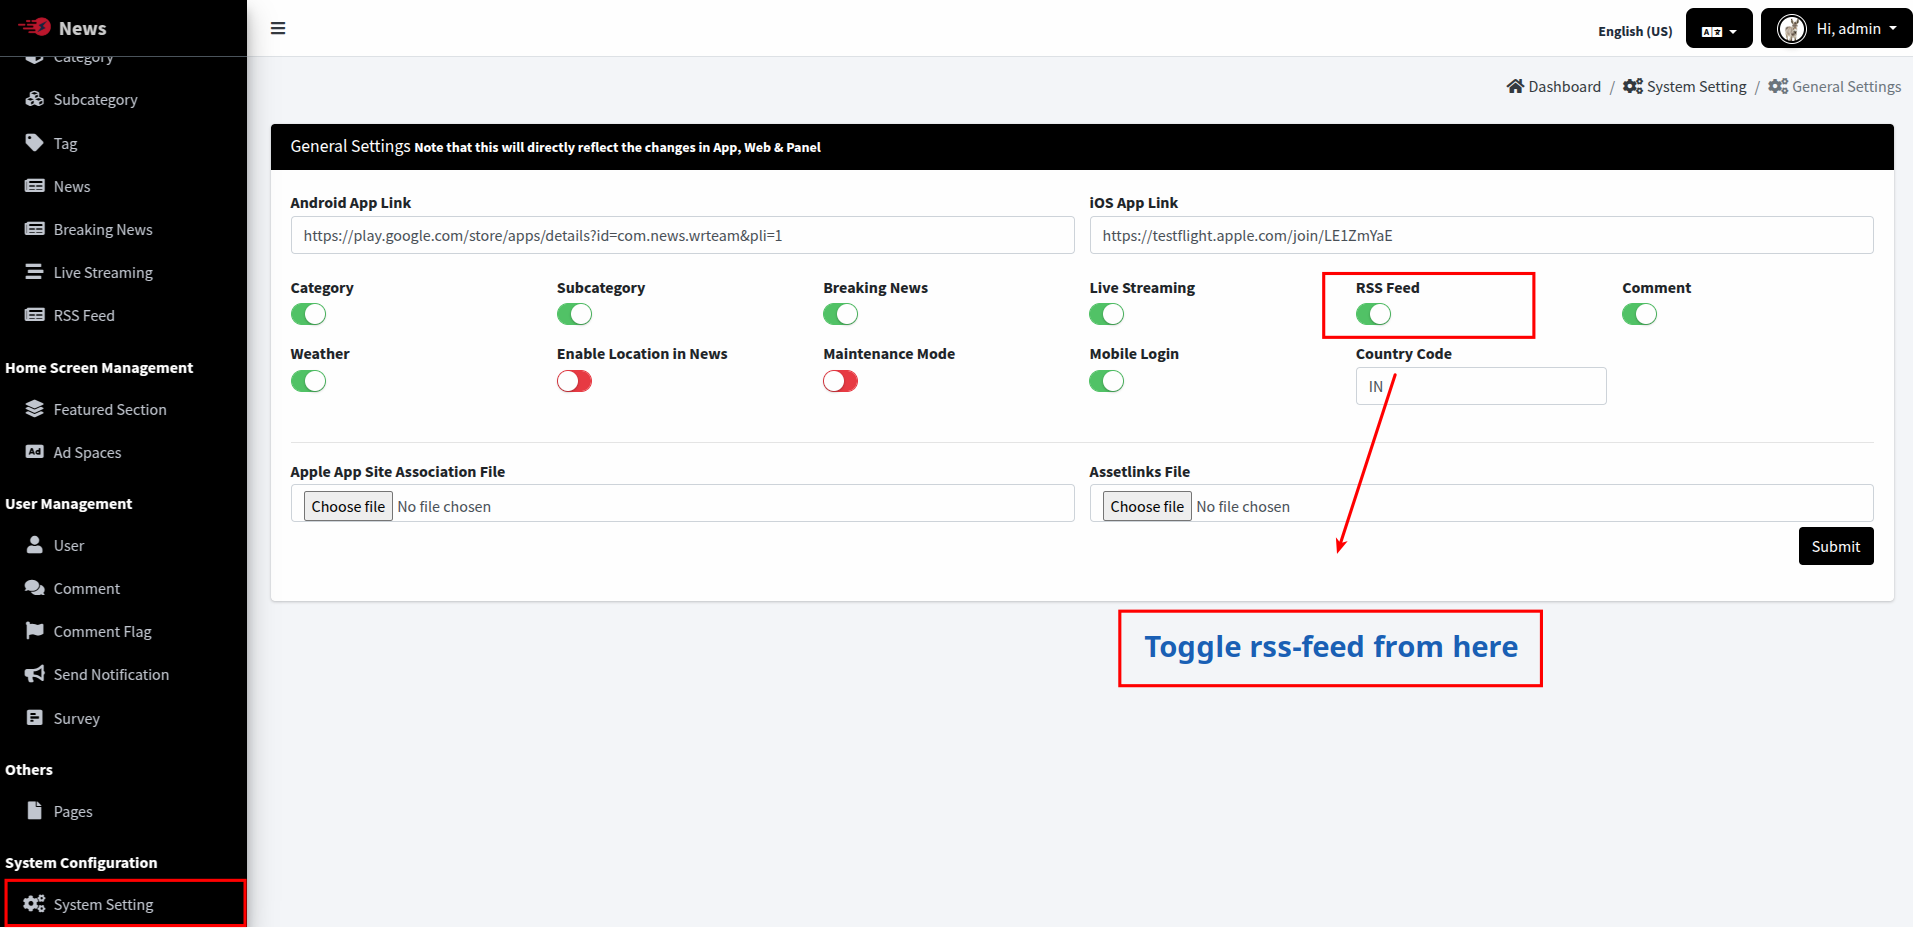
- How to change Web Application name
-
Change application name for your Web application. Go to
.env file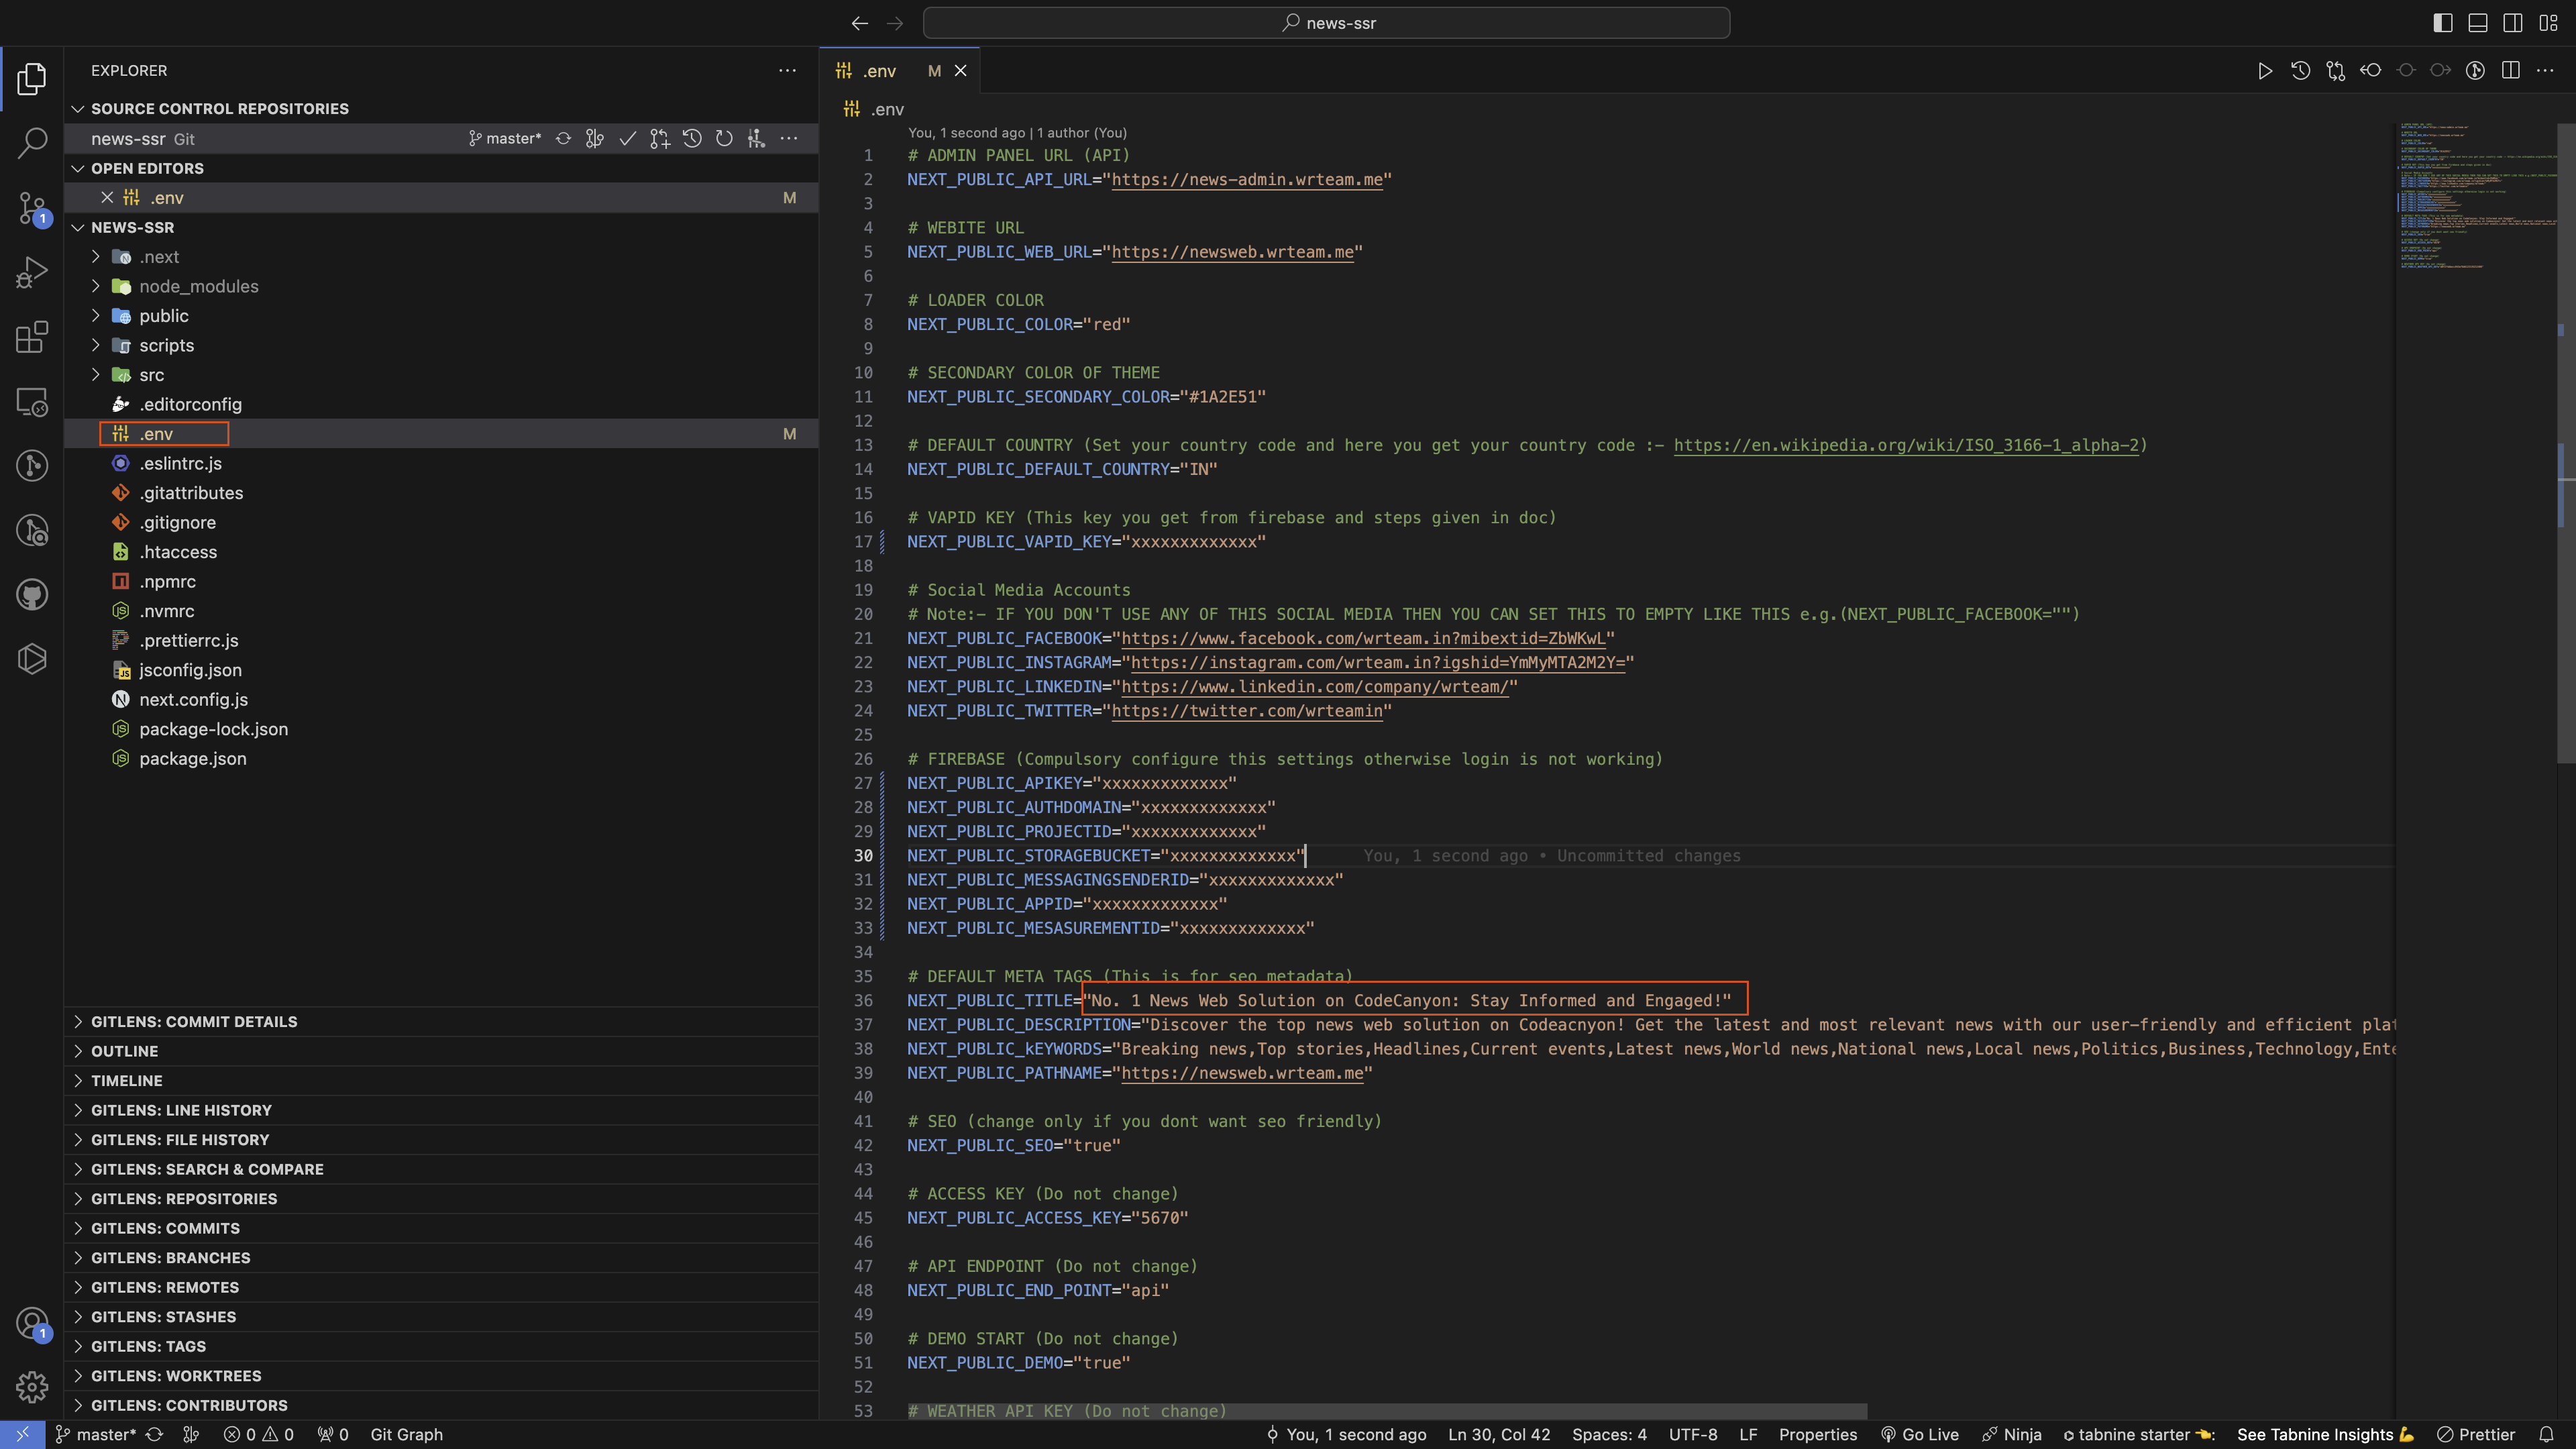
- How to Set Favicon Icon
-
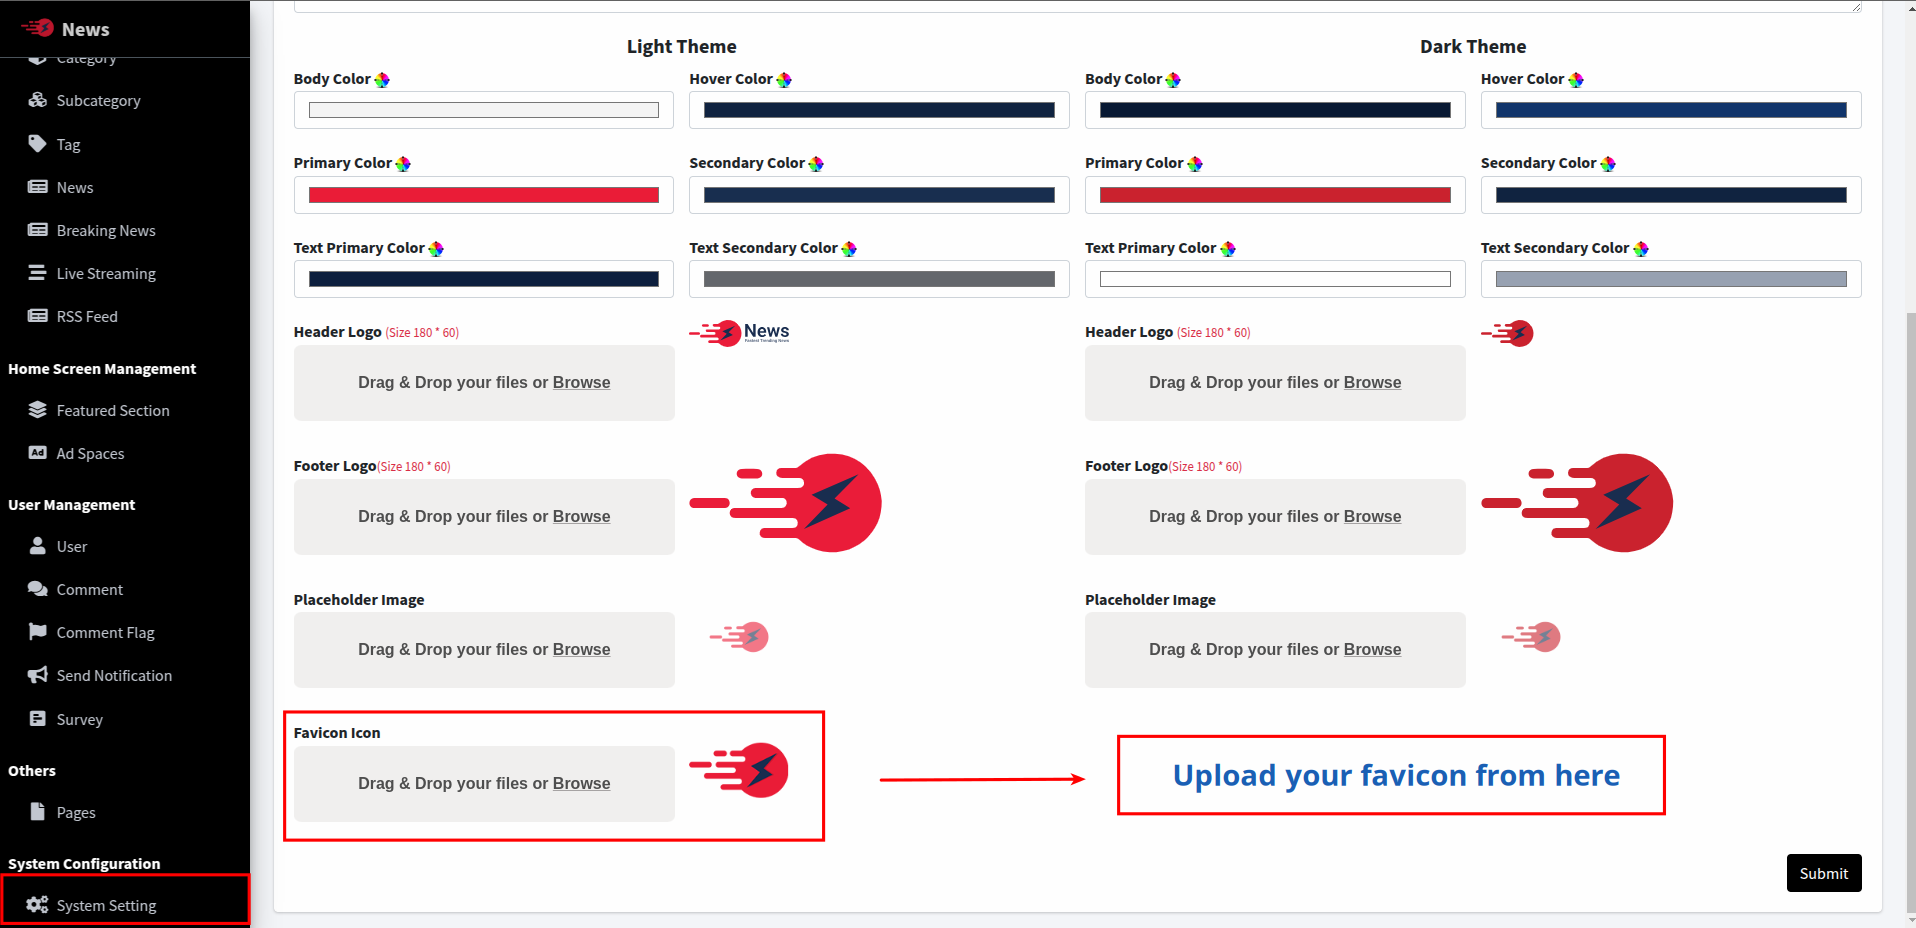
- How to Set Logo, Theme Color, Web Name, Footer Logo, Footer Description etc
-
go to admin panel ->
system settings -> web settings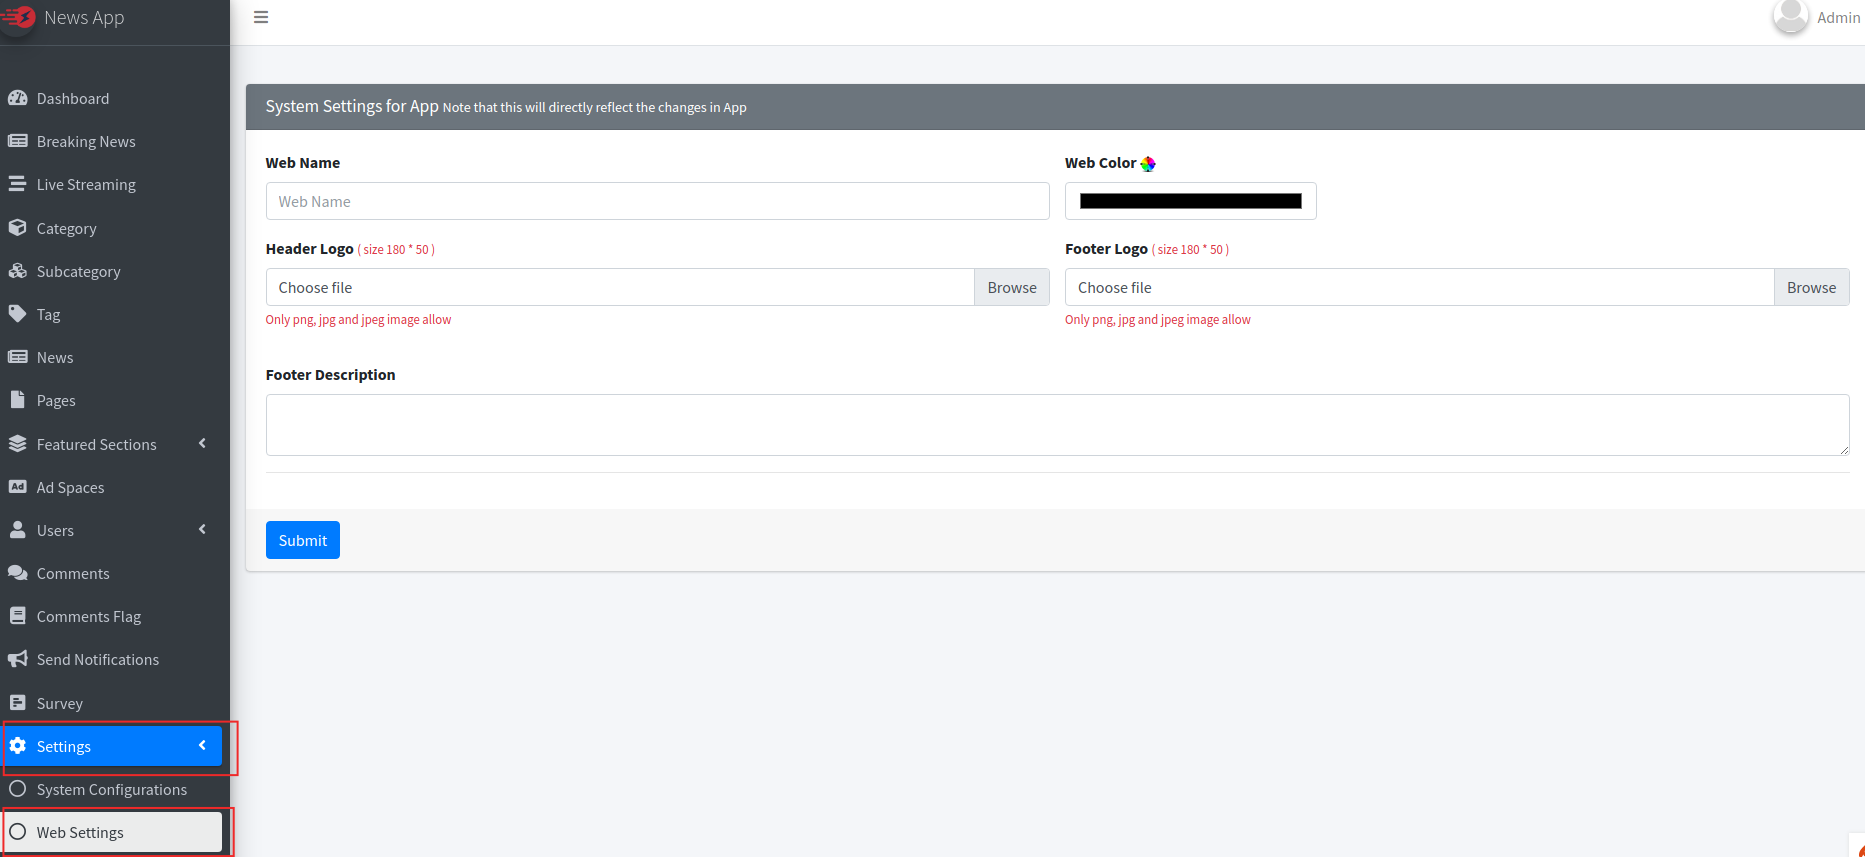
- How to add Social Media Link and its Icon
-
Go to admin panel ->
system settings -> social-media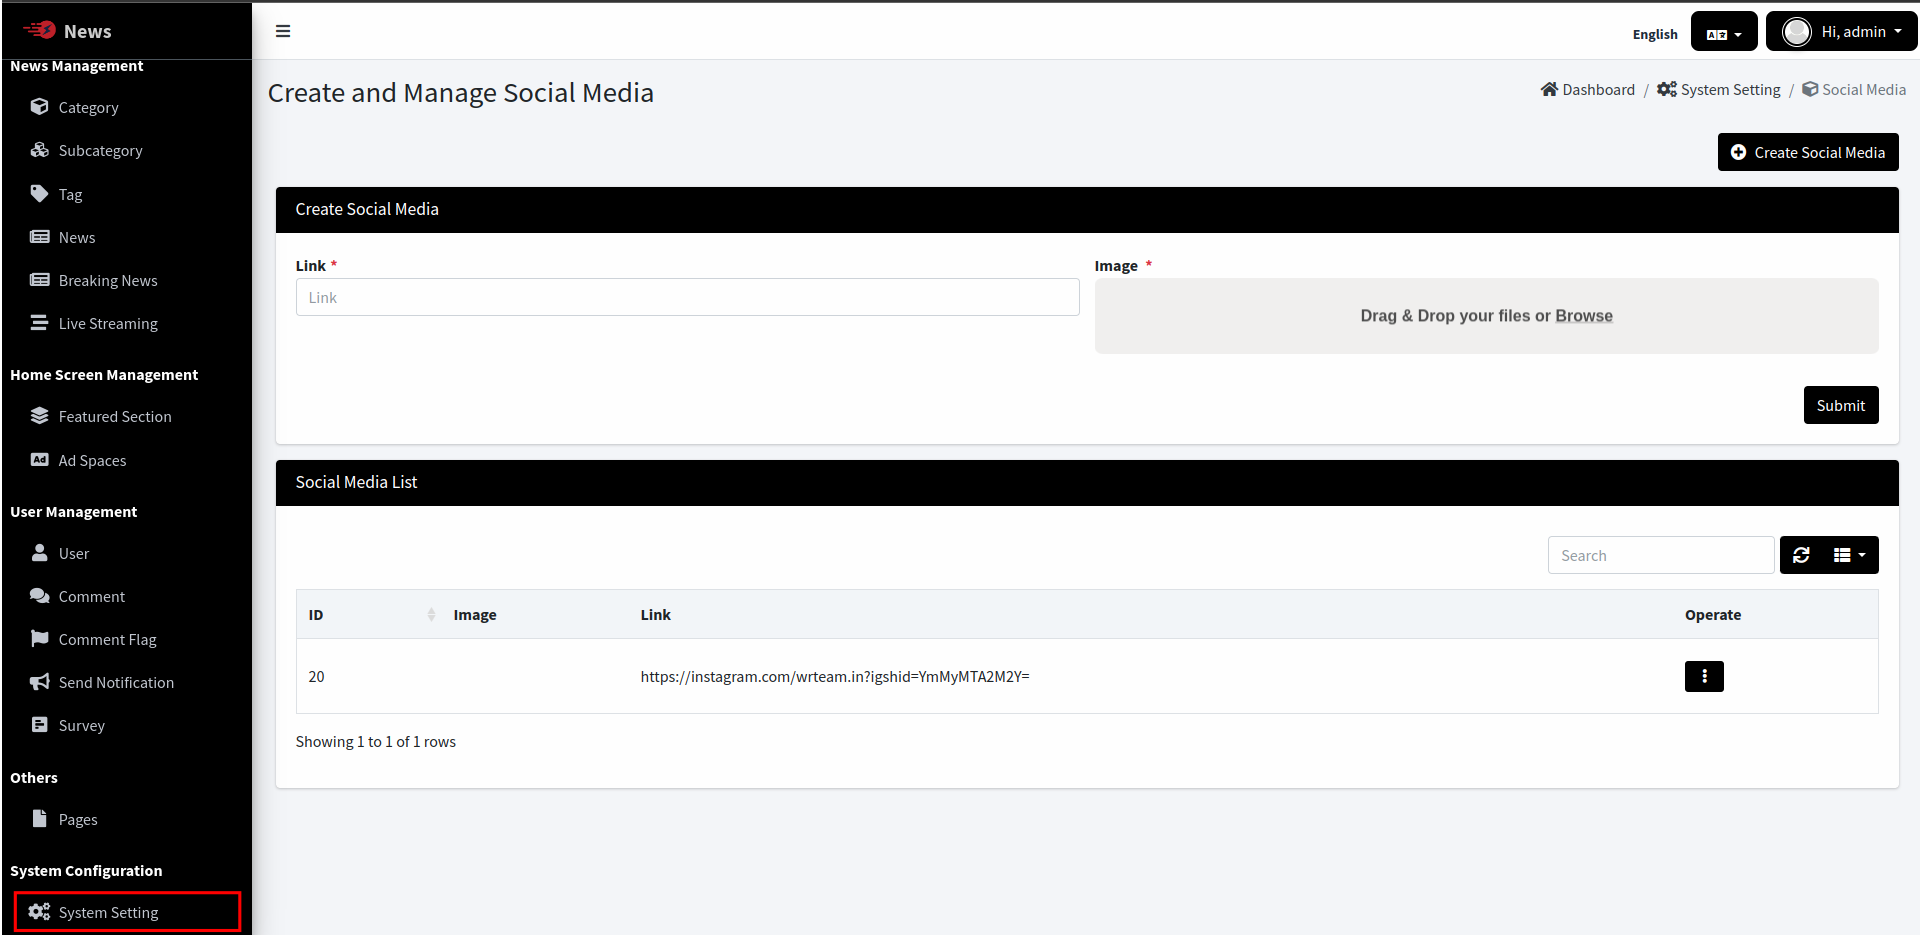
- How to add Android and iOS App link and Toggle Cookies Pop-Up
-
Go to admin
system settings -> web settings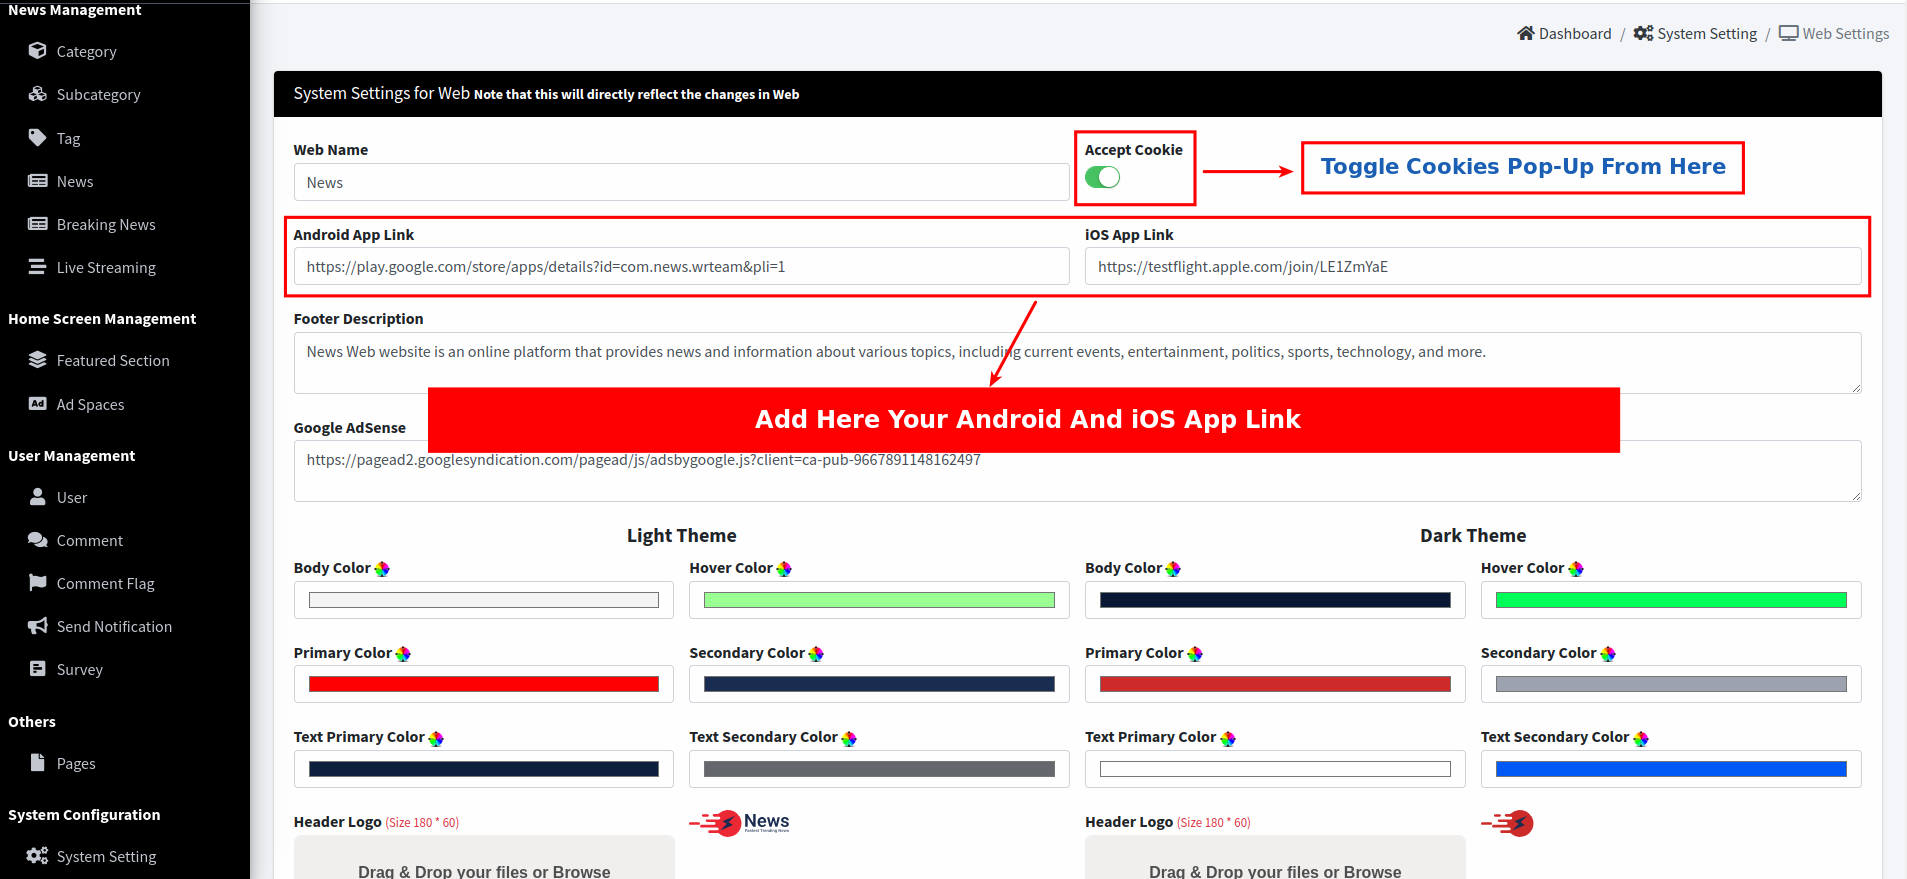
- How to add Default Image
-
Go to admin
system settings -> web settings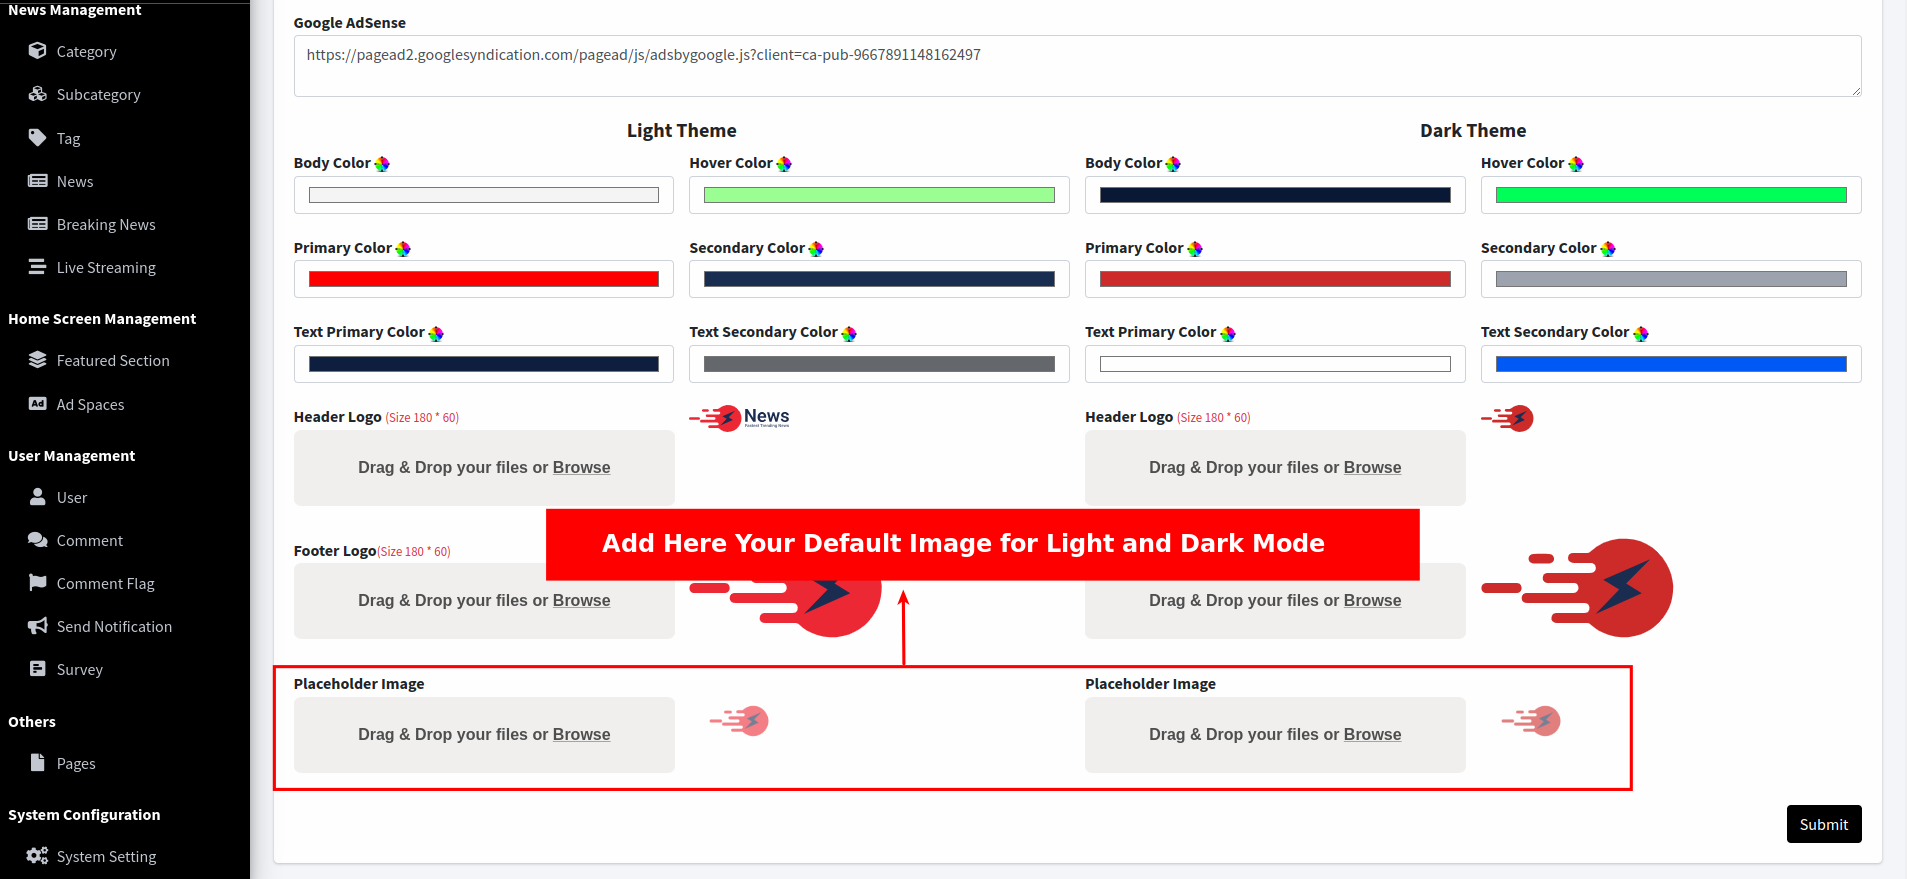
- How to On Maintenance Mode
-
Go to admin
system-settings -> general-settings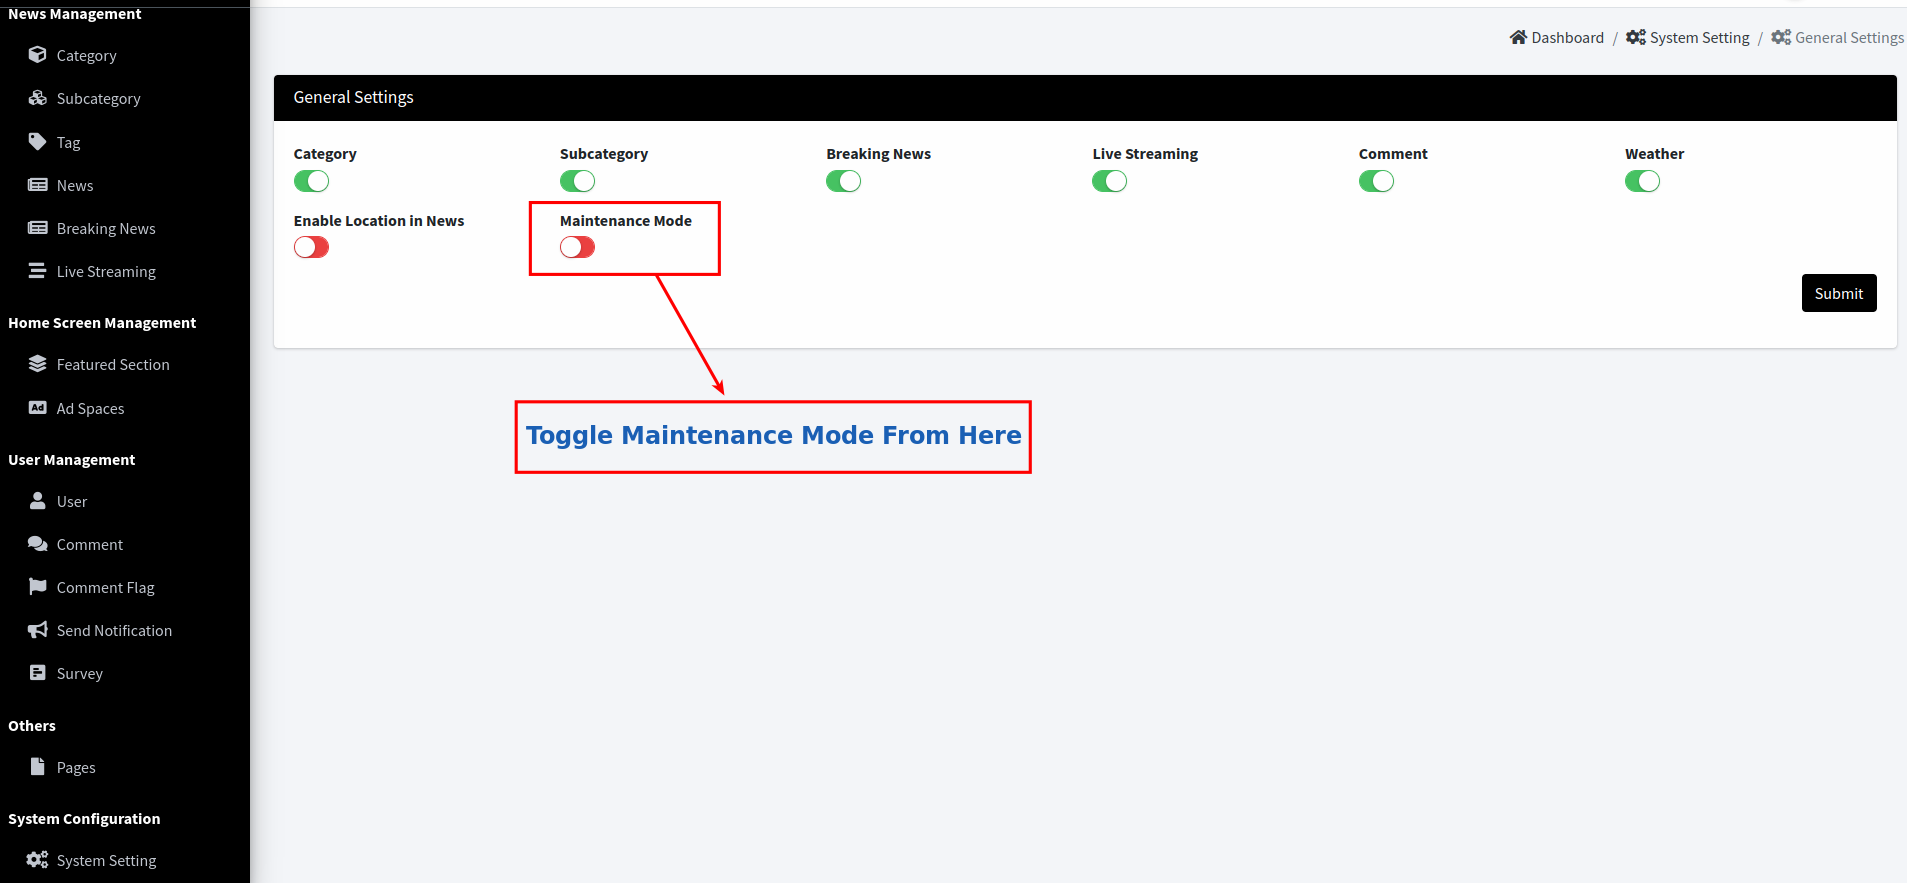
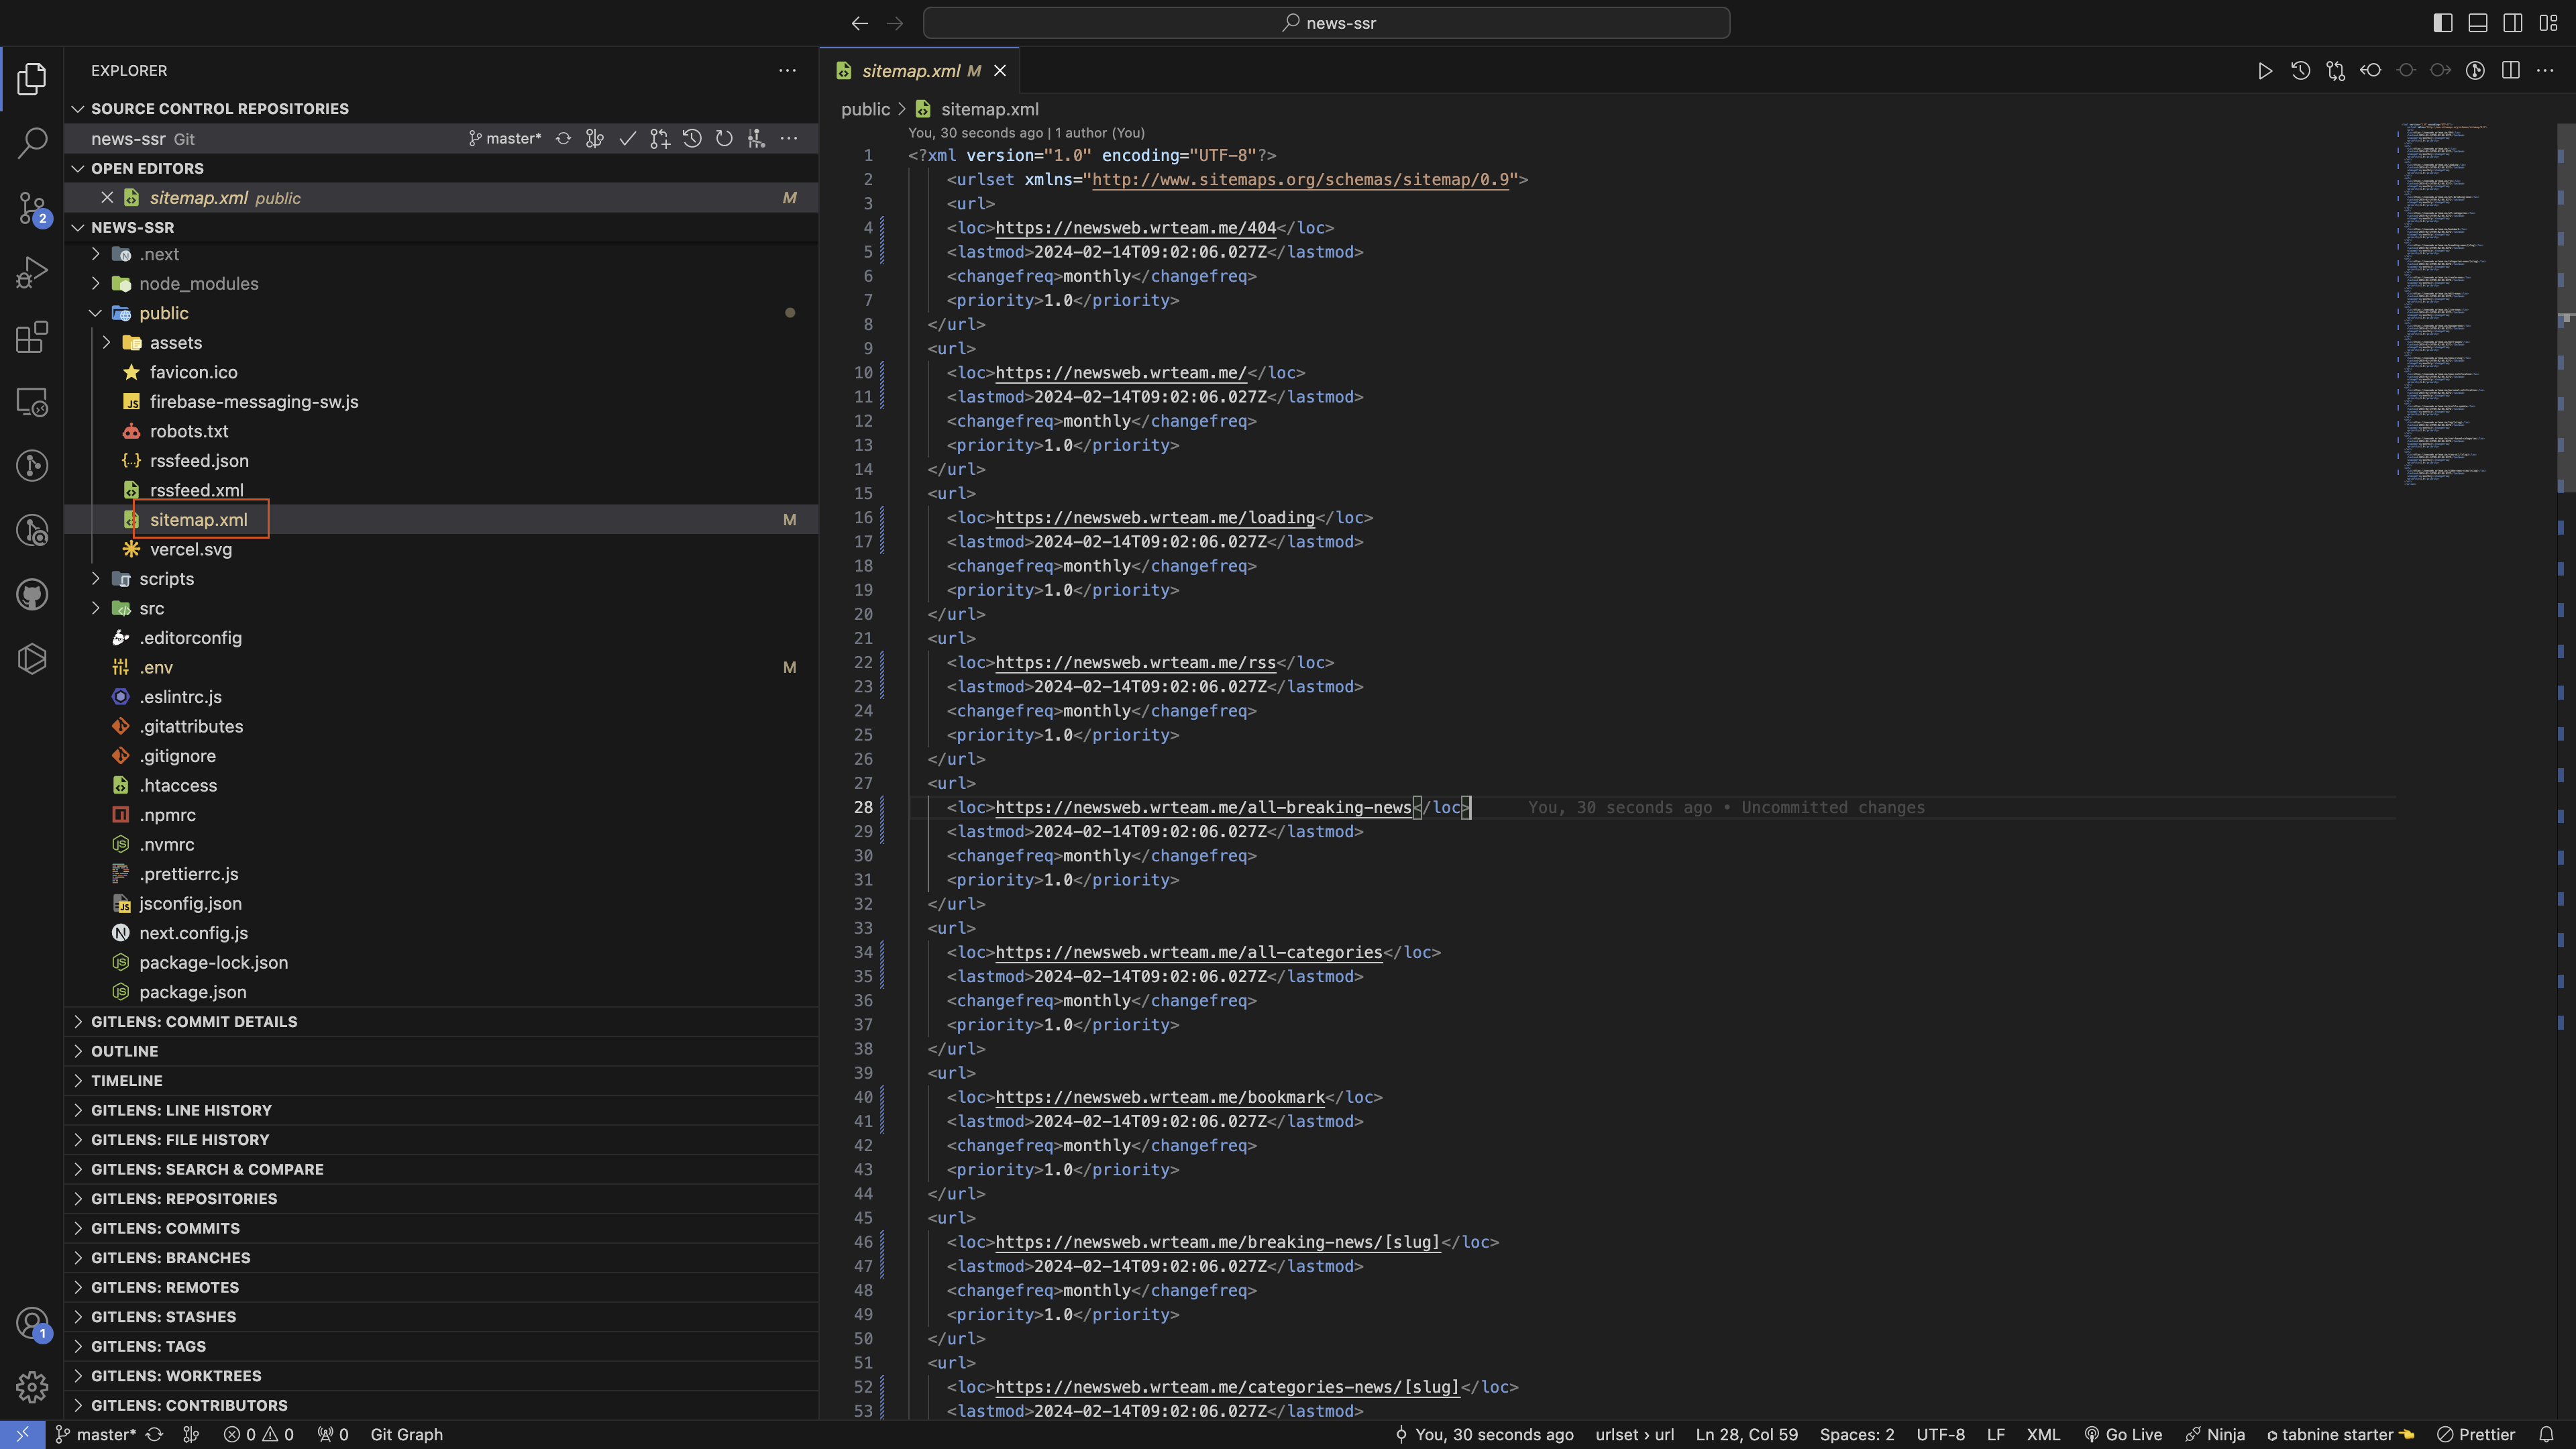
- How to Setup Sitemap
-
add web domain or subdomain url in .env File
- generate sitemap use command :-
npm run dev -
if you want to customize the sitemap then go to public->sitemap.xml file
- How to Change Fonts
-
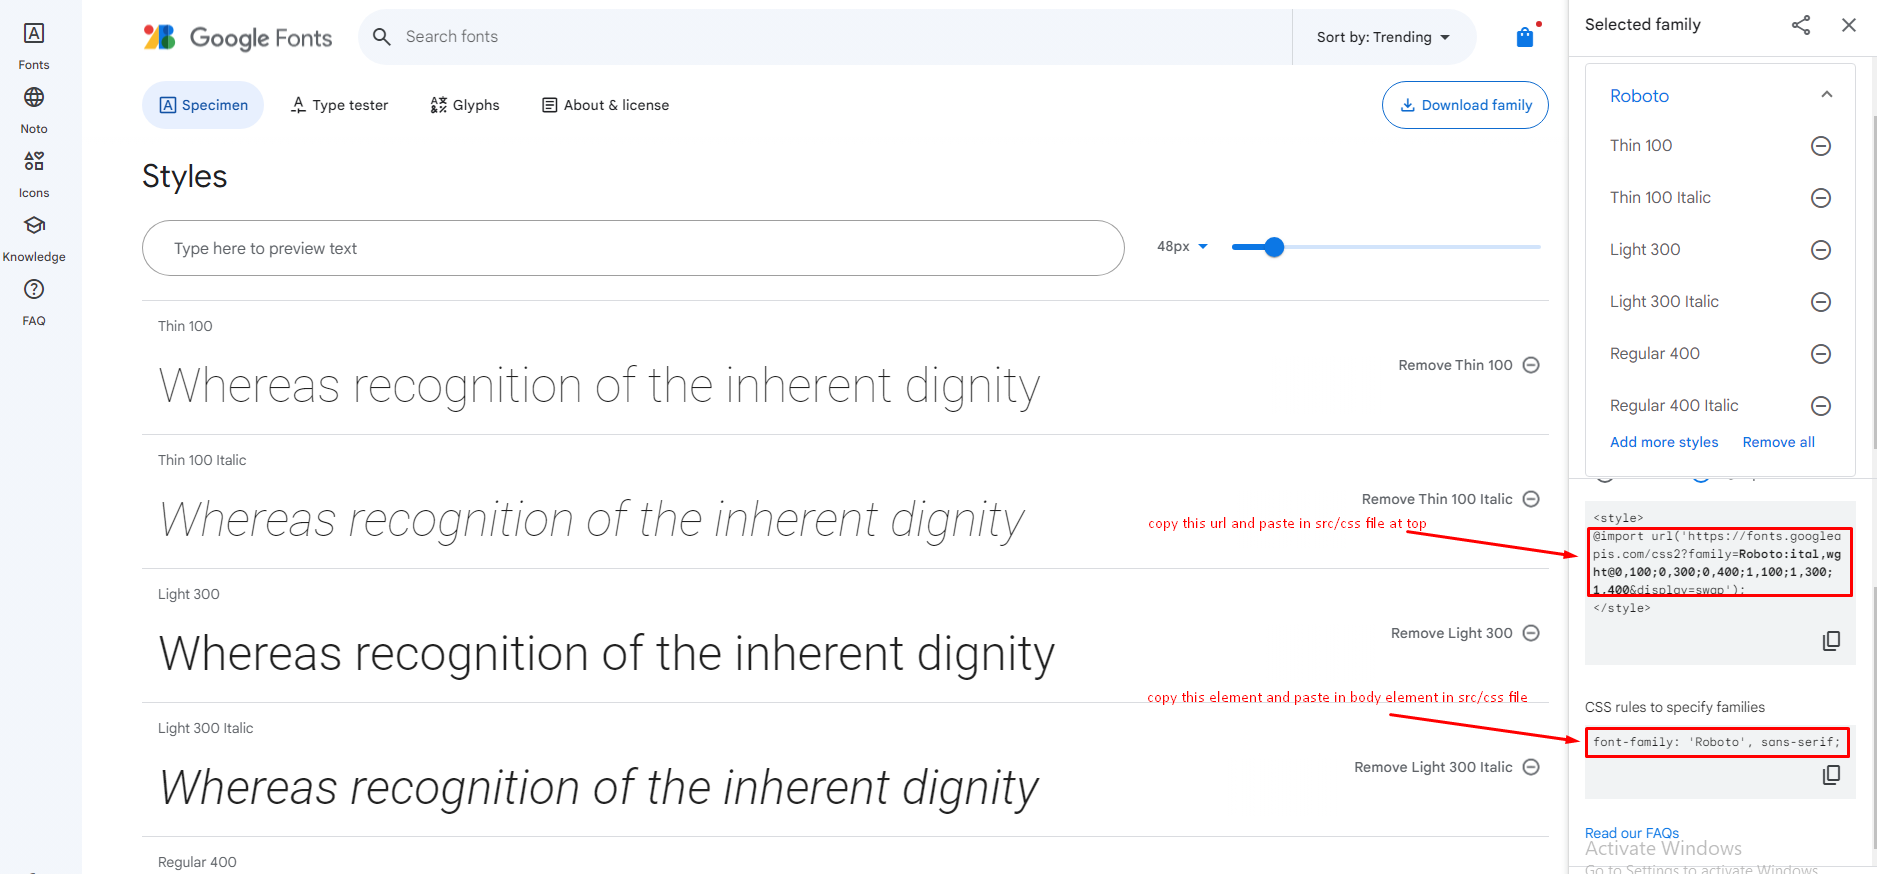
Open google font and
select the font then click on get embedded code then copy the link as shown
in
below image.
-
Open
src/pages/_document.jsfile and paste the link here as shown in below image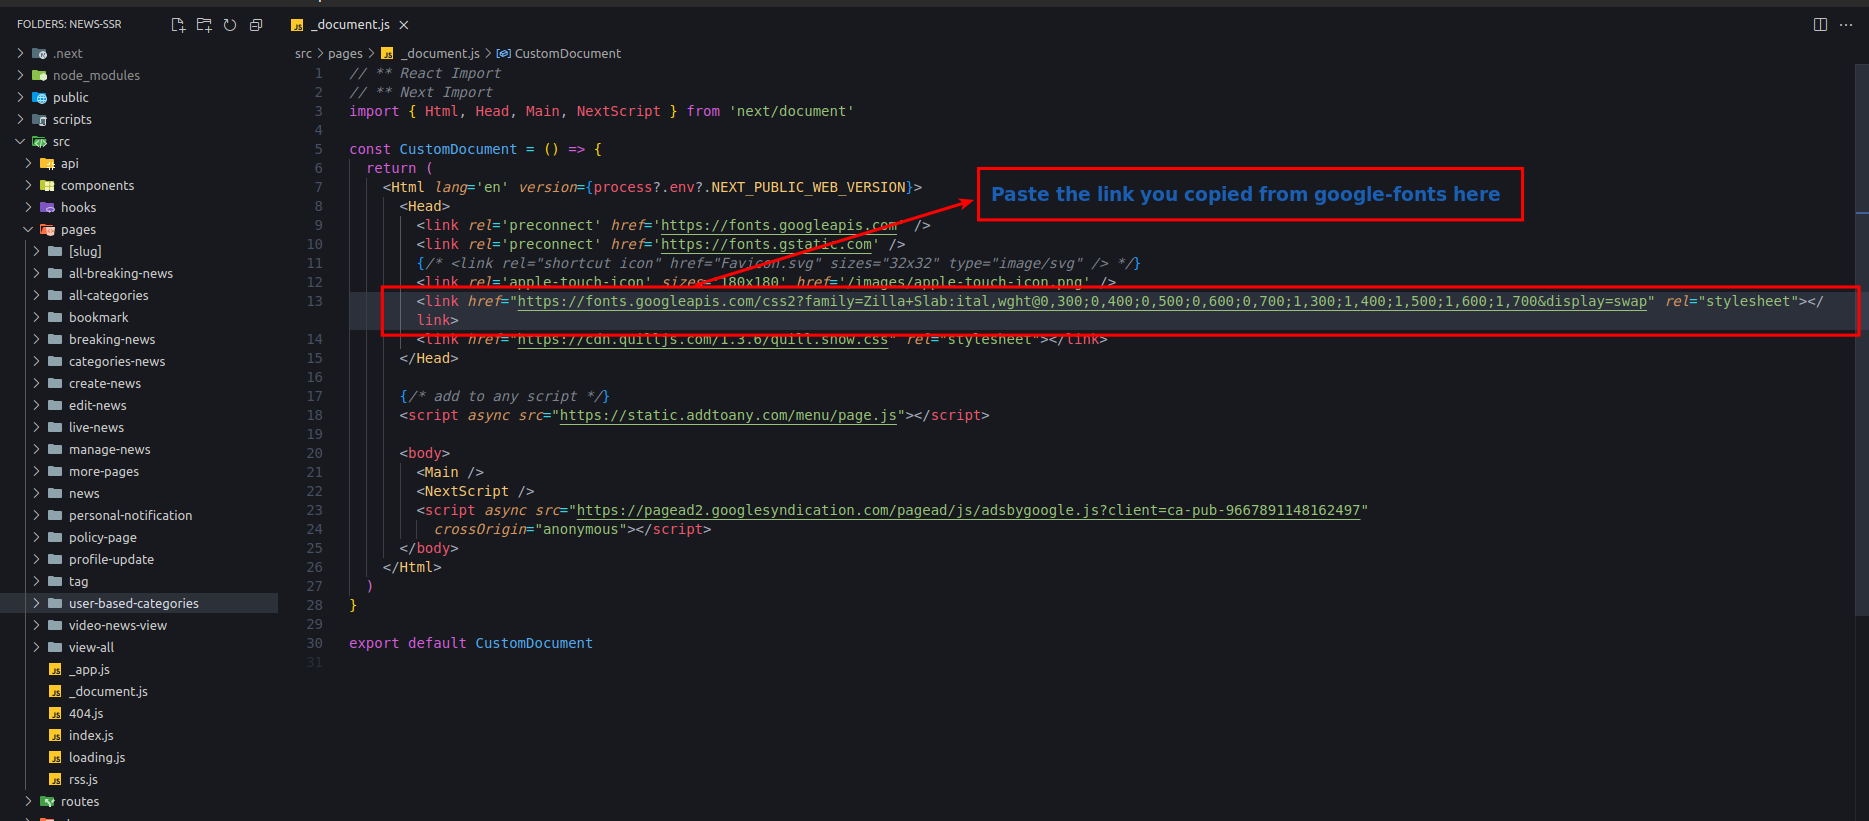
-
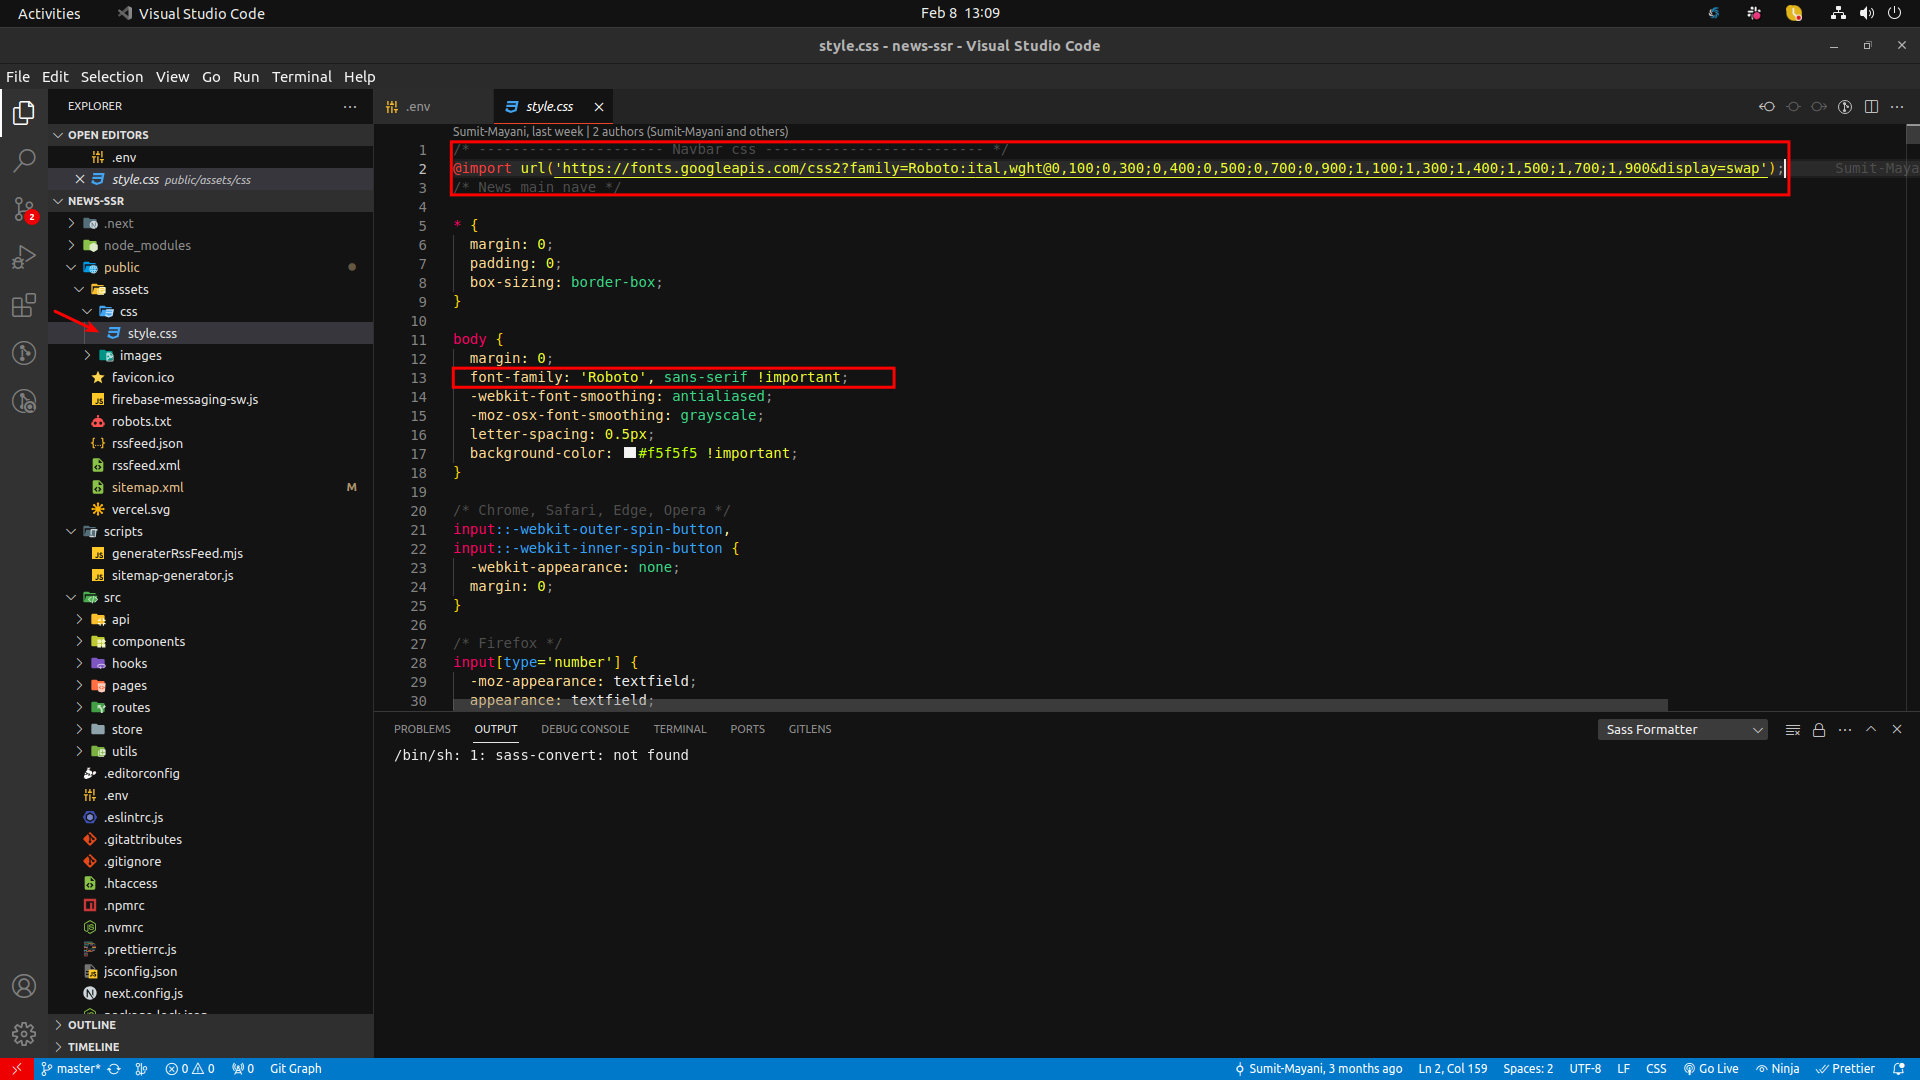
Copy the font family as shown in below image
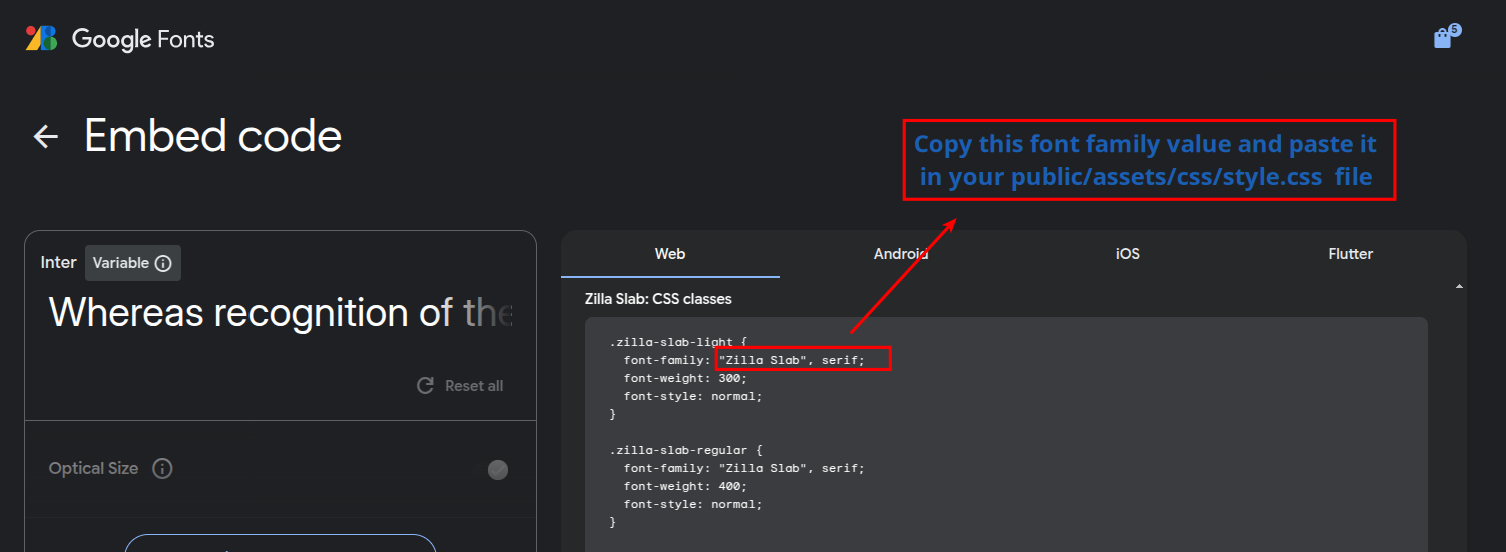
-
Paste font family value as show in image
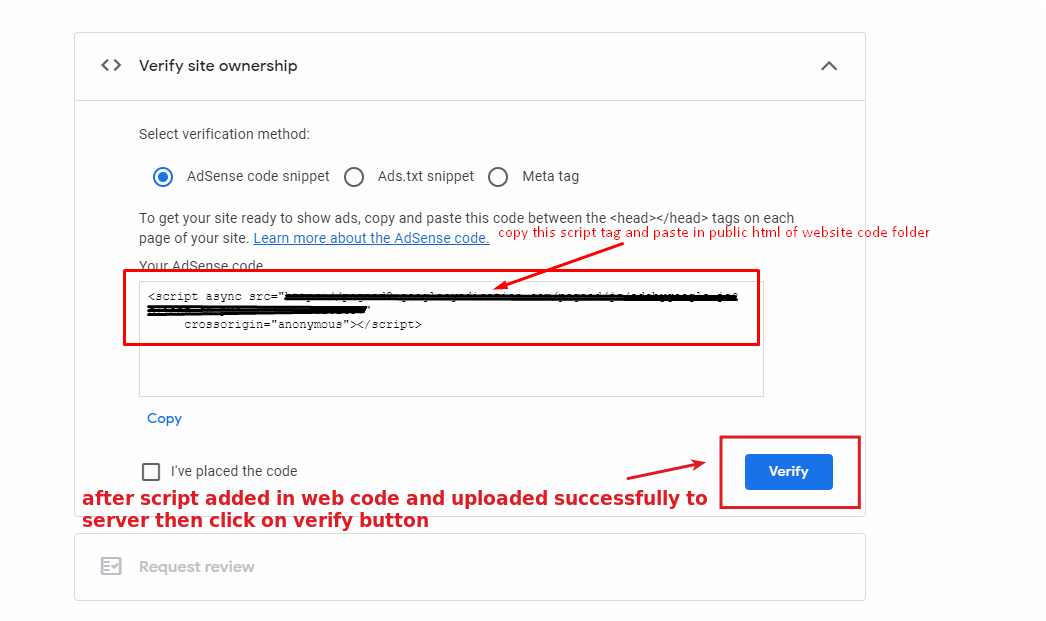
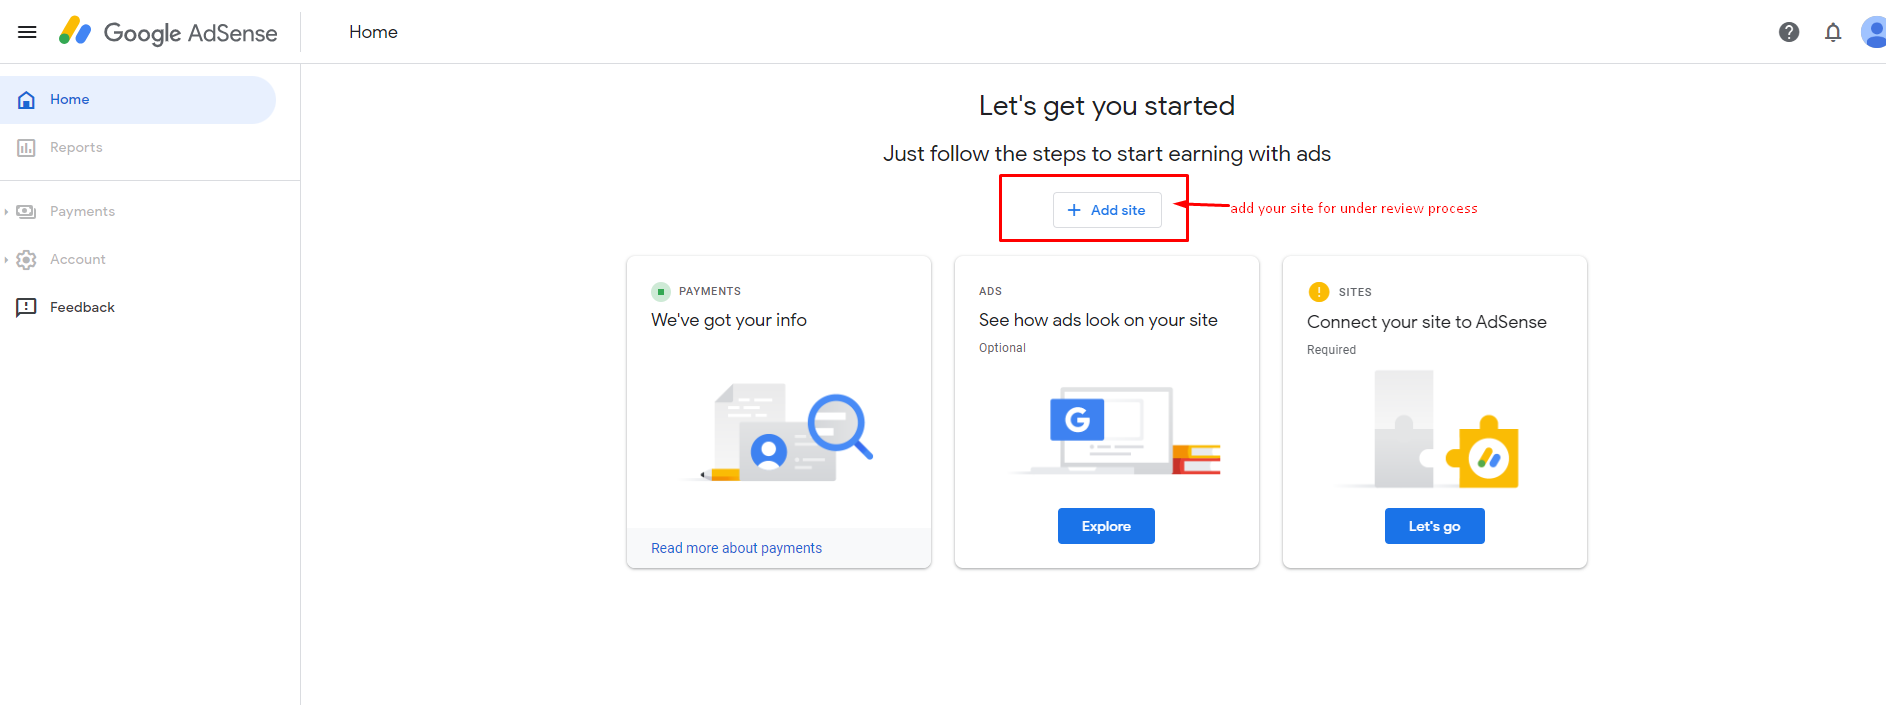
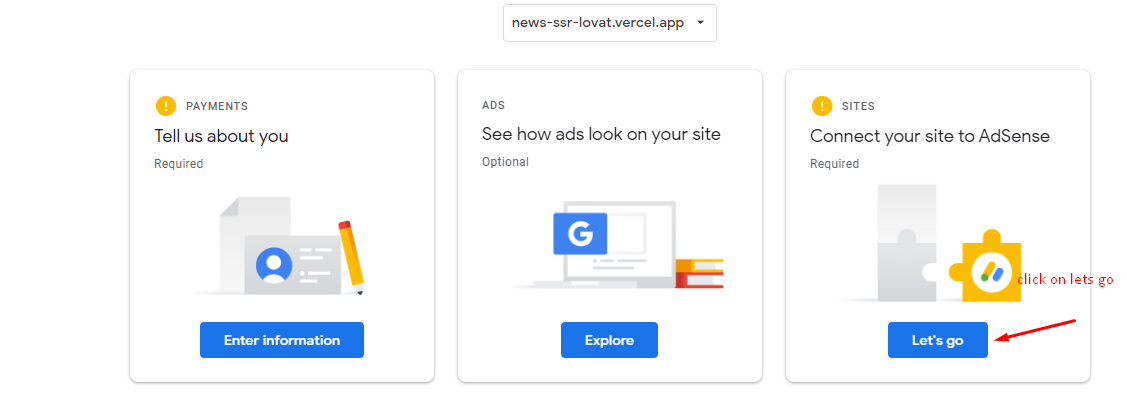
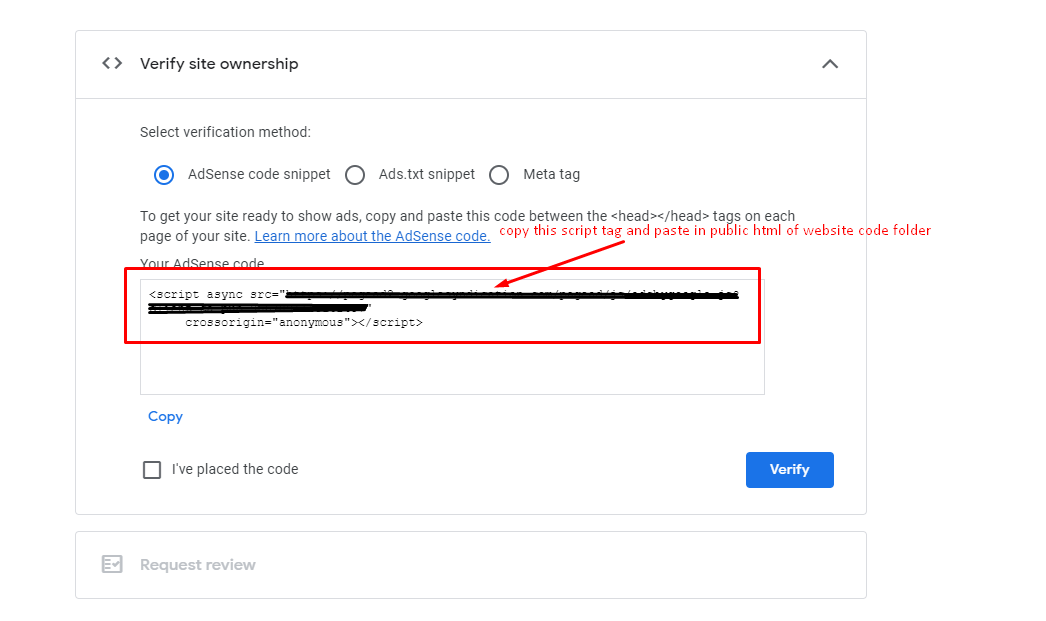
- How to Add Google AdSense
- Go to Google AdSense and sigin your account and Add site as per Image
- click on Let's Go button
- Copy this script code and paste to your admin panel -> system settings -> web settings
-
after script add you need to run command for build folder npm run
export
and upload to your server. and after click on verify button in google
adsense
- If it says “Getting ready…,” your account is still under review and your site will not display ads until it has been approved.
- How to run this project
-
Unzip the downloaded code. After unzipping you will have News - Web Code
Folder.
Open it in Visual Studio Code. -
Open VS Code teminal by typing CTRL+J in Windows/Linux, and for MacOS
CMD+J and execute the command --> npm install
This will take some time to download a few Packages so wait for a few minutes. -
After npm install finishes run this command --> npm run dev.
This Command will Start the development mode.Check If everything is working fine then your are good to go ahead. - Local Build and Deploy (WITHOUT SEO)
- Video Tutorial: Video
- After all the changes you are ready to deploy your Web applicaiton on Live Server.
-
Open VS Code teminal by typing CTRL+J in Windows/Linux, and for MacOS
CMD+J and execute the command --> npm run export
This will take few seconds to build the live and the optimized version of the web application. -
After the process completion go to
outFolder and upload this files on your live server.
(only upload out Folder's files on server do not upload any other file on server) - If you are facing any deployment related problems you can follow the official document : NextJs Deployment
- Upload .htaccess file
- Seo for Web
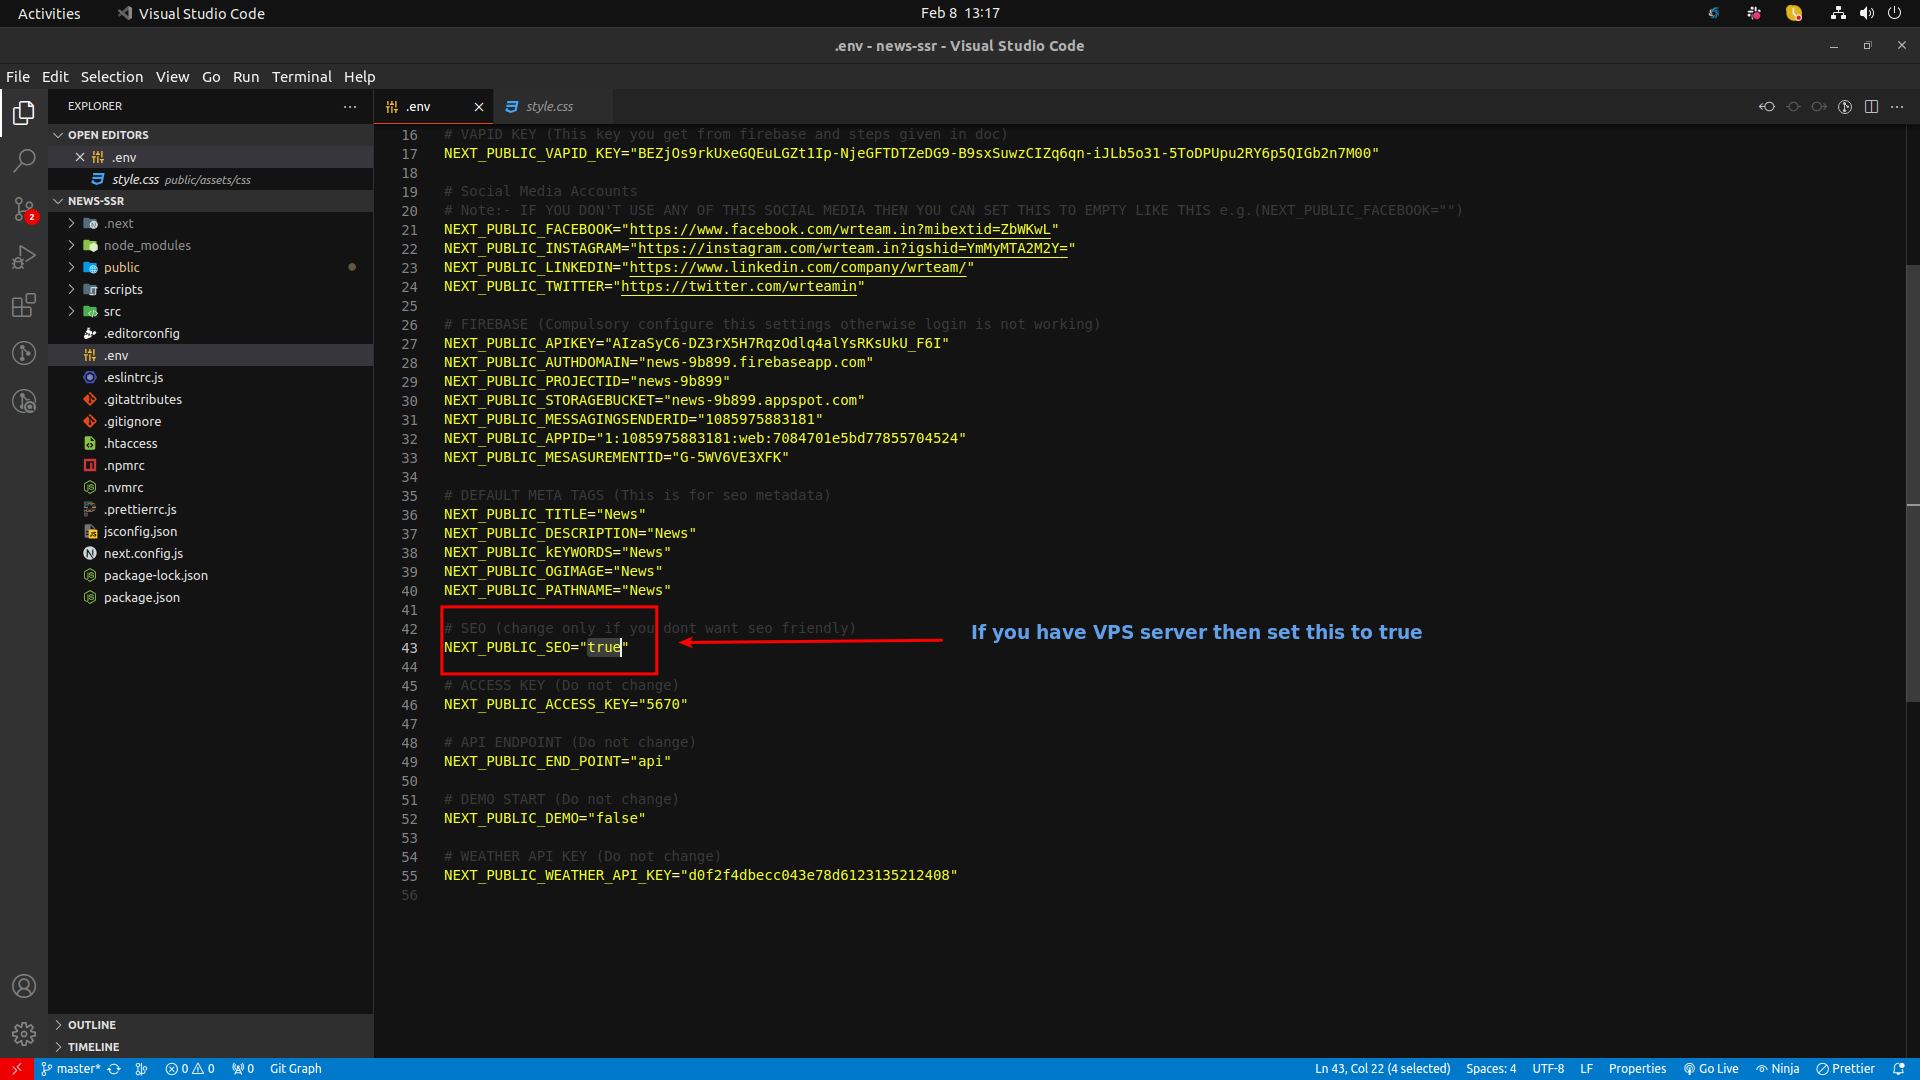
- if you have VPS server then go to
.env fileand make it "true"NEXT_PUBLIC_SEO="true" - Deploy to the Server
- .htaccess File Code for SEO
- If your server is nginx server then copy the below code and paste that code inside your server's nginx.conf file's server block.
With SEO :-
Without SEO :-
Video Tutorials
WARNING
WARNING
From this site you can generate favicon icon :- Favicon Generator
Go to admin panel system-settings -> web-settings
WARNING

WARNING
.htaccess file to your server.If you will not upload the
.htaccess file then web pages will not open as expected.
*If you are not able to find .htaccess file in your source code then please enable hidden files it will show up.
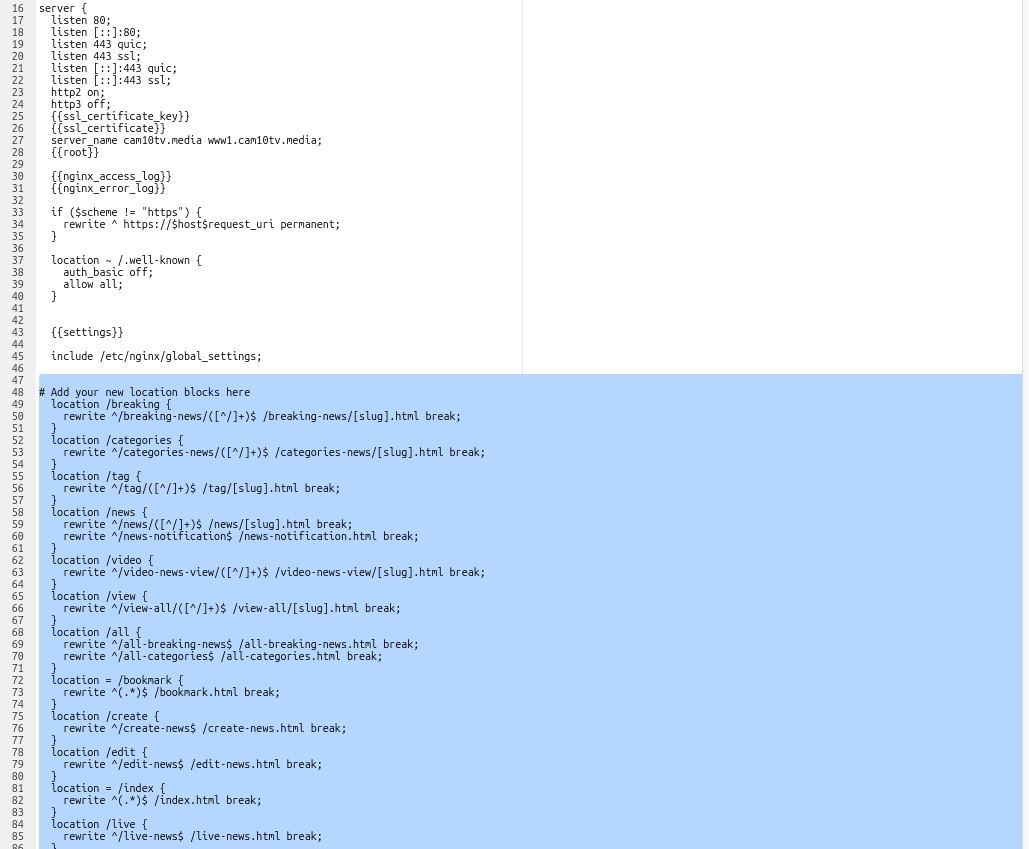
If your server is nginx server then copy the below code and paste that code inside your server's nginx.conf file's server block as shown in the example image below.
# nginx configuration by winginx.
location /breaking {
  rewrite ^/breaking-news/([^/]+)$ /breaking-news/[slug].html break;
}

location /categories {
  rewrite ^/categories-news/([^/]+)$ /categories-news/[slug].html break;
}

location /tag {
  rewrite ^/tag/([^/]+)$ /tag/[slug].html break;
}

location /news {
  rewrite ^/news/([^/]+)$ /news/[slug].html break;
  rewrite ^/news-notification$ /news-notification.html break;
}

location /video {
  rewrite ^/video-news-view/([^/]+)$ /video-news-view/[slug].html break;
}

location /view {
  rewrite ^/view-all/([^/]+)$ /view-all/[slug].html break;
}

location /all {
  rewrite ^/all-breaking-news$ /all-breaking-news.html break;
  rewrite ^/all-categories$ /all-categories.html break;
}

location = /bookmark {
  rewrite ^(.*)$ /bookmark.html break;
}

location /create {
  rewrite ^/create-news$ /create-news.html break;
}

location /edit {
  rewrite ^/edit-news$ /edit-news.html break;
}

location = /index {
  rewrite ^(.*)$ /index.html break;
}

location /live {
  rewrite ^/live-news$ /live-news.html break;
}

location = /loading {
  rewrite ^(.*)$ /loading.html break;
}

location /manage {
  rewrite ^/manage-news$ /manage-news.html break;
}

location /more {
  rewrite ^/more-pages$ /more-pages.html break;
}

location /personal {
  rewrite ^/personal-notification$ /personal-notification.html break;
}

location /profile {
  rewrite ^/profile-update$ /profile-update.html break;
}

location /user {
  rewrite ^/user-based-categories$ /user-based-categories.html break;
}

location = /rss {
  rewrite ^(.*)$ /rss.html break;
}

location / {
  if (!-e $request_filename){
    rewrite ^(.*)$ /404.html break;
  }
}
Example is shown in below image
WARNING
MANDATORY
Video Tutorial: Video
WARNING
node js npm pm2 technologies.
We have assumed that you are using a debian based OS, apt
is your package manager. If you are using any other linux distro then
apt will be replaced with the respective package manager of the OS
Before starting the project deployment, you must upload your project to the server. Project can be upload to the server using FileZila or in other ways.
Installing NodeJS
NodeJS can be installed using NVM by which multi Node version can be controlled easily.
sudo apt install curl
curl -o- https://raw.githubusercontent.com/nvm-sh/nvm/v0.39.7/install.sh | bash
source ~/.bashrc
command -v nvm
nvm install node 20.*
Check if node js is installed correctly using this command
node -v
INFO
Installing PM2 Server
By running the following command, PM2 server can be installed globally
npm install pm2 -g
Set port
Before set port check available ports with this command
sudo lsof -i -P -n | grep 8003
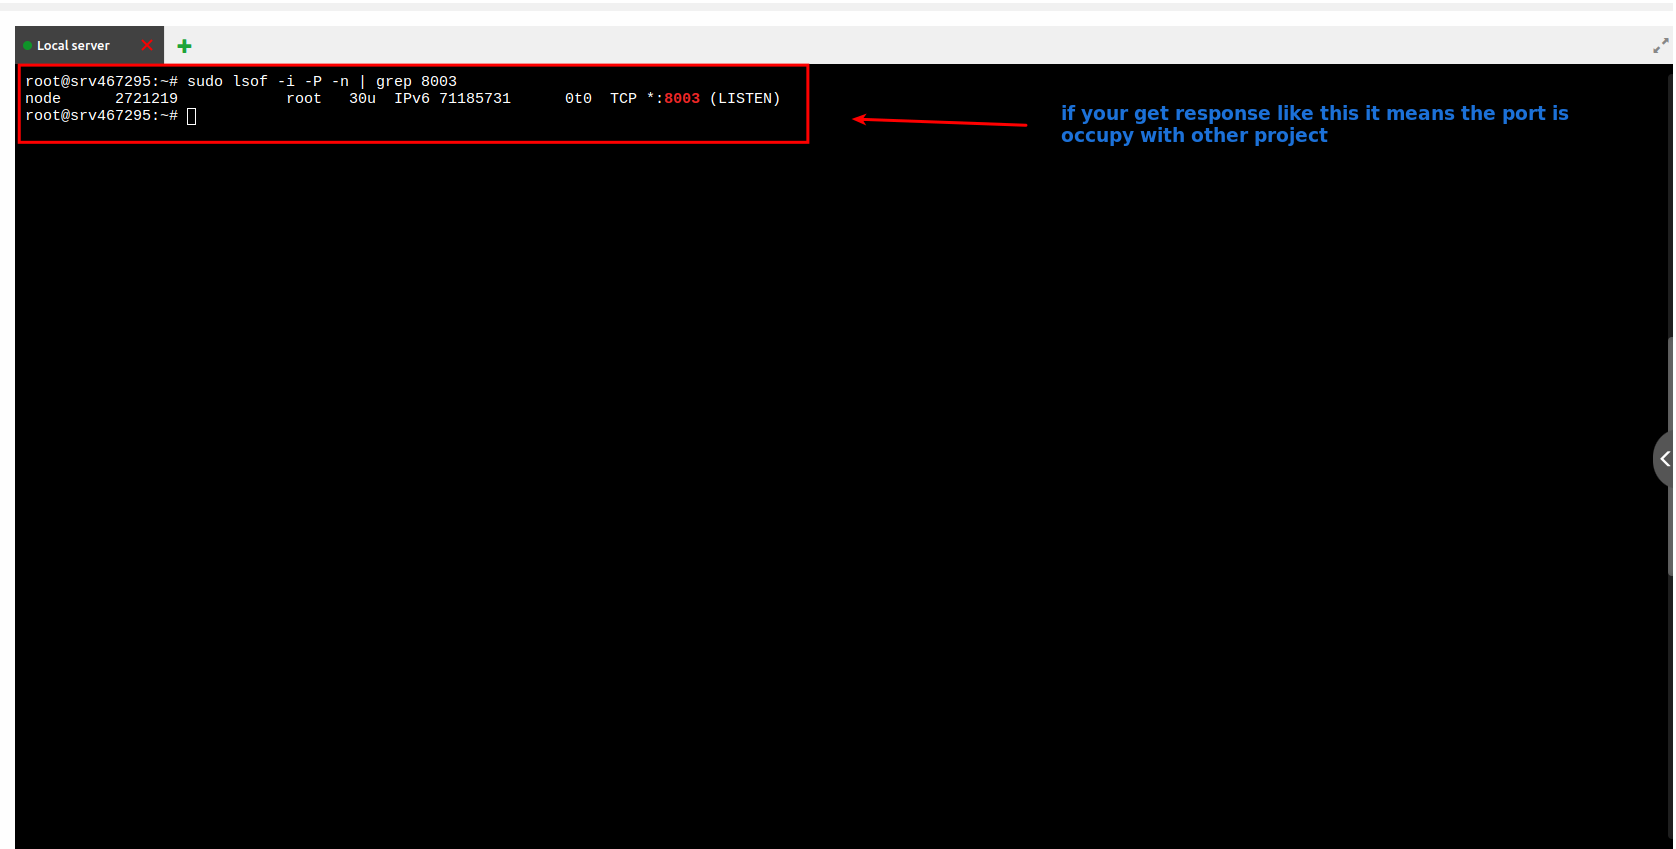
if you get response like this it means this port is occupy with other project so try other port like (8000, 8001, 8002, 8003, 8004 etc)
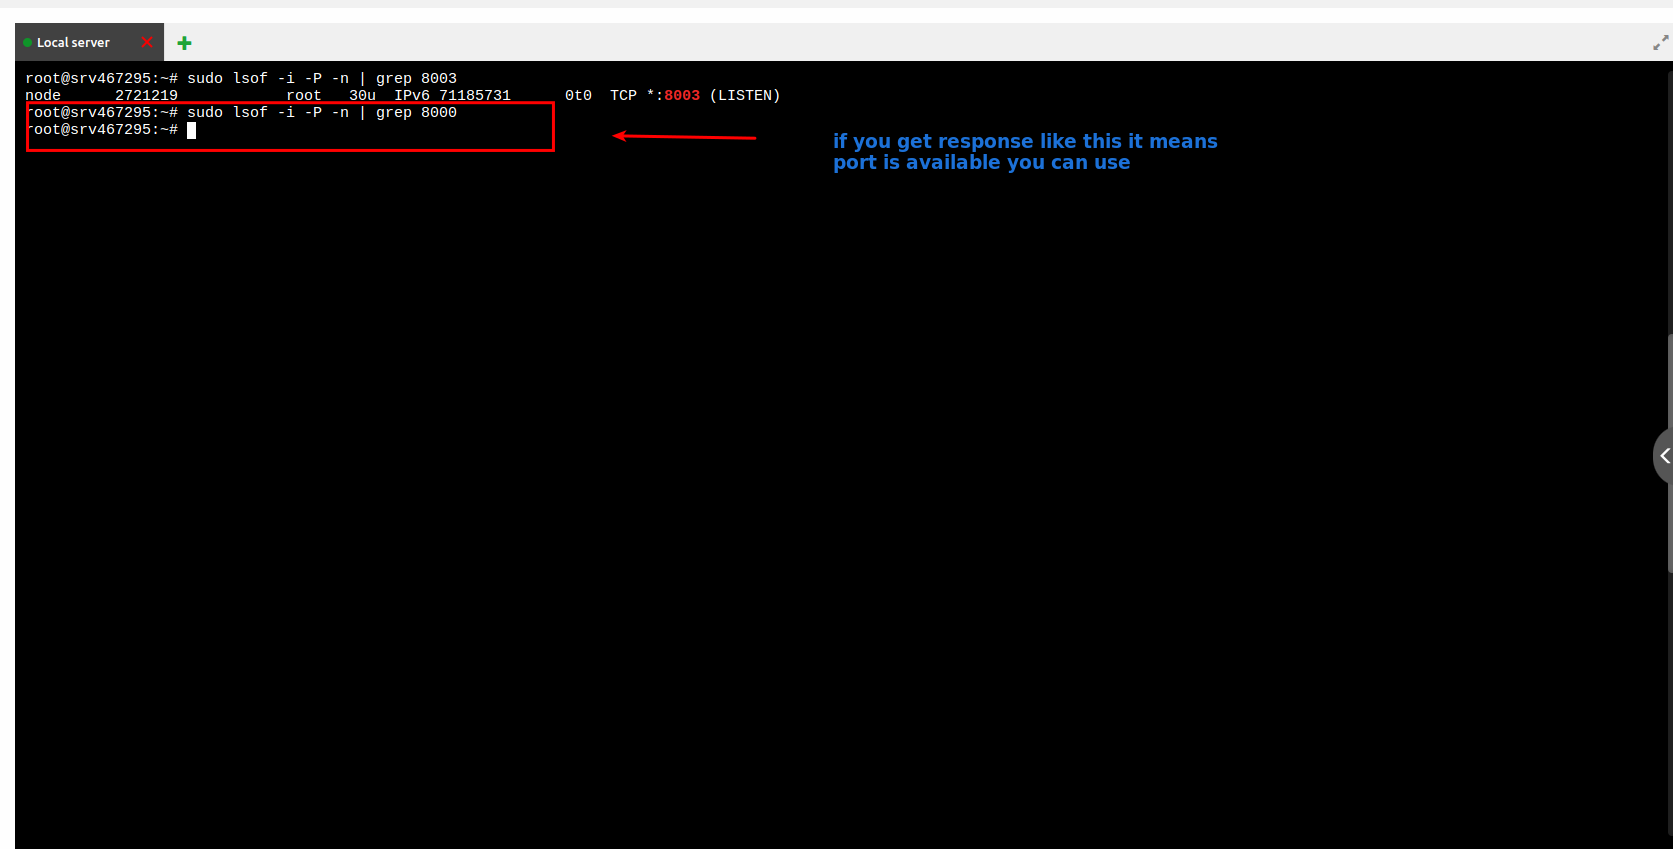
if you get response like this it means this port is available you can use this port
Now add available port to your
package.json and
.htaccess
file

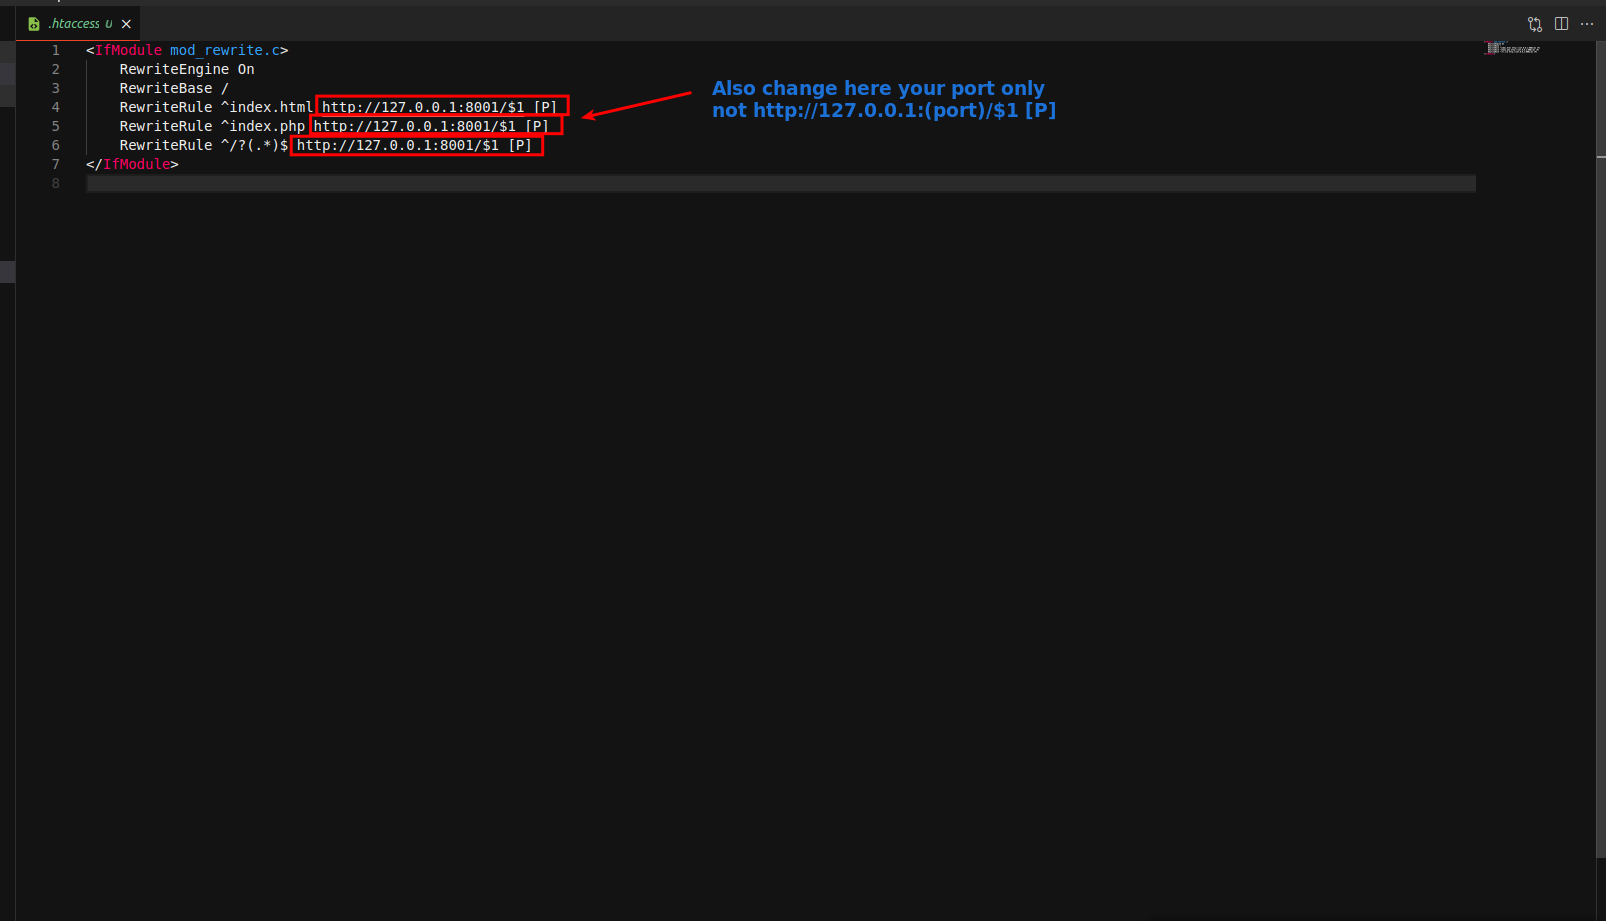
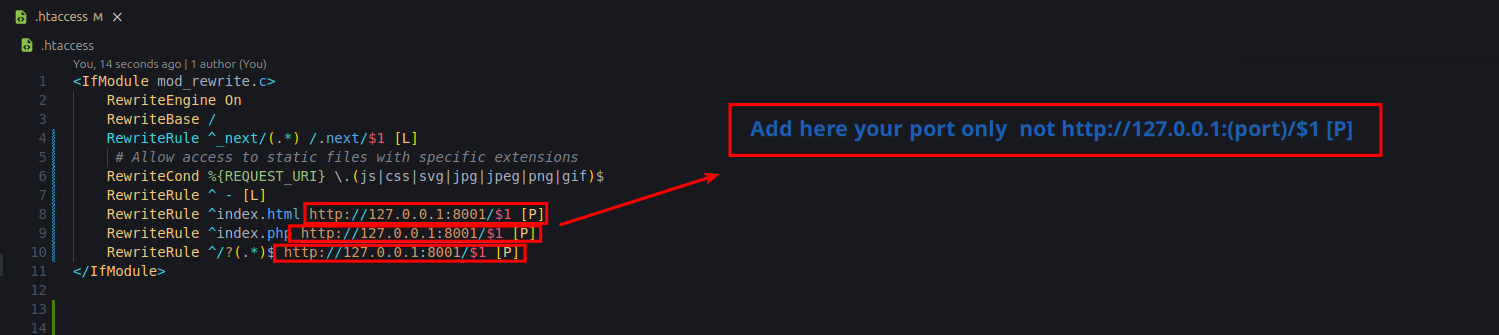
Copy the .htaccess file code given then change the port : Get htaccess code
Setup the Project
MANDATORY
node_modules installed in your
directory.
npm install
After that, project must be built. For that, run the following command, which will build the production application in the out folder.
npm run build
Run the PM2 server
Go to the project root and run the following commandpm2 start "npm start" -n "YOUR_PROJECT_NAME"
pm2 ls
1. Error :
 2. Success :
If you are getting errors in the pm2 process , then run pm2 logs and send us the Screenshot of the error, so that we can guide you to resolve your issues.
If successful, set up a startup script for your operating system to
ensure
PM2 restarts automatically after a system reboot.
pm2 startup
After setting up PM2 with the startup command, save the current process
list
pm2 save
If you want to restart your pm2 process then run pm2 restart id // Replace id with your process id
For example here id is 0 in the above screenshot
pm2 restart 0
pm2 delete "YOUR_PROJECT_NAME"
INFO
RewriteEngine On
RewriteBase /
RewriteRule ^_next/(.*) /.next/$1 [L]
# Allow access to static files with specific extensions
RewriteCond %{REQUEST_URI} \.(js|css|svg|jpg|jpeg|png|gif)$
RewriteRule ^ - [L]
RewriteRule ^index.html http://127.0.0.1:8001/$1 [P]
RewriteRule ^index.php http://127.0.0.1:8001/$1 [P]
RewriteRule ^/?(.*)$ http://127.0.0.1:8001/$1 [P]
MANDATORY
# nginx configuration by winginx.com
location ~ ^(.*)$ { }

location /_next {
 rewrite ^/_next/(.*) /.next/$1 break;
}

location / {
 if ($request_uri ~ "\.(js|css|svg|jpg|jpeg|png|gif)$"){
 rewrite ^/index.html http://127.0.0.1:8001/$1 redirect;
 }
 rewrite ^/?(.*)$ http://127.0.0.1:8001/$1 redirect;
}

location /index {
 rewrite ^/index.php http://127.0.0.1:8001/$1 redirect;
}
MANDATORY
Support
Its our pleasure to serve our service and support. please contact our support team.
Head of Customer Support :Devanshi Gor
To help our customers, we constantly be in touch with every customer if they need any assistance regarding our product. We offer our customers a support from Mon – Fri 9.00am to 6.00pm IST (GMT +5.30) – We are a Team located in India – Asia.
Typically we reply our customers for all the questions and queries within 24 hours of time via comments, support forum or emails.
FAQs
- Run command -> flutter pub upgrade --major-versions
- goto /lib/ui/screens/NewsDetailsVideo.dart File and replace
viewVideo() with following:
    viewVideo() {
        WebUri frm;
        frm = WebUri.uri(Uri.dataFromString(iframe, mimeType: 'text/html'));
        return Center(
            child: InAppWebView(initialUrlRequest: URLRequest(url: frm)),
        );
    }
Or You need to enable Firebase Blaze plan from Firebase console and other information from here
Your Feedback
Dear valuable customer, Thank you very much for choosing our product. It's our pleasure to serve top-notch service to you. Please give us your honest feedback that will help us to make a more strong and reliable product by click here Rate Us. Thank you very much.
Contact Us
WRTeam has creative and dedicated group of developers who are mastered in Apps Developments and Web Application Development with a niche in delivering quality solutions to customers across the globe. Contact us today to find out how we can help you or for freelance work.
Visit Us : https://wrteam.in
Mail Us : support@wrteam.in
Thank you very much.