Thank You for your purchase
We appreciate your purchase of Elite Quiz, and it's our pleasure to provide you with exceptional service. Thank you for choosing WRTeam.
If you encounter any challenges with the code or documentation, please reach out to our Support Team through this link.
new Share your bug reports, suggestions and areas for improvement through our feedback portal here
Elite Quiz App
Required Softwares
- Android Studio Meerkat | 2024.3.1
- Flutter 3.29.2 (Latest)
- Java Version 21
Additionally, for Macos
- HomeBrew
- Cocoapods (1.16.2)
- XCode 15 (XCode 16 is also supported)
Setup flutter
important Install the current supported Flutter v3.29.2 (Latest) from the Stable channel.
Explore the official Flutter website at
https://docs.flutter.dev/get-started/install
for a complete installation guide for your platform.
Prefer video tutorials? Check out the playlist:
After installation run flutter doctor -v to check if everything is
correctly setup.

important
It is your responsibility to install and set up Flutter correctly. Ensure that
Flutter is properly installed and configured before moving forward. You must
verify that there are no issues reported by the
flutter doctor command
important Android Toolchain, Android Studio, and XCode for Mac users should be correctly configured.
If you are using Android Studio, install the flutter &
dart plugin from Android Studio plugin market place.
and if you
are using VS Code you can install flutter extension.
If not do the necessary steps to resolve them, check the official flutter documentation for the guide.
After everything is verified to be correct you can continue with the documentation.
Steps to run this project successfully:
- Begin by extracting the downloaded code.
-
Next, extract the contents of the
Elite Quiz App XXX.zipand launch it in either Android Studio or Visual Studio Code. -
Access the IDE terminal and enter the command
flutter pub getto fetch the necessary dependencies. -
If you want to run the app in IOS simulator (otherwise skip this step), then
execute the following commands in the terminal:
											cd ios


											pod install


cd .. - Finally, To run the application, run
flutter runcommand.
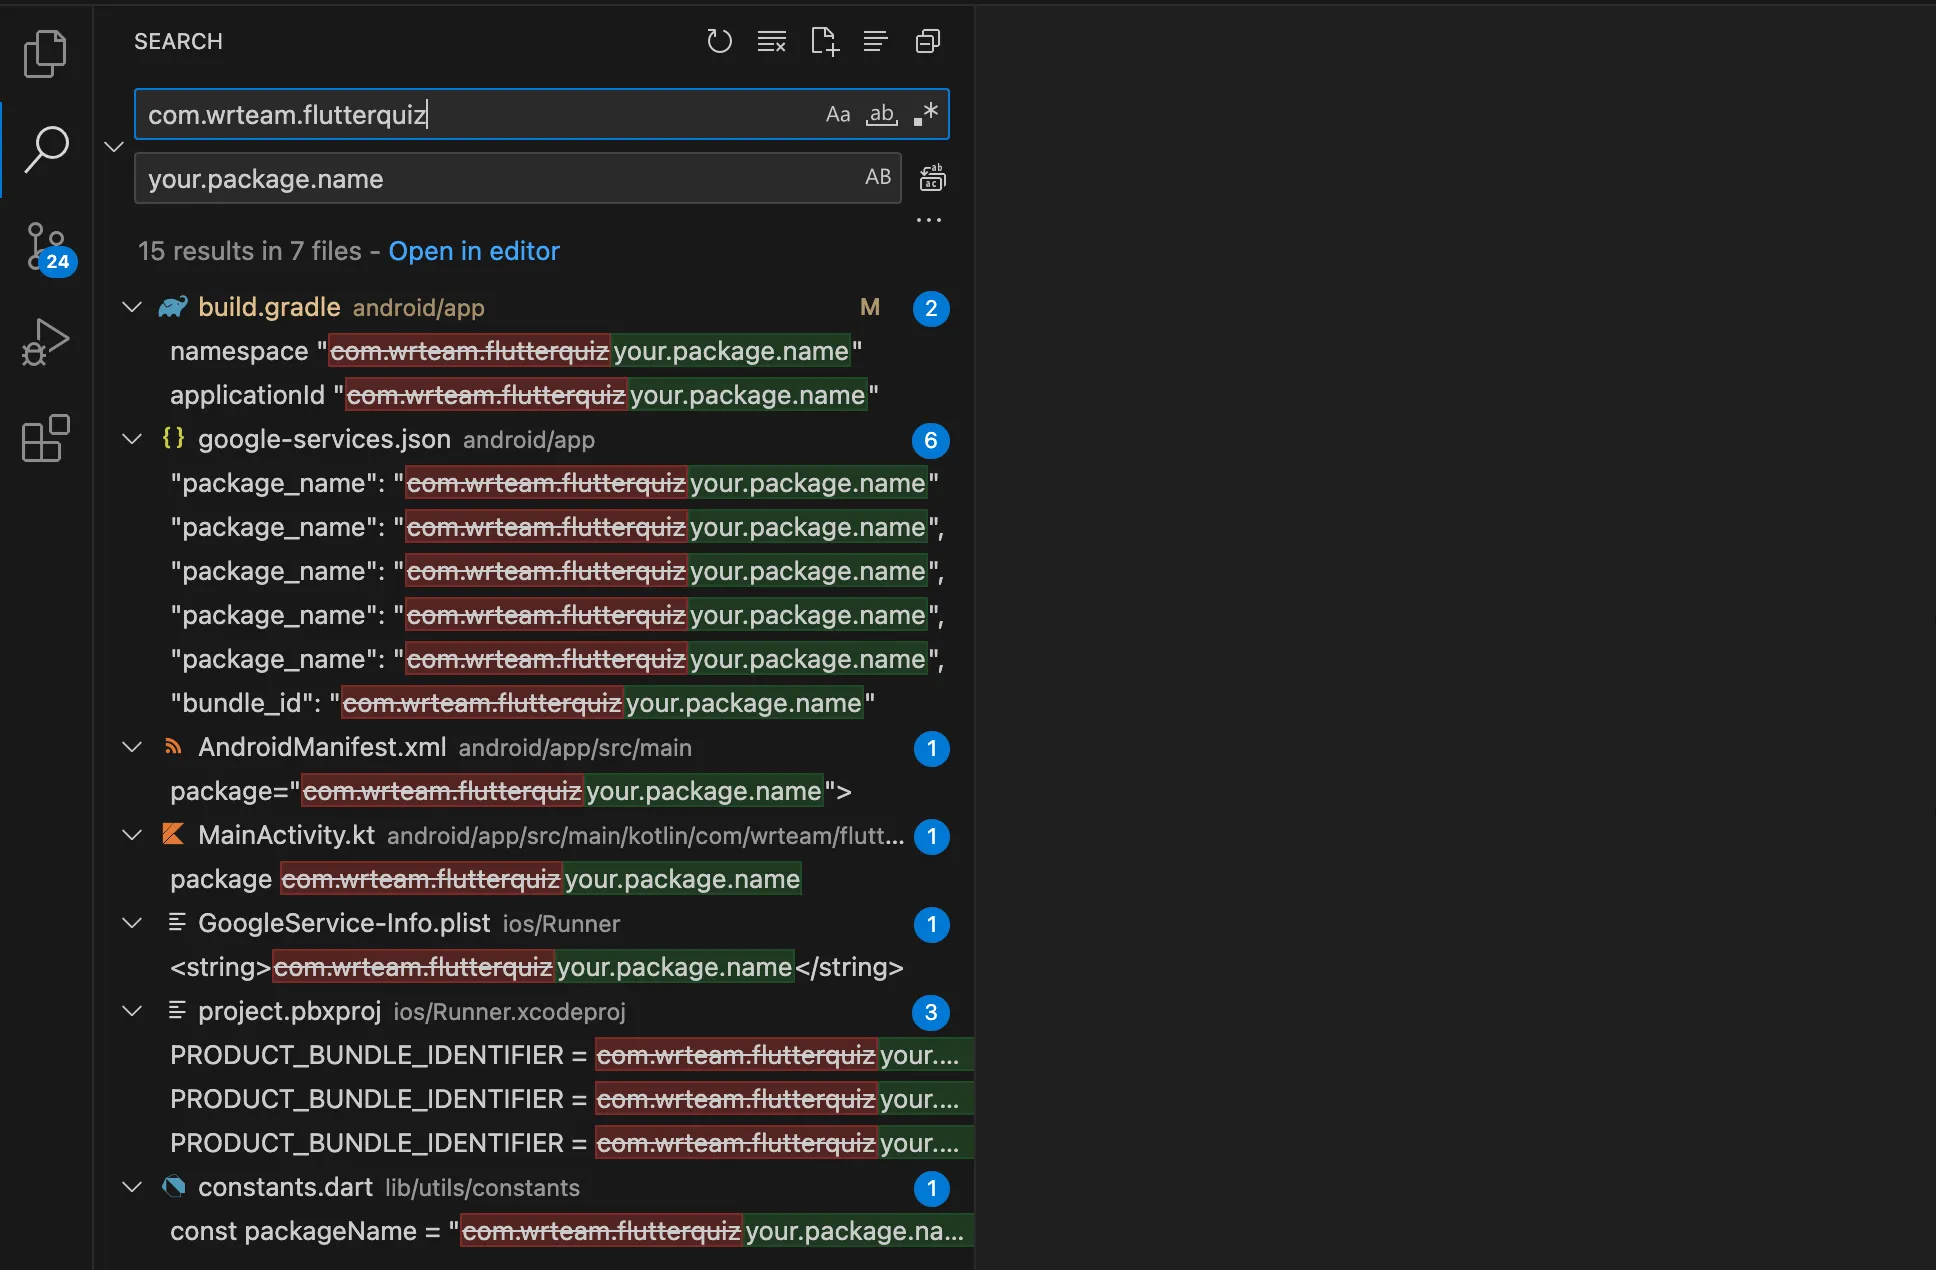
Change app package name
-
If you are using
Android Studio
, you can press
CTRL+SHIFT+Rto open Replace in Files tool.
then search our package namecom.wrteam.flutterquizand replace it with your package name in all places.
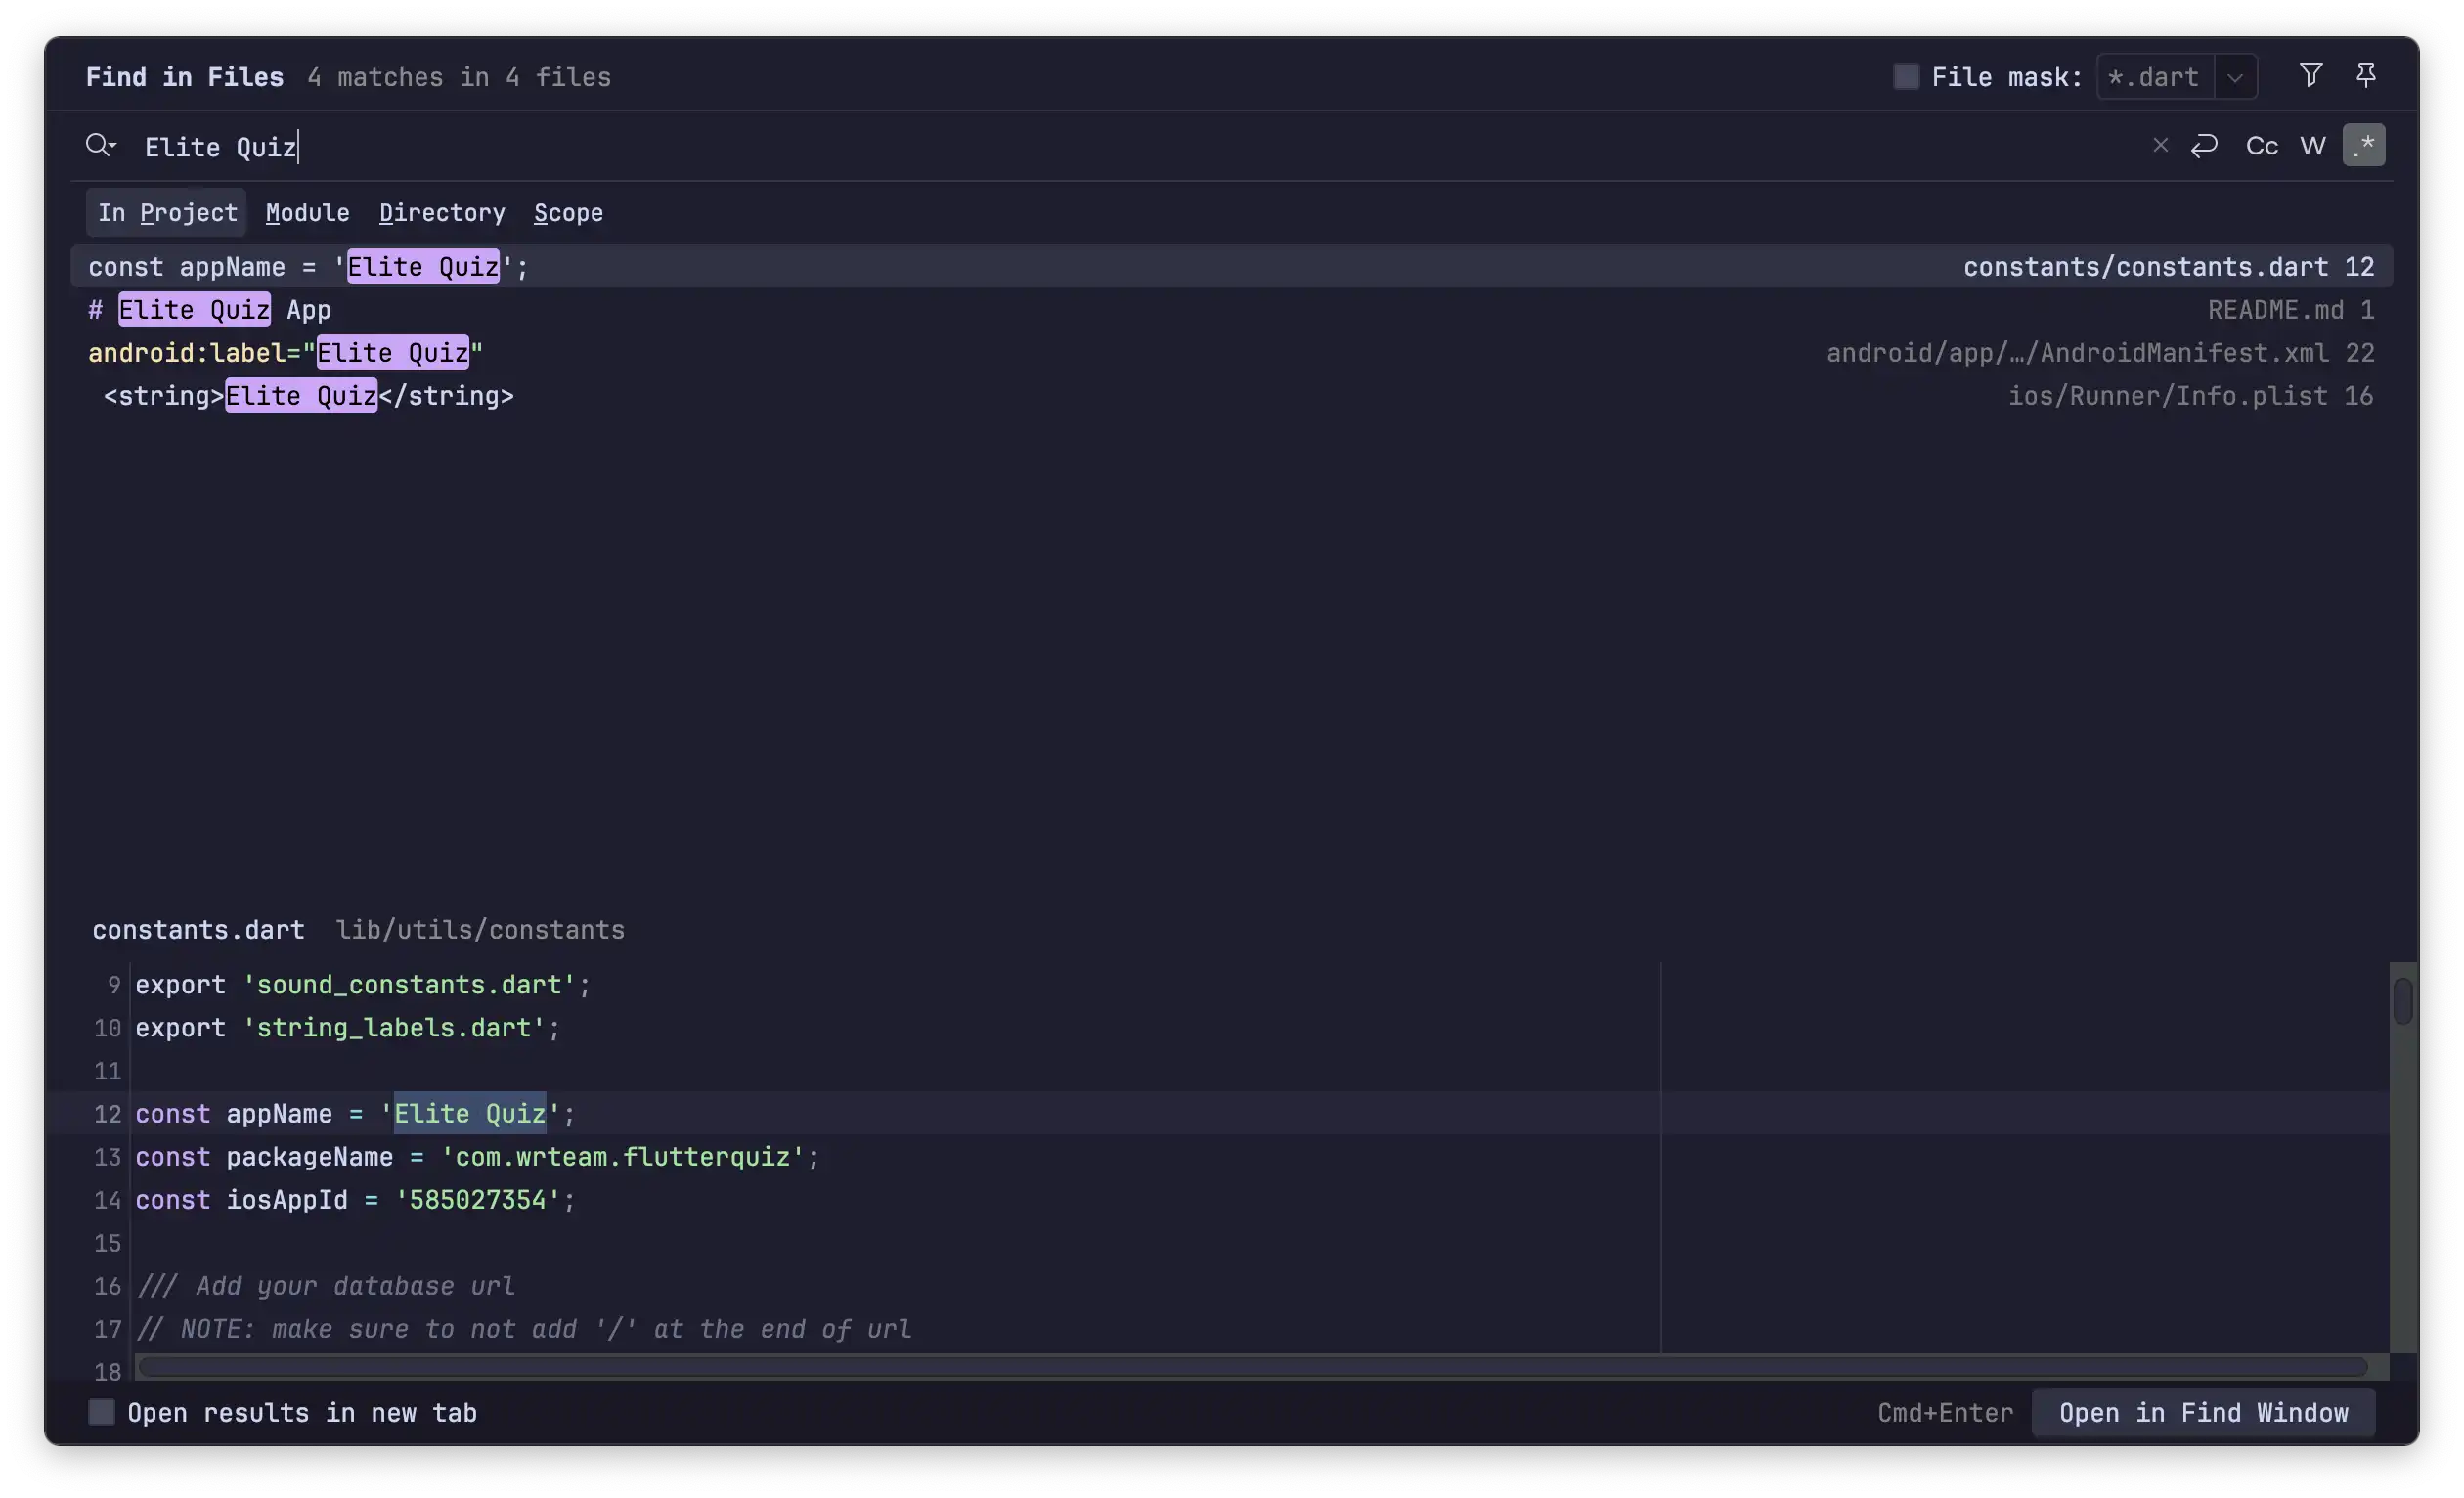
-
And if you are using
VS Code
, you can press
CTRL+SHIFT+Fto open Find in Files Tool.
then search our package namecom.wrteam.flutterquizand replace it with your package name in all places.
Change application name
Similarly you can change the app name by finding and replacing in all the places.
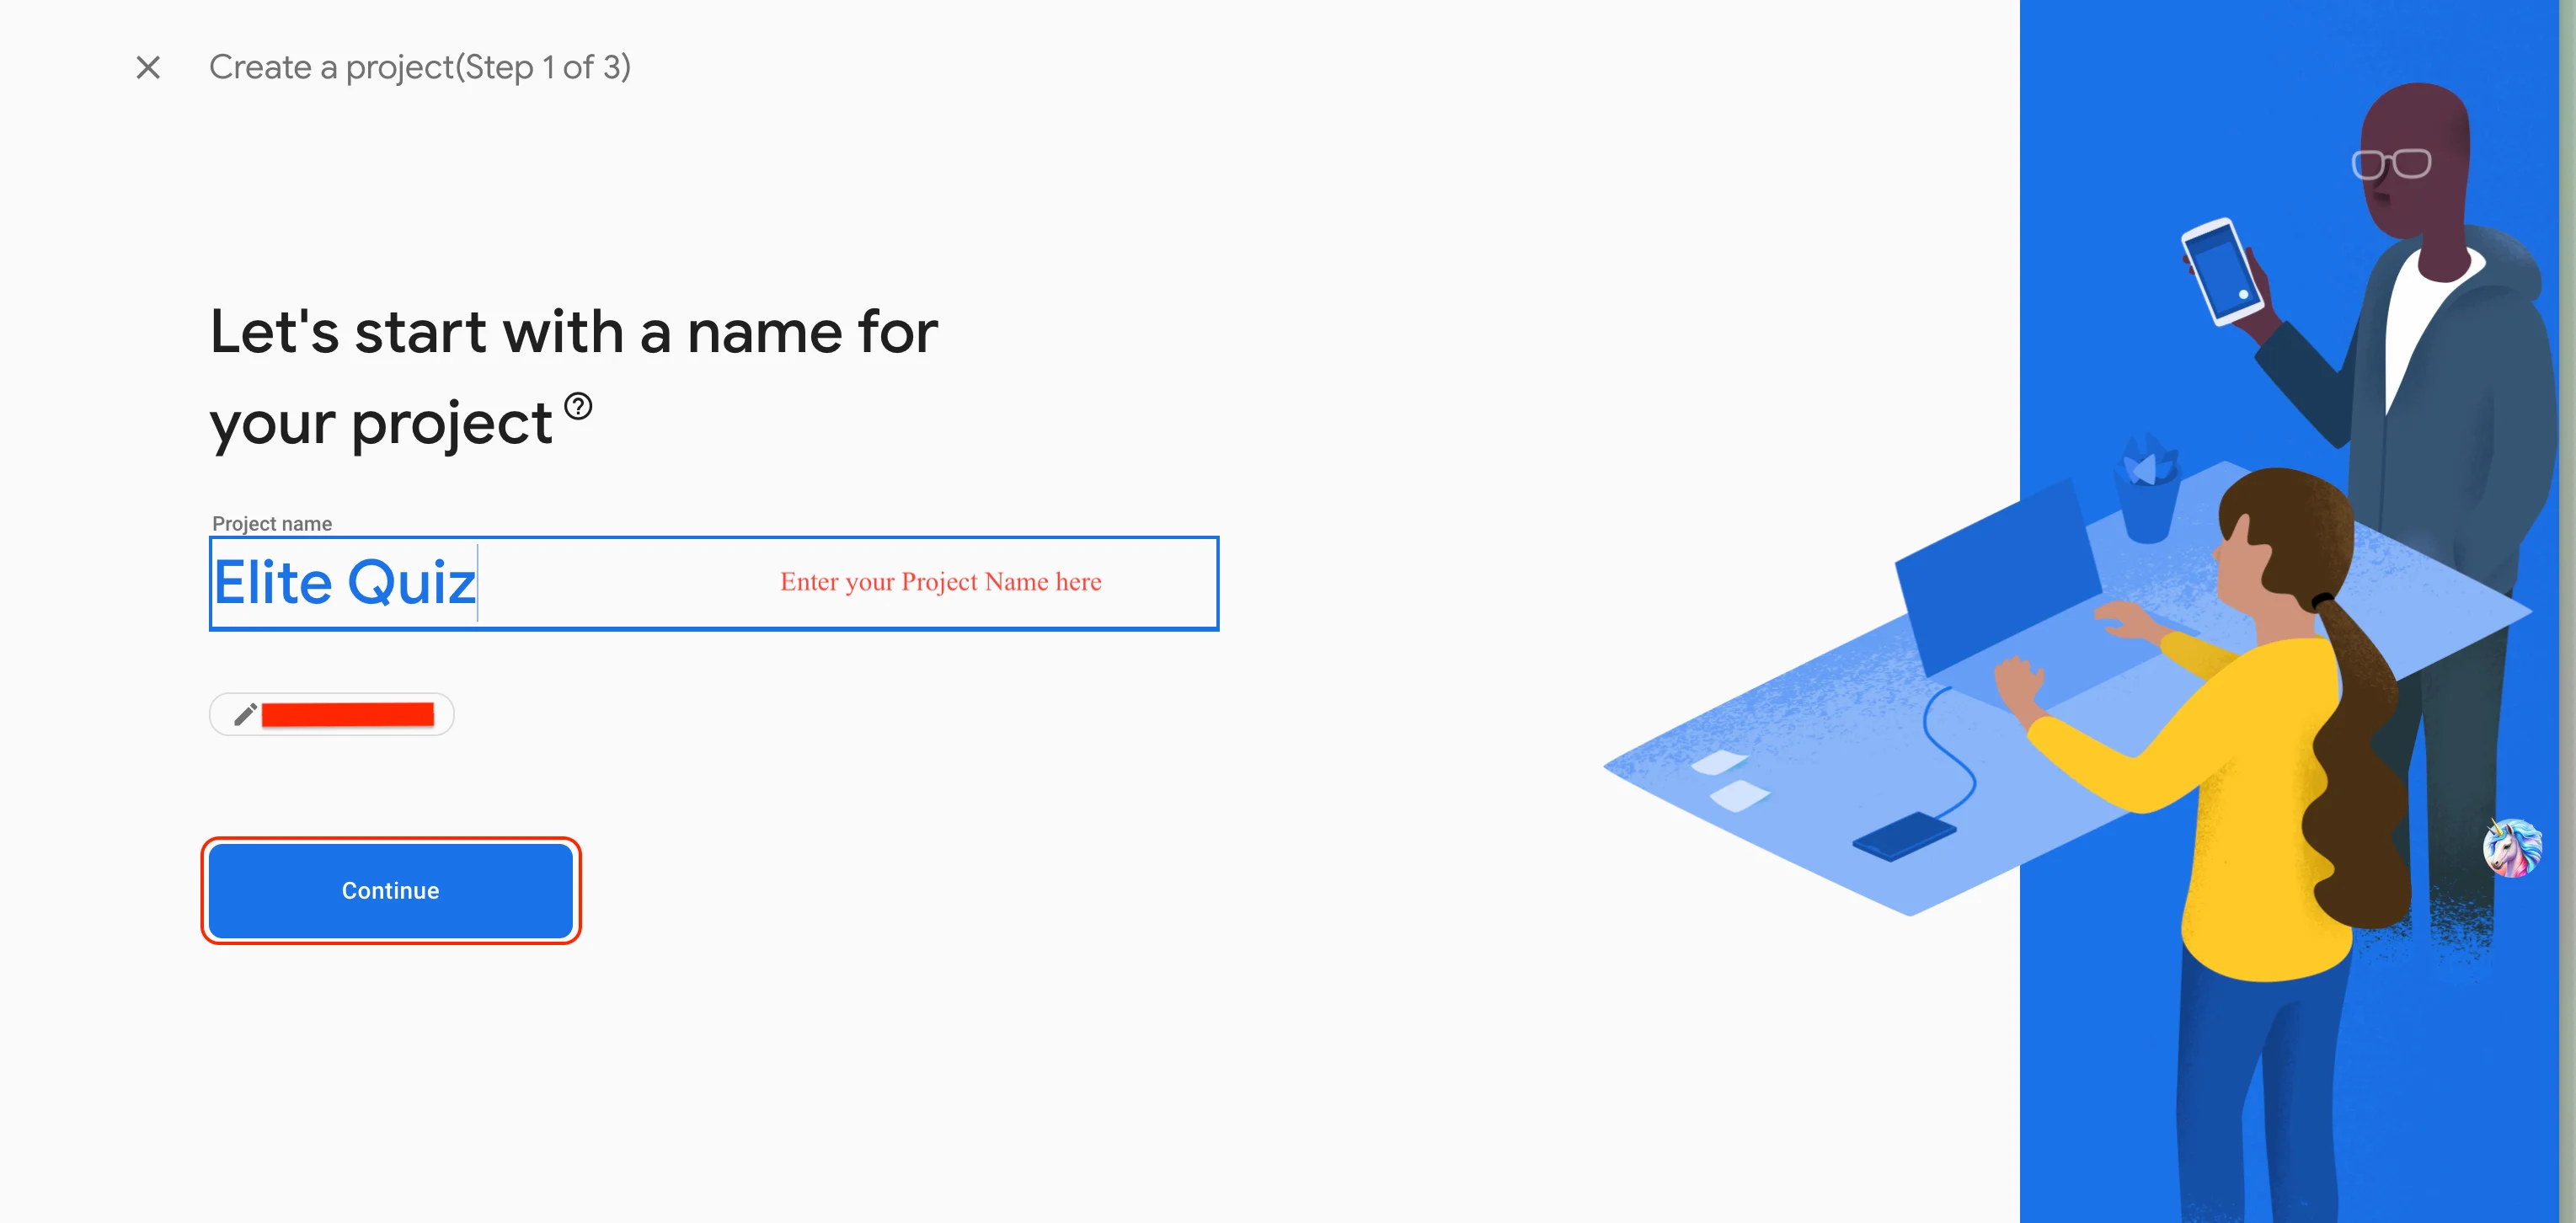
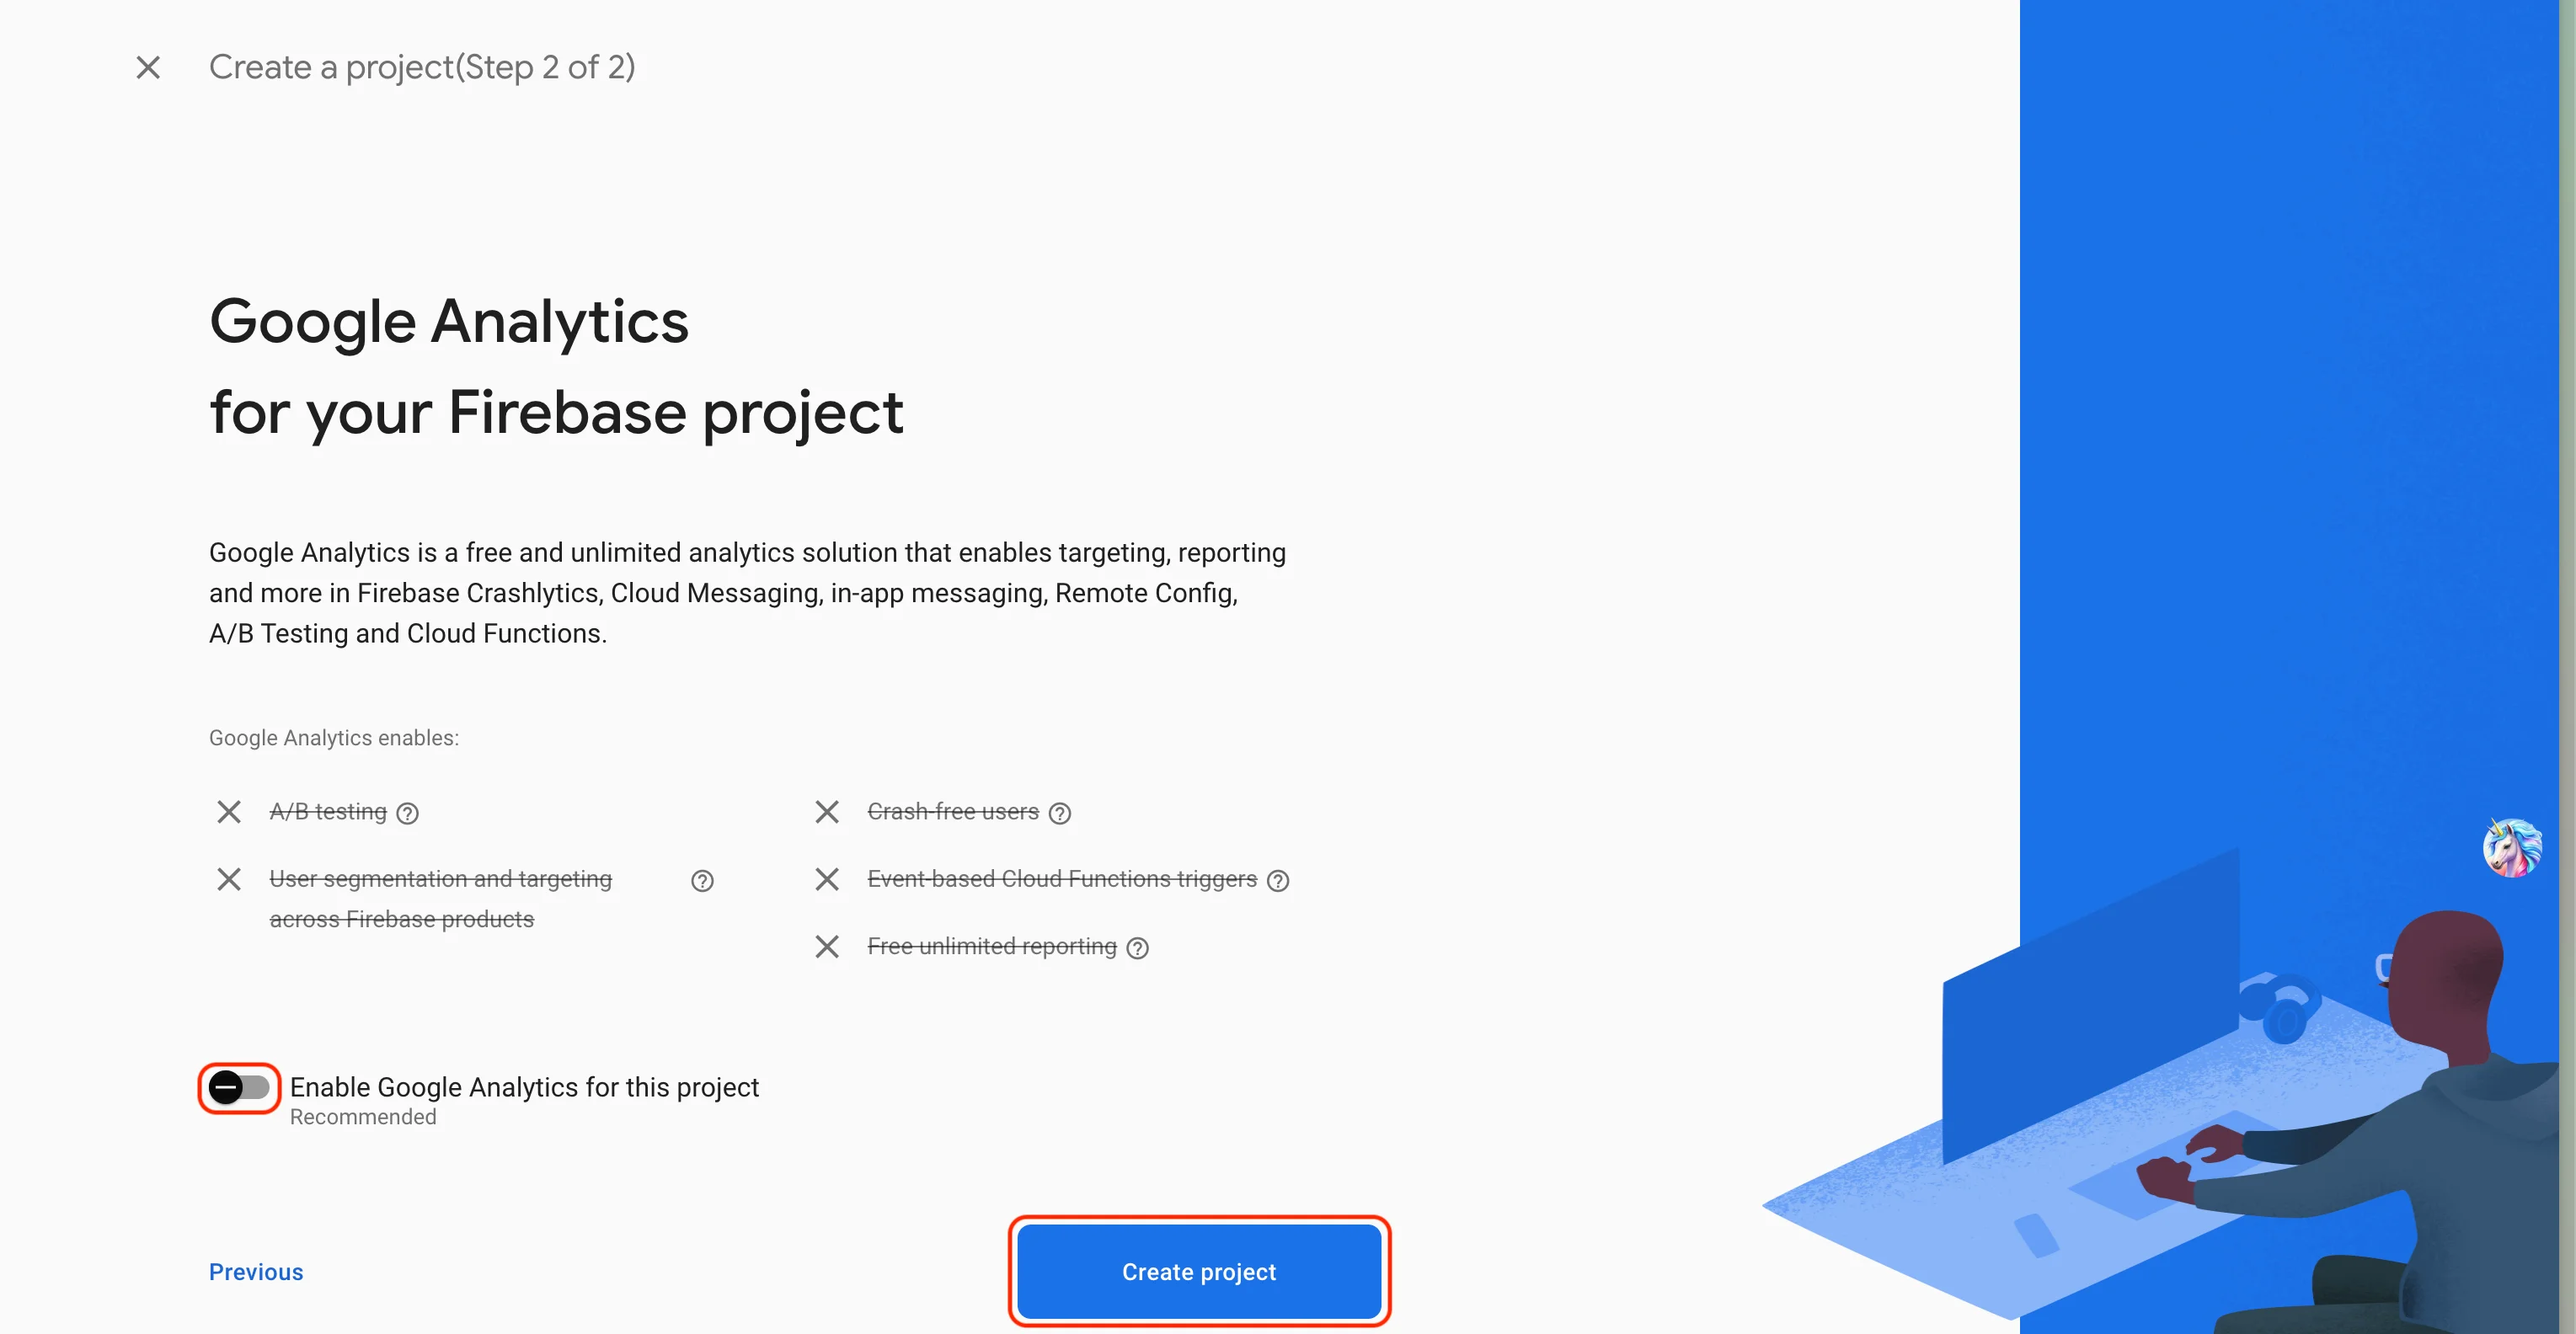
Integrate firebase with your Project
-
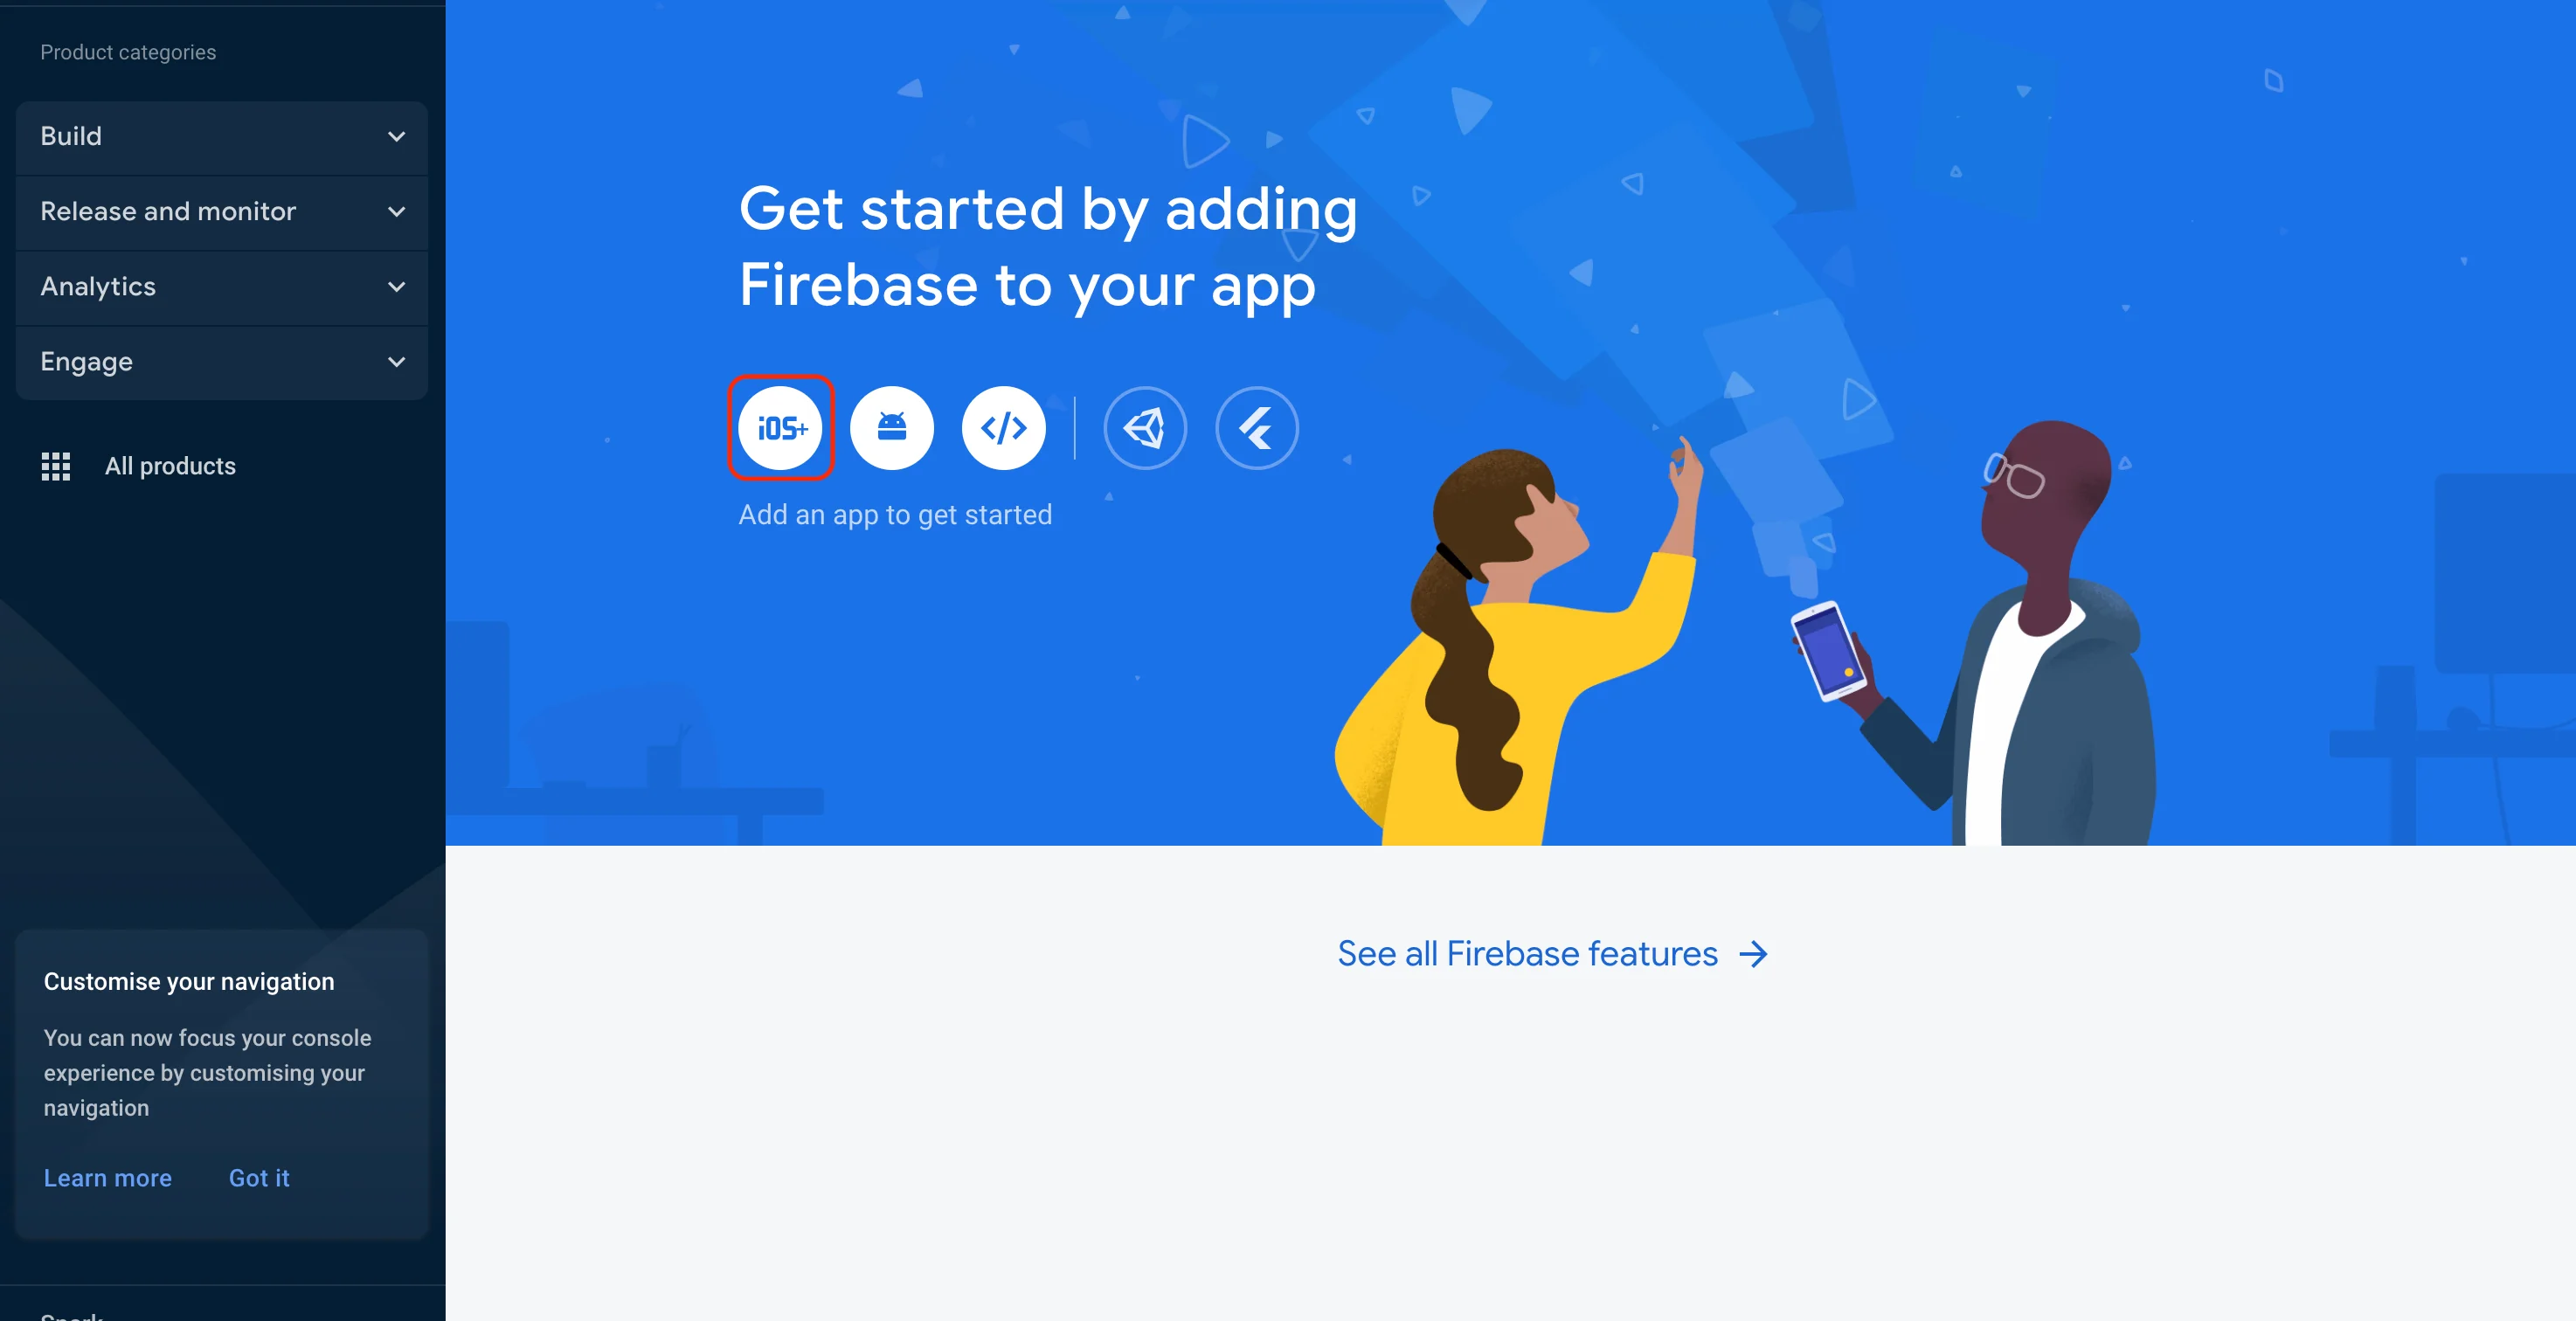
First, Create a new Firebase Project
-
After creating your Firebase project, you'll now connect your Android
application to it

-
Now, fill in the details, to get your SHA-1 & SHA-256 keys visit
https://developers.google.com/android/guides/client-auth
.
SHA keys are required for using firebase authentication. if you have doubts about SHA keys, click here.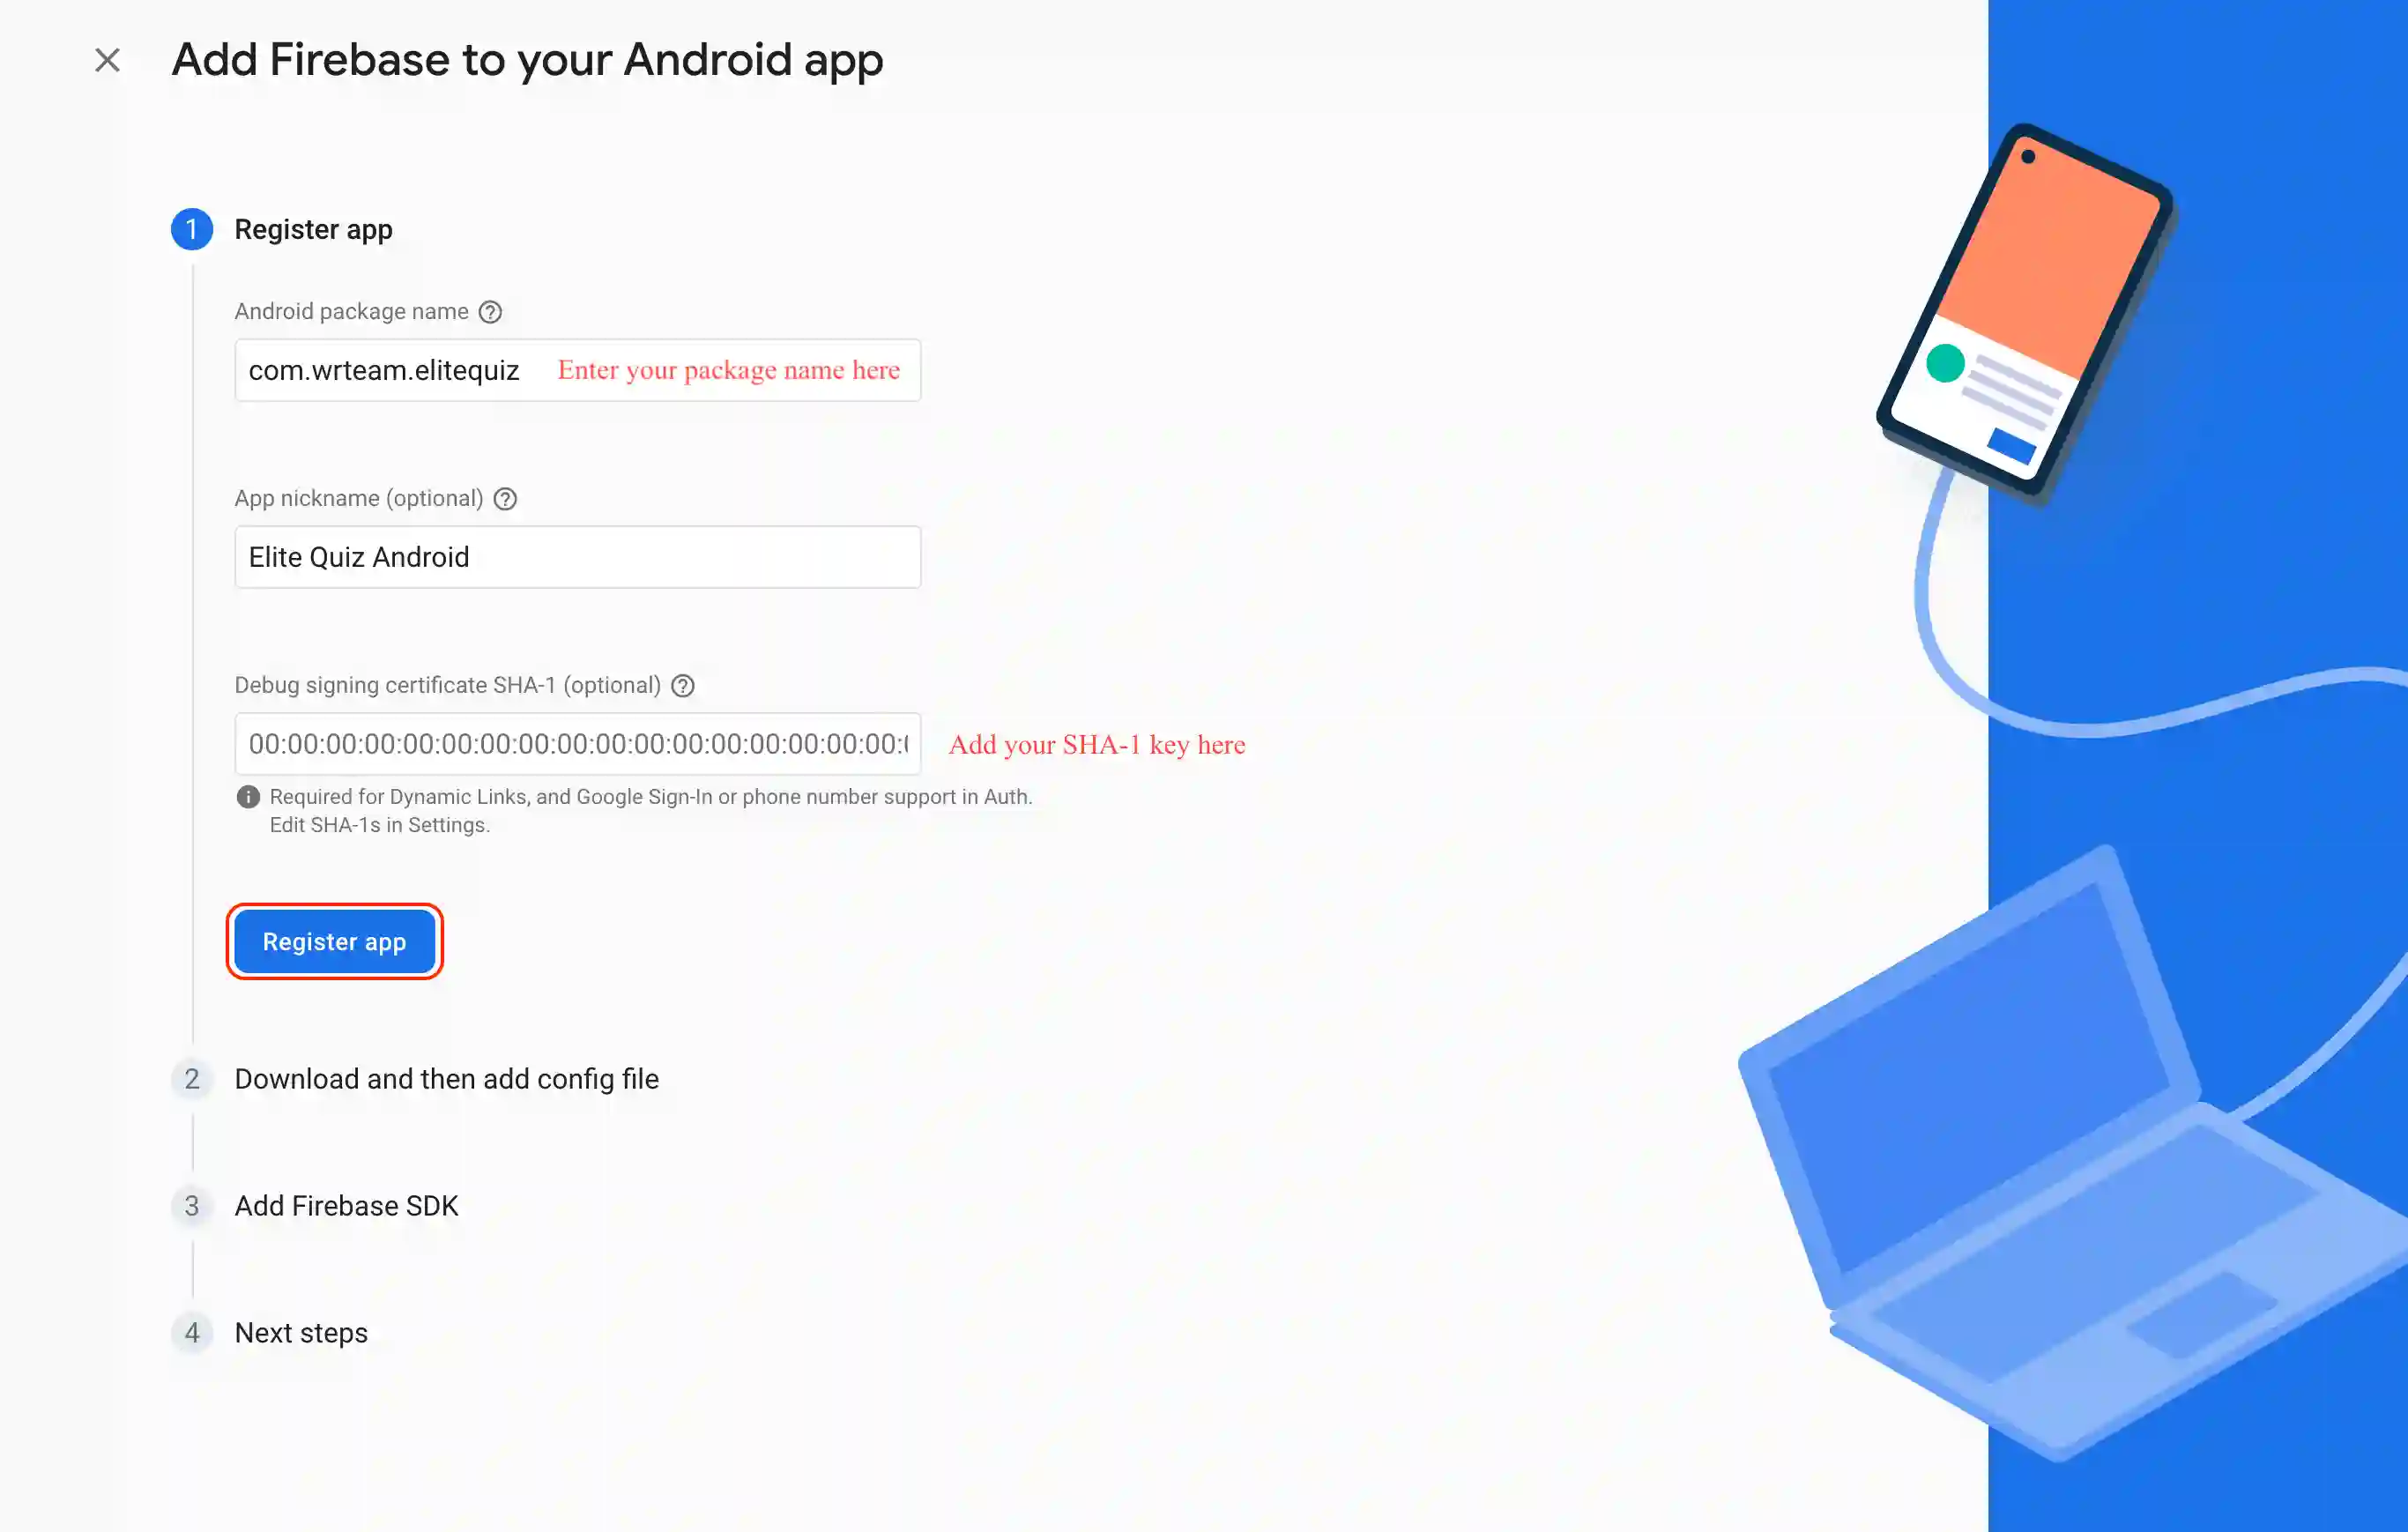

Skip this step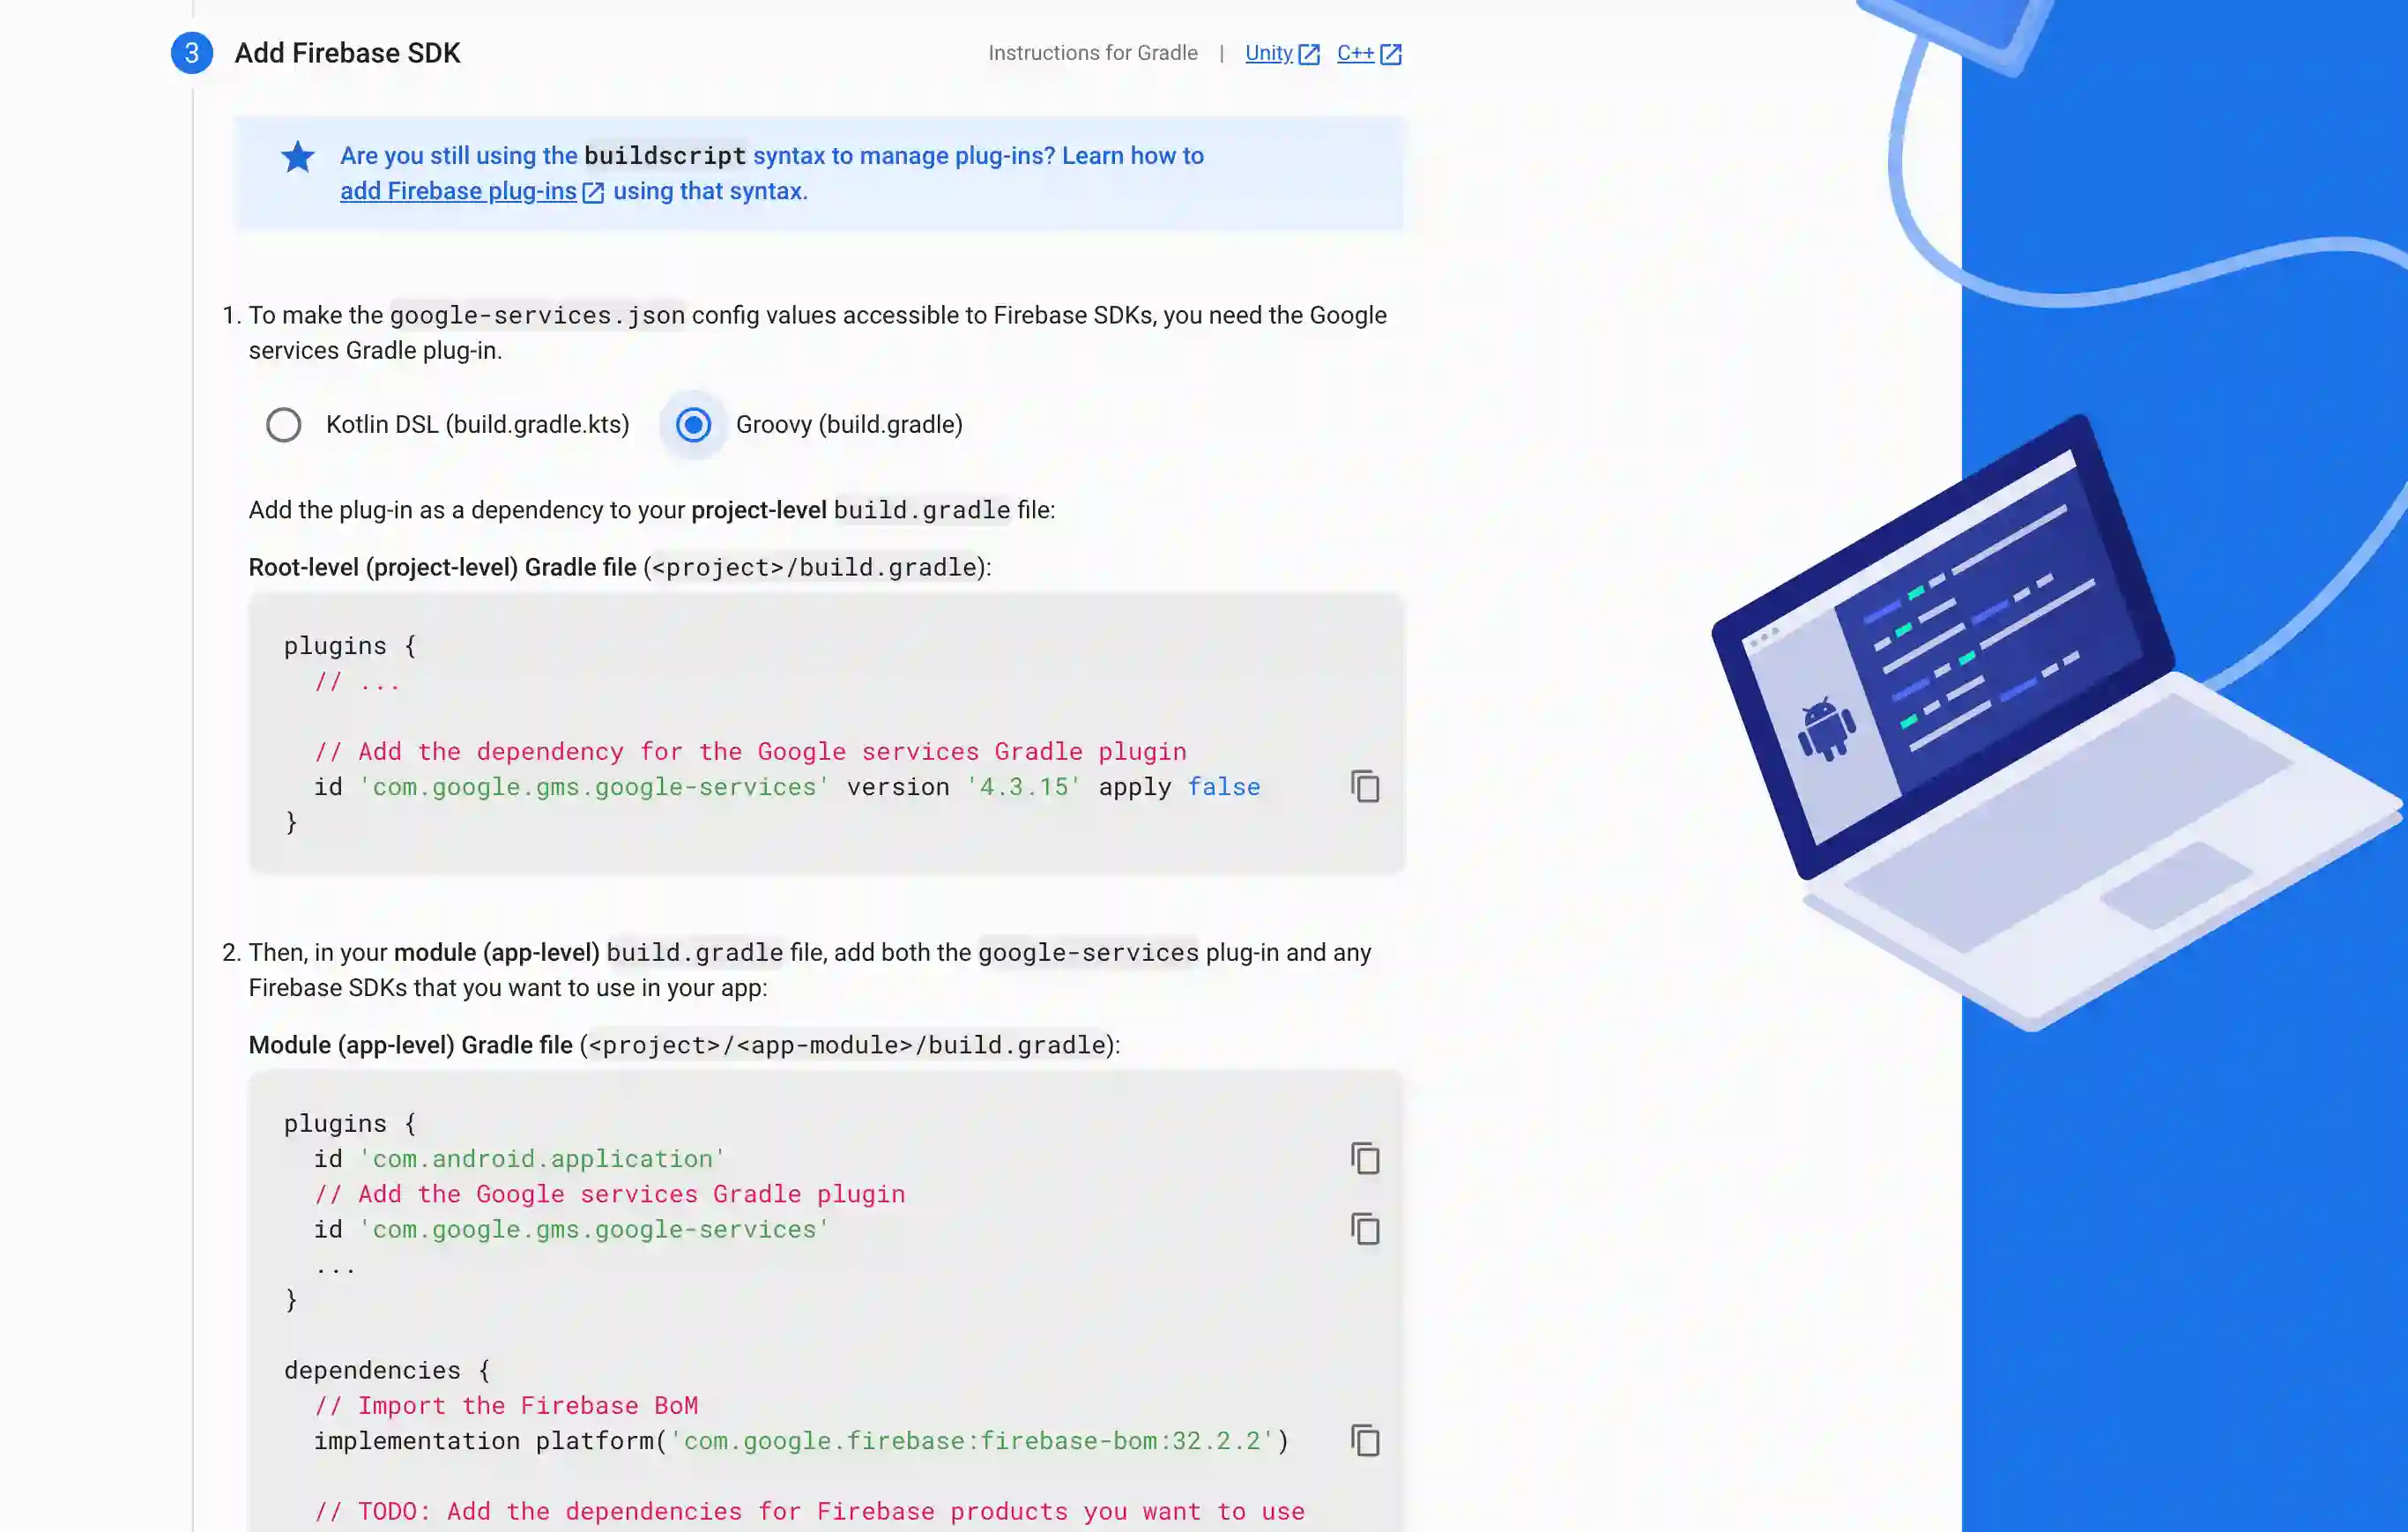
Skip this step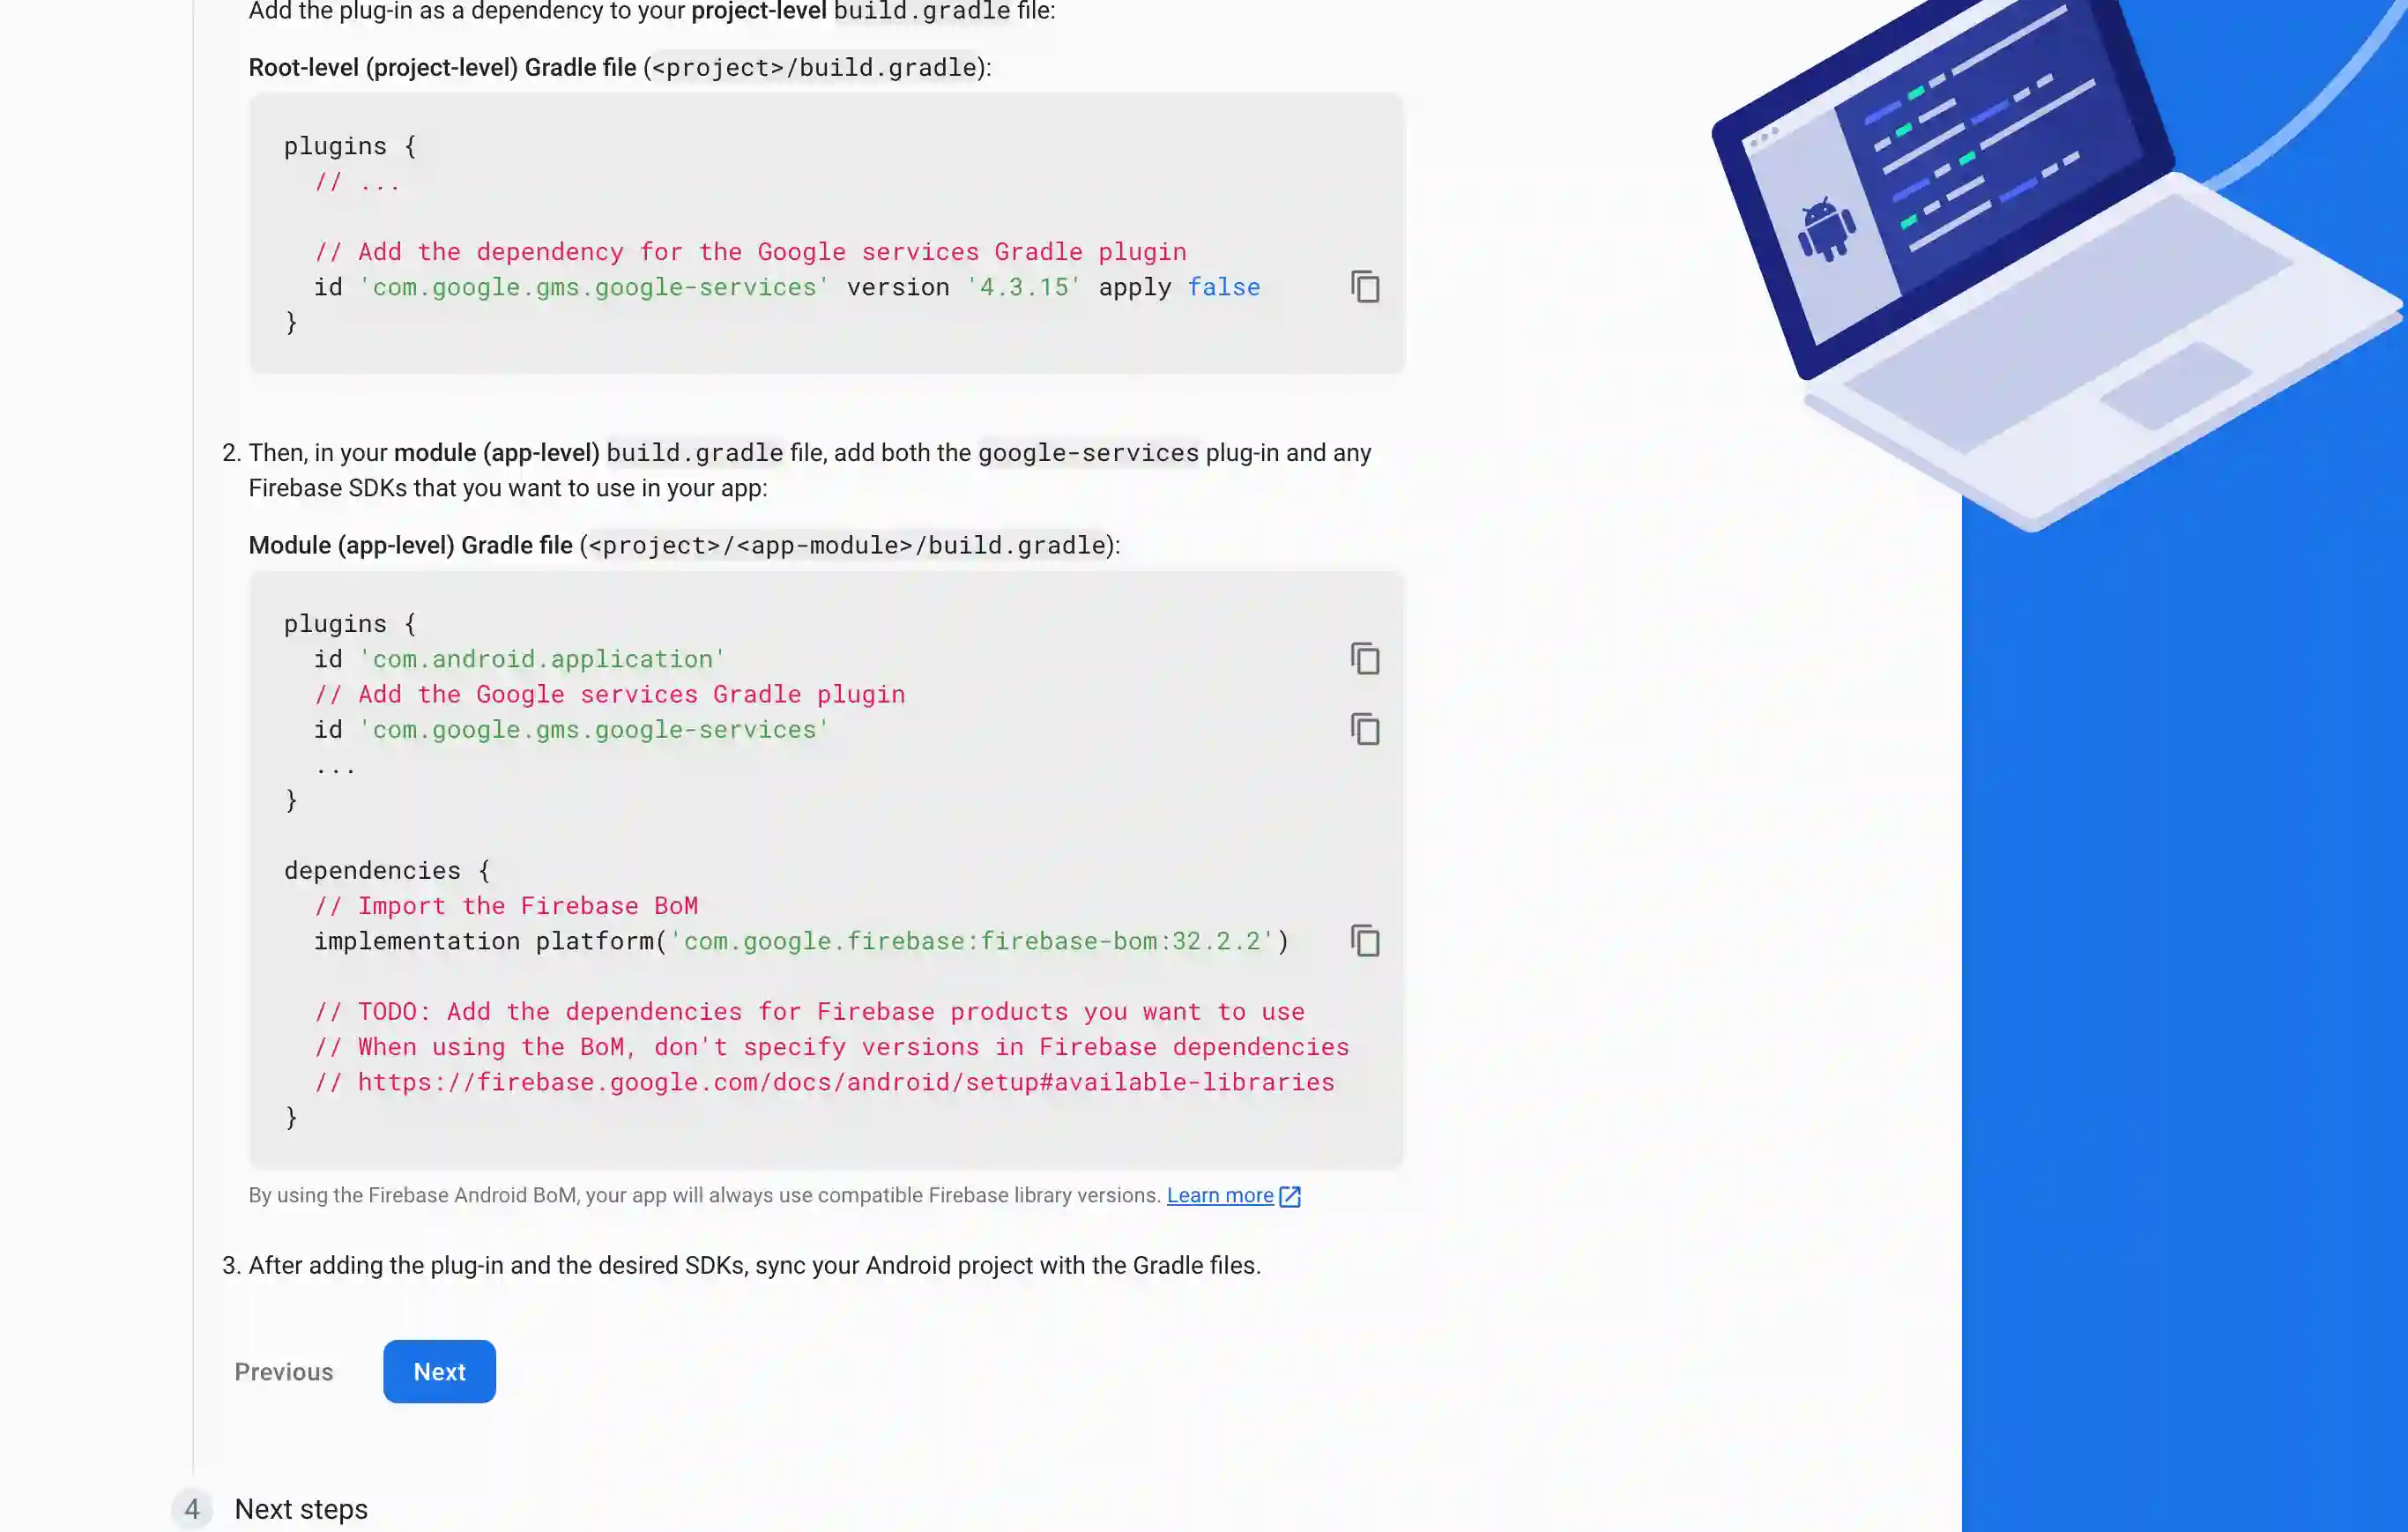
Continue
-
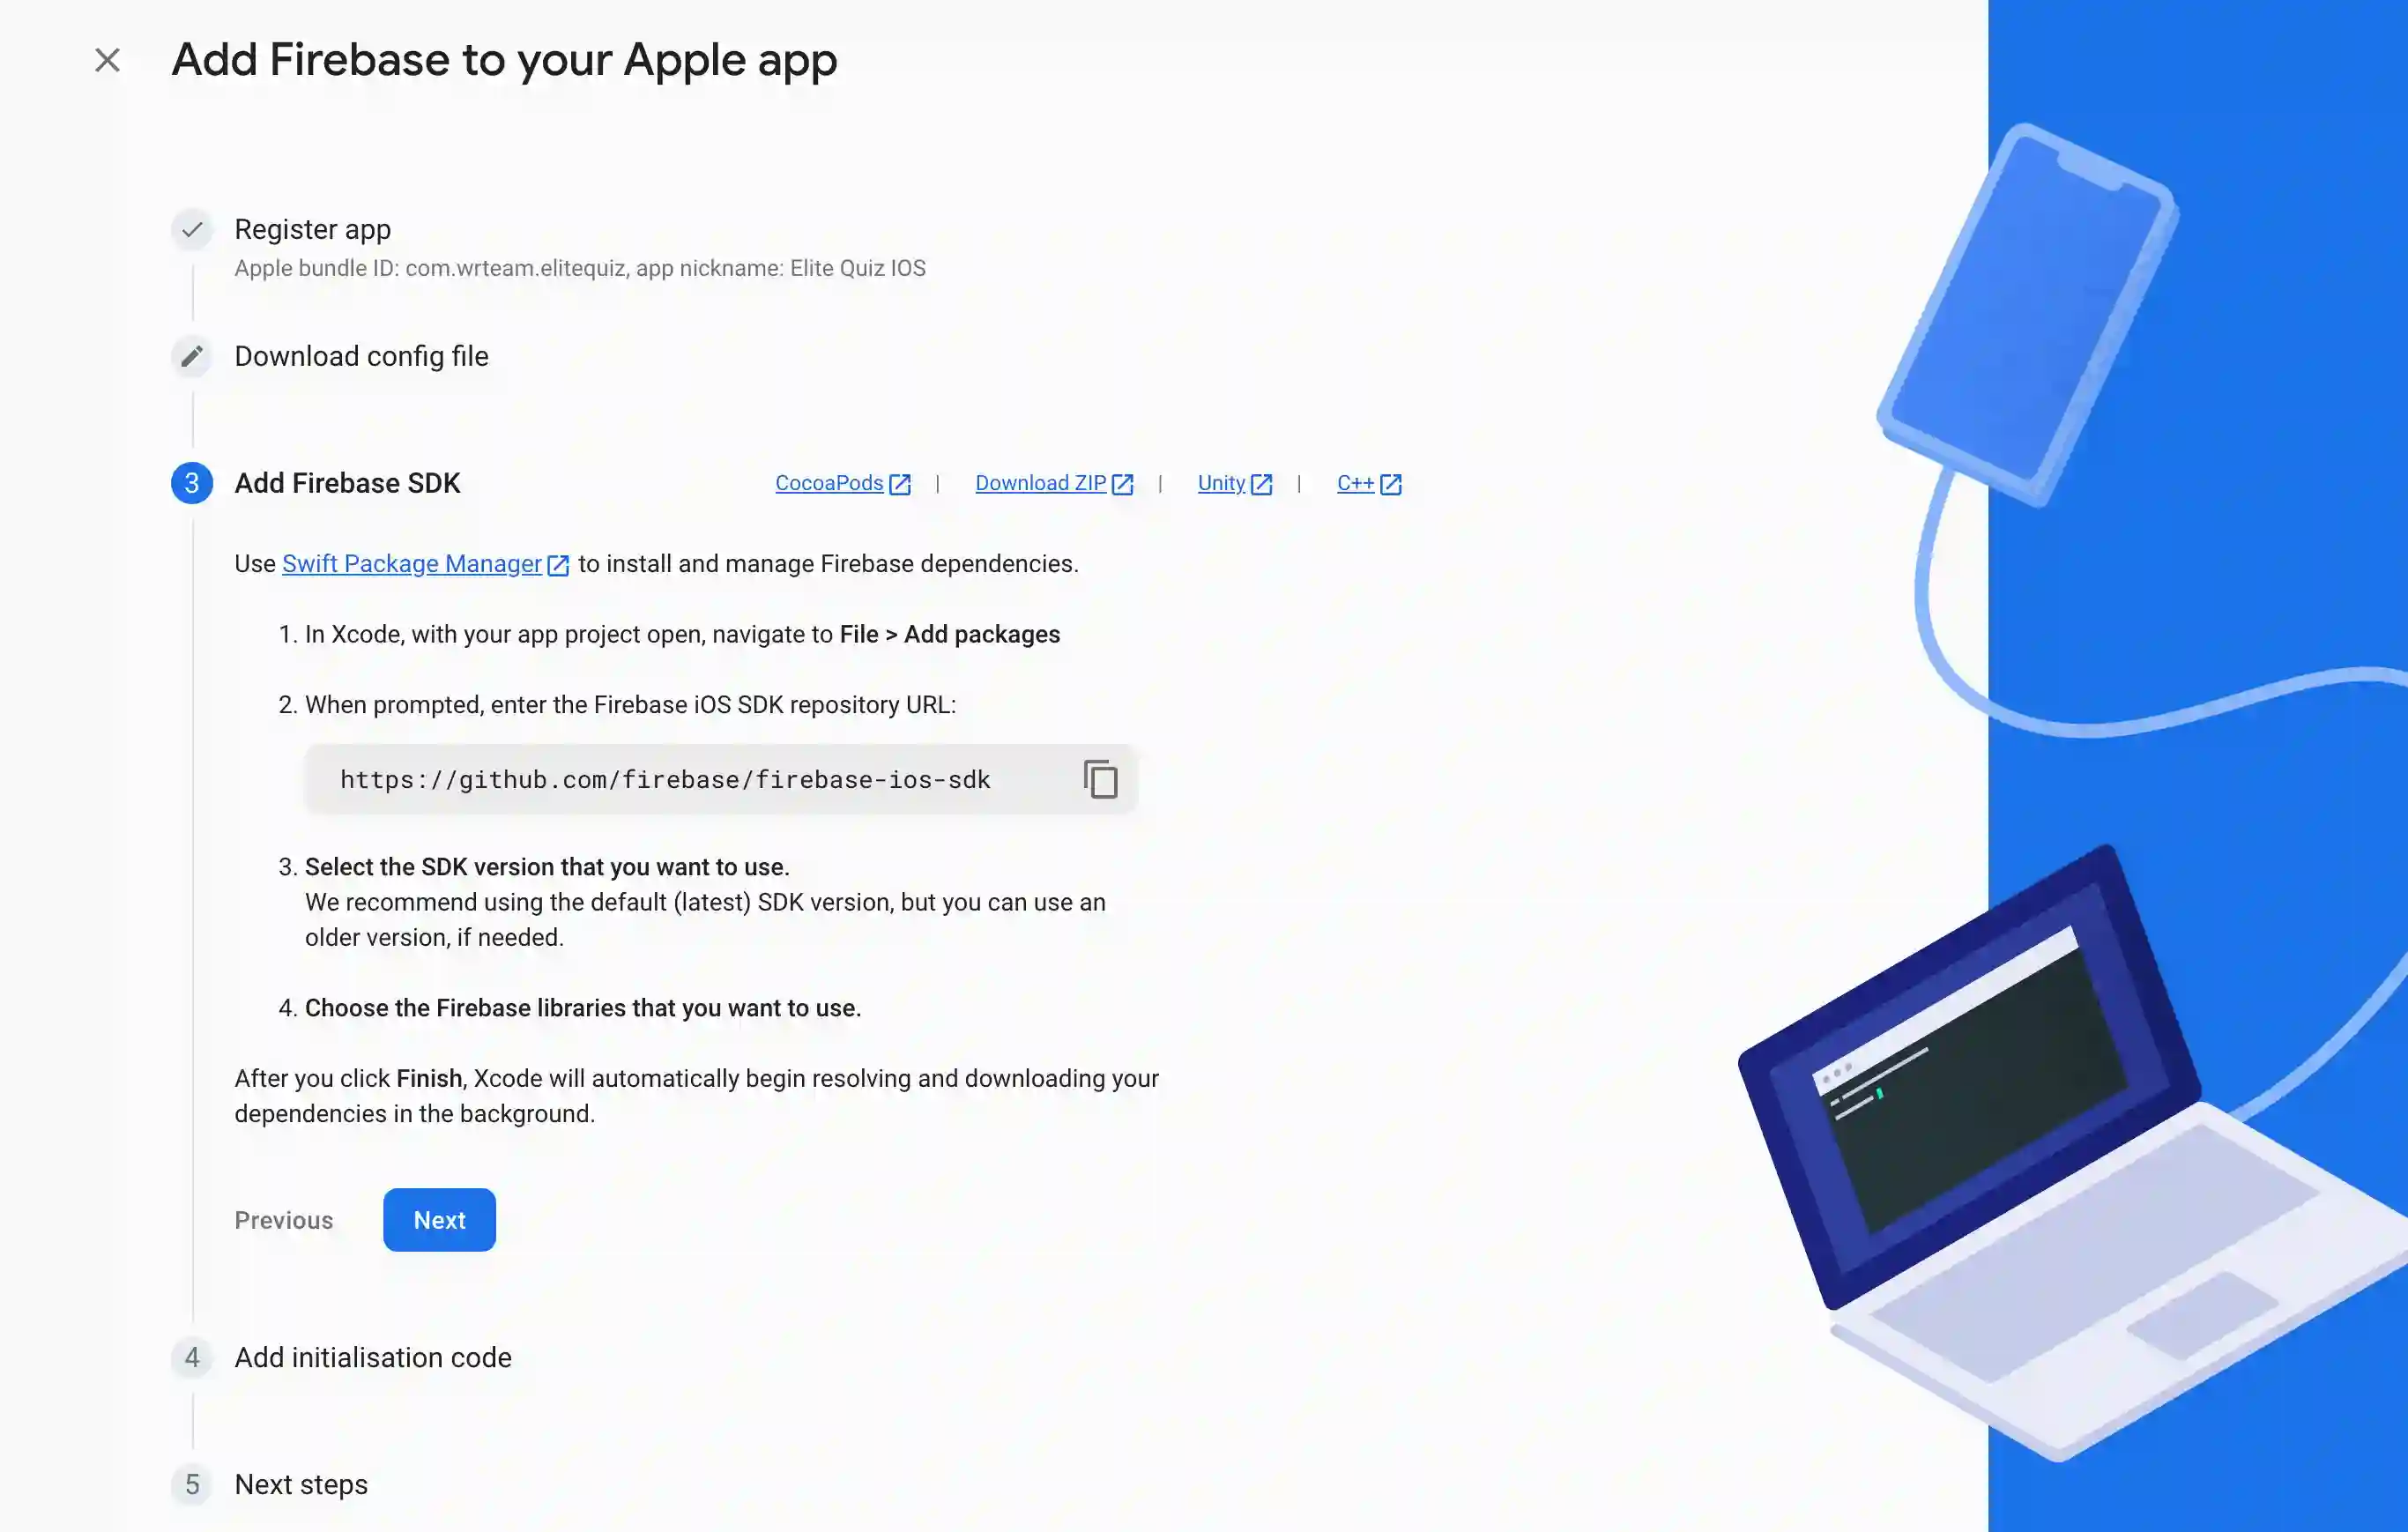
Now it's time for connecting IOS to your Firebase Project.
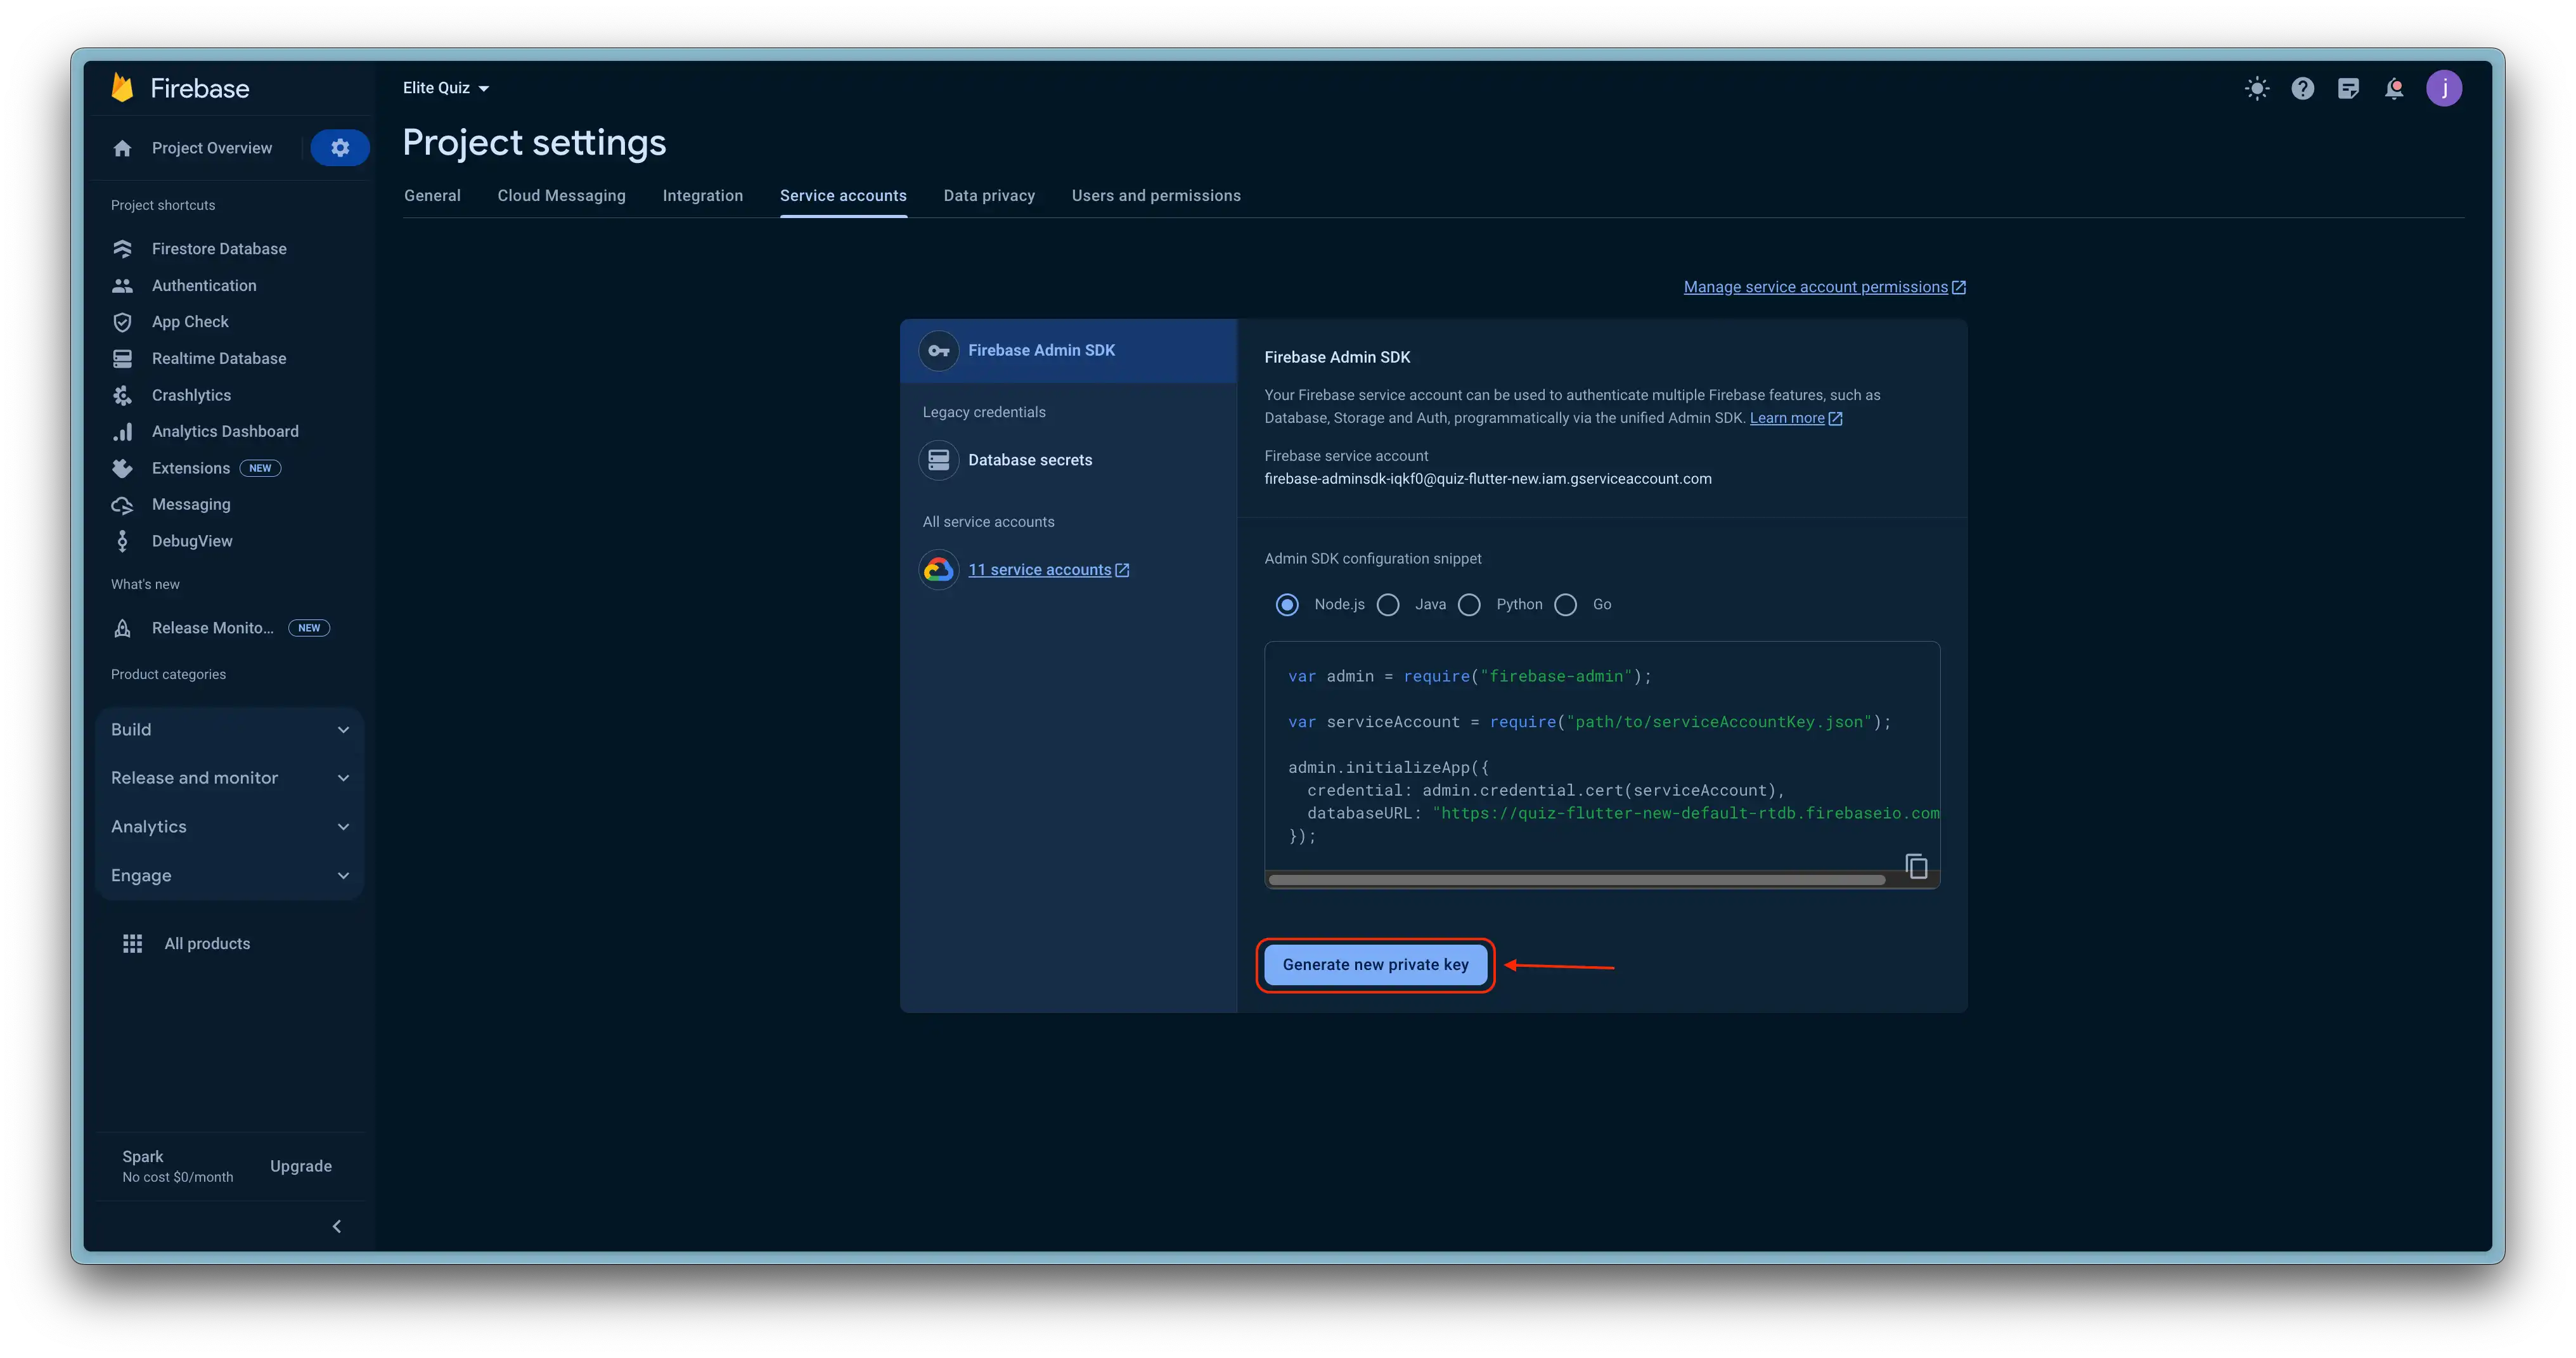
- Finally, We need to add firebase services json file into the Admin panel.
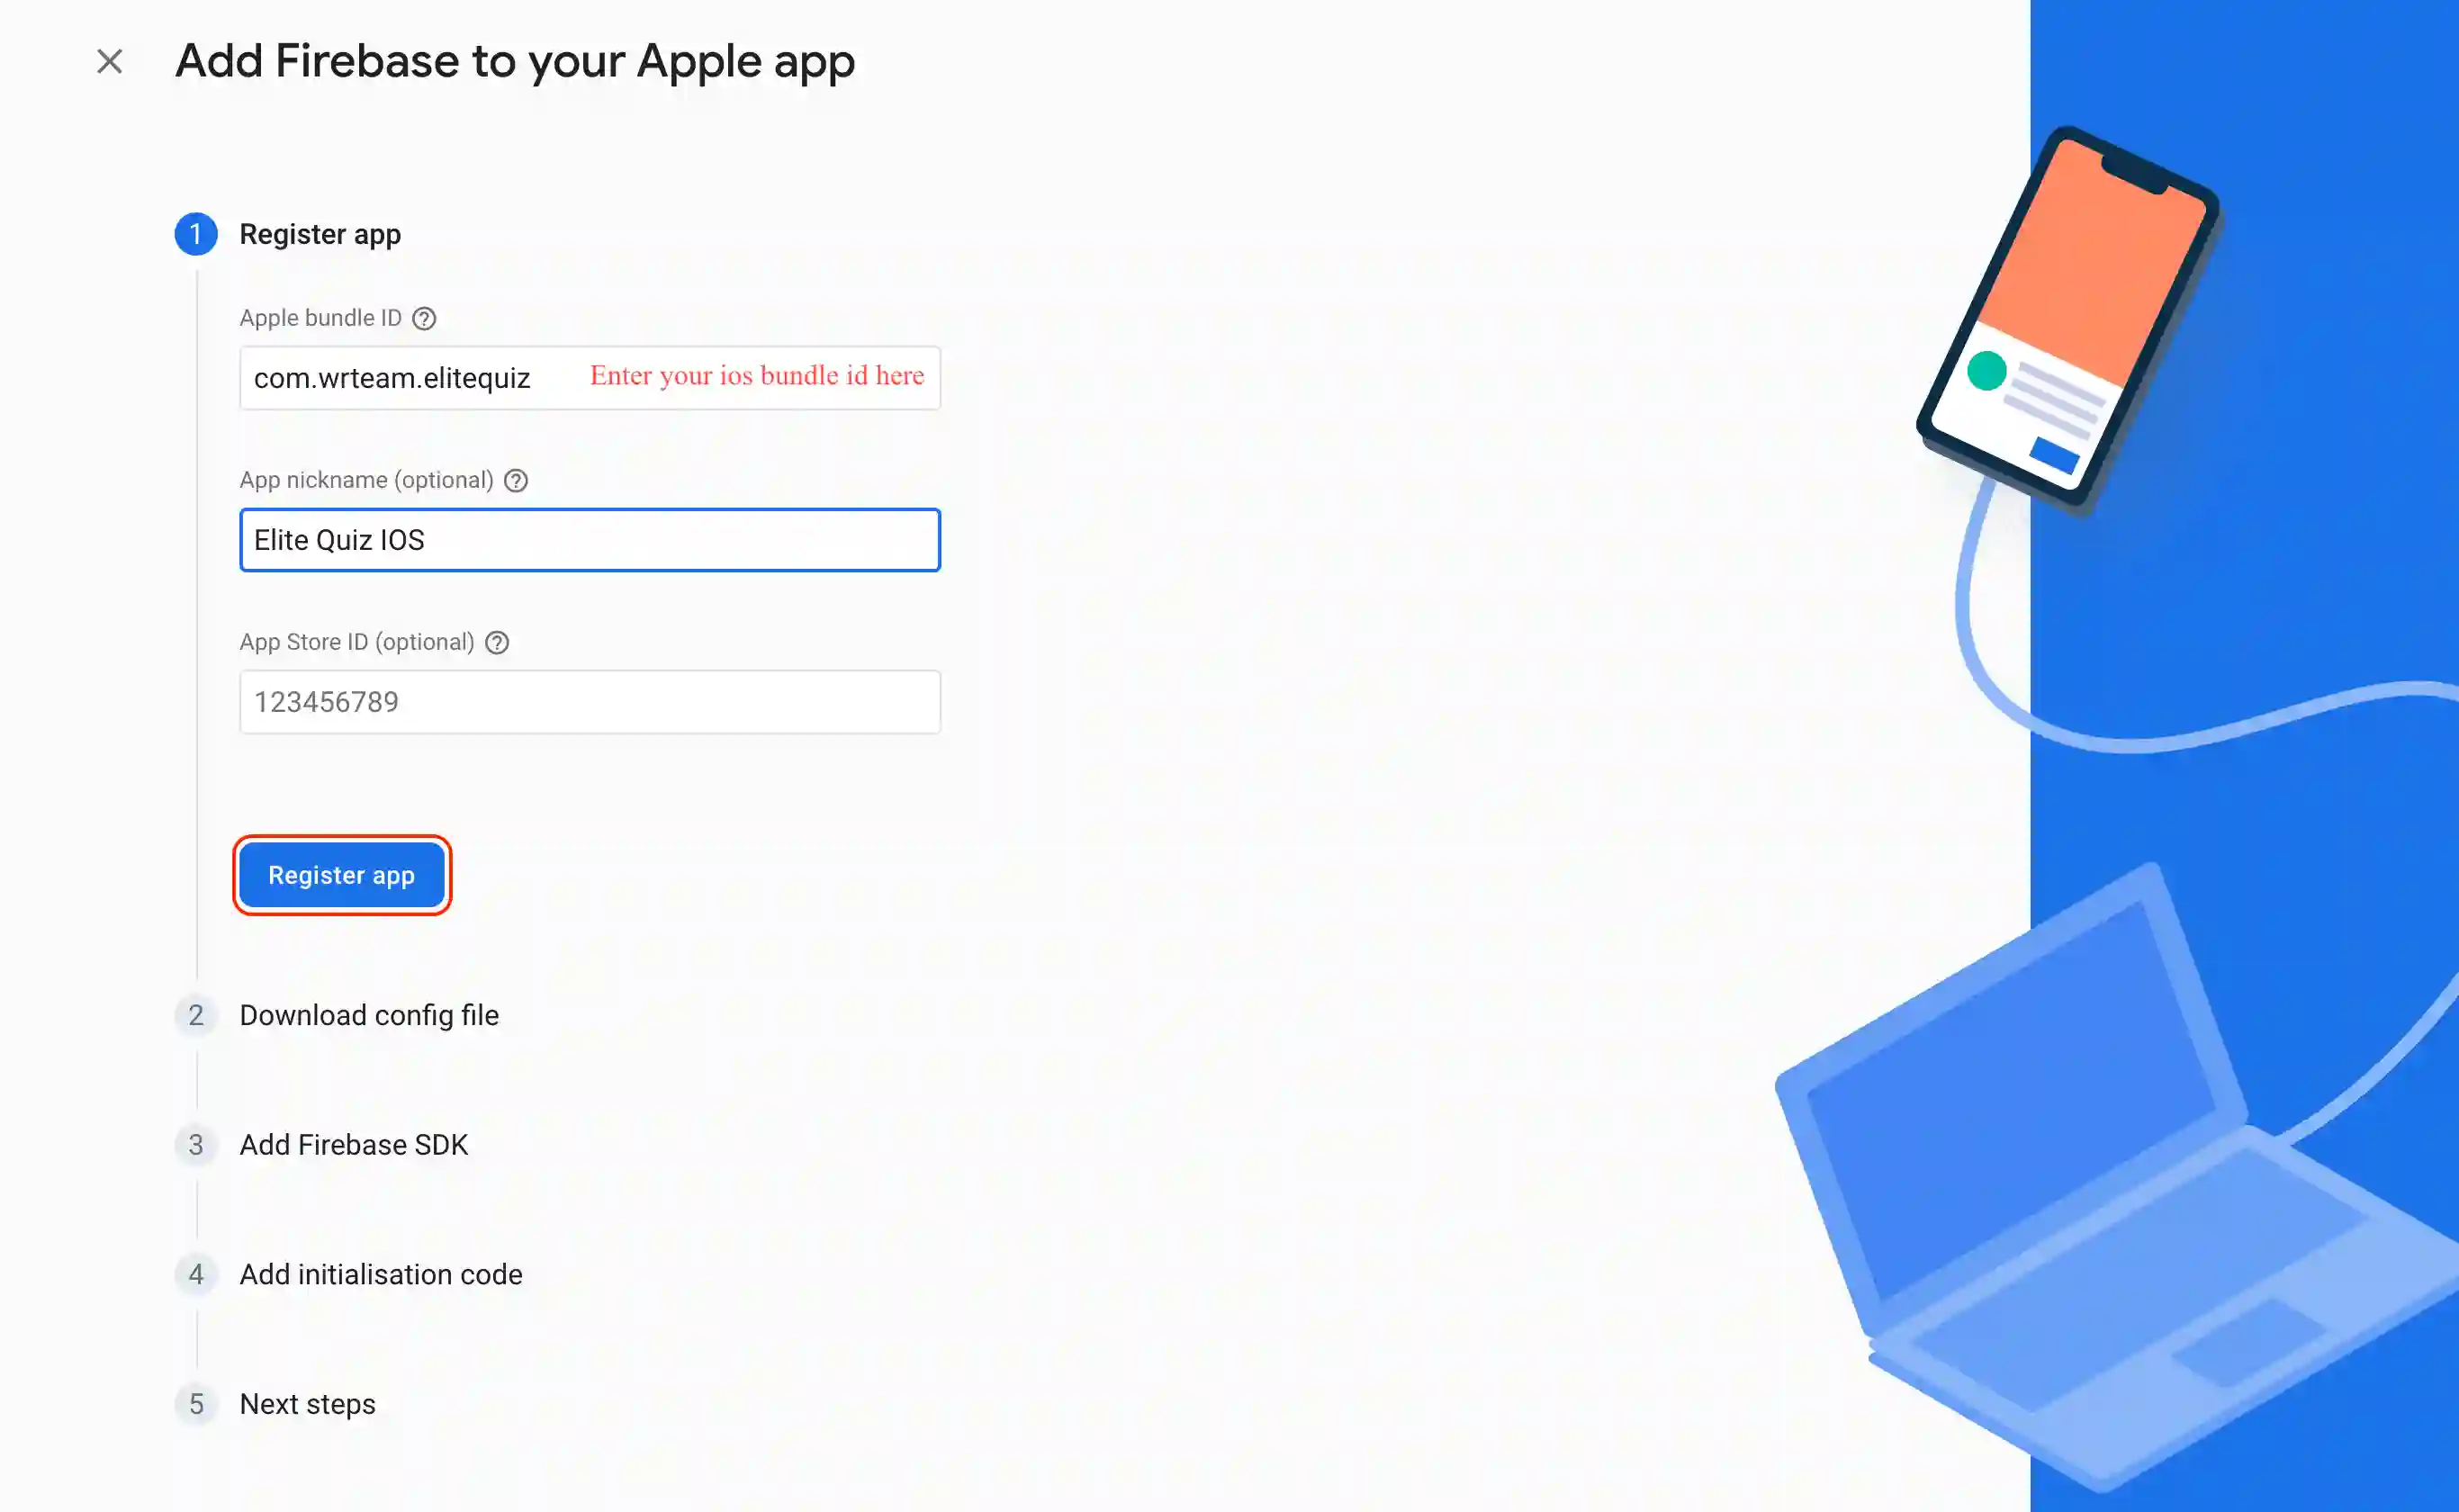
Skip this step
Download the firebase json by opening your Firebase Project > Project Settings > Services Account, and clicking generate new key.
Upload the downloaded services json in the admin panel by going to Settings > Firebase Configurations section, as shown in the image.
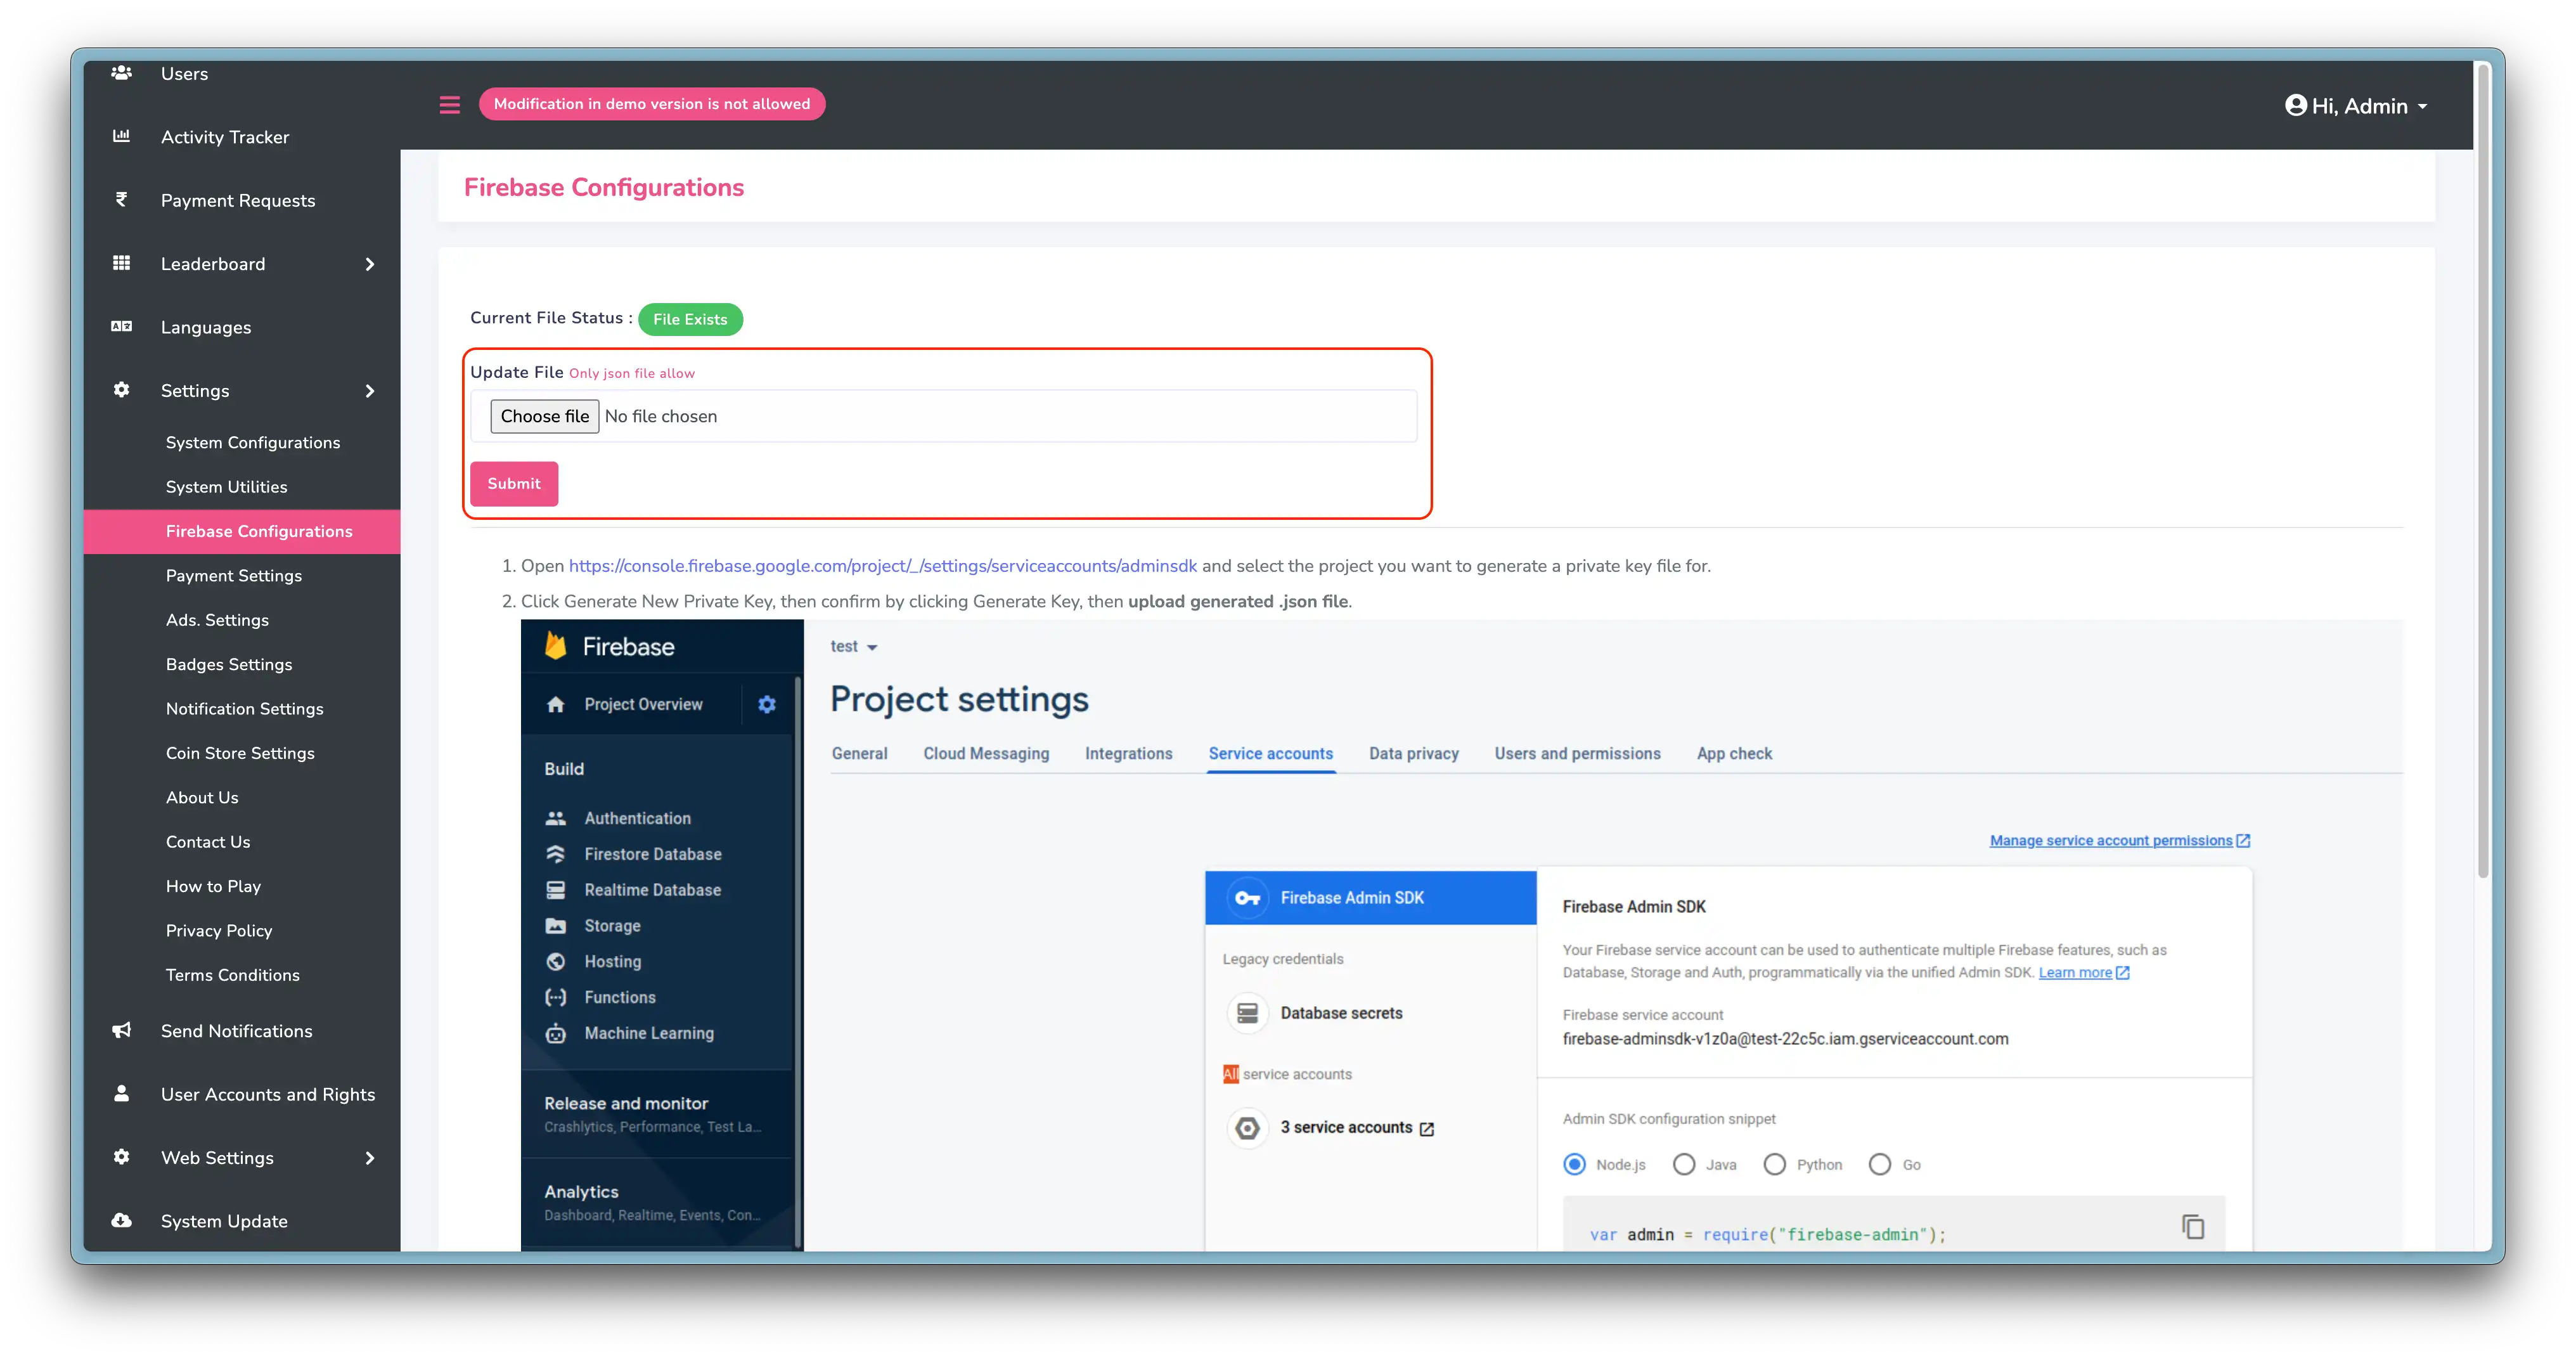
Congrats! You have successfully connected your android & IOS app to your firebase project.
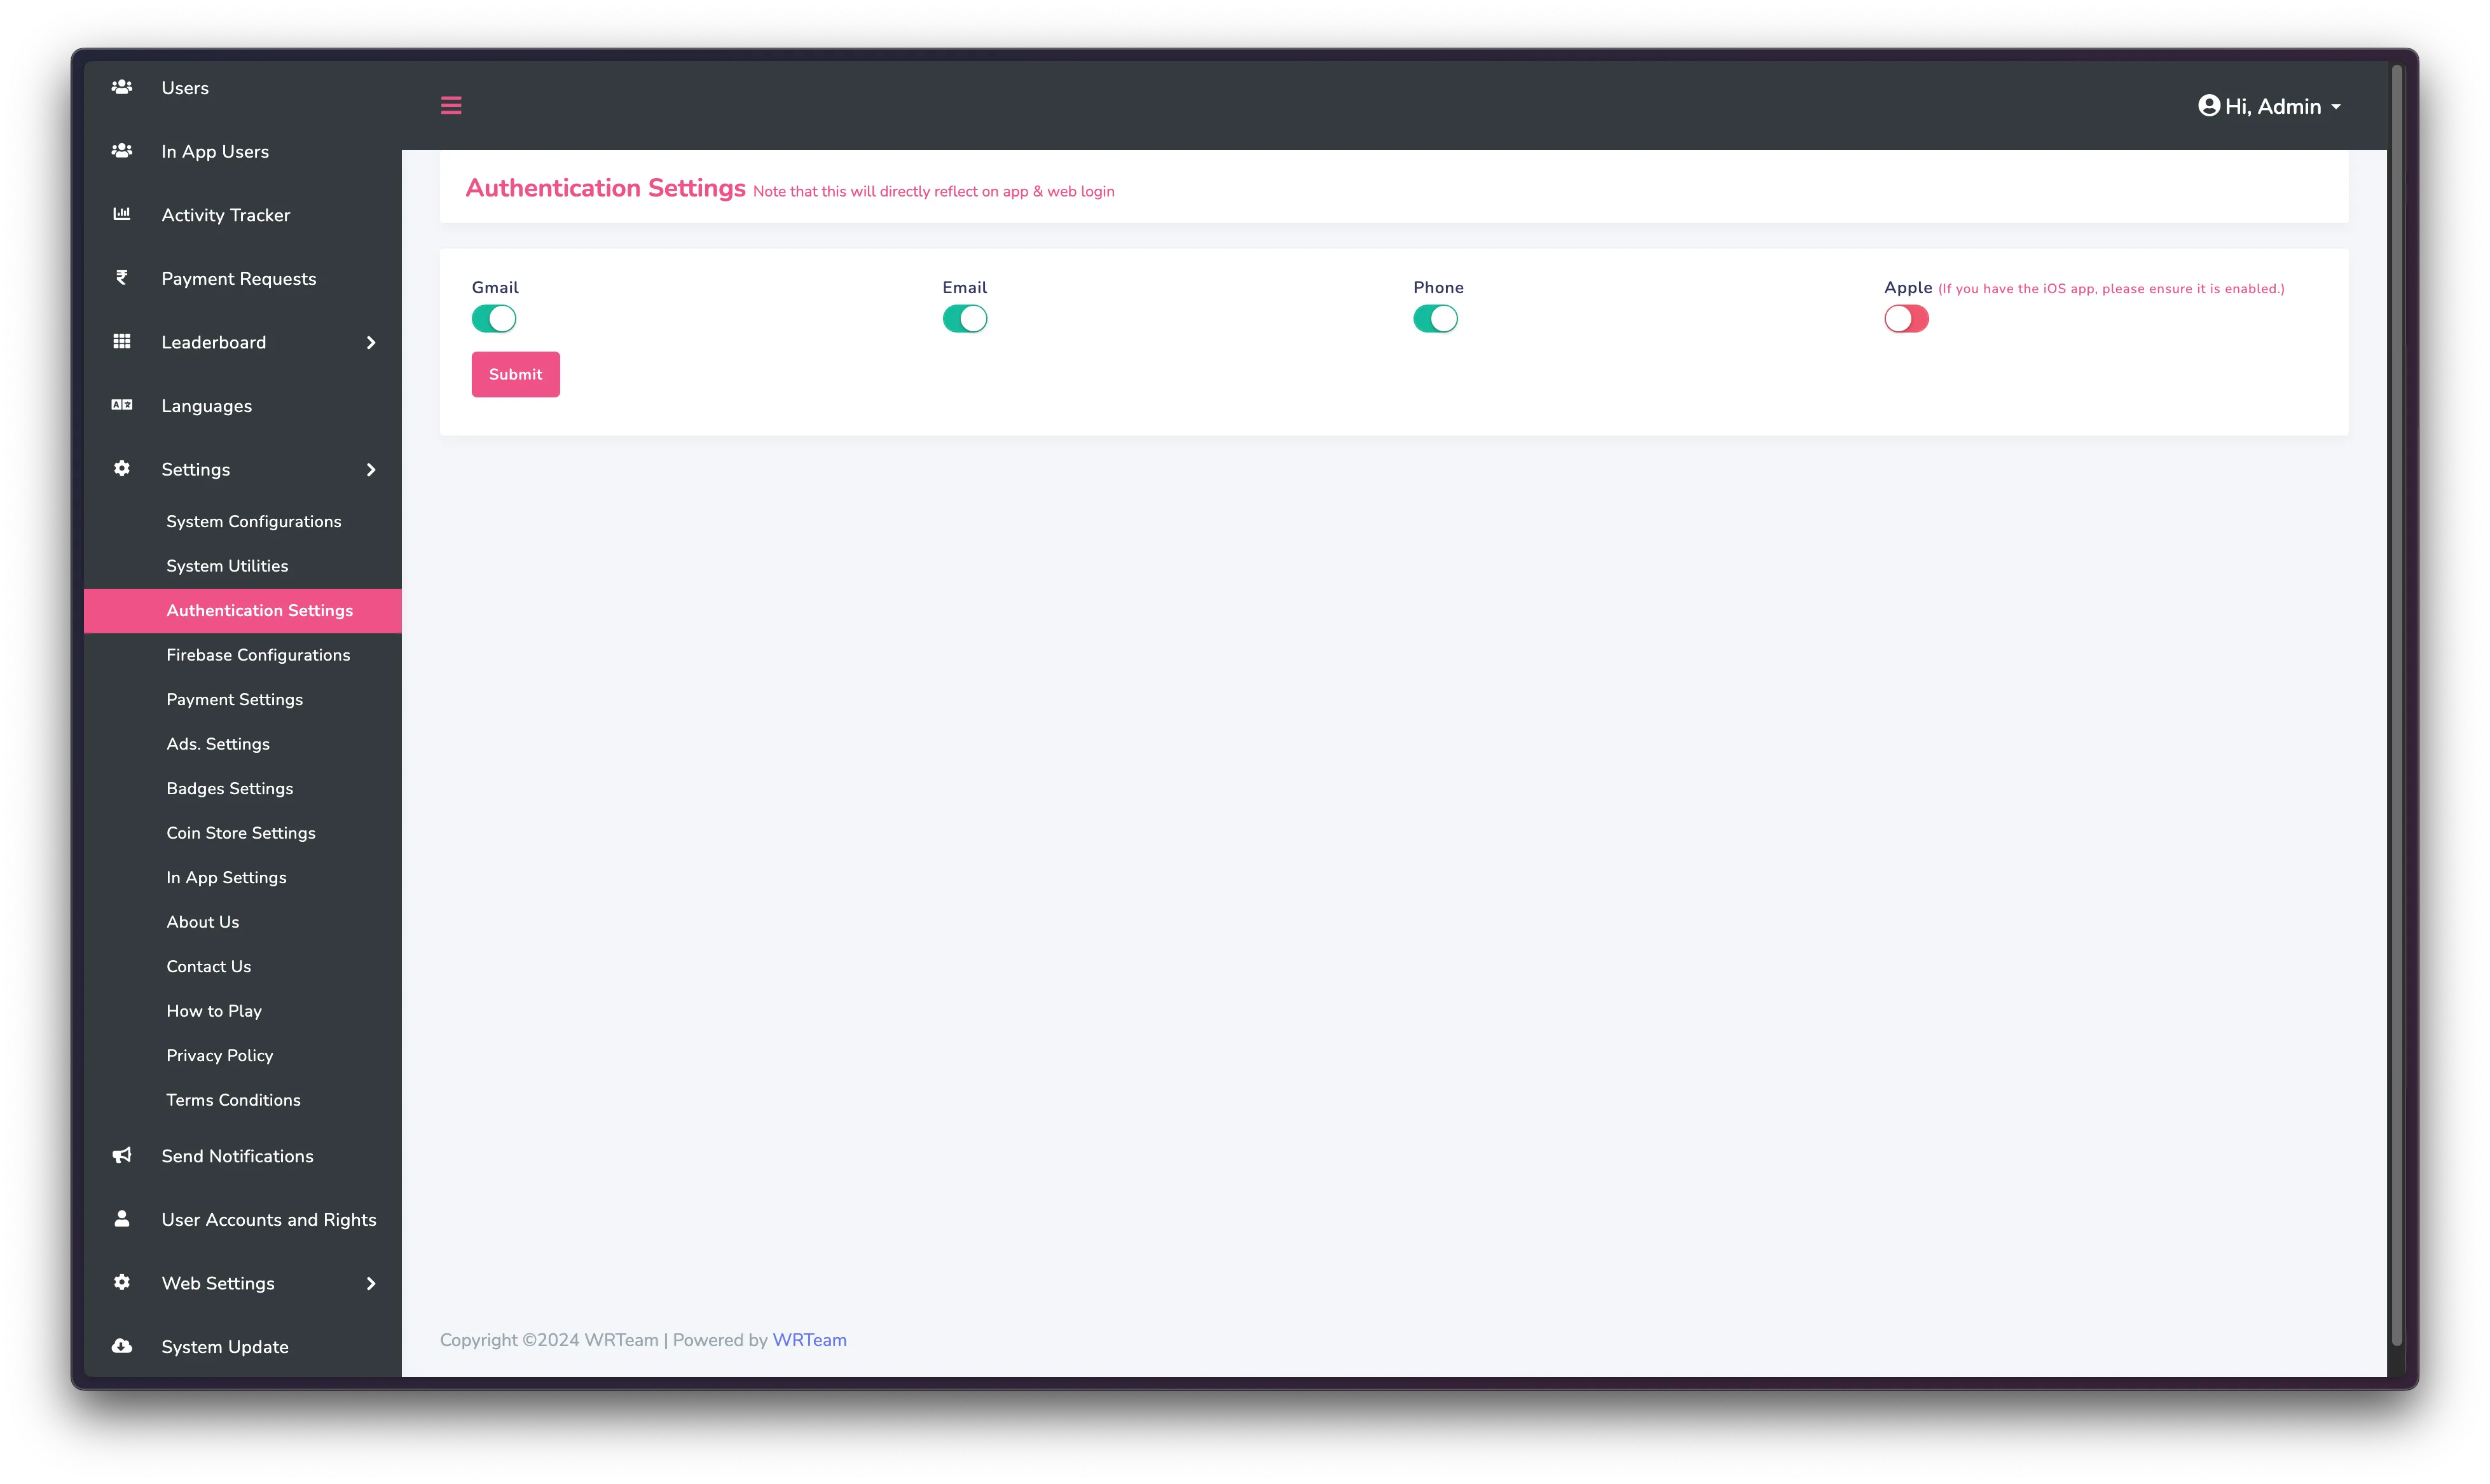
Enable Firebase Authentication
new
you can toggle authentication methods from admin panel now. go to
Settings -> Authentication Settings
Authentication Methods should be enabled in both Panel and the firebase to work properly.
-
Head to your Firebase project, click on the authentication menu, and enable
Email, Phone, Google, and Apple sign-in methods, as shown in the image.

-
Add the SHA-256 key as shown in below image. Go to Project Settings -> Your apps
-> Android apps
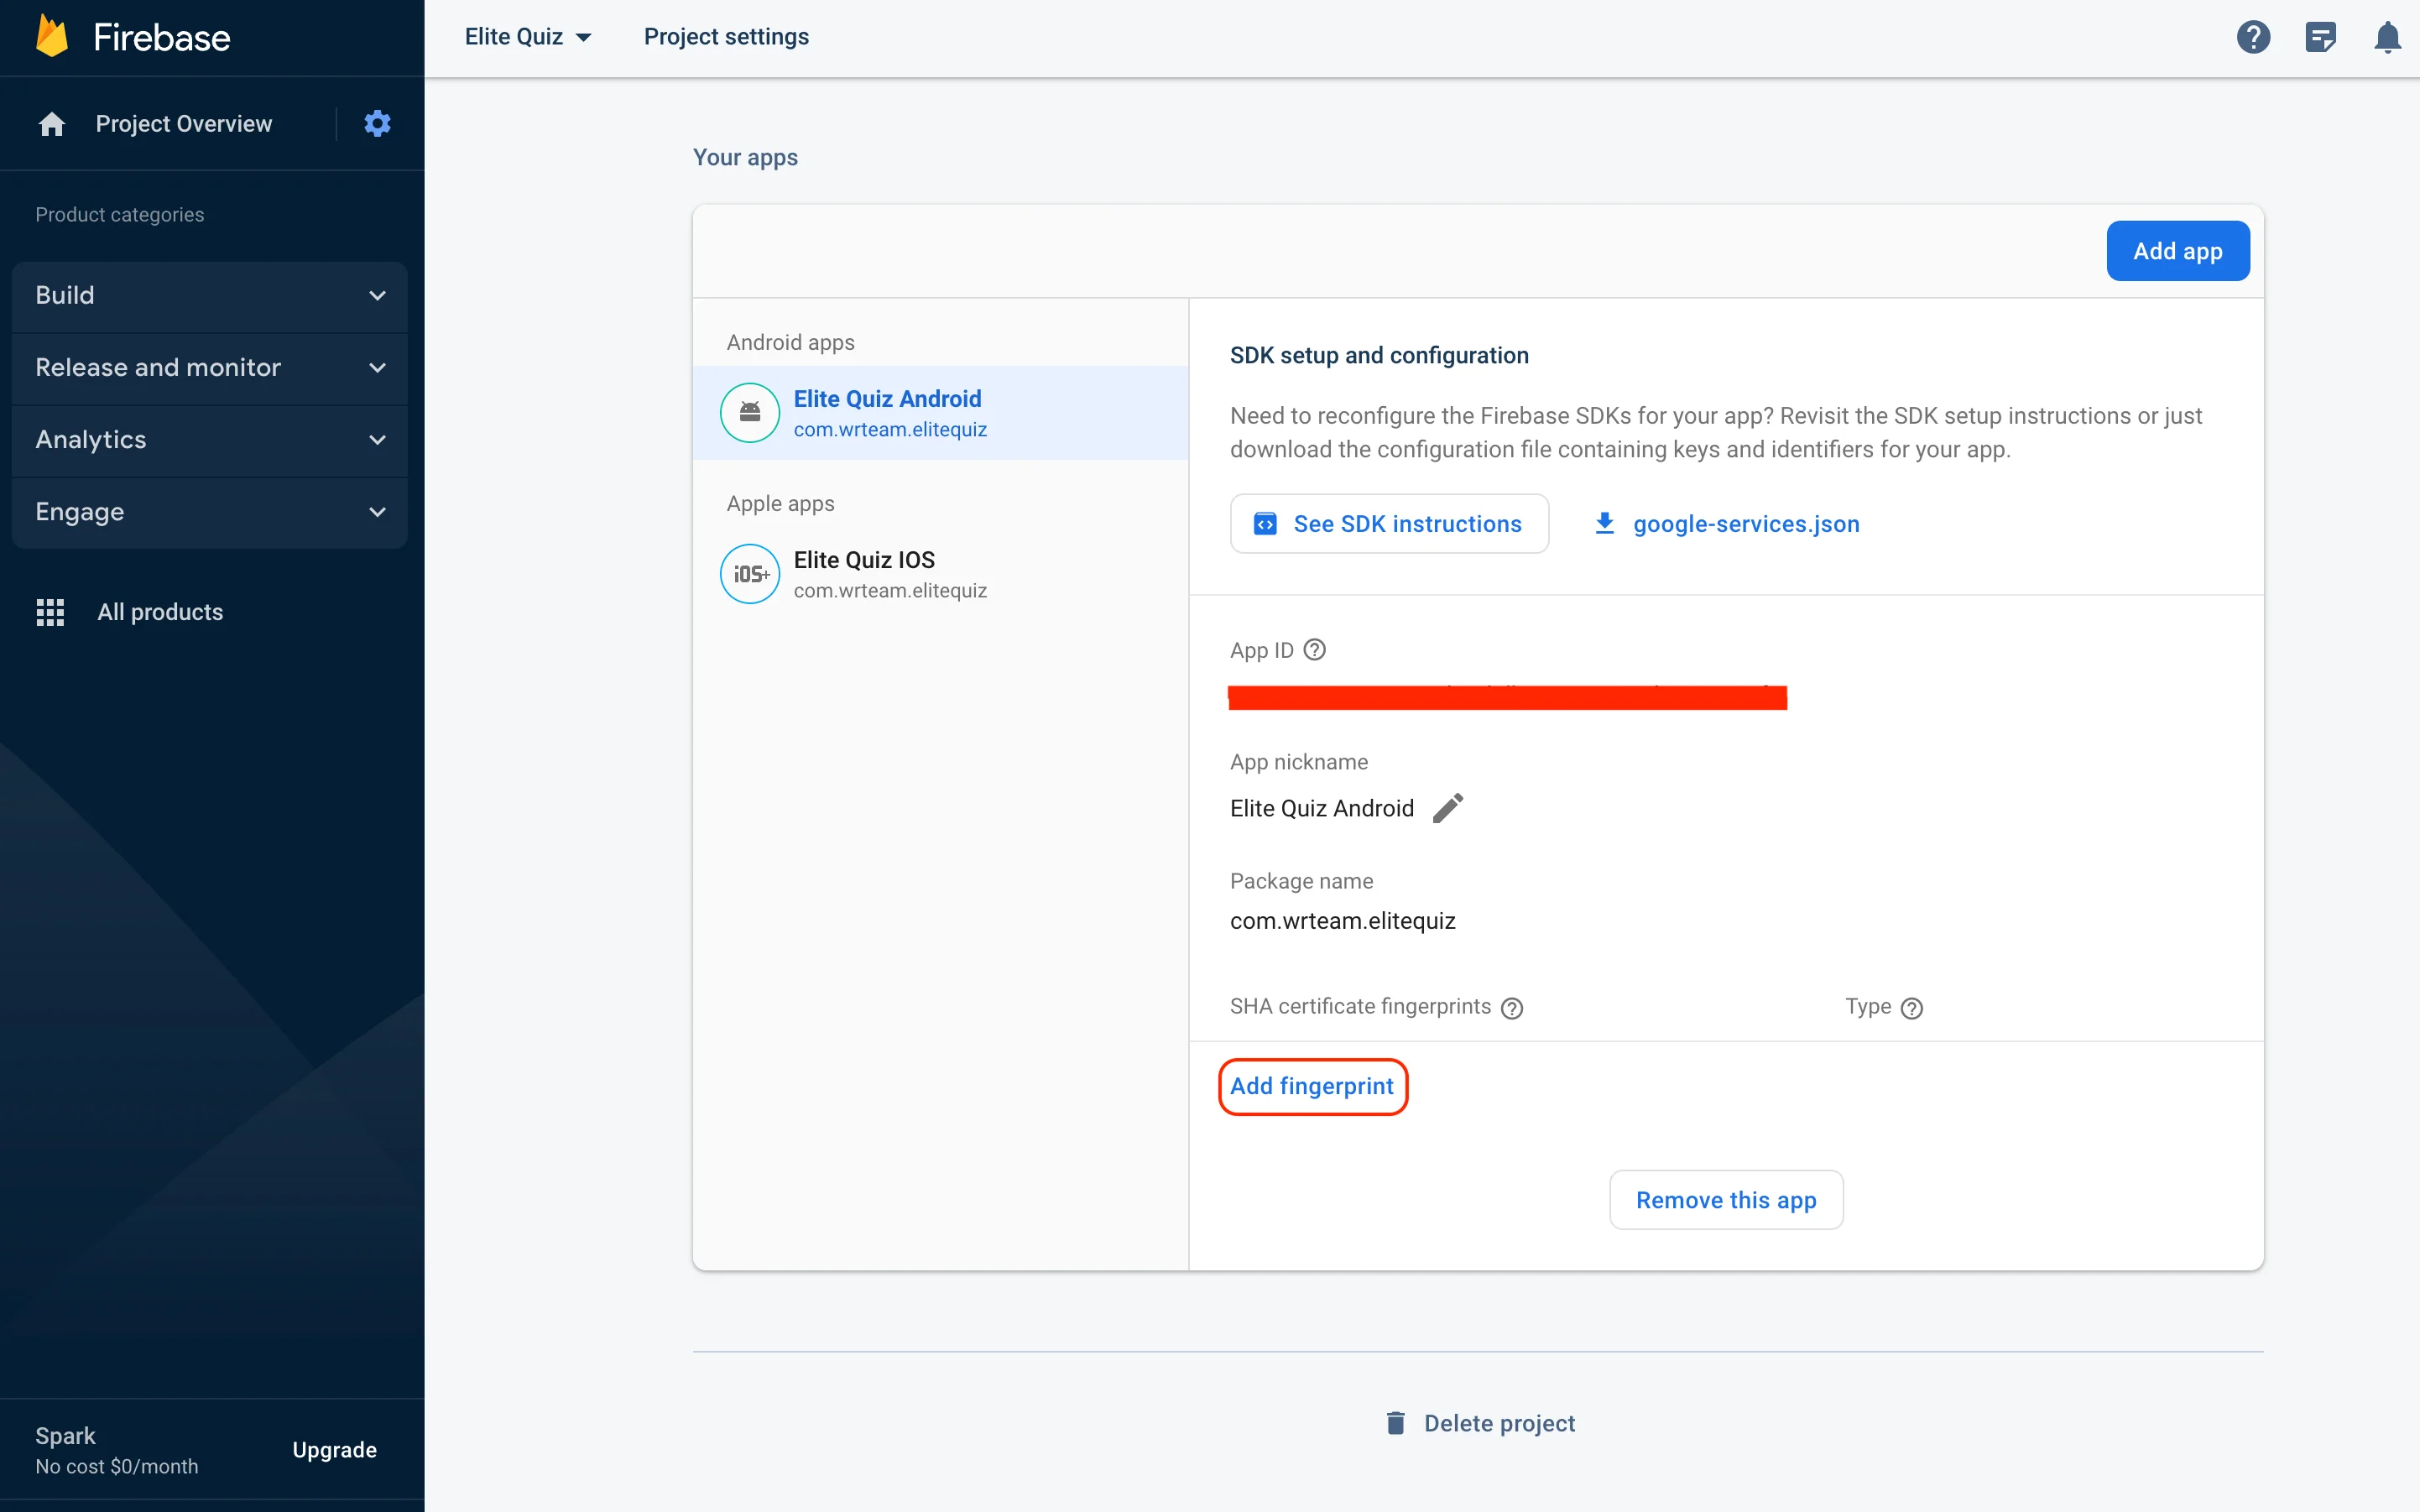
-
If you want to use Phone authentication in IOS then
-
Go to
ios/Runner/GoogleService-Info.plistand copyREVERSED_CLIENT_ID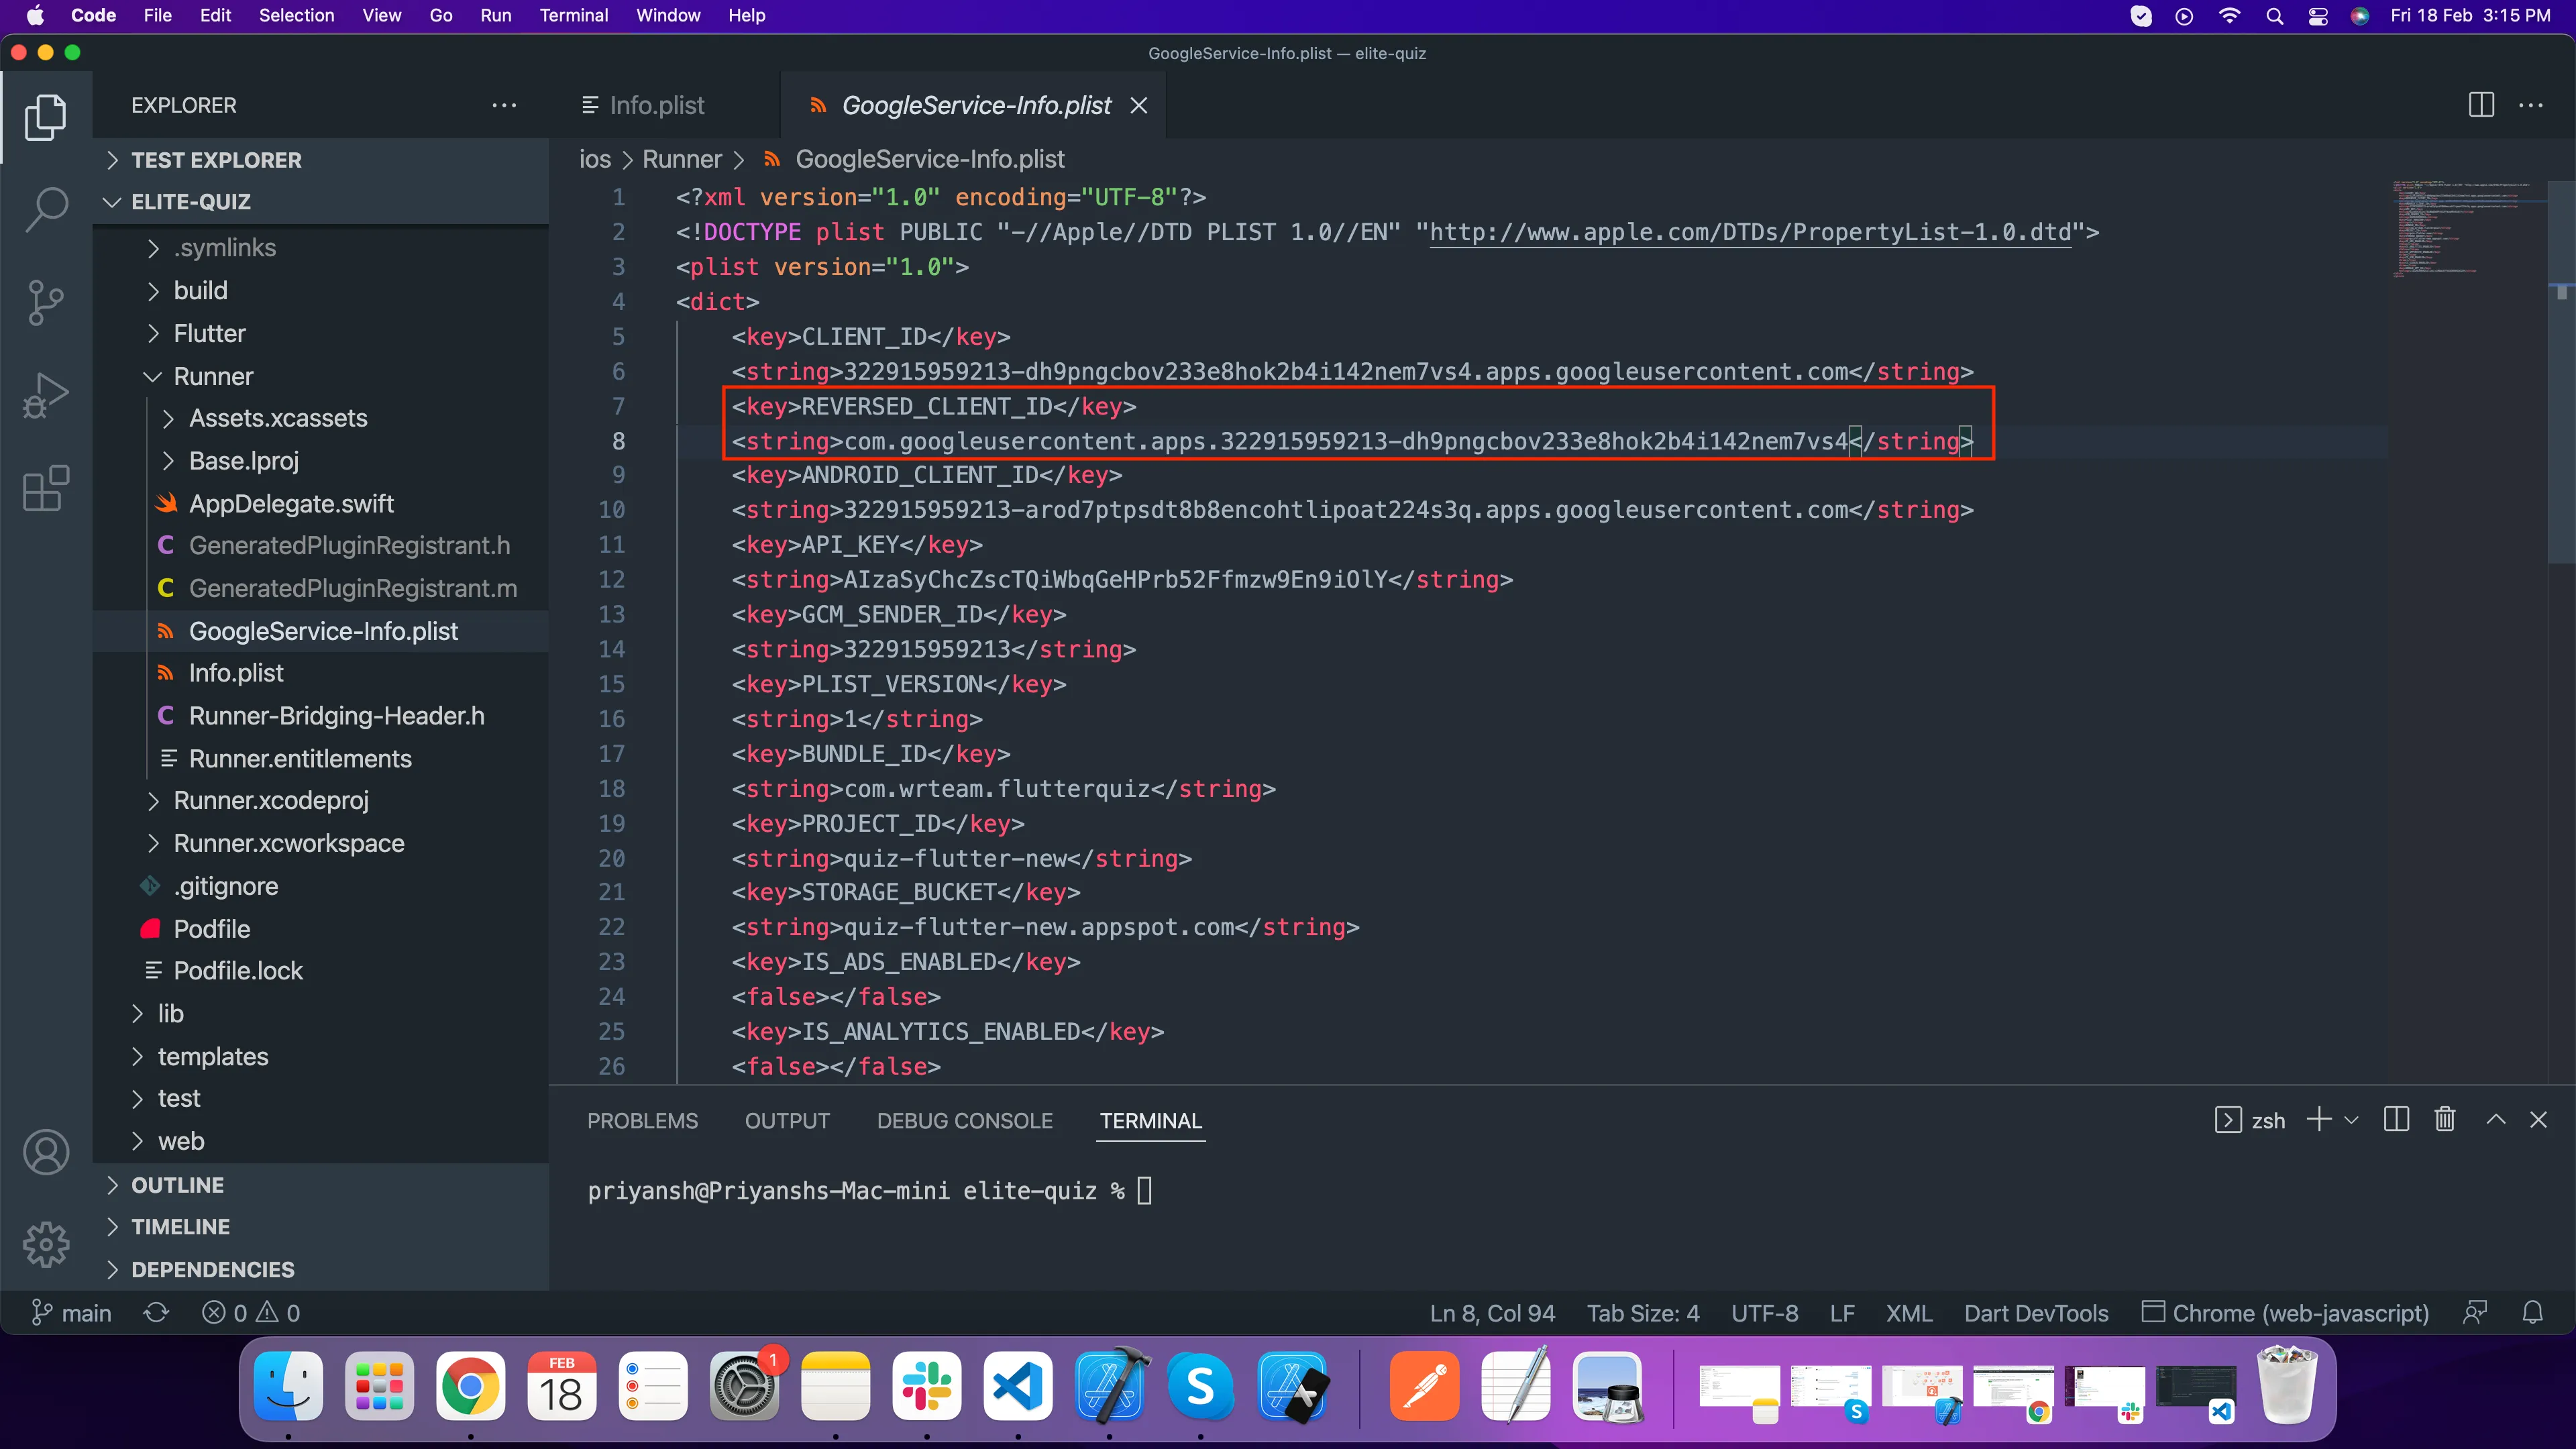
-
Paste it in
ios/Runner/Info.plistas shown in below image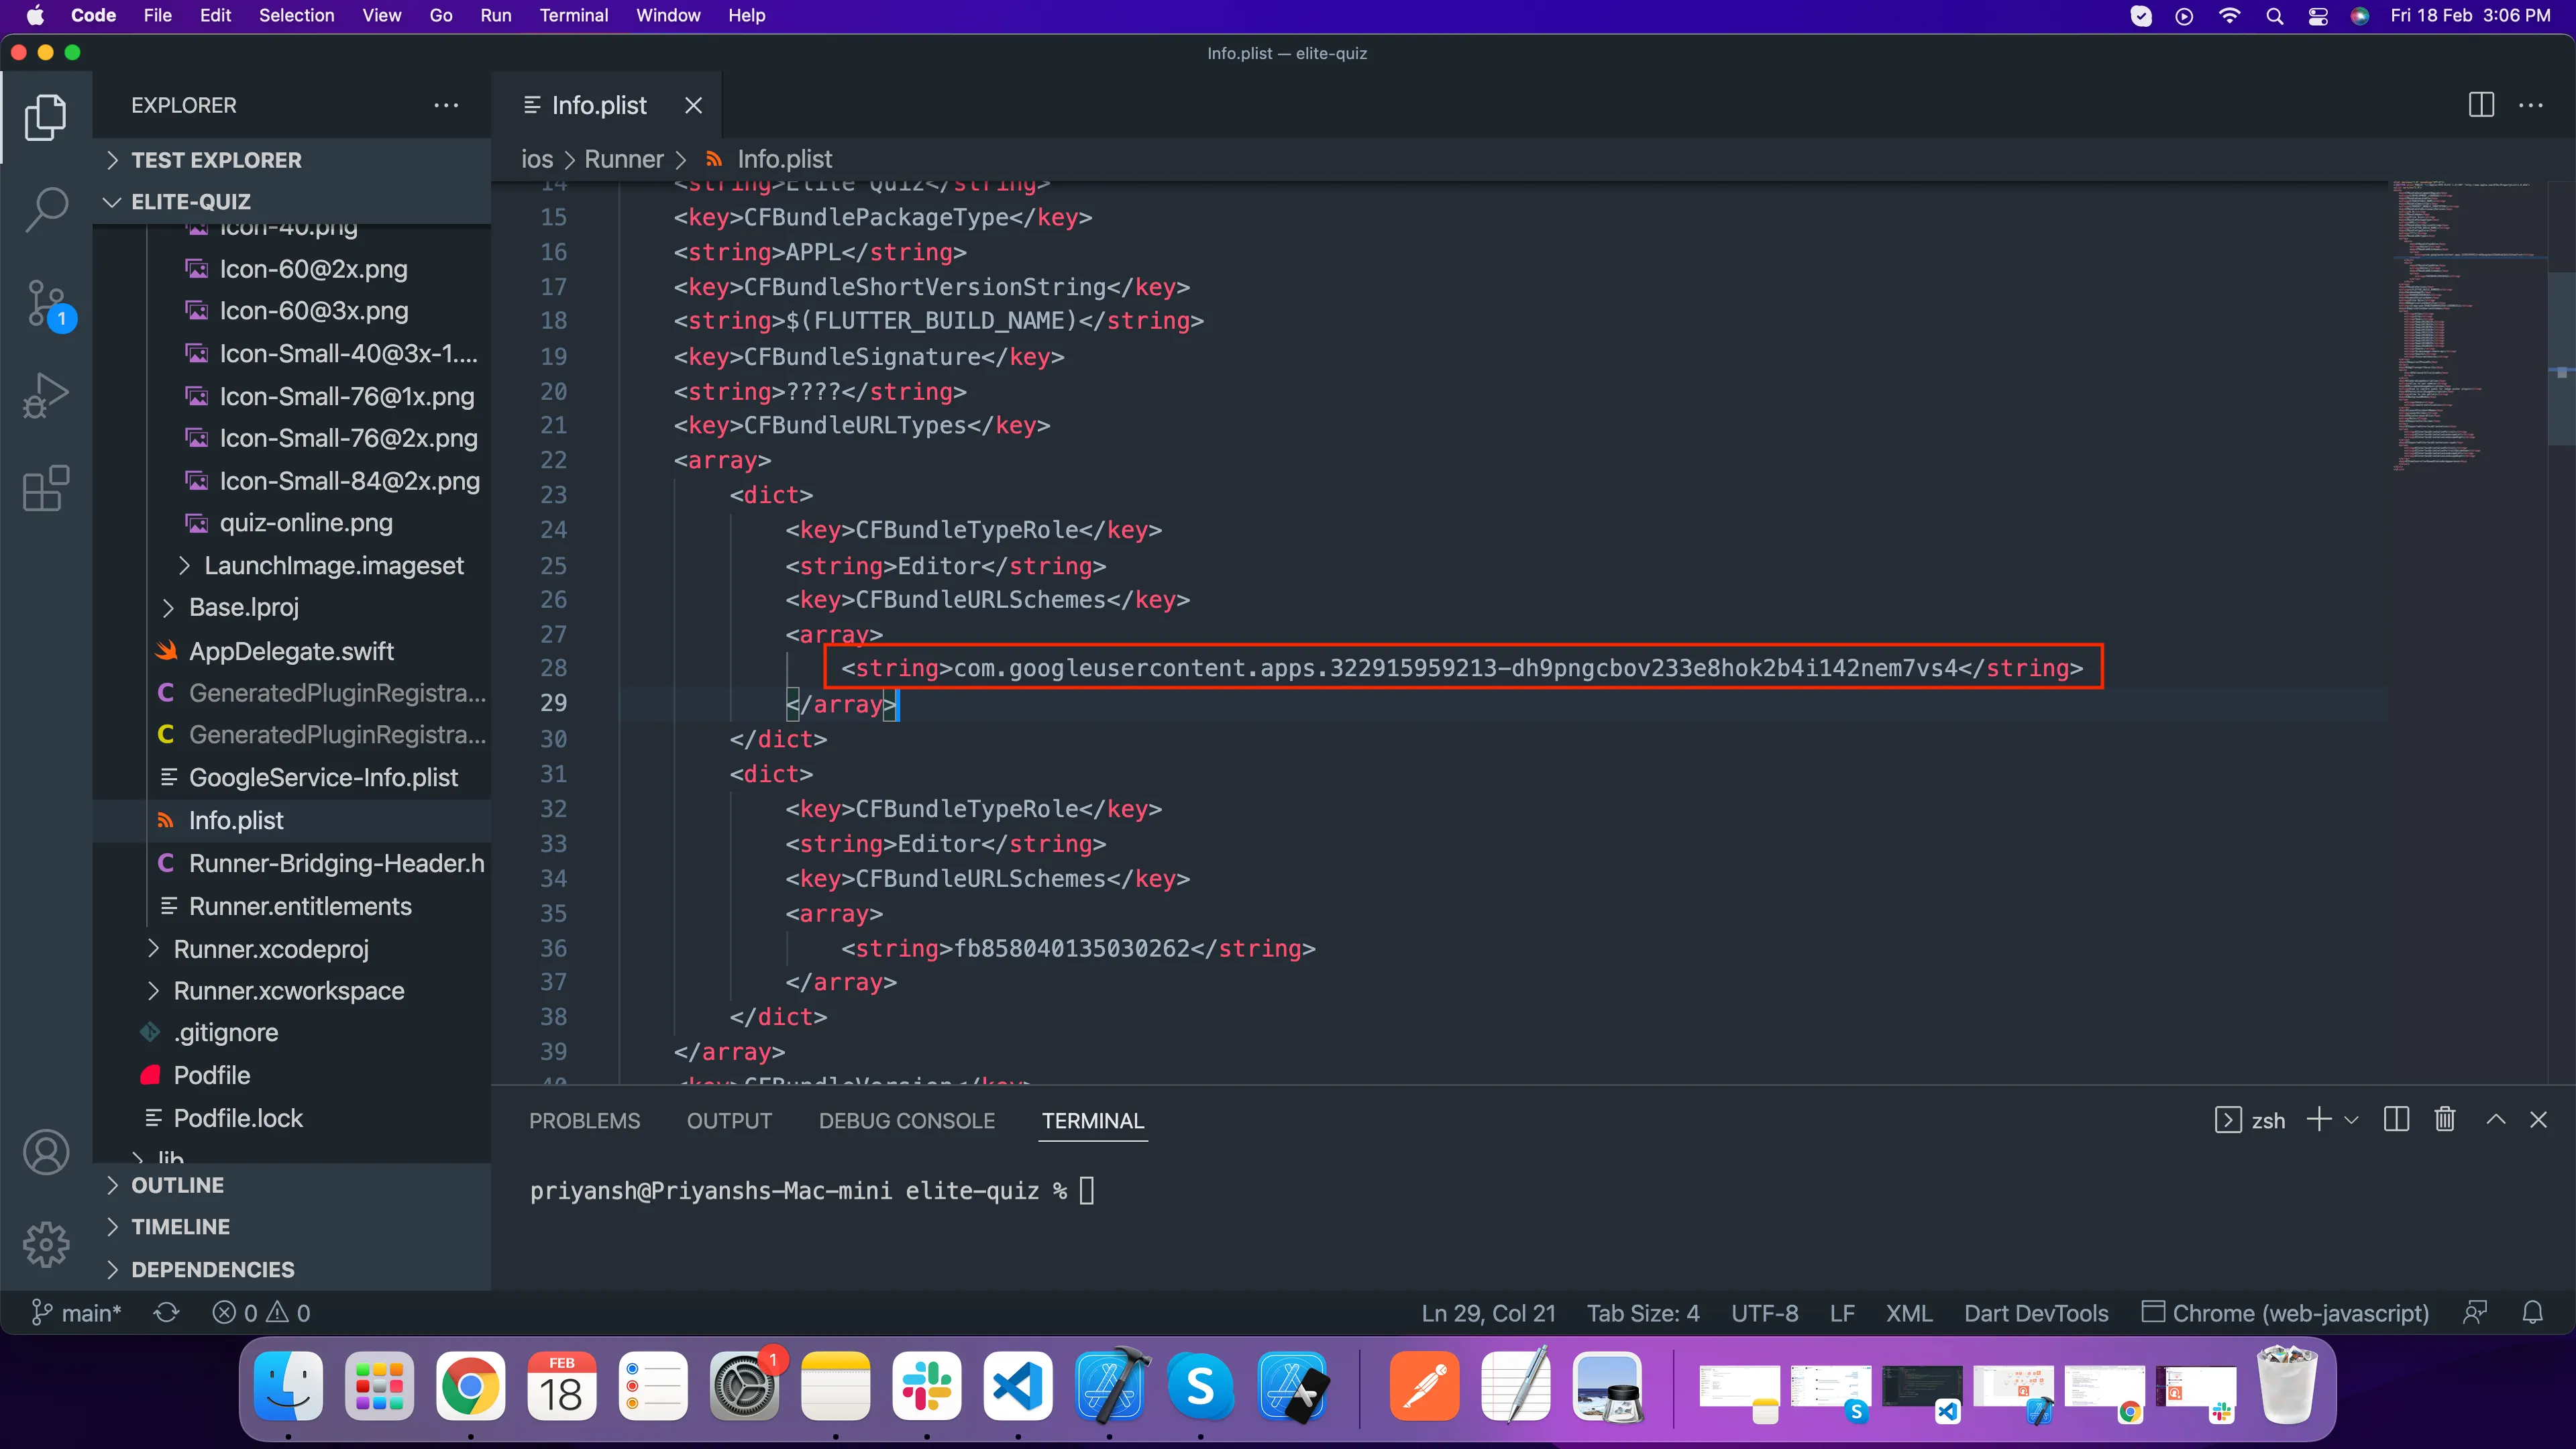
-
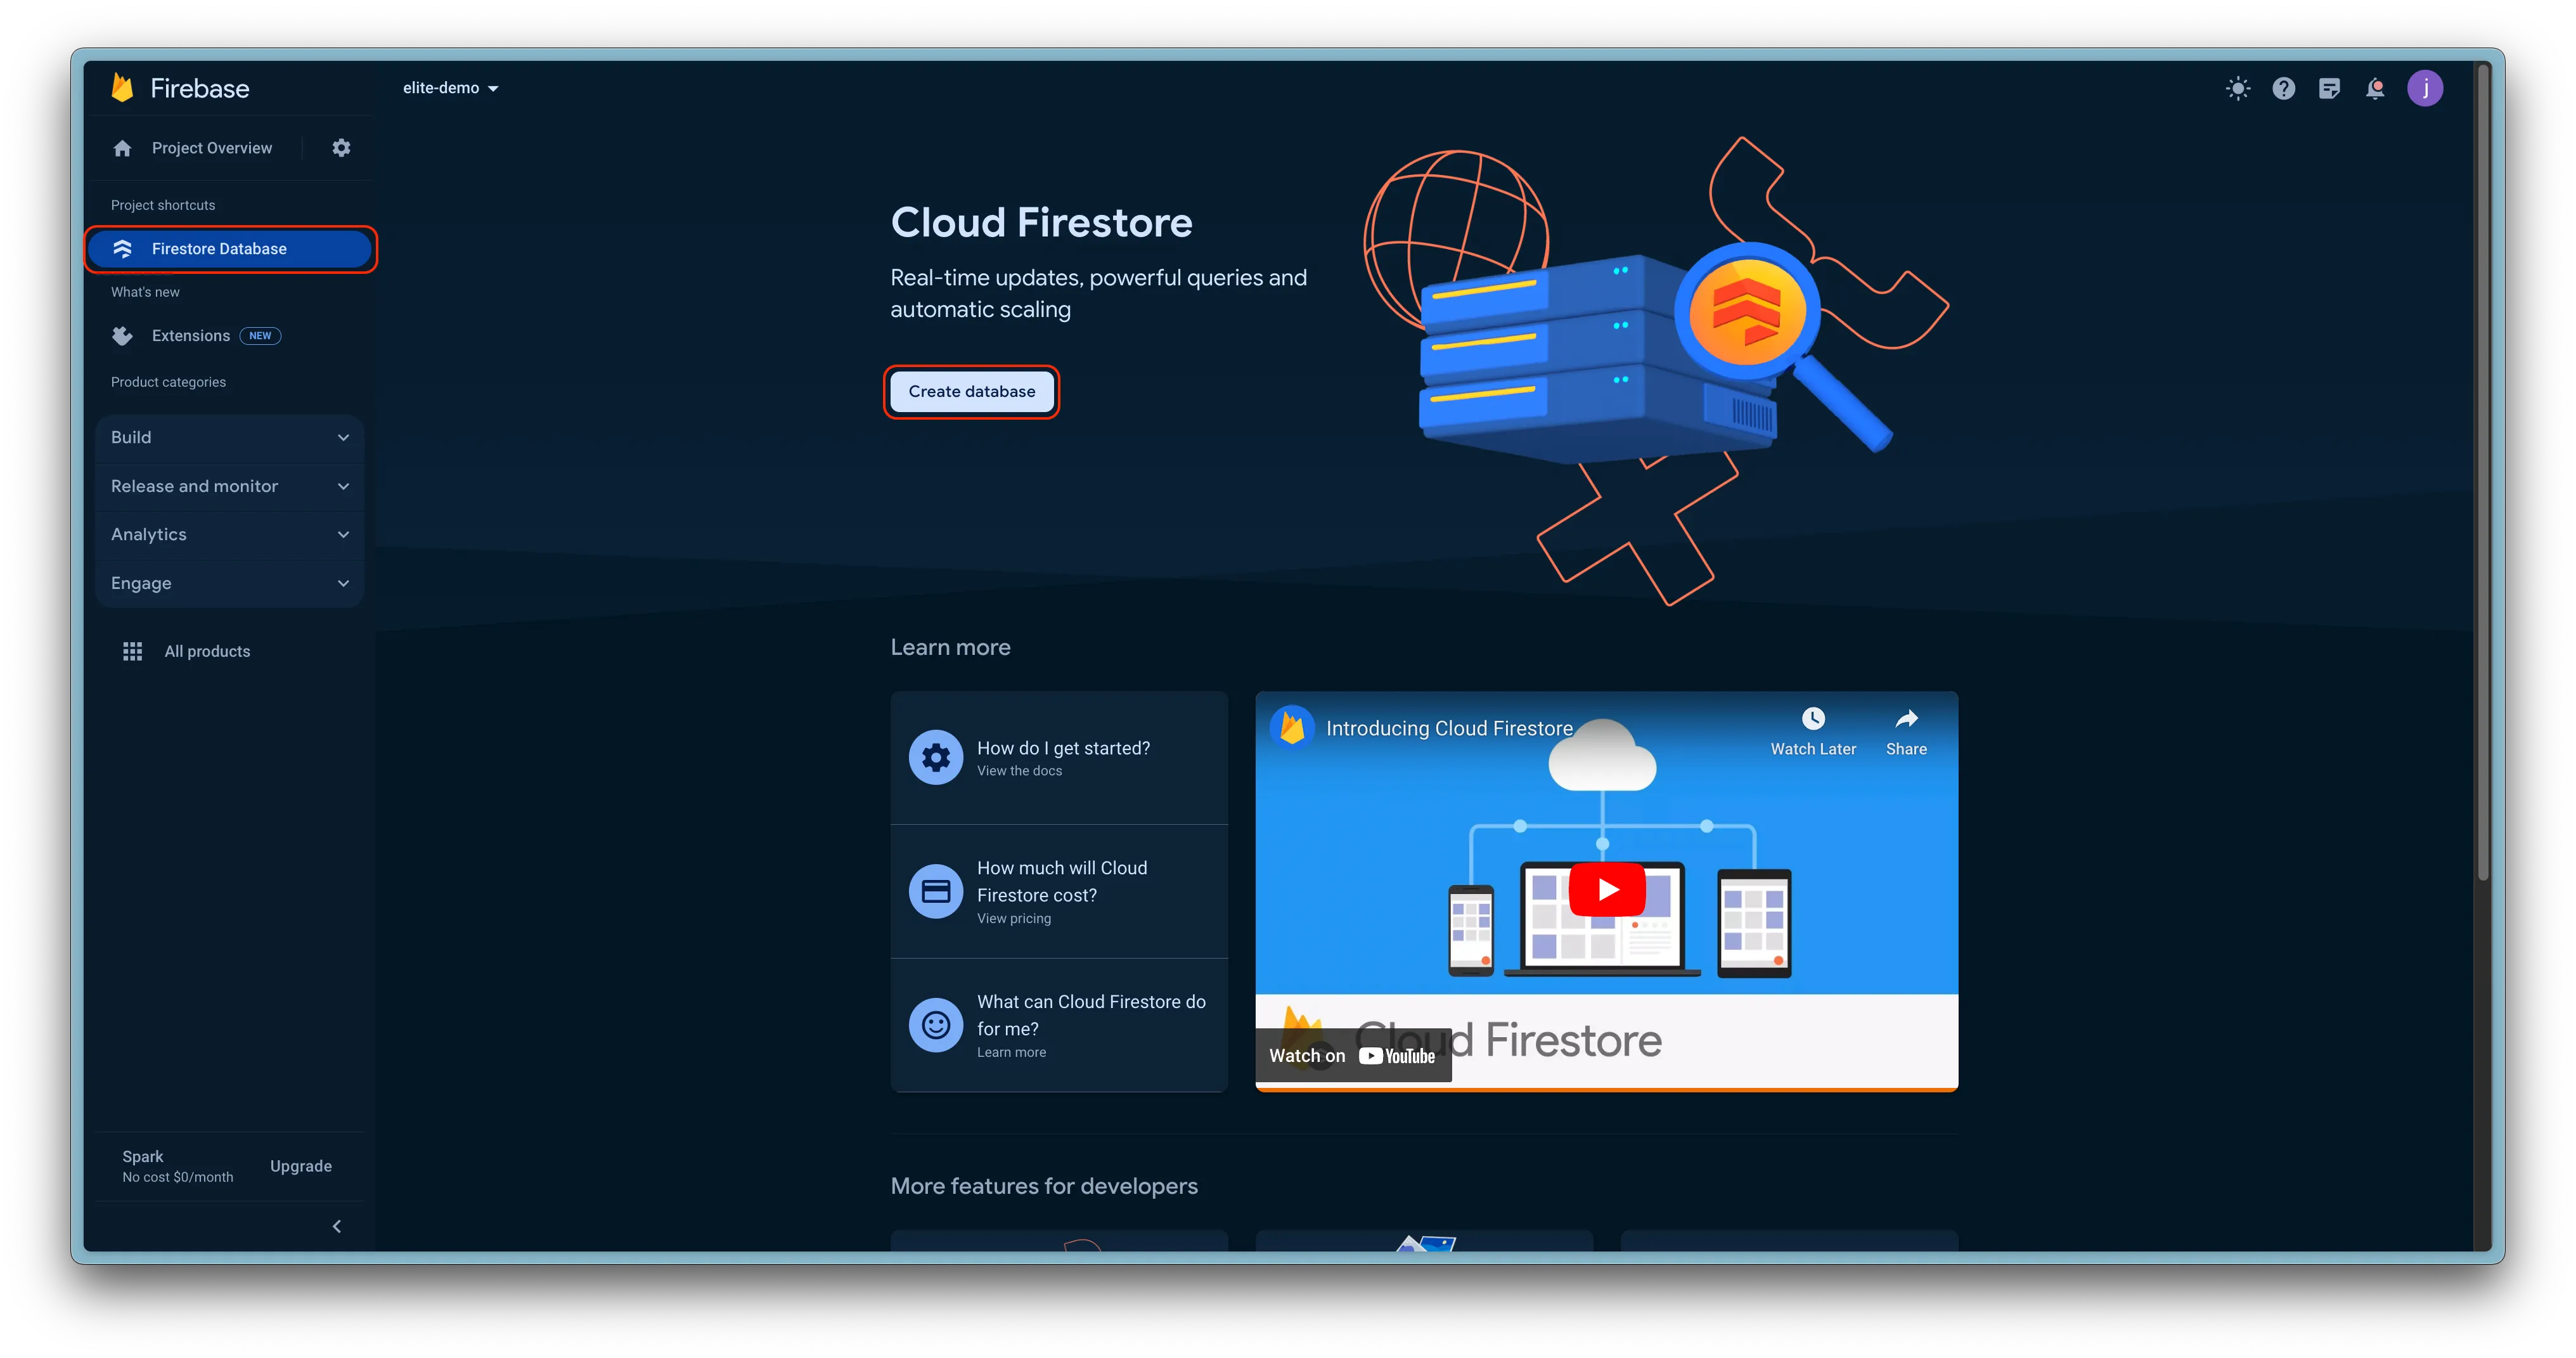
Go to
Firebase Configurations for Group and 1v1 Battles
For battles to work you will need to enable Cloud Firestore in Firebase.
Follow these steps shown in images below.
-
First Create Firestore database
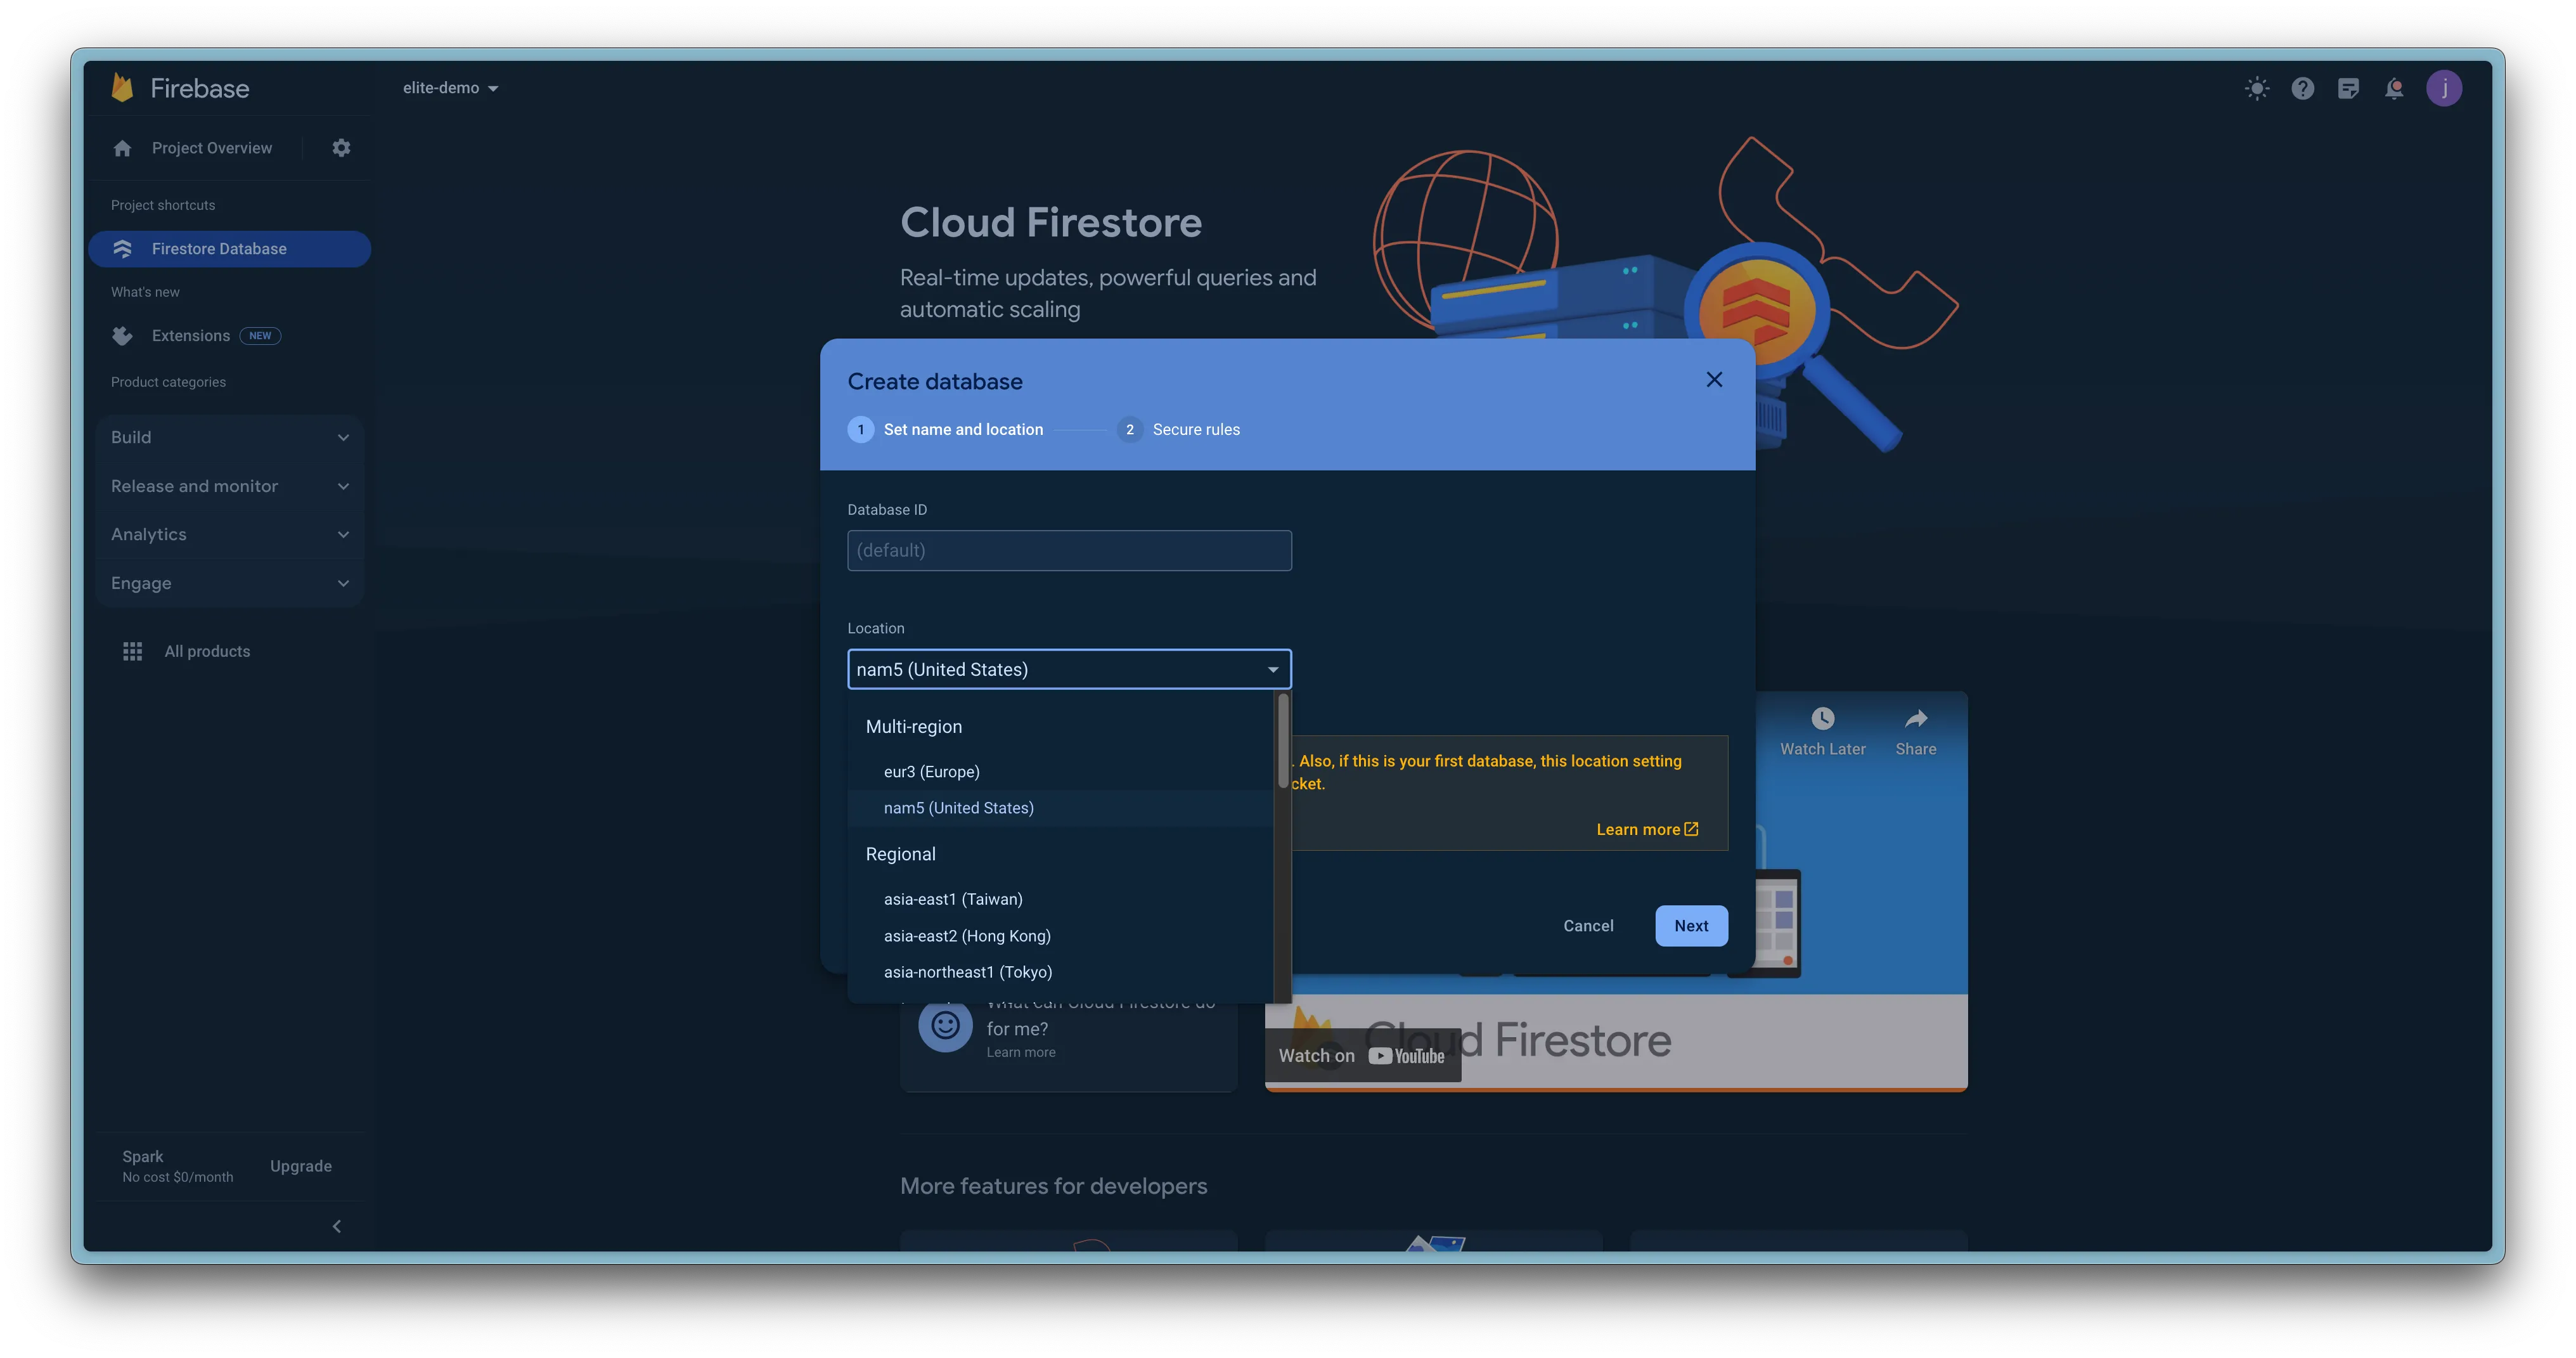
-
Select the nearest location to you
-
After database has been created, you will need to do 2 things
-
Set rules, to enable permissions for storing battle data in the database.
rules_version = '2';
service cloud.firestore {
    match /databases/{database}/documents {
        match /{document=**} {
                allow read, write: if request.auth.uid != null;
        }
    }
}
-
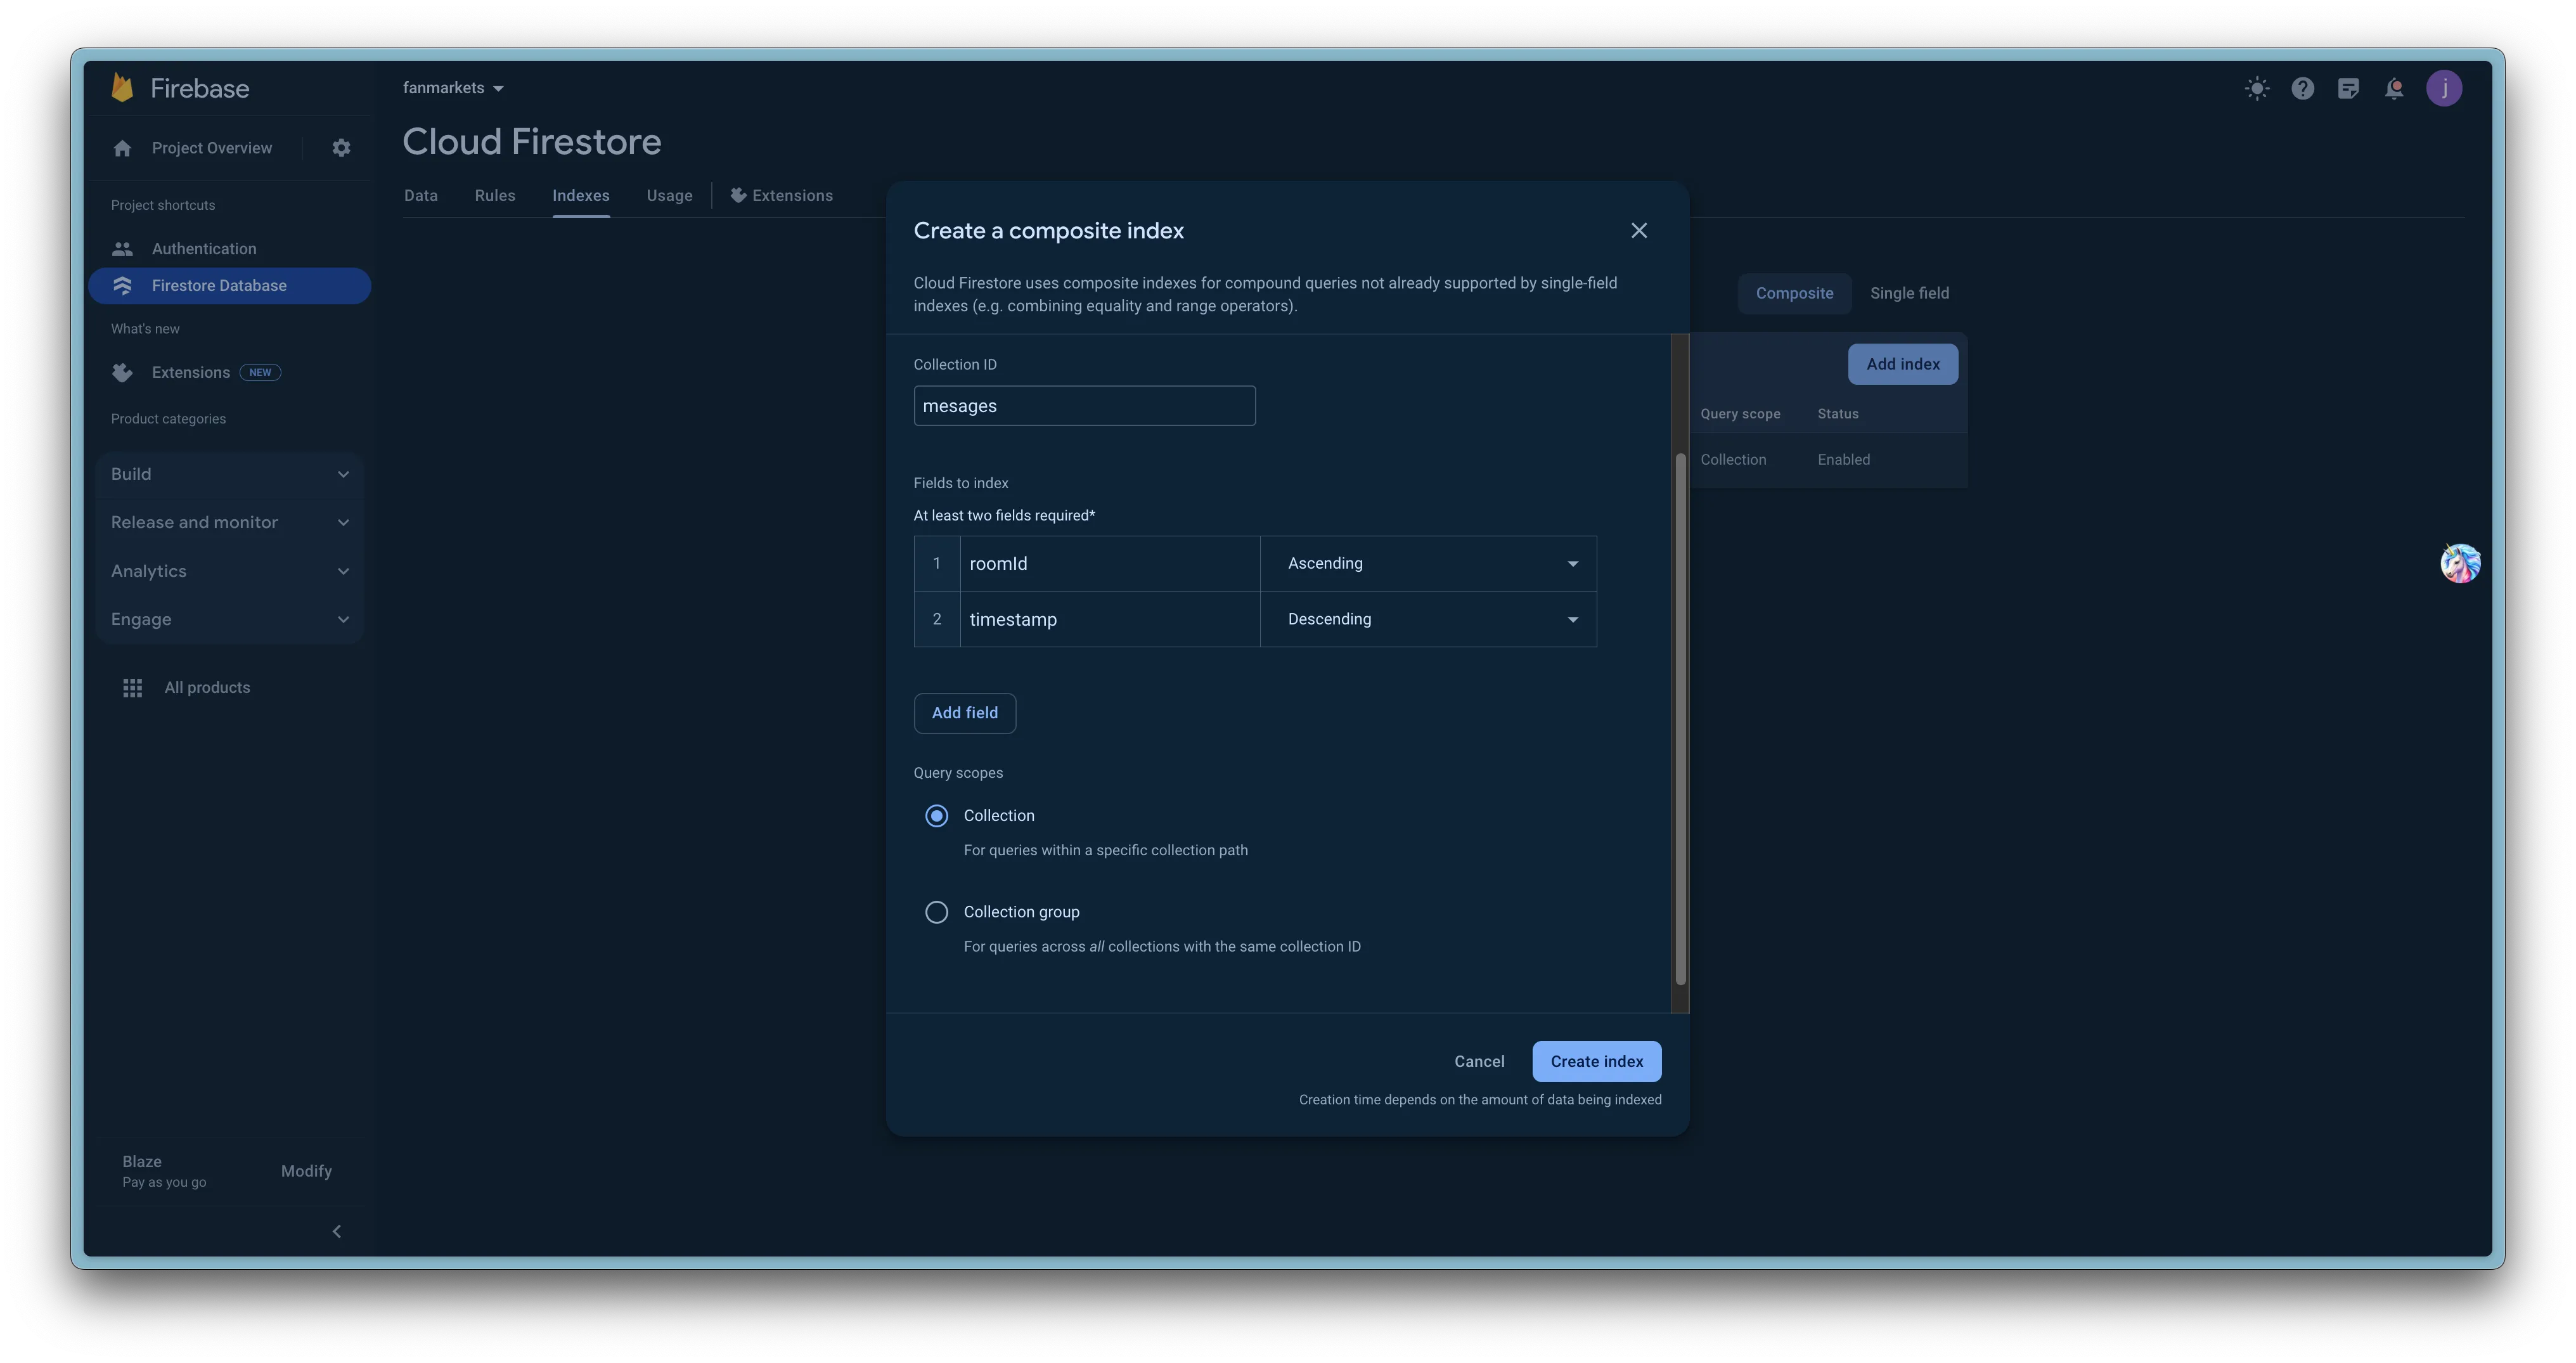
Create an index, for message functionality to work in battles.
Follow the below details exactly otherwise messages won't work in the app.
- Collection Id :
messages -
First Field :
roomId, Ascending. important hereiis Capital. - Second Field :
timestamp, Descending. - Select Query Scopes to be
Collection
- Collection Id :
-
Set rules, to enable permissions for storing battle data in the database.
That's it for battles functionality.
Connect your admin panel to the app
-
Go to
lib/utils/constants/constants.dartand add your admin panel url indatabaseUrlvariable, like shown in the image below.Important Make sure to not add '/' at the end of the url.
Important Make sure to check if the admin panel is http or https.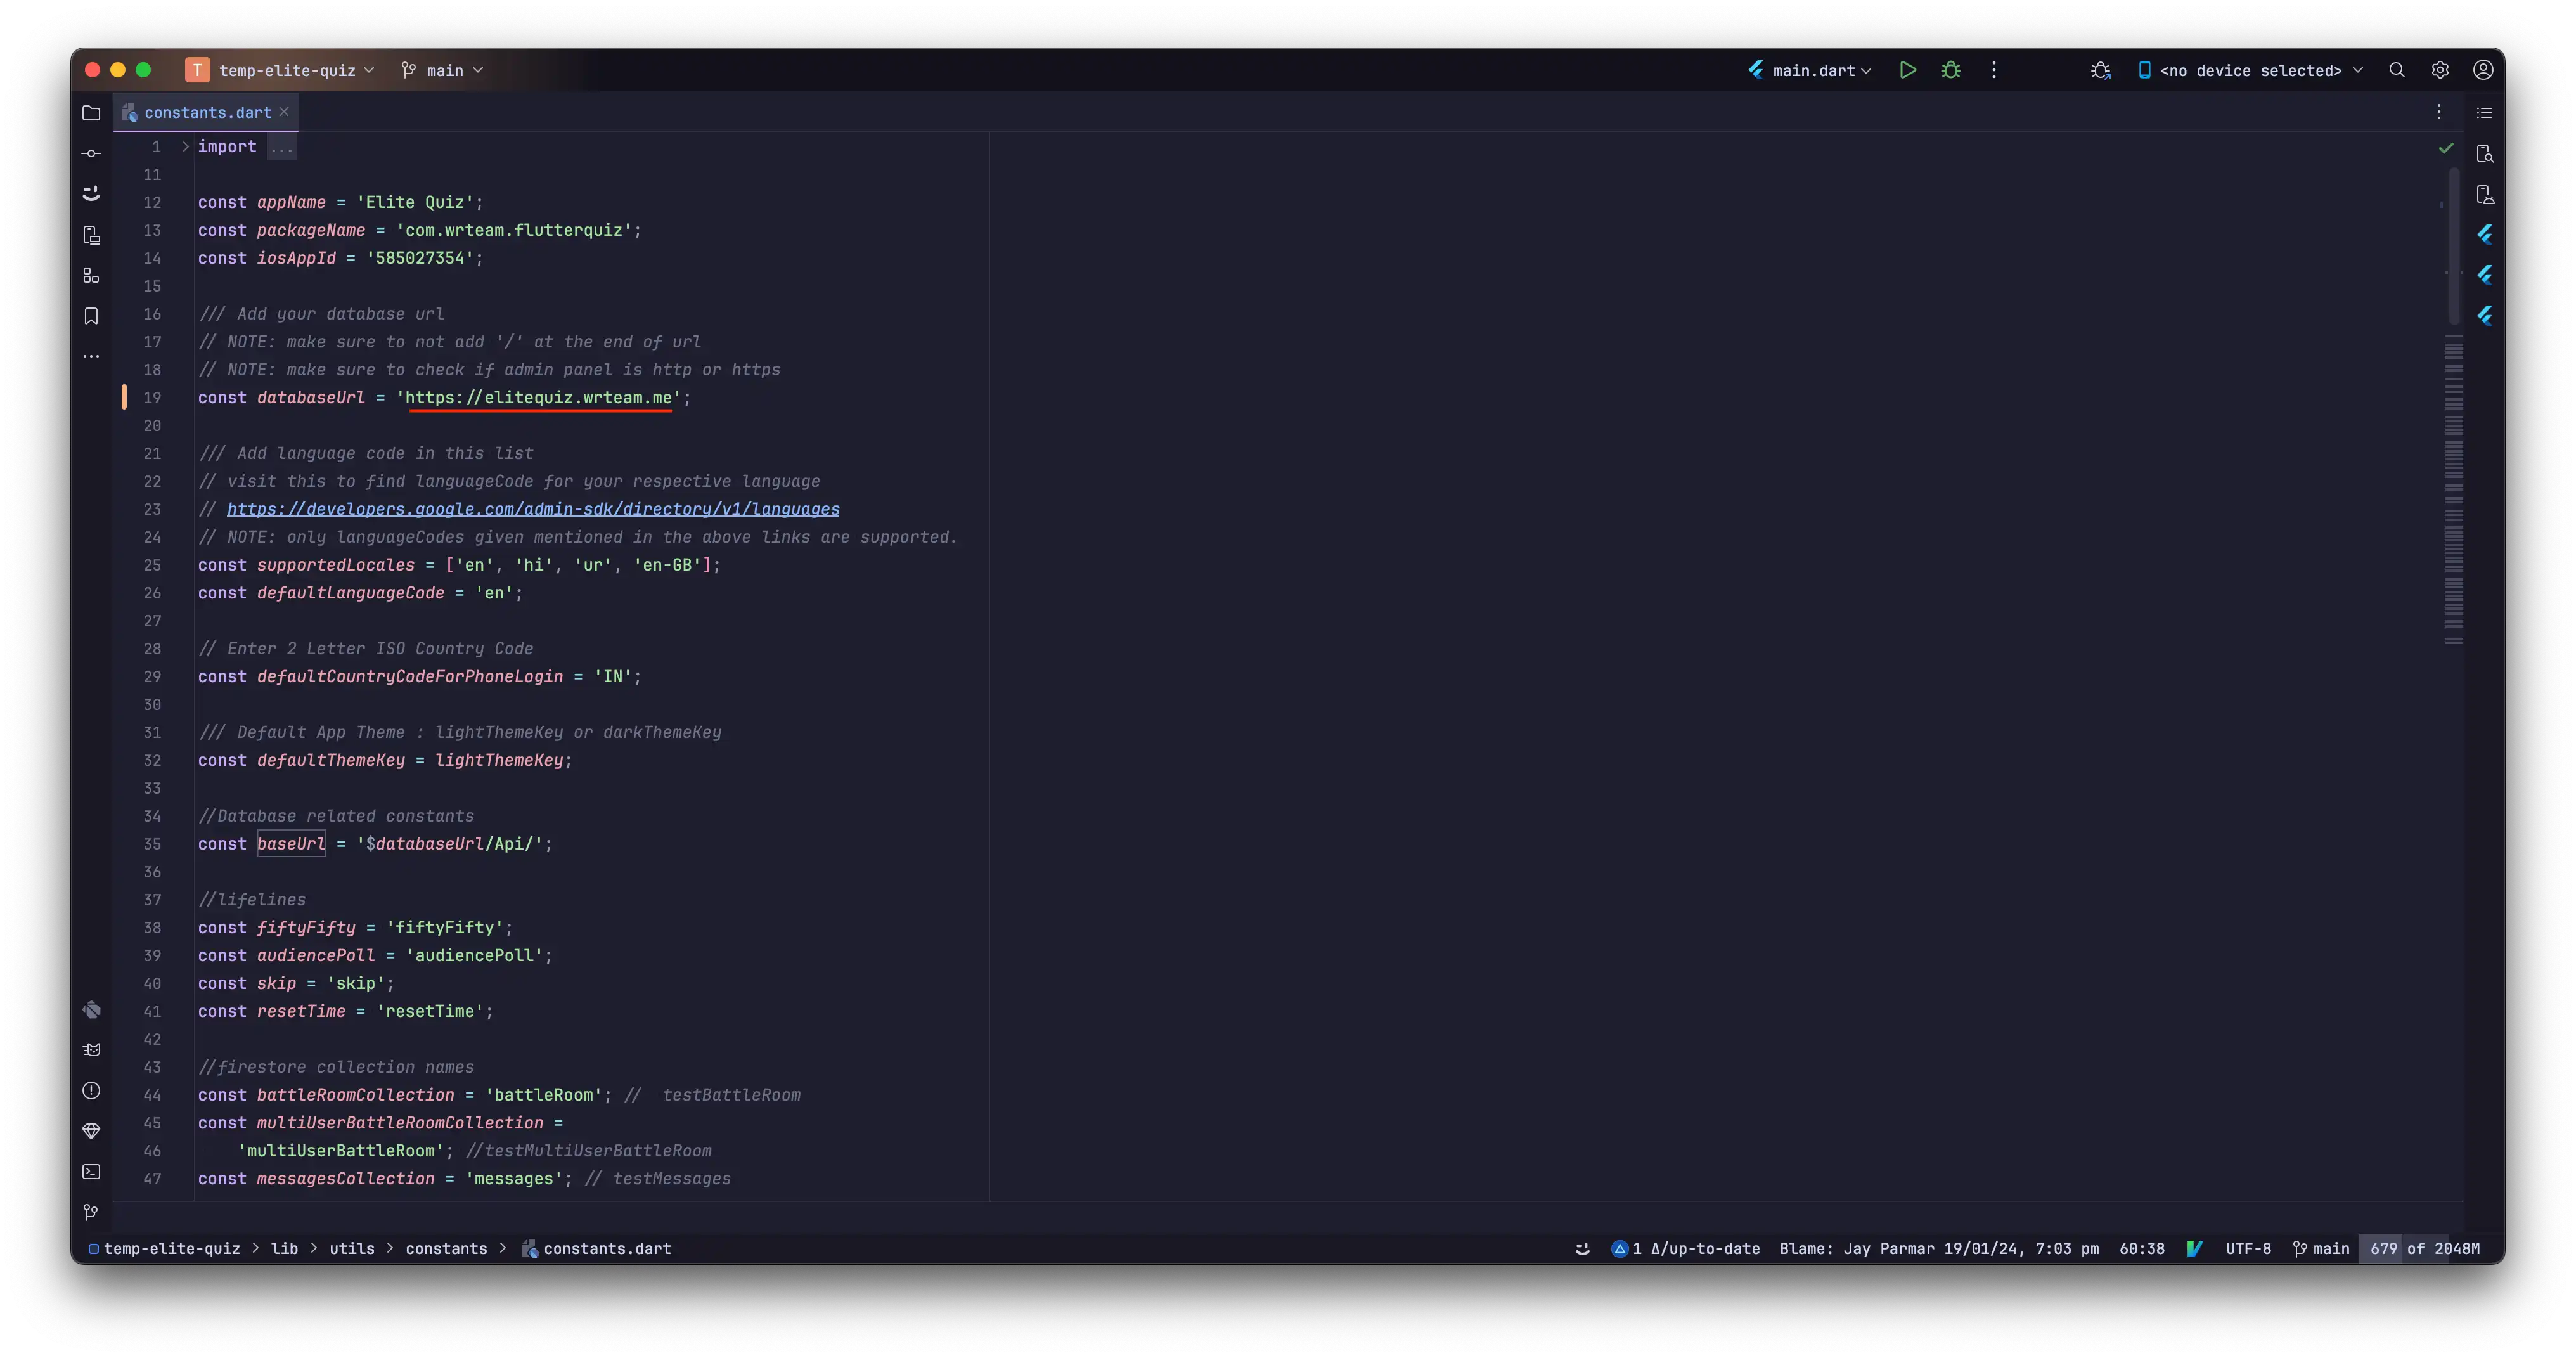
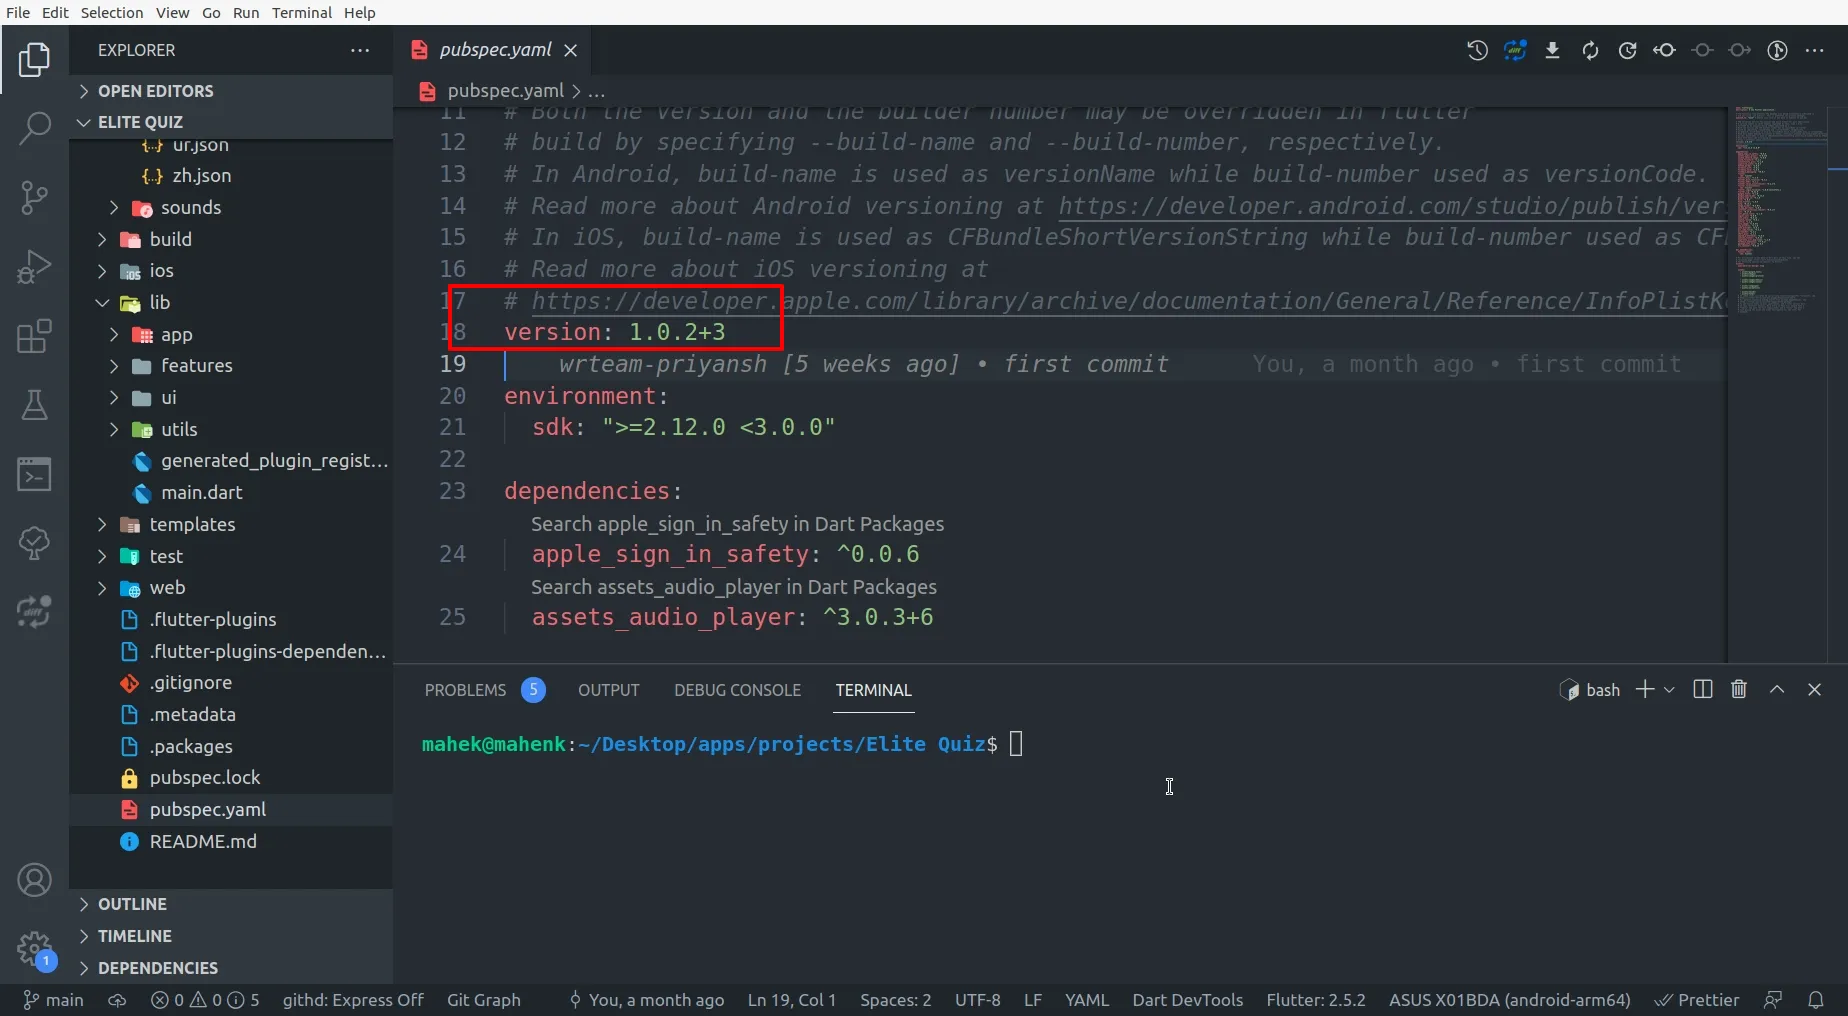
Change application version and app launcher icon
pubspec.yaml
Update the
version:A.B.C+X
as shown in image below.
flutter packages get
or
flutter build
or
flutter run
after changing the version. 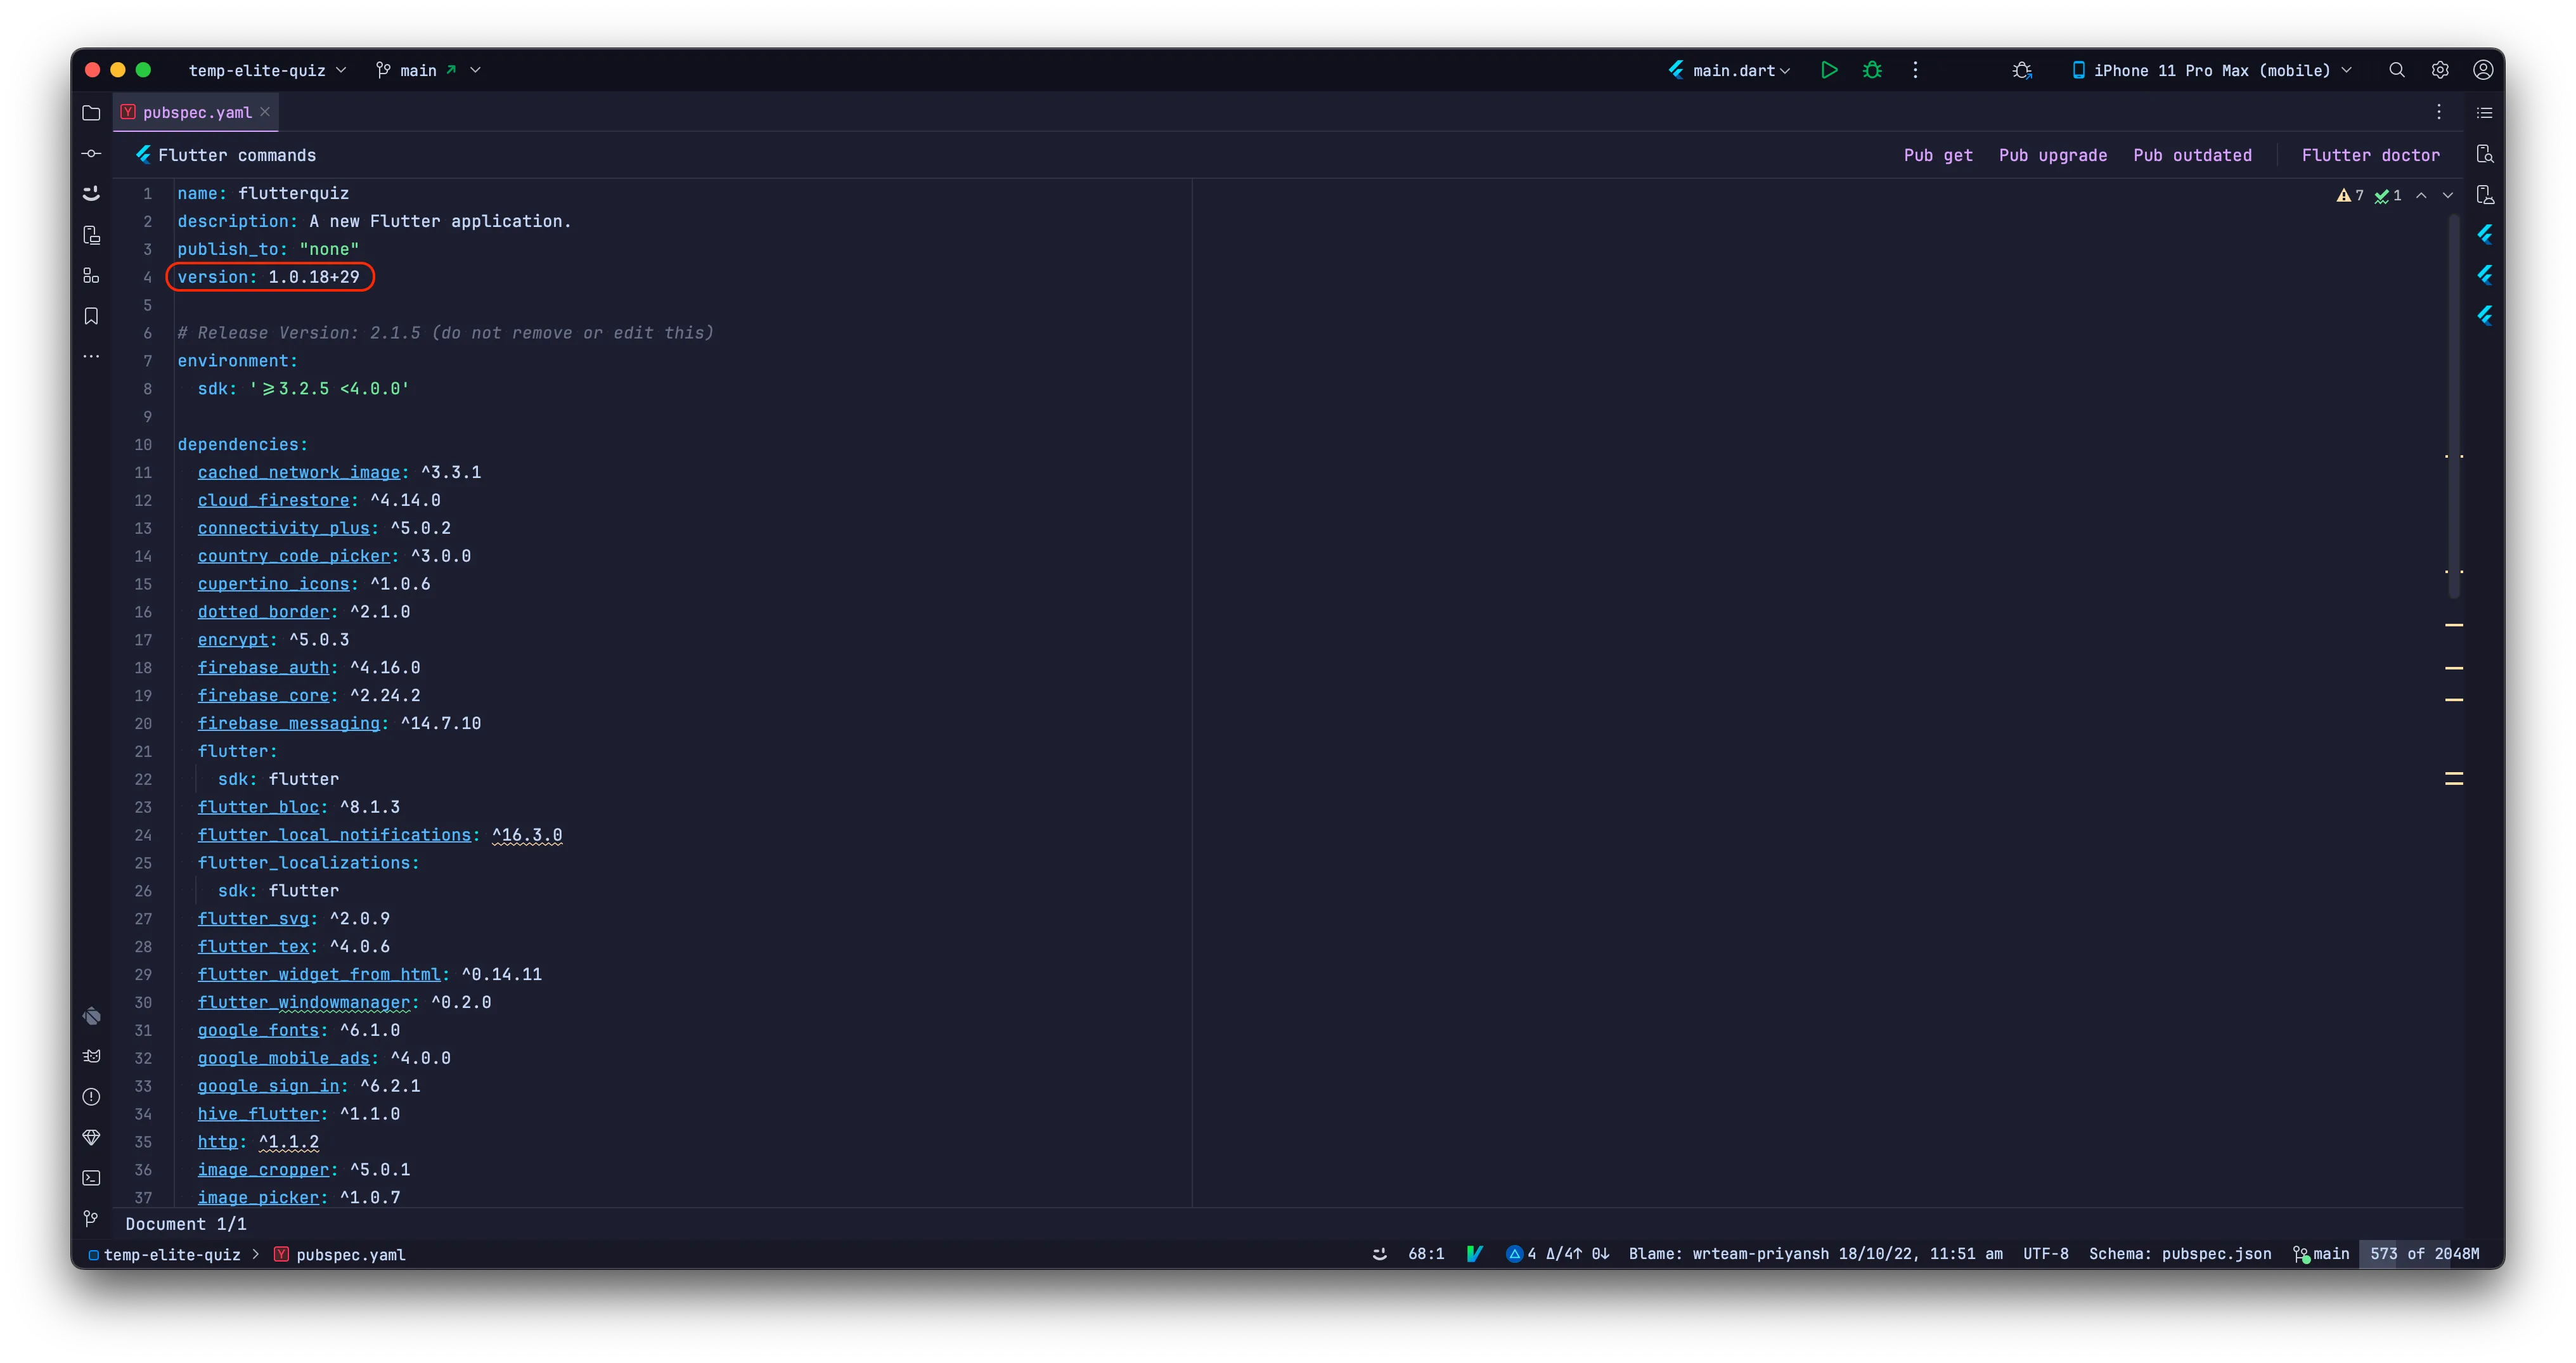
You can start from 1.0.0+1 version, then as you update the app you
can update version also. you can follow semantic versioning or simply increase
the build number, its upto you.
Change Splash and Organization Logo
To change the splash and Organization logo, you can replace svg logo files
called
splash_logo.svg & org_logo.svg. and if you are using
png images then you will have to add them in assets/images and
change its name from .svg to .png or .jpg
lib/utils/constants/assets_constants.dart
![]()
Change Authentication Screen App Logo
Similarly, you can replace app_logo.svg in assets/images and/or
change the extension by changing it in assets_constants.dart file
Change App Logo
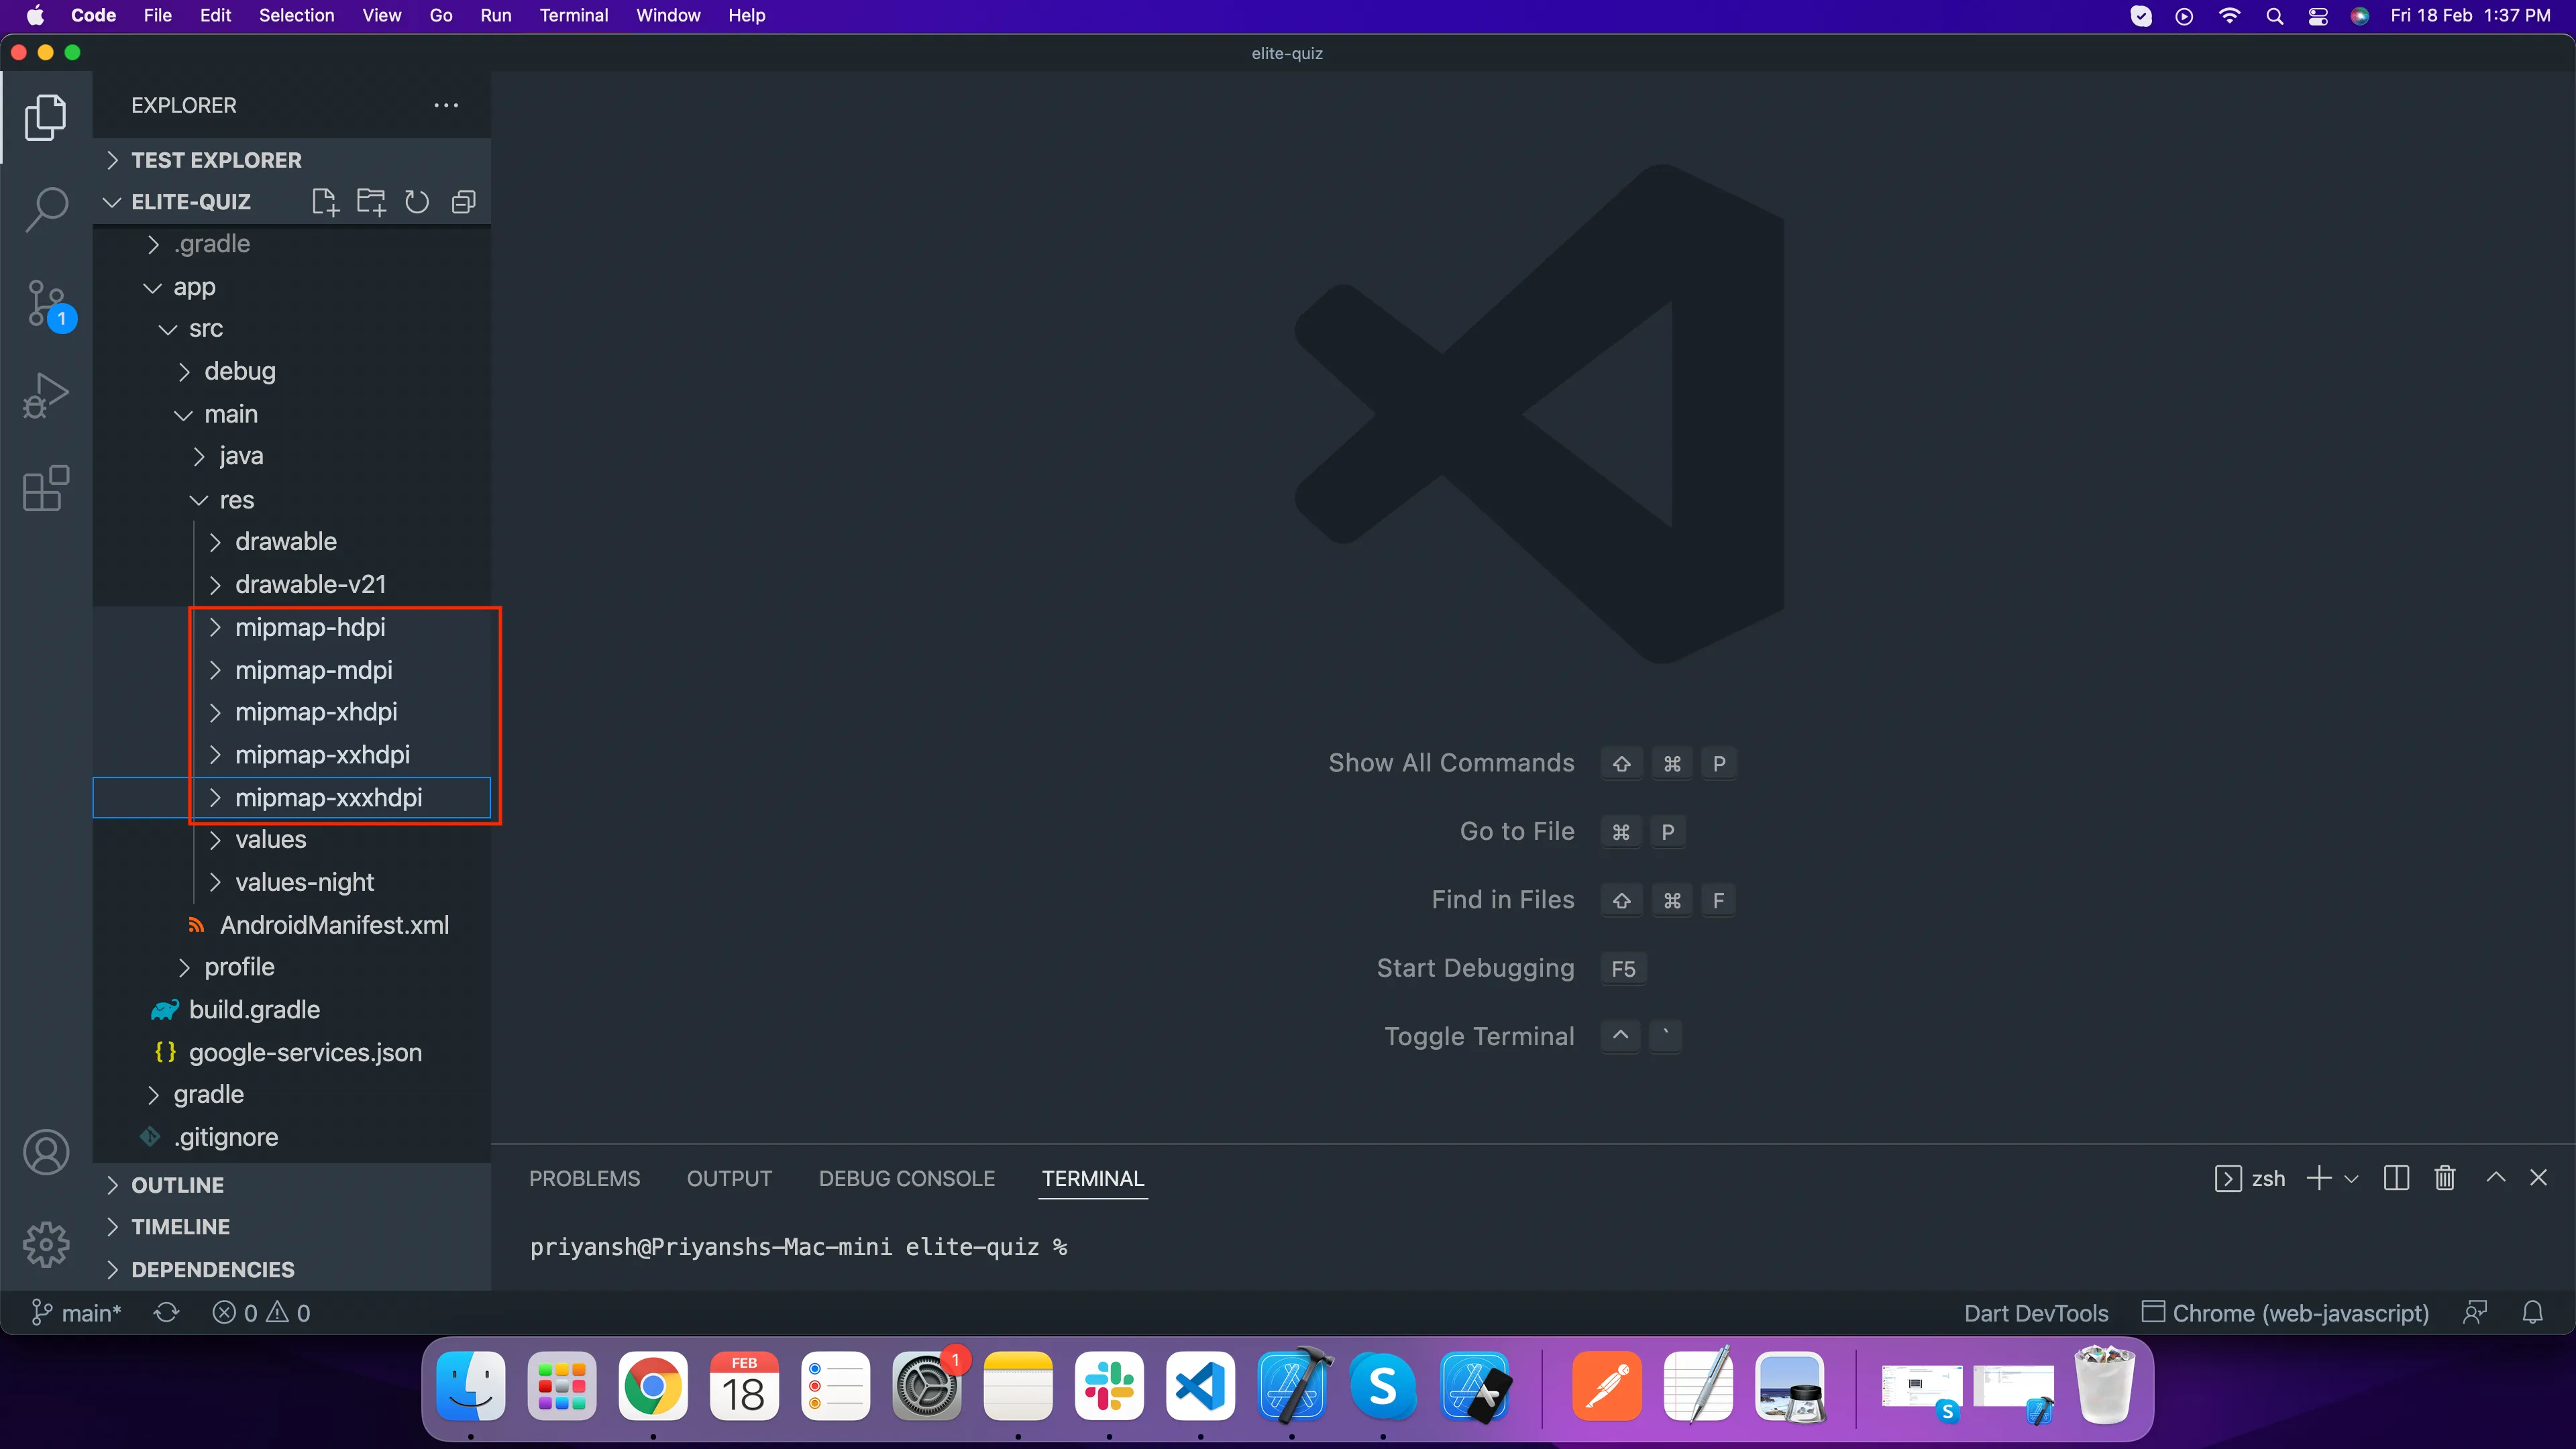
-
For Android
, open android > app > src > main > res and add here your logo according to
device screen size
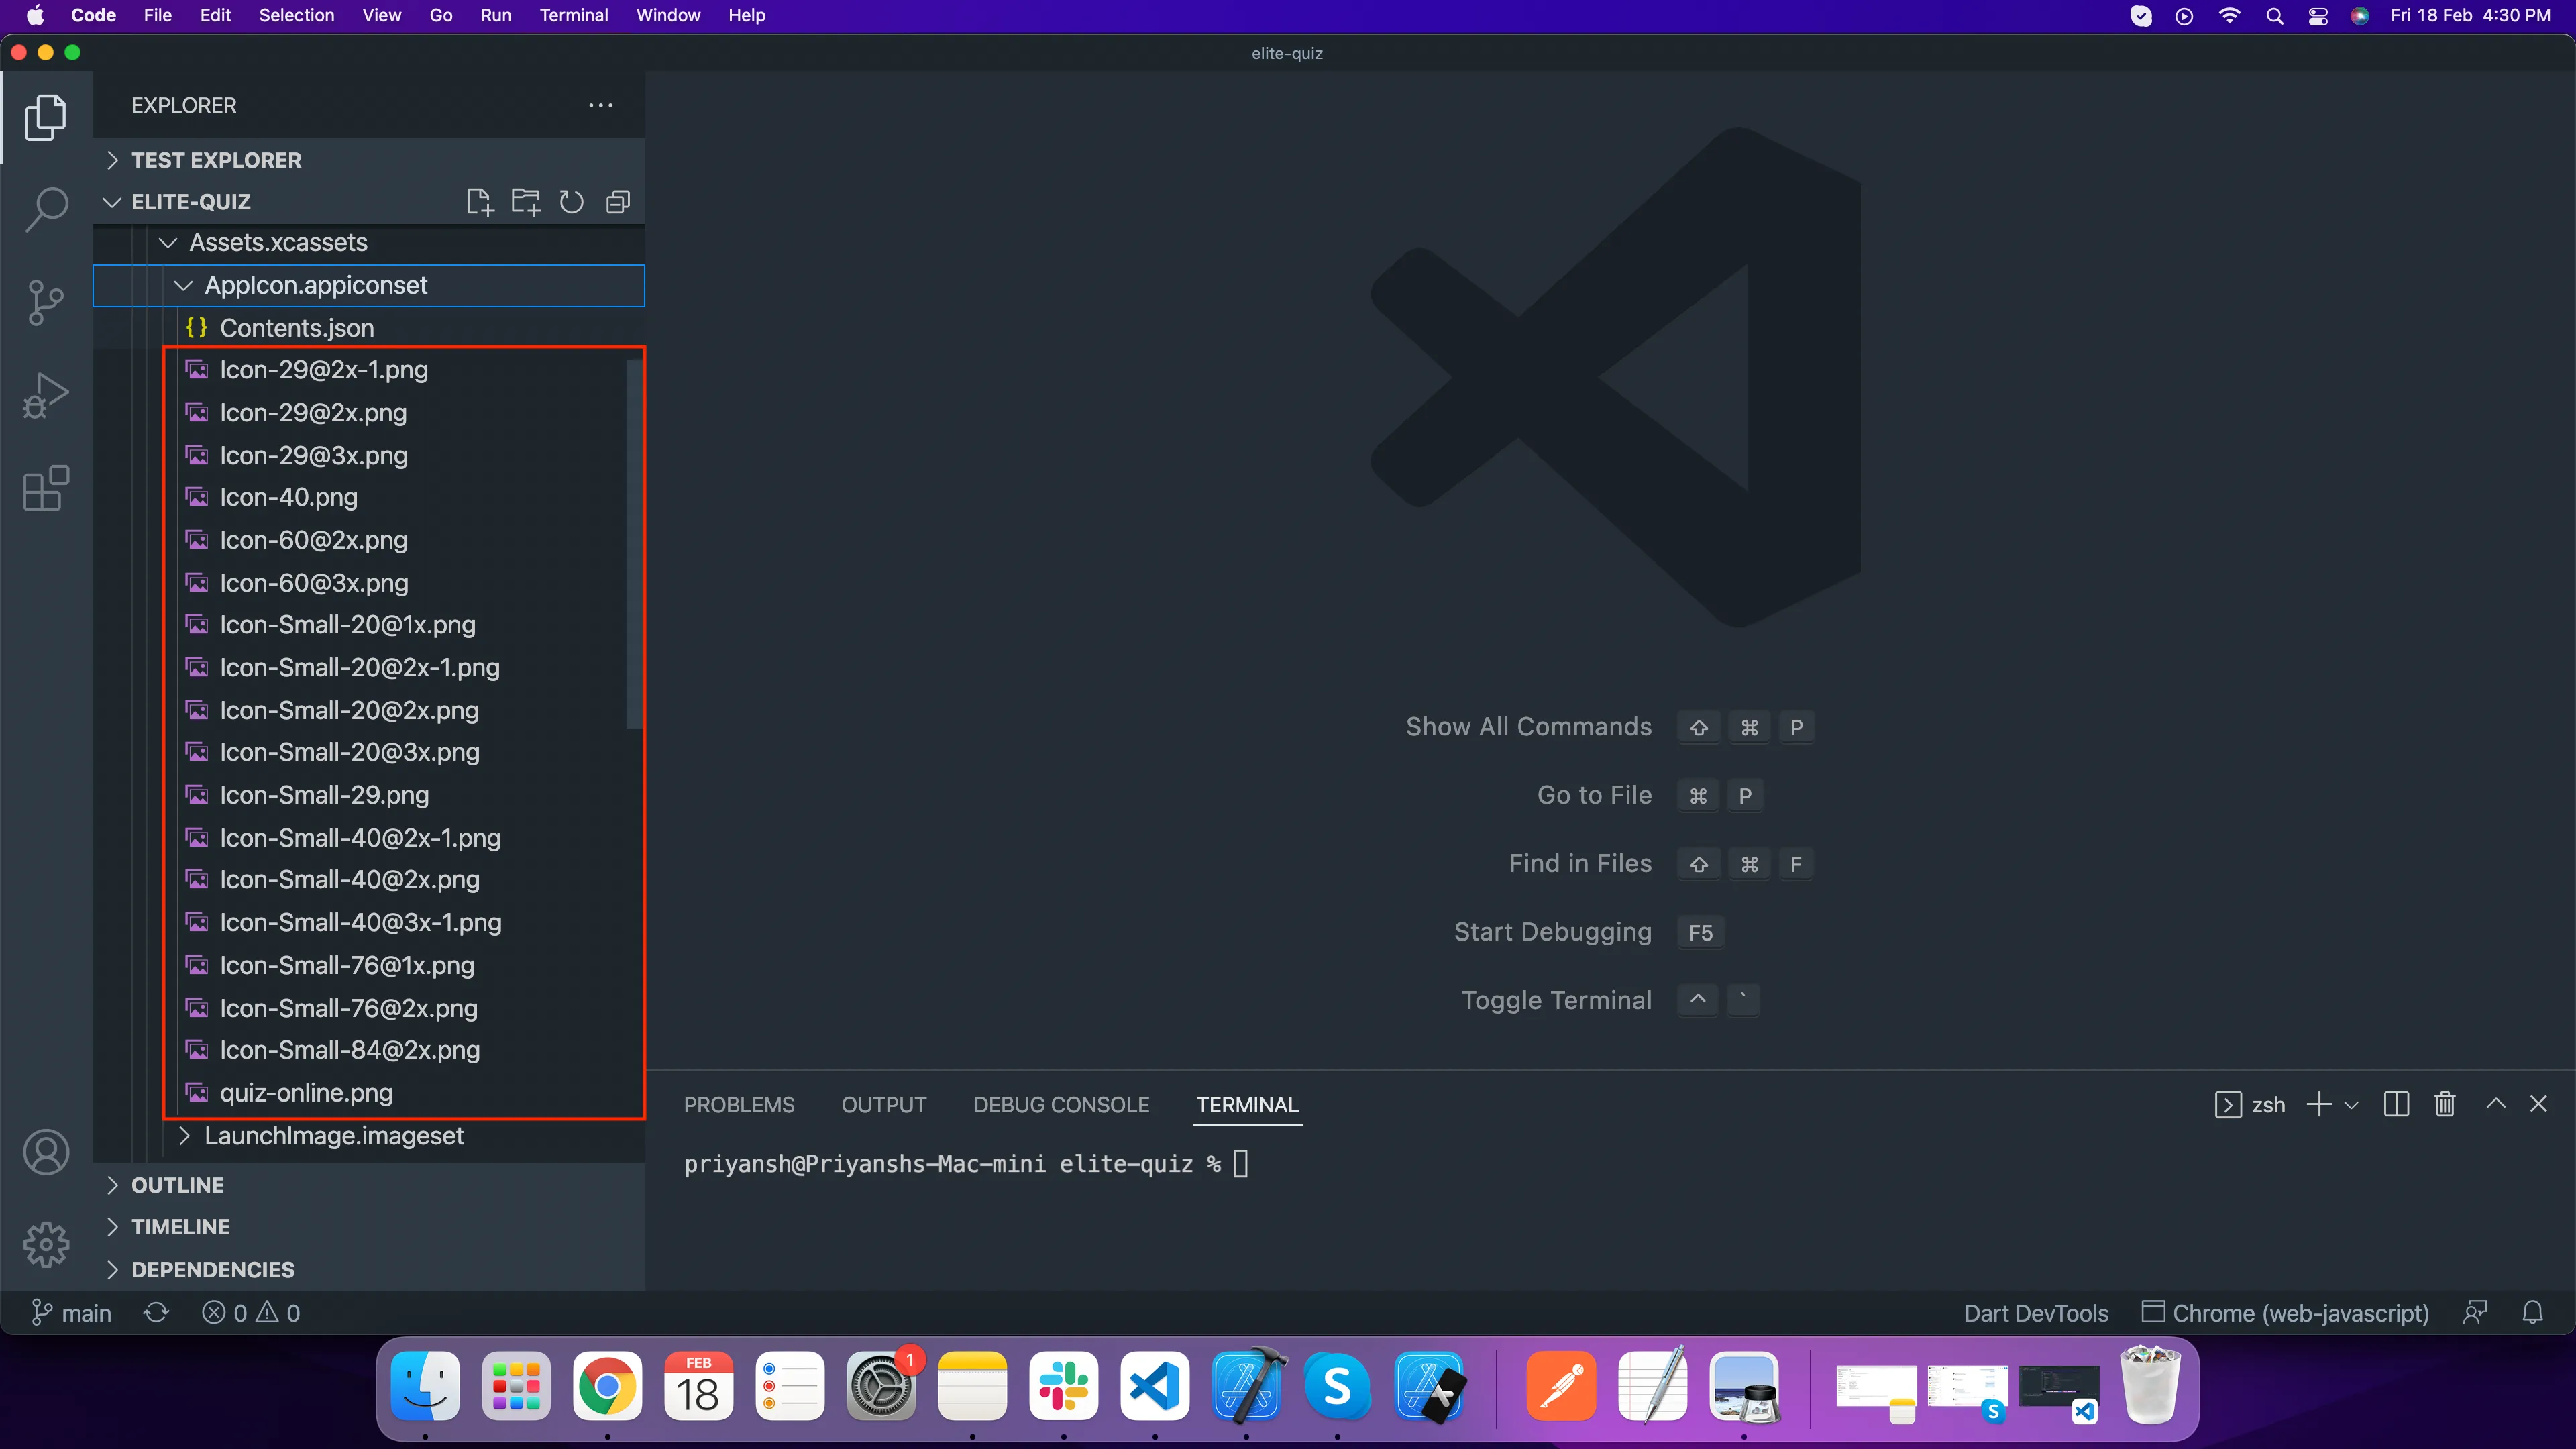
-
For IOS open
, ios > Runner > Assets.xcassets > AppIcon.appiconset here and add your logo
according to diffrent size.
Manage System Languages (Translations) from Admin Panel
to manage and add translations, you can go to System Languages setting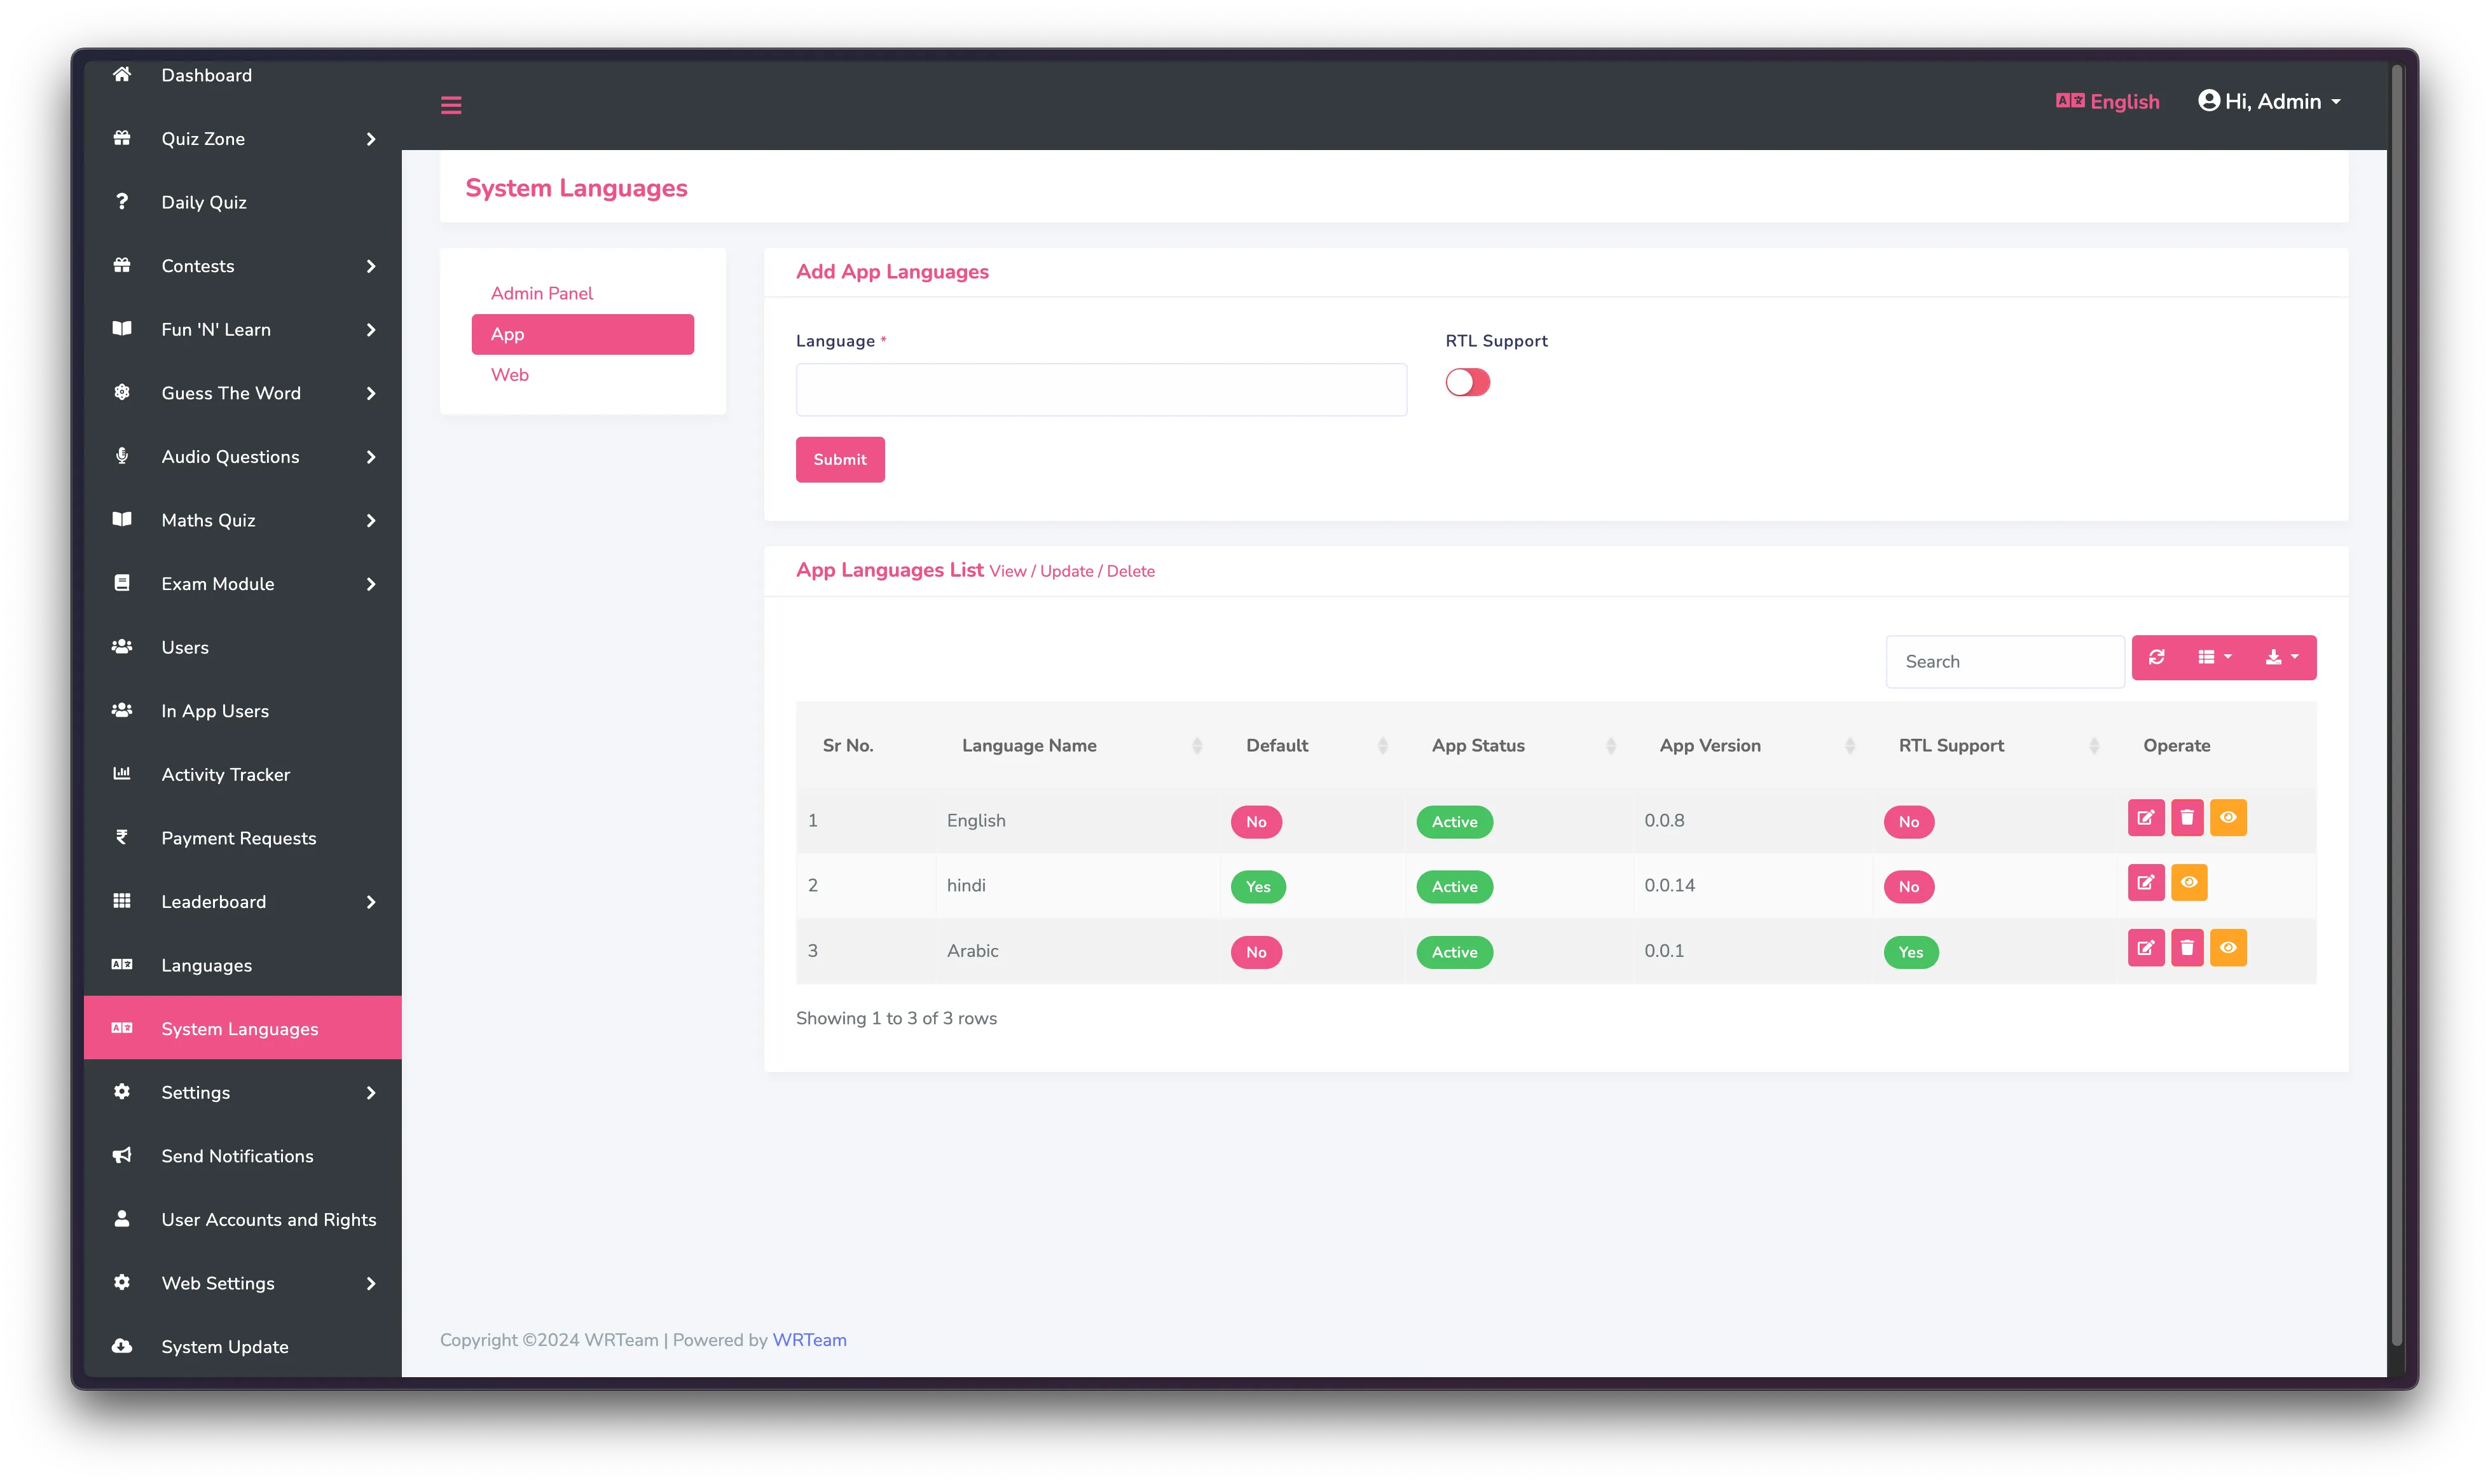 to make default language you can edit the language. When user opens the app for
first time. default language will be selected. then user can select any other
language.
to make default language you can edit the language. When user opens the app for
first time. default language will be selected. then user can select any other
language.
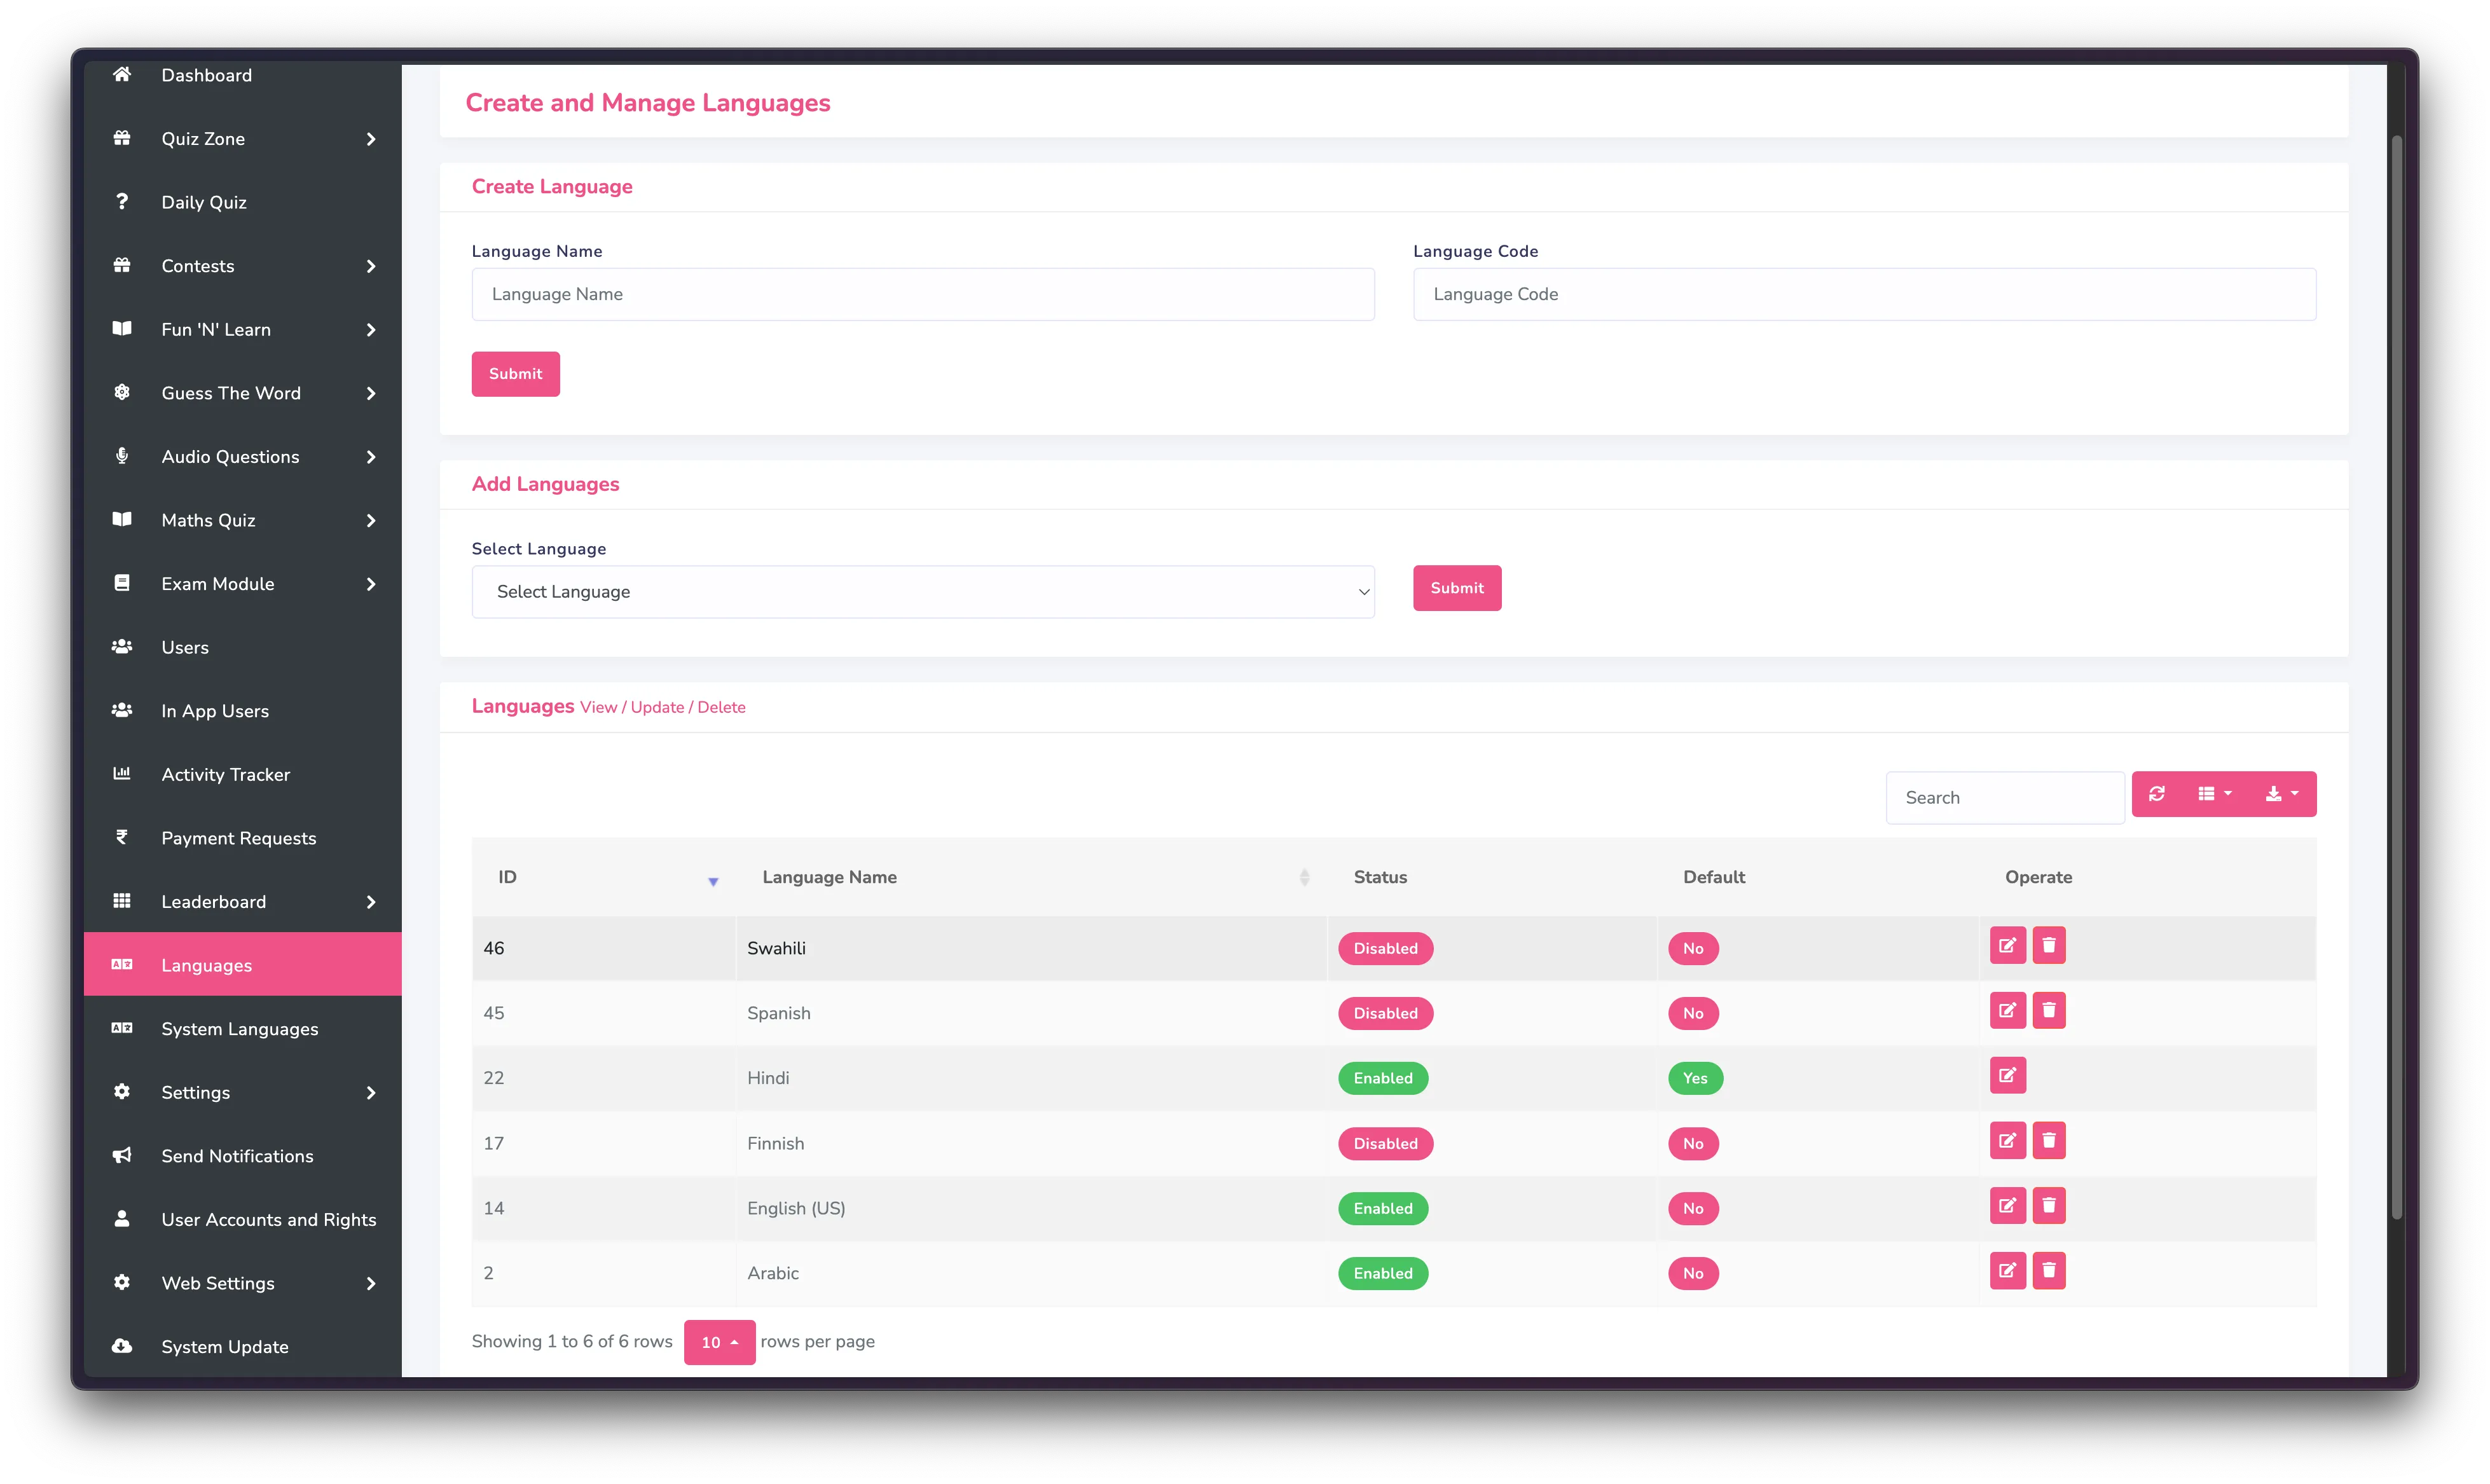
Manage Quiz Language from Admin Panel
Quiz Language meaning language of the questions, quiz content. not the translations or the labels of the app. if you want to have content in the multiple languages then it will be useful for you.-
If you want to have multiple languages for the quiz content, then you can
enable language mode in your admin panel as shown in the image below otherwise
keep it disabled.
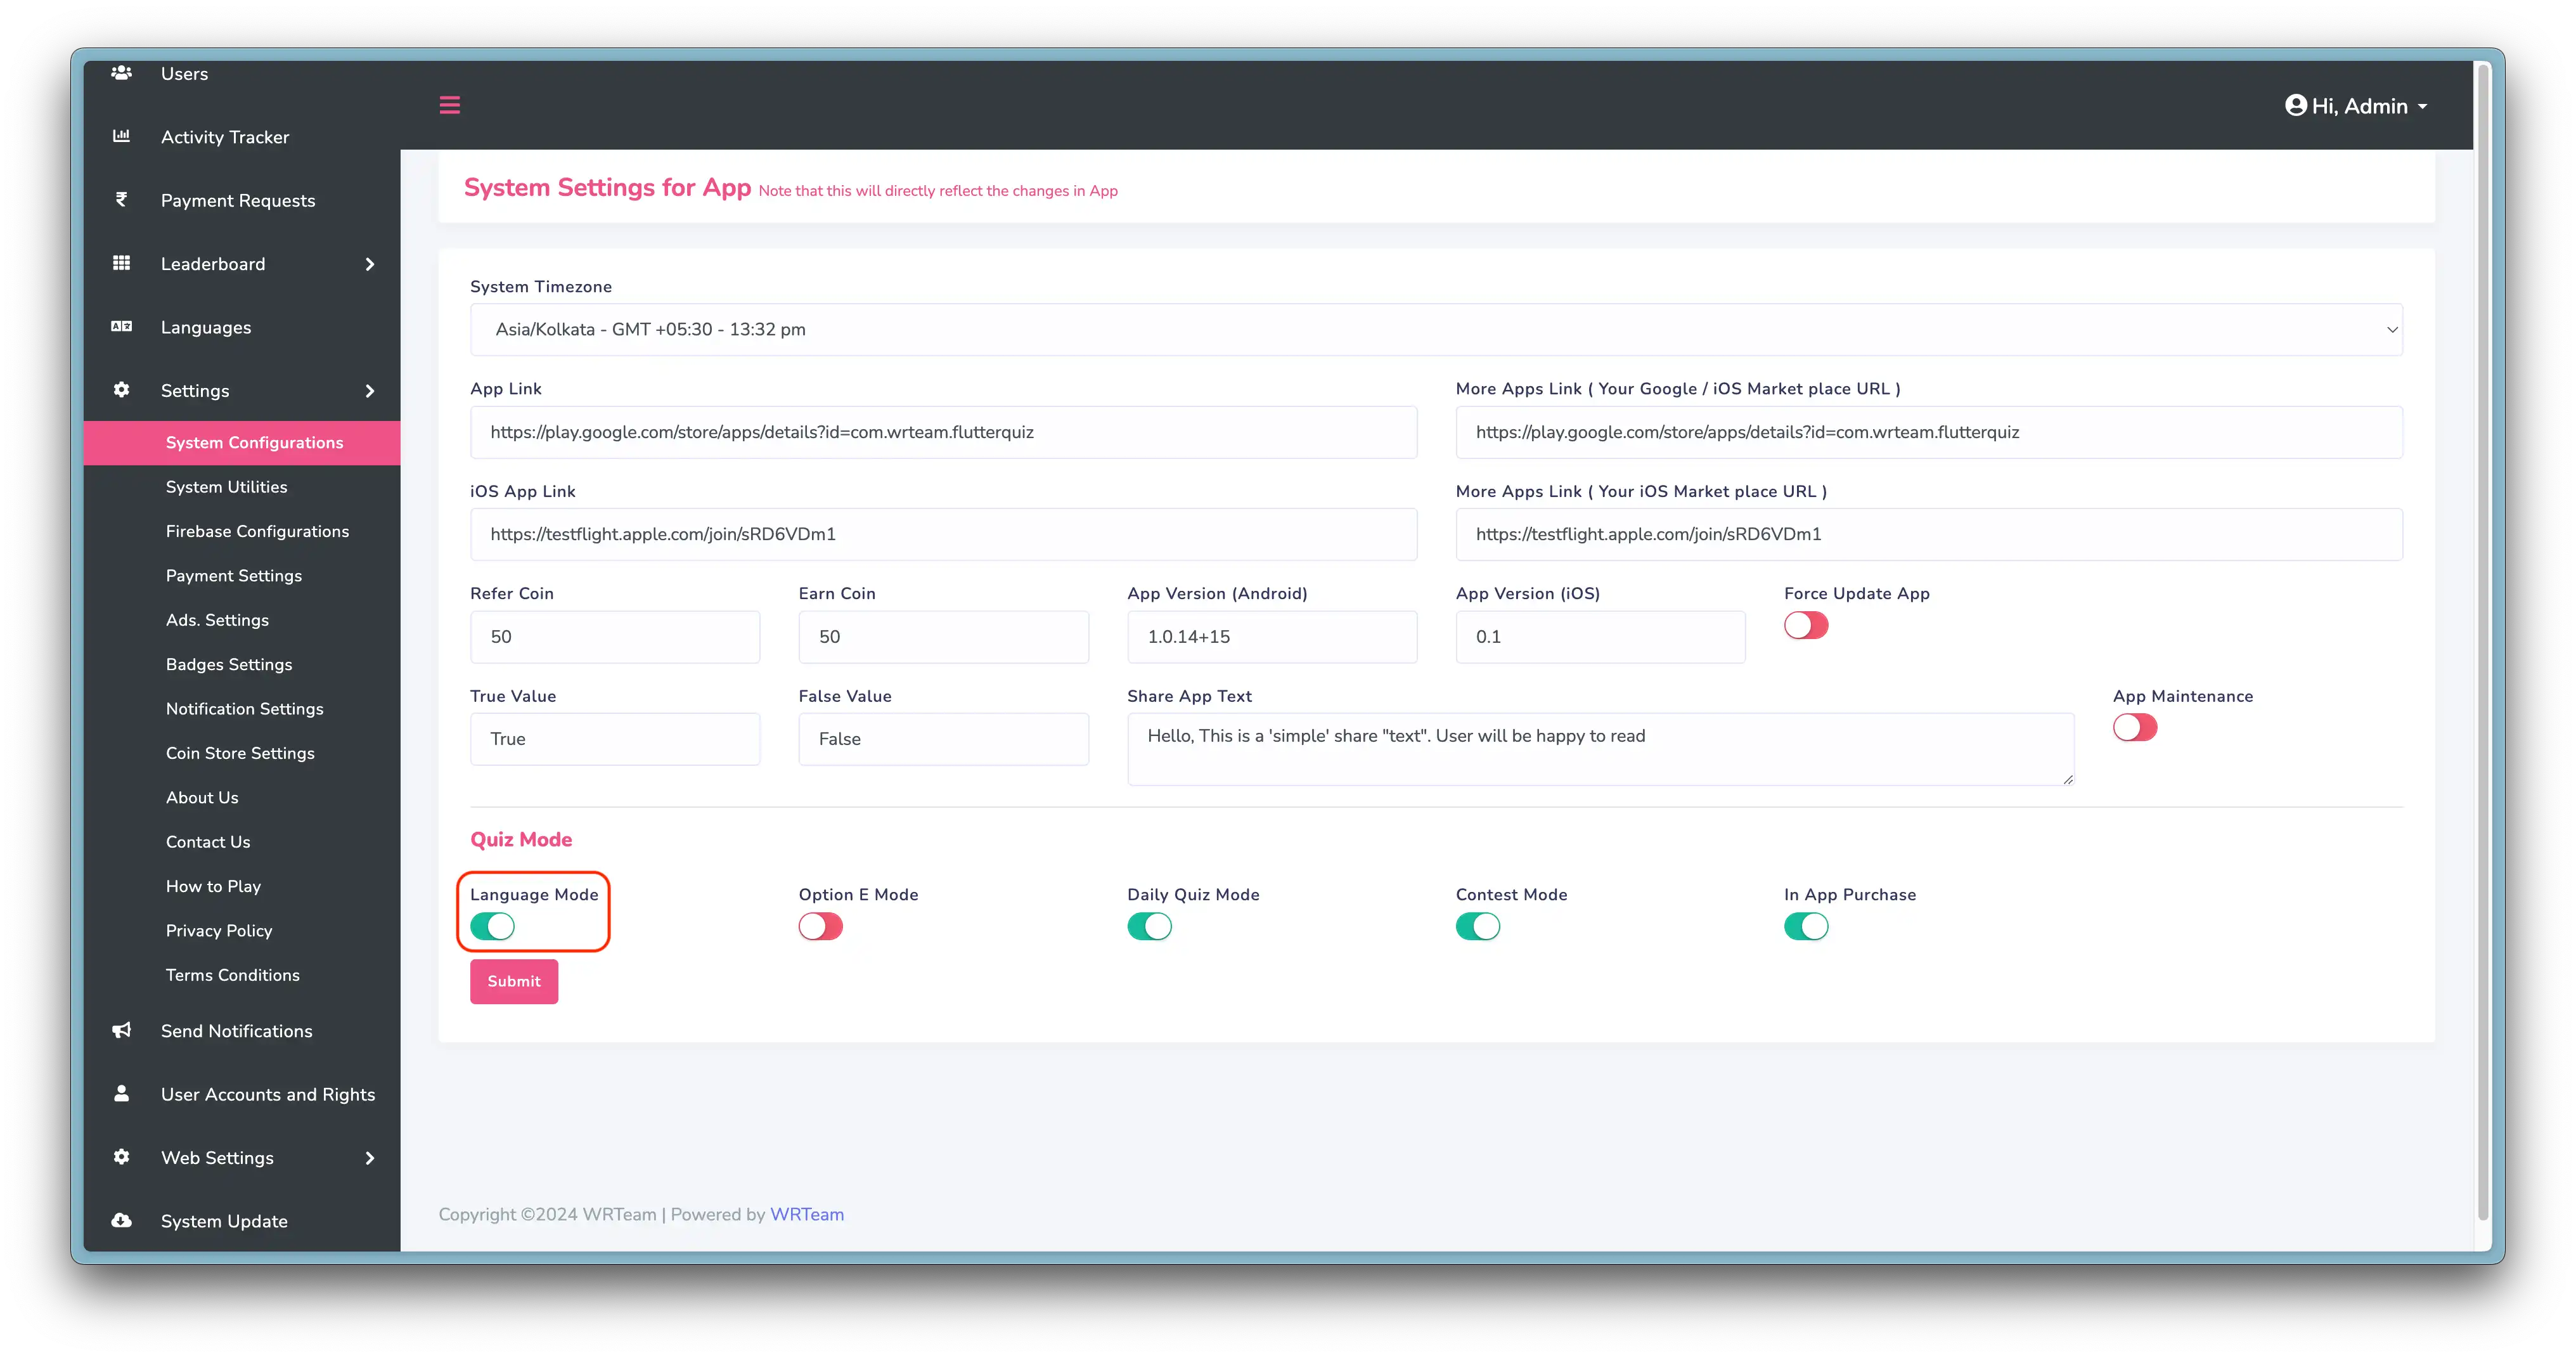
-
Then you can Add/Manage quiz languages from Languages Section. or skip this
step if language mode is disabled.
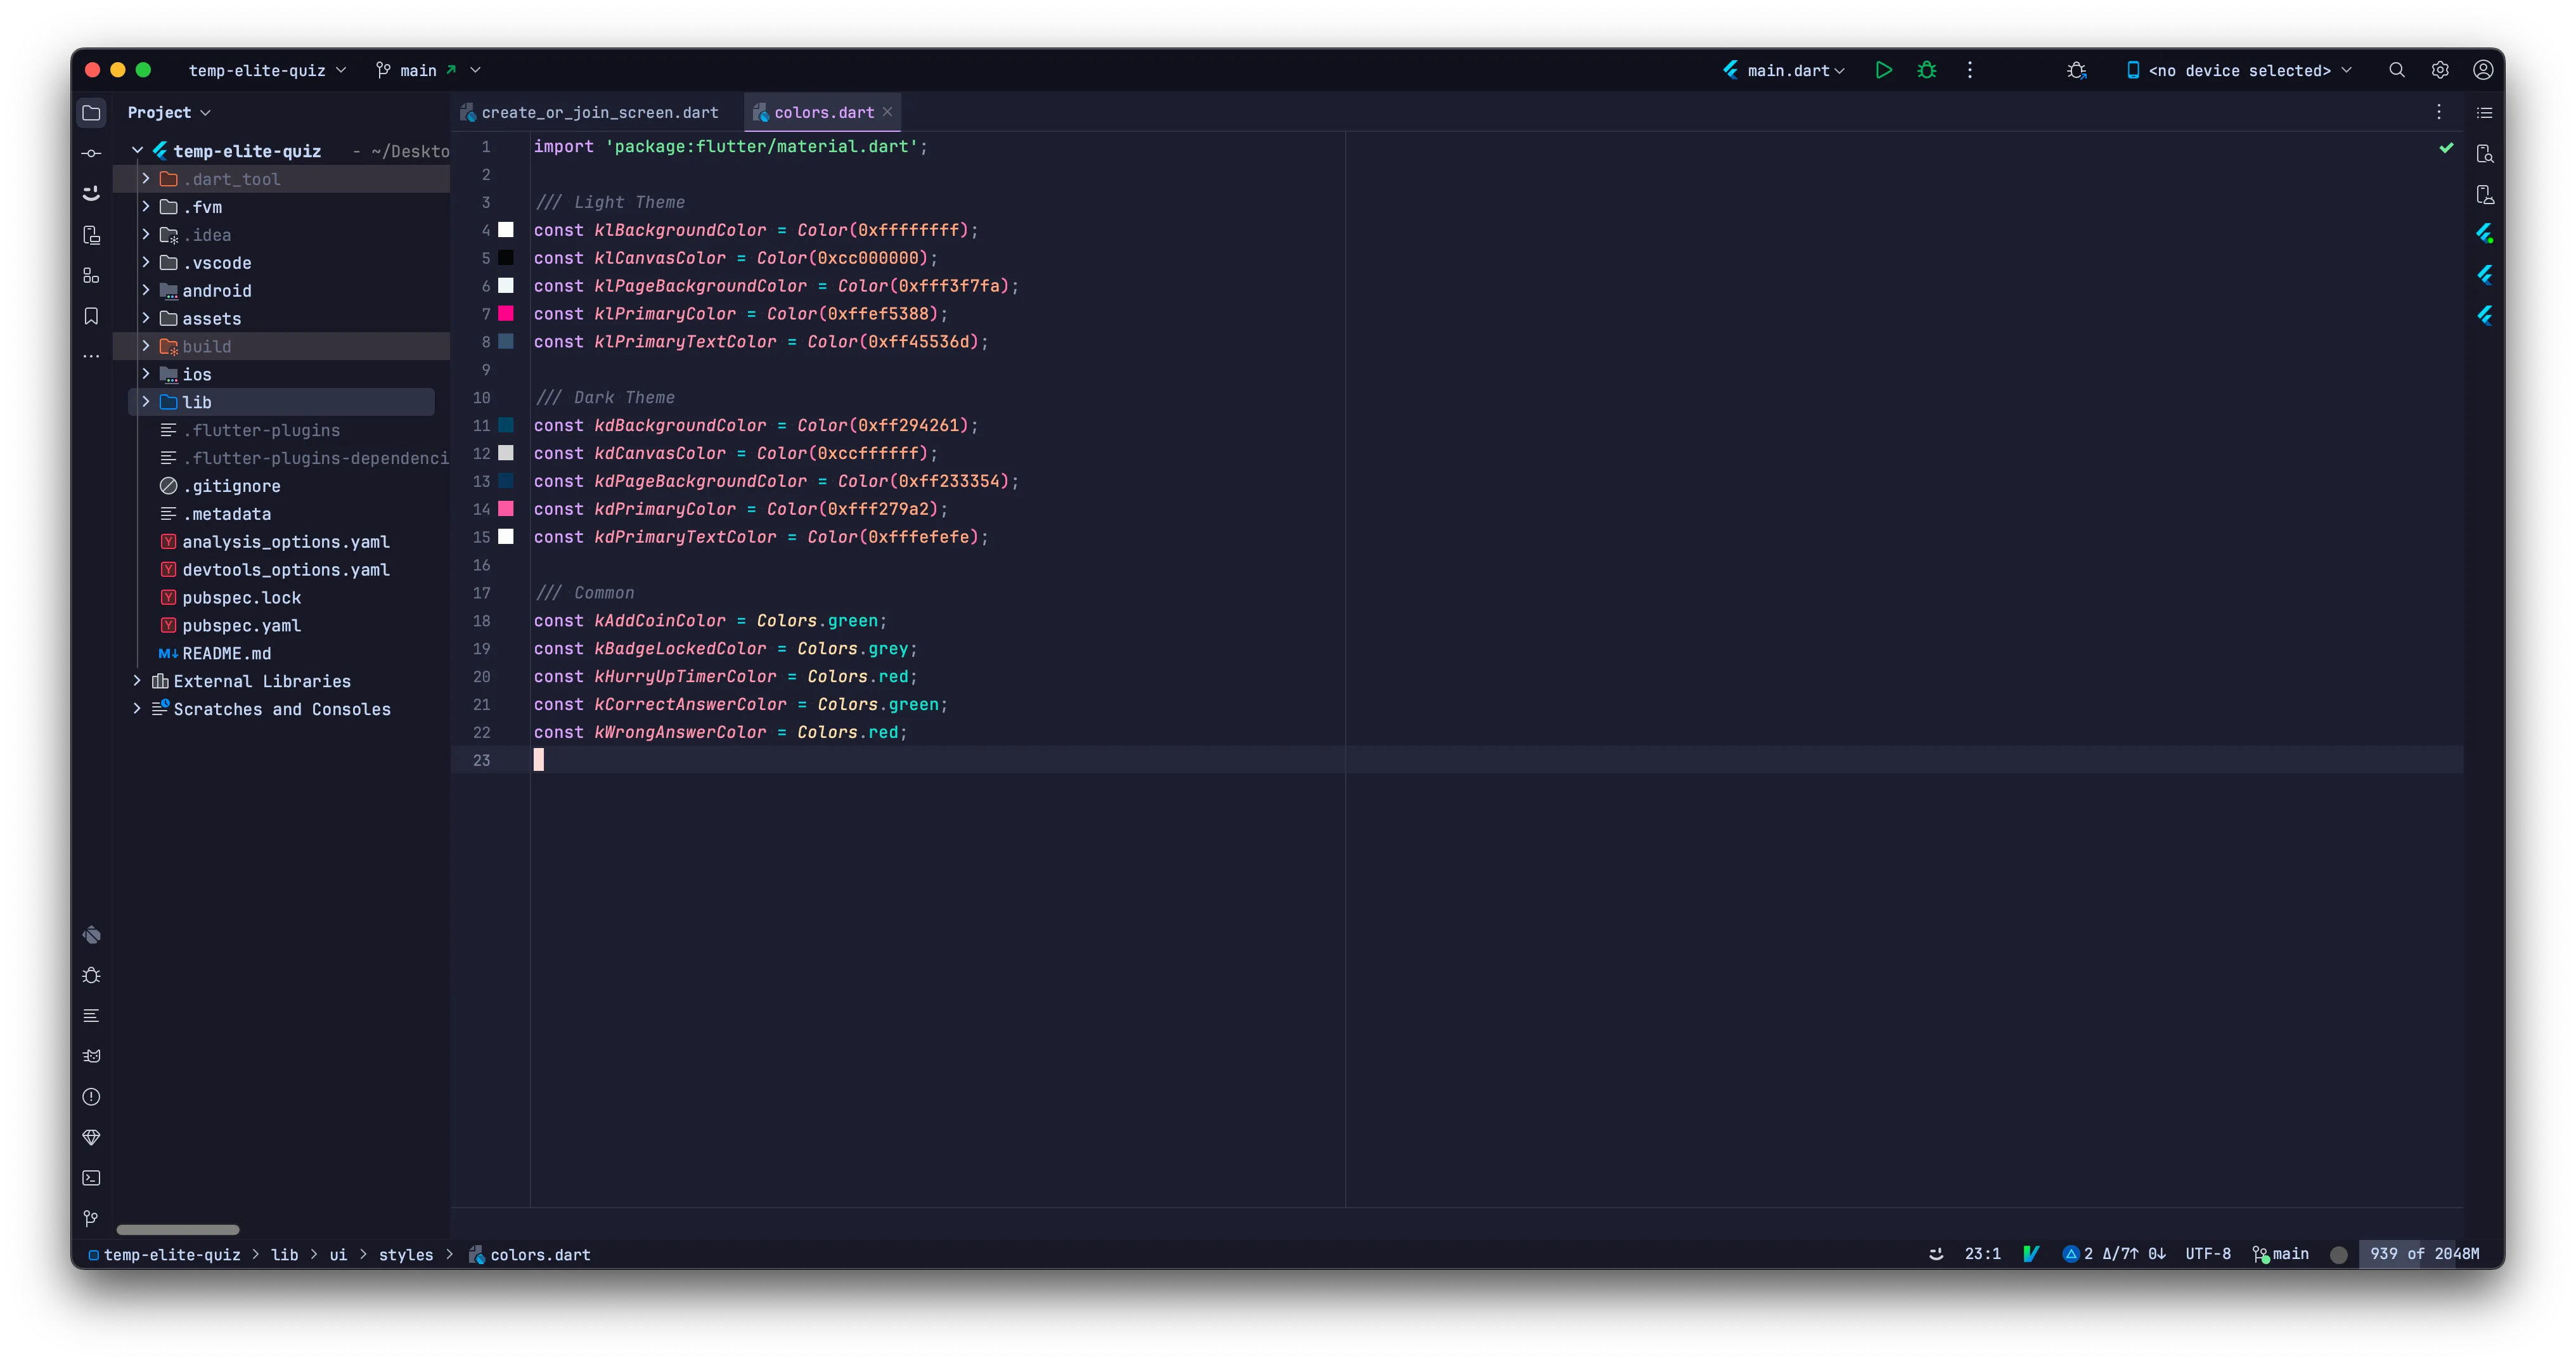
Change app colors
You can change colors of the app fromlib/ui/styles/colors.dart.
Configure Ads
Google AdMob
To begin, create an AdMob account and set up three Ad Units:
- Banner Ad
- Interstitial Ad
- Rewarded Ad
-
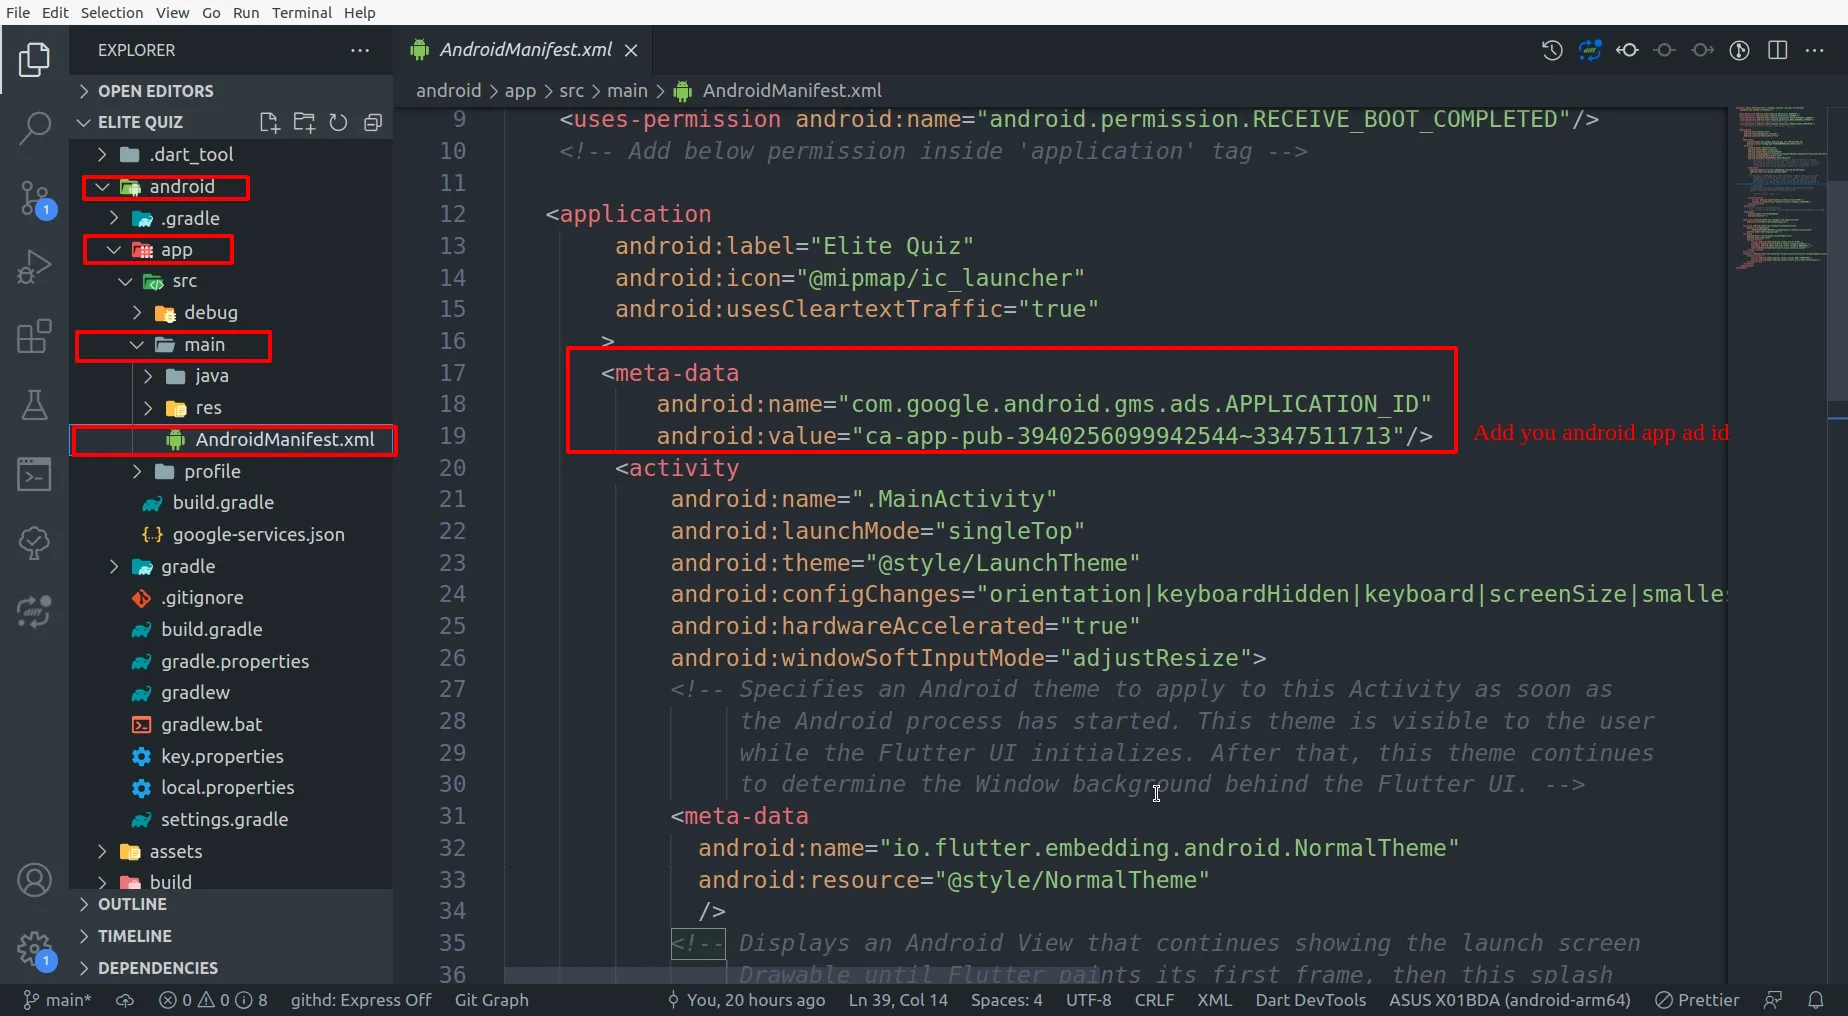
For Android, go to
android/app/src/main/AndroidManifest.xmland enter android App Id as shown in below image.
-
For IOS, go to
ios/Runner/Info.plistand enter IOS App Id as shown in below image.

-
Go to
Settings > Ads.Settingsin admin panel and add AdMob ad ids as shown in below image.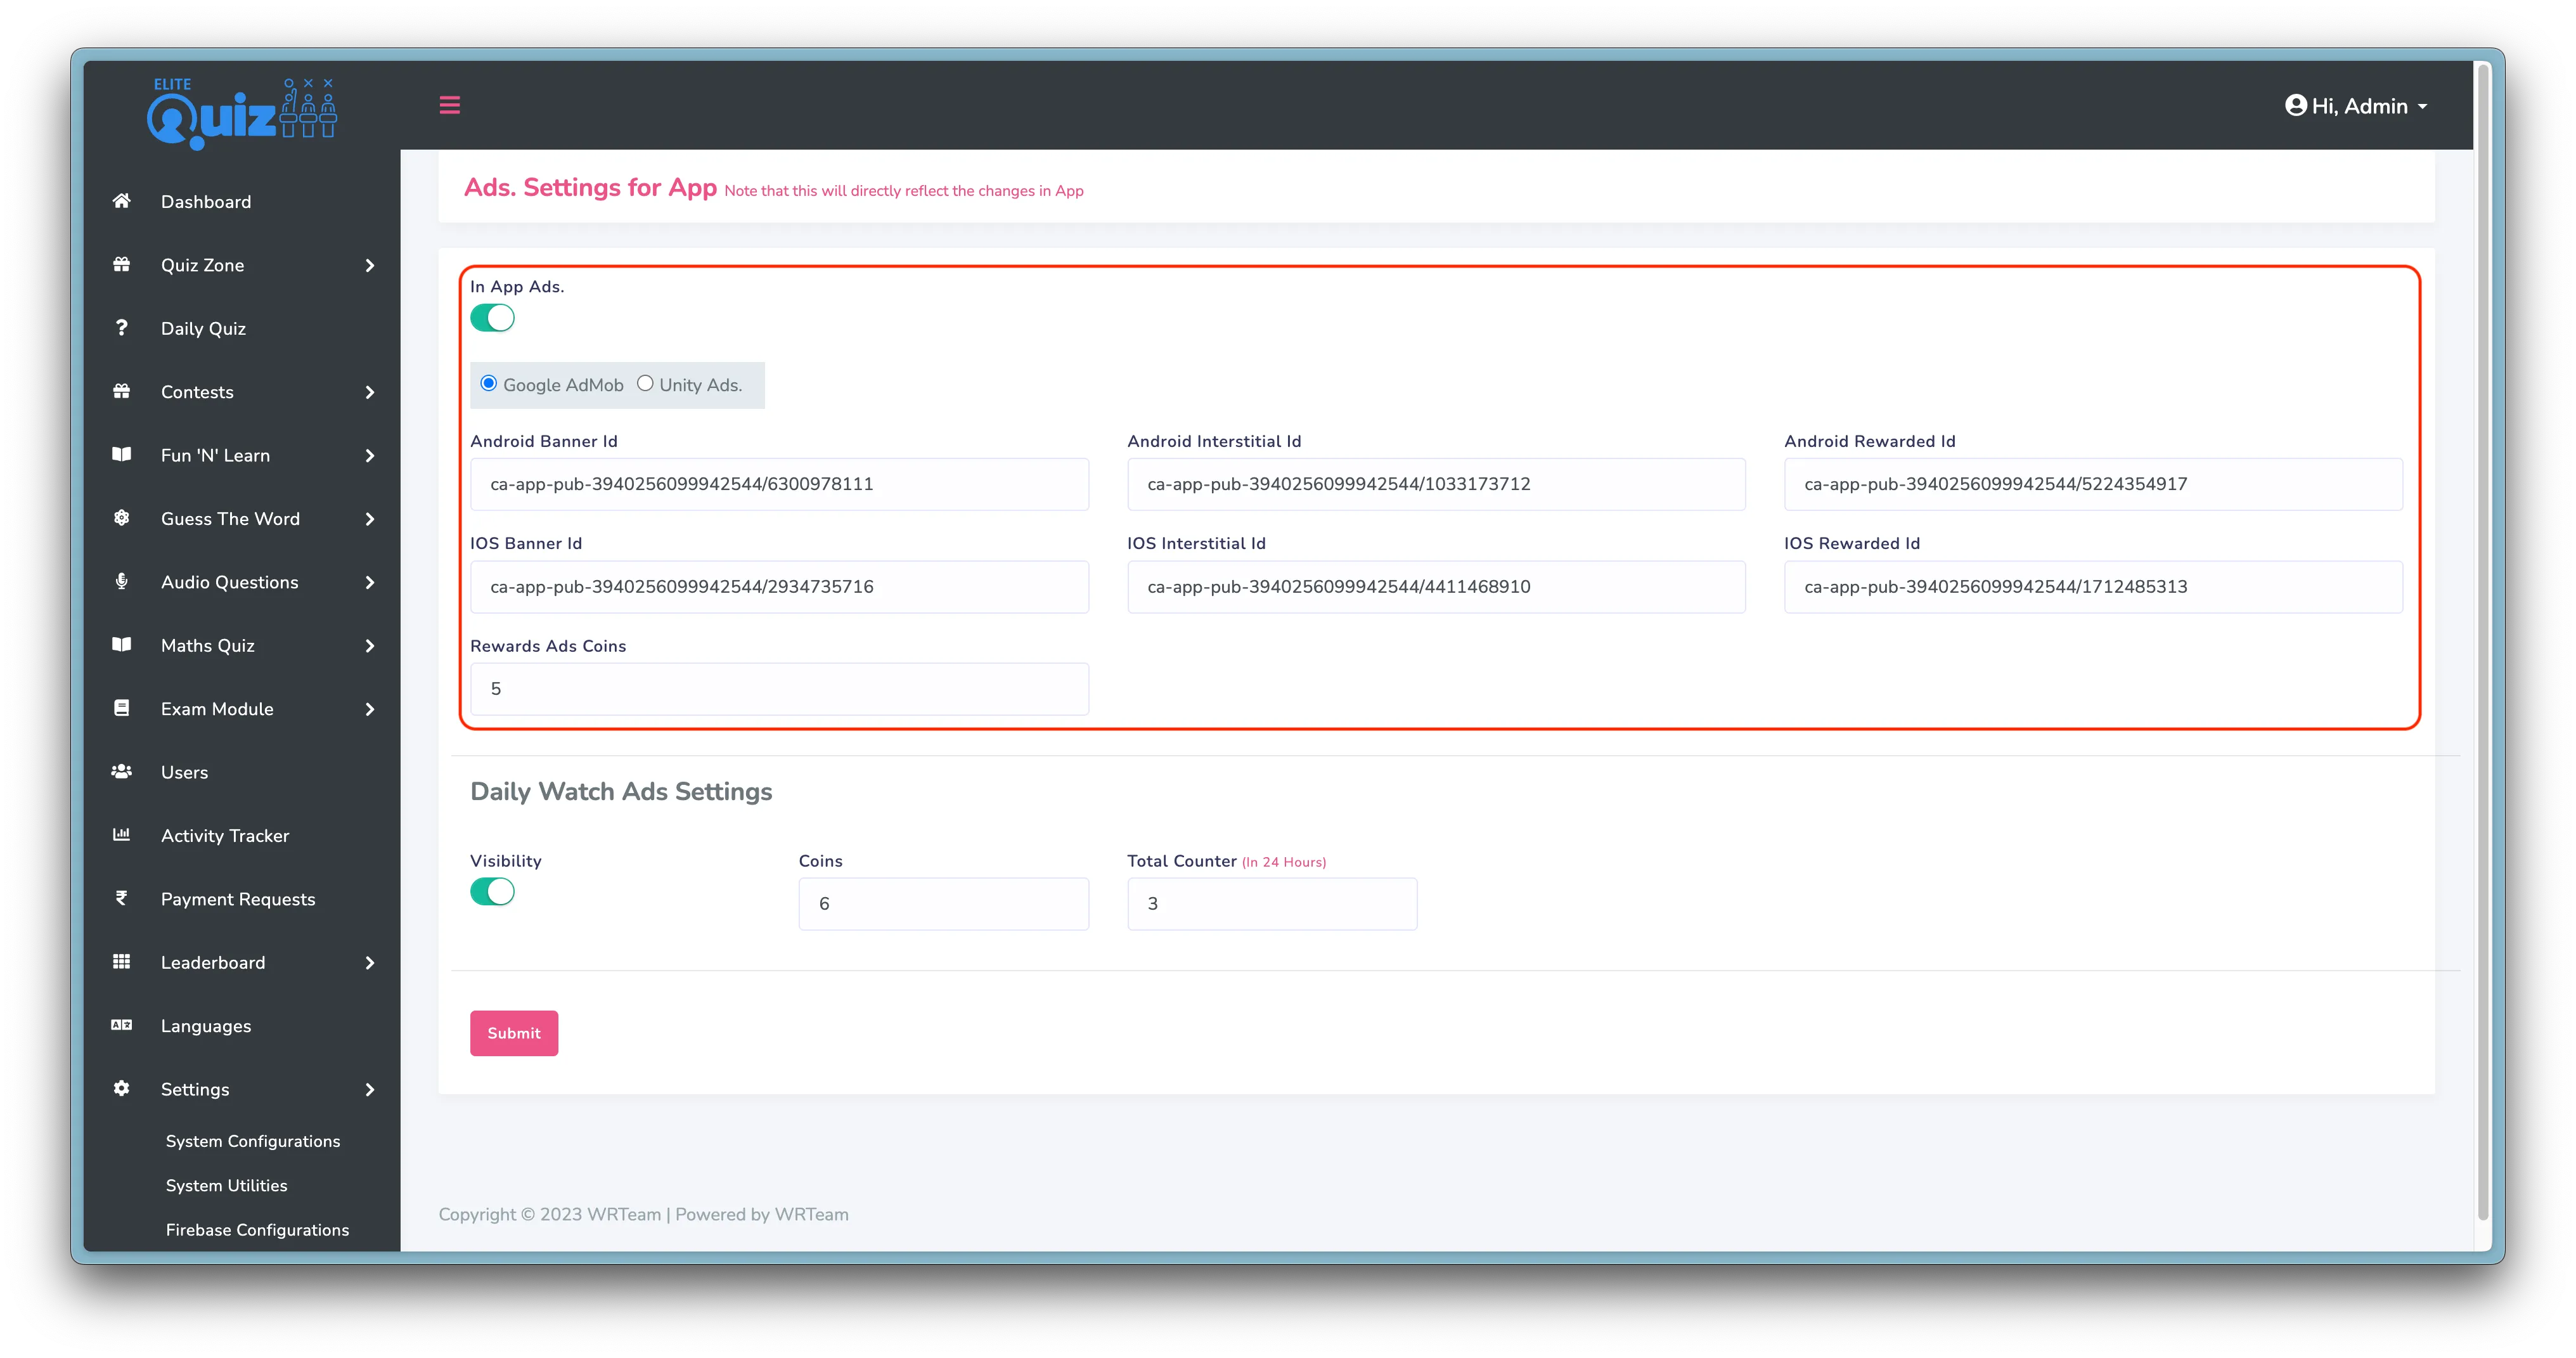
Unity Ads
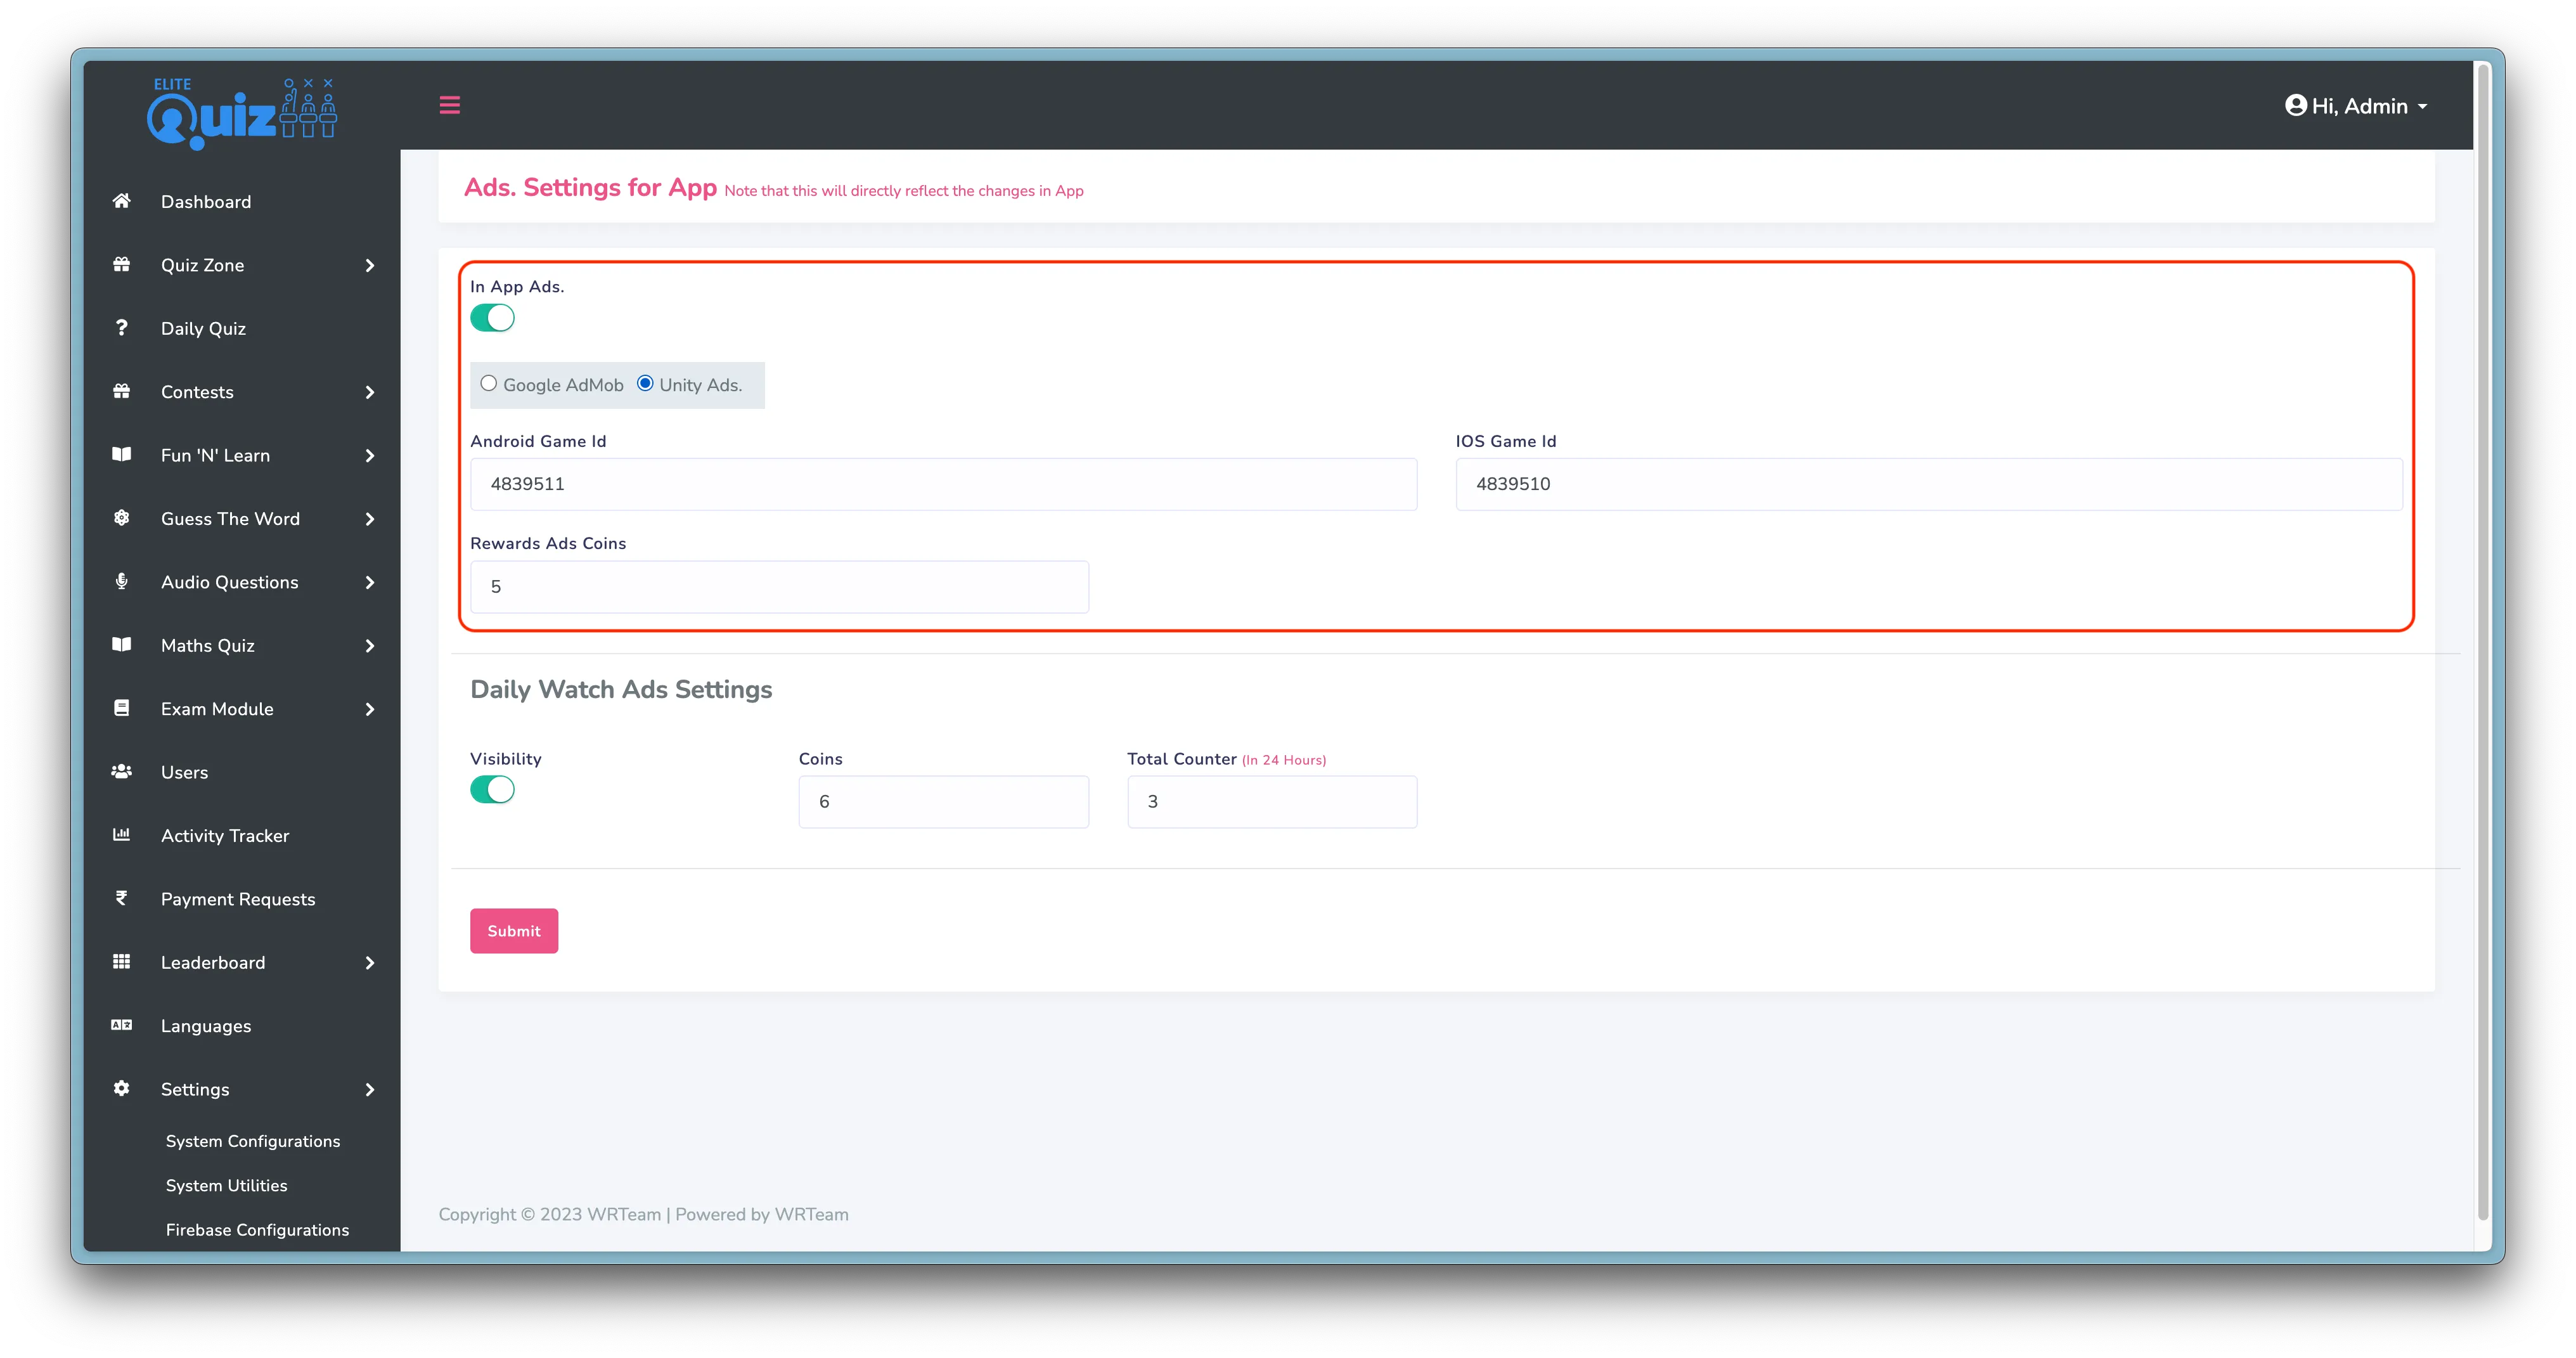
Go toSettings > Ads.Settings
in admin panel and add Unity ad ids as shown in below image.
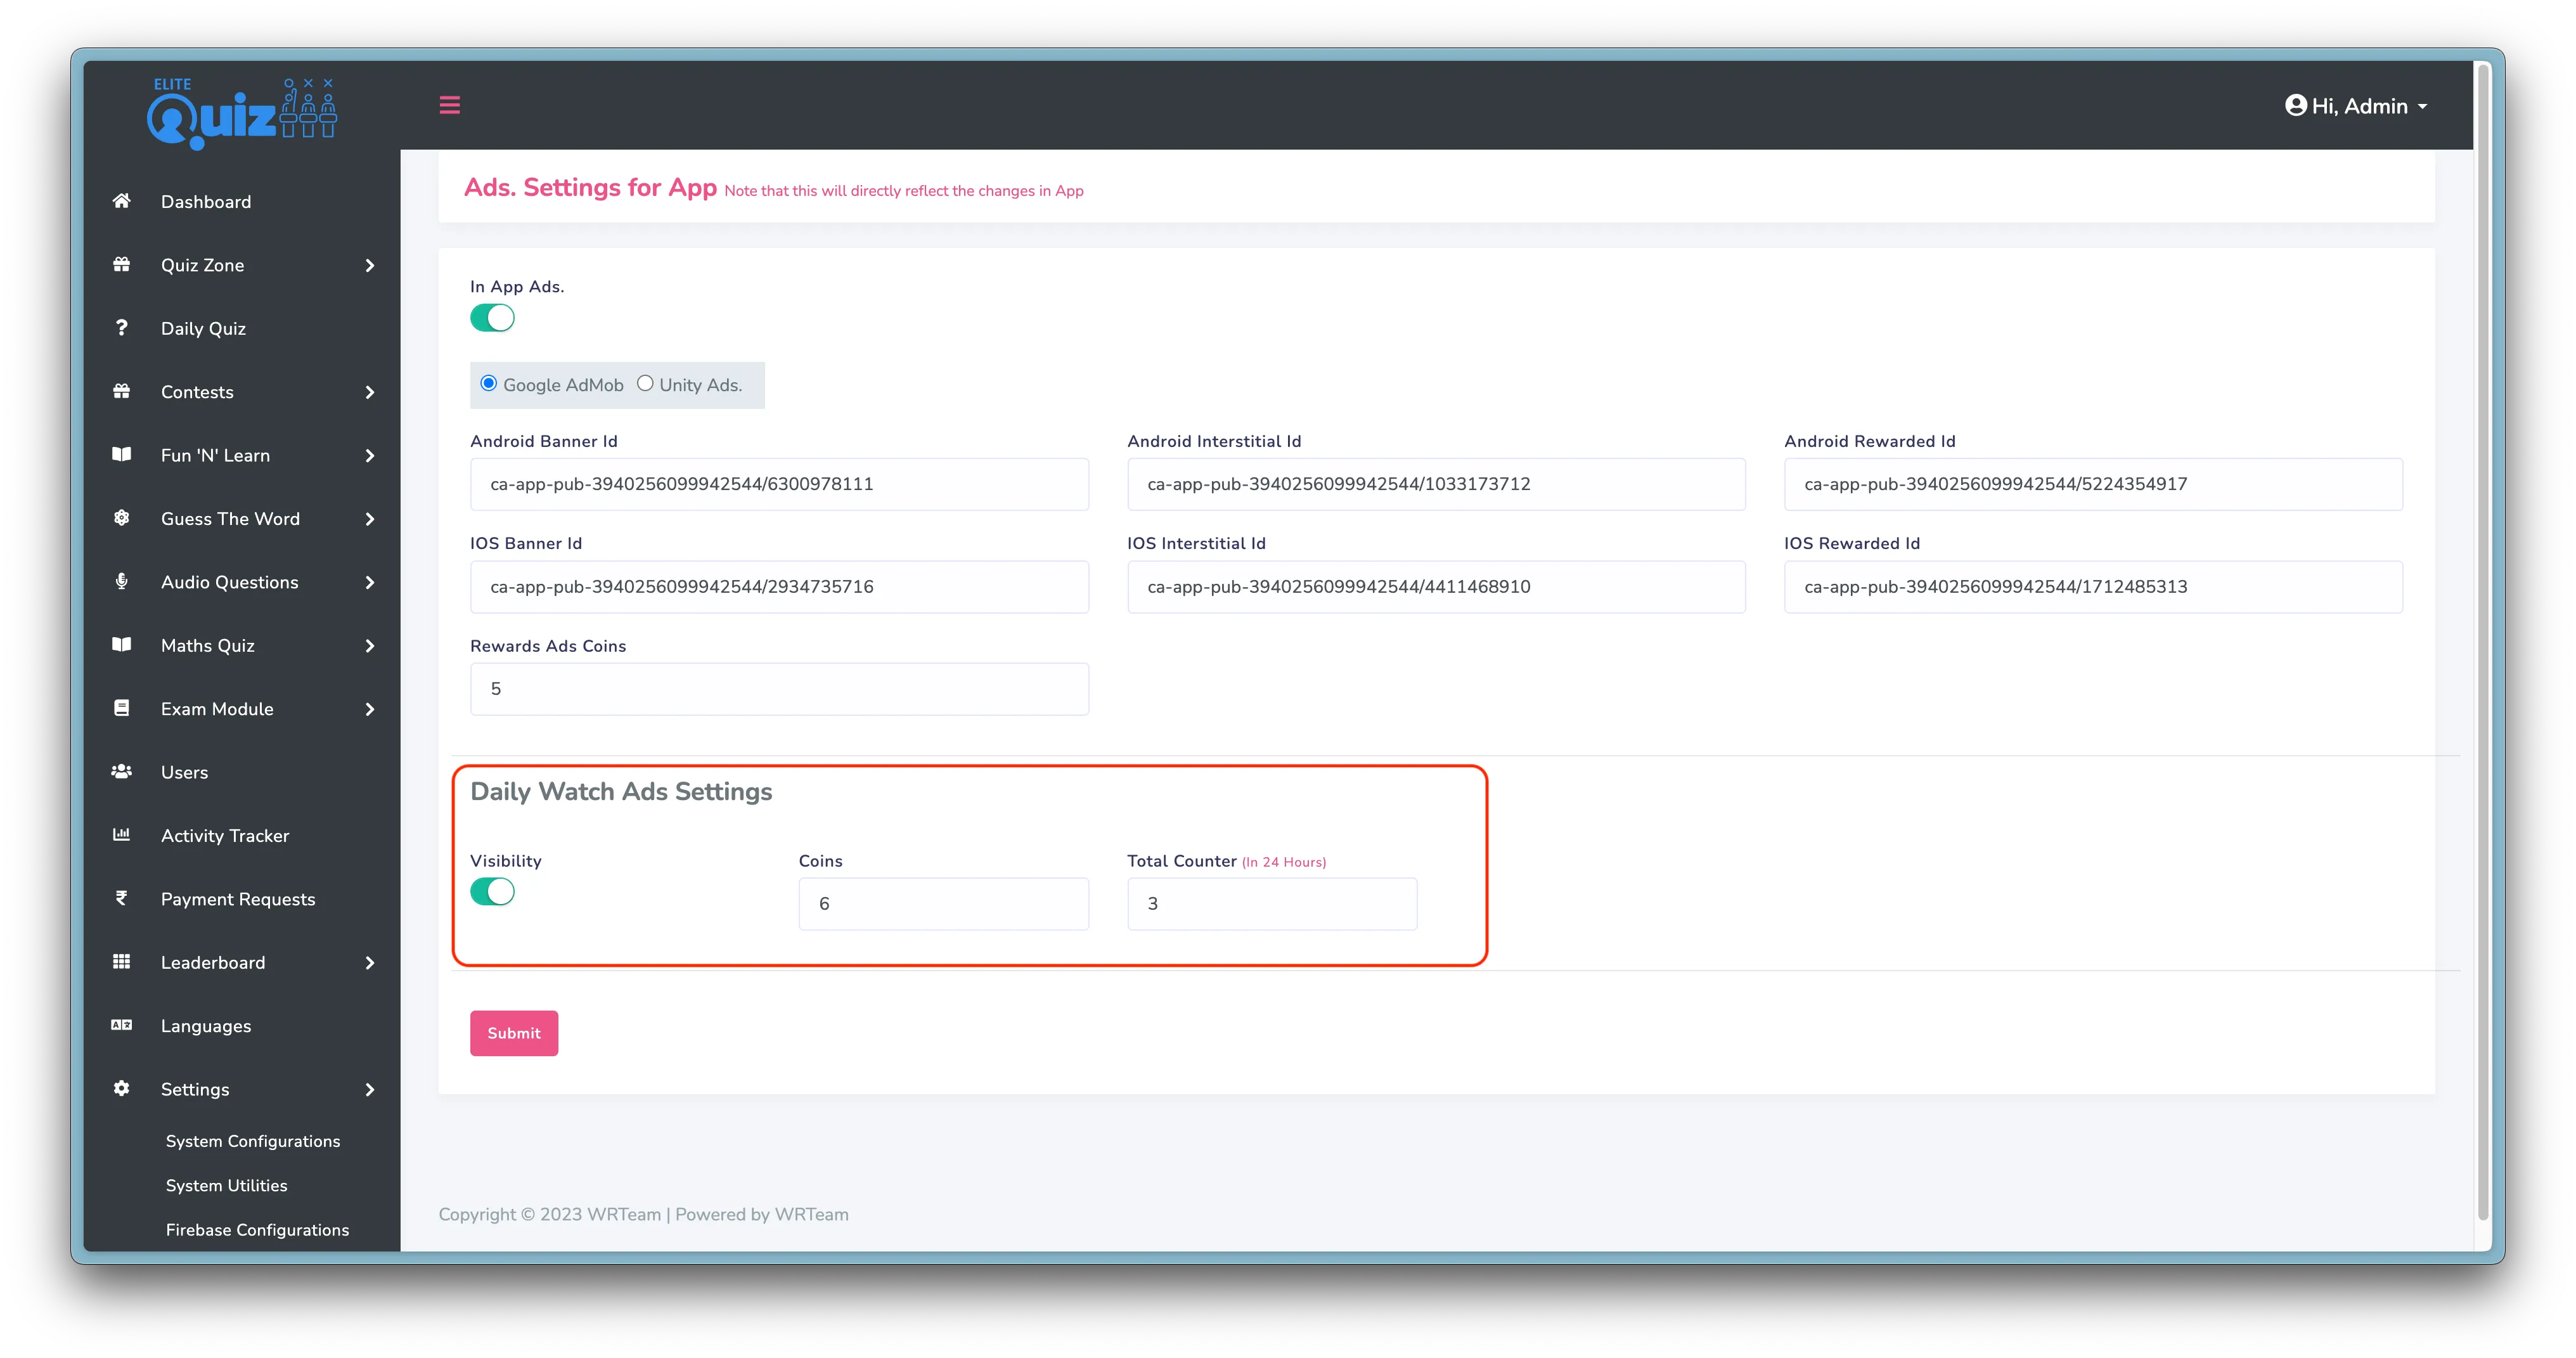
Daily Watch Ads
Daily Watch Ads are Reward Ads shown to user in home screen. Users can choose to watch ads to earn some coins. for daily watch ads you can limit how many time a day user can watch ad to earn coin. and how much coin will they get per ad.
And you can change settings for it from Ads Settings
Placements of the Ads
Banner Ads
Banner Ads are shown screens which are mainly used to show list. like,
- Category List Screen
- Sub Category List Screen
- Levels List Screen
- Sub Category & Levels List Screen
- Exams List Screen
- Fun'N'Learn List Screen
Interstitial Ads
Interstitial Ads are shown in places when user enters some section & before showing result.
- Before Showing Result Screen
- Going to sections from Menu Screen like, Notifications, Wallet, Statistics, etc
- before going to Categories List Screen
Reward Ads
Rewards Ads are shown in only specific scenarios,
- like when creating Battle Room if user doesn't have enough Coins. or when playing Random Battle user doesn't have enough coins.
- When playing quiz zone, if user doesn't have enough coins for using lifelines. And similarly in Guess The Word when user tries to use hint without enough coins.
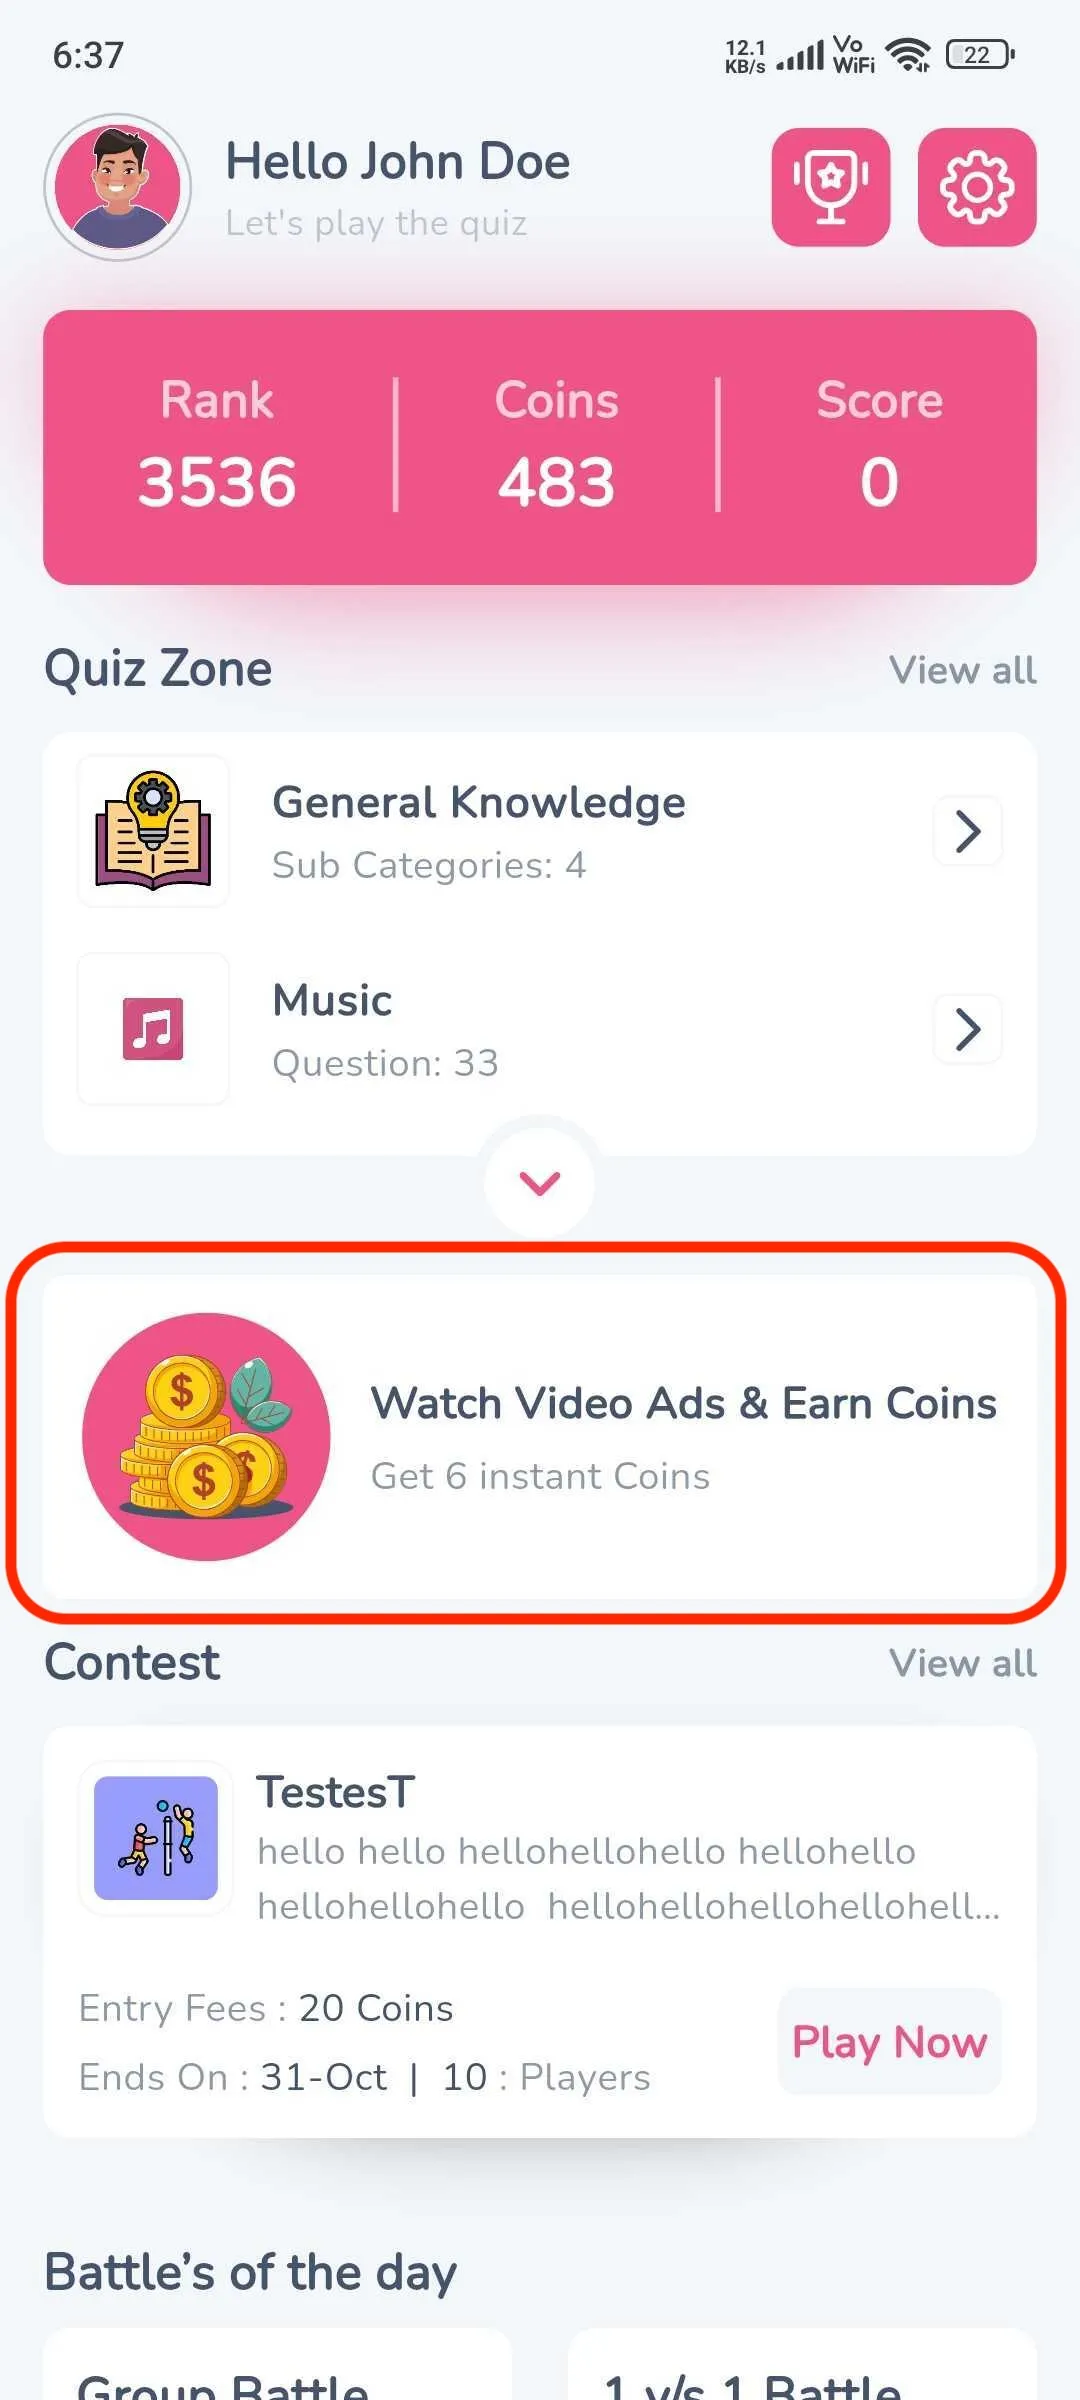
- Also in homescreen, user can opt in to watch Daily Ads to earn more coins by watching video ads.
Create the AdMob UMP/GDPR message
The first step we must take is to create the consent message in the AdMob interface. If you already have this message created then simply skip this step
If you prefer video tutorial refer to this video from 1:13 to 2:39.
Steps:
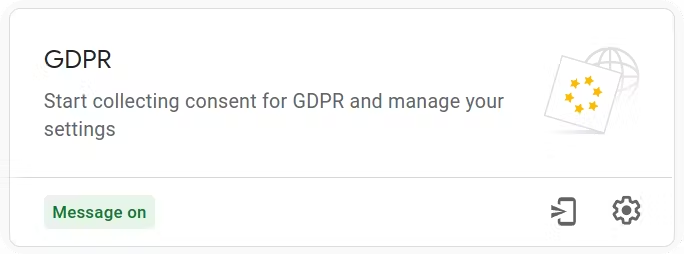
Access the AdMob console, and go to the Privacy & messaging section
Here you will see the different types of messages that you can create. Press the first button at the bottom right to create your message
In the next screen, press the Create message button to start creating your message.
You will be presented with a form with several options. Choose your app.
Then choose the languages in which you want to display the message, and the consent options:
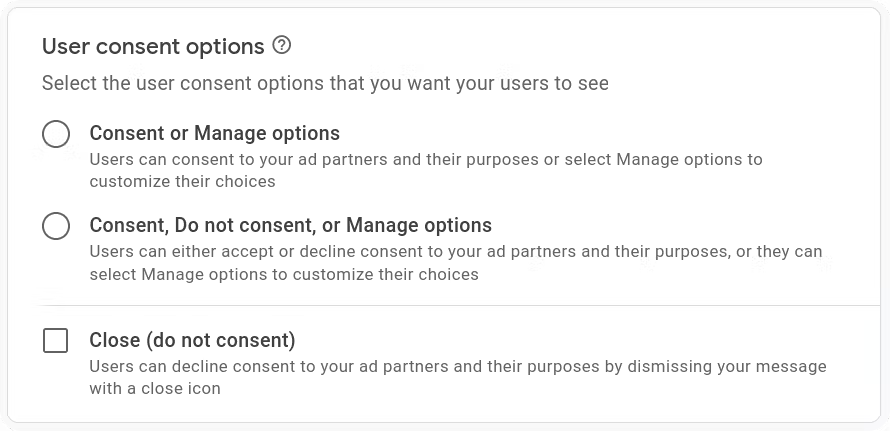
If you have doubts about which option is right for you, you should consult with a lawyer specialized in this topic.
The last step will be to choose whether we want to show this message only in regions subject to the GDPR or worldwide.
Once created you will be able to view and configure your message. At this point, you can navigate through the interface since there are several configuration options, including the selection of colors, languages, spacing, etc. Simply configure the message to your liking so that it looks good in your application.
If you have more questions about the process of creating the privacy message, I recommend that you look at the Official AdMob Guide
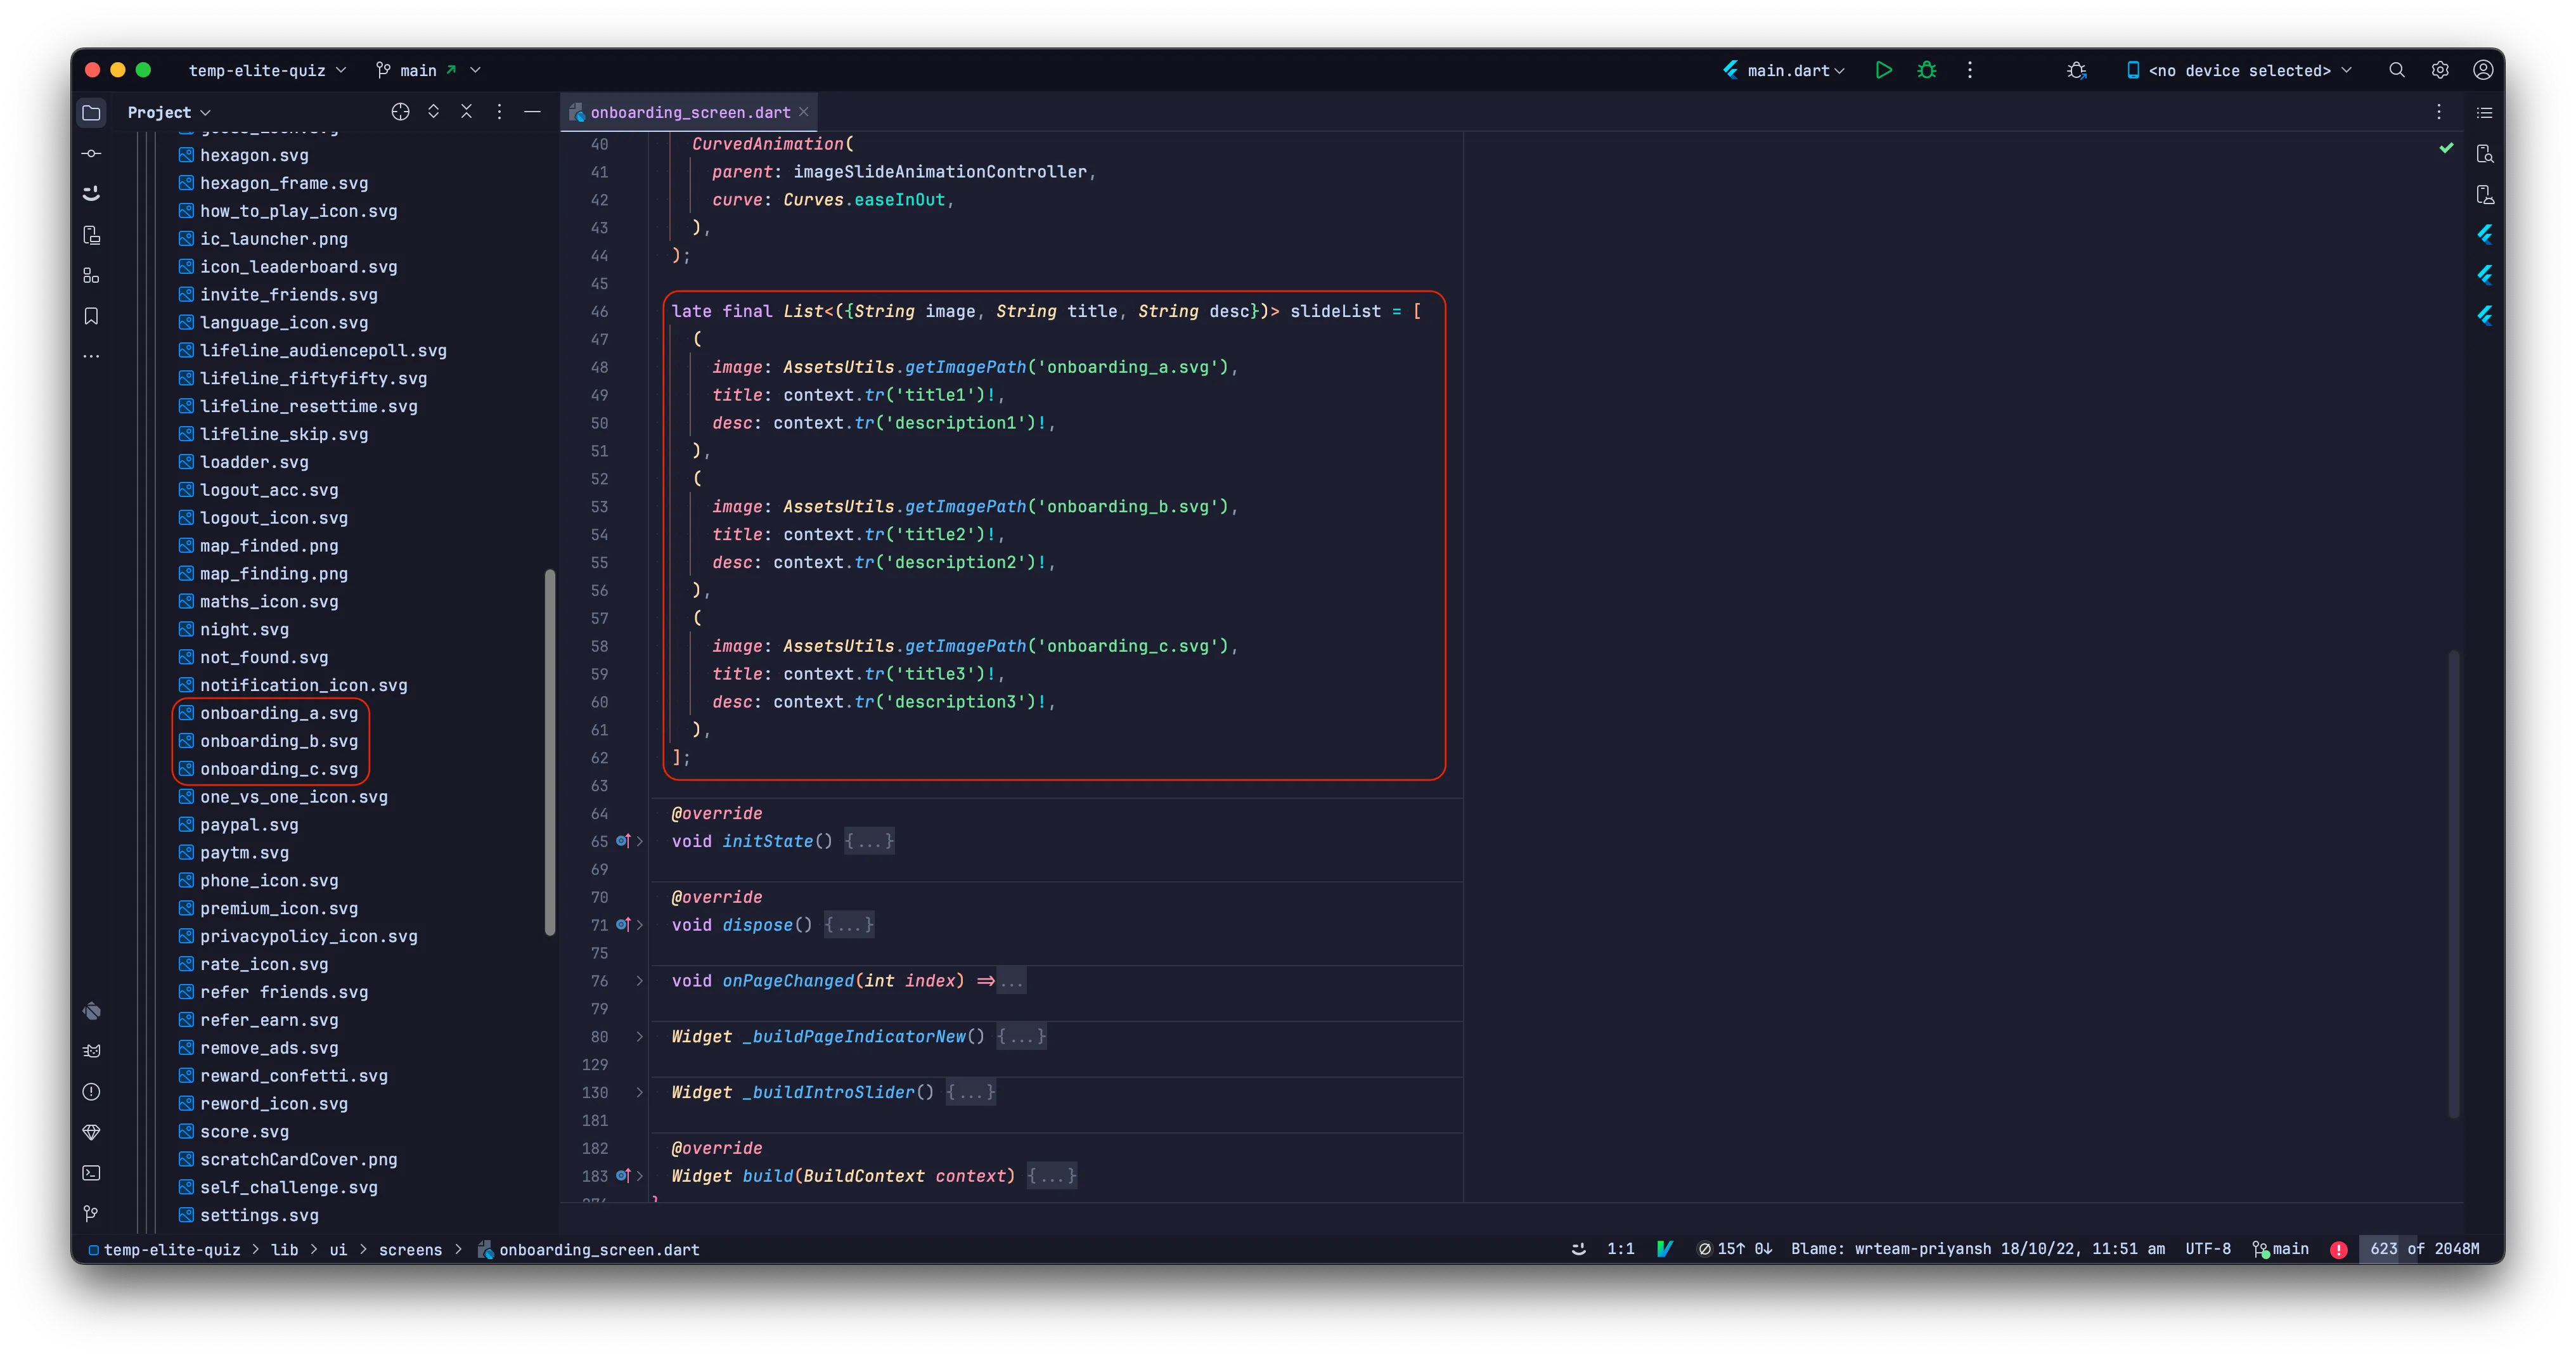
Change intro slider images
assets/images
folder using the same filenames shown in the images.
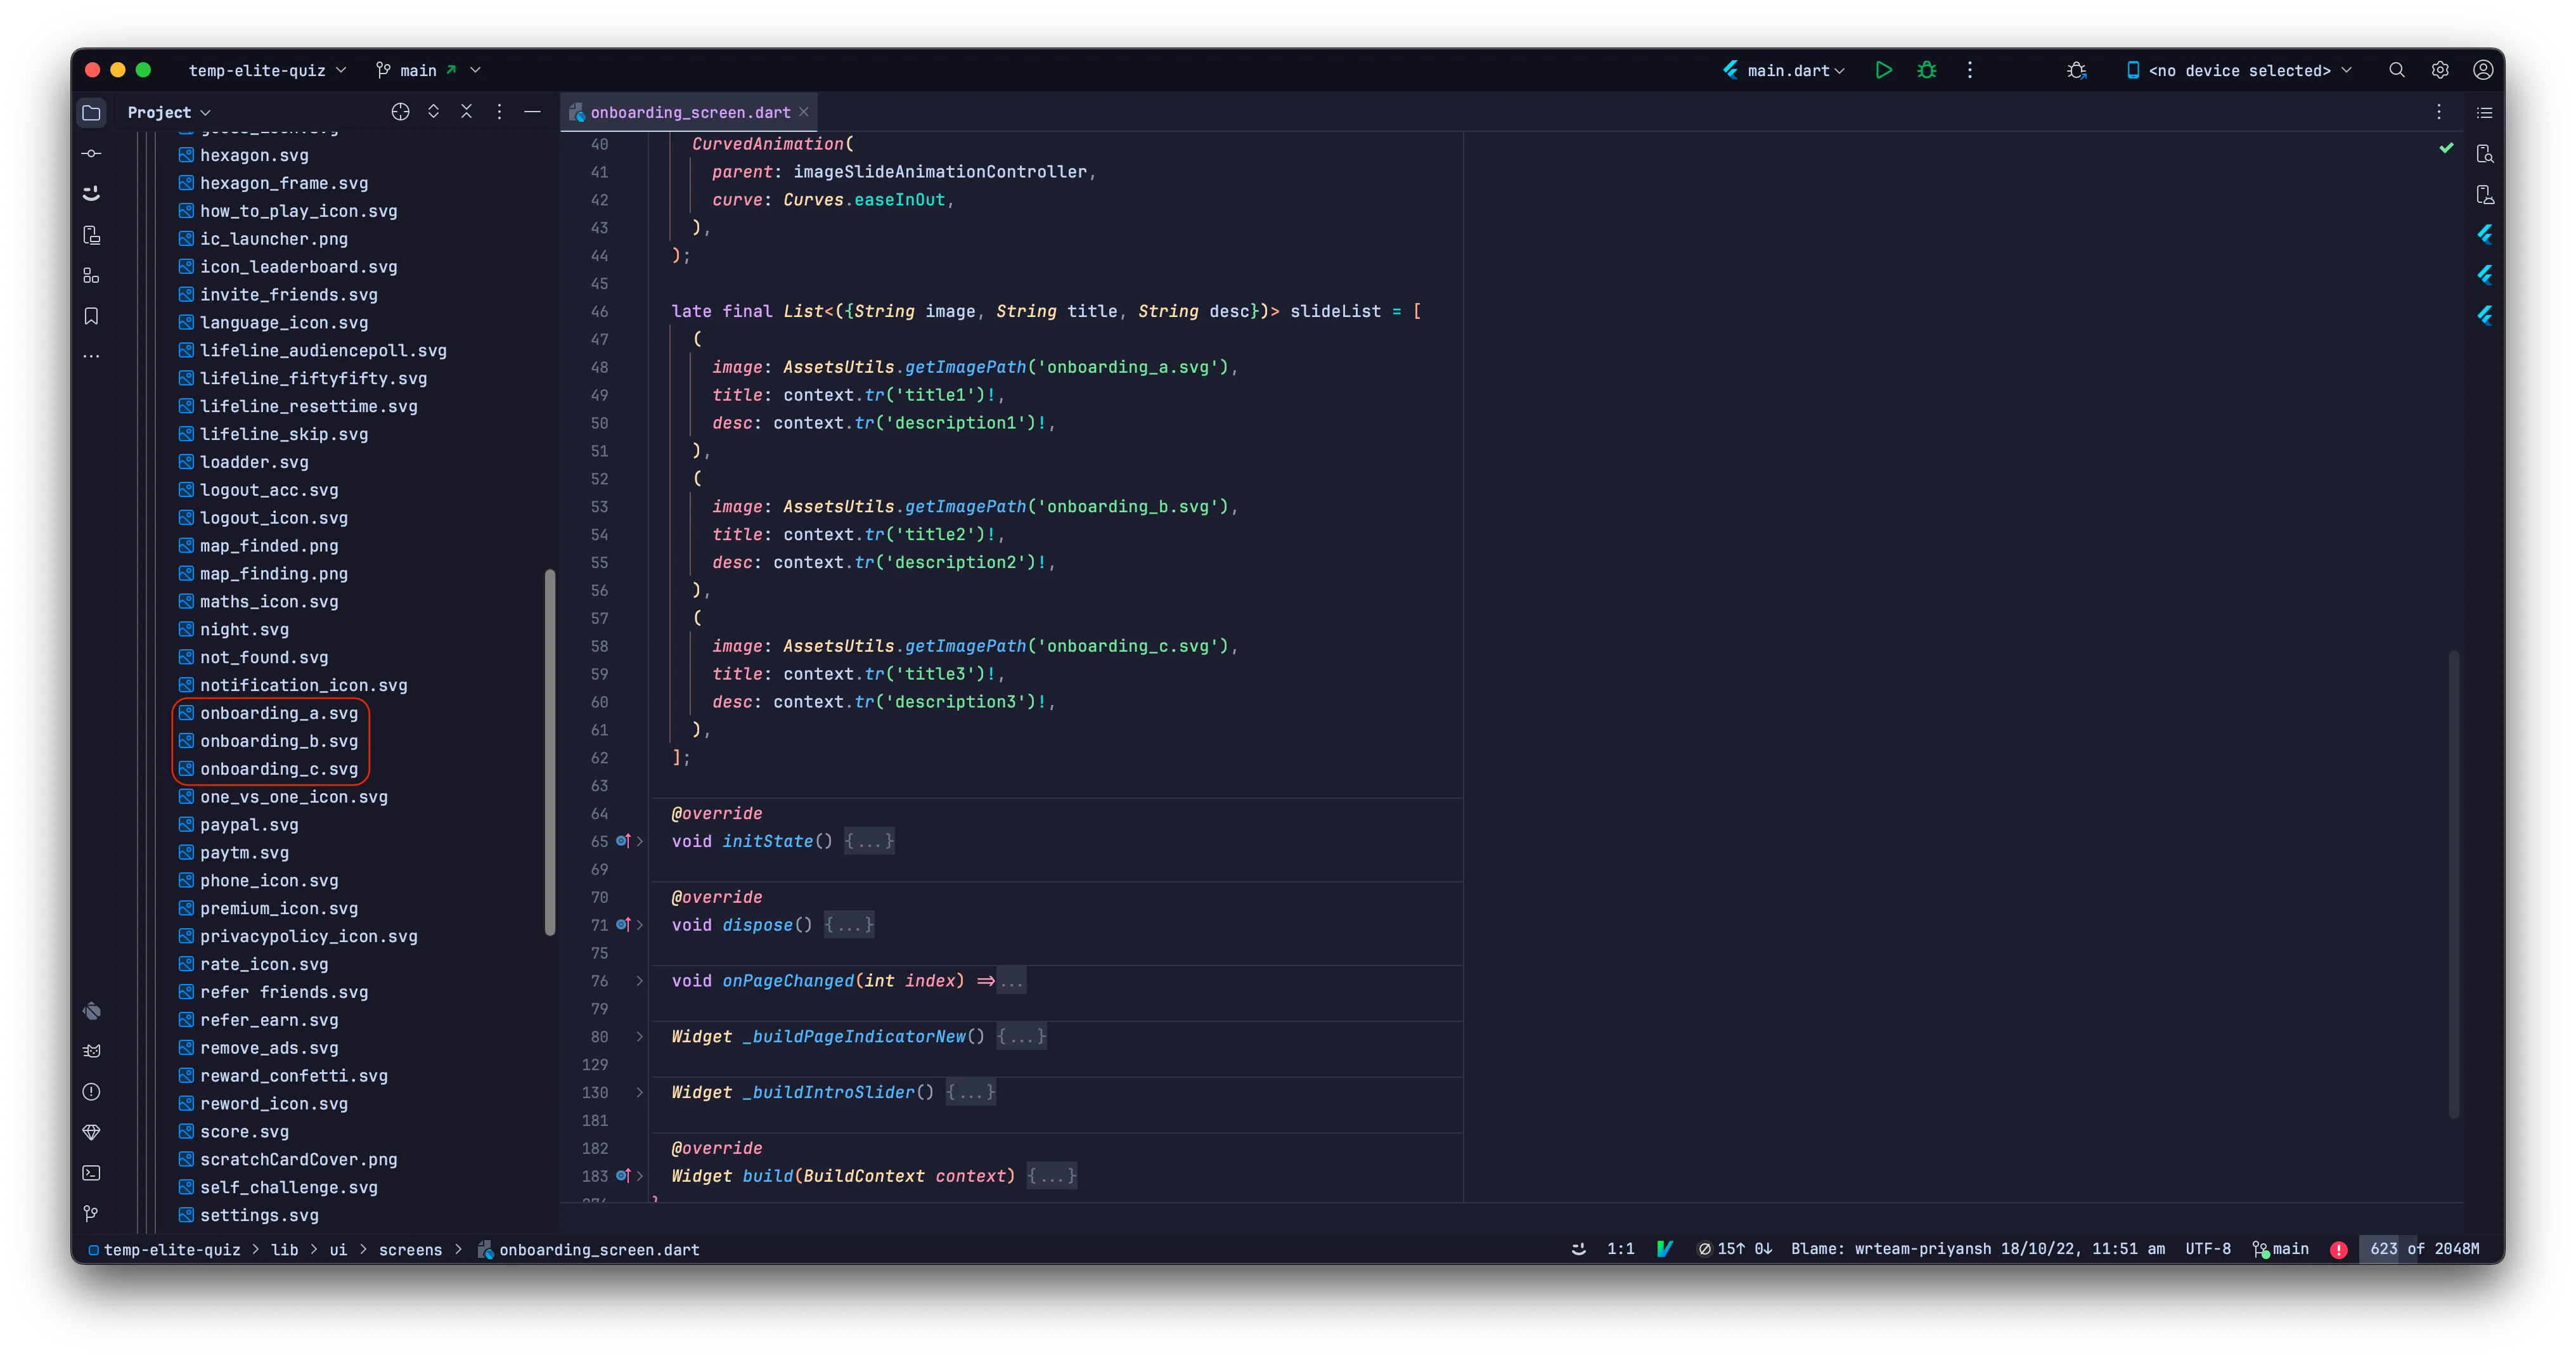
lib/ui/screens/onboarding_screen.dart
Change default profile avatar images
-
Update Avatars in
assets/images/profilefolder using the same filenames preferably shown in the images.
-
Then add those filenames in
assets/files/defaultProfileImages.jsonfile.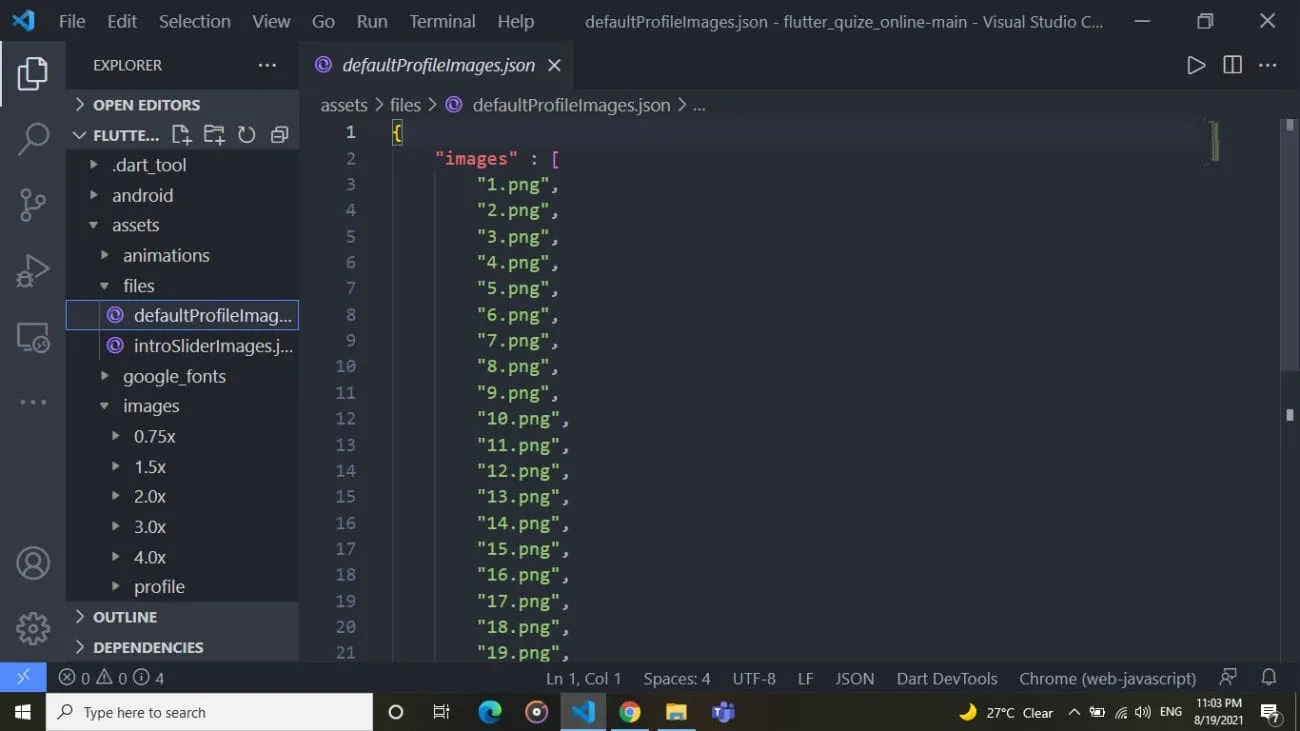
Configure In-App purchases
For In App Products to show up in the app, first you will need to at least publish the app in closed or internal testing, and create products in app store and/or play console. then create the same products with same product_id in admin panel. remember product_id should be same in admin panel products and app store/play console.
Once you have created IAP(In-App-Purchase) Products in app store/play console and in admin panel and published the app in closed/internal testing. verify that it is showing up in the app.
Follow the below given resources for creating IAP in app store / play console. and in admin panel
For creating in-app purchase products refer to the documentation here: Apple, Google
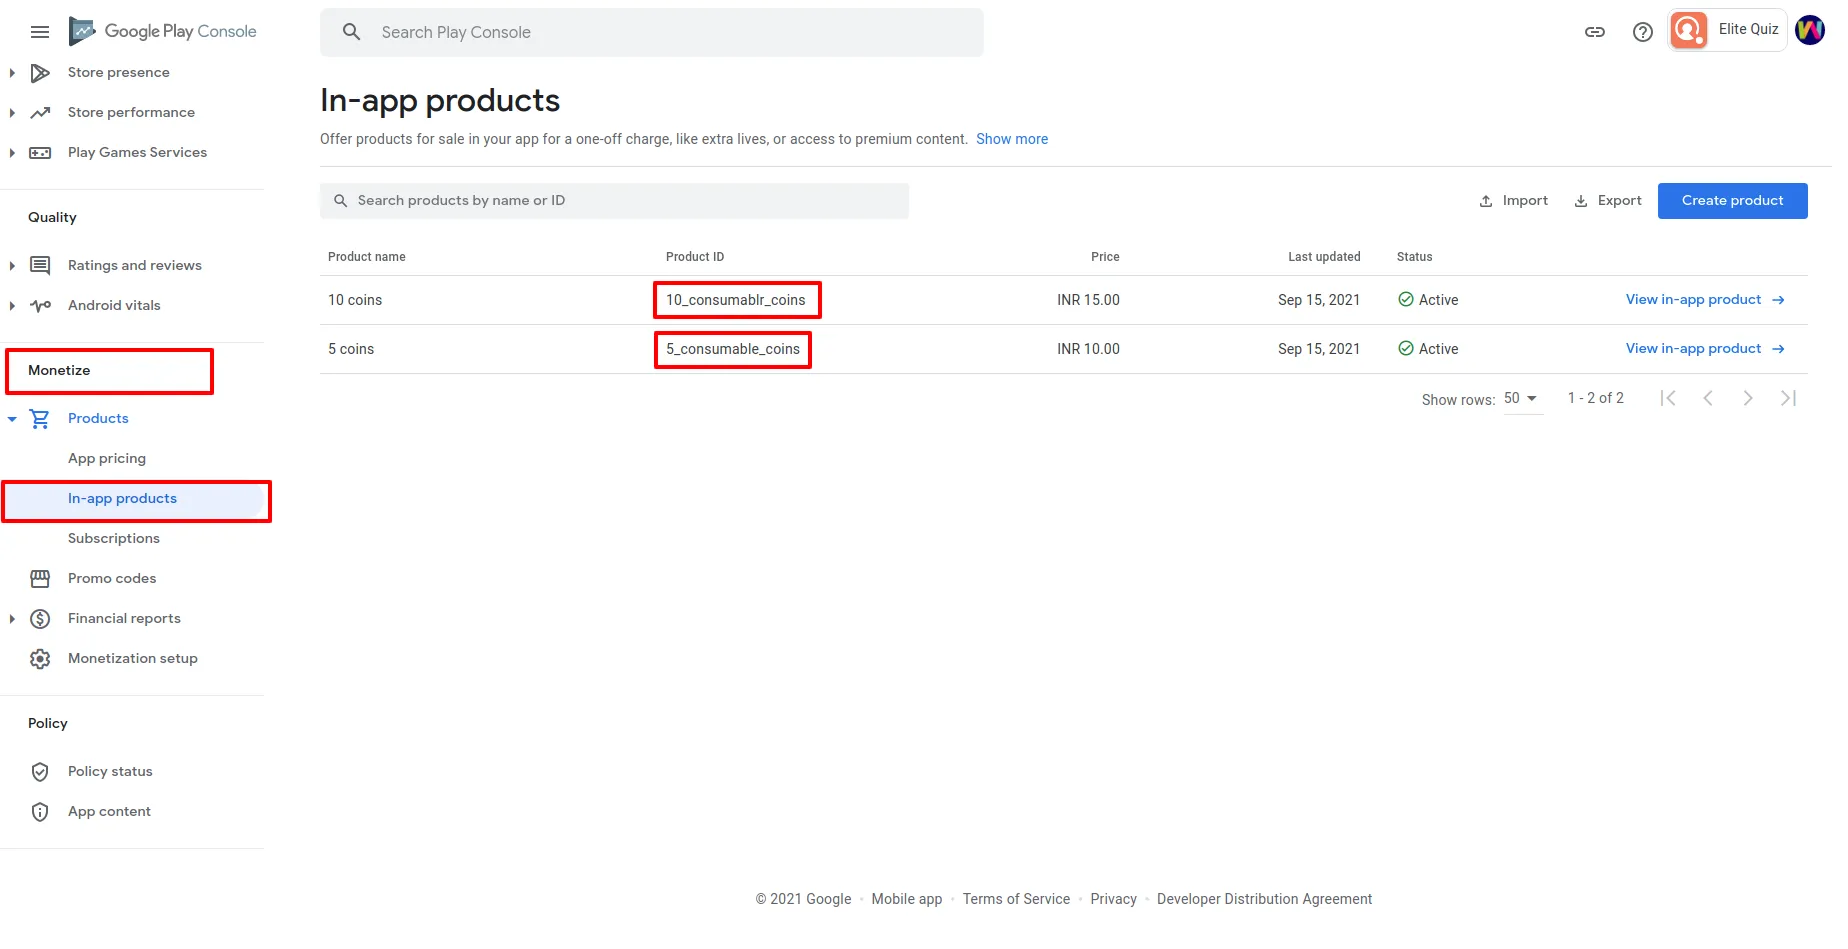
For android (Play Store)
-
Upload your application to the Play Store and create in-app products as shown
in the image. Ensure that the ID of consumable products in both Apple and Play
Store is the same.
For IOS (App Store)
-
Open the
iosfolder of the project into Xcode. Go to Capabilities. And enable "In-App Purchase" as shown in image.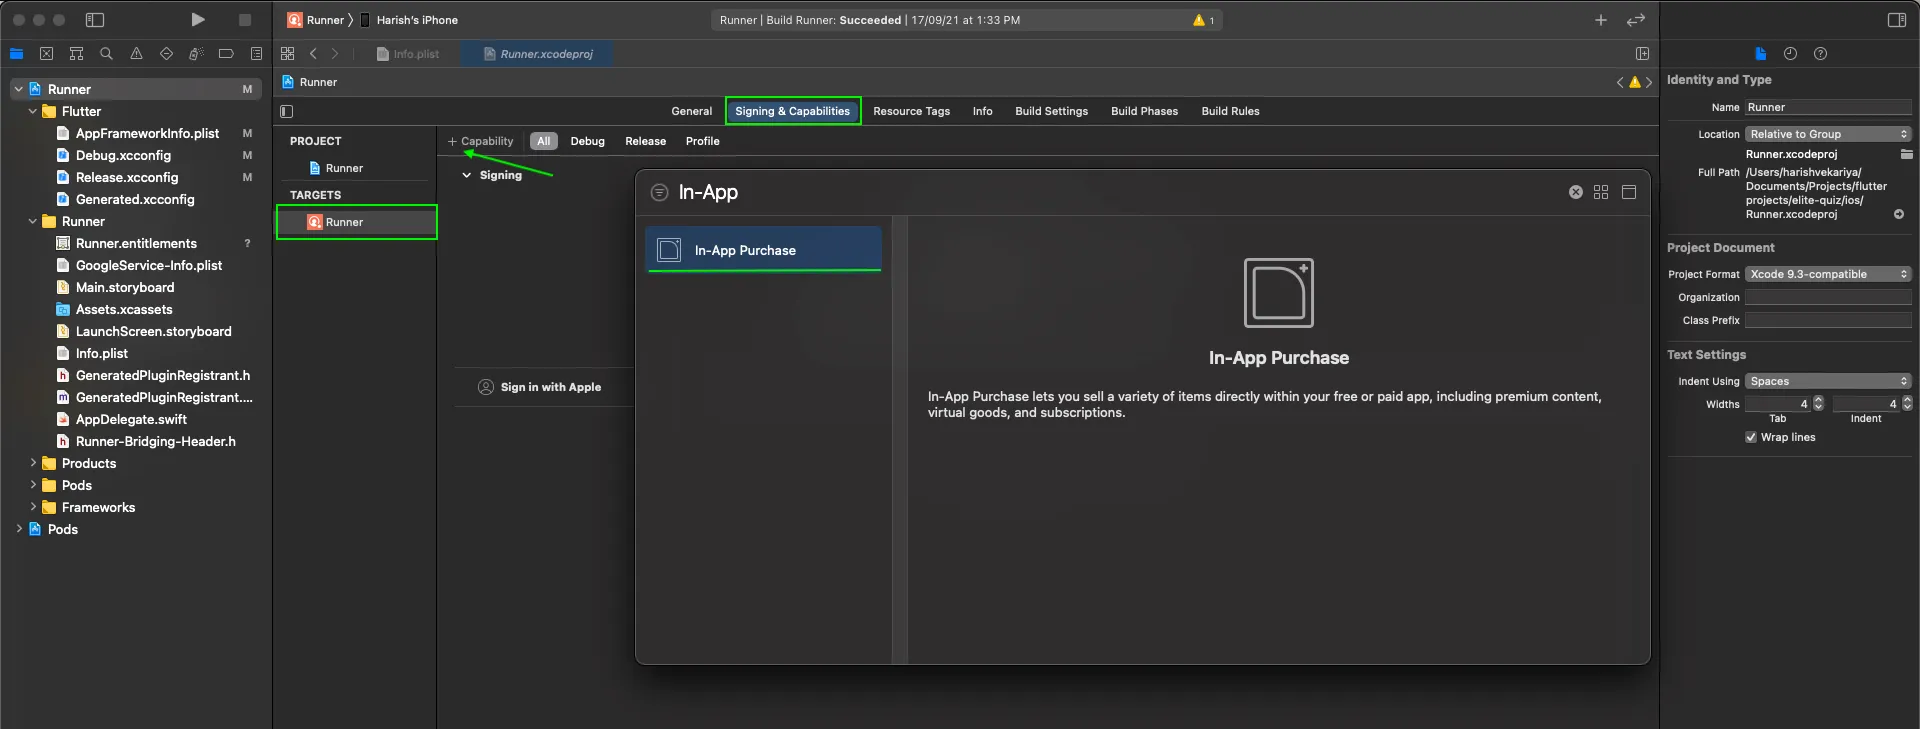
-
use the following links to get help enabling in-app purchases:
https://help.apple.com/app-store-connect/#/devae49fb316
https://help.apple.com/app-store-connect/#/devb57be10e7
For further assistance, refer to the official Apple Developer documentation on in-app purchases at: https://developer.apple.com/in-app-purchase/
Add In-App products from Admin Panel
-
Then After creating in-app purchase products, add their respective coins and
productIds in
Admin Panel > Settings > Coin Store Settingsas shown in image.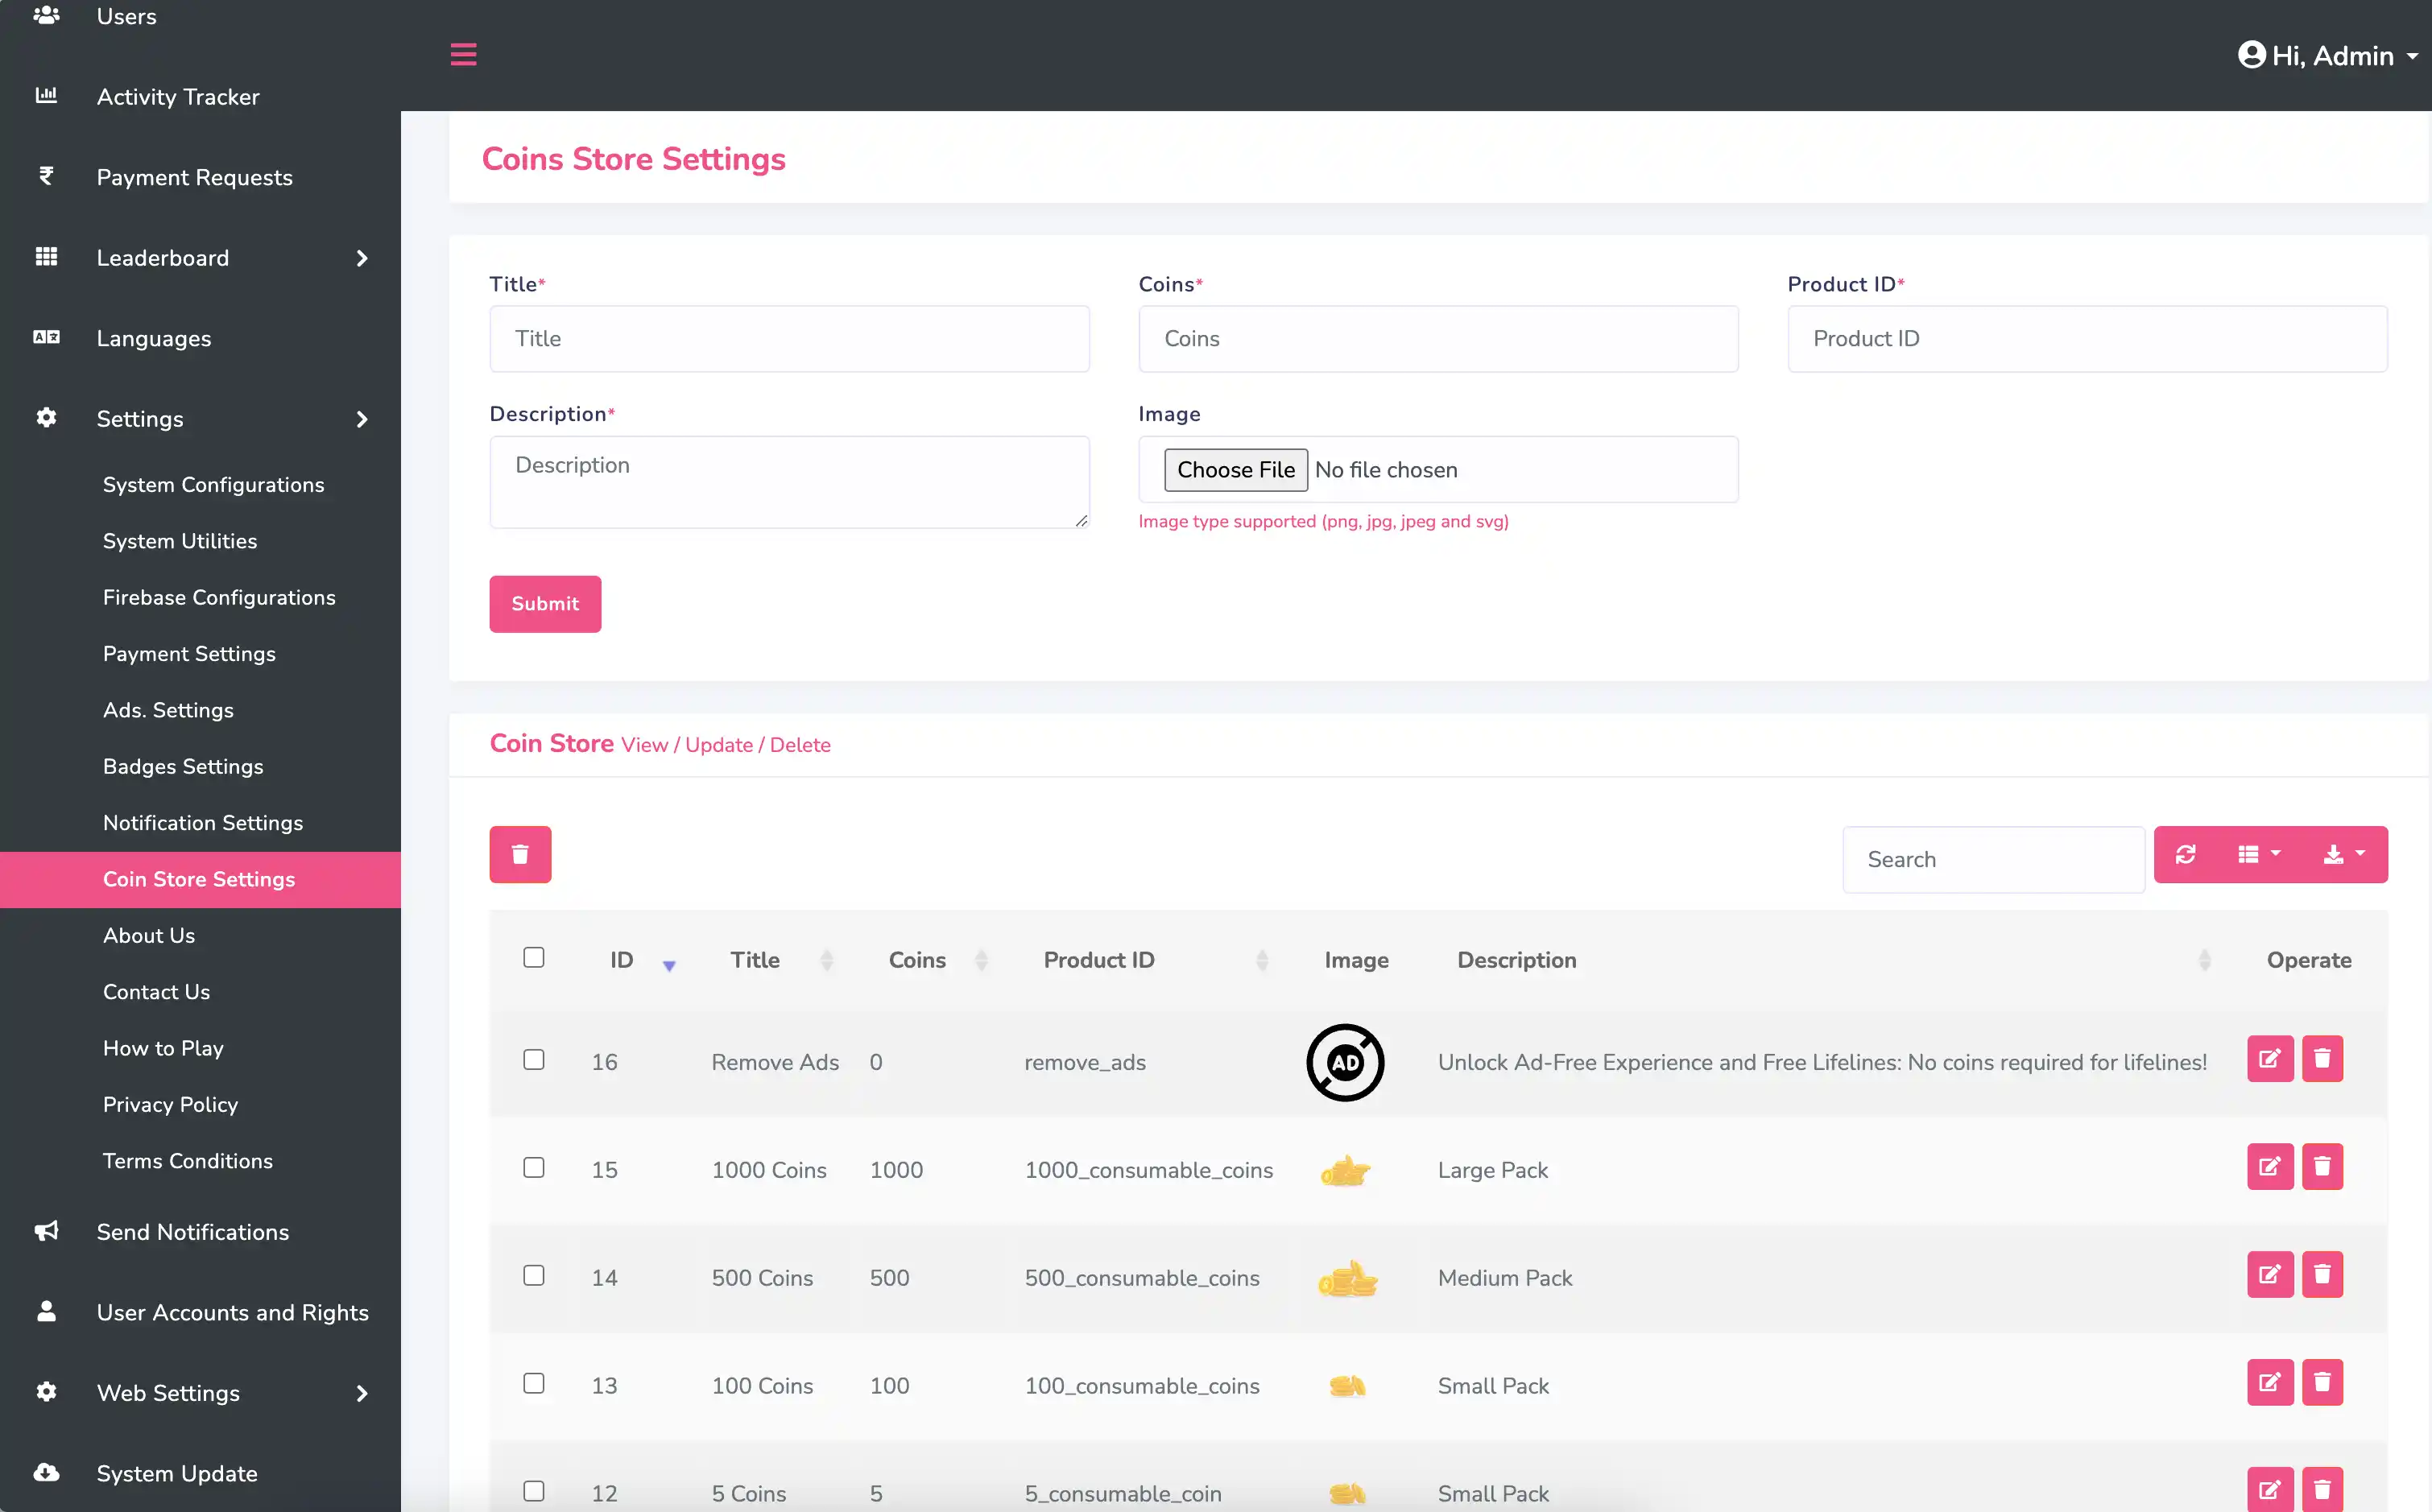
Then you will need to do some further configuration for both android and ios, so that IAP purchases can be verified from the server side.
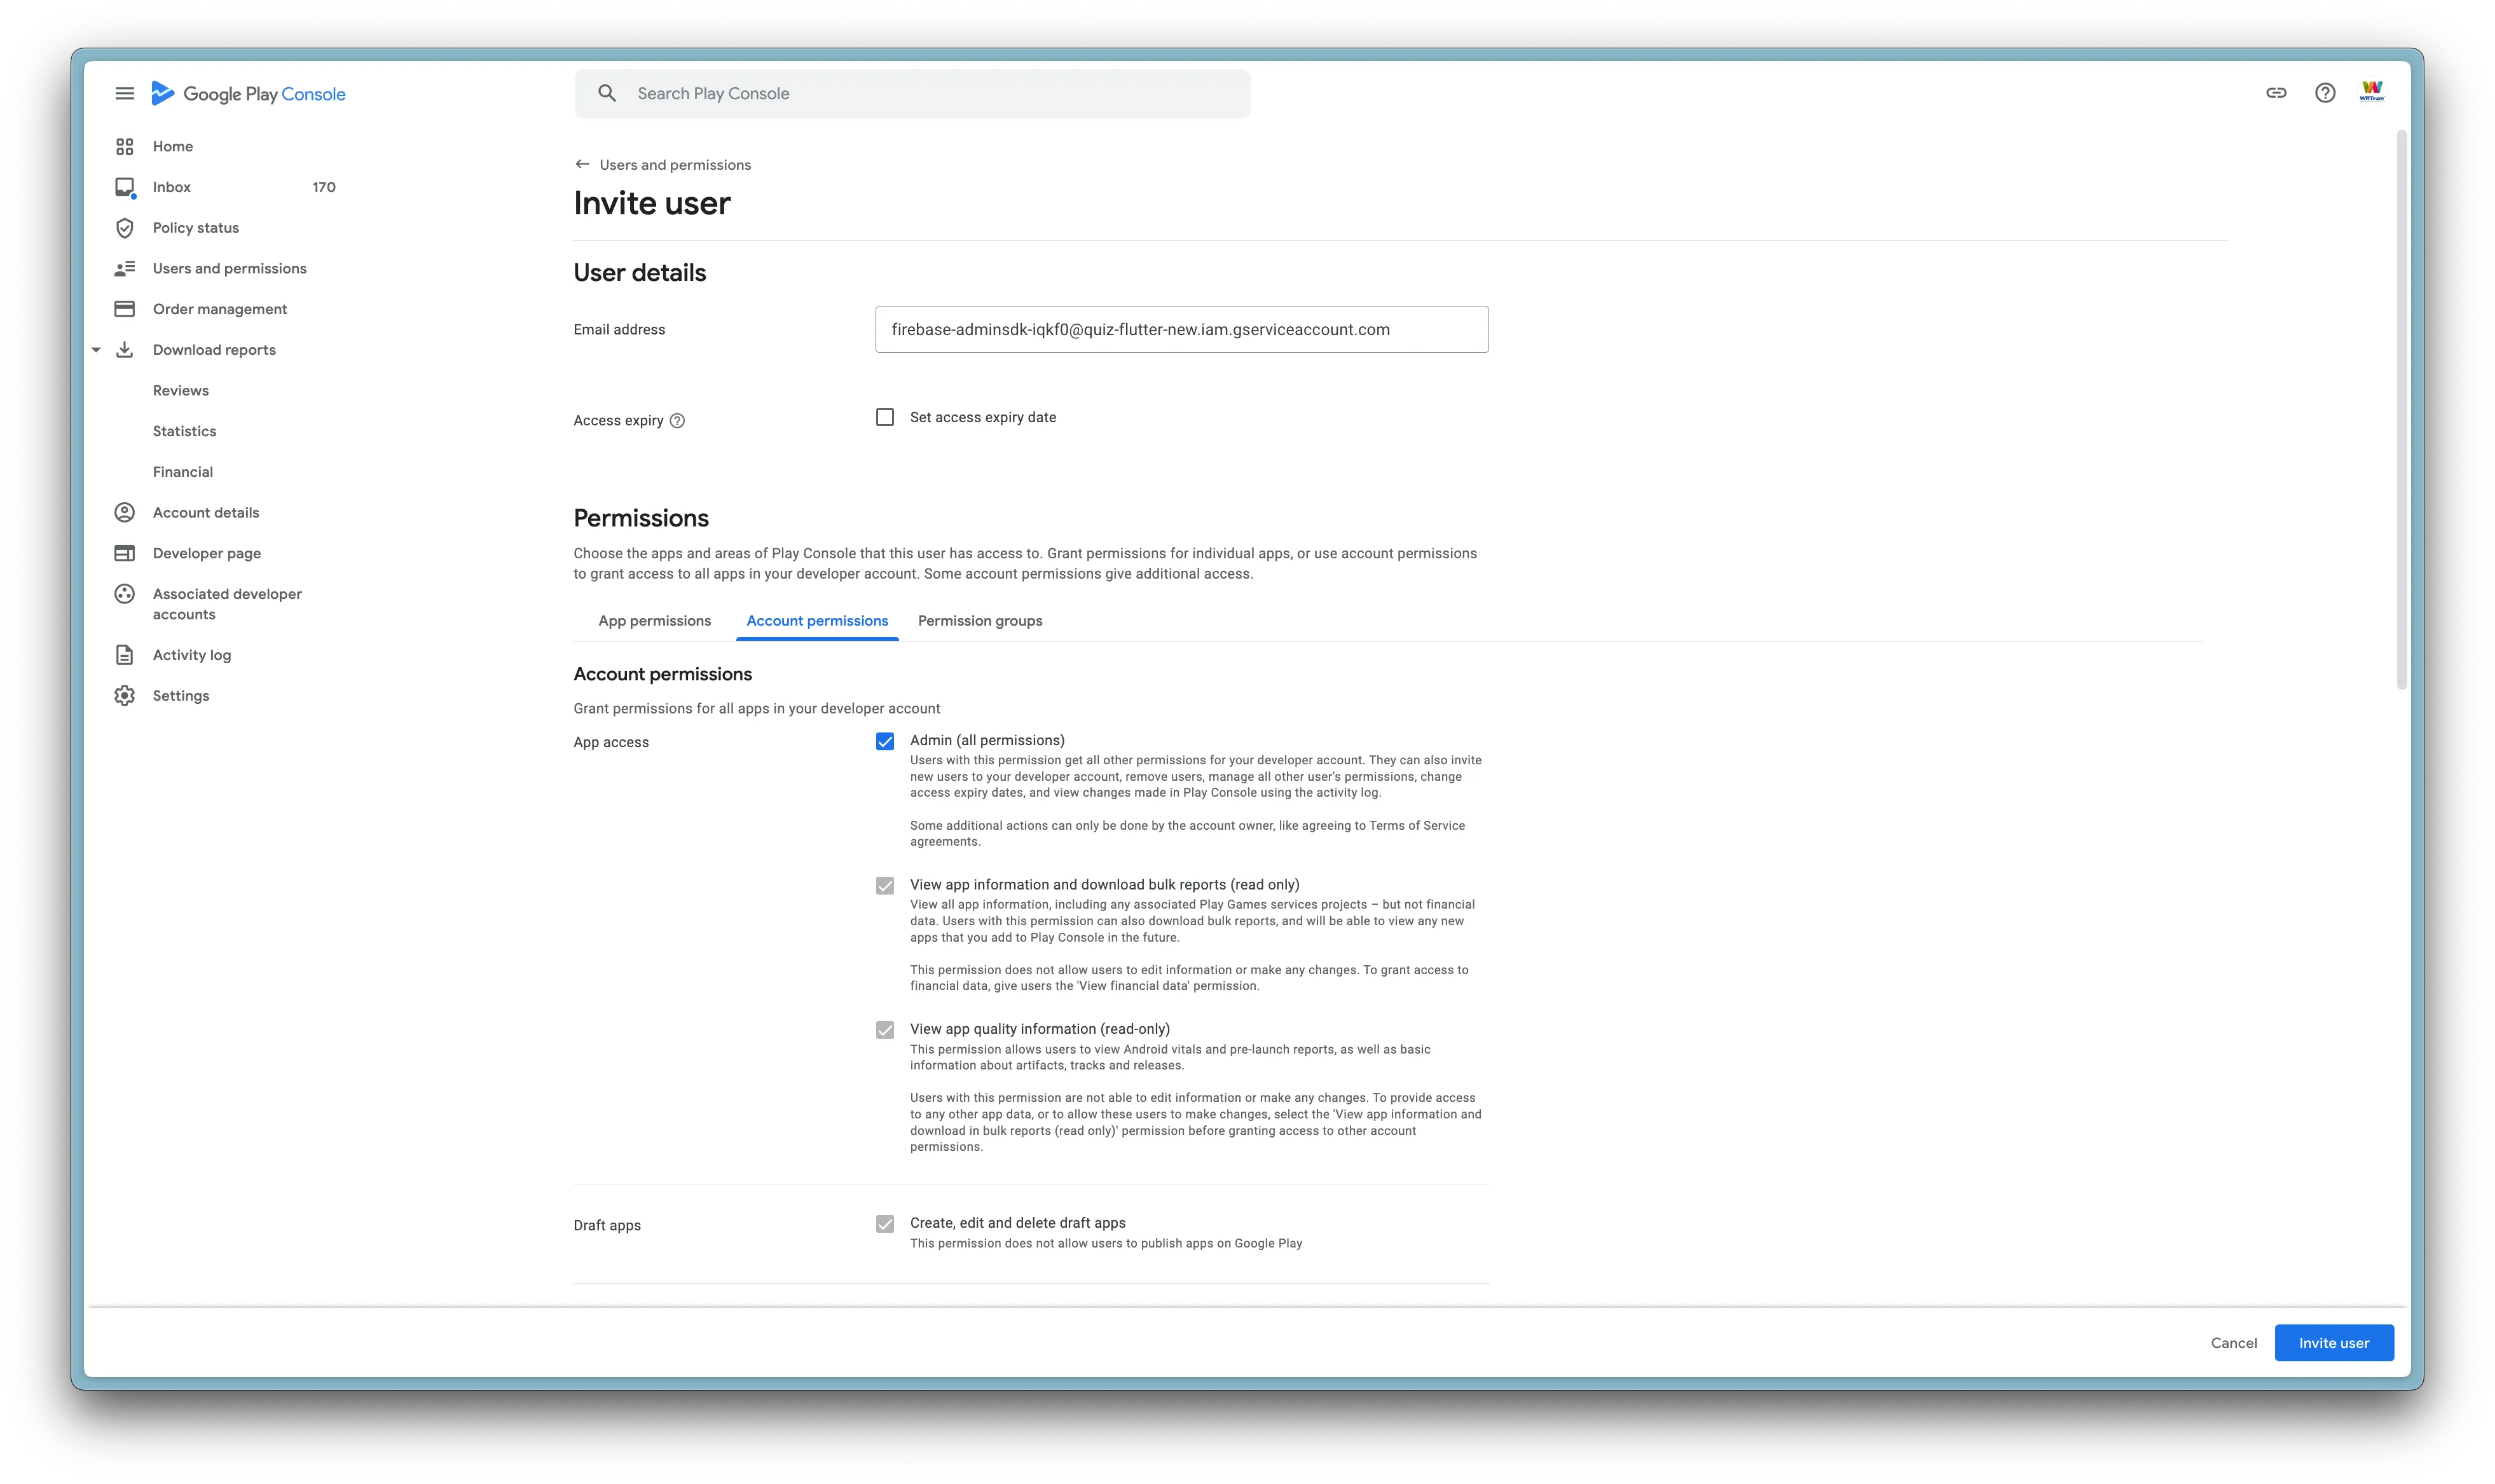
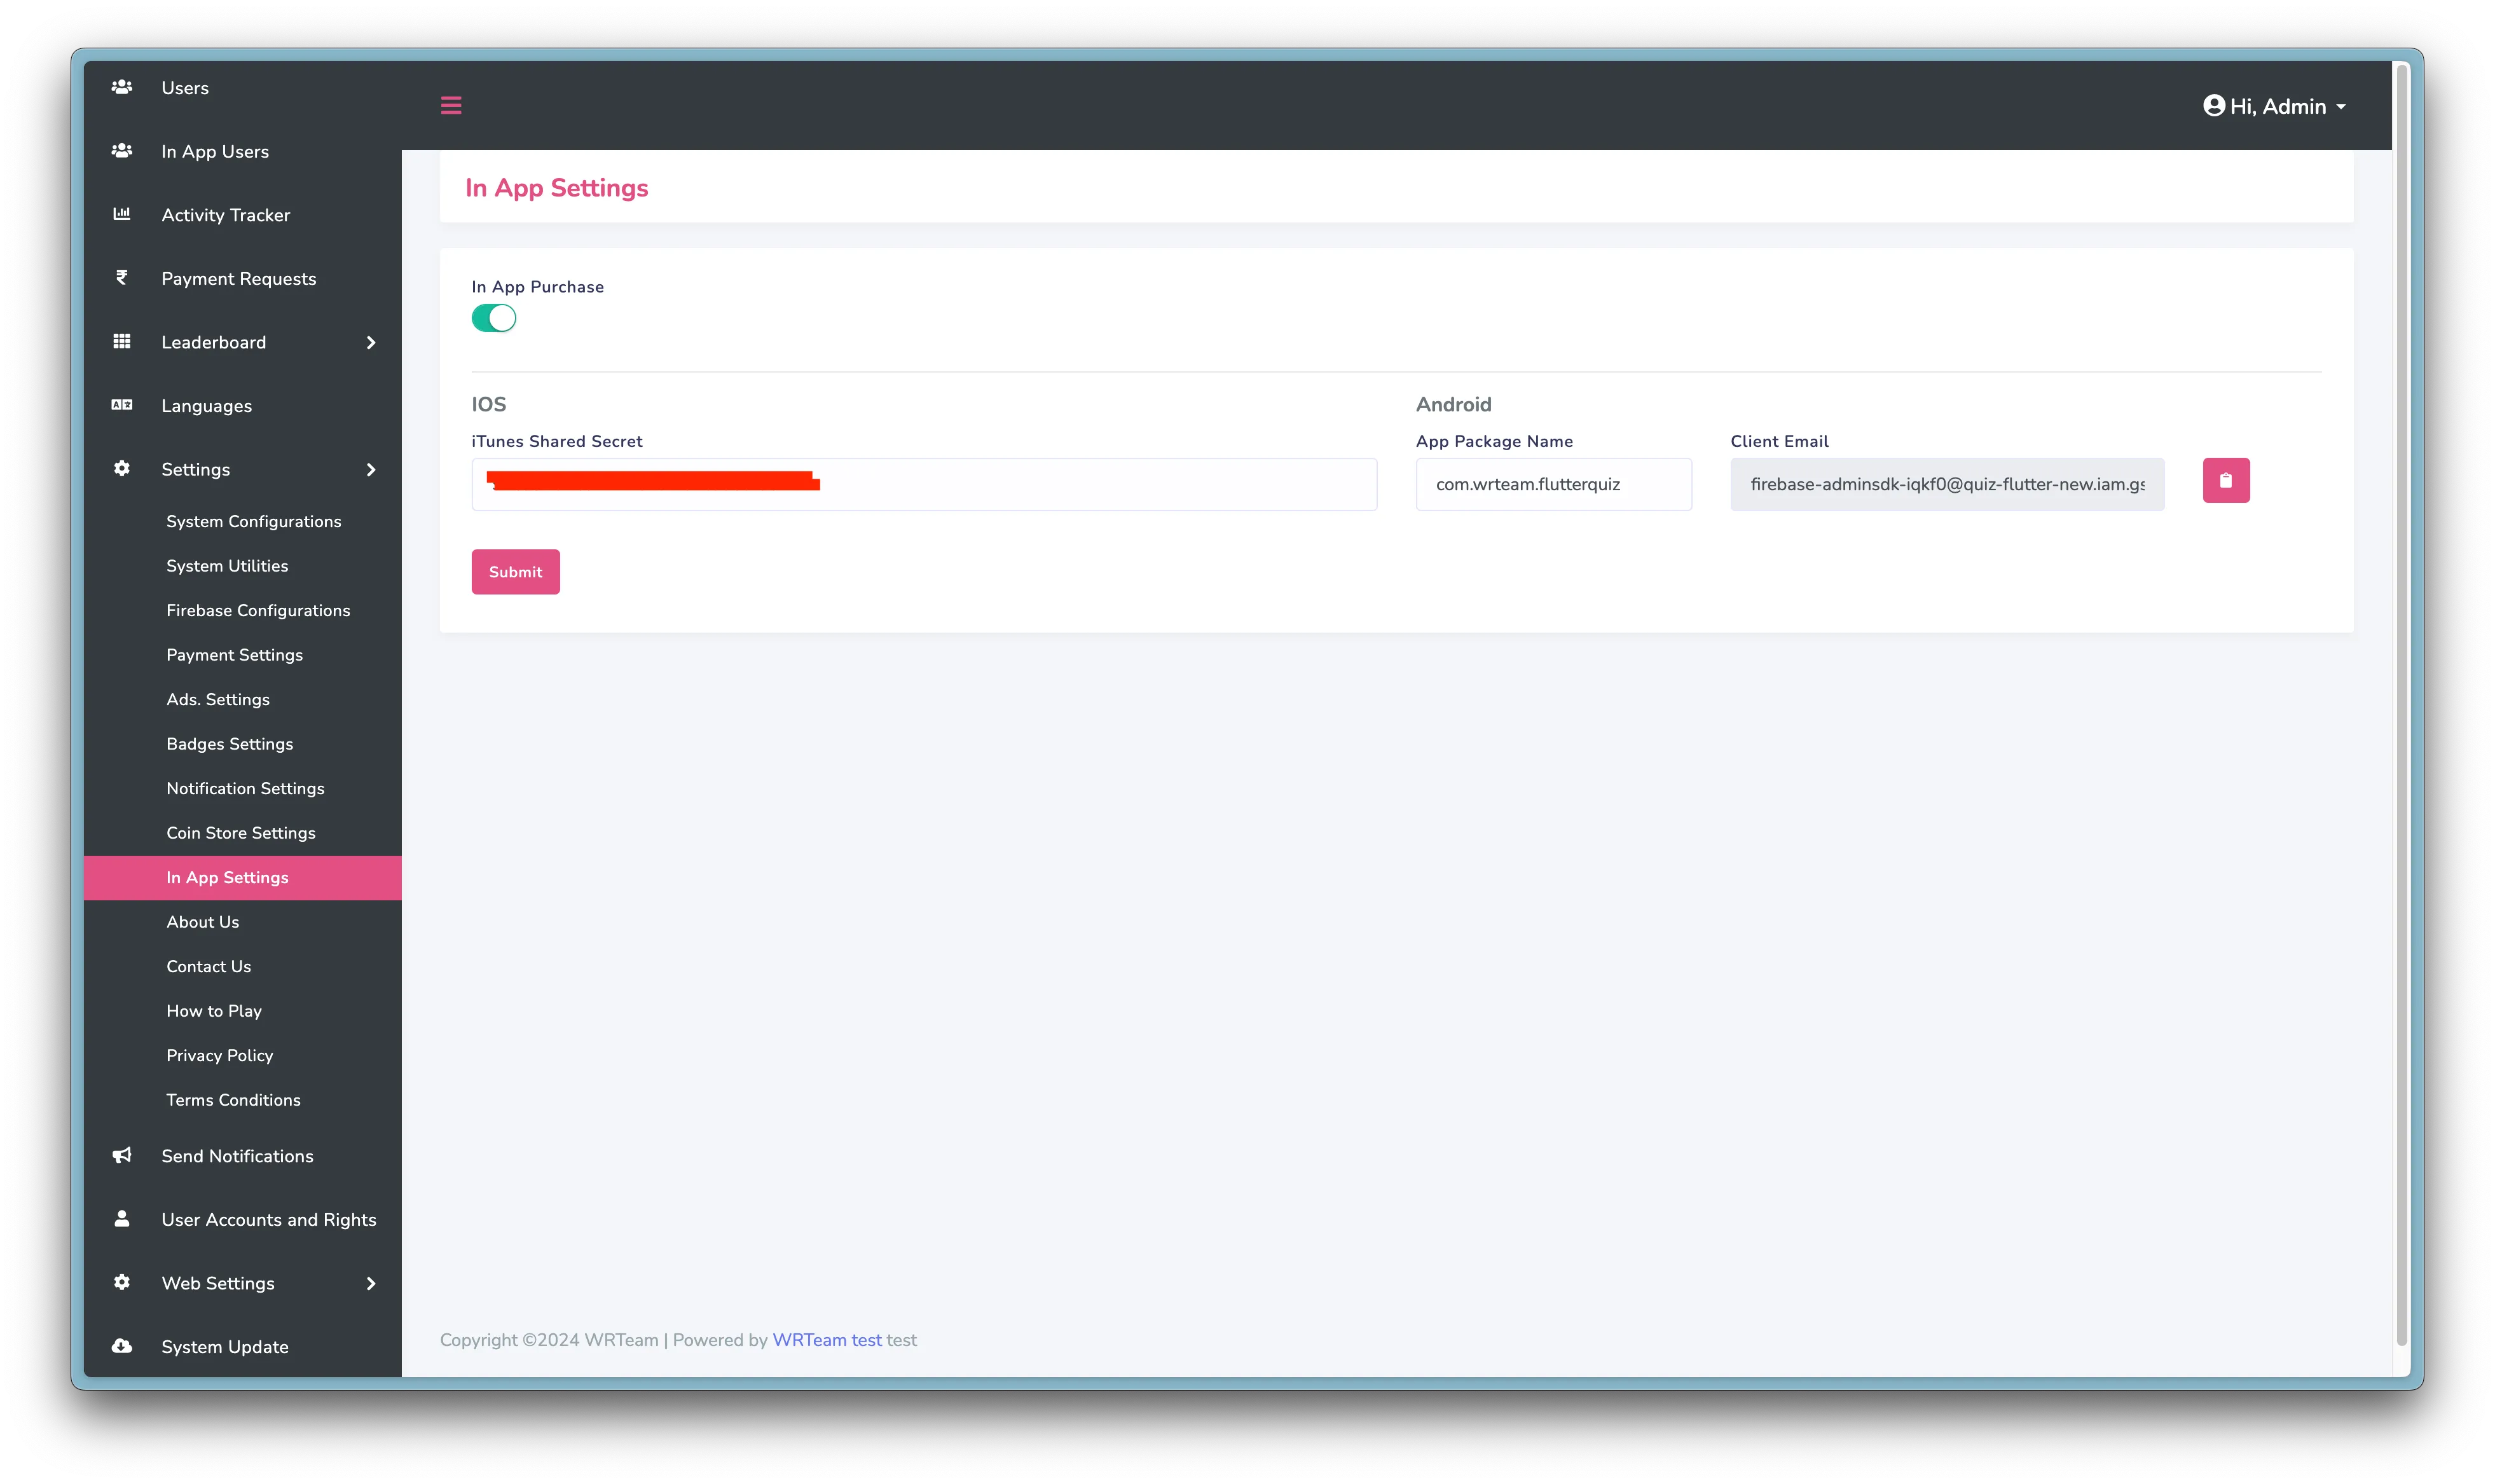
For Android- go to
Admin Panel > Settings > In App Settings - Add the Android App package name
- and copy the Client Email
- Open Play Console and go to Users and Permissions click Invite new Users
-
Paste the email into the Email Address field and for Account Permission give
it
Admin permission. as shown in the image.
-
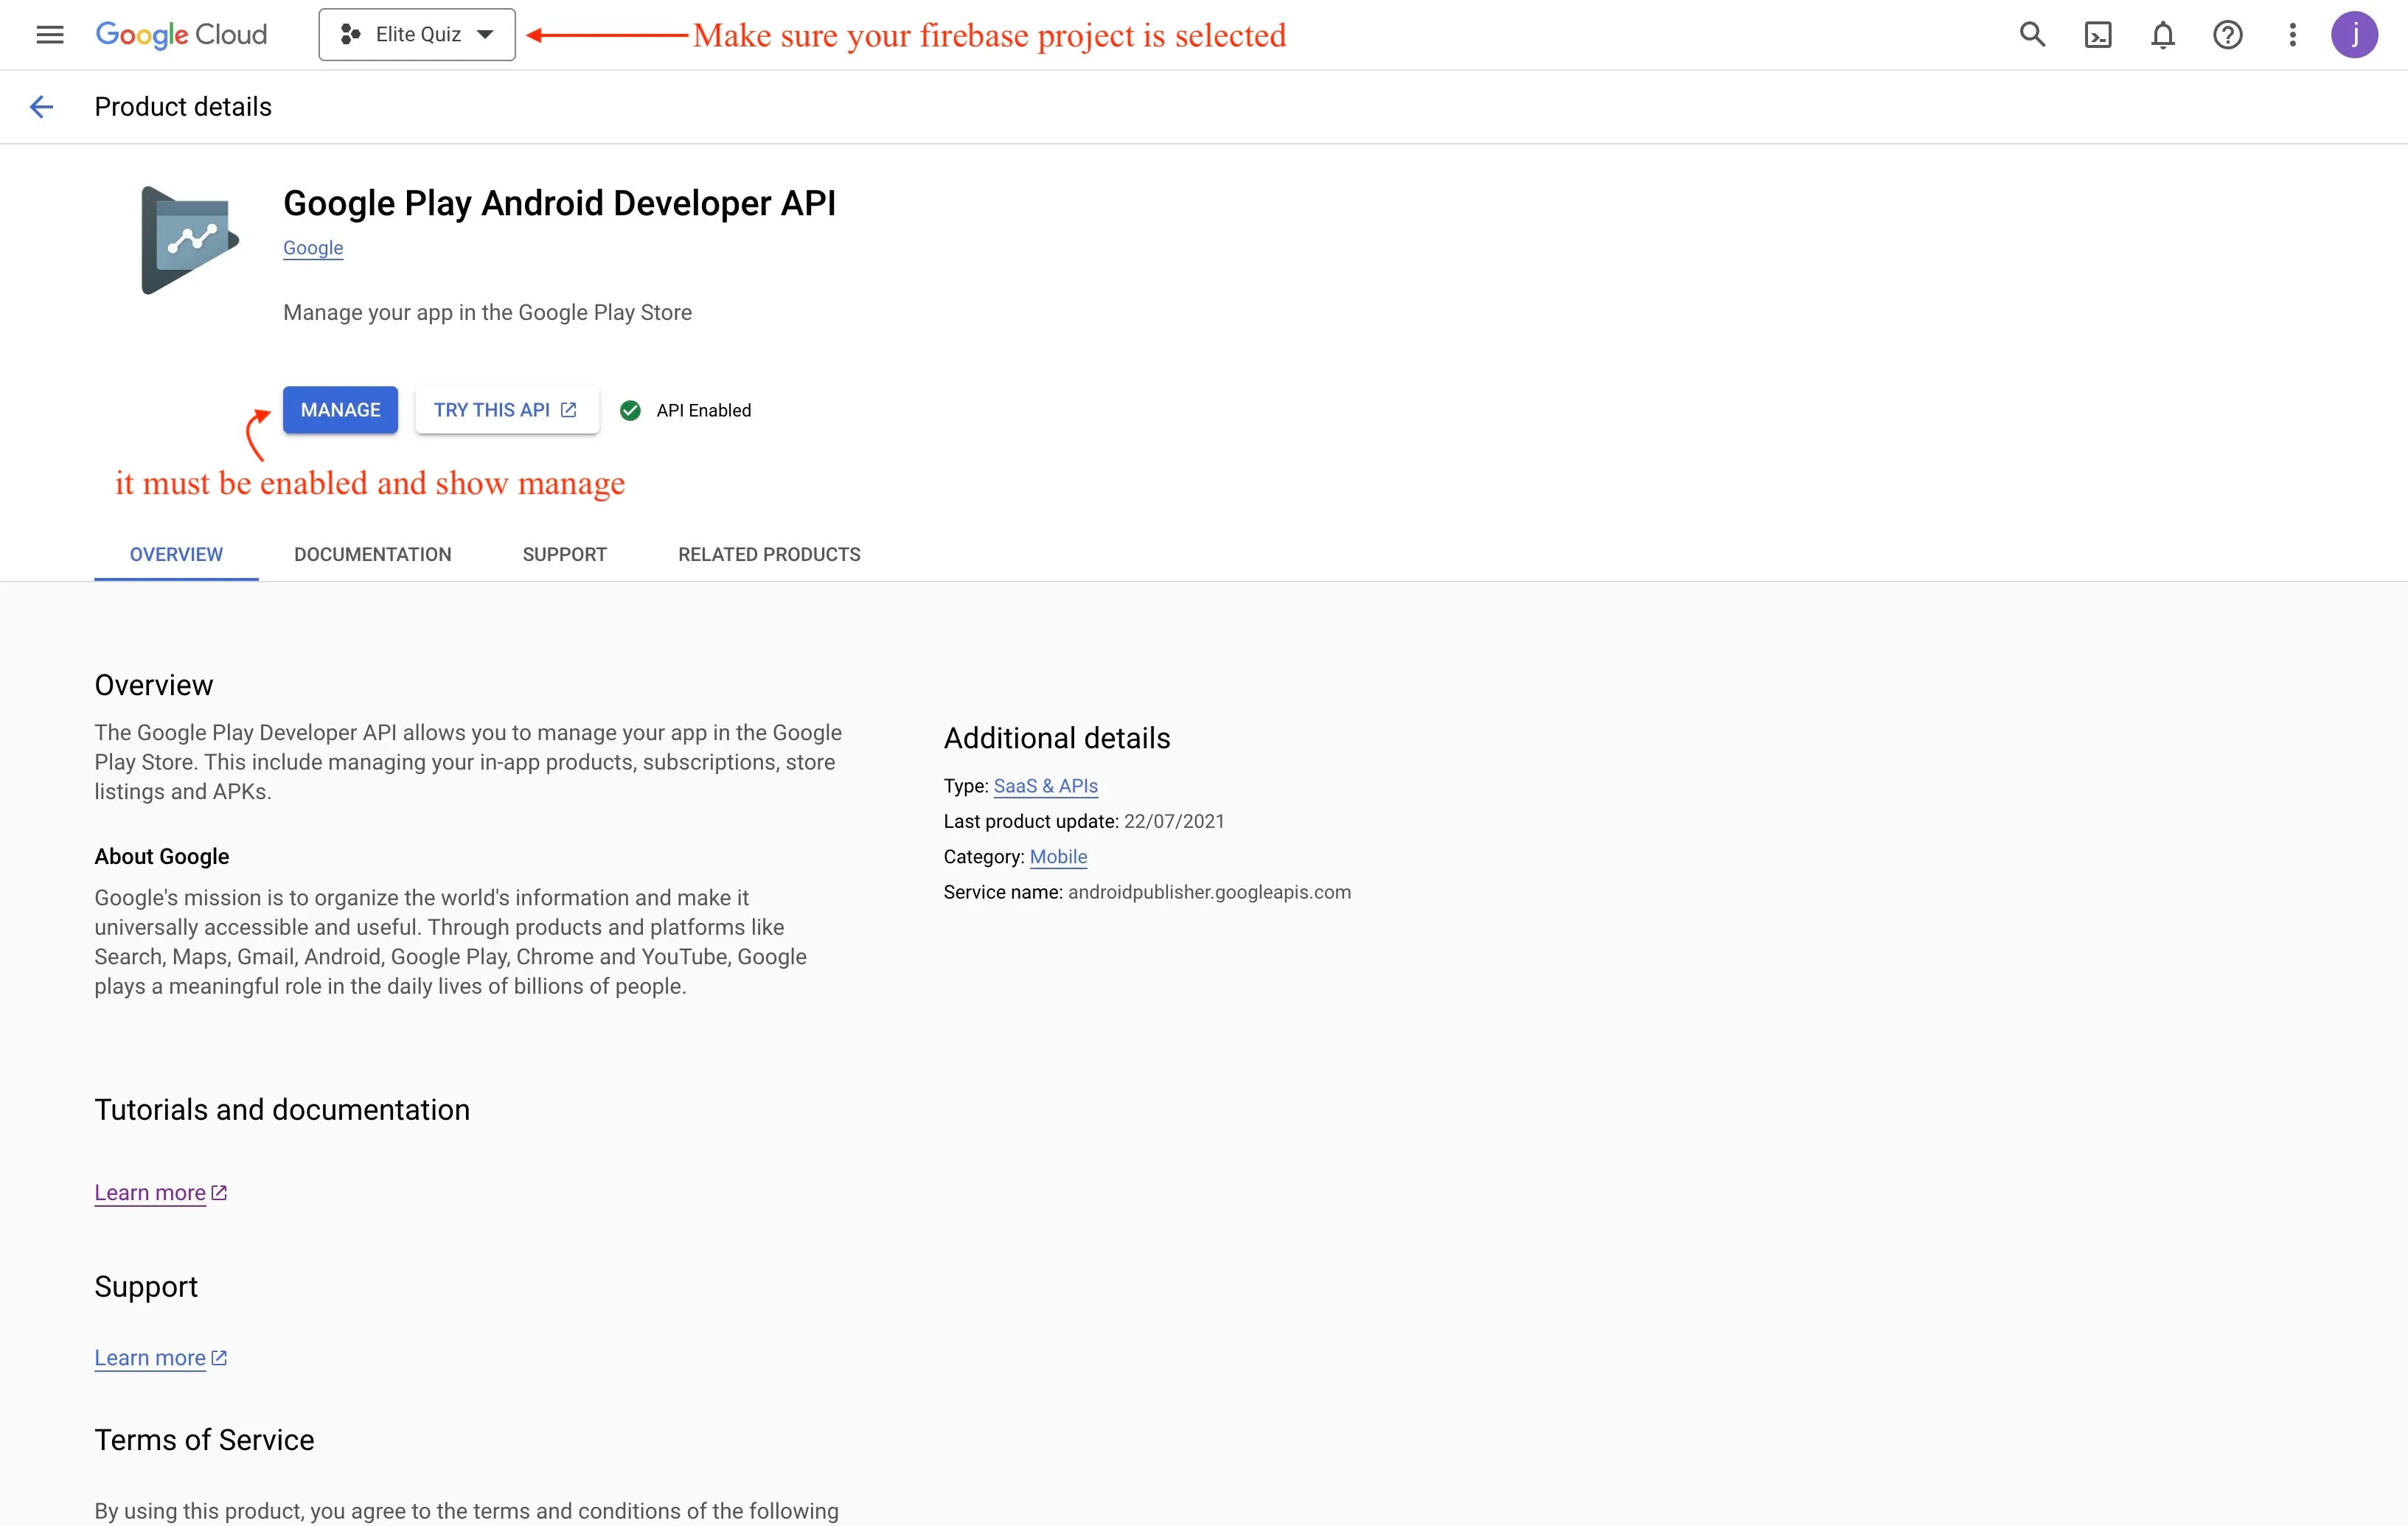
Go to your
Google Console to Android Developer API page
and make sure your project is selected select your project from top dropdown.
make sure it is enabled. if not enable it.
- Go to App Store Connect and choose your app
- Select "App Information" from the left side menu
- Click "Manage" under App-Specific Shared Secret
- Click Generate and Copy the shared secret
- Paste the copied shared secret in the admin panel in "iTunes Shared Secret"

To Enable Remove Ads feature
-
Create an product with product id of
remove_adsin the admin panel and select its Type to be of Ads. You can use any other product_id but remember to add it in every other places as well.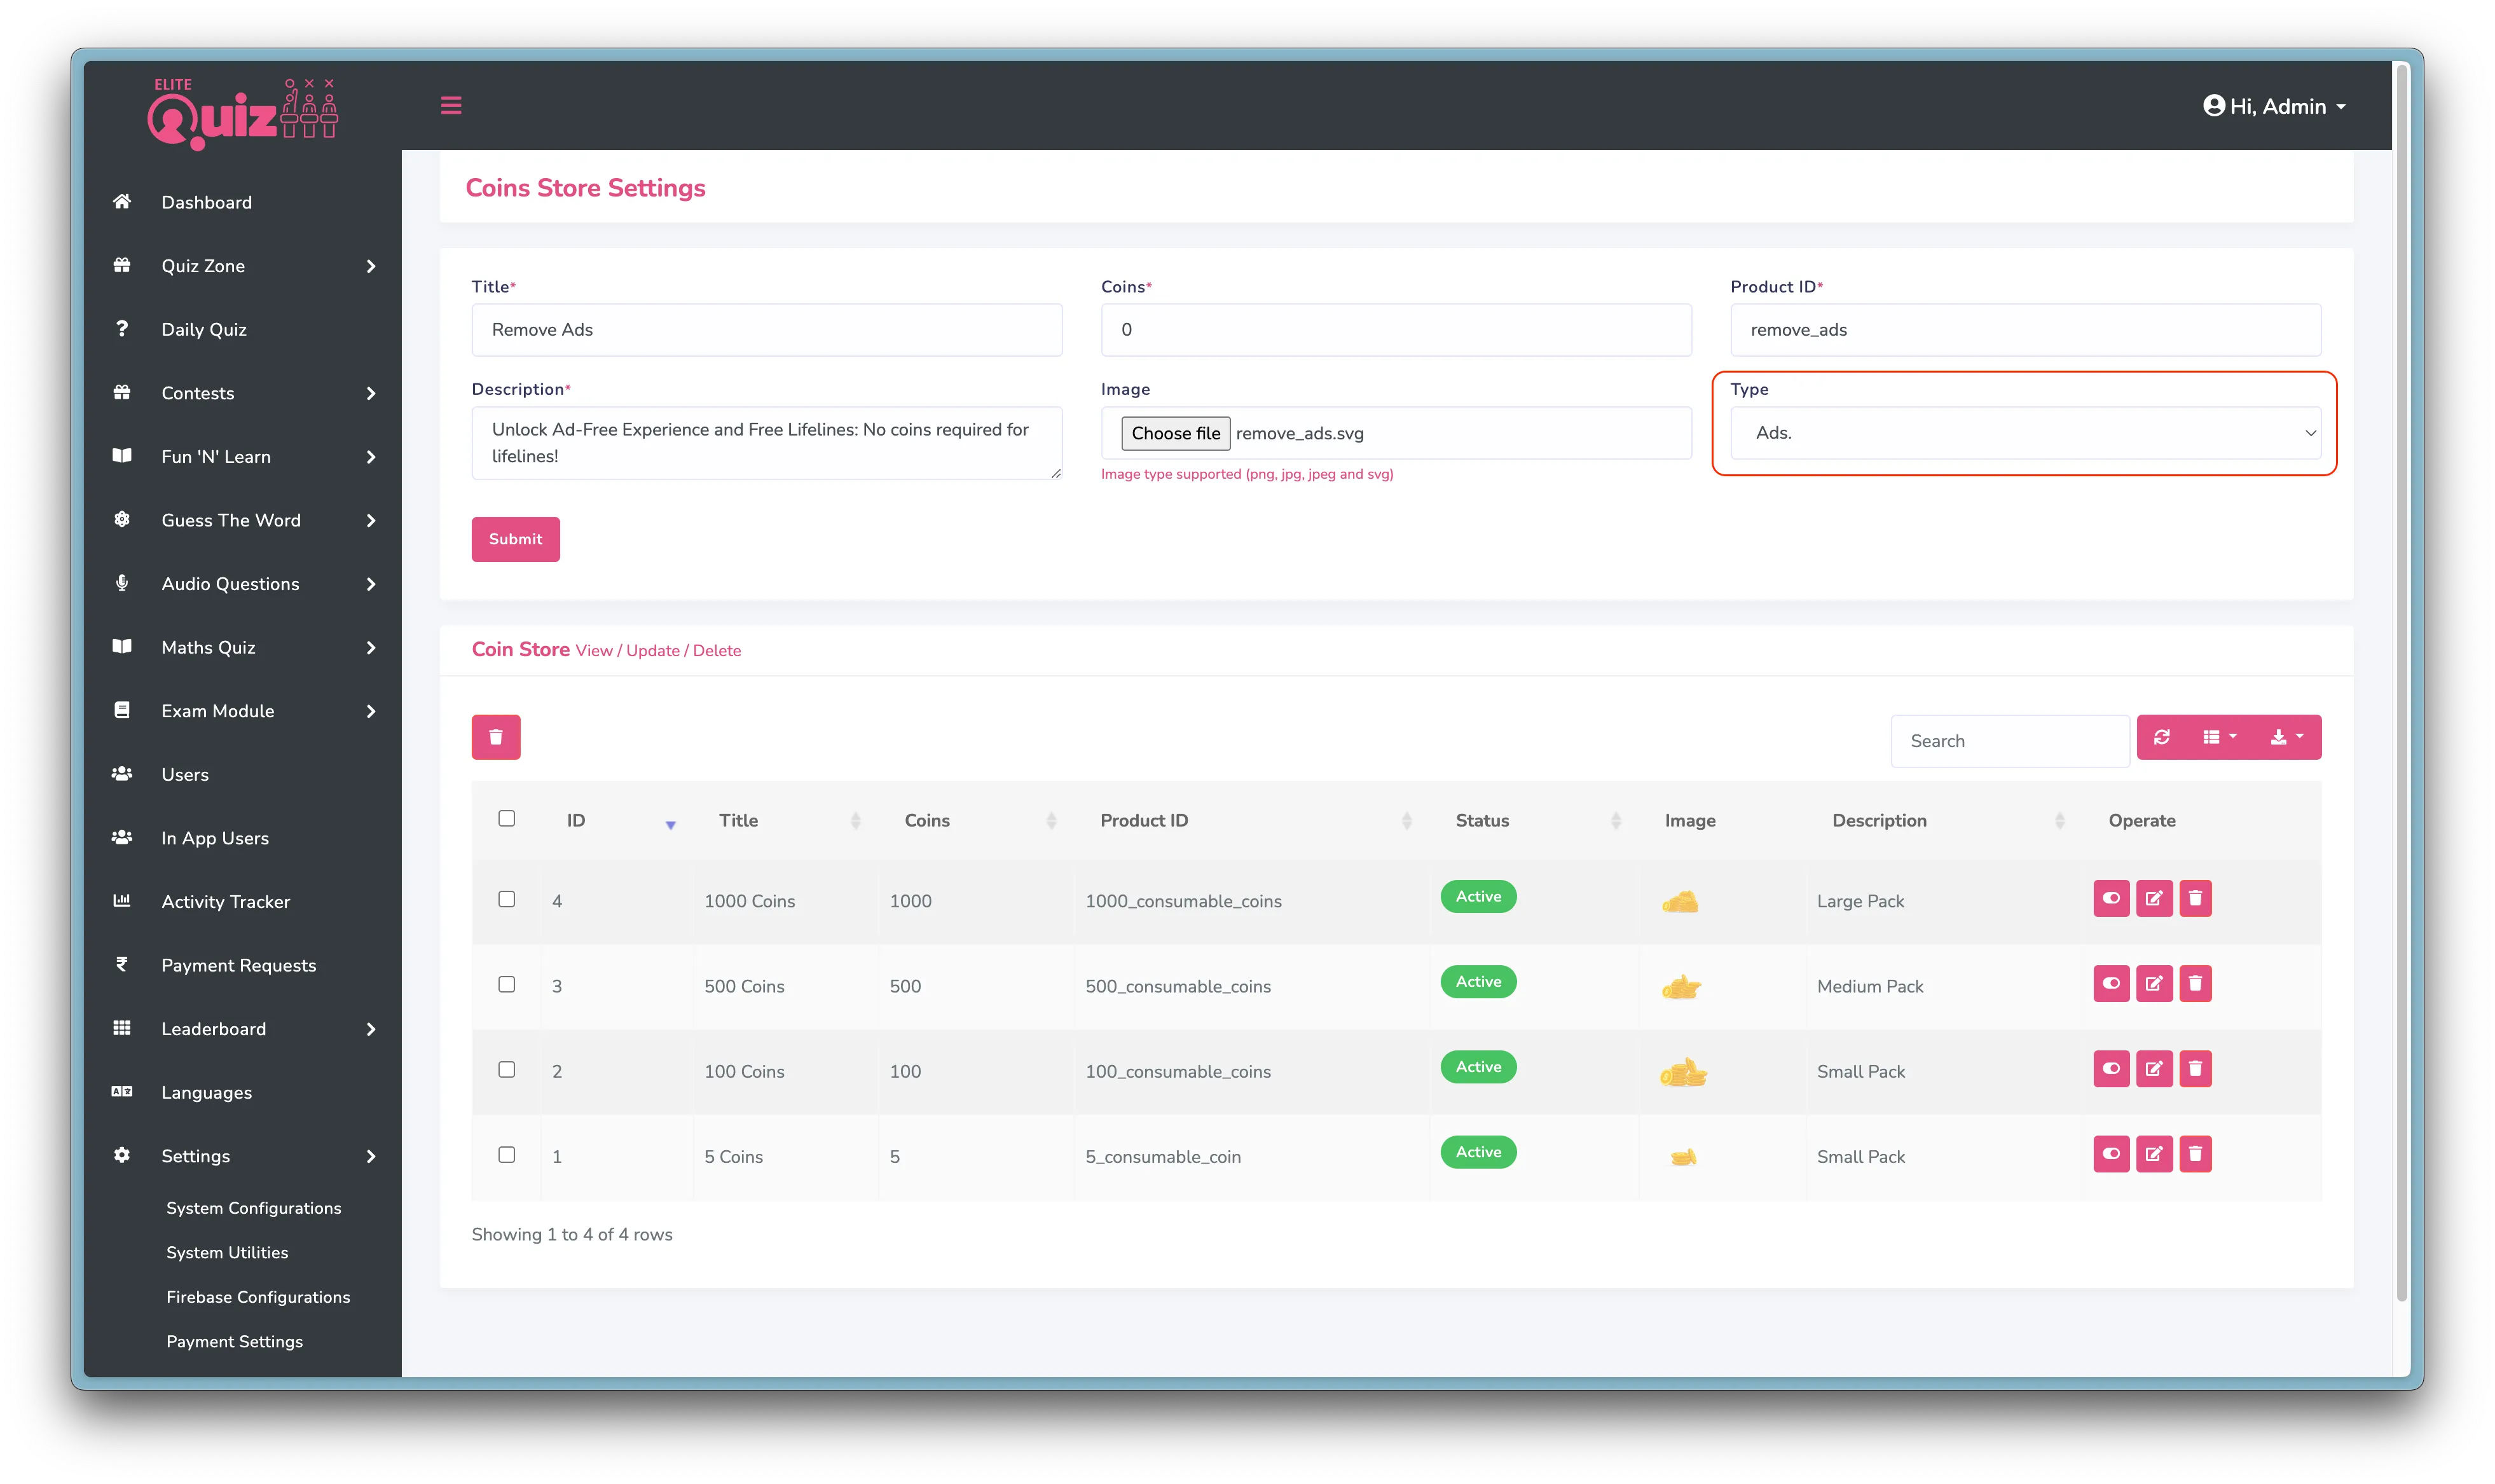 Important
if you are updating from 2.1.8 version, then after updating you will need to
edit the remove ads iap and select its type to be Ads.
Important
if you are updating from 2.1.8 version, then after updating you will need to
edit the remove ads iap and select its type to be Ads.
-
Then Create an Consumable Product in the App Store/Play
Console with the same product id (
remove_ads)
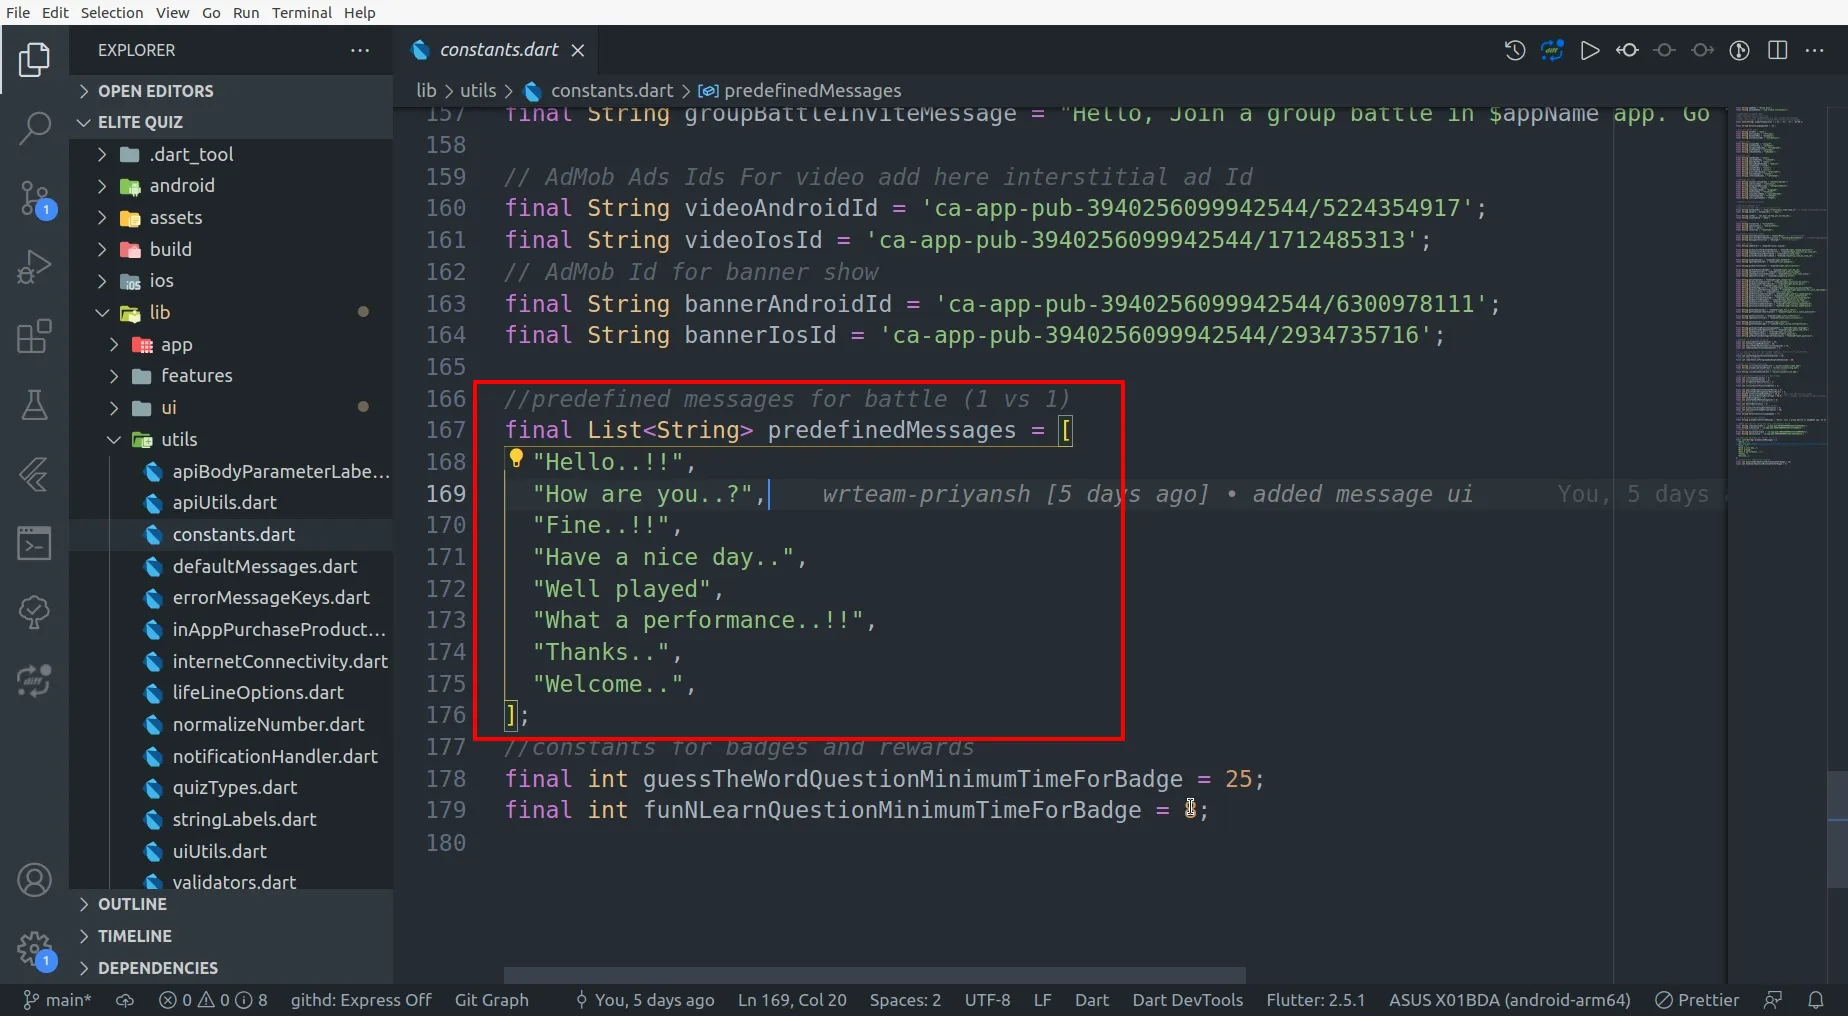
Modify battle messages & emojis
-
From
lib/utils/constants/constants.dartyou can add/modifypredefinedMessagesa list of predefined messages as per your liking.
-
You can update the emojis from
assets/images/emojis/. These emojis must be SVGs.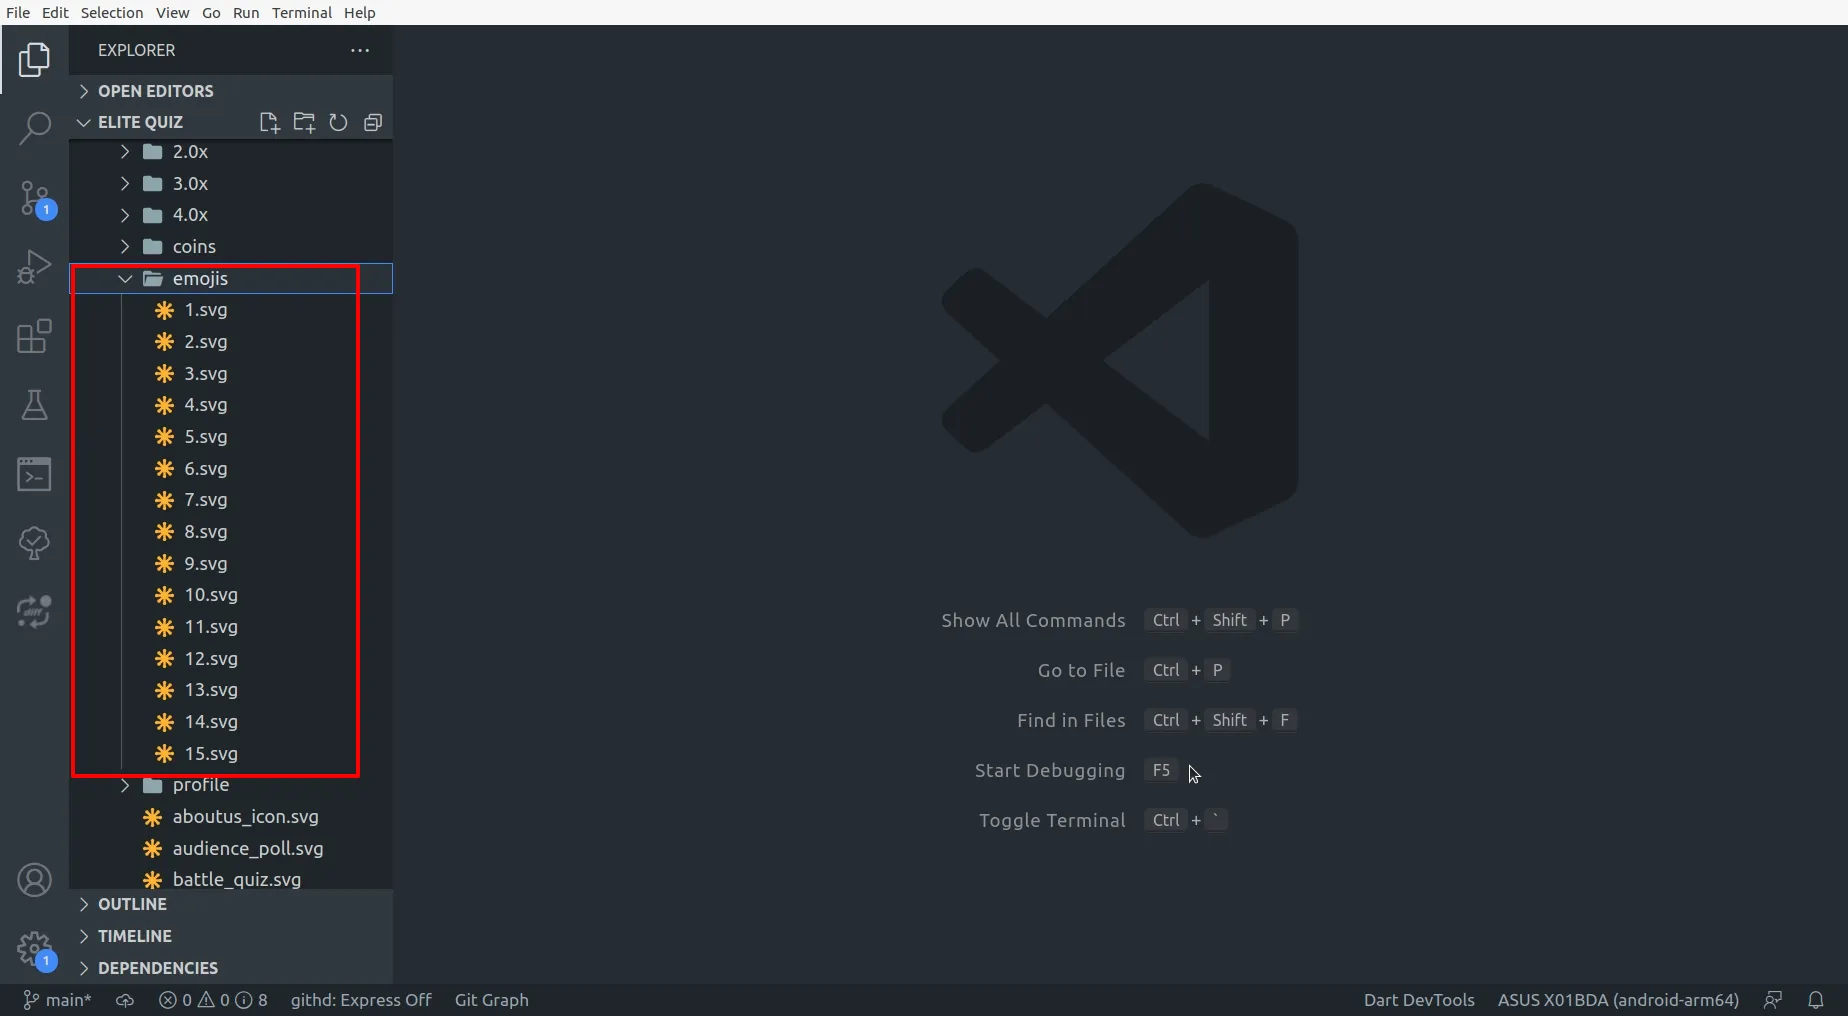
-
Any additional emojis that you might have added you also need to add them in
assets/files/emojis.json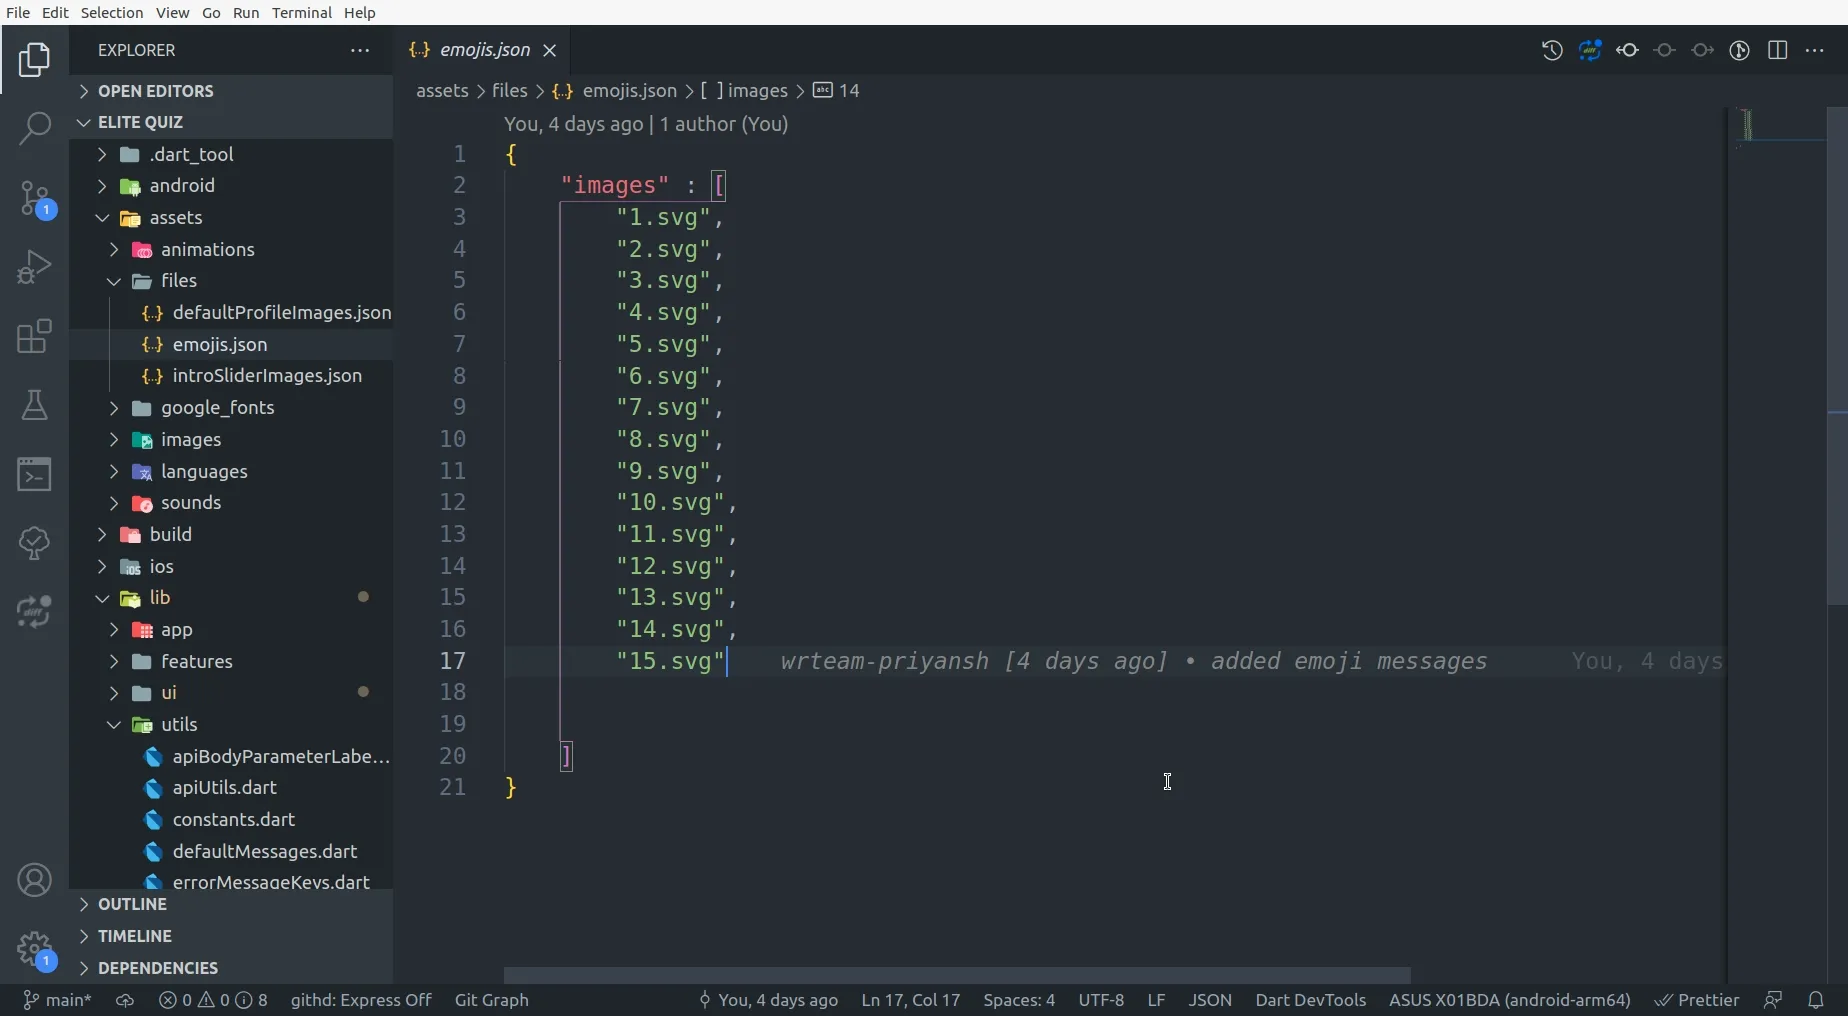
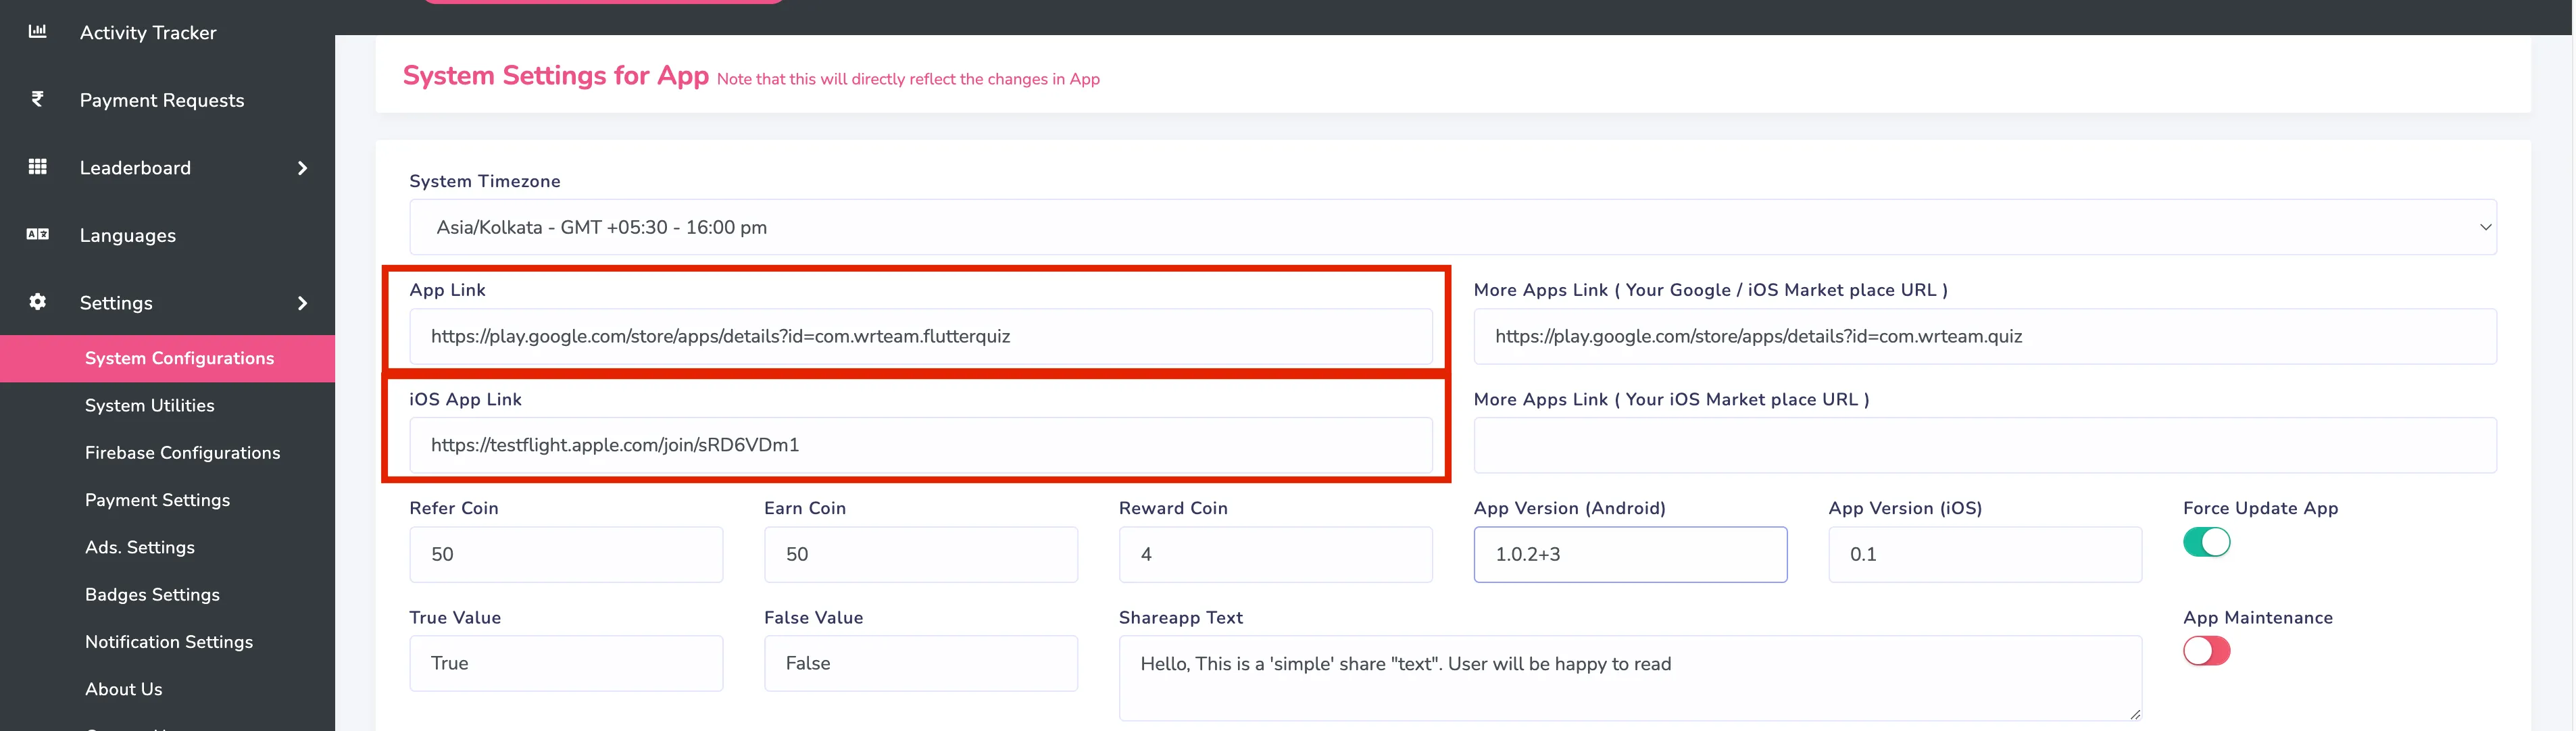
Configure force update
You can require users to update to the latest app version by specifying it in the Play/App Store. Upon opening the app, a pop-up will prompt them to update.-
To do that go to admin panel,
Settings -> System Configurationsand enable force update.
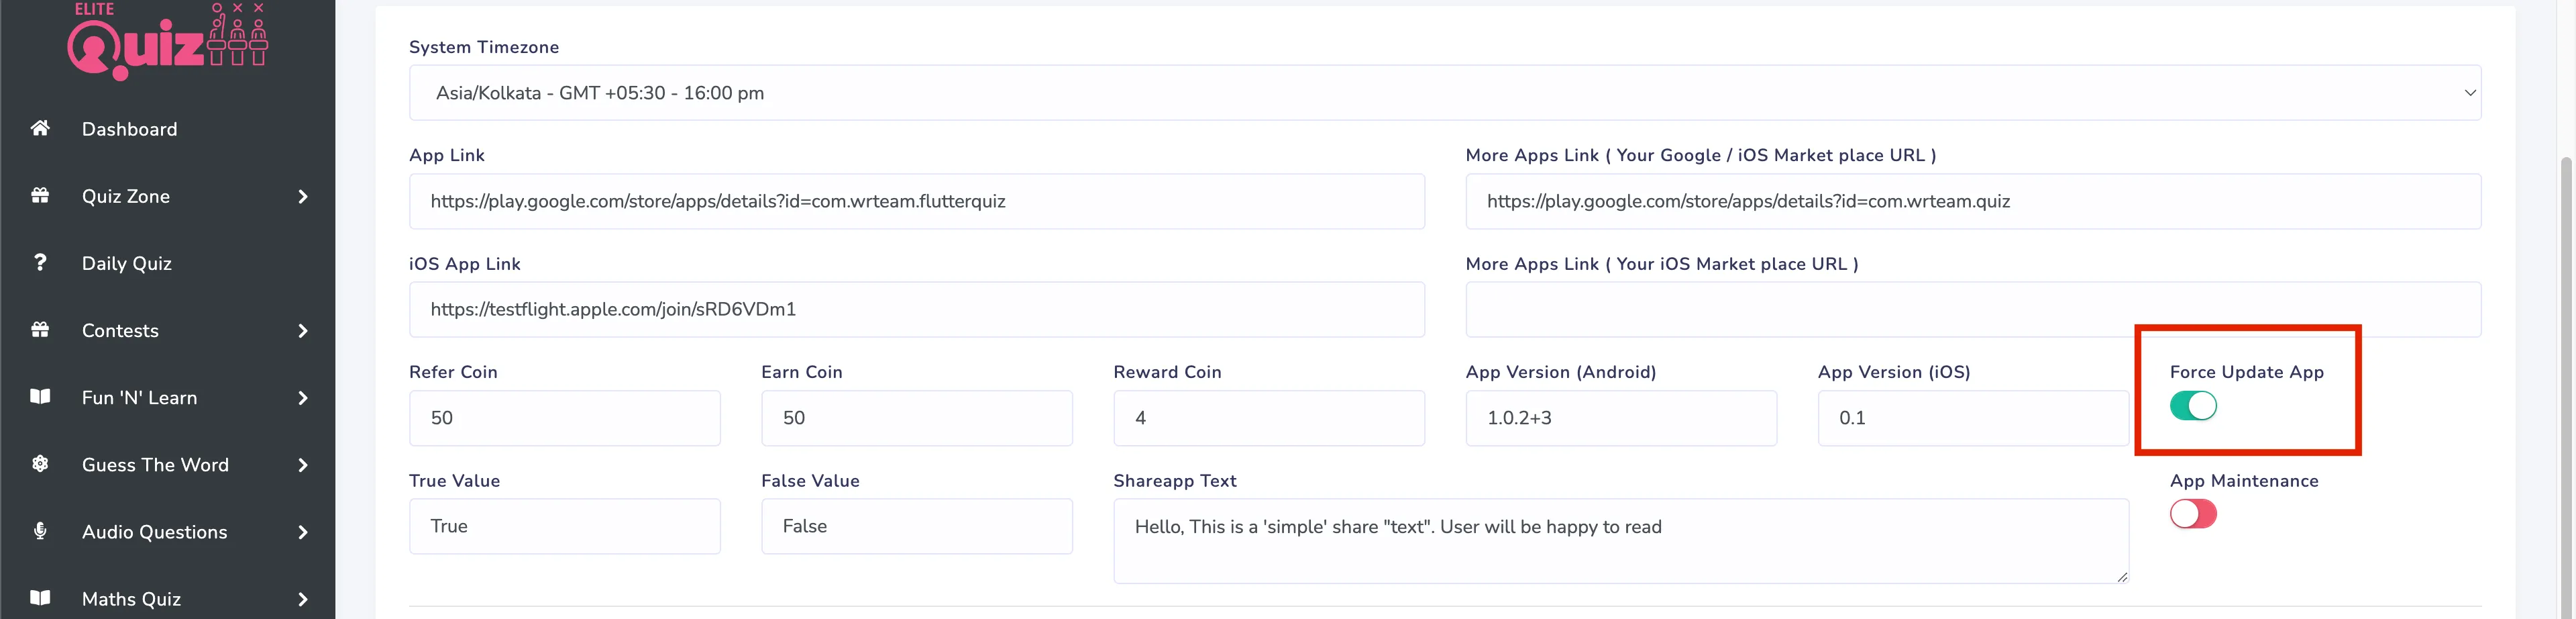
-
Go to pubspec.yaml and copy the version number of application.
-
Enter the version number that we just copied into, Android and Ios Version
fields.
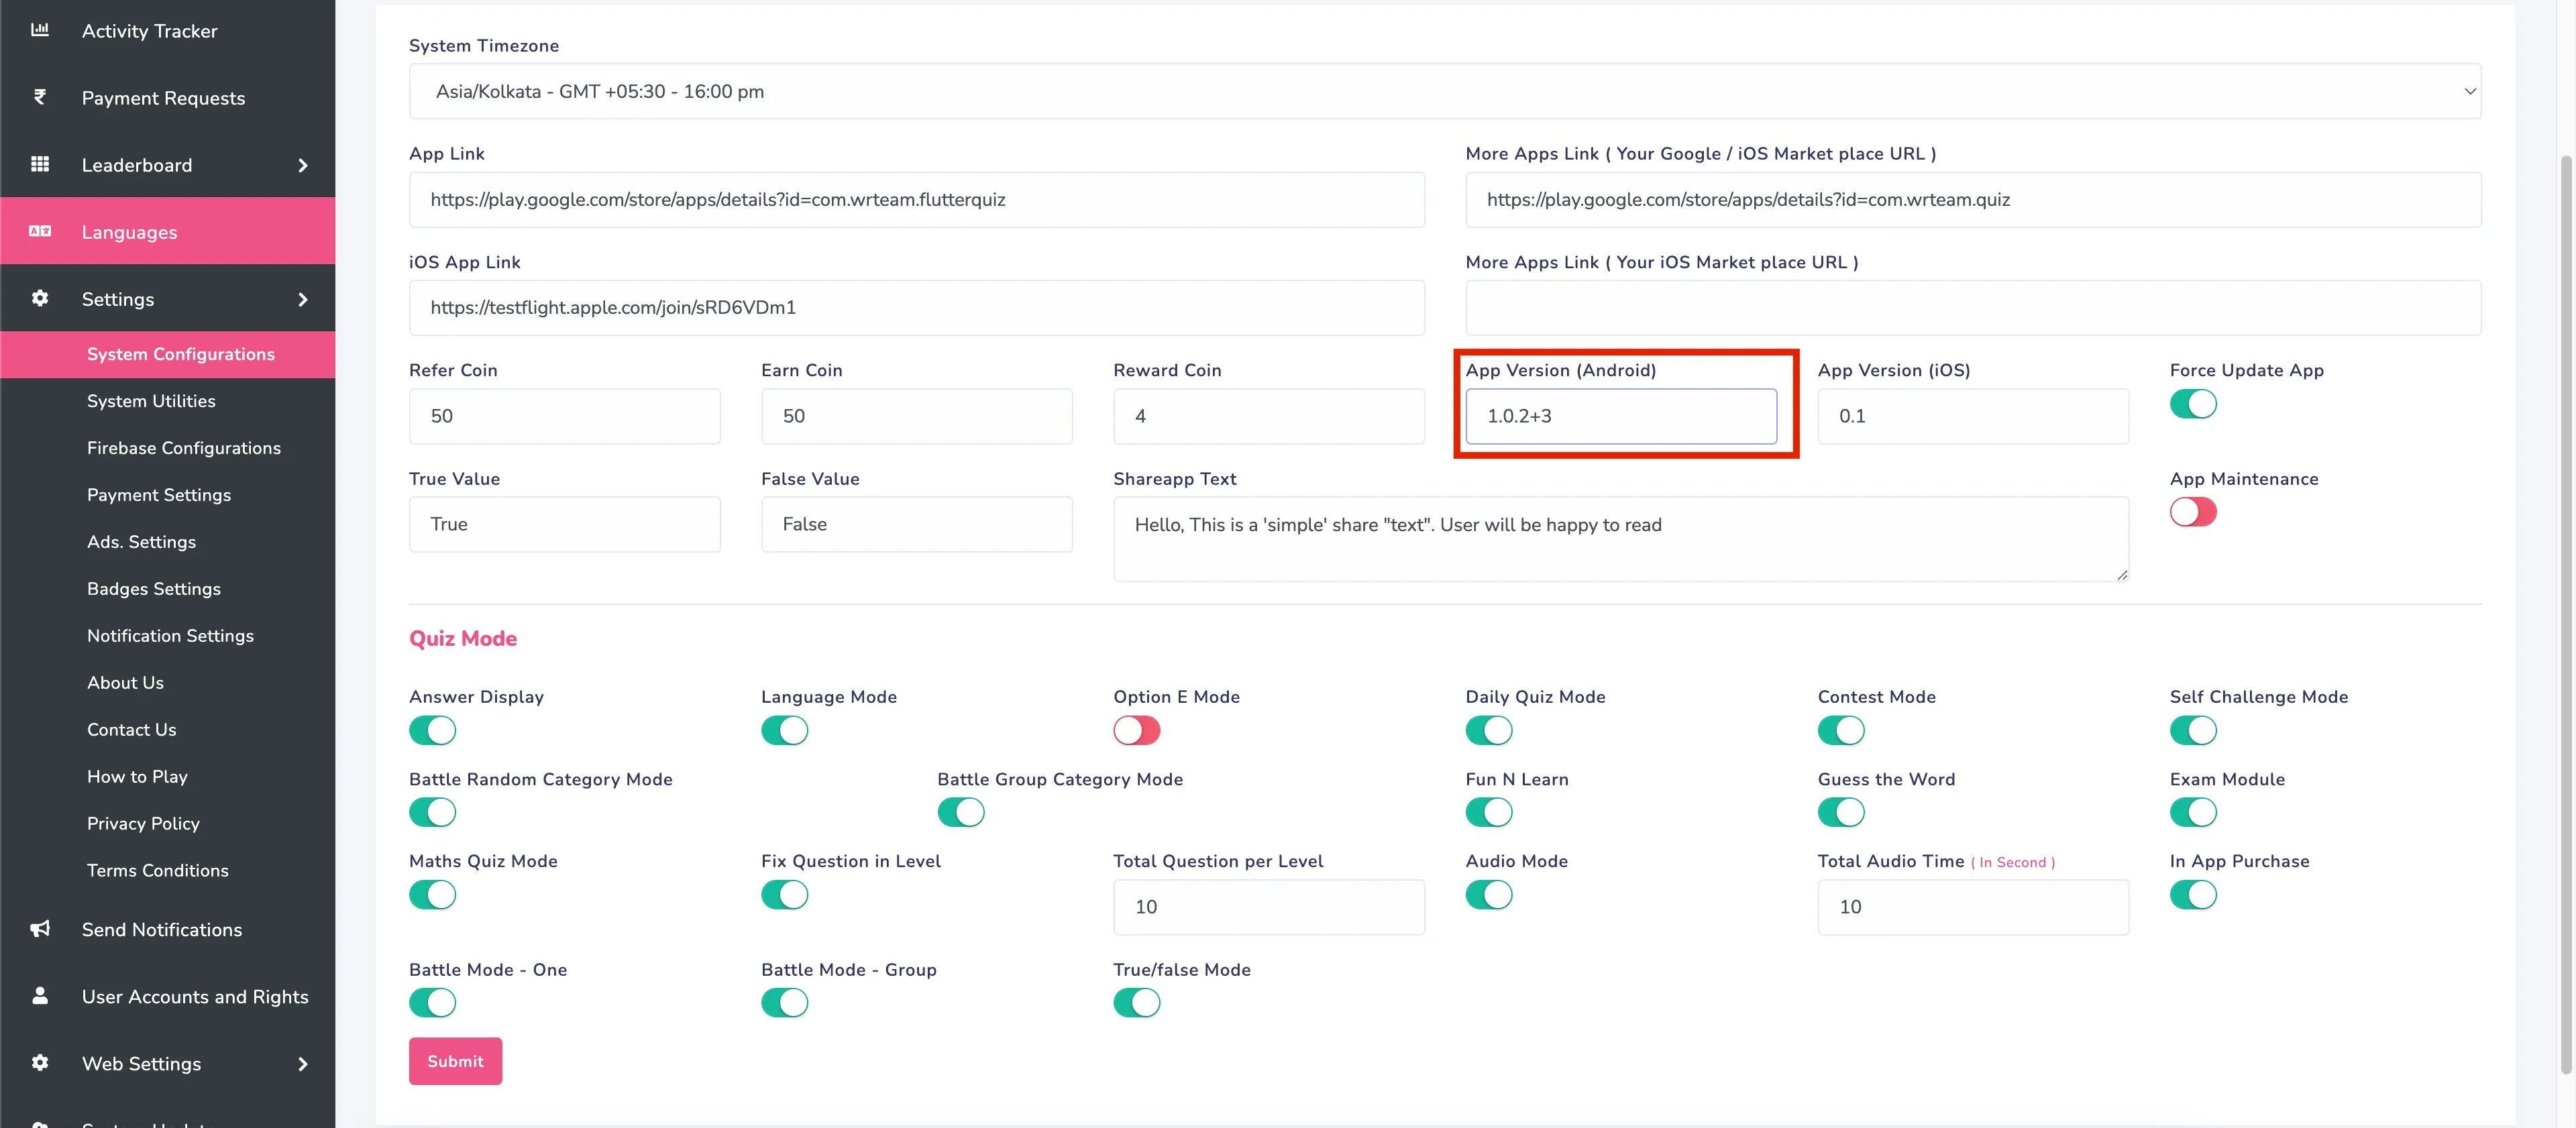
-
Add the App Store & Play Store links to your app. And make sure that links are
correct, otherwise force update will not work as expected.
Manage Badges
-
Manage badges from here
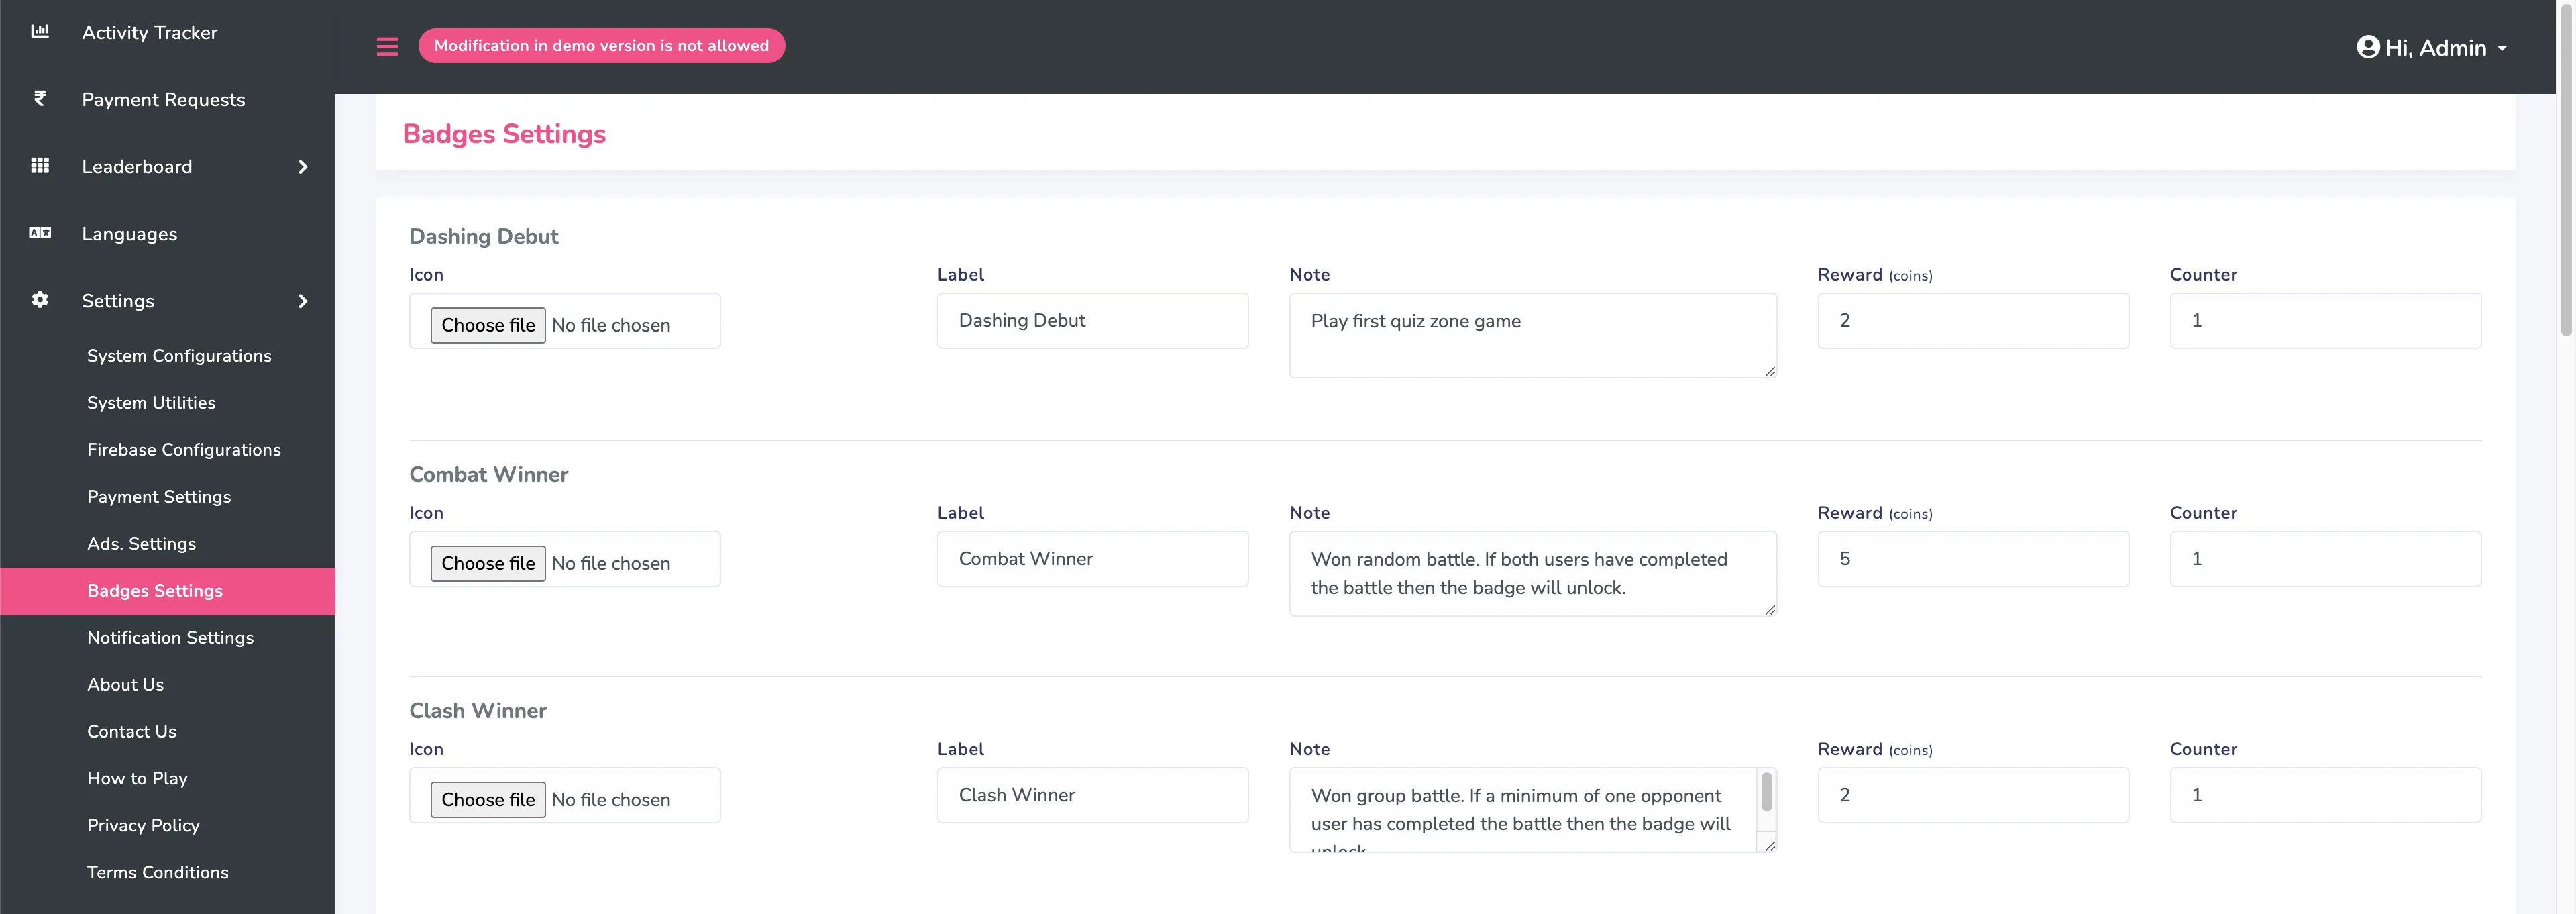
-
To unlock badges like Super Sonic, Flashback and Brainiac minimum question is
set to 5.
You can change that as shown in below image.
-
To unlock badges like Combat Winner, Clash Winner and Quiz Warrior winner must
be declared by completing battle.
- To get more information about how badges works click here .
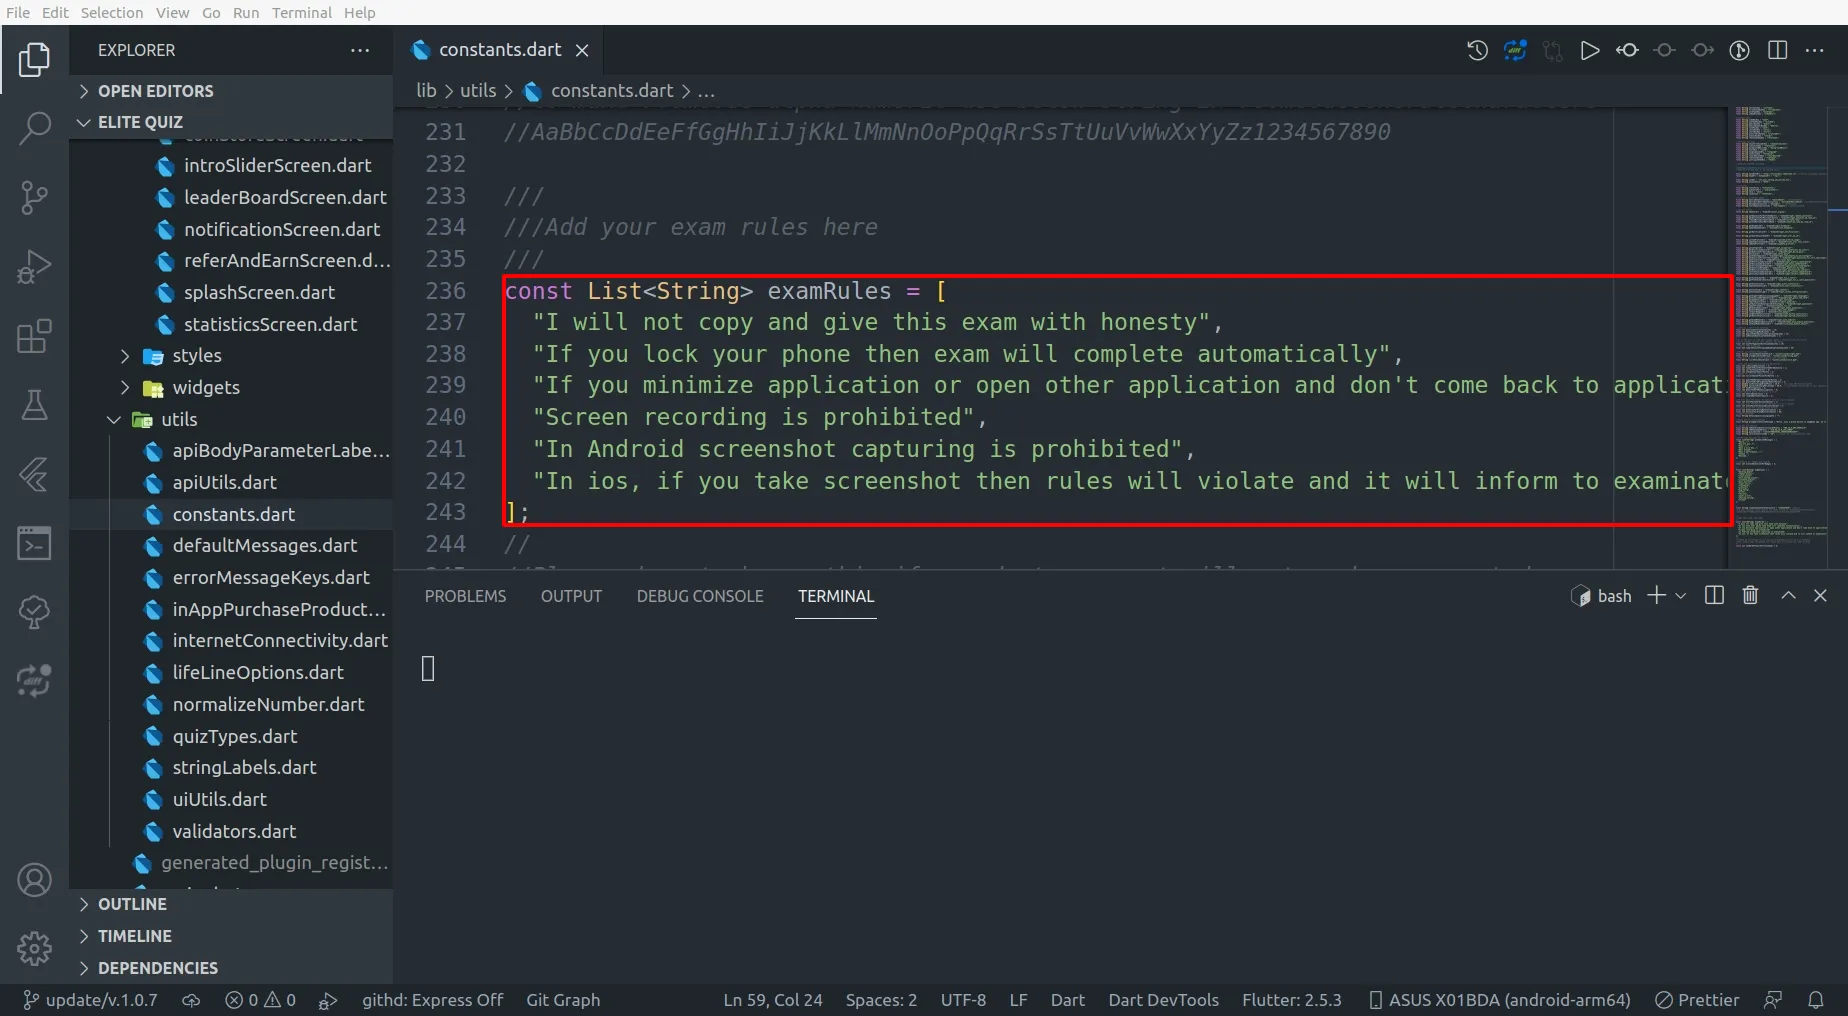
Setup Exams
-
Go to admin panel,
Settings -> System Configurationsand enable exam module as shown in image.
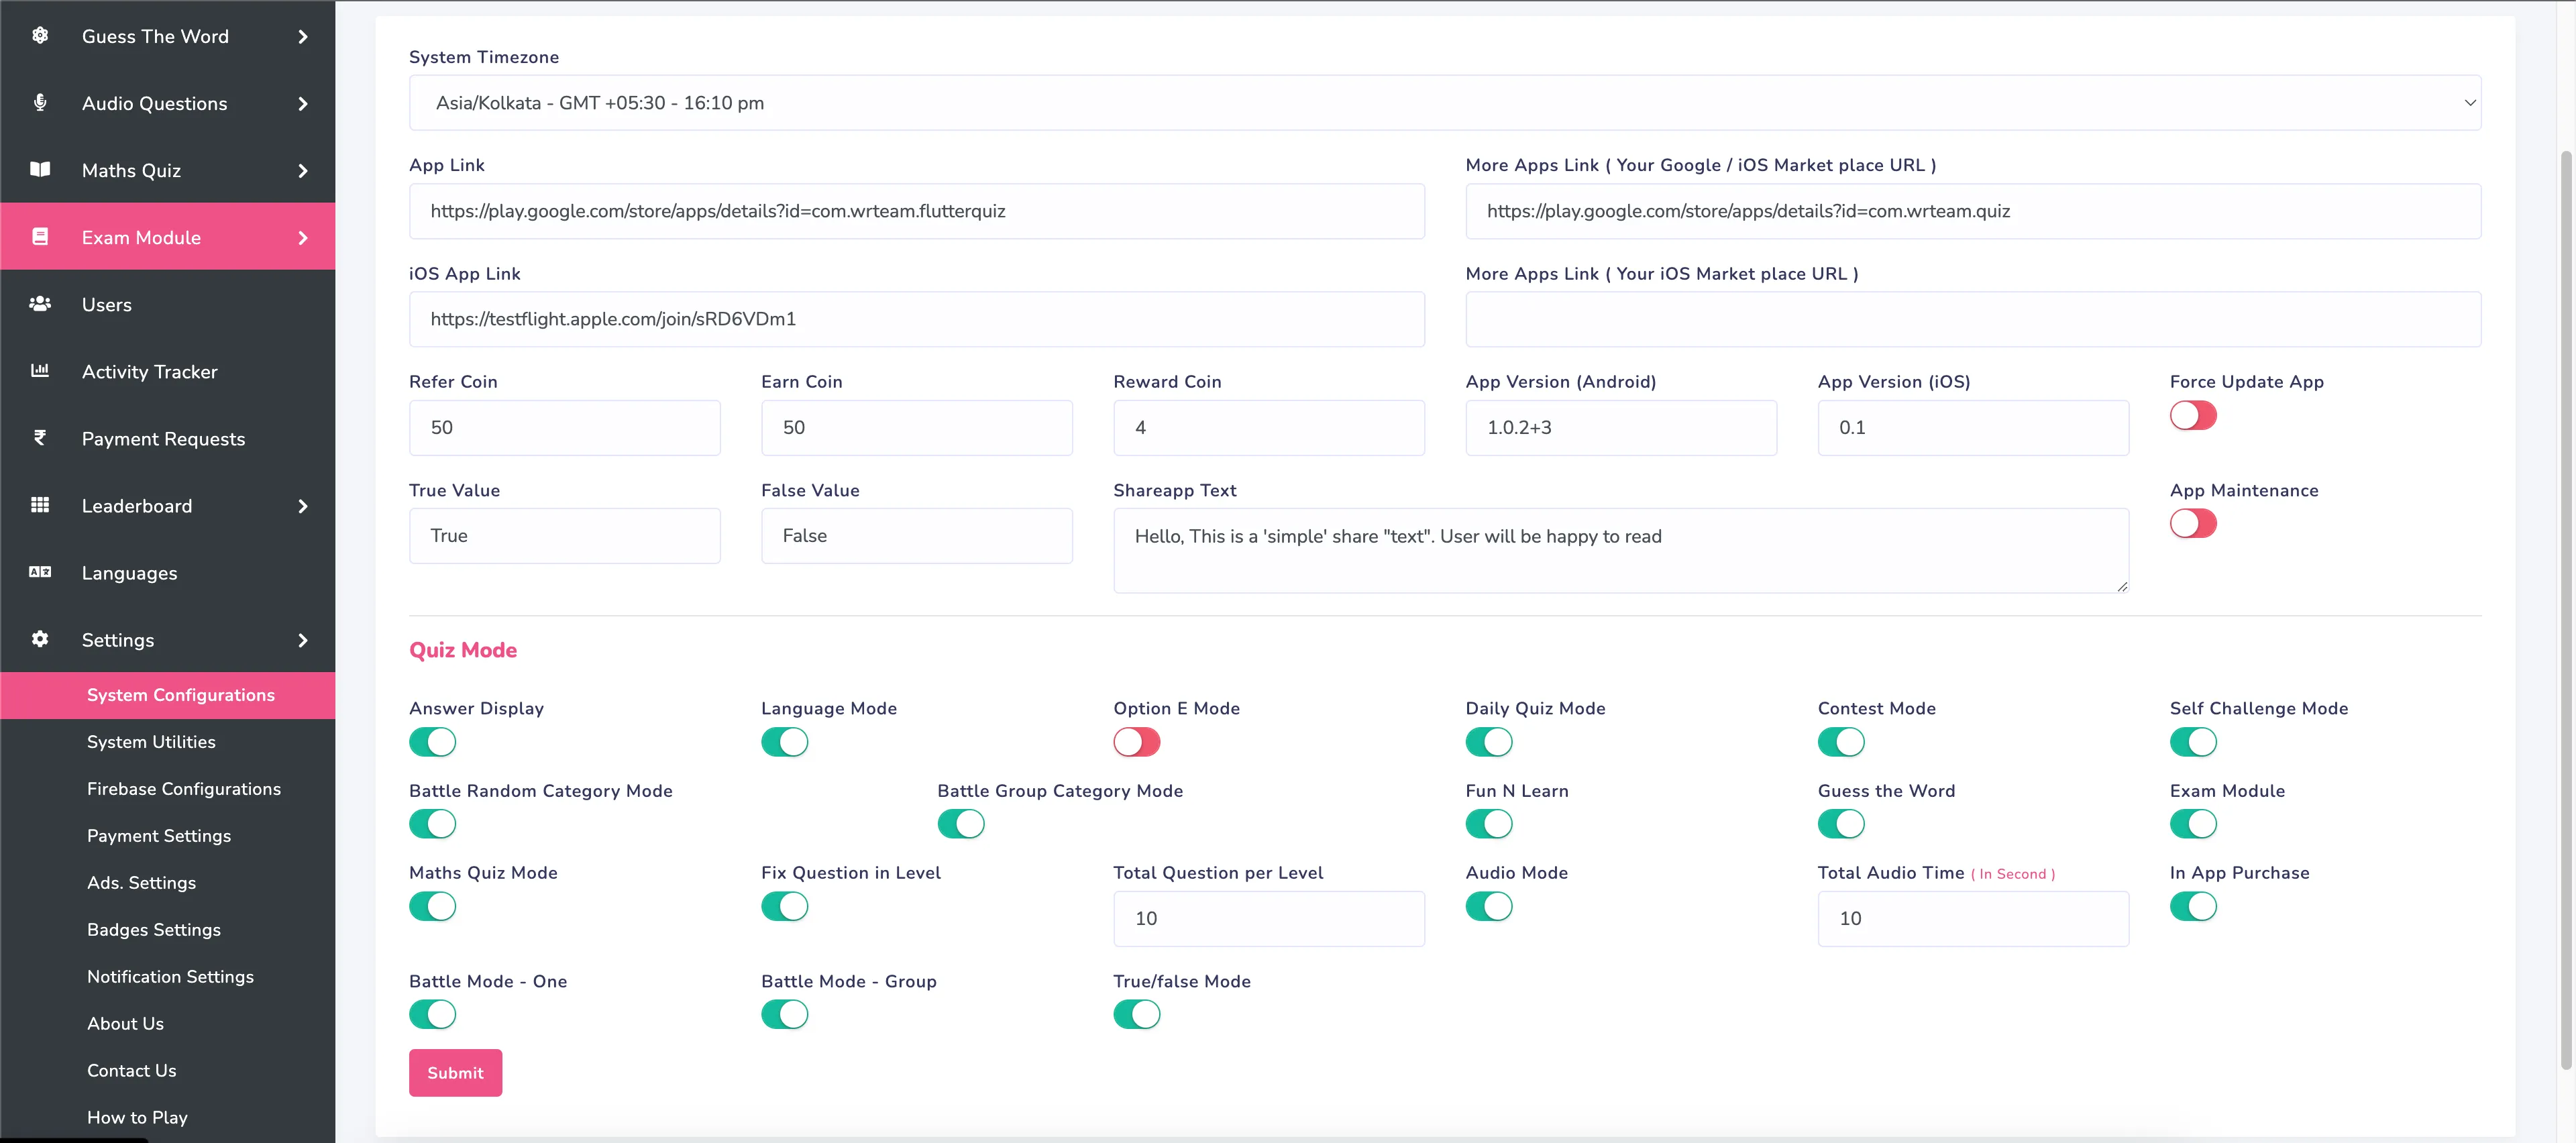
-
If you want to update the exam rules you can do so by updating
examRulesinlib/utils/constants/constants.dart
Setup earning module
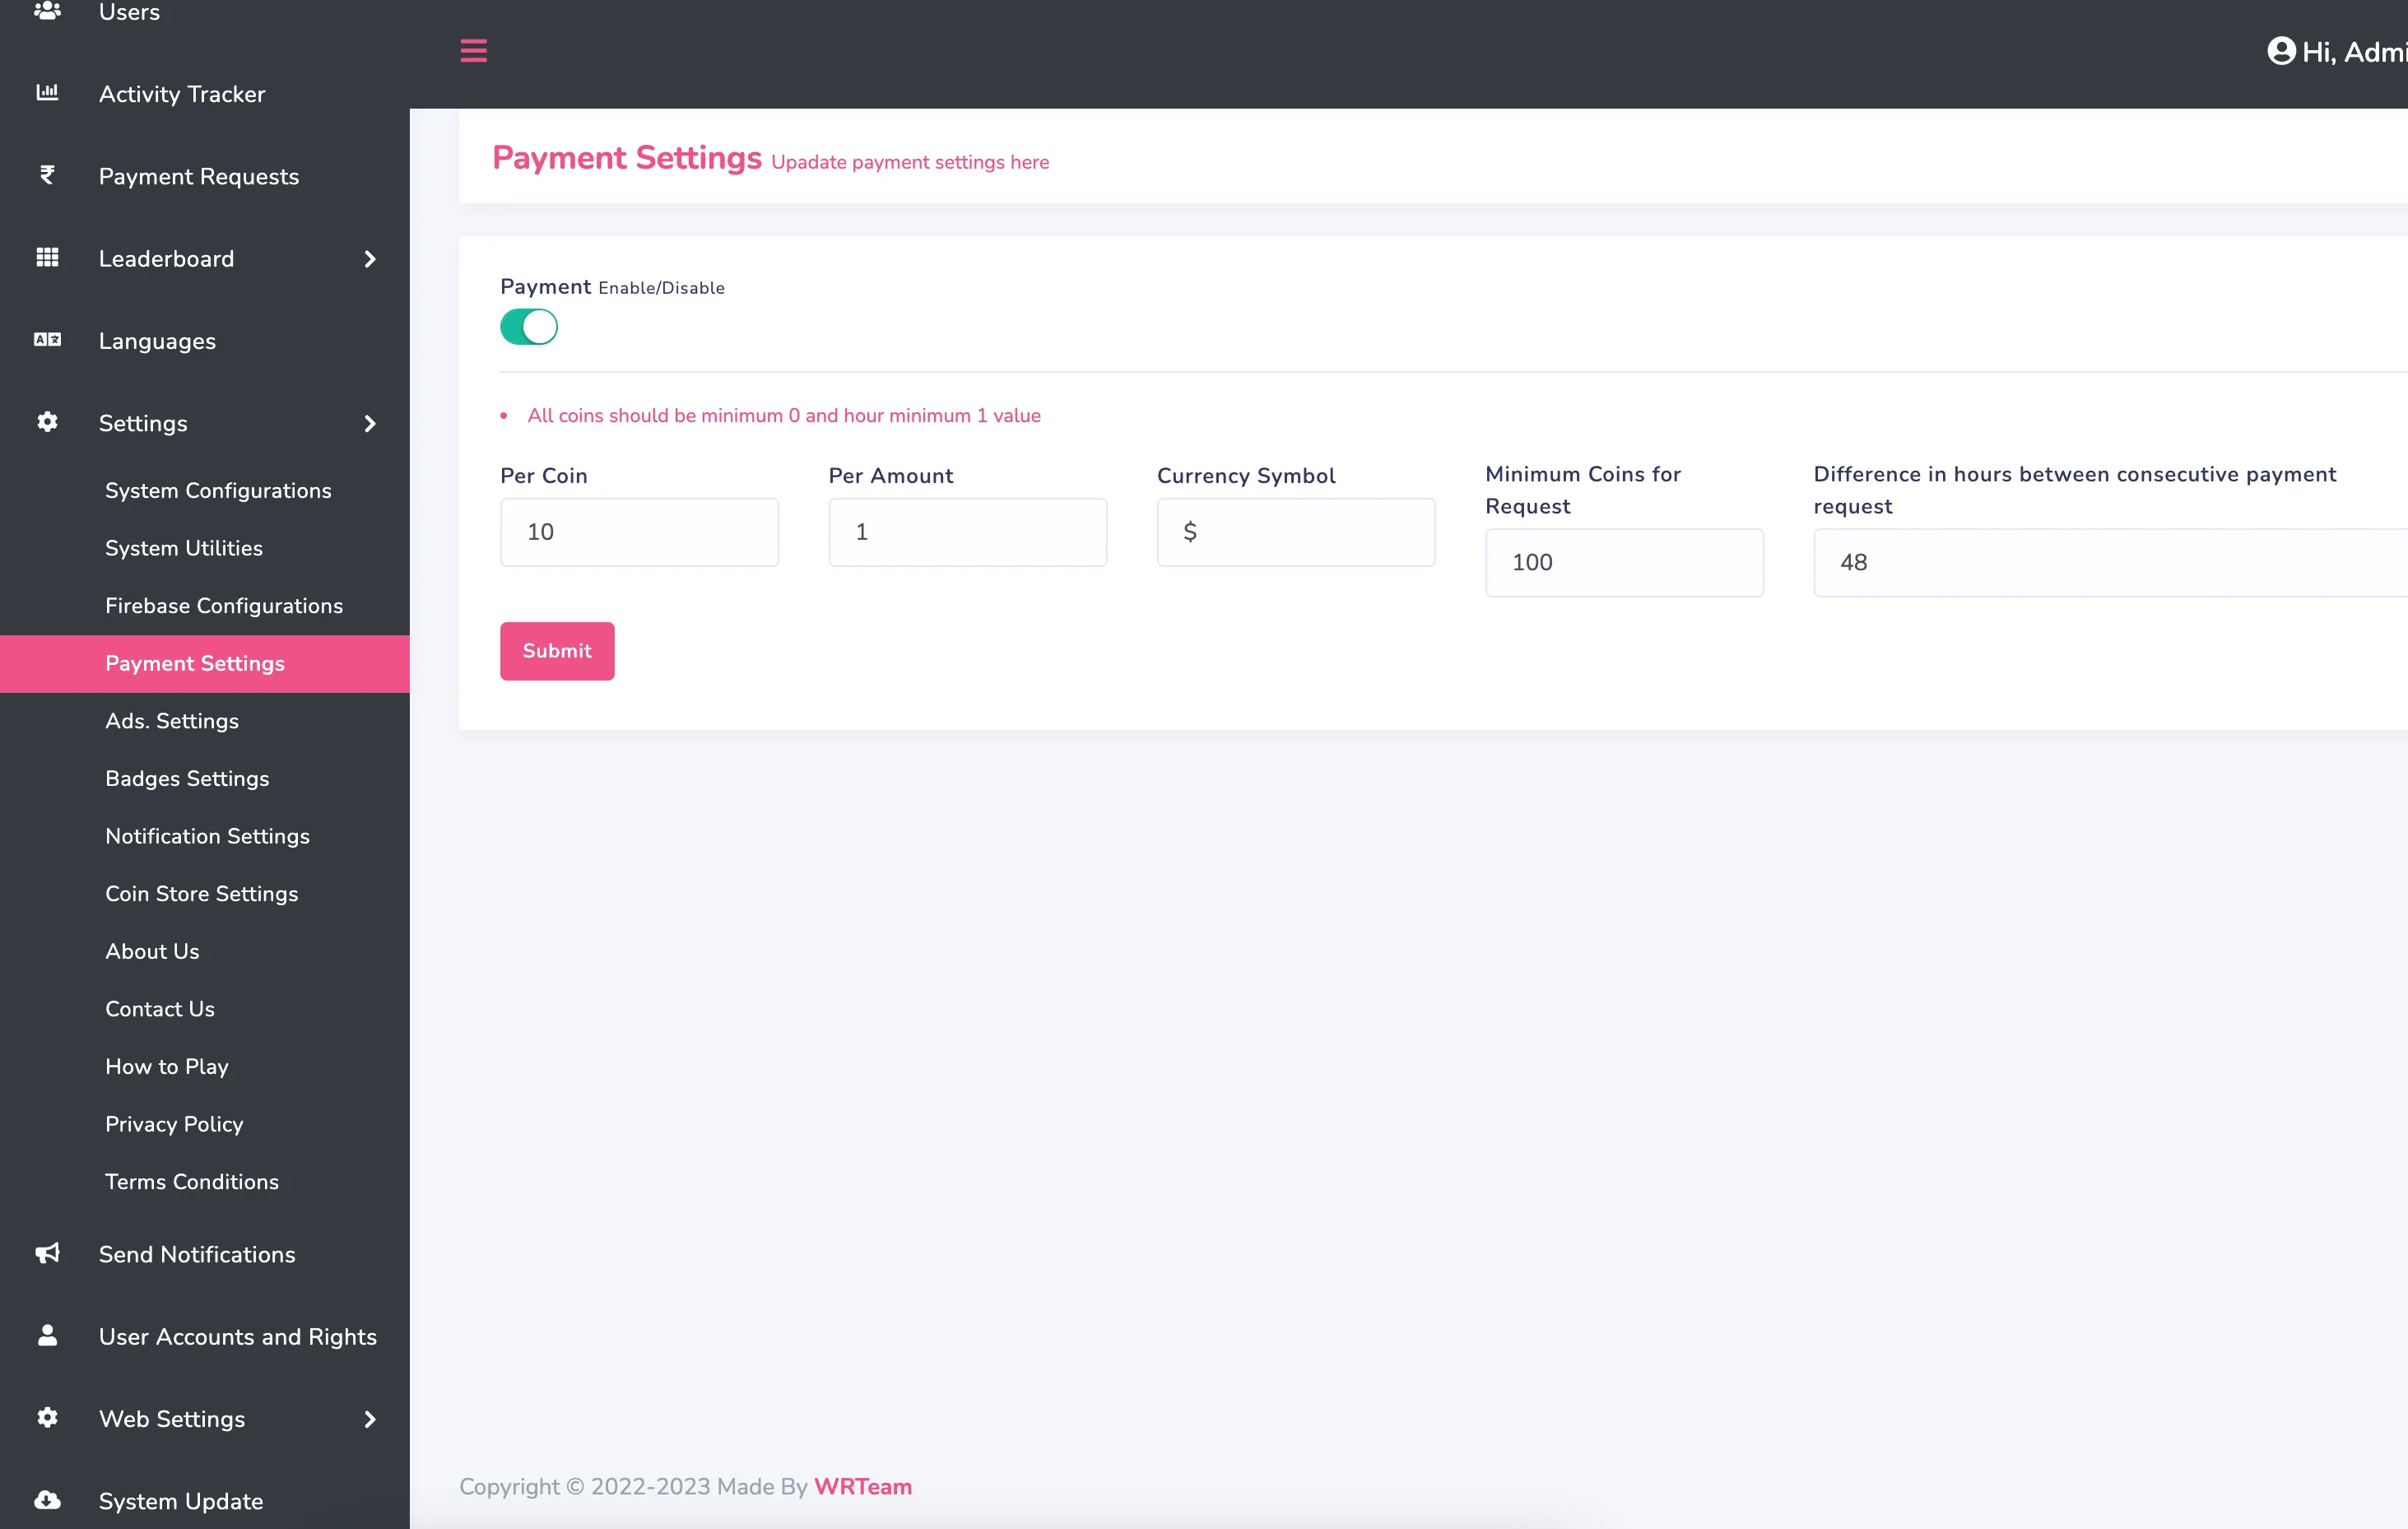
-
To set up the earning module for users to redeem coins, access the Admin Panel
and go to
Settings -> Payment Settings.
Users can convert earned coins to real money with customizable conversion rates. For example here, per10 Coinsuser will get1 Amount.
Amount here refers to the real money. AndCurrency Symbolwill be used for the amount.
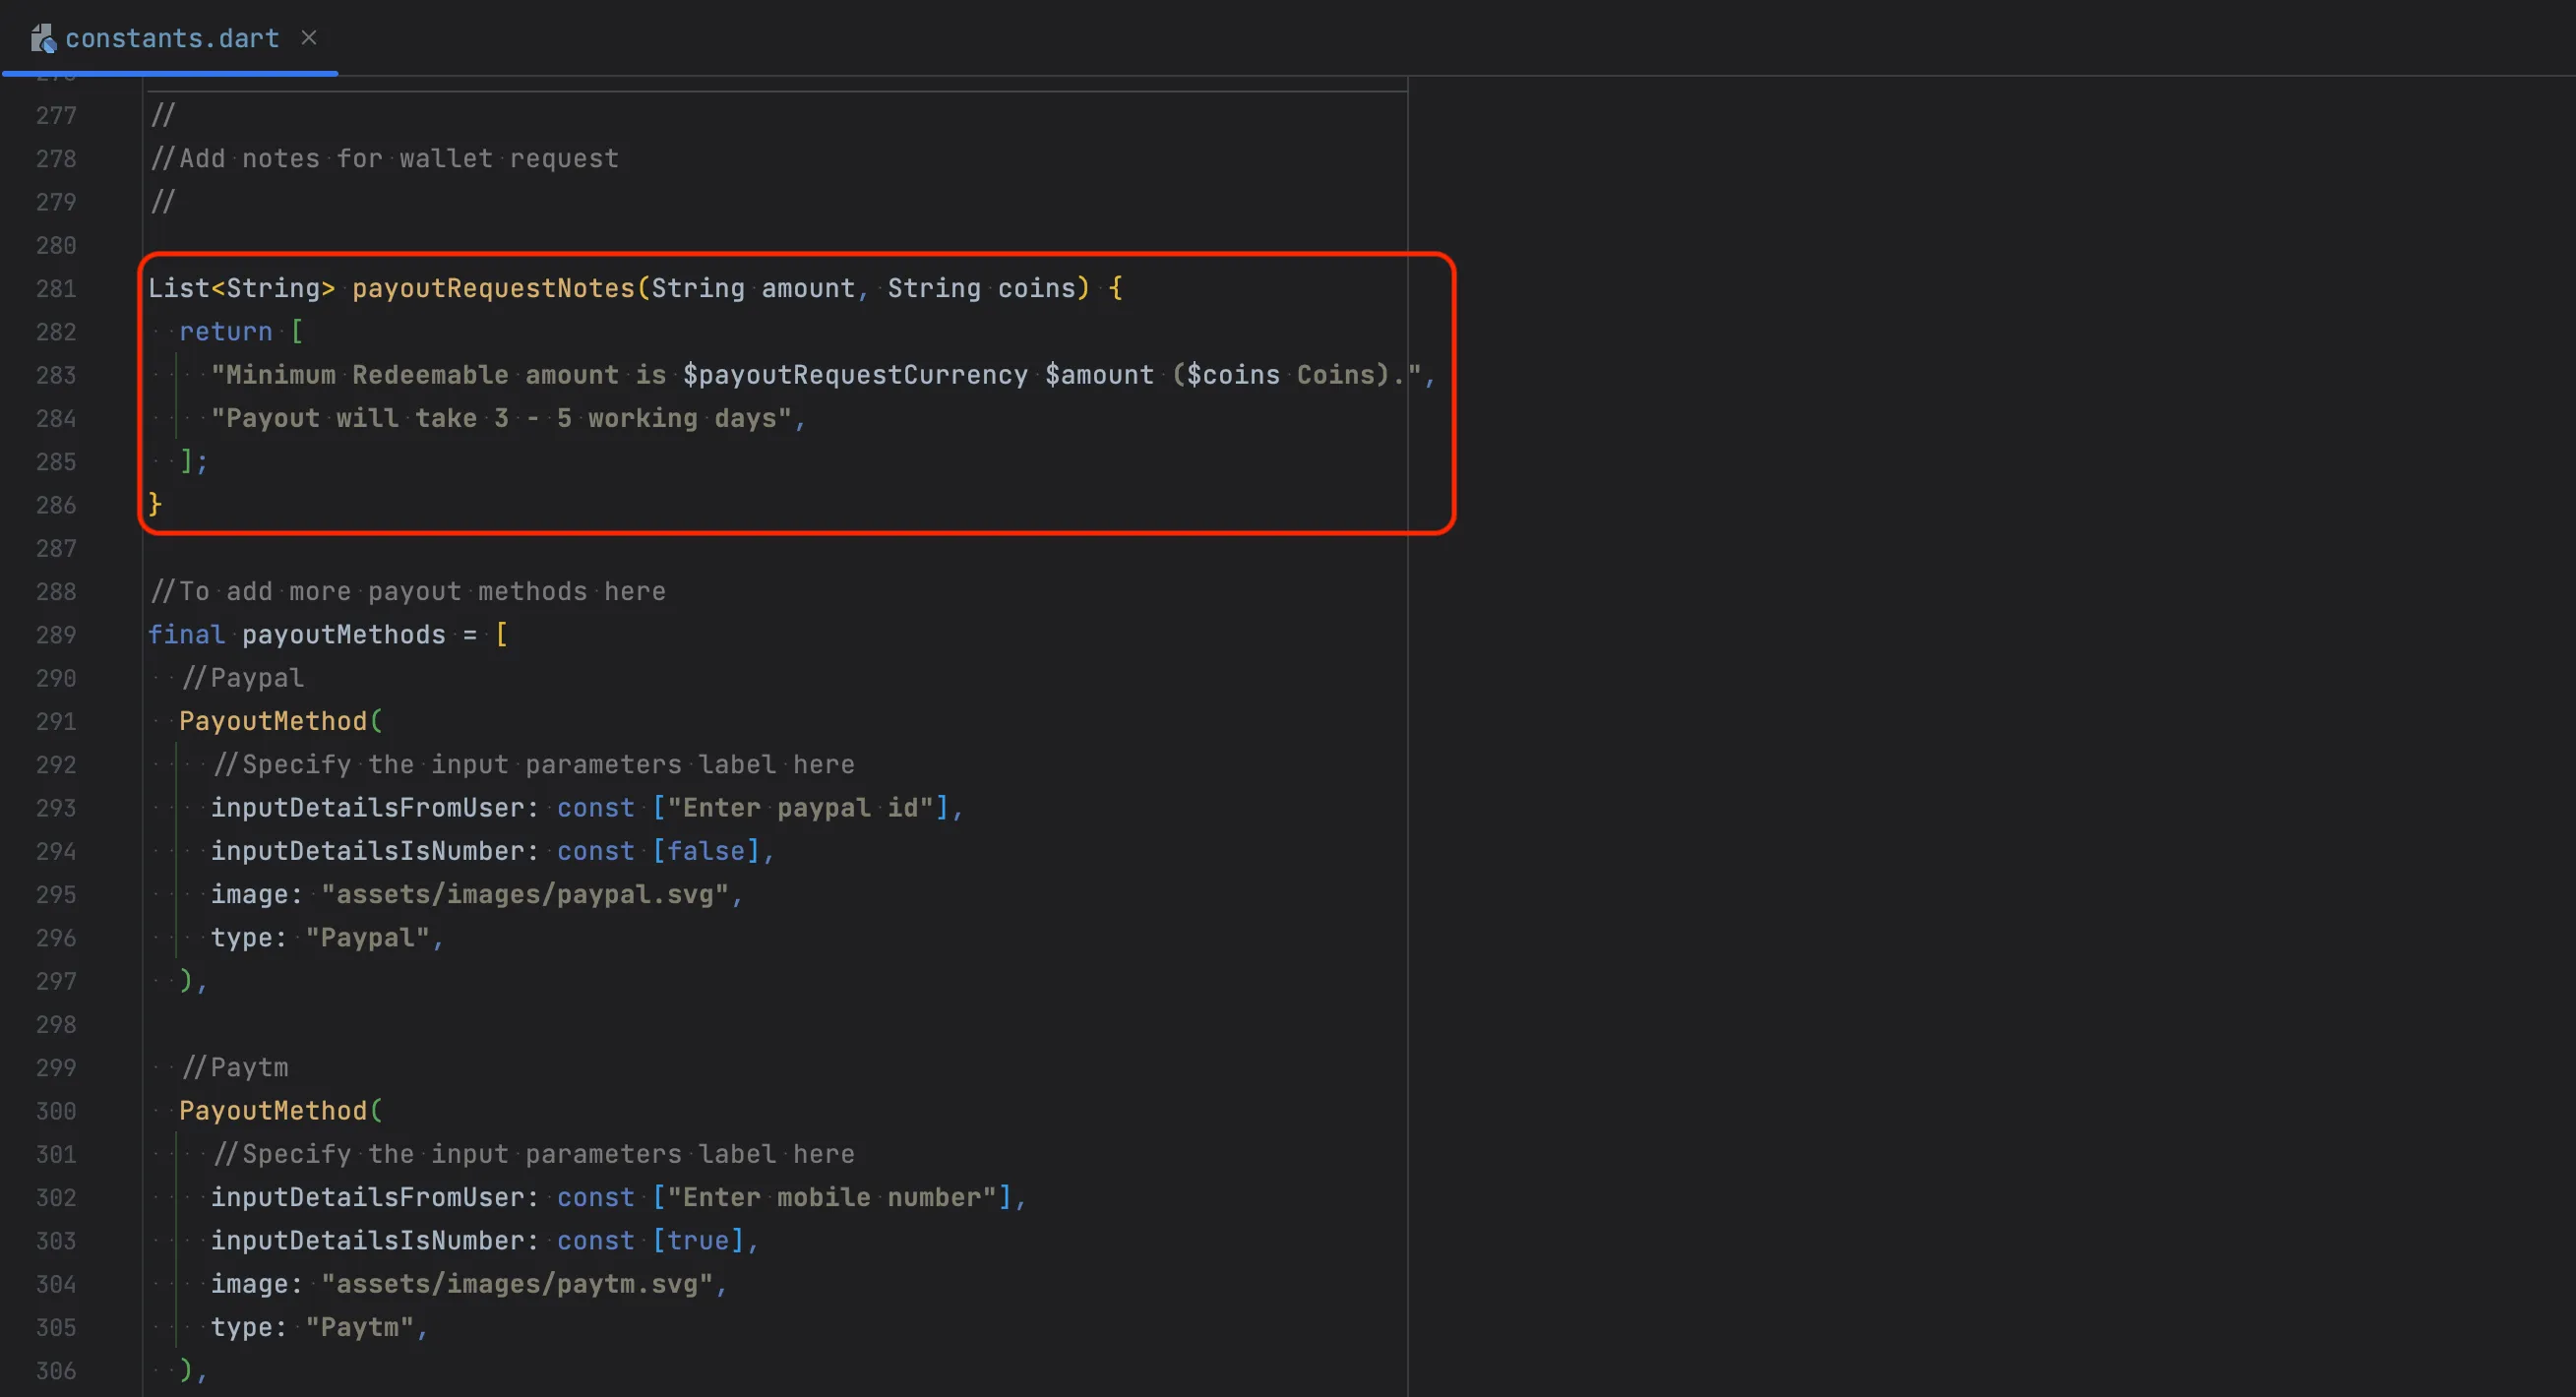
-
You can also modify the notes that will be shown to user when they redeem the
coins, and for that go to
lib/utils/constants/constants.dart
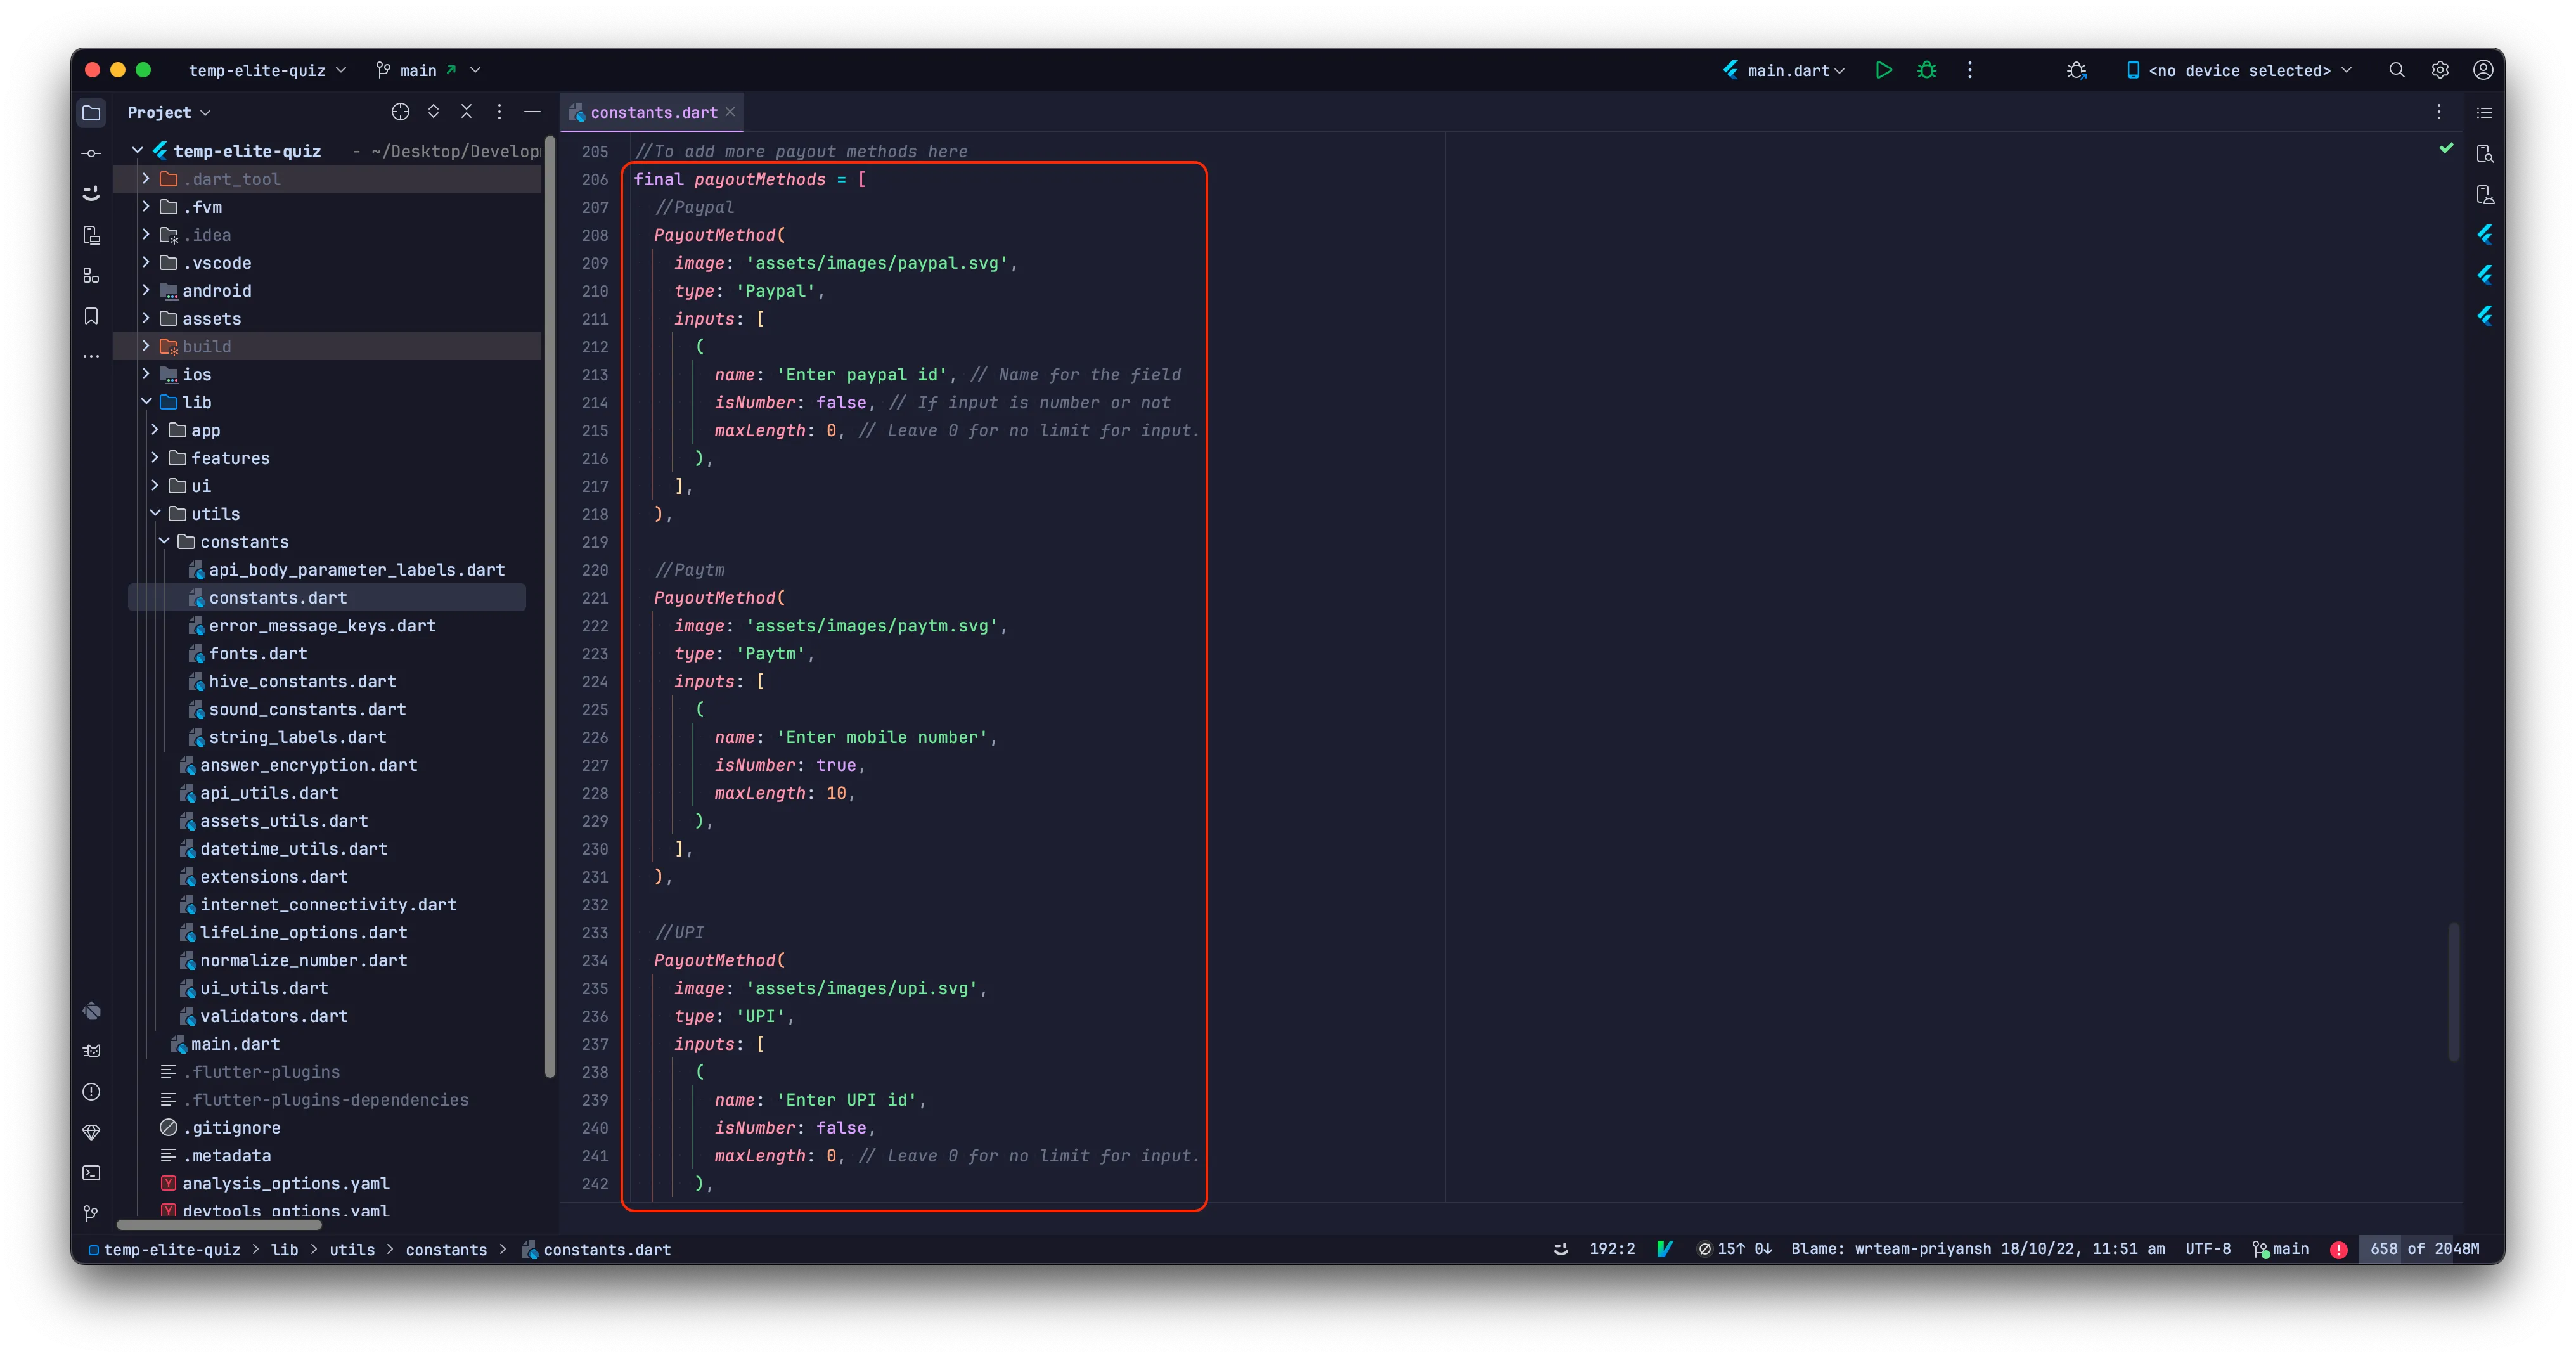
-
From there you also have the option to add or update payment methods.
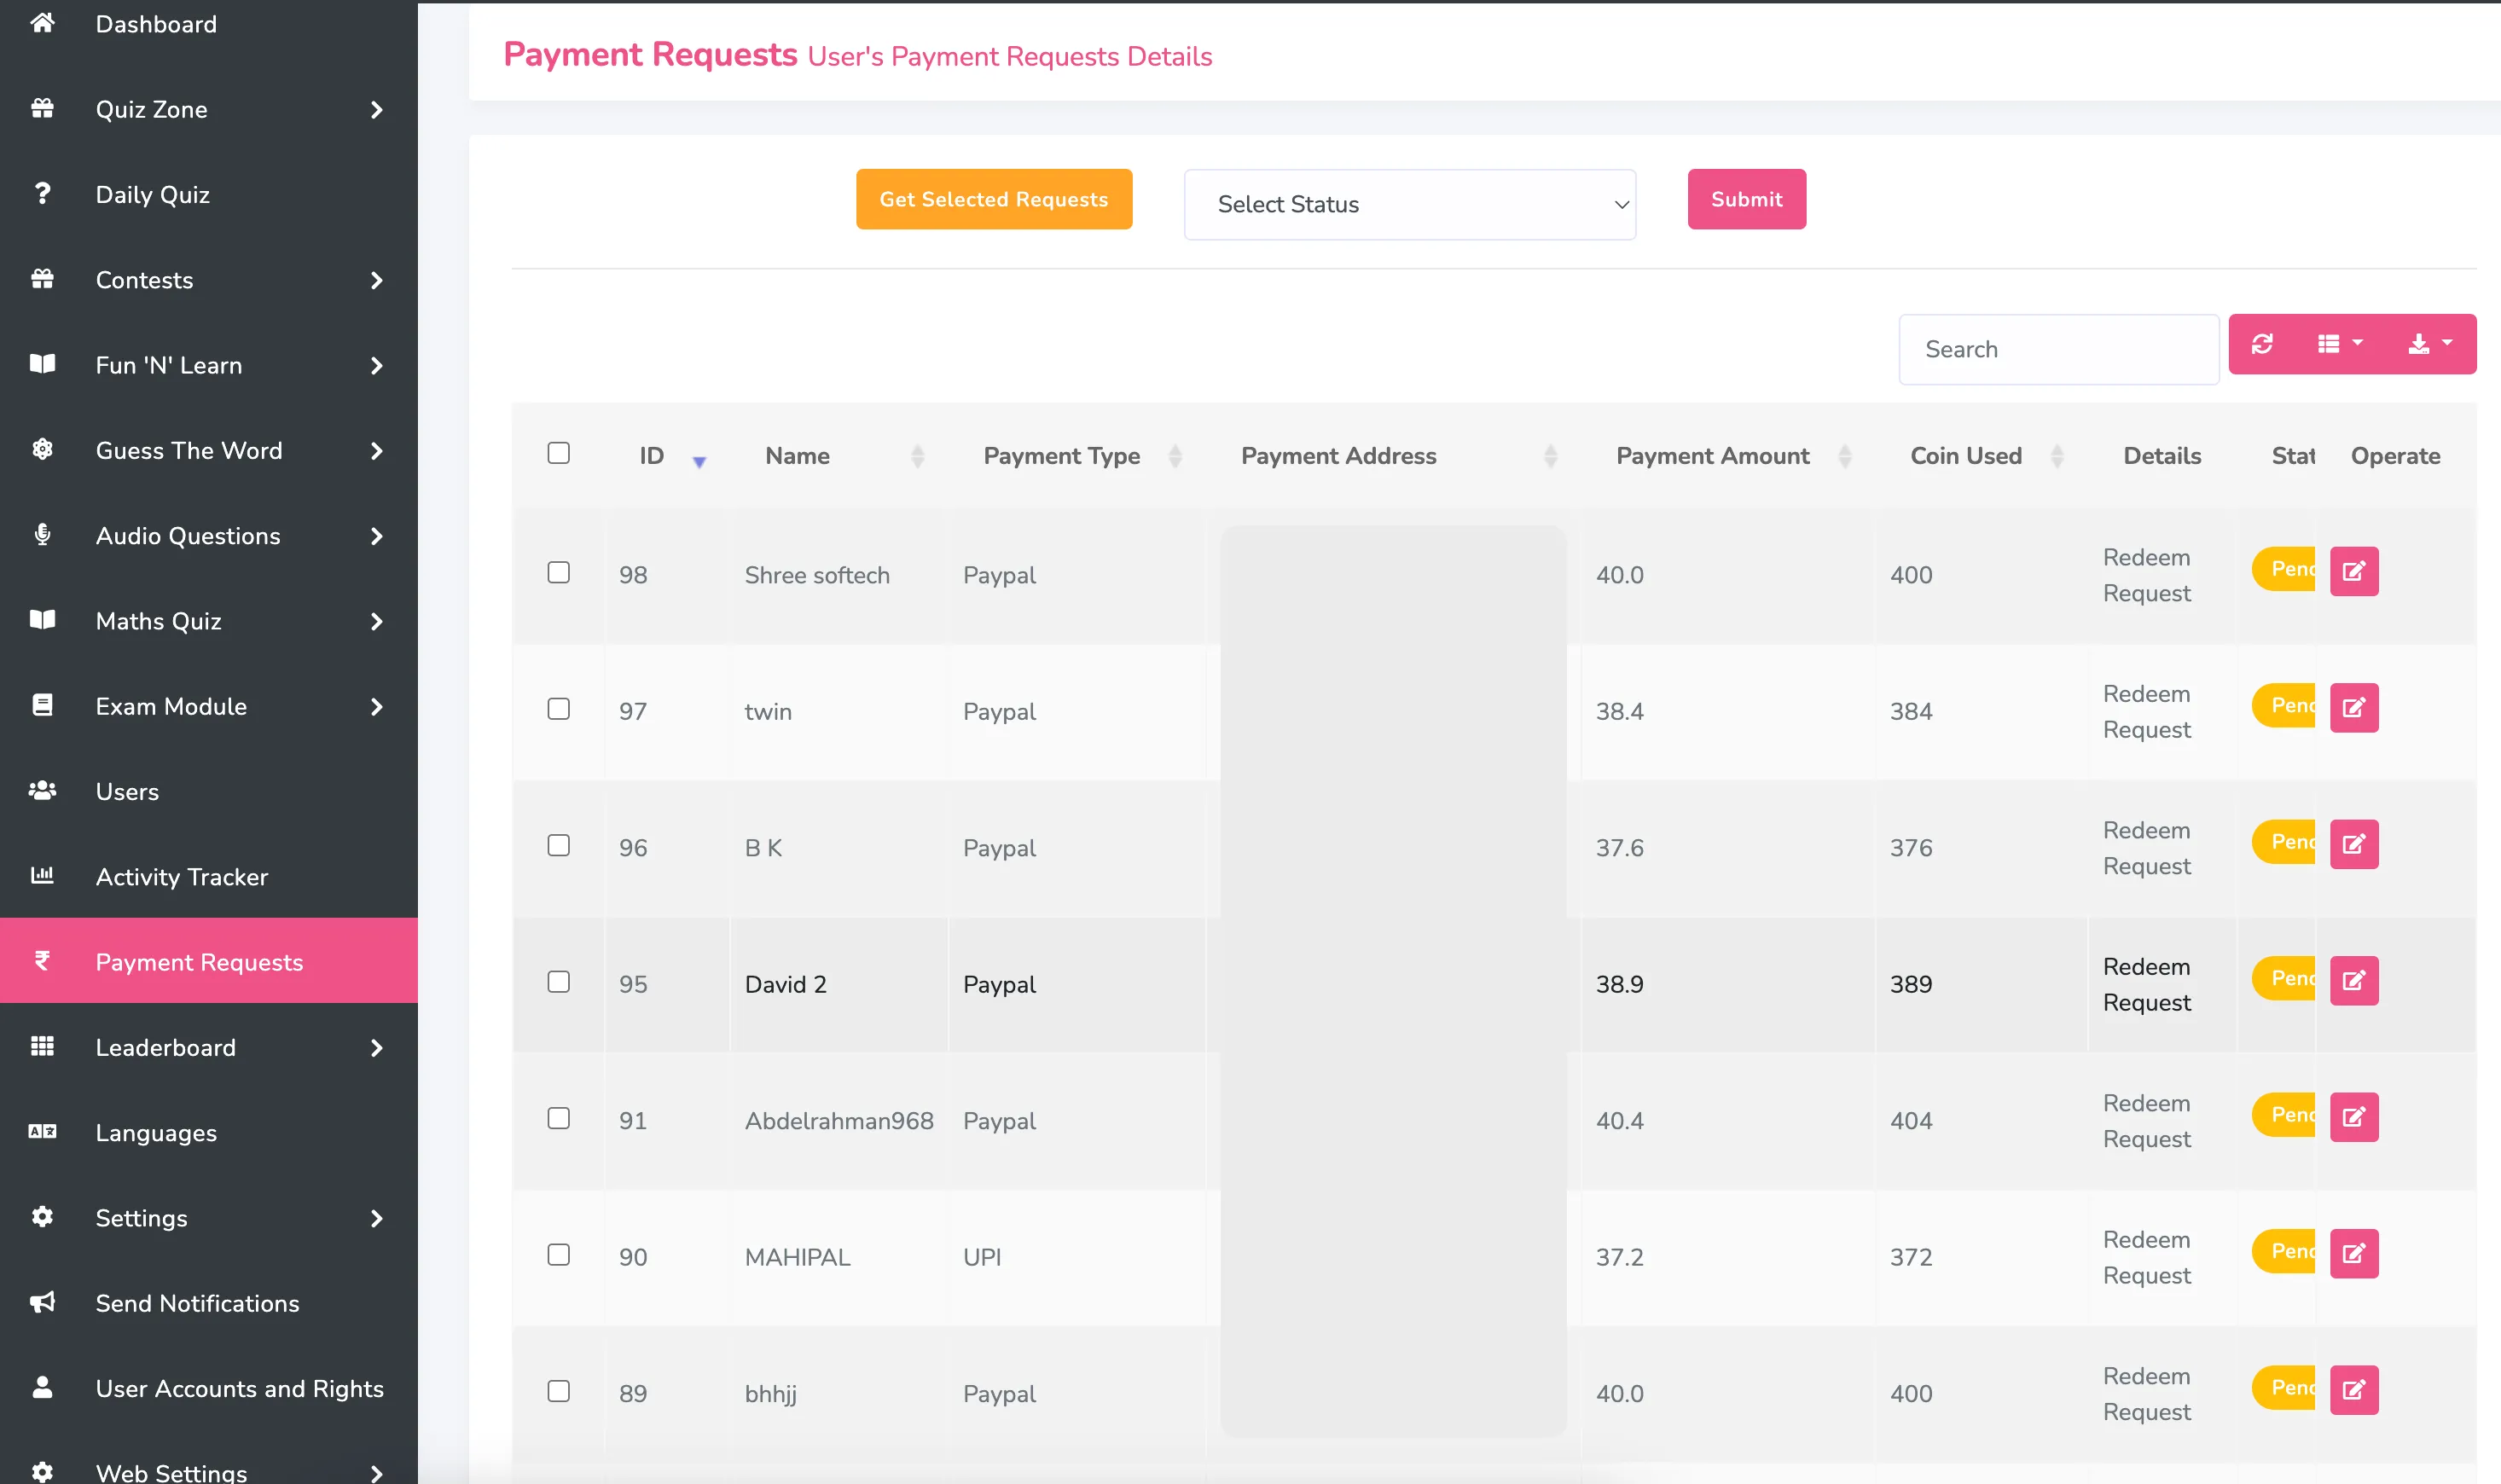
These methods require manual approval by theAdmin, who then proceeds to send the actual funds to the users through their chosen payment options specified in this section.
-
Admincan view and process payment requests in thePayment Requestssection of their Admin Panel.
Configure quiz timers, score and coins management
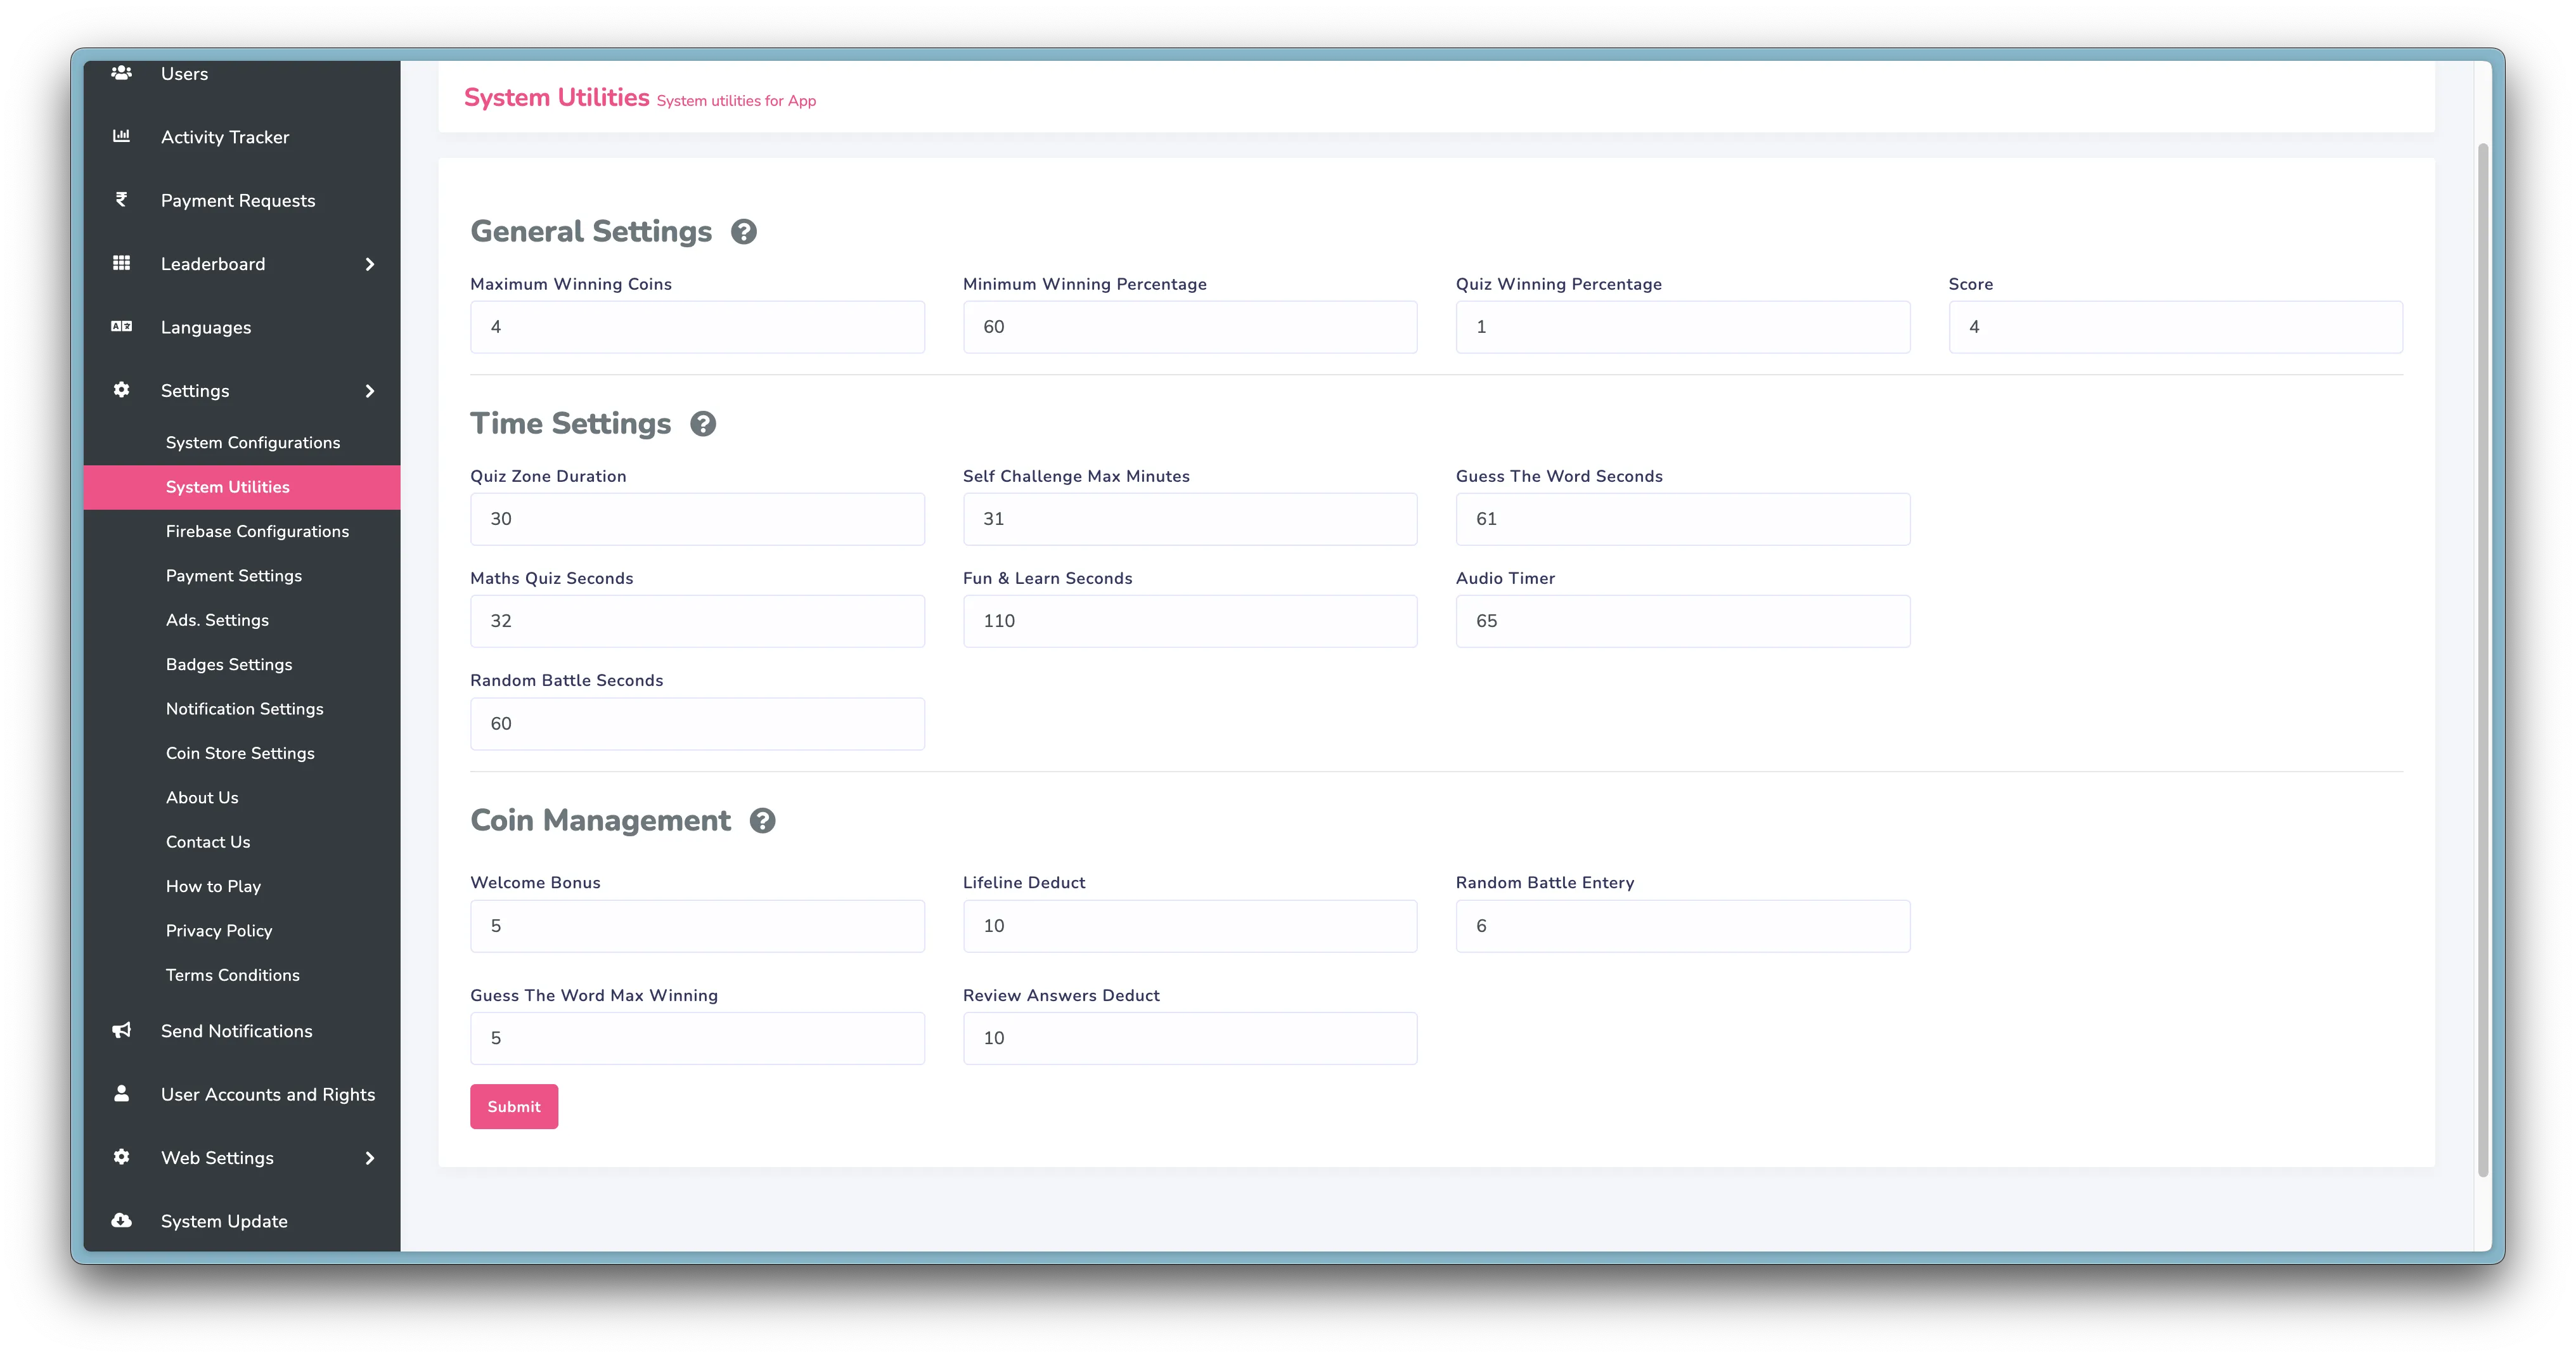
- Maximum Winning Coins : The highest coins users can earn based on their correct answers percentage in the quiz.
-
Minimum Winning Percentage: The minimum correct answers percentage needed to
earn
Maximum Winning Coins. - Quiz Winning Percentage : Percentage required to win the quiz
- Score: Points awarded per correct answer.
- Timer Settings : Customize quiz durations from here.
- Welcome Bonus : coins received on initial login.
- Lifeline Deduct : adjust coins needed for using lifeline.
- Random Battle Entry : base entry fee for playing random battles.
- Review Answers Deduct : coins deducted for reviewing quiz answers.
Change app constants
-
In addition to modifying
System ConfigurationsandSystem Utilities, you have the option to make specific changes to certain application aspects through thelib/utils/constants/constants.dartfile.
These include altering Sound files, setting theinitialSelectedCountryCodefor the default country selection in the Phone login screen,
definingmaxPhoneNumberLengthto limit the phone number length based on your country, adjusting the wait duration for opponents in battles, setting the in-between questions duration, modifying the deduction for wrong answers, and configuring extra points for the quickest answers, among other possibilities.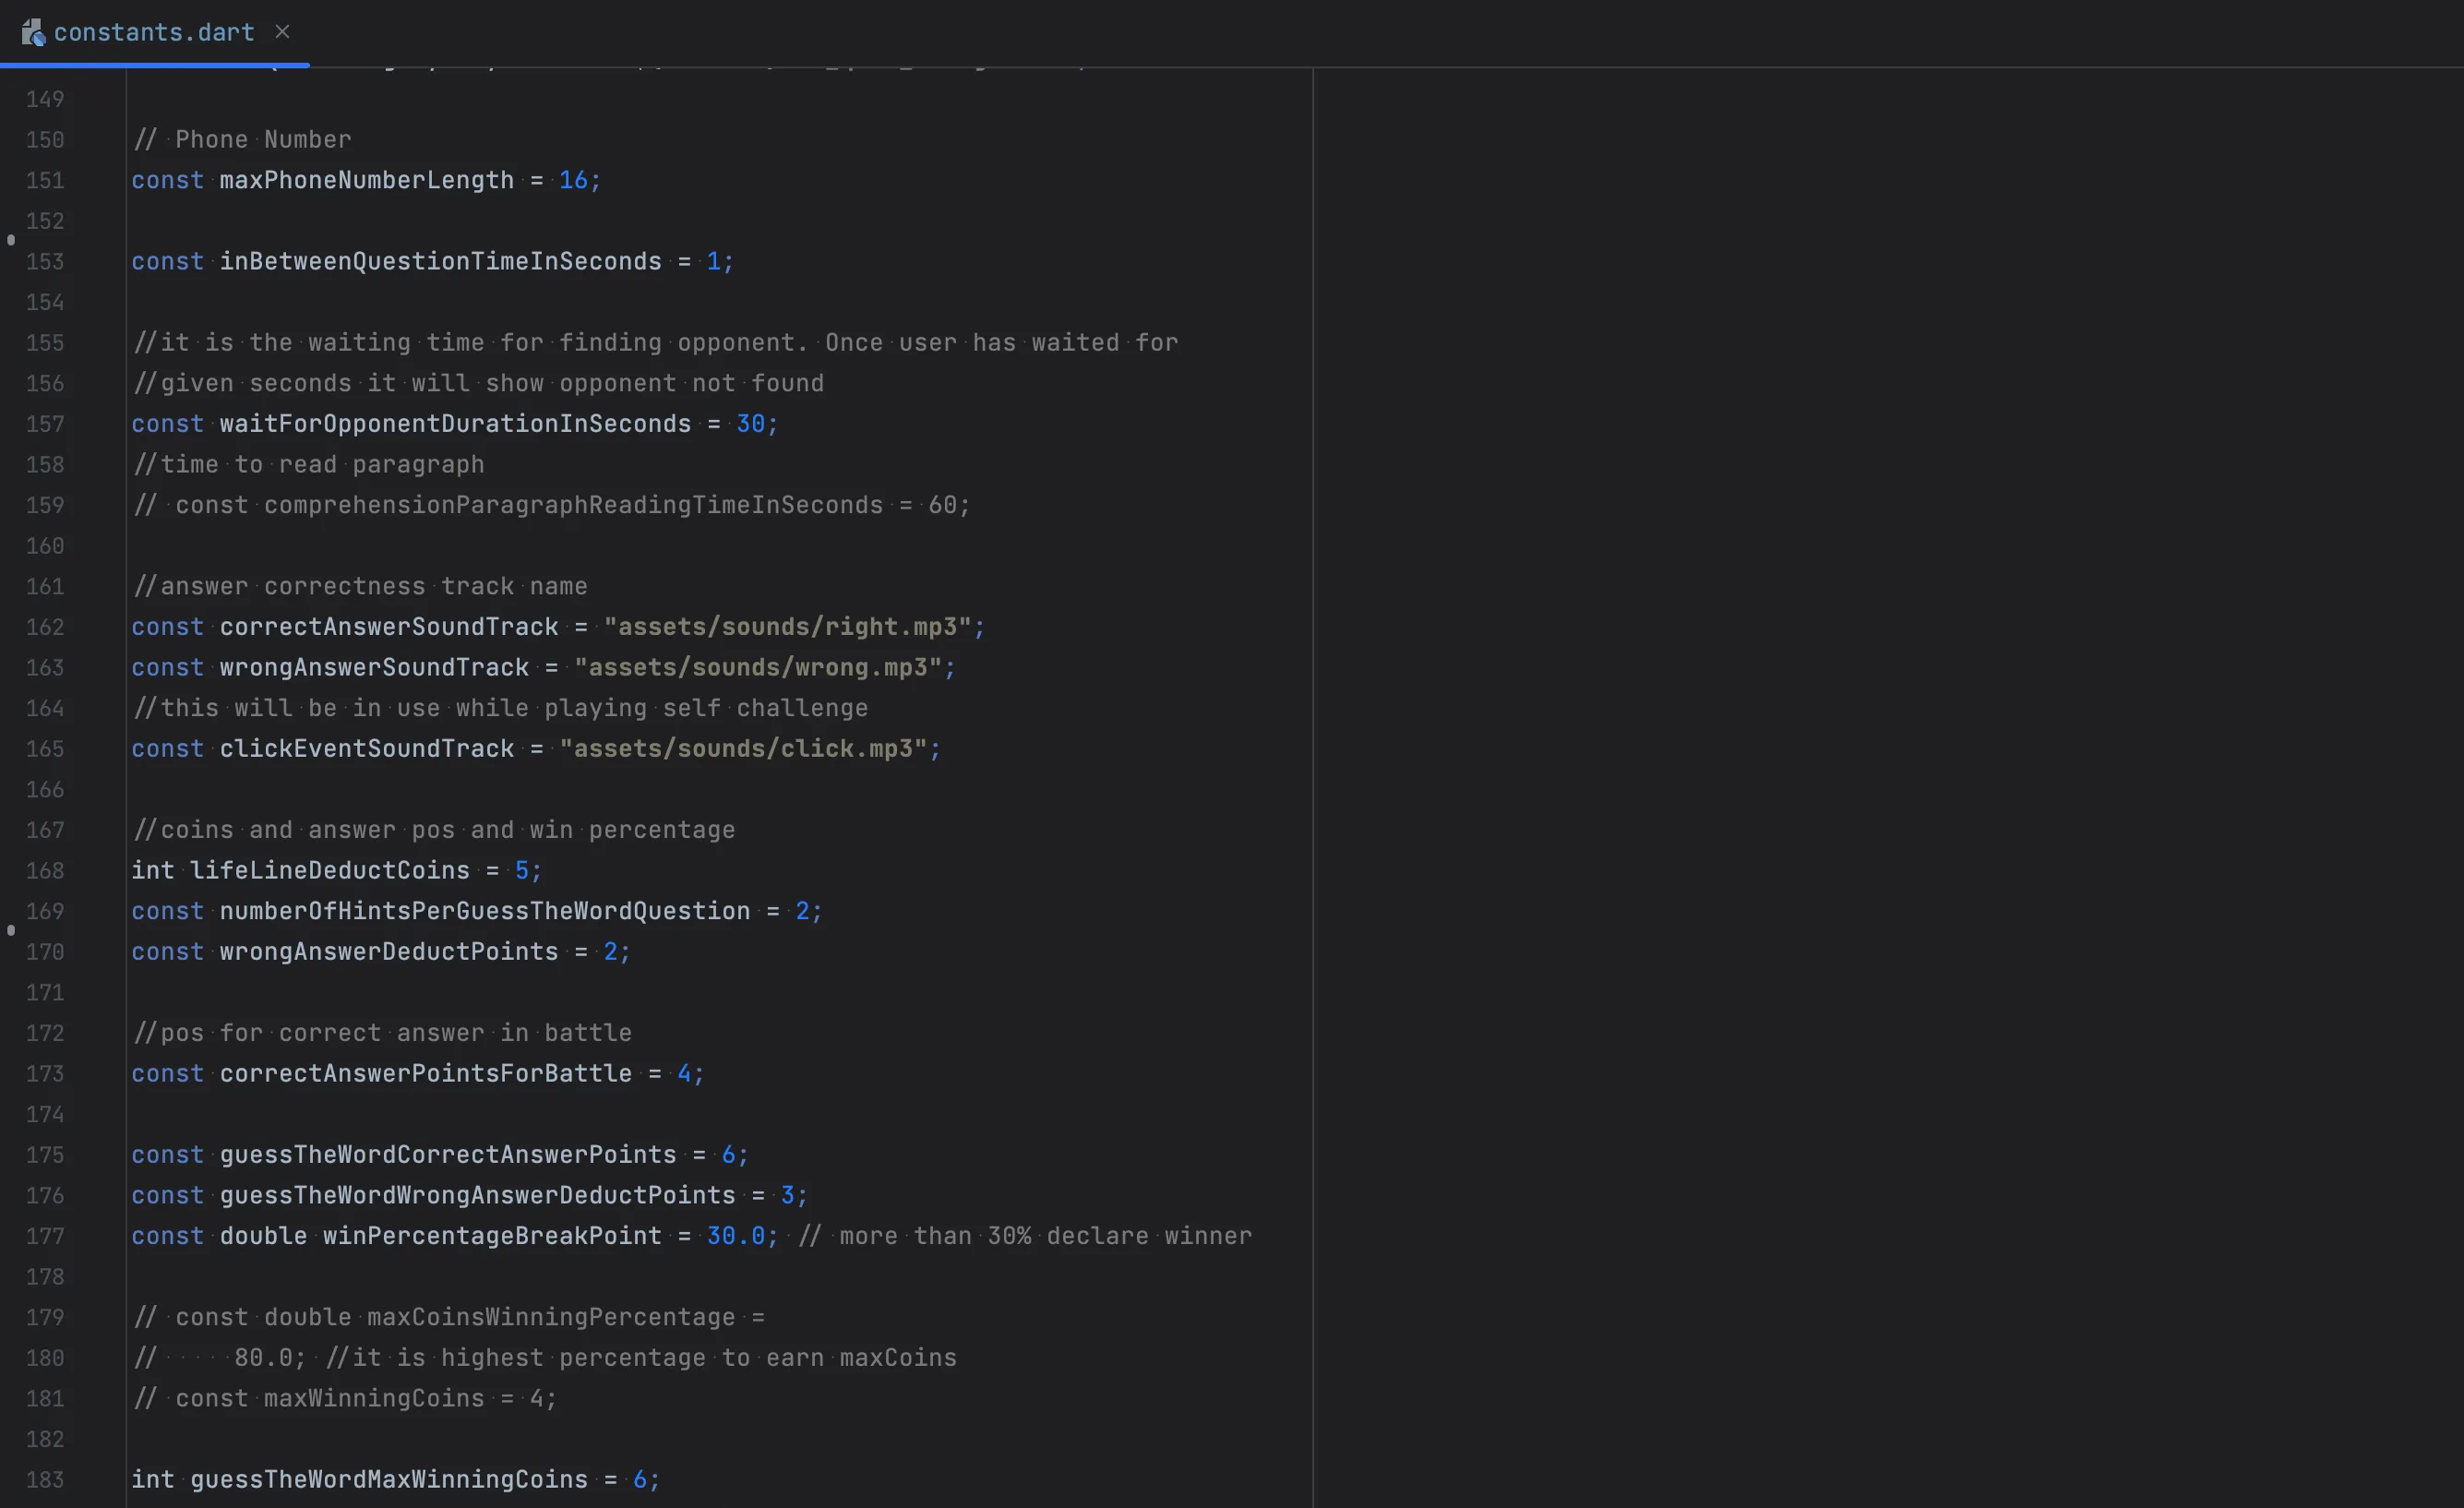
-
To modify coin distribution, access
lib/utils/ui_utils.dartand update the equation according to your preferences.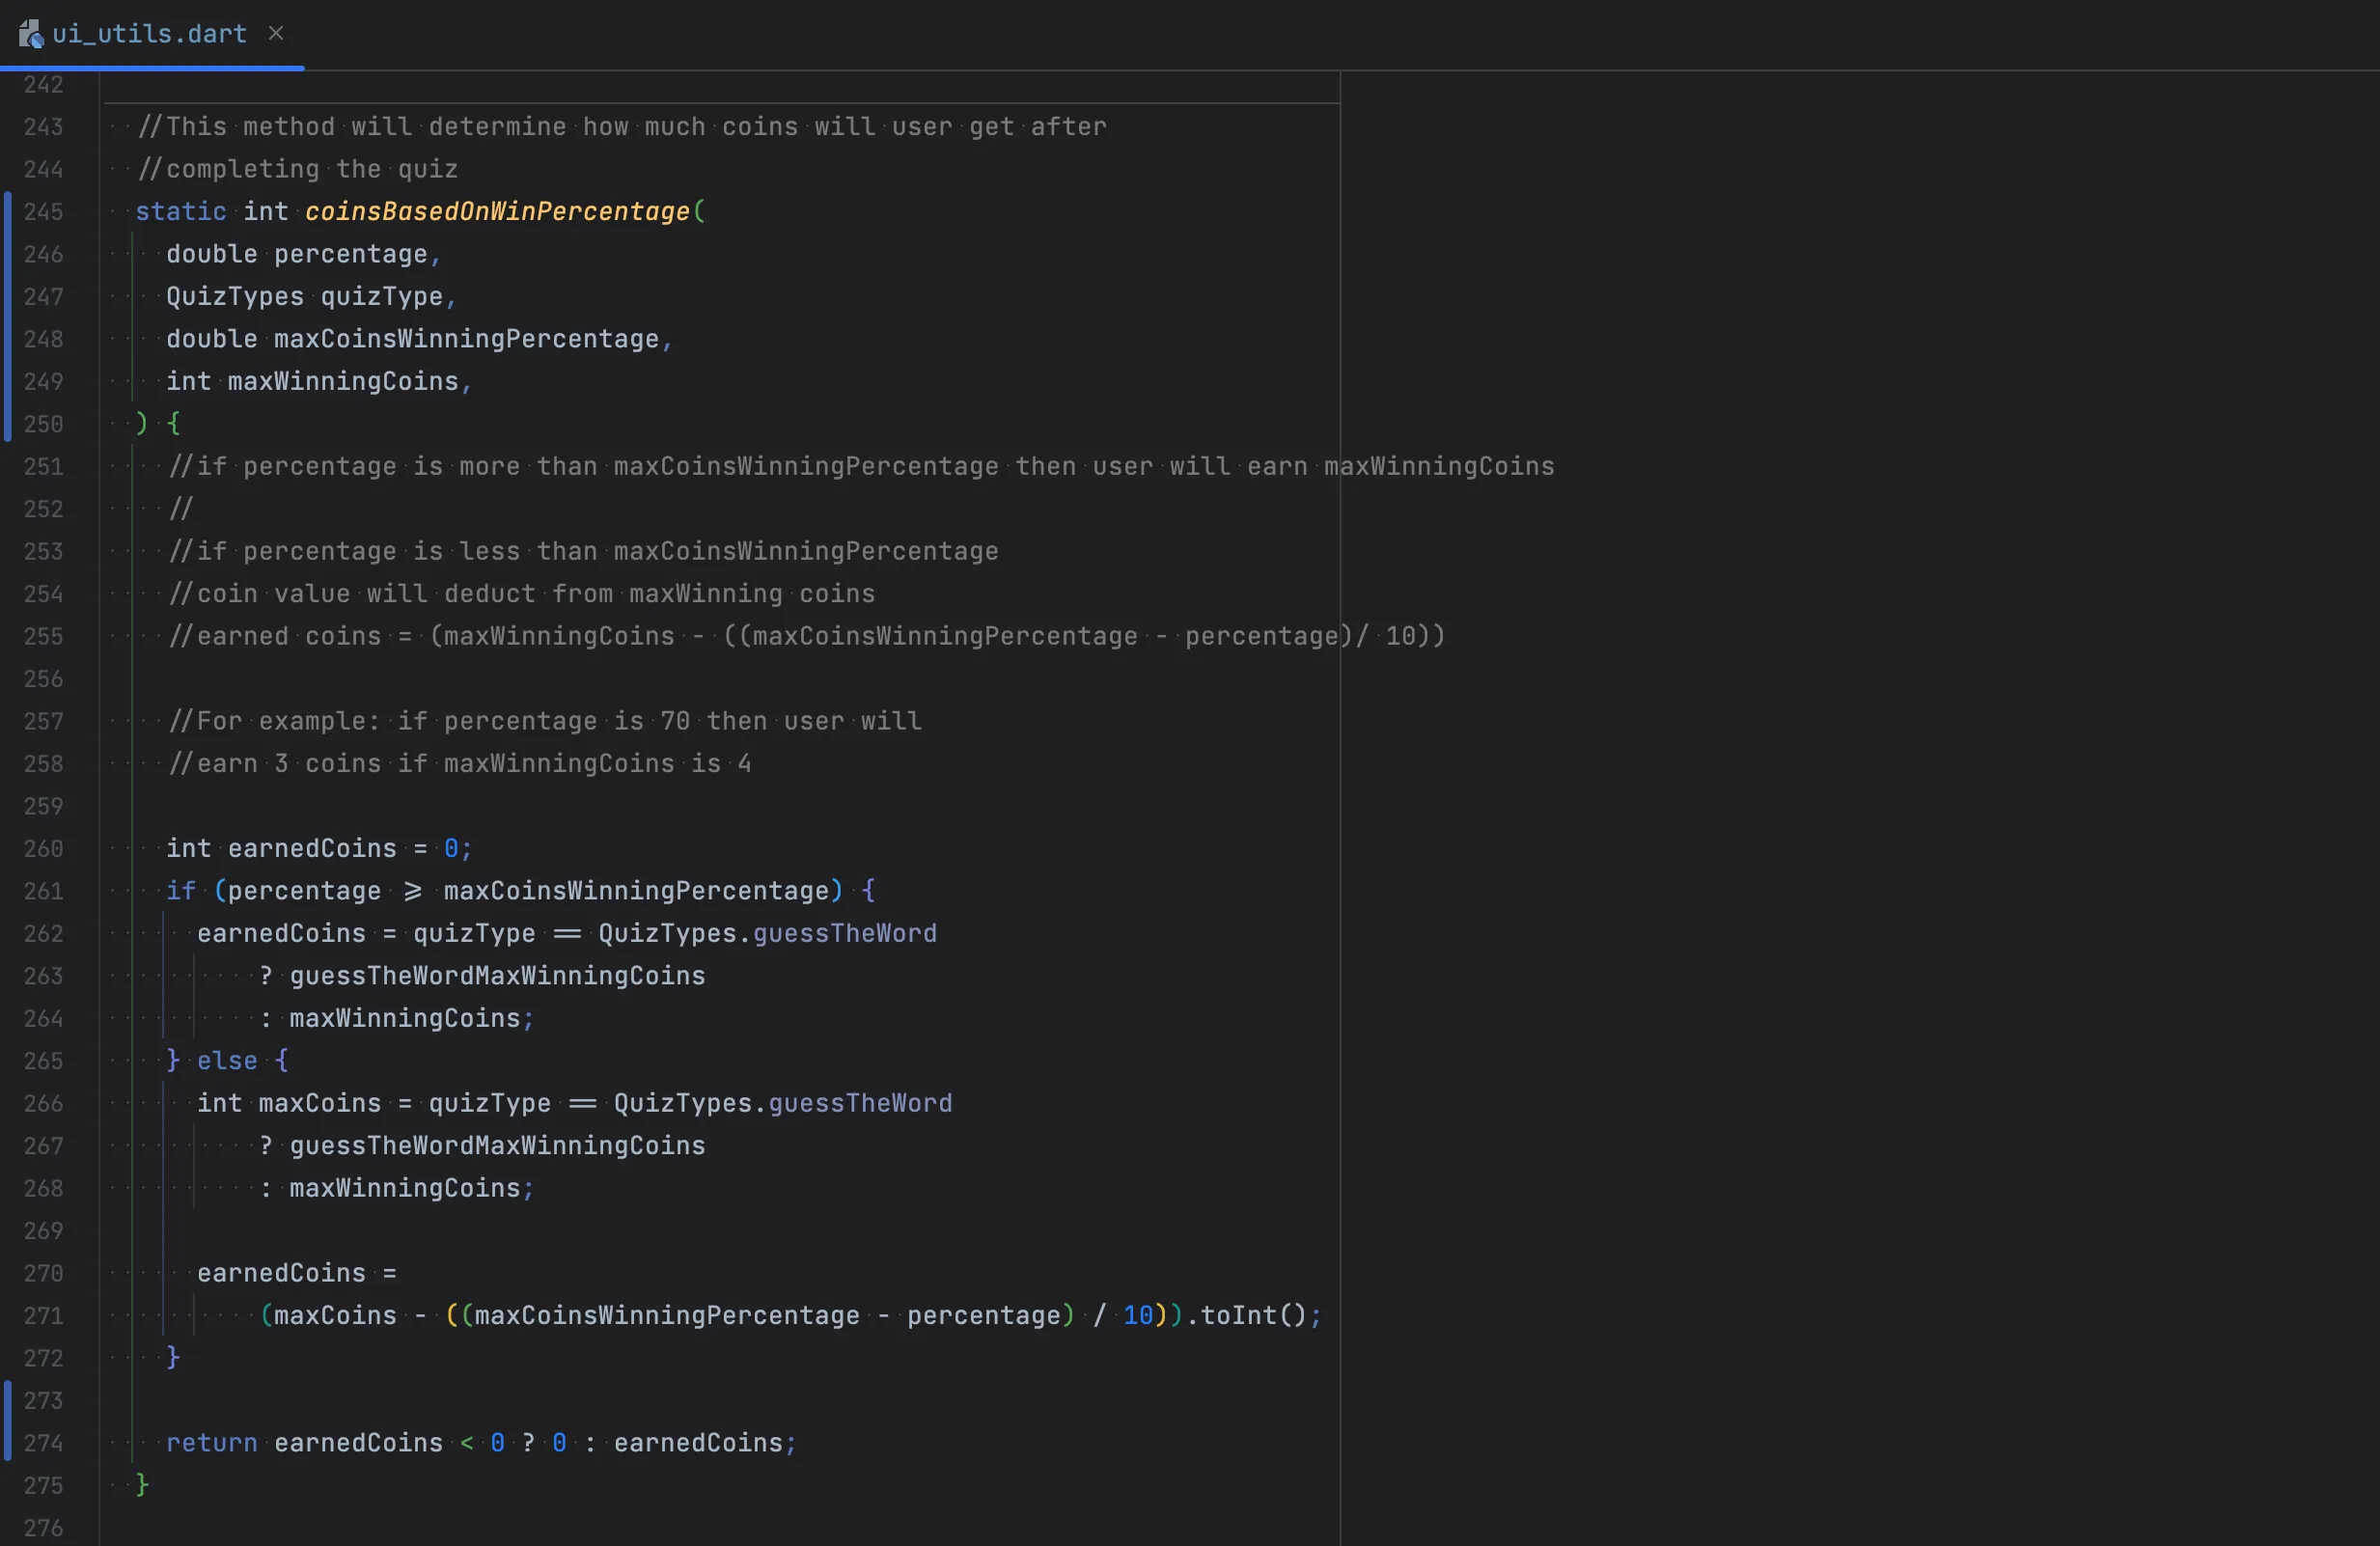
Generate release version of this product
To generate the release version of this application, please refer to the platform-specific guides: Android IOS .Important: Before deploying to IOS, ensure that the "China" option is unchecked as demonstrated in the image below.

SHA keys and Keystore Basics
For Android build you need to understand few things.- Basically Keystore file is used for signing your app. each keystore file having SHA keys, which gets associated with your app.
- SHA keys are required for android version of the app's login and battles functionalites to work.
-
Firstly, there are 2 keystores important,
debug.keystorewhich might be already present after you have installed android studio and release/upload keystore, which you will have to create when you want to publish the app. -
To get the debug SHA keys from debug.keystore
Mac:keytool -list -v -alias androiddebugkey -keystore ~/.android/debug.keystore
Windows:keytool -list -v -alias androiddebugkey -keystore %USERPROFILE%\.android\debug.keystore
-
go to
android/app/build.gradleand scroll down to buildTypes as shown in the image.
- you can select which keystore to use for signing by commenting and uncommenting them.
-
Now, run the app in android once, after running the app, in the terminal go to
android folder then,
run./gradlew :app:signingReportit will output which keystore the app is signed with currently. - add both SHA-1 and SHA-256 keys in your firebase project. then re-download the Google Services json file
To Create Upload Keystore
To create upload keystore, using keytool use below command.
										keytool -genkey -v -keystore upload.jks -alias key -keyalg RSA -keysize 4096
										-storepass upload123 -keypass upload123 -validity 10000
To read the keystore details
-
keytool -v -list -keystore upload.jks -storepass upload123 -keypass upload123 -
Then sign your app with upload.jks for release build by adding it’s details in
android/key.propertiesas shown in the image.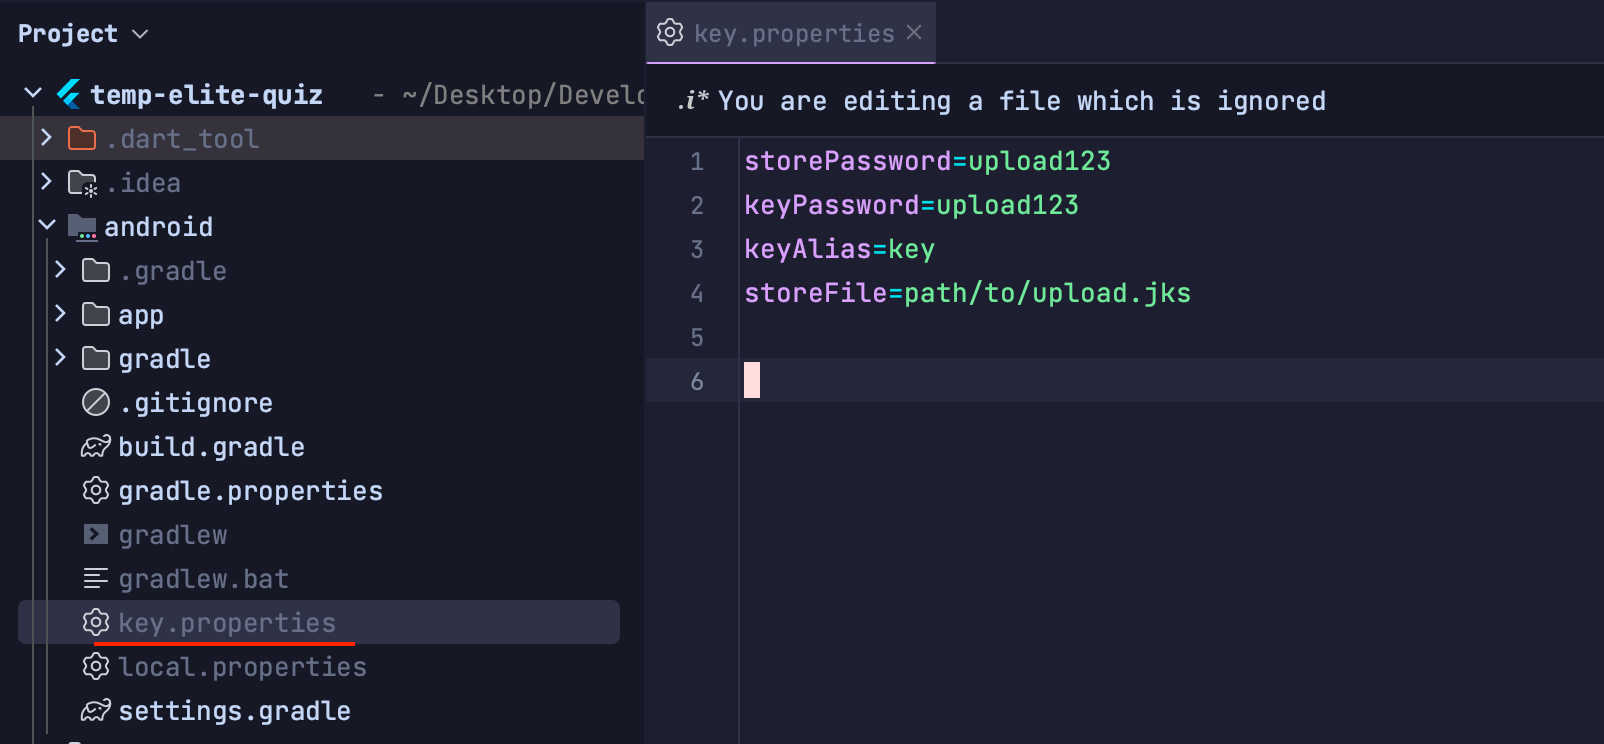
- rebuilding the app again should use your new upload keystore.
- Add both SHA-1 and SHA-256 keys in your firebase project. then re-download the Google Services json file.
And finally after you have published your app on play console, you need to add 4 more SHA keys in the firebase from the play console.
to get them follow this link: https://play.google.com/console/developers/app/keymanagement
Data Safety Form Submission Guide for Play Console
Please watch the YouTube video below for a concise tutorial on completing the mandatory Data Safety Form in Play Console.
FAQ
Common Issues
-
If you are seeing warnings on admin panel after the installation, then check if
the warning contains
ini_set()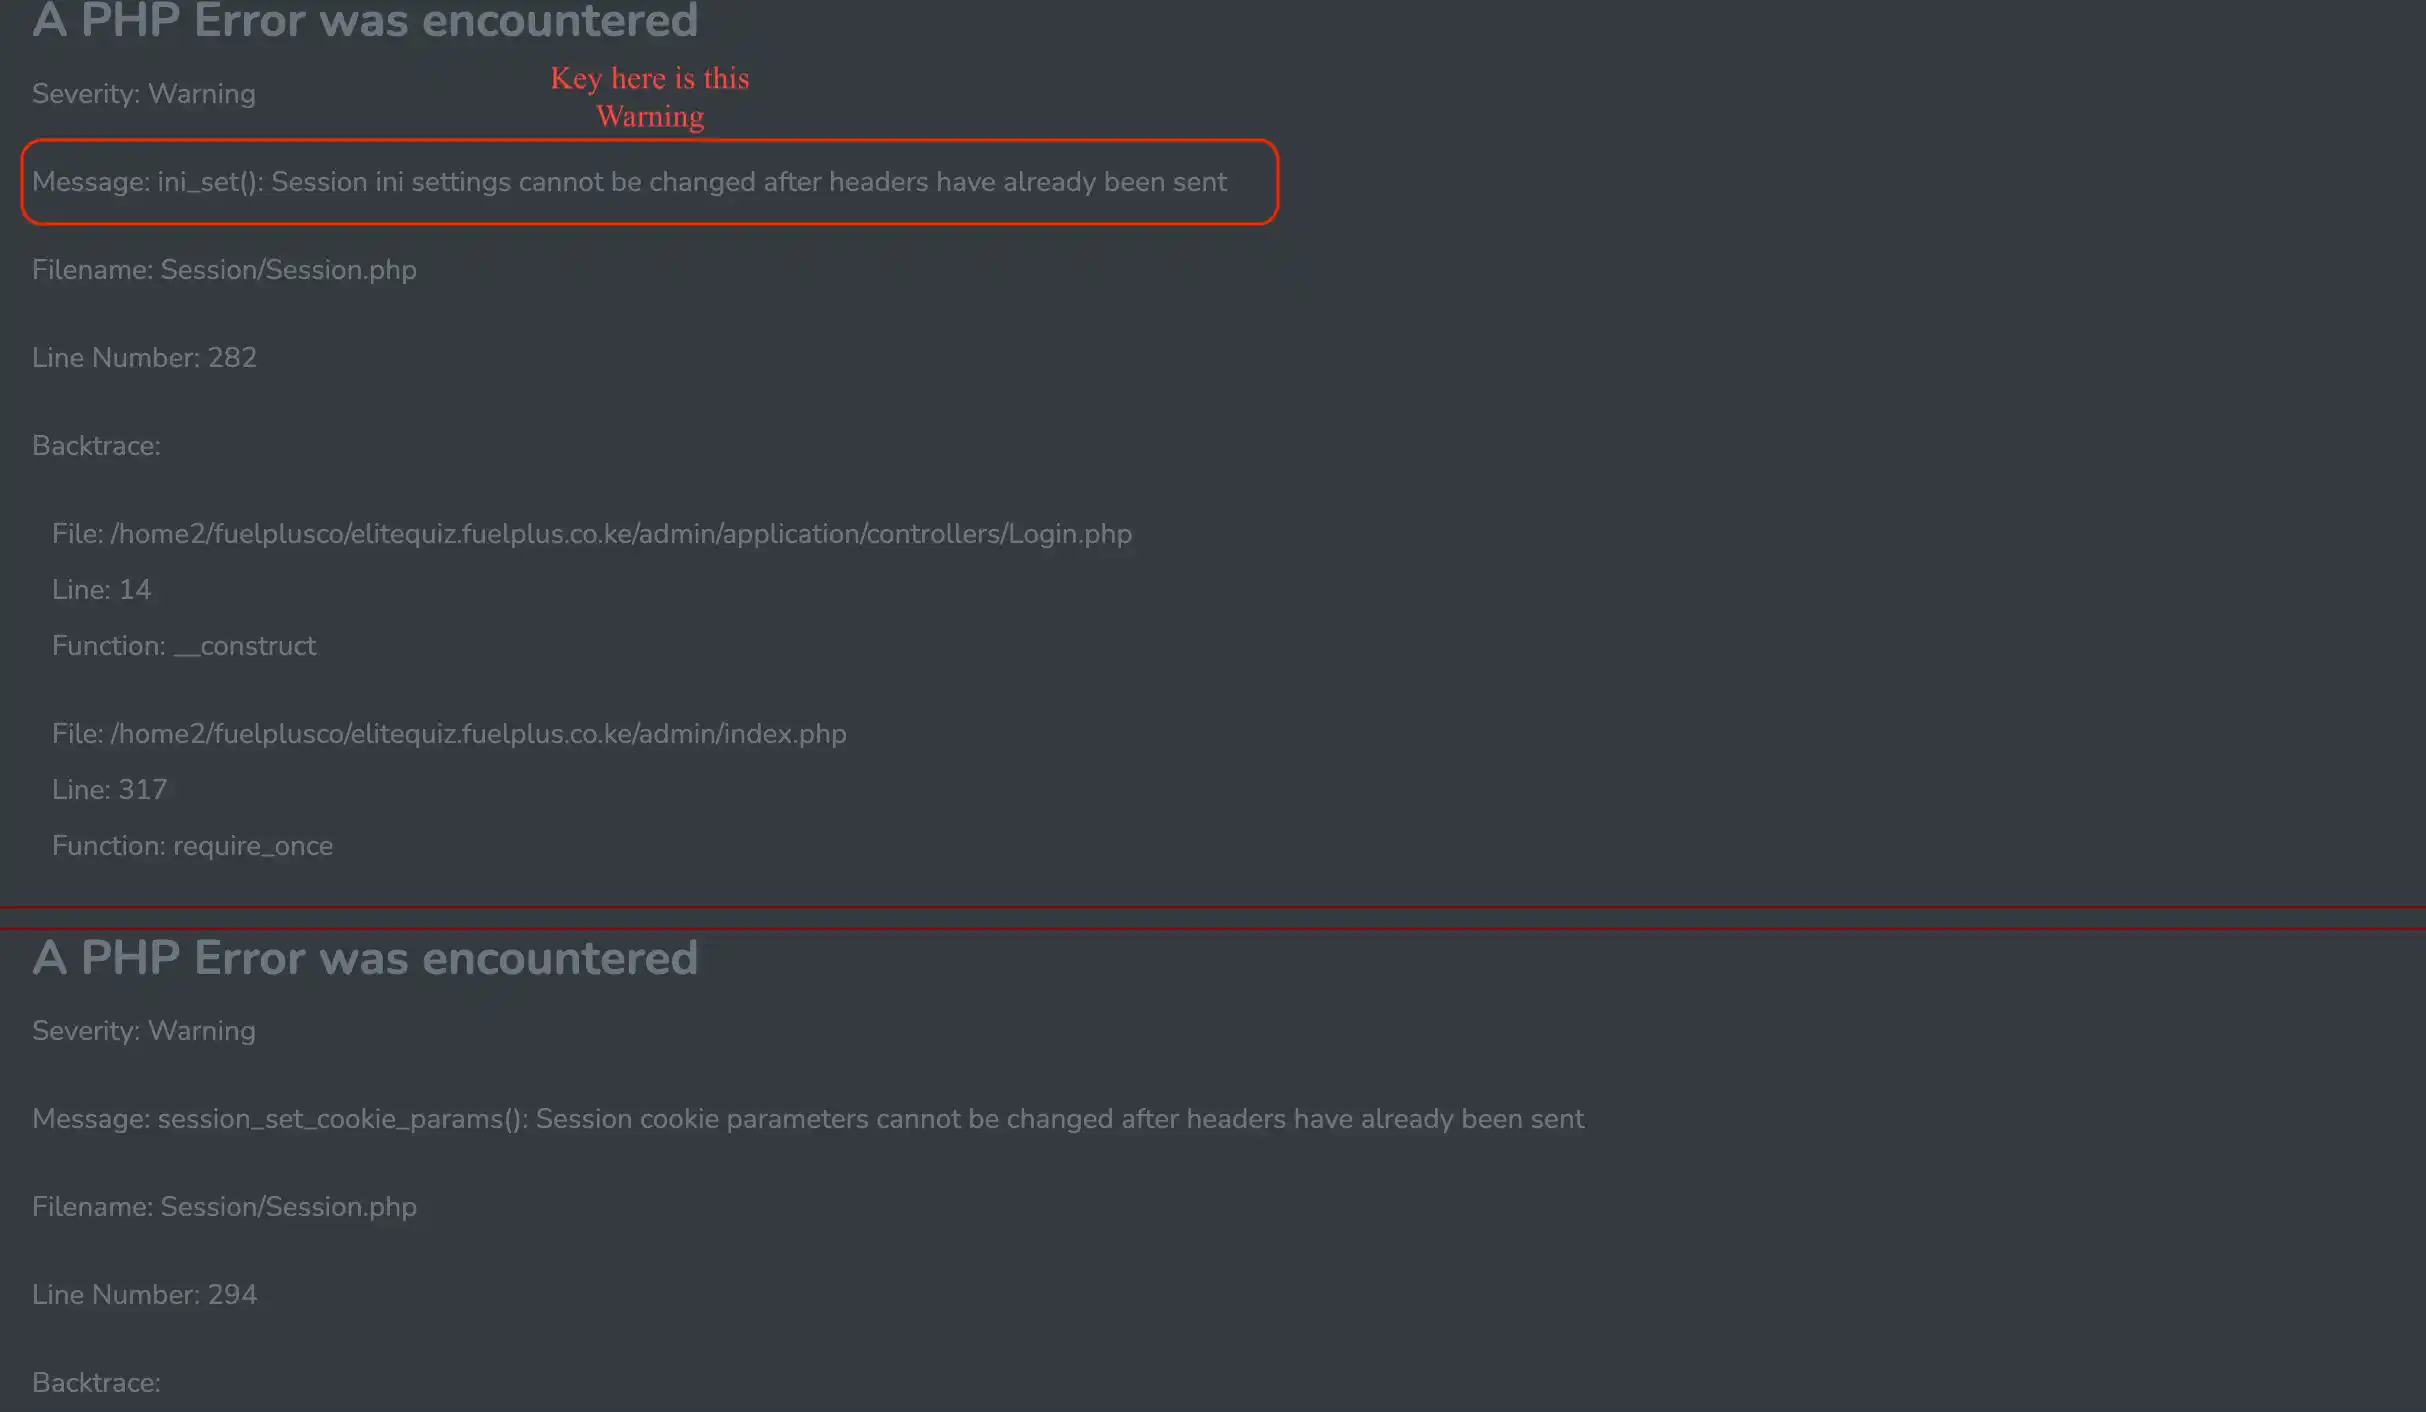
Solution:
Then Add
ob_start();in yourindex.phpfile, like shown in the image.
-
Critical security vulnerability was discovered in reCAPTCHA Enterprise for Mobile. (Not required after v2.1.5, already added)
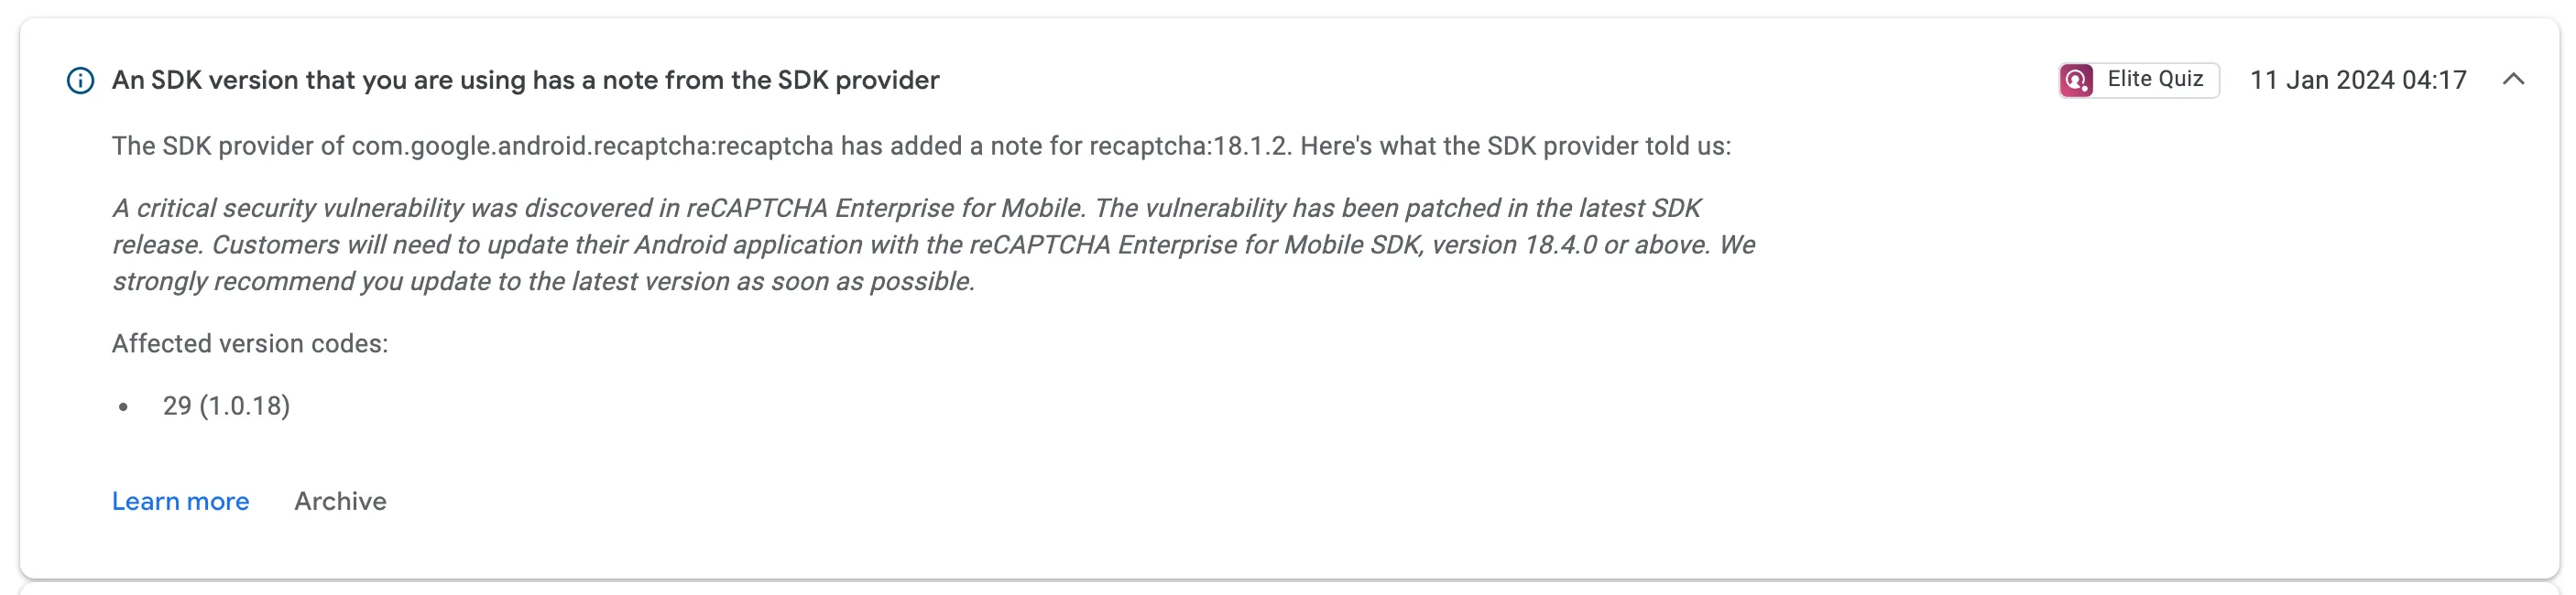
This is issue related to Firebase Auth package. which should be fixed in next update of the firebase_auth (current version is 4.16.0).
For currently you can add the following line in
android/app/build.gradle, in the dependencies section, like shown in the imageimplementation 'com.google.android.recaptcha:recaptcha:18.4.0'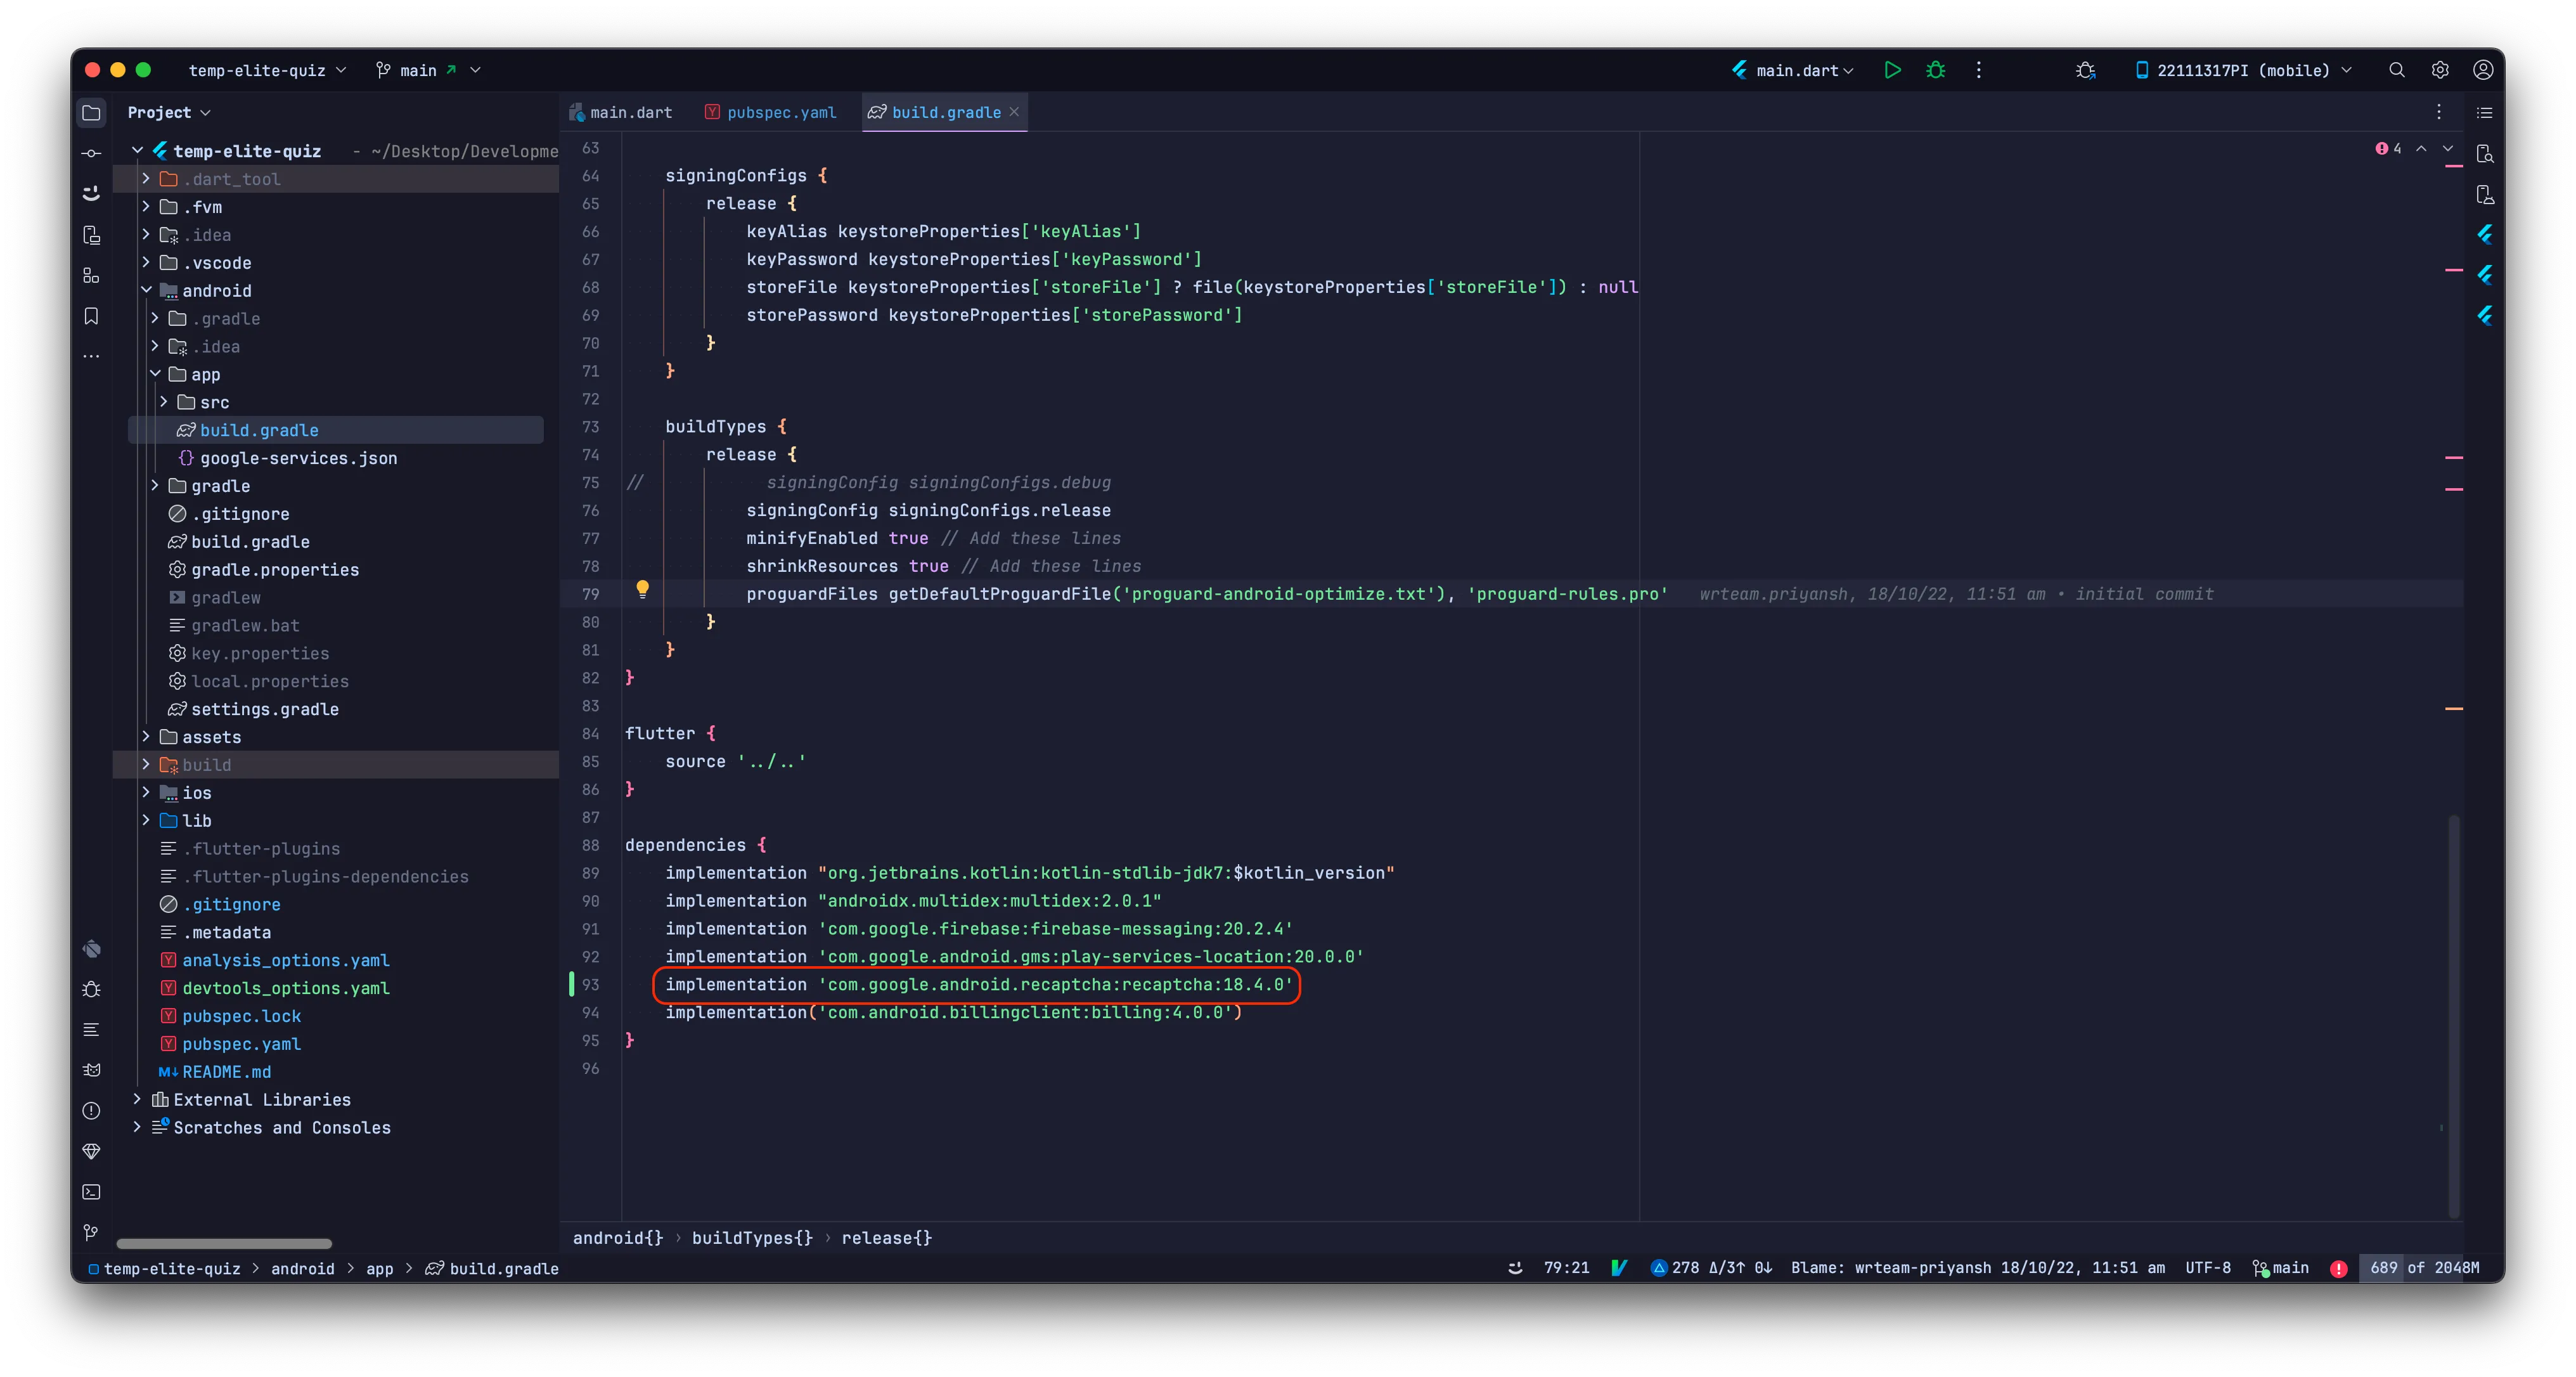
Contact Support
Delighted to serve and support you! Contact our support team led by Jay Parmar on Microsoft Teams.We're available Mon-Fri, 9:00 am - 6:00 pm IST (GMT +5.30), India - Asia.
Expect prompt responses within 24 hours via comments, forum, or email.
Your Feedback
We highly appreciate your decision to choose our product. Providing top-notch
service is our priority, and we value your feedback.
Kindly take a moment to rate us by clicking
the link
. Your honest input helps us improve and deliver the best experience possible.
Your input helps us improve!
Sharing your thoughts and experiences with our app helps us identify areas for improvement and ensure it meets your needs. We don't collect any personal data when you provide feedback.
Share your bug reports, suggestions and areas for improvement, or engage in discussion through our feedback portal here
Reach Us
Unlock the potential of WRTeam, your go-to hub for top-notch Flutter app
development and web applications.
Reach out to us today for quality solutions and exciting freelance opportunities.
Visit us at
wrteam.in
or drop an email to
support@wrteam.in
.
Thank you for considering us!