Introducation
eCart Front End is Web Version of eCart - Grocery, Food Delivery, Fruits & Vegetable store, Web Version
Thank you for purchasing code. It really means a lot and It's our pleasure to serve top-notch service to you. Thank you so much for choosing WRTeam . If you have trouble with the code and documentation please contact to our Support Team Here
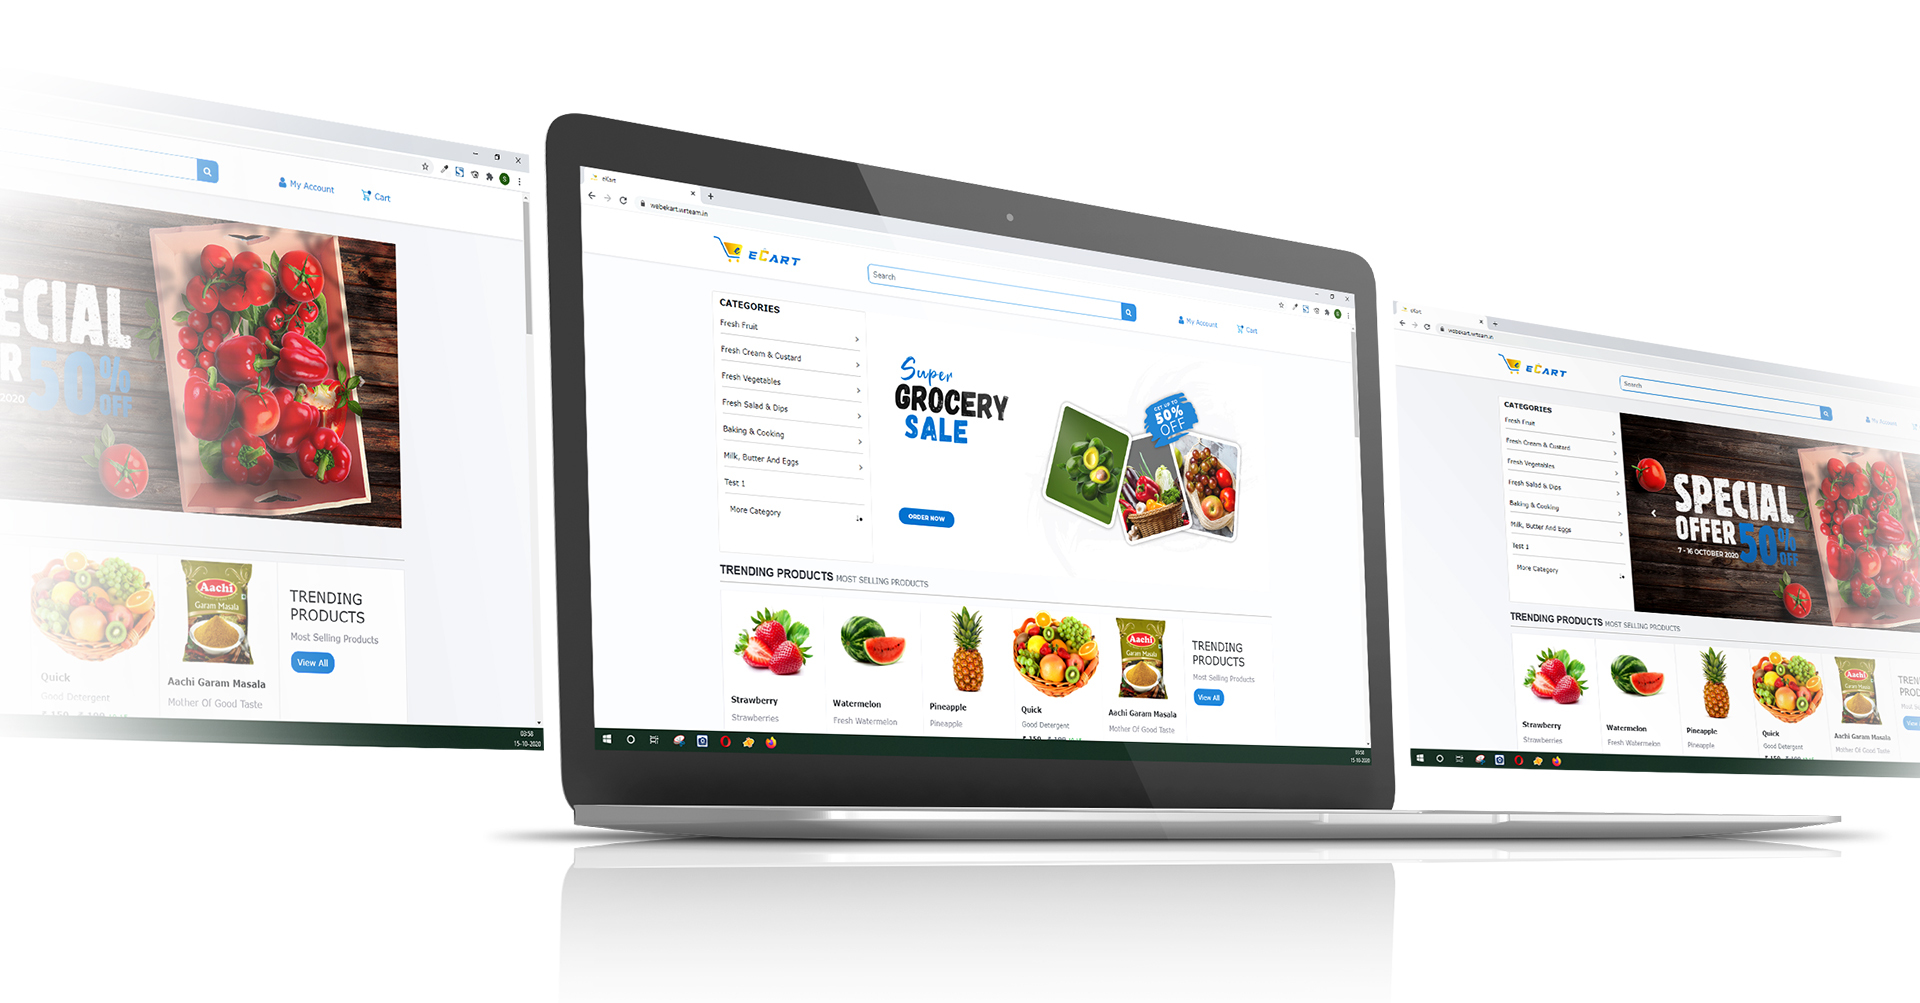
Installation of eCart Front End Website on your server
- Upload Main Code to server in root directory
- Then edit .env file
- Change APP_URL Parameter with website url
APP_URL=https://websiteurl.com/ - Add New Parameters as follwing
- API_URL with value of eCart's API URL. For E.g.
API_URL=https://adminpanelurl.com/api-firebase/(admin panel url/api-firebase) - ASSET_URL with value of eCart's ASSET URL. For E.g.
ASSET_URL=https://websiteurl.com/public(website url/public/)
- API_URL with value of eCart's API URL. For E.g.
- Then go to config folder and find ekart.php file.
- Change APP_URL Parameter with website url
APP_URL=https://websiteurl.com/ - Change API_URL Parameter
API_URL=https://adminpanelurl.com/api-firebase/(admin panel url/api-firebase)
- Change ASSET_URL Parameter
ASSET_URL1=https://adminpanelurl.com/dist/img/(admin panel url/dist/img/)
-
Change Following Parameter as per need else leave with default file.
Note : Make sure following values are same which are used in eCart Admin Panel.- jwt_secret_key - Keep same key in web side
config/ekart.phpand admin panel sideincludes/crud.php
- jwt_secret_key - Keep same key in web side
- Contact Us Form Details.
Note : Make changes on .env file.(Change your mail details on .env file)
- MAIL_HOST with value of your host. For E.g.
MAIL_HOST=mail.wrteam.in - MAIL_PORT with value of your port. For E.g.
MAIL_PORT=587 - MAIL_USERNAME with value of your username. For E.g.
MAIL_USERNAME=noreply@wrteam.in - MAIL_PASSWORD with value of your password. For E.g.
MAIL_PASSWORD="your_password"(password should required in double quotes.)
$message->to('noreply@wrteam.in')->subject
                                    ('Enquiry Mail');
- MAIL_HOST with value of your host. For E.g.
Thats it! Now you are ready to run your eCart Front End Website
Goto: https://YOURDOMAIN.com/
(Please see below for Firebase Setup its required)Firebase Setup
STEP 1 - Create Firebase Project
- Goto Firebase console.
- Register new account or try to log in with existing accout
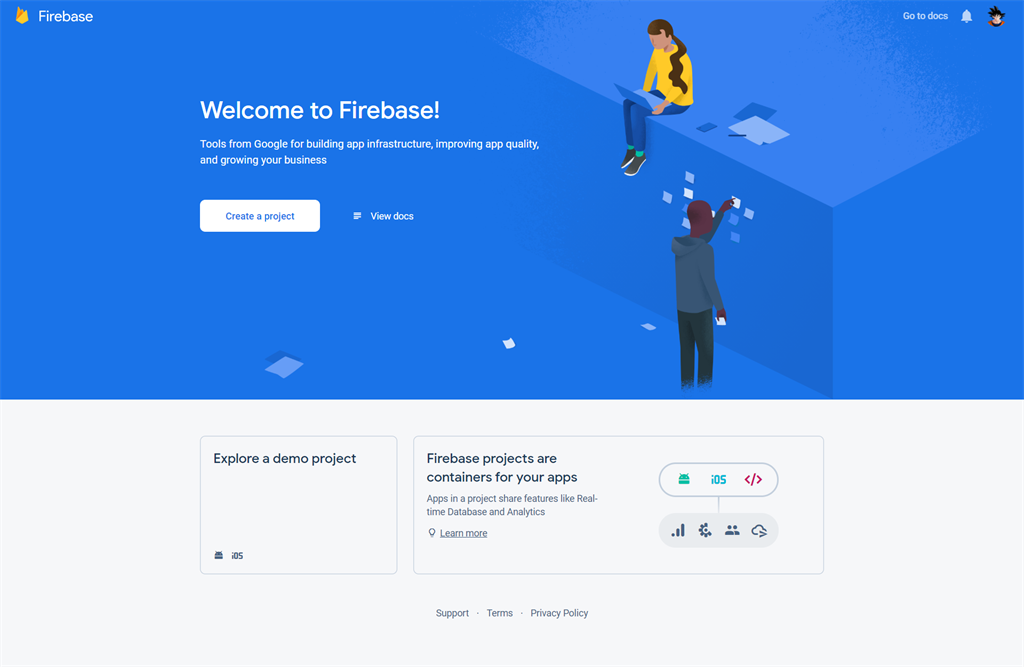
- Once logged in, you can see firebase console dashboard. Click on Add Project. Provide a project name, and then select country and then after that click on Create Project. For example, see the below image.
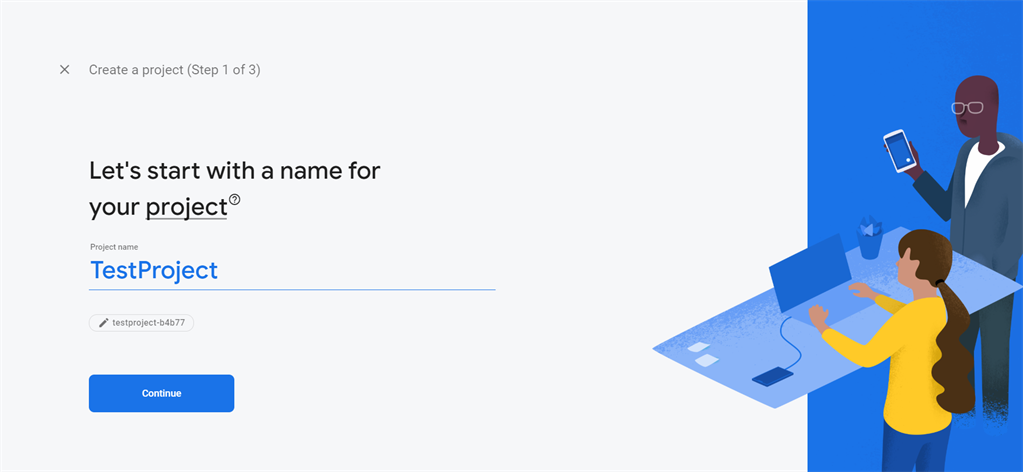
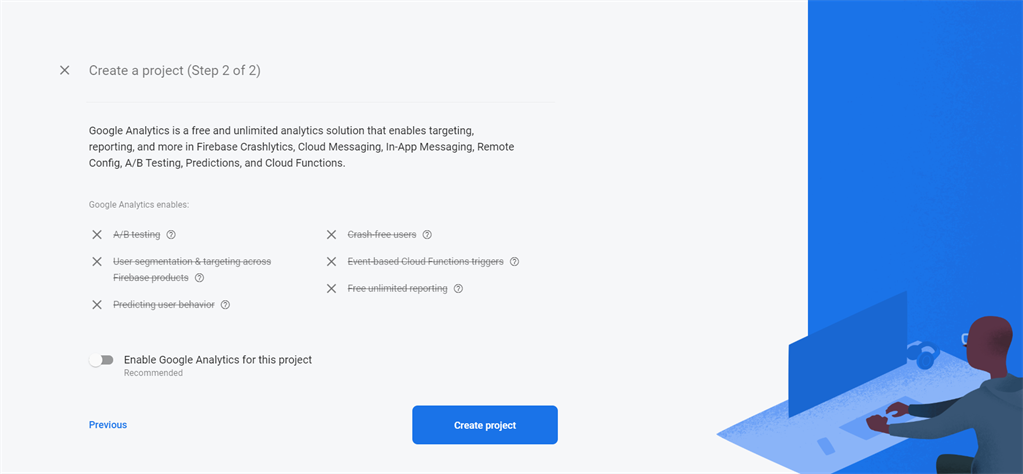
- Once the project has been created, it will automatically redirect to Firebase dashboard screen

-
As eCart Front End is a web project, you need to add web project/application to the firebase project.
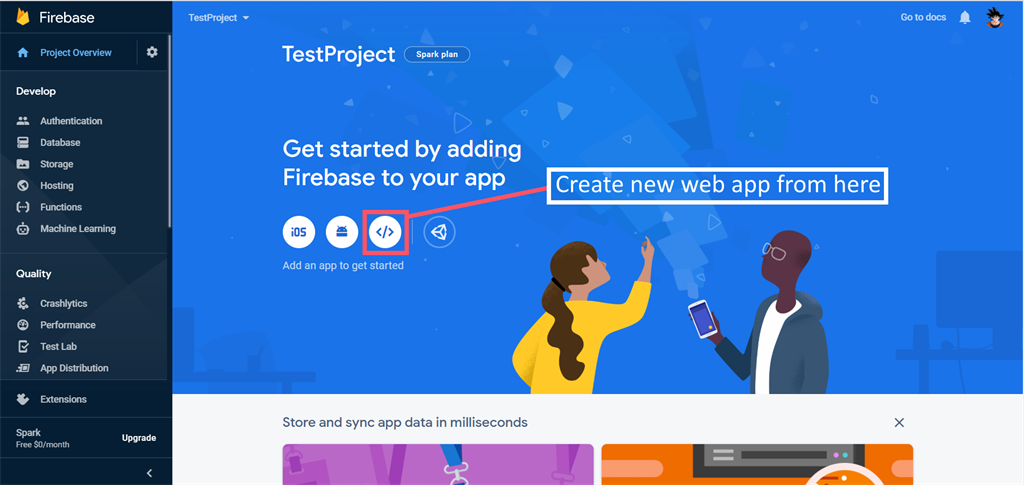
-
As mentioned in an earlier image, you can add Firebase to your web app.
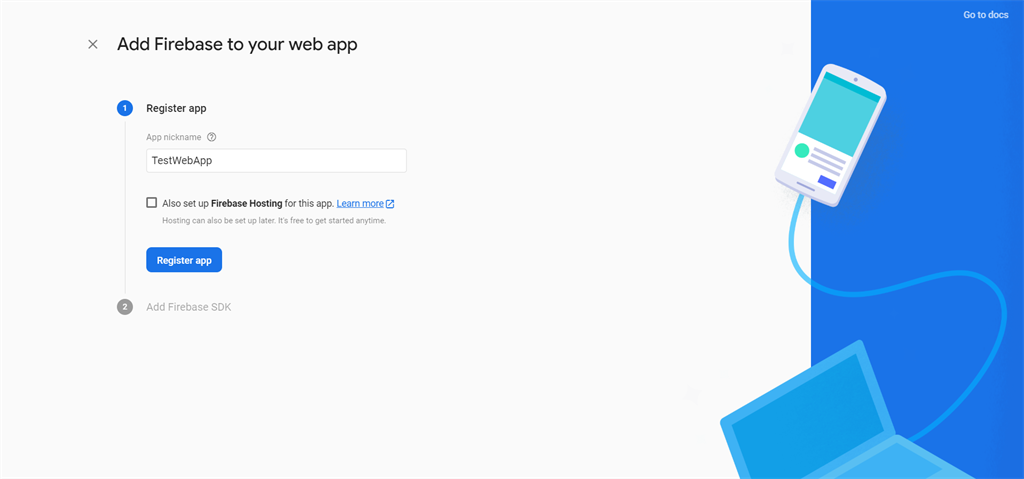
-
Once the web app been added into Firebase, you'll get a web app configuration Javascript code which you have copy and paste in
resources/views/themes/ekart/common/footer.blade.php. and remove below lines: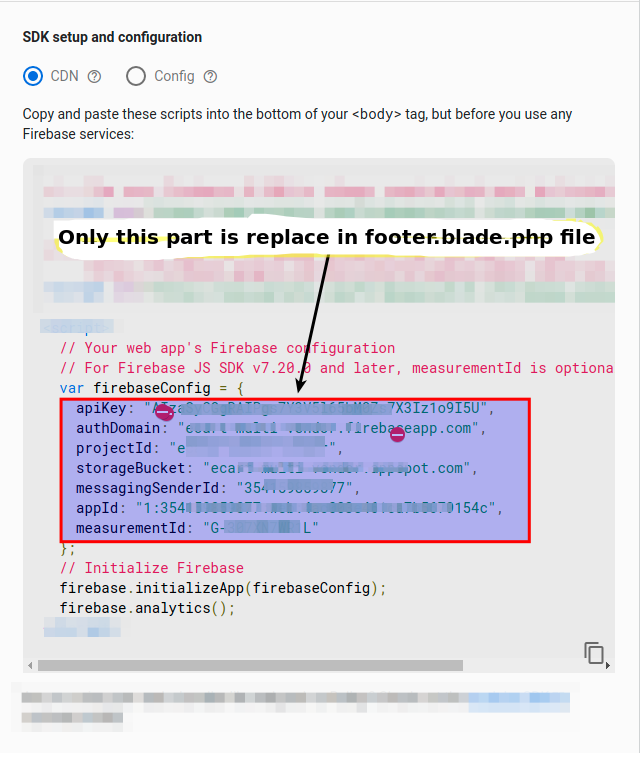
-
Then in firebase console you will be redirected to the web app dashboard screen.
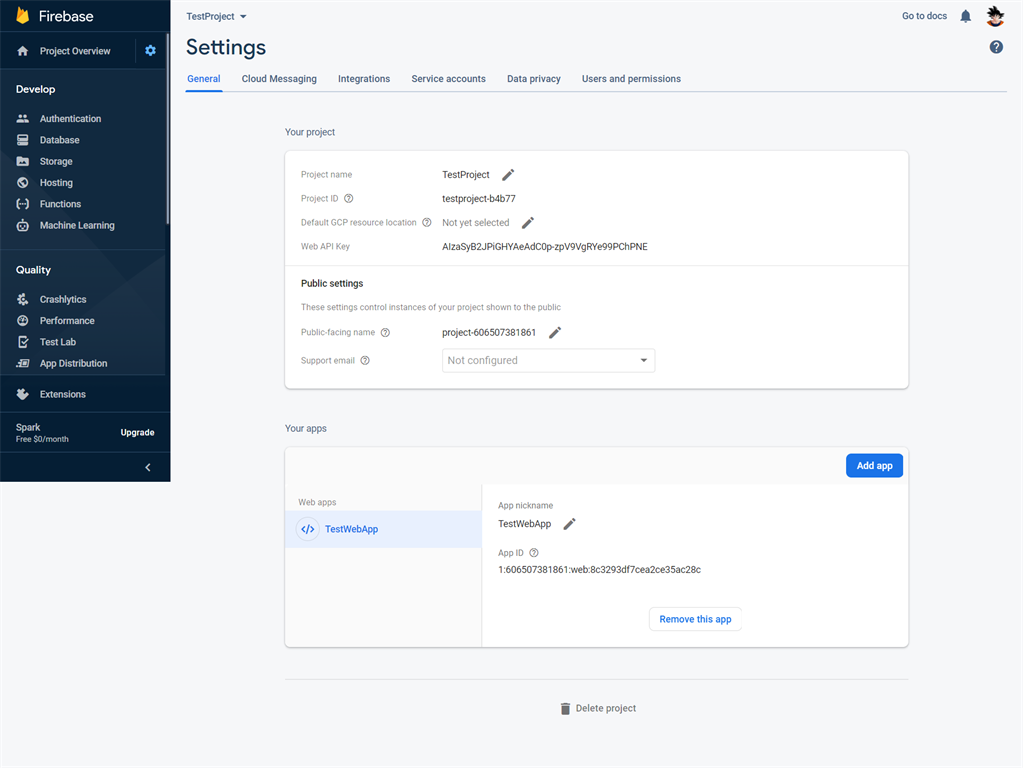
STEP 2 - Enable Phone Authentication in Firebase console
- Once the web app is created and credentials have been set, we need to enable phone authentication mode from the Firebase console. From the left sidebar there will be an option for Authentication. Once you click on the Authentication menu there will be an option for Sign-In Method.
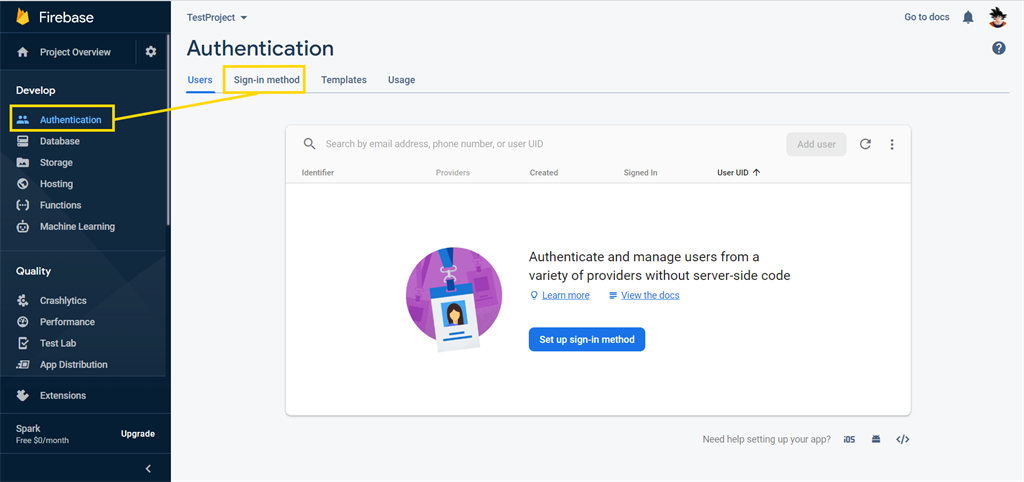
- Once you click on Sign-In Method, a new list with the multiple sign in providers will appear. From that list you need to choose the Phone option to enable it. So you need to click on the pencil icon which will appear when you hover on Phone from the list. You need to eneble the phone authentication from the screen just like the below images.

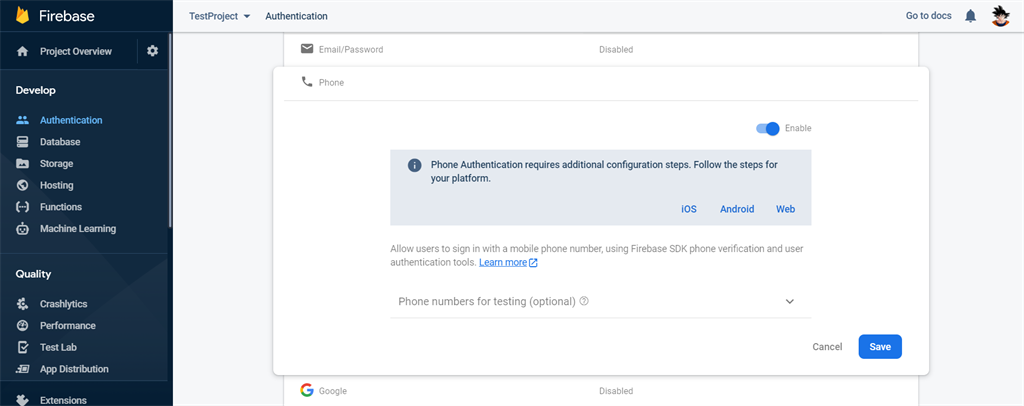
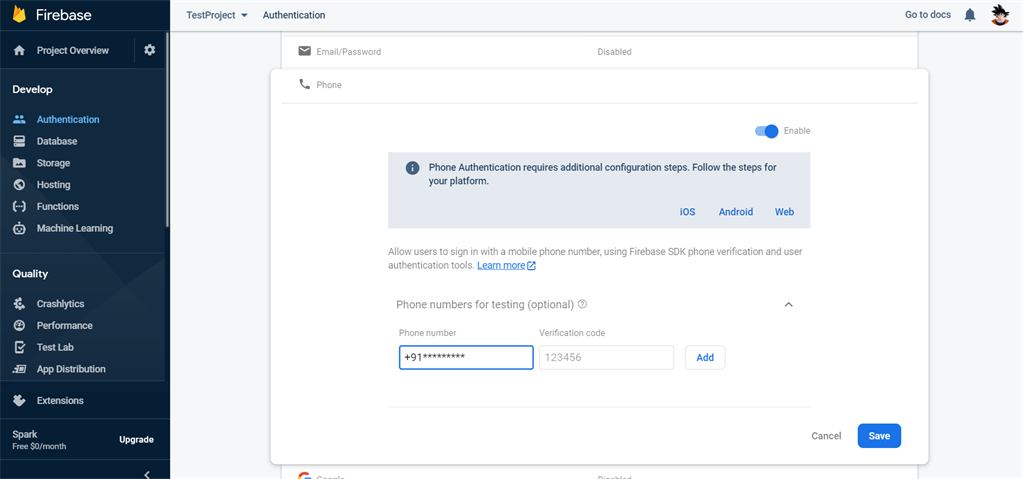
- There will be an option to test authentication as well, so you can click on it. There, you need to provide the number. It will automatically send the verification code to the given number. In this way you can test and verify the authentication using your phone number.
-
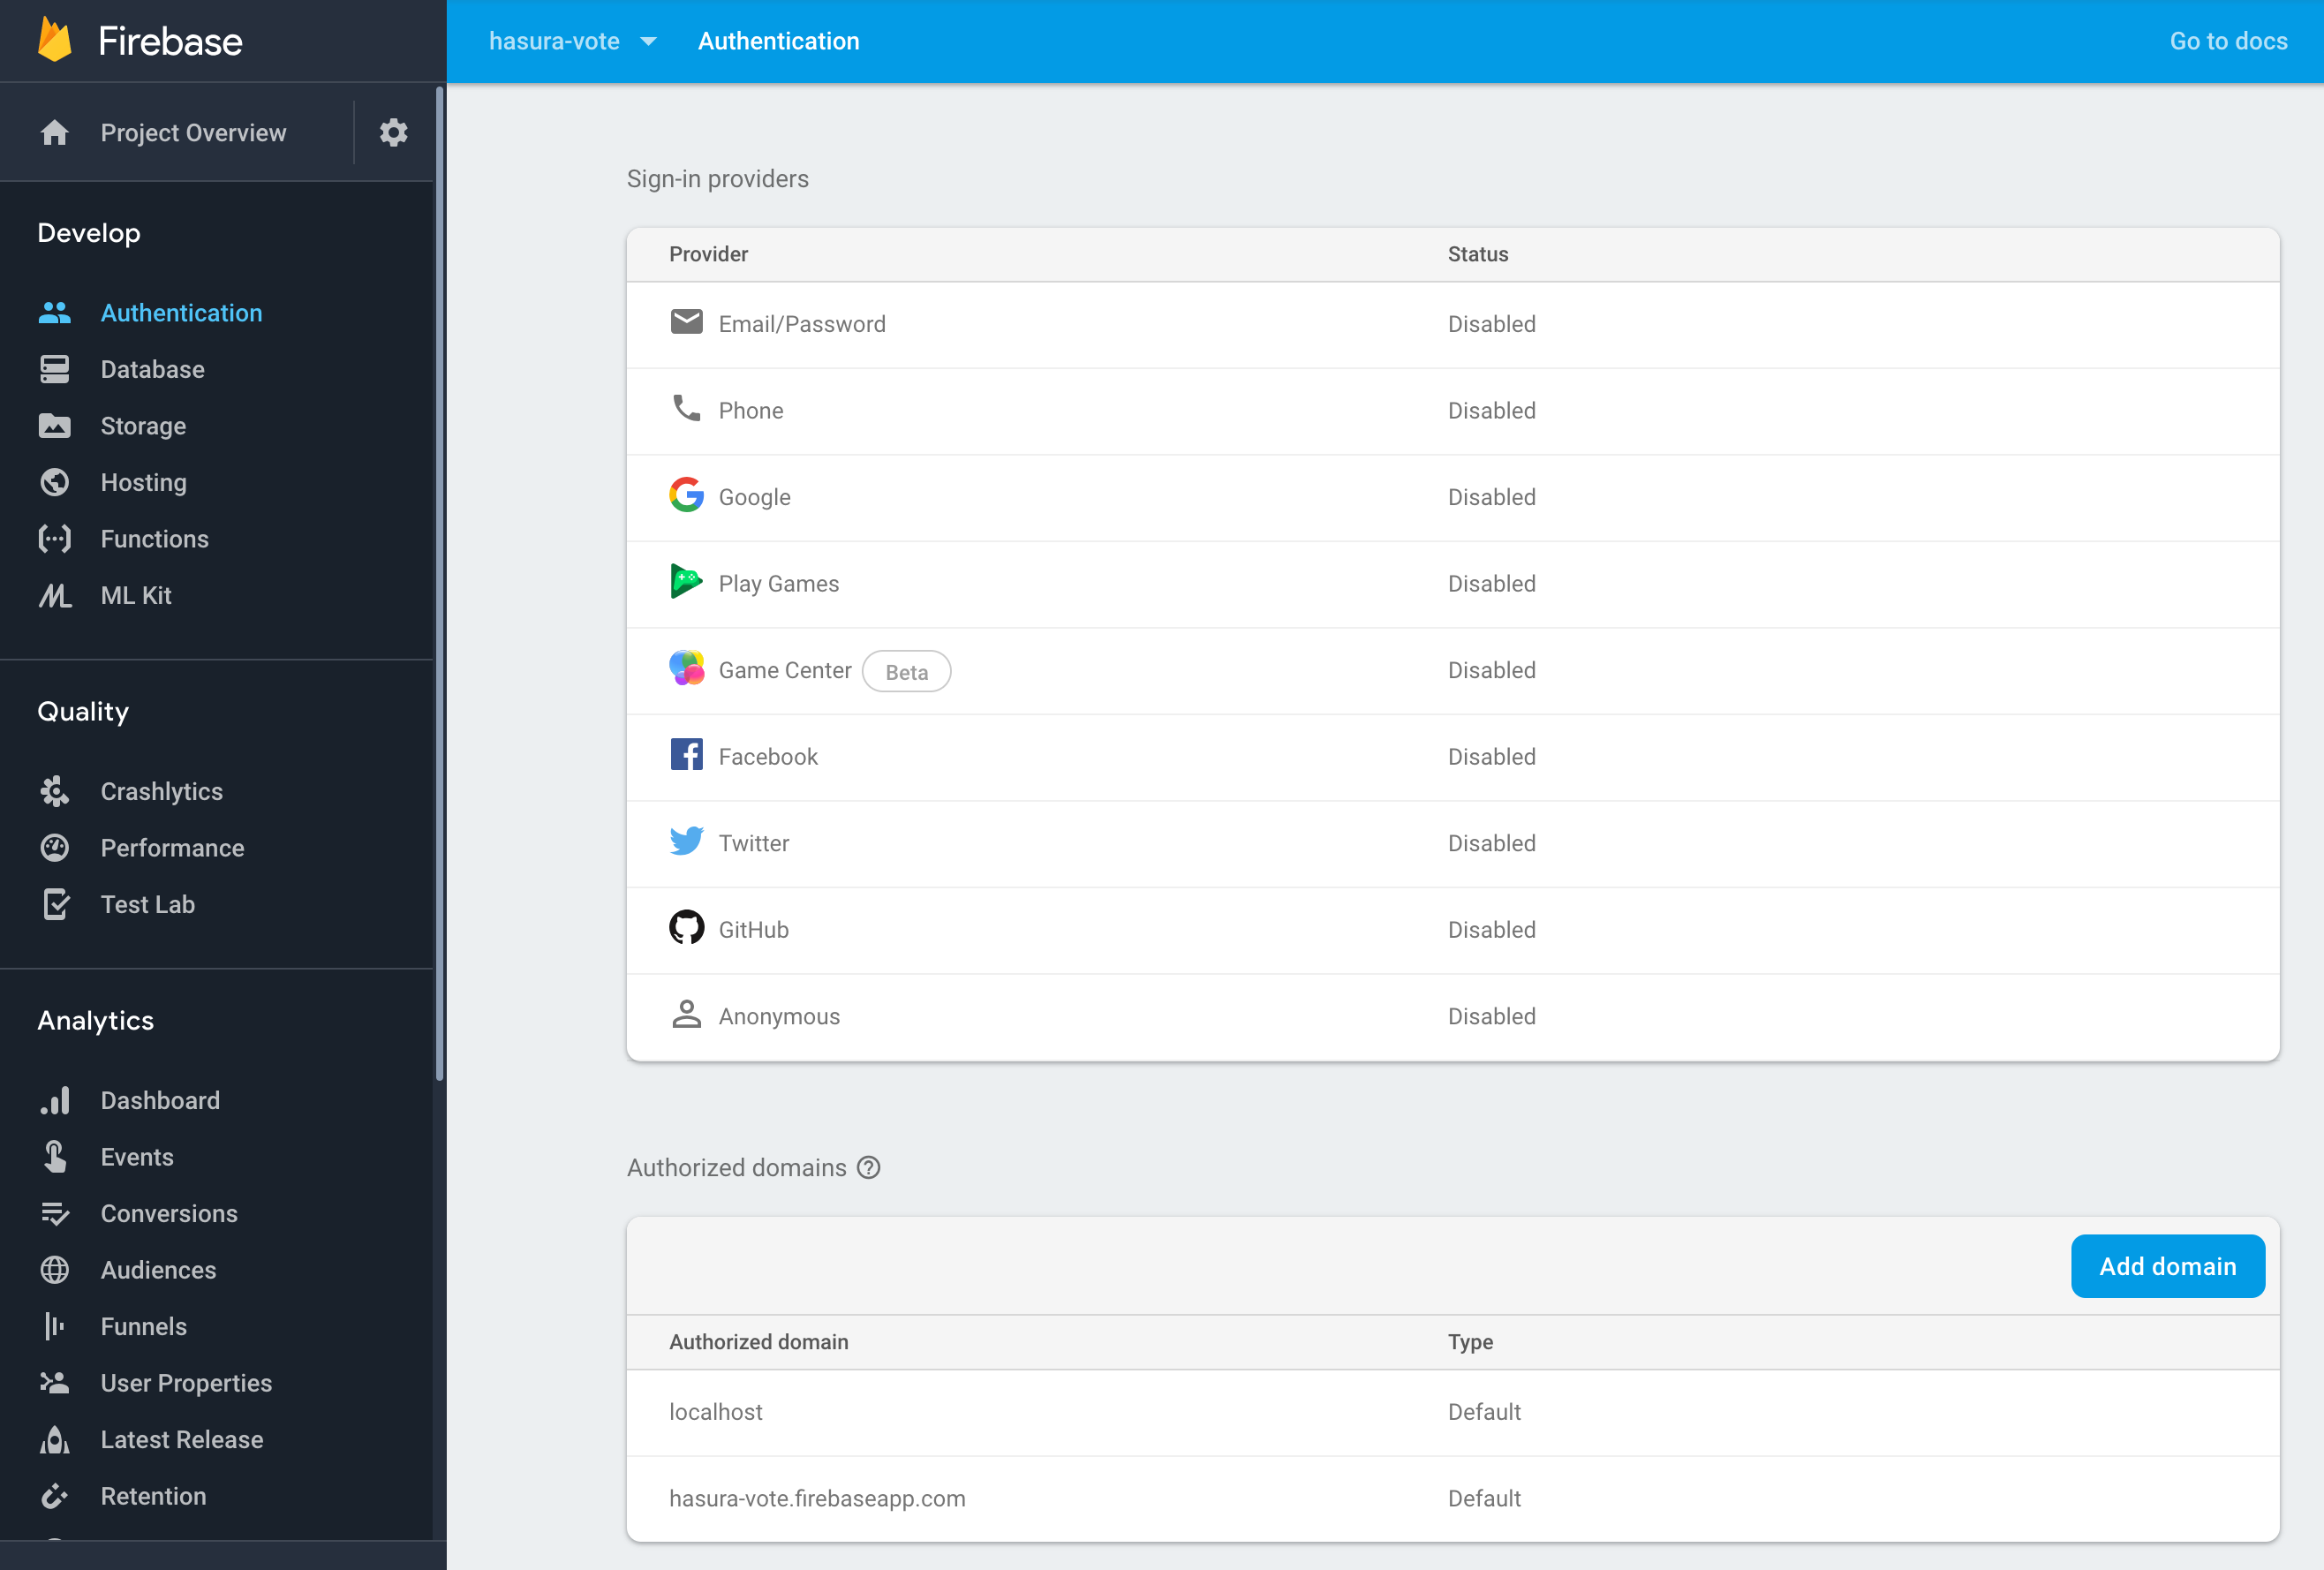
Now at the bottom of the page, in "Authorized domains", localhost and a Firebase domain are automatically added. Here we've to add domain name without http:// and https:// whever eCart Front End Website will get hosted.
If you're using www as prefix of domain name then you must have to add that.
STEP 3 - Google Service Account
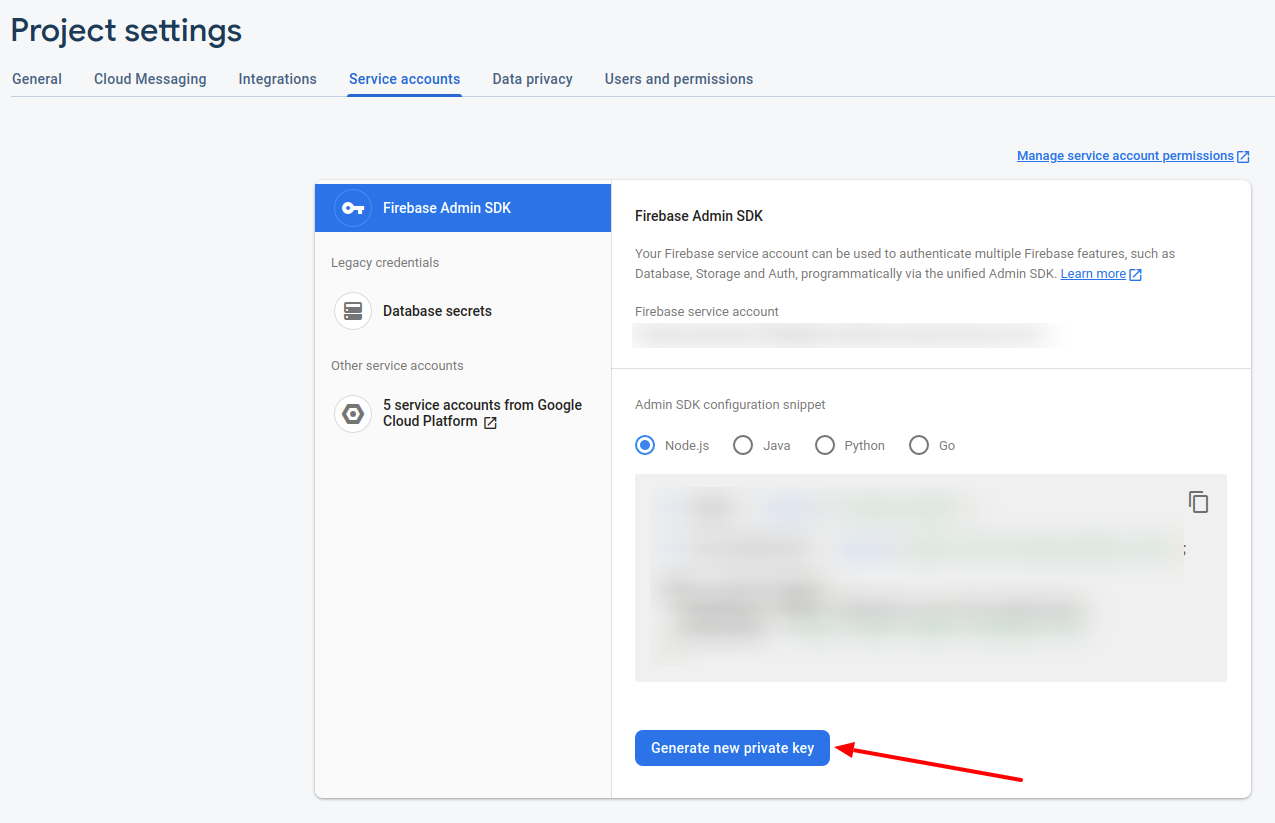
- Firebase projects support Google service accounts, To authenticate a service account and authorize it to access Firebase services, you must generate a private key file in JSON format.
- To generate a private key file for your service account:
- In the Firebase console, open Settings > Service Accounts.
- Click Generate New Private Key, then confirm by clicking Generate Key.
- Securely store the JSON file containing the key at path :
config/firebase.json
Congratulations. You're Done.
Feel Free to contact us for any queries.
Bonus Tips
1. Clear Cache Whenever doing any changes in settings of eCart Admin Panel (like Payment Methods enabled/disabled or Delivery Fees Updated) kindly hit URL https://YOURDOMAIN.com/clear-cache to Clear All Cached Data.
2. Change Placeholder Image: public/images/placeholder.png
3. Ecommerce | Full Store Website: app/http/controller/Homecontroller.php
4. eCart | eCart Front-End Web: .env file in root directory
5. Payment Gateway logo: public/images/headerlogo.png
6. Footer Copyright (link): resourses/view/themes/your-theme/common/footer.blade.php
7. Footer Copyright (text): resourses/lang/en/msg.php
8. Any text: resourses/lang/en/msg.php
9. Home page product section: Create sections in admin panel(Featured Section)
Theme Customization
- Copy folder
resources/views/themes/eCart_01 - Rename copied folder with name you wanted. For e.g. new-theme
- Copy folder
public/themes/eCart_01 - Rename copied folder with name which you created earlier. For e.g. new-theme
- Goto
config/ekart.phpchange value of attribute named theme from eCart_01 to your theme name. For e.g. new-theme - Do customizations of htmls in
resources/views/themes/new-theme - Do customizations of css, javascript in
public/themes/new-theme - Change screenshots images from this folder:
resoures/views/eCart_01/parts/offers.blade.php
Theme Change
- Goto
config/ekart.phpchange value of attribute named theme from eCart_01 to eCart_02 - Do customizations of htmls in
resources/views/themes/eCart_02 - Do customizations of css, javascript in
public/themes/eCart_02 - About Us
resources/view/theme/eCart_02/about.blade.php- you can change text -
resources/lang/en/msg.php - you can change images -
public/themes/eCart_02/images
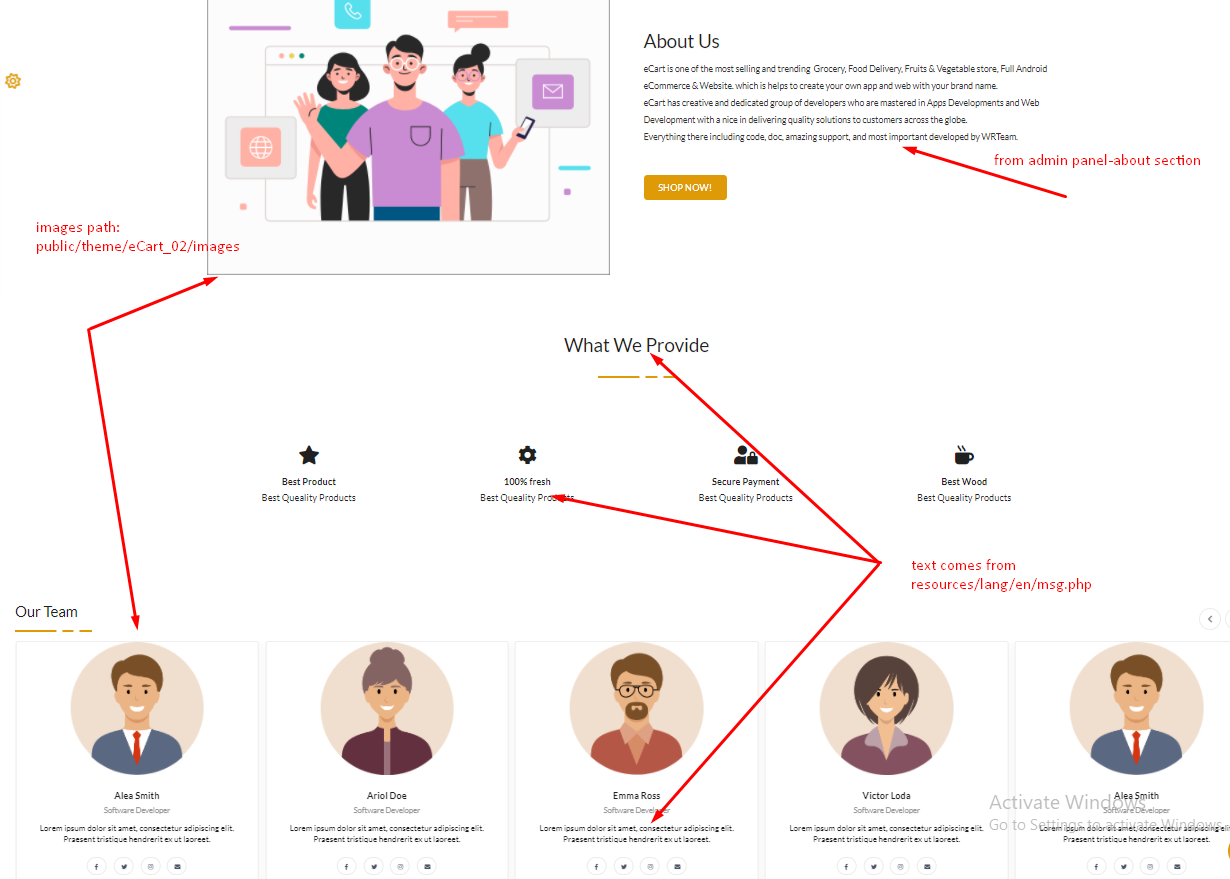
- you can change text -
Register Country Code
- Go to
public/theme/(your activated theme)/js/intlTelInput.js
Keep only one country
- Go to line no. 83 and add country shortform in []. For Ex :
onlyCountries: ['in'],
Keep your country on first order
- Go to line no. 87 and add country shortform in []. For Ex :
preferredCountries: [ "in", "gb" ],
Under Maintenance
-
Enable Under Maintainance
- Go to
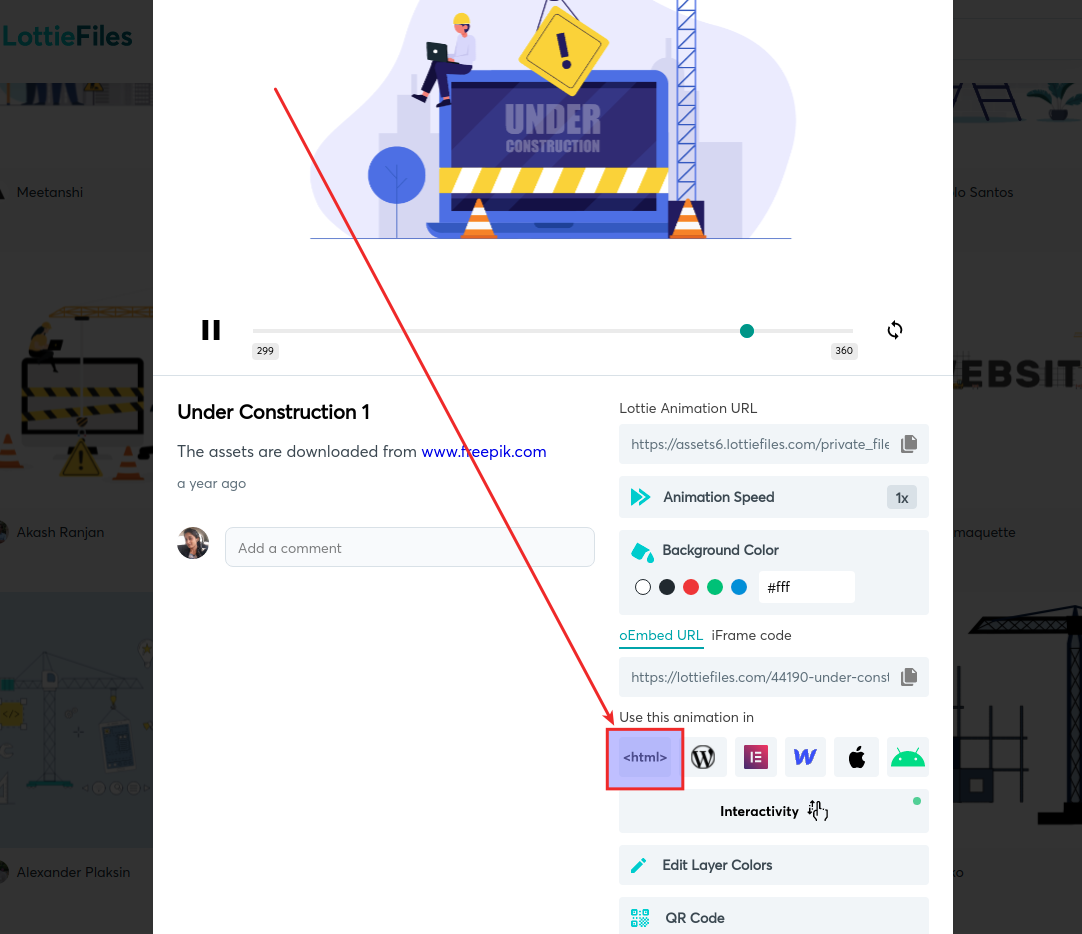
Admin panel->system->store settings - Go to Lottianimation website.
- Click on Animation and cleck on HTML
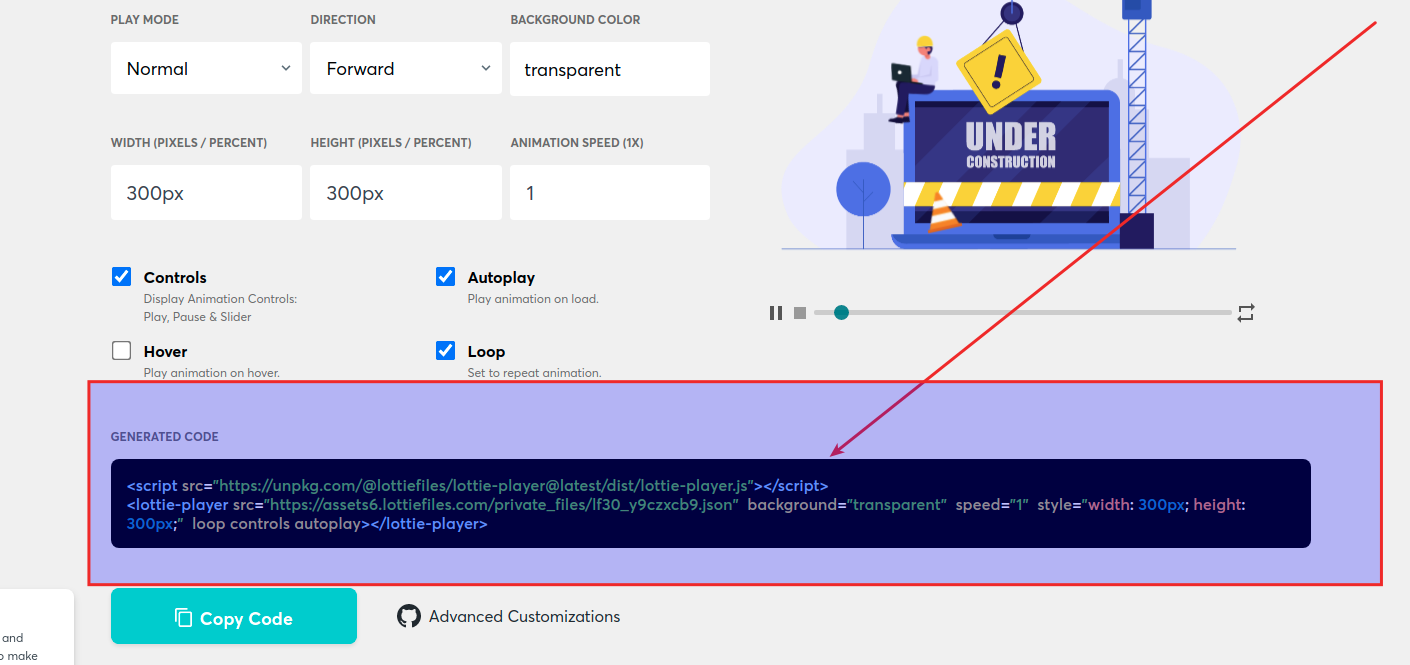
- Than copy this code and replace in
resourses/views/themes/(your-theme)/underconstruction.blade.php
 Change Animation
Need Support?
Its our pleasure to serve our service and support. please contact our support team.
Head of Customer Support :
Skype: Vijya Hirani
Skype: Sumit Mayani
To help our customers, we constantly be in touch with every customer if they need any assistance regarding our product. We offer our customers a support from Mon – Fri 9.00am to 6.00pm IST (GMT +5.30) – We are a Team located in India – Asia.
Typically we reply our customers for all the questions and queries within 24 hours of time via comments, support forum or emails.
Your Feedback
Dear valuable customer, Thank you very much for choosing our product. It's our pleasure to serve top-notch service to you. Please give us your honest feedback that will help us to make a more strong and reliable product by click here Rate Us. Thank you very much.
Contact Us
WRTeam has creative and dedicated group of developers who are mastered in Apps Developments and Web Application Development with a niche in delivering quality solutions to customers across the globe. Contact us today to find out how we can help you or for freelance work.
Visit Us : https://wrteam.in
Mail Us : info@wrteam.in
Skype : Vijya Hirani
Thank you very much.
